
Рассмотрим, как настроить шаблон ошибки 404 в WordPress, чтобы создать полезную страницу, которая поможет пользователям сориентироваться на вашем сайте и улучшить поведенческие факторы.
Что такое ошибка 404 и почему важно правильно настроить страницу?
Ошибка 404 возникает, когда посетитель пытается получить доступ к странице, которая не существует. Многие склонны игнорировать эту страницу при использовании шаблонов WordPress и не задумываются о ее существовании. Тем не менее, если вы потратите время на создание удобной страницы 404, это поможет задержать пользователя на вашем сайте.
Интернет-адрес, ведущий на страницу с ошибкой 404, может оказаться просто неправильно набранным URL либо возникнуть со временем, если вы удалили проиндексированную страницу и забыли об этом. При выдаче кода 404 WordPress настроен на автоматический поиск файла 404.php. Базовый шаблон с этой ошибкой включен в некоторые темы WordPress. Если же этого файла нет, то будет показано системное сообщение, которое не несет полезной для пользователя информации.
Как создать страницу 404 ошибки, если ее нет в шаблоне — настройка
Не все темы WordPress имеют собственный файл шаблона ошибки 404. Если разработчик темы предусмотрел это, такой файл будет называться 404.php. WordPress автоматически использует эту страницу, когда возникает ошибка 404. Если в вашей теме нет этого файла, его можно создать самостоятельно.
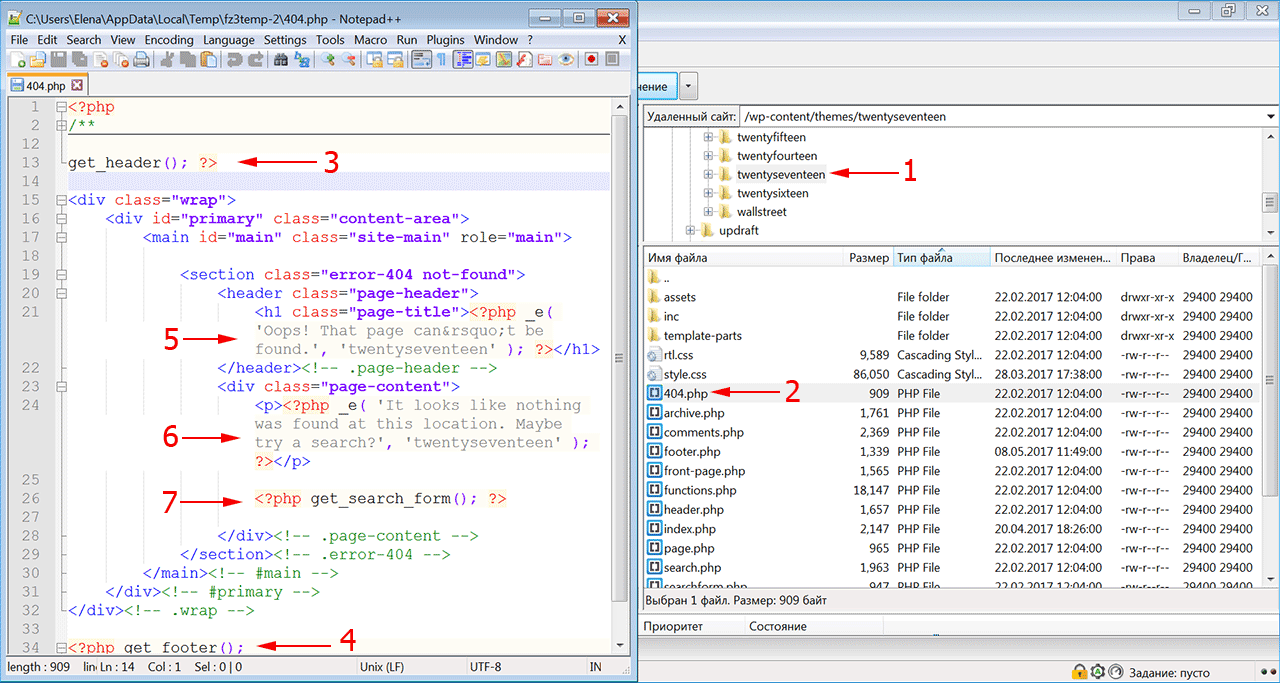
- Первое, что нужно сделать, это сформировать настраиваемый шаблон, например, редактируя файл 404.php, скопированный из другой темы. Если вы редактируете свою тему напрямую, настоятельно рекомендуется сделать резервную копию темы WordPress.
- Файл ошибки 404 расположен по адресу: /wp-content/themes/имя-темы/404.php
- Страница ошибки примет стиль активной темы, поскольку она вызывает шапку
- И подвал текущей темы.
- Понадобится только отредактировать заголовок и сообщение на странице в соответствии с вашими конкретными потребностями.
- Для этого откройте файл шаблона ошибки 404 в редакторе кода и измените текст сообщения на свое усмотрение.
- Добавьте в шаблон строку поиска, если ее там нет. Затем сохраните файл и загрузите его в каталог темы установки WordPress.
Поскольку все темы различаются, нет никакой гарантии, что простое копирование файла шаблона 404.php будет работать. Чтобы сервер нашел страницу 404, добавьте следующую строку в файл .htaccess:
ErrorDocument 404/index.php?error=404
Файл index.php расположен в корневой папке вашего сайта. Если WordPress находится в подкаталоге с именем «wordpress», код, добавляемый в файл .htaccess, должен быть:
ErrorDocument 404/wordpress/index.php?error=404
Что разместить на wordpress странице 404
Когда пользователь обнаруживает вместо искомой страницы сообщение об ошибке 404, разочарование может заставить его покинуть ваш сайт преждевременно. Задача веб-мастера помочь найти посетителю информацию, которую он искал, и тем самым снизить процент отказа и улучшить поведенческие факторы на сайте.
Рекомендуется указать пользователю правильное направление действий, которое заставит его задержаться на сайте. Это можно сделать несколькими способами:
- предоставить информацию о других разделах вашего интернет-ресурса, которые можно посмотреть;
- дать посетителю возможность связаться с вами по указанным контактным данным;
- добавить ссылки на популярные сообщения, последние комментарии, архивы;
- разместить строку поиска, чтобы посетитель сам нашел нужную информацию на сайте.
Чтобы сделать страницу уникальной, вы можете снабдить ее фоновым изображением в стиле оформления сайта. Допустимо также использовать html-теги и css-стили, чтобы придать шаблону индивидуальность.
Как создать в вордпресс 404 страницу при помощи плагина
Создать собственную страницу 404, как и любую другую страницу в WordPress можно при помощи плагина 404page (https://wordpress.org/plugins/404page/). Важной особенностью этого плагина является то, что он не создает перенаправление, а формирует правильный ответ сервера с кодом 404. Он сообщает поисковым системам, что страница не существует и должна быть удалена из индексирования, тогда как перенаправление приведет к HTTP-коду 301 или 302 и URL-адрес останется в индексе поиска.
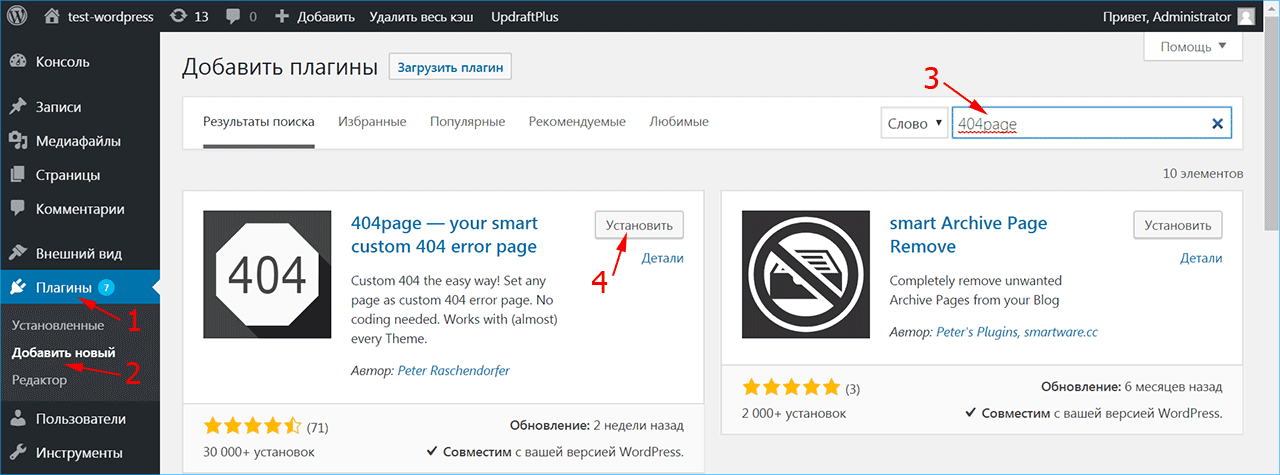
Установите плагин 404page из меню админки «Плагин -> Добавить новый» и активируйте его.
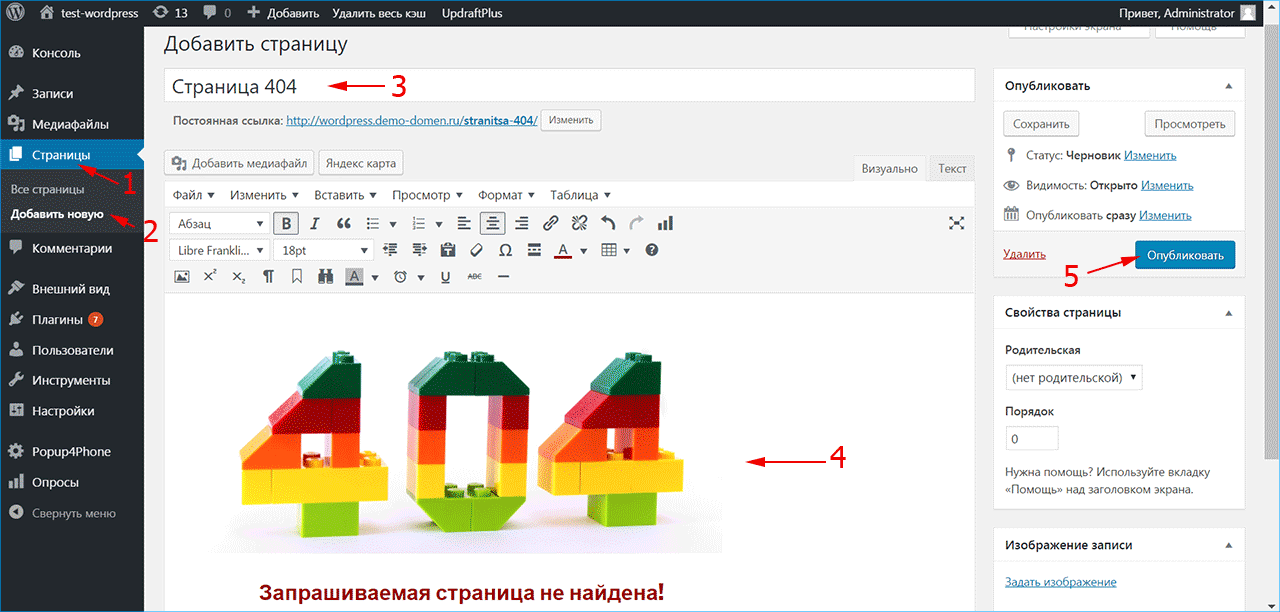
Создайте страницу 404 как обычную страницу WordPress из меню «Страницы -> Добавить новую». Внесите в нее всю необходимую информацию, которую вы хотите показать посетителю, и нажмите кнопку «Опубликовать». Плагин 404page также добавляет CSS-класс error404 в тег <body>, который можно использовать для задания дополнительных стилей на странице.
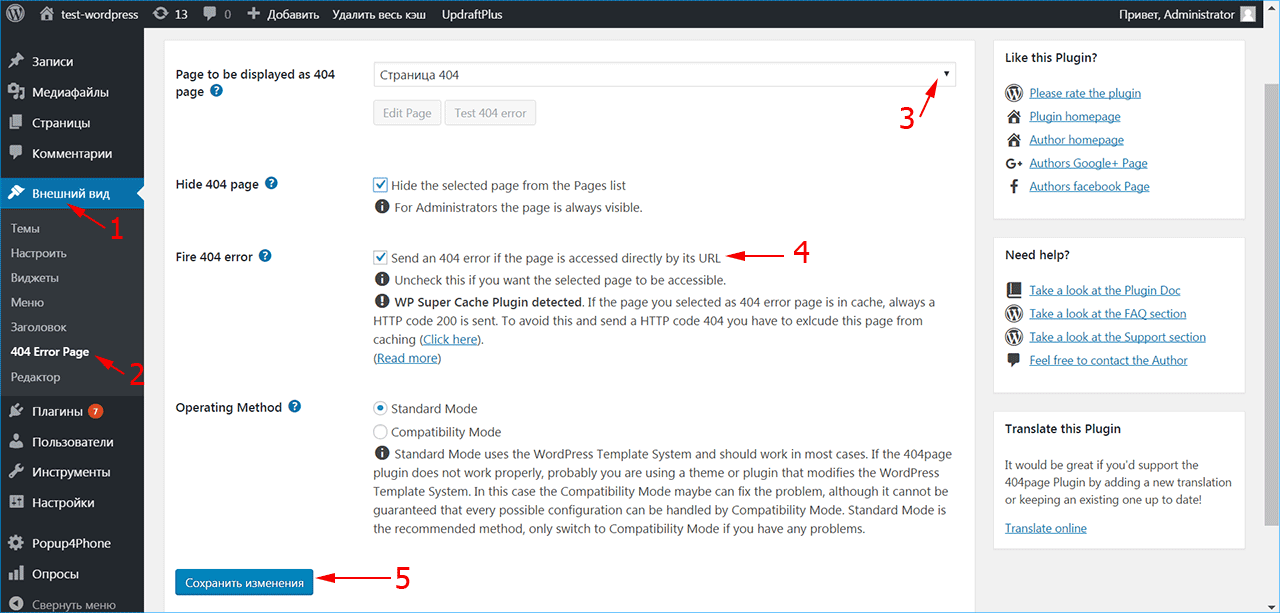
После активирования плагина в меню «Внешний вид» (1) появился раздел «404 Error Page» (2), в котором можно настроить отображение страницы ошибки.
Выберите созданную страницу 404 из списка страниц сайта (3). Убедитесь, что отмечен флажок (4), чтобы сервер отдавал код 404 при доступе к этой странице. Если вы используете кэширование, плагин выдаст предупреждение – страница из кэша будет отдавать код 200, поэтому ее нужно исключить из кэширования.
При возникновении проблем или конфликта с другими плагинами 404page может быть запущен в режиме совместимости. Нажмите кнопку «Сохранить изменения» (5).
Чтобы включить обработку ошибок 404 в WordPress, нужно установить структуру ссылок в меню «Настройки -> Постоянные ссылки» на любой пункт, кроме «По умолчанию». В противном случае ошибка 404 обрабатывается сервером, а не движком WordPress.
iPipe – надёжный хостинг-провайдер с опытом работы более 15 лет.
Мы предлагаем:
- Виртуальные серверы с NVMe SSD дисками от 299 руб/мес
- Безлимитный хостинг на SSD дисках от 142 руб/мес
- Выделенные серверы в наличии и под заказ
- Регистрацию доменов в более 350 зонах
Are your WordPress posts returning a 404 error on your website?
This error happens when you can access your WordPress admin area and blog, but when you try to open a post, you will see “404 Not Found”.
In this article, we will show you how to fix the WordPress posts returning 404 error.

What Causes the WordPress Posts Returning 404 Error?
WordPress is a powerful content management system (CMS), but a slight change can sometimes make your WordPress website inaccessible.
In some cases, you may not be able to access your WordPress admin area or the website itself, like with the internal server error or error establishing a database connection.
By contrast, when your WordPress posts are returning 404 errors, you will still be able to get into your admin area and see your WordPress website on the front end. Then, when you click on a blog post, you will see a message saying “404 Not Found”.
Although this error message can be scary, it doesn’t mean you have lost your WordPress posts. Instead, your .htaccess file has probably been deleted, or something went wrong with the rewrite rules on your blog.
That being said, let’s look at how to fix the WordPress posts returning 404 error. You can use the links below to jump straight to different solutions.
- Video Tutorial
- Fix Your Permalink Settings
- Update the WordPress .htaccess File
- Contact Your Hosting Provider
- Fix for Local Servers
Video Tutorial
Subscribe to WPBeginner
If you’d prefer written instructions, then just continue reading.
Fix Your Permalink Settings
WordPress posts can return 404 errors because of problems with rewrite rules in your .htaccess file. In most cases, you can fix the problem by updating your permalink settings.
Simply go to Settings » Permalinks in your WordPress admin, and click on the ‘Save Changes’ button.

This will update your permalink settings and flush the rewrite rules.
In most cases, this solution fixes the WordPress posts 404 error. However, if it does not work for you, then you probably need to update your .htaccess file manually.
Update the WordPress .htaccess File
First, you will need to connect to your server using an FTP client or the File Manager app in your WordPress hosting dashboard.
Next, you will need to find and edit the .htaccess file, which is located in the same location as folders like /wp-content/ and /wp-includes/.
Simply right-click on the file and select ‘File permissions’.

You can make the file writeable by changing its permissions to 666.
Simply enter ‘666’ into the ‘Numeric value’ box and then click on ‘OK’.

Then, you need to repeat the steps in the Fix the Permalinks Settings section of our tutorial. Once you have done this, don’t forget to change the permissions back to 660.
You can also edit the file and add code to it.

Once you have opened the .htaccess file with a text editor, simply insert this code.
# BEGIN WordPress
<IfModule mod_rewrite.c>
RewriteEngine On
RewriteBase /
RewriteRule ^index.php$ - [L]
RewriteCond %{REQUEST_FILENAME} !-f
RewriteCond %{REQUEST_FILENAME} !-d
RewriteRule . /index.php [L]
</IfModule>
# END WordPress
Contact Your Hosting Provider
If neither of the solutions above has fixed the WordPress posts returning 404 error, then we recommend contacting your WordPress hosting provider. There may be an error on their end, or they might be able to help you troubleshoot the problem.
Please also see our guide on how to properly ask for WordPress support and get it.
Fix for Local Servers
If you are using a local server for testing purposes, then you will need to enable the rewrite_module in the Apache configuration of your MAMP, WAMP, or XXAMP site.
We hope this article helped you resolve the posts returning 404 error in WordPress. You may also want to see our guide to the most common WordPress errors and how to fix them, along with our expert picks for the best WordPress plugins to grow your site.
If you liked this article, then please subscribe to our YouTube Channel for WordPress video tutorials. You can also find us on Twitter and Facebook.
Disclosure: Our content is reader-supported. This means if you click on some of our links, then we may earn a commission. See how WPBeginner is funded, why it matters, and how you can support us.
Editorial Staff at WPBeginner is a team of WordPress experts led by Syed Balkhi with over 16 years of experience building WordPress websites. We have been creating WordPress tutorials since 2009, and WPBeginner has become the largest free WordPress resource site in the industry.
All of a sudden I go to my WordPress website and all the pages give me a 404 page not found page. I’m assuming the problem lies with the permalink structure, which I could swear I did not touch. The permalink setting is on «month and name.»
I’ve researched similar instances of this problem online and a lot of it has to do with the .htaccess file? I tried finding, but I can’t. Perhaps it got deleted somehow? Where is it supposed to be located.
Any suggestions will be helpful
and of course I can see hidden files.
![]()
Marc
4,6113 gold badges39 silver badges62 bronze badges
asked Mar 3, 2011 at 15:07
![]()
2
.htaccess is a hidden file, so you must set all files as visible in your ftp.
I suggest you return your permalink structure to default ( ?p=ID ) so you ensure that .htaccess is the problem.
After that, you could simply set «month and name» structure again, and see if it works.
PS: Have you upgraded to 3.1? I’ve seen some people with plugin issues in this case.
answered Mar 3, 2011 at 15:18
![]()
9
Basically the .htaccess file should exists and the httpd.conf should be correct.
In my case, I changed the file /etc/apache2/apache2.conf in section:
<Directory "/var/www/html">
Line changed is:
AllowOverride None
to
AllowOverride All
And restart the web server with
systemctl restart apache2
![]()
answered Sep 9, 2016 at 4:52
![]()
georgeosgeorgeos
2,3412 gold badges24 silver badges28 bronze badges
5
Fixing that problem is very simple if you was using permalinks other than the default such as Day and name, Month and name, Numeric, Post name or Custom Structure, you only need to
Login to your admin area: Settings > Permalinks which should be : http://yoursite.com/wp-admin/options-permalink.php
Choose Default permalink setting, then save changes
Then you can return it again to your other previous permalink choice or keep it as default as yo wish
Note that this problem can happen when you move your site from a domain or location to another one.
answered Sep 27, 2013 at 19:59
![]()
usama sulaimanusama sulaiman
2,0033 gold badges24 silver badges37 bronze badges
8
If the default behavior (example.com/?p=42) is working, you should:
- Change to your preferred permalink style:
Admin: Settings > Permalinks, and click Save. Sometime it fixes the issue. If it didn’t: - Verify that the file
/path/to/wordpress/.htaccesshas been changed and now includes the lineRewriteEngine On. If it doesn’t include the line, it’s a WordPress permissions issue. -
Verify that the ‘rewrite’ module is loaded: create a PHP file with
<?php
  phpinfo()
?>
in it, open it in the browser and search for
mod_rewrite. It should be in the ‘Loaded Modules’ section.
If it’s not, enable it — Look at your apache defaultindex.htmlfile for details — in Ubuntu, you do it with the helpera2enmod. -
Verify that apache server is looking at the
.htaccessfile. openhttpd.conf— or it’s Ubuntu’s alternative,/etc/apache2/apache2.conf. In it, You should have something like<Directory /path/to/wordpress> Options Indexes FollowSymLinks AllowOverride All Require all granted </Directory> -
After making these changes, don’t forget to restart your apache server.
sudo service apache2 restart
![]()
RyanS
6271 gold badge10 silver badges26 bronze badges
answered Jan 30, 2017 at 2:06
![]()
tsvikastsvikas
15.6k1 gold badge21 silver badges11 bronze badges
0
IF all this dont work, your .htaccess is correct, and permalinks trick didnt work, you may have not enabled your apache2 rewite mod.
I ran this and my issue was solved:
sudo a2enmod rewrite
answered Feb 20, 2018 at 18:06
![]()
2
Within the WordPress admin interface do the following:
-
Go to admin setting
-
Click on permalink and select post name in radio button.
-
Scroll down and you will see
.htaccesscode here like.<IfModule mod_rewrite.c> RewriteRule ^index.php$ - [L] RewriteCond %{REQUEST_FILENAME} !-f RewriteCond %{REQUEST_FILENAME} !-d RewriteRule . /wordpress/index.php [L] </IfModule> - Copy the code and paste in the
.htaccessfile.
![]()
Blackbam
17.2k24 gold badges97 silver badges150 bronze badges
answered Mar 14, 2014 at 10:24
![]()
3
This error is causing due to disabled of rewrite mod in apache httpd.conf document ,just uncomment it and enjoy the seo friendly permalinks
answered Apr 5, 2013 at 22:34
![]()
Asif KhanAsif Khan
811 silver badge1 bronze badge
- Check that the directory on .htaccess are the correct
- Check the fields «siteurl» and «home» are the correct
answered Mar 4, 2011 at 7:07
![]()
José CarlosJosé Carlos
1,00516 silver badges29 bronze badges
1
We had the same problem and solved it by checking the error.log of our virtual host. We found the following message:
AH00670: Options FollowSymLinks and SymLinksIfOwnerMatch are both off,
so the RewriteRule directive is also forbidden due to its similar
ability to circumvent directory restrictions :
/srv/www/htdocs/wp-intranet/
The solution was to set Options All and AllowOverride All in our virtual host config.
answered Jul 3, 2018 at 14:48
![]()
BlackBlack
17.7k39 gold badges154 silver badges268 bronze badges
If you have FTP access to your account:
First, login to your wp-admin and go to Settings > Permalinks
You should see something at the bottom that says:
«If your .htaccess file were writable, we could do this automatically, but it isn’t so these are the mod_rewrite rules you should have in your .htaccess file. Click in the field and press CTRL + a to select all.»
If this is true do the following:
-
Go into preferences for your FTP client and make sure hidden files are displayed (varies depending on your FTP client) — If you don’t do this you won’t be able to find your htaccess file
-
Go to the folder that your wp-admin, wp-content, wp-includes directories are located. Check for .htaccess file. If it exists skip to step 4
-
If it does not exist, create a new blank file in your FTP program called .htaccess
-
Change the CHMOD for your .htaccess file to 666 (your preference on how you want to do this)
-
Go back to your Permalinks page and edit the link structure you want. Problem should be solved!
-
Make sure to change the chmod of the htaccess file back to 644 after you are done.
Just had the same problem and it seemed to fix it instantly! Good luck!
answered Oct 12, 2012 at 16:47
![]()
JEFF BJEFF B
1262 silver badges12 bronze badges
1
Most of the time this issue is fixed by simply visiting the Settings -> Permalink page in the WordPress admin and click Save (as several other answers already pointed out). When this page is accessed, WordPress rewrites the directives in the .htaccess file which magically fixes the issue. The issue often happens after moving a site (the site breaks because the .htaccess gets left behind or the settings need to be updated).
If WordPress doesn’t have the right permissions to write the .htaccess file, a notice will appear at the top of the page and further instructions at the bottom when the settings are saved. In this case you need to edit the .htaccess file yourself or, better, to fix the permissions on that file. The file is at the root of the WordPress installation. cd into the directory and sudo chmod 644 .htaccess. You might also want to check if the file belongs to the right group and change that is needed with chown. Ask your hosting provider if you don’t know how to do that.
If you are on shared hosting that’s probably all you can do. If you still have the issue you might want to talk to you hosting provider’s support. Otherwise, make sure the use of .htaccess files is enabled on the server, as @georgeos already suggested. Note that httpd.conf is not always used (Ubuntu indicates it is deprecated but the official Apache docs still says it is often the main configuration file). /etc/httpd/conf/httpd.conf and /etc/apache2/apache2.conf seem to be the most common places for this file. Find the block for the public folder, usually <Directory /var/www/> and make sure that the AllowOverride directive is set to All. If it is set to None, your .htaccess file is simply ignored by the server.
answered Aug 15, 2017 at 23:45
![]()
mrtnmgsmrtnmgs
1,36313 silver badges26 bronze badges
You may have .htaccess disallowed in webhost settings.
Setting to default permalinks would work in that case.
answered Feb 28, 2017 at 14:34
![]()
FankyFanky
1,6231 gold badge18 silver badges20 bronze badges
Before trying to do any permalink or server config changes, please check you .htaccess file. This mostly is a corrupt or blank .htaccess file issue. Reset the htaccess file to the default
# BEGIN WordPress
<IfModule mod_rewrite.c>
RewriteEngine On
RewriteBase /
RewriteRule ^index.php$ - [L]
RewriteCond %{REQUEST_FILENAME} !-f
RewriteCond %{REQUEST_FILENAME} !-d
RewriteRule . /index.php [L]
</IfModule>
# END WordPress
answered Mar 15, 2019 at 11:37
![]()
Mustafa sabirMustafa sabir
4,1301 gold badge19 silver badges28 bronze badges
0
Case 1:- Let us think if migrate site from one hosting to another hosting if see this kind of issue.
Solution:- Simply go to old server copy .htaccess file code, then past in new server .htaccess file. 99% it i will works.
answered Nov 7, 2017 at 5:05
![]()
NavrukNavruk
9276 gold badges17 silver badges29 bronze badges
after 2 long days,
the solution was to add options +FollowSymLinks to the top of my .htaccess file.
answered Apr 4, 2020 at 2:29
![]()
Ahmad AliAhmad Ali
6941 gold badge10 silver badges28 bronze badges
Go to your WordPress Dashboard, scroll down to settings, select Permalink,
in custom settings that appear, go to custom structure and replace the text in the text field with
/index.php/%year%/%monthnum%/%day%/%postname%/
and then save changes
answered Jul 7, 2021 at 14:42
![]()
InsookwaInsookwa
891 silver badge5 bronze badges
This scenario can also be caused by a database version that’s out of sync with the WP files installed on server. Nothing else listed here worked for me; I solved it with a manual WP update.
answered Nov 1, 2022 at 20:40
![]()
BlorfBlorf
5263 silver badges12 bronze badges
I have the same problem and so I remove the Apache and make it again and the problem was solved.
answered Jun 6, 2013 at 16:38
![]()
boomzboomz
6575 silver badges21 bronze badges
Just Navigate to Settings->Permalink in your dashboard and then Save Changes button in the last.
answered Jul 13, 2017 at 10:30
![]()
I just changed the permalink to ‘month and day’of all the posts by ging to setting>permalink.
Now all posts are open and working fine.
Again, I renamed to all posts to its actual permalink. Its again working fine.
This method worked for me 
answered May 20, 2018 at 13:57
![]()
For nginx users
Use the following in your conf file for your site (usually /etc/nginx/sites-available/example.com)
location / {

                try_files $uri $uri/ /index.php?q=$uri&$args;

            }
This hands off all permalink requests to index.php with a URI string and supplied arguments. Do a systemctl reload nginx to see the changes and your non-homepage links should load.
answered Jun 14, 2018 at 14:24
![]()
Wanted to share my two cents. Recently came accross that very same issue installing WordPress 5.9. Year 2021.
Configuration:
Platform MAC, Software
XAMPP, WordPress5.9
None of the previous answer did it for me.
The issue was due to the fact that files permissions accross the XAMPP folder were set to «Read only».
- Locate the
XAMPPfolder. (Usually in the Applications folder). - Right click
XAMPPfolder. Get info.- Bottom right unlock button → Follow instructions.
Sharing and permissions→Everyone→Read & Write.- Bottom left three dots button →
Apply to enclosed items.
answered Jan 29, 2022 at 10:39
![]()
amarinediaryamarinediary
4,8004 gold badges27 silver badges45 bronze badges
I had this issue not so long ago. I had reset my permalink to default or just saved it, updated themes/core to (4.7.4)/plugins, deactivated all plugins, switched to default theme, optimized database, .htaccess is already default, checked file permissions, mod_rewrite is on.
So far nothing works, what works are the posts, new page, the /contact page EXCEPT for old pages.
Basically, the pages/URLs that aren’t working are:
/breeding
/training
/training/*
/breeding/*
Ultimate, I found these files in the root folder:
/breeding.php and /training.php
I renamed both files and the pages above worked.
answered May 16, 2017 at 16:05
![]()
You’ve likely seen the “Page Not Found” error before. Unfortunately, if you operate a website of any sort (WordPress or not), the day will probably come when you see the message on one of your own pages.
Fortunately, like many common WordPress errors, 404s are relatively easy to troubleshoot and fix. The solution usually involves restoring your site’s permalink structure — something you can do in just a few minutes.
In this article, we’ll explain just what a 404 error is and what can cause one on your site. Then we’ll walk you through how to fix it in four simple steps. Let’s get started!
Get Content Delivered Straight to Your Inbox
Subscribe to our blog and receive great content just like this delivered straight to your inbox.
An Overview of the WordPress 404 Error
A 404 error, also known as a “Page Not Found” error, indicates that your browser can’t locate the page you’re trying to access. The exact message can look a bit different depending on the browser you’re using, but it will generally always contain either the “404” code or a “page not found” message of some kind.
404 Error
A 404 error is an HTTP status code that indicates that the page a user is trying to access does not exist. 404 errors can occur for a wide variety of reasons, but they almost always lead to a poor User Experience (UX).
Read More
Websites can also create their own custom 404 pages.
Seeing this notification (or any other error message) when you’re trying to access your site can be frustrating. While there is a chance that your post has actually gone missing, the vast majority of the time, there’s a more benign cause.
Some common reasons that WordPress posts might return 404 errors include:
- A mistyped URL. It could simply be attributed to a typo in the URL. This is the most common cause.
- An issue with your Domain Name System (DNS) settings. If you’ve recently updated any of your DNS information and you’re seeing this error, it could be because the changes haven’t propagated fully. It can take up to 48 hours for this process to complete.
- Problems with the permalink structure of your site. Permalink problems can be caused by a missing, broken, or corrupted .htaccess file. Compatibility issues with WordPress components such as plugins and themes could also be the culprit.
Regardless of the cause, this error prevents access to your site, so it needs to be resolved as quickly as possible. We’ll look at troubleshooting and resolving the problem shortly.
Skip the Stress
Avoid troubleshooting when you sign up for DreamPress. Our friendly WordPress experts are available 24/7 to help solve website problems — big or small.
Why 404 Errors Matter
404 errors pose several problems for a website, beyond simply preventing you from accessing pages. First, they create a poor User Experience (UX).
If there are many of these errors on your site, and they aren’t resolved quickly, they could eventually turn users away. In the worst-case scenario, those visitors could land on a competing website instead, costing you business.
404 errors can also hurt your Search Engine Optimization (SEO). Search engine crawlers won’t index a page that returns a 404 because they think it doesn’t exist.
What to Do Before Troubleshooting the WordPress 404 Error
Before changing your permalink settings or .htaccess file, it’s a smart idea to create a backup of your website and database. This way, if you accidentally make something worse, you can easily restore your site to a functioning state.
If your website is hosted with DreamPress, backups couldn’t be easier. DreamPress automatically backs up your entire site every day, so you always have a fresh copy to access. You can also create a manual backup with just a few clicks.
How to Fix WordPress Posts Returning 404 Error (In 4 Steps)
With a fresh backup of your site in hand, it’s time to get to work. You’ll want to follow these steps in order and check if the error has been resolved after each one.
Step 1: Reset Your WordPress Permalinks
The first step to try is resetting your permalinks. Head to your WordPress dashboard and navigate to Settings > Permalinks.
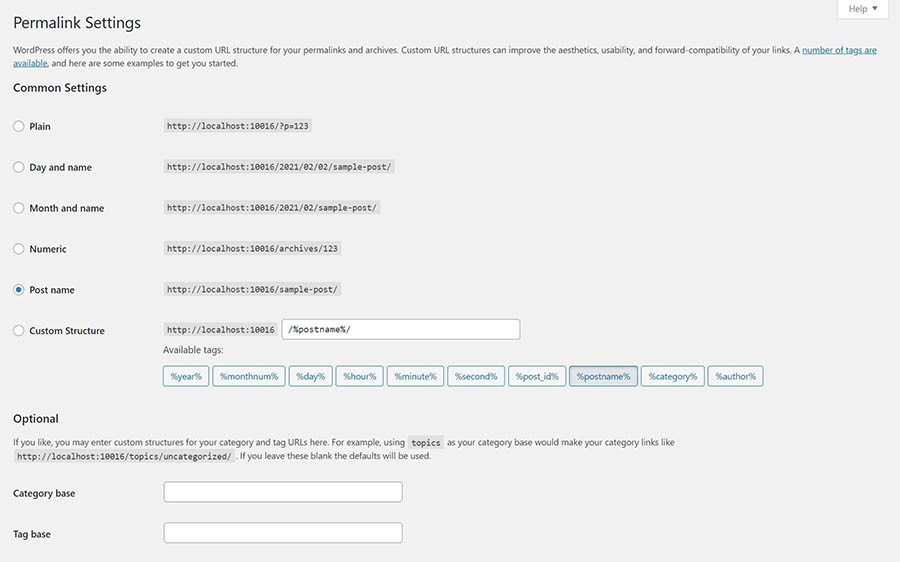
From here, just click on Save Changes. That’s right — you don’t actually need to edit anything. Clicking that button will update the permalink settings even if you don’t make any changes. This is important because it also refreshes the rewrite rules used for “pretty permalinks.”
With this done, go ahead and reload the pages you were trying to access. If everything works, you’re all done. If you still get a 404 error, head to the next step.
Step 2: Restore Your .htaccess File
If resetting your permalinks didn’t work, the next strategy is restoring your .htaccess file. This controls how WordPress interacts with the server and how it generates permalinks for your pages. Restoring it to the default settings can fix sudden 404 errors.
To restore the .htaccess file, you’ll first need a way to access it. If you’re using DreamPress hosting, you can use the built-in file manager found in the DreamHost control panel. Most other web hosts offer a similar feature, or you can use a Secure File Transfer Protocol (SFTP) client such as FileZilla. We have detailed instructions for connecting via SFTP if you need help.
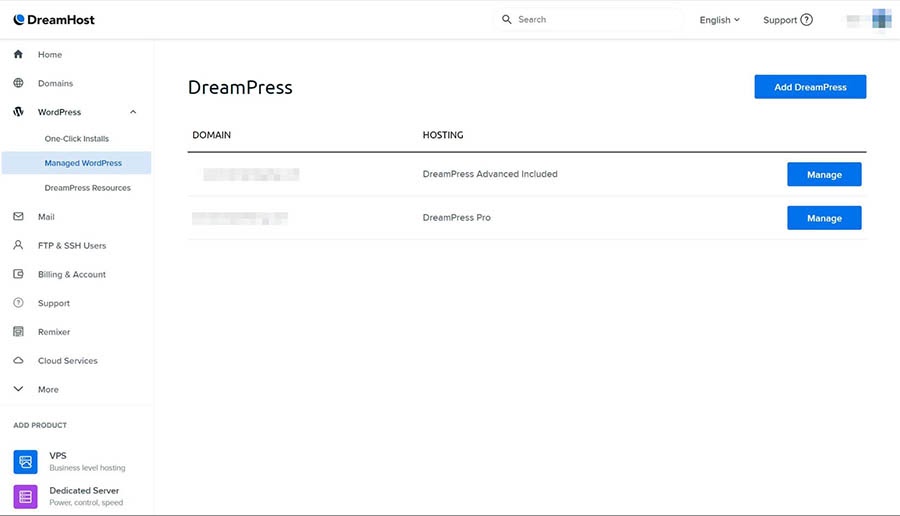
For this example, we’ll use the DreamHost file manager. Head to your DreamHost panel and navigate to WordPress > Managed WordPress in the sidebar.
Find the domain you’re having trouble with and click on the blue Manage button. On the next page, make sure the Details tab is selected at the top, and then click on Manage Files.
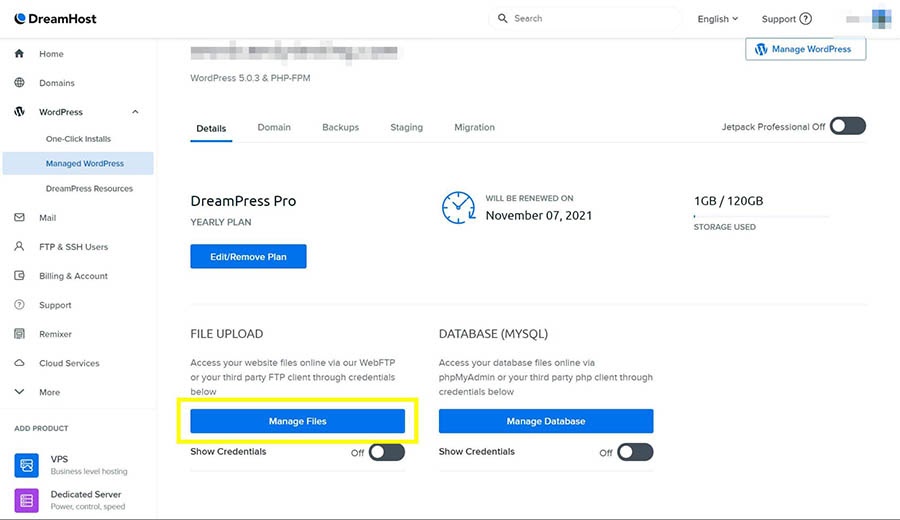
This will open the file manager in a new tab. Locate and click on the folder that corresponds to your domain name. You’ll find the .htaccess file in this directory (it’s the same one that contains items such as wp-content).
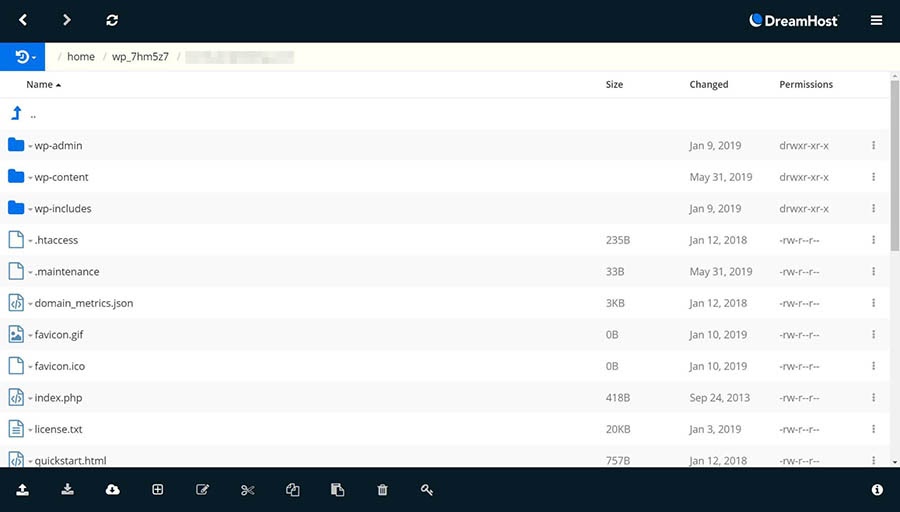
Next, click on the file name and select Edit from the list of options. You can copy the current contents of the file and paste them somewhere for safekeeping. For now, you’ll want to replace the contents with the following:
# BEGIN WordPress

<IfModule mod_rewrite.c>

RewriteEngine On

RewriteBase /

RewriteRule ^index.php$ - [L]

RewriteCond %{REQUEST_FILENAME} !-f

RewriteCond %{REQUEST_FILENAME} !-d

RewriteRule . /index.php [L]

</IfModule>

# END WordPress
This is the default .htaccess file for WordPress. When you’ve pasted this in, go ahead and save the file.
Restoring this file will also reset the permalink settings for your WordPress site. Therefore, if you’re using a custom permalink structure (or have changed it at all from the default), you’ll need to restore that setting too.
To do so, head back to your WordPress dashboard and navigate to Settings > Permalinks (just like Step 1 above). You can change it to whatever you were using before and then save it.
Finally, refresh your website and attempt to load the pages that were returning 404 errors. If everything works now, congratulations! If not, proceed to the next step.
Step 3: Disable All of Your WordPress Plugins and Theme
If you’ve reset your permalinks and .htaccess file, but you’re still seeing 404 errors on your site, the next step is to check your plugins and theme. Plugins, in particular, can sometimes have bugs or compatibility issues that prevent a site from loading.
Let’s start there. The basic idea is to disable them one by one and then check your website. If the error persists, turn it back on and move to the next one.
To get started, head to your WordPress dashboard and navigate to Plugins > Installed Plugins.

Locate and click on the Deactivate button below the first plugin. You can see that active plugins are shaded blue, while those that are off are white (as you can see with Akismet in the screenshot above). Now, refresh your site and see if the 404 error is still occurring.
If you get the error message, head back to the plugins screen, re-activate the plugin you just tried, and move to the next one in the list. If you find one that resolves the issue, you can check for updates that may resolve the problem or find an alternative with similar functionality.
If none of the plugins prove to be the issue, it’s time to try changing your theme. Head to Appearance > Themes.
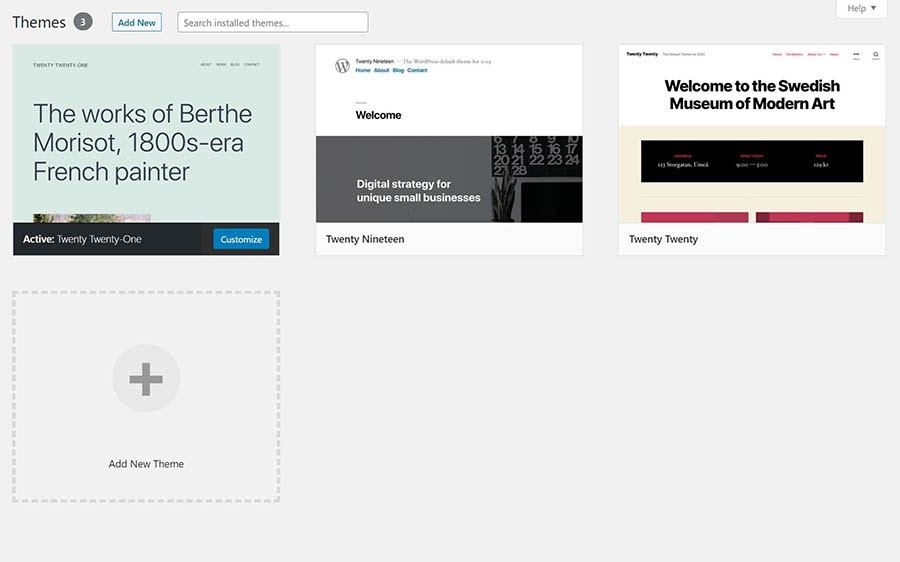
Your currently-active theme is marked as such. Hover over one of the others and click on Activate. Then refresh your site and try to access the problematic page again.
Note that changing your theme can alter your site significantly. So if you find that your theme is the issue, you may need to spend some time finding one that provides a similar look and features.
Step 4: Set Up a 301 Redirect for Moved or Renamed Content
This one is a bit of a bonus step. If you do actually have content that’s been moved or renamed and thus doesn’t exist anymore at the URL you were using previously, you’ll want to set up some 301 redirects to point that old URL to the new one.
The easiest way to do this is with a WordPress plugin such as Redirection.

This tool will enable you to quickly set up the redirects you need. Plus, it’s free and user-friendly.
How to Create Your Own “Error 404 Not Found” Page
If you want to set up your own custom 404 error page, you can do so relatively easily. The process involves adding one line to the .htaccess file to point the error to a specific page and then creating that page. We have full instructions for setting up a custom error page to walk you through the process.
Tools to Help You Monitor 404 Errors Moving Forward
Finally, if you want to keep an eye out for 404 errors in the future, you can use a few handy tools. The Google Search Console will show you crawl errors that the Google bots have come across as they index your site. This is a simple way to see all the issues Google is encountering.
You can also enter your URL into a specialized tool such as the Broken Link Checker, which will scan your entire site for broken links and let you know if it finds a 404 page.
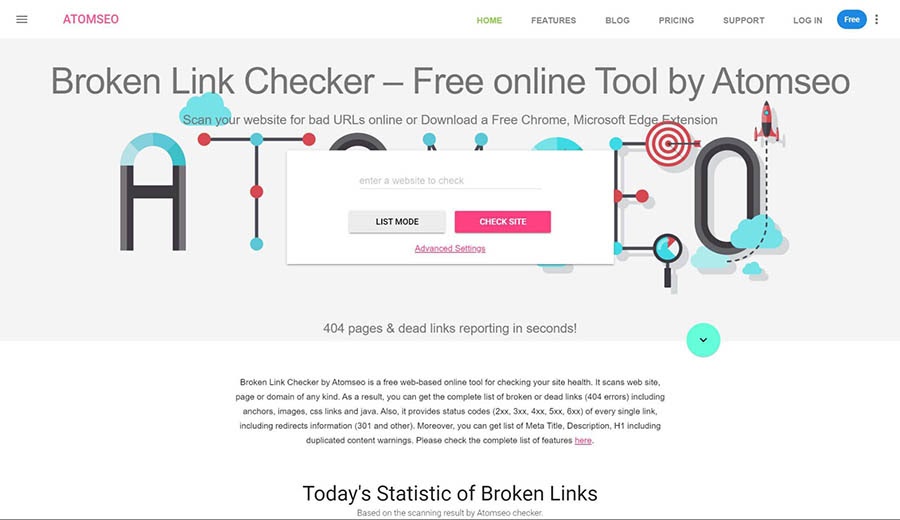
It’s free and easy to use. You can simply input your domain and then click on Check Site.
More WordPress Error Tutorials
Want to learn how to fix other common WordPress errors? We’ve created a series of guides to help!
- How to Fix the 500 Internal Server Error in WordPress
- How to Fix Syntax Errors in WordPress
- How to Fix the WordPress Not Sending Email Issue
- How to Fix the Error Establishing Database Connection in WordPress
- How to Fix the Sidebar Below Content Error in WordPress (In 3 Steps)
Ready to Find That Missing WordPress Post?
A 404 error can be frustrating — especially when it happens on your own site. These messages cause problems with SEO and ruin your site’s UX. Fortunately, they’re not too difficult to resolve.
Fixing 404 pages generally involves restoring your site’s permalink structure and setting up redirects for any posts that are actually gone. You can then use tools such as Google Search Console to monitor your site for future 404s.
If you want to spend less time dealing with errors, consider switching to DreamPress, our managed WordPress hosting service. We’ll take care of all the troubleshooting for you, so you can focus on what matters!
Дек 10, 2020
Anna
7хв. читання
Ошибка 404 в WordPress является одной из наиболее распространённых ошибок, с которой вы будете сталкиваться в интернете. Однако это не делает её менее раздражающей или неприятной, когда она появляется на вашем собственном веб-сайте. Хорошей новостью является то, что её исправление относительно простое, и процесс хорошо расписан для сайтов на WordPress.
В этой статье мы рассмотрим три способа исправления ошибки 404 в WordPress:
- Сброс настроек постоянных ссылок в WordPress (англ).
- Восстановление файла .htaccess (англ).
- Отключение тем и плагинов.
Однако, прежде чем закатывать рукава, мы поговорим о том, как работает ошибка 404 и какие причины её возникновения. Давайте перейдём непосредственно к этому!
Что такое ошибка 404 в WordPress (и что её вызывает)
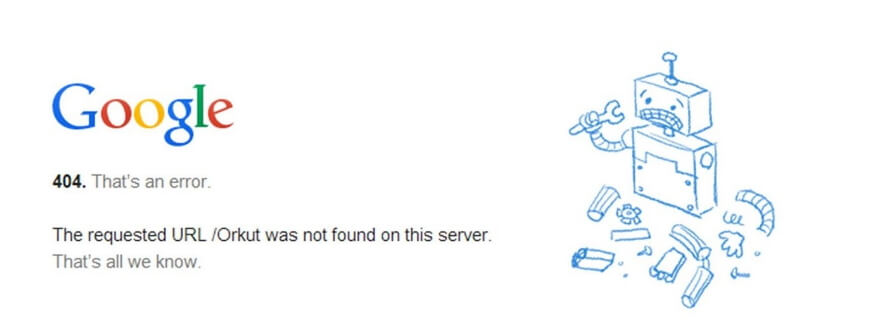
Ошибка 404 это сообщение, которое появляется, когда вы пытаетесь получить доступ к странице, которую браузер не может найти. В зависимости от того, какой браузер вы используете, сообщение может незначительно отличаться. Например, Firefox отображает такой текст: «404 Not Found», а Chrome показывает сообщение — «404. That’s an error»:
Эти сообщения об ошибках по умолчанию могут быть довольно неопределёнными, и любой веб-сайт может настроить собственную страницу ошибок 404 (англ). Это не является необходимым, но это позволяет объяснять посетителям, что сайт работает, и единственная проблема заключается в конкретной странице, которую они пытаются найти.
Независимо от того, как оно выглядит, существует много вещей, которые могут вызвать в WordPress сообщение: 404 ошибка. К ним относятся:
- Неверный URL. В некоторых случаях ошибка может быть в дополнительной букве, набранной в URL страницы.
- Проблемы с кэшированием. Иногда браузер может кэшировать страницу, к которой вы пытаетесь получить доступ, и пока она не найдена, вы будете видеть ошибку 404, даже если сайт работает для всех остальных.
- Проблема с настройками сервера доменных имен (DNS). Возможно, информация о вашем домене ещё не обновилась в DNS, поэтому вы видите ошибку при попытке получить доступ к одной из страниц вашего сайта.
- Проблемы с совместимостью в WordPress. В некоторых случаях проблемы с плагином или темой могут повлиять на то, как WordPress создаёт URL-адреса и постоянные ссылки для вашего сайта. Затем, если кто-либо попытается получить доступ к URL-адресу, который больше не работает, возникает ошибка 404 в WordPress.
Важно понимать, что ошибка 404 не уникальна только для WordPress. Она может возникать независимо от того, на какой платформе находится ваш сайт. Однако, если вы используете WordPress, у вас есть преимущество, так как существует множество способов решить эту проблему. Давайте поговорим о том, что делать, если вы столкнулись с ошибкой 404 в WordPress.
Что делать перед устранением ошибки 404 в WordPress
В следующих разделах вы будете редактировать некоторые файлы на бэкэнд WordPress. Мы проведем вас через весь процесс, и всё будет в порядке. Однако, когда вы решите редактировать конфиденциальные файлы в WordPress, лучше заранее создать резервную копию вашего сайта — на всякий случай.
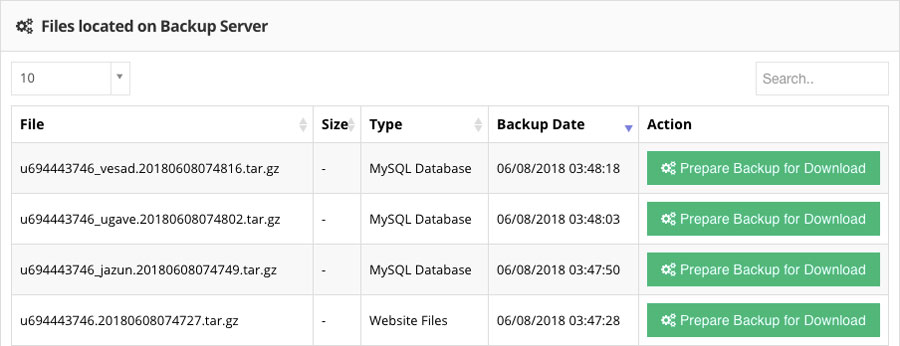
Если у вас нет доступа к панели управления WordPress прямо сейчас, не волнуйтесь. В Hostinger существует несколько способов получить резервную копию вашего веб-сайта с панели управления хостингом.
После этого вам нужно будет загрузить и настроить FTP-клиент. Мы рекомендуем FileZilla (англ), так как он бесплатный и предлагает все функции, которые могут вам понадобиться. Если вы раньше не использовали FTP, вы можете ознакомиться с нашим подробным руководством о том, как получить доступ к сайту Hostinger напрямую. Затем, когда вы будете готовы, вы сможете приступить к исправлению ошибок WordPress 404.
Как исправить ошибку 404 в WordPress (3 метода)
В некоторых случаях ненайденные страницы в WordPress вскоре исчезают сами по себе. Обычно это происходит, если они вызваны ошибкой с вашим хостинг-провайдером. Прежде чем приступать к серьёзному устранению неполадок, мы рекомендуем вам попробовать обновить сайт, предоставив ему пять или десять минут, чтобы всё уладить.
Если ошибка сохраняется и дальше, значит на вашем сайте существует проблема. В этом случае давайте рассмотрим три потенциальных решения одно за другим.
1. Сбросьте настройки своих постоянных ссылок (пермалинков) в WordPress
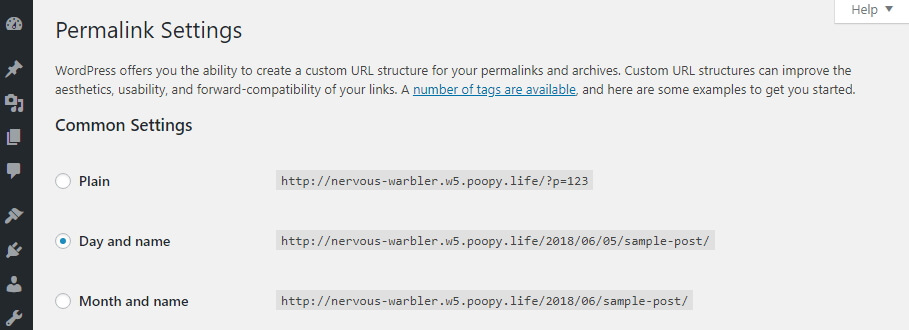
Одной из наиболее распространённых причин ошибки WordPress 404 является проблема с тем, как WordPress генерирует ваши постоянные ссылки (англ). Как вы, возможно, знаете, WordPress предоставляет вам несколько вариантов форматирования ссылок ваших записей и страниц. Например, вы можете настроить платформу для использования простых числовых ссылок или указать название каждой записи в качестве URL-адреса:
В любом случае первое, что вам нужно сделать, когда вы столкнётесь с ошибкой 404 в WordPress, это сбросить настройки ваших постоянных ссылок. Есть два способа сделать это: один через панель управления (Консоль), а другой через FTP. Если у вас есть доступ к панели управления, следуйте инструкциям в этом разделе. Еслм нет – вам следует перейти к методу номер два.
Если вы можете войти в свою панель инструментов, начните с перехода во вкладку Настройки> Постоянные ссылки. Обратите внимание на структуру, которую использует ваш сайт на данный момент. Вам нужно будет временно изменить её, чтобы сбросить настройки постоянных ссылок в WordPress, но вы измените её всего на мгновение.
Выберите параметр Простой в разделе Общие настройки и нажмите кнопку Сохранить в нижней части страницы:
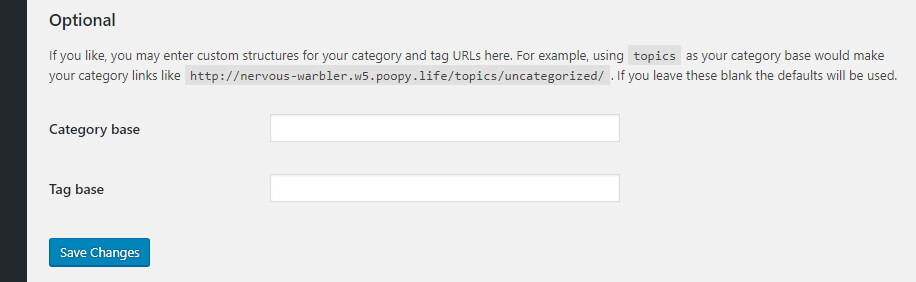
Страница перезагрузится. Затем вы можете продолжить и выбрать свой предыдущий тип постоянных ссылок и сохранить изменения ещё раз. Это всё, что требуется для сброса структуры ссылок на WordPress.
Теперь попробуйте просмотреть свой веб-сайт как обычно. Проверьте страницы, которые ранее выдавали ошибку 404. Если ошибка ушла, вы молодец – вам понадобилось минимум времени, чтобы её исправить!
2. Восстановите файл .htaccess в WordPress.
Когда вы вносите изменения в структуру постоянной ссылки в WordPress, они сохраняются в файл под названием .htaccess (англ). Этот файл определяет, как WordPress будет взаимодействовать со своим сервером, а также способ создания URL-адресов для страниц.
Если у вас нет доступа к панели управления, вам нужно будет вручную отредактировать .htaccess, чтобы переустановить постоянные ссылки. Чтобы начать работу, зайдите на свой сайт через FTP и перейдите в корневую папку WordPress. Это каталог, который содержит установку WordPress и обычно находится в папке public_html или www или назван в честь вашего сайта:
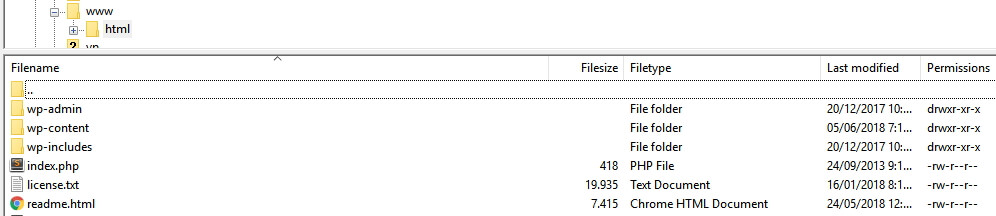
Откройте эту папку и найдите файл .htaccess. Если вы используете FileZilla, вам нужно щёлкнуть правой кнопкой мыши по файлу .htaccess и выбрать параметр Просмотреть / Изменить. Это означает, что вы загружаете копию файла на свой компьютер и открываете его с помощью локального текстового редактора по умолчанию. Теперь вы сможете внести любые изменения, которые вам нужны.
Если вы не понимаете, для чего нужен весь код в этом файле, не беспокойтесь. Вы не должны вносить в него никаких изменений, если вы не уверены в них на 100 %. Однако, что вы можете сделать, так это использовать код WordPress .htaccess, который выглядит следующим образом:
# BEGIN WordPress
<IfModule mod_rewrite.c>
RewriteEngine On
RewriteBase /
RewriteRule ^index.php$ - [L]
RewriteCond %{REQUEST_FILENAME} !-f
RewriteCond %{REQUEST_FILENAME} !-d
RewriteRule . /index.php [L]
</IfModule>
# END WordPress
Это чистый файл .htaccess без каких-либо изменений. Он удалит любые изменения, внесённые в вашу структуру постоянной ссылки. Идём дальше и создаём резервную копию содержимого старого файла .htaccess и заменяем его фрагментом кода, указанного выше.
После этого сохраните изменения в файле .htaccess с помощью текстового редактора и закройте его. FileZilla спросит, хотите ли вы заменить существующий файл .htaccess копией, которую вы только что отредактировали. Согласитесь на это действие, и всё! Вы просто переустанавливаете свои постоянные ссылки WordPress вручную, не нарушая ничего в этом процессе.
На этом этапе попробуйте снова вернуться на ваш сайт. Ошибка 404 должна исчезнуть, что уже является отличной новостью. Тем не менее, вы по-прежнему можете вернуть предыдущую структуру постоянных ссылок, если вам не нравятся числовые URL-адреса.
Помните, что вы можете изменить способ просмотра ваших постоянных ссылок, перейдя в панель управления и во вкладку Настройки> Постоянные ссылки. Выберите структуру, которую использовал ваш сайт до ошибки 404, и сохраните изменения. Тогда всё должно вернуться к нормальному функционированию.
3. Отключите темы и плагины в WordPress.
Как уже упоминалось ранее, иногда ваши плагины и темы могут влиять на структуру вашего WordPress, в зависимости от их настроек. Если вы попробовали один или оба предыдущих метода и ошибка 404 по-прежнему сохраняется, отключите свои темы и плагины.
Есть два способа сделать это, в зависимости от того, имеете ли вы доступ к панели управления или нет. Если у вас есть доступ, перейдите во вкладку Плагины> Все плагины и выполните этот процесс для каждого из ваших плагинов:
- Нажмите кнопку Деактивировать под именем плагина.
- Проверьте свой сайт, чтобы узнать, сохраняется ли ошибка 404.
- Если ошибка всё ещё существует, повторно активируйте отключённый плагин.
- Перейдите к следующему плагину в списке и повторите процесс.
Ваша цель – отключать каждый плагин один за другим. Вы можете отключить их всех сразу, но в большинстве случаев всего один плагин вызывает проблемы. Если отключение одного из ваших плагинов устраняет проблему, у вас есть три варианта. Вы можете проверить, есть ли доступное обновление, и временно отключить плагин до тех пор, пока оно не появится, или вы не замените плагин на альтернативный.
Если вы проверили все свои плагины, и ни один из них не оказался причиной проблемы, вам также придётся убедиться, что ваша активная тема не приводит к ошибке 404. Этот процесс намного быстрее, так как вам нужно проверить всего одну тему. Перейдите на вкладку Темы и переключите свою активную тему на какую-нибудь другую:

Теперь проверьте, не исчезла ли ошибка 404. Если да, то вам снова нужно выбирать между поиском обновления или поиском новой темы. Переключение тем в WordPress может быть немного хлопотным, но в конечном итоге это необходимо, раз уж ваша текущая тема приводит к ошибкам.
Если у вас нет доступа к панели управления, вы можете отключить тему и плагины вручную через FTP. Чтобы сделать это, зайдите на свой сайт с помощью FileZilla, затем перейдите в каталог public_html / wp-content. Здесь вы найдёте несколько папок, две из которых называются plugins и themes соответственно:
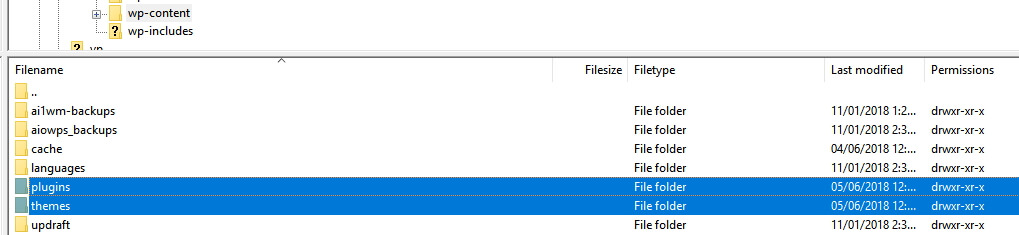
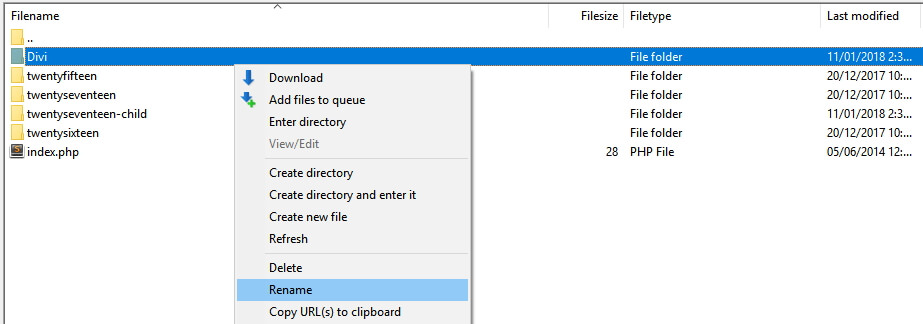
Сначала зайдите в каталог плагинов. Вы заметите, что для каждого плагина есть своя папка. Выберите одну из этих папок, щёлкнув по ней правой кнопкой мыши и выберите опцию Переименовать:

Измените название папки на что-то вроде akismet.disabled, так чтобы вы смогли легко её идентифицировать. Простого изменения названия папки плагина достаточно для того, чтобы WordPress его отключил. Теперь проверьте, не исчезла ли ошибка 404. Если нет, верните этой папке прежнее название и повторите этот процесс для каждого следующего плагина в папке.
Если один из ваших плагинов стал причиной ошибки, вы знаете, как с этим справиться. Однако, если окажется, что ошибка 404 возникает не из-за них, вы можете перейти в каталог тем wp-content> themes. Найдите папку с активной темой и переименуйте её так же, как и плагины:
Поскольку WordPress всегда нуждается в активной теме, отключение вашей приведет к тому, что платформа будет использовать один из готовых вариантов по умолчанию. Это может повлиять на внешний вид вашего веб-сайта, но не беспокойтесь, это временно.
Если ошибка исчезла, вам может потребоваться подобрать новую тему. Однако, если это не так, восстановите предыдущее название папки своей темы, чтобы WordPress снова её распознал.
Дополнительная информация
Ошибка 404 это не единственная проблема, которая может возникнуть с веб-сайтом в WordPress. Вот список наиболее популярных ошибок в WordPress с углублённой информацией о том, как их исправлять:
- Как исправить ошибку 403 Forbide Error в WordPress
- Как исправить ошибку 500 Internal Server Error в WordPress
- Ошибка 502 Bad Gateway в WordPress – причины и как исправить
- Как отладить и исправить ошибку 503 Service Unavailable в WordPress
- Ошибка 504 Gateway Time-out и как её исправить в WordPress
- Как исправить ошибку HTTP при загрузке изображений в WordPress
- Как исправить ошибку «Извините, вы не можете получить доступ к этой странице» в WordPress
Вывод
Ошибка 404 может показаться простой, но она может нанести большой урон. Если ваши посетители не могут найти нужные им страницы, они могут начать искать в другом месте, а зачем вам это? Это означает потерянный трафик и, возможно, снижение конверсий.
К счастью, есть много способов решить эту проблему в WordPress, включая отключение тем и плагинов, восстановление вашего файла .htaccess и сброс ваших постоянных ссылок.
Если у вас возникли какие-либо вопросы, советы или рекомендации по работе с ошибкой WordPress 404 – давайте поговорим о них в разделе комментариев!

Анна долгое время работала в сфере социальных сетей и меседжеров, но сейчас активно увлеклась созданием и сопровождением сайтов. Она любит узнавать что-то новое и постоянно находится в поиске новинок и обновлений, чтобы делиться ими с миром. Ещё Анна увлекается изучением иностранных языков. Сейчас её увлёк язык программирования!