
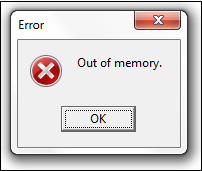
Многие пользователи ПК во время работы с какой-либо программой могут столкнуться с «вылетом» указанной программы, и появившимся сообщением «Out of memory». Возникшая проблема может иметь множество причин, начиная от банального недостатка памяти на пользовательском ПК, и заканчивая некорректной работой с памятью какой-либо программы.
- Причины появления дисфункции
- Как исправить ошибку «Out of memory»
- Заключение
Причины появления дисфункции
Сообщение «Out of memory» (в переводе дословно «вне памяти», или «недостаточно памяти») обычно возникает при недостатке памяти на пользовательском компьютере. В частности же, в появлении данной ошибки «виновен» следующий набор факторов:
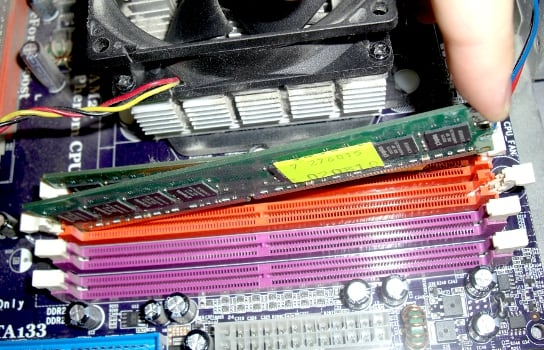
- Недостаток памяти RAM на вашем ПК (рабочей памяти, планки которой установлены на материнской плате вашего компьютера). Если на вашем компьютере установлен всего 1 гигабайт памяти, вы будете встречаться с описываемой ошибкой довольно часто. Нормальным же ныне считается наличие на компьютере 4 гигабайт памяти и выше;
- Недостаток места на жёстком диске.
Когда вашему компьютеру не хватает физической R.A.M. памяти, он заимствует часть места на жёстком диске, и создаёт так называемую «виртуальную память». Система временно хранит в такой виртуальной памяти ту часть данных, которая не помещается в памяти обычной. Такие данные обычно хранятся в файле «pagefile.sys», размер которого может увеличиваться или уменьшаться в зависимости от специфики работы вашей ОС. Если на диске будет недостаточно места, файл «pagefile.sys» не сможет расти, и пользователь получит рассматриваемую ошибку.
- При одновременном запуске на ПК большого количества программ, каждая из которых бронирует часть памяти ПК под свои задачи;
- При запуск большого количества вкладок браузера. Веб-навигаторы уровня «Firefox» или «Google Chrome» способны занимать от 500 мегабайт до 1 гигабайта памяти под свой функционал, при этом число открытых вкладок и соответствующей обслуживающей памяти может быть ограничено системой. Специалисты Майрософт называют такую проблему «the desktop heap limitation» — «ограничение кучи рабочего стола»);
- Некорректная работа с памятью ряда программ (наиболее часто это игровые программы);
- Не оптимальный размер файла подкачки, с которым работает система.


Для решения указанной проблемы рекомендую сделать следующее:
- Перезагрузите ваш ПК, и запустите требуемую программу вновь. Возможно, что проблема имеет случайный характер, и более повторяться не будет;
- Перед запуском нужной программы закройте другие ненужные программы (браузер, музыкальный или видео плеер, текстовый или графический редактор, мессенджер и так далее);
- Если проблема возникает во время серфинга в сети, закройте всё множество вкладок вашего браузера (при наличии), оставив лишь одну или две.


Альтернативным вариантом решения проблемы является установка соответствующего фикса от Майкрософт. Или использование расширений или дополнений для браузера уровня «The Great Suspender» для «Google Chrome», хорошо работающего с ненужными вкладками браузера.
- Добавьте оперативной памяти на ваш ПК. Если у вас на компьютере установлено 1-2 гигабайта памяти, будет оптимальным довести её объём до 4 гигабайт (а для 64-битных Виндовс 7, 8 и 10 версии рекомендую 8 и более гигабайт);

- Убедитесь, что на вашем жёстком диске (или SSD) достаточно свободного места. При необходимости, освободите диск от ненужных файлов;
- Используйте инструмент командной строки BCDEdit для изменения параметров загрузки системы. Если у вас на ПК установлена Виндовс 7 и более, запустите командную строку от имени администратора на Виндовс 7 и Виндовс 10, и в ней наберите:
bcdedit/set IncreaseUserVa 3072
И нажмите на ввод, и перезагрузите ваш ПК. Функционал данной команды позволяет выделить пользовательским приложениям 3 гигабайта оперативной памяти для работы. В некоторых системах этого может быть слишком много, потому если после ввода данной команды система начала чаще сбоить, то введите в командной строке от имени администратора:
bcdedit /set IncreaseUserVa 2560 — что позволит задействовать 2,5 гигабайта вместо ранее забронированных 3.
Если ситуацию этим исправить не удалось, верните настройки на состояние по умолчанию:
bcdedit /deletevalue IncreaseUserVa
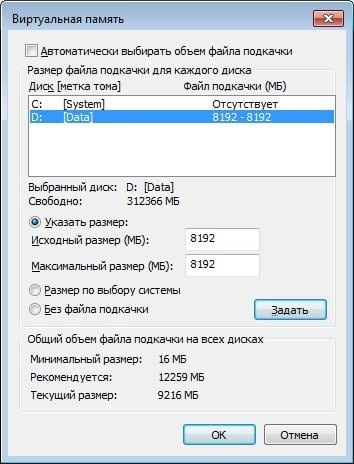
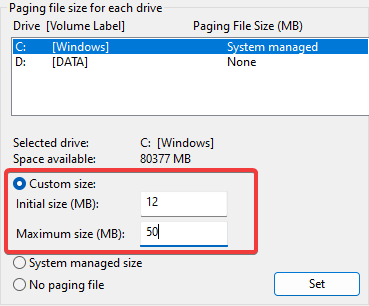
- Увеличьте объём файла подкачки. Нажмите кнопку «Пуск», в строке поиска введите sysdm.cpl и нажмите ввод. В открывшемся окне настроек системы выберите «Дополнительно» — «Быстродействие» — «Параметры» — «Дополнительно» — «Виртуальная память» — «Изменить». Снимите галочку с опции автоматического размера, поставьте галочку на «Указать размер», и поставьте исходный размер в 8192, и максимальный в 8192. Затем выберите «Задать»;

Установите нужный размер файла подкачки
- Если ошибка возникает при использовании игровой программы, перейдите в её графические настройки, и выберите их минимальные значения;
- Произведите правильную настройку «Java». Для решения проблем с игровой программой «Майнкрафт» перейдите в Панель управления Виндовс, найдите там «Java» и запустите данную среду исполнения. Нажмите на кнопку «View», затем дважды кликните на «Runtime Parametres». Введите туда –Xms256m – Xmx3072m (или больше). Xms – это минимальное выделение ОЗУ, Xmx – максимальное. Значение Xmx рекомендуют устанавливать на процентов 70-80% от общего объёма ОЗУ. Примените изменения, и перезагрузите ваш ПК.
Заключение
Ошибка «Out of memory» может иметь множество причин, связанных как с физическим недостатком памяти на ПК, так и другими детерминантами, изложенными мной выше. Для решения проблемы советую закрыть ненужные программы (вкладки браузера) на вашем компьютере (тем самым разгрузив его память), а самым эффективным инструментом является установка дополнительной планки памяти на ПК, что в большинстве случаев поможет избавиться от ошибки на вашем компьютере.
|
Хидеки 1 / 1 / 0 Регистрация: 05.01.2015 Сообщений: 12 |
||||
|
1 |
||||
|
05.01.2015, 08:09. Показов 1887. Ответов 11 Метки нет (Все метки)
Добрый день. Есть простейшая программка, запускающая ms word.
Суть проблемы: Отсюда следует вопрос — что нужно сделать, чтобы программа работала с exe’шника? Миниатюры
__________________ 0 |

|
_lunar_
3222 / 2481 / 429 Регистрация: 03.05.2011 Сообщений: 5,151 Записей в блоге: 20 |
||||
|
05.01.2015, 11:41 |
2 |
|||
|
а без try catch тоже не работает?
0 |
|
1 / 1 / 0 Регистрация: 05.01.2015 Сообщений: 12 |
|
|
05.01.2015, 13:12 [ТС] |
3 |
|
а без try catch тоже не работает? Да, без трай-кэча та же песня. Для того и поставил, чтоб поймать, на чём вылетает. 0 |

|
_lunar_
3222 / 2481 / 429 Регистрация: 03.05.2011 Сообщений: 5,151 Записей в блоге: 20 |
||||
|
05.01.2015, 13:25 |
4 |
|||
|
могу предложить написать как в примере (сам проверить не могу, т.к. не установлены средства разработки office)
0 |
|
Master of Orion
6094 / 4950 / 905 Регистрация: 10.07.2011 Сообщений: 14,522 Записей в блоге: 5 |
|
|
05.01.2015, 13:29 |
5 |
|
Хидеки, не устаю повторять — качайте OpenXML и не пользуйтесь дебильным интеропом 0 |
|
Хидеки 1 / 1 / 0 Регистрация: 05.01.2015 Сообщений: 12 |
||||
|
05.01.2015, 15:42 [ТС] |
6 |
|||
|
могу предложить написать как в примере Так у меня практически тоже самое и написано. На строке
краш. Добавлено через 16 минут 0 |
|
_exp10der_ Warrior 500 / 427 / 177 Регистрация: 23.11.2014 Сообщений: 932 |
||||
|
05.01.2015, 16:22 |
7 |
|||
попробуй этот пример в консольки 0 |
|
1 / 1 / 0 Регистрация: 05.01.2015 Сообщений: 12 |
|
|
05.01.2015, 16:37 [ТС] |
8 |
|
попробуй этот пример в консольки То же самое — при запуске из проекта VS всё без ошибок проходит (хотя сохранённый файл я таки не нашёл…). Добавлено через 13 секунд
попробуй этот пример в консольки То же самое — при запуске из проекта VS всё без ошибок проходит (хотя сохранённый файл я таки не нашёл…). Добавлено через 5 минут
попробуй этот пример в консольки То же самое — при запуске из проекта VS всё без ошибок проходит (хотя сохранённый файл я таки не нашёл…). 0 |
|
_exp10der_ Warrior 500 / 427 / 177 Регистрация: 23.11.2014 Сообщений: 932 |
||||
|
05.01.2015, 16:52 |
9 |
|||
|
Да там у меня с путем косяк
но у меня это работает если с экзешника запускать Может быть дело в версии ворда? у меня Word 2013 (15.0.4569.1504) MSO (15.0.4569.1506), 64-разрядная версия 0 |
")
|
1 / 1 / 0 Регистрация: 05.01.2015 Сообщений: 12 |
|
|
05.01.2015, 17:36 [ТС] |
10 |
|
Может быть дело в версии ворда? Может быть. Или вообще с компом беда…) 0 |
|
Warrior 500 / 427 / 177 Регистрация: 23.11.2014 Сообщений: 932 |
|
|
05.01.2015, 17:52 |
11 |
|
Попробуйте сделать билд на этом проекте если у вас студия 2013 0 |
|
1 / 1 / 0 Регистрация: 05.01.2015 Сообщений: 12 |
|
|
05.01.2015, 19:28 [ТС] |
12 |
|
_exp10der_, в 12-й студии пишу. 13-й нету. 0 |
Ошибка «Out of Memory» обычно появляется, когда на компьютере запущено много программ, использующих ресурсы, доступные для компьютера. Компьютерная память или ОЗУ (оперативное запоминающее устройство) используется компьютером для быстрого хранения данных для их обработки.
Структура статьи
- 1 Когда появляется эта ошибка?
- 2 Причина ошибки «Out of Memory»
- 3 Как исправить ошибку «Out of Memory»
- 4 Чтобы избежать проблем, тщательно следуйте этим инструкциям.
- 5
Отсюда, следуйте этим шагам в зависимости от вашей операционной системы
Когда появляется эта ошибка?
Как я уже отмечал выше, запуск сразу нескольких программ может перегрузить объем доступной свободной памяти, что приведет к ошибке «Out of Memory». Это может случиться как с новыми программами, так и с уже запущенными на компьютере программами. Иногда это может произойти, независимо от объема доступной свободной памяти.
Причина этих ошибок немного сложнее. Подсистема WIN32 Windows имеет ограниченный объем доступной памяти. Если память в куче рабочих столов подсистемы WIN32 используется. Windows может выдавать сообщение об ошибке «Out of Memory».
Компьютеры, работающие не так, как операционные системы Microsoft Windows, не слишком уязвимы. Эта проблема в основном существует для пользователей Windows NT 3.5 и Windows NT 3.1
Как исправить ошибку «Out of Memory»
Чтобы исправить эту проблему, вам необходимо отредактировать свой реестр Windows. Редактирование реестра является рискованным занятием. Действовать нужно с осторожностью, и только строго по инструкции:
- Резервное копирование реестра — так что вы можете восстановить его позже, если что-то пойдет не так.
- Нажмите здесь, чтобы узнать, как создать резервную копию и восстановить реестр.
Чтобы избежать проблем, тщательно следуйте этим инструкциям.
- Увеличьте размер кучи рабочего стола, чтобы исправить эту проблему.
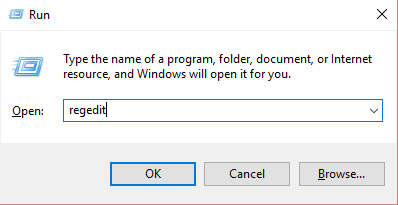
- Запустите редактор реестра, открыв диалоговое окно RUN с помощью сочетания клавиш Windows_Key + R или из меню «Пуск». В диалоговом окне RUN введите regedit для запуска Regedt32.exe.
- Из поддерева HKEY_LOCAL_MACHINE,
Перейдите к следующему разделу: - System CurrentControlSet Control Session Manager SubSystems
- Выберите значение Windows.
- Выберите «Строка» в меню «Правка».
- Увеличить параметр SharedSection
Отсюда, следуйте этим шагам в зависимости от вашей операционной системы
Для Windows NT:
- SharedSection используется для определения размера системы и рабочего стола, он использует следующие параметры
- SharedSection = XXXX, YYYY
- Добавить «, 256» или «, 512» после номера yyyy.
Для Windows 2000, Windows XP и Windows Server 2003:
- SharedSection используется для определения размера системы и рабочего стола, он использует следующие параметры
- SharedSection = XXXX, YYYY, ZZZZ
Для 32-разрядных операционных систем
- Увеличьте значение yyyy до «12288» и увеличьте значение zzzz до «1024».
Для 64-разрядных операционных систем
- Увеличьте значение yyyy до «20480»; Увеличьте значение zzzz до «1024».
Есть свой вариант быстрого решения ошибки «Out of Memory»? Пишите его в форму комментариев к этой статье, и если ваш вариант окажется полезным, мы обязательно дополним руководство.
Learn how to get your Edge browser working properly again
by Loredana Harsana
Loredana is a passionate writer with a keen interest in PC software and technology. She started off writing about mobile phones back when Samsung Galaxy S II was… read more
Updated on December 21, 2022
Reviewed by
Vlad Turiceanu

Passionate about technology, Windows, and everything that has a power button, he spent most of his time developing new skills and learning more about the tech world. Coming… read more
- The Out of memory error code in Microsoft Edge occurs when your computer no longer has any spare memory to allocate to the browser or other programs.
- The leading causes of the error are memory-related and browser settings, and there are several ways of correcting the issue.
- How to fix Error code: Out of memory? For example, you may reset the browser using one of the methods below.
- Easy migration: use the Opera assistant to transfer exiting data, such as bookmarks, passwords, etc.
- Optimize resource usage: your RAM memory is used more efficiently than in other browsers
- Enhanced privacy: free and unlimited VPN integrated
- No ads: built-in Ad Blocker speeds up loading of pages and protects against data-mining
- Gaming friendly: Opera GX is the first and best browser for gaming
- Download Opera
Microsoft Edge shares some engines with the Chrome browser, making it use more memory and consume many of the PC resources.
When they open a new web page on the Edge browser, most users get the Out of memory error code. It makes the page not open, inconveniencing the user.
Most of the issues are memory-related and other Chrome settings, and they can go to the extent of slowing the machine due to the processes like network service.
There are several ways to fix this problem, and most methods involve troubleshooting the Edge settings to clear it.
Several issues related to the browser and memory cause this problem. Some of the problems include:
- Having a lot of Edge extensions and add-ons
- Opening many tabs in one window
- Lack of insufficient memory on your PC
- Using an outdated version of Edge
- Interference from the browser’s cookie and cache
What does Error code: Out of memory mean?
This error implies that the resources or memory available in the Edge browser are insufficient to obtain and open the requested web page. In other words, we can say you are out of memory, or there is a Microsoft Edge memory leak.
Because both RAM and hard drive space are casually referred to as memory, some users believe the error message refers to the memory in the hard drive.
Following that, some will begin to delete files from the computer to free up memory. While this will thin the hard drive, it will not resolve your browser’s Out of memory error code.
Moreover, here are some error variations that you may encounter, but nonetheless, fix with the solutions below:
- Error code out of memory Jupyter Notebook, PC, Windows 11, Windows 10
- Browser error code out of memory – Error code out of memory Edge, Chrome, Brave
- Error code out of memory Facebook, YouTube, Canvas, Cypress
- Error code out of memory chrome StackOverflow, PHP
Luckily, there are different ways to fix the issue and enjoy browsing seamlessly.
How do I fix error Out of memory?
- What does Error code: Out of memory mean?
- How do I fix error Out of memory?
- 1. Try an alternative browser
- 2. Clear cache and cookies on Microsoft Edge
- 3. Remove any extensions and add-ons
- 4. Reduce memory usage of the browser
- 5. Repair Microsoft Edge
- 6. Reset the Microsoft Edge browser
- 6.1. Use the edge://settings/reset command
- 6.2. Use the Settings option
- 7. Change the page filing
1. Try an alternative browser
Edge is a good and dependable browser, but if you continue to receive error messages, try a browser that focuses on performance.
With built-in CPU and RAM limiting features, Opera GX is one of the best alternatives. Moreover, you can enable it by opening the sidebar panel in just a few clicks.
Built to handle in-browser gaming and streaming without interruption, Opera GX also integrates standard browsing features.
You can bookmark your favorite pages, customize your experience with dedicated extensions, and use the instant messaging sidebar to communicate with your peers quickly.
The browser is also very much focused on privacy, with a built-in anti-tracking feature and a free VPN with unlimited bandwidth. The VPN will hide your IP and also help you bypass geo-blocks.

Opera GX
Browse error-free with this performance-oriented with dedicated CPU and RAM controls and industry-leading privacy features.
2. Clear cache and cookies on Microsoft Edge
1. Open the Edge browser on your PC.
2. Click on the Settings option.
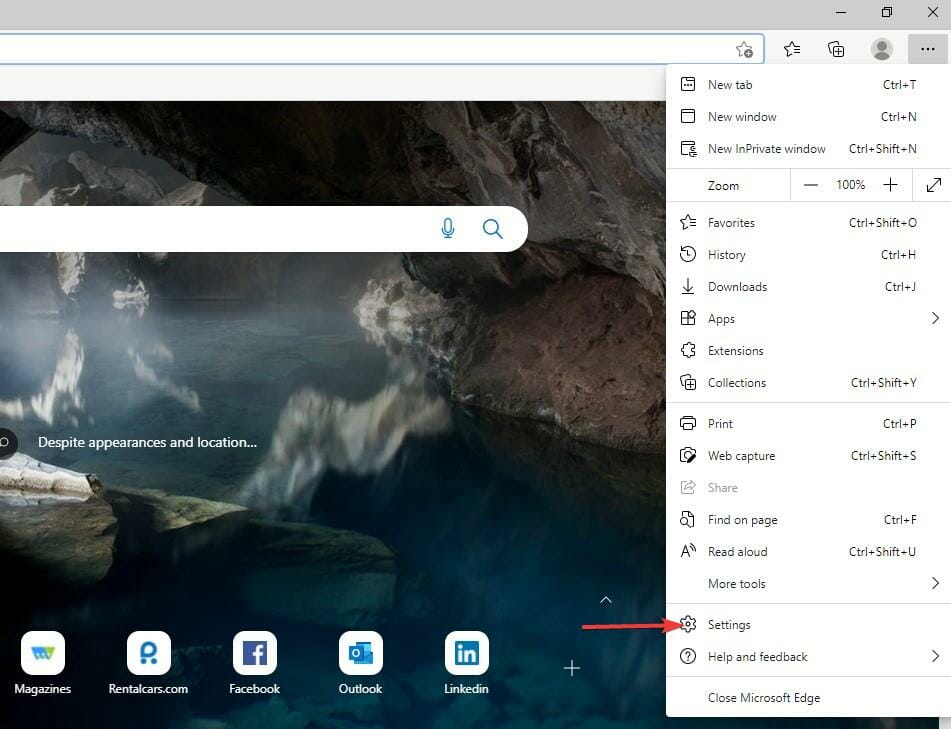
3. Click on the Privacy, search, and services tab to provide more options.
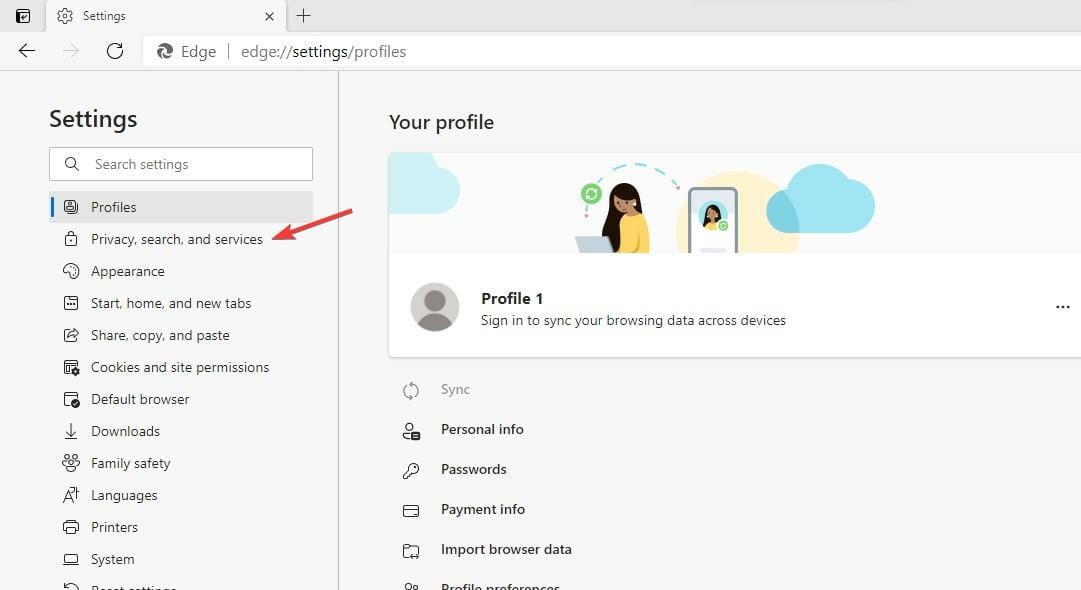
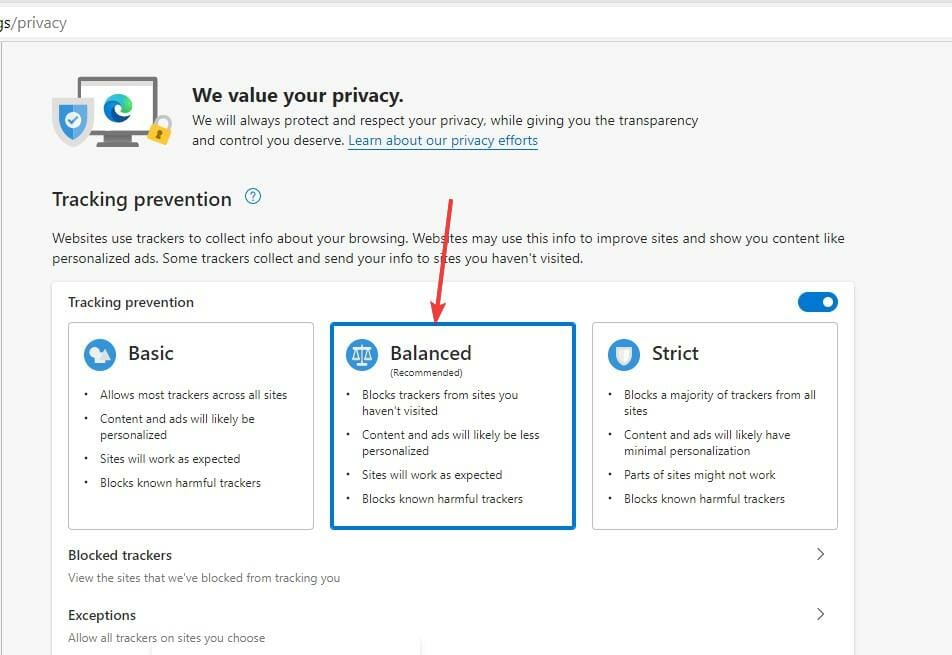
4. Select the Balanced option from the three to improve your privacy.
5. Go to the Clear browsing data tab and click the Choose what to clear button.
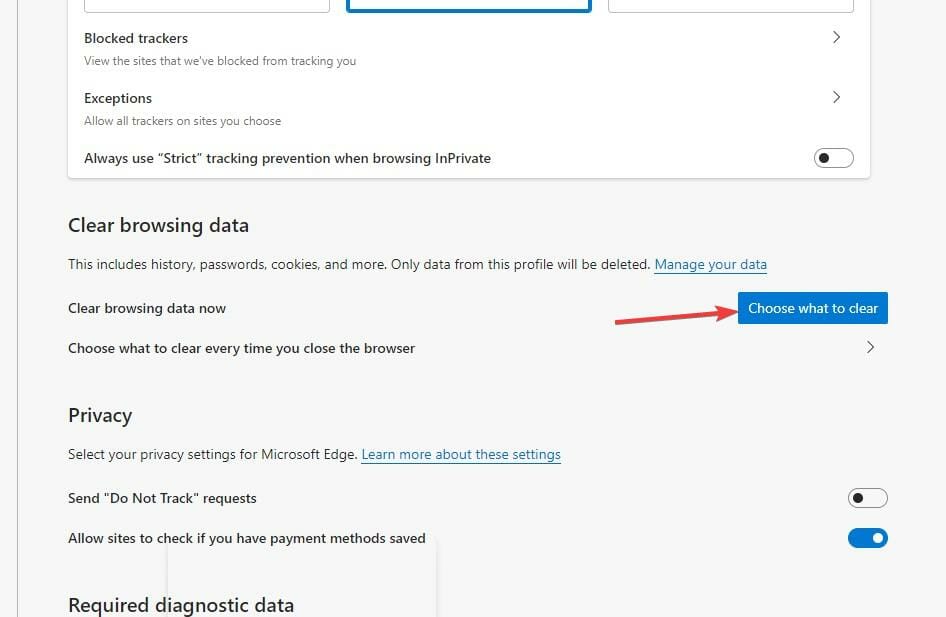
6. A pop-up will display where you have to choose the Time range, check the Cookies and other site data and Cached images and files options.
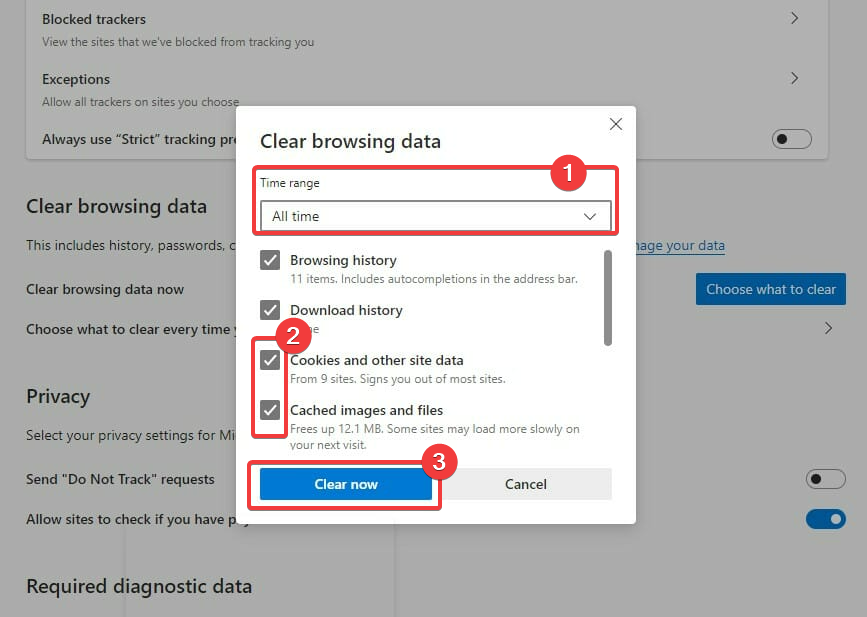
7. After you made your selection, click the Clear now button.
Using a browser such as Microsoft Edge saves information from websites you visit in its cache and cookies. Clearing these can help with a website’s formatting and loading issues and make your browsing more secure.
Clearing cache removes all the Edge errors. So restart the browser and try to re-access the web pages to see if it’s solved.
We recommend CCleaner, a professional tool that automatically cleans your browser’s cookies, trackers, internet history, download history, and cache. Plus, this software can even delete individual session activity.
3. Remove any extensions and add-ons
- Open the Edge browser and click on the three-dotted lines.

- Choose the Extensions option.

- Look for the list of the Installed extensions.

- Click on the extensions button to turn it off, and you may also click the Remove button to uninstall them.


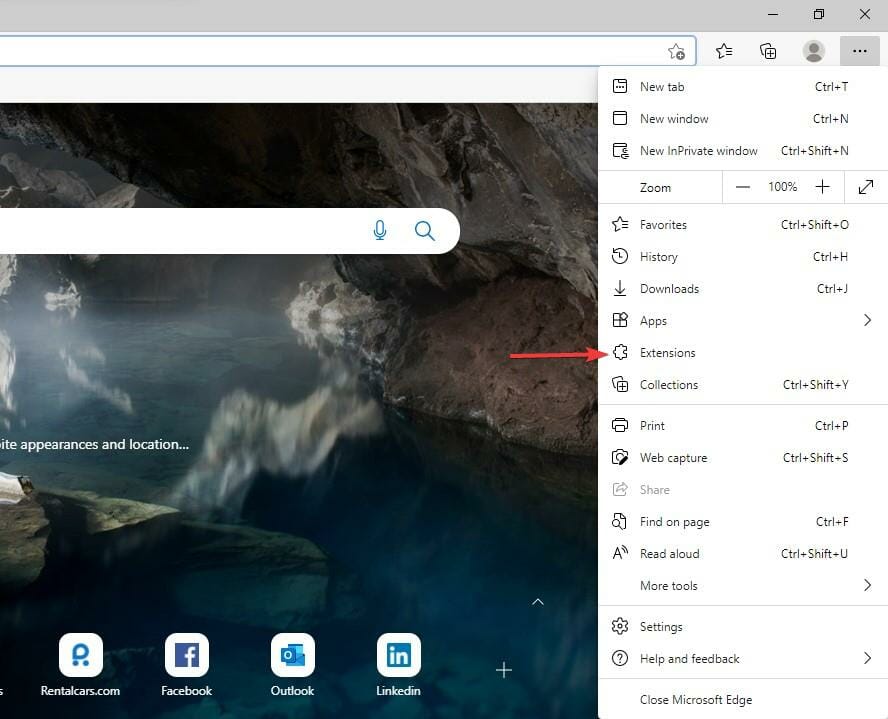

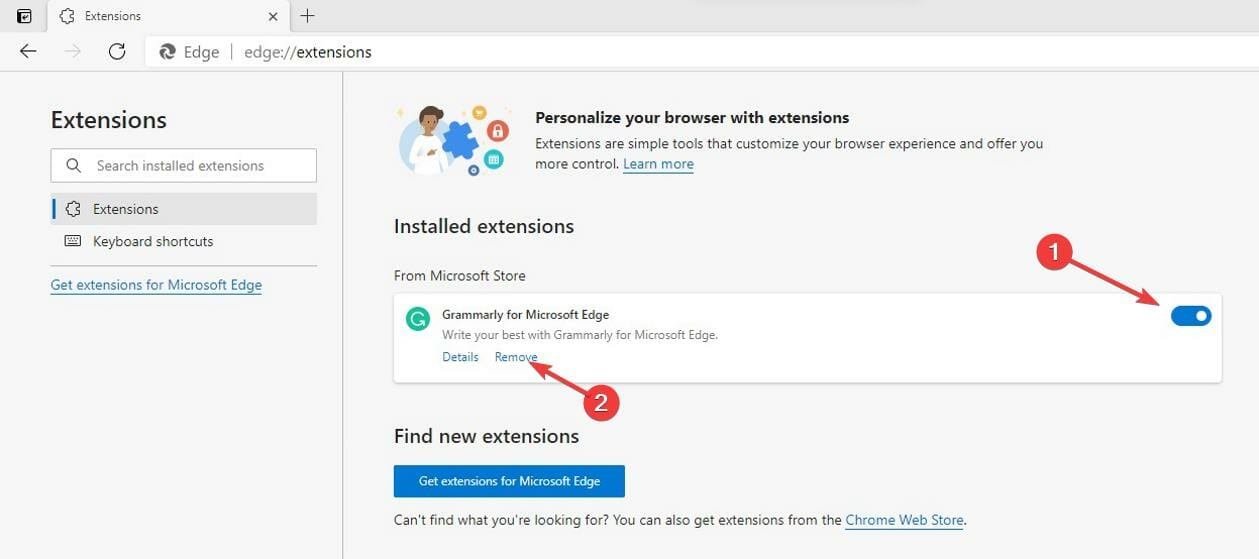
Most users use add-ons and extensions to improve their experience on the web and automate some processes with the help of the add-ons. But too many of them can affect the browser’s performance by using more memory allocated.
4. Reduce memory usage of the browser
- Launch your Microsoft Edge browser.

- Press Shift + Esc on the keyboard to open the Browser Task Manager.

- Locate the browser tab that uses a lot of memory, click on it, and click the End process button.

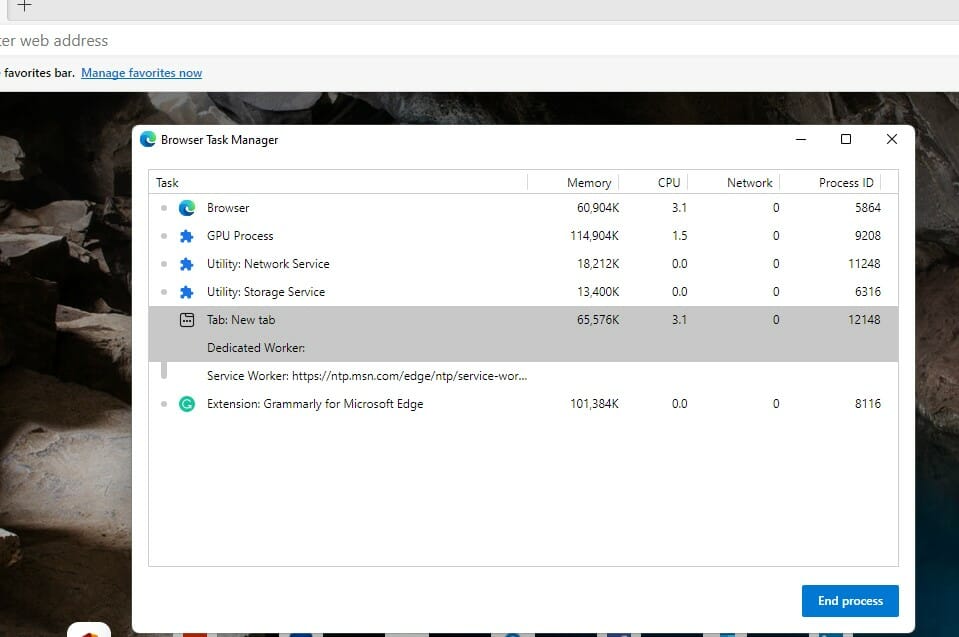
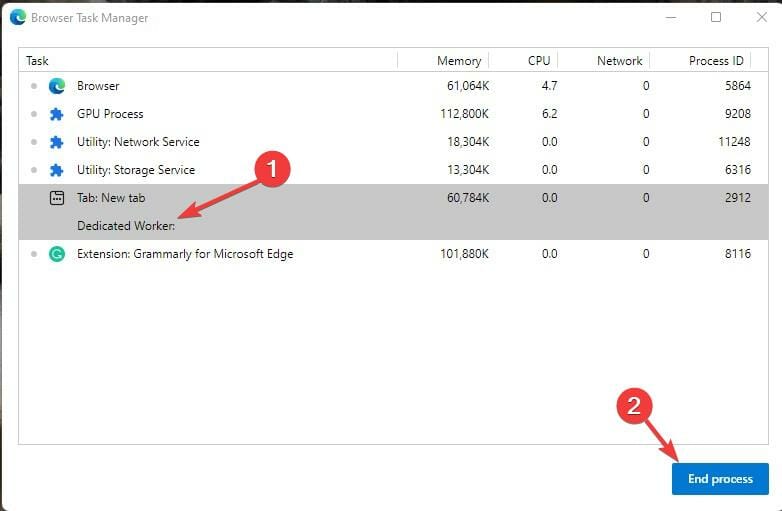
Some things that affect memory usage include ads, screen resolution, the tab’s content, windows size, number of browser tabs open, e.t.c.
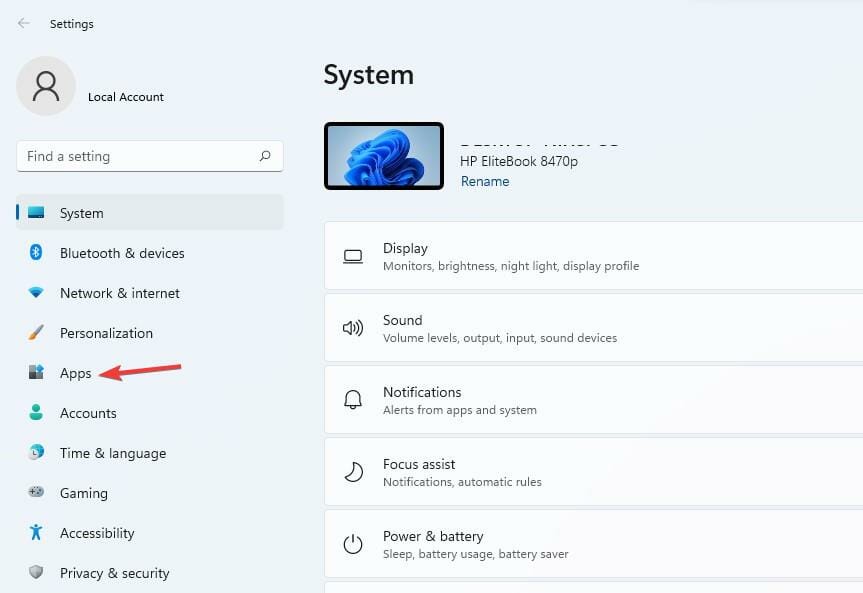
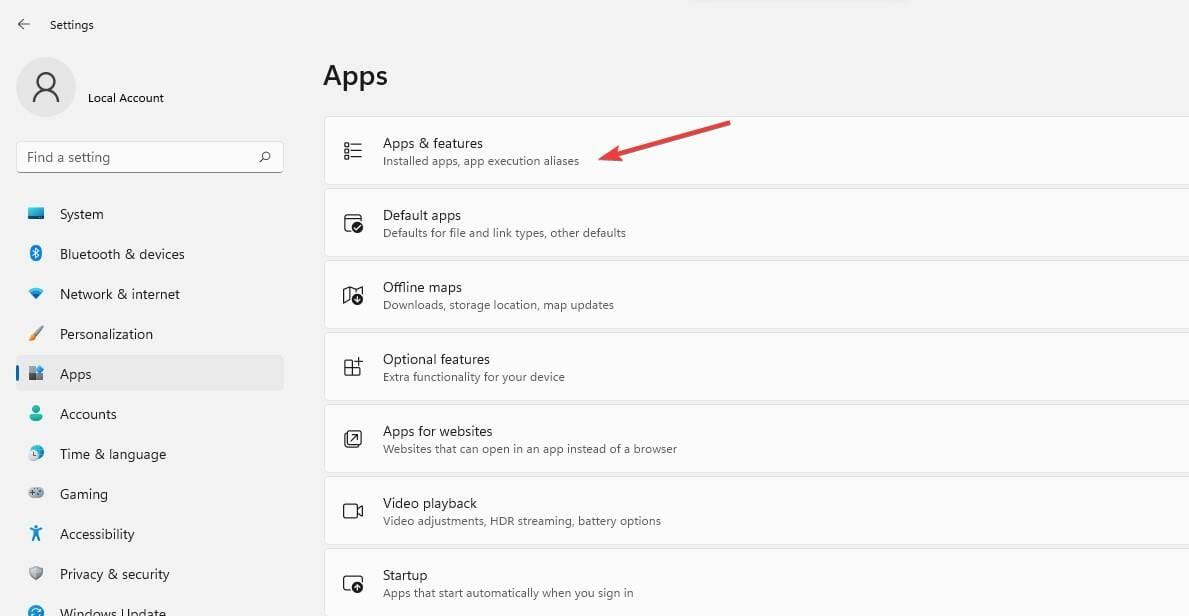
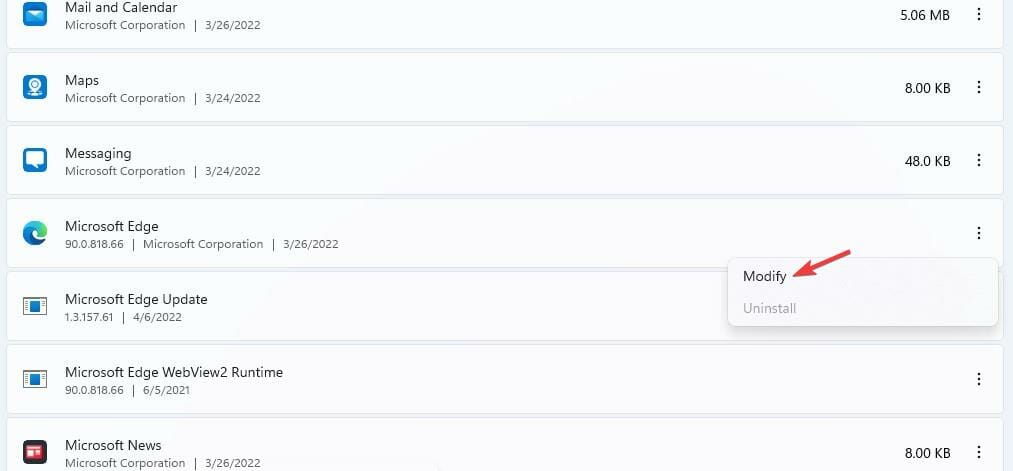
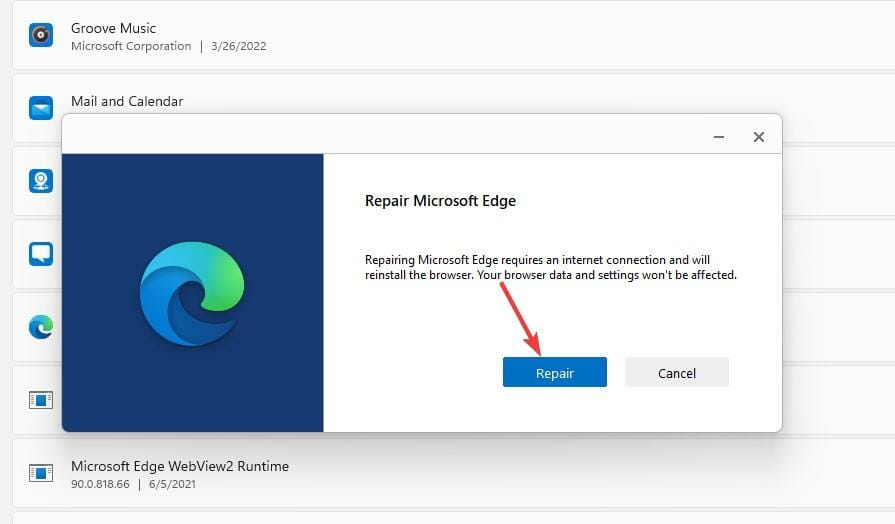
5. Repair Microsoft Edge
- Press Windows key + I to open the Settings app.

- Click on the Apps tab.

- Click on the Apps and features tab.

- Select the Edge browser.

- Click on the three-dotted lines and select Modify.

- Click on the Repair button when you receive a pop-up.


- Edge Shortcut Keeps Appearing on Desktop: 5 Easy Fixes
- How To Stop Microsoft Edge From Running in Background
- Fix: Microsoft Edge Keeps Freezing, Hangs or It’s Not Responding
- Saved Passwords Missing in Edge: How to Recover Them
- 8 Ways to Fix Edge When is Slow or Lagging on Windows 10
6. Reset the Microsoft Edge browser
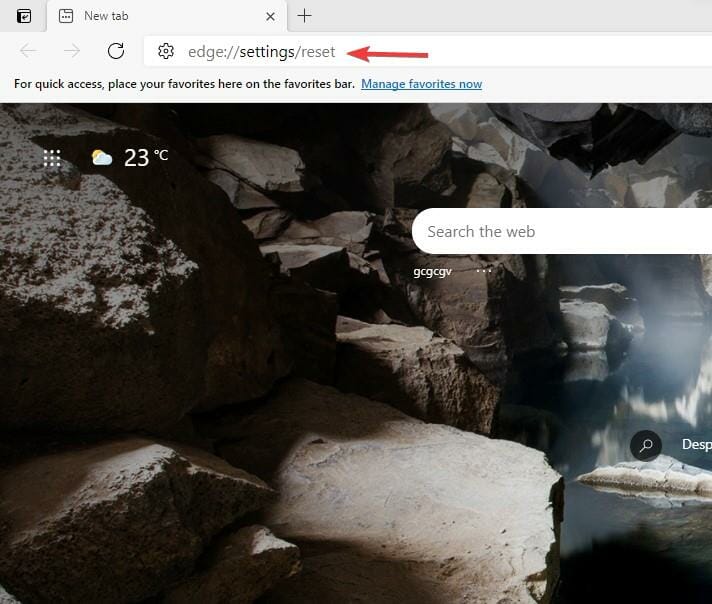
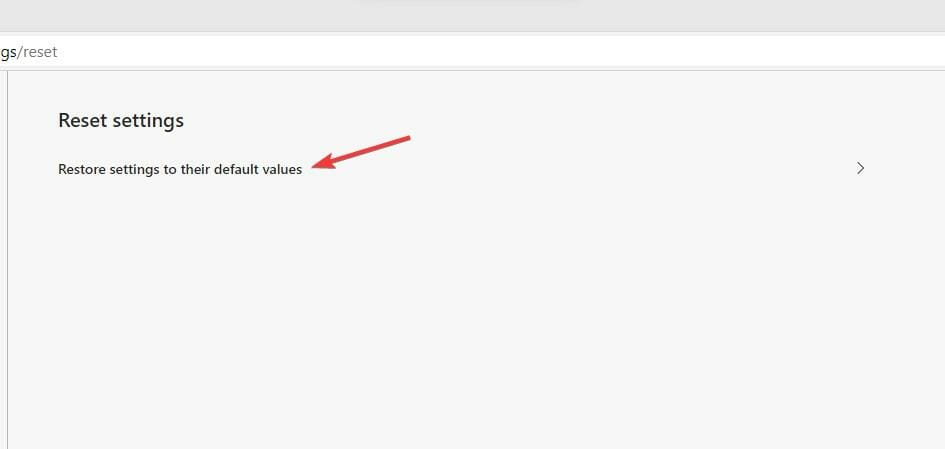
6.1. Use the edge://settings/reset command
- Open the Edge browser.
- Type the following command in the address brand and hit Enter.
edge://settings/reset
- Depending on your browser’s data, it will take a few minutes to pop up. Next, choose the Restore settings to their default values option.
- You will get a notification alerting you of the reset. Click on the Reset button.

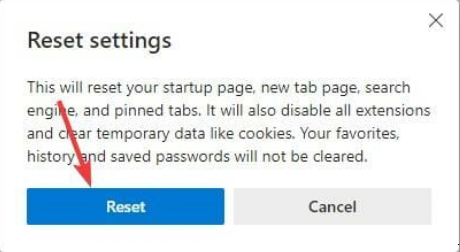
Resetting the Edge browser brings all the settings to default. It will clear all the tabs and delete all the cookies and cache, maintaining the history and the saved passwords.
Note that you may also have the error code out of memory Edge error on platforms like Xbox.
6.2. Use the Settings option
- Launch your browser and click on the Settings option.

- Click on the Reset settings option.

- Click the Restore settings to their default values.

- A reset pop-up will emerge. Click on the Reset button.


Once done, double-check to see if the error code out of memory error in Edge is fixed; if not, proceed to a different solution.
7. Change the page filing
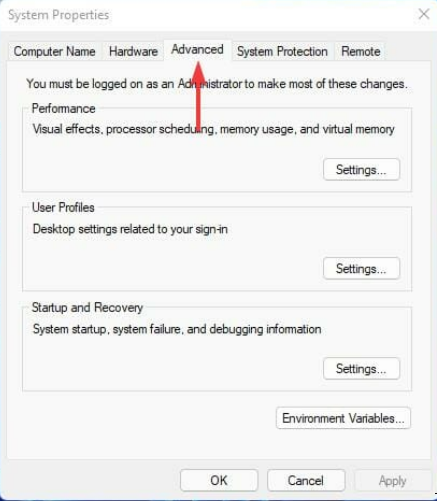
- Go to the Search button, search for Advanced System Settings, and hit Enter.

- Click on the Advanced tab.

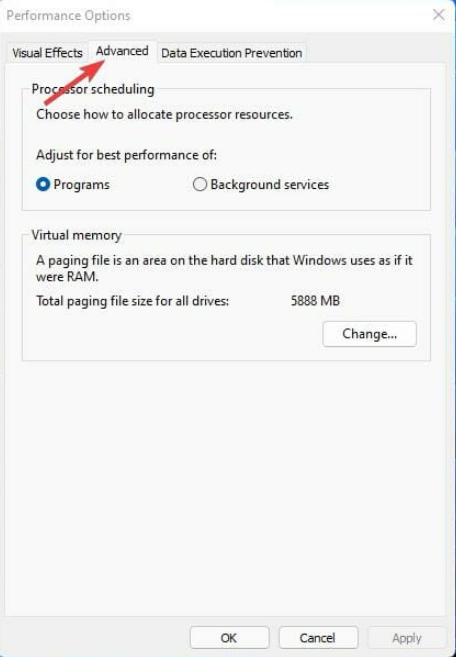
- Select the Settings button in the Performance section.

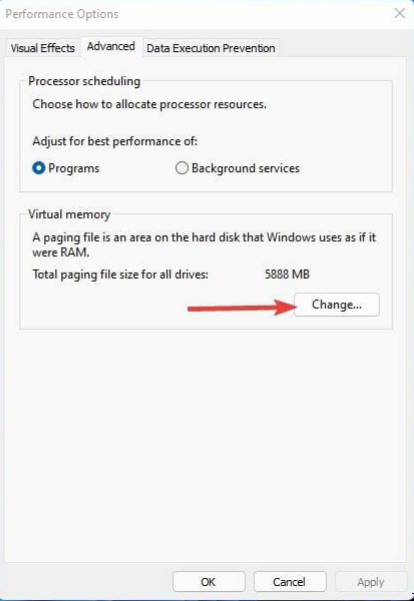
- Click on the Advanced tab.

- Hit the Change button.

- Untick the Automatically manage page file size for all drives option.

- Select the Custom size button and in the Initial size, enter the Recommended size. Then, on the Maximum size box, enter Currently allocated values.

- Click on the Set button, then OK to apply the changes.


Fixing the issue takes a few minutes when you do the right thing. However, it requires fewer skills, and anyone can fix it. The code comes in some variants; sometimes, you may have an error code that says this page is having a problem.
Users need to know that some errors occur when they browse, there is no need to panic but carry out the different troubleshooting methods.
However, it is good to reduce the resources, especially the hardware resources that also affect memory.
Before applying those fixes, when you encounter the problem, perform the basic troubleshooting first, like restarting the PC and browser.
Most browsers also have this issue, and you can use the same steps stated above to correct it. For example, you can check out how to solve the Server execution failed error on Chrome.
Which method helped you fix the error? Do not hesitate to let us know in the comments section below.
![]()
Newsletter
Learn how to get your Edge browser working properly again
by Loredana Harsana
Loredana is a passionate writer with a keen interest in PC software and technology. She started off writing about mobile phones back when Samsung Galaxy S II was… read more
Updated on December 21, 2022
Reviewed by
Vlad Turiceanu
Passionate about technology, Windows, and everything that has a power button, he spent most of his time developing new skills and learning more about the tech world. Coming… read more
- The Out of memory error code in Microsoft Edge occurs when your computer no longer has any spare memory to allocate to the browser or other programs.
- The leading causes of the error are memory-related and browser settings, and there are several ways of correcting the issue.
- How to fix Error code: Out of memory? For example, you may reset the browser using one of the methods below.
- Easy migration: use the Opera assistant to transfer exiting data, such as bookmarks, passwords, etc.
- Optimize resource usage: your RAM memory is used more efficiently than in other browsers
- Enhanced privacy: free and unlimited VPN integrated
- No ads: built-in Ad Blocker speeds up loading of pages and protects against data-mining
- Gaming friendly: Opera GX is the first and best browser for gaming
- Download Opera
Microsoft Edge shares some engines with the Chrome browser, making it use more memory and consume many of the PC resources.
When they open a new web page on the Edge browser, most users get the Out of memory error code. It makes the page not open, inconveniencing the user.
Most of the issues are memory-related and other Chrome settings, and they can go to the extent of slowing the machine due to the processes like network service.
There are several ways to fix this problem, and most methods involve troubleshooting the Edge settings to clear it.
Several issues related to the browser and memory cause this problem. Some of the problems include:
- Having a lot of Edge extensions and add-ons
- Opening many tabs in one window
- Lack of insufficient memory on your PC
- Using an outdated version of Edge
- Interference from the browser’s cookie and cache
What does Error code: Out of memory mean?
This error implies that the resources or memory available in the Edge browser are insufficient to obtain and open the requested web page. In other words, we can say you are out of memory, or there is a Microsoft Edge memory leak.
Because both RAM and hard drive space are casually referred to as memory, some users believe the error message refers to the memory in the hard drive.
Following that, some will begin to delete files from the computer to free up memory. While this will thin the hard drive, it will not resolve your browser’s Out of memory error code.
Moreover, here are some error variations that you may encounter, but nonetheless, fix with the solutions below:
- Error code out of memory Jupyter Notebook, PC, Windows 11, Windows 10
- Browser error code out of memory – Error code out of memory Edge, Chrome, Brave
- Error code out of memory Facebook, YouTube, Canvas, Cypress
- Error code out of memory chrome StackOverflow, PHP
Luckily, there are different ways to fix the issue and enjoy browsing seamlessly.
How do I fix error Out of memory?
- What does Error code: Out of memory mean?
- How do I fix error Out of memory?
- 1. Try an alternative browser
- 2. Clear cache and cookies on Microsoft Edge
- 3. Remove any extensions and add-ons
- 4. Reduce memory usage of the browser
- 5. Repair Microsoft Edge
- 6. Reset the Microsoft Edge browser
- 6.1. Use the edge://settings/reset command
- 6.2. Use the Settings option
- 7. Change the page filing
1. Try an alternative browser
Edge is a good and dependable browser, but if you continue to receive error messages, try a browser that focuses on performance.
With built-in CPU and RAM limiting features, Opera GX is one of the best alternatives. Moreover, you can enable it by opening the sidebar panel in just a few clicks.
Built to handle in-browser gaming and streaming without interruption, Opera GX also integrates standard browsing features.
You can bookmark your favorite pages, customize your experience with dedicated extensions, and use the instant messaging sidebar to communicate with your peers quickly.
The browser is also very much focused on privacy, with a built-in anti-tracking feature and a free VPN with unlimited bandwidth. The VPN will hide your IP and also help you bypass geo-blocks.
Opera GX
Browse error-free with this performance-oriented with dedicated CPU and RAM controls and industry-leading privacy features.
2. Clear cache and cookies on Microsoft Edge
1. Open the Edge browser on your PC.
2. Click on the Settings option.
3. Click on the Privacy, search, and services tab to provide more options.
4. Select the Balanced option from the three to improve your privacy.
5. Go to the Clear browsing data tab and click the Choose what to clear button.
6. A pop-up will display where you have to choose the Time range, check the Cookies and other site data and Cached images and files options.
7. After you made your selection, click the Clear now button.
Using a browser such as Microsoft Edge saves information from websites you visit in its cache and cookies. Clearing these can help with a website’s formatting and loading issues and make your browsing more secure.
Clearing cache removes all the Edge errors. So restart the browser and try to re-access the web pages to see if it’s solved.
We recommend CCleaner, a professional tool that automatically cleans your browser’s cookies, trackers, internet history, download history, and cache. Plus, this software can even delete individual session activity.
3. Remove any extensions and add-ons
- Open the Edge browser and click on the three-dotted lines.
- Choose the Extensions option.
- Look for the list of the Installed extensions.
- Click on the extensions button to turn it off, and you may also click the Remove button to uninstall them.
Most users use add-ons and extensions to improve their experience on the web and automate some processes with the help of the add-ons. But too many of them can affect the browser’s performance by using more memory allocated.
4. Reduce memory usage of the browser
- Launch your Microsoft Edge browser.
- Press Shift + Esc on the keyboard to open the Browser Task Manager.
- Locate the browser tab that uses a lot of memory, click on it, and click the End process button.
Some things that affect memory usage include ads, screen resolution, the tab’s content, windows size, number of browser tabs open, e.t.c.
5. Repair Microsoft Edge
- Press Windows key + I to open the Settings app.
- Click on the Apps tab.
- Click on the Apps and features tab.
- Select the Edge browser.
- Click on the three-dotted lines and select Modify.
- Click on the Repair button when you receive a pop-up.
- Edge Shortcut Keeps Appearing on Desktop: 5 Easy Fixes
- How To Stop Microsoft Edge From Running in Background
6. Reset the Microsoft Edge browser
6.1. Use the edge://settings/reset command
- Open the Edge browser.
- Type the following command in the address brand and hit Enter.
edge://settings/reset - Depending on your browser’s data, it will take a few minutes to pop up. Next, choose the Restore settings to their default values option.
- You will get a notification alerting you of the reset. Click on the Reset button.
Resetting the Edge browser brings all the settings to default. It will clear all the tabs and delete all the cookies and cache, maintaining the history and the saved passwords.
Note that you may also have the error code out of memory Edge error on platforms like Xbox.
6.2. Use the Settings option
- Launch your browser and click on the Settings option.
- Click on the Reset settings option.
- Click the Restore settings to their default values.
- A reset pop-up will emerge. Click on the Reset button.
Once done, double-check to see if the error code out of memory error in Edge is fixed; if not, proceed to a different solution.
7. Change the page filing
- Go to the Search button, search for Advanced System Settings, and hit Enter.
- Click on the Advanced tab.
- Select the Settings button in the Performance section.
- Click on the Advanced tab.
- Hit the Change button.
- Untick the Automatically manage page file size for all drives option.
- Select the Custom size button and in the Initial size, enter the Recommended size. Then, on the Maximum size box, enter Currently allocated values.
- Click on the Set button, then OK to apply the changes.
Fixing the issue takes a few minutes when you do the right thing. However, it requires fewer skills, and anyone can fix it. The code comes in some variants; sometimes, you may have an error code that says this page is having a problem.
Users need to know that some errors occur when they browse, there is no need to panic but carry out the different troubleshooting methods.
However, it is good to reduce the resources, especially the hardware resources that also affect memory.
Before applying those fixes, when you encounter the problem, perform the basic troubleshooting first, like restarting the PC and browser.
Most browsers also have this issue, and you can use the same steps stated above to correct it. For example, you can check out how to solve the Server execution failed error on Chrome.
Which method helped you fix the error? Do not hesitate to let us know in the comments section below.
![]()
Newsletter
Как правило, код ошибки Out of memory появляется при запуске многих игр и программ, в частности Mortal Kombat 9, DayZ, Minecraft, After Effects, Google Chrome и даже utorrent. Почему она возникает и что делать для ее устранения? Давайте разбираться.
В переводе на русский сбой означает «недостаточно памяти», что уже толкает на некоторые решения – увеличить объем оперативной, видео памяти или освободить место на диске «C». Но срабатывает это далеко не всегда, поэтому рассмотрим еще несколько вариантов исправления ошибки.
Содержание статьи
- Системные требования
- Плохая сборка
- Очистка Windows
- Дополнительные решения для Mortal Kombat
- Не запускается
- Зависает или вылетает
- Проверка микрофона
- Чистая загрузка
- Сканирование на ошибки
- Устранение неполадок
- Файл подкачки
- Диагностика ОЗУ
- Редактирование реестра
- Комментарии пользователей
Системные требования
Удостоверьтесь, что компьютер удовлетворяет системные требования игры. Например, если для нормальной работы приложения требуется 4 ГБ оперативной памяти или 2 ГБ видео памяти, а на компьютере стоит в 2 раза меньше, то очевидно проблема в этом.
Вариантов решения здесь несколько:
- Выполнить апгрейд компьютера.
- Понизить качество игровых настроек.
- Закрыть все открытые программы, изменить версию Windows или оптимизировать ее, чтобы сэкономить больше ресурсов.
Плохая сборка
Работоспособность программы также зависит от сборки. В идеале если это оригинальная версия. Но как обычно бывает, используются взломанные сборки «рэпаки». В таком случае попробуйте скачать и установить другую версию.
Очистка Windows
Попробуйте удалить сбойную программу через любой деинсталлятор. Затем воспользуйтесь программой для очистки системы и исправления проблем в реестре, например, «ccleaner». После этого перезагрузите ПК и установите заново нужное приложение. Редко, но это помогает.
Дополнительные решения для Mortal Kombat
Более подробно разберем некоторые способы касающиеся игры мортал комбат 9. Поскольку чаще всего именно при запуске этой игры возникает ошибка out of memory.
Нехватка памяти и неподдерживаемое разрешение экрана
- Нажмите «WIN + R», введите %appdata% и щелкните «Ок».

- Найдите папку «MKKE» и откройте файл dxdiag.txt через блокнот.
- Найдите строку «Dedicated Memory», укажите значение «1024» и сохраните изменения. Закройте файл.
- Нажмите правой мышкой по dxdiag.txt и откройте «Свойства».
- В графе «Атрибуты» установите галочку «Только чтение» и щелкните «Ок».

Проверьте, есть ли результат.
Не запускается
Если MK запускался только один раз после установки, то скорее всего сбились настройки.
- Входим в папку appdata, как это делали выше.
- Открываем через блокнот файл «options.ini», находим строку max_texture и после знака «=» выставляем значение «1024». Должно получиться так: max_texture = 1024.
Зависает или вылетает
- Заходим в папку appdata, как это делали ранее и открываем в блокноте «options.ini».
- Находим строку configured = false и меняем значение на «true». В итоге получится так: configured = true.
- Сохраняем изменения и проверяем результат.
Проверка микрофона
Mortal Kombat очень чувствителен к микрофону. Если он включен, то отключите его, выдернув провод из гнезда.
Иногда, наоборот, помогает подключение микрофона к гнезду. Особенно в случае с ноутбуками.
Чистая загрузка
Попробуйте выполнить чистую загрузку. Это избавит от приложений и их служб, грузящих систему.
- Нажмите «Windows + R», введите msconfig.
- Откройте вкладку «Службы», скройте службы Microsoft и выберите «Отключить все».

- Затем пройдите в «Автозагрузку» и избавьтесь от сторонних приложений.

- Перезагрузите ОС и проверьте результат.


Сканирование на ошибки
Неполадку способны вызывать поврежденные системные файлы. Их также желательно проверить.
- Открываем командную строку «WIN+R — CMD».
- Вводим sfc /scannow и жмем «Enter».

- Если по завершении служба сообщит, что восстановление не удалось, то выполните еще одну команду — DISM /Online /Cleanup-Image /RestoreHealth.


После того, как все будет сделано, перезапустите ПК.
Устранение неполадок
Воспользуйтесь автоматическим средством по устранению неполадок, которое предоставляет Microsoft.
- Откройте панель управления через меню «Пуск» или «Поиск»
 .
. - Перейдите в раздел «Устранение неполадок».

- Нажмите по просмотру всех категорий.
- Выберите «Обслуживание системы».
- Откроется окно с мастером диагностики, выполните процедуру до конца и перезапуститесь.


Файл подкачки
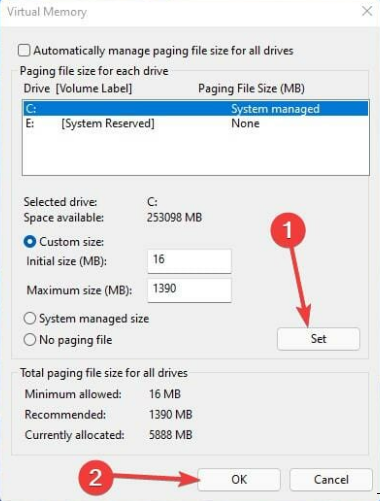
Возможно, ОС не хватает объема виртуальной памяти. Следует его увеличить.
Как это сделать:
- Запускаем окно «Выполнить» и вводим «sysdm.cpl».
- Перемещаемся в «Дополнительно» и в разделе «Быстродействие» щелкаем кнопку «Параметры».

- Снова переходим в «Дополнительно» и в разделе «Виртуальная» щелкаем «Изменить».

- Выделите диск с Windows и активируйте пункт «Указать размер». В обеих строках введите значение выше текущего, в моем случае это будет «4096».


Также можно позволить ОС автоматически выбирать его размер. В большинстве случаев это работает еще лучше.
Диагностика ОЗУ
Иногда, out of memory возникает из-за поврежденной оперативной памяти. Рекомендую провести диагностику.
Существуют два способа, как это можно сделать.
- Пользователям Windows 10 и 8 доступно штатное средство. Запускается через «WIN + R — mdsched.exe».
- Более универсальным методом является диагностика через утилиту «Memtest86».

Однако эти программы не всегда выявляют дефекты. Обнаружить их получается вынув одну планку ОЗУ или переставив ее в другой слот.
Редактирование реестра
Добиться нормальной работы ОС можно через правку реестра. Если вы решитесь на это, будьте осторожны, неправильные действия могут вывести операционку из строя.
- В поиске введите «regedit» и откройте редактор.

- Пройдите в ветку HKEY_LOCAL_MACHINESYSTEMCurrentControlSetControlSession ManagerSubSystems
- Выберите «Windows» и следом «Изменить».

- Найдите запись SharedSection, увеличьте второе и третье значение.


К примеру, SharedSection=aaaa,bbbb,cccc
Для x32 разрядной системы меняем следующие значения:
- bbbb на 12288
- cccc на 1024
Для x64:
- bbbb на 20480
- cccc на 1024
Нажмите «Ок» и перезагрузите компьютер.
Бывает, что ничего не помогает устранить ошибку. В таких случаях ничего не остается, кроме переустановки операционки или ее обновлении.
Здравия ДТФ, произошла проблема при которой вылетают игры Borderlands 3 и PUBG с ошибками run out of memory, компьютер Ryzen 7 1700 GTX 660 2gb 16gb ddr4 2400, с недавних пор эта проблема проявляется в этих играх (в других не проверял) буквально через 1.5 часа что крайне раздражает и не позволяет нормально играть, файл подкачки до этого убавлял до 2 гигов ибо изначально автоматом ставило почти 30ГБ файла. После изменения файла игралось все стабильно и по гиганстким сессиям.
В чем проблема и как решить?
p.s в стресс тестах стабильности системы аида 80 минут беспрерывно с включенным браузером все было ок, загрузки проверял больше 70% озу не ест
“Are you searching for solutions on how to fix out-of-memory errors in Windows? if yes, then this is the perfect place for you to read the complete article and know the solution how to resolve error code out of memory.”
Out-of-memory error is an often unwanted state of computer performance. Where no additional memory can be assigned for use by applications or the Windows operating system. Such a system will be not able to load any additional programs, and many programs may load additional data into memory during execution. These will discontinue functioning appropriately. This usually occurs because all available memory, including disk swap space, has been distributed.

Most of the users may receive an out-of-memory error message because of the desktop heap disadvantage. When you open many programs on Windows, you may be unable to open any other additional Windows. Sometimes, a wizard may open. However, it will not consist of the expected elements. So, in this article, we will be going to discuss the free technique to resolve the out-of-memory error in Windows 10, 8, 7, etc.
Note:- Restore virus-infected data from hard drive
Reasons of Out of Memory Error
The main reason for out-of-memory errors is a little bit complex. The WIN32 subsystem of Windows has a limited amount of memory obtainable. If the memory in the desktop heap of the WIN32 subsystem is fully utilized. Windows might pop up an error saying Out of memory.
Computers running resent MS Windows operating systems are not too unprotected though. This issue mainly exists for users of Windows NT 3.5, and Windows NT 3.1.

When you run a large number of Windows-based applications, Out of Memory error messages are displayed. When you attempt to start new programs and try to utilize programs that are already running, even though you still have plenty of physical and page file memory accessible.
Also Read:- Restore HDD files from Dead PC
Important Note:
Be conscious while dealing with out of memory error. Because data loss can occur. Download the trustworthy hard drive data recovery tool and secure your vital files. It is very easy to use non technical users can also use this utility to restore data from hard disk that won’t boot Windows:-
Download Now
Purchase Now
Steps to Recover Lost Data from Computer
Free Solution to Fix Out of Memory Error Effectively
To repair this tiresome error such as memory error in Windows 10, 8, 7, etc. In this segment, we have discussed some steps. You just need to follow all of them in sequence to get a positive outcome. All the steps are provided in a descriptive manner:
Step 1: First of all, navigate to the Start and type “Regedit” in the start search box, and then click on regedit.exe in the Programs list. Press Windows key + R and in the Run dialog box add Regedit, and click on OK.
Step 2: Now, locate after that hit on the following registry subkey:
“HKEY_LOCAL_MACHINESYSTEMCurrentControlSetControlSession ManagerSubSystems”

Step 3: Here, right-click the Windows entry, and click on Modify.
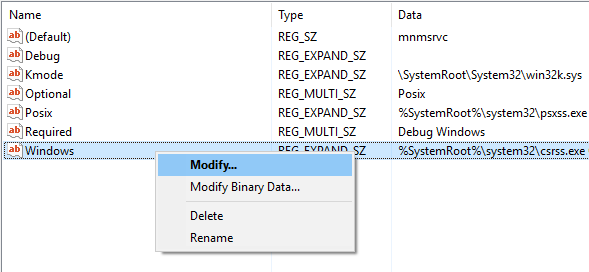
Step 4: Then, in the Value data segment of the Edit String dialog box, go to the SharedSection entry, after increasing the second and third value for this entry.

• SharedSection utilizes the following format to indicate the system and PC heaps:
SharedSection= xxxx, yyyy, zzzz
Operating Systems
yyyy Value
zzzz value
For 32-bit
Increase the yyyy value to “12288”
Increase the zzzz value to “1024”
For 64-bit
Increase the yyyy value to “20480”
Increase the zzzz value to “1024”
More Information:
- The initial SharedSection value 1024 states that the heap size is common to all computers. This contains the global handle table (Window handles are unique machine-wide) and shared system settings (such as SystemMetrics). It is probably, that you would never want to change this value.
- The second value of the SharedSection registry entry is the size of the desktop heap for each and every computer that is integrated with an interactive Window station. The heap is needed for every desktop that is generated in the interactive window station (WinSta0). The value is in kilobytes “KB”.
- The third SharedSection value 512 controls the size of the desktop heap for each computer that is integrated with a non-interactive window station. If this value is not present, the size of the desktop heap for non-interactive window stations will be the same as the size particularized for interactive window stations (the second SharedSection value).
- We expand the second value of the SharedSection registry entry to 20480 and enlarge the third value of the SharedSection registry entry to 1024 in the automatic fix.
Final Verdict
Sometimes, users may encounter this kind of error, when they are working on their computer. Mainly, in this article, we emphasize the free technique to repair memory errors instantly. You can easily perform the repairing task but, it contains some highly technical terms. So, it is better to take backup in advance. If in case, you forget to take backup and may lose your data. Then, do not worry you can take help Windows Data Recovery Tool to Enable TRIM on Windows.
Содержание
- Ошибка 0x00000e9 при включении ПК
- Устранение ошибки 0xc00000e9 на Windows 7, 8, 10
- Причины появления 0xc00000e9
- Как исправить ошибку 0xc00000e9
- Программный способ решения поставленной задачи
- Физический способ
- Ошибка 0xc000000e (. winload.efi) после включения компьютера, Windows не стартует (надпись «Recovery, Your PC/Device needs to be repaired»)
- Что делать с ошибкой 0xc000000e
- ШАГ 1
- ШАГ 2
- ШАГ 3
- Если при попытке восстановления (запуска командной строки) — появилось требование ввести КЛЮЧ
- Если в меню загрузки будет появляться 2 ОС
- ШАГ 4: универсальный вариант восстановления загрузчика
- [FIX] There Was A Problem With A Device Connected To Your PC. An Unexpected I/O Error Has Occurred.
- Recovery
- There was a problem with a device connected to your PC
- An unexpected I/O error has occurred.
- Error code: 0xc00000e9
- FIX : There Was A Problem With A Device Connected To Your PC. An Unexpected I/O Error Has Occurred In Windows 10
- FIX 1 – Perform Automatic Repair
- FIX 2 – Repair Boot Records
- FIX 3 – Refresh Windows 10
- About Kapil Arya
- Исправляем ошибку 0xc0000e9 при загрузке Windows 7, 10
- Описание ошибки
- Отключите функцию защиты ELAM
- Проблемы при установке
- Исправление ситуации с помощью разнообразных программ
- Проблемы в работающей системе
- Windows 7
- Windows 10
- Проверяем шлейфы
- Маловероятные причины и кардинальные решения
- IO Error Symptoms
- Method 5 Cleaning out Windows Registry
- Solution 2 Change your BIOS settings
- Common Causes of the 0xc00000e9 Unable to Boot Error
- Solution 5 Fix the MBR with Windows PE
- Repair your Errors automatically
- Solution 4 Run a disk check
- Windows 10 Boot Error 0xc000000e
- Perform the Automatic repair
- Rebuild the Boot Configuration Data
- Method 1 Checking the Compatibility of your Hardware
Ошибка 0x00000e9 при включении ПК
Проблема при включении ПК
Recovery
There was a problem with a device connected to your PC
An unexpected I/O error has occurred.
File:BootBCD
Error code: 0xc00000e9
This problem can happen when a removable storage device is removed while it’s in use or is failing. Properly connecting any removable storage and restarting your PC may fix this problem.
Кто сталкивался с такой проблемой, помагите пожалуйста, заранее спасибо.
1) Отсутствие контакта между материнской платой и приводом или винчестером ПК. В такой ситуации неприятность может проявить себя при установке Windows 7 или будет обнаружена ошибка взаимодействия с устройством.
2) Повредилась поверхность жесткого диска – error code будет возникать сразу при запуске OS.
3) Повреждения контроллера стационарного накопителя информации.
4) Возникновение конфликтной ситуации при установке операционки, например, при загрузке Windows 7 на ноутбуке.
5) Не удалось загрузить Windows, поскольку файл реестра системы имеют повреждения, не совместимые с полноценной функциональностью.
Учитывая, что file boot bcd status 0xc00000e9 может возникать по совершенно не похожим причинам, рассмотрим два варианта исправления.
1) Программный способ решения поставленной задачи:
В этой части мы рассмотрим решение проблем, связанных с 4-6 пунктами. Осуществить проверку операционки на наличие вредоносных программ с помощью хорошего и актуального антивирусника.
Что делать, если статус неприятности продолжает себя проявлять? Переходим дальше. Если возникла неожиданная ошибка ввода/вывода с этим кодом, то необходимо выполнить пошаговое лечение:
1) Проверить и, в случае необходимости, провести редактирование реестра. Можно сделать это в ручном режиме, если человек обладает достаточными познаниями в этом вопросе или скачать одну из профильных программ, которая выполнит эту работу полностью автоматически.
2) Попробовать откатить установленную OS до ее ранее работоспособного состояния.
3) Выполнить проверку с помощью команды sfc /scannow.
4) Если проблема связана с boot bcd, то зайти в BIOS и вернуть первоначальную конфигурацию.
5) Если ничего не помогает, то рекомендуется запустить процесс переустановки операционной системы, желательно из проверенного источника, который зарекомендовал себя повышенной надежностью.
Не помогло? Тогда переходим к 1-3 вариантам, описанных выше.
Первый шаг – проверка целостности SATA кабеля. Для этого необходимо открыть боковую стенку PC и проверить его на другом оборудовании. При возможности – установить новое изделие.
Второй шаг – проверка винчестера на наличие поврежденных секторов. Эту процедуру можно выполнить одной из множества доступных сегодня программ: Victoria, MHDD, или их аналогами.
Последний вариант – очистка контактов накопителя от возможного окисления или загрязнения.
Если не один из способов не смог излечить компьютер, то существует высокая вероятность того, что жесткий диск PC имеет непоправимые повреждения, которые можно устранить только приобретением нового оборудования.
Источник
Устранение ошибки 0xc00000e9 на Windows 7, 8, 10
Разношёрстные «экраны смерти» и прочие ошибки всегда доставляют неудобства и говорят о неисправностях различного характера, но в большинстве случаев с возникшими трудностями можно справиться своими силами, не привлекая специалистов сервиса. С ошибками BSOD сталкиваются пользователи любой из версий Windows и причины этого неприятного явления могут быть самыми разными. Сбои, появляющиеся при различных условиях, сопровождаются сообщением с кодом и описанием проблемы. От содержания текста во многом зависит, в каком направлении следует двигаться при решении задачи и важным моментом для быстрого устранения неприятности является определение причины. Один из таких сбоев возникает под кодом 0xc00000e9 и может свидетельствовать как о программных проблемах, так и аппаратных неисправностях устройства. «Непредвиденная ошибка ввода-вывода» или ошибка 0xc00000e9 – не редкое явление, с которым пользователи Windows могут «познакомиться» при установке, обновлении системы или уже во время её эксплуатации. Способов решения проблемы несколько, каждый из них будет эффективен в различных условиях, поэтому конкретнее помочь в поисках источника неисправности поможет отслеживание предшествующих сбою событий.

Методика устранения ошибки 0xc00000e9 на Windows.
Причины появления 0xc00000e9
Возникший сбой BSOD, отображающий состояние 0xc00000e9 с соответствующим уведомлением на экране сопровождается сообщением о некорректности взаимодействия с устройством, которое было подключено к ПК или ноутбуку, при этом совсем не факт, что к девайсу в действительности что-либо подключалось. Текст ошибки говорит о возможных причинах в проблемном подключении накопителей (внешних устройств USB и прочих), при их использовании или сбоях в функционировании оборудования, например, жёсткого диска или дисковода, в связи с чем, рекомендуется проверить корректность подключений и выполнить перезагрузку. В сведениях о сбое будет констатация этого факта – возникла неожиданная ошибка ввода-вывода. Больше ни о чём конкретном нам текст на экране не говорит, но можно сделать вывод, что это скорее аппаратная проблема. Не исключено и, что мы имеем дело с программным сбоем. Причин, по которым появляется ошибка с кодом 0xc00000e9, предостаточно, наиболее вероятны следующие из них:
Ошибка взаимодействия с устройством, обнаруженная ввиду отсутствия контакта жёсткого диска с материнской платой, появляется при установке Windows 7, 8, 10. В такой ситуации следует воспользоваться рекомендацией проверить корректность подключения. В случае повреждений жёсткого накопителя или выхода из строя его контроллера система информирует об ошибке 0xc00000e9 при каждом запуске Windows 7 (или другой версии операционной системы). Сбой будет появляться снова, пока пользователь не примет соответствующие меры, поэтому с решением вопроса затягивать не стоит. Ошибка 0xc00000e9 при загрузке Windows 7, возникшая вследствие конфликта в процессе установки дистрибутива характерна для ноутбуков. В связи с наличием нескольких «подозреваемых», способных спровоцировать проблему, чтобы точнее определить источник неприятности, важно учитывать условия появления сбоя.

Как исправить ошибку 0xc00000e9
Поскольку частыми виновниками сбоя при загрузке системы являются подключённые периферийные устройства, их следует отключить от компьютера или ноутбука и выполнить перезагрузку. Если ОС запустилась нормально, устройство можно подключить снова, но в дальнейшем оно не должно быть подключено на момент старта Windows. Это самое простое, что можно сделать при возникшей неисправности в таких условиях, и если источником сбоя является другой фактор, он может быть устранён одним из методов, рассмотренных далее. Чаще всего пользователь не может с ходу определить, в чём конкретно причина неполадки, поэтому приходится пробовать несколько способов, решающих проблему в том или ином случае. Рассмотрим, как можно решить проблему средствами Windows и сторонними инструментами, а также путём физического вмешательства.
Программный способ решения поставленной задачи
Вариант устранения ошибки, имеющей код 0xc00000e9, подойдёт в зависимости от её первоисточника, так что если вы столкнулись с данным сбоем и его причина неясна, выполните следующие действия:
Доступ к возможностям восстановления системы у Windows 10 проще, чем у Семёрки, хотя меню при запуске с загрузочного накопителя вначале не слишком отличается. В режиме восстановления здесь нужно выбрать раздел «Поиск и устранение неисправностей», перейдя в который мы получим целый арсенал инструментов для реанимации Windows. Можно выбрать командную строку, восстановление при загрузке и прочие варианты, можно также вернуться к предыдущей сохранённой точке и откатить операционную систему на тот момент, когда всё работало без сбоев. Если ОС загружается, отправить ОС в «прошлое» можно, используя службу Windows. В случае с «Десяткой» рекомендуется также установить последние обновления системы.

Физический способ
Ошибка с кодом 0xc00000e9 независимо от того, какая на устройстве стоит ОС, 7 или 10 версии, часто возникает по аппаратным причинам. Рассмотрим, как исправить сбой в таком случае.

В большинстве случаев вышеперечисленные способы помогают устранить проблему, но если ни один из них не оказался эффективным, вероятно, что жёсткий диск имеет сильные физические повреждения, которые уже не исправить и полный выход устройства из строя теперь лишь вопрос времени. Поэтому как можно скорее следует скопировать важные данные со старого HDD на исправный накопитель.
Источник
Ошибка 0xc000000e (. winload.efi) после включения компьютера, Windows не стартует (надпись «Recovery, Your PC/Device needs to be repaired»)
 Доброго времени!
Нередко при работе с разделом диска, на котором установлена ОС Windows (перенос/миграция ОС, подключение доп. диска и пр.) — при включении ПК появляется синее окно «Recovery. « и код ошибки 0xc000000e (пример на скрине ниже в статье 👇). Разумеется, дальше Windows не загружается и ждет от вас какого-нибудь решения.
Как правило, такое «поведение» Windows связано не с повреждением каких-то значимых файлов ОС, а с тем, что том был привязан к определенной букве, и когда система была перемещена на др. диск (скажем так для примера) — эта «связь» нарушается и на старте получаем ошибку.
Не так давно, как раз разбирался с этим «добром», попутно сделав несколько фото. Думаю, эта небольшая заметка сможет помочь тем, кто столкнулся с нечто подобным. 👌

Что делать с ошибкой 0xc000000e
ШАГ 1
Для начала отключите от ПК (ноутбука) все подключенные к нему накопители (флешки, внешние жесткие диски, и пр.). Попробуйте перезагрузить устройство. Снова ошибка?
После обратите внимание на нижнюю часть окна — как правило там есть пункт, позволяющий нажать на кнопку ESC и попасть в BIOS (UEFI). Это нам и нужно.

Пример ошибки, переход в настройки BIOS (0xc000000e, Winload.efi, Recovery: Your PC/Device needs to be repaired)

Ваш компьютер или устройство необходимо восстановить // Пример ошибки на русском (0xc0000225, Winload.efi)
После нужно сохранить настройки и попробовать перезагрузить устройство.

Проверка настроек UEFI | Ноутбук Asus | Кликабельно


👉 Кстати, еще один важный момент!

ШАГ 2
Если корректировка настроек BIOS не увенчалась успехом — далее для работы нам понадобиться установочная флешка с Windows. Такую флешку обязательно нужно иметь в своем арсенале! (про запас 👌)
1) Создание загрузочной USB-флешки Windows 10 — несколько способов
2) Создание установочной флешки с Windows 11 — см. инструкцию

Далее перейти в меню поиска и устранения неисправностей.

Поиск и устранение неисправностей
В нем есть две ключевых вкладки:

ШАГ 3
Если ОС по-прежнему не загружается — стоит попробовать вручную привязать ОС Windows к нужному тому. Делается это не так уж и сложно.

После нужно ввести (очень внимательно) следующую команду (и нажать Enter 😉):
bcdboot D:windows /s Z: /f UEFI
Примечание : вместо «D» нужно указать тот том, на котором у вас установлена Windows (далеко не всегда это диск «C»). Вместо «Z» — букву тома ESP (мы его задали при использовании DISKPART, чуть выше 👆).

Привязка целевого раздела Windows
Если при попытке восстановления (запуска командной строки) — появилось требование ввести КЛЮЧ
Похожее окно может появиться в том случае, если ваш диск был зашифрован ( прим. : BitLocker сегодня может активироваться на современных устройствах под Windows 10/11 автоматически!).
В этом случае для вас восстановление ОС чуть усложняется. Сначала вам необходимо будет узнать свой ключ и ввести его в соответствующую строку. О том, как его узнать — 👉 см. эту заметку!

Ключ восстановления — ввести или загрузить
Если вы решите не вводить ключ расшифрования и пропустите этот шаг — диск будет недоступен для работы (файловая система отобразиться как «Unkno» 👇).

Если в меню загрузки будет появляться 2 ОС
Ах да. чуть не забыл.

Выбор ОС Windows 10 при загрузке
А чтобы это окно вас не донимало — после загрузки Windows зайдите в проводник и откройте свойства «Моего компьютера», и перейдите в доп. параметры (👇).
Альтернативный вариант : нажать Win+R и использовать команду sysdm.cpl

Доп. параметры системы
Далее откройте параметры загрузки и восстановления и измените время отображения списка ОС (лучше всего установить время в 1 сек. В этом случае и меню будет пропадать быстро, и, если что не так — вы всегда сможете до него добраться 👌).

Отображать список ОС 1 сек.!
ШАГ 4: универсальный вариант восстановления загрузчика
Этот способ актуален даже в том случае, если у вас слетел системный EFI раздел (и компьютер при включении сообщает, что он вообще не нашел ни одного загрузочного устройства, см. пример ниже 👇)!
Правда для работы нам понадобиться LiveCD-диск (ссылка на нужный).

The system cannot find any bootable devices — система не может найти на одного загрузочного устройства
Загрузившись с LiveCD — для начала необходимо запустить утилиту MiniTool Partition Wizard и посмотреть, что там с разделами.

Запускаем программу MiniTool Partition Wizard
Обратите внимание на тот диск, на котором у вас установлена Windows. Обычно в его начале должен идти раздел на 100÷512 МБ в FAT32/NTFS (см. скриншот ниже: в моем случае раздел «слетел» и отображается как «Незанятый»).

Находим системный раздел EFI
Если у вас тоже файловая система отображается как «Незанятая» — необходимо будет кликнуть по этой области ПКМ и создать раздел:

Создать раздел (если GPT — FAT32, если MBR — NTFS, активный)

Далее необходимо запустить другую утилиту — Dism++.


Восстановление загрузки (Dism++)

В моем случае он идет первым (чуть ранее мы его создали в MiniTool Partition Wizard).

Выбираем наш подготовленный раздел
Если увидите окно с сообщением об успешном восстановлении загрузки — задача выполнена! 👌

Восстановление загрузки успешно восстановлено!
После выкл. и вкл. устройства — Windows начала загружаться в штатном режиме без каких-либо ошибок.

Если вы решили вопрос как-то иначе — чиркните в комментариях хоть пару слов (заранее благодарю!).
Источник
[FIX] There Was A Problem With A Device Connected To Your PC. An Unexpected I/O Error Has Occurred.
3 Comments · Updated: February 22, 2017 · 02:40 PM IST \ Applies to: Troubleshooting, Windows 10
When your machine is not able to connect with hardware devices associated with it, your computer will boot into recovery mode. Under this condition, an error message followed by the code is displayed on the typical blue recovery screen as shown below. In this article, we’ll discuss this problem and try to resolve it with easiest possible solutions. Here is the error screenshot for the reference:
Recovery
There was a problem with a device connected to your PC
An unexpected I/O error has occurred.
Error code: 0xc00000e9
This problem can happen when a removable storage device is removed while it’s in use or failing. Properly connecting any removable storage and restarting your PC may fix this problem.

You may come to this screen when any of following things happen:
So if you’re victim of this issue, the first thing you should do is to check the external device connection(s) physically as suggested by the error message itself. Ensuring proper connectivity and many times, rebooting machine can also solve this issue. However if the problem still exists, here are the advanced options you can try:
FIX : There Was A Problem With A Device Connected To Your PC. An Unexpected I/O Error Has Occurred In Windows 10
FIX 1 – Perform Automatic Repair
The safest option you have to deal with such kind of error is to go ahead with Automatic or Startup repair. You’ll need to boot using System Recovery Drive or Windows 10 installation media, in case if your PC is not bootable with the OS.

Check following guide to perform Startup repair:
FIX 2 – Repair Boot Records
Generally error 0xc00000e9 is associated with Boot Configuration Data (Boot/BCD) file. Hence re-creating the boot records can help you magically with this problem. Repairing Master Boot Record aka MBR can be easily done with the help of steps mentioned in following guide:

FIX 3 – Refresh Windows 10
If even after trying FIX 1 & 2 you don’t find any differences in situation, you can opt for Refresh or reinstalling Windows 10 without affecting your data. You can perform Refresh from Settings > Update & security > Recovery from a OS bootable system, while you can also try same thing from Advanced Recovery Options for a non-bootable machine. Here is the guide for that:

Hope something helps!

About Kapil Arya
Kapil is presently a Microsoft MVP in Windows IT Pro expertise. He is Windows Insider MVP as well, and author of ‘Windows Group Policy Troubleshooting’ book. In 2015, Microsoft India accomplished him as ‘Windows 10 Champion’. Being passionate Windows blogger, he loves to help others on fixing their system issues. You can follow him for news/updates and fixes for Windows.
Hello! I get the same blue screen. Format my disk and try to install Windows 10 from scratch, but same screen appears. What I can do? (I tried the disk on another machine: ok; another disk on my laptop, same problem. I tried linux, and it boots fine so it is not the laptop). Help accepted
^^ If any external device attached to system, try removing it and see if it makes any differences.
With or without connected devices it is the same. It was possible to install w7 but when changing to w10 the error returns.
Источник
Исправляем ошибку 0xc0000e9 при загрузке Windows 7, 10
К самым неприятным нюансам при работе с ОС Windows следует отнести те, которые, вообще, не позволяют запустить операционную систему. Именно такой часто является ошибка 0xc000000e. Впервые столкнувшись с ней, понять причины возникновения достаточно трудно. А борьба с неполадками такого характера должна вестись «с нескольких сторон». Это значит, что стоит применить сразу несколько способов исправить проблему. О них и пойдёт речь.

Причины возникновения и методика устранения ошибки Windows 0xc000000e.
Описание ошибки
Большая часть владельцев ПК при возникновении ошибки даже не пытается вникнуть в содержимое ее описания, появившееся на мониторе. Текст на иностранном языке по умолчанию считается непереводимым или бесполезным. Хотя в данном случае Microsoft дает короткое, но емкое описание проблемы и рецепт ее устранения.
Код ошибки 0xc00000e9 означает, что у ОС проблемы с подключением устройства ввода-вывода информации. Понять это можно, использовав переводчик от Google или Яндекс. Далее приводится перечень вероятных «виновников» проблемы и стандартная рекомендация по перезагрузке.
Не будь ошибка столь «универсальной», этой информации пользователю вполне бы хватило, чтобы ее устранить. Беда в том, что причин, приводящих к ее появлению, гораздо больше, чем содержится в описании.
Отключите функцию защиты ELAM
В том случае, если первый и второй метод не помогли решить проблему—попробуйте отключить технологию ранней защиты от вредоносного ПО — ELAM (Early-launch Anti-Malware ), которая по умолчанию активна.
Примечание. Технология ELAM – позволяет сертифицированным антивирусам загружаться до запуска всего стороннего ПО. Антивирус в этом случае может выполнять раннюю антивирусную проверку и контролировать запуск драйверов и загружаемого ПО.
Проблемы при установке
Проще всего разобраться с тем, как исправить данную ошибку, можно в момент установки операционной системы. Периферия еще не подключена, следовательно, выбор устройств I/O ограничен. Status 0xc00000e9 при установке Windows 7 или 10 может быть вызван следующими причинами:
Возможных источников проблем не так много, следовательно, «вычислить виновника» достаточно просто:
Исправление ситуации с помощью разнообразных программ
Давайте сразу исключим возможное влияние вирусов: устанавливаем хороший антивирусник, диагностируем систему.
Дальше, если возникла неожиданная ошибка ввода/вывода именно с кодом 0xc00000e9, действуем следующим образом:
При продолжении возникновения неприятной ситуации скачиваем Victoria или MHDD. Запускаем проверку. Последний вариант – попытка переустановки операционной системы. Обязательно следует использовать надежный источник. При невозможности завершения установочного процесса, скорее всего, придется распрощаться с жестким диском и бежать в магазин за новым винчестером.
Знаете английский? Тогда вам может помочь это видео:
Проблемы в работающей системе
Уже установленная и работающая ОС может подкинуть «сюрприз», выдав такую ошибку в момент очередной загрузки. В этом случае первым делом следует отключить периферийные устройства, чтобы исключить возможные источники появления проблемы. Если после перезагрузки система не загрузилась в нормальном режиме, следует переходить к более серьезным действиям.
Windows 7
Ошибка 0xc00000e9 при загрузке Windows 7 говорит о возможных проблемах в работе аппаратной конфигурации. Рассмотрим методы ее исправления, сгруппированные по степени сложности и эффективности.
Выбираем безопасный режим с поддержкой командной строки, отмеченный на скриншоте. После запуска потребуется ввести команду проверки диска на ошибки и подтвердить свои действия.
Поскольку в этом режиме меню «Пуск» отсутствует, третьей командой ПК отправляется в перезагрузку. В результате Windows выполнит проверку жесткого диска на наличие ошибок и поврежденных секторов с попутным восстановлением данных. Операция выполняется в пять этапов, а скорость ее завершения зависит от состояния и объема HDD.
Если компьютер загрузится без ошибок, для очистки совести можете выполнить проверку целостности системных файлов.
Таким образом, вы дополнительно убедитесь, что ошибка не вызвана проблемами в работе самой Windows.
Выбираете пункт, отмеченный на скриншоте, чтобы войти в режим восстановления системы.
Здесь можно последовательно опробовать два выделенных варианта. Если не сработает первый, второй восстановит ОС в устойчивом состоянии с использованием точек System Restore.
Windows 10
Сообщение об ошибке 0xc00000e9 при загрузке Windows 10 вызывается теми же причинами, что и в предыдущих версиях. Отличие заключается в технологии ее устранения. Быстрая загрузка исключает использование клавиши F8. Чтобы войти в режим восстановления сразу, потребуется установочный носитель. Исключением из этого правила могут стать ноутбуки. Часть производителей встраивает в свои модели механизм защиты, который при двух неудачных попытках загрузки ОС автоматически запускает режим восстановления. На десктопе такого «подарка» вам никто не сделает.
Проверяем шлейфы
В настройках БИОС можно обнаружить, что жесткий диск не числится в списке устройств. Соответственно, загрузка с него не может быть произведена. В таком случае необходимо проверить подключено ли комплектующее физически, а именно, не отключены ли шлейфы.
В первую очередь понадобится разобрать компьютер или ноутбук. Жесткий диск подключен к материнской плате при помощи шлейфов. Пользователю необходимо убедиться в их работоспособности. Для этого, следует отключить их, а затем, подключить заново. При это рекомендуется убедиться, что сам шлейф не поврежден.
После этого можно включать компьютер. Если проблема возникала именно по этой причине, то она будет устранена, и система загрузится.
Маловероятные причины и кардинальные решения
Незначительная часть пользователей сталкивается с этой ошибкой в результате установки обновлений, нового ПО или заражения вирусами. Если вы точно уверены, что проблемы в программном обеспечении, можете удалить «виновника» в безопасном режиме. Не выходя из Safe Mode, проведите тестирование системы автономной антивирусной утилитой, запустив ее с флешки.
Если аппаратная конфигурация полностью работоспособна, но систему не удается реанимировать ни одним из перечисленных способов, остается только крайняя мера. Придется пожертвовать несохраненными персональными данными и выполнить «чистую» установку Windows.
IO Error Symptoms
This error may occur suddenly.В When you power on your PC, It will show the windows logo. But it won’t bring any login screen. Instead of login screen, You will see the blue screen and messages something like –
«Windows has encountered a problem communicating with a device connected to your pc.This error can be caused by unplagging a removable storage device…,or by faulty hardware such as a hard drive or CD-ROM.Make sure any removable storage is properly connected and then restart your pc. File:BootBcd Status:0xc00000e9 Info an unexpected I/O error has occured.»
Some users may not see any windows logo and they may see these messages in black screen. It completely indicates that it is a boot error.
Method 5 Cleaning out Windows Registry
Before proceeding, remember that the registry is a complex yet sensitive database on Windows. It is essential in ensuring that the system operates smoothly. Moreover, if you modify it and make even a single punctuation error, you may cause more damage to your computer. So, before you try to manually repair damaged Registry files, you have to make sure that you are absolutely confident that you can correctly complete the process.
What we do recommend is opting for a one-click solution like Auslogics Registry Cleaner. This tool automatically scans and repairs corrupted or damaged registry files that may have caused the error 0xc00000e9. It also creates a backup before every scan so you can easily undo the changes.
Another key thing to remember is that Auslogics Registry Cleaner is 100% free. What’s more, it will take care of all the problematic registry files and not just the ones related to the 0xc00000e9 error. After completing the procedure, you can enjoy optimum computer performance and speed.
Solution 2 Change your BIOS settings
You can try to boot your computer with the hard drive to fix 0xc00000e9. Follow the steps below:
1) Shut down your computer, then press the Power button to boot your computer.
2) Press and hold the button to enter the BIOS setting, generally the ESC, F2, F12 or Delete key (please consult your PC manufacturer or go through your user manual).
3) Once you’re in the BIOS Setup Utility screen, go to Boot options.
4) Once you’re in the Boot options, make sure the first boot device is your hard drive. You can press the arrow key to highlight the hard drive and move it to the top of the boot device list.
5) Save your changes, and reboot your computer. This should fix your problem.
Common Causes of the 0xc00000e9 Unable to Boot Error
In most scenarios, this error leads the user to a blank screen when they try to boot their operating system. In other cases, the user may boot Windows in Normal Mode, but the functionalities are available in Safe Mode. There are several reasons why this problem occurs, and we’ll show them to you so you can have a better understanding of how you can resolve 0xc00000e9 error. Here are some of the factors that cause this issue:
Solution 5 Fix the MBR with Windows PE
The error 0xc00000e9 can occur when you install Windows without setting the Master Boot Record (MBR), so you should set your C drive as the MBR to fix 0xc00000e9.
Note: This is a complicated and difficult process. You should attempt it only if you’re confident in your computer skills.
1) Connect the hard drive or external drive with the Windows PE to your computer.
2) Launch Windows PE, and set your C drive as your Master Boot Record.
3) Reboot your computer to reinstall Windows to see if the problem is solved.
That’s all there is to it. Hope the solutions help you through. If you have any idea, feel free to comment below and let us know.
Repair your Errors automatically
ugetfix.com team is trying to do its best to help users find the best solutions for eliminating their errors. If you don’t want to struggle with manual repair techniques, please use the automatic software. All recommended products have been tested and approved by our professionals. Tools that you can use to fix your error are listed bellow:
Compatible with Microsoft Windows Compatible with OS X
Still having problems?If you failed to fix your error using Reimage, reach our support team for help. Please, let us know all details that you think we should know about your problem.
Reimage – a patented specialized Windows repair program. It will diagnose your damaged PC. It will scan all System Files, DLLs and Registry Keys that have been damaged by security threats.Reimage – a patented specialized Mac OS X repair program. It will diagnose your damaged computer. It will scan all System Files and Registry Keys that have been damaged by security threats.This patented repair process uses a database of 25 million components that can replace any damaged or missing file on user’s computer.To repair damaged system, you have to purchase the licensed version of Reimage malware removal tool.
Reimage Terms of Use | Reimage Privacy Policy | Product Refund Policy | Reimage Terms of Use | Reimage Privacy Policy | Product Refund Policy |
Solution 4 Run a disk check
The error 0xc00000e9 can be caused by the disk problem. You should make sure that your disk works properly.
2) In the search box on your desktop, type cmd. Then right click Command PromptВ (right click cmd if you’re using Windows 7) and click Run as administrator. Then click Yes to confirm.
3) Type chkdsk /f /r, then press Enter on your keyboard.
4пј‰ Press Y on your keyboard.
Note: Disk check will start the next time you boot your PC and it might take some time to complete. If you don’t have time to wait for the disk check to complete when restarting your computer, you can skip it or schedule it again.
Windows 10 Boot Error 0xc000000e
Unplug all USB devices and disconnect if possible all other hard drives.В Then unplug power and remove battery, press and hold the Power button down for 30 seconds, plug back in power cable and try starting again.В Check if this helps to boot normally.
Note: As windows wonвЂt start normally to perform troubleshooting steps, we need boot Windows form installation media to access advanced options and perform startup repair and rebuild Boot configuration data. If you donвЂt have check how to create Windows 10 installation media from here.
Perform the Automatic repair
When you are ready with Windows 10 installation media, or UBD put it to your PC. Now follow steps below to access advanced options and perform startup repair that scan and fix problems prevent windows to start normally.
Rebuild the Boot Configuration Data
If after startupВ repair still getting the same error then its now time to look at the BCD (В Boot Configuration Data ). As discussed before the main reason behind this error 0xc000000e is the invalid or corrupted BCD (Boot Configuration Data) configuration. Lets follow steps below to rebuild the Boot configuration file.
Also Read: How to secure all your Windows 10 devices and browse anonymously
Bootrec /scanos Bootrec /fixmbr Bootrec /fixboot Bootrec /rebuildbcd
After that restart Windows and check there is no more Boot Error 0xc000000e while start Windows.
Method 1 Checking the Compatibility of your Hardware
As we’ve mentioned, one of the causes of this error can be malfunctioning or incompatible drivers. As such, we recommend disconnecting external devices, such as USB flash drives and external hard drives. However, leave your keyboard and mouse connected. After disconnecting the external devices, restart your computer.
If this method fixes the issue, you can plug back your devices one at a time. Restart your computer after connecting a device. You should be able to determine which of them causes the error. In this case, you would have to update its driver to the latest manufacturer-recommended version. To complete this step, proceed to Method 3.
Источник
К самым неприятным нюансам при работе с ОС Windows следует отнести те, которые, вообще, не позволяют запустить операционную систему. Именно такой часто является ошибка 0xc000000e. Впервые столкнувшись с ней, понять причины возникновения достаточно трудно. А борьба с неполадками такого характера должна вестись «с нескольких сторон». Это значит, что стоит применить сразу несколько способов исправить проблему. О них и пойдёт речь.

Причины возникновения и методика устранения ошибки Windows 0xc000000e.
Описание ошибки
Большая часть владельцев ПК при возникновении ошибки даже не пытается вникнуть в содержимое ее описания, появившееся на мониторе. Текст на иностранном языке по умолчанию считается непереводимым или бесполезным. Хотя в данном случае Microsoft дает короткое, но емкое описание проблемы и рецепт ее устранения.

Код ошибки 0xc00000e9 означает, что у ОС проблемы с подключением устройства ввода-вывода информации. Понять это можно, использовав переводчик от Google или Яндекс. Далее приводится перечень вероятных «виновников» проблемы и стандартная рекомендация по перезагрузке.
Не будь ошибка столь «универсальной», этой информации пользователю вполне бы хватило, чтобы ее устранить. Беда в том, что причин, приводящих к ее появлению, гораздо больше, чем содержится в описании.
Отключите функцию защиты ELAM
В том случае, если первый и второй метод не помогли решить проблему—попробуйте отключить технологию ранней защиты от вредоносного ПО — ELAM (Early-launch Anti-Malware ), которая по умолчанию активна.
Примечание. Технология ELAM – позволяет сертифицированным антивирусам загружаться до запуска всего стороннего ПО. Антивирус в этом случае может выполнять раннюю антивирусную проверку и контролировать запуск драйверов и загружаемого ПО.
Для этого:
- Выполните шаги 1-2 из 2 способа.
- Перейдите в раздел Troubleshoot-> Advanced options -> Startup settings (Диагностика -> Дополнительные параметры -> Восстановление системы).
- И перезагрузите компьютер, нажав кнопку Restart.
- После следующей загрузки, система автоматически откроет меню настройки параметров загрузки — Startup Setting / Параметры загрузки (кстати, именно отсюда можно загрузить Windows 8 или Windows 10 в безопасном режиме).
- Нажмите F8 чтобы выбрать пункт
 Disable early launch anti-malware protection / Отключить автоматическую перезагрузки при сбое системы.


Проблемы при установке
Проще всего разобраться с тем, как исправить данную ошибку, можно в момент установки операционной системы. Периферия еще не подключена, следовательно, выбор устройств I/O ограничен. Status 0xc00000e9 при установке Windows 7 или 10 может быть вызван следующими причинами:
- неисправностью носителя (флешка, DVD-диск);
- проблемами в работе жесткого диска ПК;
- неисправностью разъема на материнской плате или шлейфа SATA.
Возможных источников проблем не так много, следовательно, «вычислить виновника» достаточно просто:
- попробуйте другой установочный носитель или создайте его самостоятельно. При этом желательно использовать оригинальный образ операционной системы с сайта Microsoft и утилиту Media Creation Tools. Это в равной степени относится к флешкам и DVD. Как вариант можно записать «болванку» на другом компьютере с минимальной скоростью;
- проверьте правильность подключения HDD, открыв корпус десктопа. Иногда, чтобы избавиться от этой ошибки, достаточно включить кабель SATA в другой свободный разъем на материнской плате;
- если первые два способа не помогают, высока вероятность неисправности устройства хранения данных — жесткого диска или твердотельного накопителя.
Исправление ситуации с помощью разнообразных программ
Давайте сразу исключим возможное влияние вирусов: устанавливаем хороший антивирусник, диагностируем систему.
Дальше, если возникла неожиданная ошибка ввода/вывода именно с кодом 0xc00000e9, действуем следующим образом:
- Скачать любое ПО, способное качественно проверить и исправить ошибки с реестром.
- Если есть точки восстановления – откатить систему к нормальному состоянию.
- Запустить командную строку. Выполнить процедуру sfc /scannow.
- При подозрениях на boot bcd, перезагрузиться, перейти в БИОС, вернуть ему первоначальное состояние. То есть, сбросить настройки на начальные.

При продолжении возникновения неприятной ситуации скачиваем Victoria или MHDD. Запускаем проверку. Последний вариант – попытка переустановки операционной системы. Обязательно следует использовать надежный источник. При невозможности завершения установочного процесса, скорее всего, придется распрощаться с жестким диском и бежать в магазин за новым винчестером.
Знаете английский? Тогда вам может помочь это видео:
Проблемы в работающей системе
Уже установленная и работающая ОС может подкинуть «сюрприз», выдав такую ошибку в момент очередной загрузки. В этом случае первым делом следует отключить периферийные устройства, чтобы исключить возможные источники появления проблемы. Если после перезагрузки система не загрузилась в нормальном режиме, следует переходить к более серьезным действиям.
Windows 7
Ошибка 0xc00000e9 при загрузке Windows 7 говорит о возможных проблемах в работе аппаратной конфигурации. Рассмотрим методы ее исправления, сгруппированные по степени сложности и эффективности.
- Выполняем проверку HDD на наличие ошибок. Предназначенные для этой цели средства ОС запускаются в безопасном режиме. Нажимая функциональную клавишу F8 в момент старта ОС, вы откроете расширенное меню загрузки.

Выбираем безопасный режим с поддержкой командной строки, отмеченный на скриншоте. После запуска потребуется ввести команду проверки диска на ошибки и подтвердить свои действия.

Поскольку в этом режиме меню «Пуск» отсутствует, третьей командой ПК отправляется в перезагрузку. В результате Windows выполнит проверку жесткого диска на наличие ошибок и поврежденных секторов с попутным восстановлением данных. Операция выполняется в пять этапов, а скорость ее завершения зависит от состояния и объема HDD.
Если компьютер загрузится без ошибок, для очистки совести можете выполнить проверку целостности системных файлов.

Таким образом, вы дополнительно убедитесь, что ошибка не вызвана проблемами в работе самой Windows.
- Загружаемся с установочного носителя. В настройках BIOS установите приоритет загрузки, чтобы запустить режим установки с флешки или DVD.

Выбираете пункт, отмеченный на скриншоте, чтобы войти в режим восстановления системы.

Здесь можно последовательно опробовать два выделенных варианта. Если не сработает первый, второй восстановит ОС в устойчивом состоянии с использованием точек System Restore.
Windows 10
Сообщение об ошибке 0xc00000e9 при загрузке Windows 10 вызывается теми же причинами, что и в предыдущих версиях. Отличие заключается в технологии ее устранения. Быстрая загрузка исключает использование клавиши F8. Чтобы войти в режим восстановления сразу, потребуется установочный носитель. Исключением из этого правила могут стать ноутбуки. Часть производителей встраивает в свои модели механизм защиты, который при двух неудачных попытках загрузки ОС автоматически запускает режим восстановления. На десктопе такого «подарка» вам никто не сделает.
Проверяем шлейфы
В настройках БИОС можно обнаружить, что жесткий диск не числится в списке устройств. Соответственно, загрузка с него не может быть произведена. В таком случае необходимо проверить подключено ли комплектующее физически, а именно, не отключены ли шлейфы.

В первую очередь понадобится разобрать компьютер или ноутбук. Жесткий диск подключен к материнской плате при помощи шлейфов. Пользователю необходимо убедиться в их работоспособности. Для этого, следует отключить их, а затем, подключить заново. При это рекомендуется убедиться, что сам шлейф не поврежден.
После этого можно включать компьютер. Если проблема возникала именно по этой причине, то она будет устранена, и система загрузится.
Маловероятные причины и кардинальные решения
Незначительная часть пользователей сталкивается с этой ошибкой в результате установки обновлений, нового ПО или заражения вирусами. Если вы точно уверены, что проблемы в программном обеспечении, можете удалить «виновника» в безопасном режиме. Не выходя из Safe Mode, проведите тестирование системы автономной антивирусной утилитой, запустив ее с флешки.
Если аппаратная конфигурация полностью работоспособна, но систему не удается реанимировать ни одним из перечисленных способов, остается только крайняя мера. Придется пожертвовать несохраненными персональными данными и выполнить «чистую» установку Windows.
IO Error Symptoms
This error may occur suddenly.В When you power on your PC, It will show the windows logo. But it won’t bring any login screen. Instead of login screen, You will see the blue screen and messages something like –
«Windows has encountered a problem communicating with a device connected to your pc.This error can be caused by unplagging a removable storage device…,or by faulty hardware such as a hard drive or CD-ROM.Make sure any removable storage is properly connected and then restart your pc. File:BootBcd Status:0xc00000e9 Info an unexpected I/O error has occured.»
Some users may not see any windows logo and they may see these messages in black screen. It completely indicates that it is a boot error.
Method 5 Cleaning out Windows Registry
Before proceeding, remember that the registry is a complex yet sensitive database on Windows. It is essential in ensuring that the system operates smoothly. Moreover, if you modify it and make even a single punctuation error, you may cause more damage to your computer. So, before you try to manually repair damaged Registry files, you have to make sure that you are absolutely confident that you can correctly complete the process.
What we do recommend is opting for a one-click solution like Auslogics Registry Cleaner. This tool automatically scans and repairs corrupted or damaged registry files that may have caused the error 0xc00000e9. It also creates a backup before every scan so you can easily undo the changes.

Another key thing to remember is that Auslogics Registry Cleaner is 100% free. What’s more, it will take care of all the problematic registry files and not just the ones related to the 0xc00000e9 error. After completing the procedure, you can enjoy optimum computer performance and speed.
Solution 2 Change your BIOS settings
You can try to boot your computer with the hard drive to fix 0xc00000e9. Follow the steps below:
1) Shut down your computer, then press the Power button to boot your computer.
2) Press and hold the button to enter the BIOS setting, generally the ESC, F2, F12 or Delete key (please consult your PC manufacturer or go through your user manual).

3) Once you’re in the BIOS Setup Utility screen, go to Boot options.

4) Once you’re in the Boot options, make sure the first boot device is your hard drive. You can press the arrow key to highlight the hard drive and move it to the top of the boot device list.

5) Save your changes, and reboot your computer. This should fix your problem.
Common Causes of the 0xc00000e9 Unable to Boot Error
In most scenarios, this error leads the user to a blank screen when they try to boot their operating system. In other cases, the user may boot Windows in Normal Mode, but the functionalities are available in Safe Mode. There are several reasons why this problem occurs, and we’ll show them to you so you can have a better understanding of how you can resolve 0xc00000e9 error. Here are some of the factors that cause this issue:
- Viruses corrupting the Registry files or data responsible for properly booting your operating system
- The malfunctioning hard drive
- Outdated or incompatible drivers
- Corrupted data due to abruptly shutting down the computer amidst downloading important updates
- Missing system files due to constantly uninstalling and reinstalling various programs
- Incompatible operating system updates
Solution 5 Fix the MBR with Windows PE
The error 0xc00000e9 can occur when you install Windows without setting the Master Boot Record (MBR), so you should set your C drive as the MBR to fix 0xc00000e9.
Note: This is a complicated and difficult process. You should attempt it only if you’re confident in your computer skills.
1) Connect the hard drive or external drive with the Windows PE to your computer.
2) Launch Windows PE, and set your C drive as your Master Boot Record.
3) Reboot your computer to reinstall Windows to see if the problem is solved.
That’s all there is to it. Hope the solutions help you through. If you have any idea, feel free to comment below and let us know.
Repair your Errors automatically
ugetfix.com team is trying to do its best to help users find the best solutions for eliminating their errors. If you don’t want to struggle with manual repair techniques, please use the automatic software. All recommended products have been tested and approved by our professionals. Tools that you can use to fix your error are listed bellow:
Offer
do it now!
do it now!
Compatible with Microsoft Windows Compatible with OS X
Still having problems?If you failed to fix your error using Reimage, reach our support team for help. Please, let us know all details that you think we should know about your problem.
Reimage – a patented specialized Windows repair program. It will diagnose your damaged PC. It will scan all System Files, DLLs and Registry Keys that have been damaged by security threats.Reimage – a patented specialized Mac OS X repair program. It will diagnose your damaged computer. It will scan all System Files and Registry Keys that have been damaged by security threats.This patented repair process uses a database of 25 million components that can replace any damaged or missing file on user’s computer.To repair damaged system, you have to purchase the licensed version of Reimage malware removal tool.
Reimage Terms of Use | Reimage Privacy Policy | Product Refund Policy | Reimage Terms of Use | Reimage Privacy Policy | Product Refund Policy |
Solution 4 Run a disk check
The error 0xc00000e9 can be caused by the disk problem. You should make sure that your disk works properly.
1) Boot your computer into Safe Mode. (You can check this article for more information about .)
2) In the search box on your desktop, type cmd. Then right click Command PromptВ (right click cmd if you’re using Windows 7) and click Run as administrator. Then click Yes to confirm.

3) Type chkdsk /f /r, then press Enter on your keyboard.

4пј‰ Press Y on your keyboard.

Note: Disk check will start the next time you boot your PC and it might take some time to complete. If you don’t have time to wait for the disk check to complete when restarting your computer, you can skip it or schedule it again.
Windows 10 Boot Error 0xc000000e
Unplug all USB devices and disconnect if possible all other hard drives.В Then unplug power and remove battery, press and hold the Power button down for 30 seconds, plug back in power cable and try starting again.В Check if this helps to boot normally.
Note: As windows wonвЂt start normally to perform troubleshooting steps, we need boot Windows form installation media to access advanced options and perform startup repair and rebuild Boot configuration data. If you donвЂt have check how to create Windows 10 installation media from here.
Perform the Automatic repair
When you are ready with Windows 10 installation media, or UBD put it to your PC. Now follow steps below to access advanced options and perform startup repair that scan and fix problems prevent windows to start normally.
- Forcefully restart windows and wait for theВ manufacturer logoВ to check the option forВ boot menu, it will usually beВ F12.
- RestartВ the computer, when the manufacturer’s logo is displayed,В keep pressing the Boot menu option keyВ to enter the boot menu and change the boot option toВ CDDVD ROM or removable disk (if you are bootable USB)
- A black screen appears with the gray text “Press any key to boot from CD or DVD”. Press any key.
- Select the correct time and Keyboard type.
- ClickВ Repair your computerВ in the lower left corner

- Click onВ Troubleshooting, advanced option and then clickВ Automatic repair.

- This will scan and detect problems prevent windows starting normally.
- During startup repair, this will diagnose your system corrupt files or botched configuration settings and try to fix them.
- Wait until complete the scanning process, this will automatically restart windows and start computer normally.
Rebuild the Boot Configuration Data
If after startupВ repair still getting the same error then its now time to look at the BCD (В Boot Configuration Data ). As discussed before the main reason behind this error 0xc000000e is the invalid or corrupted BCD (Boot Configuration Data) configuration. Lets follow steps below to rebuild the Boot configuration file.
- Again Access Advanced Startup options and select Command prompt.
- If ask for password type the current user login password and click ok.
- Windows restart and you will see a command prompt,
- Here type the following commands one by one and pressВ Enter after each
Also Read: How to secure all your Windows 10 devices and browse anonymously
Bootrec /scanos Bootrec /fixmbr Bootrec /fixboot Bootrec /rebuildbcd

After that restart Windows and check there is no more Boot Error 0xc000000e while start Windows.
Method 1 Checking the Compatibility of your Hardware
As we’ve mentioned, one of the causes of this error can be malfunctioning or incompatible drivers. As such, we recommend disconnecting external devices, such as USB flash drives and external hard drives. However, leave your keyboard and mouse connected. After disconnecting the external devices, restart your computer.
If this method fixes the issue, you can plug back your devices one at a time. Restart your computer after connecting a device. You should be able to determine which of them causes the error. In this case, you would have to update its driver to the latest manufacturer-recommended version. To complete this step, proceed to Method 3.
Quickly fix sign in errors on Windows 10 with our quick guide
by Milan Stanojevic
Milan has been enthusiastic about technology ever since his childhood days, and this led him to take interest in all PC-related technologies. He’s a PC enthusiast and he… read more
Updated on December 22, 2022
Reviewed by
Vlad Turiceanu

Passionate about technology, Windows, and everything that has a power button, he spent most of his time developing new skills and learning more about the tech world. Coming… read more
- The Windows 10 login screen acts as a way to separate user profiles from each other, as well as a method of protecting one’s private data.
- Unfortunately, various issues can lead to errors that can prevent you from logging into Windows 10, and that is what we will be looking over in the article below.

XINSTALL BY CLICKING THE DOWNLOAD FILE
This software will repair common computer errors, protect you from file loss, malware, hardware failure and optimize your PC for maximum performance. Fix PC issues and remove viruses now in 3 easy steps:
- Download Restoro PC Repair Tool that comes with Patented Technologies (patent available here).
- Click Start Scan to find Windows issues that could be causing PC problems.
- Click Repair All to fix issues affecting your computer’s security and performance
- Restoro has been downloaded by 0 readers this month.
Windows 10 has its share of issues, and one of the more troubling issues that users have reported is the inability to log in to Windows 10. This sounds like a big problem, but there are a few things you can do to fix it.
Not being able to log in to Windows 10 can be one of the worst problems that PC users can face. You can’t access your files or applications, and not being able to use Windows 10 can cause major problems especially if you use Windows 10 regularly for work or school projects.
Why can’t I log into my computer on Windows 10?
First of all, make sure that you do not have Capslock enabled or are using another language. Also, one other common reason is lack of internet connection, so make sure to also verify it.
What are the different error variations?
- Windows 10 can’t sign into your Account
- You’ll get this error in case something’s wrong with your User Account.
- Windows 10 won’t let me log in to my computer
- You can remediate the can’t sign in Windows 10 issue by resetting your password, disconnecting your peripherals, or troubleshooting with microsoft support.
- Windows 10 can’t login with Microsoft Account
- When you are unable to login, you can try various tricks such as removing your antivirus, editing your registry, or changing group policy settings.
- Windows 10 can’t login with correct password
- This error appears when there’s something wrong with your password.
- Windows 10 can’t login after upgrade
- Windows upgrades are known for causing various login problems to users.
- We can’t sign into your account this problem can often be fixed
- To sign back into your account you can try to change the password of the problematic account, run a SFC scan, and also check for Windows updates.
- Windows 10 can’t get to login screen
- This is a more serious issue, as it probably means your computer is unable to boot correctly.
What can I do if I can’t get past the login screen on Windows 10?
- Why can’t I log into my computer on Windows 10?
- What are the different error variations?
- What can I do if I can’t get past the login screen on Windows 10?
- 1. Check your keyboard
- 2. Make sure you’re connected to the internet
- 3. Run the PC in the Safe Mode
- 4. Use the Local Account
- 5. Install Windows Updates
- 6. Perform System Restore
- 7. Scan for viruses
- 8. Run the SFC scan
- 9. Reset Windows
1. Check your keyboard
- On the login screen on the bottom right click Ease of Access icon.
- Find the On-screen keyboard and click it.
- The keyboard should appear on your screen.
- Use your mouse to enter the password and try to log in again.
Make sure that if you’re using a localized keyboard you’re entering the correct password. Sometimes with localized keyboards, key placement might be a bit different so keep that in mind.
Sometimes special characters or numbers in some rare cases can be assigned to different keys when you use a localized keyboard, so that might be preventing you from accessing Windows 10.
If you still have trouble logging in to Windows 10, you can always try using a different keyboard especially if your current keyboard has a different letter placement. So if you have a spare keyboard try connecting it to your computer and using it to log in to Windows 10.
This solution sounds simple, but it has been confirmed that it works by many users so make sure that you give it a try.
2. Make sure you’re connected to the internet
If you recently change your Microsoft Account password in the web browser, there’s a chance your computer hasn’t ‘registered’ it yet.
So, before moving on, make sure your computer is connected to the internet. This will allow your PC ‘to’ register the new password, and you’ll be able to log in to your PC again.
If you’re already connected to the internet, move on to the next solution from down below.
In case you cannot log in because of your password, it is important to know that you can solve it by using a specific password recovery tool.
Password recovery software is easy-to-use tools that can recover both local and domain admin account passwords. The best ones available are compatible with multiple file types and besides recovering, they can also safely store your passwords.
3. Run the PC in the Safe Mode
- Restart your computer while holding the SHIFT button
- The Advanced Startup menu will open on the boot.
- Go to Troubleshoot.

- Now, go to Advanced Options > Startup Settings.
- Click the Restart button.
- A window with various startup options will show up.
- Press 5 or F5 on your keyboard to choose to Enable Safe Mode with Networking.

- Wait for your computer to boot.
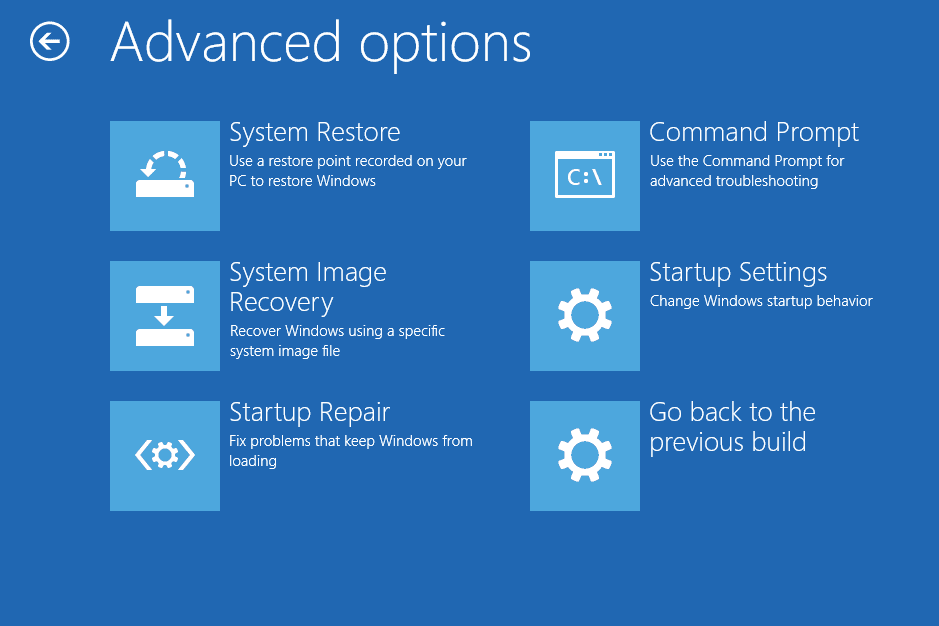

If you’re still unable to log in to your PC, the only thing you should do next is to enter Safe Mode. The Safe Mode does wonders in cases like this.
Some PC issues are hard to tackle, especially when it comes to corrupted repositories or missing Windows files. If you are having troubles fixing an error, your system may be partially broken.
We recommend installing Restoro, a tool that will scan your machine and identify what the fault is.
Click here to download and start repairing.
Not only that it’ll help us get your computer up and running, but it’ll also help us with determining the cause of the problem and solving it. Running your computer in Safe Mode will also be required for some of the solutions below. So, keep that in mind.
That’s all, now that we’re in Safe Mode, we can move on to finding and solving our problem.
4. Use the Local Account
- Open the Settings app.
- Go to the Accounts section. Now navigate to the Your info tab.
- Click Sign in with a local account instead.

- Enter your password and click Next.
- Now enter a username for your local account and click Next.
- After doing that, click the Sign out and finish button.
- Now log into Windows 10 with your local account.
- Fix: Signed in with a temporary profile error in Windows 10/11
- Fix: Unable to login with Microsoft Account in Windows 10/11
- 0XC00002EE Error: How to Fix It on Windows 10 & 11
- How to Register Schema.dll (Active Directory MMC Snap-in)
- Shpafact.dll: What is It And How to Fix Its Errors
5. Install Windows Updates
Sure, Windows updates are known for causing and solving various problems. It’s like an infinite loop. But in this case, you shouldn’t be worried about the actual content of the update.
To install any Windows update, you need to restart your computer to apply changes. And that’s where things can get nasty. It’s more than likely for the update you just installed to disrupt your booting process.
6. Perform System Restore
- Restart your computer while holding the SHIFT button
- The Advanced Startup menu will open on the boot. Go to Troubleshoot.

- Choose System Restore.
- Choose your last restore point, and follow further on-screen instructions.
- Finish the setup.
If something inside your system got corrupt, System Restore is a tool that might come in handy.
7. Scan for viruses
There’s also a chance you’ve picked up a virus somewhere, and it’s blocking you from logging into your PC. So, boot in Safe Mode, and perform a deep virus scan.
If there are any threats, your antivirus program will remove them, and hopefully, you’ll be able to log in to your computer normally again.
Not everybody has an antivirus program. If you’re in this situation and you’re looking for the best option for Windows 10, consider an antivirus with multiple scanning engines.
8. Run the SFC scan
- Go to Search, type cmd, right-click Command Prompt, and go to Run as Administrator.
- Enter the following command, and press Enter on your keyboard: sfc/scannow

- Wait for the process to finish.
- Restart your computer.
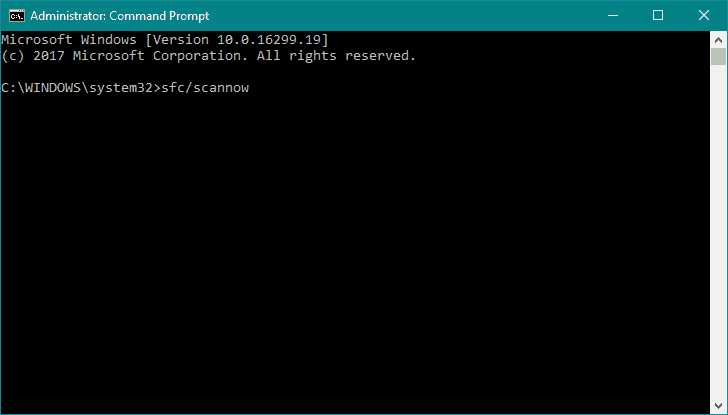
The SFC scanner is a handy tool used for dealing with various system-related problems. As there’s a chance our problem lies deep in the system, the SFC scan could prove as useful.
In some cases, scannow can cause you some trouble and you won’t be able to properly run the command because the process stops. In that case, you will have to start by fixing this scannow stops on Windows 10 error and try again.
9. Reset Windows
- Go to the Settings app.
- Go to Update & Security > Recovery.
- Under Reset this PC, select Get Started.
- Choose whether you want to completely wipe your partition, or keep your personal files.
- Follow further on-screen instructions very carefully. Note: If you’re not certain about doing this, ask someone more experienced for help.
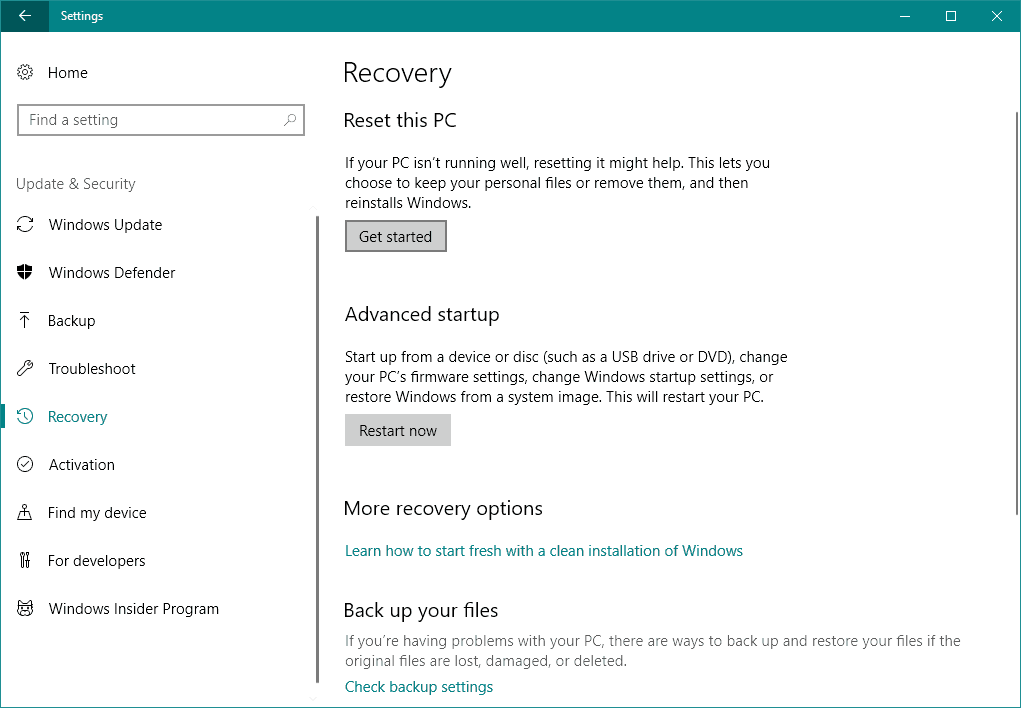
And finally, if none of the solutions above proved to be useful in solving our login problem, we’ll have to raise the white flag and reinstall your operating system.
We hope that these solutions have helped you to log in to Windows 10, but if you still have this issue we have already covered what to do if you are unable to log in with a Microsoft account and what to do if Windows 10 freezes at the login section.
If you have any more questions, don’t hesitate to reach out in the comments section below.
![]()
Fix Windows Could Not Complete The Installation. To Install Windows On This Computer, Restart The Installation: If you are facing this error then it means you are using Audit Mode to install Windows which is the main cause of this error. When Windows boots for the very first time then either it can boot to Windows Welcome Mode or Audit Mode.

What is Audit Mode?
Audit Mode is a network-enabled environment where a user can add customizations to Windows images. Whenever Windows starts it shows you a Welcome screen immediately after installation, however one can skip this Welcome screen and boot directly to audit mode instead. In short Audit Mode allows you to boot directly to Desktop after Windows installation.
Windows could not complete the installation. To install Windows on
this computer, restart the installation.
Also, the main issue in this error is that you’re stuck in a Reboot loop and that’s why it’s more annoying. Now you know about Audit Mode and Welcome Mode it’s time how to fix this error, so without wasting any time let’s see how to Install Windows when in Audit Mode.
Table of Contents
1
Method 1: Run Automatic Repair
1. Insert the Windows 10 bootable installation DVD and restart your PC.
2. When prompted to Press any key to boot from CD or DVD, press any key to continue.

3. Select your language preferences, and click Next. Click Repair your computer in the bottom-left.

4. On choose an option screen, click Troubleshoot.

5. On Troubleshoot screen, click Advanced option.

6. On the Advanced options screen, click Automatic Repair or Startup Repair.

7. Wait till the Windows Automatic/Startup Repairs complete.
8. Restart and you have successfully Fix Windows Could Not Complete The Installation Error.
Method 2: Enable Administrator Account
1. On the error screen press Shift + F10 to open Command Prompt.
2. Type the following command and hit Enter: MMC
3. Next click File > Add/Remove Snap-in.

4. Select Computer Management and then double-click on it.

5. In the new window that opens select Local computer and then click Finish followed by OK.

6. Then double-click Computer Management (Local) > System Tools > Local Users and Groups > Users > Administrator.
7. Make sure to Uncheck the “Account is disabled” option and click OK.

8. Next, right-click on the Administrator then select Set Password and set a strong password to get started.

9. Finally, close everything and restart your PC. After the restart, you may be able to Fix Windows Could Not Complete The Installation.
Method 3: Start Account Creation Wizard
1. Again open the Command Prompt on the error screen by pressing Shift + F10.
2. Type the following command and hit Enter: cd C:windowssystem32oobe

3. Again type “msoobe” (without quotes) and hit Enter.
4. The above will start the user account creation wizard, so create a generic account and it’s password.
Note: Keep your product key ready as sometimes it is required. If it asks for OEM/No then simply hit finish.
5. Once done hit Finish and close everything. Restart your PC you may have successfully fix Windows Could Not Complete The Installation. To Install Windows On This Computer, Restart The Installation.
Method 4: Change Password Requirements
This error tends to pop-up when in Audit Mode and the computer has just been joined to a domain. The error is caused by password requirements added to the local security policy. This typically includes a minimum password length and password complexity.
1. Open the Command prompt on the error screen.
2. Type the following the command and hit Enter: secpol.msc
3. Navigate to Account Policies > Password Policy.

4. Now change “Minimum password length” to 0 and disable “Password must meet complexity requirements.“
5. Apply the changes and then exit the Security Policy console.
6. Click OK on the error message to reboot your PC.
Method 5: Registry Fix
1. On the same error screen press Shift + F10 to open Command Prompt.
2. Type the following command and hit Enter: regedit

3. Now in the Registry Editor navigate to the following key: ComputerHKEY_LOCAL_MACHINESYSTEMSetupStatus
4.Adjust the following values if they don’t match the following:
Note: To change the value of the below keys double click on them and then enter the new value.
HKEY_LOCAL_MACHINESYSTEMSetupStatusAuditBoot Value: 0
HKEY_LOCAL_MACHINESYSTEMSetupStatusChildCompletionsetup.exe Value: 3
HKEY_LOCAL_MACHINESYSTEMSetupStatusChildCompletionaudit.exe Value: 0
HKEY_LOCAL_MACHINESYSTEMSetupStatusSysprepStatusCleanupState Value: 2
HKEY_LOCAL_MACHINESYSTEMSetupStatusSysprepStatusGeneralizationState Value: 7
HKEY_LOCAL_MACHINESYSTEMSetupStatusUnattendPassesauditSystem Value: 0

5. After a Reboot the Audit Mode is disabled and Windows starts regularly – in the Out of Box Experience mode.
Method 6: Disable Audit Mode
Running Sysprep command each time resets Windows licensing the state to default. So if your Windows is activated and you run this command, you’ll need to reactivate Windows after executing this command.
1. Open Command Prompt on the error screen.
2. Type the following command in the cmd and hit Enter: sysprep /oobe /generalize

3. This will disable the Audit Mode.
4. Close everything and reboot your PC normally.
5. If you’re still facing this issue then again open cmd.
6. Type the following command and hit Enter: regedit
7. Navigate to the following registry key:
HKEY_LOCAL_MACHINESOFTWAREMicrosoftWindowsCurrentVersionSetupState
8. Highlight State Registry key, then right-click on ImageState in the right window pane and click on Delete.

9. Once you deleted the string, close everything and restart your PC.
Recommended for you:
- Fix The computer restarted unexpectedly or encountered an unexpected error
- Enable Dark Theme for every Application in Windows 10
- How to create empty files from the command prompt (cmd)
- Fix you don’t have permission to save in this location
That’s it you have successfully Fix Windows Could Not Complete The Installation Error but if you still have any queries regarding this guide then please feel free to ask them in the comment’s section.