Как правило, эта ошибка возникает после установки нового оборудования или приложений, несовместимых с вашим компьютером. Далее приведены некоторые возможные решения.
-
Перезапустите компьютер, нажав кнопку «Пуск» и выбрав «Выключение» > «Перезапуск». Во время запуска быстро нажмите клавишу F8 на клавиатуре несколько раз. Когда откроется страница «Дополнительные параметры меню загрузки», с помощью клавиш со стрелками выберите пункт «Безопасный режим», а затем нажмите клавишу ВВОД.
-
Проверьте, удается ли открыть значки недавно установленных устройств или программного обеспечения. Если не удается, удалите их.
-
Убедитесь, что программное обеспечение компьютера обновлено до последней версии. Нажмите кнопку «Пуск» , а затем в поле поиска рядом с кнопкой «Пуск» введите «Центр обновления Windows» и в списке результатов выберите пункт «Проверка наличия обновлений». В меню «Параметры» нажмите кнопку «Проверка наличия обновлений» . Когда все будет готово, перезапустите компьютер, нажав кнопку «Пуск» и выбрав элементы «Выключение» > «Перезапуск».
-
Перейдите на веб-сайт изготовителя, чтобы установить последнюю версию драйвера.
Дополнительные сведения можно найти в разделе «Устранение ошибок «синий экран»»
Нужна дополнительная помощь?
Нужны дополнительные параметры?
Изучите преимущества подписки, просмотрите учебные курсы, узнайте, как защитить свое устройство и т. д.
В сообществах можно задавать вопросы и отвечать на них, отправлять отзывы и консультироваться с экспертами разных профилей.
Синий экран смерти встречается пользователям Windows не так уж редко. Коды ошибок, с которыми мы сталкиваемся, могут быть самыми разными. Но все они сигнализируют о неполадках операционной системы. Одна из них — Bad pool header. Давайте разберемся, что это за проблема и как ее можно исправить.
Причины появления
Bad pool header связана с ошибкой пула при выделении памяти – физической или виртуальной. Она сигнализирует о том, что поставленное вами ПО или оборудование требует ресурсов больше, чем способна выделить Windows.
Самыми частыми источниками являются:
- Недостаточный объем винчестера, в том числе и наличие множества повреждений.
- Нехватка оперативной памяти вследствие ее малого объема изначально или повреждений плашек.
- Проблемы с оборудованием. Оно или просто не функционирует с вашим ПК, или драйвера поставлены неправильно.
- Вирусы.
- Непорядок в системных файлах или в реестре.
- Неправильно выполненное обновление. Некоторые антивирусные программы могут заблокировать процесс обновления в самый его разгар. В этом случае Windows будет работать некорректно.
Если у вас наблюдается нехватка памяти из-за малого объема ПЗУ или ОЗУ – здесь мы помочь не сможем. Вам надо провести апгрейд своего компьютера. А вот повреждения попробовать исправить можно. Для оперативной памяти используйте программу Memtest86.
Memtest86
Если с оперативной памятью все в порядке, просканируйте диск на ошибки. В случае, когда компьютер грузится, вызовите командную строку от имени администратора через «Выполнить» (WIN+R). Если же ПК зависает, вам придется зайти в безопасном режиме (в 7 версии) или при загрузке (если это 10-ка) вызывать ее. Давайте рассмотрим оба варианта.
Bad pool header Windows 7 — как исправить?
До версии 8 вход в режим безопасности Windows осуществлялся очень просто. При перезагрузке нажимайте F8 и далее выбирайте в меню «Безопасный режим с поддержкой командной строки».
Далее произойдет обычная загрузка ПК, и в системе вы сможете вызвать командную строку. Нажмите WIN_R и введите cmd.
Закройте ВСЕ файлы и папки. Должно остаться только черное окно как на скриншоте. Введите команду chkdsk /f /r. Она позволит проверить весь жесткий диск на наличие ошибок (ключ /f) и вдобавок еще и отсканирует системные файлы (ключ/r). Если диск все же чем-то занят, то вы увидите следующее сообщение:
Согласитесь (нажмите Y) и перезагрузите ПК. Сразу же при его загрузке начнется сканирование. Хотим предупредить, что процесс это долгий, так что запаситесь терпением.
Ошибка Bad pool header — как исправить в Windows 10?
Проблема Bad pool header 0x00000019 при загрузке Windows 7 решается просто. А вот в 10-ке вход в безопасный режим усложнили. Сейчас для этого требуется установочный диск или накопитель с восстановлением системы. Вообще, он создается заранее. Если вы не обзавелись таким, создайте его на другом компьютере. Вам даже не понадобится искать ПК с Windows 10. Этот инструмент есть и в 7-й версии.
После того, как вы обзавелись нужным накопителем, загружайте компьютер. Как только появится черный экран, входите в БИОС (F2 или DEL – обычно написано внизу). Для ноутбуков варианты могут быть разные. Например, Леново имеет отдельную кнопку.
В БИОСе вам необходим раздел загрузки – BOOT. В нем измените загрузочной устройство, сохраните и выйдите. Например, флешка.
Следующий вход в систему будет осуществляться уже с флеш-устройства. Вы увидите установочный экран Windows. Нажимайте внизу «Восстановление системы».
Далее последовательно выбирайте:
- Поиск и устранение неисправностей.
- Дополнительные параметры
- Командная строка
- И далее произведите все те же действия, что были описаны ранее для исправления ошибки Bad pool header посредством команды chkdsk.
Вход в безопасный режим в Windows 10
Для всех остальных вариантов исправления синего экрана смерти Bad pool header вам понадобится на этом этапе выбрать не командную строку, а «Параметры загрузки». Это позволит зайти в систему в безопасном режиме, чтобы начать дальнейшую борьбу Bad pool header. Нажмите кнопку «Перезагрузить».
И выберите шестой вариант (F6).
Теперь начнется загрузка ОС.
Код ошибки bsod bad pool header – качаем обновления
Как уже говорили ранее, сбой при установке обновлений может вызвать такую проблему. После того, как вам удалось загрузиться, зайдите в параметры.
Выберите обновление и безопасность.
И проверьте наличие.
После установки перезагрузитесь. Если проблема была в этом, bad pool header пропадет и не будет вас беспокоить.
Stop 0x00000019 bad pool header Windows 7 или 10 – вирусы
После входа в безопасный режим в любой версии, обновите антивирусные базы и проверьте свой ПК. Вам нужна глубокая проверка. Например, в Avira это делается следующим образом:
- Найдите в трее значок и нажмите на него.
- Далее нажмите «Сканировать».
Ваша система будет вылечена от вирусов, если таковые имелись.
Исправляем bad pool header откатом системы
Последний вариант – откат системы до точки восстановления. Он поможет, если вы установили ПО или оборудование, которое вызвало конфликт. Надо вернуться назад, до момента инсталляции. Здесь возможны два варианта для Windows 10:
- Зайти в безопасном режиме и пройти следующими этапами: Пуск – Параметры – Восстановление – Запуск восстановления системы.
- При загрузке с установочного диска на этапе «Дополнительные параметры» (После выбора диагностики) выбрать «Восстановление системы».
В обоих случаях вы попадете в мастер восстановления. Здесь выполняйте следующие действия:
- Нажмите «Далее»
- Выберите точку восстановления.
- Если вы затрудняетесь, проверьте какое ПО будет затронуто и соотнесите эту информацию с тем, что было изменено последним до появления ошибки.
- Если данные совпадают с вашим анализом, нажмите «Закрыть» и вернитесь в окно восстановления.Например, на скрине видно, что основные изменения касались драйвера видеокарты NVidia. После их обновления и стала появляться ошибка bad pool header.
- Кликайте «Далее».
- Готово.
После восстановления все изменения будут удалены, и система вернется в нормальное состояние.
Все вышеперечисленные действия относятся и к системе Windows 8. Она очень близка к 10-ке. Только «Параметры» приходится искать в меню «Пуск».
Надеемся, что наши инструкции помогут вам избавиться от ошибки bad pool header.
Отличного Вам дня!
Skip to content
Как убрать BAD_POOL_HEADER (0x00000019)?
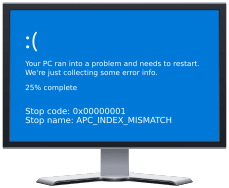
Как убрать « BAD_POOL_HEADER » ( 0x00000019)?
На компьютере или ноутбуке под управлением Windows появился «синий экран смерти»? После появления сообщения «
BAD_POOL_HEADER » (
0x00000019) система перезагружается? Ищите как исправить
0x00000019: «
BAD_POOL_HEADER »?
Как просмотреть информацию об ошибках, исправить ошибки в Windows 10, 8 или 7
Причины появления ошибки
- На жестком диске компьютера или ноутбука не достаточно места. Для правильной работы ОС Windows 10 на системном диске должно быть свободно 2 — 10 ГБ.
- На компьютер был установлен не совместимый BIOS или прошивка была повреждена.
- Установлены не совместимые с ОС драйвера устройств.
- Реестр Windows был поврежден или удален. Возможно в результате очистки были удалены системные ключи реестра.
- Ативирусное программное обеспечение или компьютерные вирусы могут заблокировать системные файлы или удалить важные ключи реестра.
- В результате ошибок в работе программы для резервного копирования.
- В результате обновления ОС Windows.
Актуально для ОС: Windows 10, Windows 8.1, Windows Server 2012, Windows 8, Windows Home Server 2011, Windows 7 (Seven), Windows Small Business Server, Windows Server 2008, Windows Home Server, Windows Vista, Windows XP, Windows 2000, Windows NT.
Вот несколько способов исправления ошибки «
BAD_POOL_HEADER »:
Восстановите удаленные файлы
Часто появление BSoD ошибок приводит к утери важных файлов. Блокировка файлов компьютерными вирусами, ошибки в работе программ для резервного копирования, повреждение или перезапись системных файлов, ошибки файловой системы или наличие битых секторов диска – это не далеко полный список причин удаления данных.
Исправление соответствующих ошибок восстановит работоспособность устройства, но не всегда восстановит повреждённые или утерянные файлы. Не всегда имеется возможность устранить ту или иную ошибку без форматирования диска или чистой установки операционной системы, что также может повлечь за собой утерю файлов.
Загрузите бесплатно и просканируйте ваше устройство с помощью Hetman Partition Recovery. Ознакомьтесь с возможностями программы и пошаговой инструкцией.
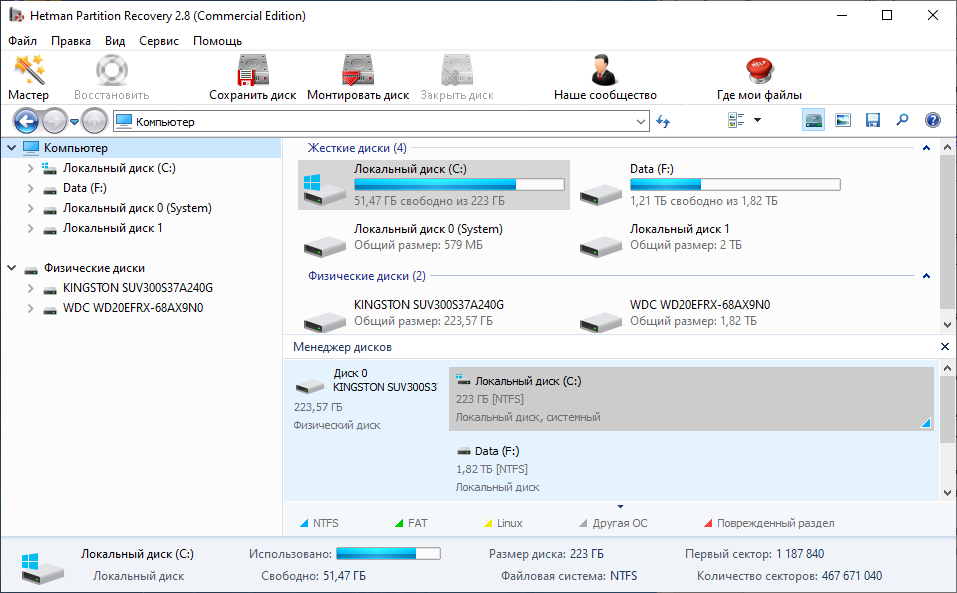
Программа для восстановления данных
Запустите компьютер в «безопасном режиме»
Если ошибка «BAD_POOL_HEADER » (0x00000019) возникает в момент загрузки Windows и блокирует любую возможность работы с системой, попробуйте включить компьютер в «безопасном режиме». Этот режим предназначен для диагностики операционной системы (далее ОС), но функционал Windows при этом сильно ограничен. «Безопасный режим» следует использовать только если работа с системой заблокирована.
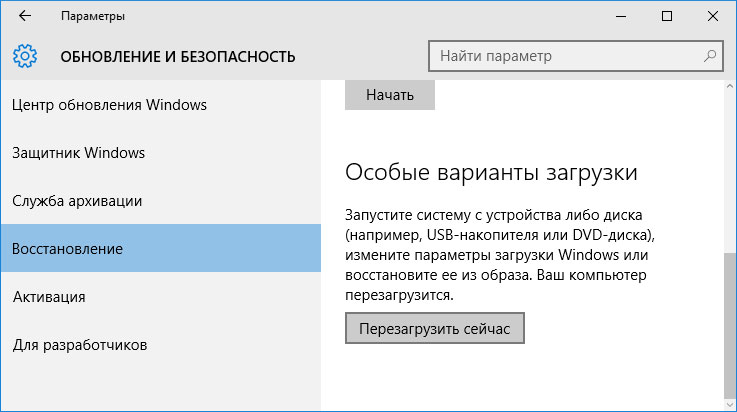
Чтобы запустить безопасный режим сделайте следующее:
- Перейдите в меню Пуск и выберите Параметры.
- В открывшемся окне параметров перейдите в меню Обновление и Безопасность и выберите раздел Восстановление.
- В разделе Восстановление найдите Особые варианты загрузки и нажмите кнопку Перезагрузить сейчас.
- После этого Windows перезагрузится и предложит выбрать следующее действие. Выберите Поиск и устранение неисправностей.
- В меню Поиск и устранение неисправностей кликните на Дополнительные параметры, далее — Параметры загрузки.
- Далее Windows уведомит вас о том, что компьютер можно перезагрузить с использованием дополнительных параметров загрузки. Укажите — Включить безопасный режим. Нажмите Перезагрузить.
- После перезагрузки выберите Включить безопасный режим нажав клавишу F4.
Как загрузить Windows в безопасном режиме
Обновите драйвер через Диспетчер устройств
Вы установили новое аппаратное обеспечение на компьютере? Возможно вы начали использовать новое USB-устройство с вашим компьютером. Это могло привести к ошибке «BAD_POOL_HEADER ». Если вы установили драйвер устройства используя диск, который поставляется вместе с ним, или использовали драйвер не c официального сайта Microsoft, то причина в нем. Вам придется обновить драйвер устройства, чтобы устранить эту проблему.

Вы можете сделать это вручную в диспетчере устройств Windows, для того выполните следующие инструкции:
- Нажмите кнопку Windows, затем введите диспетчер устройств с клавиатуры.
- Выберите Диспетчер устройств из списка.
- Просмотрите список категорий устройств, нажмите на стрелочку рядом с категорией вашего нового устройства. Драйвер может быть отмечен желтым треугольником.
- Кликните правой кнопкой мыши на имя устройства и нажмите Обновить драйвер.
- Далее откроется окно Мастера обновления драйверов с двумя опциями:
- Автоматический поиск обновленных драйверов. Windows проверит наличие наиболее подходящего драйвера для этого устройства в автоматическом режиме.
- Выполнить поиск драйверов на этом компьютере. Используйте эту опцию, что бы самостоятельно указать ОС файлы драйвера.
Перезагрузите компьютер после установки драйвера.
Используйте sfc /scannow для проверки всех файлов системы
Повреждение или перезапись системных файлов может привести к ошибке «BAD_POOL_HEADER ». Команда sfc находит поврежденные системные файлы Windows и заменяет их.
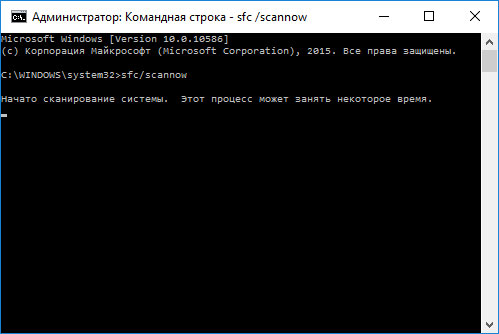

- Нажмите кнопку Windows, затем введите cmd с клавиатуры.
- Правой кнопкой мышки кликните на CMD и запустите от имени администратора.
- В окне командной строки введите sfc /scannow и нажмите Enter.
Этот процесс может занять несколько минут.
Как восстановить системные файлы Windows 10
Проверьте диск с Windows на наличие ошибок командой chkdsk c: /f
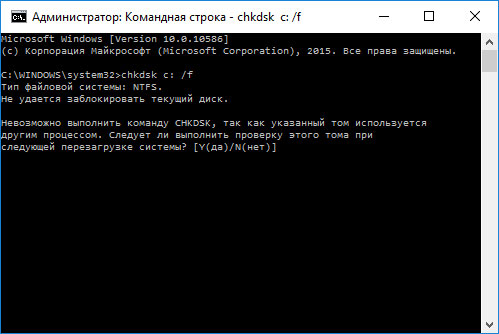
Возможно к синему экрану с «BAD_POOL_HEADER » привела ошибка файловой системы или наличие битых секторов диска. Команда CHKDSK проверяет диск на наличие ошибок файловой системы и битых секторов. Использование параметра /f заставит программу автоматически исправлять найденные на диске ошибки, а параметр /r позволяет найти и «исправить» проблемные сектора диска. Для запуска следуйте инструкциям:
- Нажмите кнопку Windows, затем введите CMD с клавиатуры.
- Правой кнопкой мышки кликните на CMD и запустите от имени администратора.
- В окне командной строки введите chkdsk c: /f и нажмите Enter (используйте ту букву диска, на котором установлена ОС).
Дождитесь окончания процесса и перезагрузите компьютер.
Используйте режим совместимости со старой версией Windows
Отключите лишние программы из автозагрузки Windows
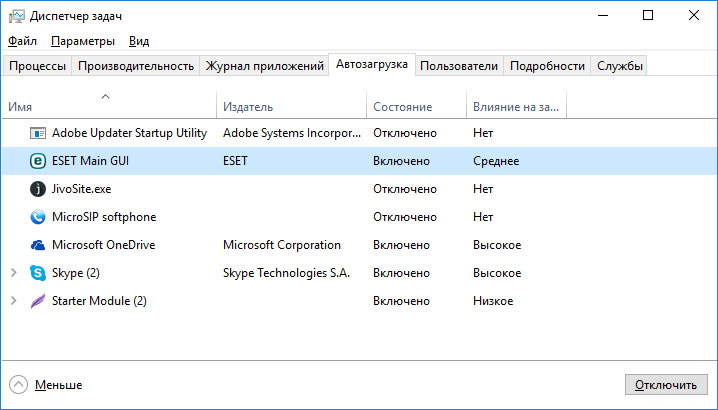
Программное обеспечение, вызывающее «BAD_POOL_HEADER » (0x00000019), может быть прописано в автозагрузку Windows и ошибка будет появляться сразу после запуска системы без вашего участия. Удалить программы из автозагрузки можно с помощью Диспетчера задач.

- Загрузитесь в Безопасном режиме.
- Кликните правой кнопкой мышки на Панели задач, затем на пункте Диспетчер задач.
- Перейдите на вкладку Автозагрузка.
- Чтобы убрать ту или иную программу из автозагрузки выберите её из списка и отключите, нажав кнопку Отключить в правом нижнем углу окна.
Обратитесь в поддержку Microsoft
Microsoft предлагает несколько решений удаления ошибки «голубого экрана». «BAD_POOL_HEADER » (0x00000019) можно убрать с помощью Центра обновления или обратившись в поддержку Windows.
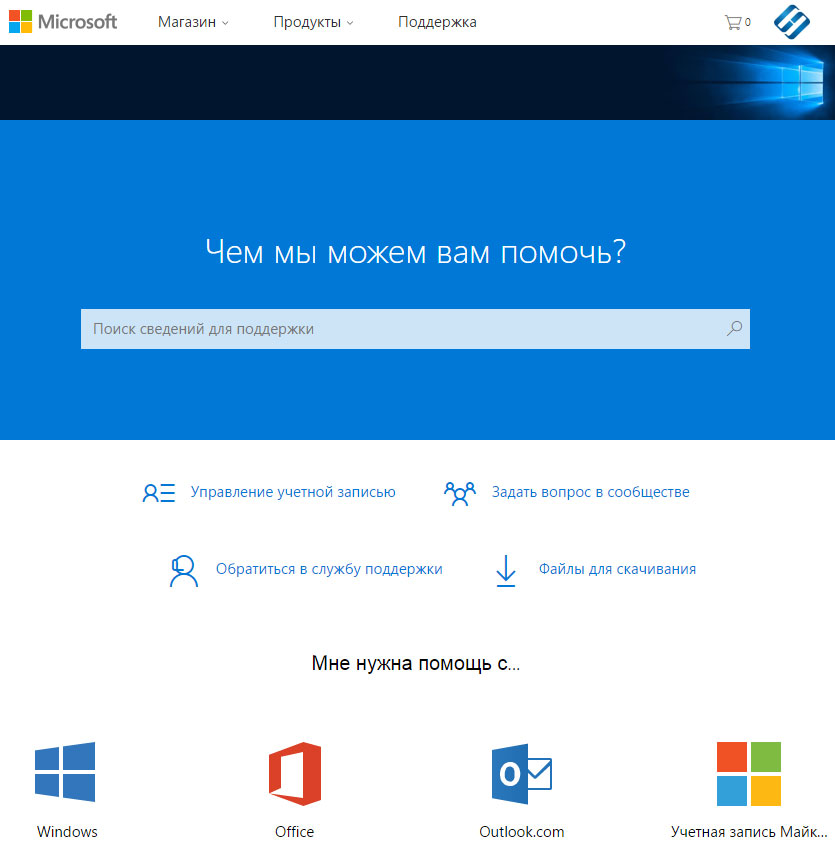
- Перейдите на сайт технической поддержки Microsoft.
- Введите код и сообщение об ошибке в поисковую строку и следуйте найденным рекомендациям.
- Если вы не найдете готового решения, то задайте вопрос в сообществе — возможно вам ответит сертифицированный системный администратор.
Установите последние обновления системы
С обновлениями Windows дополняет базу драйверов, исправляет ошибки и уязвимости в системе безопасности. Загрузите последние обновления, что бы избавиться от ошибки «BAD_POOL_HEADER » (0x00000019).
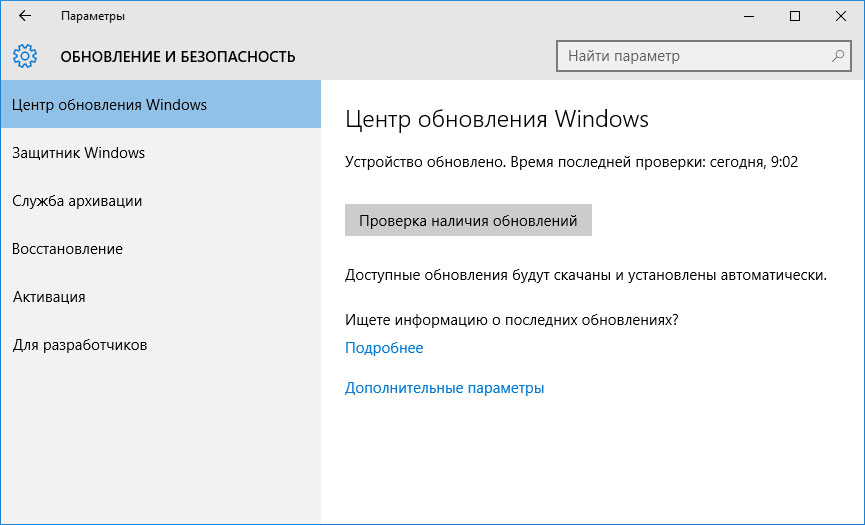

Запустить Центр обновления Windows можно следующим образом:
- Перейдите в меню Пуск и выберите Параметры.
- В окне Параметров перейдите в меню Обновление и Безопасность.
- Для установки последних обновлений Windows нажмите кнопку Проверка наличия обновлений и дождитесь окончания процесса их поиска и установки.
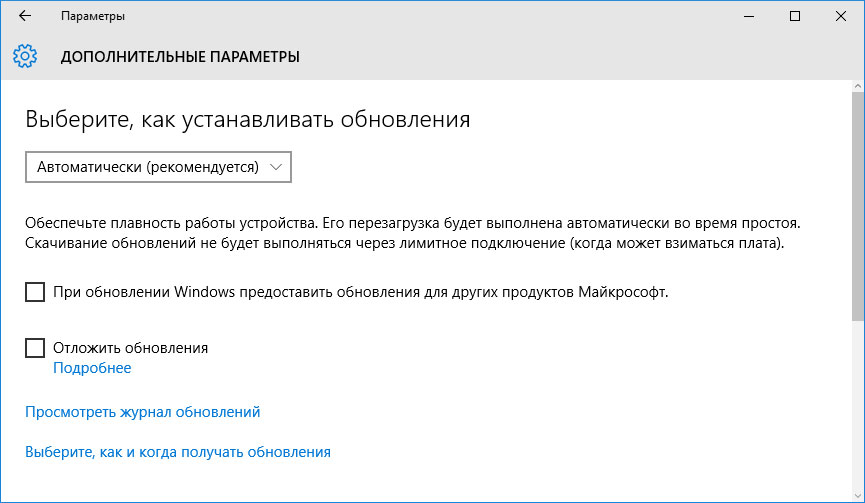
Рекомендуется настроить автоматическую загрузку и установку обновлений операционной системы с помощью меню Дополнительные параметры.
Чтобы включить автоматическое обновление системы необходимо запустить Центр обновления Windows:
- Перейдите в меню Пуск и выберите Параметры.
- В окне Параметров перейдите в меню Обновление и Безопасность и выберите подменю Центр обновления Windows. Для установки последних обновлений Windows нажмите кнопку Проверка наличия обновлений и дождитесь окончания процесса их поиска и установки.
- Перейдите в Дополнительные параметры и выберите, как устанавливать обновления — Автоматически.
Запустите проверку системы на вирусы
«Синий экран смерти» с ошибкой «BAD_POOL_HEADER » 0x00000019 может вызывать компьютерный вирус, заразивший систему Windows.
Для проверки системы на наличие вирусов запустите установленную на компьютере антивирусную программу.

Современные антивирусы позволяют проверить как жесткие диски, так и оперативную память. Выполните полную проверку системы.
Выполните проверку оперативной памяти
Неполадки с памятью могут привести к ошибкам, потере информации или прекращению работы компьютера.
Прежде чем проверять оперативную память, отключите её из разъёма на материнской плате компьютера и повторно вставьте в него. Иногда ошибка BAD_POOL_HEADER » вызвана неправильно или не плотно вставленной в разъём планкой оперативной памяти, или засорением контактов разъёма.
Если предложенные действия не привели к положительному результату, исправность оперативной памяти можно проверить средствами операционной системы, с помощью средства проверки памяти Windows.
Запустить средство проверки памяти Windows можно двумя способами:
- С помощью Панели управления:
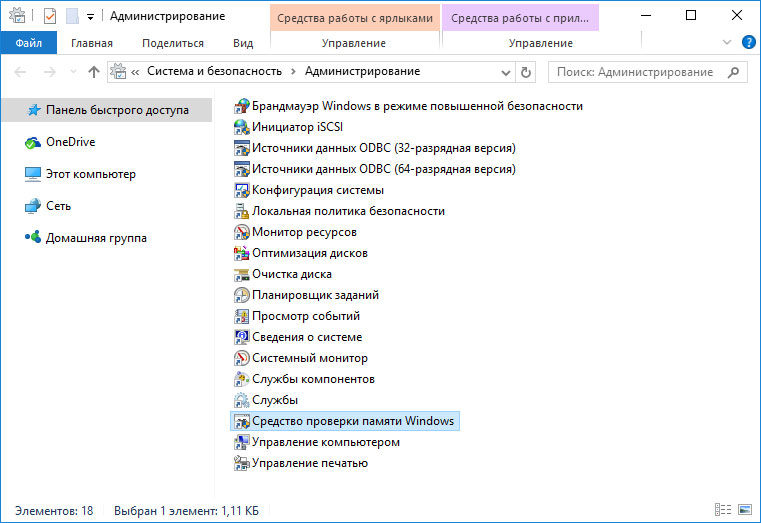
Перейдите в Панель управления / Система и безопасность / Администрирование. Запустите приложение Средство проверки памяти Windows.
- С помощью средства Выполнить:
Перейдите в Панель управления / Система и безопасность / Администрирование. Запустите приложение Средство проверки памяти Windows.
- С помощью средства Выполнить:
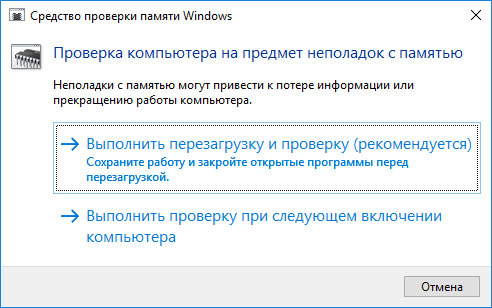
Запустите средство Выполнить с помощью комбинации клавиш Windows + R. Наберите mdsched и нажмите Enter. После чего откроется средство проверки Windows.
Для начала проверки выберите один из предлагаемых вариантов, проверка оперативной памяти в соответствии с которым будет запущена после перезагрузки компьютера.
Если в результате проверки будут определены ошибки, исправить которые не представляется возможным, то такую память необходимо заменить (замене подлежит модуль памяти с неполадками).
Выполните «чистую» установку Windows
Если не один из перечисленных методов не помог избавиться от BAD_POOL_HEADER », попробуйте переустановить Windows. Для того чтобы выполнить чистую установку Windows необходимо создать установочный диск или другой носитель с которого планируется осуществление установки операционной системы.
Загрузите компьютер из установочного диска. Для этого может понадобиться изменить устройство загрузки в BIOS или UEFI для более современных компьютеров.
Следуя пунктам меню установщика укажите диск, на который вы хотите установить Windows. Для этого понадобится отформатировать его. Если вас не устраивает количество или размер локальных дисков, их можно полностью удалить и заново перераспределить.
Помните, что форматирование, удаление или перераспределения дисков удалит все файлы с жесткого диска.
После указания диска для установки Windows запуститься процесс копирования системных файлов и установки операционной системы. Во время установки от вас не потребуется дополнительных действий. В течении установки экран компьютера будет несколько раз гаснуть на непродолжительное время, и для завершения некоторых этапов установки компьютер будет самостоятельно перезагружаться.
В зависимости от версии Windows на одном из этапов от вас может понадобиться выбрать или внести базовые параметры персонализации, режим работы компьютера в сети, а также параметры учётной записи или создать новую.
После загрузки рабочего стола чистую установку Windows можно считать законченной.
Примечание. Прежде чем приступить к выполнению чистой установки Windows заранее побеспокойтесь о наличии драйверов ко всем установленным устройствам и сохранности ваших файлов. Загрузите и сохраните драйвера на отдельный носитель информации, а для важных данных создайте резервную копию.
Как сбросить Windows 10 к исходному состоянию
Как сбросить Windows 10, 8, 7 если компьютер не загружается
Bad pool header can cause your computer unbootable. In this situation, to recover data from an unbootable machine, you can try MiniTool Power Data Recovery Bootable Edition. Then, you can try these 9 solutions mentioned in this MiniTool post to get rid of this bad pool header error.
When using the computer, the machine may suddenly appear as Blue Screen of Death with error bad pool header.
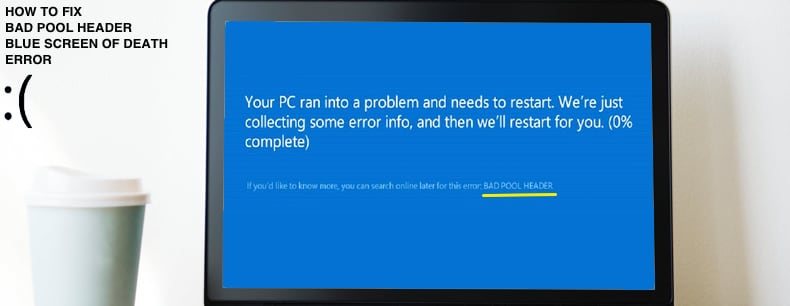
If your computer is running Windows 10/8, you will see a blue screen with the error message of Your PC ran into a problem and needs to restart. We’re just collecting some error info, and then we’ll restart for you…. BAD_POOL_HEADER.
If you are using Windows 7, you will receive an error message saying A problem has been detected and Windows has been shut down to prevent damage to your computer. BAD_POOL_HEADER.
Reasons for Bad Pool Header/Error 0x00000019
Usually, the bad pool header error is caused by the Windows memory allocation problems. Simply put, this issue often occurs after installing new hardware or software — always the antivirus software — which doesn’t work with the computer. Besides, faulty drivers & routers or other disk write issues can also lead to Windows bad_pool_header issue.
Then, you will ask how to solve this terrible issue?
To solve the bad pool header issue, we do some researches and apply many solutions. Now, in the following content, we will show you some available ways which can fix this issue.
In this part, we will show you how to get bad pool header Windows 10 fixed. If you are running other Windows OSs, the operations are similar.
If the computer can’t boot normally, you need to boot it into Safe Mode which can assist you to work through a resolution.
You can go through all of the following solutions first and then decide which one or more of them can solve the bad pool header issue accordingly.
How to Fix Bad Pool Header?
- Uninstall Recently Installed Software
- Uninstall Recently Installed Hardware
- Disconnect External Devices
- Disable Fast Startup Feature
- Update Device Drivers
- Perform a Clean Boot
- Perform Hardware Clean Boot
- Reinstall Windows
- Run Windows Memory Diagnostics Tool
Solution 1: Uninstall Recently Installed Software
If there is any recently installed software, you can uninstall it to have a try.
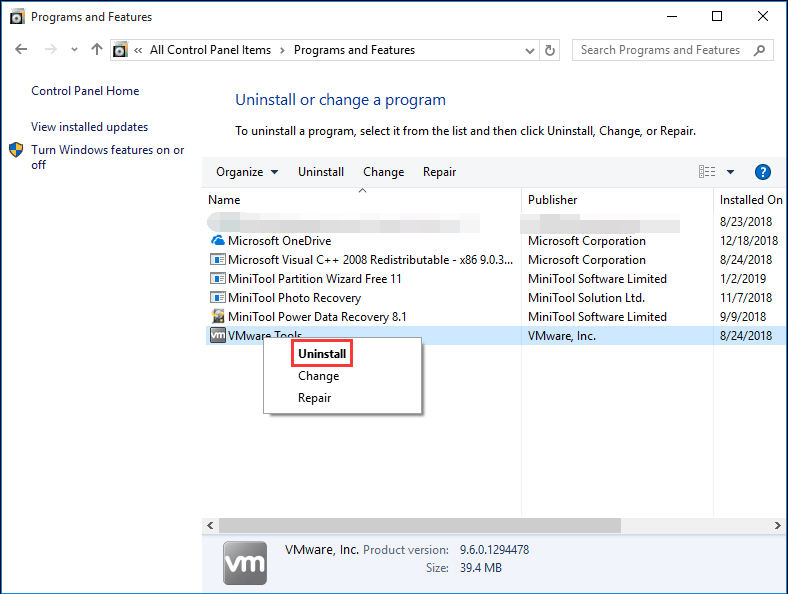
Please right-click on the Start button and then go to Control Panel > Programs and Features. Then, you will enter the following interface. Next, right-click on the target software and choose Uninstall from the popup list to uninstall the software.
At last, try to restart your computer to see whether the Windows bad_pool_header error is disappeared.
Solution 2: Uninstall Recently Installed Hardware
If you have installed any hardware recently, uninstall it now. Also, you need to right-click on the Start button and choose Device Manager from the list. Then right-click on the hardware driver and select Uninstall.
When all the recently installed software is uninstalled, restart your computer to have a try.
Solution 3: Disconnect External Devices
One reason for bad pool header error might be the external devices which are interfering with the system. Thus, you can disconnect all peripherals and external devices except the keyboard and mouse. After that, please restart the computer to check if the error is fixed.
If this solution doesn’t work, try the next one.
Solution 4: Disable Fast Startup Feature
If the Fast Startup feature is enabled by default, it may interfere with the system and then cause bad pool header error. In this situation, you can disable Fast Startup Feature to try.
Please go to Control Panel > Power Options > Choose what the power buttons do. Then, under Shutdown settings option, you need to uncheck Turn on fast startup (recommended).
At last, click on the Save changes button and restart the computer.
Solution 5: Update Device Drivers
Although Windows update can update all drivers automatically, these update steps may don’t work at times. Then the faulty drivers may cause bad pool header issue sometimes. In this situation, you can manually update the drivers.
To do this work, you need to go to Device Manager, right-click on the individual driver and choose Update Driver Software option. Then, just repeat these steps to update all the drivers one by one.
When all updates finish, please restart the computer to check whether the bad pool header issue is disappeared.
Click to Tweet
Solution 6: Perform a Clean Boot
If the above solution doesn’t work for you, please then perform a Clean Boot to see whether it can fix the bad pool header error.
To do this job, you need to right-click on the Start button and choose Run from the popup list. Then, type msconfig into the run box and press Enter to enter the System Configuration interface as follows. Stay at the General interface and check Selective startup under Startup selection.
Next, uncheck Load startup items, and make sure that both Load system services & Use original boot configuration are selected.
Next, switch to the Services tab, check Hide all Microsoft services and then click on the Disable all button.
Then, press the Apply and OK buttons successively. At last, restart the computer and Windows will enter the Clean Boot state. If there is no issue anymore, it means that the error is caused by some non-Microsoft processes. Then, you need to try and identify the exact offender manually.
Solution 7: Perform Hardware Clean Boot
Unlike the usual Clean Boot, a Hardware Clean Boot needs to disable the hardware components that are not necessary for a system to run in the Device Manager.
To do this job, you press Win+R keys to open the Run window. Then, please type devmgmt.msc and press Enter to open the Device Manager.
The following drivers should be disabled:
- Display Adapters.
- DVD/CD-ROM drives.
- Sound, video and game controllers.
- Network Adapters.
- Modems
- Ports
- USB Devices and controller if you are NOT using USB/Wireless Mouse or Keyboard.
To disable them, you need to right-click on the driver and choose Disable from the popup list.
Next, you can restart the system to check whether you have got rid of the bad pool header error. If yes, it means that one of the hardware is the cause of the issue and you have to try and identify the device manually.
Solution 8: Reinstall Windows
If all of the above solutions can’t fix the bad pool header issue, you should consider reinstalling your Windows. Before doing this, you’d better recover your data on the computer to a safe location.
If you want to recover files when bad pool header issue happens, what should you do then? Now, you can try a file recovery tool, and MiniTool Power Data Recovery can be your first choice.
This MiniTool data recovery software is specially designed to recover all your lost and deleted files from different data storage media, like internal hard drives external hard drives USB flash drives, memory cards, SD cards, scratched CD/DVD discs, and more.
You will say the machine is unbootable now, is it possible to recover data with a piece of third-party software. Of course, the answer is yes. You can use the Bootable Edition of this software to do the job.
Besides, this software can also scan the existing data on the drive for you. Thus, it can fully meet your need to recover data from an unbootable computer which is bothered by bad pool header error.
To get MiniTool Power Data Recovery Bootable Edition, you need to use the MiniTool Media Builder which can be obtained from the Professional or the above editions of this software to build a bootable CD/DVD or bootable USB flash drive.
Then, you can boot your computer from the bootable media and start the data recovery journey.
Here, we will take the MiniTool Power Data Recovery Personal Deluxe Edition as an example.
Step 1: When the software is open, you will enter This PC interface by default and this is the exact recovery module you are going to use. Then, choose the drive you want to recover and click on the Scan button to start the scanning process.
If you only want to recover some specific types of files, you can press the Settings button to make some selections.
Step 2: It will take some minutes to finish the scanning process. When it ends, you will enter the scanning result with the existing and deleted files. By default, the scanned files are listed by path and you need to open each path to find the data you want to recover.
Usually, there should be a lot of files in the scan result and it is difficult to find the needed files quickly. However, there are some features you can use to find the desired items easily and effectively:
- You can switch to the Type option to make the software show the scanned files by type which can help you find the data easily.
- If you know the name of the target file, you can click on the Find feature to enter the name and locate the file directly.
- By using the Filter function, you can make some file screening according to the file’s extension, size, creation date, modification date, and more.
- Besides, you can use the Preview feature of this software to preview the image files and text files which are not larger than 20MB.
Step 3: After checking the needed items, you can click on the Save button to choose a drive to save them. In this case, the computer is unbootable. Thus, you’d better use an external hard drive to keep these files.
You can see that it is easy to use MiniTool to recover data from an unbootable PC which is caused by bad pool header error.
Click to Tweet
Then, it’s time to reinstall Windows. There are many ways you can use to reinstall Windows. You can refer to this post to choose a suitable one according to your own situation: Detailed Steps and Instructions to Reinstall Windows OS.
Solution 9: Run Windows Memory Diagnostics Tool
When reinstalling Windows doesn’t work, there should be some hardware issues with the computer.
Windows 10/8/7 has a built-in tool, Memory Diagnostic Tool, which can help you to check for possible memory problems, including testing of the Random Access Memory (RAM) on the computer.
To open and use this tool, please follow these steps:
Step 1: Open Control Panel. Then, type memory in the upper right corner Search box and press Enter.
Step 2: Then, you need to choose Diagnose your computer’s memory problems under Administrative Tools from the search result and the Windows Memory Diagnostic interface will pop out. Next, please click on the Restart now and check for problems (recommended) option to continue.
Step 3: The computer will begin to restart and then enter the Windows Memory Diagnostics Tool which can check for memory problems automatically.
When the checking process ends, you can open the Event Viewer and look for the results in the MemoryDiagnostics-Results entry.
If this tool detects errors, you’d better contact the computer manufacturer to ask for fixes, since memory errors usually indicate there is a problem with the memory chips in your computer or other hardware problem.
Bottom Line
In this post, we show you 9 ways to fix bad pool header issue. You can try them one by one to help you out. There is always one way available. Besides, if you decide to reinstall Windows, you’d better use the MiniTool data recovery software to retrieve your data to keep them safe.
Should you have any question when using MiniTool software, you can contact us via [email protected]. You can also let us know in the comment.
What is a bad pool header?
Bad Pool Header means that your computer boots into a problem in allocating memory. When this error happens, your computer will not boot successfully and you will receive a blue screen with that error message.
What causes bad pool header Windows 10?
This issue can happen in various situations. For example, an anti-malware software is installed but it is not compatible with your computer; the device driver is outdated and incompatible with your computer; the RAM memory is faulty.
How do you fix a bad pool error?
- Uninstall recently installed software
- Uninstall recently installed hardware
- Disconnect external devices
- Disable fast startup feature
- Update device drivers
- Perform a clean boot
- Perform hardware clean boot
- Reinstall Windows
- Run Windows Memory Diagnostics Tool
How do I check if my RAM is faulty?
You can go to Control Panel > Administrative Tools or search for memory in Windows search box to access Administrative Tools. Then, you need to select Windows Memory Diagnostic to check whether your RAM is faulty.
How to Fix BAD_POOL_HEADER Blue Screen of Death Error in Windows 10
BAD_POOL_HEADER is a Blue Screen of Death (BSoD) error that appears when Windows encounters a critical problem from which it cannot recover. In this article, we describe tried and tested fixes to address this error.
The BAD_POOL_HEADER error is related to Windows memory allocation. However, the error can also occur due to other issues. RAM problems are usually the cause of the error, but problems with device drivers, bad disk sectors, and other disk write issues are also known to be common reasons for this error.
Fixing the BAD_POOL_HEADER error might require you to run the memory diagnostics tool, disable the Fast Startup feature, update drivers, temporarily disable installed third-party antivirus software, and other actions.
Note: If BAD_POOL_HEADER prevents you from starting Windows, you need to boot Windows into Safe Mode with Networking. Read this guide and use the «Interrupt Windows Boot Process» method. Then start Windows in Safe Mode with Networking from there.
Table of Contents:
- Introduction
- Temporarily Disable Your Antivirus
- Disconnect External Devices
- Run Windows Memory Diagnostic Tool
- Disable Fast Startup
- Update Your Drivers
- Perform a Clean Boot
- Check Your RAM
- Restore Your System Using Restore Points
- Video Showing How to Fix BAD POOL HEADER Error
Temporarily Disable Your Antivirus
If you recently installed antivirus software, this may be causing this BAD POOL HEADER error — many users have reported that temporarily disabling (or uninstalling) their antivirus software fixed the problem.
We recommend that you try this method even if you have been using your antivirus software for some time. If this solves the problem, contact the antivirus software developers and ask them if they can prevent their software from causing the BAD POOL HEADER error.
Read this guide if you are not sure how to disable your antivirus software. The article contains detailed instructions on how to disable some of the most popular antivirus programs.
[Back to Table of Contents]
Disconnect External Devices
Disconnecting external devices might fix the BAD POOL HEADER error. Connected external devices/peripherals might be interfering with the operating system. Disconnect all peripherals and external devices, and leave only the mouse and keyboard connected. Then restart the computer. Check if you still receive the BAD POOL HEADER error.
If the problem is resolved, one of the peripherals or external devices might be damaged or faulty, thus causing the problem. In this case, replace the peripheral or external device.
[Back to Table of Contents]
Run Windows Memory Diagnostic Tool
If there are problems with RAM (Random Access Memory), run the Windows Memory Diagnostic, a comprehensive memory test tool and easy to use.
To launch it, type «windows memory diagnostic» or «mdsched» in Search and click the «Windows Memory Diagnostic» result.
To run diagnostics, restart the computer. You will be asked if you want to restart now or run it the next time you start the computer.
When you restart the computer, Windows Memory Diagnostic Tool will start automatically. The testing process and results are displayed on the screen.
[Back to Table of Contents]
Disable Fast Startup
Fast startup is a useful Windows 10 feature that provides faster boot times on startup. Leaving fast startup enabled could be the reason for the BAD POOL HEADER error.
To fix the problem, you could disable this feature. Go to Search and type «power». Click the «Choose power plan» result to open it.
In the Power Options window, click «Choose what the power button do».
Click «Change settings that are currently unavailable» and then uncheck the «Turn on fast startup (recommended)» option (if it is enabled).
Click «Save changes» to save the changes made and see if this fixes the BAD POOL HEADER error.
Click «Change settings that are currently unavailable» and then uncheck the «Turn on fast startup (recommended)» option (if it is enabled).
Click «Save changes» to save the changes made and see if this fixes the BAD POOL HEADER error.
[Back to Table of Contents]
Update Your Drivers
A device driver is software that informs the operating system and other software how to interact with particular hardware. If the appropriate driver is not installed, the device might not function properly (if at all) and deliver various blue screen of death errors, including BAD POOL HEADER.
To update drivers, open Device Manager by right-clicking the Start button and selecting the «Device Manager» result from the contextual menu, or type «device manager» in Search and click the «Device Manager» result.
In Device Manager, you will see a list of devices connected to your computer. Since it is difficult to ascertain which driver is causing the problem, you will have to update them all unless you have noticed particular circumstances under which the BAD POOL HEADER occurred.
For example, if the error occurs when you connect to the Internet, start with updating the Network adapter drivers. Right-click the device and select «Update driver» from the drop-down menu.
You will be asked to search for updated driver software automatically or to browse your computer for driver software. If you select the first option, Windows will search the computer and Internet for the latest driver software for the device.
If you select the second option, you must locate and install drivers manually. Using this option requires having previously downloaded drivers on your computer or USB flash drive — this is a long process since you will have to manually download all the latest drivers for all the devices by visiting device manufacturers’ official websites.
We recommend you select the first option and follow the instructions. Apply the steps to all devices.
Snappy Driver Installer (SDI) is a powerful free driver updater for Windows. Drivers are downloaded through Snappy Driver Installer in ‘driverpacks’, which are simply collections (packs) of drivers for various hardware such as sound devices, video cards, network adapters, etc.
It can also show duplicate drivers and invalid drivers. It separates the updates that require you to restart your computer so that they are easier to distinguish. You can download Snappy Driver Installer from here.
Alternatively, look for other automated driver updaters online to update all drivers.
[Back to Table of Contents]
Perform a Clean Boot
You can also fix this problem by performing a clean boot of the Windows 10 operating system. A clean boot starts Windows by using a minimal set of drivers and startup programs. This helps to eliminate software conflicts when you install a program or an update or run a program in Windows. Therefore, you must disable all third-party applications and services to ascertain if any of these applications are causing the BAD POOL HEADER error.
To perform a clean boot, type «system configuration» in Search and open the System Configuration desktop app.
Another way to access System Configuration is to type «run» in Search, open it, type «msconfig» and click OK to run it.
When System Configuration is opened, select «Selective startup» so you can make changes and unmark «Load startup items».
When System Configuration is opened, select «Selective startup» so you can make changes and unmark «Load startup items».
Then, go to the «Services» tab and mark the «Hide all Microsoft services» checkbox. This will hide Microsoft apps and services (because we need to disable only third-party applications). In our example, only two services remain. Click «Disable all».
Click «Apply» and «OK» to save the changes and exit the System Configuration window. It will inform you that you need to restart the computer to apply the changes. Choose if you want to restart now or manually later.
Click «Apply» and «OK» to save the changes and exit the System Configuration window. It will inform you that you need to restart the computer to apply the changes. Choose if you want to restart now or manually later.
If this fixes the problem, you know that one installed third-party program is causing the problem. Finding which particular program is causing BAD POOL HEADER could be a long process since you must disable the programs one by one.
Additionally, if you wish to boot Windows normally, you will have to undo the changes to enable a Normal startup rather that Selective startup in System Configuration.
[Back to Table of Contents]
Check Your RAM
As mentioned in our introduction, the BAD POOL HEADER error can be caused by Random Access Memory (RAM) problems. It is possible that the RAM chip is not connected correctly or the slot (or chip) is dusty. If you know how to detach the RAM and reconnect it, we recommend trying this. Remove the RAM chip, ensure it is not dusty, and return it.
Do not do this when your computer is turned on. When you have finished, turn the computer back on and see if you still receive the BAD POOL HEADER error.
[Back to Table of Contents]
Restore Your System Using Restore Points
Finally, we would recommend you run System Restore using restore points. A restore point is a collection of important system files stored by System Restore on a given date and time.
To use this tool, you must have created restore points. With a created restore point, this feature will bring your system back to the previous working state, without affecting your files and data. If you have any system restore points created before the BAD POOL HEADER error started to occur, you might be able to fix it by simply restoring your system to a previous state.
To run System Restore, press the Windows Key + R and type «rstrui.exe». In the Run dialog box, press Enter or click «OK». Another way to open the Run dialog box is to right-click Start and select «Run» from the contextual menu.
The System Restore introduction window will appear. Click «Next» to proceed.
The System Restore introduction window will appear. Click «Next» to proceed.
If there are restore points created, you will see a list of them. Mark the «Show more restore points» checkbox, which should display more restore points. Select the most appropriate restore point (depending on time created, etc.) and click «Next». Ensure that you do not select a restore point when the BAD POOL HEADER error was already present.
Confirm the restore point. Your computer will be restored to the state before the event detailed in the «Description» field. If you are happy with your choice, click «Finish» and begin the system restore process.
Confirm the restore point. Your computer will be restored to the state before the event detailed in the «Description» field. If you are happy with your choice, click «Finish» and begin the system restore process.
We hope that one of the above solutions fixed the BAD POOL HEADER error.
[Back to Top]


