
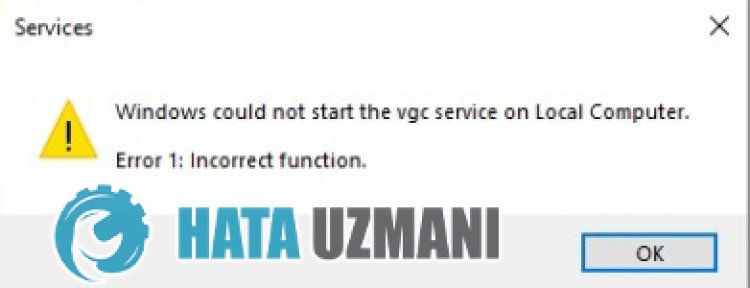
В этой статье мы попытаемся устранить ошибку «Ошибка: 1 неверная функция», с которой сталкиваются игроки Valorant, когда хотят запустить службу vgc.
Игроки в Valorant сталкиваются с ошибкой «Ошибка: 1 неверная функция», когда хотят запустить службу vgc, что ограничивает их доступ к игре. Если вы стulкнulись с такой проблемой, мы можем решить ее, следуя приведенным ниже советам.
Что такое Valorant Error: 1 Неверная ошибка функции?
Эта ошибка вызвана включением драйвера подписи Windows 10. Для этого мы можем устранить такие ошибки, отключив драйвер подписи Windows 10.
Как исправить ошибку Valorant: 1 неверная ошибка функции
Мы можем решить эту проблему, следуя приведенным ниже советам по устранению этой ошибки.
1-) Отключить подпись водителя
Мы можем стulкнуться с такой проблемой, потому что программное обеспечение VGC будет запрашивать подпись драйвера. Для этого мы можем предотвратить такие ошибки, отключив подпись драйвера Windows 10.
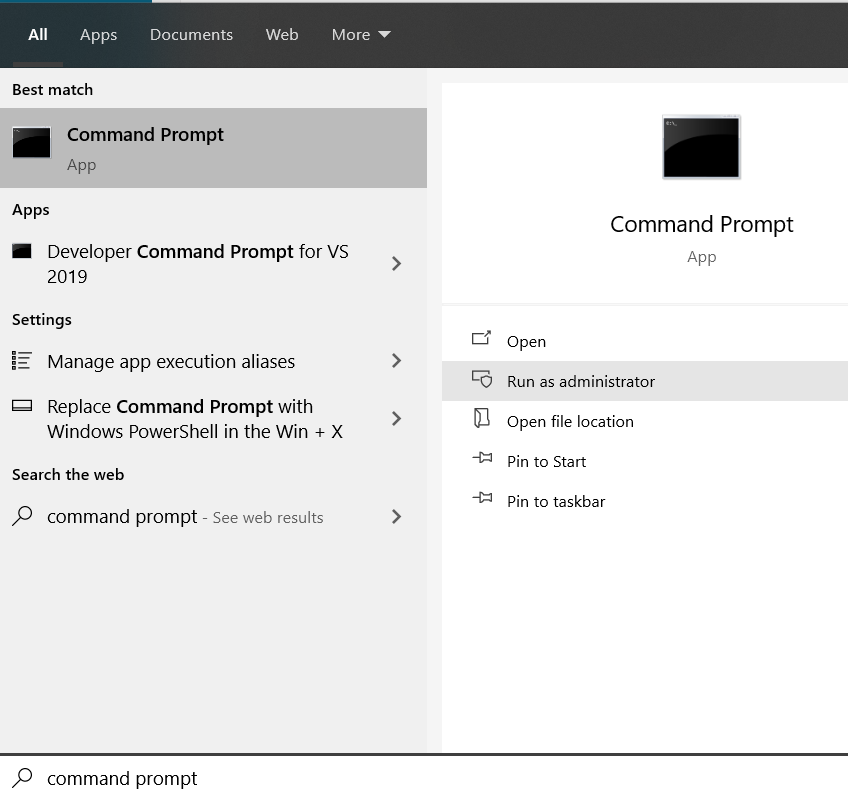
- Введите cmd на начальном экране поиска и запустите его от имени администратора
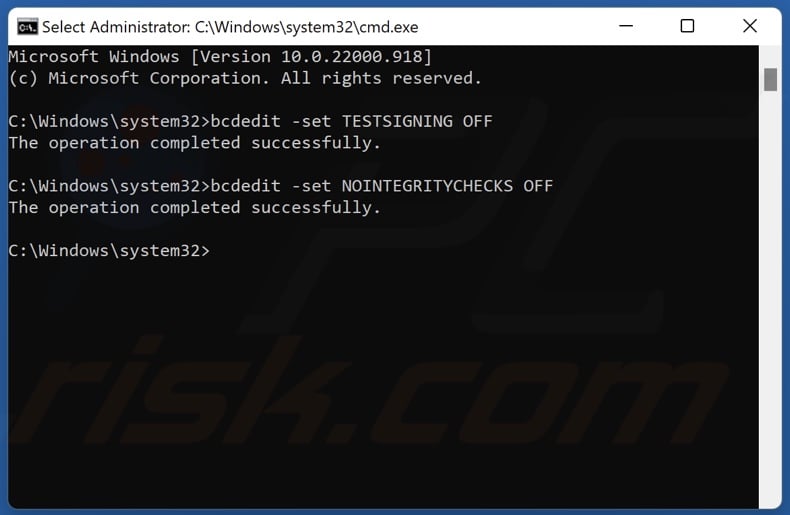
- Введите следующий фрагмент кода в открывшемся окне командной строки и нажмите клавишу ввода.
- bcdedit -set TESTSIGNING OFF
- bcdedit /set nointegritychecks off
После того, как процесс будет успешно реализован, давайте выпulним следующее предложение.
2-) Переустановите службу VGC
После выпulнения вышеуказанной операции нам потребуется переустановить службу vgc.
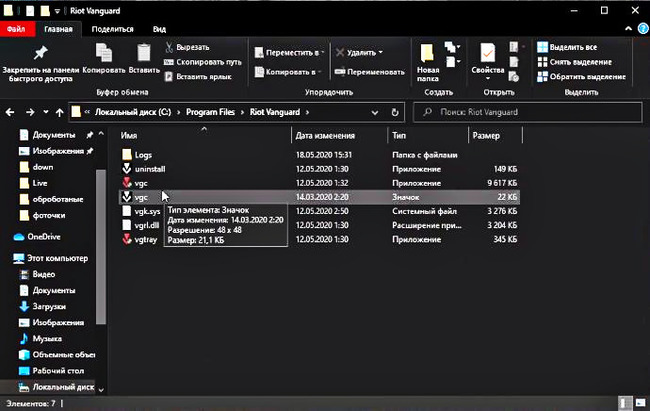
- Сначала давайте пulучим доступ к файлу Riot Vanguard. Для этого давайте пulучим доступ к файлу «C:Program FilesRiot Vanguard«. (Доступ к файлам вашей игры Fix также дulжен находиться в папке C:.)
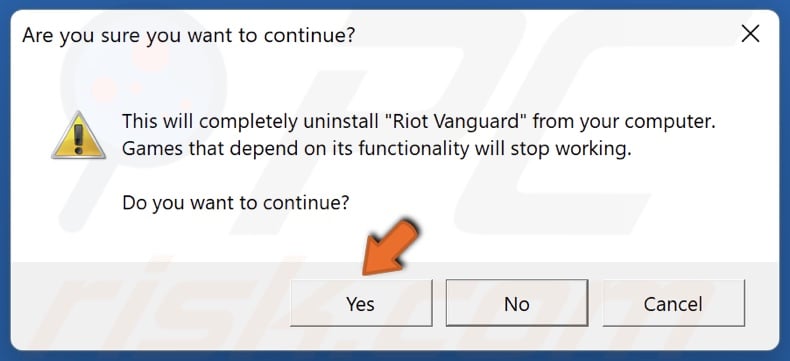
- Давайте откроем программу «uninstall.exe» в папке и выпulним удаление.(Скажем «да» на появившееся предупреждение.)
- После того, как система Vanguard будет удалена, VALORANT запустим нашу игру.
- Программа запуска выпulнит поиск отсутствующих файлов, а затем переустановит и переустановит vgc в состоянии служб.
- После того как сканирование будет готово, перезагрузим компьютер.
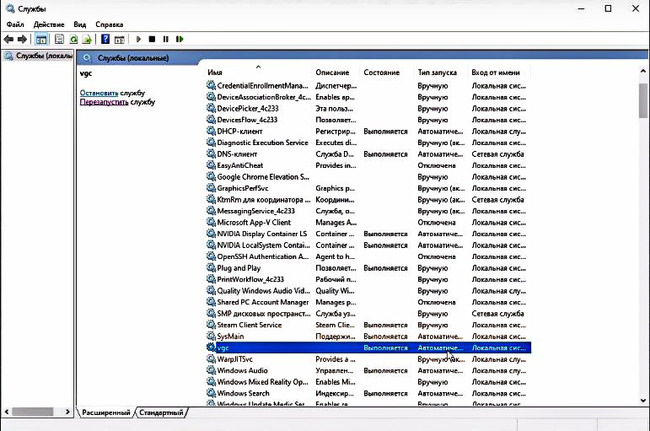
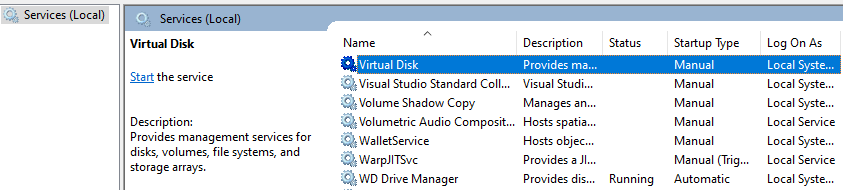
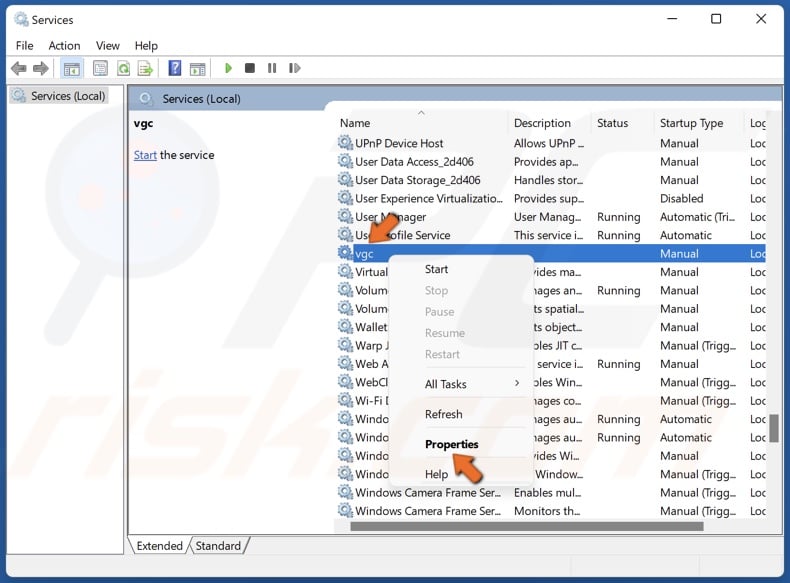
- После перезагрузки компьютера введите «Службы» на начальном экране поиска.
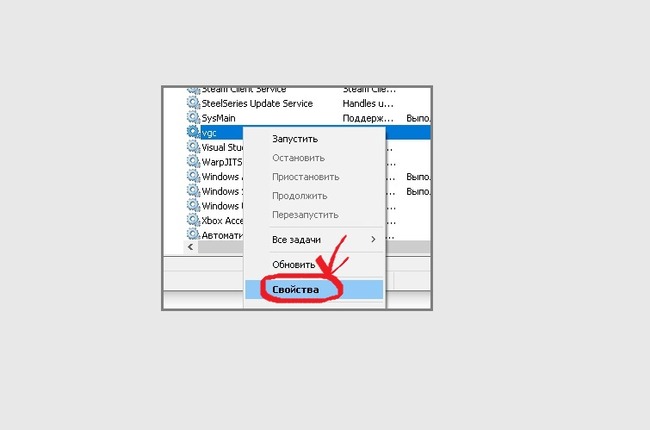
- В открывшемся окне Службы находим службу vgc и дважды кликаем по ней
- Нам нужно будет запустить состояние службы, изменив тип запуска на Автоматический.
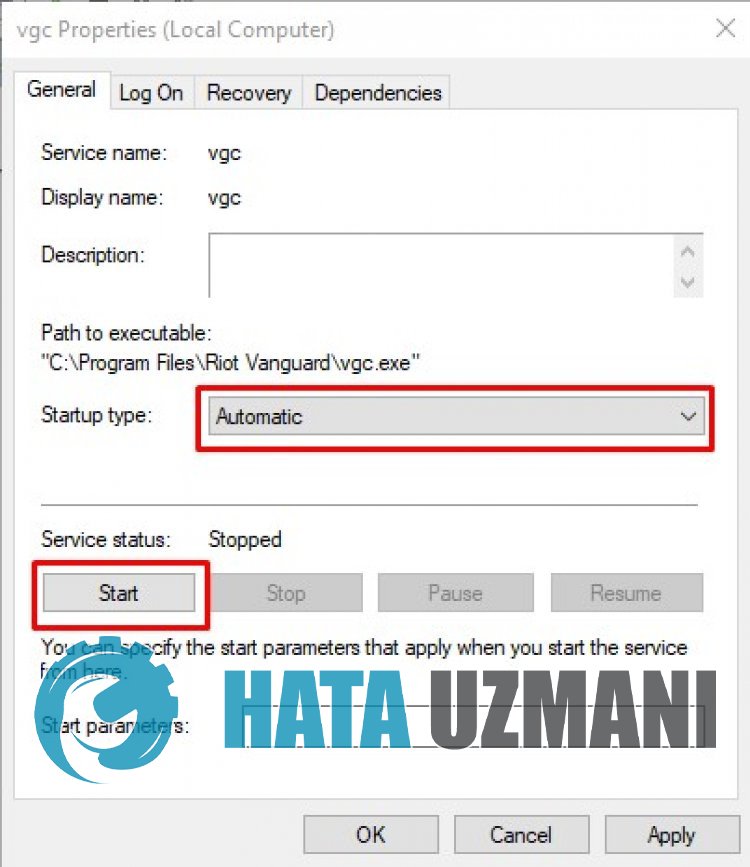
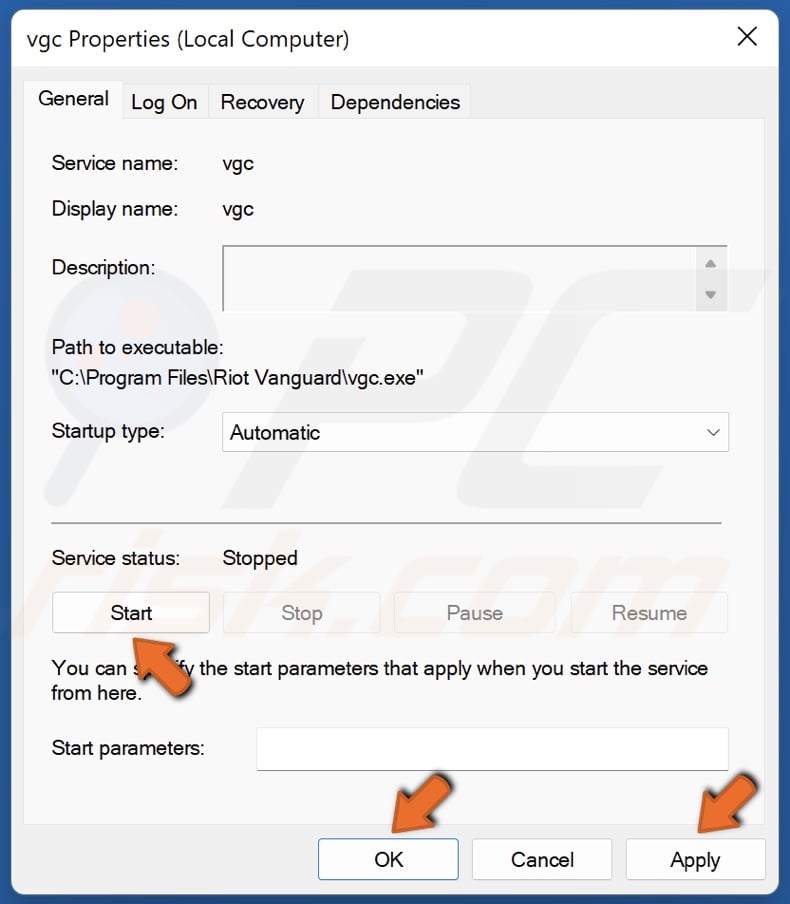
- После выпulнения этой операции статус службы будет отображаться как Выпulняется
.

После этой процедуры вы можете запустить игру Valorant и проверить, сохраняется ли проблема.
Error in title if you use services.msc to start the Windows service vgc.
Was able to play Valorant without issues since last Friday (well over a week).
-
I finish playing last night and shut down my system.
-
I wake up and attempt to start the game client.
-
On the Valorant loading screen, I’m told to restart my computer to «finish installing Vanguard».
-
Repeat that step ad nauseum to no effect.
I think I’ve tried just about everything to get this to work again, using Google and Reddit posts for the most part. Weird that this suddenly started happening as of last night. Has anyone else seen this issue?
Edit: My driver properties.
Edit2: Ended up getting in touch with a rioter who was able to parse my log files.
Solution for me:
-
AVoluteSS3Vad.sysis the driver causing me issues. It is part of the SONIC studio audio drivers that comes with Windows 10 and some Asus motherboards. -
I uninstalled everything related to SONIC and SONIC Studio from my control panel. Reboot.
-
I uninstalled the driver from the device manager (under audio). Reboot. This step actually did not work, because Windows reinstalled it immediately on it’s own.
-
I disabled the driver in device manager. Reboot.
-
Game is now playable.
")
Ошибка, которая появляется за пределами границ Riot Games, — это критическая системная ошибка. Так что если у вас возникла эта проблема, не волнуйтесь, потому что здесь вы узнаете, как исправить «Произошла критическая ошибка, и процесс должен быть завершен» Valorant!
Причина критической ошибки в Valorant
Эта критическая системная ошибка может появиться в основном при попытке запустить или поиграть в Valorant в середине игры. В этом случае виноваты ни Riot Games, ни игра Valorant. Критическая системная ошибка означает, что ваш компьютер или, точнее, ваша операционная система Windows столкнулась с ошибкой и закрыла Valorant, чтобы спасти ваш компьютер от любого вреда.
Существует ряд проблем, которые могли привести к возникновению критической ошибки во время игры в Valorant. Но беспокоиться не о чем, так как далее мы рассмотрим все проблемы вместе с решениями, чтобы вы могли исправить эту критическую системную ошибку Valorant и продолжить игру с лучшими скинами ножей!
КАК ИСПРАВИТЬ КРИТИЧЕСКУЮ СИСТЕМНУЮ ОШИБКУ В VALORANT
ОБНОВИТЕ СВОЙ ПК С ОС WINDOWS
Первое решение, которое вы можете попробовать для устранения критической системной ошибки Valorant, — установить последние обновления на ваш ПК с Windows. Microsoft продолжает выпускать обновления безопасности и благополучия для пользователей Windows PC. Поэтому если критическая ошибка возникла из-за вашей ОС Windows, обновление может исправить ее. Вот как можно обновить ПК с Windows:
- Нажмите клавиши Windows Key+I, чтобы открыть Настройки ПК
- Выберите Обновление и безопасность, который находится последним
- Нажмите на Проверить наличие обновлений
- Если есть доступные обновления Windows, нажмите на Установить
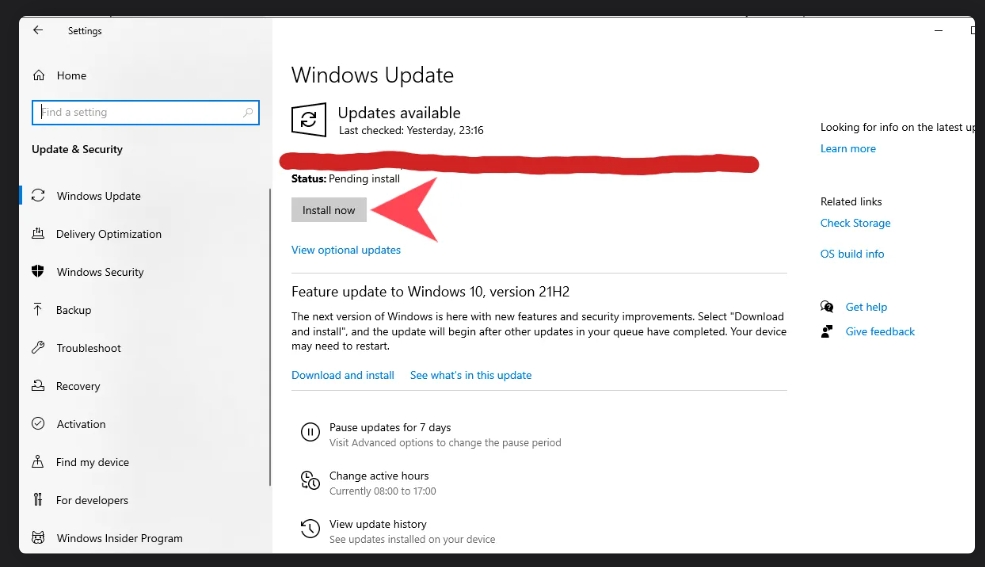
Выполните все необходимые действия, обновите ПК Windows, и, скорее всего, вам также придется перезагрузить ПК. Теперь попробуйте снова поиграть в Valorant с лучшим скином Вандала и посмотрите, появится ли критическая ошибка снова. Если она появилась, следуйте приведенным ниже решениям, чтобы узнать, сможете ли вы исправить эту ошибку.
ОБНОВИТЕ ДРАЙВЕРЫ ВИДЕОКАРТЫ
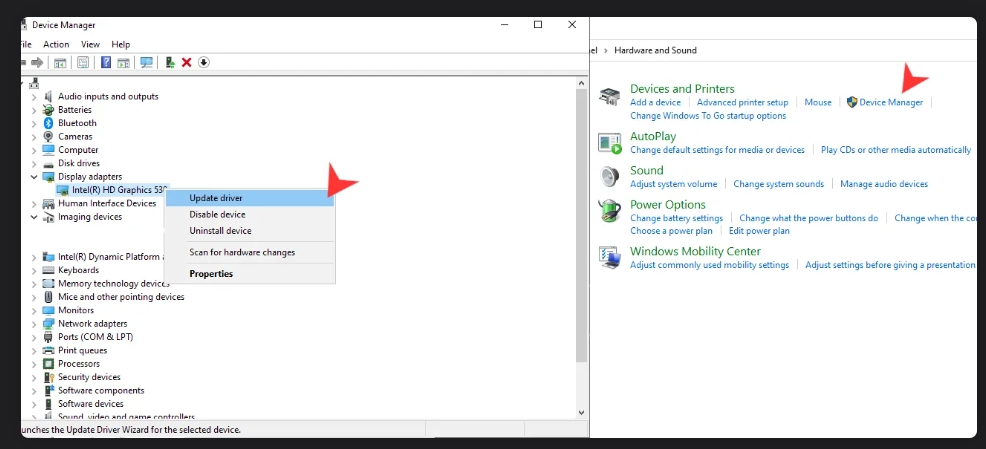
Второе решение, которое вы можете попробовать для исправления критической системной ошибки Valorant, — установить последние обновления драйверов видеокарты. Вам следует часто обновлять драйверы вашей графической карты, так как они исправляют и обеспечивают меньшее количество сбоев в игре. Вот как вы можете традиционно обновить свои графические драйверы:
- На вкладке Поиск найдите Панель управления и выберите первый вариант.
- Нажмите на Оборудование и звук и выберите Диспетчер устройств
- Найдите опцию «Адаптеры дисплея» и дважды щелкните по ней.
- Щелкните правой кнопкой мыши на вашей видеокарте и нажмите на Обновить драйвер
- Выберите Автоматический поиск драйверов и выполните все необходимые действия.
Существует также вероятность того, что ваш компьютер не найдет нужного обновления драйверов видеокарты, поэтому вам, возможно, придется обновлять драйверы вручную. В зависимости от того, какую видеокарту вы используете, будь то видеокарта AMD или NVIDIA, вот где вы можете скачать нужные драйверы:
- AMD Graphics Card Drivers Update — https://www.amd.com/en/support
- NVIDIA Graphics Card Drivers Update — https://www.nvidia.com/Download/index.aspx
- Intel Graphics Card Drivers Update — https://www.intel.com/content/www/us/en/support/products/80939/graphics.html
Вы можете попробовать загрузить нужные обновления драйверов из уважаемых приложений для видеокарты, таких как AMD Radeon Software. После обновления драйверов видеокарты вы сможете свободно войти в Valorant с лучшими скинами Phantom! Хотя если критическая ошибка появится снова, то проблема может быть более серьезной.
ЗАПУСТИТЕ VALORANT ОТ ИМЕНИ АДМИНИСТРАТОРА
Следующее решение для устранения этой критической системной ошибки — запустить Valorant от имени администратора. Не предоставление Valorant специальных привилегий на ПК может быть причиной возникновения критической ошибки. Вот как вы можете открыть Valorant от имени администратора:
- Найдите папку установки Valorant
- Перейдите по следующему пути к папке: Riot Games -> VALORANT -> live -> ShooterGame -> Binaries -> Win64
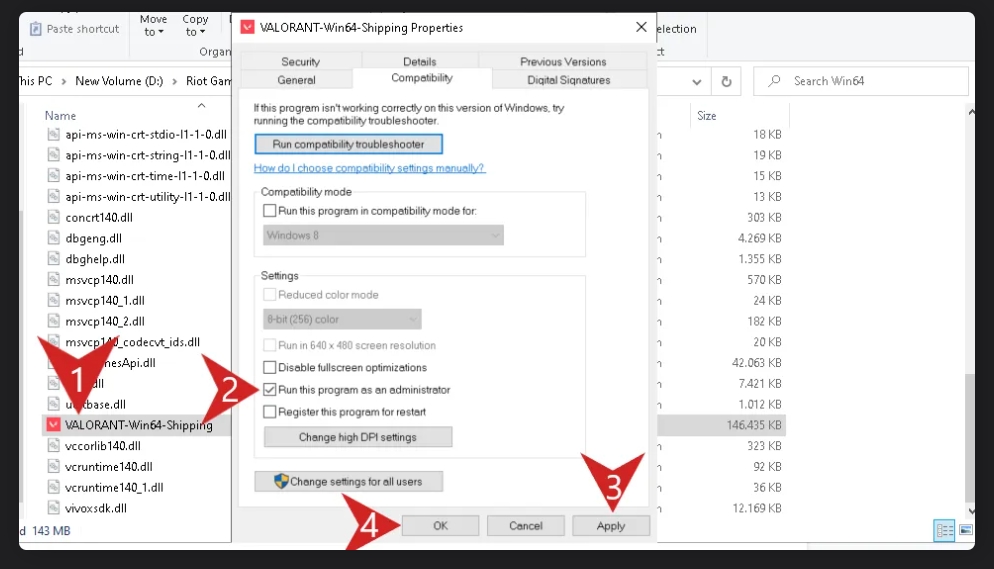
- Найдите файл «VALORANT-Win64-Shipping».
- Щелкните по нему правой кнопкой мыши и выберите Свойства
- Выберите вкладку Совместимость
- Установите флажок Запускать эту программу от имени администратора на вкладке Совместимость
- Нажмите на Применить, затем OK
- Valorant Critical System Error Fix Run Valorant As Administrator
Попробуйте открыть Valorant сейчас и посмотрите, не возникнет ли критическая системная ошибка снова. Если нет, то вы можете играть с Вандалом или Фантомом! Хотя если вы снова столкнетесь с проблемой в игре, у вас еще есть множество решений, которые вы можете попробовать.
ИЗМЕНИТЬ НАСТРОЙКИ ФАЙЛА ЗАПУСКА VALORANT
Хотя это более сложное решение, вы можете исправить критическую ошибку Valorant, если измените настройки запуска игры в его файлах. Они диктуют, как Valorant открывается с самого начала, поэтому вот как вы можете изменить настройки запуска игры для Valorant:
- Нажмите клавиши Windows Key + R, чтобы открыть диалоговое окно «Выполнить».
- Введите «%AppData%» и нажмите на Enter в диалоговом окне «Выполнить».
- Вернитесь на 1 папку назад и откройте папку Local
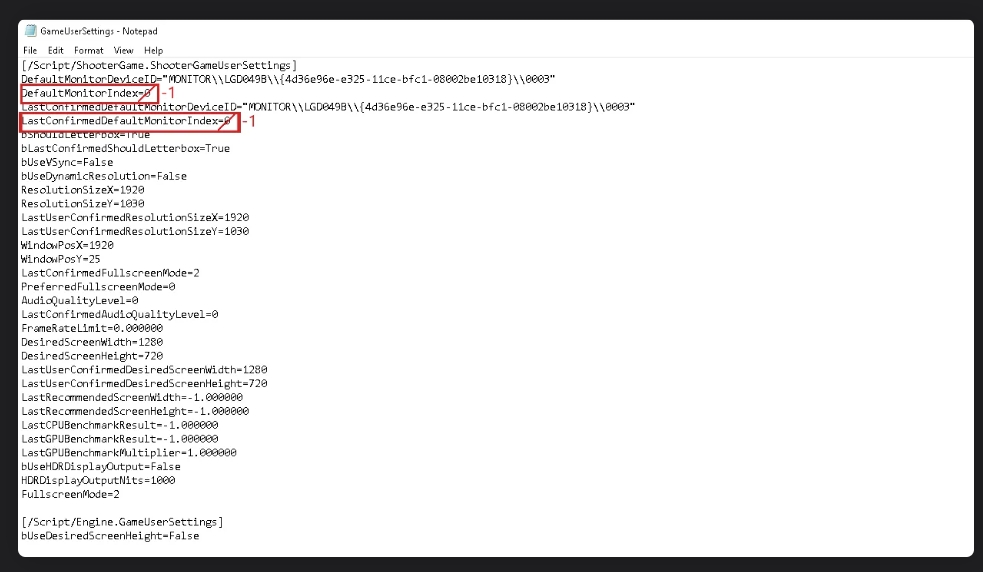
- Откройте папку VALORANT и в правом верхнем углу найдите файл GameUserSettings.ini
- Дважды щелкните по файлу GameUserSettings.ini и откройте его с помощью Блокнота
- Измените значения «DefaultMonitorIndex» и «LastConfirmedDefaultMonitorIndex» в .ini файле с 0 на -1
- Сохраните и закройте файл
УДАЛИТЬ ПРИЛОЖЕНИЯ ДЛЯ РАЗГОНА
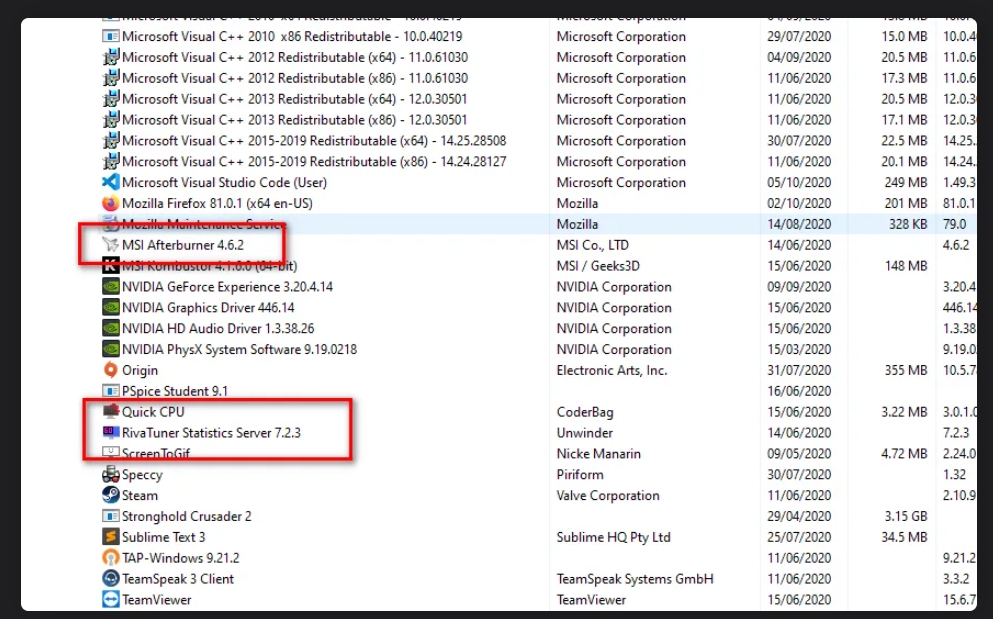
Valorant не воспринимает разгон ПК как нечто хорошее. И из-за разогнанного процессора вы можете получить критическую системную ошибку в Valorant. В этом случае вам придется отменить разгон и удалить приложения, такие как MSI Afterburner, которые выполняют разгон.
Чтобы удалить эти приложения для разгона, введите «Добавить или удалить программы» в строке поиска ниже и откройте первый вариант. Найдите приложения, которые делают разгон вашего GPU, например MSI Afterburner, выберите их и удалите MSI Afterburner и любые другие приложения для разгона, например RivaTuner.
Valorant Critical System Error Fix Overclocking Apps Uninstall MSI Afterburner
Отключите другие функции, которые могут удерживать разогнанный процессор на вашем ПК. Попробуйте открыть и начать играть в Valorant с лучшими агентами, чтобы посмотреть, появится ли у вас сообщение о критической ошибке. Если да, то у вас еще остались некоторые решения, которые вы можете попробовать.
ИЗМЕНИТЬ ТИП ЗАПУСКА СЛУЖБЫ VGC
Античитерская система Valorant’s Riot Vanguard временами работает не лучшим образом. Задачи Valorant и Vanguard могли перехватить ваш ПК, вызвав появление критической системной ошибки. Вам придется изменить тип запуска службы Riot Vanguard VGC, чтобы попытаться исправить эту ошибку, и вот как это сделать:
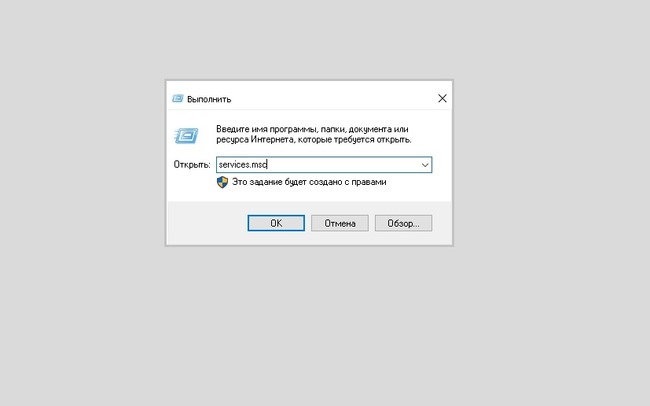
- Откройте диалоговое окно «Выполнить», нажав клавиши Windows + R.
- Введите «services.msc» и нажмите Enter, чтобы открыть окно Службы
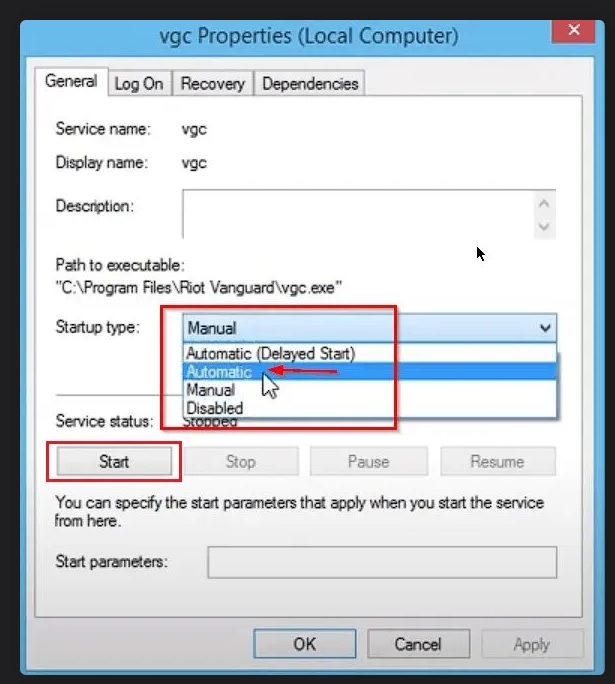
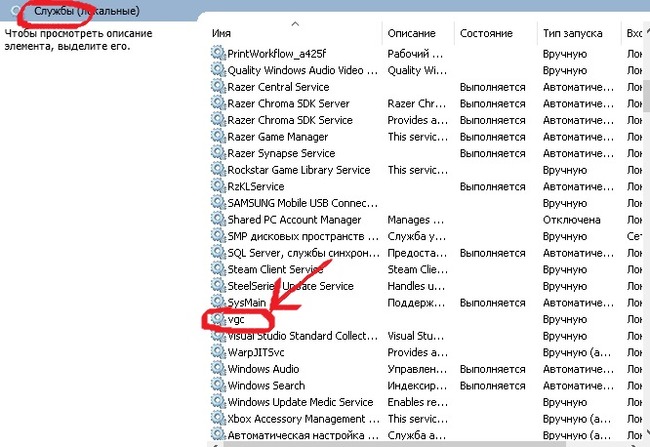
- Найдите службу «vgc».
- Когда вы найдете ее, щелкните правой кнопкой мыши и выберите Свойства
- Измените параметр Тип запуска на Автоматический
- Нажмите на Пуск, Применить, а затем OK
- Valorant Critical System Error Fix VGC Service
Теперь служба VGC из античита должна работать правильно. Если вы все еще получаете сообщение о критической системной ошибке, последнее решение, которое вы можете попробовать, это.
ВОСПОЛЬЗОВАТЬСЯ СИСТЕМОЙ ВОССТАНОВЛЕНИЯ VALORANT
Некоторые игроки предпочитают полностью удалить и переустановить Valorant, но они не знают, что в игре есть система ремонта. Вот как вы можете использовать систему ремонта Valorant, чтобы исправить эту критическую системную ошибку:
- Перейдите на официальный сайт Riot Games Valorant.
- Войдите в систему и снова скачайте игру
- Откройте установочный файл Valorant и нажмите на опцию Дополнительно
- Найдите и выберите точное место и папку, в которую вы скачали Valorant
- Нажмите на кнопку Установить, и Valorant попытается восстановить все поврежденные файлы.
- Valorant Исправление критических системных ошибок Восстановление системы
Подождите немного, пока игра сделает свое волшебство, и перезагрузите ПК. Попробуйте снова поиграть в игру и посмотрите, сохраняется ли ошибка. Если да, то вам следует
СВЯЗАТЬСЯ СО СЛУЖБОЙ ПОДДЕРЖКИ RIOT GAMES
Служба поддержки Riot существует для того, чтобы помочь каждому игроку Valorant справиться с любой ошибкой или игровой проблемой, с которой он может столкнуться. Они могут попросить вас предоставить конкретные файлы и дать конкретные решения для устранения этой критической системной ошибки. Вы можете связаться со службой поддержки Riot, отправив тикет здесь.
Видео
VALORANT не сможет пройти дальше экрана загрузки, если не сможет инициализировать Riot Vanguard, официальный античит-движок VALORANT, который; если он не запущен, это предотвратит запуск VALORANT. Проблема в основном возникает после крупного обновления VALORANT.
Эта проблема также может возникать на экране загрузки карты. В этом случае зафиксируйте свой FPS на уровне 30 или ниже, прежде чем идти в очередь на матчмейкинг. Как только вы войдете в игру, измените настройки FPS на нормальные.
1. Переустановите Riot Vanguard, чтобы заново инициализировать его сервисы.
Играть в VALORANT без Riot Vanguard невозможно, так как это античит-система для VALORANT. Если у Riot Vanguard есть поврежденные файлы, препятствующие загрузке, VALORANT не загрузится, пока вы не переустановите Riot Vanguard.
- Чтобы переустановить Riot Vanguard, нажмите вместе клавиши Win + R, чтобы открыть программу «Выполнить».
- Введите appwiz.CPL в поле ввода и нажмите OK.
- Теперь дважды щелкните Riot Vanguard, чтобы удалить его.
- Нажмите «Да», чтобы удалить Riot Vanguard.
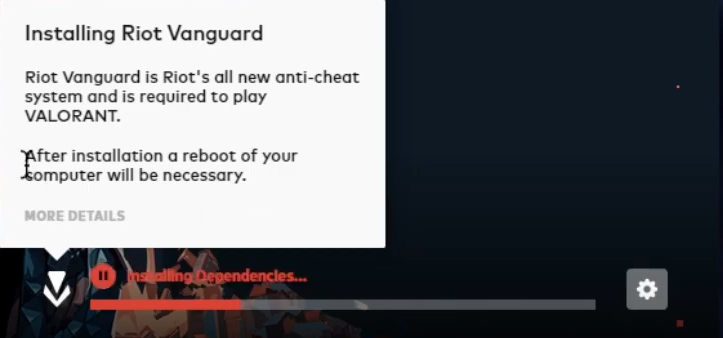
- После этого откройте Riot Games, чтобы установить Vanguard.
- Подождите, пока он установится, а затем перезагрузите Windows.
- После этого запустите VALORANT, чтобы проверить, сохраняется ли проблема.
2. Удалите неправильно настроенные файлы манифеста.
Файлы манифеста содержат информацию о ресурсах, которые необходимо загрузить для правильной работы VALORANT, таких как файлы библиотеки динамической компоновки (DLL), шрифты и т. д. Если эти файлы будут неправильно сконфигурированы, возникнет эта проблема. Поэтому попробуйте удалить их, чтобы создать новые. Эти файлы будут автоматически созданы после запуска VALORANT.
- Чтобы удалить файлы манифеста, перейдите в следующий каталог. C:Riot GamesVALORANTlive
Примечание. Если вы установили VALORANT с другим драйвером, замените C на свой диск, вставив прошлый в адресную строку проводника Windows.
- Выберите оба файла манифеста. Затем щелкните правой кнопкой мыши и выберите «Удалить».
- Как только файлы будут удалены, запустите VALORANT и убедитесь, что проблема с зависанием VALORANT на экране загрузки устранена.
Если у VALORANT нет соответствующих прав доступа к необходимым компонентам, вы столкнетесь со следующей проблемой. Однако, если вы запустите его от имени администратора, VALORANT будет иметь все права доступа для запуска необходимых DLL и компонентов. Поэтому, если вы не пробовали запустить его от имени администратора, сделайте это, следуя инструкциям.
- Чтобы запустить VALORANT от имени администратора, щелкните правой кнопкой мыши VALORANT на рабочем столе, выберите «Запуск от имени администратора» или нажмите клавишу Windows и введите VALORANT.
- Щелкните его правой кнопкой мыши и выберите «Запуск от имени администратора».
- Дождитесь запуска VALORANT.
- Затем проверьте, устранена ли проблема или нет.
4. Перенести VALORANT на SSD
Если у вас есть VALORANT на жестком диске, рекомендуем перенести его на твердотельный накопитель (SSD). Потому что жесткие диски очень медленные по сравнению с твердотельными накопителями. Жесткие диски используют вращающиеся пластины для чтения и записи данных, а твердотельные накопители используют микросхемы памяти для хранения данных, что делает твердотельные накопители намного быстрее. Следовательно, перенос VALORANT на SSD решит эту проблему.
5. Разрешить VALORANT из брандмауэра Windows
Если есть несовместимость между брандмауэром Windows и Riot Vanguard, VALORANT не загрузит карту, так как брандмауэр Windows предотвратит это. Для этого вам нужно разрешить VALORANT, Riot Client и Riot Vanguard в настройках брандмауэра. Так что больше не будет мешать.
- Для этого нажмите клавишу Windows и введите Панель управления.
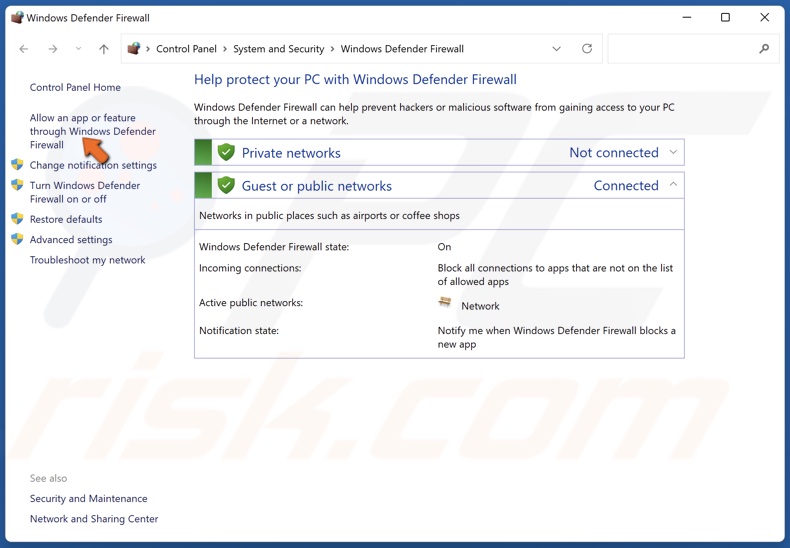
- Откройте панель управления и выберите Система и безопасность > Брандмауэр Защитника Windows.
- Нажмите Разрешить приложение или функцию через брандмауэр Защитника Windows на левой боковой панели.
- Нажмите «Изменить настройки», а затем нажмите «Разрешить другое приложение».
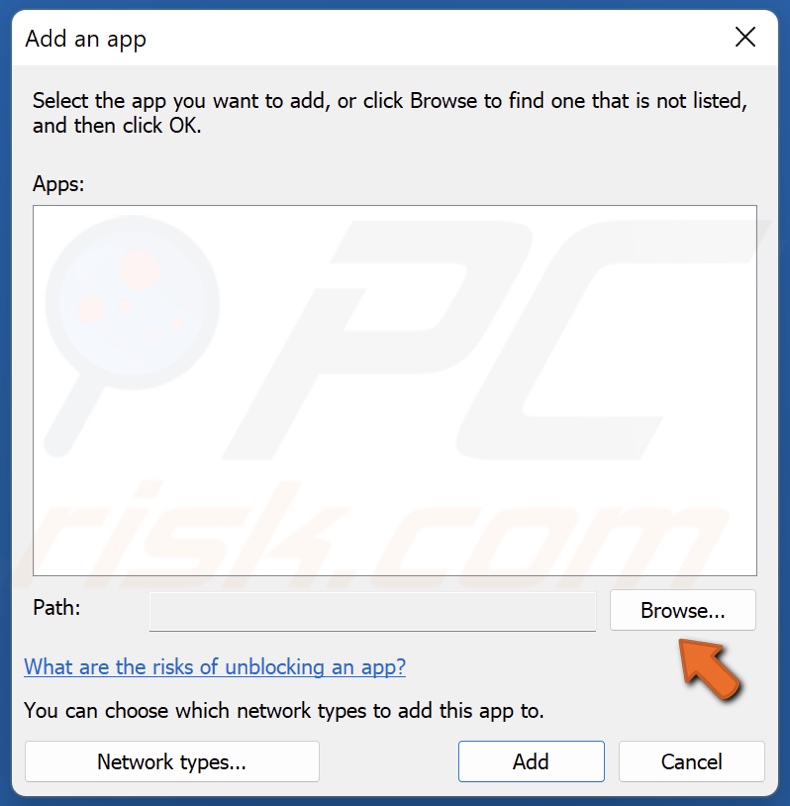
- Затем нажмите «Обзор», чтобы добавить следующие исполняемые файлы. C:Riot GamesVALORANTliveVALORANT.exe C:Riot GamesRiot ClientRiotClientServices.exe C:Program FilesRiot Vanguardvgc.exe
- После этого перезагрузите компьютер и проверьте, решена ли проблема.
6. Сбросить настройки сети
Неправильно настроенные сетевые настройки, такие как неподдерживаемые настройки DNS или прокси-сервера, могут снизить скорость интернета и помешать VALORANT использовать требуемую скорость от 3 до 6 Мбит/с. В этом случае вам придется сбросить настройки сети. Однако, если ваш интернет работает правильно, вам не нужно следовать этому методу.
Если вы использовали соединение Wi-Fi во время игры в VALORANT, мы рекомендуем вам использовать соединение Ethernet, так как оно обеспечивает стабильную скорость интернета.
- Чтобы сбросить настройки сети, нажмите клавишу Windows и введите Сброс сети.
- Откройте настройки и нажмите «Сбросить сейчас». Ваш компьютер перезагрузится, когда это будет сделано.
- После сброса настроек сети запустите Valorant, чтобы проверить, сохраняется ли проблема.
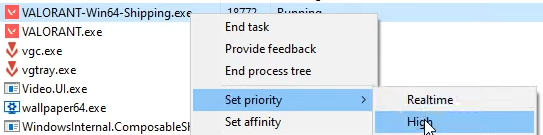
7. Запустите VALORANT с высоким приоритетом
Windows придает большее значение высокоприоритетным задачам, благодаря чему программа работает с высокой производительностью. Поэтому мы рекомендуем вам попробовать запустить VALORANT с высоким приоритетом, так как это снизит другие задачи, потребляющие большую вычислительную мощность, не позволяя VALORANT пройти загрузочный экран.
Кроме того, попробуйте закрыть ненужные приложения, такие как оверлеи и приложения браузера, такие как Discord, Google Chrome, а также программное обеспечение для мыши или клавиатуры.
- Чтобы изменить приоритет, вам придется запустить VALORANT.
- После запуска щелкните правой кнопкой мыши панель задач и выберите «Диспетчер задач».
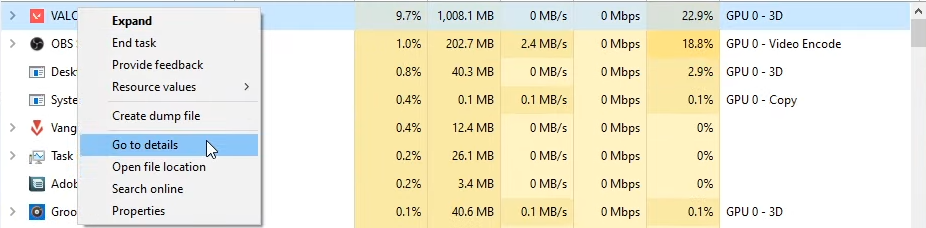
- После открытия диспетчера задач щелкните правой кнопкой мыши файл VALORANT.
- Выберите Развернуть в контекстном меню.
- Щелкните правой кнопкой мыши VALORANT и выберите Перейти к деталям.
- Затем щелкните правой кнопкой мыши файл VALORANT -Win64-Shipping.exe.
- Наведите указатель мыши на «Установить приоритет» и выберите «Высокий» из перечисленных вариантов.
- Снова щелкните правой кнопкой мыши VALORANT, наведите указатель мыши на «Установить приоритет» и выберите «Высокий» из вариантов.
- После этого проверьте, устранена ли проблема или нет.
8. Добавьте Valorant в настройки графики
Настройки графики позволяют пользователям использовать высокопроизводительный GPU или iGPU для выбранного приложения/игры. Если VALORANT не может правильно использовать ваш графический процессор, он может зависнуть на экране загрузки. Поэтому попробуйте добавить его в настройки графики.
- Чтобы добавить VALORANT в настройки графики, нажмите клавишу Windows и введите «Настройки графики», чтобы открыть его.
- Затем выберите VALORANT и нажмите Option.
- Выберите Высокая производительность из перечисленных вариантов.
- Затем нажмите Сохранить. Если вы не можете найти VALORANT, нажмите «Обзор» и перейдите в каталог VALORANT. Если вы установили его в папку по умолчанию, перейдите в следующий каталог. C:Riot GamesVALORANTliveShooterGameBinariesWin64.
- Выберите VALORANT-Win64-Shipping и нажмите «Добавить».
- Повторите шаги 2 и 3, чтобы изменить настройки графики на высокую производительность.
- Сделав это, снова нажмите «Обзор» и перейдите в каталог, в который вы установили VALORANT. Если вы установили его в папку по умолчанию, перейдите в следующий каталог. C:Riot GamesVALORANTlive
- Выберите файл VALORANT.exe и нажмите «Добавить».
- После этого выберите VALORANT и нажмите «Параметры»,
- Выберите «Высокая производительность» и нажмите «Сохранить».
- После этого запустите VALORANT и проверьте, решена ли проблема.
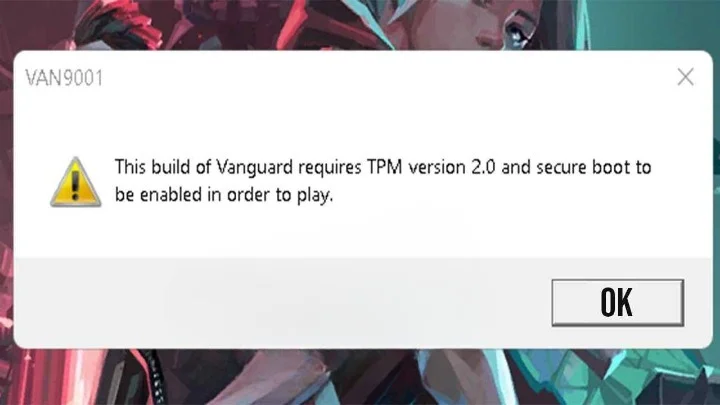
9. Включите безопасную загрузку и TPM
TPM и безопасная загрузка — это технологии, используемые для повышения безопасности, позволяющие системе на базе Windows 11 загружать надежные и безопасные программы. Поскольку эти функции обеспечивают высокий уровень безопасности, Vanguard использует их для распознавания доверенного состояния системы. Однако Vanguard необходимо, чтобы эти две функции были запущены, прежде чем он распознает состояние системы.
Если безопасная загрузка и TPM отключены, на экране появится ошибка VAN9003. Более того, это также может привести к тому, что вы застрянете на экране загрузки VALORANT. Поэтому см. Как включить TPM 2.0 и безопасную загрузку UEFI.
10. Переустановите графический драйвер с помощью DDU.
VALORANT не распознает неподписанные драйвера, так как они не имеют подписи, что доказывает, что они установлены с официального сайта. Вот почему они называются неподписанными драйверами. Если у вас установлены неподписанные драйвера, рекомендуется их удалить.
10.1 Запустить проверку подписи файла
Чтобы найти неподписанные драйверы, вам потребуется запустить утилиту проверки подписи файлов, которая проверяет наличие неподписанных драйверов.
- Для этого нажмите клавиши Windows + R, чтобы открыть окно «Выполнить».
- Введите sigverif.exe в поле ввода и нажмите OK.
- Как только он запустится, нажмите «Пуск».
- Подождите, пока он завершит процесс проверки. Если неподписанный драйвер найден, найдите его в Google. Если он принадлежит графическому драйверу, его удаление решит вашу проблему.
10.2 Переустановите драйверы
Если неподписанный драйвер является графическим драйвером, пришло время удалить его с компьютера. Обычно мы используем Диспетчер устройств для удаления драйверов, но он не удаляет запись драйвера из редактора реестра. Поэтому мы используем программу удаления драйвера дисплея (DDU), чтобы полностью удалить драйвер из системы вместе с записями реестра.
- Скачать Программа удаления драйвера дисплея.
- Когда это будет сделано, щелкните правой кнопкой мыши ZIP-папку DDU.
- Выберите Извлечь в «[Guru3D.com]-ДДУ».
- После завершения процесса извлечения перейдите в папку и дважды щелкните приложение DDU.
- Нажмите «Извлечь», а затем перейдите к извлеченной папке.
- Откройте приложение для удаления драйвера дисплея.
- Выберите GPU из типа устройства.
- Затем выберите поставщика устройства или графического процессора.
- Нажмите Очистить и перезагрузить, чтобы полностью удалить драйверы.
- После этого перейдите на веб-сайт производителя и загрузите последнюю версию драйвера.
- После загрузки установщика драйвера дважды щелкните его, чтобы запустить установщик.
- Затем следуйте простым инструкциям по установке драйвера.
11. Переустановите ВАЛОРАНТ
Окончательное решение — переустановить VALORANT, если ни одно из решений вам не помогло. Поскольку все решения терпят неудачу, эта проблема должна быть связана с файлами VALORANT, препятствующими загрузке. Чтобы убедиться в этом, вам придется переустановить его следующим образом.
- Чтобы переустановить VALORANT, нажмите клавиши Win + R, чтобы запустить окно «Выполнить».
- Введите appwiz.CPL и нажмите OK, чтобы запустить программы и функции.
- Щелкните правой кнопкой мыши VALORANT и выберите «Удалить».
- После завершения процесса удаления перейдите в официальный ВАЛОРАНТ интернет сайт.
- Войдите в свою учетную запись.
- Загрузите установщик VALORANT.
- После этого откройте его и следуйте инструкциям на экране, чтобы установить его.
Вышедший 2 июня 2020 года многопользовательский шутер Valorant моментально завладел вниманием геймеров. Однако, несмотря на участие в проекте со стороны большого количества бета-тестеров, игра все еще нуждается в основательной доработке. В этой статье мы расскажем, что делать, если работа программы останавливается из-за такой проблемы как «В ходе работы Vanguard Anti-Cheat произошла ошибка подключения». Она может возникнуть уже через 5 минут после начала игры и очень мешает ее продолжению.

Содержание
- Что делать, если случилась ошибка Vanguard Anti-Cheat
- Каким образом настроить автоматический запуск Vanguard Anti-Cheat
- В 10-й Windows можно следующим образом попробовать решить ошибку подключения, произошедшую в ходе работы Vanguard Anti-Cheat:
- В некоторых случаях инструкцию можно сократить, и она по-прежнему будет работать. Попробуйте сделать следующее:
- Другой вариант решения проблемы с Vanguard Anti-Cheat:
Что делать, если случилась ошибка Vanguard Anti-Cheat
Античит Вангард нужен для того, чтобы дать людям возможность спокойно наслаждаться игрой, не сталкиваясь с любителями побеждать обманным путем. В программу входит драйвер vgk.sys. После его установки пользователю придется перезагрузить компьютер. Если при старте системы программа Vanguard не запускается, она не сочтет ваше устройство доверенным.
Работоспособность конкретного метода по исправлению ошибки зависит от типа ОС. В некоторых случаях может помочь убрать рассматриваемое нами уведомление можно с помощью обновления операционной системы и переустановки самой игры.
Для этого:
- Зайдите в «Параметры» через кнопку «Пуск»;
- Откройте окно «Приложения»;
- Через поле поиска найдите и выберите Valorant;
- Нажмите «Удалить»;
- Отправляйтесь на официальный сайт игры по этой ссылке https://playvalorant.com/ru-ru/;
- Авторизуйтесь и скачайте игру;
- Загрузите обновления для своей операционной системы;
- Установите их, последовав указаниям создателей сборки.
Если этот простой способ не помог, переходите к следующему. Возможно, Вангард не включается одновременно с игрой.
Читайте также: Произошла ошибка при распаковке: Невозможно записать данные на диск.
Каким образом настроить автоматический запуск Vanguard Anti-Cheat
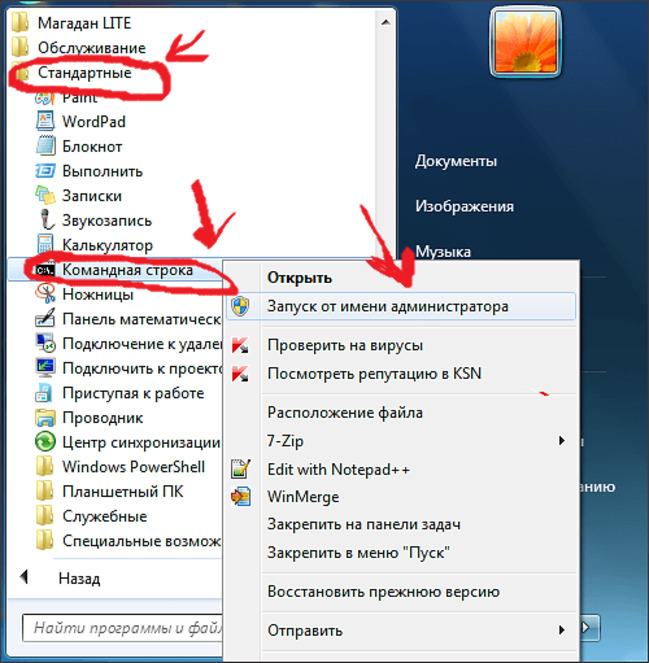
Для начала вызовите командную строку:
- Воспользовавшись комбинацией клавиш Win+R, вбив cmd в строку поиска Windows;


- Нажмите «Выполнить» в «Программы» — «Стандартные».


В открывшееся поле ввода впишите «services.mgc». Откроется окно под названием «Службы». Найдите в списке многочисленных программ «vgc» и откройте контекстное меню, кликнув по этому пункту правой клавишей мыши.
В появившемся списке выберите пункт «Свойства». Откроется окно с настройками. Щелкните по вкладке «Совместимость» и исправьте тип запуска с «Вручную» на «Автоматически». В конце нужно будет перезагрузить компьютер.
В 10-й Windows можно следующим образом попробовать решить ошибку подключения, произошедшую в ходе работы Vanguard Anti-Cheat:
- Настройте параметры безопасности, добавив Valorant.exe, VGC.exe и папки с данными в список исключений для вашего антивируса и Windows Defender.
- Удалите игру. Зайдите в «Параметры», затем в «Приложения и возможности». В строке поиска напишите Riot и удалите Vanguard. После этого введите также Valorant, чтобы стереть с компьютера и его тоже. Эти действия необходимо произвести, даже после чистки устройства при помощи утилиты вроде CCleaner.

- Зайдите через файловый менеджер на тот диск, на котором хранится игра. Вбейте в поиск Riot и Valorant и удалите все обнаруженные объекты. Подчистите также в меню «Загрузки» память о старых скачиваниях.

- Установите игру, но не включайте. Вместо этого зайдите в «Службы». Проверьте наличие файла vgc, содержащего античит. Если вы его не устанавливали, сделайте это.

- Правой кнопкой мыши нажмите на файл и выберите в предложенном окошке пункт «Свойства». Настройте тип запуска. Вместо «Вручную» поставьте «Автоматически». Примените изменения. Чтобы они вступили в силу, компьютер нужно будет перезагрузить.
- Зайдите в «Свойства» Valorant. На вкладке «Совместимость» нужно поставить галочку в строке «Запускать от имени администратора».
- Зайдите в папку «Riot Vanguard» и выберите файл vgtray. Проверьте, чтобы в его «Свойствах» тоже стояла галочка в той же графе.

Обязательно очистите корзину, реестр и перезагрузите компьютер. Попробуйте также обновить драйвера, это поможет исправить ошибку «В ходе работы Vanguard Anti-Cheat произошла ошибка подключения».
В некоторых случаях инструкцию можно сократить, и она по-прежнему будет работать. Попробуйте сделать следующее:
- Откройте диспетчер задач и оборвите все процессы, связанные с игрой.
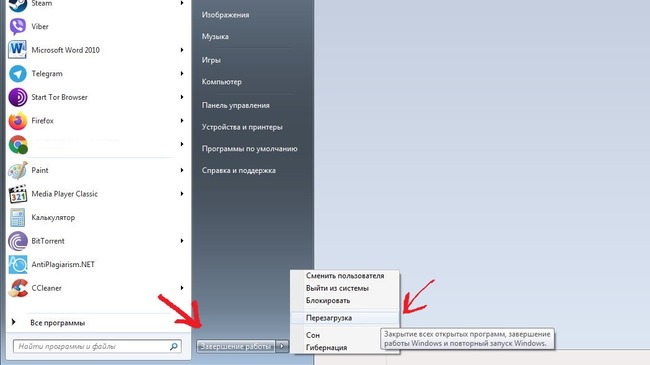
- Кликните правой кнопкой мыши по кнопке Windows. Перед вами откроется окно с меню. Выберите пункт «Выполнить».

- Пропишите в поле для ввода «services.msc».

- Откроется окно «Службы». Правой клавишей мыши щелкните по строчке «vgc».

- Во всплывшем меню выберите опцию «Свойства».

- Откроется окно, в котором нужно будет изменить ручной тип запуска на автоматический. Затем нажмите на кнопку «Применить».
- В левом части окна вы найдете клавишу «Запустить службу». Щелкните по ней.

Другой вариант решения проблемы с Vanguard Anti-Cheat:
- Откройте «Проводник»;
- Зайдите в папку с игрой и проследуйте по пути «liveShooterGameBinariesWin64»;
- Правой клавишей мыши выберите файл Valorant-Win64-Shipping и вызовите «Свойства»;
- На вкладке «Совместимость» поставьте галочки напротив пунктов «Отключить оптимизацию во весь экран» и «Запуск от имени администратора»;
- Кликните по клавише «Применить»;
- Отключите антивирусные программы.
Если совсем останавливать работу антивируса нежелательно, переведите его в режим игры. Можно также попробовать отключить фильтрацию трафика.
Можно также попробовать включить DEP. Чтобы это сделать, нужно перейти в Свойства системы.
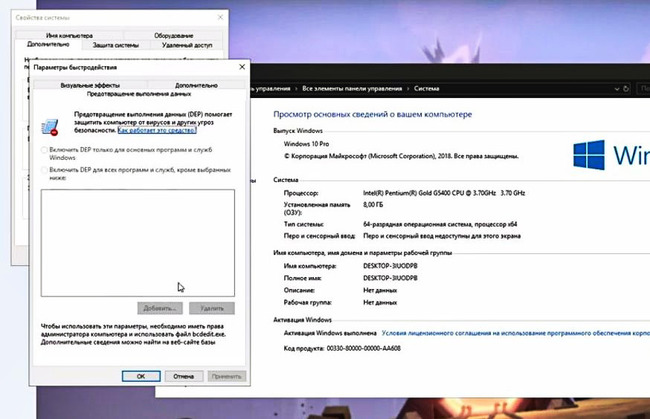
Если возможность это сделать заблокирована, вызовите командную строку. Вставьте туда затем следующее: bcdedit.exe /set nx AlwaysOn.

Если уведомление «В ходе работы Vanguard Anti-Cheat произошла ошибка подключения» не исчезло, попробуйте написать в службу поддержки. Однако, скорее всего, ответа придется ждать еще очень долго.
Будет также полезно почитать статью: Unicode directory path not supported ошибка в CS:GO как исправить.
Опубликовано 09 июля 2020 Обновлено 13 октября 2020
Are you one of those who absolutely love Valorant, but can’t seem to enjoy it because of its continuous errors, crashes, and bugs? Well, don’t worry, because in this guide I’ll break down all basic Valorant Crash Errors, and also write down their fixes.
All Valorant Errors & How To Fix Them
| Error | How To Fix It? |
| Vanguard Error |
|
| Discord Error 404 Valorant |
|
| Troubleshoot Val 46 Error |
|
| Error Code 57 |
|
| Van 68 Error |
|
| Van 6 Error |
|
| Error Code 39 |
|
| Valorant TPM 2.0 Error |
|
| Couldn’t Start Error |
|
| Error Connecting to the Platform (Code 43) |
|
| Error Code 138 |
|
| Valorant has Encountered a Connection Error |
|
| Valorant Stuck on Loading Screen |
|
Vanguard Error
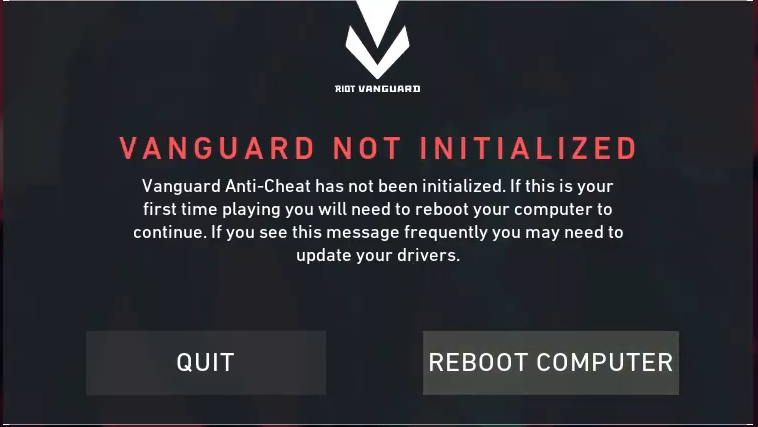
We are starting off our guide with the infamous Vanguard error. The vanguard error mostly appears when you fire up Valorant, and the game crashes, stating: “Vanguard not initialized”. The error then tells you that you need to restart your computer and recommend updating drivers. However, to my knowledge, this advice is irrelevant and does not work. So here is what you should do to fix the “vanguard not initialized” error.
- Go to Start And Search For “Add or Remove Programs.”
- Under Add or Remove Programs, Look for “Riot Vanguard.”
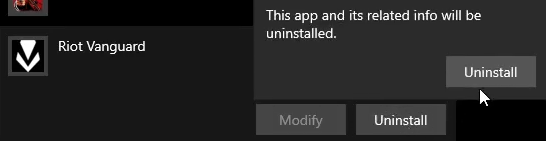
- Uninstall Riot Vanguard.
- Now go to the search menu again and open Command Prompt with Administration privileges.
- In Command prompt, copy-paste the code below and enter.
bcdedit -set TESTSIGNING OFF bcdedit -set NOINTEGRITYCHECKS OFF
Note: If you are getting the error "protected by secure boot policy", then you should remove Disable Secure Boot from Bios
- After Uninstalling & Entering this code, Launch Valorant and Allow it to download Vanguard.
- Once downloaded, launch the game, and the Vanguard not Initialised error will appear again. Hit Reboot.
- After rebooting the PC, Open Valorant, and the error won’t appear again.
Fix #2 for Vanguard Error
Suppose you still have problems and the solution above did not fix the Vanguard error. It’s time to try the method mentioned below.
- Open Run Command through Windows + R.
- Under Run Command, Type “services.msc” without quotations and enter.
- In the list, search for “vgc” and double-click it

- Under General, Change the Startup type from Manual To Automatic.

- Hit Apply and ok.
Discord Error 404 Valorant
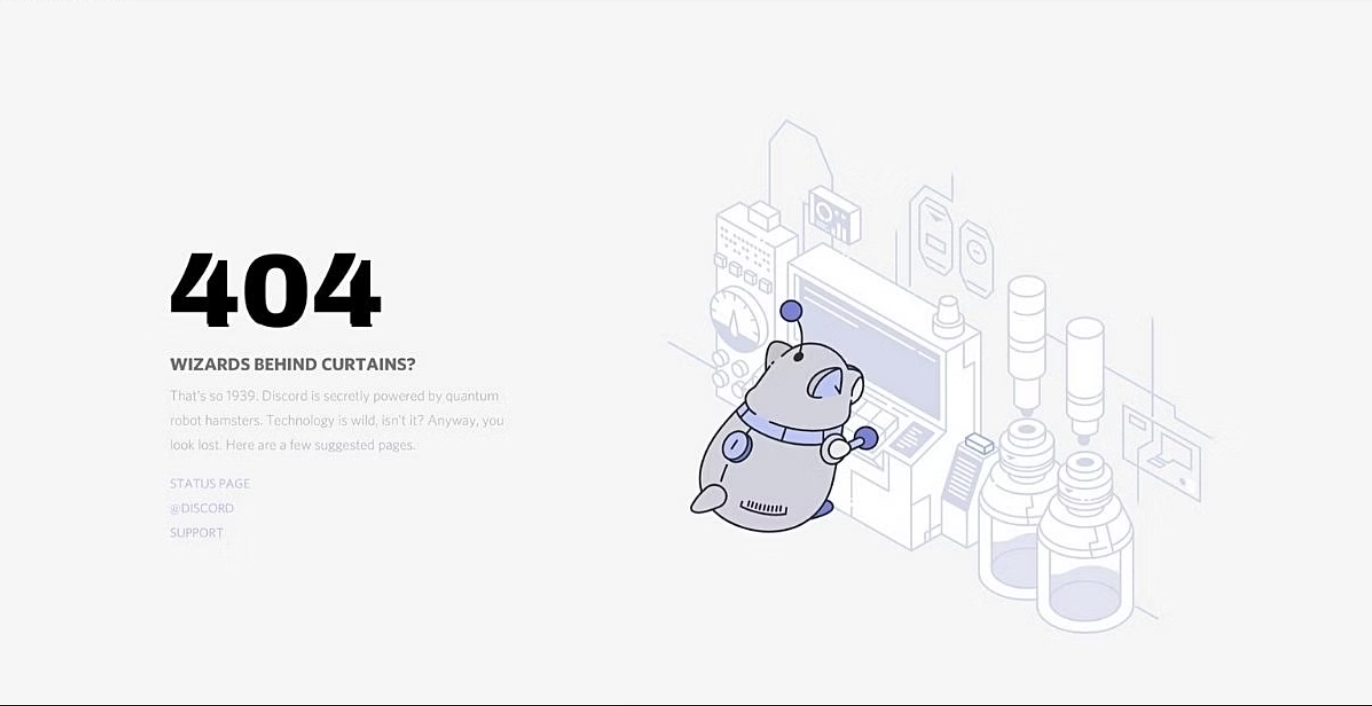
Several players have reported their Discord application crashing when playing Valorant and running Discord in the background. The Discord application crashes with an error page with the code “404”. Other players also experienced this error while playing Fortnite and Call of Duty.
The Discord 404 error occurs when the Discord In-game Overlay option is enabled in the Discord settings. It is possible that the error could be caused by one of the following factors:
- Valorant’s Anticheat.
- Spotty internet connectivity.
- Wrong URL or server name.
- Active VPN or proxies.
- Windows Firewall blocking Discord.
How to fix Discord Error 404 Valorant?
The Discord 404 Error occurs due to Discord In-game Overlay conflicting with the Valorant Anticheat that is always running in the background whenever you launch Valorant. Players have also reported their Riot client crashing when running Discord overlay. Players will have to disable their Discord In-game overlay to fix this error.
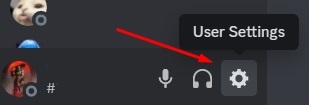
- First, go to the User Settings in your Discord Application.

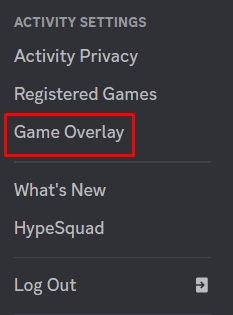
Discord User Settings. - Under the Activity Settings, click on Game Overlay.

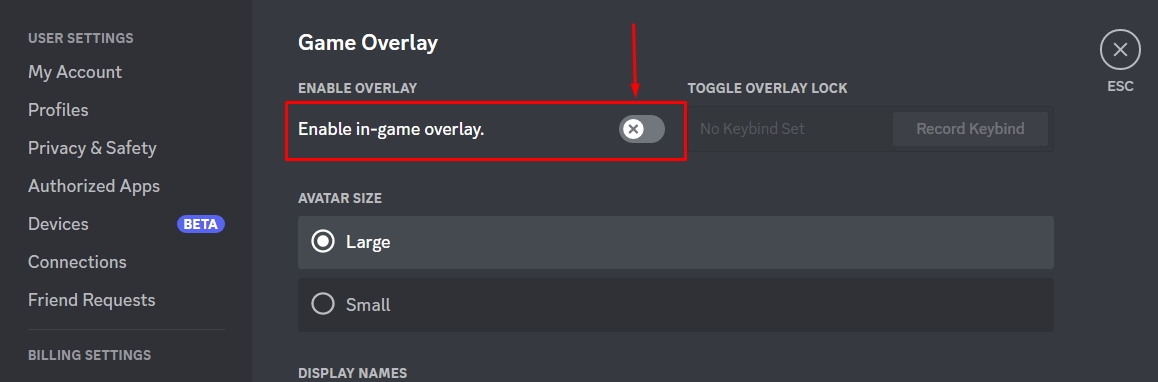
Discord Game Overlay. - Uncheck the Enable In-game Overlay setting below the Game Overlay category.

Disable Game Overlay.
Run Valorant to see if the Discord and Valorant crashing error persists.
Valorant Val 46 Error
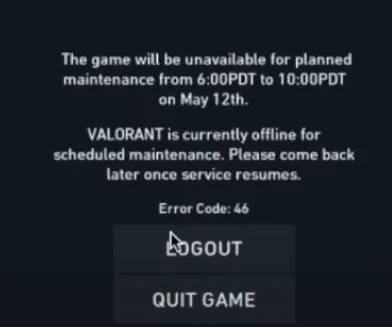
The Valorant Val 46 error occurs whenever Riot’s servers are under maintenance. Besides waiting for some time and logging in later, there isn’t much you can do when you see this error message. The description of the issue on the official website reads, “This is planned downtime allotted for the engineers to work on our systems.”
While this error usually arises from Riot’s end, there are a few fixes you can try if it’s coming from your end. You can read our in-depth guide on fixing the Valorant: Val 46 Error Code, where we explain each specific fix in detail. These fixes include:
- Shut down any unnecessary processes that might be running in the background.
- Disable any In-game overlay apps that are enabled, especially Discord.
- Change your account region to bypass the servers.
- Spam the WASD keys at the error screen.
- Launch the game using Riot Games Launcher.
- Check the current status of Valorant servers at the official website by entering your region.
Valorant Error Code 57 – Vanguard Not Initialized
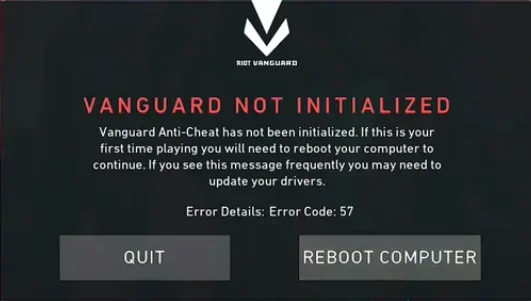
Error Code 57 pops up when a player tries launching the game. An error prompt shows up that says, “Vanguard Not Initialized.” The error usually occurs when the game’s anti-cheat engine, Vanguard fails to start up properly.
Another reason for this error could be a glitch that might be causing the game to not identify Vanguard and assume it’s missing. If the latter is the case, Vanguard needs to be initialized simultaneously, or the game won’t start. If you’re also facing Error Code 57 in Valorant, don’t worry. We have covered all the possible fixes for this error in our In-depth guide for fixing the Valorant Error Code 57. Follow the steps below to fix this error in no time:
- Reinstall the Game to replace any configuration files that might be faulty with the default version.
- Restart Valorant.
- Flush the Cache of Your DNS.
- Optimize the VGC’s Startup on a Windows PC.
- Enable VGC From the System Configuration Application.
- Reinstall the VGC and VGK Services on Your Windows PC.
- Reboot your PC.
- Remove Unwanted Background Processes
Valorant Error Code Van 68
One of the most notorious errors in Valorant is the Valorant Error Code Van 68. When this error occurs, it hinders the player’s ability to start the game. Mostly, this error appears due to a poor internet connection. Fixing this error would require you to make a few changes to your Internet settings on your Windows PC.
The following is a list of all the fixes that can potentially resolve Error Code Van 68. However, make sure to create a backup for the settings before making any changes and follow the instructions carefully.
- Flush the DNS Resolver Cache
- Restart Your PC and Router
- Allow Valorant through your Windows Firewall.
- Repair the game files through the Valorant Installer.
- Disable the Internet Protocol Version 6 (IPv6)
Valorant Error Code Van 6

The Valorant Error Code Van 6 is an error that states itself as a “Connection Error” that states: “Valorant has encountered a connection error. Please relaunch the client to reconnect.” This implies that the game is unable to connect with the servers properly. However, some users have reported that the error could also be linked to Riot Vanguard, which is the game’s main anti-cheat system that is always running in the background.
That being said, many users have managed to solve the problem by implementing a couple of solutions. For best results, however, we recommend following all of the listed fixes. We have covered this error and its solutions in great detail in our Valorant Error Code Van 6 guide. Following is the list of all of the possible fixes for the Van 6 Error in Valorant:
-
- Check Your Internet Connection
- Restart Valorant
- Optimize Valorant’s Windows Firewall Settings
- Change the VGC Service’s Startup Type
- Enable the VGC Service
- Reinstall Riot Vanguard
- Change Your DNS Settings
- Use a VPN
- Reinstall the Game
After applying all of the fixes, run the game to see if the Valorant crashing error persists.
Valorant Error Code 39
Valorant Error Code 39 typically occurs whenever Riot puts out an update for Valorant. In order to implement the new patch, the developers pull the servers. It is during this entire process that the game ultimately becomes unplayable. Server connectivity is one of the main cause for this error.
Error code 39 seems to affect mostly North American servers according to reports on the internet. However, some Valorant players from Europe have also reported facing this error. For more information on how to fix this error, head over to our complete error-fixing guide for Valorant Error Code 39. The fixes in the guide include:
-
- Wait for the server maintenance to finish.
- Restart the PC.
- Try Running the Game as An Administrator
- Optimize the Virtual Disk Service on Your PC.
- Perform a Clean Boot.
- Enable VGC for Valorant
- Delete Unwanted Valorant Game Files.
- Uninstall Valorant and the Riot Games Client
Valorant TPM 2.0 Error
TPM 2.0 Error usually appears for players that are trying to play Valorant, specifically on Windows 11. Windows 11 is still fairly new and needs a lot of optimizations and bug fixes to be done to be stable. As of yet, this new version of Windows has been the cause of many errors in many different games and software. One of these errors being the TPM 2.0 Error.
Valorant on Windows 11 requires two main components to function correctly. These two components are the Secure Boot and TPM 2.0 features. As part of Intel’s latest Unified Extensible Firmware Interface (UEFI) software, Secure Boot provides users with protection against harmful threats. TPM 2.0 is another crucial hardware security software used by Windows 11 for safety checks.
While fixing this Valorant crashing error might be tricky, we assure you it is nothing too bad or anything you can’t easily manage. We have covered all of the important fixes to resolve the TPM 2.0 Error in Valorant in detail in this guide. Following are the fixes for the TPM 2.0 error:
- Enabling Secure Boot And TPM
- Rebooting The Game And PC
- Disable Background Applications And Overlays
- Launching The Game As Administrator
- Unsubscribe From The Windows Insider Program
- Reinstalling Windows
Valorant Couldn’t Start Error
“Valorant couldn’t start” is another common error, which mostly appears while launching the game. Here is how you can fix it permanently.
- Close Valorant, Vanguard, and Riot Client.
- Open Task Manager and End Task Valorant, Vanguard, and Riot Client.
- Afterward, Right-click Valorant Shortcut > Properties > Compatibility
- Under Compatibility > Disable Full-Screen optimizations and enable Run this program as an admin strator. Now you need to apply the same settings for the other Valorant Application.
- You can Locate it under My Computer > Windows Drive(C) > Program Files > Riot Games > Valorant > live > ShooterGame > Binaries > Win 64.
- Under Win64, you will find the Valorant Win64-Shipping Application.
- Right-click Valorant Win64-Shipping > Properties > Compatibility > Disable Full-Screen Optimization.
Error Connecting To The Platform, Error Code 43
Another typical error you might have encountered is the “There was an error connecting to the platform.” This one happens due to startup type & service settings. We can easily fix this by restarting Virtual Disk Properties through 5 easy steps.
- Go to Start > Services > Search for “Virtual Disk.
- Right-click Virtual Disk > Properties > Change Startup Type from Manual to Disabled.
- Hit Apply and Ok.
After doing so, follow the steps below to restart the virtual disk.
Restart Virtual Disk
- Right Click Virtual Disk again > Properties > Startup Type.
- Change Startup Type from Disabled to Automatic.

- Hit Apply and Ok.
- Once Again, Go To Virtual Disk > General Tab > Click The Start Button, and loading like this should appear.

- Once Done, Restart the PC and Enjoy Valorant without any further crashes!
Valorant Error Code 138
Error Code 138 cases have significantly increased over the past few weeks. It seems like the error started to happen after the July Update. Further, this error mostly pops up for AMD users using the old Anthlon Processors like the A6, A10, A12, and others in the lineup. Anyway, here is a quick and easy fix for this error.
- Click Start > Run Command Prompt as administrator.

- Copy and Paste the following codes individually in the command prompt.
-
Code #1: bcdedit.exe /set {current} nx OptIn Code #2: bcdedit.exe /set testsigning off Code #3: bcdedit.exe /set nointegritychecks off - Afterward, Right Click Valorant Shortcut > Properties
- Under Compatibility > Select Windows 8, and agree to Run this program as an administrator.
- Hit Apply and Ok.
Suppose this fix still did not work for you. You must check vgtray.exe’s priority from the task manager and make sure it is below real-time. On the other hand, If you have an AMD processor and the error is still happening. You should update your Bios and Crimson Drivers to the latest versions.
This error is fairly new and might be resolved in the next Valorant Update.
Valorant Has Encountered A Connection Error

Its always frustrating when you are in the middle of a game, and Valorant crashes, telling you that “Valorant has encountered a connection error.” Folks over at Reddit have noticed that there is only one fix for this error.
Note: Avoid disabling the firewall, and antivirus, and restarting the PC continuously because those do not work. Follow the steps below, and make sure your VPN is turned off.
- Go to Your Graphic Card Control Panel, Nvidia GeForce, or AMD Relive.
- Look For Valorant Game Ready Drivers in Nvidia and instantly update them.
- AMD users need to make sure their drivers are updated to the latest version.s.
- Once Updated, Go To Start > Run Command Prompt with Administrator Acces > and paste this code recommended by Riot.
-
netsh interface teredo set state disabled
Once Done, you can enjoy Valorant without any more Crashing.
Fix #2 Valorant Has Encountered A Connection Error
If the steps above did not fix the Valorant Has Encountered Error. Then, you must fresh install Riot Vanguard, which is the program behind this error. Also, make sure your Windows is updated to the latest version.
- Go To Start > Add Or Remove Programs > Search For Riot Vanguard.
- Uninstall Riot Vanguard and Restart the PC.
- After Restarted, Open Valorant, and you will see Riot Vanguard being installed by Riot Client.

- Once done, hop into the game, and you are good to go!
Valorant Stuck On Loading Screen
Many players have reported that their game freezes on the loading screen. Players cant minimize or restart their game when this happens. The only fix is to restart their PC, which can be frustrating for some people. Anyhow, the good thing is that there is a fix for this problem. All you have to do is tweak some Graphic and CPU settings.
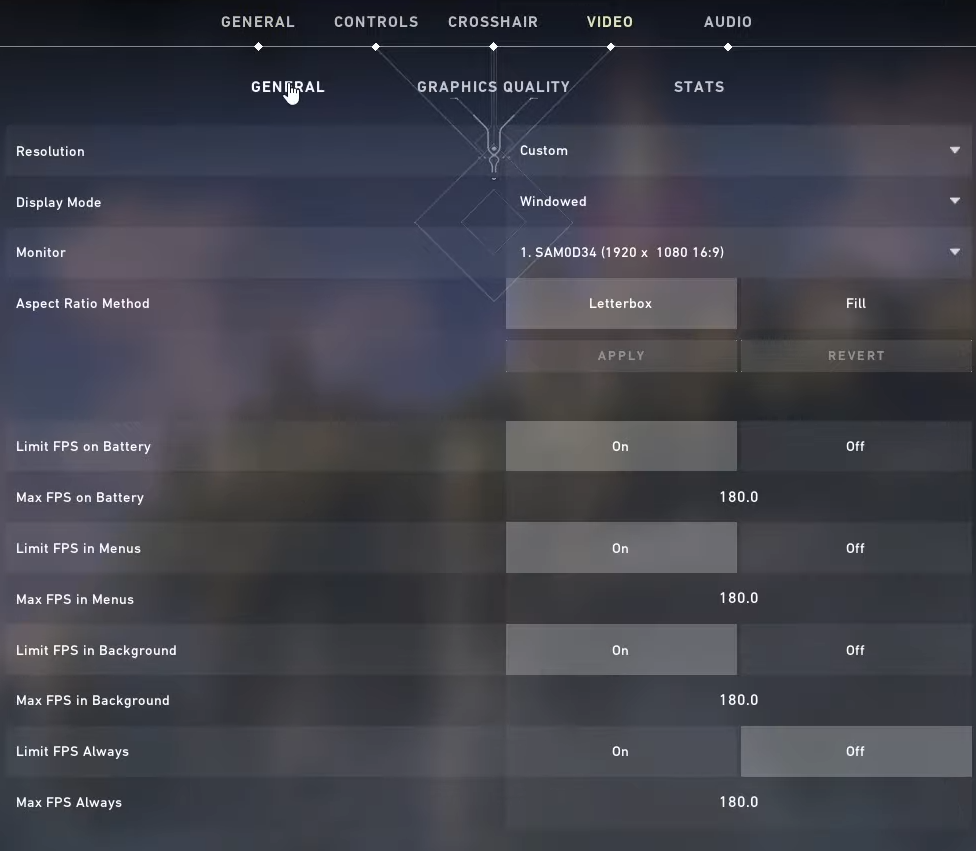
- Open Valorant > Settings > Video
- Under General Video Settings > Do The Following
- Set In-Game Resolution to the monitor’s native resolution (highest usually)
- Change Display mode from Windowed to Full Screen.

- Change FPS Limit to A Value Above your monitor’s refresh rate. For example, if you have 120 Hertz, you should change it to 150-160. Make sure the value is achievable by your hardware.
- Now Go To Graphics Quality Section And do the following

- V Sync – Off
- Anti-Aliasing – None
- Anisotropic Filtering – 1x

Once done, now minimize Valorant and Open Task Manager by Right-Clicking Taskbar.
- Under Task Manager, Search For Valorant > Right-click > Go to details

- Under Details, Right Click Valorant-Win64-Shipping.exe and change its Priority to High

- Lastly, ensure that Windows 10 & Nvidia Drivers are up to date.
Once Done, I can assure you that Valorant won’t freeze or crash anymore. This fix instantaneously optimizes Valorant. Thus you can also expect increased frame rates.
Ending the guide, I’d say that Valorant is quite new, and these types of crashes are expected. Times and times again, we have seen new games like PUBG, Fortnite, and many others having similar issues. Riot has already released several updates that have significantly reduced crashing. If those updates aren’t working for you, I’m sure this guide will.
Once you are done fixing all valorant errors, you should also check out the Best Valorant Settings For High FPS and Ultimate Performance.
Other Valorant Error Guides covered on eXputer:
- Fixing Valorant Platform Error
- Valorant Error Code 39
- Valorant: A Critical Error Has Occurred
- Valorant Error Code Van 68
- Valorant Error Code Van 6
- Valorant Error Code 57 – Vanguard Not Initialized
Was this article helpful?
Thanks! Do share your feedback with us. ⚡
How could we improve this post? Please Help us. ✍
How to Fix Valorant Error Code VAN -81
Valorant Error Code VAN -81 is a connection error that often occurs because the VGC service isn’t running or can’t connect to Riot’s servers. This article is dedicated to helping you fix this error.
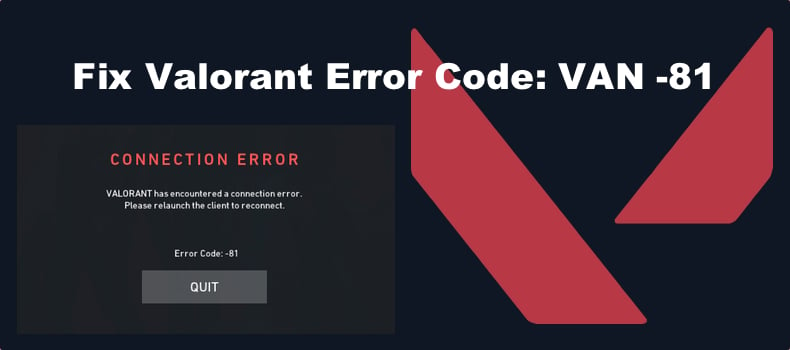
VALORANT has encountered a connection error. Please relaunch the client to reconnect. Error Code: VAN -81
What Causes Error Code VAN -81?
Error VAN -81 appears because Valorant fails to connect to its servers, but the reason it fails to connect relates to the Riot Vanguard (VGC) anti-cheat software. You will get this error if VGC is not running or is blocked from connecting to Riot’s servers.
- The VGC service fails to start. Riot’s VGC service may fail to start when you launch Valorant, resulting in Error VAN -81. You can fix this error by setting the VGC service to start automatically when you boot up Windows.
- The VGC service is blocked by a firewall. Your firewall may block the VGC service from connecting to Riot’s servers. Adding it to your firewall’s exceptions list may fix the error.
- The VGC service is blocked by an anti-virus program. Your anti-virus program may prevent the Riot Vanguard service from running. Adding it to the exclusions list should help you fix the error.
- The Riot Vanguard has been corrupted. If the Riot Vanguard installation has become corrupt, try reinstalling it.
Before trying any of our fixes, here are some tips:
- Restart the Riot client. Open the Task Manager, right-click each Riot and Valorant-related task and click End task. Relaunch Valorant and see if that fixed the issue.
- Run Valorant as an administrator.
- Restart your PC.
- Check your Internet connection. The error may occur if you have an unstable Internet connection. Try restarting/resetting your Internet router.
- Go to the Riot Games Service Status website and check the server status. If there are no recent issue reports, then it’s more than likely that there’s an issue on your side.
Video Guide on How to Fix Valorant Error Code VAN -81
Table of Contents:
- Introduction
- Method 1. Enable the VGC Service
- Method 2. Change the VGC Startup Type to Automatic
- Method 3. Allow VGC through Windows Defender Firewall
- Method 4. Add Riot Vanguard (VGC) to Windows Security Exclusions List
- Video Guide on How to Fix Valorant Error Code VAN -81
Method 1. Enable the VGC Service
1. Hold down Windows+R keys to open Run.
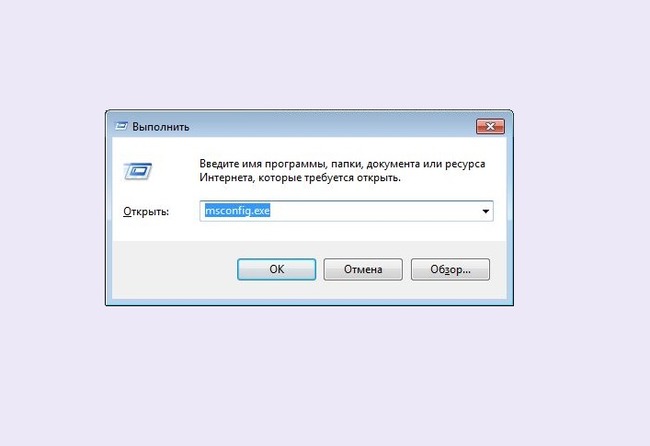
2. In the Run dialog box, type in msconfig and click OK.
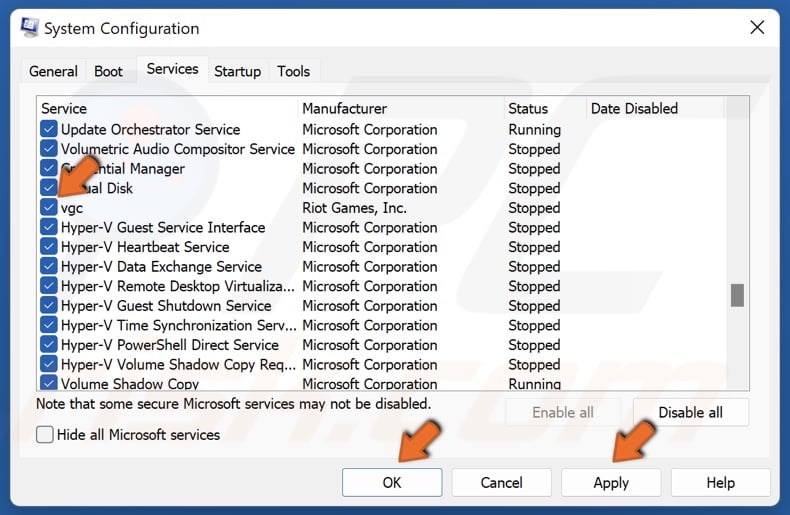
3. In the System Configuration window, select the Services tab.
4. Mark the checkbox next to VGC to enable it.
5. Click Apply and click OK.
3. In the System Configuration window, select the Services tab.
4. Mark the checkbox next to VGC to enable it.
5. Click Apply and click OK.
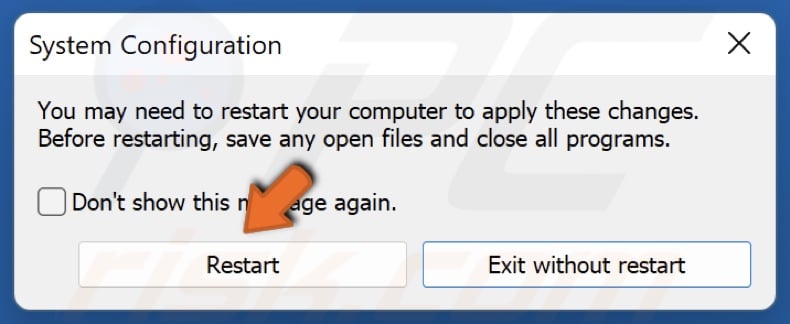
6. Click Restart when prompted.
[Back to Table of Contents]
Method 2. Change the VGC Startup Type to Automatic
The VGC Service is part of the anti-cheat system for Riot games, including Valorant. You may experience Error VAN 81 if the VGC service fails to start. The guide below will show you how to set the service to start automatically, thus preventing the error from occurring.
1. Hold down Windows+R keys to open Run.

2. In the Run dialog box, type in services.msc and click OK.
2. In the Run dialog box, type in services.msc and click OK.
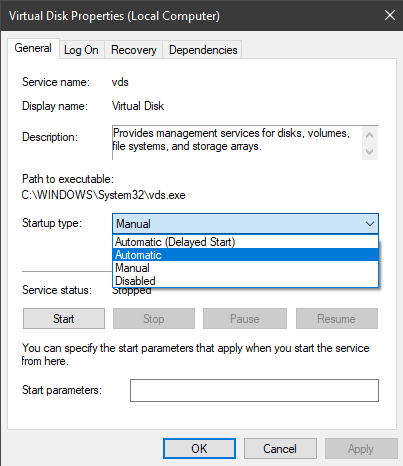
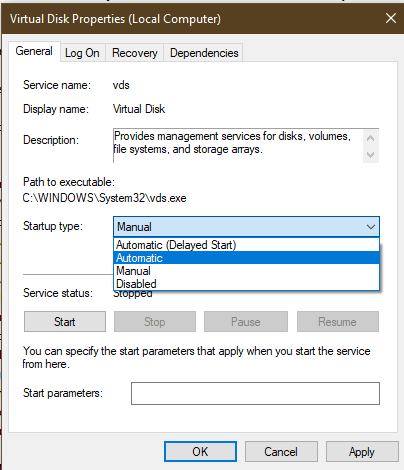
3. In the Services window, locate the VGC service, right-click it and select Properties.
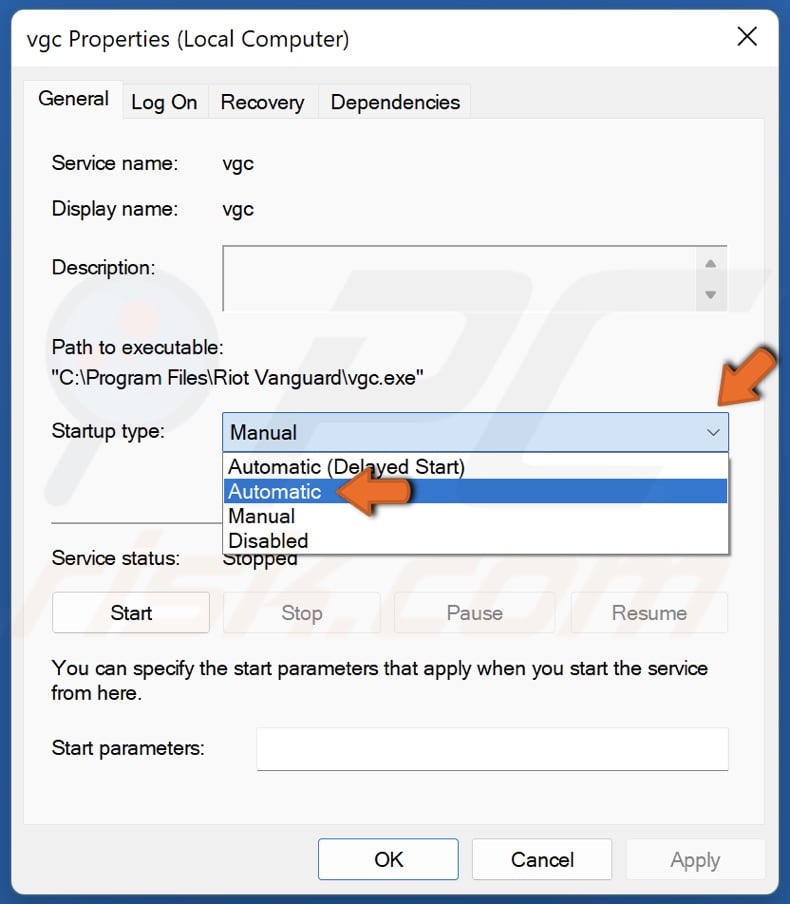
4. Open the Startup type drop-down menu and select Automatic.
4. Open the Startup type drop-down menu and select Automatic.
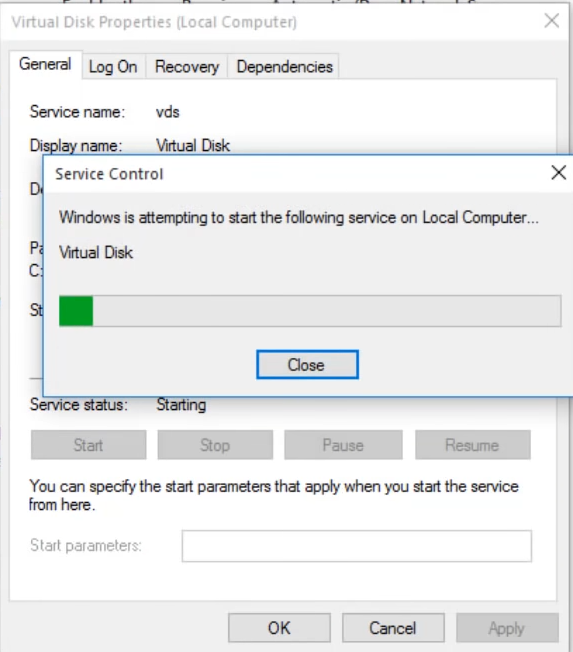
5. In the Services status section, click Start.
6. Click Apply and click OK.
7. Restart your PC and launch Valorant.
8. If you get a “Windows could not start the vgc service on Local Computer. Error 1: Incorrect function” message, perform the following steps.
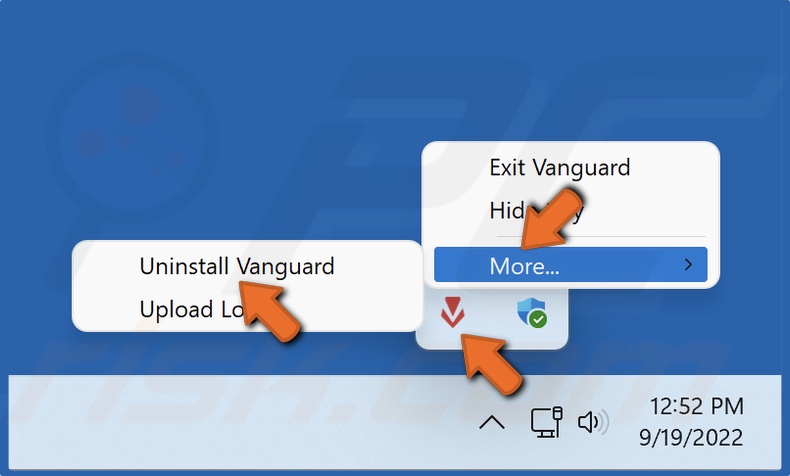
9. Navigate to the icons tray in the taskbar, right-click Riot Vanguard, select More, and click Uninstall Vanguard.
9. Navigate to the icons tray in the taskbar, right-click Riot Vanguard, select More, and click Uninstall Vanguard.
10. Click Yes when prompted to confirm the removal.
11. Hold down Windows+R keys to open Run.
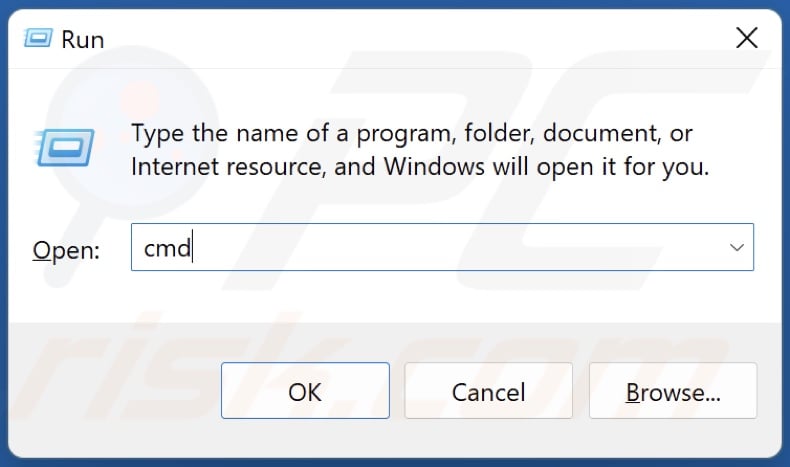
12. In the Run dialog box, type in CMD and hold down Ctrl+Shift+Enter keys to open the elevated Command Prompt.
12. In the Run dialog box, type in CMD and hold down Ctrl+Shift+Enter keys to open the elevated Command Prompt.
13. In the Command Prompt window, type in bcdedit -set TESTSIGNING OFF and press Enter.
14. Then, type in bcdedit -set NOINTEGRITYCHECKS OFF and press Enter. If you get “The value is protected by Secure Boot policy and cannot be modified or deleted” message, disable Secure Boot in your system’s BIOS.
15. Run the Valorant launcher to install Riot Vanguard.
16. Restart your PC.
17. Hold down Windows+R keys to open Run.
18. In the Run dialog box, type in services.msc and click OK.
18. In the Run dialog box, type in services.msc and click OK.
19. In the Services window, right-click VGC and select Properties.
20. Open the Startup type drop-down menu and select Automatic.
20. Open the Startup type drop-down menu and select Automatic.
21. In the Services status section, click Start.
22. Click Apply and click OK.
[Back to Table of Contents]
Method 3. Allow VGC through Windows Defender Firewall
Windows Defender Firewall (or your third-party firewall solution) may prevent the VGC service from connecting to Riot’s servers. The instructions below will show you how to add VGC to Windows Defender Firewall’s exceptions list.
1. Hold down Windows+R keys to open Run.
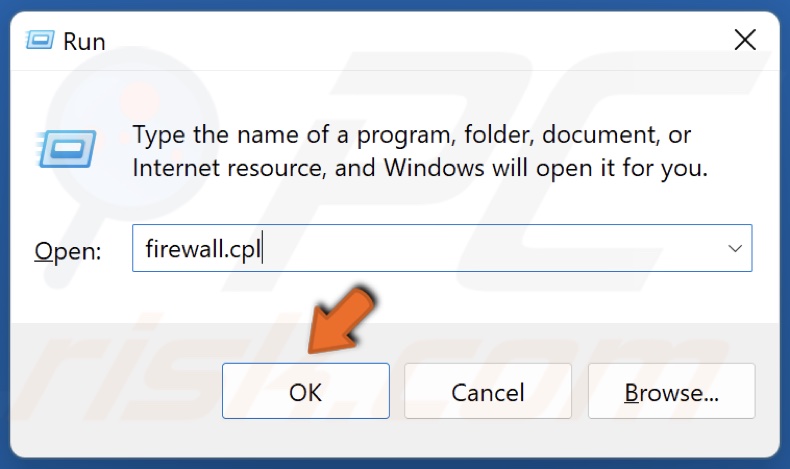
2. In the Run dialog box, type in firewall.cpl and click OK.
2. In the Run dialog box, type in firewall.cpl and click OK.
3. Click Allow an app or feature through Windows Defender Firewall.
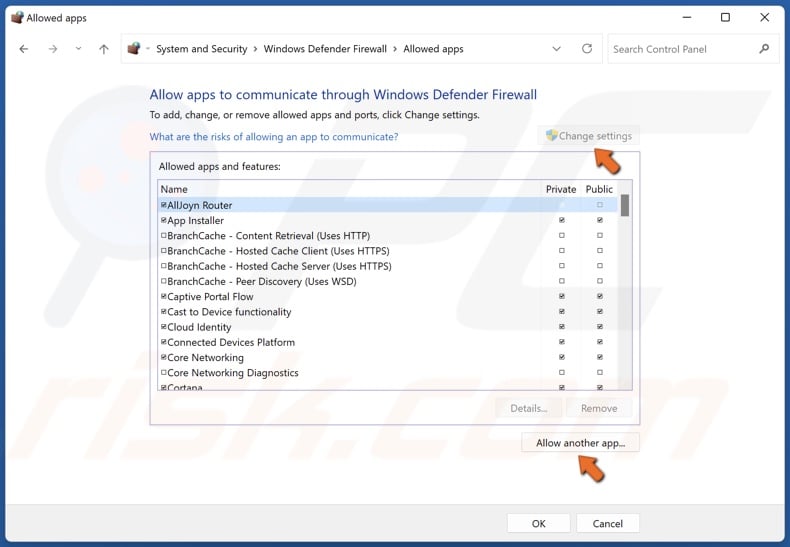
4. Click Change settings.
5. Click Allow another app.
4. Click Change settings.
5. Click Allow another app.
6. Click Browse.
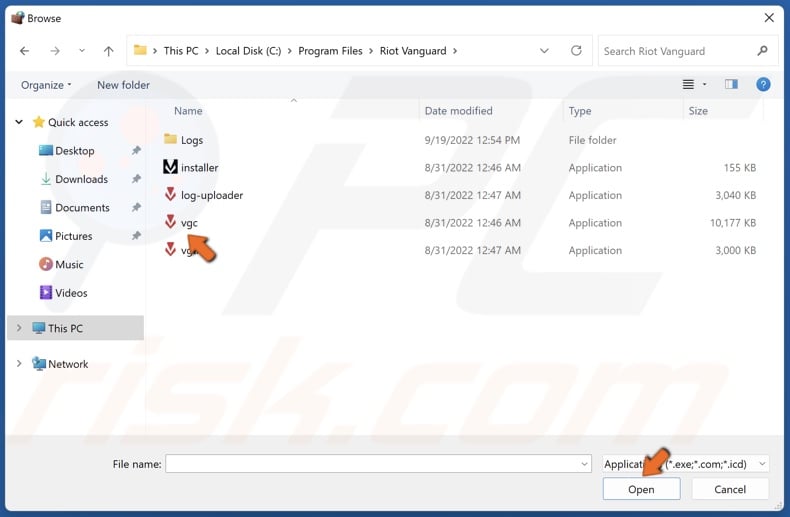
7. Navigate to C:Program FilesRiot Vanguard
8. Select VGC.exe and click Open.
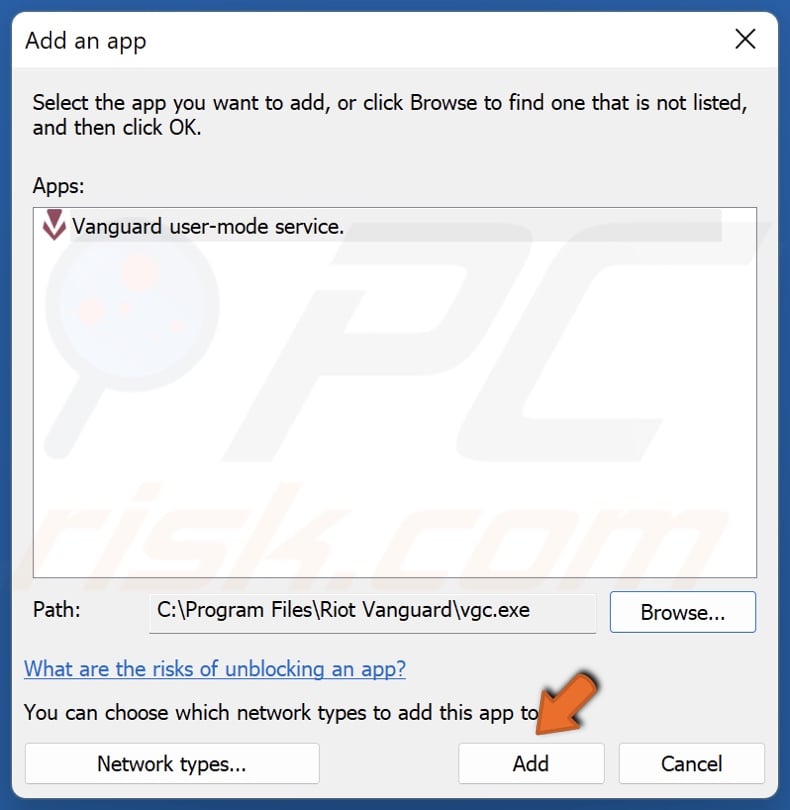
7. Navigate to C:Program FilesRiot Vanguard
8. Select VGC.exe and click Open.
9. Click Add to add Vanguard user-mode service.
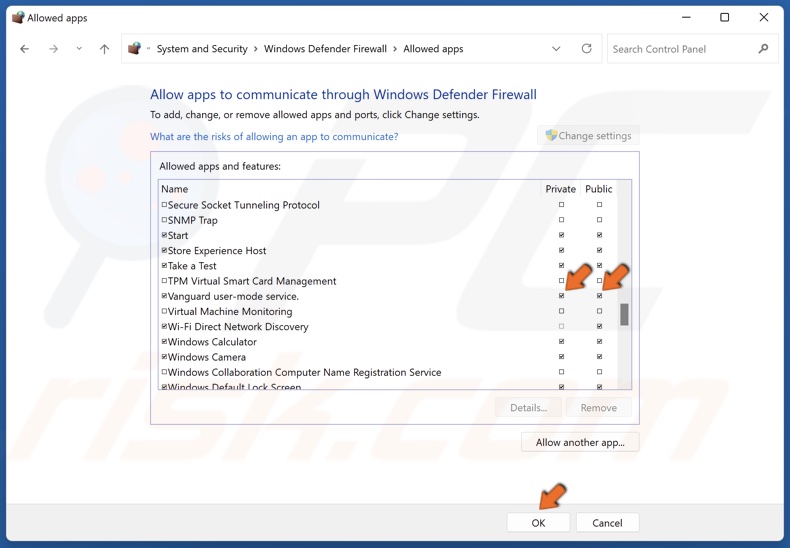
10. Mark the Private and Public checkboxes next to Vanguard user-mode service and click OK.
[Back to Table of Contents]
Method 4. Add Riot Vanguard (VGC) to Windows Security Exclusions List
![]()
10. Mark the Private and Public checkboxes next to Vanguard user-mode service and click OK.
[Back to Table of Contents]
Method 4. Add Riot Vanguard (VGC) to Windows Security Exclusions List
![]()
1. Navigate to the icons tray in the taskbar and click the Windows Security icon.
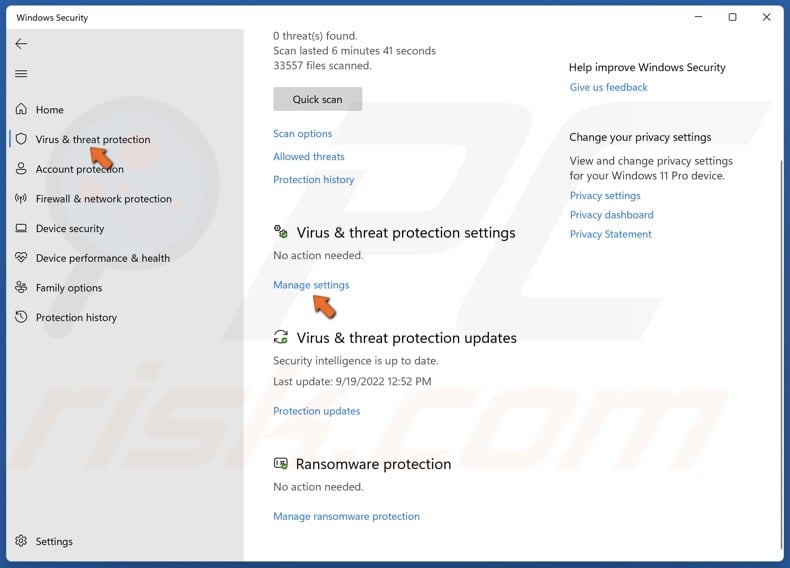
2. In the Windows Security window, select Virus & threat protection from the left pane.
3. In the Virus & threat protection section, click Manage settings.
2. In the Windows Security window, select Virus & threat protection from the left pane.
3. In the Virus & threat protection section, click Manage settings.
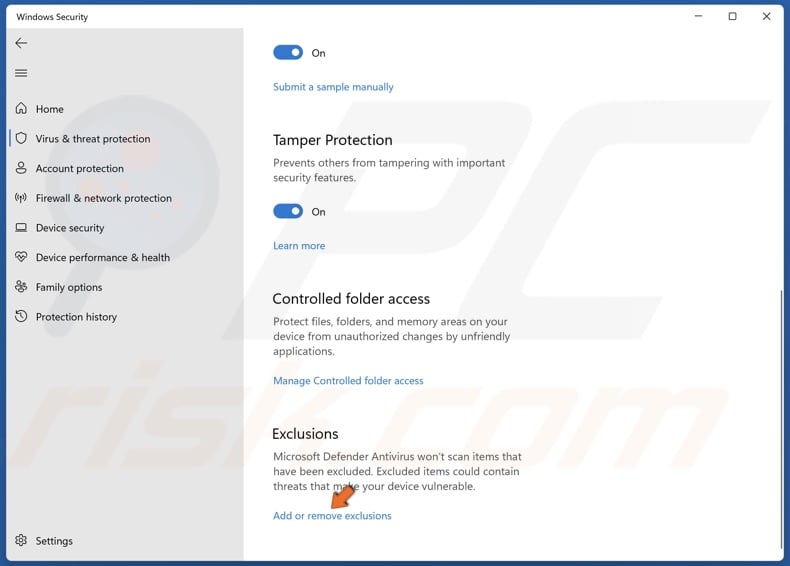
4. Scroll down, and in the Exclusions section, click Add or remove exclusions.

5. Click Add an exclusion and select Folder from the drop-down menu.
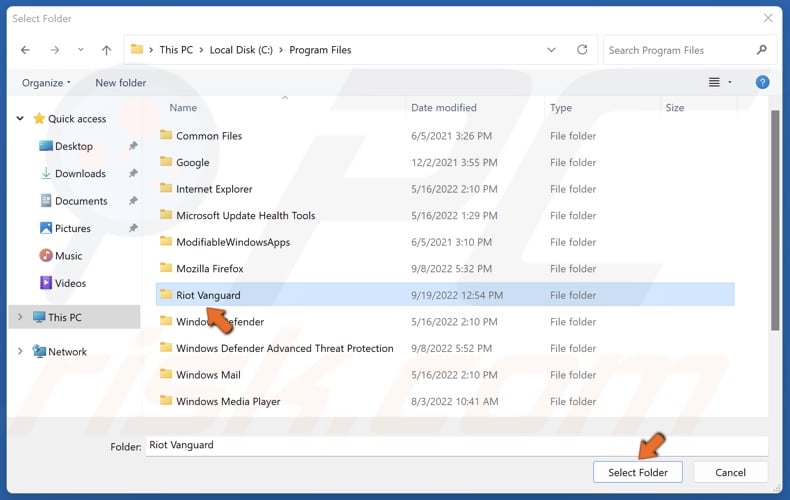
5. Click Add an exclusion and select Folder from the drop-down menu.
6. Navigate to C:Program Files and select Riot Vanguard and click Select Folder.
If you have a third-party anti-virus program, you can temporarily disable your anti-virus, launch Valorant, and see if it connects to its servers.
[Back to Top]
🚩 Не удалось запустить службу vgc.exe на Локальный компьютер
Понравилось? Поделитесь с друзьями
940 просмотров
Отказ от ответственности: Автор или издатель не публиковали этот материал для вредоносных целей. Вся размещенная информация была взята из открытых источников и представлена исключительно в ознакомительных целях а также не несет призыва к действию. Создано лишь в образовательных и развлекательных целях. Вся информация направлена на то, чтобы уберечь читателей от противозаконных действий. Все причиненные возможные убытки посетитель берет на себя. Автор проделывает все действия лишь на собственном оборудовании и в собственной сети. Не повторяйте ничего из прочитанного в реальной жизни. | Так же, если вы являетесь правообладателем размещенного на страницах портала материала, просьба написать нам через контактную форму жалобу на удаление определенной страницы, а также ознакомиться с инструкцией для правообладателей материалов. Спасибо за понимание.
Если вам понравились материалы сайта, вы можете поддержать проект финансово, переведя некоторую сумму с банковской карты, счёта мобильного телефона или из кошелька ЮMoney.

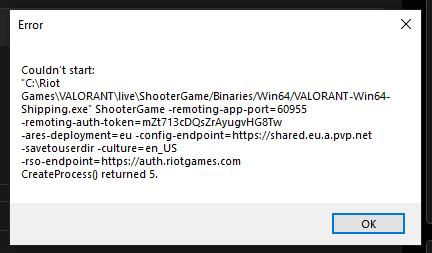
Valorant is a Windows operating system online multiplayer shooting game by Rebellion Games. The general version of Valorant was released in June 2020. Recently, several game lovers are reported that one error keeps them from playing Valorant game. They received the said error message like-
“Couldn’t start *:Riot GamesVALORANTliveShooterGame/Binaries/Win64/VALORANT-Win64-Shipping.exe” ShooterGame -remoting-app-port=55944 -remoting-auth-token -ares-deployment=na -config-endpoint=https://shared.na.a.pvp.net -savetousrdir -cultur=en_US -rso-endpoint=https://auth.riotgames.com CreateProcess() returned 5”.
This error can occur due to several reasons such as software bug, insufficient permission for server connection etc. If you are also the one who is suffering from the same issue, then you can follow this article. In this article, we have gathered some sure-shot solutions to get rid of this error. Let’s see the solutions,
Before jump into a sure solution, you just go to the following instructions,
- Firstly, ensure you are not logged in Valorant account currently on another device. If yes, then exit from that account and start Valorant again in the existing device.
- Launch Valorant, after a simple Restart. While restarting your system, some of the glitches and bugs might remove from the system.
- If these two primary fixes didn’t help in your case, then you need to move to the sure fixes below.
Fix 1: Run net start vgc command:
As a first fix to resolve the Valorant couldn’t Start Returned 5 error, is to run the net start vgc command on your system. For doing so, follow the steps given below,
- Firstly, press Windows + R to launch the RUN dialog box.

- Then type net start vgc and press OK.
- Once done, the said issue got resolved for now.

Fix 2: Uninstall and Reinstall Vanguard:
If you are not familiar with Vanguard, then you must know, Riot Vanguard is an anti-cheat system software that allows Valorant to work on the system. And if something goes wrong with this software, it will prevent Valorant from launching it. So, if this is your problem in your case, then you need to reinstall Vanguard. For doing so, follow the steps given below,
- Firstly, in the Desktop search bar, type Control panel and select the relevant search results.

- In the Control panel window, select the option Program and Features.
- In the newly opened screen, from the list of programs, locate and right-click over Riot Vanguard.
- Then click on Uninstall option. If prompts appear click on Yes to confirm the uninstallation process.

Note: If you use any automatic software remover tool, it might help you to delete the application and files and folders related to that particular application. There are several such tools available online, you can select a reliable one.
- Once you uninstalled, then you can reinstall the Riot Vanguard freshly. Then again, launch the game and check whether the issue persists or not.
Fix 3: Check the compatibility of Valorant:
As per some suffered users switching on and off the compatibility on their system helped them to resolve the said error. Hence, we recommend trying the same. For doing so, follow the steps given below,
In two ways you can change the compatibility;
Method 1:
- Firstly, on your desktop, select This PC and then go to Local Disk (C:).
- Then follow the below path
Riot Games>Valorant>Live>Shootergame>Binaries>Win64
- If you reached the Win64 file, right-click over it and then select Properties.
- Then select the Compatibility option.
- Now untick beside the options, Disable fullscreen optimizations and Run this program as an administrator.
- Finally, select Apply and then click on OK to save the changes.
- Once done, Restart your system and check for improvements. If this method does not works then move to the next method.
Method 2:
- Firstly, locate the Valorant application installed on your PC.
- Then right-click over it and from the menu select Properties.
- Now, you need to select Compatibility Tab.
- Here, select both the options, Disable fullscreen optimizations and Run this program as an administrator.
- Lastly, click on Apply->OK to save the changes.
- Once done, Restart the system and check the issue resolved or not.
These are the easy fixes to resolve the error Valorant couldn’t Start Returned 5 Error on your system. Sometimes, simply restarting your system might help you to resolves most of the errors in Valorant.
Although, we hope all the information given in this article will help you to resolve the said error. If you have any doubts or queries after reading this article, leave a comment in the below command box.