
-

-
December 10 2012, 23:08
- Игры
- Cancel
Стоило мне проявить хоть какое-то внимание к игрвому сервису Steam, как тут же он перестал у меня запускаться.
При попытке запустить клиент на компьютере выскакивает вот такое окошко и, вскоре, исчезает.

Все способы решения проблемы, которые я смог найти на просторах интернета уже испробованы.
Толку никакого.
Заметил, что проблема появляется, как только в папке стима возникает файл ClientRegistry.blob, но что все это значит мой гуманитарный мозг понимать отказывается.
У кого-нибудь из друзей моих геймеров была подобная беда? И если была, то как ее удалось решить?
Если найдем ответ – сразу же сделаю апдейт поста. Пусть человечество знает, как бороться с компьютерным бунтом.
- Sometimes Steam servers are incredibly congested and prevent you from accessing your Steam content, but in most cases, when Steam won’t open, the problem is related to your computer.
- To repair Steam Errors, Download Fortect PC Repair Tool
- Restarting your computer is always the quickest and easiest way to fix Steam, not opening issues.
Automatically Repair Steam Errors
Recommended: To easily install drivers automatically, use the tool below.
According to widespread reports, many popular programs, including Steam, have malfunctioned when running under earlier versions of Windows 10.
However, it is not always the fault of Windows. Other programs and Steam file corruption can interfere with your Steam experience. Although it can be very frustrating when you can’t open Steam, you don’t have to feel helpless. If you have trouble opening Steam, read on to discover 17 methods to fix Steam issues in Windows 10.
Common Reasons Why Steam Won’t Open
It’s essential to understand that various factors can contribute to Steam’s inability to open or function correctly on your computer. Identifying the root cause can help you resolve the issue more effectively. Here are some common reasons why Steam may not open:
- Outdated Windows or Steam version: As mentioned earlier, running Steam on an older version of Windows 10 or an outdated Steam client can cause issues. It’s crucial to keep your system and applications up to date for optimal performance.
- Corrupted Steam files: Over time, Steam files can become corrupted, leading to errors and issues when trying to open or run the application. Regularly clearing the cache and cookies, or repairing the Steam client, can help prevent this problem.
- Antivirus interference: Some antivirus programs may mistakenly identify Steam as a potential threat and block its execution. Temporarily disabling your antivirus or adding Steam to its whitelist can resolve this issue.
- Network-related issues: Problems with your router or internet service provider (ISP) can prevent Steam from connecting to the internet, hindering its performance. Restarting your router or checking your ISP’s status can help identify and resolve these issues.
- Outdated or incompatible drivers: Your computer’s hardware drivers play a crucial role in ensuring that all applications, including Steam, run smoothly. Outdated or incompatible drivers can cause Steam to malfunction or not open. Regularly updating your drivers can help prevent this problem.
First: Perform a System Backup Before You Fix Steam
Creating a system backup is always a good idea to ensure you don’t lose any files or data during computer repair. The following steps will help you if you don’t know how.
Step #1
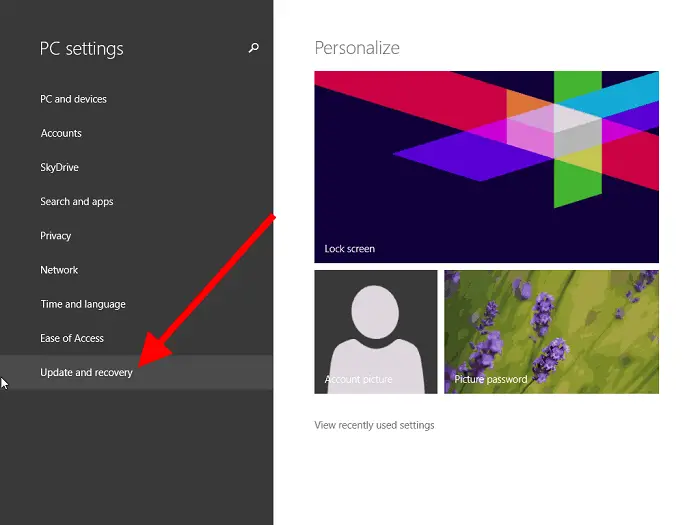
Press the Windows key and click “Settings.”

Step #2
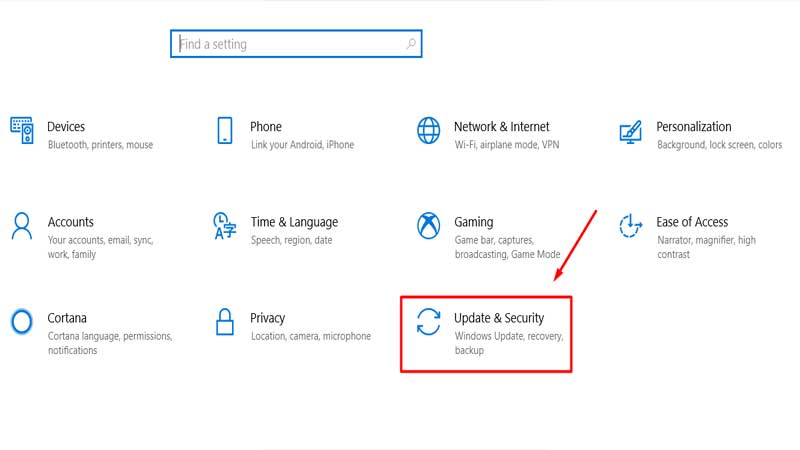
In the window that appears, click “Update & Security.’ Then select “Backup” from the left panel.

Step #3
Connect an external drive, such as a USB drive to your computer. Click “Add a Drive” and then choose the drive you attached.

Backing up your computer usually takes a while, but Windows will create the backup on the drive for you.

Methods to Fix Steam Not Opening on Your Computer
Fix 1: Restart Steam
Sometimes the exe file runs in the background, preventing it from launching Steam. If you stop the Steam client processes and try restarting it, Steam opens.
Step #1
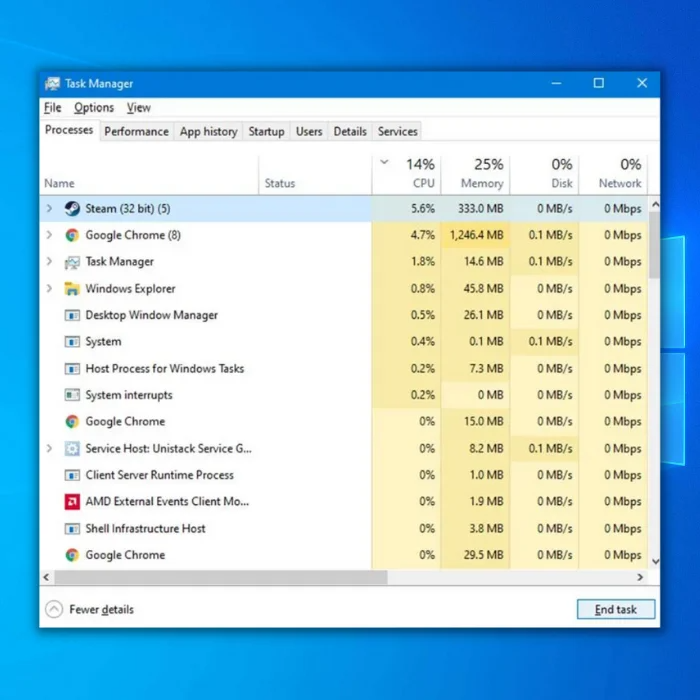
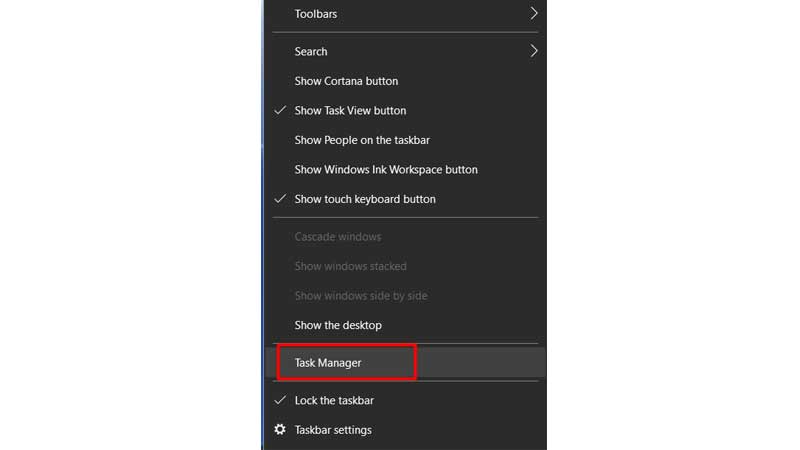
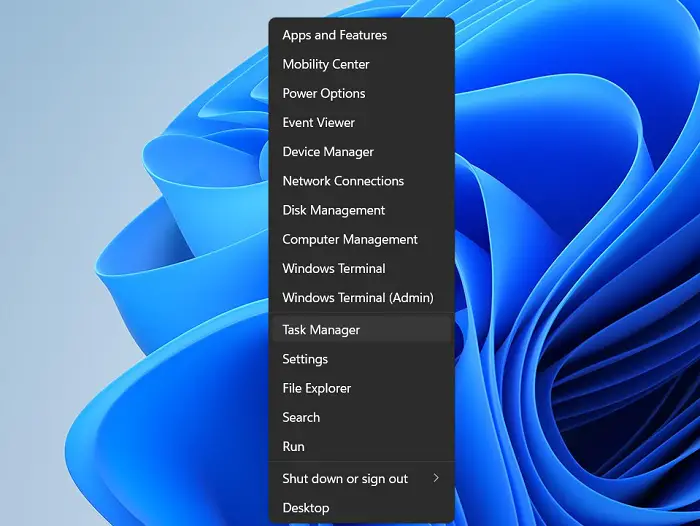
Right-click on the taskbar and select “Task Manager” from the open menu.

Step #2
Select the “Processes” tab. Find the Steam processes that are listed, particularly the Steam.exe file. Click on a Steam client process and click on “End task.” If you don’t find any Steam processes, continue to the following method.
Step #3
Repeat step #2 until all the Steam processes, including the Steam.exe file, are closed. Then try restarting Steam.
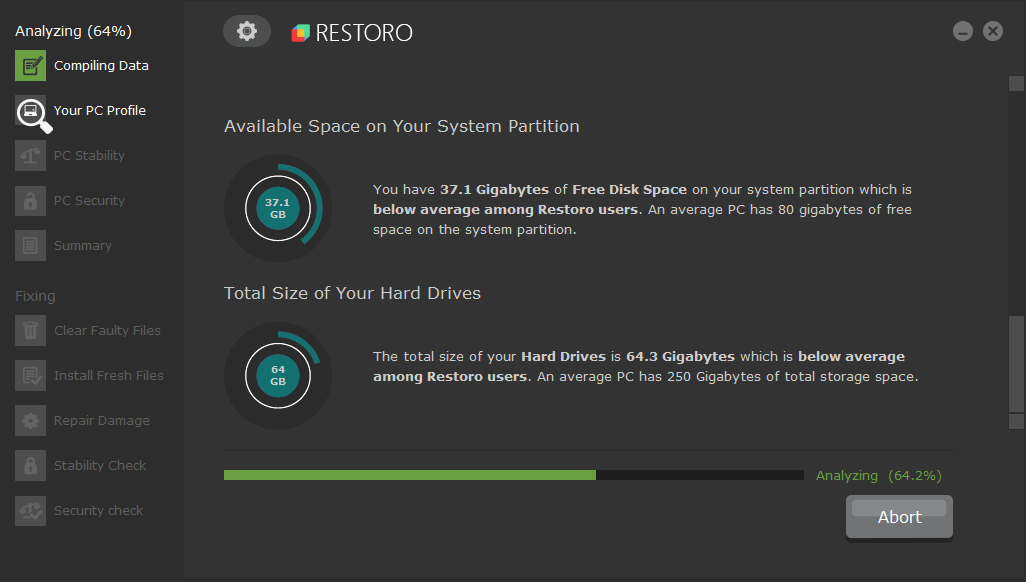
Fix 2: Use the Advanced Repair Tool (Fortect) to Fix Steam
Fortect is a robust program designed to automatically find and repair issues on your PC that might be causing Steam not to function correctly. If the Steam client doesn’t open, we recommend scanning your PC with Fortect.
Follow the steps below to download and install Restoro on your PC.
Please note that you may need to temporarily disable or deactivate your antivirus to keep it from interfering with utility programs like Fortect.
Step#1
Download Now
Step#2
Accept the license terms by checking the “I Accept the EULA and Privacy Policy” to continue.
Step#3
You can view the scan details by expanding the “Details” tab.

Step#4
To set an action, expand the “Recommendation” tab to either choose “clean” or “ignore.”
Step#5
Click “Clean Now” at the bottom of the page to begin the repair process.
If nothing happens and Steam won’t open, continue with the following method.
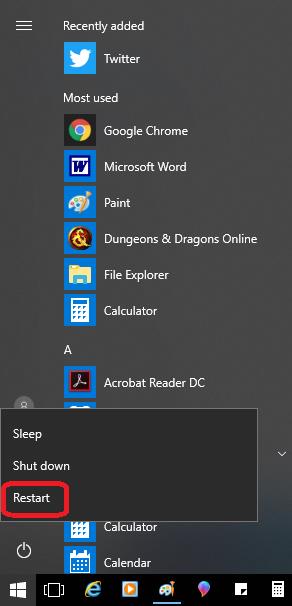
Fix 3: Restart Your Computer
Restarting your computer is always the quickest and easiest way to fix the Steam app not opening issues.
Step #1
Open the Start menu and click on the Power icon. Then, click “Restart.”
That is all there is to it. Once the computer has rebooted, try to restart the Steam app again. If it doesn’t open, continue to the following method.
Fix 4: Clear Steam’s Cache & Cookies
Sometimes, cached data or cookies might cause issues for Steam app users. If Steam won’t open, you can try clearing its cache by manually deleting the necessary files. Here’s how to do it:
- Close the Steam app completely, including any background processes. To do this, press Ctrl+Shift+Esc to open Task Manager. Look for any Steam-related processes (like Steam.exe, steamwebhelper.exe, or steamerrorreporter.exe) and click on them, followed by “End Task” or “End Process” to close them. Be sure to close all Steam tasks.
- Press Win+R to open the Run dialog box.
- Type: %temp%..LocalSteamhtmlcache into the Run dialog box and press Enter. This will open the Steam cache folder.
- Press Ctrl+A to select all files and folders within the cache folder, then press Shift+Del to delete them permanently. Confirm the deletion when prompted.
- Now, go back to the Run dialog box (Win+R), type: %appdata%..LocalSteamcookies, and press Enter. This will open the Steam cookies folder.
- Press Ctrl+A to select all files within the cookies folder, then press Shift+Del to delete them permanently. Confirm the deletion when prompted.
- Restart your computer.
- Launch the Steam app again to see if the issue has been resolved.
Please note that clearing the cache and cookies will remove some browsing data and website preferences from the Steam browser. However, it should not impact your installed games, saved game data, or Steam settings.
Fix 5: Update Windows
Another fast way to resolve the issue is to make sure your Windows 10 operating system is updated. A faulty update may cause the problem in some cases, but a more recent update resolves the issue. To update Windows 10, follow these steps.
Step #1
Click on the “Settings” icon in the Start Menu.
Step #2
In the Settings window, choose “Updates & Security.”

Step #3
Choose “Windows Update” from the list that appears on the right. On the left, click “Check for updates.” You can find it under “Update status.”

Step #4
If updates are installed, you must restart your computer before they go into effect. To do this, click on the Start menu “Power” icon and select “Restart.”

Continue if you are still not connected.
Fix 6: Restart the Router
Sometimes a simple restart is needed to fix Steam not opening.
Step #1
Shut down your computer. Then shut off your router.
Step #2
Unplug your router and wait two minutes before plugging it back into the power outlet. Wait another two minutes. Turn the router on again.
Step #3
Once your router is back on, turn on your computer.
Fix 7: Test Your RAM
The RAM can develop memory problems that interfere with Steam, especially during installation. RAM problems also cause gameplay issues. The following method allows you to check your RAM.
Step #1
Close any open programs and save your work. Type “mdsched” into the Start menu and select “Windows Memory Diagnostic” from the list.

Step #2
In the pop-up window, choose “Restart now and check for problems.”

Step #3
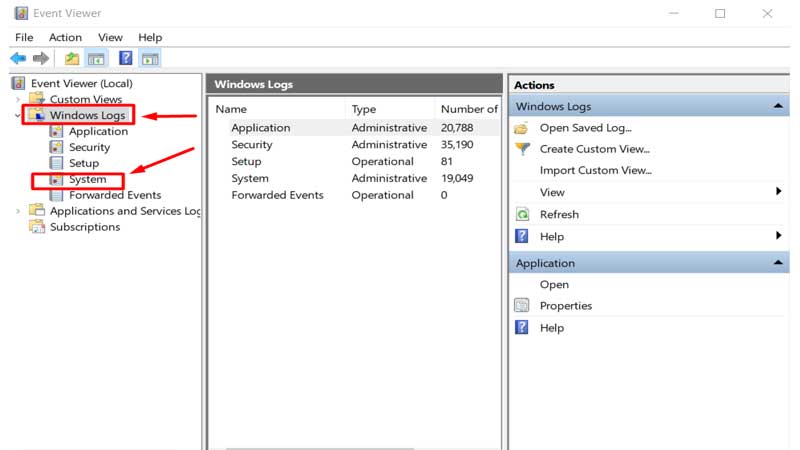
Your computer will run a memory check and restart. The review can take a while, but it is essential not to interrupt it. When the computer finishes the examination and is completely rebooted, type “event” into the Start menu and select “Event Viewer.”

Step #4
On the left side of the window, open the “Windows Logs” menu and click on “System” once.

Step #5
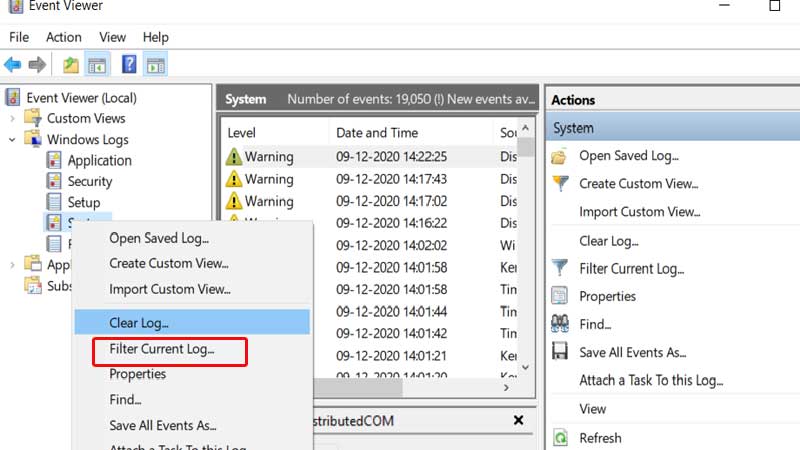
Now, you need to click “System” again, but this time use a right-click, which will bring up another menu. Choose “Filter current log.” You would be unable to select this option if you did not left-click “System” first.

Step #6
In the Filter Log window, click on the drop-down menu next to “Event sources.” Scroll down (the menu is quite long) until you find “MemoryDiagnostics-Results.” Place a checkmark in the box next to that and click “OK.”

Step #7
This will return you to the Event Viewer, where you should have about two “Events” listed in the filtered log. Click each event and look at the information provided. If no errors are detected, go on to the next method. You do not have issues with your RAM hardware. If you see an error, you need to continue to Step #8.

Step #8
If you have a problem with your RAM, the only way to fix it is to replace your RAM sticks. If you prefer, you can test each one by shutting down your computer and removing all the sticks except the one you are testing. Then you can reboot your computer and rerun steps #1-7.
Repeat this with all the sticks. Replace any that had errors with factory-recommended RAM sticks. When you have replaced all the faulty RAM sticks, check to see if the System and Compressed Memory have returned to normal CPU usage.
Fix 8: Repair Steam
Steam client’s installer has a built-in repair feature that can automatically fix Steam. Before using this method, you need to back up your game file.
Step #1
To do this, you must open the steam directory folder where the Steam.exe file is installed. By default, you should be able to find it by typing “File Explorer” into the Start menu and opening it.
Then choose “This PC” on the left menu. Select “Windows C:” on the right. Type “steamapps” into the search bar.
Now, right-click the “steamapps” folder and “Copy” it to your Documents file.

Step #2
Right-click on the “steamapps” folder and choose “Open file location.” Locate the Steam.exe file in the folder.

Step #3
Visit the Steam website and download the latest Steam installer. Run the Steam installer after it finishes downloading. It should allow you to repair the files, including the Steam.exe file, when you run them. Select that option and follow any onscreen prompts.
Try to launch Steam once the repair is complete. If Steam doesn’t open, continue with the following method. If you can open the Steam client but cannot access your saved game data, simply copy the “steamapps” folder in “My Documents” back into the Steam folder and replace the file of the same name there.
Fix 9: Reinstall Steam
Like the previous method, you must back up your game files before performing this method. When you reinstall and restart Steam, data from your online games may be lost even with a backup. You should, however, still be able to access them through your Steam account.
Step #1
Completely exit the Steam client and make sure none of its processes are running in the background by right-clicking on the taskbar and choosing “Task Manager.”
Step #2
As in the other methods, click on the “Processes” tab. Click on a Steam Client process, and click “End task.” If no Steam Client processes are running, continue to Step #3. If more than one Steam Client process is running, continue clicking each process and “End task” until all the Steam Client processes are closed.
Step #3
As with the previous method, back up your game file by finding the Steam folder on your computer. Type “Steam” into the Start menu. Open the file folder named Steam.exe by right-clicking on it and choosing “Open file location.”
Step #4
In the Steam folder, find the file named “steamapps.” Copy this file to the “My Documents” folder by right-clicking it and selecting “Copy.”
Step #5
Now, open the Start menu and type in “Control Panel” without the quotations.

Step #6
Click “Uninstall a Program.”

Step #7
Find the Steam icon on the list and click it. Then click Uninstall/Change and confirm you wish to uninstall Steam. When Steam has finished uninstalling, restart your computer.

Step #8
Go to the Steam website and download the latest Steam installer to reinstall Steam. Open the Steam client installer on your computer, and follow the onscreen prompts. To access your saved game data once you are done reinstalling Steam, copy the “steamapps” folder in “My Documents” back into the Steam folder (replacing the folder of the same name) once Steam is fully installed.
If the Steam files became corrupt, so the repair could not fix them, reinstalling Steam should have fixed the error. If it didn’t, continue to the following method.
Recommended: Fortect System Repair Tool – Fix Errors & Speed Up Windows Automatically
Fix 10: Update Your Date and Time Settings
Steam collects real-time data from your computer. This process involves your date and time settings, and if these are off, it can prevent Steam from launching.
Follow these steps to make sure your date and time settings are synchronized.
Step #1
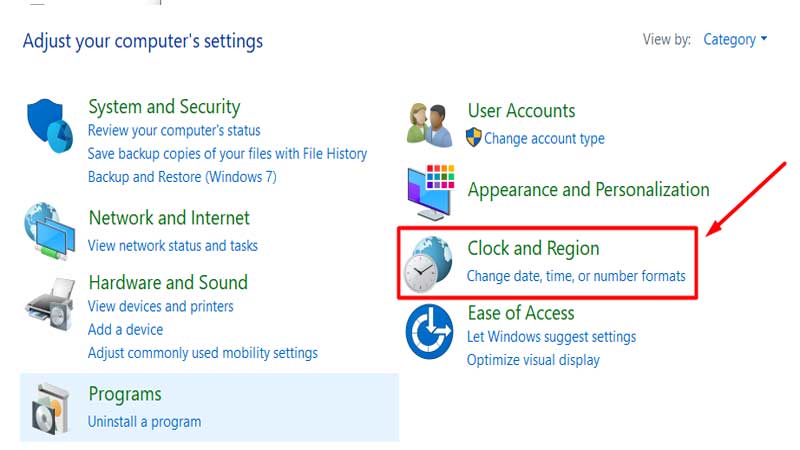
Type “Control Panel” into the Start menu without quotation marks. Click on the Control Panel option at the top of the list.
Step #2
Select “Clock and Region” from the Control Panel window that appears.

Step #3
Next, choose “Date and Time.”

Step #4
Select the tab that says “Internet Time in the pop-up window.” Then click “Change settings….”

Step #5
Make sure the box next to “Synchronize with an Internet time server” has a checkmark. Then click “Update now.” When the update is finished, click “OK.”

Now, double click on Steam and see if it will open. Hopefully, this resolves the issue. If Steam still fails to open, continue with the following method.
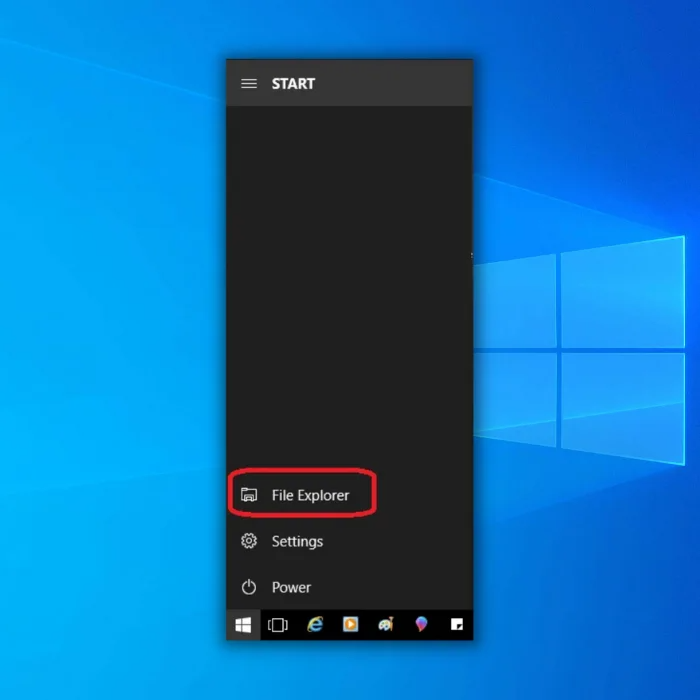
Fix 11: Check Your Hard Drive for Errors
Any storage device can become corrupt, especially after long-term or heavy use. Checking your drive for errors (and having it automatically repaired) can fix these issues that may prevent Steam from opening.
Step #1
Open the Start menu and click the File Explorer icon. Alternatively, you could type “File Explorer” into the Start menu and click that on the list.
Step #2
Scroll down to “This PC” and click it on the left side. Now, right-click on the drive you want to fix.

Step #3
Select “Properties” from the drop-down menu.

Step #4
Select “Tools” from the tabs at the top of the pop-up. Then click the “Check” button. Choose “Scan drive” if the Error check app says it hasn’t found any errors.

Step #5
When the scan is complete, close the window and see if you can open Steam.
Fix 12: Uninstall a Third-Party Antivirus
Sometimes third-party antivirus programs interfere with Steam because online games use copyright protection features that trick antivirus programs into thinking it is malicious software. If you suspect a third-party of antivirus software is causing computer problems, you should check to ensure Windows Defender (Microsoft’s built-in antivirus software) is deactivated.
Running two antivirus programs (such as Windows Defender and a third-party antivirus) simultaneously can cause many problems because the two can interfere with each other. To find out how to deactivate Windows Defender, click here.
Step #1
With Windows Defender disabled, check to see if you can access the webpage. If you can’t, you need to uninstall your antivirus software to fix the Steam won’t open problem. Press the [X] and [Windows] keys on your keyboard together. Click on “Settings.”
Step #2
Choose “Apps” in the Settings window. Scroll until you find your antivirus program in the “Apps & Features” submenu. Click on it, and then click the “Uninstall” button.

Step #3
Click on the Start menu Power icon and restart your computer.
Step #4
If Steam won’t open up, reinstall your antivirus and move on to the following method. If Steam does open, ensure the steam.exe file is running correctly. You can try reinstalling the third-party antivirus if a Windows update corrupted it.
If the problem reappears after you reinstall the antivirus, you must uninstall it and find another third-party antivirus or turn on Windows Defender and use that. You should never use the Internet without antivirus protection active on your computer, even if you are gaming on a website you trust and have confirmed the proper functioning of the steam.exe file to fix Steam won’t open issues.
Fix 13: Check if Your Internet Provider Is Interfering With Steam
Although this is generally not a problem unless you have recently changed Internet providers, it is one thing that is simple to check if you have access to a second network from a different provider. If the plan or provider you are using saves bandwidth by compressing data, it can cause severe problems with Steam’s operation.
The only way to test if this is the cause of Steam not opening is to open Steam when you connect to a different network with another provider. If your Internet service provider is the reason Steam will not open, the only thing you can do to resolve the issue is to change providers.
Fix 14: Update Drivers
So far, we have covered many quicker methods to ensure Steam opens correctly. However, if none of them have worked, this method should help. Sometimes if Steam won’t open, it’s caused by outdated drivers on your computer.
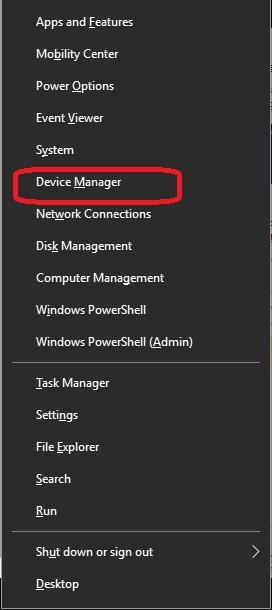
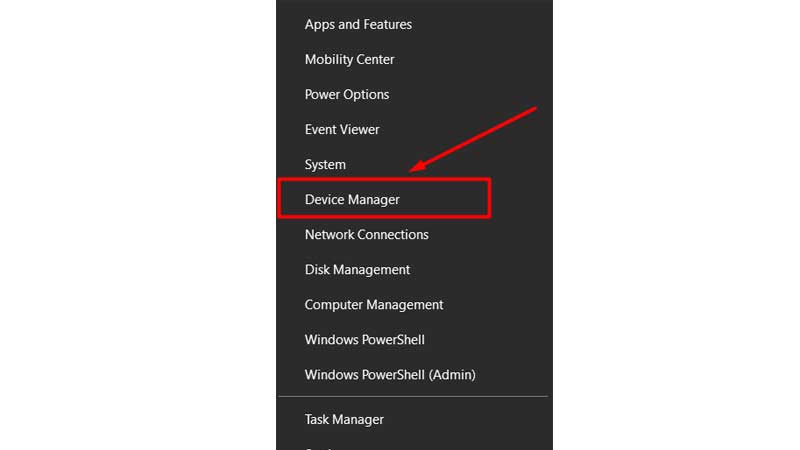
Step #1
Access the device manager by pressing the [X] and the [Windows] keys together. This opens the Quick Link menu, where you must choose “Device Manager.”
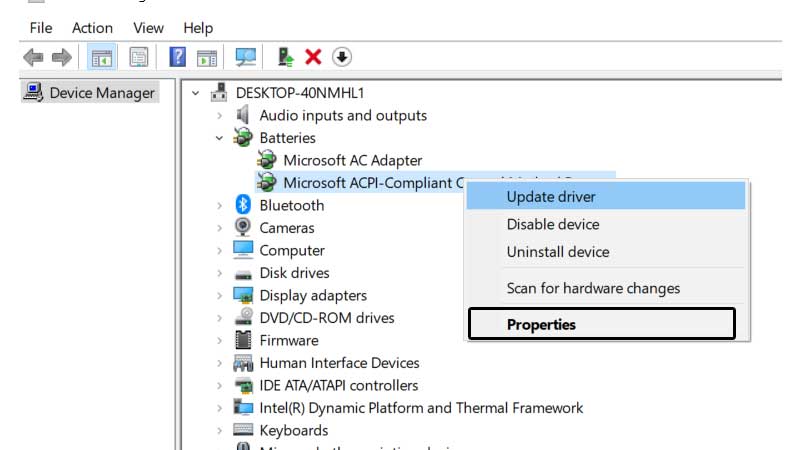
Step #2
Click the first type of device to expand it. Now, right-click on the name of the first device listed and click “Properties.”

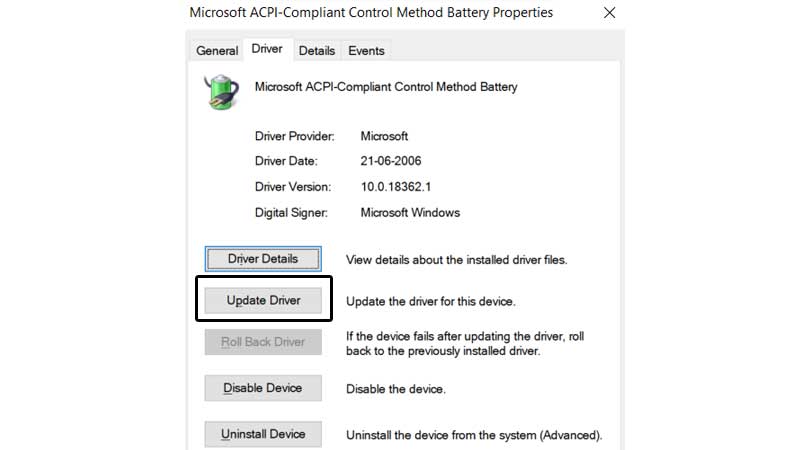
Step #3
In the driver tab, choose “Update Driver.”

Step #4
When you click Update Driver, you will see an option to have the computer automatically search for driver software. Choose this option. Alternatively, you can note the current driver version and check on the manufacturer’s website for the latest version.
You can manually download and install the latest version from the manufacturer’s website if you do not have the latest version.

Step #5
The computer should perform an automatic search. If your driver is up-to-date, you will see a message stating you already have the best driver installed for that device. Otherwise, the computer should automatically update the driver.
Close the pop-up window once the search (and update if needed) is finished. Return to the device manager window (and Step #2) and follow the instructions for the next device until you have checked for driver updates on all the types of devices and device drivers listed.

Step #6
Once you have checked for updates for every driver on the list, restart your computer.
Again, try to launch Steam to see if it will open. If nothing happens and Steam doesn’t open on your computer, continue the following method.
Fix 15: Disable Compatibility Mode if Steam won’t Open
Steam is designed to run on the latest version of Windows (Windows 10), and Steam has a compatibility mode for users with an older version of Windows. Sometimes Windows 10 is proactive and automatically sets Compatibility Mode when various game errors occur, especially for Steam users.
In general, Steam will warn you that running the program in Compatibility Mode is not recommended if this is the problem. Steam users should be aware that Compatibility Mode is not recommended on your Windows 10 computer because this can interfere with the way Steam runs.
Please note that you must ensure you have performed a registry backup before continuing with this method. If you do not know how to back up your registry or are not an advanced user, you should not continue past step #6. Only advanced users should attempt editing their registries.
Step #1
First, you must exit Steam and any open Steam games and stop any Steam processes running. To prevent the processes, right-click on the taskbar, and select “Task Manager.”

Step #2
Now click on the “Processes” tab. Click on a Steam process, and then click “End task.” If you don’t find any Steam processes, continue to Step #3. If you find more than one Steam process, continue clicking each process and “End task” until all the Steam processes are closed.
Step #3
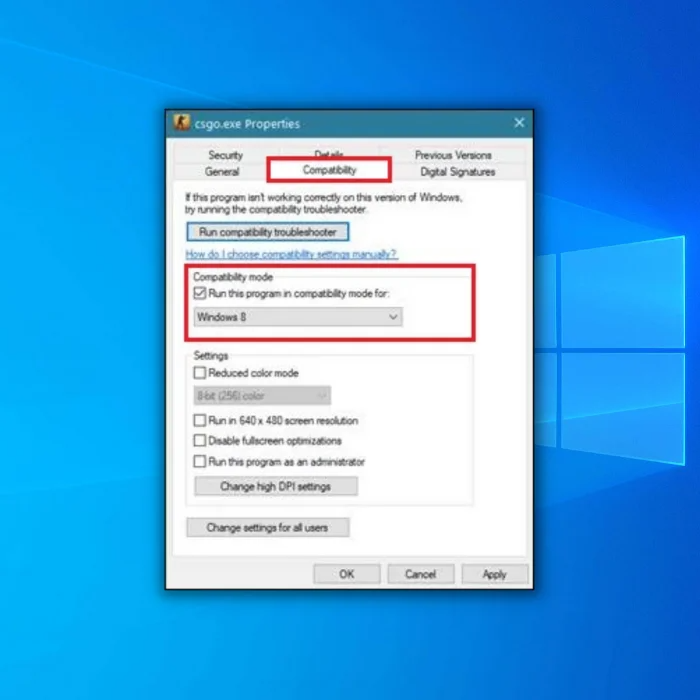
Type “Steam” into your File Explorer and right-click “Steam.exe.” Select “Properties.”

Step #4
Open the tab that says “Compatibility.” Make sure nothing has a checkmark next to it. Then click “Apply.”
Step #5
Now, click “Change settings for all users.” Again, make sure nothing has a checkmark next to it. Click “Apply” and “OK.”

Step #6
Click “OK” again to close the properties window.
Step #7
At this point, you should check to see if Steam will launch. Only continue if Steam does not launch, and you still see the Compatibility Mode warning. To continue, press the [R] key and the [Windows] key on your keyboard to access the Run box.
Type in “regedit” without quotation marks and hit [Enter]. If you see a warning about the app making changes to the registry, click “Yes” to continue.

Step #8
Open the following drop-down lists on the left side of the Registry Editor window. First, click “HKEY_CURRENT_USER” and then “Software.”

Step #9
Continuing, click “Microsoft.”

Step #10
Now, choose “Windows NT” then “CurrentVersion” then “AppCompatFlags” and finally, “Layers.”

Step #11
After you open layers, the right side of the window should display a list of registry entries. You need to find “Steam.exe” right-click on it, and choose the option to “Delete” the entry.
Please note that you may find other Steam entries or entries for individual Steam games. Deleting these other entries could cause problems with the associated games the next time you attempt to launch them.

Step #12
In the same AppCompatFlag folder on the left, click on “Compatibility” and then “Persisted.” Again, look for a “Steam.exe” file to delete. If you find one, right-click on it and delete it.

Step #13
You need to scroll back to the top of the left menu and close the “HKEY_CURRENT_USER” folder. Instead, open “HKEY_LOCAL_MACHINE.”

Step #14
In this folder, open the following in order: “SOFTWARE” then “Microsoft” then “Windows NT” then “CurrentVersion” then “AppCompatFlags” and finally, “Layers.” If you do not see this exact folder, continue to the next step.
If you find the folder and see a Steam.exe file, delete the Steam.exe file as in the previous steps.
Step #15
Now close the registry and try to open Steam.
This method also works if Steam will open, but you have trouble opening Steam games. Merely find the game in the Steam folder on your computer; right-click on the game, select properties, and follow steps #4—#6 above.
Fix 16: Disable Overclocking
Overclocking is when you set your computer above the manufacturer’s settings. Although the boost gives you more performance power, it can cause excessive file and memory corruption issues and cause your computer to run at higher temperatures.
If Steam won’t open and you adjusted your computer to overclock, you need to undo those settings. The UEFI/BIOS differs for each processor, so these steps are general.
Step #1
Type “Settings” into the Start menu, and select the Settings option.
Step #2
In the Settings window, choose “Updates & Security.”
Step #3
Now, click “Recovery” on the left and then choose “Restart now,” which is found under “Advanced startup” on the right.

Step #4
You should see the “Choose an Option” menu. Click on “Troubleshoot.” Then, choose “Advanced Options” and click UEFI Firmware Settings.

Step #5
The computer should restart and take you to the UEFI (or BIOS) menu. At this point, you need to look for something that says “Reset settings to default” or “Return to default” or something similar. Choose that option.
Step #6
Save your changes, and exit the BIOS.
Fix 17: Do a Clean Boot
If third-party apps interfere with Steam, restarting the computer without these running should fix the issue. When you do a clean boot, it reboots the computer with only the necessary Microsoft apps running. Any third party software that changes the operating system itself, disk, or network activity can interfere with Steam, especially for Steam users.
These programs and services run in the background, such as ad-blockers, web-optimizers, system cleaners, proxies, and performance boosters, among other things.
Step #1
Log in as an administrator. Once logged in, press the [R] and the [Windows] keys together. Type “msconfig” in it without quotation marks, and click “OK.”

Step #2
In the System Configuration window, click the “Services” tab. Ensure that “Hide all Microsoft services” has a checkmark next to it. Click the button to “Disable all.”

Step #3
Now, click the “Startup” tab in the System Configuration window. Then click “Open Task Manager.”

Step #4
When the Task Manager opens, click the “Startup” tab if it isn’t already open. Select each item you find and click the button to “Disable” it if it isn’t already disabled. When you are finished, close the Task Manager. Remember to select Steam and any Steam-related processes to ensure they do not interfere during the clean boot.

Step #5
You should be back in the System Configuration window that is still open. Click the “Apply” button and then “OK.”
Step #6
Now you need to restart your computer. Click on the Power icon on the Start menu and choose “Restart.”
Step #7
Once the computer restarts, attempt to reaccess Steam. Remember to select Steam again after the clean boot to ensure it runs smoothly.
Fix 18: System Restore
If you manually created a system restore point before Steam stopped launching, you can restore your system to that point. Although some of your information might be lost, this method allows you to fix the issue by reverting to a system restore point before the Steam Client starts having problems. You can find out how to turn the System Restore feature on and create a restore point here.
Step #1
As previously mentioned, simultaneously press the [X] and [Windows] keys. Choose “Settings” from the menu that appears.
Step #2
Now, select “Update & Security.” In the Update & Security window, click on “Recovery” on the left. You should see “Advanced Startup” on the right. Click the “Restart now” button found underneath that.
Step #3
You will see the “Choose an Option” menu when Windows restarts. Select “Troubleshoot.”
Step #4

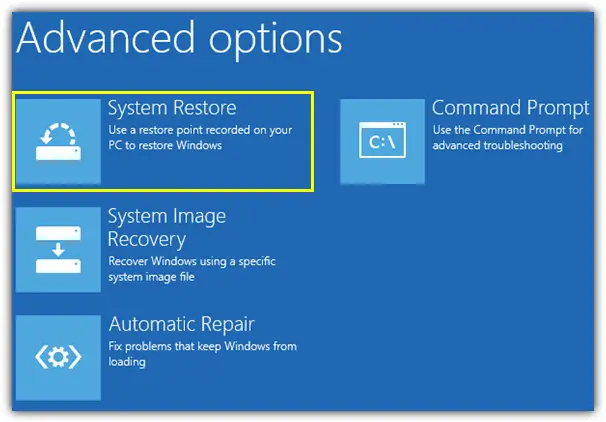
Pick “Advanced Options.”
Step #5
Select “System Restore.”

Step #6
The computer will allow you to pick a restore point and then return it to that point in time.
See Also: How To Enable System Restore In Windows 10
Conclusion:
Windows Automatic Repair Tool

System Information
-
Your machine is currently running Windows Vista -
Restoro is compatible with your operating system.
Recommended: To repair Windows Errors, use this software package; Fortect System Repair. This repair tool has been proven to identify and fix these errors and other Windows problems with very high efficiency.

-
100% safe as confirmed by Norton. -
Only your system and hardware are evaluated.
If none of the above methods can resolve your steam won’t open issue, the problem is likely because of an error in the Steam program itself. Although Steam is prompt at fixing known errors, you should contact Steam support with the list of things you have done to resolve the issue.
Frequently Asked Questions
Why Steam won’t open?
If you launched Steam and nothing is happening, your connection may run slow or unstable. On the other hand, it can also be due to corrupted installation files, an outdated version of the software, and down its servers.
What to do if Steam won’t open?
The easiest way to fix Steam which won’t open is to restart your computer. This way, all of its resources would be reloaded and can eliminate any errors that may have occurred. You can also run the client as an administrator or open it in compatibility mode.
Why won’t my Steam game open?
Steam games that won’t launch are mainly due to corrupted game files or missing files, which hinders Steam from opening your game completely. You can fix this by verifying the integrity of your game files on the client.
Why won’t Steam open on my Mac?
The primary reason Steam is not opening on Mac devices is a corrupted application file. You can fix this by reinstalling the client on your Mac computer.
Why won’t Steam launch?
Steam won’t launch on your computer if its installation files are corrupted. It is also possible that your network is running slow and can’t connect to Steam servers.
Why is my Steam not launching?
Ensure that your computer’s components run the most recent versions of their respective drivers. When a game cannot launch, in most cases, this results from the corruption of the extracted game files.
How do I force Steam to open?
The first thing you should do is see if the game client service is down. This should help you figure out if it’s a short-term problem with the service. To find out, go to the steamstat.us website and look at the information for your area. If there’s no reported outage in your area, we suggest you perform any of the methods outlined in this article.
When I click play on Steam nothing happens?
Numerous consumers complained that when their Steam game launches, nothing happens. You should momentarily disable your antivirus program because it can prevent the app from working. To resolve this issue, you should always ensure that Steam runs with administrator rights.
How do I fix Steam not responding?
We suggest running Steam as an administrator, and you can give it a shot. Also, sometimes all you have to do to get Steam to work again is restart the Steam client or your computer. For Steam to connect to its servers, you should also ensure that your internet connection is steady.
Why can’t I open Steam or any Steam games?
There may be a faulty download cache in your Steam client, preventing your games from launching. Most of the time, this happens when a Steam update is interrupted, which stops games from starting. The only solution to this problem is to delete all game cache files in Steam’s installation folder.
How do I repair Steam?
Some of the game files in your system may be missing or corrupt. As a result, Steam would not launch your game. Your library files’ wrong setting may result in a buggy Steam overlay. We advise deleting some Steam files. Steam will reinstall itself on your machine when you update its files.
Please be aware that any delay during the copy procedure will corrupt the files, forcing you to download the whole thing. If you are confident that there won’t be any disruptions to your computer, only use this option.
How to run Steam client as admin?
To run Steam as an administrator, you must locate the Steam executable file, typically in C:Program Files (x86)Steam. Right-click on the Steam executable and select “Run as administrator” from the drop-down menu. You may be prompted to enter your administrator credentials to confirm the action. Once you have successfully entered your credentials, Steam will launch, and you will be running it as an administrator.
How to stop Avast from blocking Steam?
When Avast antivirus is installed, it may block Steam client from launching or interfere with its operation in other ways. You need to adjust the Avast settings to stop Avast from blocking Steam. First, open the Avast user interface by double-clicking the Avast icon in the system tray. Then, click the “Protection” tab at the top of the window. Select “Virus Chest” from the left-hand menu, and select “Settings” from the drop-down menu. On the popup window, locate the “Exclusions” section and click “Add.” Navigate to the directory where the Steam software is installed and select the Steam folder. This will ensure that Steam is excluded from Avast’s scans. Next, open the “Active Protection” tab. Select “File System Shield” from the left-hand menu and click “Expert Settings.” On the popup window, locate the “Exclusions” section and click “Add.” Navigate to the directory where Steam is installed and select the Steam folder. This will ensure that Steam is excluded from Avast’s scans. Finally, click “OK” to save the changes. Avast should now no longer block Steam.

Steam is arguably the biggest PC gaming platform right now. There is no denying that Steam has improved significantly since it was launched in September 2003. Steam has been in the market for more than 15-years but there are thousands of players who still face ‘Steam Not Opening’ and ‘Steam not connecting’ issues while accessing the platform.
If you are too are going through the same problem then don’t fret, we have brought to you a few tips and tricks that might fix the problem.
Also Read | How To Hide Games From Friends On Steam?
Before we explain multiple methods to fix the ‘Steam Not Opening’ issue, let me tell you that Steam goes down for a brief time every Tuesday around 1 to 3 PM Pacific time for routine maintenance. If you are having the same issue during the said time then wait for a while before checking out the following fixes.
If you have been having trouble opening Steam then make sure you don’t have any unnecessary application is running in the background. To check whether an application is running in the background, you simply need to right-click on the task and select ‘Task Manager’ from the menu that appears.
Now, you will have to select the “Processes’ tab and search for the Steam processes that are listed. After clicking on Steam processes, you will have to click on ‘End Task’. After closing Steam processes from the Task Manager, restart it.
Method 2: Restart Your Computer
Restarting PC solves most of the problems and it could also fix the ‘Steam Not Opening’ error. Once you have successfully restarted your PC, try to open Steam again. If you are still unable to open Steam properly, then you should try another solution.
Method 3: Update Windows
If you have the latest version of Windows installed on your PC, your 90% of the problems will be automatically solved. Yes, there are plenty of issues that only happen because of a faulty update and it is likely that that’s the reason why you are unable to open Steam properly.
To update Windows 10, you will have to follow a few steps:
- Click on the ‘Settings’ icon in the Start Menu
- Select ‘Updates and Security’
- When you click on Update a& Security, you will see a message which says ‘Updates Available’. You simply need to click on the ‘Download’ button to update your OS.

Once you have successfully updated your OS, make sure to restart your PC before you open Steam.
Method 4: Restart the Router
You simply need to shut down your PC and then turn off your router. Once you have unplugged your router, wait for a few minutes before you plug it back into the power outlet and then switch on the router and then your PC.
Method 5: Test Your RAM
There are various problems that usually happen because of RAM. It is likely that you might be facing the ‘Steam Not Connecting’ error because of RAM. Here are a few steps to check your RAM.
- You simply need to type ‘mdsched’ into the Start menu and select ‘Windows Memory Diagnostic’.
- Clicking on ‘Windows Memory Diagnostic’ will open the following window.
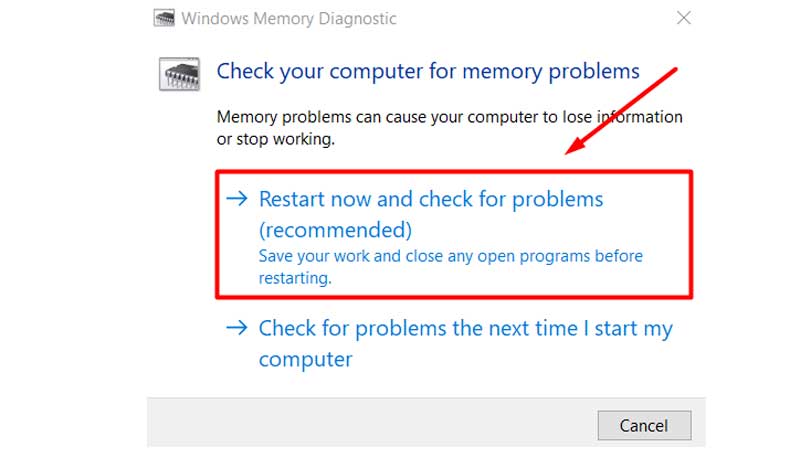
- You will have to select ‘Restart now and Check For Problems’ (see above pic).
- Doing this will start checking your memory and restart. Notably, the process might take a few minutes but don’t cancel it.
- Once the process is completed and your PC is rebooted, you will have to type ‘event’ into the Start Menu and select ‘Event Viewer’.
- Clicking on ‘Event Viewer’ will open a new window. From there, you will have to select Windows Logs and then ‘System. (See below pic).
- Now, you will need to right-click on ‘System’, which will open up a new menu. Select ‘Filter current log’. Notably, this option will only be available to select if you have already open the System folder by left click.
- In the Filter Log Window, Click on the drop-down menu next to ‘Event source’ until you see ‘Memory Diagnostic-Results’. After checkmark in the box, click ok.

- Doing this will take you back to the Event Viewer, where you will have two ‘Events’ listed in the filtered log. You can get full information by clicking on each event. If you don’t have any issue with your RAM then go on to the next way.
- If you have found an error in RAM then you can only fix it by replacing your RAM sticks. You can test each one, if you prefer, by shutting down your computer and removing all the sticks except the one you are working on. Then you restart your PC and repeat the step from start to here.
- Repeat this with all the sticks and replace the one which had errors with factory-recommended RAM sticks. Once you have successfully replaced all the faulty RAM sticks, check to see if the System and Compressed Memory has returned to normal CPU usage.
Method 6: Repair Steam
There is an in-built repair feature in Steam, making it easier for users to take a backup of the game file. To repair Steam, make sure you have already taken the backup of your game files. To do this, you will have to open the Steam installation folder. You can find it by simply typing ‘File Explorer’ into the Start menu.
When you get there, select ‘This PC’ on the left menu and choose “Windows C:” on the right. Type “steamapps” into the search bar. Now, right-click on the ‘steamapps’ folder and copy it to your Document file. Now, right-click on the “steamapps” folder again but this time you will have to choose ‘Open File Location.”
Now, all you need to do is download the Steam installer from its official website. When downloaded, when you run it for the first time, you will be given an option to repair the files. Select that option and follow onscreen instructions.
Once the repair is done, launch Steam. If you are struggling to open Steam then use the next method. If you have managed to open Steam but are unable to access your saved game data, you will have to copy the “steamapps” folder in “My Documents” back into the Steam folder and replace the file of the same name there.
Method 7: Reinstall Steam
If you are sure that there is no application is running in the background then you can opt for this fix. After opening the Task Manager, go to the “Processes” Tab. Click on a Steam process and then click on End Task. If there is no Steam process is running then keep reading.
If there are more than one Steam processes are running in the background then click on each process and then End Task untill all of them are closed. Now type ‘Steam’ into the Start menu and search for a file named Steam.exe and right-click on that file and choose ‘Open File Location’.
In that folder, you will find a file named “steamapps.” You will have to copy this file to the ‘My Documents’ folder by right-clicking on it and selecting ‘Copy’. Now, open ‘Control Panel’, where you will see all of the applications installed in your PC.
You will have to find out Steam and then click Uninstall/Change and confirm to uninstall it from your computer. When uninstalled, restart your PC.
Now, visit the official website of Steam and reinstall Steam. Once it is installed, you can access your saved game data by copying the “steamapps” folder in “My Documents” back into the Steam folder once Steam has been successfully installed.
If your Steam file had an error then reinstalling Steam will certainly solve the ‘Steam Not Opening’ error. If you are still unable to open Steam then you can check out following fixes.
Method 8: Update Your Date and Time Settings
Updating your date and time could fix ‘Steam won’t opening or connecting’ error because Steam collects real-time date from your PC. If your date and timing settings are off and not set in the right timezone then you are likely are face the issue.
Here’s how you can synchronize your date and time on your PC:
- Open Control Panel and select ‘Clock and Region’
- Now, Select ‘Date and Time’.
- Now, you will have to select a tab ‘Internet Time’ and then click “Change settings…”
- When you click on ‘Change Settings…”, make sure you have a checkmark in ‘“Synchronize with an Internet time server” option.
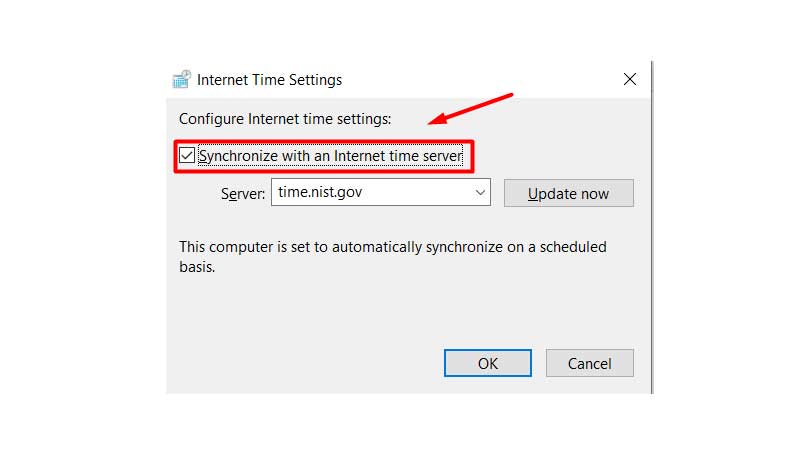
- Now, click on the ‘Update Now’ button. Once you have successfully updated, click on OK.
- Now, go back and try to open Steam.
Method 9: Uninstall Third-Party Antivirus
There are various third-party Anti-Viruses that prevent applications to run smoothly. If you too have installed any of the third-party Anti-virus and struggling to open Steam then make sure you have deactivated the Windows Defender.
In case you are using two antiviruses at the same time then it might cause a lot of problems. If you don’t know how to deactivate Windows Defender then keep reading.
- If you have disabled Windows Defender but still having an issue accessing the webpage, you will need to uninstall your antivirus software.
- Go to ‘Setting’s and select ‘Apps’ in the Settings Window.

- Now, you will have to find the Antivirus software and uninstall it from the Apps and Features menu.
- Now, restart your PC and we hope this will fix the ‘Steam Not Connecting’ error on your PC.
Method 10: Update Drivers
If none of the above-mentioned methods worked for you then you can try this one to fix the ‘Steam Not Working’ error. Notably, this might take a little bit of your time but it will certainly fix your Steam problem.
Here’s how to update drivers:
- To access Device Manager, you simply need to press the [X] key and the [Windows] key simultaneously.
- Now, you will need to double-click on ‘Batteries’ and then right-click on the Microsoft ACPI- Complaint Control Method Battery and then click on Properties.
- When you click on Properties, a window will appear on your screen. Now, you will have to click on a tab ‘Driver’.
- There, you will have to click on the ‘Update Driver’ button.
- Clicking on the Update Driver will automatically begin the search for updated driver software.
- You can also download and install the latest version of your driver manually from the manufacturer’s website.
- Once you have updated your driver, restart your PC and check if Steam is running smoothly.
These are some of the fixes that you try to solve the ‘Steam Not Opening or connecting’ error on your PC. If none of the above-mentioned Steam Won’t Opening fixed worked for you then don’t worry, we will soon update a few fixes.
Steam Won’t open is an error faced by many steam users worldwide. Many have reported that while trying to open the client or the program, it closes within a few seconds without any other prompting issues. There are many issues speculated to be the reason behind this error.

The most common of those issues are, having a Steam Process running in the background, or even interference from some other software. Whatever the reason behind the error maybe, this can be a very frustrating and annoying issue because this error blocks you from accessing or playing the games you have in your Steam Library which means that all those are pretty much useless now.
Read Also: Steam Games Not Launching on Windows
In case you are facing such an issue, worry no more. We are here with the best and proven methods that have been helpful to a lot of Steam Users to resolve the error. These methods can help you to revive your steam client and go back to your favorite games. We suggest that you go through the steps thoroughly before attempting any of the methods, to avoid any system damage.
Table of Contents
- 1 How to Fix Steam Won’t Open Error
- 1.1 Close all the Steam tasks in the background
- 1.2 Restart your computer
- 1.3 Restart your network devices
- 1.4 Try Reinstalling your Steam client
- 1.5 Update your operating system and drivers
- 1.6 Temporarily disabling your Anti-Virus software
- 1.7 Restore your computer from a previous restore point
- 2 FAQs
- 2.1 Why can’t I open steam after logging in?
- 2.2 Why does steam keep closing after a few seconds?
- 2.3 How to fix steam not responding to games?
- 3 Conclusion
Also, we recommend that you can select the best way for you from the list based on the actual issue you are facing, which means that you need not try all the steps. Try the ones that you feel will resolve your problem.
Close all the Steam tasks in the background
At times, your Steam client may not have been shut down correctly or entirely, and the processes or tasks that have been running in Steam are still running as processes in the background. So when you are trying to launch the Steam client later, your operating system comes to the understanding that the same particular processes have already been running in your system and as a result, refuses to launch the program. To open the Steam Account usually, you should just end all the tasks related to Steam in the Task manager.
1. Right-click on any space on the taskbar and then click on the Task Manager option or select Start Task Manager.
2. End all Steam Tasks that are running.
3. To end a task, right click on the particular task and then click End task or End processes option.
• The task mentioned here includes tasks, an application as well as processes.
4. After the process has been completed, Re-Launch your Steam client and then see if it opens.
Read Also: 6 Ways to Disable Steam Auto Updates
Restart your computer
The issue may be caused by very small problems in your system that are caused by any other program or process. These faulty programs or processes may be causing your OS to be unable to open Steam client. Restarting your computer can be a beneficial solution to this problem as it can help to get rid of these small problems. Restart your computer and then check whether the issue remains.
See also:
- 3 Ways to Fix Service Host Local System High Disk Usage
- 3 Ways to Fix Windows Update Service Not Running
- Fix We Couldn’t Complete the Updates, Undoing Changes
- {Solved} 5 Ways to Fix Nvlddmkm.Sys Error on Windows 10
Restart your network devices
Another reason why you are not able to open Steam would be because of a bad network. Some fault may cause this issue in your modem, router or any network devices. If these devices are faulty, then it is sure to cause the Steam not Opening error. So the easiest way to bring back these devices to a normal state is to restart your network devices. Follow the below mentioned steps to restart them:
1. Firstly, you must Shut down your computer, and also shut down your modem and router.
2. Unplug the power from your modem and the router so that they are entirely out of power now.
3. After waiting for a couple of minutes, plug the power cables back in.
4. Then, Switch on your modem and also your router, then wait until they are entirely turned on.
5. Now, switch on your computer and then check whether the Steam won’t open Windows 10 issue that you were facing is resolved.
Try Reinstalling your Steam client
Reinstalling your Steam client can be a helpful method while trying to fix the Steam Won’t open error. This method will help you to fix any issue regarding the steam program files or any operating system compatibility problems that may be preventing steam from opening. To reinstall Steam:
Read also: This Device Cannot Start (Error Code 10)
1. Go to the Steam official website and then download a new Steam installer from there.
2. Then, Open and run the Steam installer that you have just downloaded.
3. Follow the instructions given by the install wizard to install your Steam client on your computer.
Note: while installing your Steam client, remember to install it in the same location it was already installed. Else all your user data and games will be lost from steam.
Update your operating system and drivers
The steam client may be facing issues, probably because of outdated Operating System or Drivers. You can resolve this by simply updating your OS and Device Drivers. To update your operating system:
1. Click on the Windows Start icon in the lower left corner of your computer’s desktop. After clicking on it, type in “update.“
2. Check for Windows Update in the search results and then click on it.

3. On the windows update window, Click on the Check for updates option. (On Windows 7 operating system, you will be able to see the Check for updates option in the left pane of the Windows Update window.)
4. Then, Windows Update will check for the latest updates that you need to install. Download and install these updates on your computer.
5. Then Check whether this method has resolved the Steam not launching error.
See also: 13 Ways to Fix Windows Update Error Code 0x80070643
Temporarily disabling your Anti-Virus software
Sometimes the Steam Won’t start error arises due to the interference caused by the Anti Virus software installed on your computer. To check if your Antivirus is the reason behind this problem, you can temporarily disable your Anti-Virus Program and check if the problem persists.
If disabling your Antivirus program resolves the problem, then we suggest that your Re-Install your Antivirus program or install another option.
Note: Be extra careful while using the internet when your Antivirus is disabled. As it is easier for you to get a malware infection on your computer without the protection of an Antivirus Program.
Restore your computer from a previous restore point
If you have made any changes in your computer’s settings that may be the reason behind this problem, then the best method that you can resort to is Restoring your computer. This method may be beneficial to resolve many problems that you face on your computer. Restoring your computer to a previous restore point can be very helpful in fixing the Steam Won’t Open error.
1. Click on the Windows Start button at the lower left of your desktop screen. Type in “recovery“ in the search box. And then from the list of results, click on Recovery,
2. Click on the Open System Restore option. Then The System Restore wizard will appear.
3. Follow the instructions given by the wizard to restore your system from a system restore point that you have created previously.
4. After the system restore process completes, open your Steam client to check whether the Steam won’t open error remains.
Read also-
5 Ways to Fix Your Windows License Will Expire Soon Error
6 Ways To Fix Could Not Connect To Steam Network Error
{Solved} 7 Ways to Fix Windows Update Not Working
7 Ways to Fix Steam Download Stopping and Restarting Error
FAQs
Why can’t I open steam after logging in?
One of the problems that can cause Steam won’t open after logging in could be errors in Windows OS components such as Registry files.
Why does steam keep closing after a few seconds?
his issue can result from various reasons, such as unclosed Steam processes in the background or interference from other software.
How to fix steam not responding to games?
Close Steam Client and backup your game data and go to Processes tab. Here, end any active Steam processes. Close Windows Task Manager. Open Control Panel (use Windows search). Go to Uninstall a program. Here, select Steam and click Uninstall. After this, reinstall Steam application again from the internet.
Conclusion
These are the best methods that you can try to resolve the Steam Won’t Open error on your computer. We hope that these instructions helped you to solve the problem you are facing.

Gravit Sinha: Founder of ValidEdge, a problem-solving website, driven by his lifelong passion for fixing issues.
Ошибка «Unable to initialize Steam API» появляется в большинстве случаев из-за повреждений файлов игры на жестком диске и при попытке запуска нелицензионной версии игры через Steam.
Проблему можно решить несколькими способами, в зависимости от причин ее появления. Читайте инструкцию ниже.
Способ 1
Очистите кэш клиента Steam. Для этого выполните следующие действия:
Запустите программу, в верхнем углу щелкните по надписи «Steam», затем «Настройки».

В открывшемся окне слева выберите «Загрузки», а справа — «Очистить кэш загрузки», затем «ОК».

После этого перезапустите программу и проверьте, помогла ли эта процедура.
Способ 2
Если ошибка возникает после неудачного обновления Steam, или если файлы программы были случайно повреждены по какой-либо причине, самым простым решением проблемы будет ручная переустановка.
Нажмите кнопку «Пуск» и найдите там «Панель управления». В Windows 10 для этого нужно просто начать набирать слово «панель» на клавиатуре, и она будет найдена через поиск. В Windows 7 ссылка на нее закреплена в Пуске. Кликните по панели управления и в открывшемся окне щелкните по надписи «Программы и компоненты».

Найдите в списке Steam, правой кнопкой мыши откройте контекстное меню и выберите команду «Удалить».

После этого скачайте новый загрузочный файл с нашего или с официального сайта https://store.steampowered.com/ и установите программу на компьютер снова, следуя инструкции по установке.
Способ 3
Steam может сообщать о невозможности инициализации (unable to initialize), потому что учетной записи пользователя Windows не хватает прав. Тогда попробуйте открыть программу с правами администратора. Для этого нужно найти на рабочем столе ее ярлык, щелкнуть по нему правой кнопкой мыши и выбрать пункт меню «Запуск от имени администратора».

Способ 4
Попробуйте временно отключить все защитные программы вашего компьютера, которые могут препятствовать работе Steam: антивирус, брандмауэр (межсетевой экран), VPN клиент (если есть).
Если это помогло, добавьте Steam в исключения и запустите программы заново. Если вы выходите в сеть через VPN клиент, отключайте его на время игры.
Способ 5
Если ошибка выскакивает на игре, которая была скачана не из каталога Steam, возможно вы ее неправильно добавили в свою библиотеку. Прочитайте инструкцию Как добавить стороннюю игру в Steam и как активировать ключ.
Советы
- не отключайте компьютер во время обновления игр. Перед завершением работы Windows, выйдите сначала из Steam, кликнув по его значку в трее правой кнопкой мыши и выбрав там команду «Выход»;
- если есть выбор, откуда устанавливать игру, то лучше установить ее из каталога Steam, чем с компакт-диска;
- не удаляйте игры из папок компьютера вручную — вы можете случайно удалить файлы других игр или самого клиента. У каждой игры есть свой деинсталлятор в «программах и компонентах» Windows. Также в библиотеке Steam есть свой встроенный инструмент удаления добавленных туда игр и программ. Используйте его;
- настройте постоянный запуск Steam с правами администратора. Зайдите в свойства ярлыка, который запускает программу, и поставьте там галочку возле опции «Запускать эту программу от имени администратора».
Это поможет избежать повторения ошибки в будущем.
[Steam] «Unable to open»
![]()
Регистрация:
02.10.2012
Сообщения: 86
Рейтинг: 2
В принцепи проблема вот в чем.
Когда запускаю steam идет [обновление доходит до 26% . И начинаеться после этого [Обновление платформы steam] !
И бывает такое!Либо пишет при [0% обновление платформы steam пишет ошибку «Unable to open»]
Либо оно начинает прогружаться до [100% и после этого сразу же выдает ошибку «Unable to open»]Пробывал удалять blob файлы / и другие !
Ползовался програмой [SteamCleaner_25]
Тоже не помогло!
Steam переустонавливал!
Тоже не помогло!
Качал Steam без всяких дополнительных обновлений
Тоже не помогло!Сносить винду и заного ставить ?.
Думаю тоже не поможет .Или Valve Обновлят чтоб не было такой ошибки ?.
Прошу помочь с этой проблемой . Кто поможет и все будет впорядке . [Invite Dota 2 ] Получит этот приз…
_________________________________________________________________________________________________________________________
[ATTACH]8097.IPB[/ATTACH]
TrusTToDrugs
Пользователь
Регистрация:
01.08.2012
Сообщения: 1545
Рейтинг: 260
Нарушения: 108
![]()
Регистрация:
01.08.2012
Сообщения: 1545
Рейтинг: 260
Нарушения: 108
не у тебя одного такое да и не в первые,ща должны помошники нарисоваться,жди *BUBA*
Jazz529
Пользователь
Регистрация:
23.01.2012
Сообщения: 708
Рейтинг: 429
Нарушения: 91
![]()
Регистрация:
23.01.2012
Сообщения: 708
Рейтинг: 429
Нарушения: 91
1.попробуй удалить стим из реестраскачать заного
2.удали ВСЕ файлы из папки стим, кроме самого ярлыка и папки стим аапсбыла такая трабла, помог пункт номер 2.
Лосось
Пользователь
Регистрация:
02.11.2012
Сообщения: 464
Рейтинг: 213
![]()
Регистрация:
02.11.2012
Сообщения: 464
Рейтинг: 213
Напиши все зеленым шрифтом, виделись от всех…Написал все зеленым…СЛомал систему
![]()
Регистрация:
02.10.2012
Сообщения: 86
Рейтинг: 2
Лосось сказал(а):↑
Напиши все зеленым шрифтом, виделись от всех…Написал все зеленым…СЛомал систему
Нажмите, чтобы раскрыть…
Мне просто нравиться этот цвет . И не тебе меня судить…..
Jazz529 сказал(а):↑
1.попробуй удалить стим из реестраскачать заного
2.удали ВСЕ файлы из папки стим, кроме самого ярлыка и папки стим аапсбыла такая трабла, помог пункт номер 2.
Нажмите, чтобы раскрыть…
Попробую !
Может поможет!
Если будет работать . Пришлю инвайтик *BLUSH*
D3s~
Пользователь
Регистрация:
02.10.2012
Сообщения: 2376
Рейтинг: 593
![]()
Регистрация:
02.10.2012
Сообщения: 2376
Рейтинг: 593
Зеленый шрифт, огромное количество ошибок…
![]()
Регистрация:
02.10.2012
Сообщения: 86
Рейтинг: 2
D3s~ сказал(а):↑
Зеленый шрифт, огромное количество ошибок…
Нажмите, чтобы раскрыть…
Иди в раздел флуда ….
Тут раздел помощи а не флуда !!
artem2x
Пользователь
Регистрация:
04.12.2012
Сообщения: 9
Рейтинг: 0
![]()
Регистрация:
04.12.2012
Сообщения: 9
Рейтинг: 0
![]()
Регистрация:
02.10.2012
Сообщения: 86
Рейтинг: 2
artem2x сказал(а):↑
Нажмите, чтобы раскрыть…
Незнаю не проверял …
Проверь отпиши .
artem2x
Пользователь
Регистрация:
04.12.2012
Сообщения: 9
Рейтинг: 0
![]()
Регистрация:
04.12.2012
Сообщения: 9
Рейтинг: 0
![]()
Регистрация:
02.10.2012
Сообщения: 86
Рейтинг: 2
artem2x сказал(а):↑
Нажмите, чтобы раскрыть…
2 варианта не помогло ??
artem2x
Пользователь
Регистрация:
04.12.2012
Сообщения: 9
Рейтинг: 0
![]()
Регистрация:
04.12.2012
Сообщения: 9
Рейтинг: 0
![]()
Регистрация:
02.10.2012
Сообщения: 86
Рейтинг: 2
БЛИН ЧТО ЖЕ ДЕЛАТЬ КАК ЖЕ БЫТЬ

БЛИН ЧТО ЖЕ ДЕЛАТЬ КАК ЖЕ БЫТЬ

Vladias
Пользователь
Регистрация:
22.10.2012
Сообщения: 14
Рейтинг: 4
![]()
Регистрация:
22.10.2012
Сообщения: 14
Рейтинг: 4
Блин ребят такая же проблема, второй день гуглю и ничего….. Если найдёте решение плз отпишитесь в личку или в теме…….. Буду длагодарен инвайтом доты…..
k1dd1
Пользователь
Регистрация:
08.12.2012
Сообщения: 1
Рейтинг: 0
![]()
Регистрация:
08.12.2012
Сообщения: 1
Рейтинг: 0
Вчера появилась такая же проблема… Пробовал SteamCleaner 2.5 — не помогло. Попробовал поставить стим на другом компе — всё отлично… даже после всех обновлений. На первом компе запустил RegistryBooster, тот нашел 45 ошибок реестра, почистил. Затем я удалил из папки стима всё кроме steam.exe и папки SteamApps. Запустил стим, тот обновился и всё заработало!:) Пробуйте… надеюсь кому-нибудь поможет.
Mr_SamuraY_UA
Пользователь
Регистрация:
08.12.2012
Сообщения: 1
Рейтинг: 0
![]()
Регистрация:
08.12.2012
Сообщения: 1
Рейтинг: 0
зайди через безопасный режим, а потом через обычную загрузку!!!
KillAllPlz
Пользователь
Регистрация:
25.08.2012
Сообщения: 2
Рейтинг: 0
![]()
Регистрация:
25.08.2012
Сообщения: 2
Рейтинг: 0
Безопасный режим -> обновляешь стим в нем -> запускаешь в обычном режиме ->все готово
radik029
Пользователь
Регистрация:
12.12.2012
Сообщения: 1
Рейтинг: 0
![]()
Регистрация:
12.12.2012
Сообщения: 1
Рейтинг: 0
Мне помогло! Всем огромное спасибо!
У кого такая же ошибка: unable to open (steam), попробуйте следующие действия:
1) сносите стим (в корень)
2) скачиваете стим
3) устанавливаете стим, но без подключения к интернету
4) заходите в безопасный режим
5) подключаетесь к интернету
6) после завершения обновления переходите в обычный режим
Все должно работать как часы!
Только вот не знаю, можно ли не снося стим его просто обновить в безопасном режиме, но у кого такая проблема можете попробывать, если поможет без удаления(без пунктов 1,2,3), просьба написать в эту тему! Всем зарание спасибо!
KillAllPlz
Пользователь
Регистрация:
25.08.2012
Сообщения: 2
Рейтинг: 0
![]()
Регистрация:
25.08.2012
Сообщения: 2
Рейтинг: 0
Можно и без удаления стима просто зайти (через безопасный режим) и обновить его
Тема закрыта
-
Заголовок
Ответов Просмотров
Последнее сообщение
-
Сообщений: 14
09 Jun 2023 в 05:08Сообщений:14
Просмотров:29
-
Сообщений: 22
09 Jun 2023 в 03:13Сообщений:22
Просмотров:76
-
Сообщений: 20
09 Jun 2023 в 03:07Сообщений:20
Просмотров:65
-
Сообщений: 13
09 Jun 2023 в 02:54Сообщений:13
Просмотров:40
-
Сообщений: 3
09 Jun 2023 в 02:42Сообщений:3
Просмотров:21


Содержание
- Как исправить ошибку [failed to initialize Steam]
- Способ 1. Перезапустите Steam
- Способ 2. Войдите в Steam с правами администратора
- Способ 3. Проверьте файлы – не повреждены ли они
- Способ 4. Переустановите игру
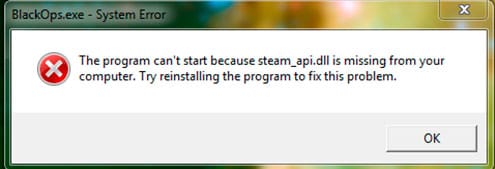
- Ошибка при запуске игры: «запуск невозможен, отсутствует файл »
- Что делать, если появляется ошибка, связанная со steam_api.dll
- Steam_API.dll скачать для Windows 7, 8, 10 x32 / x64
- Что за ошибка. Что пишет
- 1. Как выглядит ошибка steam_API.dll
- 2. Почему возникает
- Решение ошибки
- 1. Steam_api.dll был заблокирован антивирусом. Добавьте в исключение.
- 2. Переустановите Steam
- 3. Скачайте файл steam_API.dll
- 4. Произведите восстановление системы
- 5. Переустановите Windows
- Отзывы
- Что делать при отсутствии файла steam_api.dll?
- Причины возникновения ошибки
- Устранение проблемы путём отключения антивируса
- Добавления файла steam_api.dll вручную
- Отключение стандартного защитника Windows Defender
- [Steamworks.NET] SteamAPI_Init() failed. Refer to Valve’s documentation or the comment above this line for more information. #83
- Comments
- Kew commented Dec 29, 2015
- gamenew09 commented Dec 30, 2015
- Kew commented Dec 30, 2015
- Kew commented Dec 30, 2015
- thestonefox commented May 17, 2016 •
- thestonefox commented May 17, 2016
- Astiolo commented May 18, 2016 •
- Astiolo commented May 18, 2016
- sonnyg007 commented Jun 24, 2016 •
- Tagette commented Aug 4, 2016 •
- Astiolo commented Aug 5, 2016 •
- rlabrecque commented Aug 5, 2016
- Tagette commented Aug 5, 2016 •
- Magris commented Aug 18, 2016 •
- gycot commented Aug 30, 2016
- marnel-estrada commented Oct 4, 2016
- rlabrecque commented Oct 4, 2016
- Nakano37 commented Oct 28, 2016
- Wuzseen commented Nov 3, 2016
- mikeshultz commented Nov 13, 2016
- Unable to initialize Steam API как исправить
- Что значит ошибка «Unable to initialize Steam API»
- Как исправить ошибку «Unable to initialize Steam API»
- Заключение
Как исправить ошибку [failed to initialize Steam]
Сообщение «failed to initialize Steam» часто появляется при запуске PUBG, CS GO, GTA 5 и других игр. Распространенные причины:
- повреждение файлов игры;
- неправильная установка системных библиотек;
- плохая оптимизация кода игры со стороны разработчика.
Расскажем о четырех способах решения проблемы.
Способ 1. Перезапустите Steam
Простой перезапуск Steam решает проблему в 50% случаев. Кликните по значку программы в системном трее и выберите «Выход».

Затем заново откройте клиент. После старта он может начать скачивать файлы обновлений – это нормально. Дождитесь окончания процесса и пробуйте запустить игру.
Если это не помогло, перезагрузите компьютер, и попробуйте запустить игру снова.
Способ 2. Войдите в Steam с правами администратора
Кликните правой кнопкой мыши по значку программы и выберите команду «Запуск от имени администратора».

Попробуйте поиграть. Если проблема решилась, можно сделать так, чтобы Steam работал с правами администратора всегда. Перейдите в папку с программой, кликните правой кнопкой мыши по файлу Steam.exe и выберите «Свойства». Затем перейдите в раздел «Совместимость», отметьте пункт «Запускать эту программу от имени администратора» и нажмите «Применить».

Способ 3. Проверьте файлы – не повреждены ли они
Откройте библиотеку в клиенте Steam, кликните правой кнопкой мыши по названию неработающей игры и выберите «Свойства».

В появившемся окне откройте раздел «Локальные файлы» и кликните по кнопке «Проверить целостность файлов…».

Дождитесь окончания проверки. Программа заменит поврежденные файлы автоматически, если такие будут обнаружены. Перезагружать компьютер после этого не обязательно.
Способ 4. Переустановите игру
Если предыдущие способы не помогли, попробуйте переустановить игру. Кликните по ее названию в библиотеке правой кнопкой мыши и выберите «Удалить».

В следующем окне нажмите «Удалить» еще раз. Дождитесь окончания процесса деинсталляции, затем перезагрузите компьютер. После этого установите игру снова и попробуйте ее запустить.
Также вы можете переустановить требуемые библиотеки и компоненты самостоятельно. Их инсталляторы хранятся в папке с игрой (…Steamsteamappscommonназвание_игры). Зайдите в эту папку и установите их по очереди.
Источник
Ошибка при запуске игры: «запуск невозможен, отсутствует файл »


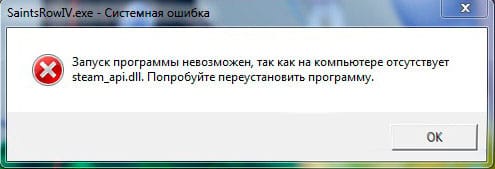
Подскажите, почему у меня одна из игр постоянно «ломается»: я ее устанавливаю, нормально играю. А на следующий день (обычно после перезагрузки ПК), при ее запуске выскакивает ошибка: «запуск программы невозможен, отсутствует файл steam_api.dll».
После переустановки игры, она опять работает до следующего выключения ПК. Что можно сделать?
Вообще, библиотека steam_api.dll используется при взаимодействии игры с приложением Steam (онлайн-сервис цифрового распространения компьютерных игр) .
Сразу отмечу, что этот файл достаточно «подозрительный» для большинства антивирусов, и при малейших сомнениях — они его просто блокируют (удаляют). Видимо в вашем случае, это происходит после каждой перезагрузки компьютера.
Многие могут возразить, что у них якобы нет никакого антивируса — но это не совсем так.
Что делать, если появляется ошибка, связанная со steam_api.dll
❶ Антивирус / Защитник
Дело в том, что встроенный в Windows 10 защитник очень активно борется с любыми «подозрительными изменениями» файлов (особенно, EXE, DLL и пр.). А во многих версиях игр (особенно не официальных) — этот файл «измененный».
Вообще, прежде чем рекомендовать что-то для «восстановления» самого steam_api.dll — нужно добавить этот файл в исключения вашего антивируса (защитника). Иначе, он постоянно будет пропадать.
Как проверить удалял ли защитник steam_api.dll
1) Открыть параметры Windows (Win+i), в разделе «Безопасность Windows» открыть настройки защитника. См. пример ниже.
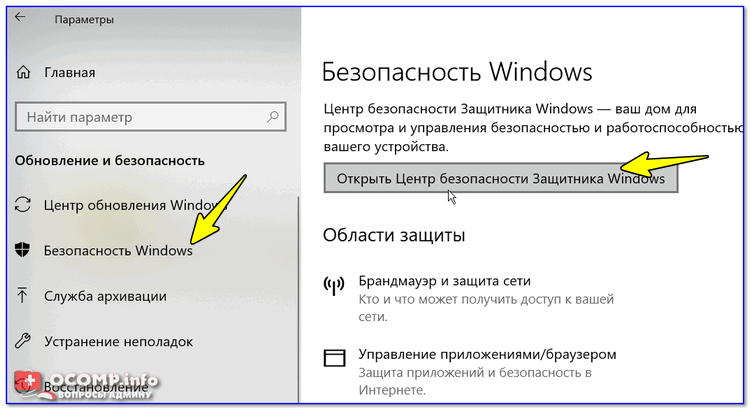
Центр безопасности Windows
2) Далее перейти в «Журнал угроз» и посмотреть список ликвидированных угроз в тот день, когда пропал steam_api.dll.
Как правило, в списке угроз вы увидите, что защитник посчитал его трояном и заблокировал. См. скрин ниже.

Прямо из этого же журнала можно восстановить steam_api.dll и дать задание защитнику, чтобы он более не удалял его. Как правило, этого будет достаточно для дальнейшей спокойной работы.
Примечание!
Если у вас установлен классический антивирус — проверьте вкладку «Карантин». Как правило из нее можно восстановить все «пропавшие» файлы.
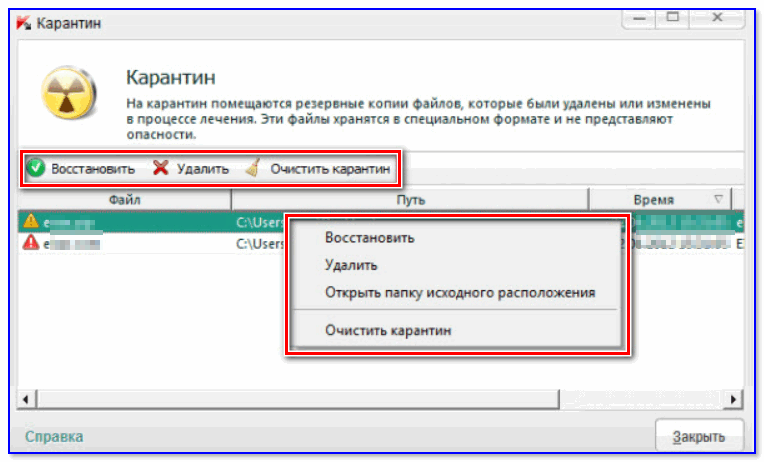
Карантин в антивирусе от Касперского / Кликабельно
❷ Пару слов о версии игры
Второй момент, на котором стоит сделать акцент — это версия игры. Многие пользователи загружают не лицензионные копии игр (сами того не зная), в которых файл steam_api.dll может быть существенно изменен (собственно, из-за этого антивирусы и считают его трояном).
Если вы не хотите «рисковать» и отключать защиту антивируса перед установкой неизвестной версии ПО — то просто загрузите лицензионную копию игры (например, это можно сделать со Steam — на нём не всегда всё дорого, часть игр вообще распространяется бесплатно, другая стоит достаточно дешево. ).
❸ Переустановка игры (+ создание надежной копии)
Если восстановить steam_api.dll с помощью карантина антивирусной программы (защитника) не получилось — просто переустановите игру. Примечание: перед этим полностью удалите игру из системы (с очисткой «хвостов» в реестре).
Кстати, если побаиваетесь, что steam_api.dll снова может пропасть — запакуйте его в архив, и поставьте на него пароль. Таким образом, у вас будет две копии файла: если оригинал пропадет, вы всегда сможете его достать из архива.
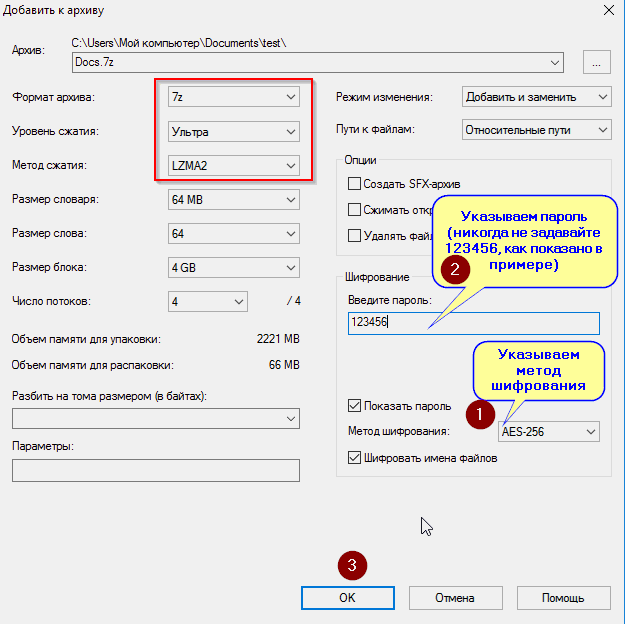
Создаем зашифрованный архив с паролем
❹ Загрузка Steam_api.dll со сторонних ресурсов
Сейчас в сети интернет можно найти и загрузить Steam_api.dll для самых разнообразных игр (многие пользователи предпочитают загрузить 1-2 файла, чем переустанавливать целую игру, особенно, если на это придется потратить час-другой. ).
К примеру, есть весьма неплохой сайт — библиотека DLL файлов: https://ru.dll-files.com/ (поможет быстро найти сотни самых разнообразных DLL).
Способ вполне рабочий, но я его не очень поддерживаю т.к.:
- среди этих DLL часто встречаются файлы других версий, что приводит к доп. ошибкам и проблемам;
- легко можно нарваться на вирусы и трояны;
- часто в дополнению к файлу распространяется рекламное ПО (определенные версии браузеров, всплывающая реклама и пр.).
❺ Обновление «игровых» библиотек
В некоторых случаях проблемы со steam_api.dll возникают не из-за самого этого файла, а по причине отсутствующих (не обновленных) библиотек: DirectX, Visual C++, NET Framework и т.д.
Чтобы не терять время и не пытаться «вручную» найти причину проблемы, рекомендую воспользоваться утилитой Driver Booster. Драйвера с ее помощью обновлять не обязательно, а вот библиотеки (которая она пометит как нужные для игр) — очень рекомендую!
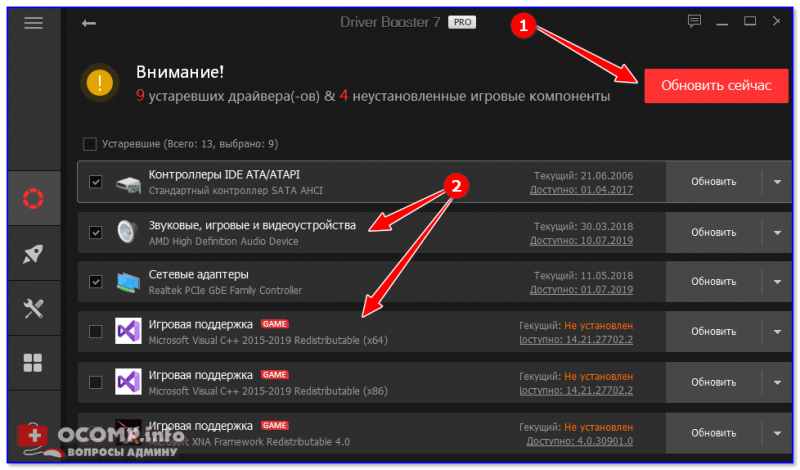
Обновить всё — игровые компоненты, звуковые и игровые устройства и пр. / Driver Booster
Примечание : после обновления — обязательно перезагрузите компьютер!
PS
Если вы используете только лицензионный копии игр и в карантине антивируса (защитника Windows) у вас нет удаленного файла steam_api.dll — очень вероятно вы подцепили вирус или рекламное ПО, которое и удалило этот файл (не всегда антивирус «видит» все угрозы!).
В этом случае рекомендую проверить систему как это указано в этой заметке: https://ocomp.info/esli-antivirus-ne-vidit-virusov.html (в ней приведены спец. утилиты на этот счет ☝).
Дополнения по теме приветствуются.
Steam_API.dll скачать для Windows 7, 8, 10 x32 / x64
Отсутствует файл Steam_API.dll? Способ работает 100%. Скачайте бесплатно Steam_API.dll для 64-битных и 32-битных систем. Но для начала рекомендуем проверить настройки антивируса.
Что за ошибка. Что пишет
1. Как выглядит ошибка steam_API.dll
Ошибка выдает такие сообщения:
На русском:
Запуск программы невозможен, так как на компьютере отсутствует steam_API.dll. Попробуйте переустановить программу.
отсутствует на Вашем компьютере
Иногда всплывает такое сообщение:
Точка входа в процедуру steamuserstats не найдена в библиотеке steam_API.dll
Или такое
Failed to load library steam_API.dll
2. Почему возникает
Библиотека steam_API.dll отвечает за взаимодействие игры с сервисом Steam.
Иногда такой файл повреждается по самым разных причинам или блокируется (удаляется) антивирусом. Последняя причина самая частая, особенно если вы устанавливаете Repack версию игры или ломаете ее сами или по инструкции, помещенной в торрент-раздаче.
Удаление (блокировка) файла чаще всего происходит во время первого запуска игры, реже — во время установки.
Решение ошибки
1. Steam_api.dll был заблокирован антивирусом. Добавьте в исключение.
Если вы пользуетесь взломанной игрой или Repack версией, есть большая вероятность, что антивирус воспринял файл steam_API.dll как подозрительные и заблокировал его или удалил. Добавьте его в исключения и попробуйте запустить игру.
Как вариант, отключите антивирус и попробуйте запустить игру.
2. Переустановите Steam
Если файл поврежден или удален, лучше переустановить Steam. Но перед этим сохранить настройки. Для этого прейдите в C:Program FilesSteam и сделайте копии файла steam.exe и папки Steamapps. Теперь нужно корректно удалить программу: Панель управления → Программы и компоненты. Найти приложение и удалить.
 |
Скачать Steam с официального сайта |
На время установки отключите антивирус.
3. Скачайте файл steam_API.dll
3.1. Скачайте файл по ссылке:
 |
Скачать файл steam_API.dll |
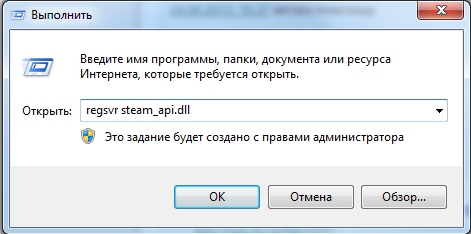
3.2. Куда вставлять
Внимание!
Зарегистрируйте библиотеку dll в системе Windows. Для этого продите: Пуск → Поиск→ Выполнить (другой вариант — нажать горячие клавиши Windows + R). В открывшемся окне «Выполнить» пишем: regsvr steam_api.dll
Внимание!
4. Произведите восстановление системы
5. Переустановите Windows
Бонус!
В каких играх распространена ошибка «Отсутствует файл Steam_API.dll»
Отзывы
![]()
Какова гарантия что антивирус врёт тобиж если я скачаю этот файл с этого сайта и вируса по типу троян не будет на компе?
какова гарантия что ваш файл не вирус?
![]()
скачал SnowRunner 2020 и пишет точка входа не известно помогите пожалуста

Дмитрий Владимирович Макаров,
делайте по инструкции в этой статье.
![]()
У меня игра ПАМ не могу включить, помогите
Дима,
какая у вас версия?
![]()
мне нужна ваша помощь. ,
Проблема заключается в том что dll файл не подходит к версии виндовс!
![]()
у меня игра Farming Simulator 17,у меня ошибка steam_api.dll как ёе исправить
мне нужна ваша помощь. , недостающий файл скачивали?
![]()
низня не помогает
the binding of Isaac например
у меня х64 и я отправил в sysWOW
переустановил игру и пишет что steam_api.dll отсутствует
В ЧЕМ ПРИЧИНА?
не знаю
и регать пытался regsvr и regsvr32
![]()
постоянно система выдает ошибку в stream
![]()
Для тех у кого пишет regsvr не найден попробуйте regsvr32
Что делать при отсутствии файла steam_api.dll?
В этой статье мы рассмотрим распространённую ошибку связанную со стимом, когда она выдает сообщение «steam_api.dll», и что делать в данной ситуации, методы решения и всё что с этим связанно.
Вот так выглядит данная ошибка смотрим скриншот (красным выделено сама проблема). Данная ошибка может отобразиться при включении одной из любых игр связанных со Steam.
Причины возникновения ошибки
Одна из причин возникновения – это не отключение антивируса при установке самой игры, то есть антивирус (не важно какой) думает, что файл steam_api.dll содержит вирус и поэтому при установке он его удаляет.
По сути, файл steam_api.dll считается вирусным, потому что он «крякает» игру или взламывает, так как она является не лицензионный. В нашем случае данный файл никак не вредит компьютеру, а наоборот помогает запускать игру без самой её покупки.
Рассмотрим методы исправления.
Устранение проблемы путём отключения антивируса
Для начала нам придётся удалить установленную игру заранее.
Для тех, кто не знает как удалять игру полностью (кто не настолько чайник, может пролистать ниже):
- заходим в меню – «Пуск»;
- в поиске вбиваем – «Установка и удаление программ»;
- в открывшемся списке игр (смотрим скрин снизу). Находим нашу игру и кликаем по ней два раза.
- Windows предложить удалить или изменить игру;
- нажимаем «Удалить». Произойдет процесс удаления игры и всё.
Этап установки удаление игры – пройден. Вот примерно вот так это будет выглядеть.

Далее перед установкой нашей игры, в которой возникала ошибка «steam_api.dll» отключаем наш антивирус. В моём случае это Avast Antivirus.
Для этого нахожу в панели задач иконку антивируса и нажимаю по ней правой кнопкой мыши (далее ПКМ). Смотрим скриншот:

Откроется контекстное меню, где нужно выбрать «Управление экранами Avast» (1)
В раскрывшемся подменю выбираем отключить антивирус на 1 час (2). Таким образом наш антивирус будет не активен в течение часа, за которое время мы успеем установить игру без проблем.
(Отключение других антивирусов схожи с данным методом отключением защиты Avast. Поэтому дерзайте, в этом нет ничего сложного. Часто данная ошибка встречается еще и с антивирусом eset smart security NOD 32).
После отключения антивируса запускаем старт установки необходимой игры. У меня на выбор установка игры «Craft the World» (С такой проблемой может столкнуться любая игра, к примеру такие ошибки выпадали и на игры Hitman, Call of Duty и тому подобные).

Проходит обычный процесс установки игры, где нужно нажимать:
«Далее» – Выбор место расположения игры – «Выбор локального диска под установку игры» – «Выбор месторасположения папки в меню пуск».
В конечном итоге игра установится и сообщит об успешном завершении процесса.
Добавление игры в «Исключения» антивируса.
После завершения установки. Проверяем игру (при этом антивирус включать еще не нужно).
Если игра запускается и не выдаёт ошибку – отлично, если же ошибка осталась смотрим пункт 2. Теперь необходимо выполнить действие по добавлению игры в исключения антивируса. Так как игра установился с нужным нам файлом, то в будущем антивирус будет распознавать его как заражённым, нам этого не в коем случае не нужно.
1.3.1 Для этого нам нужно открыть интерфейс защиты, щёлкнув по значку программы антивируса в системной трее (в правом углу нижнем рабочего стола).
Переходим в «Настройки», нажав на нужную иконку в правом верхнем углу;
В подменю Общие про скрольте чуть ниже, до момента пока не увидите пункт «Исключения». Открываем его:

Нам нужно добавить файл в исключения антивируса, поэтому нажимаем кнопку «Обзор» (смотрим на скриншоте).
В открывшемся обозревателе файлов указываем «Путь» до файла (или же папку, кому как удобнее). Не стоит указывать общую папку с играми, так как она еще будет пополняться, и кто знает, вдруг там засядет вирус, который в дальнейшем защита не сможет увидеть.
Следует указать папку с игрой либо же файл.
В нашем случае я отмечаю папку с названием моей игры «Craft The World» нажимаю «Ок» и следом «Добавить».
Закрываем Avast. Не забудьте после установки включить обратно антивирус, в том случае если вы отключили его на более чем на один час. Процесс включения аналогичен, как и с отключением антивируса. Возвращаемся к пункту 1.1 и делаем те же манипуляции, описанные в том разделе. Только вместо отключения антивируса, Вам откроется подменю с кнопками его включения.
Готово. Теперь Вы можете пользоваться этим способом и для других игр и приложений, с которыми возникла данная проблема.
Запускаем игру и наслаждаемся, играя в неё.
Добавления файла steam_api.dll вручную
Этот способ применяется в том случае, если Вас не устраивает первый способ с отключением антивируса. Например, игра слишком долго устанавливается или Вам лень ждать установку, так как большой вес и тому подобно.
Нам нужно вручную скачать этот файл на компьютер. В интернете достаточно копий этого файла, которые подойдут для нашей «проблемной игры».
2.1 Открываем любой браузер Chrome, Yandex, Opera Browser без разницы.
2.2. Нам нужно найти файл steam_api.dll. (для вашей удобности отдельная ссылка на файл будет прикреплена в конце мануала)
2.2.1 Советую искать этот файл исключительно для той игры, которую хотите восстановить. Например если это игра GTA V. То воспользуйтесь поиском в интернете, к примеру. Файл Steam_api.dll для gta 5.
2.3 И так, вы скачали необходимый компонент steam_api.dll, теперь его необходимо поместить в папку с нашей игрой.
2.4. В моём случае будет игра TESV – Skyrim. Находим папку с игрой. У нас путь «E:GameTES V Skyrim – Special Edition».

2.5. В этой же корневой папке мы находим наш старый файл «steam_api.dll». Так же он может находится не в корневой папке, а в папках bin или system. Советую воспользоваться поиском по каталогу папки.
(возможно, в новых играх файл будет иметь название с указанием разрядности вашей системы «steam_api64.dll» самое главное — это тот самый нужный файл).
2.6 Копируем наш скачанный из интернета новый файл в корневую папку и при предложении заменить его – подтверждаем наше копирование.
2.7 После проделанных манипуляции добавляем снова эту папку в «Исключение» антивируса, чтобы он снова не сожрал его как зараженного.
2.8 Пробуем включить игру и играем.
Если же после данного пункта у вас до сих пор вылетает ошибка «отсутствует steam_api.dll», то возможно у вас стоит операционная система Windows выше 7. В таком случае смотрим 3 метод исправления.
Отключение стандартного защитника Windows Defender
Начиная с Windows 8 и выше. В ОС системе начал активно работать встроенный защитник Windows Defender и помимо установленных ваших антивирусов, он тоже может блокировать файл steam_api64.dll и выдавать ошибку «Точка входа в процедуру SteamInternal_ContextInit не найдена в библиотеки DLL steam_api64.dll Steam Internal Context Init крякнутый steam_api64.dll».
Что нужно делать.
3.1 Открываем Защитник Windows.
Переходим в меню «Пуск» – «Поиск» и пишем Защитник Windows.

3.2 Открываем его и видим примерно такое окно.
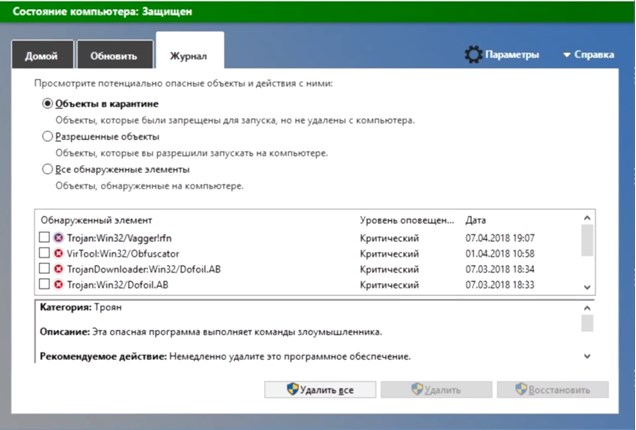
3.3 Видим во вкладке «Журнал», что защитник заблокировал наш любимый файл пометив его как троян «Trojan:Win32/Vagger» и для этого нам нужно восстановить его. Как правило, именно этот файл изменяют хакеры, чтобы игра работала без активации.
3.4 Таким образом отмечаем галочкой нужный нам файл в защитнике Windows и нажимаем восстановить его. Тем самым мы его вытаскиваем с карантина и возвращаем в папку с игрой.
3.5 Не забудьте в защитнике Windows добавить его в исключение или же вообще отключите его.
После данных методов исправлений игра должна запуститься 100% и Вам будет опыт на будущее.
Спасибо за внимание и успехов в этой ситуации.
[Steamworks.NET] SteamAPI_Init() failed. Refer to Valve’s documentation or the comment above this line for more information. #83
Copy link Quote reply
Hi,
I’m running Unity 5,3,1f Personal.
My first game was recently Greenlit http://steamcommunity.com/sharedfiles/filedetails/?id=542685634 so this is my first time getting a game onto Steam.
I imported the SteamWorks.NET Unity component as per the instructions here https://steamworks.github.io/installation/
steam_api.dll did not appear in the root, but the steam_appid.txt did and I edited it, making it my own appid. While poking around I found steam_api.dll under Assets/Plugins/x86.
So not 100% sure that the import went correctly.
When I have steam running and launch the game in Unity UI I get this error. Same if I run a stand alone build.
[Steamworks.NET] SteamAPI_Init() failed. Refer to Valve’s documentation or the comment above this line for more information. UnityEngine.Debug:LogError(Object, Object) SteamManager:Awake() (at Assets/Scripts/Steamwork.NET/SteamManager.cs:97)
Is this normal? Is it because I am not launching it from Steam?
Copy link Quote reply
Copy the steam_api.dll into the executable folder. That should work.
Copy link Quote reply
Manged to solve it by taking a leap of faith and uploading a depot to SteamWorks and it worked!
Didn’t have to copy steam_api.dll into the root. When I build the binary it ends up there anyway.
So it looks like that error is what happens when you don’t launch it from Steam?
Copy link Quote reply
On another machine, The first time I launched the game from Steam I got the error.
[Steamworks.NET] SteamAPI_Init() failed. Refer to Valve’s documentation or the comment above this line for more information. UnityEngine.Debug:LogError(Object, Object) SteamManager:Awake() (at Assets/Scripts/Steamwork.NET/SteamManager.cs:97)
Subsequent times, all good.
Copy link Quote reply
I’m having this same issue in the Unity editor. How can you launch your game within the Unity editor and get support for Steamworks?
Doesn’t seem valid that you have to do a build to test the Steamworks functionality.
Also, when I did the import of the Steamworks.Net unitypackage it didn’t copy the dll’s to the root directory (which I believe is now the correct process?)
I have my steam_appid.txt file in my root directory and I updated the number.
I’ve run DbgView and I don’t see any output from Steam that would shed any light on what the issue may be.
Unity 5.3.4f1 64 bit
Copy link Quote reply
I’ve resolved the issue, I’ll post in case someone else hits the same problem.
The issue is because my app ID is for an unpublished app and my steamworks account is not the same as the account I log into steam on my desktop with, it means the API doesn’t have permission to access the App ID.
I resolved it by adding a permission for my desktop steam account within my steamworks web page and now it’s working.
This is probably obvious to most people! 🙂 but if you’re stumped like I was, then try this! 🙂
Copy link Quote reply
I’m having a similar problem. When I run my game within Unity, DbgView reports that it’s «unable to locate a running instance of Steam, or a local steamclient64.dll». But with a build (without a local steam_appid.txt) it works fine.
I’ve got the steam_api64.dll in the root directory and I’ve tried it with and without the appid file, but it’s the same result.
What I find strange is that when I put the appid file in the build directory it creates the same problem when I thought you had to put it there to solve it. I have triple checked that it’s got the correct id in it.
Copy link Quote reply
Looks like I just had to run Unity as administrator
Copy link Quote reply
@thestonefox Thanks for taking the time to post your fix. Was stuck for a few hours trying to figure what was the problem. Making sure the user logged into steam had permissions for the AppID did the trick.
Copy link Quote reply
@Astiolo Did you ever find a better solution then running Unity as administrator? Seems bad to force a customer to launch the game as administrator every time they play the game. It is also quite annoying as a developer. I have the same issue on my Windows 8 machine using Unity 5.4.0f3. All my other computers don’t have this issue.
Edit: It might be worth noting that all my windows accounts are administrator accounts.
Copy link Quote reply
@Tagette, The game shouldn’t need to be run as admin, just Unity when you’re running the game from within the engine. Really you shouldn’t need to even do that but it solved the problem for me.
Copy link Quote reply
How does your steam launch? Games should be running at the same process elevation as Steam, If Steam is being run as Admin then the Unity Editor will need to be as well.
When you run stuff from Steam it will inherit the same elevation level as Steam itself so it will always work.
Copy link Quote reply
@rlabrecque We have not been launching through steam but I imagine it would have the same issue because we don’t have steam run as administrator. We run from the .exe and have the steam_appid.txt present.
@Astiolo It seems we have different issues then. I’m using the same Steamworks .Net in Unity 5.1 and I don’t have this issue running it on my windows 8 computer. However a different build running 5.4 fails to load the dll unless it is ran as administrator.
Copy link Quote reply
@rlabrecque I have same issue
other appid(480 or published) is working but not mine T.T(492610)
What can i do??
Unity 5.3.6 OSX 10.11
Copy link Quote reply
Giving my alt account permissions solved the biggest problem I had, thanks!
One thing of note — I had to manually copy steam_appid.txt to my build directory, and only then would it start up. Did anyone else have to do the same, or should Build be creating/copying the file to the root of the build dir?
Copy link Quote reply
Hello. I have the same issue. How do you give «account permissions»? Is it to be setup in Steamworks or in Steam?
Copy link Quote reply
This is done via one of two ways.
A: Your account must be in your Steamworks partner group.
B: Your account owns the game through a «Developer Comp» (red) CD-Key.
Essentially it just means that your game should show up as playable in your Steam library.
@gycot:
Yes, you need to manually copy steam_appid.txt if you need it. You’re not supposed to ship it to customers as Steam injects the appid itself when it’s run from Steam. You can ensure that you’re running from Steam by calling SteamAPI.RestartAppIfNecessary with your AppId (as is done in SteamManager)
Copy link Quote reply
I’ve tried everything in this thread and I’m still getting the same SteamAPI_Init() failed error. strangely it works if I replace my appID with 480 in the steam_appid.txt file (comes up as Spacewar, of course). Since that’s the case it makes me fairly sure it something wrong with how I’ve got the app setup, but the user I’m logged in with on steam is an admin on the application with full permissions for everything. Does anyone have any other idea on what I might be missing?
Copy link Quote reply
I am also experiencing this same issue. I’ve added my relevant steam accounts on steamworks in the «Everyone» group which should give them permissions on the app right?
Copy link Quote reply
Having the same/similar problem. At this point I’m not entirely sure where the problem lies(Steamworks.Net, Steamworks SDK). Trying to get a Linux x86_64 build running for a headless server. Game is packaged as a dedicated server and deployed using steamcmd . Potentially relevant info from the logs:
I can only guess it might have to do with not having a steam client running(I can’t for a headless system) but steamcmd should have my credentials. Are there any logs anywhere on Valve’s side that can be checked to see if there were permissions issues?
Most of the suggested fixes here or elsewhere just don’t work, including the official suggestion of symlinking steamclient.so to .steam/sdk32 .
The game is packaged with steampipe(ass a tool as described here on their partner site, which purposely includes steamclient.so and steam_appid.txt as redistributables. But an strace only suggests that it’s looking for a pid file isntead of steamclient.so but I’m no expert at reading these traces.
Not really sure where to go from here, but would love some ideas.
Unable to initialize Steam API как исправить
При попытке запуска какой-либо игры (реже самого клиента «Стим») пользователь может столкнуться с вылетом программы, и соответствующим сообщениями «Unable to initialize Steam API» и Steam client not found (рассмотрена ранее). Обычно данная дисфункция возникает в ситуации, когда пользователь пробует запустить игру не через клиент «Стим», а также в случае, если какой-либо из основоположных файлов данного клиента удалён или повреждён. В данной статье я расскажу, что за ошибка «Unable to initialize Steam API», когда она возникает, и как исправить на вашем ПК.
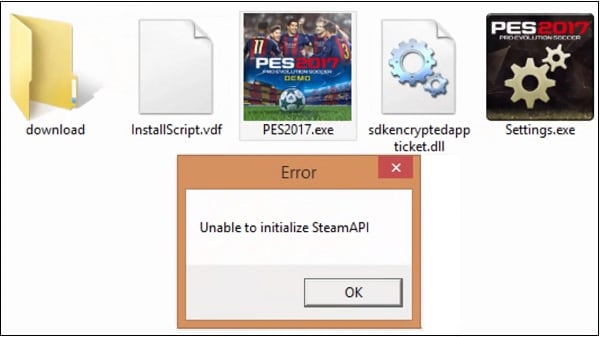 Ошибка «Unable to initialize Steam API» при запуске «PES2017»
- Что значит ошибка «Unable to initialize Steam API»
- Как исправить ошибку «Unable to initialize Steam API»
- Заключение
Что значит ошибка «Unable to initialize Steam API»
В переводе с английского языка текст данного сообщения звучит как «Невозможно инициализировать Steam API», обычно обозначая ситуацию, когда запускаемая программа обратилась с соответствующим запросом к клиенту Стим, но так и не получила от него необходимый ответ.
Причинами этого может быть следующее:
- Файлы клиента «Steam» повреждены или удалены;
- Пользователь запустил игровую программу не через клиент Стим;
- Пользователь запустил клиент не с правами администратора;
- Пользователь запустил пиратскую версию программы;
- Корректную работу со «Steam» блокирует антивирус или брандмауэр;
- Неудачное обновление Стим вызвало появление данной ошибки.
 Исправляем ошибку инициализации Steam API
Как исправить ошибку «Unable to initialize Steam API»
Для решения данной проблемы существует несколько основных путей, а именно:
- Перезагрузите ваш компьютер, а затем попытайтесь вновь запустить Стим;
- Запускайте игровую программу только через «Steam»;
- Запускайте клиент Стим от имени администратора. Наведите курсор на его иконку на рабочем столе, нажмите правую клавишу мыши, и выберите «Запуск от имени администратора», это может помочь избавиться от ошибки «Unable to initialize Steam API» на вашем ПК;
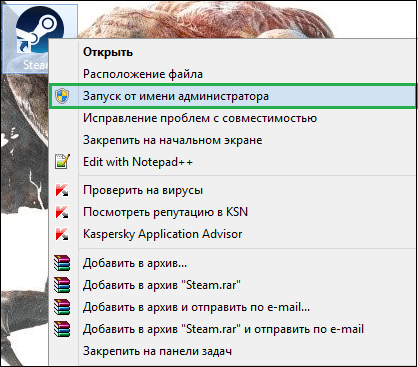 Запускайте клиент с правами администратора
 Переустановите клиент «Steam» на вашем ПК
Заключение
В большинстве случаев вариантом решения проблемы «Unable to initialize Steam API» является полная переустановка клиента «Steam». Также рекомендую воспользоваться другими советами, перечисленными мной выше, они доказали свою эффективность по борьбе с рассмотренной мной дисфункцией программного клиента.
Источник
Сообщение «failed to initialize Steam» часто появляется при запуске PUBG, CS GO, GTA 5 и других игр. Распространенные причины:
- повреждение файлов игры;
- неправильная установка системных библиотек;
- плохая оптимизация кода игры со стороны разработчика.
Расскажем о четырех способах решения проблемы.
Важно: если ошибка появилась после очередного обновления, сначала ничего не делайте – просто подождите. Скорее всего разработчик в ближайшие часы выпустит патч, который все исправит.
Простой перезапуск Steam решает проблему в 50% случаев. Кликните по значку программы в системном трее и выберите «Выход».
Затем заново откройте клиент. После старта он может начать скачивать файлы обновлений – это нормально. Дождитесь окончания процесса и пробуйте запустить игру.
Если это не помогло, перезагрузите компьютер, и попробуйте запустить игру снова.
Способ 2. Войдите в Steam с правами администратора
Кликните правой кнопкой мыши по значку программы и выберите команду «Запуск от имени администратора».
Попробуйте поиграть. Если проблема решилась, можно сделать так, чтобы Steam работал с правами администратора всегда. Перейдите в папку с программой, кликните правой кнопкой мыши по файлу Steam.exe и выберите «Свойства». Затем перейдите в раздел «Совместимость», отметьте пункт «Запускать эту программу от имени администратора» и нажмите «Применить».
Примечание: вы можете выставить права администратора и для самой игры. Для этого проделайте аналогичные действия с файлом .exe, который ее запускает. Быстрый способ его найти – открыть свойства игры в библиотеке Steam, перейти во вкладку «Локальные файлы» и нажать кнопку «Просмотреть локальные файлы».
Способ 3. Проверьте файлы – не повреждены ли они
Откройте библиотеку в клиенте Steam, кликните правой кнопкой мыши по названию неработающей игры и выберите «Свойства».
В появившемся окне откройте раздел «Локальные файлы» и кликните по кнопке «Проверить целостность файлов…».
Дождитесь окончания проверки. Программа заменит поврежденные файлы автоматически, если такие будут обнаружены. Перезагружать компьютер после этого не обязательно.
Способ 4. Переустановите игру
Если предыдущие способы не помогли, попробуйте переустановить игру. Кликните по ее названию в библиотеке правой кнопкой мыши и выберите «Удалить».
В следующем окне нажмите «Удалить» еще раз. Дождитесь окончания процесса деинсталляции, затем перезагрузите компьютер. После этого установите игру снова и попробуйте ее запустить.
Важно: возможно, перед первым запуском появится окно с предложением установить или обновить Microsoft Visual c++ Redistributable или другой компонент Windows. Обязательно соглашайтесь, не отменяйте процесс.
Также вы можете переустановить требуемые библиотеки и компоненты самостоятельно. Их инсталляторы хранятся в папке с игрой (…Steamsteamappscommonназвание_игры). Зайдите в эту папку и установите их по очереди.
Содержание
- Как исправить ошибку «Failed to initialize Steam»?
- «Failed to initialize Steam»: способы по устранению ошибки
- Способ №1 Перезапуск Steam
- Способ №2 Запуск от имени Администратора
- Способ №3 Проверка целостности файлов игры
- Не удалось выполнить инициализацию Steam в PUBG: почему, что делать?
- Проверка целостности файлов
- Запуск от имени администратора
- Русские буквы
- Visual C++
- Исправить Не удалось инициализировать ошибку STEAM PUBG
- Попробуйте эти исправления
- Метод 1: принудительно перезапустите Steam
- Метод 2: запустите Steam от имени администратора
- Метод 3: обновите драйверы вашего устройства
- Метод 4: отключите запуск от имени администратора для вашей игры
- Метод 5: отключите полноэкранную оптимизацию для вашей игры
- Как исправить “Не удалось выполнить инициализацию” ошибка в PUBG
- Что это за ошибка и из-за чего она возникает
- Как пофиксить ошибку «не удалось выполнить инициализацию Steam»
Как исправить ошибку «Failed to initialize Steam»?
Failed to initialize Steam – невероятно популярная ошибка, возникающая в клиенте дистрибуции Steam. Появляется данная ошибка сразу же после запуска той или иной игры из библиотеки пользователя. Этой игрой может оказаться GTA 5, PUGB или Dota 2 – буквально любая игра. В сегодняшней статье мы попытаемся разъяснить вам, как избавляться от ошибки Failed to initialize Steam, когда та возникает на вашем компьютере.
«Failed to initialize Steam»: способы по устранению ошибки

Способ №1 Перезапуск Steam
Самый элементарный, тем не менее эффективный способ – перезапуск Steam. В клиенте данного магазина частенько возникают всевозможные баги, проблемы или ошибки, но решается все крайне просто – обычным перезапуском. Попробуйте перезапустить клиент Steam, а затем запустите нужную вам игру, чтобы проверить, была ли устранена ошибка «Failed to initialize Steam».
Способ №2 Запуск от имени Администратора
Следующий способ – запуск клиента Steam от имени Администратора. Огромное множество пользователей по всему миру утверждают, что избавиться от ошибки «Failed to initialize Steam» можно попросту запустив клиент с правами администраторской учетной записи системы. Чтобы это сделать, вам нужно следующее:
- закрыть работающий клиент Steam;
- пройти в корневую папку клиента Steam;
- найти там исполнительный файл Steam.exe;
- нажать правой кнопкой мыши на этот файл и выбрать «Запуск от имени Администратора».
Попробуйте запустить нужную игру из вашей библиотеки еще раз. Возможно, ошибка «Failed to initialize Steam» на этот раз исчезнет.
Способ №3 Проверка целостности файлов игры
Порой, ошибка «Failed to initialize Steam» может быть вызвана повреждением файлов запускаемой вами игры. Проверить это крайне просто с помощью встроенной в клиент Steam проверки целостности файлов игры. Чтобы запустить проверку, вам потребуется сделать следующее:
- запустите Steam;
- войдите в библиотеку игр и найдите нужную вам;
- нажмите на нее правой кнопкой мыши и перейдите в «Свойства»;
- перейдите во вкладку «Локальные файлы»;
- нажмите на кнопку «Проверить целостность файлов игры…».
Как только будет нажата вышеуказанная кнопка, перед вами появится маленькое окошко с прогрессом проверки файлов игры. Если какие-то файлы игры не пройдут проверки, то они будут повторно загружены. В свою очередь, если какие-то файлы не прошли проверки и были повторно загружены – попробуйте вновь открыть нужную вам игру, чтобы проверить наличие ошибки «Failed to initialize Steam».
Источник
Не удалось выполнить инициализацию Steam в PUBG: почему, что делать?
Не удалось выполнить инициализацию Steam в PUBG, работая по привычному алгоритму? Рассказали несколько действенных способов «лечения» возникающих проблем – несколько минут, и вы в игре!
Проверка целостности файлов
Вам не удалось выполнить инициализацию Стим в PUBG, хотя вы не делали никаких необычных действий? Ошибки в играх – не редкость, поэтому не переживайте, лучше ищите действенный путь решения.

Первый вариант, который стоит испробовать – проверка целостности файлов через десктопный клиент. Эта опция позволяет выявить и заменить поврежденные элементы автоматически:
- Откройте клиент и перейдите в библиотеку;
- Найдите название игры в списке слева и щелкните по нему правой кнопкой мышки;
- Перейдите к пункту «Свойства» из выпадающего меню;

- Откройте вкладку «Локальные файлы» и нажмите на кнопку «Проверка целостности файлов» .

На экране будет отображаться процесс работы – если потребуется восстановление или загрузка новых элементов, система выполнит задачу автоматически. Теперь повторите попытку входа в игру!
Запуск от имени администратора
Появилась надпись «Не удалось выполнить инициализацию Steam» в ПАБГ? Возможно, системе не хватает определенных разрешений – это легко исправит запуск от имени администратора.
- Найдите ярлык игры на рабочем столе;
- Щелкните правой кнопкой мышки и выберите соответствующий пункт в контекстном меню.

Второй вариант действий при возникновении ошибки «Не удалось выполнить инициализацию Стим» в ПУБГ таков (возьмите на заметку):
- Откройте папку PLAYERUNKNOWN’S BATTLEGROUNDS внутри директории Стима;
- Найдите среди файлов документ под названием «TsLGame.exe» ;
- Кликните правой кнопкой мыши и нажмите на строчку «Свойства» ;
- В открывшемся окне ищите вкладку «Совместимость» ;
- Поставьте галочку напротив пункта «Выполнять программу от имени администратора» ;
- Сохраните внесенные изменения.
Простейшее решение, которое недооценивают многие пользователи! Спасает за несколько секунд.
Русские буквы
Столкнулись с ошибкой «Не удалось выполнить инициализацию Стим» в ПАБГ? Необходимо потратить несколько секунд и проверить, нет ли в названии директории (где хранится программа) русских букв.
Есть русские слова и буквы? Переименовывайте папку или переносите содержимое в директорию, озаглавленную только латиницей.
Visual C++
Когда ПУБГ пишет «Не удалось инициализировать Стим», нужно использовать все доступные средства. Последний вариант таков:
- Войдите в директорию игры и найдите папку «vcredist» ;
- Внутри вы увидите три папки с компонентами – 2013, 2015 и 2017;
- Откройте каждую и последовательно установите Visual C++. Обязательно загрузить все три компонента;
- Перезагрузите компьютер и повторите попытку.
Методы, приведенные выше, работают – если сделаете все правильно, сможете навсегда забыть о возникающих ошибках инициализации, будете наслаждаться игрой!
Источник
Исправить Не удалось инициализировать ошибку STEAM PUBG
Fix Failed Initialize Steam Pubg Error
Ошибка «Не удалось инициализировать STEAM» часто возникает в PUBG. Он появляется до того, как игрок попадает в сцену меню. Узнайте, как исправить ошибку Не удалось инициализировать STEAM.

Многие игроки PUBG (PlayerUnknown’s Battlegrounds) видят ошибку в своей игре. А “ Не удалось инициализировать STEAM »Произошла ошибка до того, как они попали в сцену меню. Они не могут играть в свою игру из-за этой ошибки. И это очень раздражает.
Но не волнуйтесь. Ниже приведены несколько методов, которые помогли многим игрокам PUBG исправить ошибку.
Попробуйте эти исправления
Необязательно пробовать их все; просто продвигайтесь вниз по списку, пока не найдете тот, который вам подходит:
Метод 1: принудительно перезапустите Steam
Ошибка «Не удалось инициализировать STEAM» может возникать из-за проблем с вашим клиентом Steam. И вы должны принудительно перезапустить свой клиент Steam, чтобы избавиться от них. Для этого:
1) Нажмите Ctrl , сдвиг и Esc одновременно клавиши на клавиатуре, чтобы открыть диспетчер задач.
2) Щелкните значок Процессы таб. Щелкните правой кнопкой мыши каждый Пар и PUBG (TslGame) приложение или процесс, затем щелкните Завершить задачу / Завершить процесс .
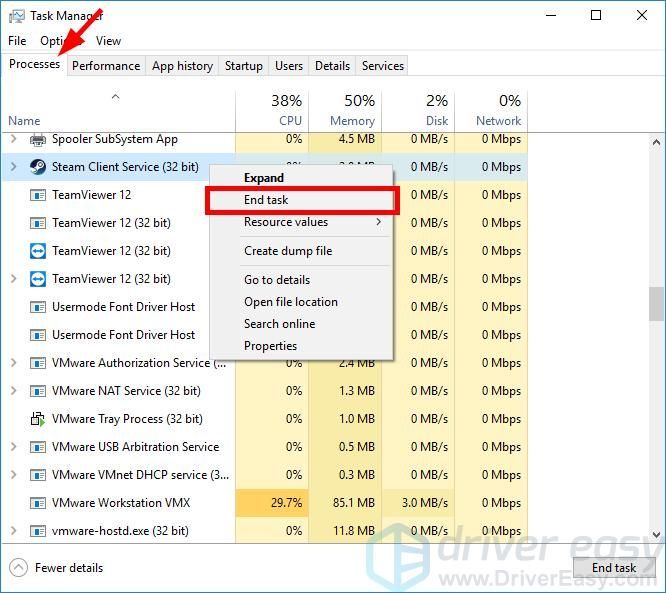
3) Откройте свой клиент Steam, затем запустите PUBG и посмотрите, исправит ли это вашу игровую ошибку.
Метод 2: запустите Steam от имени администратора
Ваш Steam может «не инициализироваться» из-за некоторых проблем с привилегиями вашего клиента Steam. Вы должны запустить свой клиент Steam от имени администратора. Для этого:
1) открыто Проводник (нажмите Windows logo key и ЯВЛЯЕТСЯ на клавиатуре одновременно), затем перейдите туда, где установлен Steam (по умолчанию это C: Program Files (x86) Steam или же C: Program Files Steam ).
2) Щелкните правой кнопкой мыши Пар или же Steam.exe , затем щелкните Запустить от имени администратора .
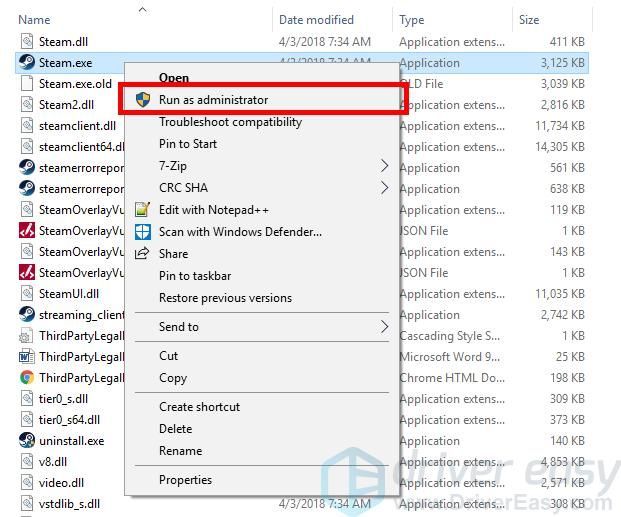
3) Запустите PUBG и посмотрите, сможете ли вы исправить свою ошибку, и войдите в меню своей игры.
Метод 3: обновите драйверы вашего устройства
Другой распространенной причиной ошибки «Не удалось инициализировать Steam» являются устаревшие или неисправные драйверы устройств. Поэтому вам следует обновить драйверы, чтобы увидеть, решит ли это вашу проблему. Если у вас нет времени, терпения или навыков для обновления драйверов вручную, вы можете сделать это автоматически с помощью Водитель Easy .
Водитель Easy автоматически распознает вашу систему и найдет для нее подходящие драйверы. Вам не нужно точно знать, в какой системе работает ваш компьютер, вам не нужно рисковать, загружая и устанавливая неправильный драйвер, и вам не нужно беспокоиться о том, что вы ошиблись при установке.
Вы можете загрузить и установить драйверы с помощью Free или За версия Driver Easy. Но с версией Pro требуется только 2 клики (и вы получаете полная поддержка и 30-дневная гарантия возврата денег ):
1) Скачать и установить Водитель Easy .
2) Бежать Водитель Easy и щелкните Сканировать сейчас кнопка. Водитель Easy затем просканирует ваш компьютер и обнаружит все проблемные драйверы.

3) Щелкните значок Обновить рядом с каждым из ваших устройств, чтобы загрузить для него последнюю версию драйвера. Вы также можете щелкнуть Обновить все кнопку в правом нижнем углу, чтобы автоматически обновить все устаревшие или отсутствующие драйверы на вашем компьютере (для этого требуется Pro версия — вам будет предложено обновить, когда вы нажмете «Обновить все»).
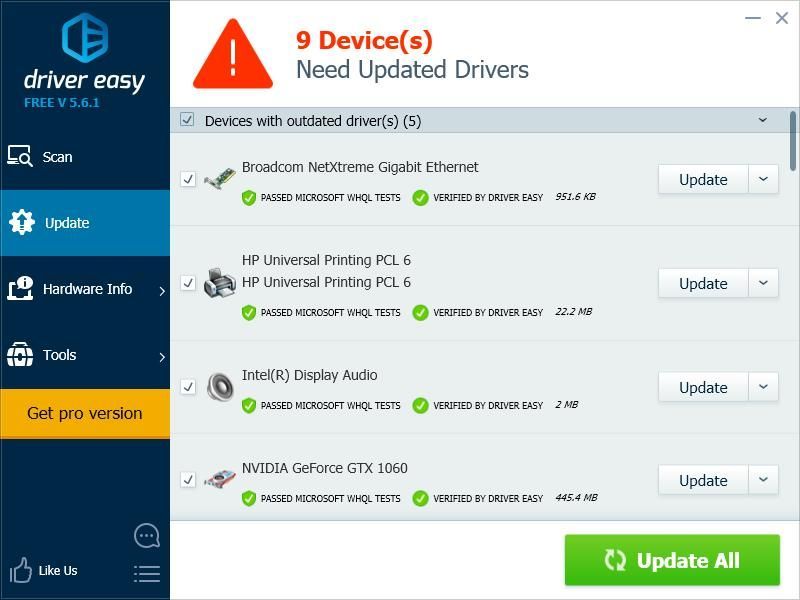
Метод 4: отключите запуск от имени администратора для вашей игры
Ошибка может возникнуть из-за проблем с правами доступа к игре. Вам следует отключить настройку запуска PUBG от имени администратора. Для этого:
1) открыто Проводник (нажмите Windows logo key и ЯВЛЯЕТСЯ на клавиатуре одновременно), перейдите туда, где установлен Steam (по умолчанию это C: Program Files (x86) Steam или же C: Program Files Steam ), а затем перейдите к steamapps common TslGame Binaries Win64 .
2) Щелкните правой кнопкой мыши TslGame или же TslGame.exe , затем щелкните Свойства .
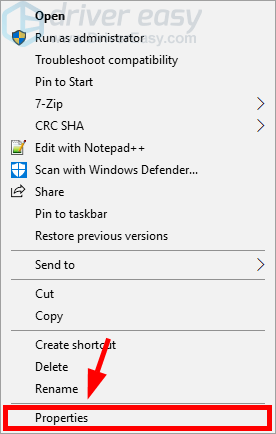
3) Щелкните значок Совместимость вкладка, убедитесь Запустите эту программу от имени администратора является не отмечен , затем щелкните Хорошо .
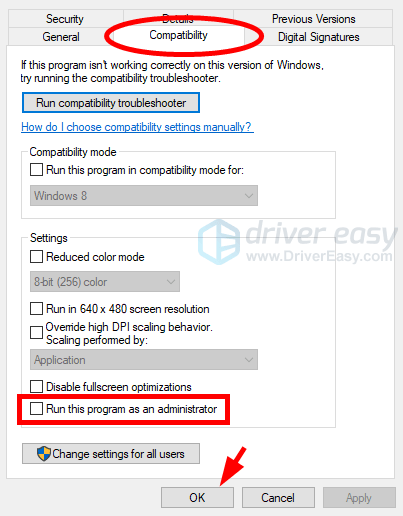
4) Запустите игру и посмотрите, исправит ли это вашу ошибку.
Метод 5: отключите полноэкранную оптимизацию для вашей игры
Ошибка «Не удалось инициализировать STEAM» может возникнуть из-за функции полноэкранной оптимизации. Это функция Windows 10, разработанная для повышения производительности вашей игры. Но это также может вызвать непредвиденные проблемы со стабильностью. Вы должны отключить эту функцию, чтобы увидеть, исправит ли это вашу ошибку. Чтобы отключить полноэкранную оптимизацию:
1) открыто Проводник (нажмите Windows logo key и ЯВЛЯЕТСЯ на клавиатуре одновременно), перейдите туда, где установлен Steam (по умолчанию это C: Program Files (x86) Steam или же C: Program Files Steam ), а затем перейдите к steamapps common TslGame Binaries Win64 .
2) Щелкните правой кнопкой мыши TslGame или же TslGame.exe , затем щелкните Свойства .
3) Щелкните значок Совместимость вкладка, убедитесь Отключить полноэкранную оптимизацию является проверил , затем щелкните Хорошо .
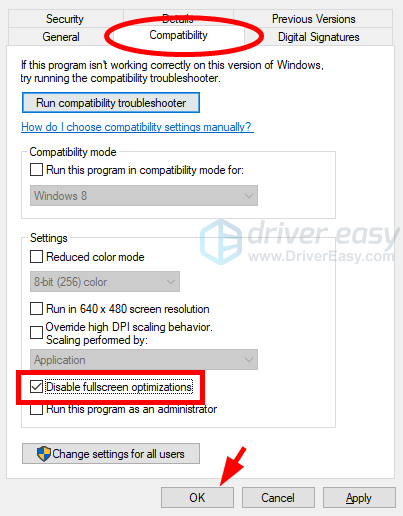
4) Запустите свою игру. Если этот метод работает для вас, вы больше не увидите ошибку «Не удалось инициализировать STEAM».
- PLAYERUNKNOWN’S BATTLEGROUNDS
- Windows
Источник
Как исправить “Не удалось выполнить инициализацию” ошибка в PUBG
Всем привет, дорогие читатели. Как вы, наверное, знаете, особенно если зашли прочитать нашу статью, PUBG – игра хорошая, но богатая на самые разнообразные ошибки. И сегодня мы поговорим об одной из них, называющейся «Ошибка, не удалось выполнить инициализацию Steam».
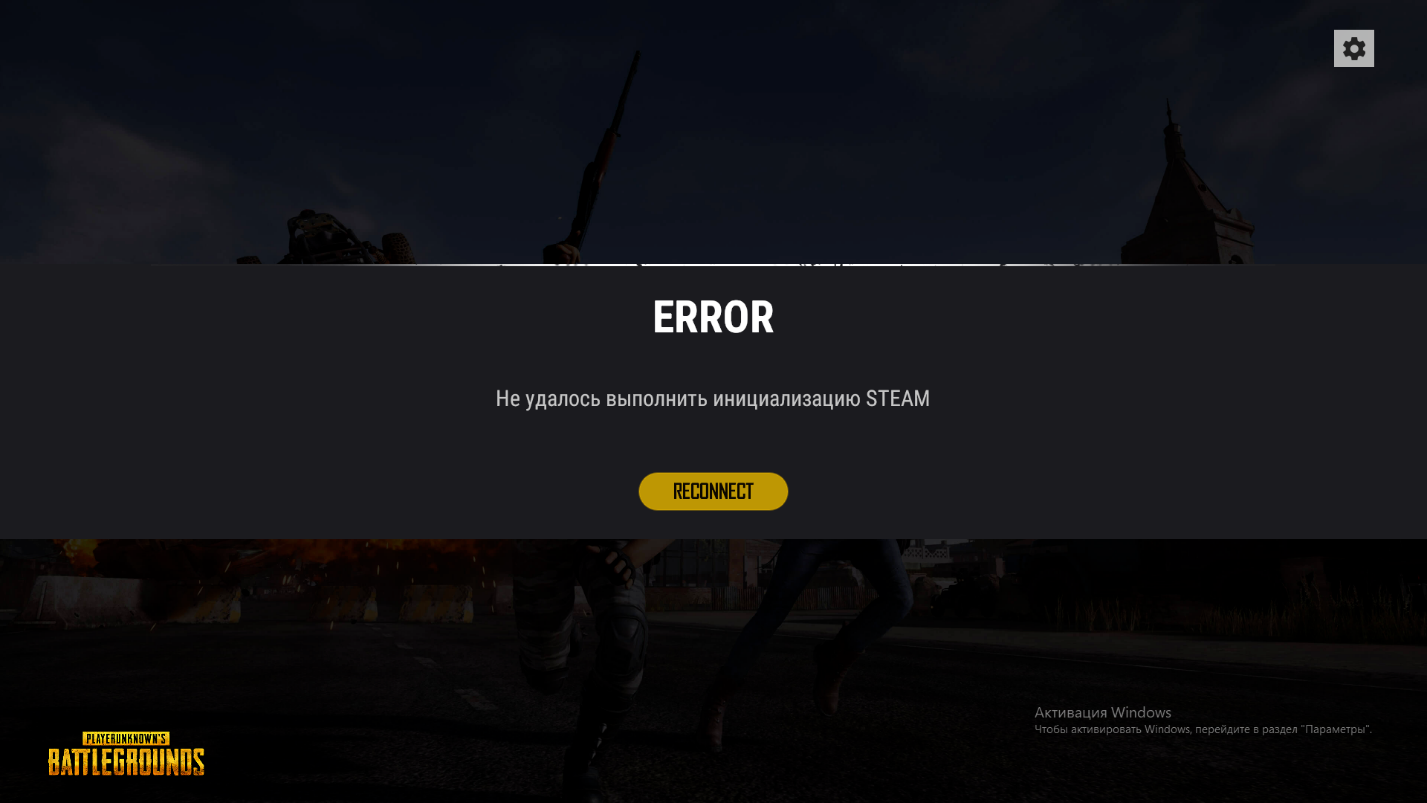
Что это за ошибка и из-за чего она возникает
Данная ошибка относится к разряду сетевых. Она появляется, когда у вас на компе возникает какой-то перебой в сети. Пусть даже подключение моментально восстановилось – хватит и нескольких мгновений для того, чтобы Стим потерял соединение с сетью и появилась данная ошибка.
Как пофиксить ошибку «не удалось выполнить инициализацию Steam»
Сразу скажем, что любые попытки исправления данной ошибки нужно делать тогда, когда у вас появится подключение к сети. В остальных случаях – можно и не пытаться.
Попробуйте полностью выйти со своего профиля Steam. Не просто закрыть его, а именно выйти. В 90% случаев – это помогает.
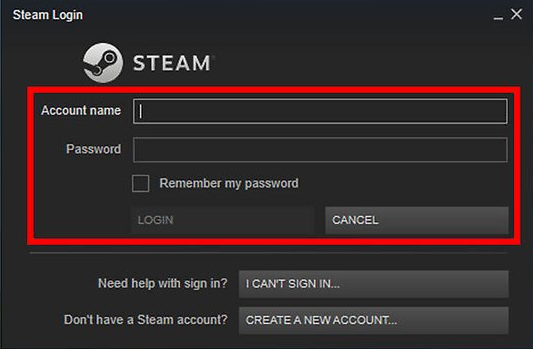
Попробуйте запустить игру от имени администратора. Для этого просто кликните по иконке игры правой кнопкой мышки и выберите соответствующий пункт.
Если не помогает и это – проверьте, чтобы на пути к игре – не было папок с русскими буквами (если у вас лицензия – можете не переживать по этому поводу).
Если не помогло ничего, из вышеперечисленного – делаете следующее:
Заходите в папку с игрой.
Локальный диск (с или d).
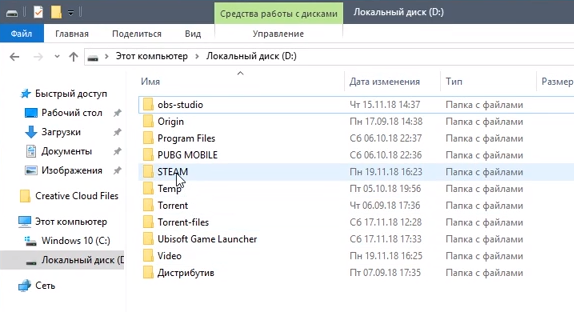
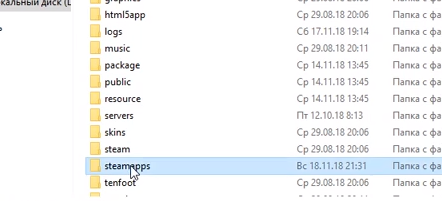


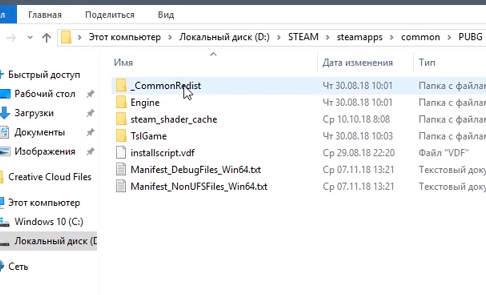
Там вы увидите папку «vсredist».
Заходите в эту папку и видите еще 3, которые будут называться по годам, 2013, 2015 и 2017.

Вам нужно будет по очереди зайти в каждую из них, найти там 2 вот таких файла:
И переустановить их. Помните, что сделать это нужно в каждой папке.
Закрываете папку с игрой, заходите в Steam и пробуйте зайти в игру. Если все ОК – значит играете, если нет – пробуете еще раз запустить игру от имени администратора.
Вот и все, дорогие читатели. Теперь вы знаете, как решить проблему инициализации Стима в PUBG. Удачи и поменьше вам подобных проблем.
Источник
Are you struggling to fix the Steam connection error “could not connect to Steam network”? It is a great inconvenience that you cannot play games as normal. Don’t worry. In the post of MiniTool, you will get several effective troubleshooting methods.
Steam is an amazing online game platform that you can use it to manage your games with ease. You can enjoy a fantastic gaming experience from it, but you may also be vexed about some problems like failed to load Steamui.dll, Steam game uninstalled itself, and especially the Steam connection error.
The error message “Could not connect to Steam network” usually pops up when trying to log in to your Steam account. When you encounter the error, the first step that you can do is to restart your computer.
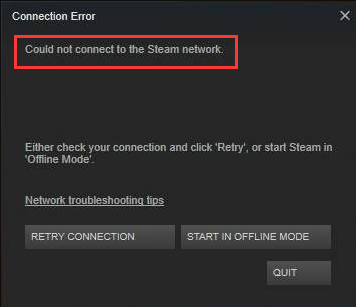
A simple restart can clear up the software crashes, driver issues and reset your network settings, which can probably fix the Steam not connecting error. If a restart fails to work, you can try the following methods.
Solution 1. Change Your Steam’s Internet Protocol
UDP (User Datagram Protocol) is the original Internet protocol for many Steam users. However, the protocol becomes unstable sometimes. In this case, you can change it to TCP (Transmission Control Protocol), which is more reliable and faster.
Therefore, if you encounter the “could not connect to the Steam network” error, you can try changing it. Here’s how to do that.
Note:
Before you do, make sure you close the Steam client completely and log out of your account. If you still can’t add tcp to the end of the shortcut, you can try resetting TCP.
Step 1. If there is a Steam shortcut on the desktop, right-click it and select Properties.
Step 2. In the Properties window, navigate to the Shortcut tab.
Step 3. In the Target dialogue box, add –tcp to the end. The entire text line is «C:Program Files (x86)SteamSteam.exe« -tcp.
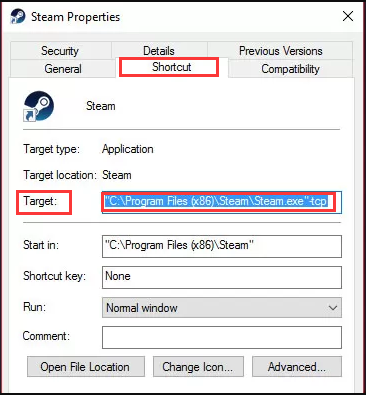
Now, you can re-launch your steam client and see if the Steam connection error is fixed.
Solution 2. Check Your Internet Connection Works Normally
In addition, you can check if your Internet connection works as normal or not. It is very simple to operate. You can open the browser to check if your computer can connect the Internet normally. Alternatively, you can check your network adapter. Here’s how.
Step 1. Press Win + X keys to open the context menu and select Device Manager from it.
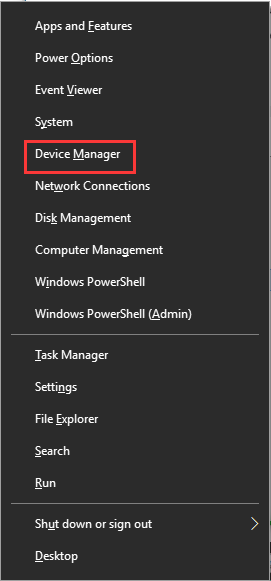
Step 2. In the pop-up window, navigate to the Network adapter and expand it, and then you will find a list of WiFi /LAN adapters with their own official name.
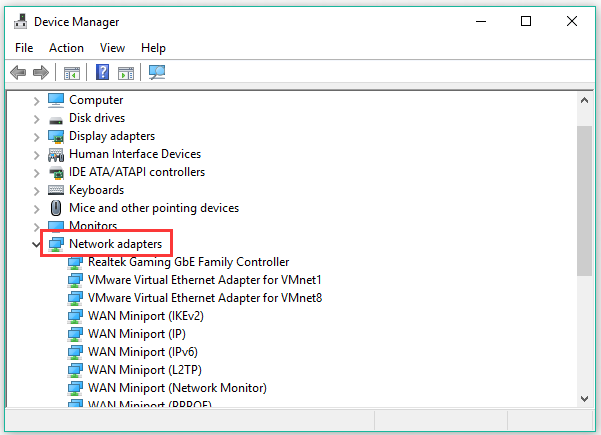
Step 3. Double click one adapter to open its Properties window, and then see if there is a window that states this device is working properly. Here you can check all the adapters one by one.
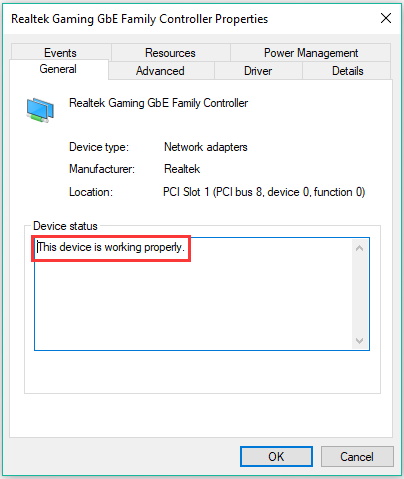
Step 4. If you made any changes to your network settings, you need to revert them by running certain commands. Press Win + R keys to open the Run box, and then type cmd in it and hit Enter.
Step 5. Type the following commands and hit Enter after typing each command.
- ipconfig/release
- ipconfig/all
- ipconfig/flushdns
- ipconfig/renew
- netsh int ip set dns
- netsh winsock reset
Step 6. After running these commands, restart your computer and check if the error “could not connect to Steam network” is fixed.
Solution 3. Reinstall Your Steam Client after Deleting Its Files
If the above methods fail to work, you can try reinstalling your Steam client. If you follow the steps below, this operation will not delete your gaming data. So, please don’t worry.
Step 1. Right-click the Steam shortcut on your desktop and select Open file location to open its root directory.
Step 2. Delete some files such as appcache, config, bin, and others except the following folders and files that are used to launch Steam:
- Steamapps
- Userdata
- Skins
- Steam.exe
- Ssfn files
Step 3. After deleting the files, launch your Steam from the Steam.exe launcher and then Steam will download some files and update itself.
When the reinstallation completes, you can check if the Steam connection error still persists.
Solution 4. Update the Network Driver
The outdated or problematic network adapters are also responsible for the Steam connection error. So, you can try updating the network adapter. For that:
Step 1. Open the Device Manager window by following the Solution 2.
Step 2. Right-click the network adapter and select Update driver from the menu.
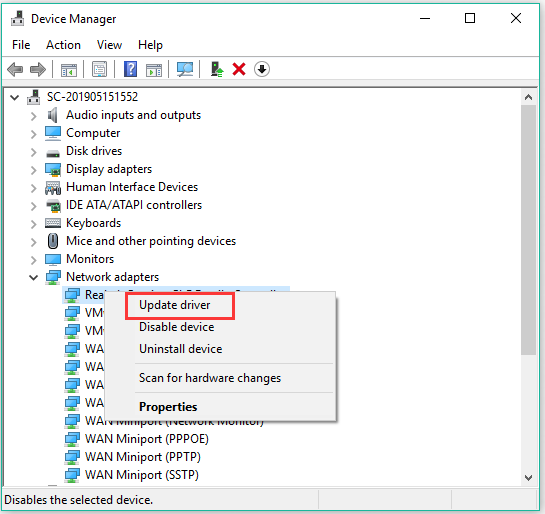
Step 3. In the pop-up window, choose how to search for drivers. Here are 2 options: automatically and manually. You can choose one based on your needs and follow the on-screen instructions to complete the update.
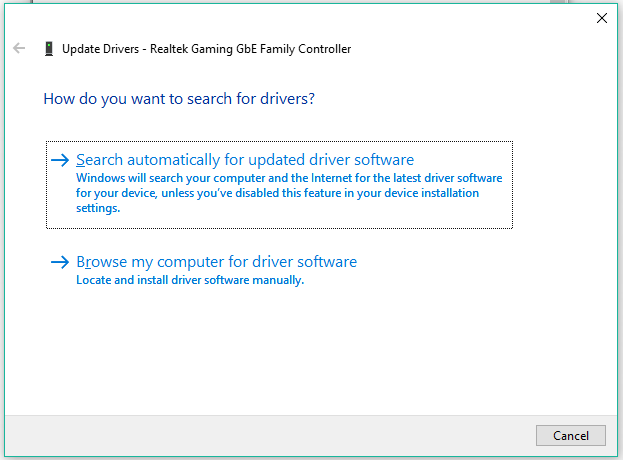
If the above method failed to update drivers, you can use a professional third-party program to update drivers. Driver Easy Pro can detect all outdated drivers and update them with just one click. Here is the guide:
Step 1: Install Driver Easy and launch it. Click the Scan Now button.
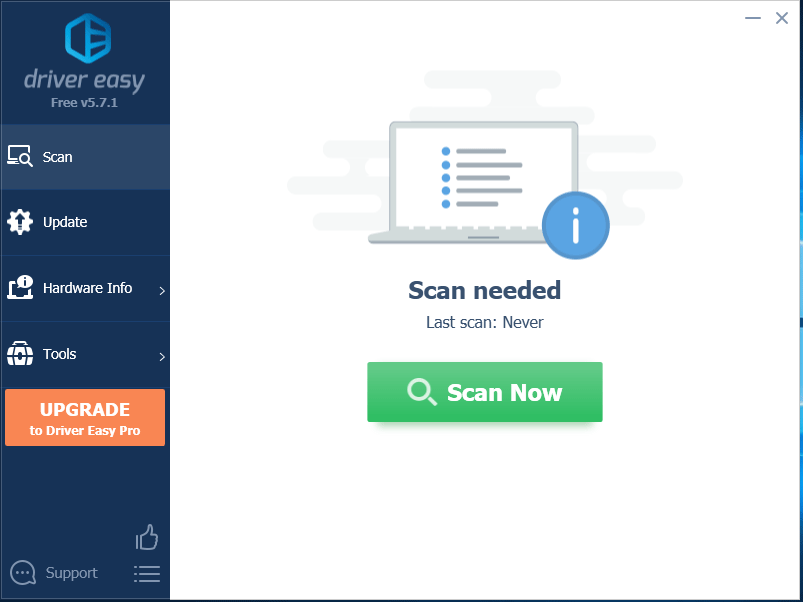
Step 2: After the scanning process is completed, click the Update All button to download and install the latest drivers for all devices with outdated drivers.
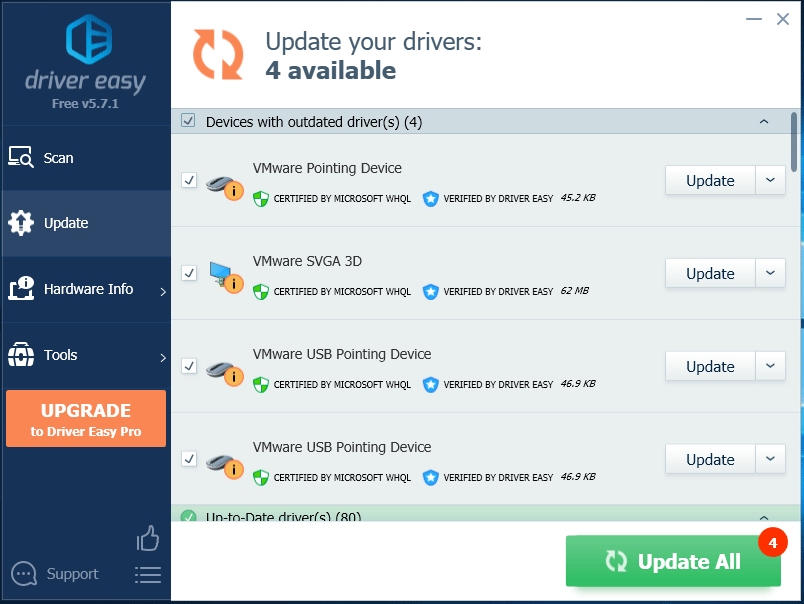

The 4 methods to fix the problem “can’t connect to Steam” have been told to you. Now, it’s your turn to have a try.
Are you struggling to fix the Steam connection error “could not connect to Steam network”? It is a great inconvenience that you cannot play games as normal. Don’t worry. In the post of MiniTool, you will get several effective troubleshooting methods.
Steam is an amazing online game platform that you can use it to manage your games with ease. You can enjoy a fantastic gaming experience from it, but you may also be vexed about some problems like failed to load Steamui.dll, Steam game uninstalled itself, and especially the Steam connection error.
The error message “Could not connect to Steam network” usually pops up when trying to log in to your Steam account. When you encounter the error, the first step that you can do is to restart your computer.
A simple restart can clear up the software crashes, driver issues and reset your network settings, which can probably fix the Steam not connecting error. If a restart fails to work, you can try the following methods.
Solution 1. Change Your Steam’s Internet Protocol
UDP (User Datagram Protocol) is the original Internet protocol for many Steam users. However, the protocol becomes unstable sometimes. In this case, you can change it to TCP (Transmission Control Protocol), which is more reliable and faster.
Therefore, if you encounter the “could not connect to the Steam network” error, you can try changing it. Here’s how to do that.
Note:
Before you do, make sure you close the Steam client completely and log out of your account. If you still can’t add tcp to the end of the shortcut, you can try resetting TCP.
Step 1. If there is a Steam shortcut on the desktop, right-click it and select Properties.
Step 2. In the Properties window, navigate to the Shortcut tab.
Step 3. In the Target dialogue box, add –tcp to the end. The entire text line is «C:Program Files (x86)SteamSteam.exe« -tcp.
Now, you can re-launch your steam client and see if the Steam connection error is fixed.
Solution 2. Check Your Internet Connection Works Normally
In addition, you can check if your Internet connection works as normal or not. It is very simple to operate. You can open the browser to check if your computer can connect the Internet normally. Alternatively, you can check your network adapter. Here’s how.
Step 1. Press Win + X keys to open the context menu and select Device Manager from it.
Step 2. In the pop-up window, navigate to the Network adapter and expand it, and then you will find a list of WiFi /LAN adapters with their own official name.
Step 3. Double click one adapter to open its Properties window, and then see if there is a window that states this device is working properly. Here you can check all the adapters one by one.
Step 4. If you made any changes to your network settings, you need to revert them by running certain commands. Press Win + R keys to open the Run box, and then type cmd in it and hit Enter.
Step 5. Type the following commands and hit Enter after typing each command.
- ipconfig/release
- ipconfig/all
- ipconfig/flushdns
- ipconfig/renew
- netsh int ip set dns
- netsh winsock reset
Step 6. After running these commands, restart your computer and check if the error “could not connect to Steam network” is fixed.
Solution 3. Reinstall Your Steam Client after Deleting Its Files
If the above methods fail to work, you can try reinstalling your Steam client. If you follow the steps below, this operation will not delete your gaming data. So, please don’t worry.
Step 1. Right-click the Steam shortcut on your desktop and select Open file location to open its root directory.
Step 2. Delete some files such as appcache, config, bin, and others except the following folders and files that are used to launch Steam:
- Steamapps
- Userdata
- Skins
- Steam.exe
- Ssfn files
Step 3. After deleting the files, launch your Steam from the Steam.exe launcher and then Steam will download some files and update itself.
When the reinstallation completes, you can check if the Steam connection error still persists.
Solution 4. Update the Network Driver
The outdated or problematic network adapters are also responsible for the Steam connection error. So, you can try updating the network adapter. For that:
Step 1. Open the Device Manager window by following the Solution 2.
Step 2. Right-click the network adapter and select Update driver from the menu.
Step 3. In the pop-up window, choose how to search for drivers. Here are 2 options: automatically and manually. You can choose one based on your needs and follow the on-screen instructions to complete the update.
If the above method failed to update drivers, you can use a professional third-party program to update drivers. Driver Easy Pro can detect all outdated drivers and update them with just one click. Here is the guide:
Step 1: Install Driver Easy and launch it. Click the Scan Now button.
Step 2: After the scanning process is completed, click the Update All button to download and install the latest drivers for all devices with outdated drivers.
The 4 methods to fix the problem “can’t connect to Steam” have been told to you. Now, it’s your turn to have a try.
Failed to initialize Steam – невероятно популярная ошибка, возникающая в клиенте дистрибуции Steam. Появляется данная ошибка сразу же после запуска той или иной игры из библиотеки пользователя. Этой игрой может оказаться GTA 5, PUGB или Dota 2 – буквально любая игра. В сегодняшней статье мы попытаемся разъяснить вам, как избавляться от ошибки Failed to initialize Steam, когда та возникает на вашем компьютере.
«Failed to initialize Steam»: способы по устранению ошибки

Способ №1 Перезапуск Steam
Самый элементарный, тем не менее эффективный способ – перезапуск Steam. В клиенте данного магазина частенько возникают всевозможные баги, проблемы или ошибки, но решается все крайне просто – обычным перезапуском. Попробуйте перезапустить клиент Steam, а затем запустите нужную вам игру, чтобы проверить, была ли устранена ошибка «Failed to initialize Steam».
Способ №2 Запуск от имени Администратора
Следующий способ – запуск клиента Steam от имени Администратора. Огромное множество пользователей по всему миру утверждают, что избавиться от ошибки «Failed to initialize Steam» можно попросту запустив клиент с правами администраторской учетной записи системы. Чтобы это сделать, вам нужно следующее:
- закрыть работающий клиент Steam;
- пройти в корневую папку клиента Steam;
- найти там исполнительный файл Steam.exe;
- нажать правой кнопкой мыши на этот файл и выбрать «Запуск от имени Администратора».
Попробуйте запустить нужную игру из вашей библиотеки еще раз. Возможно, ошибка «Failed to initialize Steam» на этот раз исчезнет.
Способ №3 Проверка целостности файлов игры
Порой, ошибка «Failed to initialize Steam» может быть вызвана повреждением файлов запускаемой вами игры. Проверить это крайне просто с помощью встроенной в клиент Steam проверки целостности файлов игры. Чтобы запустить проверку, вам потребуется сделать следующее:
- запустите Steam;
- войдите в библиотеку игр и найдите нужную вам;
- нажмите на нее правой кнопкой мыши и перейдите в «Свойства»;
- перейдите во вкладку «Локальные файлы»;
- нажмите на кнопку «Проверить целостность файлов игры…».
Как только будет нажата вышеуказанная кнопка, перед вами появится маленькое окошко с прогрессом проверки файлов игры. Если какие-то файлы игры не пройдут проверки, то они будут повторно загружены. В свою очередь, если какие-то файлы не прошли проверки и были повторно загружены – попробуйте вновь открыть нужную вам игру, чтобы проверить наличие ошибки «Failed to initialize Steam».
Это распространенная проблема, с которой сталкиваются многие геймеры. Игра, которая вызывает ошибку, может быть абсолютно любой, это могут быть даже такие хиты как GTA5 и Dota. В большинстве случаев проблема решается перезапуском клиента. Если же проблема не решилась, попробуйте выписать нижеописанные действия.
Запуск от имени Администратора
Закройте программу и выполните следующие действия:
- Откройте корневую папку Steam и кликните левой клавишей по файлу Steam.exe;
- Выберите «запуск от имени Администратора».
Проверка целостности файлов игры
Если проблема возникает не со всеми подряд играми, а с какой-либо одной, необходимо проверить целостность файлов. Сделать это можно при помощи штатной опции Стим следующим образом:
- Откройте приложение и зайдите в библиотеку.
- Найдите проблемную игру, кликните по ней ПКМ и выберите «свойства».
- Переключитесь на вкладку «Локальные файлы».
- Кликните по кнопке «Проверить целостность файлов».
- После этого появится шкала с прогрессом. Все недостающие или поврежденные файлы будут подгружены автоматически. То есть вам останется только дождаться окончания проверки и запустить игру.
- Имейте в виду, что локальные файлы могут быть повреждены лишь по двум причинам:
- Компьютер заражен вирусом.
- Жесткий диск выходит из строя.
Поэтому обязательно проверьте компьютер на наличие вирусов и состояние жесткого диска. В противном случае вы можете потерять файлы, которые не удастся восстановить.
Переустановка Microsoft Visual C++
В отдельных ситуациях помогает переустановка библиотеки Microsoft Visual C++. Сделать это можно следующим образом:
- Откройте панель управления Windows и запустите «Удаление программ».
- Отметьте галочками все установленные пакеты Microsoft Visual C++.
- Скачайте по этой ссылке средство устранения неполадок на сайте https://support.microsoft.com и установите.
- Запустите утилиту и проверьте, остались ли данные пакетов Microsoft Visual C++. Удалите их, если они не были удалены полностью.
- Скачайте пакеты Microsoft Visual C++ с официального сайта и установите.
После окончания установки запустите игру.
Steam — отличный и популярный магазин, который позволяет вам покупать массу игр и даже позволяет вам добавлять в него своих друзей. Steam существует довольно давно, с 2003 года. Клиент Steam используется для покупки, загрузки и даже обновления игр. Хотя есть и другие программы запуска игр и клиенты, из которых можно выбирать, Steam всегда будет предпочтительнее. Однако, как и у всех программ, могут быть проблемы, и у Steam есть одна такая проблема, когда время от времени он отказывается подключаться к сети. Если вы столкнулись с подобной проблемой в Steam, прочтите эту статью, чтобы узнать больше.
Время от времени пар может находиться на техническом обслуживании, поэтому в определенное время недели это обычно длится около получаса. Если у вас нестабильное подключение к Интернету, могут быть случаи, когда Steam может работать не лучшим образом. Иногда это также может быть ошибкой Steam, который не может подключиться к Интернету. Итак, если у вас когда-либо были проблемы с вашей программой Steam, не подключенной к Интернету, вот несколько методов устранения неполадок, которым вы можете следовать.
Исправлено: не удавалось подключиться к сети Steam.
Проверьте подключение к Интернету
Как я уже сказал ранее, если у вас нестабильное подключение к Интернету, высока вероятность того, что Steam может не подключиться и выйти в Интернет. Он просто перейдет в автономный режим, и вы сможете играть только в те игры, которые установлены на вашем компьютере. Итак, проверьте, могут ли другие программы подключаться к Интернету. Если они не могут, возможно, ваше интернет-соединение может создавать некоторые проблемы. В этом случае вы можете просто перезапустить маршрутизатор и посмотреть, решит ли он проблему.
Однако, если вы видите, что другие программы могут подключаться к Интернету, значит, со Steam что-то не так. Вы можете выполнить другие шаги по устранению неполадок, упомянутые ниже,
Запустите Steam от имени администратора
Да, это то, о чем многие забывают. Попробуйте проверить, нормально ли работает Steam от имени администратора. Как правило, он должен иметь возможность подключаться к Интернету и сразу же позволять вам выходить в Интернет. Возможно, запуск программы без каких-либо прав администратора может помешать ей подключиться к Интернету. Чтобы запустить Steam от имени администратора, просто щелкните правой кнопкой мыши значок Steam на рабочем столе и выберите «Запуск от имени администратора». Система спросит, хотите ли вы запустить программу от имени администратора. Выберите Да, и теперь должен открыться Steam. Это решение, которое подходит многим людям.

Изменить протокол Steam
Steam по умолчанию использует UDP (протокол пользовательских дейтаграмм) для подключения к Интернету. Однако, если у вашего приложения Steam возникают проблемы с подключением к сети Steam, лучшее, что вы можете сделать, это изменить его с UDP на более надежный протокол TCP. Вот как это можно изменить.
- Перво-наперво убедитесь, что Steam не запущен на вашем компьютере. Вы можете использовать диспетчер задач, чтобы принудительно завершить работу служб Steam.
- Теперь щелкните правой кнопкой мыши ярлык на рабочем столе Steam и выберите «Свойства».

- Перейдите на вкладку «Ярлыки» в окне свойств Steam.
- В текстовом поле, где написано Target, просто введите -tcp в конце пути к файлу.
- Теперь нажмите кнопку «Применить», а затем нажмите «ОК», чтобы применить эти изменения к исполняемому файлу Steam.
- Теперь, когда вы открываете Steam от имени администратора или открываете его напрямую, Steam должен иметь возможность сразу подключиться к сети Steam.


Проверьте обновления сетевых драйверов
Иногда ваши программы могут работать нормально, и даже ваш Интернет может работать нормально. Так в чем может быть проблема, которую вы спросите> Ну, сетевые драйверы в вашей системе иногда могут быть виноваты. Последняя версия сетевых драйверов поможет решить эту проблему. Обычно сетевые драйверы, если они когда-либо будут обновлены, появятся в разделе Центра обновления Windows для загрузки. Но если вы по-прежнему хотите убедиться, что он обновлен до последней версии и не пропускает никаких обновлений, вы можете сделать следующее.
- Откройте меню «Пуск» и введите «Диспетчер устройств».
- После открытия диспетчера устройств вы увидите список различных аппаратных устройств, подключенных к вашей системе. В списке выберите Сетевые адаптеры.
- Теперь выберите сетевой адаптер, который хотите обновить. Это может быть адаптер Wi-Fi или адаптер Ethernet. Щелкните адаптер правой кнопкой мыши и выберите свойства.
- Теперь щелкните вкладку «Драйвер» и нажмите кнопку «Обновить».
- Теперь он начнет проверять наличие обновлений и загружать их, если доступно какое-либо обновление.


Очистить кеш Steam
Это одна из основных причин, по которой Steam иногда отказывается подключаться к сети Steam. Возможно, у вас все работает и обновляется, но Steam по-прежнему отказывается подключаться. Очистка файлов кеша для Steam помогает решить такие проблемы. И этот метод много раз работал лично для меня. Вот как вы можете очистить кеш Steam.
- Сначала завершите все службы Steam. Вы можете сделать это, открыв диспетчер задач и завершив задачу Steam.
- Теперь откройте каталог, в который был установлен Steam.
- Найдите папку с именем appcache. Откройте папку.
- Просто выберите все содержимое в папке, нажав клавиши Control и A.
- Выделив все содержимое, просто нажмите клавишу «Удалить», чтобы удалить все содержимое.
- После удаления всего содержимого закройте папку и запустите Steam.
- Теперь Steam проверит наличие обновлений, создаст кеш Steam, и вы сразу же сможете снова подключиться к сети Steam.


Переустановите Steam
Если по какой-то причине ни один из вышеперечисленных методов не помог решить эту проблему, последний и последний вариант — удалить и переустановить приложение. Это должно технически решить все проблемы, с которыми вы можете столкнуться при работе с клиентом Steam.
- Откройте меню «Пуск» и введите «Панель управления».
- Откройте приложение «Панель управления» из результатов поиска.
- Теперь в разделе «Программы» нажмите «Удалить программу».
- Он покажет вам список всех установленных вами программ.
- Прокрутите и выберите приложение Steam. Щелкните его правой кнопкой мыши и выберите Удалить.
- После удаления программы перейдите на официальный сайт Steam и загрузите последнюю версию клиента.


Заключение
Это множество методов устранения неполадок, которые вы можете использовать, чтобы исправить ошибку Не удалось подключиться к сети Steam. Хотя большинство решений действительно работают, очистка кеша — это один из методов устранения неполадок, который я бы рекомендовал попробовать в любое время, когда вы сталкиваетесь с ошибкой в клиенте Steam.
Если у вас есть какие-либо другие методы, которыми вы хотели бы поделиться с нами, о которых мы не упомянули, вы можете просто поделиться ими в разделе комментариев ниже.