
█ 04.11.2020 06:29
Помогите, постоянно вылазиет ошибка нет рибона, уже все физические процедуры решения этой проблемы пройдены, копаясь в настройках меню, пропадает но до первой перезагрузки принтера, после снова, колибровал чистил дачик все ровно.
█ 04.11.2020 07:58
после ресета принтера постоянно задается значение рибонна на ОN
█ 04.11.2020 08:08

(0,15Мб)
█ 04.11.2020 10:37
ПРОБЛЕМА РЕШЕНА ПРИ ПОМОЩИ НОВОЙ ВЕРСИИ DiagTool v1.63 в которой есть исправление ошибки риббона
█ 10.05.2021 13:03
Цитата:
krisht89 ➤ ПРОБЛЕМА РЕШЕНА ПРИ ПОМОЩИ НОВОЙ ВЕРСИИ DiagTool v1.63 в которой есть исправление ошибки риббона
Где можно найти эту опцию? Перерыл все вкладки, ничего подобного про исправление ошибки риббона не нашёл.
█ 11.05.2021 15:51
Цитата:
LevaZzz ➤ Где можно найти эту опцию? Перерыл все вкладки, ничего подобного про исправление ошибки риббона не нашёл.
В версии 1.63 под риббоном есть «Ошибка риббона» и Выкл.
Кстати, как победить сбрасывание ошибки при перезагрузке принтера, не знаете?
█ 11.05.2021 16:08
Цитата:
Action2003 ➤ В версии 1.63 под риббоном есть «Ошибка риббона» и Выкл.
Кстати, как победить сбрасывание ошибки при перезагрузке принтера, не знаете?
Точнее как победить сбрасывание настройки Риббона — Выкл.
█ 11.05.2021 21:11
Как я понял проблема больше в самом риббоне, скорости протяжки и натяжении. Плюс производитель сказал что желательно использовать их риббон.
█ 12.05.2021 11:29
Цитата:
LevaZzz ➤ Как я понял проблема больше в самом риббоне, скорости протяжки и натяжении. Плюс производитель сказал что желательно использовать их риббон.
Дело в том, что мы не используем риббон (прямая термопечать), а отключать опцию через DiagTool приходится каждый раз, как включаешь принтер, т.к. при включении риббон становится включен. Можно не выключать принтер, но все же, хорошо бы было, чтоб принтер запомнил режим. Где то читал, что версию программы сменили и все запомнилось, но 1.63 по ходу последняя версия. На оф.сайте в поддержке — она.
Часовой пояс GMT +3, время: 05:26.
Форум на базе vBulletin®
Copyright © Jelsoft Enterprises Ltd.
В случае заимствования информации гипертекстовая индексируемая ссылка на Форум обязательна.
6.1 Common Problems
The following guide lists the most common problems that may be encountered when operating this
bar code printer. If the printer still does not function after all suggested solutions have been invoked,
please contact the Customer Service Department of your purchased reseller or distributor for
assistance.
Problem
Power indicator does not
illuminate
— The printer status from DiagTool
shows «Head Open».
— The LCD shows «Carriage Open».
— The printer status from DiagTool
shows «Ribbon End Err.» Or
«Ribbon Encoder Err.»
— The LCD shows «No Ribbon».
— The printer status from DiagTool
shows «Out of Paper».
— The LCD shows «No Paper».
— The printer status from DiagTool
shows «Paper Jam».
— The LCD shows «Paper Jam».
— The LCD shows «Take Label».
— The LCD shows as below:
UP:
DOWN:
MENU:
* The power cord is not properly
connected.
* The printer carriage is open.
* Running out of ribbon.
* The ribbon is installed incorrectly.
* Running out of label.
* The label is installed incorrectly.
* Gap/black mark sensor is not
calibrated.
* Gap/black mark sensor is not set
properly.
* Make sure label size is set
properly.
* Labels may be stuck inside the
printer mechanism.
* Peel-off function is enabled.
* Cutter jam.
Fwd.
* There is no cutter installed on the
printer.
Rev.
* Cutter PCB is damaged.
Exit
Possible Cause
72
Recovery Procedure
* Plug the power cord in printer and
outlet.
* Switch the printer on.
* Please close the print carriage.
* Supply a new ribbon roll.
* Please refer to the steps on
section 2.5 to reinstall the ribbon.
* Supply a new label roll.
* Please refer to the steps on
section 2.6 to reinstall the label
roll.
* Calibrate the gap/black mark
sensor.
* Calibrate the gap/black mark
sensor.
* Set label size correctly.
* If the peel-off module is installed,
please remove the label.
* If there is no peel-off module in
front of the printer, please switch
off the printer and install it.
* Check if the connector is plugging
correctly.
* If the cutter module is installed,
please press UP or DOWN key to
rotate the cutter up or down to
make the knife back to the right
position.
* Remove the label.
* Make sure the thickness of label is
less than 280 g/m2.
* Replace a cutter PCB.
Наиболее частые неисправности принтера этикеток TSC TE 200
В данной статье представлено описание неполадок, которые чаще всего возникают при эксплуатации принтера штрихкодов. Если после выполнения рекомендуемых действий
принтер все равно не работает должным образом, обратитесь в отдел обслуживания клиентов продавца или дистрибьютора, у которого был приобретен принтер.
| Проблема | Возможная причина | Рекомендации по устранению |
|---|---|---|
| Не светится индикатор питания. |
* Не подключен должным образом кабель питания. |
* Подсоедините кабель питания к принтеру и к электрической розетке. * Включите принтер. |
| — DiagTool показывает состояние принтера “Ribbon End Err.” (Ошибка окончания ленты) или “Ribbon Encoder Err.” (Ошибка кодировщика ленты). — Индикатор мигает красным цветом. |
* Лента закончилась. * Лента неправильно загружена. |
* Установите новый рулон ленты. * См. описание действий в п. 3,2 для переустановки ленты. |
| — “DiagTool” (Программа диагностики) показывает состояние принтера “Out of Paper” (Нет бумаги). — Индикатор мигает красным цветом |
* Закончился носитель. * Носитель неправильно загружен. * Не откалиброван датчик высечки (черной метки). |
* Установите новый рулон носителя. * См. описание действий в п. 3,3 для переустановки рулона этикеток. * Откалибруйте датчик высечки (черной метки). |
| — “DiagTool” (Программа диагностики) показывает состояние принтера “PaperJam” (Замятие бумаги). — Индикатор мигает красным цветом. |
* Не установлен надлежащим образом датчик высечки (черной метки). * Удостоверьтесь, что задан соответствующий размер этикетки. * Возможно, этикетки прилипли к механизму печати изнутри. |
* Откалибруйте датчик высечки (черной метки). * Настройте должным образом размер этикетки. |
| Не выполняется печать | * Плохо подключен кабель к последовательному порту, порту USB или параллельному порту. * Разъемы кабеля последовательного порта распаяны по-разному. |
* Заново подсоедините кабель к разъему. * Замените кабель. * Лента несовместима с носителем. * Проверьте, с какой стороны ленты нанесена краска. * Перезаправьте ленту. * Очистите печатающую головку. * Неправильно настроена насыщенность печати. * Разъем жгута принтера плохо подключен к печатающей головке. Выключите принтер и заново подсоедините разъем. * Проверьте программу: в конце файла должна быть команда PRINT, а в конце каждой командной строки — CRLF. |
| Переполнение памяти ( FLASH / DRAM ) |
* Заполнена флеш-память (FLASH)/DRAM. |
* Удалите из флеш-памяти (FLASH)/DRAM ненужные файлы. |
| Низкое качество печати | * Неправильно загружены лента и носитель. * На печатающей головке скопились пыль или клей. * Неправильно настроена насыщенность печати. * Поврежден элемент печатающей головки. * Лента несовместима с носителем. |
* Заново загрузите носитель. * Очистите печатающую головку. * Очистите бумагоопорный валик. * Настройте насыщенность и скорость печати. * Проведите самодиагностику принтера и проверьте, не отсутствуют ли точки в тестовом узоре. * Загрузите подходящую ленту или подходящий носитель. * Механизм печатающей головки не фиксирует должным образом печатающую головку. |
| При печати происходит пропуск этикеток |
* Неправильно указан размер этикетки. * Неправильно настроена чувствительность датчика. * Датчик носителя покрыт пылью. |
* Проверьте, правильно ли настроен размер этикетки. * Откалибруйте датчик с помощью функций автокалибровки датчика высечки или ручной калибровки датчика высечки. * Очистите датчик высечки (черной метки) сжатым воздухом. |
| Неправильное положение печати этикеток малого формата |
* Неправильно настроена чувствительность датчика носителя. * Неправильно задан размер этикетки. * Неправильно задано смещение по вертикали в экранном меню. |
* Откалибруйте чувствительность датчика. * Задайте правильный размер этикетки и ширину высечки. * Если используется программное обеспечение BarTender, задайте смещение по вертикали с помощью драйвера. 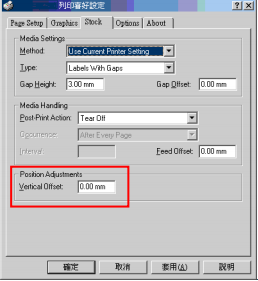 |
| Не печатается изображение в правой или левой части этикетки. |
* Неправильно настроен размер этикетки. |
* Задайте правильный размер этикетки. |
| Образуются складки | * Неправильно загружена лента. * Неправильно загружен носитель. * Неправильно настроена насыщенность печати. * Неправильная подача носителя. |
* Для достижения высокого качества печати настройте должным образом насыщенность печати. * Удостоверьтесь, что направляющая носителя касается края носителя. |
| Серая линия на пустой этикетке |
* Загрязнена печатающая головка. * Загрязнен бумагоопорный валик. |
* Очистите печатающую головку. * Очистите бумагоопорный валик. |
| Печатаются некорректные данные |
* Принтер находится в режиме печати шестнадцатеричного дампа. |
* Выключите принтер и включите его снова, чтобы он вышел из режима печати дампа. |
- ivldenis
- Сообщения:2
- Зарегистрирован:18 янв 2019, 11:16
-
Благодарил (а):
0 -
Поблагодарили:
0 - Контактная информация:
TSC TTP-247 не наматывает риббон
Добрый день. Купили принтер TTP-247. Поставили в начале для пробы этикетки для термопечати. Этикетки напечатались. Установили риббон для термотрансферной печати, то же для пробы. Не заработал вал намотки риббона. лента все время выходит вместе с этикетками. Делал полный сброс принтера. Ни чего не помогает. Ощущение, что вал намотки не работает совсем. Может где то нужно указать, что используется риббон? Но в инструкции написано, что принтер определяет его автоматически.
- NALim
- Сообщения:1
- Зарегистрирован:14 сен 2020, 12:51
-
Благодарил (а):
0 -
Поблагодарили:
0 - Контактная информация:
TSC TTP-247 не наматывает риббон
Сообщение
NALim » 14 сен 2020, 12:52
Здравствуйте. Как решилась проблема?
█ 04.11.2020 06:29
Помогите, постоянно вылазиет ошибка нет рибона, уже все физические процедуры решения этой проблемы пройдены, копаясь в настройках меню, пропадает но до первой перезагрузки принтера, после снова, колибровал чистил дачик все ровно.
█ 04.11.2020 07:58
после ресета принтера постоянно задается значение рибонна на ОN
█ 04.11.2020 08:08
(0,15Мб)
█ 04.11.2020 10:37
ПРОБЛЕМА РЕШЕНА ПРИ ПОМОЩИ НОВОЙ ВЕРСИИ DiagTool v1.63 в которой есть исправление ошибки риббона
█ 10.05.2021 13:03
Цитата:
krisht89 ➤ ПРОБЛЕМА РЕШЕНА ПРИ ПОМОЩИ НОВОЙ ВЕРСИИ DiagTool v1.63 в которой есть исправление ошибки риббона
Где можно найти эту опцию? Перерыл все вкладки, ничего подобного про исправление ошибки риббона не нашёл.
█ 11.05.2021 15:51
Цитата:
LevaZzz ➤ Где можно найти эту опцию? Перерыл все вкладки, ничего подобного про исправление ошибки риббона не нашёл.
В версии 1.63 под риббоном есть «Ошибка риббона» и Выкл.
Кстати, как победить сбрасывание ошибки при перезагрузке принтера, не знаете?
█ 11.05.2021 16:08
Цитата:
Action2003 ➤ В версии 1.63 под риббоном есть «Ошибка риббона» и Выкл.
Кстати, как победить сбрасывание ошибки при перезагрузке принтера, не знаете?
Точнее как победить сбрасывание настройки Риббона — Выкл.
█ 11.05.2021 21:11
Как я понял проблема больше в самом риббоне, скорости протяжки и натяжении. Плюс производитель сказал что желательно использовать их риббон.
█ 12.05.2021 11:29
Цитата:
LevaZzz ➤ Как я понял проблема больше в самом риббоне, скорости протяжки и натяжении. Плюс производитель сказал что желательно использовать их риббон.
Дело в том, что мы не используем риббон (прямая термопечать), а отключать опцию через DiagTool приходится каждый раз, как включаешь принтер, т.к. при включении риббон становится включен. Можно не выключать принтер, но все же, хорошо бы было, чтоб принтер запомнил режим. Где то читал, что версию программы сменили и все запомнилось, но 1.63 по ходу последняя версия. На оф.сайте в поддержке — она.
Часовой пояс GMT +3, время: 06:30.
Форум на базе vBulletin®
Copyright © Jelsoft Enterprises Ltd.
В случае заимствования информации гипертекстовая индексируемая ссылка на Форум обязательна.
На чтение 1 мин Просмотров 2.8к. Опубликовано 08.10.2022
В данной статье представлено описание неполадок, которые чаще всего возникают при эксплуатации принтера штрихкодов. Если после выполнения рекомендуемых действий
принтер все равно не работает должным образом, обратитесь в отдел обслуживания клиентов продавца или дистрибьютора, у которого был приобретен принтер.
| Проблема | Возможная причина | Рекомендации по устранению |
|---|---|---|
| Не светится индикатор питания. |
* Не подключен должным образом кабель питания. | * Подсоедините кабель питания к принтеру и к электрической розетке. * Включите принтер. |
| — DiagTool показывает состояние принтера “Ribbon End Err.” (Ошибка окончания ленты) или “Ribbon Encoder Err.” (Ошибка кодировщика ленты). — Индикатор мигает красным цветом. |
* Лента закончилась. * Лента неправильно загружена. |
* Установите новый рулон ленты. * См. описание действий в п. 3,2 для переустановки ленты. |
| — “DiagTool” (Программа диагностики) показывает состояние принтера “Out of Paper” (Нет бумаги). — Индикатор мигает красным цветом |
* Закончился носитель. * Носитель неправильно загружен. * Не откалиброван датчик высечки (черной метки). |
* Установите новый рулон носителя. * См. описание действий в п. 3,3 для переустановки рулона этикеток. * Откалибруйте датчик высечки (черной метки). |
| — “DiagTool” (Программа диагностики) показывает состояние принтера “PaperJam” (Замятие бумаги). — Индикатор мигает красным цветом. |
* Не установлен надлежащим образом датчик высечки (черной метки). * Удостоверьтесь, что задан соответствующий размер этикетки. * Возможно, этикетки прилипли к механизму печати изнутри. |
* Откалибруйте датчик высечки (черной метки). * Настройте должным образом размер этикетки. |
| Не выполняется печать | * Плохо подключен кабель к последовательному порту, порту USB или параллельному порту. * Разъемы кабеля последовательного порта распаяны по-разному. |
* Заново подсоедините кабель к разъему. * Замените кабель. * Лента несовместима с носителем. * Проверьте, с какой стороны ленты нанесена краска. * Перезаправьте ленту. * Очистите печатающую головку. * Неправильно настроена насыщенность печати. * Разъем жгута принтера плохо подключен к печатающей головке. Выключите принтер и заново подсоедините разъем. * Проверьте программу: в конце файла должна быть команда PRINT, а в конце каждой командной строки — CRLF. |
| Переполнение памяти ( FLASH / DRAM ) | * Заполнена флеш-память (FLASH)/DRAM. |
* Удалите из флеш-памяти (FLASH)/DRAM ненужные файлы. |
| Низкое качество печати | * Неправильно загружены лента и носитель. * На печатающей головке скопились пыль или клей. * Неправильно настроена насыщенность печати. * Поврежден элемент печатающей головки. * Лента несовместима с носителем. |
* Заново загрузите носитель. * Очистите печатающую головку. * Очистите бумагоопорный валик. * Настройте насыщенность и скорость печати. * Проведите самодиагностику принтера и проверьте, не отсутствуют ли точки в тестовом узоре. * Загрузите подходящую ленту или подходящий носитель. * Механизм печатающей головки не фиксирует должным образом печатающую головку. |
| При печати происходит пропуск этикеток | * Неправильно указан размер этикетки. * Неправильно настроена чувствительность датчика. * Датчик носителя покрыт пылью. |
* Проверьте, правильно ли настроен размер этикетки. * Откалибруйте датчик с помощью функций автокалибровки датчика высечки или ручной калибровки датчика высечки. * Очистите датчик высечки (черной метки) сжатым воздухом. |
| Неправильное положение печати этикеток малого формата | * Неправильно настроена чувствительность датчика носителя. * Неправильно задан размер этикетки. * Неправильно задано смещение по вертикали в экранном меню. |
* Откалибруйте чувствительность датчика. * Задайте правильный размер этикетки и ширину высечки. * Если используется программное обеспечение BarTender, задайте смещение по вертикали с помощью драйвера.  |
| Не печатается изображение в правой или левой части этикетки. | * Неправильно настроен размер этикетки. |
* Задайте правильный размер этикетки. |
| Образуются складки | * Неправильно загружена лента. * Неправильно загружен носитель. * Неправильно настроена насыщенность печати. * Неправильная подача носителя. |
* Для достижения высокого качества печати настройте должным образом насыщенность печати. * Удостоверьтесь, что направляющая носителя касается края носителя. |
| Серая линия на пустой этикетке | * Загрязнена печатающая головка. * Загрязнен бумагоопорный валик. |
* Очистите печатающую головку. * Очистите бумагоопорный валик. |
| Печатаются некорректные данные | * Принтер находится в режиме печати шестнадцатеричного дампа. |
* Выключите принтер и включите его снова, чтобы он вышел из режима печати дампа. |

Администратор
«Админы делятся на тех, кто не делает бэкапы, и тех, кто уже делает». Народная мудрость.
Наиболее частые неисправности принтера этикеток TSC TE 200
В данной статье представлено описание неполадок, которые чаще всего возникают при эксплуатации принтера штрихкодов. Если после выполнения рекомендуемых действий
принтер все равно не работает должным образом, обратитесь в отдел обслуживания клиентов продавца или дистрибьютора, у которого был приобретен принтер.
| Проблема | Возможная причина | Рекомендации по устранению |
|---|---|---|
| Не светится индикатор питания. |
* Не подключен должным образом кабель питания. |
* Подсоедините кабель питания к принтеру и к электрической розетке. * Включите принтер. |
| — DiagTool показывает состояние принтера “Ribbon End Err.” (Ошибка окончания ленты) или “Ribbon Encoder Err.” (Ошибка кодировщика ленты). — Индикатор мигает красным цветом. |
* Лента закончилась. * Лента неправильно загружена. |
* Установите новый рулон ленты. * См. описание действий в п. 3,2 для переустановки ленты. |
| — “DiagTool” (Программа диагностики) показывает состояние принтера “Out of Paper” (Нет бумаги). — Индикатор мигает красным цветом |
* Закончился носитель. * Носитель неправильно загружен. * Не откалиброван датчик высечки (черной метки). |
* Установите новый рулон носителя. * См. описание действий в п. 3,3 для переустановки рулона этикеток. * Откалибруйте датчик высечки (черной метки). |
| — “DiagTool” (Программа диагностики) показывает состояние принтера “PaperJam” (Замятие бумаги). — Индикатор мигает красным цветом. |
* Не установлен надлежащим образом датчик высечки (черной метки). * Удостоверьтесь, что задан соответствующий размер этикетки. * Возможно, этикетки прилипли к механизму печати изнутри. |
* Откалибруйте датчик высечки (черной метки). * Настройте должным образом размер этикетки. |
| Не выполняется печать | * Плохо подключен кабель к последовательному порту, порту USB или параллельному порту. * Разъемы кабеля последовательного порта распаяны по-разному. |
* Заново подсоедините кабель к разъему. * Замените кабель. * Лента несовместима с носителем. * Проверьте, с какой стороны ленты нанесена краска. * Перезаправьте ленту. * Очистите печатающую головку. * Неправильно настроена насыщенность печати. * Разъем жгута принтера плохо подключен к печатающей головке. Выключите принтер и заново подсоедините разъем. * Проверьте программу: в конце файла должна быть команда PRINT, а в конце каждой командной строки — CRLF. |
| Переполнение памяти ( FLASH / DRAM ) |
* Заполнена флеш-память (FLASH)/DRAM. |
* Удалите из флеш-памяти (FLASH)/DRAM ненужные файлы. |
| Низкое качество печати | * Неправильно загружены лента и носитель. * На печатающей головке скопились пыль или клей. * Неправильно настроена насыщенность печати. * Поврежден элемент печатающей головки. * Лента несовместима с носителем. |
* Заново загрузите носитель. * Очистите печатающую головку. * Очистите бумагоопорный валик. * Настройте насыщенность и скорость печати. * Проведите самодиагностику принтера и проверьте, не отсутствуют ли точки в тестовом узоре. * Загрузите подходящую ленту или подходящий носитель. * Механизм печатающей головки не фиксирует должным образом печатающую головку. |
| При печати происходит пропуск этикеток |
* Неправильно указан размер этикетки. * Неправильно настроена чувствительность датчика. * Датчик носителя покрыт пылью. |
* Проверьте, правильно ли настроен размер этикетки. * Откалибруйте датчик с помощью функций автокалибровки датчика высечки или ручной калибровки датчика высечки. * Очистите датчик высечки (черной метки) сжатым воздухом. |
| Неправильное положение печати этикеток малого формата |
* Неправильно настроена чувствительность датчика носителя. * Неправильно задан размер этикетки. * Неправильно задано смещение по вертикали в экранном меню. |
* Откалибруйте чувствительность датчика. * Задайте правильный размер этикетки и ширину высечки. * Если используется программное обеспечение BarTender, задайте смещение по вертикали с помощью драйвера. |
| Не печатается изображение в правой или левой части этикетки. |
* Неправильно настроен размер этикетки. |
* Задайте правильный размер этикетки. |
| Образуются складки | * Неправильно загружена лента. * Неправильно загружен носитель. * Неправильно настроена насыщенность печати. * Неправильная подача носителя. |
* Для достижения высокого качества печати настройте должным образом насыщенность печати. * Удостоверьтесь, что направляющая носителя касается края носителя. |
| Серая линия на пустой этикетке |
* Загрязнена печатающая головка. * Загрязнен бумагоопорный валик. |
* Очистите печатающую головку. * Очистите бумагоопорный валик. |
| Печатаются некорректные данные |
* Принтер находится в режиме печати шестнадцатеричного дампа. |
* Выключите принтер и включите его снова, чтобы он вышел из режима печати дампа. |
-
Contents
-
Table of Contents
-
Troubleshooting
-
Bookmarks
Quick Links
ME240/ ME340
THERMAL TRANSFER / DIRECT THERMAL
BAR CODE PRINTER
USER’S
MANUAL
i
Related Manuals for TSC ME240
Summary of Contents for TSC ME240
-
Page 1
ME240/ ME340 THERMAL TRANSFER / DIRECT THERMAL BAR CODE PRINTER USER’S MANUAL… -
Page 2
Information in this document is subject to change without notice and does not represent a commitment on the part of TSC Auto ID Technology Co. No part of this manual may be reproduced or transmitted in any form or by any means, for any purpose other than the purchaser’s personal use, without the expressed… -
Page 3
Agency Compliance and Approvals CE CLASS A EN 55022:2006 +A1:2007 EN 55024:1998+A1:2001+A2:2003 EN 61000-4 SERIES REQULATIONS FCC CFR Title 47 Part 15 Subpart B:2009-Section 15.107 and 15.109 ICES-003 Issue 4:2004 Class A AS/NZS CISPR 22:2009 CLASS A GB4953-2001 GB9254-2008 (CLASS A) GB17625.1-2003 此为… -
Page 4: Table Of Contents
Contents 1. Introduction ……….1 1.1 Product Introduction ………………1 1.2 Product Features ………………..2 1.2.1 Printer standard features …………… 2 1.2.2 Printer optional features ……………. 3 1.3 General Specifications ………………4 1.4 Print Specifications ………. 4 1.5 Ribbon Specifications……… 4 1.6 Media Specifications ……….
-
Page 5
3.2.1 File List ………………..56 3.2.2 Avail. Memory ………………57 3.2.3 Del. All Files ………………57 3.3 Diagnostics …………………. 58 3.3.1 Print Config………………. 58 3.3.2 Dump Mode ………………. 58 3.3.3 Rotate Cutter ………………58 3.4 Language ………………….60 3.5 Service ………………….61 3.5.1 Initialization ………………. -
Page 6: Introduction
TSC ME240 series of industrial thermal label printers is designed to offer the right features at the best value in the industry. The ME240 series features a small footprint and low profile design that fits where larger industrial printers do not.
-
Page 7: Product Features
1.2 Product Features 1.2.1 Printer standard features The printer offers the following standard features. 203 dpi 300 dpi Product standard feature models models ○ ○ Thermal transfer printing ○ ○ Direct thermal printing ○ ○ Die-cast based print mechanism ○ ○…
-
Page 8: Printer Optional Features
○ ○ Text, bar code, graphics/image printing (Please refer to the TSPL/TSPL2 programming manual for supporting code page) Supported bar code Supported image 1D bar code 2D bar code BITMAP, Code 39, PDF-417, BMP, Code 93, Maxicode, Code128UCC, DataMatrix, Code128 subsets QR code, (Max.
-
Page 9: General Specifications
1.3 General Specifications General Specifications Physical dimensions 286 mm (W) x 259 mm (H) x 434 mm (D) Weight 11 kg Electrical Internal switching power supply Input: AC 100-240V Output: DC 24V 3.3A Operation: 5 ~ 40˚C (41 ~ 104˚F), 25~85% non-condensing Environmental Storage: -40 ~ 60 ˚C (-40 ~ 140˚F), 10~90% condition…
-
Page 10: Media Specifications
1.6 Media Specifications Media Specifications 203 dpi models 300 dpi models Label roll capacity 203.2 mm (8”) OD Media alignment Edge alignment Media type Continuous, die-cut, black mark, fan-fold, notch Media wound type Printing face outside wound Media width (label + Max.
-
Page 11: Operations Overview
2. Operations Overview 2.1 Unpacking and Inspection This printer has been specially packaged to withstand damage during shipping. Please carefully inspect the packaging and printer upon receiving the bar code printer. Please retain the packaging materials in case you need to reship the printer. Unpacking the printer, the following items are included in the carton.
-
Page 12: Printer Overview
2.2 Printer Overview 2.2.1 Front View 1. LED indicators 2. Pause key 3. Feed key 4. Paper exit chute 5. Lower front cover 6. Media viewer 7. Printer right side cover opener 8. LCD (Option) 9. Keys for LCD module (Option)
-
Page 13: Interior View
2.2.2 Interior view 1. Ribbon rewind spindle 2. Ribbon supply spindle 3. Print head pressure adjustment knob 4. Ribbon end sensor 5. Print head release lever 6. Label roll guard 7. 3” core adapter 8. Label supply spindle 9. Ribbon guide bar 10.
-
Page 14: Rear View
2.2.3 Rear View 1. Internal Ethernet interface (Option) 2. Fan-fold paper entrance chute 3. RS-232C interface (Max. 115,200 bps) 4. USB interface (USB 2.0/ Full speed mode) *5. SD card slot 6. Centronics interface (Option) 7. USB host (Option) 8. Power switch 9.
-
Page 15
V2.0 SDHC CLASS 4 microSD 4 GB Panasonic V2.0 SDHC CLASS 6 microSD 4 GB Transcend V1.0, V1.1 miniSD 128 MB Transcend, Panasonic V1.0, V1.1 miniSD 256 MB Transcend, Panasonic V1.0, V1.1 miniSD 512 MB Transcend, Panasonic V1.0, V1.1 miniSD 1 GB Transcend, Panasonic V2.0 SDHC CLASS 4 miniSD 4 GB… -
Page 16: Operator Controls
2.3 Operator Controls 2.3.1 Front Panel & Keys Standard LED indicators Feed key Pause key Keys Function Advance one label Feed key Pause/Resume the printing process Pause key…
-
Page 17
Option LED indicators LCD display Front panel keys Keys Function 1. Enter the menu 2. Exit from a menu or cancel a setting and return to the previous menu Pause/Resume the printing process Advance one label Scroll up the menu list Scroll down the menu list Enter/select cursor located option… -
Page 18: Led Indicators
2.3.2 LED Indicators Status Indication The printer power is turned off POWER The printer power is turned on Printer is ready ON-LINE Pause Blinking Downloading data into printer Printer is ready ERROR “Carriage open”, “Cutter error” or “Clearing data” “No paper”, “Paper jam” or “No ribbon” Blinking 2.4 Setting up the Printer 1.
-
Page 19: Installation Of Ribbon
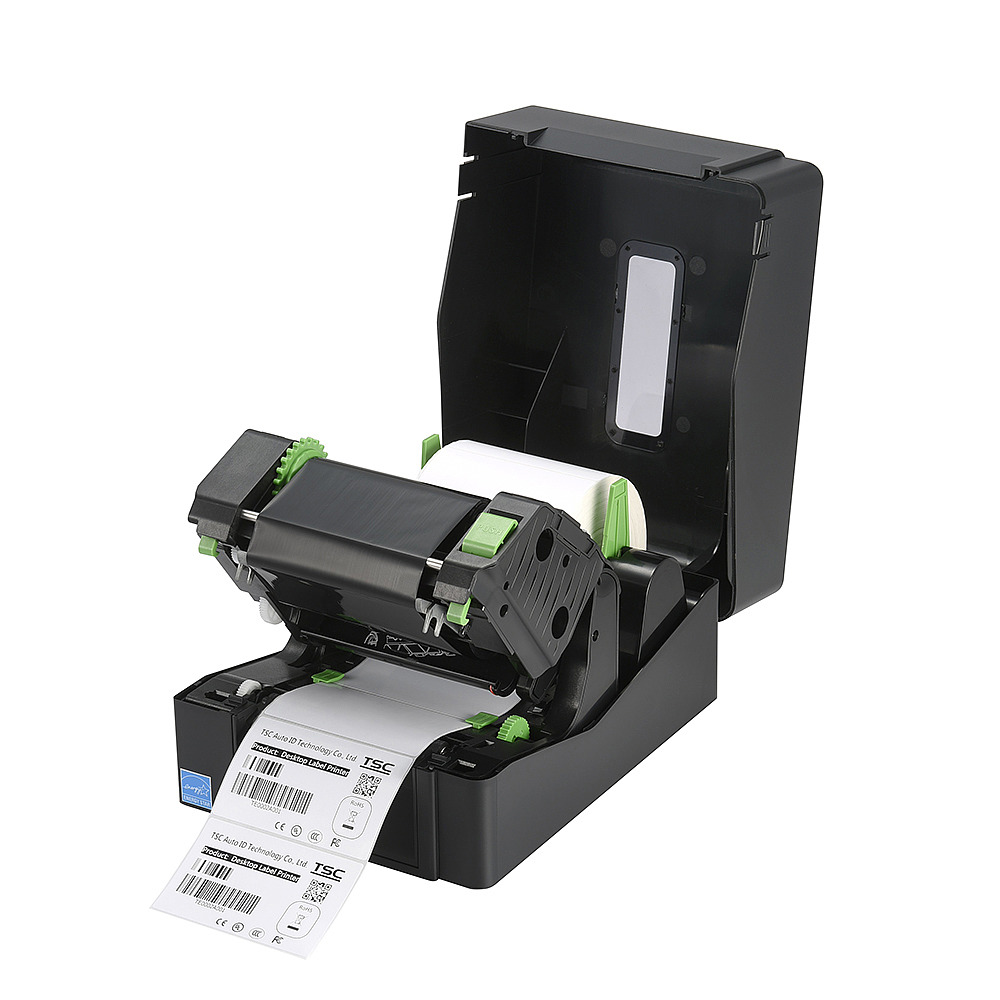
2.5 Installation of Ribbon 2.5.1 Loading the Ribbon 1. Open the printer right side cover. 2. Install the ribbon and paper core onto the ribbon supply spindle and ribbon rewind spindle. Push the paper core and ribbon roll to the end of the spindle. 3.
-
Page 20
4. Thread the ribbon leader through the slot between ribbon sensor and ribbon guide bar until ribbon passes through the print head and place the ribbon leader onto the ribbon rewind spindle. Ribbon leader Ribbon sensor Ribbon guide bar 5. Stick the ribbon leader onto the paper core. -
Page 21
7. Close the print head mechanism. Make sure the latches are engaged securely. Loading path for ribbon Ribbon (Ribbon supply spindle) Ribbon rewind spindle Ribbon guide bar Ribbon sensor Note: Please refer to videos on TSC YouTube or driver CD. -
Page 22: Installation Of Media
2.6 Installation of Media 2.6.1 Loading the Roll Label 1. Open the printer right side cover. 2. Push the print head release lever to open the print head mechanism. 3. Move the label roll guard horizontally to the end of label spindle then flip down the label roll guard.
-
Page 23
4. Place the roll of media on the label supply spindle. Flip up the label roll guard. Note: When insert the 3 inch core adapter to the spindle, please making sure the arrow direction is as following fig. When using 1 inch core media, please remove the 3 inch core adapters from the label supply spindle. -
Page 24
The media sensor position is moveable. Please make sure the gap or black mark is at the location where media gap/black mark will pass through for sensing. Please refer to videos on TSC YouTube or driver CD. -
Page 25
Loading path for roll labels Rear media loading slot Platen roll Media supply spindle Media sensor Media guide bar… -
Page 26: Loading The Fan-Fold Label
2.6.2 Loading the Fan-fold Label Fan-fold media feeds through rear external label entrance chute. 1. Open the printer right side cover. 2. Push the print head release lever to open the print head mechanism. 3. Move the label roll guard horizontally to the end of label spindle then flip down the label roll guard.
-
Page 27: Loading The Media In Peel-Off Mode (Option)
2.6.3 Loading the Media in Peel-off Mode (Option) 1. Open the peel-off cover by pulling-down the tabs located on peel-off cover. 2. Refer to chapter 2.6.1 to install the label. 3. Use the DiagTool to set the media sensor type and calibrate the selected sensor. (Please refer to chapter 4.) 4.
-
Page 28
6. Close the peel-off cover and the print head mechanism. Liner 7. Use the DiagTool to set the printer setting for peeler mode. (Please refer the chapter 4) Peeling will automatically start. Press the FEED button to test. Label Liner Note: Please calibrate the gap/black mark sensor when changing media. -
Page 29: Loading The Media In Cutter Mode (Option)
2.6.4 Loading the Media in Cutter Mode (Option) 1. Install the label. (Please refer to chapter 2.6.1) 2. Lead the media through the cutter paper opening. 3. Adjust the label guide to fit the width of the label. Cutter paper opening 4.
-
Page 30: Print Head Pressure Adjustment Knob
2.7 Print Head Pressure Adjustment Knob There are two conditions that will need to adjust the print head pressure. 1. Print with thick media If the media thickness is larger than 0.19 mm, the larger pressure is required to get good quality printout.
-
Page 31: Lcd Panel Menu Function (Option)
3. LCD Panel Menu Function (Option) Main Menu Overview Main Menu Setup File Manager Diagnostics Language Service Exit ↓ ↓ ↓ ↓ ↓ Printer Setup File List Print Config. English Initialization ↓ ↓ ↓ ↓ ↓ Sensor Avail. Memory Dump Mode Chinese(TC) Mileage Info.
-
Page 32: Setup Menu Overview
3.1 Setup Menu Overview Setup Printer Setup Sensor Serial Comm. Ethernet Exit ↓ ↓ ↓ ↓ TSPL2 Status Baud Rate Status ↓ ↓ ↓ ↓ ZPL2 Calibration Parity Configure ↓ ↓ ↓ ↓ Exit Exit Data Bits Exit ↓ Stop Bit(s) ↓…
-
Page 33: Printer Setup (Tspl2)
3.1.1-1 Printer Setup (TSPL2) Printer Setup TSPL2 Speed Density Direction Print Mode Offset Shift X Shift Y Reference X Reference Y Code Page Country Exit ↓ ↓ ↓ ↓ ↓ ↓ ↓ ↓ ↓ ↓ None +000~- +000~-000 +000~-000 000~999 000~999 Batch Mode Peeler Mode…
-
Page 34
3.1.1-1.1 Speed: Print Setup 1/12 Speed > Speed Density Direction Use this option to setup print speed. Each increment/decrement is 1 ips. Printer default density is 5 ips (203 dpi) or 3 ips(300 dpi). Press key to raise the print speed, and press key to decrease print speed. -
Page 35
Press key to set the direction as 1, and to set it as 0, and to enable the setting. Press key to cancel the setting and return to the previous menu. The following 2 figures are the printouts of DIRECTION 0 and 1 for your reference. DIRECTION 0 DIRECTION 1 Note: If printing from enclosed software/driver, the software/driver will send out the… -
Page 36
Cutter Mode Enable the cutter mode. Cutter Batch Cut the media once at the end of the printing job. Note: If printing from enclosed software/driver, the software/driver will send out the command, which will overwrite the setting set from the front panel. 3.1.1-1.5 Offset: Print Setup 5/12… -
Page 37
Print Setup 9/12 Shift Y Reference Y Reference X > Reference Y This option is used to set the origin of printer coordinate system horizontally and vertically. Press the button to move the cursor from left digit to right digit, and press the button to set the value from “0”… -
Page 38
Swedish Swiss Windows Code Page (SBCS) Windows Code Page (DBCS) International code page International code page number Character Set number Character Set 1252 Latin 1 Traditional Chinese Big5 Simplified Chinese GBK 1250 Central Europe 1253 Greek Japanese Shift-JIS 1254 Turkish Korean 1251 Cyrillic… -
Page 39
current setting. Press key to cancel the setting and return to the previous menu. Code Country Code Country Code Country Code Country United Spanish Brazil (Spain) Kingdom English 002 Canadian-French 036 Hungarian Danish (International) Spanish Yugoslavian Swedish Portuguese (Latin America) Dutch Italian Norwegian… -
Page 40: Printer Setup (Zpl2)
3.1.1-2 Printer Setup (ZPL2) Printer Setup ZPL2 Delimite Dark- Print Tear Print Print List List List List Control Format Head Label Left Media Exit ness Speed Mode Width Fonts Images Formats Setup Prefix Prefix Power Up Close Position Char ↓ ↓…
-
Page 41
3.1.1-2.1 Darkness: Print Setup 1/17 > Darkness Dankness Print Speed Tear off Use this option to setup printing darkness. The available setting is from 0 to 30, and the step is 1. Printer default density is 16.You may need to adjust your density based on selected media. -
Page 42
“-” or “0” to “9”. Press the button to set the value into printer. Press key to cancel the setting and return to the previous menu. The default value is +000. Note: If printing from enclosed software/driver, the software/driver will send out the command, which will overwrite the setting set from the front panel. -
Page 43
3.1.1-2.6 List Fonts: Print Setup 6/17 Self Test … Printing … > List Fonts List Images List Formats This feature is used to print current printer available fonts list to the label. The fonts stored in the printer’s DRAM, Flash or optional memory card. Press button to print the list. -
Page 44
This feature is used to print current printer configuration to the label. Press button to print the list. 3.1.1-2.10 Control Prefix: Print Setup 10/17 List Formats Control Prefix List Setup < ~ > 7EH > Control Prefix This option is used to set control prefix character. Press the button to move the button to set the value from “0”… -
Page 45
This option is used to set delimiter character. Press the button to move the button to set the value from “0” to cursor from left digit to right digit, and press the “9” or “A” to “F”. Press the button to set the value into printer. Press key to cancel the setting and return to the previous menu. -
Page 46: Sensor
Selections Description Feed Printer will advance one label Printer will calibration the sensor levels, determine length and Calibration feed label Length Printer determine length and feed label No Motion Printer will not move media 3.1.1-2.15 Label Top: Print Setup 15/17 Media Power Up Label Top Head Close…
-
Page 47: Sensor
3.1.2.1 Status This function is available to check the printer’s sensor status. When enter the [Status] option, you will see following message. Paper Len. Gap Size Intensity Ref. Level 3.1.2.2 Calibration This option is used to set the media sensor type and calibrate the selected sensor. We recommend to calibrate the sensor before printing when changing the media.
-
Page 48
A. Gap Mode Calibration Gap Mode > Gap Mode > Automatic Bline Mode Manual Cont. Mode Pre-Printed Press the buttons to scroll the cursor to the media type and press the button to enter the sensor calibration mode. Note: If printing from enclosed software/driver, the software/driver will send out the GAP or BLINE command, which will overwrite the sensor type setting set from the front panel. -
Page 49
2. Press the button to move the cursor from left digit to right digit, Gap Size and press the button to set the value from “0” to “9” and the “dot/ 0024 dot mm/ inch”. Press the button to set the gap size into the printer. -
Page 50
Gap Mode Manual > Pre-Printed Exit When enter [Pre-Printed] option, you will see following message. Please complete there steps: 1. Press the button to move the cursor from left digit to right digit, Paper Len. and press the button to set the value from “0”… -
Page 51
B. Bline Mode Calibration Bline Mode Gap Mode > Automatic > Bline Mode Manual Cont. Mode Pre-Printed Press the buttons to scroll the cursor to the sensor type. Press the button to enter the black-mark sensor calibration mode. B-1 Automatic When enter the [Automatic] option, you will see following message and printer will feed the black mark label to calibrate the sensor sensitivity automatically. -
Page 52
3. Open the print head mechanism, put the black Bline Mode mark under the media sensor. Press the Scan Mark button to set the value into the printer. Intensity Ref. Level Media sensor Black mark 4. Then, put the label without black mark under Bline Mode the media sensor. -
Page 53
When enter [Pre-Printed] option, you will see following message. Please complete there steps: 1. Press the button to move the cursor from left digit to right digit, Paper Len. and press the button to set the value from “0” to “9” and the “dot/ 00812 dot mm/ inch”. -
Page 54
C. Cont. Mode Calibration Cont. Mode Bline Mode > Automatic > Cont. Mode Manual Exit Exit Press the buttons to scroll the cursor to the sensor type. Press the button to enter the black-mark sensor calibration mode. C-1 Automatic When enter the [Automatic] option, you will see following message and printer will calibrate the sensor sensitivity automatically. -
Page 55: Serial Comm
3. The sensor calibration is complete. Cont. Mode Press the button the LCD Complete screen will return to the previous menu. Intensity Ref. Level 3.1.3 Serial Comm. Serial Comm. Baud Rate Parity Data Bits Stop Bit(s) Exit ↓ ↓ ↓ ↓…
-
Page 56
3.1.3.1 Baud Rate Serial Comm. Baud Rate > Baud Rate > 9600 bps Parity 19200 bps Data Bits 38400 bps This option is used to set the RS-232 baud rate. The default setting is 9600 bps. Press buttons to select the different baud rate and press button to set the value into printer. -
Page 57
3.1.3.4 Stop Bit Serial Comm. Stop Bit(s) Parity > Data Bits > Stop Bit(s) Exit This option is used to set the RS-232 Stop Bits. The default setting is “1” stop bit. Press buttons to select the different Stop Bits and press button to set the value into printer. -
Page 58: Ethernet
3.1.4 Ethernet Use this menu to configure internal Ethernet configuration check the printer’s Ethernet module status, and reset the Ethernet module. This function is available on the LCD display when Ethernet card is installed. Press buttons to select the different options and press button to enter the option.
-
Page 59
3.1.4.1.2 MAC Ethernet Status MAC Address > Status IP Address 001B82-FF0918 Configure > Exit Exit The MAC address information will be shown on the LCD display. Please press button to return to the previous menu. 3.1.4.2 Configure: (DHCP / Static IP) Use this menu to set the printer’s DHCP and Static IP. -
Page 60
3.1.4.2.2 Static IP Use this menu to set the printer’s IP address, subnet mask and gateway. Ethernet Configure Status DHCP > Configure > Static IP Exit Exit Press buttons to select the different options and press button to enter the option. Press key to cancel the setting and return to the previous menu. -
Page 61: File Manager
3.2 File Manager This feature is used to check the printer available memory and file list. File Manager File List Avail. Memory Del. All Files Exit ↓ ↓ DRAM DRAM ↓ ↓ FLASH FLASH ↓ ↓ CARD CARD ↓ ↓ Exit Exit 3.2.1 File List…
-
Page 62: Avail. Memory
3.2.2 Avail. Memory Use this menu to show available memory space. File Manager Avail. Memory File List DRAM: 256 KB > Avail. Memory FALSH: 6656 KB Del. All Files CARD: 0 KB 3.2.3 Del. All Files Use this menu to delete all files. Press button to delete all files in the device.
-
Page 63: Diagnostics
3.3 Diagnostics Diagnostics Print Config. Dump Mode Rotate Cutter Exit 3.3.1 Print Config. This feature is used to print current printer configuration to the label. On the configuration printout, there is a print head test pattern, which is useful for checking if there is any dot damage on the print head heater element.
-
Page 64
In case paper is jammed in the cutter, this feature can rotate the cutter blade forward or reverse direction, which is helpful to remove the jammed paper easily from the cutter. Diagnostics Fwd. Print Config. DOWN: Rev. Dump Mode > Rotate Cutter MENU: Exit… -
Page 65: Language
3.4 Language Language English Chinese (TC) Chinese (SC) Japanese German Italian French Russian Polish Spanish Exit This option is used to setup the language on LCD display. Press buttons to scroll the curser to desire language and press button to select this option. Press key to cancel the setting and return to the previous menu.
-
Page 66: Service
3.5 Service Service Initialization Mileage Info. Exit This feature is used to restore printer settings to defaults and display printer mileage information. 3.5.1 Initialization Service Initialization Initializing … > Initialization Mileage Info. SELECT Exit MENU The printer settings are restored to defaults once printer is initialized. (Please refer to section 4.2 for default settings.) Note : When printer initialization is done, please calibrate the gap or black mark sensor before…
-
Page 67: Diagnostic Tool
4. Diagnostic Tool TSC’s Diagnostic Utility is an integrated tool incorporating features that enable you to explore a printer’s settings/status; change a printer’s settings; download graphics, fonts and firmware; create a printer bitmap font; and send additional commands to a printer. With the aid of this powerful tool, you can review printer status and settings in an instant, which makes it much easier to troubleshoot problems and other issues.
-
Page 68: Printer Function
Password Setup Set the password to protect the settings The factory default settings are listed as below. Parameter Default setting Speed ME240: 5 IPS (127 mm/sec) ME340: 3 IPS (76.2 mm/sec) Density Label width 4.00” (101.6 mm) Label height 4.00” (101.6 mm)
-
Page 69
sensitivity Bline sensor 2 (Will be reset. Need to re-calibrate the gap sensor) sensitivity Language English IP address DHCP Configuration Page Self-test printout Printer model name & Main board firmware version Printer serial number Printed mileage Main board firmware checksum Serial port setting Code page Country code… -
Page 70
Self-test printout (with printer firmware V7.0 and later version) Model name F/W version Firmware checksum Printer S/N TSC configuration file System date System time Printed mileage (meter) Cutting counter Print speed (inch/sec) Print darkness Label size (inch) Gap distance (inch) -
Page 71
Numbers of download files Total & available memory space Print head check pattern… -
Page 72
Dump Text DOWNLOA 0D 0A 44 4F 57 4E 4C 4F 4I D „TEST2. 44 20 22 54 45 53 54 32 2E DAT“,5,CL 44 41 54 22 2C 35 2C 43 4C S DOWNLO 53 0D 0A 44 4F 57 4E 4C 4F AD F,“TES 41 44 20 46 2C 22 54 45 53 T4.DAT“,5… -
Page 73: Setting Ethernet By Diagnostic Utility (Option)
5 Setting Ethernet by Diagnostic Utility (Option) The Diagnostic Utility is enclosed in the CD disk Utilities directory. Users can use Diagnostic Tool to setup the Ethernet by RS-232, USB and Ethernet interfaces. The following contents will instruct users how to configure the Ethernet by these three interfaces. 5.1 Using USB interface to setup Ethernet interface 1.
-
Page 74: Using Rs-232 Interface To Setup Ethernet Interface
5.2 Using RS-232 interface to setup Ethernet interface 1. Connect the computer and the printer with a RS-232 cable. 2. Turn on the printer power. 3. Start the Diagnostic Utility by double clicks on the icon. Note: This utility works with printer firmware V6.00 and later versions. 4.
-
Page 75: Using Ethernet Interface To Setup Ethernet Interface
5.3 Using Ethernet interface to setup Ethernet interface 1. Connect the computer and the printer to the LAN. 2. Turn on the printer power. 3. Start the Diagnostic Utility by double clicks on the icon. Note: This utility works with printer firmware V6.00 and later versions. 4.
-
Page 76
The default IP address is obtained by DHCP. To change the setting to static IP address, click “Static IP” radio button then enter the IP address, subnet mask and gateway. Click “Set IP” to take effect the settings. Users can also change the “Printer Name” by another model name in this fields then click “Set Printer Name”… -
Page 77: Troubleshooting
6. Troubleshooting 6.1 Common Problems The following guide lists the most common problems that may be encountered when operating this bar code printer. If the printer still does not function after all suggested solutions have been invoked, please contact the Customer Service Department of your purchased reseller or distributor for assistance.
-
Page 78
* Re-connect cable to interface. * If using serial cable, — Please replace the cable with pin to pin connected. — Check the baud rate setting. The default baud rate setting of printer is 9600,n,8,1. * If using the Ethernet cable, — Check if the Ethernet RJ-45 connector green LED is lit on. -
Page 79
* Reload the supply. * Clean the printhead. * Clean the platen roller. * Adjust the print density and print speed. * Run printer self-test and check the print head test pattern if there is dot missing in the pattern. * Change proper ribbon or proper label media. -
Page 80
* Calibrate the sensor sensitivity again. * Set the correct label size and gap size. * Press [MENU] [SELECT] x3[DOWN]x6 [SELECT] to fine tune the parameter of Shift Y. (Option) * If using the software BarTender, please set the vertical offset in the driver. -
Page 81: Mechanism Fine Adjustment To Avoid Ribbon Wrinkles
6.2 Mechanism Fine Adjustment to Avoid Ribbon Wrinkles This printer has been fully tested before delivery. There should be no ribbon wrinkle presented on the media for general-purpose printing application. Ribbon wrinkle is related to the media thickness, print head pressure balance, ribbon film characteristics, print darkness setting…etc. In case the ribbon wrinkle happens, please follow the instructions below to adjust the printer parts.
-
Page 82
Adjust the print head pressure adjustment knob Adjust the print head pressure adjustment knob Left knob Right knob The print head pressure adjustment knob has 5 The print head pressure adjustment knob has 5 levels of settings. Clockwise direction adjustment levels of settings. -
Page 83: Maintenance
7. Maintenance This session presents the clean tools and methods to maintain your printer. 1. Please use one of following material to clean the printer. Cotton swab Lint-free cloth Vacuum / Blower brush 100% ethanol 2. The cleaning process is described as following, Printer Part Method Interval…
-
Page 84: Revise History
Editor Camille 2011/11/16 Modify the section 4.2 2011/12/2 Modify the section 2.3.2 Camille Modify the “Agency Compliance and Approvals” 2011/12/6 Camille Modify section 1.2.2 (cutter spec) Camille 2013/4/2 Modify section 4.2 (V7.0 F/W self test) Add TSC YouTube web address…
-
Page 85
9F., No.95, Minquan Rd., Xindian Dist., No.35, Sec. 2, Ligong 1st Rd., Wujie Township, New Taipei City 23141, Taiwan (R.O.C.) Yilan County 26841, Taiwan (R.O.C.) TEL: +886-2-2218-6789 TEL: +886-3-990-6677 FAX: +886-2-2218-5678 FAX: +886-3-990-5577 Web site: www.tscprinters.com E-mail: printer_sales@tscprinters.com TSC Auto ID Technology Co., Ltd. tech_support@tscprinters.com…
This manual is also suitable for:
Me340