
- Operating system: Windows 10 Enterprise LTSC Version 1809
- Python version: 2.7.15
- ESP hardware in use: ESP8266(EX)
Full esptool.py command line as run:
esptool.py --port COM13 --baud 115200 write_flash -fs 1MB -fm dout 0x0 sonoff.bin
Full output from esptool.py (please copy and paste all lines of output)
esptool.py v2.6
Serial port COM13
Connecting........_____....._____....._
Detecting chip type... ESP8266
Chip is ESP8266EX
Features: WiFi
MAC: 68:XX:XX:XX:XX:XX
Uploading stub...
Running stub...
Stub running...
Configuring flash size...
Compressed 534032 bytes to 365310...
Writing at 0x00008000... (13 %)
A fatal error occurred: Timed out waiting for packet header
What is the expected behaviour?
Successful flash
Do you have any other information from investigating this?
I have tested with CH340G and also a PL2303 USB TTL Serial adapter. Both result in the same errors.
Using write_flash at various baud rates (tested 9600, 19200, 38400, 57600, 115200, and leaving it blank) results in the same error, always at the same 0x00008000 address, after varying times (slower baud rates take longer to show the error).
A complete log with the —trace flag is here:
https://pastebin.com/3CFKFULQ
I am using a 3.3V breadboard power supply module, which in turn, is supplied by a 9V wall wart.
Other commands tried:
Running esptool.py --port COM13 erase_flash results in the following:
esptool.py v2.6
Serial port COM13
Connecting....
Detecting chip type... ESP8266
Chip is ESP8266EX
Features: WiFi
MAC: 68:XX:XX:XX:XX:XX
Uploading stub...
Running stub...
Stub running...
Erasing flash (this may take a while)...

A fatal error occurred: Timed out waiting for packet content
Running esptool.py flash_id results in the following:
esptool.py v2.6
Found 1 serial ports
Serial port COM13
Connecting....
Detecting chip type... ESP8266
Chip is ESP8266EX
Features: WiFi
MAC: 68:XX:XX:XX:XX:XX
Uploading stub...
Running stub...
Stub running...
Manufacturer: ef
Device: 4016
Detected flash size: 4MB
Hard resetting via RTS pin...
Running esptool.py chip_id results in the following:
esptool.py v2.6
Found 1 serial ports
Serial port COM13
Connecting....
Detecting chip type... ESP8266
Chip is ESP8266EX
Features: WiFi
MAC: 68:XX:XX:XX:XX:XX
Uploading stub...
Running stub...
Stub running...
Chip ID: 0x08cd7baa
Hard resetting via RTS pin...
Running esptool.py --port COM13 read_flash 0x0 0x400000 backout.txt results in the following:
esptool.py v2.6
Serial port COM13
Connecting....
Detecting chip type... ESP8266
Chip is ESP8266EX
Features: WiFi
MAC: 68:XX:XX:XX:XX:XX
Uploading stub...
Running stub...
Stub running...

A fatal error occurred: Corrupt data, expected 0x1000 bytes but received 0xfff bytes
Learn how to fix the Fatal Error Occurred: “Failed to connect to ESP32: Timed out waiting for packet header” error when trying to upload new code to your ESP32 board once for all.
![[SOLVED] Failed to connect to ESP32: Timed out waiting for packet header](https://i0.wp.com/randomnerdtutorials.com/wp-content/uploads/2019/02/esp32-waiting-for-packet-header-featured.jpg?resize=828%2C466&quality=100&strip=all&ssl=1)
Why are you getting this error?
Some ESP32 development boards (read Best ESP32 boards) don’t go into flashing/uploading mode automatically when uploading a new code.
This means that when you try to upload a new sketch to your ESP32, the Arduino IDE fails to connect to your board, and you get the following error message:

Holding the BOOT/FLASH button
One of the ways to solve this is holding-down the “BOOT/FLASH” button in your ESP32 board while uploading a new sketch at the same time. But having to worry about this every time you want to upload new code can be tedious, specially when you’re testing and debugging your code. There is a way to fix this once for all – no need to hold down the “BOOT/FLASH” button anymore.
How to fix the Error?
To make your ESP32 board go into flashing/uploading mode automatically, you can connect a 10 uF electrolytic capacitor between the EN pin and GND.
You may want to test this setup first on a breadboard to make sure it works for your ESP32 development board.

Note: electrolytic capacitors have polarity. The white/grey stripe indicates the negative lead.
If it works, then you can solder the 10 uF electrolytic capacitor to the board. Since the EN and GND pins are far apart from each other, you can simply connect the capacitor between the EN and the GND of the ESP32 chip as shown in the schematic diagram below:

Recommended: ESP32 Pinout Reference: Which GPIO pins should you use?
The following figure shows how my ESP32 looks like after soldering the capacitor. It doesn’t occupy much space, and fortunately you won’t get more trouble connecting to the ESP32 when uploading new code.

Before trying to upload a new code, you should check the connections with a multimeter in continuity mode – check that you haven’t inadvertently solder anything to the next pin.

If everything is soldered properly, you won’t need to press the BOOT button when uploading new code. You also won’t get the Fatal Error Occurred: “Failed to connect to ESP32: Timed out waiting for packet header”.

Wrapping Up
We hope you’ve found this trick useful and it solved your problem. Thanks to Ben Hall for the suggestion.
- For more ESP32 troubleshooting tips, consult the ESP32 troubleshooting guide.
- To learn more about ESP32 enroll in the Learn ESP32 with Arduino IDE course.
- More projects about ESP32: 20+ ESP32 Projects and Tutorials

I tried to flash an ESP32 but I didn’t succeed, I tried with esptool.py and Arduino IDE. I tried to press the boot button and reset but it didn’t work. Here is the error:
A fatal error occurred: Failed to connect to ESP32: Timed out waiting for packet header
![]()
asked Dec 30, 2021 at 13:09
![]()
2
DISCLAIMER! May not be correct answer but may help to save time for someone.
Quick answer if you do not want read my experience: Disconnect all wires from pins and try uploading again! It may help.
I came across with the same error and could not figure it out. I first thought that something is wrong with the code, because it happened after I edited working code while figuring out where to connect what pin 😀. I also wasn’t able to upload simple HelloWorld after it happened with connected wires. But then I disconnected all my wires from the board and the upload works fine.
I can not figure out the WHY factor but I think it must had been the input/data pin I was using, in my case D13. I have the DevKit with fewer pins. Maybe someone can comment why connected pins may make the error come up?
answered Apr 7, 2022 at 19:27
![]()
Tarvo MäeseppTarvo Mäesepp
4,4573 gold badges42 silver badges89 bronze badges
If using the Arduino IDE, try lowering the upload speed (Tools/Upload Speed). Lowering mine from 921600 to 460800 did the trick.
First ensure that you are in download mode:
- Start the serial monitor and set the speed (mine is 115200).
- While pressing the «boot» button, press and release the «en» button (your buttons may be labeled differently).
- You should see something like this on the serial monitor:
waiting for download - Now start the upload
My development machine, a 2013 iMac is connected via USB to the USB-c port on my ESP32 Dev Module. Apparently the iMac’s USB or ESP32 board’s USB cannot keep up at the 921600 upload speed.
answered Nov 30, 2022 at 23:13
![]()
On some AliExpress-like ESP32s you have to press the boot button in order to upload your sketch.
If you are watching the Arduino IDE console ouput and Connecting ... appears, you have to press the boot button for approximately 2 seconds until the console output changes.
answered Apr 8, 2022 at 9:44
![]()
Try to do this one after the other
- Press the boot button when press uploading button until it write the code.
- Try disconnect esp32 from the board/header/pcb that you are using right at the time.
- Disconnect any other connection that your esp32 might have.
- Do not connect to anything even your hand if possible.
- Try put it in something that doesnt have a moist surface. look pic number 3.
MY CASES(30 pin version):
Case 1: I dont know why. I was connecting the pin to a female header it doesnt work and sometimes it just work like that. look pic number 1.
Case 2: when Im holding esp32 on my hand sometimes it wont work then i put it on my table and another time it doing well.
Case 3: pressing boot button when uploading it helped sometimes, and the other time it just work like it should.
Case 4: when it connected to pcb its simply just wont work, but when disconnected boom it work like nothing ever happen. look pic number 2.
Maybe just maybe something with capacitive or something like that (just assuming because number Case 1). hope that will help you out.
pic 1pic 2pic 3
answered May 20, 2022 at 17:22
![]()
With Arduino IDE
Make sure the Com port is selected under Tools menu. My experience with ESP32 is Com 5.
If it is not available as an option, try changing USB ports and/or re-select Tools — Board — ESP32 dev module.
Watch the «Compiling Sketch» window.
Press the «Boot» button as soon as you get the red message «Serial port Com 5» You can release the button as soon as it starts to upload.
If this doesn’t work,try plugging into another USB port.
The Reset button only resets the uploaded sketch to re-initialise and has nothing to do with the uploading.
answered Jan 24, 2022 at 17:11
![]()
Just download the drivers x)
CP210x: CP210x USB to UART Bridge VCP Drivers
FTDI: FTDI Virtual COM Port Drivers
answered Sep 29, 2022 at 14:10
![]()
ri1_ri1_
1171 gold badge1 silver badge6 bronze badges
Install expressif.exe and port drivers,connect the port and flash the esp32 ,upload the code using ardiuno,solve the error
answered Oct 27, 2022 at 15:14
![]()
in my case buttons are new but not shorting properly as multimeter showed ..opened both scratched resoldered and all working
answered Dec 3, 2022 at 19:26
![]()
Changing by upload speed from 921600bps to 115200bps fixed it. No need to press any buttons.
answered Jan 26 at 9:21
![]()
PunnerudPunnerud
6,9982 gold badges54 silver badges44 bronze badges
Download and install the latest CP2102 driver. This sloved the issue permenetly for me.
answered Mar 22 at 0:23
![]()
I’m on windows.
The only thing that worked for me was plugging the device to my MacOSX M1. It then successfully programs. Then I move it back to windows and it works there too now.
Installing the driver, doing a pulldown of GPIO2 to GND/3.3v didn’t work for me. It appears that something inside the MCU is getting into a pad state.
answered May 13 at 8:16
![]()
-
#1
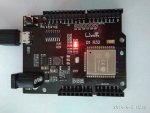
Здравствуйте! Хотел поиграться с ESP32, купил платку в UNO форм-факторе (сильно за это не пинайте в первый раз закупаюсь). Фото во вложении.
Не могу прошить тестовую программу. Выдает ошибку :
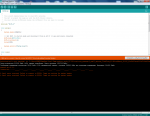
Connecting…….._____….._____….._____….._____….._____….._____….._____….._____….._____….._____
A fatal error occurred: Failed to connect to ESP32: Timed out waiting for packet header
A fatal error occurred: Failed to connect to ESP32: Timed out waiting for packet header
Фото ошибки во вложении.
Понятия не имею как исправить?
С уважением и надеждой на отзыв.

-
79.8 KB
Просмотры: 472 -
550.5 KB
Просмотры: 469
Последнее редактирование: 5 Июн 2018

-
#2
Плата то нормальная, у меня работает… что указываете в настройках среды Arduino: «Инструменты/Плата:» и «Инструменты/Порт:» ? Питаете плату от USB?
-
#3
Плата то нормальная, у меня работает… что указываете в настройках среды Arduino: «Инструменты/Плата:» и «Инструменты/Порт:» ? Питаете плату от USB?
Инструменты/Плата: Noduino Quantum,
Инструменты/Порт: COM5 (USB-SERIAL CH340),
Никакого дополнительного питания не подключаю — только через USB.
После первого включения вроде подмигивал синий индикатор, потом я ушел оставив включенным и подключенным к компьютеру ESP32 на довольно продолжительное время. Когда вернулся уже горел только красный диодик.
Но могу перепутать насчет синего диода, т.к. еще тестировал ESP8266 (он рабочий).
Последнее редактирование: 5 Июн 2018
-
#4
Попробуйте указать что плата «NodeMCU-32S», а если вдруг не пойдет, то еще и снизить скорость до 115200.
-
#5
Попробуйте указать что плата «NodeMCU-32S», а если вдруг не пойдет, то еще и снизить скорость до 115200.
Не пошло — скорость снизил, плату поменял… Вот здесь на англоязычном сайте что-то обсуждают на данную тему — https://www.esp32.com/viewtopic.php?f=2&t=4912. По корявому переводу Яндекса ничего конкретного не понять. Если владеете английским — посмотрите, пожалуйста!
-
#6
Там про другую плату, c wrover — она сильно другая…
Я только что взял заново установил esp32 под Arduino (обычно сам пользуюсь vs code с platformio) взял точно такую-же как на фото плату, обозвал ее NodeMCU-32S и сходу залил пример wifiscan. Вот лог компиляции — все зашилось без ошибок, работает:
Код:
Скетч использует 535126 байт (40%) памяти устройства. Всего доступно 1310720 байт.
Глобальные переменные используют 38020 байт (12%) динамической памяти, оставляя 256892 байт для локальных переменных. Максимум: 294912 байт.
esptool.py v2.3.1
Connecting.....
Chip is ESP32D0WDQ6 (revision 1)
Features: WiFi, BT, Dual Core
Uploading stub...
Running stub...
Stub running...
Changing baud rate to 921600
Changed.
Configuring flash size...
Auto-detected Flash size: 4MB
Compressed 8192 bytes to 47...

Writing at 0x0000e000... (100 %)
Wrote 8192 bytes (47 compressed) at 0x0000e000 in 0.0 seconds (effective 21845.2 kbit/s)...
Hash of data verified.
Compressed 12480 bytes to 8255...

Writing at 0x00001000... (100 %)
Wrote 12480 bytes (8255 compressed) at 0x00001000 in 0.1 seconds (effective 950.9 kbit/s)...
Hash of data verified.
Compressed 536272 bytes to 327531...

Writing at 0x00010000... (5 %)
Writing at 0x00014000... (10 %)
Writing at 0x00018000... (15 %)
Writing at 0x0001c000... (20 %)
Writing at 0x00020000... (25 %)
Writing at 0x00024000... (30 %)
Writing at 0x00028000... (35 %)
Writing at 0x0002c000... (40 %)
Writing at 0x00030000... (45 %)
Writing at 0x00034000... (50 %)
Writing at 0x00038000... (55 %)
Writing at 0x0003c000... (60 %)
Writing at 0x00040000... (65 %)
Writing at 0x00044000... (70 %)
Writing at 0x00048000... (75 %)
Writing at 0x0004c000... (80 %)
Writing at 0x00050000... (85 %)
Writing at 0x00054000... (90 %)
Writing at 0x00058000... (95 %)
Writing at 0x0005c000... (100 %)
Wrote 536272 bytes (327531 compressed) at 0x00010000 in 5.0 seconds (effective 858.9 kbit/s)...
Hash of data verified.
Compressed 3072 bytes to 144...

Writing at 0x00008000... (100 %)
Wrote 3072 bytes (144 compressed) at 0x00008000 in 0.0 seconds (effective 4915.3 kbit/s)...
Hash of data verified.

Leaving...
Hard resetting via RTS pin...
Может SDK esp32 криво встал?
В курсе что прежде чем ставить sdk под arduino надо поставить питон и гит и потом произвести некие манипуляции вручную?
-
#7
@Юрий Ботов, ГИТ поставил, про ПИТОН не в курсе вообще? ГИТ устанавливал согласно инструкции — Знакомимся с ESP32, часть 1: установка в Arduino IDE. Манипуляций кроме как выбор платы и порта не производил…
Может стоить попробовать прошить в vs code с platformio? Я с ней совсем не знаком конечно… Он англоязычный кажется — нам колхозникам не по зубам)
Питон оказывается это язык программирования — эта ошибка от языка наверно не зависит…
Последнее редактирование: 5 Июн 2018
-
#8
Вот это «и запускаем файл get.exe» из руководства точно выполнилось? Оно загружает всякие дополнительные файлы распаковывает их и запускает скрипты на питоне (вот он Питон зачем нужен). Питон надо установить Python 2.7 (нельзя более поздние версии — 3.х)
-
#9
Инструменты/Плата: Noduino Quantum,
Инструменты/Порт: COM5 (USB-SERIAL CH340),
Никакого дополнительного питания не подключаю — только через USB.
После первого включения вроде подмигивал синий индикатор, потом я ушел оставив включенным и подключенным к компьютеру ESP32 на довольно продолжительное время. Когда вернулся уже горел только красный диодик.
Но могу перепутать насчет синего диода, т.к. еще тестировал ESP8266 (он рабочий).
Найдите на форуме мою тему как поставить LUA на ESP32 Там все нарисовано. Сделайте для начала как там написано.
-
#10
@nikolz, попробовал прошить через ESP DOWLOAD TOOL v3.6.4 — не получается, никакой реакции. Фото во вложении.
@Юрий Ботов, ПИТОН установил, запустил еще раз get.exe, но проблема осталась…
«0» реакции — горит красный и всё… Что хотя бы может означать этот красный индикатор?
-
74.9 KB
Просмотры: 122

-
#11
@nikolz, попробовал прошить через ESP DOWLOAD TOOL v3.6.4 — не получается, никакой реакции. Фото во вложении.
@Юрий Ботов, ПИТОН установил, запустил еще раз get.exe, но проблема осталась…
«0» реакции — горит красный и всё… Что хотя бы может означать этот красный индикатор?
1) Соm5 — это вы установили или это по умолчанию вывелось? Если по умолчанию то установите фактический.
2) проверьте напряжения на выходе 1117
-
#12
@nikolz, COM-порт выбирал после обнаружения CH340 — соответствующий.
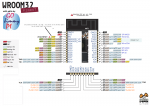
А выход 1117 — это какой PIN ??? Вложил схему распиновки esp32
-
585.6 KB
Просмотры: 60
-
#13
@nikolz, COM-порт выбирал после обнаружения CH340 — соответствующий.
А выход 1117 — это какой PIN ??? Вложил схему распиновки esp32
1117 это на плате такой чип с тремя ногами и головой под ESP32 стоит
Стабилизатор AMS1117-3.3 схема включения
На средней ножке должно быть 3.3 в
-
#15
@nikolz, да, там ровно 3.3 В…
теперь на пине 3V3 ESP32
-
#17
@nikolz, тоже все в порядке — 3.3В
Вы когда dounload загрузили SYNC отображался?
когда старт нажимаете что пишет в черном окне ?
Поставьте скорость BAUD 230400
-
#18
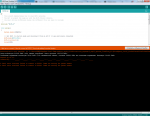
@nikolz,
Вы когда dounload загрузили SYNC отображался?
— не совсем понял?
Скриншот черного окна выкладываю — во вложении. Скорость перед загрузкой поменял.
-
77.1 KB
Просмотры: 70
-
#19
возьмите терминальную программу например teraterm
установите скорость 115000 и порт платы и нажмите ресет.
-
#20
@nikolz,
— не совсем понял?
Скриншот черного окна выкладываю — во вложении. Скорость перед загрузкой поменял.
я говорю про программу загрузки луа
Loading