
Системе не удается найти указанный файл -это сообщение об ошибке, которое может появиться в Windows 10 при попытке открыть или удалить файл, запустить приложение, обновить ОС, выполнить резервное копирование данных или выполнить другие файловые операции.
В более серьезных случаях ошибка появляется при попытке загрузить операционную систему, показывая оранжевый экран . Однако есть несколько способов решить эту проблему, в зависимости от того, где вы на нее наткнулись.
Как исправить Системе не удается найти указанный файл ошибку в Windows 10
Обратите внимание на следующие исправления. Если возможно, убедитесь, что создайте точку восстановления системы , чтобы вы могли восстановить Windows 10, если вам нужно начать работу с нуля.
1. Перезагрузите компьютер
Возможно, Windows показывает ошибку Система не может найти указанный файл из-за зависшего процесса или неотвечающей службы. Поэтому рекомендуется начать с чего-нибудь столь же простого, как перезагрузка компьютера. Еще лучшая идея-жестко перезагрузить компьютер. После выключения отключите источник питания и удерживайте кнопку питания нажатой в течение 20-30 секунд, чтобы очистить кэш ПК. Затем загрузите операционную систему и проверьте, решена ли ваша проблема.
2. Обновите Windows 10
Установка последних обновлений операционной системы имеет решающее значение для обслуживания вашего компьютера, что стало возможным благодаря Центру обновления Windows. Эта служба должна автоматически работать в фоновом режиме, постоянно проверять наличие обновлений и запрашивать вас, когда требуются дальнейшие действия.
Проверьте, нет ли в центре уведомлений или меню параметров питания красных точек, указывающих на отложенный перезапуск, особенно если вы не выключали компьютер в течение длительного времени. В противном случае вы можете вручную проверить наличие обновлений:
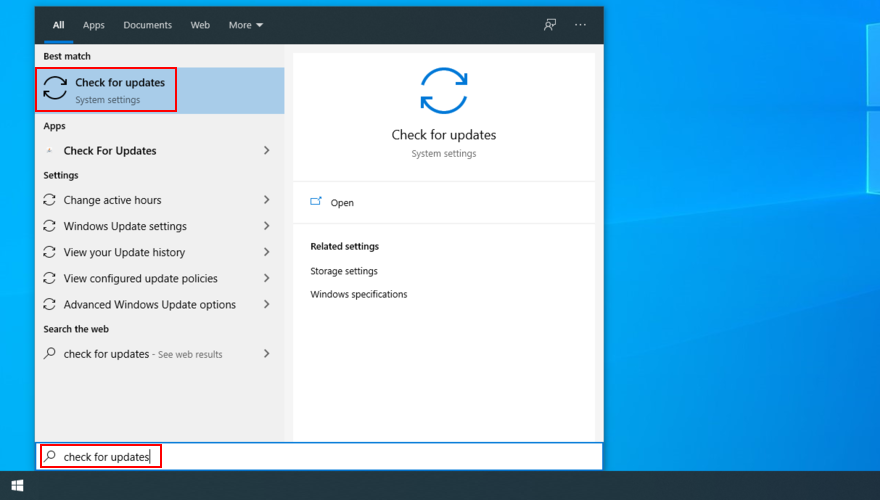
- Нажмите кнопку Пуск , введите проверить наличие обновлений и нажмите Enter

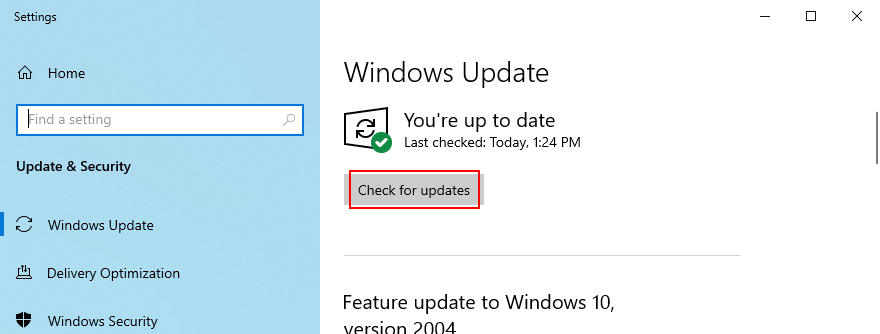
- Нажмите Проверить обновления и подождите

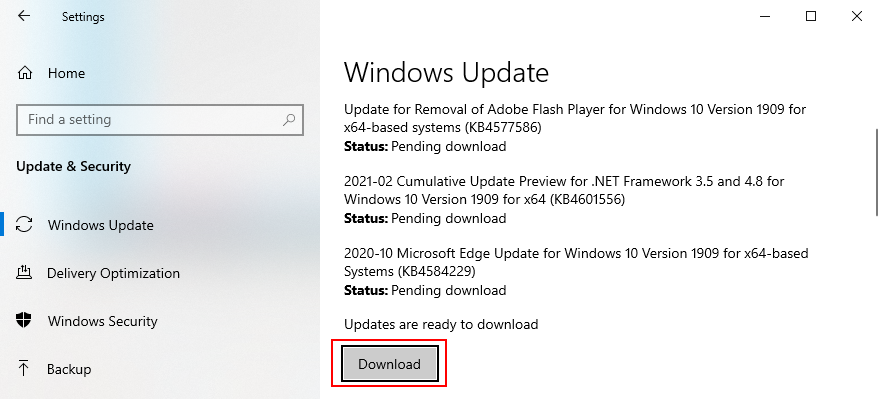
- Если есть что-то ожидающее, нажмите Загрузить

- Не выключайте и не перезагружайте компьютер в это время. После загрузки и установки обновлений перезагрузите компьютер, чтобы завершить задачу.
3. Запустите средство устранения неполадок Центра обновления Windows
Многие пользователи не могут запустить Центр обновления Windows из-за ошибки Системе не удается найти указанный файл . В этом случае вам следует использовать средство устранения неполадок Центра обновления Windows , чтобы найти и исправить типичные проблемы, мешающие запуску этого приложения:
- Нажмите кнопку Пуск , введите Настройки устранения неполадок и нажмите Enter
- Нажмите Дополнительные средства устранения неполадок .
- Выберите Центр обновления Windows и нажмите Запустить средство устранения неполадок

- Примените все исправления, обнаруженные средством устранения неполадок.
- Перезагрузите компьютер и попробуйте запустить Центр обновления Windows прямо сейчас.

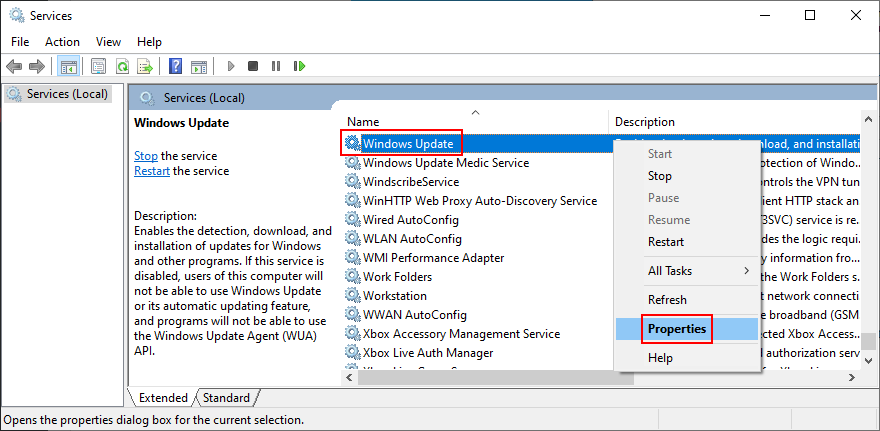
4. Проверьте службы Центра обновления Windows
Некоторые пользователи отключить службу Windows Update , потому что она прерывает их действия и требует навсегда выключить, запустить или перезагрузить их компьютер во время срочных задач. Однако, если он останется отключенным, служба не сможет получать критические обновления, что приведет к различным проблемам с компьютером.
Как перезапустить службы Центра обновления Windows:
- Нажмите клавиши Win + R , введите services.msc и нажмите Enter , чтобы открыть Сервисы
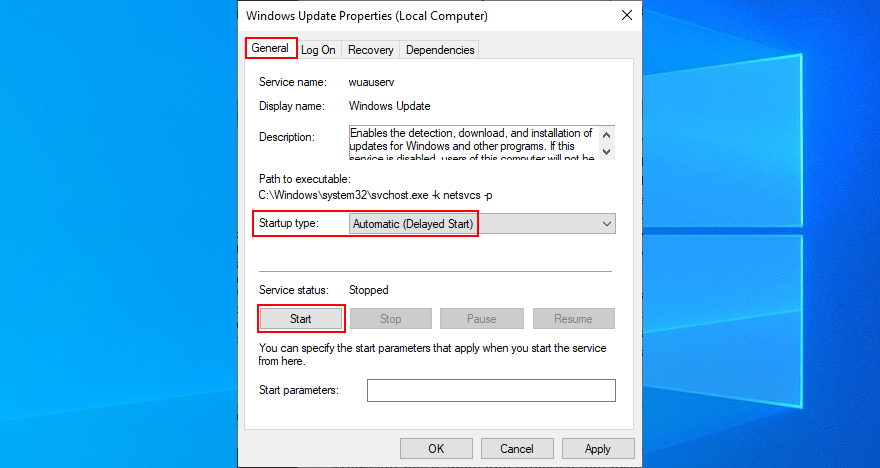
- Найдите и дважды щелкните Центр обновления Windows , чтобы просмотреть его свойства

- Установите для Тип запуска значение Автоматический (отложенный запуск)
- Нажмите кнопку Пуск , чтобы сразу запустить службу.
- Нажмите Применить и вернитесь в главное окно

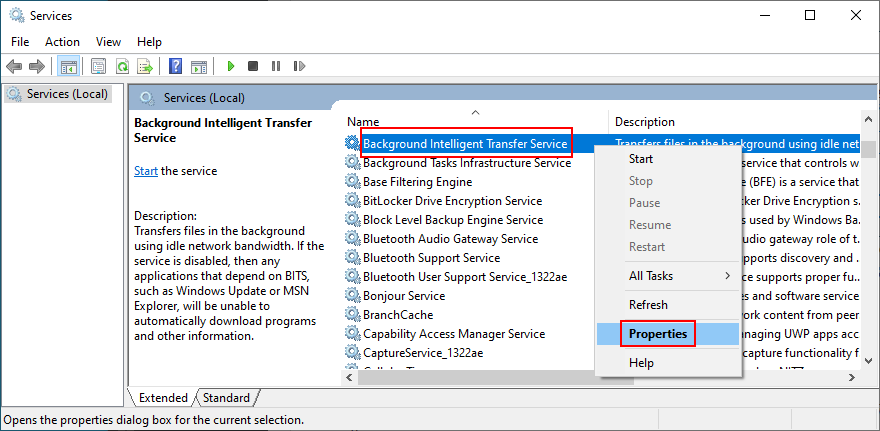
- Найдите службы Фоновая интеллектуальная передача и Готовность приложения , чтобы изменить те же настройки, указанные выше
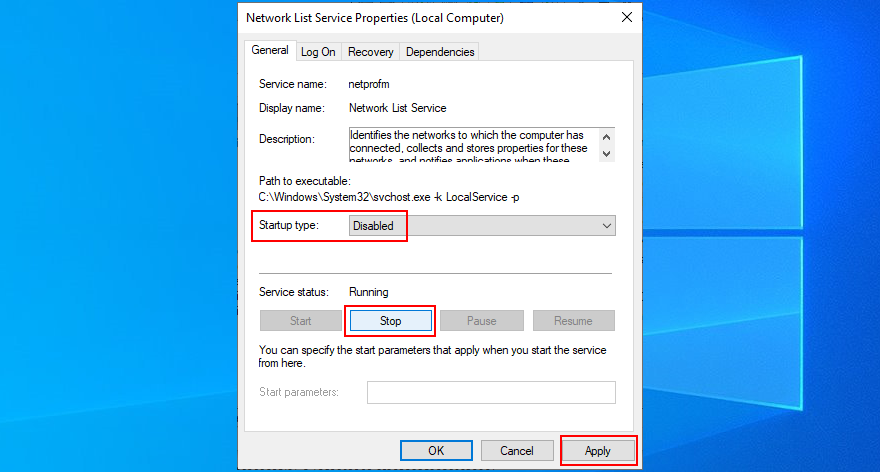
Также неплохо отключить службу списка сетей, которая иногда конфликтует со службой Центра обновления Windows:
- Найдите и дважды щелкните Служба списка сетей , чтобы получить доступ к ее свойствам

- Установите для Тип запуска значение Выключено
- Нажмите Остановить , чтобы прекратить обслуживание.
- Нажмите Применить и выйдите на рабочий стол
- Попробуйте запустить Центр обновления Windows прямо сейчас.

5. Запустите Windows 10 в безопасном режиме
Если ошибка Система не может найти указанный файл вызвана неисправным сторонним драйвером или службой, вы можете запустить Windows 10 в безопасном режиме , чтобы автоматически отключить все драйверы и службы, не принадлежащие вашему Операционная система. Вот что вам нужно сделать:
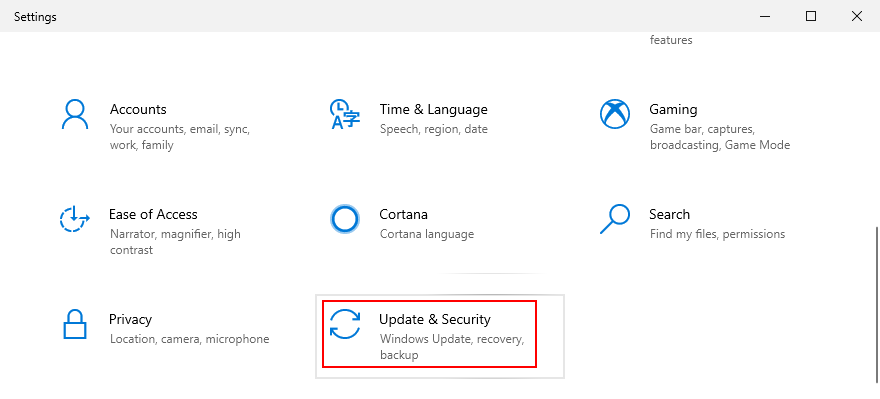
- Щелкните правой кнопкой мыши кнопку Пуск и выберите Настройки
- Выберите Обновление и безопасность .
- Перейдите на страницу Восстановление
- В разделе Расширенный запуск нажмите Перезагрузить сейчас

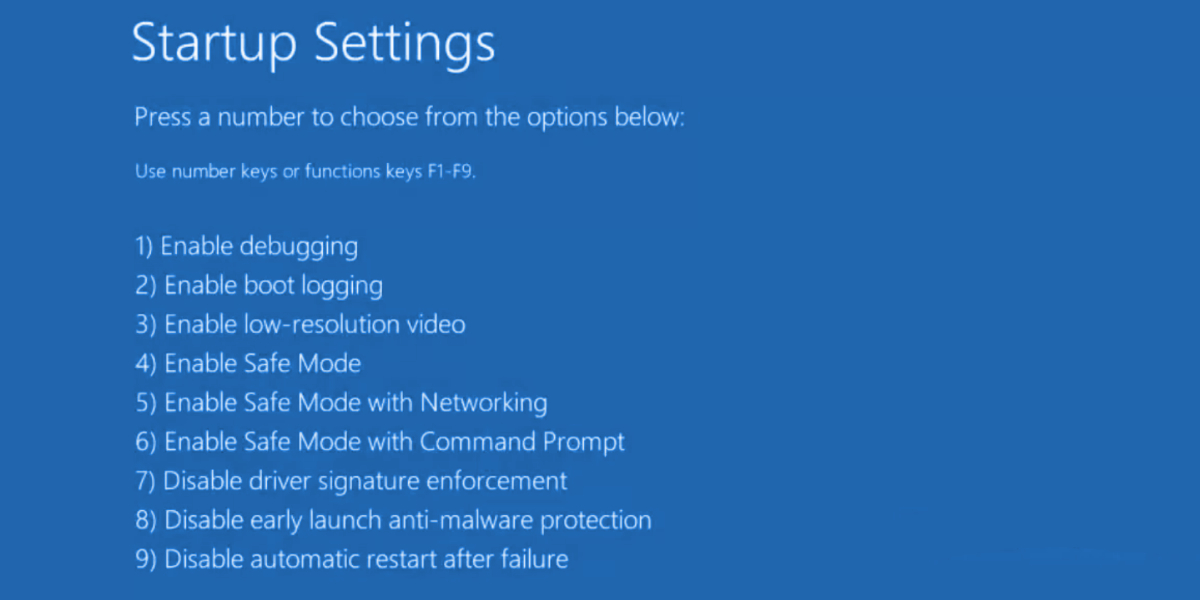
- Перейдите в Устранение неполадок > Дополнительные параметры > Настройки запуска

- Нажмите Перезагрузить
- Если вам не нужен доступ в Интернет, нажмите F4 . В противном случае нажмите F5 , чтобы включить безопасный режим с сетью


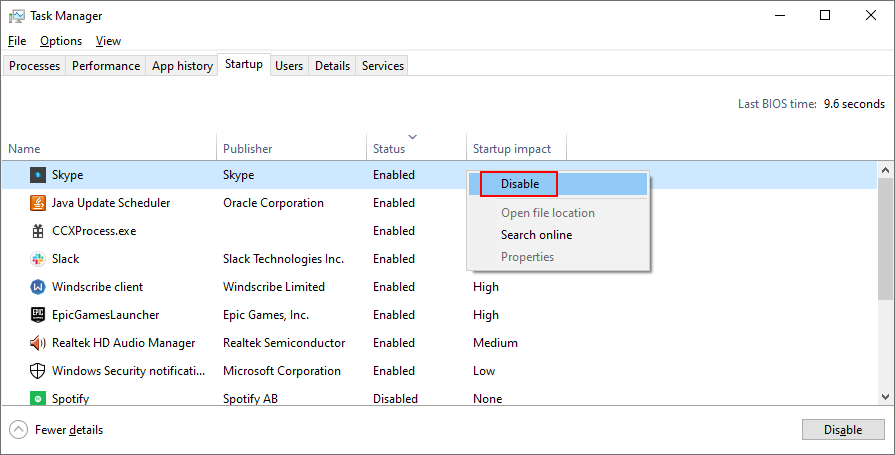
6. Отключить запускаемые приложения
Если безопасный режим не помог устранить ошибку Система не может найти указанный файл , попробуйте отключение запускаемых программ . Например, у вас может быть приложение безопасности, которое автоматически запускается каждый раз при включении компьютера, что конфликтует с критически важными системными процессами. Выявить виновных бывает сложно, поэтому лучше все выключить.
Как отключить автозагрузку программ:
- Щелкните правой кнопкой мыши панель задач Windows 10 и выберите Диспетчер задач
- Перейдите в раздел Запуск .
- Для каждого приложения со статусом Включено выберите его запись и нажмите Отключить

- Перезагрузите компьютер.
.
7. Чистая загрузка ОС
Выполнение чистой загрузки в Windows 10 чем-то похож на безопасный режим. Разница в том, что при чистой загрузке отключаются не только второстепенные устройства и службы, но и элементы автозагрузки. Вот как это настроить:
- Нажмите клавиши Win + R , введите msconfig и нажмите Enter , чтобы открыть Системный Приложение”Конфигурация “
- Оставайтесь на вкладке Общие .
- Выберите Выборочный запуск
- Снимите флажки Загружать системные службы и Загружать элементы автозагрузки
- Нажмите Применить

- Перейдите на вкладку Автозагрузка
- Нажмите Открыть диспетчер задач .
- Отключите все запускаемые приложения со статусом Включено
- Перезагрузите компьютер.

Если позже вам потребуется восстановить настройки загрузки по умолчанию, откройте приложение «Конфигурация системы» и выберите Обычный запуск .
8. Удалите сторонние приложения
Получение Системе не удается найти указанный файл . Ошибка после запуска приложения может сигнализировать о конфликте программного обеспечения. Возможно, ваша программа конфликтует с другой, например, с двумя антивирусными программами с отдельными ядрами реального времени. Вам ничего не остается, кроме как удалить другое приложение с вашего компьютера.
- Щелкните правой кнопкой мыши кнопку Пуск и выберите Приложения и функции .
- Найдите и выберите программу из списка.
- Нажмите Удалить , а затем еще раз для подтверждения.
- Продолжить работу с мастером
- Перезагрузите компьютер.
Однако, если программа изменила настройки реестра, программа удаления Windows по умолчанию не поможет их восстановить. Вместо этого вам следует использовать программу удаления программного обеспечения , которая удаляет не только программу, но и все оставшиеся файлы и записи реестра.
9. Отключите внешние устройства
Конфликты также могут быть вызваны неподдерживаемыми периферийными устройствами, недавно подключенными к вашему компьютеру. Если вы недавно приобрели или получили в подарок новое оборудование, например адаптер Wi-Fi, новые наушники, веб-камеру или USB-накопитель, немедленно извлеките его из компьютера, а затем перезапустите, чтобы проверить, решило ли это проблему Система не может найти указанный файл ошибка.
Возможно, дело не в устройстве, а в вашем порту. Попробуйте изменить порты USB, если у вас есть несколько вариантов. В противном случае подключите многопортовый концентратор USB к компьютеру, а затем ваше устройство к концентратору, а не непосредственно к компьютеру. Иногда это срабатывает.
10. Запустите CHKDSK
CHKDSK (Проверить диск)-это внутренний инструмент Windows, которым можно управлять из среды командной строки. Это помогает устранить проблемы с повреждением жесткого диска и наличие битых секторов, которые могут помешать правильной работе вашего компьютера и в результате вызвать ошибку Система не может найти указанный файл .
Как использовать CHKDSK:
- Нажмите кнопку Пуск , введите Командная строка , выберите это приложение и нажмите Запуск от имени администратора
- Если Windows установлена на диске C: по умолчанию, введите
chkdsk c:/f/r. В противном случае не забудьте заменитьc:буквой раздела ОС
- Когда вас попросят запланировать CHKDSK при следующей перезагрузке системы, введите y и нажмите Enter
- Перезагрузите компьютер и дождитесь, пока CHKDSK выполнит свою работу.

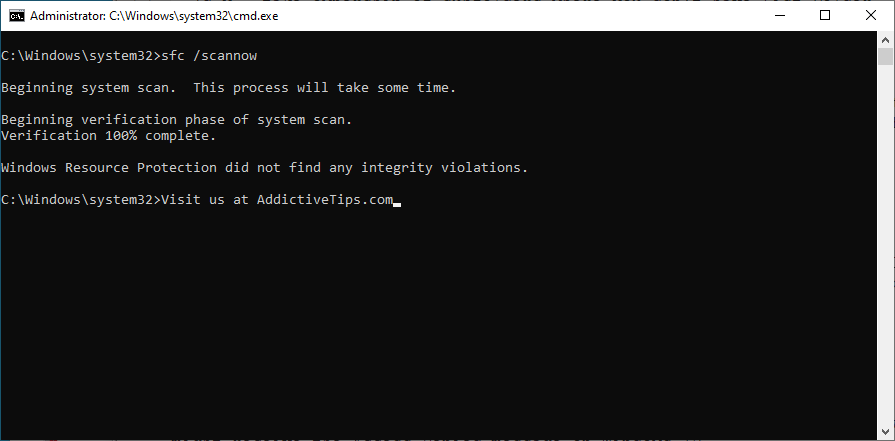
11. Запустите SFC
Если вы по-прежнему получаете сообщение об ошибке Система не может найти указанный файл после запуска инструмента CHKDSK, возможно, вам следует переключить свое внимание на систему, поскольку в ней могут быть поврежденные или отсутствующие файлы. SFC (проверка системных файлов) может помочь вам в этом внимание.
Как использовать SFC:
- Запустите Windows 10 в безопасном режиме.
- Нажмите клавиши Win + R и нажмите Enter, чтобы запустить командную строку.
- Напишите
sfc/scannowи нажмите Enter
- После завершения работы SFC перезагрузите компьютер.
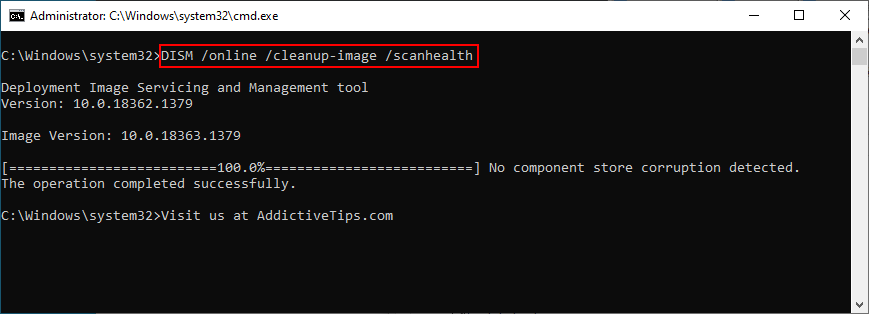
12. Запустите DISM
DISM (Обслуживание образов развертывания и управление ими)-более продвинутый инструмент, чем SFC, поскольку он может проверять целостность хранилища компонентов в файле образа Windows.
Как использовать DISM:
- Запустите Windows 10 в безопасном режиме.
- Откройте Командную строку
- Введите
DISM/online/cleanup-image/scanhealthи нажмите Enter
- Если он обнаруживает какие-либо ошибки, запустите
DISM/online/cleanup-image/restorehealth, чтобы избавиться от них. - После его завершения перезапустите Windows 10 в безопасном режиме.
- Откройте Командную строку и запустите SFC (
sfc/scannow) - Перезагрузите компьютер в обычном режиме.
13. См. Системный журнал
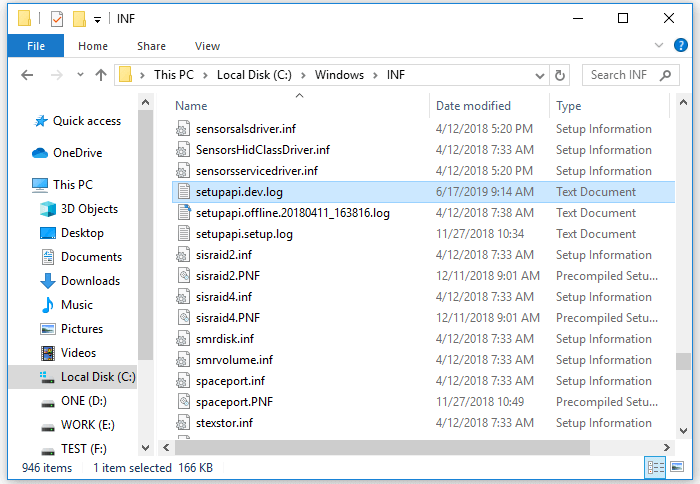
Вы можете узнать, какой именно драйвер устройства вызывает ошибку Система не может найти указанный файл , просмотрев файл системного журнала. Вот что вам нужно сделать:
- Нажмите клавишу Win + E , чтобы открыть Проводник Windows .
- Перейдите по следующему адресу:
% SystemRoot% INF
- Найдите и откройте файл setupapi.dev или setupapi.dev.log в Блокноте

- Нажмите Ctrl + F , введите система не может найти файл и нажмите Enter

- В FilePath скопируйте имя драйвера.
- Откройте веб-браузер и введите имя файла драйвера, чтобы узнать, какому устройству он принадлежит.
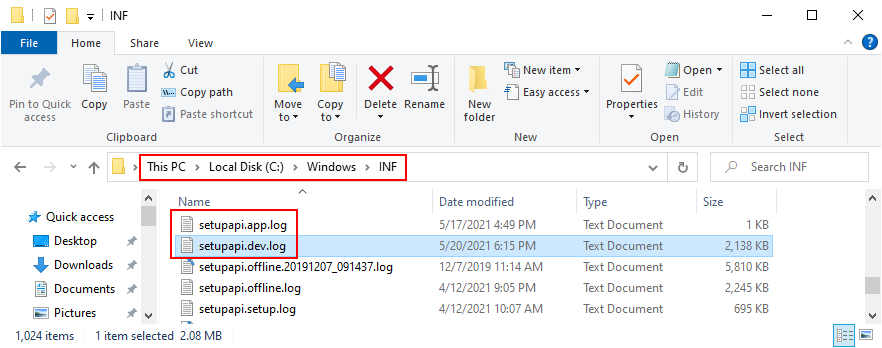
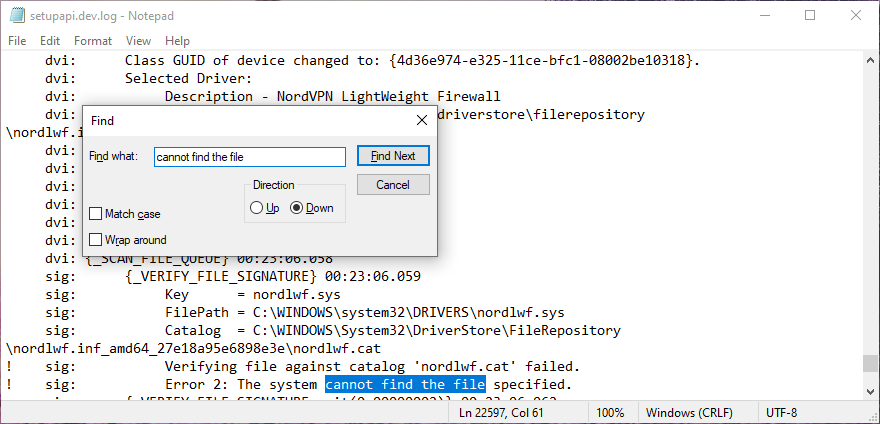
После определения виновного устройства вы можете предпринять дальнейшие действия в Диспетчере устройств (выполните следующие решения).
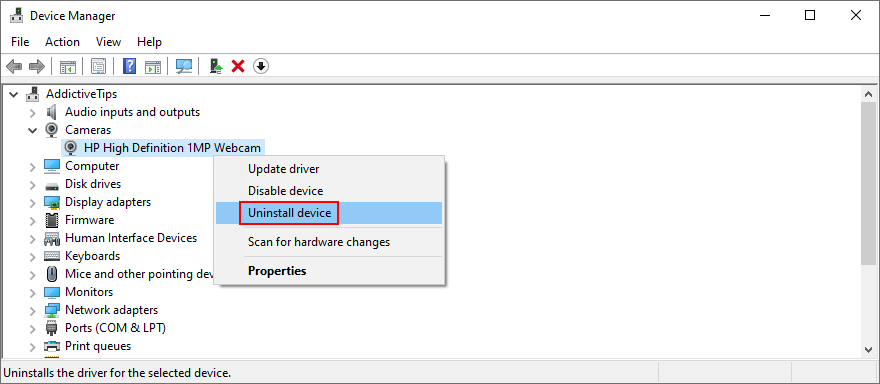
14. Быстро переустановите устройства
Принимая во внимание драйвер и устройство, обнаруженные в системном журнале, вам следует перейти в Диспетчер устройств , чтобы переустановить устройство. Если он не был правильно установлен на вашем ПК с Windows 10, этот метод должен исправить это. Вот что вам нужно сделать:
- Щелкните правой кнопкой мыши кнопку Пуск и выберите Диспетчер устройств
- Find the device and double-click it
- Switch to the Driver tab and click Driver Details
- Here you can double-check that the driver file matches the information you found in the system log
- Return to the main window of Device Manager
- Right-click the device and select Uninstall device

- Check Delete the driver software for this device and click Uninstall to confirm
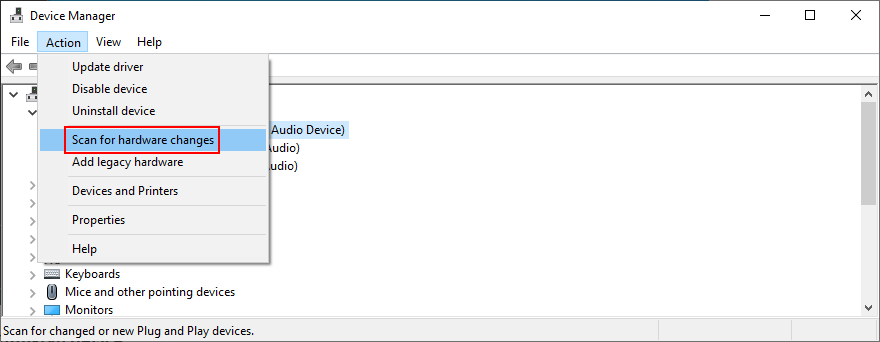
- Open the Action menu and select Scan for hardware changes

- If the device doesn’t reappear in Device Manager, reboot your PC since Windows will auto-reinstall the missing adapter
.
15. Update device drivers
It’s possible that the device is properly installed on your computer but its driver is outdated. The solution here is to update the obsolete drivers:
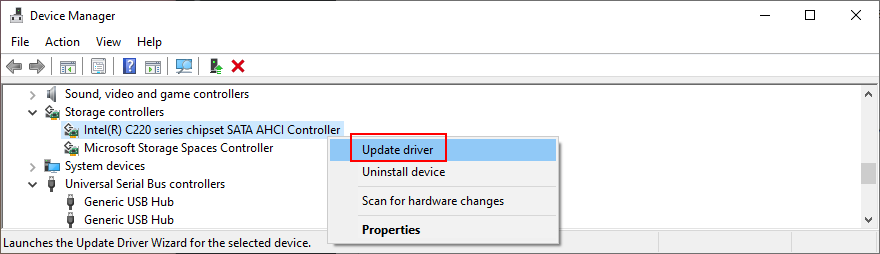
- Press Win key + R, type devmgmt.msc, and press Enter
- Right-click the device and select Update driver

- Click Search automatically for drivers and follow the on-screen instructions
If the online search doesn’t return any results, click Search for updated drivers on Windows Update. However, if you have already checked for system updates or the dedicated service doesn’t work, then you have to manually download and install drivers.
However, if you don’t want to risk installing an unsupported driver, it’s better to use a driver update tool. Besides, you can use it to update all your obsolete drivers at the same time, without risking compatibility issues.
16. Roll back drivers
If you have already downloaded an unsupported driver, you must roll it back to the previous version before performing the update. Here’s what you need to do:
- Click the Start button, search for Device Manager, and press Enter
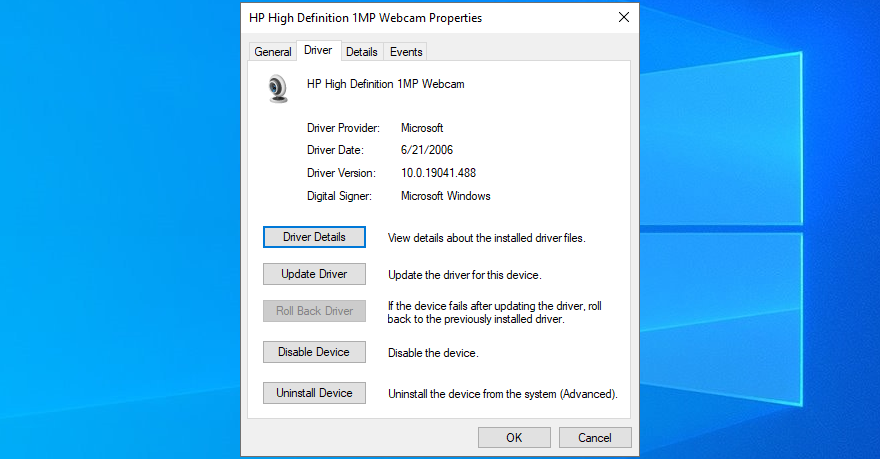
- Right-click a device and go to Properties
- Select the Driver section
- Click Roll Back Driver and follow the instructions. If the button is greyed out, you can skip this step since you can’t perform the rollback

17. Reinstall programs
Some software applications should be reset, repaired, or reinstalled, depending on the available operations. It certainly applies in the scenario where the The system cannot find the file specified error started appearing on your screen after a recent software change.
You have multiple options when it comes to Microsoft Store apps. Click the Start button, search for a program, and go to App settings. From that section, you can repair or reset the app with one click. And, if those two options fail, you should uninstall the app and reinstall it from Microsoft Store.
It’s simpler with regular software programs since the repair option rarely works. Instead, you can uninstall the application from Apps & Features, then download it again from its official website and proceed with the setup operation.
18. Check registry settings
If you can’t open files or launch applications due to the The system cannot find the file specified error, you should inspect registry settings to make sure that everything is in order. It’s pretty easy. Here’s what you need to do:
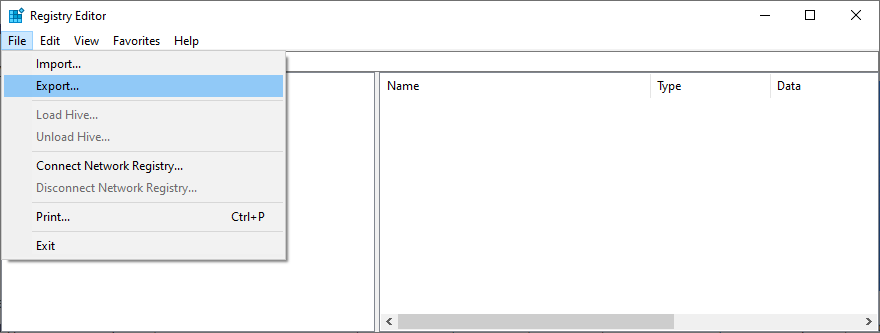
- Click the Start button, search for Registry Editor, and hit Enter to open this app
- Open the File menu and click Export

- Create a registry backup by setting a file name, picking a destination, and clicking Save. If you need to restore the initial registry configuration later, just double-click the.reg file
- Visit the following address:
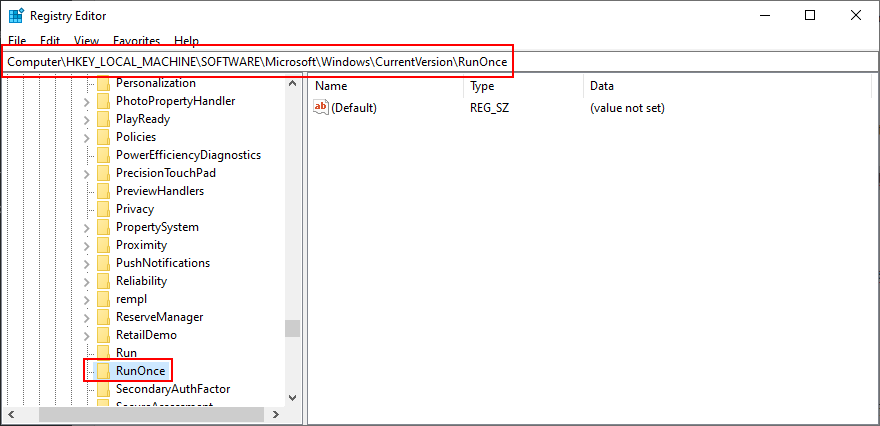
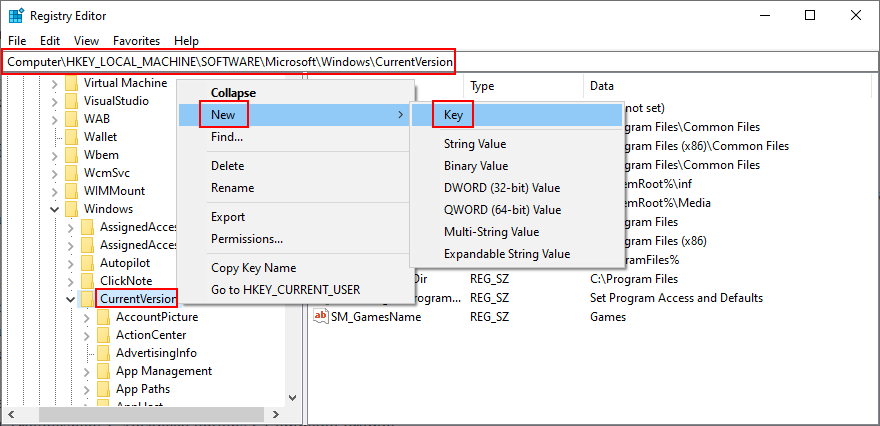
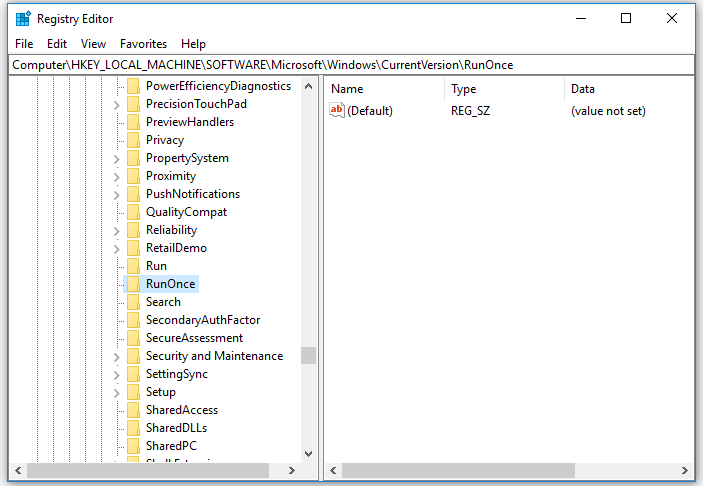
ComputerHKEY_LOCAL_MACHINESOFTWAREMicrosoftWindowsCurrentVersion
- Look for the RunOnce key (looks like a folder in the tree on the left)

- If the key doesn’t exist, right-click the CurrentVersion key and select New > Key
- Set the key name to RunOnce
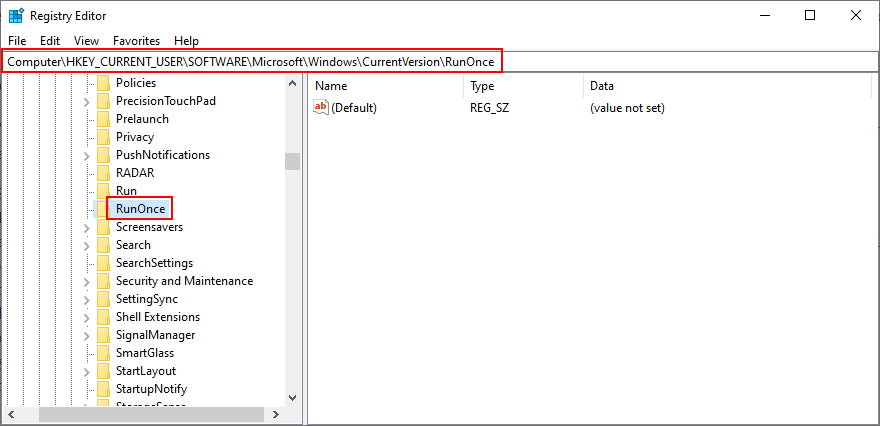
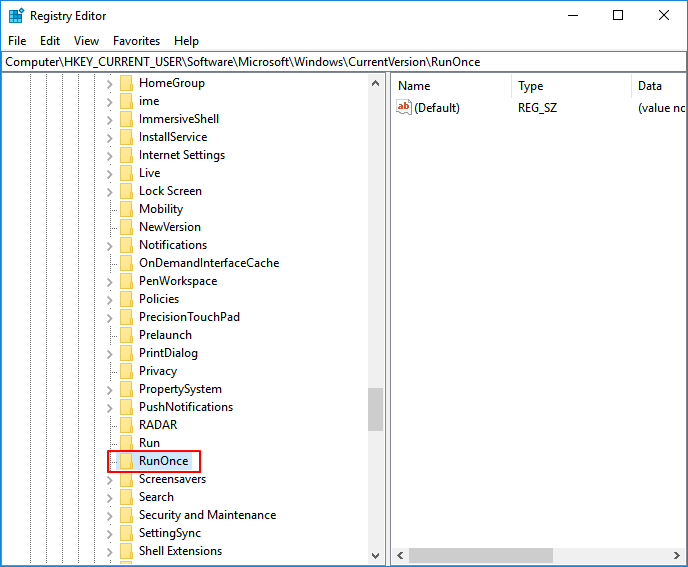
- Now, go to this location:
ComputerHKEY_CURRENT_USERSOFTWAREMicrosoftWindowsCurrentVersion
- Take the same steps: if the RunOnce key doesn’t exist, create it
- Exit Registry Editor
19. Restore the original registry settings
If the system registry suffered more modifications that you can’t identify, it’s easier to restore its configuration to factory values, which is more effective than using a registry cleaner. Here’s how to make it happen.
- Click the Start button, search for Registry Editor, and launch this tool
- Create a registry backup:
- Open the File menu and click Export
- Set a file name and destination
- Click Save to create a backup of the current registry settings
- Press the Windows key and click the power button to view power options
- While holding down the Shift key, click Restart to reboot Windows in troubleshooting mode
- Select Troubleshoot > Advanced options > Command Prompt
- Choose your PC account and enter your password to continue
- Write the following commands and hit Enter after each one:
-
cd %SystemRoot%System32config
-
ren %SystemRoot%System32configDEFAULT DEFAULT.old
-
ren %SystemRoot%System32configSAM SAM.old
-
ren %SystemRoot%System32configSECURITY SECURITY.old
-
ren %SystemRoot%System32configSOFTWARE SOFTWARE.old
-
ren %SystemRoot%System32configSYSTEM SYSTEM.old
-
copy %SystemRoot%System32configRegBackDEFAULT %SystemRoot%System32config
-
copy %SystemRoot%System32configRegBackDEFAULT %SystemRoot%System32config
-
copy %SystemRoot%System32configRegBackSAM %SystemRoot%System32config
-
copy %SystemRoot%System32configRegBackSECURITY %SystemRoot%System32config
-
copy %SystemRoot%System32configRegBackSYSTEM %SystemRoot%System32config
-
copy %SystemRoot%System32configRegBackSOFTWARE %SystemRoot%System32config
-
- Restart your computer
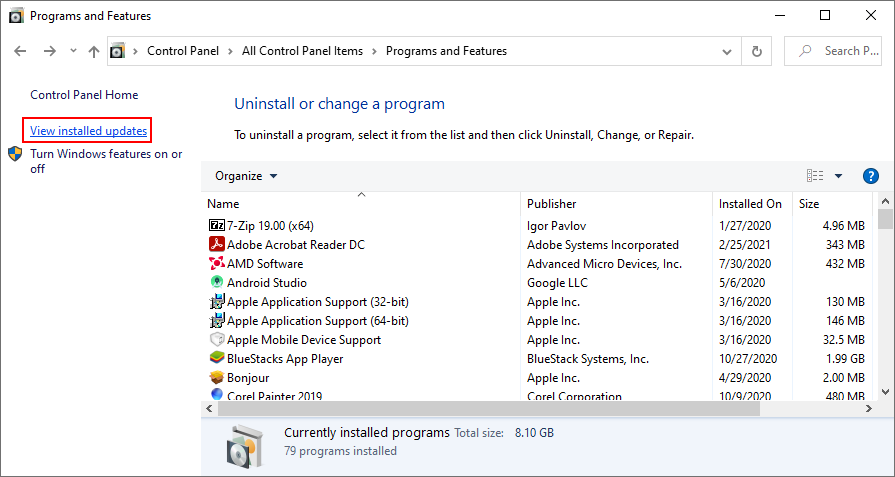
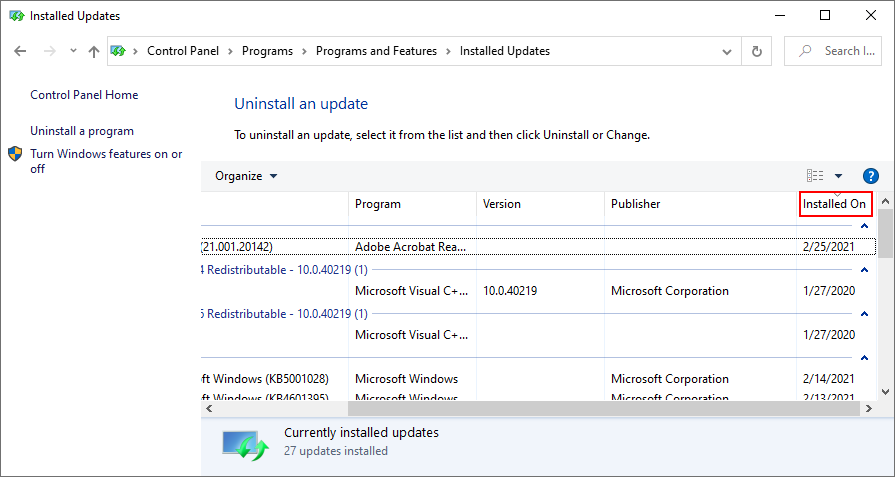
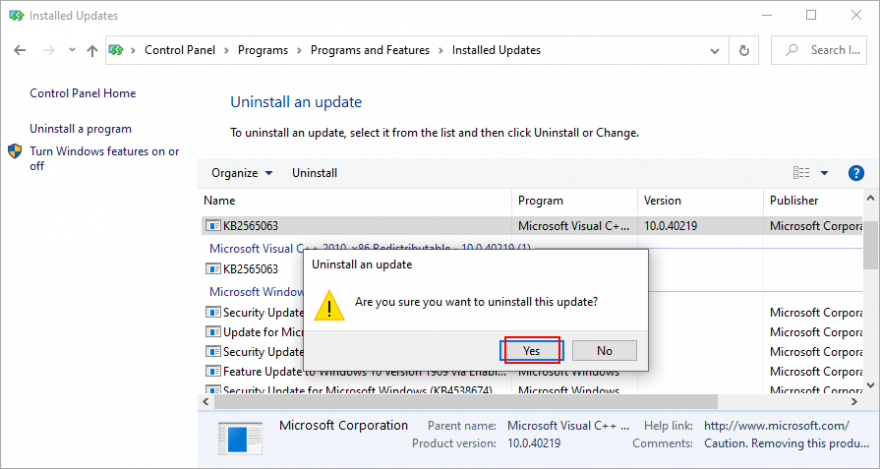
20. Uninstall system updates
Some Windows updates end up harming your computer and causing various problems, including the The system cannot find the file specified error. In this case, the best course of action is to remove the most recent system update. Here’s how:
- Press Win key + R, type appwiz.cpl, and hit Enter

- Click View installed updates

- To sort the updates by time of installed, click the Installed On column
- Search for the Microsoft Windows category
- Double-click the first update in that group
- When asked to confirm its uninstall, click Yes

- Restart your computer

If you can’t boot Windows due to the The system cannot find the file specified error, you can interrupt the startup sequence three times in a row to start Windows troubleshooting mode. Then go to Troubleshoot > Advanced Options > Uninstall Updates.
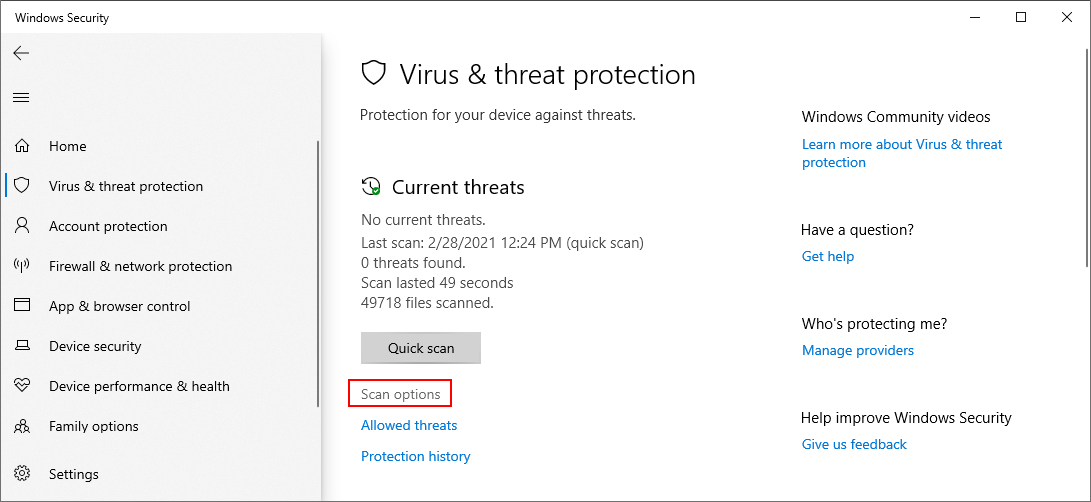
21. Check your computer for malware
A malware agent could have infected system files, thus preventing you from opening any files or launching applications. To fix this issue, you can resort to Windows Defender:
- Press the Win key, search for Windows Security, and open this app
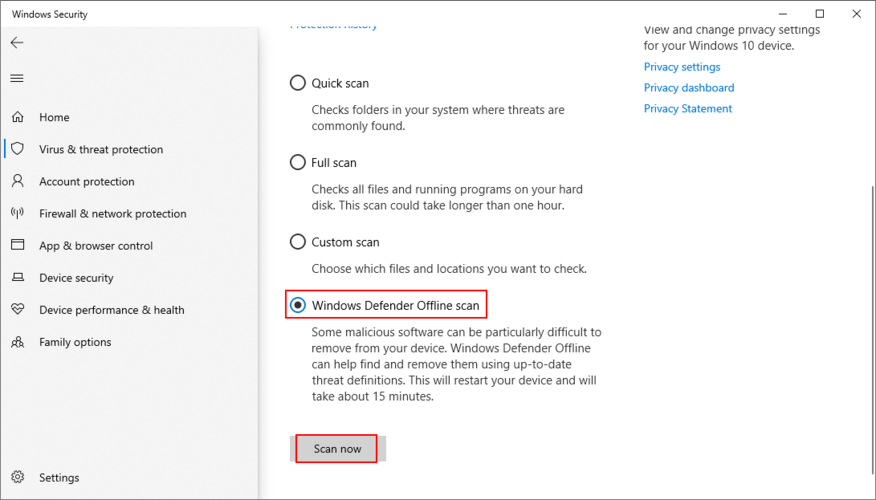
- Select Virus & threat protection

- Click Scan options

- Pick Quick scan and click Scan now

- If it doesn’t find any threats, choose Windows Defender Offline scan and click Scan now
- Allow Windows to quarantine or remove any suspicious files. If you think some of those files are safe, make sure to add them to the whitelist, in order to exclude them from any upcoming scans

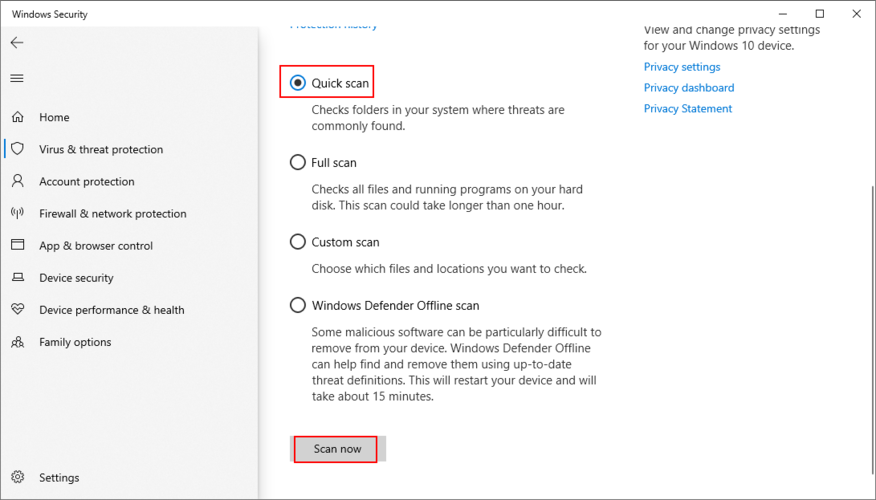
If you have a third-party security solution that you rely on, make sure to adjust the steps above.
22. Use a Linux live distro
You might think that your data will be lost forever due to this serious error. And it might be impossible to even perform a disk backup because Windows doesn’t recognize the selected files. If there’s a major problem with your OS that requires system reset, you can save your files with the help of a Linux live distro.
Simply put, you will be creating a USB flash drive that boots a Linux-based operating system (e.g. Ubuntu), in order to gain access to your files and copy them somewhere safe. Since it’s not Windows, you shouldn’t be getting the The system cannot find the file specified error anymore. Then, you can safely proceed with more dangerous scenarios that involve data loss, like disk formatting.
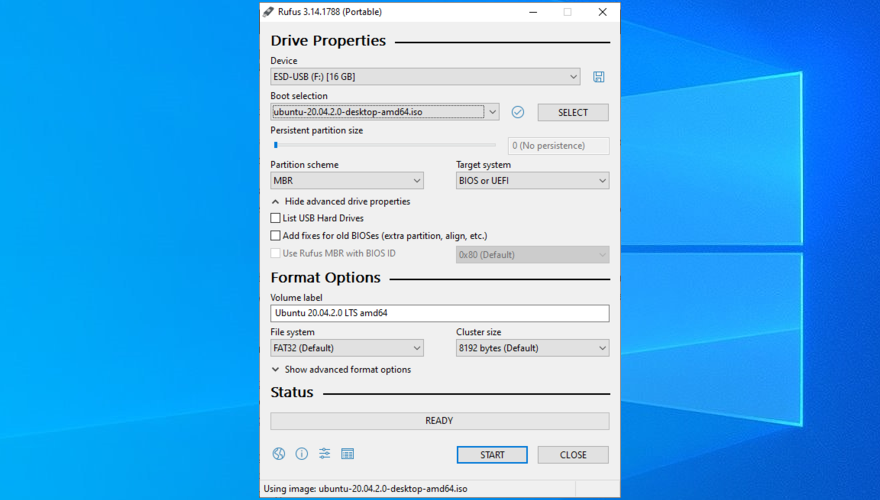
How to create a Linux live distro with Rufus:
- Download a Linux distro. If you can’t decide which, we suggest Ubuntu since it’s intuitive
- Connect a USB flash drive to your PC. Make sure it doesn’t contain any files you might need later since the disk will be formatted
- Download Rufus from the official website
- Install and run Rufus
- Choose the pen drive and set Boot section to Disk or ISO image
- Click SELECT and add the Ubuntu ISO
- Set Partition scheme to MBR
- At File system, select FAT32
- Click OK and wait for Rufus to create your Linux live distro drive
How to boot Linux from the USB flash drive:
- Keep the flash drive plugged into your PC
- Restart Windows
- Right after your display turns on and before Windows boots, press the key shown on the screen to enter the boot startup menu (e.g. F12)
- Select the USB storage drive and hit Enter
- Once Ubuntu loads, create a backup of your files
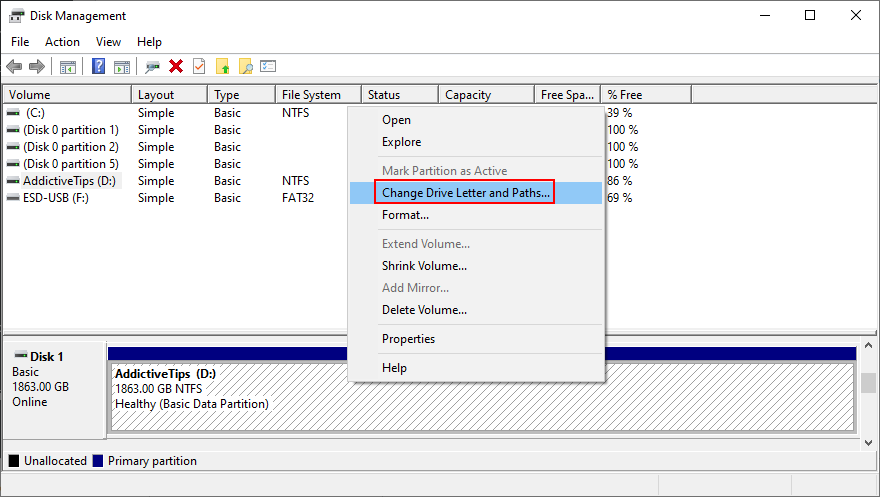
23. Change drive letters
You might be experiencing file access errors due to your HDD or SSD. For instance, if it doesn’t have a partition letter assigned, or if it shares the letter with another drive, you should immediately fix this problem. The simplest way to do this is by using Disk Management.
How to assign drive letters with Disk Management:
- Press Win key + R, type diskmgmt.msc, and press Enter
- In Disk Management, select the drive that’s giving you trouble
- Right-click the drive and select Change Drive Letters and Paths

- If the drive already has a letter
- Click Change
- Set a new drive letter
- Click OK
- If the drive doesn’t have a letter
- Click Add
- At Mount in the following empty NTFS folder, click Browse
- Set the new drive path by selecting an empty NTFS folder and click OK
- Then, click OK to confirm
- Quit to the desktop
However, if you can’t access Disk Management or if it doesn’t identify your drive, you can turn to the console environment.
How to assign drive letters with Command Prompt:
- Press Windows key + R, type cmd, then press Ctrl + Shift + Enter to launch Command Prompt with elevated rights
- Type
diskpartand hit Enter to use the partition manager built into Windows - Run
list volumeto view all current drives - Check out the number assigned to your disk or partition. Run
select volume #and use that number (e.g.select volume 4) - Write
assign letter=and add the new drive letter (e.g.assign letter=e). Hit Enter - Quit to the desktop
24. Format the partition
If changing the drive letter didn’t help get rid of the The system cannot find the file specified error, it’s time to format the partition. Keep in mind that it means losing everything saved there.
So, you should perform a backup before proceeding with this solution. If you can’t perform the backup in Windows, check out the previous solution on how to create a backup from a Linux distro.
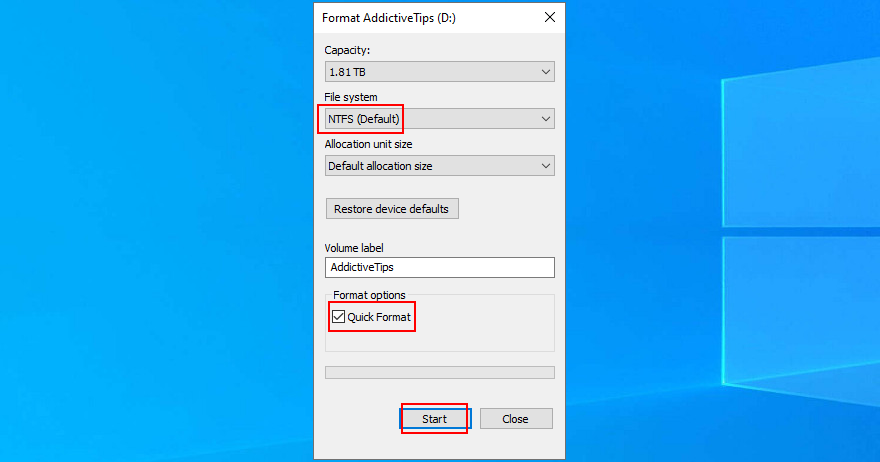
How to format a partition using Windows Explorer:
- Press Win key + E to open File Explorer on Windows 10
- Select the drive, right-click it, and choose Format
- At File system, select NTFS
- Leave Quick Format enabled
- Click Start


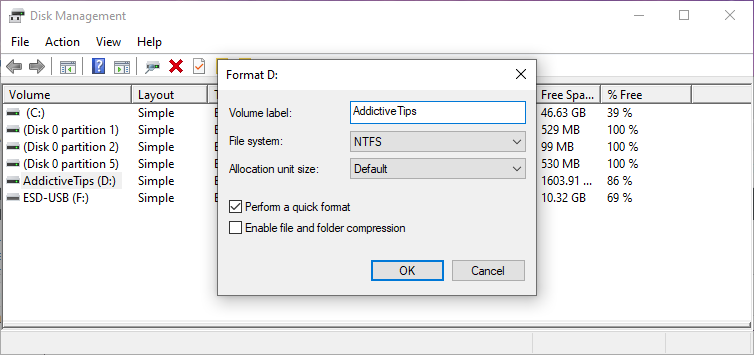
How to format a partition using Disk Management:
- Right-click the Start button and launch Disk Management
- Pick the partition, right-click it, and select Format
- Set File system to NTFS
- Leave Perform a quick format enabled
- Click OK

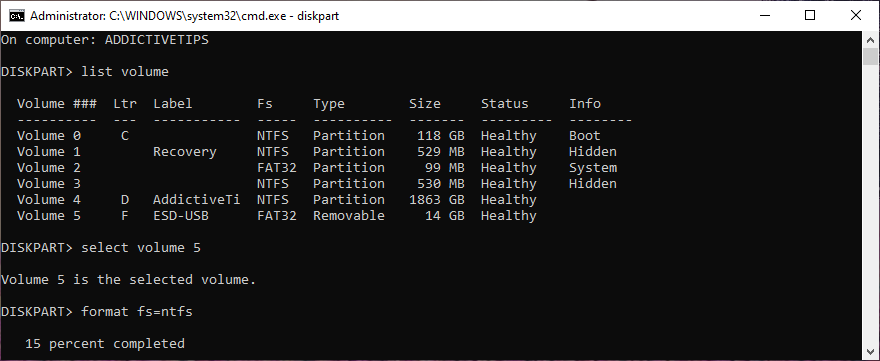
How to format a partition using Command Prompt:
- Press the Win key, search for Command Prompt, and click Run as administrator. If prompted by User Account Control, click Yes
- Type
diskpartand press Enter - Run
list volumeto view all volumes - Identify the number of your partition and use it when entering
select volume #(e.g.select volume 5) - Run
format fs=ntfsto format the partition as NTFS
25. Roll back the operating system
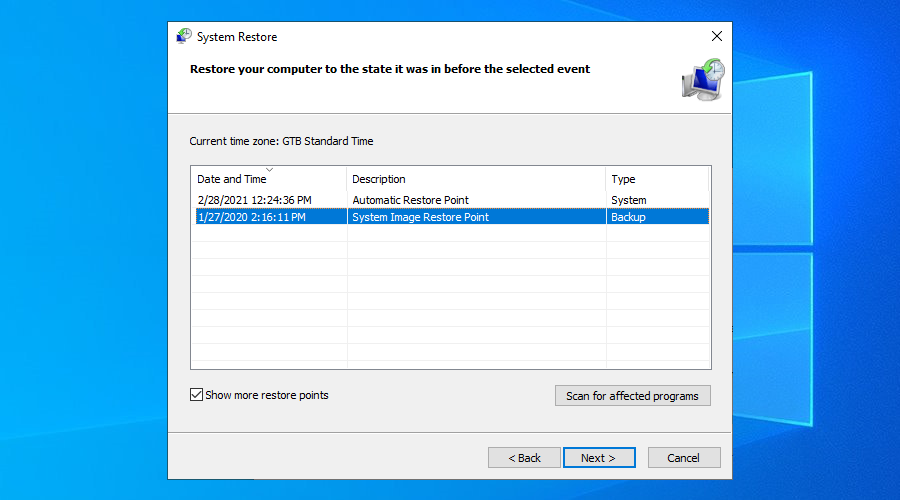
You can roll back Windows 10 to a restore point that was recorded before you started experiencing the The system cannot find the file specified error, thanks to System Restore. It means undoing all software modifications made to your computer that you can’t detect and which somehow led to file access and application launch issues. However, it automatically means that all programs you installed after the restore point was recorded will no longer exist, so you will have to install them again.
How to use System Restore:
- Sign in to Windows 10 with an administrator account
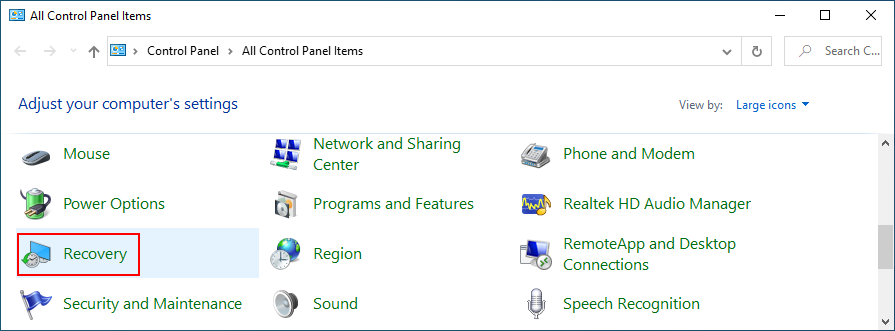
- Click the Start button, find Control Panel, and open this app
- Select Recovery

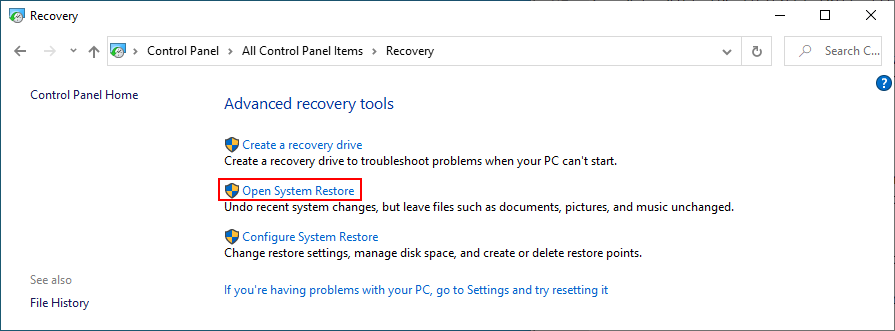
- Click Open System Restore
- Choose a restore point or click Show more restore points to get more options. Click Scan for affected programs to discover the exact applications you will have to reinstall

- After making a selection, click Next and follow the remaining steps
If you can’t boot Windows 10, interrupt the startup three times in a row to access system troubleshooting mode. Then, go to Troubleshoot > Advanced Options > System Restore.
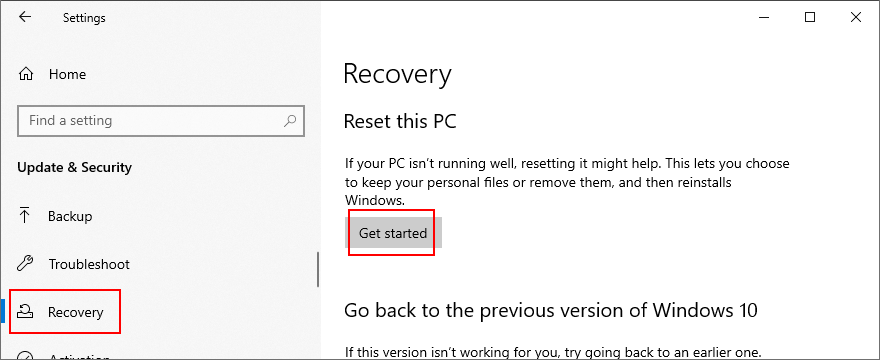
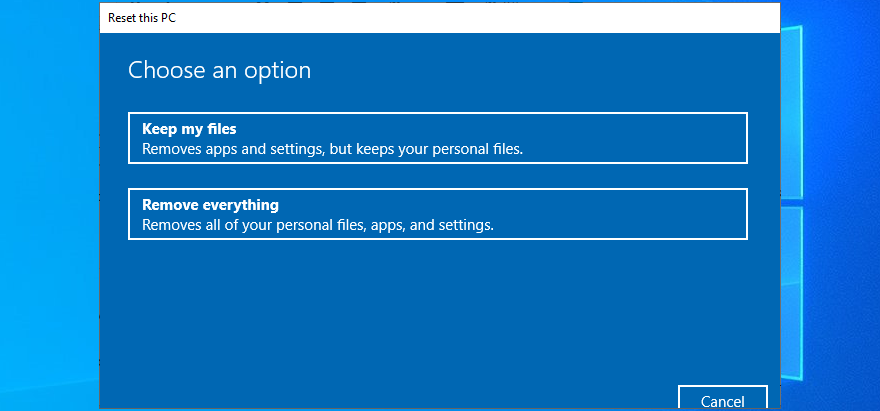
26. Reset Windows 10
If you still can’t shake off the The system cannot find the file specified error or if System Restore didn’t work, there’s nothing left to do except restore Windows 10 to factory settings. It means uninstalling all your applications and reverting the system configuration to default. But you can keep your personal files, so it’s not necessary to perform a backup.
How to reset Windows 10:
- Right-click the Start button and select Settings
- Click Update & Security and select Recovery
- At Reset this PC, click Get started

- Pick Keep my files and follow the remaining instructions

You can also turn your PC on and off three times to launch Advanced Startup mode before Windows boot. There, you can go to Troubleshoot > Reset your PC.
If you managed to get hold of your files by using the Linux live distro, we suggest performing a clean reset by selecting the Remove everything option instead of Keep my files.
Error The system cannot find the file specified can be fixed
To review, you can try to fix the The system cannot find the file specified error by restarting your PC, updating Windows 10, running the Windows Update troubleshooter, checking the Windows Update services, starting the OS in Safe Mode, disabling startup apps, running a clean boot, and uninstalling third-party applications.
It’s also a good idea to disconnect external devices, run CHKDSK, SFC and DISM, investigate the system log, reinstall devices, update or roll back drivers, reinstall programs, check registry settings or restore the registry to default, uninstall system updates, run a malware scan, use a Linux live distro, change drive letters, format partitions, use System Restore, and reset Windows 10.
How did you repair this error? Let us know in the comments below.
Quick fix: Use SFC to fix the system cannot find the file specified error

In Command Prompt, type the following command: sfc /scannow. Now press Enter.
After scanning and correcting errors, restart the computer and check if the «the system cannot find the file specified» error is fixed.
«The system cannot find the file specified»
«The system cannot find the file specified» is an error that may happen on Windows 10 or earlier versions and usually indicates an Error Code 0x80070002. The error may also occur under various conditions, but most people receive this prompt when they:
- Access a local hard drive, external hard drive, USB, and more in Disk Management
- Access files and folders on your computer
- Launch a program
- Install Driver
- Back up system
How to Fix «The system cannot find the file specified»
Depending on your situation, the solutions to the problem «The system cannot find the file specified» vary. Identify your situation and find the corresponding solutions below.
| Workable Solutions | Step-by-step Troubleshooting |
|---|---|
| Case 1. Error while accessing the drive | Recover data from the hard drive > fix the hard drive via Diskpart…Full steps |
| Case 2. Error while accessing folders | Check the system log file > look for files via Regedit > check for RTHDCPL in Registry key…Full steps |
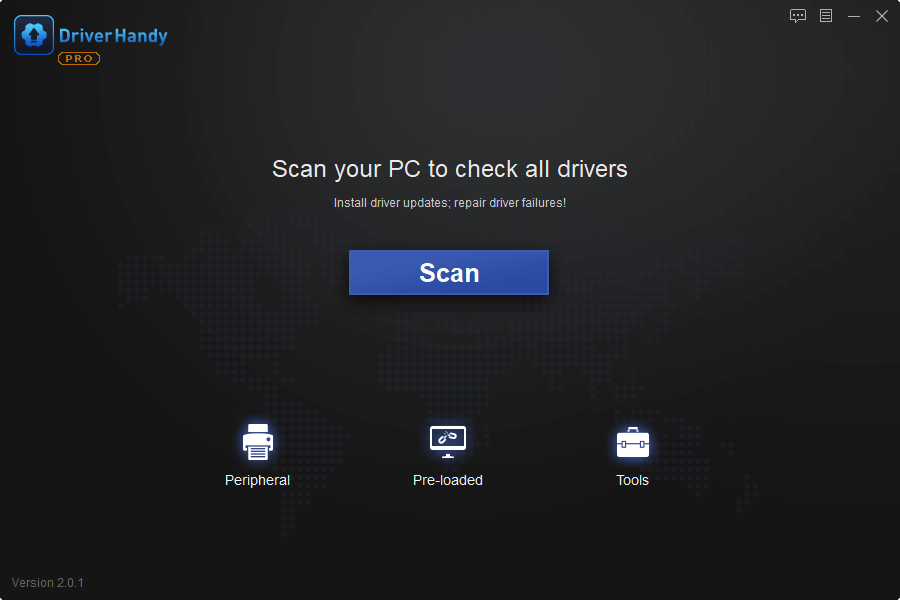
| Case 3. Error while launching programs | Click open EaseUS DriverHandy and click «Scan» to find all the outdated drivers…Full steps |
| Case 4. Error while installing drivers | Look for files via Regedit > check for RTHDCPL in the Registry key…Full steps |
| Case 5. Error while backing up system | Install the latest Windows updates > check Services settings…Full steps |
Situation 1. Receive «The system cannot find the file specified» While Accessing a Hard Drive
Most people encounter the «the system cannot find the specified file» error when trying to access or back up some data. This is because the file system of the target device is corrupted or damaged, making your hard drive, USB, or external hard drive inaccessible. To fix this error, you need to run the chkdsk command to repair the corrupted file system, using reliable data recovery software to return all lost data. Then, clean and re-partition the hard drive using the diskpart command in CMD.
First. Run CHKDSK Command to Fix «System Cannot Find File Specified» Device
- Right-click the Start button, type cmd in the Search, and select Command Prompt (Admin).
- Type chkdsk x: /f /r (x represents your target drive) into the Command Prompt window and press Enter Wait while chkdsk tries to repair the corrupted file systems.
- Type exit and press Enter to leave this command.
After this, you can try to re-open the drive to find your saved files. If files are missing or not showing up, move to the following tutorial to recover data from your storage device using reliable data recovery software
Next. Recover Data from Problematic Hard Drive or Device
Whether it’s an external storage device or a local hard drive, you can use EaseUS Data Recovery Wizard to recover data from the device. It can retrieve deleted/formatted/lost files and get back data from formatted or inaccessible hard drives. To regain access to your precious files:
Step 1. Run EaseUS Data Recovery Wizard. Choose the drive where you lost files and start scanning. This software allows you to recover lost data from all devices, including HDD, SSD, USB drive, SD card, pen drive, camera, etc.

Step 2. Browse the full scan results. You can choose the file type you need by clicking on the file type filter. EaseUS data recovery software supports 1000+ file types like photos, videos, documents, emails, audio files, and many more.

Step 2. Browse the full scan results. You can choose the file type you need by clicking on the file type filter. EaseUS data recovery software supports 1000+ file types like photos, videos, documents, emails, audio files, and many more.
Step 3. Select the files you want to preview. Click «Recover» and set a storage location to save the recovered data.

Last. Fix the Hard Drive via Disk Clean Diskpart
Now that you have kept your files safe, but the device is still not accessible, you can follow the steps below to fix the device without any worries.
Step 1. Run Command Prompt as an administrator.
Step 2. Enter diskpart and click «Yes» to allow this app to make changes on the computer.
Step 3. Enter the following commands one by one:
- list disk
- select disk 1 (Replace «1» with the number of your problematic disk)
- list disk (Now you will see a star in front of the disk you selected)
- clean (Then you will receive a notification asking you to insert a disk. Click «Cancel». Repeat the «clean» command until you succeed.)
Step 4. If you have successfully cleaned your disk, enter the following commands in order:
- list disk
- select disk X
- create partition primary
- select partition 1
- active
- format fs=fat32 quick («fs» means the file system you want to assign to the partition, be it FAT32, NTFS, or exFAT. «quick» indicates «quick format».)
If the process goes smoothly, you can now access your hard drive or USB drive and use it for data storage again.
Situation 2. Get the Prompt «The system cannot find the file specified» While Accessing Files/Folders
You will also see the error message when you try to open a folder or file by double-clicking it. There are three solutions to this situation.
Method 1. Check the System Log File
Step 1. Navigate to the C:/Windows/inf directory and open the Inf folder.
Step 2. Locate the setupapi.dev or setupapi.dev.log file and open it.
Step 3. Press «Ctrl + F» hotkey and type cannot find the file in the search.
Step 4. Press «Enter» to run the search. You should get the missing file.
Step 5. Copy and paste it into the Windows/inf folder.
Step 6. Reinstall the hard disk driver and reboot the system.
Method 2. Look for Files via Regedit
Step 1. Press «Windows + R» and enter regedit. If there is a prompt asking for permission, click «Yes».
Step 2. Go to HKEY_LOCAL_MACHINESOFTWAREMicrosoftWindowsCurrentVersion and check if there is «RunOnce». If not, add it manually.
Step 3. Go to HKEY_CURRENT_USERSoftwareMicrosoftWindowsCurrentVersion and check whether there is «RunOnce». If not, create it manually.
Step 3. Go to HKEY_CURRENT_USERSoftwareMicrosoftWindowsCurrentVersion and check whether there is «RunOnce». If not, create it manually.
Step 4. Quit Registry Edit, restart your computer, and install hard disk drivers again.
Method 3. Check for RTHDCPL in Registry Key
Step 1. Press «Windows + R» and enter regedit. If there is a prompt asking for permission, click «Yes».
Step 2. Go to HKLMSoftwareMicrosoftWindowsCurrentVersionRun and look for RTHDCPL. If it doesn’t exist, check for «Run» property and set the Admin-user permission as «Full Control», press «OK» to continue.
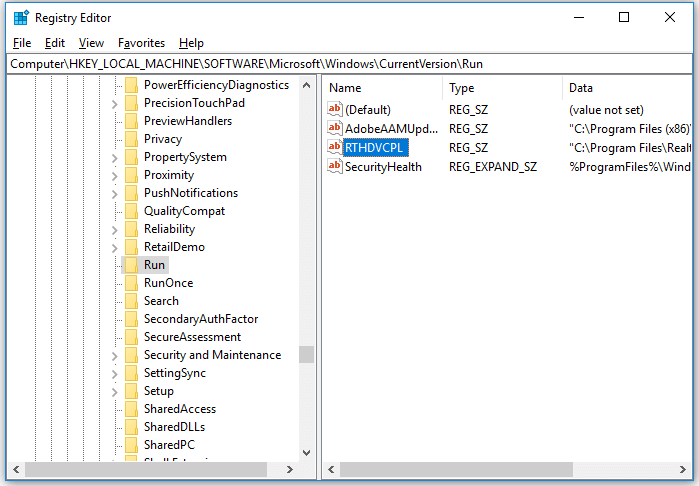
Be careful not to delete content from your registry since it may result in severe issues on your computer.
Situation 3. See the Prompt Saying, «The system cannot find the file specified» While Launching Programs
This one seems to occur frequently among users. Apply one of the three methods below to have a try.
Method 1. Update Your Hard Disk Driver
In this method, you will know a utility that is called, EaseUS DriverHandy. This tool can help you update all drives with one click. It can automatically scan all your outdated drives and update these drivers automatically. It can free your hands from the complex updating process. Now, download it to try.
With the help of EaseUS DriverHandy, you can have:
- Better audio and sharper graphics
- Less freezing and crashing
- Smoother browsing and downloading
- Fewer hardware and system issues
Method 2. Reinstall the Program
Step 1. Quit the program.
- Right-click on your taskbar and choose «Task Manager.»
- Under the Processes tab, select the program and choose «End Task.»
Step 2. Reinstall your program
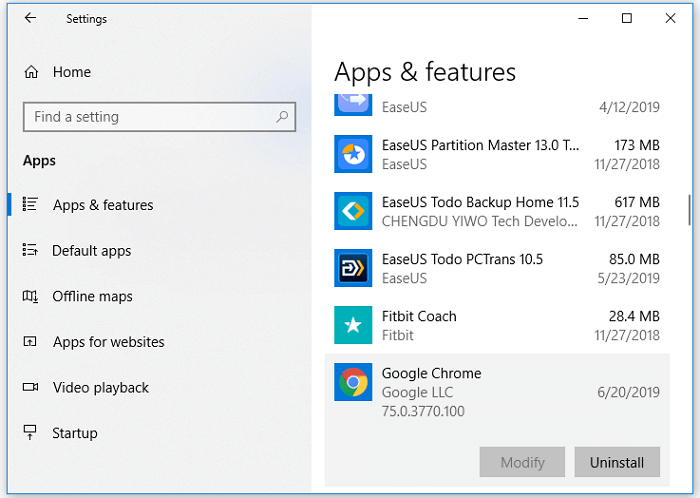
- Go to «Windows Settings» > «Apps» > «Apps & features»
- Click the problematic program and choose «Uninstall.»
- Go to Microsoft Store, download the application, and install it again.
Step 3. Restart your computer.
Method 3. End nginx.exe Process
You may feel unfamiliar with nginx.exe, which is an essential Windows process. The notification of the «The system cannot find the find specified» error may result from the fact that the Windows OS starts or restart the nginx.exe abnormally. To fix it:
Step 1. Right-click on your taskbar and choose «Task Manager».
Step 2. Under the Processes tab, select nginx.exe and choose «End Task.»
Step 3. Download nginx.exe again and restart it.
Situation 4. Receive «The system cannot find the file specified» While Installing Drivers
If you receive the notification while installing a driver on your PC, you can try method 2 or 3 in Situation 2 to eliminate the «The system cannot find the file specified» error.
Situation 5. Get the Error Message «The system cannot find the file specified» While Backing Up System
If your condition fits this situation, you have several options to try. In addition to trying method 3 in Situation 3, you can also try the two tips detailed below.
Method 1. Install Windows updates
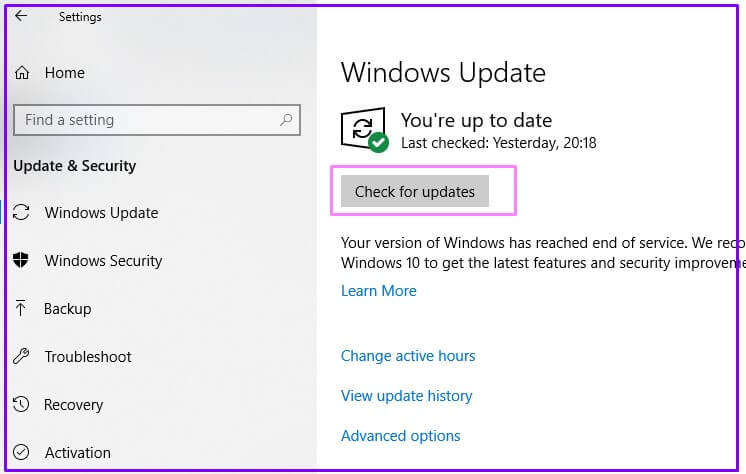
If you haven’t updated Windows for a long time, the «The system cannot find the file specified» error signifies that it’s about time to install all pending updates. For this purpose, you have to:
Step 1. Press the «Windows + I» keys and select Update & Security.
Step 2. Click «Check for Updates» and wait.
Step 3. When the list of available updates is revealed, install all of them.
Step 4. Repeat the same procedure several times to ensure that all needed updates have been installed.
Step 5. Don’t forget to restart the system to finish the installation of updates.
If you find files are missing after the Windows update, you can restore the files with the help of the EaseUS data recovery tool. This free tool allows you to recover lost files in Windows 10, 8 or 7, etc., due to the system upgrade, system crash, careless deleting, or virus attacking within three simple steps.
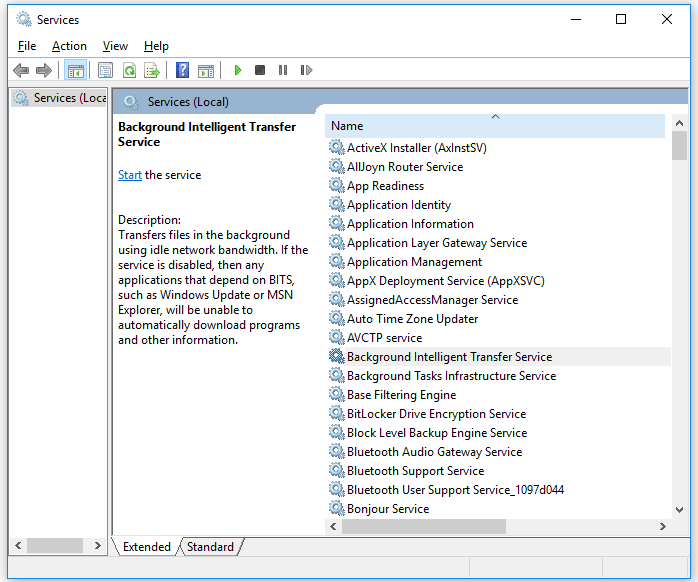
Method 2. Check Services Settings
Step 1. Go to the Start menu and type services.
Step 2. Go to «Background Intelligent Transfer Services», right-click it, and set the «Startup type» to «Automatic» or «Automatic (Delayed Start)», then click «Start».
Step 3. Go back to find «Cryptographic Services» and «Windows Update», then set their «Startup type» to «Automatic», too.
Step 4. Don’t forget to click «Start» to initiate the service and click «Apply» > «OK».
Method 3. End nginx.exe Process
You may feel unfamiliar with nginx.exe, which is an essential Windows process. The notification of the «The system cannot find the find specified» error may result from the fact that the Windows OS starts or restart the nginx.exe abnormally. To fix it:
Step 1. Right-click on your taskbar and choose «Task Manager».
Step 2. Under the Processes tab, select nginx.exe and choose «End Task.»
Step 3. Download nginx.exe again and restart it.
Situation 4. Receive «The system cannot find the file specified» While Installing Drivers
If you receive the notification while installing a driver on your PC, you can try method 2 or 3 in Situation 2 to eliminate the «The system cannot find the file specified» error.
Situation 5. Get the Error Message «The system cannot find the file specified» While Backing Up System
If your condition fits this situation, you have several options to try. In addition to trying method 3 in Situation 3, you can also try the two tips detailed below.
Method 1. Install Windows updates
If you haven’t updated Windows for a long time, the «The system cannot find the file specified» error signifies that it’s about time to install all pending updates. For this purpose, you have to:
Step 1. Press the «Windows + I» keys and select Update & Security.
Step 2. Click «Check for Updates» and wait.
Step 3. When the list of available updates is revealed, install all of them.
Step 4. Repeat the same procedure several times to ensure that all needed updates have been installed.
Step 5. Don’t forget to restart the system to finish the installation of updates.
If you find files are missing after the Windows update, you can restore the files with the help of the EaseUS data recovery tool. This free tool allows you to recover lost files in Windows 10, 8 or 7, etc., due to the system upgrade, system crash, careless deleting, or virus attacking within three simple steps.
Method 2. Check Services Settings
Step 1. Go to the Start menu and type services.
Step 2. Go to «Background Intelligent Transfer Services», right-click it, and set the «Startup type» to «Automatic» or «Automatic (Delayed Start)», then click «Start».
Step 3. Go back to find «Cryptographic Services» and «Windows Update», then set their «Startup type» to «Automatic», too.
Step 4. Don’t forget to click «Start» to initiate the service and click «Apply» > «OK».
The Bottom Line
Since the error message «The system cannot find the file specified» may appear in many situations, it’s almost impossible to include all the solutions in one article. Thus, we have presented you with four commonest situations and the most effective fixes for them. Hope one of the tips above can fix «The system cannot find the file specified» for you successfully.
Windows 7 Enterprise Windows 7 Home Basic Windows 7 Home Premium Windows 7 Professional Windows 7 Starter Windows 7 Ultimate More…Less
Symptoms
After you back up files by using Windows Backup on a Windows 7-based computer, you receive a notification that resembles the following:
Check your backup results
The backup completed but some files were skipped.
When you click the Options button that is next to the notification, you receive the following message:
Check your backup results
The backup completed but some files were skipped.
View skipped files
When you click the View skipped files link, you see one of the following error logs.
Scenario 1:
Backup encountered a problem while backing up file C:WindowsSystem32configsystemprofile<folder Name>. Error:(The system cannot find the file specified. (0x80070002))
Scenario 2:
Backup encountered a problem while backing up file C:Users<User Name>AppDataLocalLow. Error:(The system cannot find the file specified. (0x80070002))
Backup encountered a problem while backing up file C:Users<User Name>Contacts. Error:(The system cannot find the file specified. (0x80070002))
Backup encountered a problem while backing up file C:Users<User Name>Searches. Error:(The system cannot find the file specified. (0x80070002))
Scenario 3:
Windows Backup will fail with error code 0x80070002, «The system cannot find the file specified.» In this scenario, either of the following issues occurs:
-
The computer stops responding.
-
The copy operation stops.
Cause
Scenario 1 cause
This issue occurs if you back up a library that contains custom folders that are located under your user profile.
Scenario 2 cause
This issue occurs if the following conditions are true:
-
Windows Backup tries to back up files in the LocalLow, Contacts, and Searches folders.
-
These folders are not present on your computer.
Note These folders are created only if certain applications are installed on the computer.
Scenario 3 cause
This issue occurs if the following conditions are true:
-
The computer has an NVIDIA USB Enhanced Host Controller Interface (EHCI) chipset.
-
The computer has at least 4 GB of RAM.
-
You try to copy data from the computer to an external USB storage device.
Notes
-
This issue may also occur when you are using USB devices other than storage devices.
-
This issue may also occur if you perform other input/output (I/O) operations on the USB storage device. In this situation, the I/O operations fail.
Resolution
To resolve this issue, use one of the resolution methods that are listed for your scenario.
Scenario 1 resolution
To resolve this issue, take one of the following actions:
-
Ignore the error message.
Note The custom library files that are stored in your user profile will not be backed up.
-
Move the library folder from the user profile path to a location outside the user profile path. For example, move the folder to the C:MyLibraries folder.
-
Exclude the library from the list of files that Windows Backup backs up. Then, include the original location of the content in the library in the backup list.
-
Move the library folder to a location other than the user profile folder. Then, add a link to the moved folder from the library. Make sure that the library is included in the backup.
To do this, follow these steps:
-
Click Start, and then click your user name.
-
Right-click the folder that you want to move, and then click Cut.
-
On the navigation pane, expand Computer, locate the place where you want to store the folder, and then paste the folder in that location.
-
Right-click the folder that you moved to the new location, and then click Copy.
-
Click Start, click your user name, right-click any empty area in the folder, and then click Paste shortcut.
Note To store the folder in a location other than a folder in your user profile, you may have to create a new folder. To do this, browse to the root of the drive in Windows Explorer, click New Folder on the Windows Explorer menu, and then edit the folder name. For example, rename the folder «MyLibraries.»
-
Scenario 2 resolution
You can safely ignore this error message.
However, you can also use one of the following methods to eliminate this error message during future backup operations:
-
Create the missing LocalLow, Contacts, and Searches folders that are listed in the error message.
-
Exclude the folders from the files to back up in the Backup settings, and then include those folders in their original location. To exclude the folders in the additional locations and to include those folders in the original location, follow these steps:
-
In Control Panel, open Backup and Restore.
-
In the Backup section, click Change settings.
-
In the Set up backup dialog box, click Next.
-
In the What do you want to back up dialog box, click Let me choose, and then click Next.
-
Expand Data Files, expand <your user name> Libraries, expand Additional Locations, and then click to clear the AppData folder, Contacts, and Searchescheck boxes.
-
Expand Computer, expand the item for your system drive (for example, expand Local Disk (C:)), expand Users, expand <your user name>, and then click to select the AppData, Contacts, and Searchescheck boxes if they exist.
-
Click Next, and then click Save settings and exit.
-
In Backup and Restore, click Back up now to perform a new backup. The backup operation should complete without errors.
-
Scenario 3 resolution
For information about how to resolve this issue, see the following Microsoft Knowledge Base article:
976972 You encounter problems when you move data over USB from a Windows 7 or Windows Server 2008 R2-based computer that has an NVIDIA USB EHCI chipset and at least 4GB of RAM
Need more help?
Want more options?
Explore subscription benefits, browse training courses, learn how to secure your device, and more.
Communities help you ask and answer questions, give feedback, and hear from experts with rich knowledge.
Maybe you’re already familiar with this: you want to create a system image, install a driver or access files, but then the Windows error “The system cannot find the file specified” pops up. Often, this error message results from corrupted system files, update errors or missing drivers. We’ll show you some solutions to this error.
Contents
- How to resolve the Windows error “The system cannot find the file specified”
- Solution 1: Check the system log files
- Solution 2: Change the registry key
- Solution 3: Update or reinstall a driver
- Update a driver
- Reinstall a driver
- Solution 4: Delete the ProfileImagePath key
- Solution 5: Use SFC and DISM
Nobody likes seeing them, because they almost always mean effort and problems: Windows error codes like 0x80004005 or 0x80070057. Another commonly seen error is “The system cannot find the file specified”, which usually occurs in conjunction with the update error code 0x80070002 and when creating a system image. Unfortunately, it’s not possible to generalize reasons for this error. The cause can be missing drivers, incorrect registry keys or corrupt or missing system and update files. The following solutions can help to solve the problem.
How to resolve the Windows error “The system cannot find the file specified”
If your computer is causing problems, the standard advice is to restart it. If you get the Windows error “The system cannot find the file specified”, try the following methods first:
- Restart your PC: Restart your computer and check if the error still occurs.
- Windows Troubleshooting: Open Windows “Troubleshooting Settings” via the Windows search line and select the Windows area where the error occurs under “Additional Troubleshooting”.
- Antivirus scan: Use reliable antivirus programs to detect and remove malware because error messages can also occur due to malware.
If these standard solutions don’t help, try the following five solutions:
Solution 1: Check the system log files
Check if there is a problem with the system log files. To do this, proceed as follows:
Step 1: In Explorer, go to the C:/Windows/inf directory and open the “Inf” folder.
Step 2: Now locate the setupapi.dev (sometimes setupapi.dev.log) file and double-click on it.
Step 3: Press [Ctrl] + [F] to bring up the search box. Type “cannot find the file” or “cannot find the file specified” into it and press [Enter]. This way, you’ll find out which file is missing or not found.
Step 4: Copy the found file and paste it into the “Inf” folder.
Step 5: Now reinstall the affected driver and reboot.
Solution 2: Change the registry key
In some cases, it may help to change a missing or incorrect registry key as follows:
Step 1: Open the command line with [Windows] + [R] and enter the CMD command “regedit” to open the registry.
Step 2: Before you make any changes to the registry, you should always make a backup copy of the current registry file. To do this, go to “File” and “Export”. Enter a name for the backup file, select “All” and click “Save”. In case of emergency, you can use the backup to restore the registry.
Step 3: Now enter the following key in the registry editor in the bottom left corner: “HKEY_LOCAL_MACHINE\SOFTWARE\Microsoft\Windows\CurrentVersion”.
Step 4: Look for a key named “RunOnce” there. If it doesn’t exist, click on “CurrentVersion”, go to “New” and to “Key”.
Step 5: Now enter “RunOnce” as the name of the key.
Step 6: Access “HKEY_LOCAL_MACHINE\SOFTWAREMicrosoft\Windows\CurrentVersion”, expand the entry and check if “RunOnce” is now present.
Step 7: If the key is present, exit the registry and reboot.
Solution 3: Update or reinstall a driver
If the error occurs in connection with a driver, you can try to update the driver as follows:
Update a driver
Step 1: Type “Device Manager” into the Windows search line and click the result.
Step 2: Now find the device that is causing the error and expand the line.
Step 3: Right-click on the device in question and select “Update Driver”.

Reinstall a driver
Step 1: In the Device Manager, select “Uninstall Device” instead of “Update Driver” and check “Delete driver software for this device” in the menu window. Make sure to deactivate or disconnect the corresponding device from the computer beforehand.
Step 2: Now close the Device Manager and restart the computer. Windows will then try to reinstall the device and its drivers.
Solution 4: Delete the ProfileImagePath key
If the error occurs when creating a system image or a backup, you can try deleting the “ProfileImagePath” key:
Step 1: Type “Registry Editor” into the Windows search line to open the registry.
Step 2: Call up the following path: “HKEY_LOCAL_MACHINESOFTWAREMicrosoftWindowsNTCurrentVersionProfileList”.
Step 3: Open the “ProfileList” item.
Step 4: Now check each subkey. If one is empty or has no value for “ProfileImagePath”, you can click on it and remove it with “Delete”.
Solution 5: Use SFC and DISM
The DISM (Deployment Image Servicing and Management) and SFC (System File Checker) repair tools are also among the standard solutions to error messages. Both check and repair damaged or missing system files:
Step 1: Open the command line as an administrator with [Windows] + [R], “cmd” and [Ctrl] + [Shift] + [Enter].
Step 2: Enter the CMD command “sfc/scannow” and confirm with [Enter].
Step 3: Then enter the commands “DISM.exe/Online/Cleanup-image/Scanhealth” and “DISM.exe/Online/Cleanup-image/Restorehealth” and confirm each command with [Enter].
Step 4: Check to see if the error message is gone after a restart.
Since the reasons for the error “The system cannot find the file specified” can vary, you should go through the solutions step by step to see which one is suitable or works best. Be careful here as incorrect changes to the registry can permanently affect the system. If these solutions don’t help, the best option is to reset to a previous restore point. To do this, go to “System and Security” > “Security and Maintenance” > “Restore”. Finally, you have the option to reset Windows 10 or reset Windows 11. However, all saved data and installed programs will be lost. Therefore, be sure to create a backup beforehand.
$1 Domain Names
Register great TLDs for less than $1 for the first year.
Why wait? Grab your favorite domain name today!
Matching email
SSL certificate
24/7/365 support
Related articles

Change font size in Windows 11: here’s how
Are you struggling with the font size in Windows 11? Luckily, you can change the text size via the “Accessibility” menu in the Windows settings. However, as of the Windows 10 Creators Update (1703) and Windows 11, this will result in scaling of all display items. App windows and menus are automatically adapted. Find out how to change the font size in Windows 11.
Change font size in Windows 11: here’s how

Windows 11: virtual desktops – definition and tutorial
Has your desktop run out of space for additional shortcuts? Got too many different applications and windows launched that you are on the verge of losing track? The Windows 11 “Virtual Desktop” is the perfect solution. In just a few steps, you can create theme-specific interfaces for different tasks and use cases. Read on to find out how.
Windows 11: virtual desktops – definition and tutorial

How to use the Windows 11 Clipboard
The Windows 11 Clipboard offers the option to save several items (text, HTML, and Bitmap) for a short time, or also a longer time, and paste the item into the desired program at a later point. Thanks to this handy tool, you can also quickly access other items such as GIFs or emojis. We’ll show you how to open the Windows 11 Clipboard and how to use it for your everyday copy-and-paste tasks.
How to use the Windows 11 Clipboard
I installed Visual Studio 2010. I wrote a simple code which I’m sure is correct but unfortunately, when I run the code, I get the error below.
Here is my code:
#include<iostream>
using namespace std;
int main (){
  cout <<"Hello StackOverFlow ;)";
  return 0;
}
And here is the error:
Unable to start program ‘C:UsersSoheilDesktopNew foldersamDebugsam.exe
The system cannot find the file specified
Would you help me solve the issue? Should I define the project in a
specific directory? I’ve spent a ton of hours to solve this issue and
have not had any success yet.
![]()
pmr
58.3k10 gold badges112 silver badges155 bronze badges
asked May 12, 2013 at 20:51
![]()
21
This is a first step for somebody that is a beginner. Same thing happened to me:
Look in the Solution Explorer box to the left. Make sure that there is actually a .cpp file there. You can do the same by looking the .cpp file where the .sln file for the project is stored. If there is not one, then you will get that error.
When adding a cpp file you want to use the Add new item icon. (top left with a gold star on it, hover over it to see the name) For some reason Ctrl+N does not actually add a .cpp file to the project.
![]()
answered Nov 9, 2013 at 17:44
![]()
cdelsolacdelsola
3972 gold badges7 silver badges17 bronze badges
1
Encountered the same issue, after downloading a project, in debug mode. Searched for hours without any luck. Following resolved my problem;
Project Properties -> Linker -> Output file -> $(OutDir)$(TargetName)$(TargetExt)
It was previously pointing to a folder that MSVS wasn’t running from whilst debugging mode.
EDIT: soon as I posted this I came across: unable to start «program.exe» the system cannot find the file specified vs2008 which explains the same thing.
![]()
answered Mar 20, 2016 at 5:51
![]()
ReturnVoidReturnVoid
1,0991 gold badge10 silver badges18 bronze badges
0
For me, I didn’t have my startup project set in Solution Explorer.
Go to Solution Explorer on the left of VS, right click your unit test project, and choose «set as startup project».
I had just ported my code to a new workspace, and forgot that when I opened the project in VS in the solution there, that I needed to re-set my startup project.
answered Apr 11, 2017 at 15:35
![]()
MicheleMichele
3,57711 gold badges45 silver badges80 bronze badges
I know this is an old thread, but for any future visitors, the cause of this error is most likely because you haven’t built your project from Build > Build Solution. The reason you’re getting this error when you try to run your project is because Visual Studio can’t find the executable file that should be produced when you build your project.
answered Oct 31, 2015 at 16:14
![]()
Ethan BierleinEthan Bierlein
3,3034 gold badges28 silver badges42 bronze badges
1
As others have mentioned, this is an old thread and even with this thread there tends to be different solutions that worked for different people. The solution that worked for is as follows:
Right Click Project Name > Properties
Linker > General
Output File > $(OutDir)$(TargetName)$(TargetExt) as indicated by @ReturnVoid
Click Apply
For whatever reason this initial correction didn’t fix my problem (I’m using VS2015 Community to build c++ program). If you still get the error message try the following additional steps:
Back in Project > Properties > Linker > General > Output File >
You’ll see the previously entered text in bold
Select Drop Down > Select "inherit from parent or project defaults"
Select Apply
Previously bold font is no longer bold
Build > Rebuild > Debug
It doesn’t make since to me to require these additional steps in addition to what @ReturnVoid posted but…what works is what works…hope it helps someone else out too. Thanks @ReturnVoid
answered Apr 9, 2016 at 22:24
![]()
ChrisChris
9341 gold badge17 silver badges38 bronze badges
1
I came across this problem and none of these solution worked 100%
In addition to ReturnVoid’s answer which suggested the change
Project Properties -> Linker -> Output file -> $(OutDir)$(TargetName)$(TargetExt)
I needed to changed
Project Properties -> C/C++ -> Debug Information Format ->
/Zi
This field was blank for me, changing the contents to /Zi (or /Z7 or /ZI if those are the formats you want to use) allowed me to debug
answered Jan 9, 2019 at 15:58
![]()
rtpaxrtpax
1,66717 silver badges32 bronze badges
I know this thread is 1 year old but I hope this helps someone, my problem was that I needed to add:
#include "stdafx.h"
to my project (on the first line), this seems to be the case most of the time!
![]()
answered May 28, 2014 at 0:25
![]()
Windows65Windows65
571 silver badge7 bronze badges
2
I got this problem during debug mode and the missing file was from a static library I was using. The problem was solved by using step over instead of step into during debugging
answered Apr 26, 2019 at 0:25
![]()
mistymisty
111 silver badge4 bronze badges
if vs2010 installed correctly
check file type (.cpp)
just build it again It will automatically fix,, ( if you are using VS 2010 )
answered Aug 12, 2014 at 12:35
![]()
ANJiANJi
278 bronze badges
I had a same problem and i could fixed it!
you should add
C:Program Files (x86)Microsoft SDKsWindowsv7.1ALibx64 for 64 bit system
/ C:Program Files (x86)Microsoft SDKsWindowsv7.1ALib for 32 bit system
in property manager-> Linker-> General->Additional library Directories
maybe it can solve the problem of somebody in the future!
answered Sep 6, 2014 at 15:26
![]()
If you are getting “The system cannot find the file specified issue”, then don’t worry because We are going to troubleshoot this issue in 11 ways.

If you are encountering or getting the issue when such as transferring the files to another drive, Installing Software, Creating Backup, Opening and Accessing Files and Folder then don’t worry my friends, because This article fully discussion and troubleshoot the system cannot find the file specified issue. We will request you that read this blog and follow all the steps that can be resolved your issue.
What is the root cause of the system cannot find the file specified error?
The main root cause may be an issue “the system cannot find the file specified’ issue are followings-
- The problem in Registry Files.
- Drivers Issue.
- Old Image File Issue.
- Bad Sector in Drive.
- Windows Update Issue.
- Backup Services can be stopped.
- System File missing or corrupted.
Now we are going to solve the issue “the system cannot find the file specified” on Windows 10, Windows 8, and Windows 7.
If you are getting this error “the system cannot find the file specified” on Windows 10. Windows 8, Windows 7, then you should follow the following steps-
1. Check BAD Sector of HDD using CHKDSK Command
The system cannot find the file specified issue may be the reason for Bad Sector in the drive so first verify your Hard Drive Bad Sector using CHKDSK command.
How to Run CHKDSK?
For running CHKDSK follwo follwing steps-
- Navigate to Start Menu and Search CMD.
- Right-Click on CMD, and Run As Administrator.

3. Type CHKDSK and Hit Enter.

4. Now you can check your Bad sector Of the Hard Drive. If found any BAD sector in Hard drive repair. if not any Bad sector then follows another step.
If the issue persists, continue to the Next Step-
2. Run SFC utility for Repair Corrupted Files
SFC Scan file Checker) the utility is one of the best utility for repaired Corrupted file and Windows Missing file such as .DLL missing file. SFC file checker was first introduced on Windows 98 Operating System for prevented malicious attack, Corruptions, or repaired the such as .DLL missing file.
We use the SFC file for prevented from external attach, System File Repaired, and file corrupted.
How to Run SFC Command?
To run the SFC command follow the following steps-
- Navigate to Start Menu, and type CMD.
- Right, Click on CMD, and Run As Administrator.
- Type sfc /scannow (For repair Windows File, Corrected File).
- if you want to only View then type – sfc /verifyonly for no repair.

If the issue persists, continue to the Next Step-
3. Verify Your Disk Partition should be Active
If you are transferring some files from the inActive partition of the Hard Drive that can also create the issue “the system cannot find the file specified”. Your computer Disk Partition should be Active State.
How to set Partition to Active?
To Set partition is to Active follow these easy steps-
- Press (Windows+R) run and type diskmgmt.msc.
- Right Click on Partition, and select Mark Partition as Active.

3. You should Read Cautions. if you want then after clicking on Yes.
Note:- Only mark a partition as active if it contains a functioning operating system. If the partition lacks an operating system making it active may cause your computer to stop working. Do you want to continue?

If the issue persists, continue to the Next Step-
4. Format External Drive or USB drive
Sometimes it happens that you are able to transfer the files to an Internal hard Drive but whenever try to transfer the file on an External Drive or USB getting an error such as “the system cannot find the file specified”.
How to Format Pen Drive using Command Prompt?
To format Pen drive using Command Prompt, you need to follow the following steps-
- Navigate to Start Menu and Search CMD.
- Right, Click on CMD and select Run as Administrator.
3. Type diskpart, and press enter.
4. type listvolume, and press enter.
5. Now you select the external Disk Using selectvolume press Enter.
6. Now type format fs=ntfs or fat32 quick

If you want to Format this Drive on the NTFS partition then type NTFS. If you want to format Fat32 then used the fat32 command and Exit.
If the issue persists, continue to the Next Step-
5. Restart Windows Backup Services
Windows backup services provide Windows Backup and restore capability. Sometimes backup services also can create the problem of the system cannot find the file specified issue. So you should always backup services on Restart Status.
How to Restart Windows Backup Services?
To restart or start backup services follow these easy steps-
- Navigate to Run by using (Windows+ R).
- type services.msc and press Enter.
- Scroll Down and Right Click on Windows Backup Services and click on Start.

If the issue persists, continue to the Next Step-
6. Open Libraries Folder
If your library’s folder is on the hidden status that can also create the issue of “the system cannot find the file specified” issue. You should always put your libraries folder on “Show Libraries Status“.
How to show the Hidden libraries Folder on Windows 10?
For Show Hidden Library Folder on Windows 10 follow these easy steps-
- Open This PC.
- Right -Click on Computer Icon and select Show Libraries.

If the issue persists, continue to the Next Step-
7. Check For Windows Latest Update
Windows Update provides the package of security and bug-related update both hardware and software. Windows Update can be useful for the fixed system that cannot find the file specified.
For Windows Update follow the following steps-
- Click on the Start button and select Settings.
- 2. Click on Update and Security (Windows Settings)
- Click on Check for Updates(Windows Update).
- If any updates then Install Updates between updates It will restart your computer.
If the issue persists, continue to the Next Step-
8. Scan from Antivirus Software
If in your computer have installed updated Antivirus then scan the Files or folder from Antivirus if you are using Windows 10 then Scan the File using Microsoft Windows Defender.
If the issue persists, continue to the Next Step-
9. Delete Old Windows Files
If In computer has available old Windows Files. You should remove the Windows Old File because Some times created the problem of “system cannot find the file specified” issue.
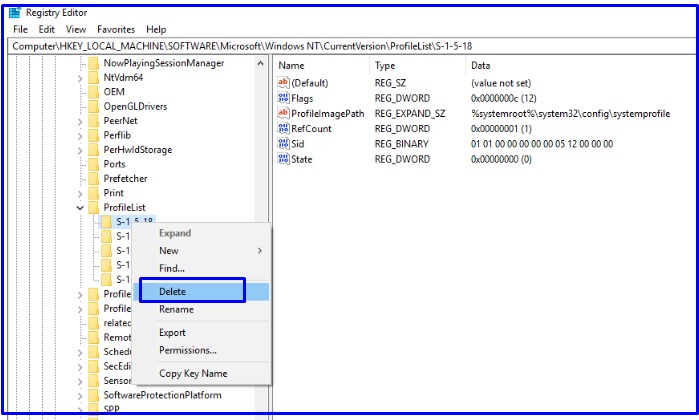
10. Delete Profileimagepath Key
If you are transferring image file and you are getting this error such as then you should delete profile list image path key.
How to Delete Profileimagepath Key?
To delete Profileimagepath you should follow these easy steps-
- Navigate to Run, type regedit and press Enter.
- Once Registry Editor opens, then navigate to HKEY_LOCAL_MACHINESOFTWAREMicrosoftWindows NTCurrentVersionProfileList
- If a certain subkey doesn’t have ProfileImagePath value available or if its Data is empty, you need to delete that subkey. To do that, right-click and select Delete.
If the issue persists, continue to the Next Step-
11. Check Permission Of Files and Folder
If you are getting “the system cannot find the file specified” may be the reason for Permission of Folder or access of Devices. You should discuss your System Administrator because in some cases Antivirus and Domain have also a policy that you can not transfer any files.
So, This is all about the “the system cannot find the file specified” on Windows Computer.
The Fixes mentioned in this article will help you to solve the issue. All you need to do is follow these solutions one by one until the issue resolved.
We hope that you like this Article and helpful for fixing your issue. So We will request this article with the users having the same issue.
You can also Join Us on Social Media Pages Like Facebook and Twitter.
Thanks For Reading, Have A Nice Day.
You May Also Read.
- 5 ways to fix Not Detecting Second Monitor in Windows 10
- 9 way to Fix “Ethernet doesn’t have a valid IP configuration” Issue