
I installed everything separately (Apache, PHP, MySQL and phpMyAdmin) and do not use a compilation, everything works fine till now except phpMyAdmin.
The problem I am experiencing is, that the error message states that the «MySQL extension is missing», as soon as I try to call up:
localhost/phpmyadmin/index.php
And when I call up
localhost/phpmyadmin/setup/index.php
I have two messages where I do not know if it is supposed to be like that:
Bzip2 compression and decompression requires functions (bzopen,
bzcompress) which are unavailable on this system.
and:
Zip decompression requires functions (zip_open) which are unavailable
on this system.
Any suggestions?
![]()
hakre
191k52 gold badges431 silver badges831 bronze badges
asked Nov 22, 2011 at 10:20
![]()
1
At first make sure you have mysql installed properly. You can ensure it just by checking that whether you can access mysql using mysql command promp. So if you mysql is working then probably it is not loading. For that follow the steps given below
First of all, you must find your php.ini. It could be anywhere but if you create a small php file with the
<?php phpinfo(); ?>
script it will tell you where it is. Just look at the path of loaded configuration file.
Common places include /etc/apache/, /etc/php4/apache2/php.ini, /etc/php5/apache2/php.ini or even /usr/local/lib/php.ini for Windows it may be C:UsersusernamePHPphp.ini
Edit your server’s php.ini and look for the following line. Remove the ‘;’ from the start of the line and restart Apache. Things should work fine now!
;extension=mysql.so
should become
extension=mysql.so
For windows it will be
;extension=mysql.dll
should become
extension=mysql.dll
answered Nov 22, 2011 at 10:42
![]()
Alim Ul GiasAlim Ul Gias
6,2612 gold badges27 silver badges39 bronze badges
1
Some linux distributions have a php_mysql and php_mysqli package to install.
![]()
Martin B
23.6k6 gold badges52 silver badges72 bronze badges
answered Nov 22, 2011 at 10:23
![]()
Ivan ButtinoniIvan Buttinoni
4,0701 gold badge24 silver badges43 bronze badges
You need to put the full path in the php ini when loading the mysql dll, i.e :-
extension=c:/php54/ext/php_mbstring.dll
extension=c:/php54/ext/php_mysql.dll
Then you don’t need to move them to the windows folder.
![]()
Thiem Nguyen
6,3357 gold badges30 silver badges50 bronze badges
answered Jun 24, 2012 at 16:01
![]()
Gavin SimpsonGavin Simpson
2,7333 gold badges29 silver badges36 bronze badges
1
In my case I had to install the extension:
yum install php php-mysql httpd
and then restart apache:
service httpd restart
That solved the problem.
answered Aug 13, 2012 at 16:27
![]()
KalenGiKalenGi
1,7564 gold badges25 silver badges40 bronze badges
Just as others stated you need to remove the ‘;‘ from:
;extension=php_mysql.dll and
;extension=php_mysqli.dll
in your php.ini to enable mysql and mysqli extensions. But MOST IMPORTANT of all, you should set the extension_dir in your php.ini to point to your extensions directory. The default most of the time is «ext«. You should change it to the absolute path to the extensions folder. i.e. if you have your xampp installed on drive C, then C:/xampp/php/ext is the absolute path to the ext folder, and It should work like a charm!
answered Mar 21, 2015 at 8:27
![]()
I just add
apt-get install php5-mysqlnd
This will ask to overwrite mysql.so from «php5-mysql».
This work for me.
![]()
Mark Amery
141k78 gold badges403 silver badges457 bronze badges
answered Sep 17, 2016 at 10:14
![]()
Installing bzip2 and zip PHP extensions solved my issue in Ubuntu:
sudo apt-get install php7.0-bz2
sudo apt-get install php7.0-zip
Use php(you version)-(extension) to install and enable any missing modules that is required in the phpmyadmin readme.
answered Mar 19, 2017 at 1:13
![]()
Hafez DivandariHafez Divandari
8,2414 gold badges44 silver badges63 bronze badges
1
Your installation is missing some php modules, there should be a list of required modules in the phpmyadmin readme. If you recently enabled the modules, try restarting the apache service / daemon.
Edit: As it seems, there is no single «enable these modules» in the docs, so enable either mysql or mysqli in your php.ini (you might need to install it first).
The two messages are not important if you do not intend to upload or download compressed file within phpMyAdmin. If you do, enable the zlib and / or bz2 modules.
answered Nov 22, 2011 at 10:23
![]()
Stephan BStephan B
3,66120 silver badges33 bronze badges
I had a similar issue, but it didn’t help to add extension=mysql.so in my php.ini. It turned out that the mysql.so file was not in my extension folder nor anywhere else on my machine. Solved this by downloading the php source and building the extension manually and then copying it into the extension folder.
answered Aug 7, 2017 at 10:26
![]()
DagliglederDagligleder
4515 silver badges14 bronze badges
Just check your php.ini file, In this file Semicolon(;) used for comment
if you see then remove semicolon ;.
;extension=mysql.dll
Now your extension is enable but you need to restart appache
extension=mysql.dll
answered Nov 23, 2011 at 8:04
![]()
1
Trying to install WordPress or visit your WordPress site only to encounter an error that says “Your PHP installation appears to be missing the MySQL extension which is required by WordPress.”?
As with any WordPress error message, it can be frustrating to encounter a problem that prevents you from using/accessing your WordPress site.
However, don’t despair!
Generally, this error means that something is going wrong with the code on your site and something is preventing WordPress from being able to connect to its MySQL database.
In this article, we’ll go over what that “something” might be and share some tips on how to troubleshoot and fix this error message.
What Causes the WordPress Missing MySQL Extension Error?
As we mentioned in the introduction, the error message “Your PHP installation appears to be missing the MySQL extension which is required by WordPress” steps from some issue with the code/scripts on your server.
Specifically, this error means that the PHP on your server doesn’t have the necessary extension to connect your WordPress site to its MySQL database.
There are two main reasons why this might be the case:
1. You’re Using an Outdated Version of WordPress with PHP 7+
If you’re using a very old version of WordPress with a modern version of PHP, you might encounter this error because PHP 7.0 deprecated the MySQL extension in favor of MySQLi. That is, PHP 7+ no longer includes the MySQL extension that WordPress is looking for.
Modern versions of WordPress will instead use the newer PDO_MySQL or MySQLi extensions. However, older versions of WordPress (below version 3.9) might cause this problem.
2. You’re Using PHP 5.6 or Lower but the Extension Is Missing or Improperly Configured
The other likely cause is that you are using PHP 5.6 (before the MySQL extension was deprecated), but the extension is either missing or improperly configured.
If you’ve ever seen this 👇 error then you know how frustrating it is to be unable to access your site. Luckily, solving this is a quick fix. 💥 Click below for the full walkthrough!Click to Tweet
How to Fix “Your PHP installation appears to be missing the MySQL extension which is required by WordPress”
Now that you know what’s going on, let’s go over some tips for how to troubleshoot and fix the issue.
1. Check What Version of PHP You’re Using
The first step to diagnose this issue is to figure out which version of PHP your WordPress site’s server is running. The answer to this question will dictate the next steps that you take.
To check this, connect to your WordPress site’s server using FTP. You can get your FTP credentials from your web host and you’ll also need an FTP client to connect.
If your host is using cPanel, you can use the cPanel File Manager tool.
Once you’ve connected to your server, create a new file called phpinfo.php in the root directory of your WordPress site. This should be the same folder that contains your wp-config.php file.
Then, edit the file and add the following code snippet:
<?php

phpinfo();

?>
Once you save the file (and re-upload the saved version if needed), navigate to yoursite.com/phpinfo.php, making sure to replace yoursite.com with your actual domain name.
You should see a screen that displays a lot of different information about the PHP configuration on your server. Scroll down to the Core section and look for the PHP Version item. Pay attention to the numbers – you should see something like x.x.x. E.g. 7.2.25 or 5.6.8:
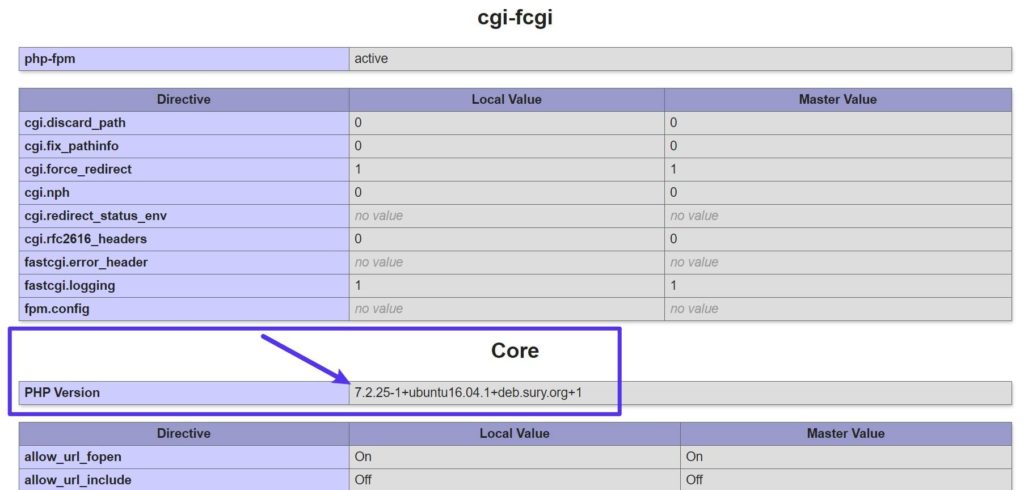
If your PHP version starts with a “7”, that usually means that you need to update the WordPress software. On the other hand, if you’re still using PHP 5.X, you might be missing the MySQL extension.
Note – at Kinsta, we strongly recommend using the latest version of PHP. In fact, we don’t support versions below PHP 8.0. These older versions have slower performance and, because they no longer receive security updates, could pose a security risk to your site.
Learn more about why it’s important to use modern, supported PHP versions.
2. Update the Core WordPress Software
If your server is using PHP 7+, the most likely cause of this error is that you’re running an old version of WordPress. If you’re using WordPress version 3.9 or lower, that can trigger this error.
Therefore, the fix is to update your WordPress software, which will also come with lots of other features, security, and performance improvements.
To manually upgrade your WordPress version, first, make sure you have a backed up version of your site. Then, go to WordPress.org and download the most recent copy of the WordPress software.
Once you’ve downloaded it, extract the zip file to your computer. Then, open the folder that contains all of the WordPress files and delete the following items:
- The wp-config-sample.php file.
- The wp-config.php file (you might not see this file – just make sure to delete it if it’s there).
- The wp-content folder.
Once you’ve deleted those items, upload the remaining files/folders to your server via FTP. When prompted about duplicate files by your FTP client, tell it to overwrite all files:
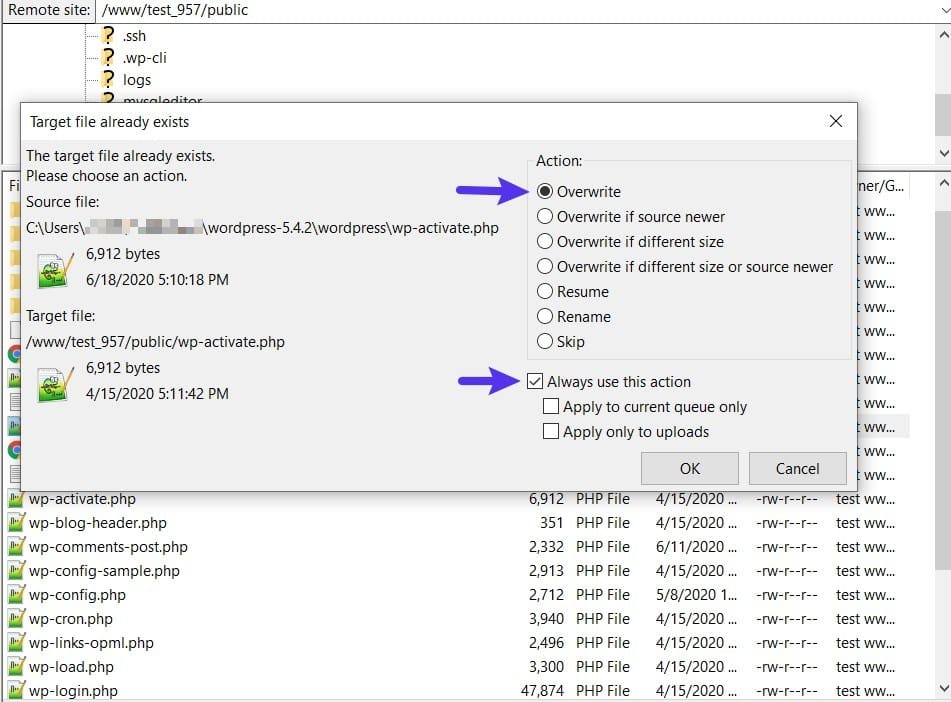
Once the file uploads finish, your WordPress site should be running the most recent version and your issue should be fixed.
As a follow-up step, you should also make sure to update all of your plugins and themes to the latest versions as well. You can follow these guides:
- How to update WordPress plugins
- How to update WordPress themes
3. Check to See If the MySQL Extension Is Installed
If your server is still using PHP 5.6 or lower, your server might be missing the MySQL extension that WordPress requires.
To check if this is the case, go back to the phpinfo.php file that you uploaded to your server in Step #1.
Look for a section named either mysql or mysqli.
If the MySQL extension is installed, you should see a version number next to the Client API library version item:
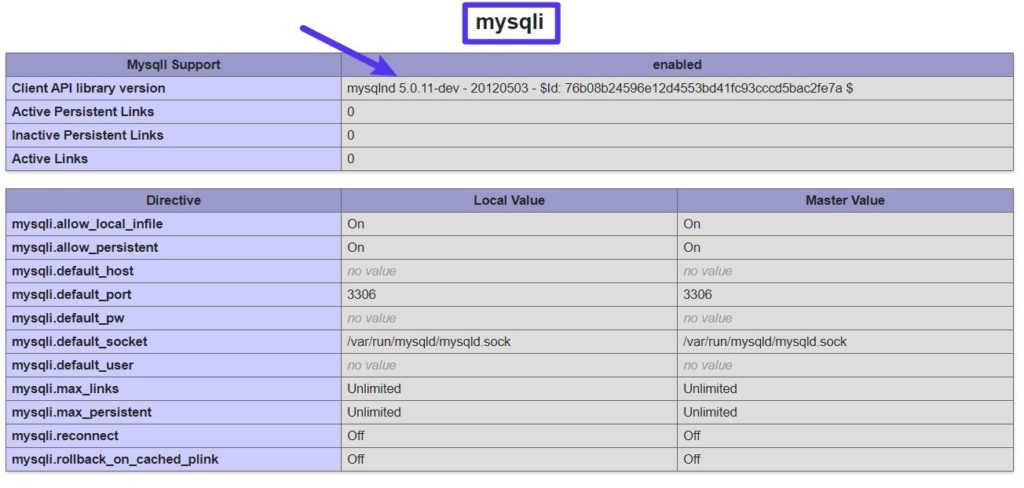
If you can’t find this information, that means the MySQL extension is not installed. The best solution is usually to reach out to your host’s support staff and ask them to install it for you.
Note – again, we highly recommend not to use PHP versions below 8.0 because they no longer receive security updates and don’t perform as well as newer versions.
Unless you absolutely must continue using PHP 7.4 or lower, a much better solution is to upgrade your server to PHP 8+ instead of putting time into properly configuring an older version of PHP. You can follow our guide on how to update the PHP version of your WordPress site and how to install PHP on any server.
4. Make Sure PHP Extension Is Configured Properly
If you’re using PHP 5.6 or lower and the extension is installed, the issue might be that it’s not configured properly. Two common issues are:
- Uploading a php.ini file that’s intended for Windows servers when you’re using a Linux server
- Incorrect file paths.
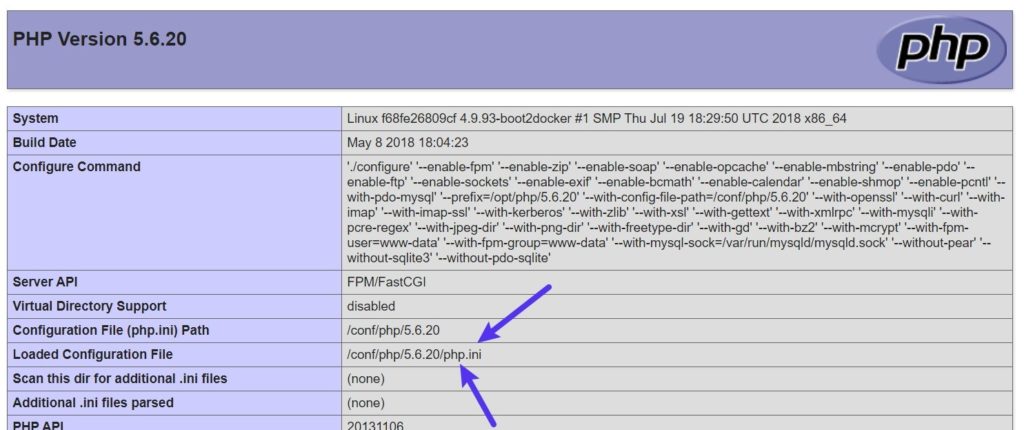
You can find the location of your php.ini file in the phpinfo.php file that you created before:
First, we recommend backing up the existing file by downloading it to your local computer. Then, try deleting the php.ini file and see if that fixes the problem.
Summary
The “Your PHP installation appears to be missing the MySQL extension which is required by WordPress” message is a frustrating error to encounter because it seems so technical.
However, with the steps in this article, you should be able to diagnose and fix the issue.
Our recommended solution is to make sure you’re using the most recent versions of both PHP and WordPress.
If you use PHP 8+ and WordPress 5.0+, you should be able to automatically fix this error and get your site working again, while also benefiting from all of the other performance, security, and feature enhancements that come from updating.
So, you just tried to visit your WordPress website and, instead of being redirected to it, you received an error message that said, “Your PHP installation appears to be missing the MySQL extension which is required by WordPress.”

This sounds bad, but don’t worry — it only means that WordPress is having trouble connecting to your MySQL database and there are several ways to remedy that situation.
In this post, we’ll examine what causes the MySQL extension error message and look at a few easy ways to resolve it.
![Download Now: How to Launch a WordPress Website [Free Guide + Checklist]](https://no-cache.hubspot.com/cta/default/53/b5ae83fa-3a09-487e-a43a-4833bf87ab87.png)
What is the MySQL extension error?
The MySQL extension error is an error message that indicates the PHP installation on your server doesn’t have the MySQL extension required to connect WordPress to your MySQL database. In other words, the version of PHP you’re using is not compatible with your WordPress software.
Here’s what the MySQL error message looks like:
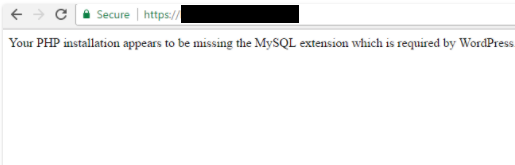
Image Source
There are several possible causes for this error. Let’s go over the following.
- You’re using an outdated version of WordPress.
- Your plugins need to be updated.
- The MySQL extension isn’t installed.
- The PHP extension is not configured properly.
The “Your PHP installation appears to be missing the MySQL extension which is required by WordPress” error typically occurs with new WordPress installations. But it can also occur if you recently migrated your website, changed your server configuration, or switched your operating system to one that doesn’t include the MySQL extension by default, like Linux.
Whatever the case is, you need to know how to fix it. Let’s walk through five ways.
- Check what PHP version you’re using.
- Update WordPress.
- Update your plugins.
- Verify that the MySQL extension is installed.
- Verify that the PHP extension is configured correctly.
1. Check what PHP version you’re using.
Before you can diagnose what is causing the MySQL extension error, you have to know which version of PHP your WordPress site is running. You can do so in two ways.
If you’re able to log in to your WordPress dashboard, you can check which version of PHP your site is running right in your dashboard.
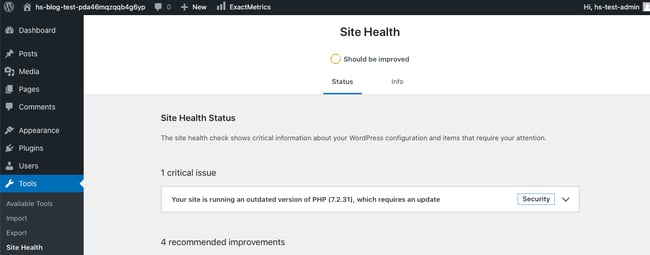
- Select Tools > Site Health.
- Under Site Health Status, WordPress will tell you which version of PHP you’re running, and whether it should be updated.
If you’re unable to log in to your WordPress dashboard, then you’ll have to access your website via an FTP client. This process is more complicated but still relatively quick and easy.
- Log into your server using Filezilla or another FTP client.
- Open your public_html folder. This is the root directory of your WordPress site.
- Create a blank file and name it phpinfo.php.
- Edit this phpinfo.php file.
- Add the following code snippet:
<?php phpinfo(); ?>
- Now load that file in a browser. To do so, just add /phpinfo.php to your website’s URL. So it will look something like: mywebsite.com/phpinfo.php
- Once loaded, the web page will list all PHP settings currently used on your website, including the version that’s running. This version should be listed at the top.

Image Source
If your PHP version starts with a “7”, then you likely need to update your WordPress software. You can go to step 2.
On the other hand, if you’re still using PHP 5.X, you might be missing the MySQL extension. You can go to step 4.
Note: It’s strongly recommended that you run your site on the latest version of PHP (which is currently 8.0). It’s faster, more secure, and offers better compatibility with the latest plugins and themes.
If you need to update your PHP installation, follow the steps in How to Update PHP in WordPress.
2. Update WordPress.
If you’re using PHP 7+ with an outdated version of WordPress, you might see the MySQL extension error. That’s because PHP 7.0 deprecated the MySQL extension that the older version of WordPress is looking for.
Newer versions of WordPress will use different extensions, like PDO_MySQL or MySQLi extensions, so you won’t see an error message. That’s why you need to check whether an updated version of WordPress is available.
If you can still log in to your WordPress dashboard, you can check whether there’s an update directly in your dashboard.
- Select Dashboard > Updates.
- If you see the message “An updated version of WordPress is available,” click Update Now.
- Select Dashboard > Updates.
- Click Update all if the option is available.
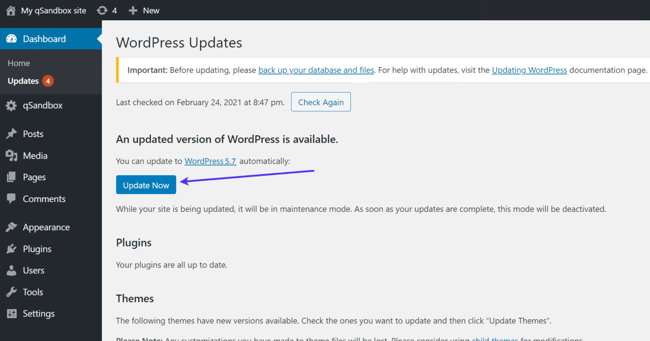
Image Source
If you’re unable to log in to your WordPress dashboard, then you’ll have to update the software via an FTP client.
- Download the latest WordPress .zip file.
- Extract the .zip file.
- Log in to your site’s server via FTP.
- Navigate to the wp-content folder.
- Right click the plugins folder and rename it “plugins.hold.” This will temporarily deactivate your plugins.
- Delete the wp-includes and wp-admin folders.
- Upload the new wp-includes and wp-admin folders from the .zip file you extracted earlier.
- Upload individual files from the new wp-content folder to your existing wp-content folder. This will overwrite the existing files. Only delete the files in your existing wp-content folder that are being overwritten by new files.
- Upload all new loose files to your public_html folder (your WordPress root directory).
- Rename the “plugins.hold” file back to “plugins.”
You should be all set. To test it, visit your /wp-admin page. You’ll likely be prompted to log back in. Once logged in, you should not see an update option for the WordPress core in your dashboard.
You can find more detailed update instructions in this WordPress Codex article if needed.
3. Update your plugins.
Like outdated core software, outdated plugins can have compatibility issues with PHP that prompt the MySQL extension error.
If you can still log in to your WordPress dashboard, you can check that all your plugins are running their latest versions directly in your dashboard.
If you’re unable to log in to your WordPress dashboard, then you’ll have to update any outdated plugins via an FTP client.
- Download the plugin .zip file.
- Extract the .zip file.
- Log in to your site’s server via FTP.
- Navigate to the wp-content folder.
- Click the plugins folder.
- Delete the folder of the plugin you’re updating.
- Find the extracted plugin folder you just downloaded, right-click it, and press “Upload”.
4. Verify that the MySQL extension is installed.
If you are running an earlier version of PHP (5.6 or lower), then the MySQL extension was not yet deprecated. That means, if you’re seeing a MySQL extension error, the extension might not be installed.
To check that, return to your phpinfo.php file that was loaded in your browser in step one. Find the row labelled “Client API library version.” You should see a four-digit number separated by dots.
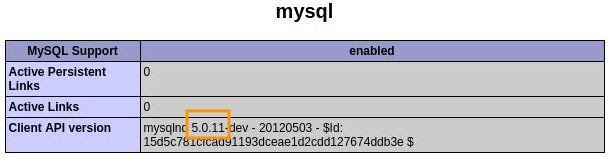
Image Source
If you can’t find this row, that means the MySQL extension is not installed. In that case, you can reach out to your hosting provider and have them install it for you. Or better yet, update the PHP version your site is running and you won’t need this extension.
When you’re done, make sure to delete the phpinfo.php file. Since it contains information about your server, you don’t want anyone else to see and use it to gain access to your server.
5. Verify that the PHP extension is configured correctly.
If you are running the latest versions of PHP and WordPress, then it’s possible that your PHP extension is configured incorrectly, which is causing the “Your PHP installation appears to be missing the MySQL extension which is required by WordPress” error.
To check that, return to your phpinfo.php file that was loaded in your browser in step one. Find the row labelled “Loaded Configuration File.”
Compare its value to the value in the row labelled “extension_dir.” If they are not matching, edit your php.ini file to replace it with the file path listed for Loaded Configuration File.
Resolving the MySQL Extension Error
Like any error in WordPress, the MySQL extension error can be frustrating — and threaten to impact the user experience on your site. Following the steps above you can resolve the error to get your site up and running as quickly as possible, with the least damage done to your site’s UX.

What is the MySQL extension error?
The MySQL extension error is an error message that indicates the PHP installation on your server doesn’t have the MySQL extension required to connect WordPress to your MySQL database. In other words, the version of PHP you’re using is not compatible with your WordPress software.
Here’s what the MySQL error message looks like:
Image Source
There are several possible causes for this error. Let’s go over the following.
- You’re using an outdated version of WordPress.
- Your plugins need to be updated.
- The MySQL extension isn’t installed.
- The PHP extension is not configured properly.
The “Your PHP installation appears to be missing the MySQL extension which is required by WordPress” error typically occurs with new WordPress installations. But it can also occur if you recently migrated your website, changed your server configuration, or switched your operating system to one that doesn’t include the MySQL extension by default, like Linux.
Whatever the case is, you need to know how to fix it. Let’s walk through five ways.
- Check what PHP version you’re using.
- Update WordPress.
- Update your plugins.
- Verify that the MySQL extension is installed.
- Verify that the PHP extension is configured correctly.
1. Check what PHP version you’re using.
Before you can diagnose what is causing the MySQL extension error, you have to know which version of PHP your WordPress site is running. You can do so in two ways.
If you’re able to log in to your WordPress dashboard, you can check which version of PHP your site is running right in your dashboard.
- Select Tools > Site Health.
- Under Site Health Status, WordPress will tell you which version of PHP you’re running, and whether it should be updated.
If you’re unable to log in to your WordPress dashboard, then you’ll have to access your website via an FTP client. This process is more complicated but still relatively quick and easy.
- Log into your server using Filezilla or another FTP client.
- Open your public_html folder. This is the root directory of your WordPress site.
- Create a blank file and name it phpinfo.php.
- Edit this phpinfo.php file.
- Add the following code snippet:
<?php phpinfo(); ?>
- Now load that file in a browser. To do so, just add /phpinfo.php to your website’s URL. So it will look something like: mywebsite.com/phpinfo.php
- Once loaded, the web page will list all PHP settings currently used on your website, including the version that’s running. This version should be listed at the top.
Image Source
If your PHP version starts with a “7”, then you likely need to update your WordPress software. You can go to step 2.
On the other hand, if you’re still using PHP 5.X, you might be missing the MySQL extension. You can go to step 4.
Note: It’s strongly recommended that you run your site on the latest version of PHP (which is currently 8.0). It’s faster, more secure, and offers better compatibility with the latest plugins and themes.
If you need to update your PHP installation, follow the steps in How to Update PHP in WordPress.
2. Update WordPress.
If you’re using PHP 7+ with an outdated version of WordPress, you might see the MySQL extension error. That’s because PHP 7.0 deprecated the MySQL extension that the older version of WordPress is looking for.
Newer versions of WordPress will use different extensions, like PDO_MySQL or MySQLi extensions, so you won’t see an error message. That’s why you need to check whether an updated version of WordPress is available.
If you can still log in to your WordPress dashboard, you can check whether there’s an update directly in your dashboard.
- Select Dashboard > Updates.
- If you see the message “An updated version of WordPress is available,” click Update Now.
- Select Dashboard > Updates.
- Click Update all if the option is available.
Image Source
If you’re unable to log in to your WordPress dashboard, then you’ll have to update the software via an FTP client.
- Download the latest WordPress .zip file.
- Extract the .zip file.
- Log in to your site’s server via FTP.
- Navigate to the wp-content folder.
- Right click the plugins folder and rename it “plugins.hold.” This will temporarily deactivate your plugins.
- Delete the wp-includes and wp-admin folders.
- Upload the new wp-includes and wp-admin folders from the .zip file you extracted earlier.
- Upload individual files from the new wp-content folder to your existing wp-content folder. This will overwrite the existing files. Only delete the files in your existing wp-content folder that are being overwritten by new files.
- Upload all new loose files to your public_html folder (your WordPress root directory).
- Rename the “plugins.hold” file back to “plugins.”
You should be all set. To test it, visit your /wp-admin page. You’ll likely be prompted to log back in. Once logged in, you should not see an update option for the WordPress core in your dashboard.
You can find more detailed update instructions in this WordPress Codex article if needed.
3. Update your plugins.
Like outdated core software, outdated plugins can have compatibility issues with PHP that prompt the MySQL extension error.
If you can still log in to your WordPress dashboard, you can check that all your plugins are running their latest versions directly in your dashboard.
If you’re unable to log in to your WordPress dashboard, then you’ll have to update any outdated plugins via an FTP client.
- Download the plugin .zip file.
- Extract the .zip file.
- Log in to your site’s server via FTP.
- Navigate to the wp-content folder.
- Click the plugins folder.
- Delete the folder of the plugin you’re updating.
- Find the extracted plugin folder you just downloaded, right-click it, and press “Upload”.
4. Verify that the MySQL extension is installed.
If you are running an earlier version of PHP (5.6 or lower), then the MySQL extension was not yet deprecated. That means, if you’re seeing a MySQL extension error, the extension might not be installed.
To check that, return to your phpinfo.php file that was loaded in your browser in step one. Find the row labelled “Client API library version.” You should see a four-digit number separated by dots.
Image Source
If you can’t find this row, that means the MySQL extension is not installed. In that case, you can reach out to your hosting provider and have them install it for you. Or better yet, update the PHP version your site is running and you won’t need this extension.
When you’re done, make sure to delete the phpinfo.php file. Since it contains information about your server, you don’t want anyone else to see and use it to gain access to your server.
5. Verify that the PHP extension is configured correctly.
If you are running the latest versions of PHP and WordPress, then it’s possible that your PHP extension is configured incorrectly, which is causing the “Your PHP installation appears to be missing the MySQL extension which is required by WordPress” error.
To check that, return to your phpinfo.php file that was loaded in your browser in step one. Find the row labelled “Loaded Configuration File.”
Compare its value to the value in the row labelled “extension_dir.” If they are not matching, edit your php.ini file to replace it with the file path listed for Loaded Configuration File.
Resolving the MySQL Extension Error
Like any error in WordPress, the MySQL extension error can be frustrating — and threaten to impact the user experience on your site. Following the steps above you can resolve the error to get your site up and running as quickly as possible, with the least damage done to your site’s UX.
WordPress is one of the most versatile and robust content management systems (CMSs) out there. Still, you may occasionally run into some issues when using it. One of those is an error informing you that “your PHP installation appears to be missing the MySQL extension which is required by WordPress.”
The good news is that this is a relatively straightforward problem with a handful of quick and easy solutions. Once you understand what the error means and the common causes of it, you’ll be better prepared to resolve it and prevent it from happening again.
Below, we’ll explain what the WordPress MySQL extension error is and some of its common causes. Then, we’ll walk you through how to fix the problem as well as how to prevent it from happening again.
What is the WordPress MySQL extension error?
Before we get into resolving this error message, it’s important to understand what it means. So let’s go over some basics.
First of all, Hypertext Preprocessor (PHP) is a server-side scripting language designed for web development. It’s also the most popular scripting language today, as well as the primary language of WordPress.
MySQL is a database management system used by WordPress to store your site’s information. This is where you can find all of your database tables and files.
When you’re working on your website, you may come across the “Your PHP installation appears to be missing the MySQL extension which is required by WordPress” error message. If you’ve never encountered this issue, you may be confused as to what it means, let alone how to fix it.
This error message will usually show up when you try to install or update WordPress. Although an error message like this can be frustrating and stressful, there’s no need to panic.
What causes the MySQL extension error on WordPress?
There are a handful of reasons you might be dealing with this problem. Typically, it means that something is wrong with your site’s code. As the error message indicates, some element is preventing WordPress from properly connecting to the MySQL database.
One of the most common causes of the error is that your server does not have the MySQL extension installed or enabled. Usually, this can be attributed to one of two things:
First, you may be using an incompatible version of PHP. MySQL 5.0 requires PHP 5.2 or higher. WordPress recommends using the latest stable version of PHP, which is currently PHP 7.4.
If you’re using a particularly outdated version of WordPress with a modern version of PHP, this error can also happen. PHP 7.0 deprecated the MySQL extension and WordPress now uses the newer PDO_MySQL or MySQLi extensions.
The other possibility is that your PHP is misconfigured, meaning it’s not properly set up to work with your WordPress site. In addition to being outdated or incompatible, it could be due to incorrect server settings.
How to fix the “Your PHP installation appears to be missing the MySQL extension which is required by WordPress” error
Now that you understand more about what the message means and what may be causing it, let’s take a look at how to resolve it.
1. Update WordPress
As we mentioned, using an older version of WordPress, like 3.9 or lower, might cause this error message. Therefore, one of the first steps you should take to resolve it is to make sure that you’re using the most updated version of WordPress Core.
This is likely the source of the problem if you’re using the latest version of PHP (which we’ll cover in the next section). To determine whether there’s an update available, you can navigate to your admin area and go to Dashboard → Updates.

Note that if you’re using a WordPress.com site, you can find updates under My Home → Updates, instead. Any available updates will be shown on this screen.
It will also inform you of what version of WordPress you’re currently using. If you see a notification saying “An updated version of WordPress is available,” you can select the Update to version [X] button.
On this page, you can also view any plugin and theme updates that are available. As with WordPress Core, plugins can present compatibility issues with PHP that may result in the MySQL extension error.
So, we also recommend updating any plugins that have newer versions available. If there are multiple, you can simply select all, then click on Update Plugins.
2. Check your PHP version
Once you’re sure that your WordPress core is up to date, the next step is to check which version of PHP your server is using. There are a couple of ways to go about this.
The easiest option is to navigate to Tools → Site Health from your WordPress dashboard.

Next, you can select the Info tab, then scroll down and expand the Server panel. Under this section, you can locate the PHP version you’re currently running.

If you’re not able to access your WordPress admin, you can check your PHP version by connecting to your server via a File Transfer Protocol (FTP) client like FileZilla. Alternatively, if your web host uses cPanel, you can use the File Manager tool.
Either in your FTP client or your File Manager, create a new file in the root directory of your site (/public_html) and name it phpinfo.php. Next, open the file and copy and paste the following code snippet:
<?php phpinfo(); ?>Save the file when you’re done. Then, in a new browser tab, visit “yoursite.com/phpinfo.php”. Be sure to replace “yoursite.com” with your domain name.
Now you should see a page that displays your server’s PHP configuration information.

The PHP version your server is running should be listed at the top of the screen. If it begins with 7 or 8, an outdated version of PHP probably isn’t the reason you’re seeing the error message.
If you’re using PHP 5.X, you should consider updating your PHP version.
3. Ensure the MySQL extension is installed
If your WordPress version is up to date, it’s important to also check whether the MySQL extension is installed and enabled. It’s possible that the Operating System (OS) you’re using didn’t include the extension by default, which means you’ll have to install it yourself.
To determine whether it’s installed, revisit the phpinfo.php file that you created in the last step. Then, navigate to the mysqli or mysql section. If the MySQL extension is installed, it will indicate the version of it next to the Client API field.

But, if this field is blank or not visible at all, it means that the MySQL extension is not installed. The process for installation will depend on your host. You can refer to the PHP installation guide for details.
If your provider uses cPanel, you can enable the extension by navigating to Software from your cPanel dashboard, then choosing Select PHP Version.

Here, select the most recent version of PHP, then click on the boxes for mysqli and mysqlnd. Save your changes, then revisit your site to see if you’re still seeing the error message.
Alternatively, if you’re unsure about installing the MySQL extension on your own, you may want to reach out to your web host. You can always request that they complete this process for you.
4. Verify that the PHP extension is properly configured
Once you know that your WordPress version is up to date and the MySQL extension is installed, you can safely confirm that something else is causing the problem. Another reason you might be seeing the error message is that the extension is not configured correctly.
There are a few issues that can lead to misconfiguration, including incorrect file paths or using a php.ini file intended for a different type of server. For instance, you may be using one meant for Windows servers on a Linux server.
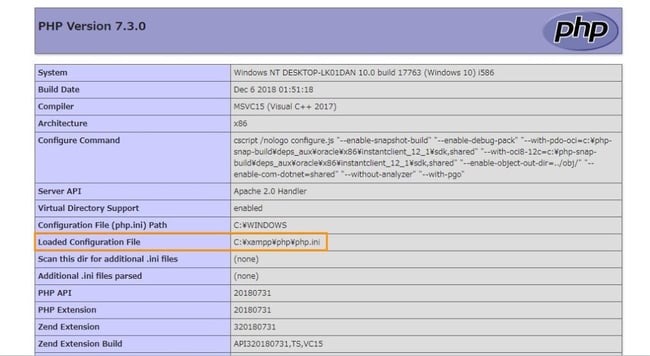
To verify that your PHP extension is configured properly, navigate back to your phpinfo.php file. Then, locate the Loaded Configuration File item.
![]()
This is where you can find the file path value. Note the file path listed here, then look for the extension_dir row.

The file path listed here should match what is listed for the Loaded Configuration File. If not, the next step is to edit your php.ini file to correct it. When you’re done, revisit your site to make sure the error is resolved.
Tips for preventing the MySQL extension error in WordPress from happening again
At this point, you’ve learned how to fix the MySQL extension error in WordPress. But there are also steps that you can take to prevent it from happening in the future.
The first is to back up your WordPress site in real time. Keeping updated copies of your site files can make it easier to identify the source of issues as they occur. When you use a solution like Jetpack, you can also ensure that you always have an updated version of your site to restore in the event that something goes wrong.
It’s also crucial to make sure you’re keeping your WordPress software up to date. Not only can this help prevent errors like the MySQL extension issue, but it can provide security and performance enhancements for your site as well.
Finally, be sure to choose a WordPress web host that uses updated versions of PHP. When providers automatically handle these updates for you, this eliminates the need to manually manage it yourself. They can also help streamline server configuration to ensure that you’re adhering to best practices.
In turn, this can reduce the likelihood of running into PHP-related errors. There are a wide variety of high-quality and reliable WordPress hosts to choose from. Some of the top WordPress hosts include Bluehost, DreamHost, and Pressable.
Streamline WordPress website maintenance
WordPress is a powerful and dependable CMS, but you can still run into issues from time to time when using it. You might encounter an error message informing you that “Your PHP installation appears to be missing the MySQL extension which is required by WordPress.” Fortunately, there are a handful of solutions you can use to resolve this problem.
As we discussed, there are four measures you can take to fix this error in WordPress:
- Update your WordPress software and plugins.
- Check your PHP version and update it, if necessary.
- Ensure that the MySQL extension is installed.
- Verify that the PHP extension is properly configured.
To help prevent WordPress errors from happening in the future and to make troubleshooting and resolving any issues easier, it’s important to back up your site in real time. Learn how Jetpack Backup can make this a breeze!
This entry was posted in Learn. Bookmark the permalink.

Simon Keating
Simon has worked in marketing and product development for over 10 years, previously at HubSpot, Workday, and now Automattic (Jetpack). He has a varied education, with a degree in chemical engineering and a masters in computer science to his name. His passion is helping people and their businesses grow.
Explore the benefits of Jetpack
Learn how Jetpack can help you protect, speed up, and grow your WordPress site.
Get up to 51% off your first year.
Compare plans
Are you receiving MySQLi extension missing error in phpMyAdmin? Here’s how we fix it.
Usually, this error happens when MySQLi extension is not enabled in the php.ini file.
At Bobcares, we often receive requests to fix MySQLi extension missing errors as part of our Server Management Services.
Today, let’s analyze the error and see how our Support Engineers fix it for our customers.
What is MySQLi extension missing phpMyAdmin error?
Before getting deeper into the error, firstly, let’s understand what is MySQLi extension missing in phpMyAdmin?
The MySQLi functions allow us to access MySQL database servers and it’s a relational database driver used in the PHP scripting language. If the MySQLi extension is present we get this error.
A sample error at PHPMyAdmin will look like

Simon Keating
Simon has worked in marketing and product development for over 10 years, previously at HubSpot, Workday, and now Automattic (Jetpack). He has a varied education, with a degree in chemical engineering and a masters in computer science to his name. His passion is helping people and their businesses grow.
Explore the benefits of Jetpack
Learn how Jetpack can help you protect, speed up, and grow your WordPress site.
Get up to 51% off your first year.
Compare plans
