The local security authority cannot be contacted ошибка

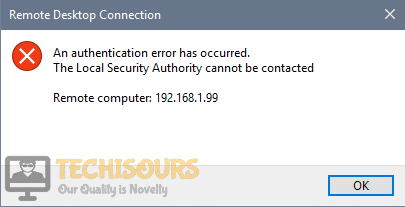
This error appears when users try to login to other computers via a remote desktop connection. The problem prevents them from connecting and it displays the “The Local Security Authority Cannot be Contacted” error message. The problem often appears after an update has been installed on either the client or the host PC and it causes plenty of problems on many different versions of Windows.

The Local Security Authority Cannot be Contacted

There have been many unofficial fixes for the problem which were created by the users who had the same unfortunate experience. We have gathered the working methods in this article so make sure you follow it in order to resolve the problem.

Pinpointing the correct cause for the problem is one of the most important steps when it comes to resolving one. That is why we have created a list of possible causes for the problem so make sure you check it out below:

  • DNS addresses may be wrongly configured – If this is indeed the case, try using the DNS addresses provided by Google or OpenDNS
  • Remote Desktop connections may be disabled by default on either the host or the client PC – Make sure you turn the option on to connect properly without errors.
  • IP and DNS address conflicts – Running a certain command may help you resolve the problem

Solution 1: Change Your DNS Address

The problem is often caused by a faulty DNS setup which is simply not accepted by the host or its service. The problem can be resolved easily by changing your default DNS settings to use the ones provided by OpenDNS or Google. This can be done easily in Control Panel so make sure you follow the steps below carefully.

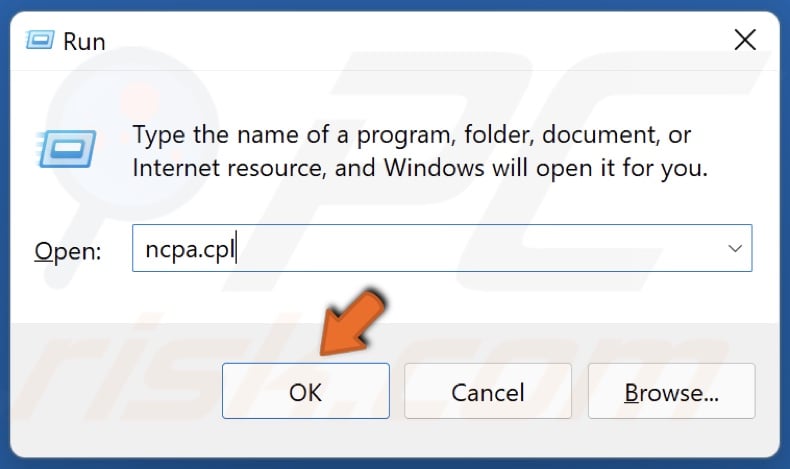
  1. Use the Windows + R key combo which should immediately open the Run dialog box where you should type ‘ncpa.cpl’ in the bar and click OK in order to open the Internet Connection Settings item in Control Panel.
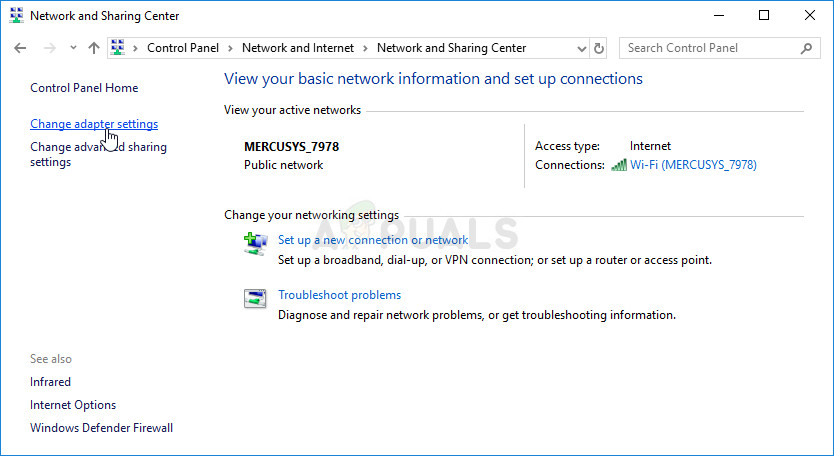
  2. The same process can also be done by manually opening Control Panel. Switch the View by setting at the top right section of the window to Category and click on Network and Internet at the top. Click the Network and Sharing Center button in order to open it. Try to locate the Change adapter settings button at the left menu and click on it.

Change adapter settings
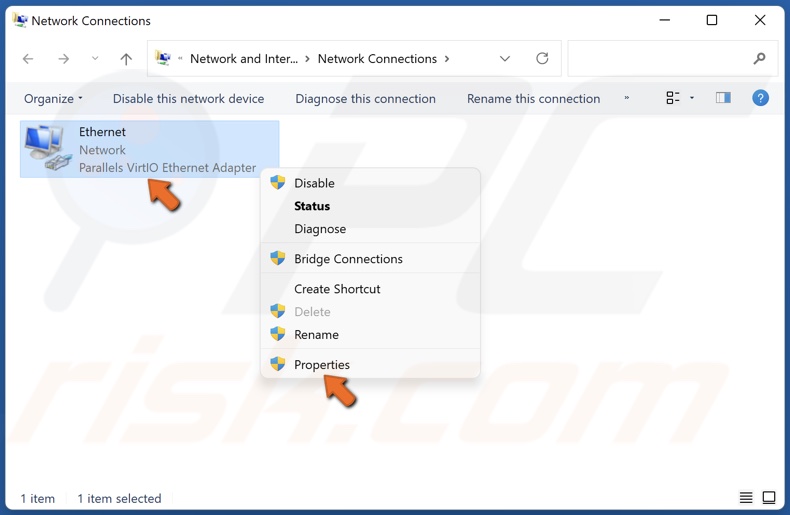
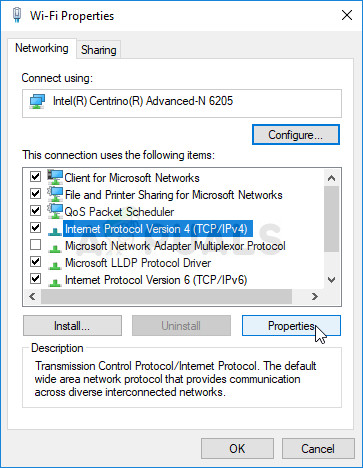
  1. Now that the Internet Connection window is open using any method above, double-click on your active network adapter and click on the Properties button below if you have admin permissions.
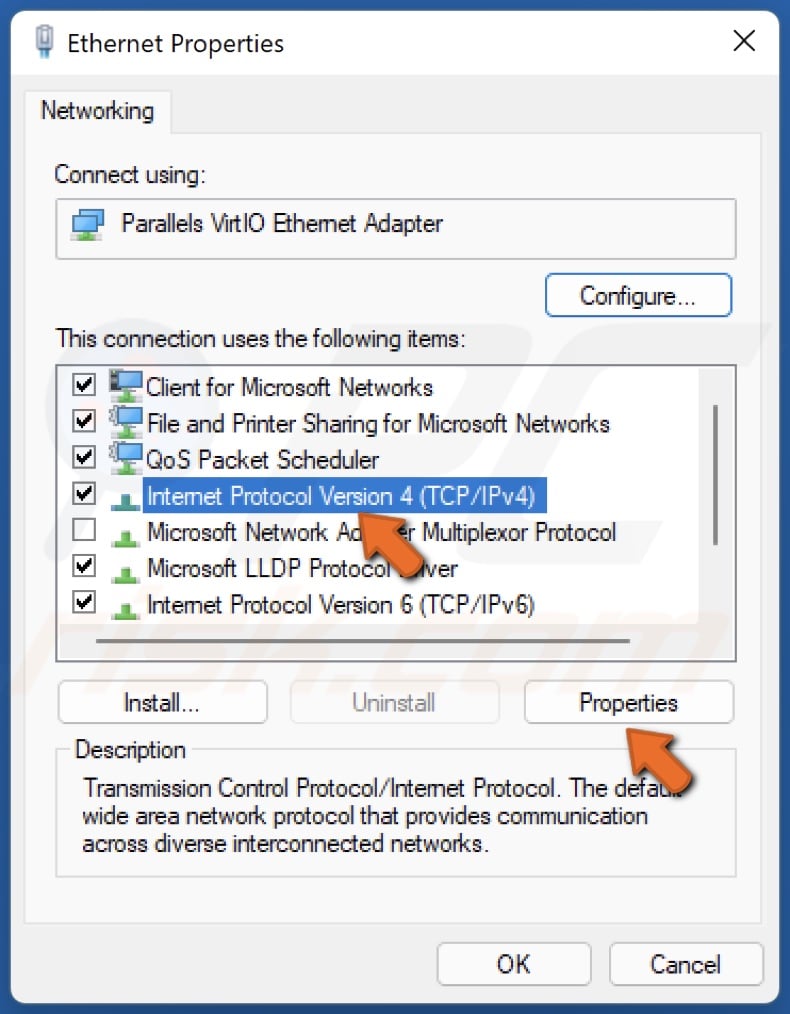
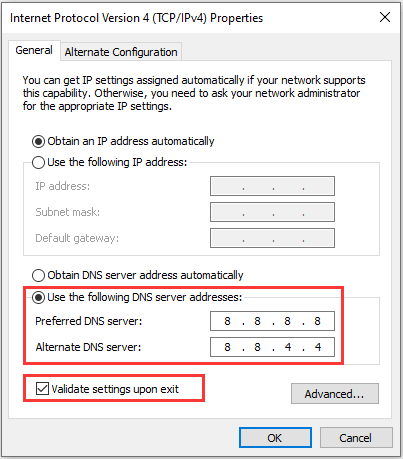
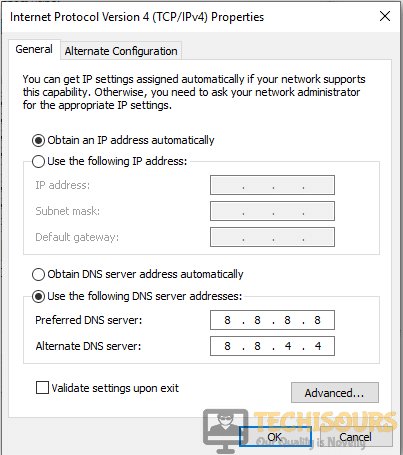
  2. Locate the Internet Protocol Version 4 (TCP/IPv4) item on the list. Click on it in order to select it and click the Properties button below.

Internet Protocol Version 4 – Properties
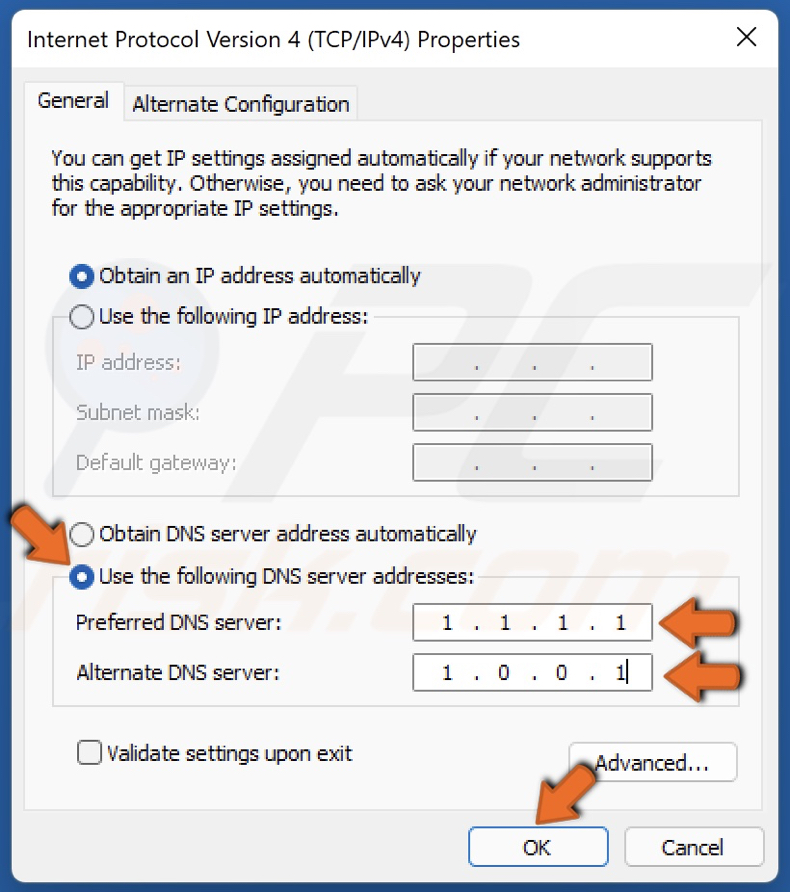
  1. Stay in the General tab and switch the radio button in the Properties window to “Use the following DNS server addresses” if it was set to something else.
  2. Set Preferred DNS server to be 8.8.8.8 and the Alternate DNS server to be 8.8.4.4

Setting the DNS address to Google DNS or OpenDNS
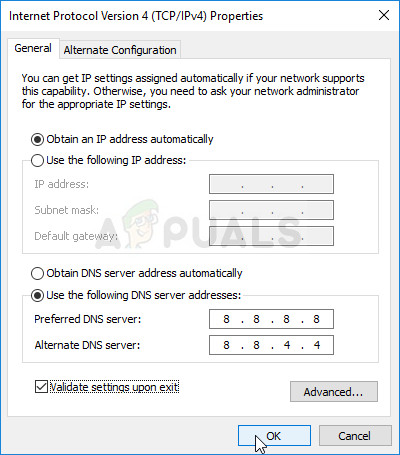
  1. Keep the “Validate settings upon exit” option checked and click OK in order to apply the changes immediately. Check to see if the same problem still appears!

Solution 2: Enable Remote Connections in Group Policy Editor

Sometimes the Group Policy on the client computer is preventing the remote Desktop connection completely. This can be changed quite easily in Group Policy Editor if you are running any version of Windows besides Windows Home. Follow the steps below in order to enable remote connections in Group Policy Editor.

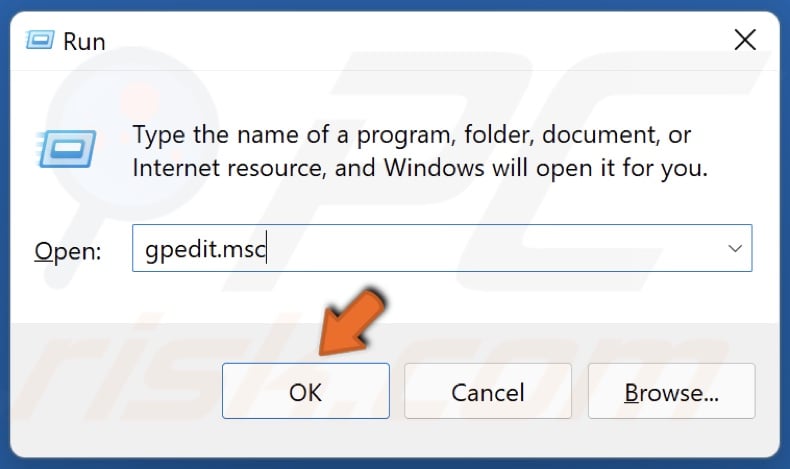
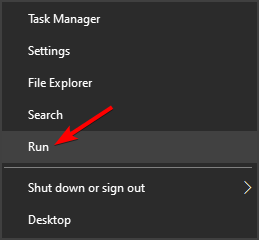
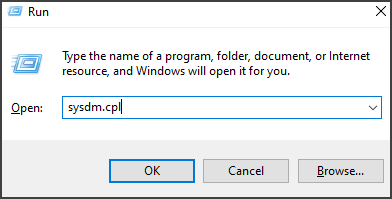
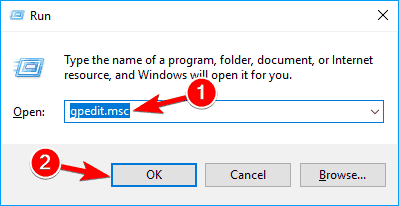
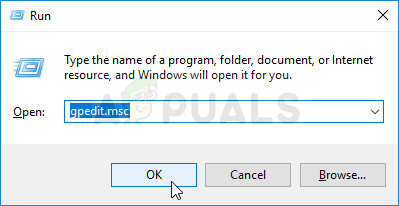
  1. Use the Windows Key + R key combination (tap the keys simultaneously) to open the Run dialog box. Enter “gpedit.msc” in the Run dialog box, and press the OK button in order to open the Local Group Policy Editor tool. On Windows 10, you can try simply type Group Policy Editor in the Start menu and click the top result.

Running Group Policy Editor
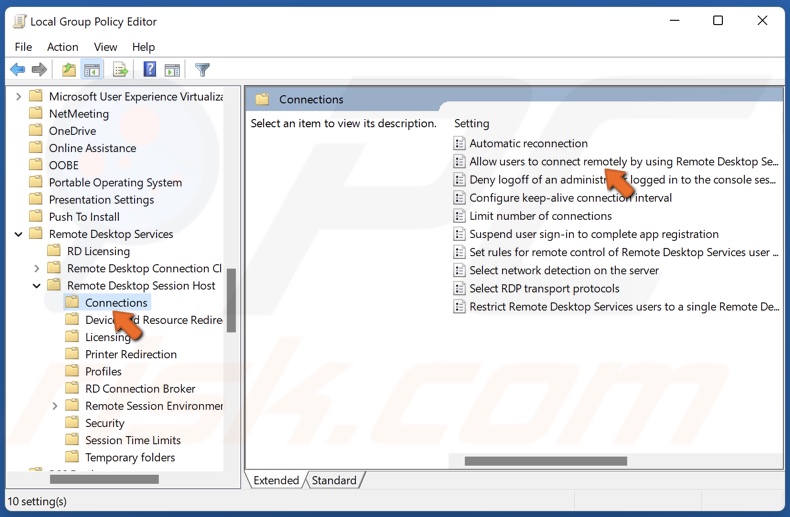
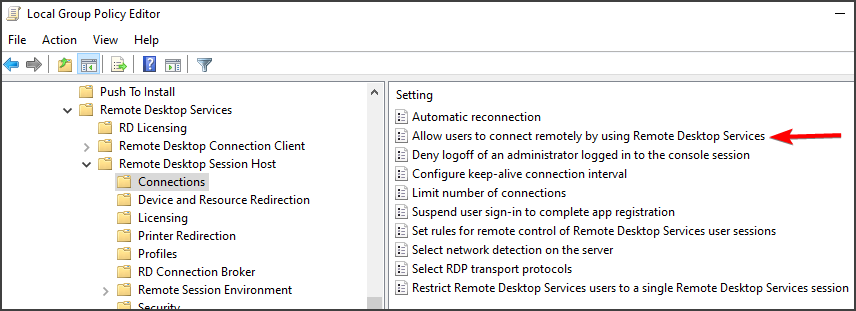
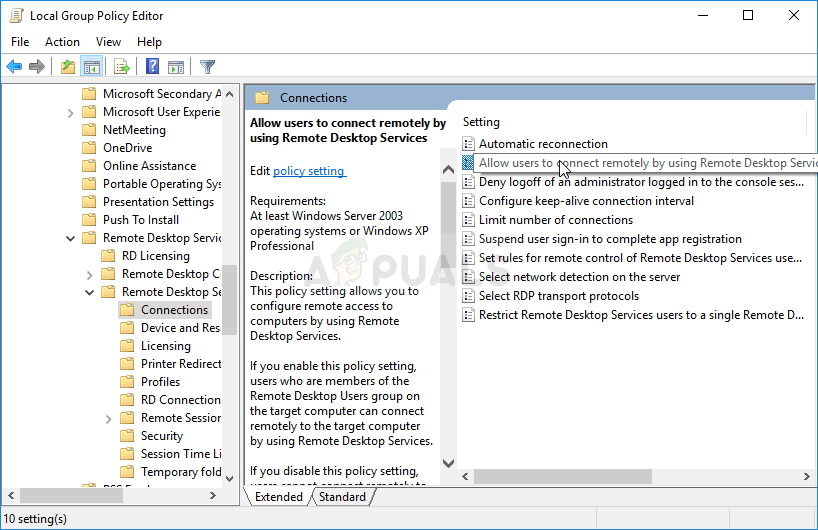
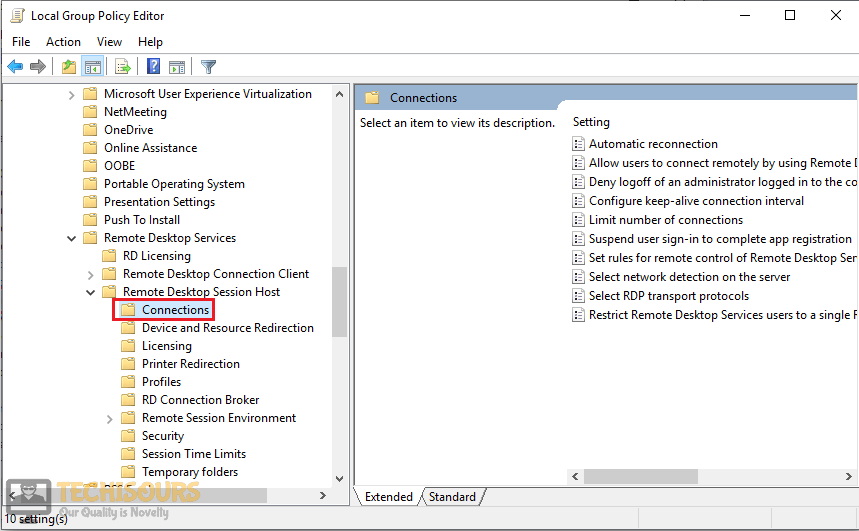
  1. On the left navigation pane of Local Group Policy Editor, under Computer Configuration, double click on Administrative Templates, and navigate to the Windows Components>> Remote Desktop Services >> Remote Desktop Session Host >> Connections.
    Allow users to connect remotely by using Remote Desktop Services
  2. Select the Connections folder by left-clicking on it and check out its right side section.
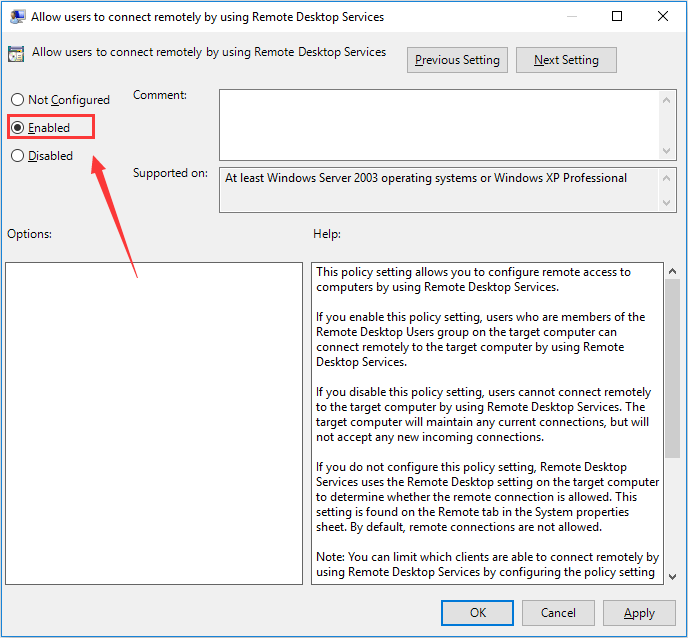
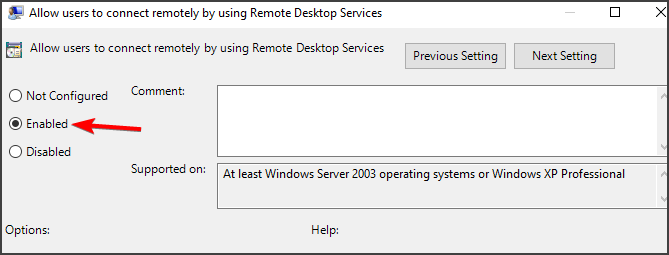
  3. Double click on the “Allow users to connect remotely by using Remote Desktop Services” policy and check the radio button next to the “Enabled” option.

Enabling the policy
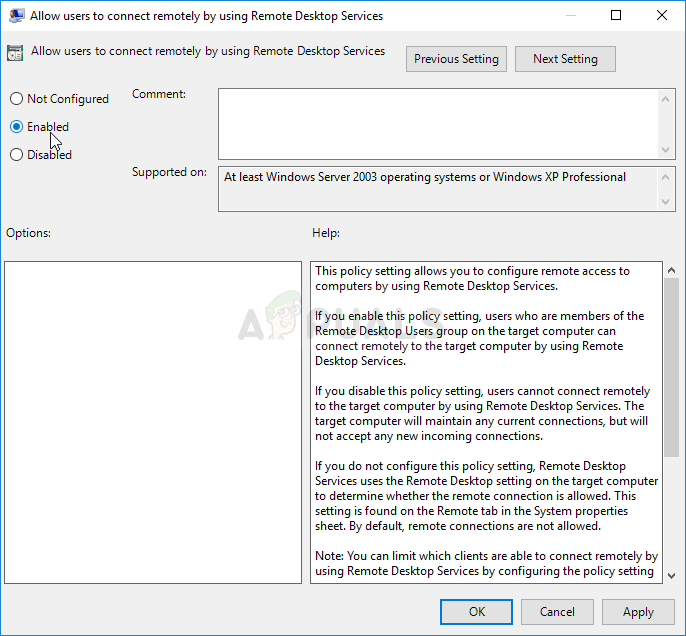
  1. Apply the changes you have made before exiting. The changes won’t be applied until you restart.
  2. Finally, reboot the computer to save the changes and check to see if you are still being targeted with the error.

Solution 3: Allow the Connection inside System Properties

The most common cause for the problem is the fact that remote access is, in one way or another, blocked on either the host or the client PC. This time, the problem may be with the host PC which may not be accepting connections from other PCs or the ones with another version of Remote Desktop running. Follow the steps below in order to fix this.

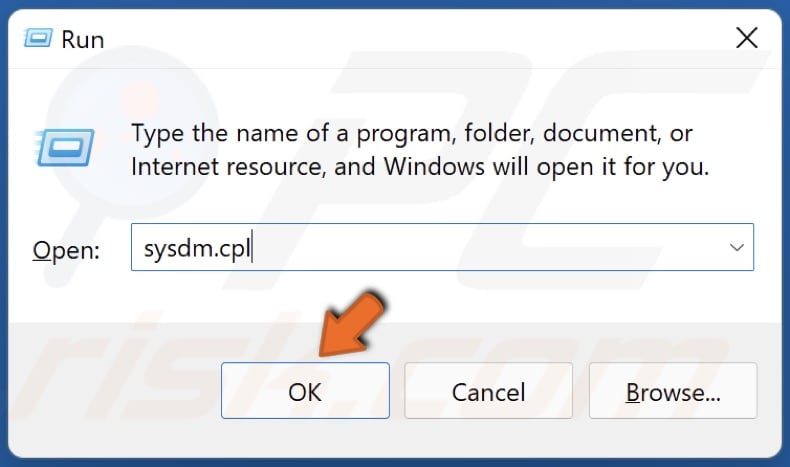
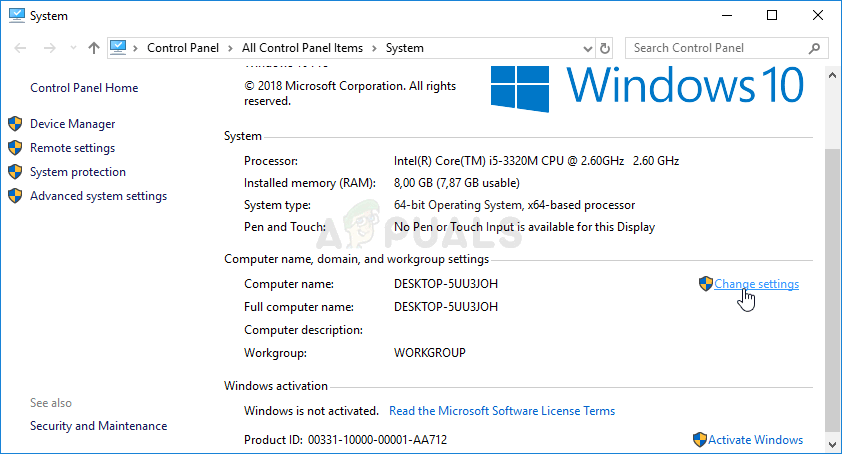
  1. Right-click either on My Computer/This PC depending on the version of Windows you have installed on your computer and choose the Properties
  2. After that, locate the Change settings button at the left side of the Properties window, under Computer name, domain, and workgroup settings, and click on it.

Change settings button in This PC >> Properties
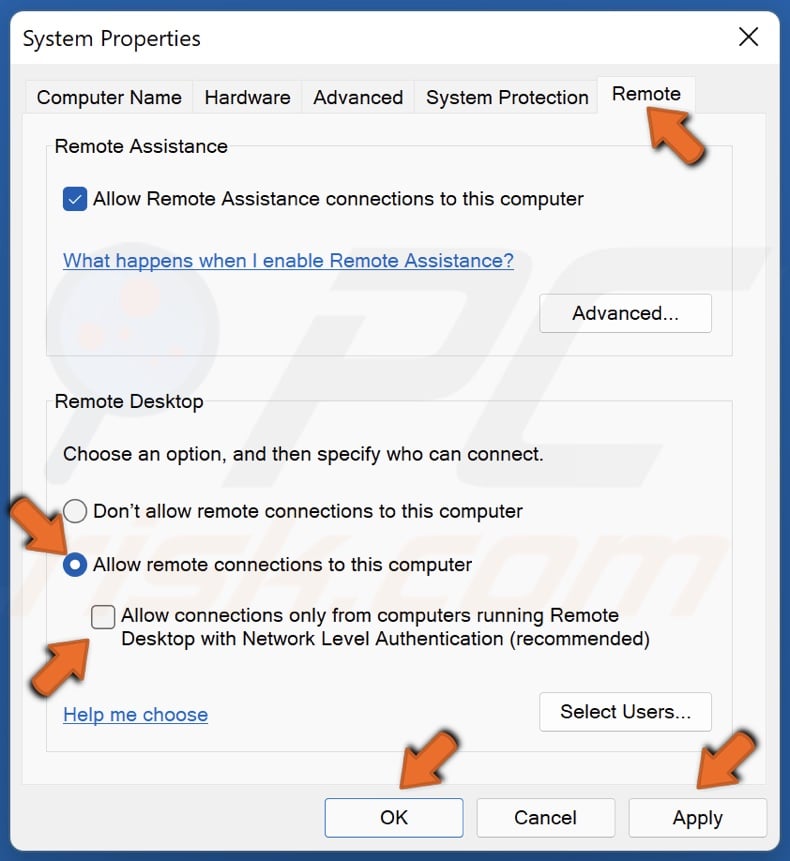
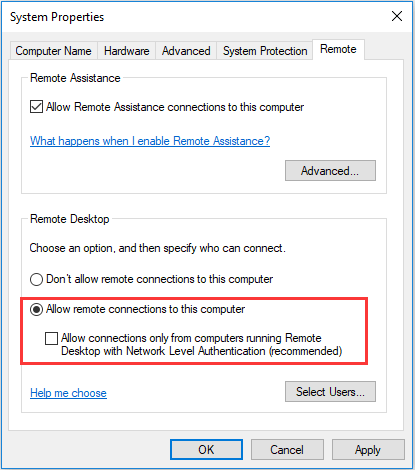
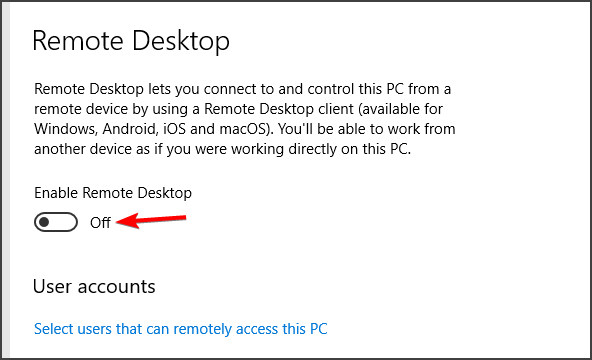
  1. In the Remote tab of System properties, check under Remote Desktop and click the radio button next to Allow remote connections to this computer. Also, uncheck the box next to the Allow connections only from computers running Remote Desktop with Network Level Authentication (recommended).

Allow remote connections to this computer
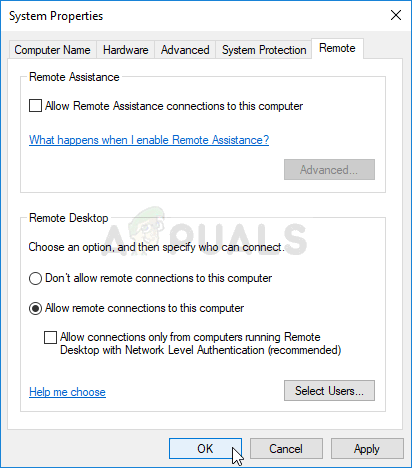
  1. Apply the changes you have made and check to see if the problem still appears.

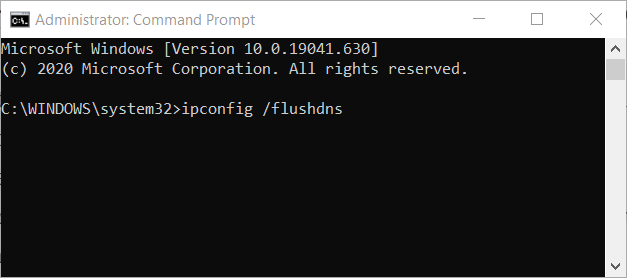
Solution 4: Run a Helpful Command on the Host

This method is quite popular for its simplicity and plenty of people use it in order to fix most things related to connectivity issues. The funny thing is that it works and users have commented saying that this is the only step it took to resolve the problem. Try it out now!

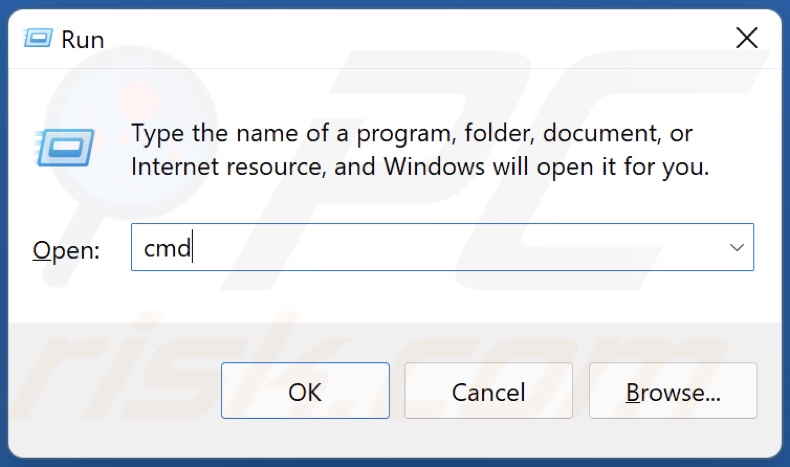
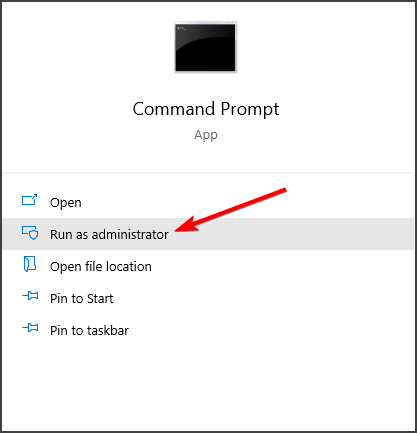
  1. Search for “Command Prompt” by typing it right in the Start menu or by pressing the search button right next to it. Right-click the first entry which will pop up as a search result and select the “Run as administrator” option from the context menu.
  2. Additionally, you can also use the Windows Logo Key + R key combination in order to bring up the Run dialog box. Type in “cmd” in the dialog box which appears and use the Ctrl + Shift + Enter key combination for administrative Command Prompt.

Running Command Prompt
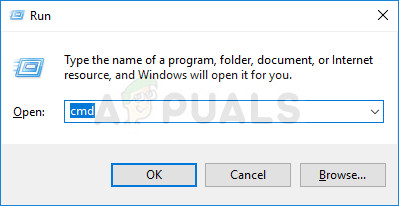
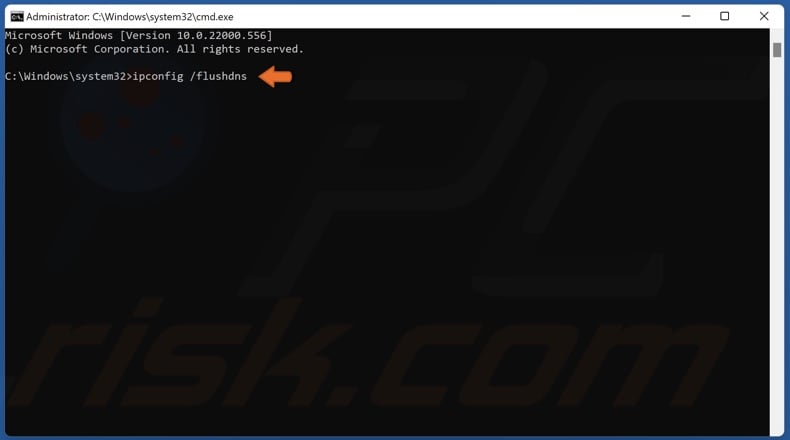
  1. Type in the following command in the window and make sure you press Enter after typing it out. Wait for the “Operation completed successfully” message or something similar to know that the method worked.
ipconfig/flushdns
  1. Try to reset the connection and check to see if the error still appears.

Solution 5: Set to Allow Connections from All Versions

Microsoft released an update to Windows 10 and Windows server to fix certain vulnerabilities and didn’t end up releasing one for Windows 7. Therefore, Windows 7 users were stuck on a different version. Therefore, you have to set up the connection in such a way that it allows connecting from any and all versions of Remote Desktop. However, keep in mind that this is much less secure than the latter option.

Photo of Kevin Arrows

Kevin Arrows

Kevin Arrows is a highly experienced and knowledgeable technology specialist with over a decade of industry experience. He holds a Microsoft Certified Technology Specialist (MCTS) certification and has a deep passion for staying up-to-date on the latest tech developments. Kevin has written extensively on a wide range of tech-related topics, showcasing his expertise and knowledge in areas such as software development, cybersecurity, and cloud computing. His contributions to the tech field have been widely recognized and respected by his peers, and he is highly regarded for his ability to explain complex technical concepts in a clear and concise manner.

A very common error that states ” An Authentication Error Has Occurred. The local security authority cannot be contacted“, appears when a user tries to access another computer by logging into it through a remote desktop connection. This error mostly arises if the OS is updated on either the host or the client computer. To resolve this issue, go through this article and follow the steps explained.

the local security authority cannot be contacted Error

Error Message

What prevents you from contacting the Local Security Authority?

There are so many reasons that cause this error to pop up. Some of these reasons are listed below:

  • The System Properties might be blocking the connection.
  • This error can occur if the Remote connections are disabled in the group policies.
  • If the DNS address is not configured correctly then this error message might pop up.

Pre Tips

This is a common error and is very easy to resolve. If you come across this error, before going to any major solution, follow some basic troubleshooting steps and check if the error s resolved.

  1. Remove your computer from the domain.
  2. Log in again as a local admin.
  3. Re-join the domain.

What to do if you get the “The Local Security Authority Cannot Be Contacted” Error?

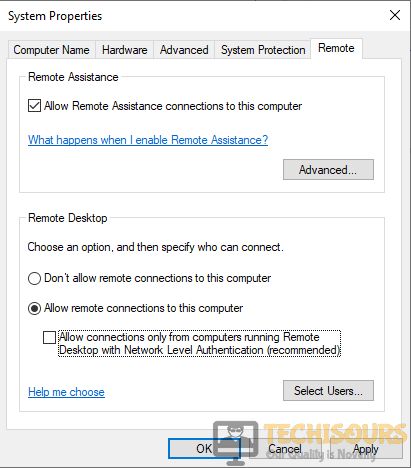
Solution 1: Edit System Properties

Sometimes this error occurs because the access through remote connection is denied in the system properties. We can allow access through remote connections by following some simple steps.

  1. Click and pen This PC from the desktop.
  2. Right-click anywhere in the window and click Properties.
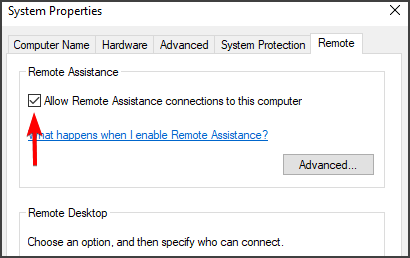
    Properties
    Properties
  3. Now click Change settings from the right pane, under the Computer name, domain, and workgroup settings section.
    Change Setting
    Change Setting
  4. Locate and open the Remote Tab.
  5. Check the radio button parallel to Allow remote connections to this computer.
    Allowing Remote Connections to fix the the local security authority cannot be contacted error
    Allow Remote Connections
  6. Make sure you uncheck the box parallel to Allow connections only from computers running Remote Desktop with Network Level Authentication.
  7. Click Apply and restart your PC.

Solution 2: Update your DNS Address

Sometimes changing the DNS address can resolve this issue. Follow the steps given below to change the DNS address of your machine.

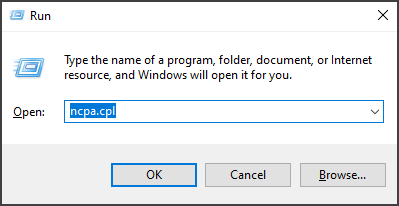
  1. Click the search button in the taskbar. Type Control Panel and open it.
    Control Panel
    Control Panel
  2. Click Network and Internet.
    Network and Internet
    Network and Internet
  3. Now click the Network and Sharing Center button.
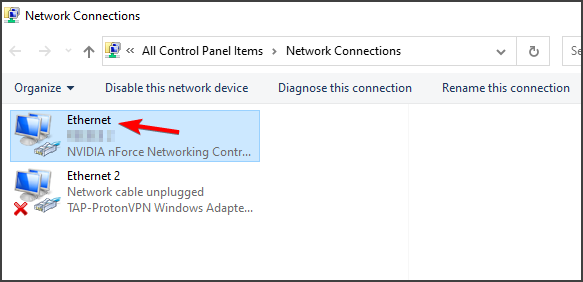
    Network and Sharing Center
    Network and Sharing Center
  4. Now click Change adapter settings button in the left pane.
    Change adapter setting
    Change adapter setting
  5. Now Locate the network you are connected to, Right-click it and open properties.
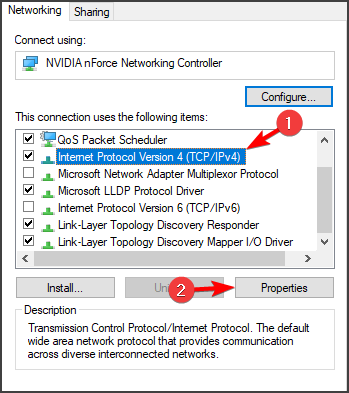
    Properties
    Properties
  6. Now locate and click Internet Protocol Version 4 (TCP/IPv4). After this click Properties.
    IPv4
    IPv4
  7. Check the radio button parallel to Use the following DNS server addresses.
  8. Set the Preferred DNS server to 8.8.8.8 and Alternate DNS server to 8.8.4.4.
    DNS address changed to fix the the local security authority cannot be contacted issue on WIndows
    DNS address

Solution 3: Enable Remote Connections

If this error message still pops up, try to enable the remote connections in the group policies. To do this, follow the steps below:

  1. Click the search button in the taskbar and type gpedit.
    Search
    Search
  2. Click and open the Group Policies Editor.
  3. Under the Computer Configuration on the left pane, Locate and click Administrative Templates.
    Administrative Templates
    Administrative Templates
  4. Locate and Click Windows Components.
    Windows Components
    Windows Components
  5. Now Locate and click Remote Desktop Sevices to expand its components.
  6. Now click Remote Desktop Session Host and then click Connections.
    Connections changed to fix the the local security authority cannot be contacted error
    Connections
  7. On the right pane, double click Allow users to connect remotely by using Remote Desktop Services.
    Allow Users to Connect Remotely to eradicate the the local security authority cannot be contacted issue
    Allow Users to Connect Remotely
  8. A window will appear. Click the Enable button and then click OK.

Solution 4: Flush DNS using Command Prompt

If you still can’t get rid of this message, then try to flush DNS and check if the issue is resolved or not. Follow the steps below to carry this task out:

  1. In the taskbar, click the search button and type Command Prompt.
  2. Right-click the icon and click Run as Administrator.
    Using Command Prompt to fix the the local security authority cannot be contacted error
    Command Prompt
  3. Type the following command and restart the PC.
ipconfig/flushdns

Flush DNS to fix the the local security authority cannot be contacted error

Flush DNS

If you want further assistance, contact here. You can also contact Microsoft Support here.

Photo of Alan Adams

Alan is a hardcore tech enthusiast that lives and breathes tech. When he is not indulged in playing the latest video games, he helps users with technical problems that they might run into. Alan is a Computer Science Graduate with a Masters in Data Science.


Back to top button

Hello,

The following error, an authentication error has occurred The local security authority cannot be contacted, appears when domain users, who have historically connected successfully using RDP, attempt to connect.

About the same time, user shares on workstations can not be accessed from other workstations. A similar error appears, saying the computer is not accessible, logon failure: the user has not been granted the requested logon type at this computer. The shares
on the servers are accessible, as always.

One domain account, however, shows none of the symptoms. This account is in the domain local group administrators, but not in the group Domain Admins.

I have carefully compared the working account with the other accounts on the network, and cant find a difference that would break RDP.

I created a new user account and added it to the same group accounts as the working account. The new user account cannot connect.

One change to the network is that one Ethernet switch was replaced, but if this or the router has problems, that would affect all users.

DNS seems ok; the windows clients are not registering with DNS, but this problem has been around for while; typing the IP address into the RDP screen had been the workaround.

I have tried changing the setting in System Properties, from Control Panel, System, Remote Settings, to allow connections from computers without NLA, after reading some of the forums.

Any ideas? User Rights?

thanks,

How to Fix “The Local Security Authority cannot be contacted” Error in Windows 11/10

“The Local Security Authority cannot be contacted” error occurs when logging in to another computer via a remote desktop connection. This article is dedicated to helping you resolve this problem.

The Local Security Authority cannot be contacted

When attempting to connect to a remote computer (such as Windows Server 2008, Windows Server 2012) using the Remote Desktop client (mstsc.exe), you may receive the following error message:

An authentication error has occurred.
The Local Security Authority cannot be contacted

Remote computer: XXX.XXX.XXX.XXX
This could be due to an expired password.
Please update your password if it has expired.
For assistance, contact your administrator or technical support.

What Causes “The Local Security Authority cannot be contacted” Error

  • Remote desktop connections may be disabled on the host or client PC. The solution is to turn the remote desktop feature on.
  • DNS address misconfiguration. The solution is to set up another DNS server address.
  • IP and DNS address conflicts.
  • An update to fix Windows 10 and Windows Server remote desktop vulnerability prevents connecting to older Windows versions.

Video Guide on How to Fix «The Local Security Authority cannot be contacted» Error

Table of Contents:

  • Introduction
  • Method 1. Allow the Connection in System Properties
  • Method 2. Allow the Connection in Group Policy Editor
  • Method 3. Change Your DNS Server Address
  • Method 4. Perform a DNS Flush
  • Video Guide on How to Fix «The Local Security Authority cannot be contacted» Error

Method 1. Allow the Connection in System Properties

1. Hold down Windows+R keys to open Run.

Type in sysdm.cpl in Run and click OK

2. In the Run dialog box, type in sysdm.cpl and click OK.

Tick Allow remote connections to this computer

2. In the Run dialog box, type in sysdm.cpl and click OK.

Tick Allow remote connections to this computer

3. Navigate to the Remote tab.

4. Mark the Allow remote connections to this computer checkbox.

5. Deselect Allow connections only from running Remote Desktop with Network Level Authentication (recommended) option.

6. Click Apply and click OK.

[Back to Table of Contents]

Method 2. Allow the Connection in Group Policy Editor

Note that This solution is not applicable to Windows 10 Home Edition since the Home Edition does not have the Group Policy Editor.

1. Hold down Windows+R keys to open Run.

Type in gpedit.msc in Run and click OK

2. In the Run dialog box, type in gpedit.msc and click OK to open the Group Policy Editor.

Enable the Allow all users to connect remotely by using Remote Desktop Services option

2. In the Run dialog box, type in gpedit.msc and click OK to open the Group Policy Editor.

Enable the Allow all users to connect remotely by using Remote Desktop Services option

3. Navigate to Computer ConfigurationAdministrative TemplatesWindows ComponentsRemote Desktop ServicesRemote Desktop Session HostConnections

4. In the right pane, double-click Allow users to connect remotely by using Remote Desktop Services.

5. Tick Enabled.

6. Click Apply and click OK.

[Back to Table of Contents]

Method 3. Change Your DNS Server Address

1. Hold down Windows+R keys to open Run.

Type in ncpa.cpl in Run and click OK

2. In the Run dialog box, type in ncpa.cpl and click OK.

Right-click the network adapter and click Properties

2. In the Run dialog box, type in ncpa.cpl and click OK.

Right-click the network adapter and click Properties

3. Right-click the network adapter and select Properties.

Select Internet Protocol Version 4 (TCP/IPv4) and click Properties

4. Select Internet Protocol Version 4 (TCP/IPv4) and click Properties.

tick-use-the-following-dns-server-addresses-v2

4. Select Internet Protocol Version 4 (TCP/IPv4) and click Properties.

tick-use-the-following-dns-server-addresses-v2

5. Tick the Use the following DNS server addresses option.

6. Enter the following addresses (or your preferred DNS addresses):

  • In the Preferred DNS server, type in 1.1.1.1
  • In the Alternate DNS server, type in 1.0.0.1

7. Click OK to save settings.

8. Restart your PC for the changes to take effect.

[Back to Table of Contents]

Method 4. Perform a DNS Flush

1. Hold down Windows+R keys to open Run.

Type in CMD in Run and hold down Ctrl+Shift+Enter keys to open the elevated Command Prompt

2. In the Run dialog box, type in CMD and hold down Ctrl+Shift+Enter keys to open the elevated Command Prompt.

Type in ipconfig /flushdns in Command Prompt and press the Enter key

2. In the Run dialog box, type in CMD and hold down Ctrl+Shift+Enter keys to open the elevated Command Prompt.

Type in ipconfig /flushdns in Command Prompt and press the Enter key

3. In the Command Prompt window, type in ipconfig /flushdns and press the Enter key. Running this command will clear the DNS cache files and reset the DNS resolver cache.

4. Close the Command Prompt.

[Back to Top]

When you are trying to log into other computer via remote desktop connections, you might receive an error message that the Local Security Authority cannot be contacted. How to fix it? In this post from MiniTool Partition Wizard, you will learn about several solutions.

It is convenient for users to access another computer via the remote desktop connection. However, they might be stopped from connecting the remote computer by the error message the Local Security Authority cannot be contacted.

This error message comes up with a Remote Desktop Connection windows, prompting that an authentication error has occurred. Why does this issue occur? The reasons could be various, including improper DNS address, Remote Desktop connections disabled, and conflictions between IP and DNS address.

If you come across the same problem, just keep on your reading to get some feasible solutions to it. Let’s check them out one by one.

Fix 1: Keep Remote Connections Enabled

If the remote desktop connections feature is disabled, you will be definitely unable to log into the remote computer. So, if you are prompting that an authentication error has occurred during the process, you should make sure the remote connections feature is enabled on both the host and the client PC.

Here are 2 methods to enable remote connections on a computer, and you can choose either one to have a try.

Enable Remote Connections in System Properties

Step 1: Right-click This PC and choose Properties.

Step 2: Click Change settings in the right pane to open System Properties.

Step 3: Switch to Remote tab, check Allow remote connections to this computer under Remote Desktop section. Uncheck Allow connections only from computers running Remote Desktop with Network Level Authentication option.

allow remote connection in system properties

Step 4: Click Apply and OK to save the changes.

Enable Remote Connections in Group Policy Editor

The Group Policy Editor is only provided in the Pro and Enterprise editions of Windows 10. If this tool is available in your Windows, you can also use this method to enable remote connections.

Step 1: Press Windows + R, input gpedit.msc and click OK button to open Group Policy Editor.

Step 2: Now, go to Computer Configuration > Administrative Templates > Windows Components > Remote Desktop Services > Remote Desktop Session Host > Connections.

Step 3: Select Connections folder and double-click Allow users to connect remotely by using Remote Desktop Services policy in the right pane.

Step 4: In the new window, choose Enabled and click Apply and OK to save changes.

enable remote connections in Group Policy Editor

After that, restart your computer and check if you are able to connect to the remote PC.

Fix 1: Change DNS Address

If your DNS address is wrongly configured, it might not be accepted by the host or the client computer. As a result, you will receive the remote desktop connection error and fail to log into the remote computer.

In this case, you can try changing your DNS address. If you don’t know how to do that, just follow the steps below.

Step 1: Press Windows + R, input ncpa.cpl and click OK to open Network Connections interface in Control Panel.

Step 2: Right-click the network adapter you are using and choose Properties.

Step 3: Under Networking tab, select Internet Protocol Version 4 (TCP/IPv4) and click Properties.

Step 4: In General tab, choose Use the following DNS server addresses and input the following value:

  • Preferred DNS server: 8.8.8.8
  • Alternate DNS server: 8.8.4.4

change DNS address

Step 5: Check Validate stings upon exit option and click OK to apply the changes. Then, check if the issue is fixed.

Fix 3: Flush DNS Cache

If the DNS cache gets corrupted or broken, you might also encounter “the Local Security Authority cannot be contacted” error. In this case, you just need to flush DNS cache with a simple command. Here’s how to do it.

Step 1: Press Windows + R, input cmd and press Enter to open Command Prompt.

Step 2: Type the command ipconfig/flushdns and press Enter to execute it.

Step 3: After the operation completed successfully, reset the connection and check if the issue has been resolved.


Offline

skull


#1
Оставлено
:

10 февраля 2017 г. 17:37:36(UTC)

skull

Статус: Участник

Группы: Участники

Зарегистрирован: 09.02.2017(UTC)
Сообщений: 24
Российская Федерация

Сказал(а) «Спасибо»: 7 раз

Здравствуйте, прошу оказать помощь с TLS!

Сервер работает на CentOS 6.6 x64. Установлен пакет КриптоПро CSP 4.0 КС2. Установлен серверный сертификат с закрытым ключен, корневой сертификат и СОС. В сервере приложений настроен коннектор на порту 8443. Запускаем сервер приложений и проверяем tls-туннель с помощью csptestf. Вот вывод команды /opt/cprocsp/bin/amd64/csptestf -tlsc -server 127.0.0.1 -port 8443 -v -v -v:

[root@localhost logs]# /opt/cprocsp/bin/amd64/csptestf -tlsc -server 127.0.0.1 -port 8443 -v -v -v
8 algorithms supported:
[0] 1.2.643.2.2.21 (ГОСТ 28147-89)
[1] 1.2.643.2.2.3 (ГОСТ Р 34.11/34.10-2001)
[2] 1.2.643.7.1.1.2.2 (ГОСТ Р 34.11-2012 256 bit)
[3] 0x801f
[4] 1.2.643.2.2.20 (ГОСТ Р 34.10-94)
[5] 1.2.643.2.2.19 (ГОСТ Р 34.10-2001)
[6] 1.2.643.7.1.1.1.1 (ГОСТ Р 34.10-2012)
[7] 1.2.643.7.1.1.1.2 (ГОСТ Р 34.10-2012)
Cipher strengths: 256..256
Supported protocols: 0x80
dwProtocolMask: 0x800a0aaa
Protocol version: 3.3
ClientHello: RecordLayer: TLS, Len: 92
Cipher Suites: (ff 85) (00 81) (00 32) (00 31)
97 bytes of handshake data sent
0000 16 03 01 00 5c 01 00 00:58 03 03 58 52 6a a9 5e …….X..XRj.^
0010 87 53 b4 16 dd 76 2a 27:22 f8 66 95 03 ad b4 49 .S…v*'».f….I
0020 d2 ec 30 20 85 1f 06 91:03 50 1e 00 00 08 ff 85 ..0 …..P……
0030 00 81 00 32 00 31 01 00:00 27 ff 01 00 01 00 00 …2.1…’……
0040 23 00 00 00 00 00 0e 00:0c 00 00 09 31 32 37 2e #………..127.
0050 30 2e 30 2e 31 00 0d 00:08 00 06 ee ee ef ef ed 0.0.1………..
0060 ed .

**** Error 104 reading data from server
An error occurred in running the program.
/dailybuildsbranches/CSP_4_0/CSPbuild/CSP/samples/csptest/WebClient.c:578:Error performing handshake.
Error number 0x80090304 (2148074244).
The Local Security Authority cannot be contacted
An error occurred in running the program.
/dailybuildsbranches/CSP_4_0/CSPbuild/CSP/samples/csptest/WebClient.c:2818:Socket shutdown()
Error number 0x80090304 (2148074244).
The Local Security Authority cannot be contacted
Total: SYS: 0,030 sec USR: 0,090 sec UTC: 0,160 sec
[ErrorCode: 0x80090304]

При запуске сервер приложений формирует лог tls.log. А после попытки загрузить страничку https://localhost:8443/ в этот же лог вываливается дамп (во вложении tls.log (5kb) загружен 13 раз(а).). Страница в браузере при этом не открывается.

Подскажите, в чем может быть ошибка, где искать ее причину?


Вверх


Offline

Максим Коллегин


#2
Оставлено
:

10 февраля 2017 г. 23:12:03(UTC)

Максим Коллегин

Статус: Сотрудник

Группы: Администраторы

Зарегистрирован: 12.12.2007(UTC)
Сообщений: 6,281
Мужчина
Откуда: КРИПТО-ПРО

Сказал «Спасибо»: 21 раз
Поблагодарили: 673 раз в 593 постах

А что за сервер, можно поподробнее?

Знания в базе знаний, поддержка в техподдержке


Вверх

WWW


Offline

skull


#3
Оставлено
:

13 февраля 2017 г. 9:40:40(UTC)

skull

Статус: Участник

Группы: Участники

Зарегистрирован: 09.02.2017(UTC)
Сообщений: 24
Российская Федерация

Сказал(а) «Спасибо»: 7 раз

Виртуалка на VMWare.
Развернута для тестирования совместимости ПО с CSP 4.0.
CentOS 6.6 с ядром 2.6.32-573.7.2.el6.x86_64.
Какие сведения нужны ?

Отредактировано пользователем 13 февраля 2017 г. 9:41:26(UTC)
 | Причина: Не указана


Вверх


Offline

Максим Коллегин


#4
Оставлено
:

13 февраля 2017 г. 15:22:48(UTC)

Максим Коллегин

Статус: Сотрудник

Группы: Администраторы

Зарегистрирован: 12.12.2007(UTC)
Сообщений: 6,281
Мужчина
Откуда: КРИПТО-ПРО

Сказал «Спасибо»: 21 раз
Поблагодарили: 673 раз в 593 постах

Интересует именно TLS-сервер. Чей это лог?

Знания в базе знаний, поддержка в техподдержке


Вверх

WWW


Offline

skull


#5
Оставлено
:

16 февраля 2017 г. 11:55:58(UTC)

skull

Статус: Участник

Группы: Участники

Зарегистрирован: 09.02.2017(UTC)
Сообщений: 24
Российская Федерация

Сказал(а) «Спасибо»: 7 раз

TLS-сервер работает под Apache Tomcat 7. Лог формирует наша имплементация TLS на JAVA. Выяснили кстати, что дамп в tls.log это лишь результат логирования в режиме DEBUG, это не ошибка.
Проверили работу TLS-сервера под Apache Tomcat 7 на двух других серверах с CSP 4.0 и CSP 3.6. На них TLS заработал, ура!
На проблемном сервере по прежнему нет… На нём же попробовали настроить TLS с помощью stunnel с использованием того же сертификата. tls не поднялся… Вот конфиг:

pid = /opt/cprocsp/sbin/amd64/stunnel_serv.pid
output = /opt/cprocsp/sbin/amd64/stunnel_serv.log
socket = l:TCP_NODELAY=1
socket = r:TCP_NODELAY=1
debug = 7

[https]
accept = 80
connect = 443
cert = /home/tech2017.cer
verify = 0

Вот и формируемый лог:

2017.02.16 11:36:09 LOG5[19908:140508684384096]: stunnel 4.18 on x86_64-unknown-linux-gnu
2017.02.16 11:36:09 LOG5[19908:140508684384096]: Threading:PTHREAD Sockets:POLL,IPv6 Auth:LIBWRAP
2017.02.16 11:36:09 LOG6[19908:140508684384096]: file ulimit = 10240 (can be changed with ‘ulimit -n’)
2017.02.16 11:36:09 LOG6[19908:140508684384096]: poll() used — no FD_SETSIZE limit for file descriptors
2017.02.16 11:36:09 LOG5[19908:140508684384096]: 0 clients allowed
2017.02.16 11:36:09 LOG7[19908:140508684384096]: FD 5 in non-blocking mode
2017.02.16 11:36:09 LOG7[19908:140508684384096]: FD 6 in non-blocking mode
2017.02.16 11:36:09 LOG7[19908:140508684384096]: FD 8 in non-blocking mode
2017.02.16 11:36:09 LOG7[19908:140508684384096]: SO_REUSEADDR option set on accept socket
2017.02.16 11:36:09 LOG7[19908:140508684384096]: https bound to 0.0.0.0:80
2017.02.16 11:36:09 LOG7[19909:140508684384096]: Created pid file /opt/cprocsp/sbin/amd64/stunnel_serv.pid
2017.02.16 11:36:09 LOG7[19909:140508684384096]: open file /home/tech2017.cer with certificate
2017.02.16 11:36:09 LOG5[19909:140508684384096]: CertFindCertificateInStore not find certificate in LOCAL_MACHINE store. Looking at CURRENT_USER
2017.02.16 11:36:09 LOG3[19909:140508684384096]: **** Error 0x80090304 returned by AcquireCredentialsHandle

2017.02.16 11:36:09 LOG3[19909:140508684384096]: Error creating credentials

2017.02.16 11:36:09 LOG7[19909:140508684384096]: removing pid file /opt/cprocsp/sbin/amd64/stunnel_serv.pid

В логе ошибка с тем же кодом, что и при проверке TLS-соединения с помощью csptestf (см. первое сообщение в теме). Код ошибки 0x80090304. Ключи установлены в хранилище пользователя root с привязкой к файлу сертификата. Помогите разобраться в чем проблема…


Вверх


Offline

Максим Коллегин


#6
Оставлено
:

17 февраля 2017 г. 9:29:47(UTC)

Максим Коллегин

Статус: Сотрудник

Группы: Администраторы

Зарегистрирован: 12.12.2007(UTC)
Сообщений: 6,281
Мужчина
Откуда: КРИПТО-ПРО

Сказал «Спасибо»: 21 раз
Поблагодарили: 673 раз в 593 постах

Скорее всего не открывается контейнер при создании мандата. Где находится контейнер? Пароль не на него не установлен?

Знания в базе знаний, поддержка в техподдержке


Вверх

WWW


Offline

skull


#7
Оставлено
:

17 февраля 2017 г. 10:11:27(UTC)

skull

Статус: Участник

Группы: Участники

Зарегистрирован: 09.02.2017(UTC)
Сообщений: 24
Российская Федерация

Сказал(а) «Спасибо»: 7 раз

Контейнер размещен в /var/opt/cprocsp/keys/root/. Пароль на него установлен стандартный 12345678. Сертификат установлен в хранилище пользователя root.


Вверх


Offline

Максим Коллегин


#8
Оставлено
:

21 февраля 2017 г. 10:19:57(UTC)

Максим Коллегин

Статус: Сотрудник

Группы: Администраторы

Зарегистрирован: 12.12.2007(UTC)
Сообщений: 6,281
Мужчина
Откуда: КРИПТО-ПРО

Сказал «Спасибо»: 21 раз
Поблагодарили: 673 раз в 593 постах

Попробуйте сделать контейнер без пароля.

Знания в базе знаний, поддержка в техподдержке


Вверх

WWW

Пользователи, просматривающие эту тему

Guest

Быстрый переход
 

Вы не можете создавать новые темы в этом форуме.

Вы не можете отвечать в этом форуме.

Вы не можете удалять Ваши сообщения в этом форуме.

Вы не можете редактировать Ваши сообщения в этом форуме.

Вы не можете создавать опросы в этом форуме.

Вы не можете голосовать в этом форуме.

by Matthew Adams

Matthew is a freelancer who has produced a variety of articles on various topics related to technology. His main focus is the Windows OS and all the things… read more


Updated on July 28, 2021

  • The local security authority cannot be contacted message will prevent you from using Remote Desktop on your PC.
  • Fix this issue easily by switching to reliable and secure remote control software.
  • Check your Remote Desktop settings and make sure that all required settings are enabled.
  • Adjusting your DNS settings is another method that you can use to fix this issue on your PC.

the local security authority cannot be contacted

Windows 10’s Remote Desktop enables users to connect with a remote PC. However, a local security authority error can arise for some users when they try to set up, or log in to, a remote desktop connection.

The full error message states:

An authentication error has occurred. The local security authority cannot be contacted.

As a consequence, a remote connection can’t be established.

1. Check that Remote Desktop is enabled

  1. First, check that the basic Remote Desktop setting is enabled.
  2. To do that, click Windows 10’s Type here to search taskbar button.
  3. Input the keyword remote desktop settings in the search box.
  4. Click Remote Desktop settings to open further options.
  5. Then toggle the Enable Remote Desktop setting on if it’s off.

2. Unblock remote access

  1. Right-click the Start menu and select Run.
  2. Input sysdm.cpl and click OK.
  3. Click the Remote tab.
  4. Then select the Allow remote connections to this computer setting if you need to .
  5. Deselect the Allow connections only form computers running Remote Desktop with Network Level Authentication (recommended) option if it’s checked.
  6. Click the Apply option.
  7. Click OK to exit the window.

Users have confirmed they’ve fixed the local security authority error by deselecting the Allow connections only from computers running Remote Desktop with Network Level Authentication setting.

3. Switch to Google DNS

  1. Open Run window.
  2. Input ncpa.cpl in the Open box and click OK to open Network and Sharing Center.
  3. Double-click your Internet adapter to open its window.
  4. Click the Properties button.
  5. Select Internet Protocol Version 4, and then click the Properties button.
  6. Select the Use the following DNS server address radio button.
  7. Enter the value 8.8.8.8 in the Preferred DNS server box.
  8. Then input 8.8.4.4 in the Alternative DNS server box.
  9. Click the OK button.

Some users might need to switch to Google DNS to resolve the local security authority error, so be sure to try that.

4. Check Group Policy’s Remote Desktop Services settings

  1. Launch the Run accessory.
  2. Enter gpedit.msc and click OK to open Group Policy Editor.
  3. Click Administrative Templates on the left side of Group Policy Editor.
  4. Then click on Windows Components and go to Remote Desktop Services.
  5. Expand Remote Desktop Services and choose. Remote Desktop Session Host. Now select Connections.
  6. Double-click Allow users to connect remotely by using Remote Desktop Services to open the window for that policy.
  7. Select the Enabled radio button.
  8. Click Apply to save the new settings.
  9. Click OK to close the policy window.
  10. Restart Windows after enabling Remote Desktop Services.

Some users might need to enable Remote Desktop Services with the Group Policy Editor on client PCs.

5. Flush DNS Cache

  1. Some users have also resolved this issue by flushing the DNS cache. To do that, enter cmd in Windows 10‘s search box.
  2. Select Run as administrator on the menu.
  3. Click Yes if a UAC dialog box opens.
  4. Input this command: ipconfig/flushdns
  5. Press Enter to initiate that command.

If the error keeps occurring, we recommend switching to alternative software. Here’s a list of some of the best remote management software.

Those are some of the resolutions users have fixed the local security authority error with. So, there’s a good chance that they’ll fix the same issue for you.

Let us know which of the solutions solved this issue for you by leaving us a message in the comments section below.

newsletter icon

I had a working asp.net site under development on IIS6 and Server 2003, and then something changed. I reset IIS and now I am getting the error message

The Local Security Authority cannot be contacted 

The IIS logs show the return code as 500 0 2148074244

I have no idea what happened, but there is nothing in any of the logs indicating why. Does anybody have any ideas?

asked Dec 8, 2009 at 20:52

Ryan Michela's user avatar

Ryan MichelaRyan Michela

8,2645 gold badges33 silver badges47 bronze badges

0

The problem was with the app pool identity. Somehow the service account name lost its domain.

The app pool was running as app_svc when it should have been running as domainapp_svc.

When the domain was added back to the service account name, everything started working again.

answered Dec 9, 2009 at 21:11

Ryan Michela's user avatar

Ryan MichelaRyan Michela

8,2645 gold badges33 silver badges47 bronze badges

Понравилась статья? Поделить с друзьями:
  • The lego movie videogame ошибка
  • The leaves is yellow исправить ошибки
  • The last of us ошибка при запуске
  • The last of us ошибка запуска
  • The kmplayer ошибка на сервере