
Содержание
- Fix: The Computer Started using the Windows Installation Media
- Solution 1: Run the Process from a Different Place
- Solution 2: Re-Insert Your Laptop’s Battery
- Solution 3: Delete a Certain Registry Key
- Solution 4: Boot in Normal Startup Before Running the Windows Setup
- Solution 5: Format the Drive You Want to Install Windows on
- The computer started using the Windows installation media
- The computer started using the Windows installation media
- 1] Modify the Registry
- 2] Upgrade using Windows 10 ISO file
- 3] Clean install Windows 10
- Compatibility report: The computer started using the windows installation media.
- Bat123Man
- How to troubleshoot Windows Installer errors
- Symptoms
- Error message 1
- Error message 2
- Error message 3
- Resolution
- To determine whether you’re using an account that has administrator rights
- Windows 10 Setup thinks it’s booted from installation media
- 2 Answers 2
Fix: The Computer Started using the Windows Installation Media
This scenario can be traced down to a single process on your computer: performing an upgrade to a new version of the Windows operating system or installing it from the scratch and it has been bugging users for quite a long time now.

Either there is a complete confusion which can be fixed quite easily and which will be explained the first solution or you will have to perform some serious troubleshooting which is, of course, the longer and more complicated path. However, the problem should be resolved quickly if you follow the methods below carefully!
Solution 1: Run the Process from a Different Place
If you want to perform an upgrade on a PC which already has an operating system installed which can be booted into, you might have made a mistake if you booted from your recovery media (Windows installation DVD or USB) and tried to initiate the upgrading process from there.
That is the usual scenario and the error message is not in vain. Instead, you need to boot into your operating system and start the process from there.


Solution 2: Re-Insert Your Laptop’s Battery
This solution definitely sounds too good to be true and we were also skeptical about it but several users confirmed that it actually works and we had to place it in our article. Nonetheless, the process takes about a minute and it won’t cost you anything, especially if it actually solved the problem.


Solution 3: Delete a Certain Registry Key
There are certain actions you may have tried out on your computer which could have led to a certain registry key being created. This registry key actually causes this problem and deleting it can solve it in no time. If you are trying to install Windows regularly and you are receiving this error, try following the steps below in order to solve the problem.


Solution 4: Boot in Normal Startup Before Running the Windows Setup
Changing the way you boot into your computer is something you choose for yourself but everyone will recommend that you switch to the normal startup mode before you try to start a Windows Setup for any purpose. It has worked for several people and we hope it will work for you as well.

Solution 5: Format the Drive You Want to Install Windows on
If you want to perform a clean install of Windows on your computer, you will definitely have to format the old drive which will include erasing all of your files. Since you have decided to perform a clean install, you should have already taken care of important files so we will skip that. You shouldn’t skip the formatting of all partitions which have the old system files on it.
The process will differ greatly depending on which installation media you are using (Windows 7, Windows 8, and Windows 10). However, the process is quite similar so we will cover the steps for Windows 10 since most people are installing this OS nowadays.

Источник
The computer started using the Windows installation media
If when performing an upgrade to a new version of Windows, and you encounter the error message The computer started using the Windows installation media, then this post is intended to help you. In this post, we will offer the most suitable solutions to this issue.

When you encounter this issue, you’ll receive the following full error message
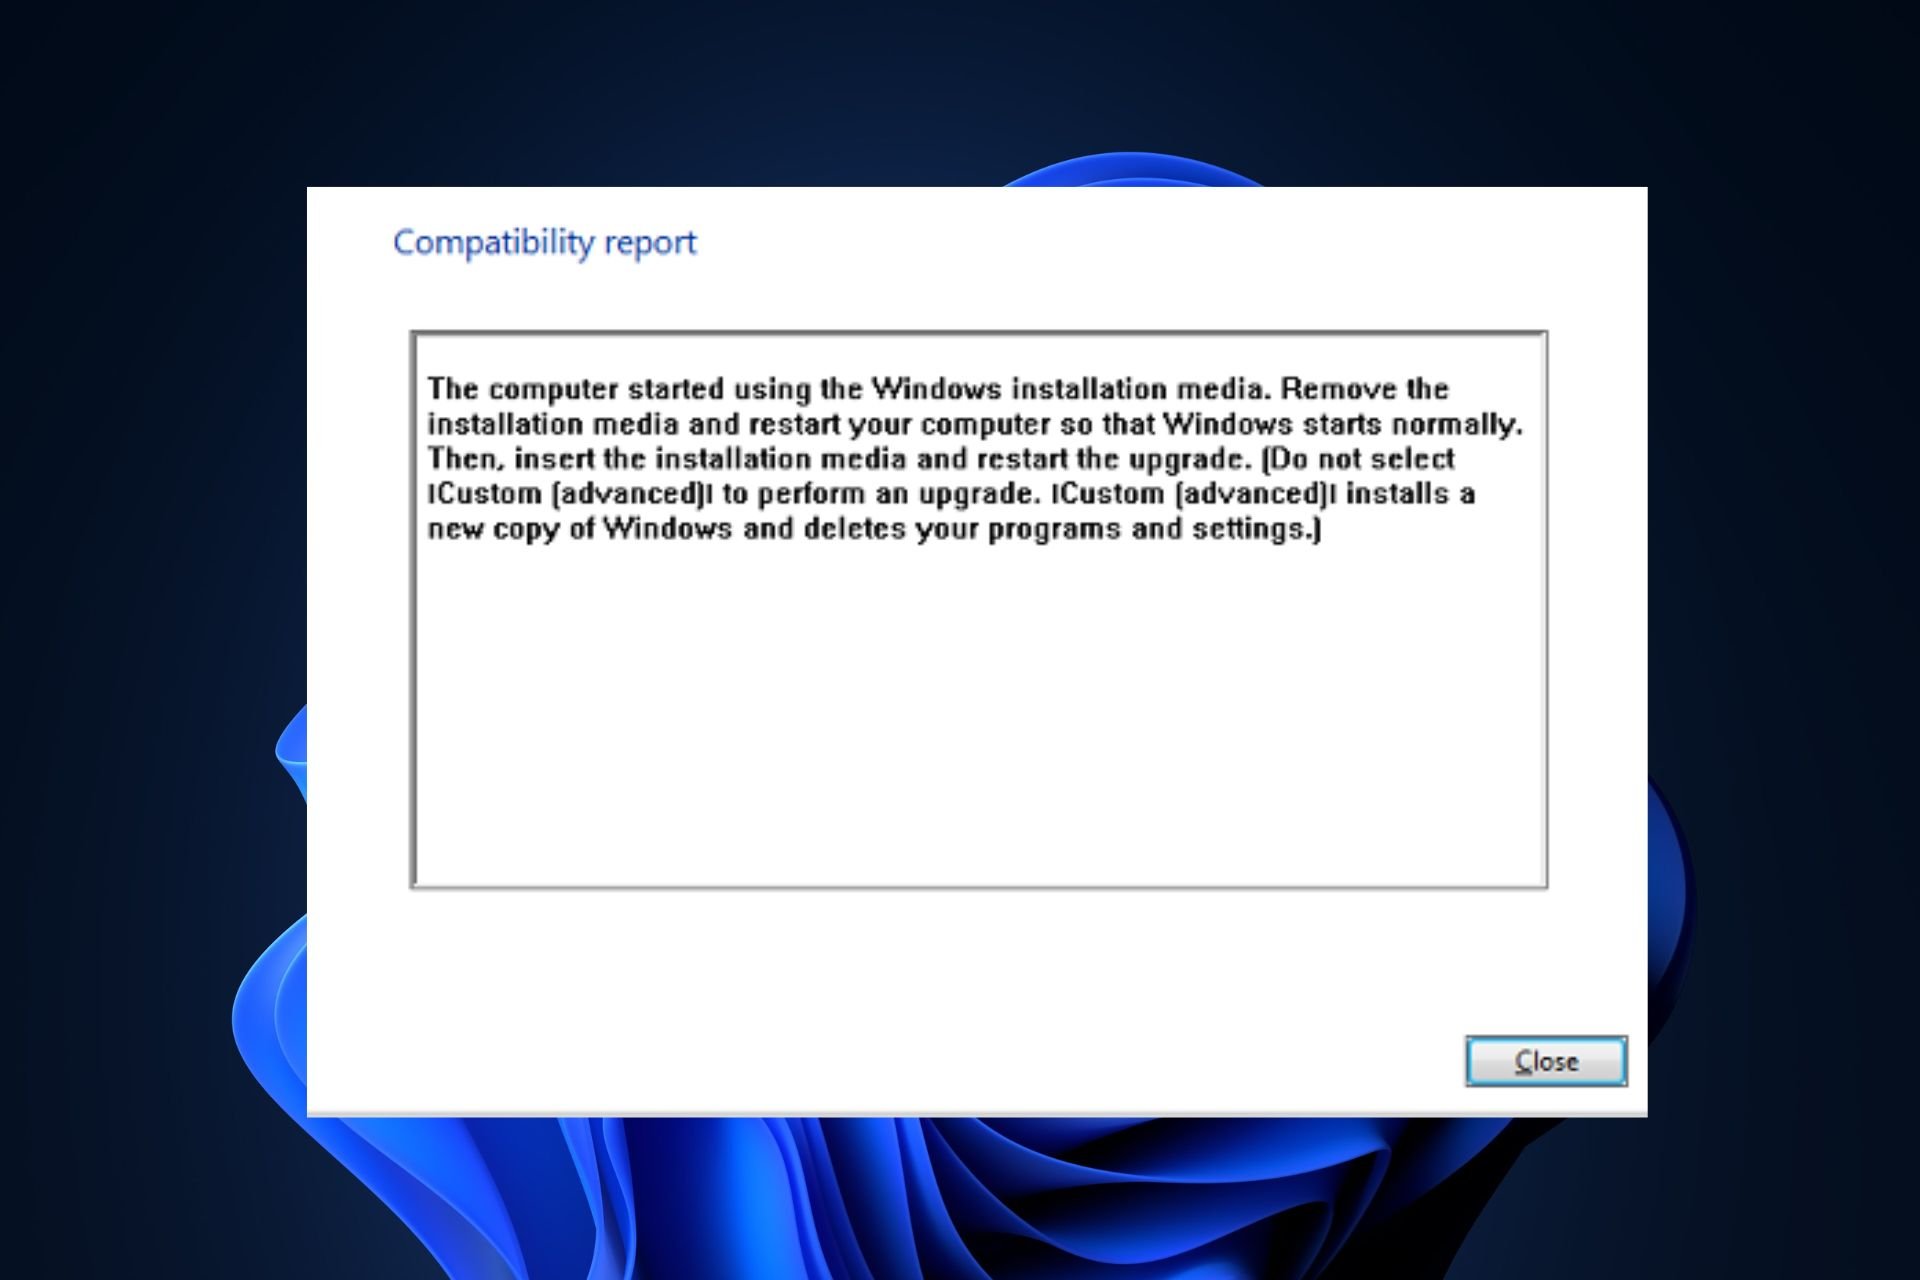
The computer started using Windows installation media. Remove the installation media and restart your computer so that Windows start normally. Then, insert the installation media and restart the upgrade. [Do not select Custom (advanced) to perform an upgrade. Custom (advanced) installs a new copy of Windows and deletes your programs and settings.]
The computer started using the Windows installation media
Let’s take a look at the description of the process involved concerning each of the listed solutions.
1] Modify the Registry
Since this is a registry operation, it is recommended that you back up the registry or create a system restore point as necessary precautionary measures. Once done, you can proceed as follows:
On boot, try the Windows 10 upgrade again and see if the error The computer started using the Windows installation media is resolved. Otherwise, try the next solution.
2] Upgrade using Windows 10 ISO file
Since you’re encountering this Windows 10 upgrade install error using the Media Creation tool aka Windows Update Assistant, this solution requires you to directly download the Windows 10 ISO image file from the Microsoft website. Once you have downloaded the ISO to a location (preferably the desktop) on your device, double-click the ISO image to mount it as a virtual drive then double-click the setup.exe file to start the in-place upgrade process with the ISO file.
3] Clean install Windows 10
If none of the above solutions worked, back up your data, create a fresh installation media with the latest version of Windows 10 and then perform a clean install on your device.
Источник
Compatibility report: The computer started using the windows installation media.
Bat123Man
Member
I started off downloading the Microsoft 64-bit upgrade tool, and selecting «Upgrade this PC». As many users have reported, the tool came back with «Something Happened». So instead, I selected the other option and downloaded the 64-bit Pro version of Win10 to upgrade my 64-bit 8.1 Pro. I selected the option to have the files end up on a flash drive (Sony 32 GB stick). All of that went smoothly. Then I ran CCleaner to make sure I had a relatively clean system (removes temp files, etc.), and launched SETUP from the stick.
After it asked me to Confirm that it was going to zap Media Center which is no longer available for Win10, it checked for Upgrades. When that was complete, it rebooted and came up with a big «Install Now» button. I clicked it, and it asked what type of install I wanted to do; Upgrade or Custom. It heavily suggested I do an Upgrade as it implied that I would have a brand new system with no previous apps selecting Custom. I selected Upgrade, whereupon it returned an error message :
«Compatibility report: The computer started using the windows installation media. Remove the installation media and restart your computer so that windows starts normally. Then, insert the installation media and restart the upgrade. (Do not select Icustom [advanced] to perform an upgrade Icustom [advanced] installs a new copy of windows and deletes your programs and settings.)»
I pulled the stick, and tried to continue, and it told me that it could not find the media. I put the stick back in, but then it said it couldn’t find the driver. The dialog box looked like it came from Win95. I tried a bunch of things, and then managed to get back to the original «Install Now» button, and with no stick in the USB drive, tried to continue. No dice. Stick back in, no dice. Finally with the stick out, I clicked on the X to close the Window, and it said it might reboot the computer (it actually said «might»). I figured I was pooched at this point, but clicked OK. Computer restarted, I had my fingers crossed that it would boot back into 8.1. It didn’t, instead it said, «Upgrading Windows», and successfully upgraded my computer to Win10.
Thought I would post this in case someone else was getting grey hairs.
Источник
How to troubleshoot Windows Installer errors
Symptoms
When you install, uninstall, or update a program on a Windows-based computer, you may receive one of the following error messages.
Error message 1
The Windows Installer Service could not be accessed.
Error message 2
Windows Installer Service couldn’t be started.
Error message 3
Could not start the Windows Installer service on Local Computer. Error 5: Access is denied.
Resolution
To fix this problem automatically, run the «Fix problems that programs cannot be installed or uninstalled» troubleshooter to repair issues that block program installation or removal because of corrupted registry keys.
Important To perform many of the methods and steps in this article, you must be logged on to your computer as an administrator.
To determine whether you’re using an account that has administrator rights
To determine whether you’re using an account that has administrator rights, use one of the following methods, as appropriate for the operating system that you’re running.
Windows 7 and Windows Vista
Open the Date and Time dialog box.
Type the following command in the Start Search or Search programs and files box, and then press Enter:
timedate.cpl
The Date and Time dialog box appears.

Click Change date and time. When the User Account Control dialog box appears, click Continue.

Do one of the following, depending on what happens when you click Continue:
If your computer does not prompt you for a password, you are already logged on with an administrator account. Click Cancel two times to close the Date and Time dialog box. You are ready to fix the Windows Installer issues.
If your computer prompts you for a password, you are not logged on with an administrator account.
Windows XP and Windows Server 2003
Open the Date and Time dialog box.
Click Start, and then click Run.
Type the following command in the Run dialog box, and then press OK:
timedate.cpl

Do one of the following, depending on the result:
If the Date and Time Properties dialog box appears, you are already logged on as an administrator. Click Cancel to close the dialog box.

If you receive the following message, you are not logged on as an administrator:

After you’ve verified that you’re logged on to your computer as an administrator, you can start troubleshooting Windows Installer issues.
If the Windows Installer engine is corrupted, disabled, or installed incorrectly, this may cause program installation issues.
Use the following methods to identify any Windows Installer issues that may be causing problems when you install, uninstall, or update programs.
Method 1: Determine whether the Windows Installer engine is working
Click Start  , type cmd in the Search box or click Run then type cmd in the dialog (Windows XP or Windows Server 2003), and then press Enter to open a Command Prompt window.
At the command prompt, type MSIExec, and then press Enter.
If the MSI engine is working, you should not receive any error messages. If you receive an error message, enter the error message text into a search engine such as Bing or Google to locate troubleshooting information about the issue.
Try to install or uninstall again.
Method 2: Make sure that the Windows Installer service is not set to Disabled
Click Start , type services.msc in the Search box or click Run then type services.msc in the dialog (Windows XP or Windows Server 2003), and then press Enter to open Services.
Right-click Windows Installer, and then click Properties.
If the Startup type box is set to Disabled, change it to Manual.
Click OK to close the Properties window.
Right-click the Windows Installer service, and then click Start. The service should start without errors.
Try to install or to uninstall again.
Method 3: Check your version of Windows Installer, and upgrade to the latest version if necessaryImportant This method applies to Windows XP, Windows Vista, Windows Server 2003, Windows Server 2003 R2, and Windows Server 2008 only.
Click Start , type cmd in the Search box or click Run then type services.msc in the dialog (Windows XP or Windows Server 2003), and then press Enter to open a Command Prompt window.
At the command prompt, type MSIExec, and then press Enter. If the MSI engine is working, you should not receive any error messages, and a separate dialog box should open. This shows the MSI version.
If the installer is not version 4.5, download and install Windows Installer 4.5.
Try to install or to uninstall again.
Method 4: Reregister the installer engineImportant This method applies to Windows XP and to Windows Server 2000 only.
Click Start, click Run, type cmd, and then click Command Prompt.
At the command prompt, type the following, and then press Enter after each line:
Try to install or to uninstall again.
The installation or update method doesn’t run to completion
There are several methods that can be used to install, to uninstall, or to update a program. Additionally, the method or methods that are used may not have started or completed successfully. In this situation, try some other method to install, or to update the program.
The following are common methods that are used to install software:
Insert the CD or DVD media, and then let the installation auto-start.
Browse to the CD, DVD, removable media, or other location where the programs installation files are stored, and then double-click the Setup program. The setup file is typically one of the following:
Autorun or Autorun.exe
Install or Install.exe
Click Run when you download the program from a website.
The installation media is unreadable
Installation media such as CD and DVD media may be dirty or scratched and therefore be unreadable by the CD or DVD reader. To resolve this issue, follow these methods:
Method 1: Clean the CD or DVDTo do this, use a CD or DVD disc-cleaning kit. Or, use a soft, lint-free cotton cloth to gently wipe the silver side of the disc. Do not use paper cloth, as this can scratch the plastic or leave streaks. When you clean the disc, wipe from the center of the disc outward. Do not use a circular motion. If the problem continues to occur, clean the disc by using a damp cloth or a commercial CD or DVD disc-cleaning solution. Dry the disc thoroughly before you insert it into the drive.
Note If multiple CDs or DVDs are required, we recommend that you copy all the disks to the same folder, in reverse order (higher disk numbers first). Be prepared to approve the overwriting of existing files if you are prompted, and then install from that location.
Method 3: Obtain a fresh version of the installation packageIf you tried to install from a CD or DVD, do the following:
Check the software manufacturer’s website for a more recent version of the software package. Download and install the new version.
If you already have the latest version, download the program from the manufacturer’s website, and then run the installation.
Downloaded or copied installation files are corrupted
If you are installing a program from the Internet, redownload the file (select Save instead of Run in the download dialog box), save the file to a folder on a local hard disk on your computer or to other removable media. Then, run the installation from that location.
If your installation files are on a network (for example, a commercial or corporate environment), copy all the files to a folder on a local hard disk on your computer, and then run the installation from that location.
Method 2: Obtain a fresh version of the installation packageIf some time has elapsed between when you downloaded the package and when you tried to install it, do the following:
Check the software manufacturer’s website for a more recent version of the software package. Download and install the new version.
If you already have the latest version, download the program again, and then run the installation.
Programs that are currently running on your computer are interfering with the installation process
Disable programs that might be interfering with the installation process. To do this, follow these steps:
Click Start , type msconfig in the Search box, and then click msconfig.exe.
 If you are prompted for an administrator password or confirmation, type the password, or provide confirmation.
On the General tab, click Selective startup, and then clear the Load startup items check box.
Click Services, click Hide all Microsoft services, and then click Disable all.
Click OK, and then click Restart.
Try running your software program installation.
When you are finished troubleshooting the problem, restart the computer in Normal Startup mode. To do this, follow these steps:
Click Start , type msconfig in the Search box, and then click msconfig.exe.
If you are prompted for an administrator password or confirmation, type the password, or provide confirmation.
On the General tab, click Normal startup, click OK, and then click Restart.
There are typically several ways to remove any program. In this situation, try some other method to remove the program.
The following are common methods that are used to install software:
Method 1: Use the uninstall option (if available)
Click Start , and then click All Programs.
Select the folder for the program that you are trying to uninstall, and then open the folder.
If there is an uninstall option, try using it.
Method 2: Use Control Panel options
Click Start , click Control Panel, click Add and Remove Programs or Programs and Features, and then click Uninstall a program.
Select the program, and then click Uninstall. Follow the instructions.
Note The following steps are appropriate for advanced users only.
Make sure that you don’t have any file or folder names that are longer than 260 characters.
For more about the maximum path length limitation, see Naming files, paths, and namespaces.
Most programs create an installation log. If you can’t locate such a log, you can enable verbose MSI logging. For more information, see How to enable Windows Installer logging.
Msiexec path your_msi.msi /L*v path your_msi_log.txt For a list of msiexec command-line parameters, see Command-line options.
A failed installation typically logs «Return Value 3» where the problem occurred and where the installation rollback began. The description of the failure appears immediately before the Return Value 3 log entry.
You can use the Wilogutl.exe tool to analyze log files from a Windows Installer installation. This tool may suggest solutions to errors that are found in a log file. It is available in the latest Windows Software Development Kit.
The following is an example of how to use the Wilogutl.exe tool at a command line:
wilogutl /q /l c:mymsilog.log /o coutputdir
You may be able to manually uninstall some parts of the program through the Windows interface. For example, you may be able to delete program files and folders. Because the steps to do this may differ widely, depending on the version of Windows that you’re running and on the program that you’re trying to uninstall, no prescriptive steps are provided here. If you’re not sufficiently familiar with the program that you’re trying to uninstall to positively identify the files and folders for that program, we do not recommend that you try this method. Generally, when you begin to delete program files and folders, you run the risk of damaging your operating system. Use this method at your own risk.
If you are considering uninstalling the program manually, be aware of the following:
Before you use this method, make sure that you create a system restore point.
Before you get started, move any personal data or documents that may have ended up in the installation folder of the program that you’re uninstalling. For example, move this material into the Documents folder.
If you cannot manually delete a program file, this may mean that the file is being used or that some other program is accessing the file and preventing you from deleting it. For example, antivirus software may be accessing the file. When antivirus software is accessing a program file and making it impossible to delete it, it’s likely that this same antivirus software was preventing you from uninstalling the program by more traditional means.
For general information about how to install or to uninstall a program, see the following:
Источник
Windows 10 Setup thinks it’s booted from installation media
This has been happening for all Windows 10 Setup builds. Windows Setup will not let me upgrade or downgrade my build (currently 11082) without losing my apps. I always get this message right after I click «Upgrade«:
The computer started using the Windows installation media. Remove the installation media and restart your computer so that Windows starts normally. Then, insert the installation media and restart the upgrade. (Do not select «Custom (advanced)» to perform an upgrade. «Custom (advanced)» installs a new copy of Windows and deletes your programs and settings.)
I have tried opening setup from flash drives, tried in C:, you name it I tried it, but every time I open setup (I even tried the setup.exe found in the sources folder), it refuses to upgrade due to it thinking » the computer started using the Windows installation media «.
Note: The same installation files from the same flash drive worked to upgrade my laptop’s Windows 10 build (which was also at build 11082), so I know the files in the installation folder are legit.
Here are some screenshots:
I get this when I open setup.exe only on my PC:

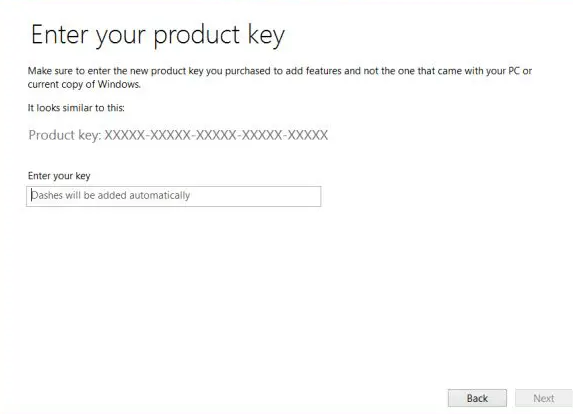
It then asks me for a key:

Then after agreeing to the Windows license policy and clicking on «Upgrade«, I get the error which I wrote above.

I have fixed the partitioning to match the Microsoft recommended specification, and I have even tried booting the installation from another PC, but to no avail.
Any thoughts before I entirely give up upgrading once and for all?
2 Answers 2
I had the same weird behavior when trying a Windows 10 upgrade. Ultimately, my decision was to install from scratch. Definitely the right call. My main issue was that I didn’t have a partition structure that Windows liked. STRONGLY recommend a fresh install on a physical drive (SSD of course) with only the Windows partitions: System, MSR, Windows, and Recovery. Yes, 4 partitions on Drive 0. I was able to use the guidance from MSDN about UEFI/GPT-based hard drive partitions.
I didn’t have to use Windows PE as specified in the article because you can run the CreatePartitions batch from any Windows machine. Using the GPT version (not the MBR version) is highly advisable for 2TB and high drives (I had a 256G SSD, several 3TB drives, and a 5TB drive). Just save this to a CMD file and CHANGE THE DRIVE NUMBER to your physical drive. Run DISKPART LIST DISK to verify the disk number.
The first time I did it, I ran all of the commands manually from CMD. Much easier to see what’s going on that way. Also, if you have Windows «Disk Management» (run diskmgmt.msc) running, you’ll see the results in near real time.
Hope this helps. It saved me, and my Windows install has never been happier.
Pro tip: don’t enter your serial number when installing. make sure you have a good install and just enter it later. Click «I don’t have a product key» instead.
Источник
1.Создал загрузочный диск с помощью программы Rufus
2.Поставил в BIOS’е на первое место флешку и начал установку.В поле обновиться ли мне и тем самым сохранить все личные файлы или же установить Windows и нечего не сохранять, выбрал первое. После этого вылезло такое окно:

«The computer started using the Windows installation media. Remove the installation media and restart your computer so that Windows starts normally. Then, insert the installation media and restart the upgrade. (Do not select |Custom (advanced)| to perform an upgrade. |Custom (advanced)| installs a new copy of Windows and deletes your programs and settings.)»
(Компьютер загружен с установочного диска Windows. Извлеките установочный носитель и перезагрузите компьютер, чтобы запустить Windows в обычном режиме. Затем вставьте установочный носитель и перезапустите обновление)
Помогите, пожалуйста кто-нибудь, я уже не знаю что делать =(
синий экран. достал уже.
подскажите в чём причина и как от неё избавится, сдавала в сервисный центр 2раза и бесполезно. говорят, что внутри всё в порядке, нужно было несколько неустановленных драйверов, но после их установки всё-равно экран не исчез, а выключ моментально, даже если только зашла в ситему. на счёт системы, переустанавливала 3 раза, и даже пробовала загружаться с другого жёсткого диска и всё-равно. в диспетчере устройств вроде все дрова установлены, кроме одного, подписано, как -другие устройства-неизвестное устройство. как быть подскажите.
вот тот самый текст, который вылазит на синем экране
A problem has been detected and windows has been shut down to prevent damage
to your computer.
If this is the first time you ve seen this Stop error screen,
restart your computer. If this screen appears again, follow
These steps:
Check to make sure any new hardware or software is properly installed.
If this is a new installation, ask your hardware or software manufacturer
For any windows updates you might need.
If problems continue, disable or remove any newly installed hardware
or software. Disable BIOS memory options such as caching or shadowing.
If you need to use Safe Mode to remove or disable components, restart
your computer, press F8 to select Advanced Startup Options, and then
Select Safe Mode.
Technical information:
STOP: 0X000000D1 (0X00000000, 0X0000001C, 0X00000001, 0X8077574C)
Beginning dump fo physical memory
Phisical memory dump complete.
Contact your system administrator or technical support group for further
assistence.
Проблема была обнаружена и окна были закрыты, чтобы предотвратить повреждение
к компьютеру.
Если это первый раз, когда вы видели этот экран неустранимой ошибке,
перезагрузите компьютер. Если этот экран появляется снова, следовать
Эти шаги:
Убедитесь, что новое оборудование или программное обеспечение установлено правильно.
Если это новая установка, спросите вашего оборудования или программного обеспечения производителя
Для любого окна обновления может понадобиться.
Если проблемы по-прежнему, отключите или удалите все недавно установленные аппаратные средства
или программного обеспечения. Отключить BIOS памяти варианты, такие как кэширование или затенение.
Если вам нужно использовать безопасном режиме, чтобы удалить или отключить компоненты, перезапустите
компьютер, нажмите F8 чтобы выбрать дополнительные параметры запуска, а затем
Выберите пункт Безопасный режим.
Техническая информация:
STOP: 0x000000D1 (0x00000000, 0X0000001C, 0x00000001, 0X8077574C)
Начало дамп физической памяти
Физические полный дамп памяти.
Обратитесь к вашему системному администратору или в группу технической поддержки для дальнейшего
Помощь.
Источник
Дополнительные способы устранения STOP-ошибки 7B или ошибки Inaccessible_Boot_Device Advanced troubleshooting for Stop error 7B or Inaccessible_Boot_Device
В этой статье приведены инструкции по устранению ошибки 7B: Inaccessible_Boot_Device. This article provides steps to troubleshoot Stop error 7B: Inaccessible_Boot_Device. Эта ошибка может возникнуть после внесения некоторых изменений на компьютер или сразу после развертывания Windows на компьютере. This error may occur after some changes are made to the computer, or immediately after you deploy Windows on the computer.
Причины ошибок Inaccessible_Boot_Device остановки Causes of the Inaccessible_Boot_Device Stop error
Ошибка остановки может привести к остановке: Any one of the following factors may cause the stop error:
Отсутствует, повреждена или несовместимость фильтров, связанных со стеком хранилища. Missing, corrupted, or misbehaving filter drivers that are related to the storage stack
Повреждение файловой системы File system corruption
Изменения в режиме бизнес-аналитики или параметрах контроллера в бизнес-аналитике Changes to the storage controller mode or settings in the BIOS
Использование контроллера хранилища, отличного от той, которая использовалась при установке Windows Using a different storage controller than the one that was used when Windows was installed
Перемещение жесткого диска на другой компьютер с другим геймпадом Moving the hard disk to a different computer that has a different controller
Сборили или контроллер хранилища либо оборудование сбоем. A faulty motherboard or storage controller, or faulty hardware
В необычных случаях сбой службы TrustedInstaller для регистрации недавно установленных обновлений из-за повреждения компонентов In unusual cases: the failure of the TrustedInstaller service to commit newly installed updates because of Component Based Store corruptions
Поврежденные файлы в разделе «Бот» (например, повреждение в том, что система помечена при diskpart > list vol выполнении команды) Corrupted files in the Boot partition (for example, corruption in the volume that is labeled SYSTEM when you run the diskpart > list vol command)
Устраните ошибку Troubleshoot this error
Запустите компьютер в режиме восстановления Windows (WinRE). Start the computer in Windows Recovery Mode (WinRE). Для этого выполните указанные ниже действия. To do this, follow these steps.
На экране установки Windows выберите > «Следующая установка компьютера». On the Install Windows screen, select Next > Repair your computer .
На экране «Параметры восстановления системы» выберите «Следующая > командная строка». On the System Recovery Options screen, select Next > Command Prompt .
Проверка подключения диска бота с подключением и доступности Verify that the boot disk is connected and accessible
Шаг 1 Step 1
В командной строке WINRE выполните diskpart команду и выполните list disk команду. At the WinRE Command prompt, run diskpart , and then run list disk .
Должен появиться список физических дисков, вложенных на компьютер и наоборот: A list of the physical disks that are attached to the computer should be displayed and resemble the following display:
Если компьютер использует интерфейс запуска Unified Extensible Firce, в столбце * GPT будет отображаться звездочка () в столбце **GPT. * If the computer uses a Unified Extensible Firmware Interface (UEFI) startup interface, there will be an asterisk () in the *GPT column.
Если компьютер использует базовую систему ввода и вывода данных (BIOS), звездочка в столбце Dyn не будет. If the computer uses a basic input/output system (BIOS) interface, there will not be an asterisk in the Dyn column.
Шаг 2 Step 2
Если list disk команда правильно отображает диски ОС, выполните list vol эту diskpart команду. If the list disk command lists the OS disks correctly, run the list vol command in diskpart .
list vol Создается выходные данные, напоминающие следующее: generates an output that resembles the following display:
Если диск, содержащий оператор, не указан в выходном файле, вам потребуется привлечь внимание oEM или виртуализации виртуализации. If the disk that contains the OS is not listed in the output, you will have to engage the OEM or virtualization manufacturer.
Проверка целостности базы данных конфигурации «Локат» Verify the integrity of Boot Configuration Database
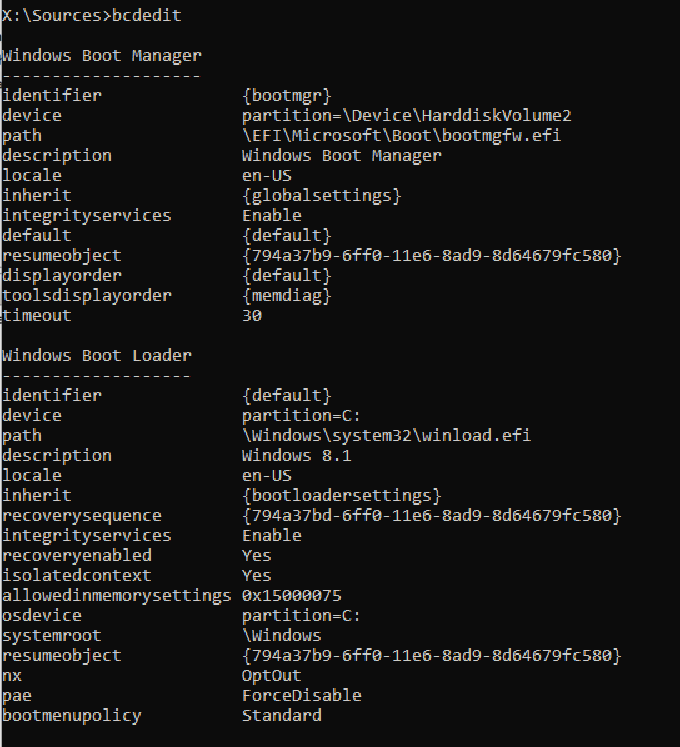
Проверьте, имеются ли база данных конфигурации BCD. Check whether the Boot Configuration Database (BCD) has all the correct entries. Для этого выполните bcdedit командную строку WinRE. To do this, run bcdedit at the WinRE command prompt.
Чтобы проверить записи в bCD-диске: To verify the BCD entries:
Изучите раздел «Диспетчер Ботов Windows» с идентификатором в разделе «Диспетчер ботов Windows». Examine the Windows Boot Manager section that has the identifier. Убедитесь, что устройство и путь указывает на правильный файл загрузки устройства и пути загрузки. Make sure that the device and path entries point to the correct device and boot loader file.
Пример выходных данных, если компьютер основан на uEFI: An example output if the computer is UEFI-based:
Пример выходных данных, если компьютер основан на бизнес-аналитике: An example output if the machine is BIOS based:
Такые выходные данные могут не содержать путь. This output may not contain a path.
В загрузиле загрузки Windows с идентификатором убедитесь, что устройство, путь, osdeviceи системный путь указывает на правильное устройство или разделить устройство или раздел, файл winload, разделитель или устройство и папку OS. In the Windows Boot Loader that has the identifier, make sure that device, path, osdevice, and systemroot point to the correct device or partition, winload file, OS partition or device, and OS folder.
Если компьютер выполняется на основе UEFI, значение path файла, указанный в параметре пути и , будет содержать расширение EFI. If the computer is UEFI-based, the filepath value specified in the path parameter of and will contain an .efi extension.
Если какие-либо сведения неправильные или отсутствуют, рекомендуется создать резервную копию магазина BCD. If any of the information is wrong or missing, we recommend that you create a backup of the BCD store. Для этого выполните команду bcdedit /export C:tempbcdbackup . To do this, run bcdedit /export C:tempbcdbackup . Эта команда создает резервную копию *в C:temp* которой называется «срез». This command creates a backup in C:temp that is named bcdbackup . Чтобы восстановить резервную копию, bcdedit /import C:tempbcdbackup выполните To restore the backup, run bcdedit /import C:tempbcdbackup . Эта команда перезаписывает все параметры BCD с помощью параметров в скрытой копии. This command overwrites all BCD settings by using the settings in bcdbackup .
После завершения резервной копии выполните следующую команду, чтобы внести изменения: After the backup is completed, run the following command to make the changes:
Например, если устройство в разделе неверно или отсутствует, выполните следующую команду, чтобы установить его: For example, if the device under is wrong or missing, run the following command to set it: bcdedit /set device partition=C:
Если вы хотите повторно создать bCD-диск или появляется сообщение «Не удалось открыть хранилищеданных конфигурации бота. Системе не удалось найти указанный файл, bootrec /rebuildbcd «выполнить». If you want to re-create the BCD completely, or if you get a message that states that «The boot configuration data store could not be opened. The system could not find the file specified, » run bootrec /rebuildbcd .
Если служба BCD содержит правильные записи, проверьте, существует ли в правильном месте пути, указанного в bootmgr команде bcdedit. If the BCD has the correct entries, check whether the winload and bootmgr entries exist in the correct location per the path that is specified in the bcdedit command. По умолчанию ботовая сертификация в ее части будет в корневом части системного этапа. By default, bootmgr in the BIOS partition will be in the root of the SYSTEM partition. Чтобы просмотреть файл, запустите Attrib -s -h -r его. To see the file, run Attrib -s -h -r .
Если файлы отсутствуют, но вы хотите перестроить файлы ботов, выполните следующие действия: If the files are missing, and you want to rebuild the boot files, follow these steps:
- Скопируйте все содержимое, расположенное в системной части, в другое место. Copy all the contents under the SYSTEM partition to another location. Кроме того, с помощью командной строки можно перейти на диск OS, создать новую папку, а затем скопировать все файлы и папки из системного громкости, как описано ниже. Alternatively, you can use the command prompt to navigate to the OS drive, create a new folder, and then copy all the files and folders from the SYSTEM volume, as follows:
Если вы используете Windows 10 или у вас возникают проблемы с помощью командной строки предустановленной среды Windows, воспользуйтесь командой BCDBOT, чтобы повторно создать файлы системы bcot, как описано ниже. If you are using Windows 10, or if you are troubleshooting by using a Windows 10 ISO at the Windows Pre-Installation Environment command prompt, you can use the bcdboot command to re-create the boot files, as follows:
Например, если назначить (диск УЛЬГОНА), а буква R — буква D, следующая команда будет выглядеть следующим образом: For example: if we assign the (WinRE drive) the letter R and the is the letter D, this command would be the following:
В КОМАНДе BCDBOT все файлы ботов будут называться все файлы ботов (UEFI и BIOS) в соответствующие расположения. The ALL part of the bcdboot command writes all the boot files (both UEFI and BIOS) to their respective locations.
Если системы Windows 10 нет ISO, необходимо отформатировать bootmgr эту часть и скопировать программу-узел с другого рабочего компьютера с сборкой Windows. If you do not have a Windows 10 ISO, you must format the partition and copy bootmgr from another working computer that has a similar Windows build. Для этого выполните следующие действия: To do this, follow these steps:
Запустите Блокнот. Start Notepad .
Нажмите клавиши CTRL+O. Press Ctrl+O.
Перейдите к системному разделу (в данном примере — R). Navigate to the system partition (in this example, it is R).
Щелкните правой кнопкой мыши часть и отформатируйте ее. Right-click the partition, and then format it.
Устранение неполадок, возникающая после установки Центра обновления Windows Troubleshooting if this issue occurs after a Windows Update installation
Чтобы проверить установку и даты установки Windows, выполните следующую команду: Run the following command to verify the Windows update installation and dates:
После выполнения этой команды вы увидите ожидающие ожидания установки и ожидания удаления: After you run this command, you will see the Install pending and Uninstall Pending packages:
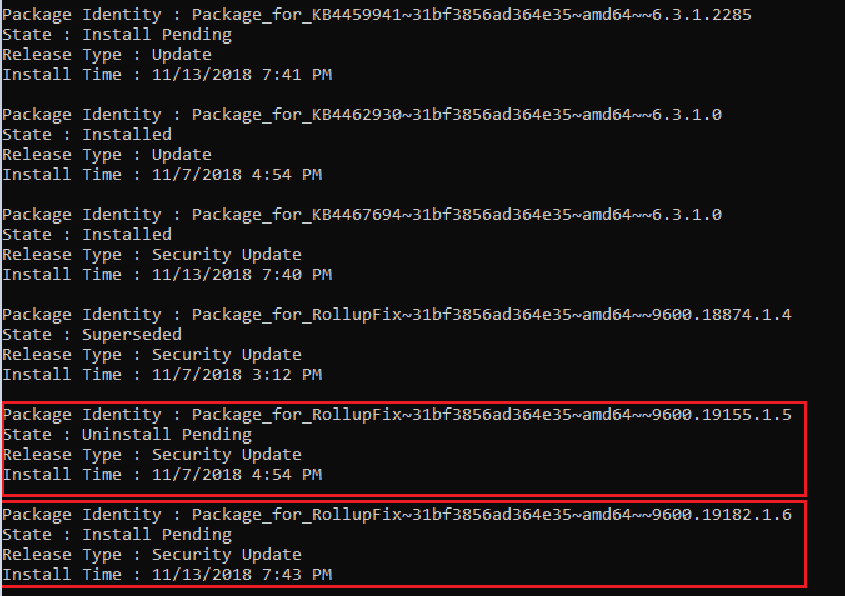
Выполните dism /Image:C: /Cleanup-Image /RevertPendingActions команду. Run the dism /Image:C: /Cleanup-Image /RevertPendingActions command. Замените C: системный адрес компьютера. Replace C: with the system partition for your computer.

Перейдите ** к OSdriveLetter :WindowsWinSxS** и проверьте, есть ли файлpending.xml. Navigate to OSdriveLetter :WindowsWinSxS , and then check whether the pending.xml file exists. При необходимости измените его pending.xml.old. If it does, rename it to pending.xml.old.
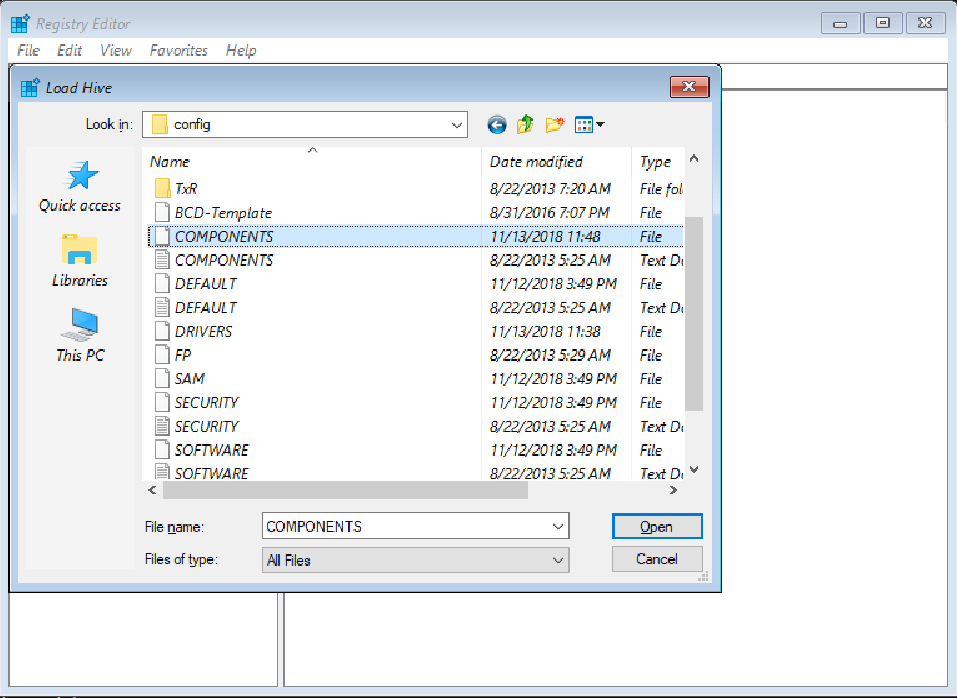
Чтобы восстановить изменения реестра, введите реестр в командной строке, чтобы открыть редактор реестра. To revert the registry changes, type regedit at the command prompt to open Registry Editor.
Выберите HKEY_LOCAL_MACHINEи перейдите к пункту «Загрузка > работы с файлом Hive». Select HKEY_LOCAL_MACHINE, and then go to File > Load Hive.
Перейдите к OSdriveLetter:WindowsSystem32config, выберите файл с именем КОМПОНЕНТА (без расширения), а затем нажмите кнопку «Открыть». Navigate to OSdriveLetter:WindowsSystem32config, select the file that is named COMPONENT (with no extension), and then select Open. Когда будет предложено, введите имя OfflineComponentHive для новой работы When you are prompted, enter the name OfflineComponentHive for the new hive
Разверните HKEY_LOCAL_MACHINEOfflineComponentHiveи проверьте, есть ли в нем ключ PendingXMLIdentifier. Expand HKEY_LOCAL_MACHINEOfflineComponentHive, and check whether the PendingXmlIdentifier key exists. Создайте резервную копию ключа OfflineComponentHive, а затем удалите ключ PendingXmlIdentifier. Create a backup of the OfflineComponentHive key, and then delete the PendingXmlIdentifier key.
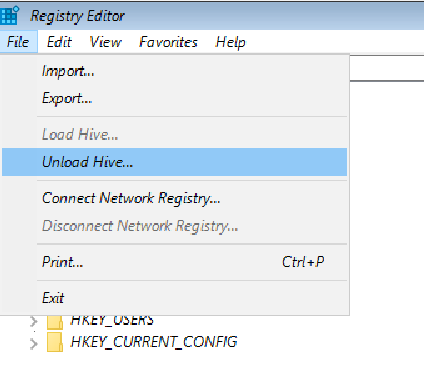
Откройте плодотвор. Unload the hive. Для этого выделите OfflineComponentHiveи выберите команду > «Файл «Не загружать на узле» To do this, highlight OfflineComponentHive, and then select File > Unload hive.

Выберите HKEY_LOCAL_MACHINE, перейдите в раздел «Загрузка > работы сфайлами», перейдите к ** OSdriveLetter :WindowsSystem32config,** выберите файл с именем SYSTEM (без расширения), а затем нажмите кнопку «Открыть». Select HKEY_LOCAL_MACHINE, go to File > Load Hive, navigate to OSdriveLetter :WindowsSystem32config, select the file that is named SYSTEM (with no extension), and then select Open . Когда будет предложено, введите имя OfflineSystemHive для нового места. When you are prompted, enter the name OfflineSystemHive for the new hive.
Разверните HKEY_LOCAL_MACHINEOfflineSystemHiveи выберите клавишу SELECT. Expand HKEY_LOCAL_MACHINEOfflineSystemHive, and then select the Select key. Проверьте данные для значения по умолчанию. Check the data for the Default value.
Если данные в HKEY_LOCAL_MACHINEOfflineSystemHiveSelectDefaultDefault имеет значение 1, разверните HKEY_LOCAL_MACHINEOfflineHiveControlSet001. If the data in HKEY_LOCAL_MACHINEOfflineSystemHiveSelectDefault is 1 , expand HKEY_LOCAL_MACHINEOfflineHiveControlSet001. Если он 2, разверните HKEY_LOCAL_MACHINEOfflineHiveControlSet002и т. д. If it is 2, expand HKEY_LOCAL_MACHINEOfflineHiveControlSet002, and so on.
Развернуть средство контролясеансов. Expand ControlSession Manager. Проверьте, есть ли в списке ключ PendingFileRenameOperations. Check whether the PendingFileRenameOperations key exists. Если это так, создайте резервную копию ключа SessionManager и удалите ключ PendingFileRenameOperations. If it does, back up the SessionManager key, and then delete the PendingFileRenameOperations key.
Проверка критически важных драйверов и служб Verifying boot critical drivers and services
Проверка служб Check services
Выполните действия 1–10 в разделе «Устранение неполадок, возникающая при возникновении этой проблемы после установки Центра обновления Windows». Follow steps 1-10 in the «Troubleshooting if this issue occurs after an Windows Update installation» section. (Шаг 11 не относится к этой процедуре.) (Step 11 does not apply to this procedure.)
Разверните раздел «Службы». Expand Services.
Убедитесь, что в службах есть следующие разделы реестра: Make sure that the following registry keys exist under Services:
Если эти ключи существует, проверьте каждый из них, чтобы убедиться, что в нем указано значение «Начало» и имеет значение 0. If these keys exist, check each one to make sure that it has a value that is named Start and that it is set to 0. В противом случае задайте значение 0. If not, set the value to 0.
Если ни одноиз этих клавиш не существует, можно попытаться заменить текущий реестр реестра с помощью RegBack. If any of these keys do not exist, you can try to replace the current registry hive by using the hive from RegBack. Для этого выполните следующие команды: To do this, run the following commands:
Проверхуровки верхнего и нижнего фильтров Check upper and lower filter drivers
Проверьте, есть ли на компьютере любые другие драйверы фильтрации, не являющиеся верхними и нижними, и нет на другом компьютере. Check whether there are any non-Microsoft upper and lower filter drivers on the computer and that they do not exist on another, similar working computer. Если их существует, удалите верхний и нижний драйвер фильтра. if they do exist, remove the upper and lower filter drivers:
Разверните HKEY_LOCAL_MACHINEOfflineHiveControlSet001Control. Expand HKEY_LOCAL_MACHINEOfflineHiveControlSet001Control.
Найдите все элементы Верхнего фильтра или меньше фильтров. Look for any UpperFilters or LowerFilters entries.
Эти фильтры основно связаны с хранилищем. These filters are mainly related to storage. После развертывания клавиши CONTROL в реестре можно выполнить поиск UpperFilters и LowerFilters. After you expand the Control key in the registry, you can search for UpperFilters and LowerFilters.
Ниже перечислены некоторые записи реестра, в которых могут быть найдены эти драйверы фильтра. The following are some of the different registry entries in which you may find these filter drivers. Эти записи находятся в элементе ControlSet и назначены по умолчанию: These entries are located under ControlSet and are designated as Default :

Если элемент «Верхний фильтр» или «Нижний фильтр» не является стандартным (например, не является драйвером фильтра Windows, установленного по умолчанию, например, части фильтра, такой как ЧастиMGrgr), удалите запись, дважды щелкнув ее в правой области и удалив только это значение. If an UpperFilters or LowerFilters entry is non-standard (for example, it is not a Windows default filter driver, such as PartMgr), remove the entry by double-clicking it in the right pane, and then deleting only that value.
Возможны несколько записей. There could be multiple entries.
Причина, по которой эти записи могут повлиять на работу, могут повлиять на себя, поскольку в ветви «Службы» может быть указано значение 0 или 1 (если они загружаются в загрузку или автоматический часть начального процесса). The reason that these entries may affect us is because there may be an entry in the Services branch that has a START type set to 0 or 1 (indicating that it is loaded at the Boot or Automatic part of the boot process). Кроме того, поврежден файл, на который ссылается, отсутствует или поврежден или его имя может отличаться от указанных в записи. Also, either the file that is referred to is missing or corrupted, or it may be named differently than what is listed in the entry.
Если фактически настроено значение 0 или 1, соответствующая элементу LowerFilters Services «Верхний фильтр», вы знаете, что для него не удаляется значение 0x,42 и 3 из-за того, что при удалении драйвера фильтра не удаляется и не удаляется. Filter Driver If there actually is a service that is set to 0 or 1 that corresponds to an UpperFilters or LowerFilters entry, setting the service to disabled in the Services registry (as discussed in steps 2 and 3 of the Check services section) without removing the Filter Driver entry causes the computer to crash and generate a 0x7b Stop error.
SFC и Chkdsk Running SFC and Chkdsk
Если компьютер все еще не запускается, chkdisk можно попробовать выполнить процесс на диске и запустить проверку системных файлов. If the computer still does not start, you can try to run a chkdisk process on the system drive, and also run System File Checker. Для этого выполните в командной строке WinRE следующую команду: To do this, run the following commands at a WinRE command prompt:
chkdsk /f /r OsDrive:

sfc /scannow /offbootdir=OsDrive: /offwindir=OsDrive:Windows
Источник
Delete a Registry key when you encounter the issue
by Vlad Turiceanu
Passionate about technology, Windows, and everything that has a power button, he spent most of his time developing new skills and learning more about the tech world. Coming… read more
Updated on June 2, 2023
Reviewed by
Alex Serban

After moving away from the corporate work-style, Alex has found rewards in a lifestyle of constant analysis, team coordination and pestering his colleagues. Holding an MCSA Windows Server… read more
- If your computer has started using the Windows installation media unexpectedly, this means there is a misconfiguration in your system’s boot order.
- Try to disconnect peripheral devices, and re-insert your laptop’s battery to see if that fixes the issue.
- You can also format the installation media to fix this issue if need be.
XINSTALL BY CLICKING THE DOWNLOAD FILE
This software will keep your drivers up and running, thus keeping you safe from common computer errors and hardware failure. Check all your drivers now in 3 easy steps:
- Download DriverFix (verified download file).
- Click Start Scan to find all problematic drivers.
- Click Update Drivers to get new versions and avoid system malfunctionings.
- DriverFix has been downloaded by 0 readers this month.
Recently, some of our readers complained of an error on their Windows PC which states that the computer started using the Windows installation media. This often occurs when you’re trying to install or reinstall the Operating system on your PC.
When you see this message, it means that the computer is attempting to boot from the Windows installation media rather than from its internal hard drive. In this article, we will take you through the causes and how to fix the error.
- Why did the computer started using the Windows installation media?
- What can I do if the computer started using the Windows installation media?
- 1. Delete a Registry key
- 2. Format the external drive used for installation
From several users’ experiences, if your computer has started using the Windows installation media unexpectedly, it could be due to several reasons. Below are some of them:
- Incorrect boot order – The boot order in your computer’s BIOS or UEFI settings may be misconfigured. If the Windows installation media is set as the first boot device, the computer will attempt to boot from it instead of the internal hard drive.
- Removable media connected – Your computer may be set by default to boot from removable media such as USB drives or DVDs. If any of these media are connected to your computer while starting up, the system might try to boot from them.
- Damaged or corrupt boot loader – The boot loader may be damaged or corrupted. This can happen due to various reasons, such as improper shutdowns, disk errors, or malware infections.
- Hardware or connection issues – In some cases, hardware problems or faulty connections can cause the computer to incorrectly detect or prioritize boot devices, leading to the error message.
The above are common reasons behind computer started using the Windows installation media. The next section will provide you with simplified steps on how to fix the issue.
What can I do if the computer started using the Windows installation media?
Try the following preliminary checks before using the advanced solutions provided for this error:
- Restart your computer.
- Check for hardware or connection issues.
- Disconnect all peripheral devices.
- Re-insert your Laptop’s battery – Several people who use Laptops have confirmed that this fix works for them and that is why this method is worth a shot at.
Having confirmed the above checks, the next section will take you through detailed steps on how to fix the computer that started using the Windows installation media error.
1. Delete a Registry key
- Press the Windows + R keys to open the Run command dialog. Type regedit in the dialog box and press Enter.
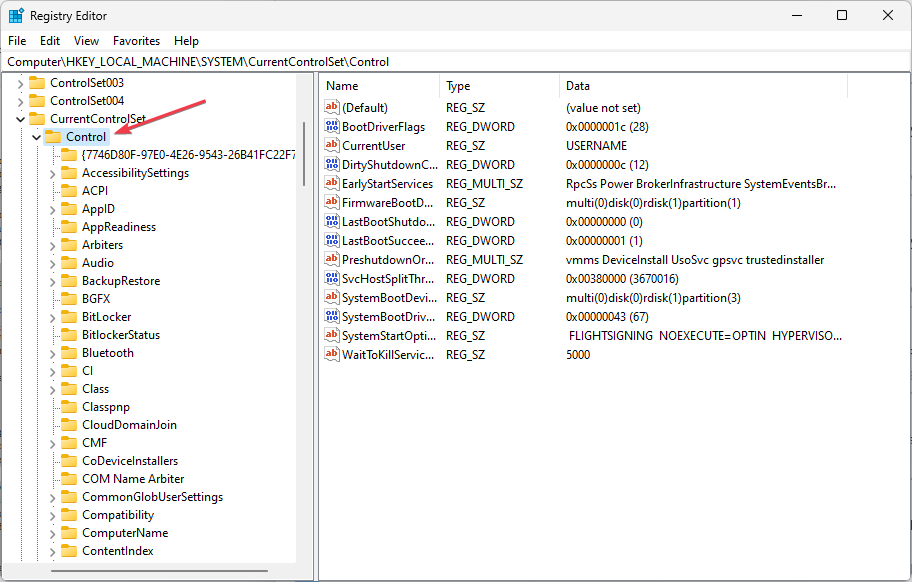
- Navigate to the following registry key:
HKEY_LOCAL_MACHINESYSTEMCurrentControlSetControl
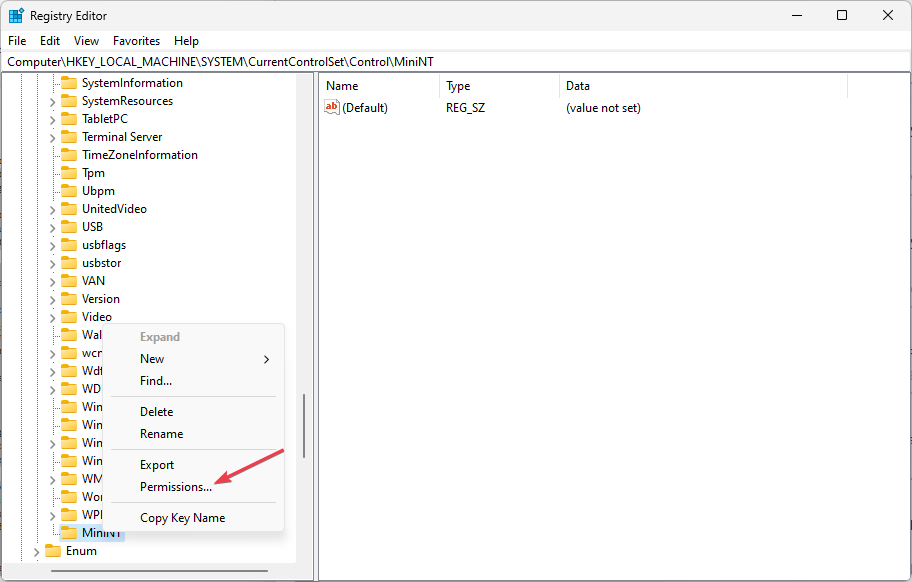
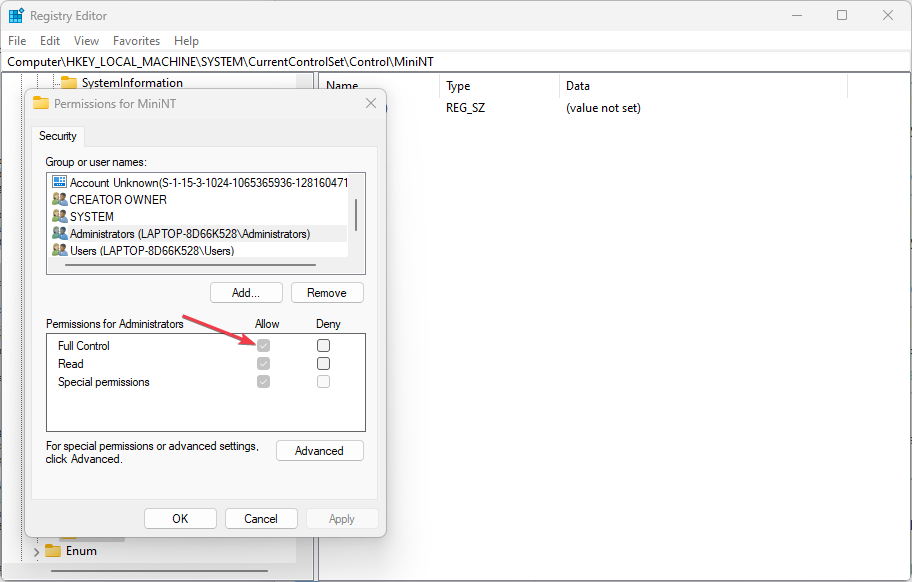
- Under the Control key, right-click on the key named MiniNT, and click on Permissions.
- Select your username under the Users or Groups section, check the Full Control checkbox under Permissions for…, and apply the changes you have made.
- Now, right-click on the MiniNT key and click on Delete.
- Confirm the dialog box which will appear and restart your computer to apply the changes.
- Finally, try installing Windows again.

If you’ve been getting the computer started using the Windows installation media error while trying to install Windows regularly, you can easily fix this problem by deleting the registry key.
- Fix: the new Outlook could not successfully launch error
- OBS Stuttering When Recording? 3 Ways to Quickly Fix it
- NTVDM.exe: What is it & How to Fix its Errors
- Windows 11’s Clipboard needs shelf support, users say
- 0XC00002EE Error: How to Fix It on Windows 10 & 11
2. Format the external drive used for installation
- Insert the installation media and boot the computer.
- Set up the language, time and date settings, etc.
- Next, enter your Windows activation key. But, if you don’t have it, click on I don’t have a product key below.

- Follow the setup process normally until you see the Which type of installation do you want? screen.
- Then. select the Custom option to perform a Clean install.
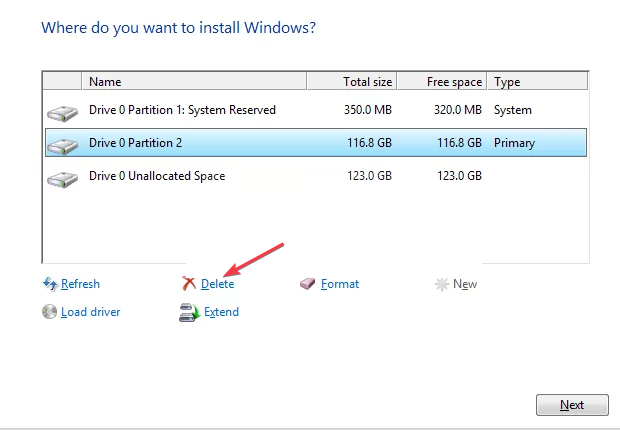
- You will now see the Where do you want to install Windows? screen with the partitions you have active.
- Choose each one with the current Operating system’ system files on it and click on Delete.

- Finally, choose the one where you want to install Windows and follow the on-screen instructions to complete the process.
This should fix the problem. However, if the issue persists after trying these methods, try to seek further assistance from a professional technician or Microsoft support.
For further assistance, check out our detailed guide on what to do if you can’t install Windows on a USB flash drive using setup.
If you have any questions or suggestions, please use the comments section below.
Still having issues? Fix them with this tool:
SPONSORED
Some driver-related issues can be solved faster by using a dedicated tool. If you’re still having problems with your drivers, just download DriverFix and get it up and running in a few clicks. After that, let it take over and fix all of your errors in no time!
![]()
Download PC Repair Tool to quickly find & fix Windows errors automatically
If when performing an upgrade to a new version of Windows, and you encounter the error message The computer started using the Windows installation media, then this post is intended to help you. In this post, we will offer the most suitable solutions to this issue.

When you encounter this issue, you’ll receive the following full error message.
The computer started using Windows installation media. Remove the installation media and restart your computer so that Windows start normally. Then, insert the installation media and restart the upgrade. [Do not select Custom (advanced) to perform an upgrade. Custom (advanced) installs a new copy of Windows and deletes your programs and settings.]
If you’re faced with this issue, you can try our recommended solutions below in no particular order and see if that helps to resolve the issue.
- Modify the Registry
- Upgrade using Windows 11/10 ISO file
- Clean install Windows 11/10
Let’s take a look at the description of the process involved concerning each of the listed solutions.
1] Modify the Registry
Since this is a registry operation, it is recommended that you back up the registry or create a system restore point as necessary precautionary measures. Once done, you can proceed as follows:
- Press Windows key + R to invoke the Run dialog.
- In the Run dialog box, type regedit and hit Enter to open Registry Editor.
- Navigate or jump to the registry key path below:
HKEY_LOCAL_MACHINESYSTEMCurrentControlSetControl
- At the location, at the left navigation pane, under the Control key, scroll down until you get to the key named MiniNT.
Note: If you do not see this key, skip to the next solution.
- Next, take Ownership of the MiniNT registry key.
- After you have taken Ownership of the key, right-click the key and select Delete.
- Restart computer.
On boot, try the Windows 10 upgrade again and see if the error The computer started using the Windows installation media is resolved. Otherwise, try the next solution.
2] Upgrade using Windows 10 ISO file
Since you’re encountering this Windows 10 upgrade install error using the Media Creation tool aka Windows Update Assistant, this solution requires you to directly download the Windows 10 ISO image file from the Microsoft website. Once you have downloaded the ISO to a location (preferably the desktop) on your device, double-click the ISO image to mount it as a virtual drive then double-click the setup.exe file to start the in-place upgrade process with the ISO file.
3] Clean install Windows 11/10
If none of the above solutions worked, back up your data, create a fresh installation media with the latest version of Windows 11/10 and then perform a clean install on your device.
I hope this helps!

Obinna has completed B.Tech in Information & Communication Technology. He has worked as a System Support Engineer, primarily on User Endpoint Administration, as well as a Technical Analyst, primarily on Server/System Administration. He also has experience as a Network and Communications Officer. He has been a Windows Insider MVP (2020) and currently owns and runs a Computer Clinic.