
Куратор(ы):
serj
| Автор | Сообщение | ||
|---|---|---|---|
|
|||
|
Member Статус: Не в сети |
DenSosed писал(а): В общем, победил я вроде как свою проблему с ошибкой: дело в моём случае было с tRFC. Вот только вряд ли виной был tRFC. Поднятием tRFC ты просто придушил чуток память, производительность снизилась и ошибки ушли. |
| Реклама | |
|
Партнер |
|
DenSosed |
|
|
Member Статус: Не в сети |
Auroson1c ну да, так и есть. А по поводу vccio и vccsa, есть вопрос: выше я писал что они у меня уже выставлены 1,15 и 1,25 вольт, соответственно — думаете есть смысл ещё увеличивать? |
|
MobileLord |
|
|
Member Статус: Не в сети |
aleksei123321 писал(а): можно как-нитb поборотb ошибку такого вида без перезагрузки? Аналогичная ошибка, рестарт не помогает. Как вы пользуетесь ей? |
|
lexa |
|
|
Member Статус: Не в сети |
Подскажите что это за ошибка вылезла одновременно или даже после окончания теста(точно момент не увидел), когда уже все закончилось и выпало окошко, что ошибок нету. Это какой то баг программы или мои кривые тайминги? Раньше такого не видел.
У вас нет необходимых прав для просмотра вложений в этом сообщении.
|
|
АthƖоn |
|
|
Заблокирован Статус: Не в сети |
Запускаю TestMem5 из определенной директории диска «E:» |
|
CHiCHo |
|
|
Member Статус: Не в сети |
lexa писал(а): когда уже все закончилось и выпало окошко, что ошибок нету. Это какой то баг программы или мои кривые тайминги? Раньше такого не видел. Аналогично, не понял, почему. Удалось разобраться? Дополню, подскажите, что может быть, глюк программы или что крутить. Последующие запуски проги — всегда без ошибок. Последний раз редактировалось CHiCHo 01.04.2019 21:08, всего редактировалось 1 раз. |
|
anta777 |
|
|
Member Статус: Не в сети |
В конфиге не должно быть два теста Refresh! |
|
CHiCHo |
|
|
Member Статус: Не в сети |
anta777 Сейчас запустил тест на последнем Стрельце Вин10х64 (с флешки загрузился), там файла подкачки нет, и тестмем об этом рапортует. |
|
anta777 |
|
|
Member Статус: Не в сети |
На скине от lexa видно конфиг, который он применяет. |
|
CHiCHo |
|
|
Member Статус: Не в сети |
anta777 |
|
anta777 |
|
|
Member Статус: Не в сети |
Вы откуда брали свой конфиг? |
|
CHiCHo |
|
|
Member Статус: Не в сети |
anta777 |
|
sahaprof |
|
|
Member Статус: Не в сети |
anta777 писал(а): используемом Вами конфиге дважды применен тест Refresh, используйте только тест 0, второй отключите. Тест 14 в конфиге enable=0, или стереть 14 тест в перечне тестов. Получается 1usmus допустил ошибку и не знает о ней или я что то не понял? |
|
anta777 |
|
|
Member Статус: Не в сети |
Знает давно, но не хочет и не будет исправлять. TestMem5 Тест 0 «как таковым» тестом не является, он лишь особая настройка того, что делать с тестируемой памятью после того, как какой-то тест выполнил проверку. Его задача — в проверенном блоке памяти вернуть первоначальное значение (в зависимости от его настроек — или «константное» значение, или «случайное») и проверить, что вся остальная память сохраняет правильное значение. Т.е. проверяется режим «сохранения» в памяти того, что не должно было измениться (с признаком ошибки, естественно). С ними связаны тест «move», которые ничего не тестируют, у них вообще нет фазы проверки. Эти тесты перемещают весь блок памяти «четное» число раз, в результате должно остаться то, что было изначально. Проверка возлагается на «сохранность» (тест 0). Remark: Я уже не помню, поэтому пожелание — в файле конфигурации можете что угодно делать с описателями, например — всести все «default», но не трогайте тест №0. Наверняка это учтено, но, на всякий случай, оставьте его как есть. Если он не нужен, просто отключите (Enable=0). Последний раз редактировалось anta777 03.04.2019 21:05, всего редактировалось 3 раз(а). |
|
sahaprof |
|
|
Member Статус: Не в сети |
anta777 писал(а): Читайте ответ автора testmem5 Спасибо! |
|
CHiCHo |
|
|
Member Статус: Не в сети |
anta777 TestMem5 #15912351 Или оптимизированный TestMem5 #15910781 ? |
|
anta777 |
|
|
Member Статус: Не в сети |
Я проверяю своими конфигами. |
|
CHiCHo |
|
|
Member Статус: Не в сети |
anta777 |
|
anta777 |
|
|
Member Статус: Не в сети |
|
|
Imian |
|
|
Member Статус: Не в сети |
anta777 с rgho.st очень сложно скачать — и на работе блочится домен, и по обеим симкам ОпСоСы блочат. вы сможете закинуть ваш конфиг и корейский на другой хостинг или прислать посредством ЛС? |
—
Кто сейчас на конференции |
|
Сейчас этот форум просматривают: нет зарегистрированных пользователей и гости: 2 |
| Вы не можете начинать темы Вы не можете отвечать на сообщения Вы не можете редактировать свои сообщения Вы не можете удалять свои сообщения Вы не можете добавлять вложения |
Лаборатория
Новости
Go to overclocking
r/overclocking
r/overclocking
All things overclocking go here. Learn to overclock, ask experienced users your questions, boast your rock-stable, sky-high OC and help others!
Members
Online
•
by
dokujaryu
TestMem5 error messages all gibberish
I’ve seen some posts online of folks saying they see error codes to diagnose, but I don’t even see Russian characters. Do I need to load the Russian language into Windows? Or is that a huge waste of time and it just says «An error happened lol»
Перешел на DDR5 и возникла следующая проблема — при включенном XMP (частота 6000 Мгц, именно она заявлена в характеристиках ОЗУ) в киберпанке происходят вылеты раз в пару часов и TestMem5 выдает ошибки (1-2 ошибки за час, anta777 heavy). При выключенном XMP (частота 4800 Мгц) ошибок не наблюдается. Чип оперативки — Hynix, планки стоят в правильных слотах 2 и 4. Стоит последняя версия биоса. Заниматься ручным разгоном не планирую, тк я в этом нуб.
Собственно, вопрос:
Что вероятней — это дефект оперативы или корявый XMP профиль? Стоит ли делать возврат или продолжать пользоваться на заводской частоте 4800 и ждать обновы биоса?
Комплектующие следующие:
- Мать ROG STRIX B660-G GAMING WIFI
- Проц i9-12900K
- Память Kingston Fury Beast KF560C40BBK2-32 DDR5 — 2×16ГБ 6000 Мгц
| TM5 Errors Decyphered | SOURCE | ||
| 1usmus_V3 | Error Type | Error Description | |
| ERROR #0 | RefreshStable 0Mb | Voltage cutoff choke, suspect tRRD & tWTR Nearly always tRRD & tWTR but can also be too low tRP or tiny bit too low tRC (if user used > -3 on tRC) Start by adding VDIMM 2,0,0,0,0 = not enough VDIMM 0 at the start = overvoltage crash |
Veii (updated 01/01/2022) |
| ERROR #1 | Variable tests 16Mb | Can be voltage related, can be tRFC issues, Tiny timeout issues (tRRD, tWTR), can also be on the edge of stability CAD_BUS (depends if #6/#4 exist or not) |
Veii |
| ERROR #2 | Variable tests 32Mb | Is a timeout issue, somewhere something ends too quickly or you lack voltage and cells are not recharged in time, a sync issue with other words, which’s first culprit is voltage somewhere or resistance somewhere ^ needs updating and clearer findings — WIP Comes together with Voltages issues for #3, #4, #5, #8, #10, #14 |
Veii (updated 02/02/2021) |
| ERROR #3 | MirrorMove 0Mb | Would suspect more tRDWR/tWRRD while for bigger dataset-errors before it = tRP, tRFC start with increasing tWTR_ , for example to 5-14 It can also be too low tRRD_L or too strong RTT_NOM |
Veii (updated 23/09/2021) |
| ERROR #4 | MirrorMove128 0Mb | PCB Crash ! Too strong RTT values too high CAD_BUS ClkDrvStr wrong tCKE or too high VDIMM |
Veii (updated 18/01/2021) |
| ERROR #5 | MirrorMove 0Mb | Would suspect more tRDWR/tWRRD while for bigger datasets tRP, tRFC — it can error after the 2nd or 3rd pass Can be incorrect RTL training, or on AMD too high/low cLDO_VDDP & ClkDrvStr causing tPHYRDL missmatch |
Veii & Bloax (updated 08/04/2022) |
| ERROR #6 | Random tests 1Mb | Is purely related to the IMC (Can mean voltage is too high) , be if procODT, CLDO_VDDP or vSOC ~ it translates to «i couldn’t even start transfering data, i crashed» 4-6x error 6 result in full bluescreen — Error 5 then 6 is a timings missmatch between dimms (Data mirror move) 0-0-0-6-6-6 (2nd cycle) Can be too low SCL with wrong tWRRD 6-6-6 at the very start , too high/low tCKE * |
Veii (updated 01/12/2021) |
| ERROR #7 | MirrorMove 2Mb | It will error out if if CAD_BUS or CAD_BUS SETUP Time is not optimal (lower CkeSetup) will error out of tRFC is too low, mostly errors out only after time Suspect vDIMM to be +/- 1 step too high/low, tFAW be awkward value, or tRAS needing +1 1-7-7 or 7-1-8-8 (increase CkeDrvStr) |
Veii (updated 05/04/2021) |
| ERROR #8 | Random tests 0Mb | =Error #1
1x #8 at the end = badly timed tWTR_ Can also be too high tWTR_L , but first try higher tWTR_S |
Veii (updated 23/09/2021) |
| ERROR #9 | MirrorMove 4Mb | Suspect tWR being too slow, voltage stability issue If you’ve lowered tRP , increase vDimm a tiny bit If you’ve increased tRP to longer delay, decrease vDIMM +0.01 , one tiny step |
Veii |
| ERROR #10 | Random tests 8Mb | Suspect tWR being too slow (lower value required) mostly affects the first 5 main timings — noticed it can be tRCDWR to RD, can be tRP too, but it also can be the last two tRDWR & tWRRD which don’t play well with your main tRCDWR/RD #10 at the very start = increase RTT_NOM to something stronger |
Veii |
| ERROR #11 | Random tests 16Mb | It is most likely RAM overheating it will error out if if CAD_BUS is not optimal or SETUP Times are wrong will error out of tRFC is too low, mostly errors out only after time Suspect vDIMM to be +/- 1 step too high/low, tFAW be awkward value, or tRAS needing +1 |
Veii |
| ERROR #12 | Random tests 32Mb | = ERROR #2
If right at the start, Alternatively — weaken ClkDrvStr & increase VDIMM slightly |
Veii (updated 01/21/2021) |
| ERROR #13 | Random tests 64Mb | It is most likely RAM overheating timeout while transfering big data — full crash, nearly always related to too much voltage ~ as memory was not able to autocorrect it Explosion of #13’s, Random #13’s, still in the first loop: |
Veii & PJVol (updated 30/03/2021) |
| ERROR #14 | MirrorMove 0Mb | 14 / 4 / 0 — relate to badly used CAD_BUS SETUP Timing Too low CAD_BUS AddrCmdDrvStr/CsOdtDrvStren/CkeDrvStren or overal badly timed powerdown They will appear together, because it’s the dimms crashing on badly timed values |
Veii (updated 01/01/2022) |
| ERROR #15 | MirrorMove128 0Mb | Crashed after #15 = End of one Cycle Timing accuracy related Can be everything from (tCWL≠tCL, tRFC, vDIMM, tFAW smaller than tRRD_L, too tight tRRD_) Can also be an unstable Curve Optimizer core |
Veii (added 01/12/2021) |
Страницы: [1] Вниз
- Печать

Автор
Тема: Память работает с ошибками в xmp профиле. (Прочитано 1418 раз)

Добрый день. Имеется плата z390 gaming pro carbon (биос последний 7B17v15) работает с процессором i9 9900k и памятью g.skiil 4266 19-19-19-39 dram 1.4v. Собственно при прогоне в тесте памяти testmem5 сыпятся ошибки при включенном xmp, а иногда система просто не заводится. В QVL листе платы моя память поддерживается, сама мат. плата поддерживает память до 4400мгц. Также я не один с такой проблемой столкнулся, на форуме overclockers.ru переписывался с людьми у которых также есть проблемы с нормальной работой памяти на своих частотах на этой плате. Максимальная частота на которой память работает нормально и все тесты проходит без ошибок это 4000мгц, все что выше этой частоты или ошибки или не запуск системы при чем с любыми вольтажами dram, iosa. Как быть в данной ситуации? Появляются мысли о продаже платы, чего не хотелось бы.
« Последнее редактирование: 08 Июль 19, 21:09:24 от grolj1 »

Записан
Добрый день!
XMP — не панацея. Здесь важна полная связка CPU + MB + DRAM.
Для начала прошить последний BIOS, выставить профиль XMP и частоту 4000 МГц, проверять далее с медленным повышением частоты до 4066-4100-4133 … Повысить напряжение CPU SA & IO Voltage, искать стабильное значение. Можно и приподнять на CPU и DRAM.
Плата обещает, но контроллер памяти стоит же в процессоре  )
)
Записан
Официальный представитель MSI Russia
Вы видимо невнимательно или не полностью прочитали мой первый пост, по поводу поднятия напряжения я же написал, что при любых напряжениях dram, iosa память выше 4000мгц работает, но с ошибками или система не запускается. Биос платы стоит последний!
« Последнее редактирование: 09 Июль 19, 19:01:32 от grolj1 »
Записан
В общем не может эта мп работать с памятью 2х8гб частотой более 4000 мгц, проверено на 3х платах z390 gaming pro carbon, о работе на 4х модулях до 4000мгц вообще речь не идет, дай бог 3600 возьмет. Пришлось все-таки продать плату т.к. нужна работа памяти на частотах более 4000 со всеми ужатыми таймингами. Вопрос с памятью полностью разрешился на новой мп asus z390 apex.
« Последнее редактирование: 30 Июль 19, 12:55:46 от grolj1 »
Записан
- Печать
Страницы: [1] Вверх
Why is this program needed.
Well, I think you know what the program is about, after all, version 5. At the moment, the memory tests are not bad, but quite bad. I would not like to talk about ‘all’ tests, but most of them are unaware of significant changes in the hardware. And the main ‘harm’ is not at all from memory, it has evolved little, namely, from the processor and memory controller (to a lesser extent). Processors have become faster, there are a lot of them and they have become strange. For example, before the memory ‘sat’ on one controller, with which the processor communicated. Now memory can hang on different processors and, as a result, have a different ‘distance’ from a particular processor core to a particular DIMM. In addition, the amount of caches in the processor has increased, which may affect testing. For example, TM4 used 512K test block size. At the time of writing the program, this was the optimum, but now this block quietly fits in L2 and the test does not work at all as intended. Will this unpleasant moment affect the quality of memory failure detection? Undoubtedly and in the most disgusting way. Alas. Other programs can operate on an access block, which is now extremely unreasonable and causes more problems than mythical benefits. Everything becomes obsolete. Alas, the same fate befell MemTest86. Quite good and effective, now it has quietly degraded to ‘just a test’. The reason is the same — the test modules have not changed for a long time, and the hardware does not stand still. Alas. Other programs can operate on an access block, which is now extremely unreasonable and causes more problems than mythical benefits. Everything becomes obsolete. Alas, the same fate befell MemTest86. Quite good and effective, now it has quietly degraded to ‘just a test’. The reason is the same — the test modules have not changed for a long time, and the hardware does not stand still. Alas. Other programs can operate on an access block, which is now extremely unreasonable and causes more problems than mythical benefits. Everything becomes obsolete. Alas, the same fate befell MemTest86. Quite good and effective, now it has quietly degraded to ‘just a test’. The reason is the same — the test modules have not changed for a long time, and the hardware does not stand still.
However, if you read a horror story about testing problems, please
What’s new.
Added full support for 16 tests and the ability to load other test configuration files. Unfortunately, a complete and imperceptible restart of the program is very difficult, so you will have to use the «manual» launch. After installing the new settings file, the program closes.
Appearance.

In the program window, on the left, the type and name of the processor, its frequency, the number of cores and the supported SSE modes are displayed.
The right side shows the state of the system memory — how much is available and how much the program is busy with.
The middle left shows the progress of testing, when a failure is detected, cells 0-5 change color to red and the number of test failures is displayed in the status section in the middle right.
Small description.
This program is built on a slightly different principle than all the previous ones. Namely — it is customizable… Moreover, it can be configured by the user for those conditions that seem best to him. The program has the concept of ‘test module’ and ‘test’. A module is called to perform testing, but it can (and should) be configured in different ways. Formally speaking, tests in S&M are one and the same module, but with different settings — have you seen that the performance of tests varies significantly? … and this effect can be different for different memory (different manufacturers). Well, if the efficiency changes, then the logical conclusion from this is that by adjusting the parameters it is possible to raise it (efficiency, that is). It is difficult to consider a program that was written 5 years ago to be optimal. So, test = test module + individual settings. The second point is the number of test threads. In terms of modern processors, the number of testing threads should be more than one, which will make it easier (more precisely, more often) to communicate with processors with their own memory. This is especially true for the K10-11-12 with its distributed bus. The program supports a different (let’s put it mildly) number of testing threads. From S&M’s experience, I can say — the fastest mode for one process, but I have been repeatedly informed that enabling multiple mode, although it leads to a slight decrease in speed, increases the efficiency of the algorithm. Well … although the speed of work is almost synonymous with quality (because a slow algorithm will not find errors), it is stupid to argue with practice. The program supports a different (let’s put it mildly) number of testing threads. From S&M’s experience, I can say — the fastest mode for one process, but I have been repeatedly informed that enabling multiple mode, although it leads to a slight decrease in speed, increases the efficiency of the algorithm. Well … although the speed of work is almost synonymous with quality (because a slow algorithm will not find errors), it is stupid to argue with practice. The program supports a different (let’s put it mildly) number of testing threads. From S&M’s experience, I can say — the fastest mode for one process, but I have been repeatedly informed that enabling multiple mode, although it leads to a slight decrease in speed, increases the efficiency of the algorithm. Well … although the speed of work is almost synonymous with quality (because a slow algorithm will not find errors), it is stupid to argue with practice.
At the moment, the following test parameters are planned (and supported):
- block size. The smaller, the more efficient the algorithm. But, if the block fits into the cache, then the algorithm will fail.
- block bypass method. Linear or bouncing. The first one has a high speed, the second one — more intensively loads the controller-DIMM bundle and leads to greater memory heating. (um, it’s not for nothing that the fourth test in S&M heated up the memory so much).
- the principle of generating templates. Constant, variable and random.
Test modules.
So far there are only two of them, but this is temporary.
1. Test 0, namely, and only on it this module works — data stability check. The idea here is that all memory is signed with some non-constant pattern, then testing is performed and the safety of this data is checked.
The test dramatically slows down the testing speed.
2. SimpleTest — although it is called simple, it is more sarcasm. All settings are supported (size-method-template), but not very efficiently optimized due to increased versatility. However, losses due to non-optimal software implementation are not so great and are leveled when multi-threaded testing is enabled — several processors clog the memory I / O channel by 100%. However, if something can be simplified, the speed will increase.
Feature: the program consists of two parts — a startup program and a DLL with test modules. Unpack everything and keep the directories.
Wrote two functions: MirrorMove and MirrorMove128.
The bottom line is that the test block is turned inside out. In this case, two processes of reading and writing go to meet. If the memory controller is trying to be clever and adapt to the access mode, then from such pornography its boss should be demolished — there are never two equal processes in + and in — addressing. The functions themselves only shake the block, but do not test data integrity. Test 0 is used for verification. Therefore, if you want to use these functions, do not turn off test 0.
MirrorMove
— mirrors the testing block. With an even number of reflections, the final state of the block does not change (if there are no failures). The block itself can be split into several subblocks and ‘mirrored’ simultaneously [/ i]. This creates big problems for the controller (and the memory itself) — more often you have to overload SDRAM pages.
Only Test Block Size and Parameter are configurable, which can take values 1,2,3,4 — this is the number of sub-blocks in the block.
All other settings (and this is the template generation mode) are ignored.
MirrorMove128
— similar to MirrorMove, but works a little differently — operations are performed on a page of 128 bytes (see below), an additional offset is made between access. Those. movement (mirroring) is done in stripes in several passes — first even stripes, then odd (for 2 stripes). In addition to increasing the load on the memory controller, this action causes an intensive page reload in SDRAM, which increases the likelihood of a failure in it. (well, heating, of course)
Only Test Block Size and Parameter are adjustable, which can take values from 0 and more. The Parameter itself means how much additional [/ i] should be shifted in pages of 128 bytes. Those. 0 will mean linear access (almost like in MirrorMove), 1 — skip page and jump ‘every other time’, 2 — skip 2 pages (256 bytes) …
Accordingly, Parameter sets the number of additional bands (passes) to fill the entire block. Judging by the execution time of the move, then, for Core2 (probably, and other processors with the old interleaving mode) the 510 hour causes the greatest problems. This means that it is potentially interesting for testing. For other processors and systems, it would be good to check numbers in powers of two minus 2. This ‘-2’ forces you to select not one, but two SDRAM pages, which causes an increase in time. That is, for optimization it would be good to check the row 128-2 = 126, 256-2, 512-2, 1024-2, 2048-2.
Regarding access to 128 bytes, this was done on purpose. As a rule, a data transfer unit on the bus is 64 bytes, which corresponds to a cache line, but in Core2 (and higher) this line is paired and its dimension is 128 bytes. If you read 64 bytes, the download speed will drop. In addition, in the new processors (AMD K10, K11 …; Intel Core i *), interleaving is not lowercase, but block and 64-byte access unit. So when accessing 128 bytes, both DIMMs are read.
A further increase from 128 to 256 bytes is not yet relevant … but you can do it. There will be MirrorMove256
In TM5 version 0.5, the dimension of the presentation of the test test block has been changed. It used to be in bytes, now in megabytes. The argument is that small blocks are nicely cached in L2 / L3 and won’t be tested. Meaning? There is no sense, but convenience suffers, so I changed it.
Because in modern processors the cache is more than 4Mb (or the order of that), then the numbers 0-3 are not interesting and they are interpreted in a special way. Namely, as the degree of window breaking.
Testing is performed in a 1Gb window (this number can be changed) and the test block should fit in it. You can specify the size of the test block in an absolute value Mb, or as part of the window. Here are the numbers 0-3 and define this ‘part’.
0 = whole window
1 = 1/2 window
2 = 1/3 window
3 = 1/4 window
Probably, for the MirrorMove * functions it is better to specify 0 and give the whole window.
Customization.
After starting the program, the MT.cfg file appeared in the bin directory, which is the test configuration file.
Enable = 1 — 1 = enabled, 0 = disabled
Time = 100 — testing time, 100%
Function = SimpleTest —
DLL function name Name = bin MT0.dll — dll name
Pattern Mode = 1 — pattern type. 0 = constant, 1 = variable, 2 = random
Pattern Param0 = 0x1E5F — used to generate a pattern; For mode 2 serves as a multiplier
Pattern Param1 = 0x45357354 — similarly. For mode 2 is added to the template.
Parameter = 0 — the principle of moving by addresses.
Test Block Size = 4194304 — block size, in bytes
To generate a template in mode 2, a simple formula is used to obtain RND = Value * Param0 + Param1
Parameter is a way to go to the next block. 0 = linear (sequential) bypass. Other values are only for their DIMM. The number itself is how much to shift.
The idea is that first one DIMM is checked, then the second (and the third, for variants like Core i7).
Access unit, i.e. the number of bytes taken from one DIMM at a time 64 bytes. Accordingly, by setting Parameter = 1, the check will go on each block of the selected DIMM. If «2» — then after one …..
By the way, the section for setting up the equipment is important here. I think almost everyone has memory in paired slots and DUAL mode works. So you need to do one thing — switch the Intreliving mode . 0 for older processors (no integrated memory controller) and 1 for newer ones.
The memory manager in Windows 7 has one feature — as soon as you take memory from Windows, it immediately begins to empty more and more. Usually, it is enough to wait a few cycles and this process will calm down. If it interferes, then you can disable this ‘soft’ mode of memory request.
If you put: Capable = 0x 0 , then the occupied memory will be immediately latched.
TestMem support page — TestMem V
Как проверить работоспособность оперативной памяти на компьютере или ноутбуке
Привет. В моей практике встречались случаи, когда неполадки компьютера были из-за оперативной памяти. Клиенты звонят с такой проблемой: выбивает синий экран, через раз загружается система. Пытаешься переустановить Windows — выходят ошибки.
В этой статье я расскажу, как проверить оперативную память на компьютере на работоспособность и выявить неисправный модуль.
Симптомы неисправности оперативной памяти
На неисправность оперативной памяти (RAM) указывают следующие признаки:
- Компьютер включается, но на экране нет изображения.
- Во время загрузки или работы системы вылетает синий экран с ошибками BSOD.
- Постоянные вылеты из программ, использующие интенсивно оперативную память: 3D приложения, игры, видеомонтаж и т.д.
- Во время установки Windows выходит ошибка.
Если периодически выскакивает синий экран во время работы или при загрузке системы, то это повод проверить оперативку на ошибки.
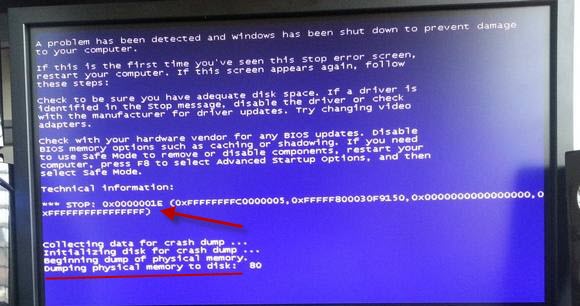 Синий экран в Windows 7
  Синий экран в Windows 10
У меня был случай, при установке Windows 7 на ноутбуке выходила ошибка 0х80070570. После проверки оперативной памяти выяснилось, что причиной была — неисправность одной из планок оперативки.

Неисправность оперативной памяти — при установке Windows 7 выходит ошибка 0x80070570
Как я выяснил неисправность оперативной памяти в ноутбуке читайте ниже в статье.
Вступайте в группу ВК — https://vk.com/ruslankomp Помогу решить проблему с вашим ПК или ноутбуком

Помогу решить проблему с ПК или ноутбуком. Вступайте в группу VК — ruslankomp
Проверка оперативной памяти на работоспособность
В этой статье я опишу 4 способа:
- Диагностика средствами Windows — самый простой способ, который встроен в операционную систему.
- MemTest86 — нужно будет создать загрузочную флешку и запустить проверку в среде DOS. Можно использовать, если даже не загружается Windows.
- TestMem5 — проверка происходит в среде Windows, что наиболее подходит к реальным условиям использования компьютера.
- Тестер слотов материнки — проверка работоспособности разъемов оперативной памяти на материнской плате.
Способ 1. Диагностика средствами Windows
Чтобы запустить проверку оперативной памяти, достаточно воспользоваться средствами виндовс.
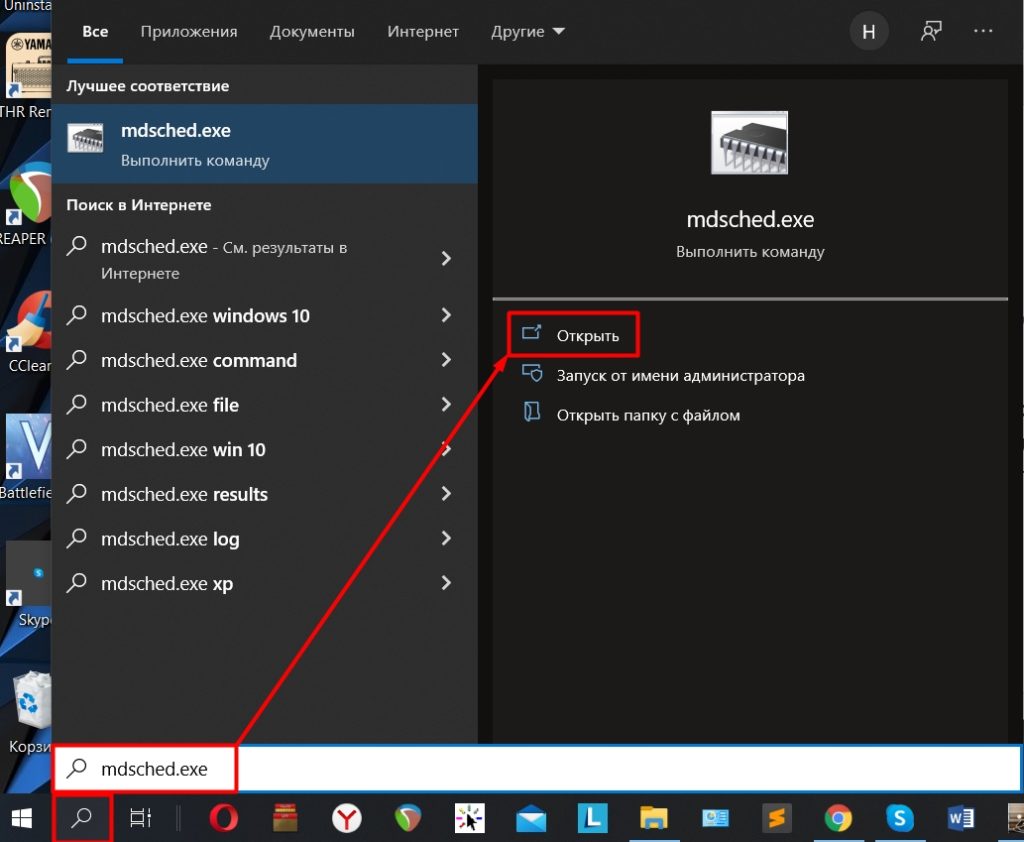
Для этого заходим в Пуск и в поле поиска вводим: оператив. Выходит список утилит, где выбираем Диагностика проблем оперативной памяти компьютера.
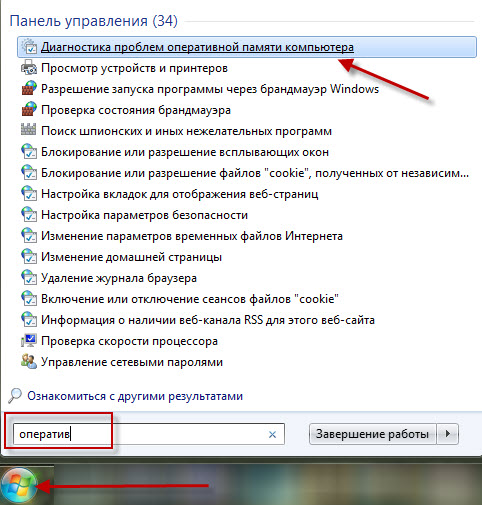
Запуск диагностики памяти в Windows 7
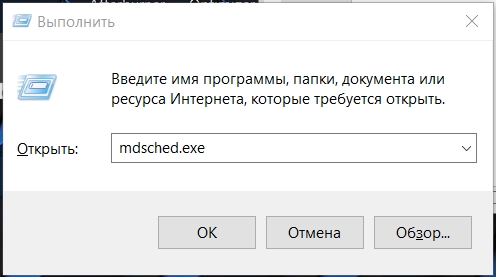
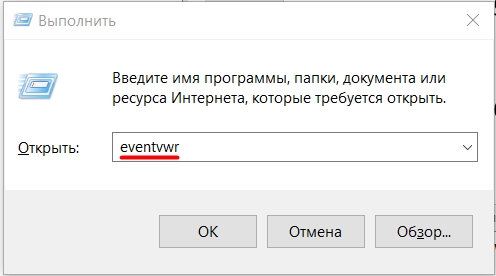
Или ещё вариант. Нажимаете Win+R
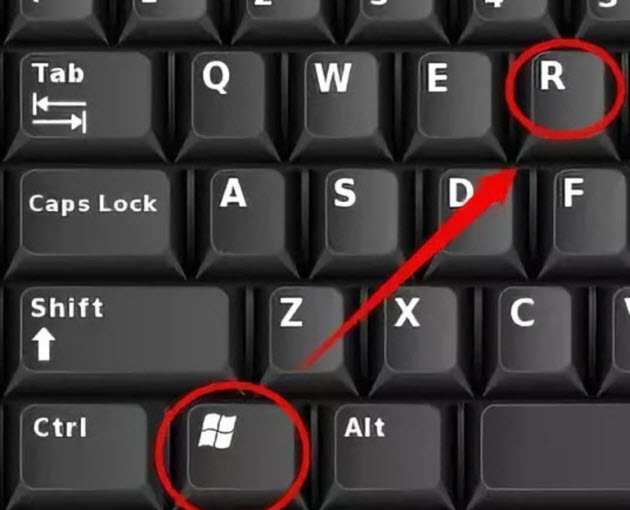
Горячие клавиши Win+R
Введите в поле: mdsched, нажмите ок.
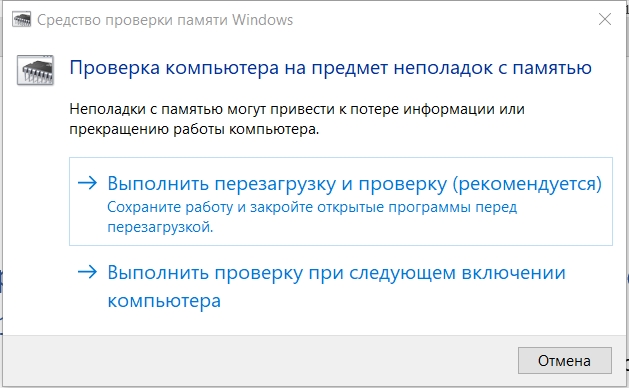
Откроется средство проверки памяти Windows. Выберите Выполнить перезагрузку и проверку.
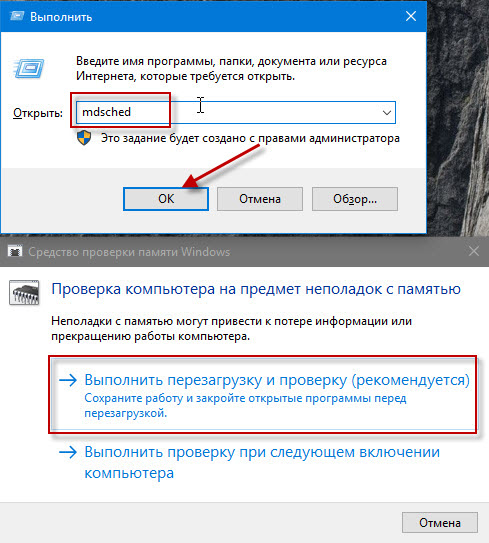
Проверка компьютера на предмет неполадок с памятью
После чего компьютер перезагрузится и запуститься диагностика оперативной памяти. По прошествии двух проходов, если неполадки не найдены, то значит все ок.
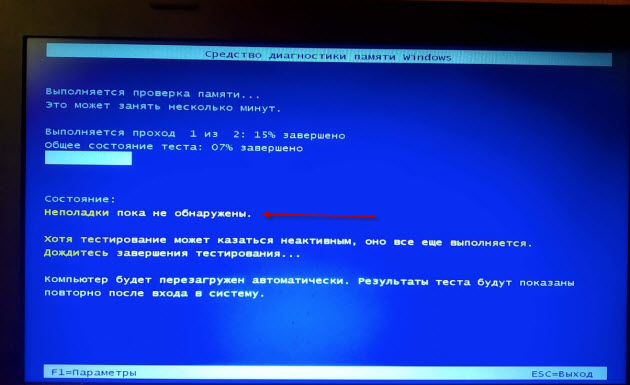
Диагностика оперативной памяти — неполадки не обнаружены
Если же появится надпись: обнаружены проблемы оборудования, то значит оперативная память с ошибками.
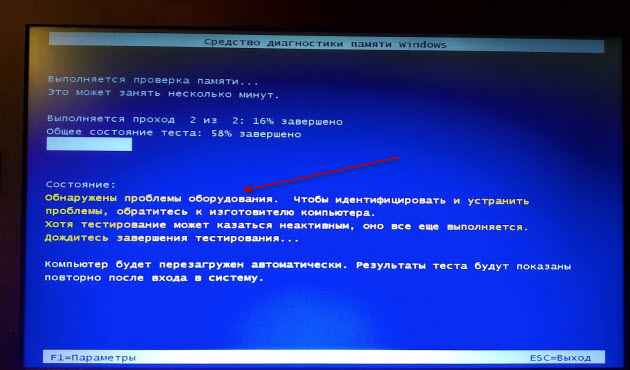
Диагностика оперативной памяти — обнаружены проблемы
Способ 2. Диагностика MemTest86
Чтобы проверить оперативную память на ошибки программой MemTest86, нужно создать загрузочную флешку.
Эта программа запускается с загрузочной флешки в среде DOS. Поэтому можно использовать на компьютере без установленной Windows или есть проблемы с загрузкой системы.
Итак, скачайте memtest с официального сайта — http://www.memtest.org/
Найдите файл для закачки, как показано на рисунке ниже.
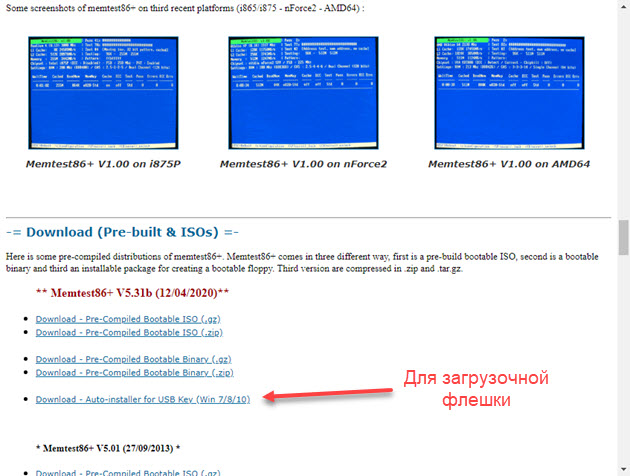
Скачивайте MemTest86+ для загрузочной флешки
После распакуйте архив, вставьте usb флешку и запустите MemTest86+USB Installer.
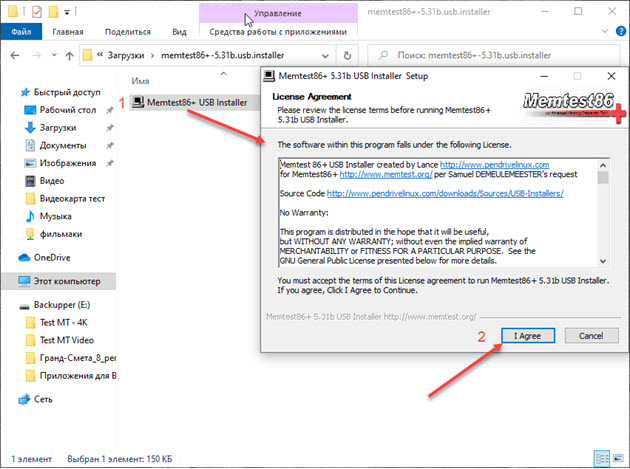
Создание загрузочной флешки Memtest86
Выберите флешку, поставьте галочку, напротив — We will format E: as Fat32 и нажмите Create.
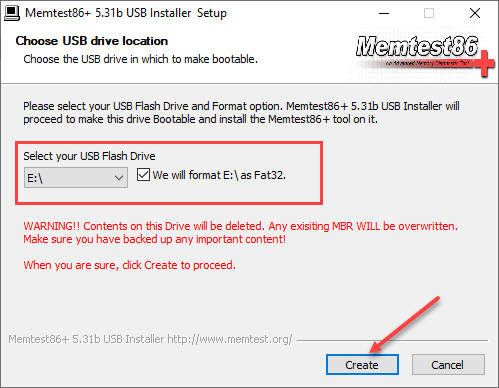 Выбираем USB носитель для Memtest86
 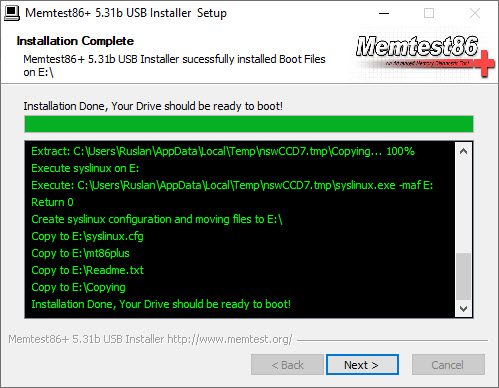 Загрузочная флешка с MemTest86 создана
После записи программы, перезагружаем компьютер и загружаемся с флешки.
В зависимости от материнской платы или модели ноутбука, меню загрузки вызывается клавишей F8, F9, F11, F12.
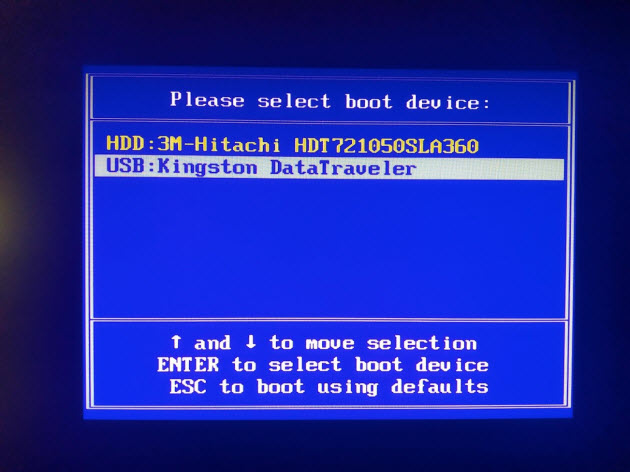
Выбираем в меню загрузки USB носитель
Или поменяйте приоритет загрузки с USB носителя в BIOSе материнской платы. Чтобы войти в BIOS на ноутбуке — это делается клавишей F2, на ПК — Del (Delete).
Важно! Соответствующую клавишу нужно нажимать быстро несколько раз, сразу после включения компьютера или в момент перезагрузки компьютера, как только потух монитор.
После загрузки с флешки проверка оперативной памяти начнется автоматически.
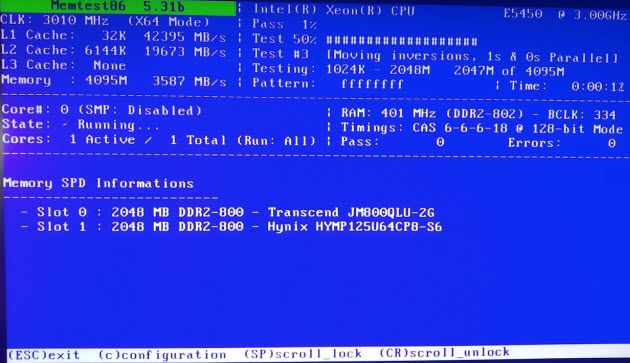
MemTest86 проверка оперативной памяти — ошибок не найдено
Если обнаружатся ошибки, то это будет выглядеть, как на картинке ниже.
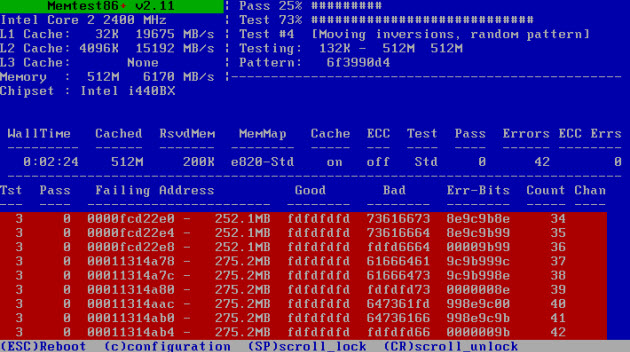
MemTest86 проверка оперативной памяти — обнаружены ошибки
Если ваш компьютер современный поддерживает загрузку UEFI, то можете использовать другую версию Memtest86.
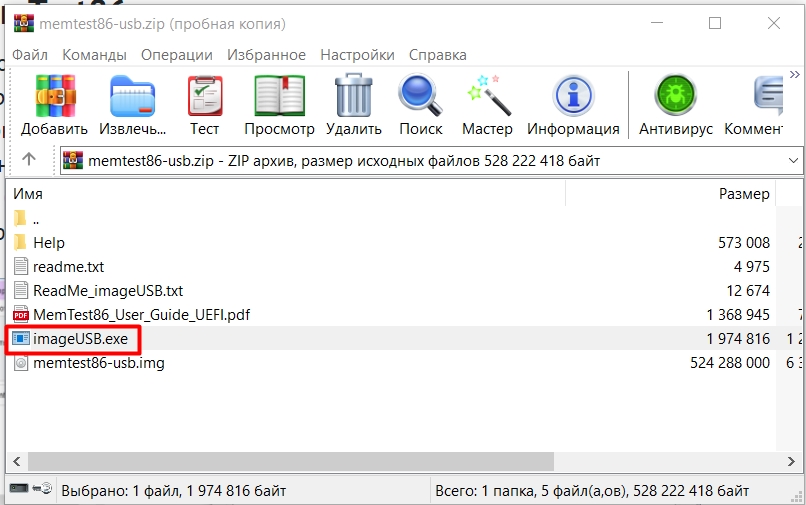
Скачиваем архив, извлекаем содержимое, вставляем флешку в компьютер.
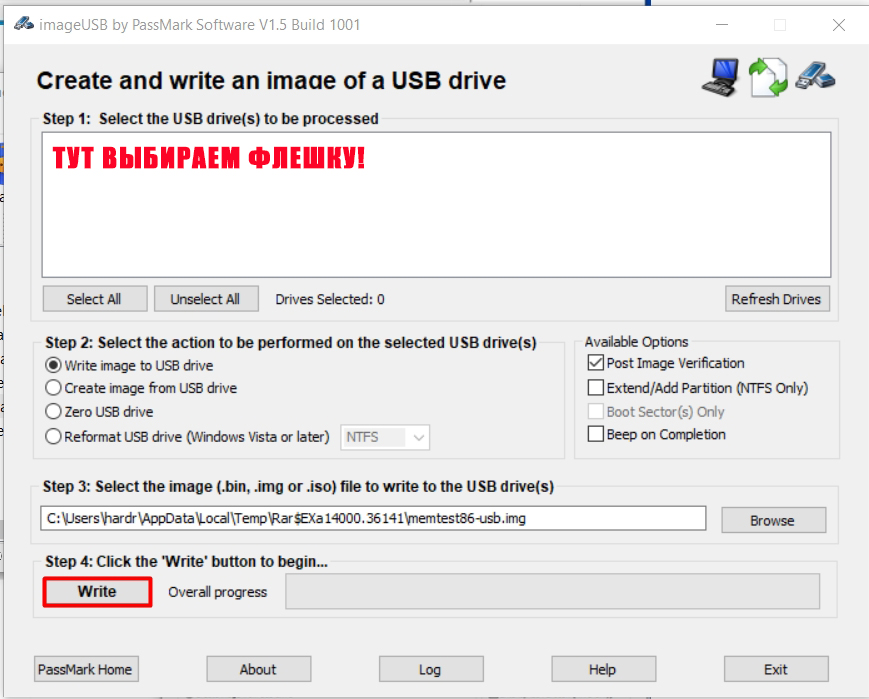
- Запускаем файл imageUSB.exe.
- Ставим галку напротив флешки, на которую запишется программа.
- Нажимаем Write.
Процесс занимает считанные минуты. Все, образ готов.
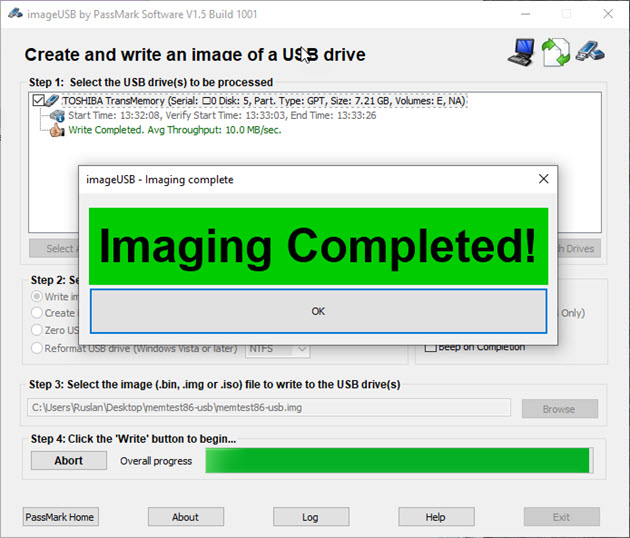
Создание загрузочной флешки Memtest86 завершено успешно
Также перезагружаем компьютер и выбираем загрузку с USB носителя.
После загрузки флешки, нажмите Config.
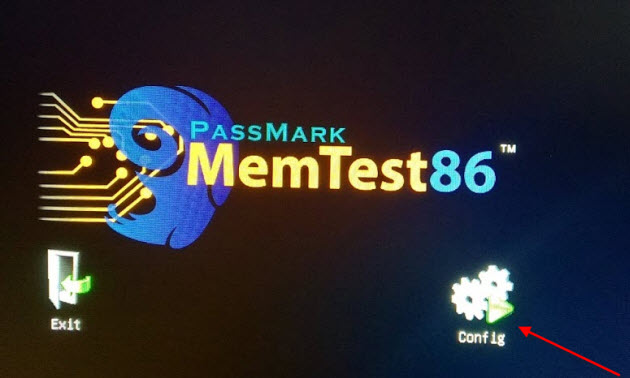
Запуск Memtest86 Passmark — кнопка Config
Запустите тест нажав кнопку Start test.
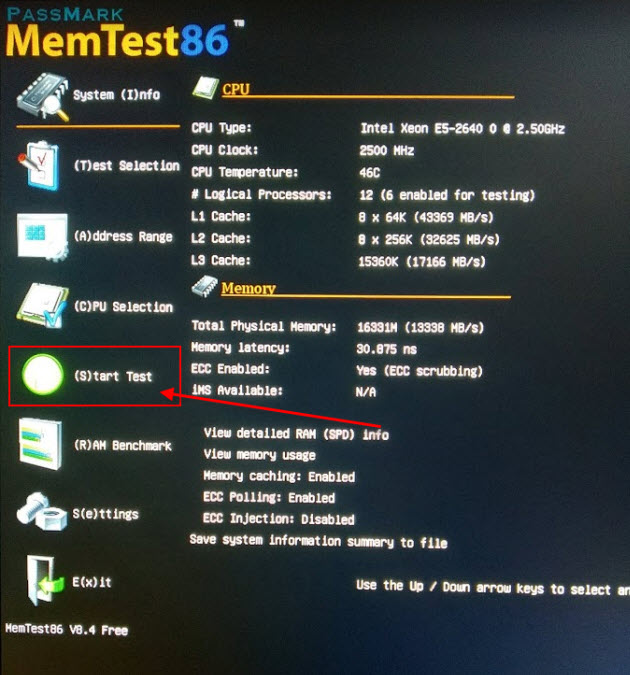
Запуск теста Memtest86 — кнопка Start Test
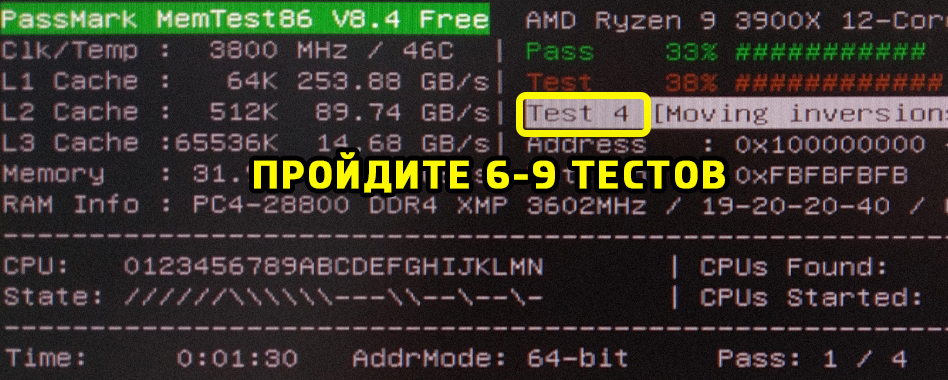
Достаточно пройти минимум 5–10 циклов проверки, чтобы выявить ошибки оперативной памяти.
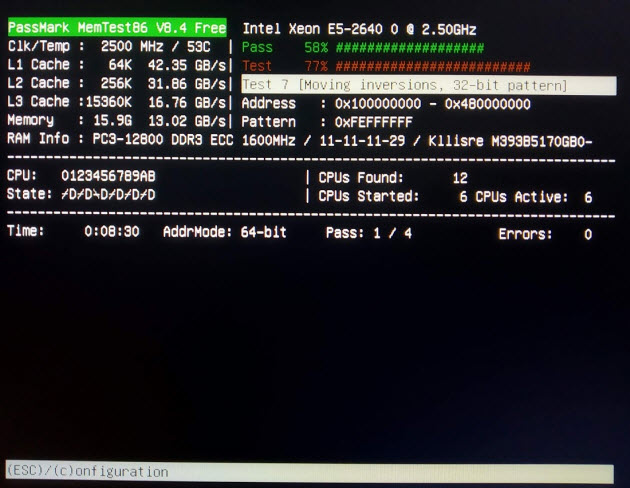
Диагностика оперативной памяти в Memtest86
Если ошибки будут найдены, то информация будет отображаться в строке Errors: 0. Соответственно вместо 0, будет другая цифра с количеством ошибок.
Способ 3. Диагностика программой TestMem5
Программа для тестирования оперативной памяти в среде Windows — скачать здесь.
Тут все просто. Скачивайте, распаковывайте архив и запускаете программу в режиме администратора.
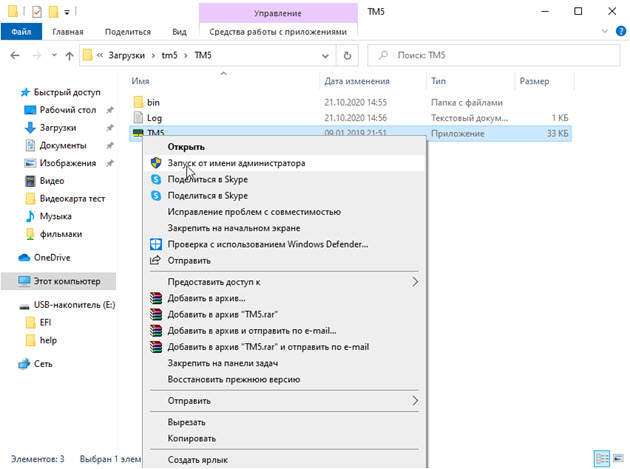
Запуск от имени администратора TestMem5
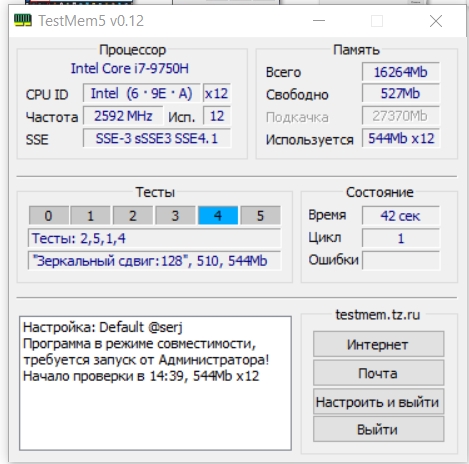
Слева в окне программы выводится:
- наименование процессора;
- тип процессора;
- частота процессора;
- количество ядер х2 х4 и т.д;
- поддерживаемые режимы SSE.
В правой части программы указывается состояние системной памяти — сколько есть в наличии и сколько занято программой.
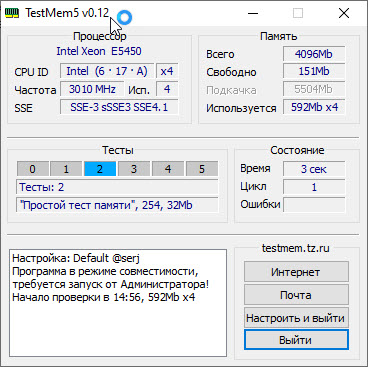
Тест оперативной памяти в TM5
В середине слева показывается ход тестирования. При обнаружении сбоя ячейки 0-5 меняют цвет на красный и количество сбоев выполнения тестов выводится в разделе ошибки справа.
Способ 4. Диагностика разъемов на материнке с помощью тестера
Порой проблемы бывают связанные с разъемом оперативной памяти в материнской плате.
Для определения работоспособности слота материнки поможет специальный тестер DDR2 / DDR3 — купить здесь.
Вставляете тестер в разъем оперативной памяти и нажмите на кнопку тестера. Если все светодиоды включены и яркость у всех одинаковая, сигнал в порядке, нет никаких проблем.
Если какой-то светодиод не светится или слабо светится, то это говорит на наличие проблем в цепи материнской платы. В таком случае рекомендуется заменить материнскую плату.
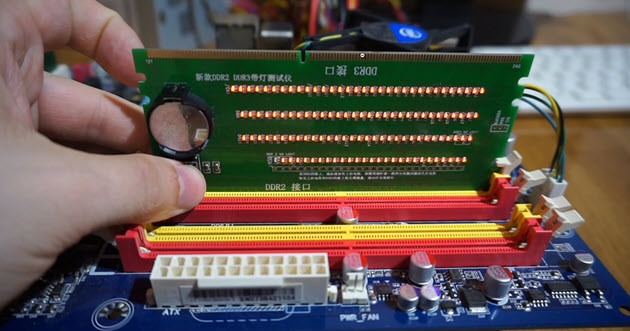
Тестер разъемов ОЗУ на материнской плате
Как определить неисправный модуль оперативной памяти
Если в компьютере одна планка, то очевидно, что в ней проблема — ее нужно заменить.
Если в компьютере две или четыре планок оперативной памяти, то нужно протестировать каждую по очереди. Для этого оставьте одну планку оперативной памяти и запускайте диагностику заново.
Как только тест покажет проблемы, значит диагностируемая планка, однозначно подлежит замене.
Или можно сделать так:
- Протестировать четыре планки.
- Если есть ошибки, оставить 2 планки, а 2 планки вытащить.
- Если ошибок нет, то значит эти планки исправные вытаскиваем и вставляем оставшиеся по одной.
- Или если на первых двух появились ошибки, то вынимаем одну и снова тестируем, до выявления неисправного модуля.
Таким образом можно выявить какая планка не рабочая.
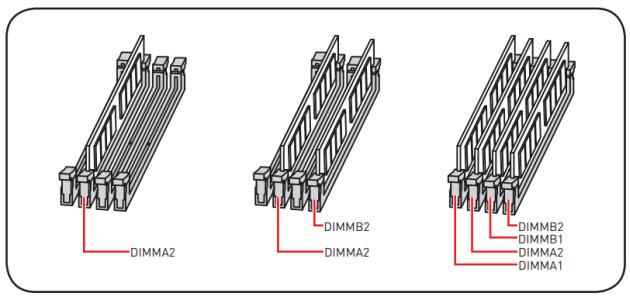
Планки оперативной памяти в разъеме материнской платы
Важно! Планки оперативной памяти отсоединяйте и подключайте только на выключенном компьютере.
Что делать с неисправным модулем памяти?
Причиной сбоя оперативной памяти могут быть:
- Окисление контактов планки.
- Разгон частоты оперативной памяти.
- Выход из строя чипов или контроллера памяти.
При окислении контактов оперативной памяти — нужно вынуть планку из слота материнской платы и почистить контакты стеркой.
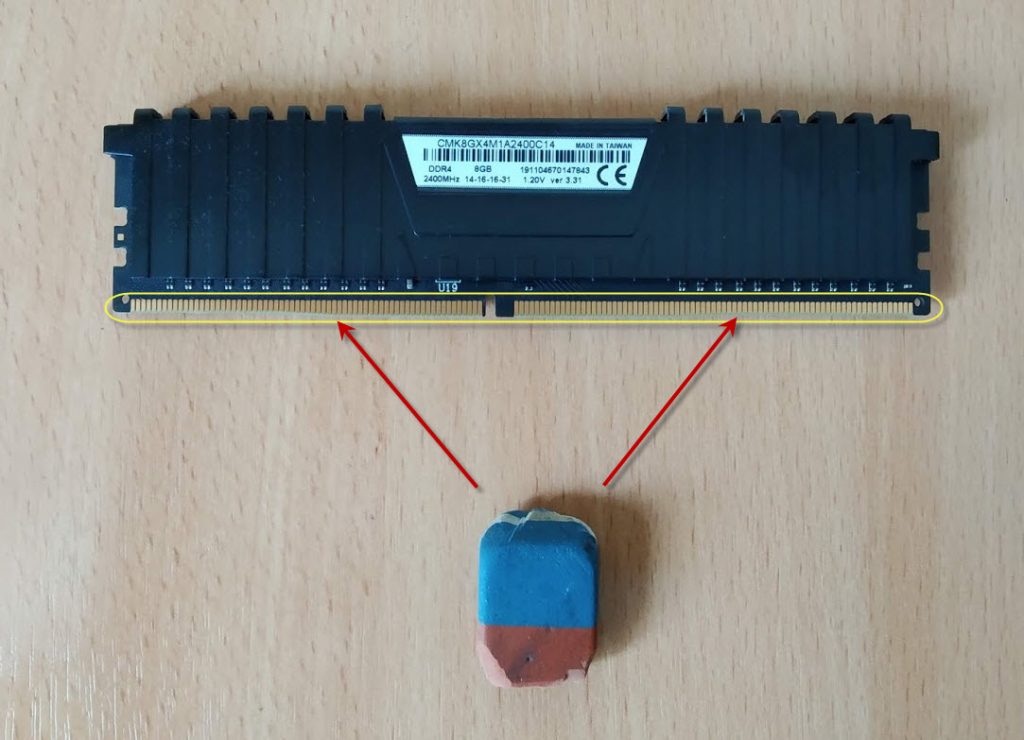
Чистим ластиком контакты планки оперативной памяти с этой и обратной стороны
Если вы разгоняли частоту оперативной памяти в биосе, то значит верните настройки Bios по умолчанию или снизьте частоту до оптимальной. Я думаю описывать, как это делать в этой статье нет смысла, если вы разгоняли частоту, то и знаете как снизить.
И последняя причина сбоя оперативки — выход из строя чипов памяти. В этом случае выход только один — замена на другую планку с подходящими характеристиками.
На этом у меня все. Если вам нужна диагностика, чистка компьютера или ноутбука вступайте в группу ВК — https://vk.com/ruslankomp и оставьте заявку на консультацию.
Помогу решить проблему с ПК или ноутбуком. Вступайте в группу VК — ruslankomp
1 комментарий к статье “ Как проверить работоспособность оперативной памяти на компьютере или ноутбуке ”
Спасибо Руслан. Благодаря вашей статье выявил неисправность одной из планок оперативки. После замены плашки глюки и вылеты синего экрана прекратились.
Тест оперативной памяти Windows 10: 3 способа
Всем привет! В этой статье мы поговорим про проверку оперативной памяти в Windows 10 на наличие ошибок. Вообще, для чего проверять ОЗУ? – На самом деле её проверяют в двух случаях:
- Вы купили новый или Б/У компьютер или взяли отдельно плашки ОЗУ, и хотите их проверить.
- На вашем компьютере часто стал появляться синий экран смерти, вылетают программы, виснет и тормозит система, есть лаги в играх.
Я привел три способа, которые проверил на своем компьютере. Если у вас что-то будет не получаться или возникнут вопросы, то сразу пишите мне в комментариях под этой статьей. Поехали!
Способ 1: Штатные средства

Почти во всех версиях «Окон» есть штатная программа, которая позволяет провести тест оперативной памяти. Проверка происходит после перезагрузки компьютера, так как при этом оператива должна быть максимально свободная, а при запущенной операционной системе сделать это невозможно.
- Нам нужно запустить системную утилиту «mdsched.exe». Это можно сделать двумя способами. Первый – откройте поиск Виндовс 10, нажав по значку лупы в левом нижнем углу экрана, и вбейте туда это название.
- Второй способ – это зажать на клавиатуре кнопку , а потом кликнуть по букве R . Вылезет вот такое вот маленькое окошко, куда нужно будет вбить название утилиты и нажать «ОК».
- Далее у вас есть два выбора – или запустить проверку прямо сейчас, или сделать это при следующем включении ПК. Если вы будете делать проверку сейчас, закройте все приложения и сохраните данные, которые вам нужны.
- Компьютер перезагрузится, а на экране вы увидите ход проверки. Не выключайте и не трогайте комп.
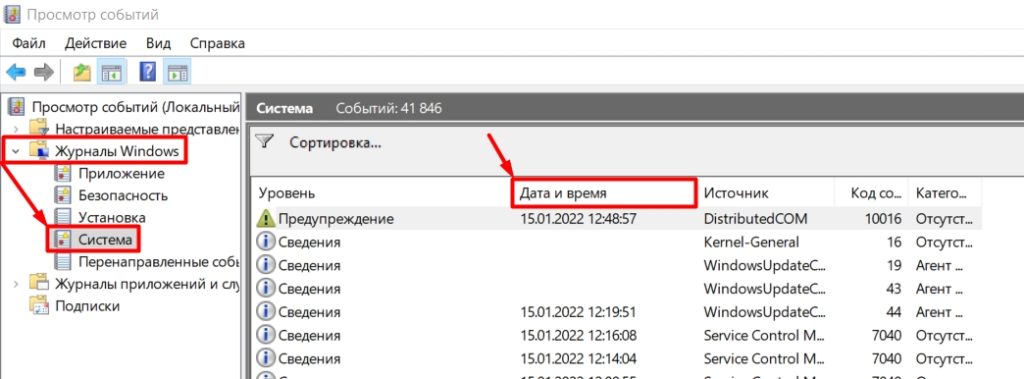
- Как только проверка закончится, система загрузится, и в правом нижнем углу экрана вы увидите оценку проверки RAM. Если вы пропустили эту оценку, или она не вылезла, то вы можете посмотреть результаты в системных событиях. Запускается он аналогично через и R и команду:
- Когда окошко откроется, выбираем слева основной раздел «Журналы Windows». Внутри находим подраздел «Система». Теперь смотрим в основное центральное окошко. Обычно события сортируются по дате и времени, и наша диагностика будет в самом верху. Если дата не совпадает, то отсортируйте колонку, нажав по верхней надписи «Дата и время».
- Открываем событие и смотрим результаты тестов.
Способ 2: MemTest86
MemTest86 – это отдельная более продвинутая утилита, которая позволяет более тщательно проверить плашки оперативной памяти. Многие системные администраторы, инженеры и программисты предпочитают именно MemTest86, а не встроенную утилиту от Виндовс, так как считают, что она более продвинутая. Минус данного способа в том, что для проверки вам нужно будет сделать загрузочную флешку.
- Скачиваем архив с официально сайта .
- Вставляем флешку в USB-порт компьютера.
- Открываем архив и запускаем exe-файл.
- В первом шаге выбираем вашу флешку. Если вы её не видите, нажмите по кнопке «Refresh Drivers». В конце жмем «Write».
- Как только флешка будет готова, перезагружаем компьютер и запускаем «BOOT-меню» – для этого вам нужно несколько раз нажать на вспомогательную кнопку на клавиатуре. Кнопка может отличаться в зависимости от версии вашего БИОС. Часто используются клавиши: F11 , F12 , F8 , Esc . Если BOOT-menu BIOS не запускается – зайдите в сам «БИОС» (кнопки: Del , F2 , Esc , F10 ), найдите там раздел «BOOT» и установите на первое место вашу USB-флешку. После того как процедура закончится, не забудьте вернуть все на место.
- Как только программа запустится, вам ничего жать не придется. Тестирование будет проходить постоянно по циклу, поэтому в конце вам нужно самостоятельно нажать на кнопку Esc , чтобы все закончилось. Нужно пройти как минимум 6 тестов. Если у ОЗУ будут какие-то ошибки, вы их увидите ниже – они будут подсвечены красным.
Способ 3: TestMem5
Еще одна интересная самодельная программа по тестированию ОЗУ. В свое время очень выручала. Скачать программу можно по этой ссылке . Плюс этой программы в том, что она имеет совершенно другие алгоритмы, чем у предыдущих двух вариантов. После запуска сразу же начнется тест. Самое главное запустить утилиту с правами администратора, нажав правой кнопкой мыши по exe-файлику. Тут все аналогично – чем больше проверочных циклов, тем лучше.
Что делать, если обнаружилась неисправная оперативная память?
Для начала нам нужно найти поломанную плашку – для этого вытаскиваем все ОЗУ. Достаточно осмотреть их визуально. На моей памяти была и горелая память. Если таким образом обнаружить виновника не удается, то придется делать все «методом тыка» – устанавливая по одной плашке памяти. Нам нужно для каждой пройти отдельные тесты.
Как только вы её обнаружите, её следует сразу же поменять на новую. Если RAM-память находится на гарантии, то бегите с чеком и отдавайте её в магазин. Если она уже вышла из гарантии, чинить её нецелесообразно. Вам нужно купить точно такую же плашку. Самое главное не ошибиться и правильно выбрать оперативу на замену. Тема достаточно скрупулезная, поэтому предлагаю вашему вниманию видео ниже.
Memory Testing with TestMem5 TM5 with custom configs

Error 2, 12 is a timeout issue, somewhere something ends too quickly or you lack voltage and cells are not recharged in time
a sync issue with other words which’s first culprit is voltage somewhere or resistance somewhere
Error 3 & 4 by checking the MT.cfg — are MirrorMove errors
That set shows tRFC 2 issues and this tRFC «auto predicted» ? is wrong.
tRFC is so far always even
as tRFC stepping are 32,16,8,4,2 ,
Error 5 then 6 is a timings missmatch between dimms (data mirror move)
Error 6 is purely related to the IMC , be if procODT, CLDO_VDDP or vSOC
it translates to «i couldn’t even start transfering data, i crashed»
4-6x error 6 result in full bluescreen
- it will error out if if CAD_BUS is not optimal
- will error out if tRFC is too low
- mostly errors out only after time
Error 10 mostly affects the first 5 main timings
— noticed it can be tRCDWR to RD. can be tRP too, but it also can be the last two tRDWR & tRDRD which don’t play well with your main tRCDWR/RD
Error 13 = Simple Test 64mb, timeout while transfering big data
= full crash, nearly always related to voltage
as memory was not able to autocorrect it
Error 14 we know is MirrorMove Omb, a timeout issue
— it can error after the 2nd or 3rd pass if something is off my some ns and just «got lost»
Thanks to @KedarWolf for this information
In no particular order:
Please comment on your favorite .cfg and why
Thankyou
@KedarWolf
To change the language to English, edit the .cfg file and change Language=1 to Language=0
When using usmus .cfg you want to change to 25 cycles. Takes like 3 hours. The default 3 cycles not near long enough
Thanks to @Hequaqua for the idea to make to download set to english
Thanks @h610er for the tip to get [email protected] anta777.cfg to work by resizing the window with his very first post on OCN Memory Testing with TestMem5 TM5 with custom configs
Thanks to all the people that contributed to this software
If you would like something added to this section leave a comment in the thread with @munternet after it
Why is this program needed.
Well, I think you know what the program is about, after all, version 5. At the moment, the memory tests are not bad, but quite bad. I would not like to talk about ‘all’ tests, but most of them are unaware of significant changes in the hardware. And the main ‘harm’ is not at all from memory, it has evolved little, namely, from the processor and memory controller (to a lesser extent). Processors have become faster, there are a lot of them and they have become strange. For example, before the memory ‘sat’ on one controller, with which the processor communicated. Now memory can hang on different processors and, as a result, have a different ‘distance’ from a particular processor core to a particular DIMM. In addition, the amount of caches in the processor has increased, which may affect testing. For example, TM4 used 512K test block size. At the time of writing the program, this was the optimum, but now this block quietly fits in L2 and the test does not work at all as intended. Will this unpleasant moment affect the quality of memory failure detection? Undoubtedly and in the most disgusting way. Alas. Other programs can operate on an access block, which is now extremely unreasonable and causes more problems than mythical benefits. Everything becomes obsolete. Alas, the same fate befell MemTest86. Quite good and effective, now it has quietly degraded to ‘just a test’. The reason is the same — the test modules have not changed for a long time, and the hardware does not stand still. Alas. Other programs can operate on an access block, which is now extremely unreasonable and causes more problems than mythical benefits. Everything becomes obsolete. Alas, the same fate befell MemTest86. Quite good and effective, now it has quietly degraded to ‘just a test’. The reason is the same — the test modules have not changed for a long time, and the hardware does not stand still. Alas. Other programs can operate on an access block, which is now extremely unreasonable and causes more problems than mythical benefits. Everything becomes obsolete. Alas, the same fate befell MemTest86. Quite good and effective, now it has quietly degraded to ‘just a test’. The reason is the same — the test modules have not changed for a long time, and the hardware does not stand still.
However, if you read a horror story about testing problems, please
Added full support for 16 tests and the ability to load other test configuration files. Unfortunately, a complete and imperceptible restart of the program is very difficult, so you will have to use the «manual» launch. After installing the new settings file, the program closes.
In the program window, on the left, the type and name of the processor, its frequency, the number of cores and the supported SSE modes are displayed.
The right side shows the state of the system memory — how much is available and how much the program is busy with.
The middle left shows the progress of testing, when a failure is detected, cells 0-5 change color to red and the number of test failures is displayed in the status section in the middle right.
Small description.
- block size. The smaller, the more efficient the algorithm. But, if the block fits into the cache, then the algorithm will fail.
- block bypass method. Linear or bouncing. The first one has a high speed, the second one — more intensively loads the controller-DIMM bundle and leads to greater memory heating. (um, it’s not for nothing that the fourth test in S&M heated up the memory so much).
- the principle of generating templates. Constant, variable and random.
Wrote two functions: MirrorMove and MirrorMove128.
The bottom line is that the test block is turned inside out. In this case, two processes of reading and writing go to meet. If the memory controller is trying to be clever and adapt to the access mode, then from such pornography its boss should be demolished — there are never two equal processes in + and in — addressing. The functions themselves only shake the block, but do not test data integrity. Test 0 is used for verification. Therefore, if you want to use these functions, do not turn off test 0.
MirrorMove
— mirrors the testing block. With an even number of reflections, the final state of the block does not change (if there are no failures). The block itself can be split into several subblocks and ‘mirrored’ simultaneously [/ i]. This creates big problems for the controller (and the memory itself) — more often you have to overload SDRAM pages.
Only Test Block Size and Parameter are configurable, which can take values 1,2,3,4 — this is the number of sub-blocks in the block.
All other settings (and this is the template generation mode) are ignored.
MirrorMove128
— similar to MirrorMove, but works a little differently — operations are performed on a page of 128 bytes (see below), an additional offset is made between access. Those. movement (mirroring) is done in stripes in several passes — first even stripes, then odd (for 2 stripes). In addition to increasing the load on the memory controller, this action causes an intensive page reload in SDRAM, which increases the likelihood of a failure in it. (well, heating, of course)
Only Test Block Size and Parameter are adjustable, which can take values from 0 and more. The Parameter itself means how much additional [/ i] should be shifted in pages of 128 bytes. Those. 0 will mean linear access (almost like in MirrorMove), 1 — skip page and jump ‘every other time’, 2 — skip 2 pages (256 bytes) .
Accordingly, Parameter sets the number of additional bands (passes) to fill the entire block. Judging by the execution time of the move, then, for Core2 (probably, and other processors with the old interleaving mode) the 510 hour causes the greatest problems. This means that it is potentially interesting for testing. For other processors and systems, it would be good to check numbers in powers of two minus 2. This ‘-2’ forces you to select not one, but two SDRAM pages, which causes an increase in time. That is, for optimization it would be good to check the row 128-2 = 126, 256-2, 512-2, 1024-2, 2048-2.
Regarding access to 128 bytes, this was done on purpose. As a rule, a data transfer unit on the bus is 64 bytes, which corresponds to a cache line, but in Core2 (and higher) this line is paired and its dimension is 128 bytes. If you read 64 bytes, the download speed will drop. In addition, in the new processors (AMD K10, K11 . ; Intel Core i *), interleaving is not lowercase, but block and 64-byte access unit. So when accessing 128 bytes, both DIMMs are read.
A further increase from 128 to 256 bytes is not yet relevant . but you can do it. There will be MirrorMove256
In TM5 version 0.5, the dimension of the presentation of the test test block has been changed. It used to be in bytes, now in megabytes. The argument is that small blocks are nicely cached in L2 / L3 and won’t be tested. Meaning? There is no sense, but convenience suffers, so I changed it.
Because in modern processors the cache is more than 4Mb (or the order of that), then the numbers 0-3 are not interesting and they are interpreted in a special way. Namely, as the degree of window breaking.
Testing is performed in a 1Gb window (this number can be changed) and the test block should fit in it. You can specify the size of the test block in an absolute value Mb, or as part of the window. Here are the numbers 0-3 and define this ‘part’.
0 = whole window
1 = 1/2 window
2 = 1/3 window
3 = 1/4 window
Probably, for the MirrorMove * functions it is better to specify 0 and give the whole window.
After starting the program, the MT.cfg file appeared in the bin directory, which is the test configuration file.
Enable = 1 — 1 = enabled, 0 = disabled
Time = 100 — testing time, 100%
Function = SimpleTest —
DLL function name Name = bin MT0.dll — dll name
Pattern Mode = 1 — pattern type. 0 = constant, 1 = variable, 2 = random
Pattern Param0 = 0x1E5F — used to generate a pattern; For mode 2 serves as a multiplier
Pattern Param1 = 0x45357354 — similarly. For mode 2 is added to the template.
Parameter = 0 — the principle of moving by addresses.
Test Block Size = 4194304 — block size, in bytes
To generate a template in mode 2, a simple formula is used to obtain RND = Value * Param0 + Param1