
I was trying to install package.json with npm init to install bootstrap in my folder but i am getting the error.
npm install bootstrap@4.0.0-alpha.6 --save
I am new to this i can’t exactly figure what i am doing wrong.
I was following a tutorial whose link i’ll attach along with screenshot of my console.
this the tutorial link

![]()
eyllanesc
233k19 gold badges163 silver badges235 bronze badges
asked Jan 5, 2018 at 5:04
![]()
2
npm init is actually creating the package.json file and setting the characteristics of the project(It has no relation with bootstrap). So, in the field package name, you have to enter the name of your project (you have now entered the npm install bootstrap command) or you can just press enter if the name displayed in bracket is enough. Complete the npm init processs by setting all characteristics of project.
As next step, you can do npm install bootstrap@4.0.0-alpha.6 --save. It’ll work
answered Jan 5, 2018 at 9:35
![]()
3
Deleting the lock-file and running npm i again solved the issue for me.
answered Feb 25, 2019 at 18:06
![]()
rexblackrexblack
1411 silver badge2 bronze badges
I was getting the same problem but I changed package-name first name was like:
My Folder Name
I changed it to
my-folder-name
with no spaces & no capital letters. It solved the problem for me.
Happy coding
![]()
answered Jan 11, 2020 at 6:44
![]()
0
Just hit enter and cycle through all the options. You don’t type in the npm install until after you have finished init.
answered Sep 22, 2019 at 10:29
![]()
Not only DELETE package-lock.json in main folder but also find (whit this command find node_modules/ -iname *-lock*) and delete all ‘-lock’ files in node_modules then run npm install again.
answered Jun 9, 2019 at 5:22
![]()
S. HesamS. Hesam
4,9583 gold badges35 silver badges58 bronze badges
Make sure you are typing in the right place, npm init and then hit enter/return a few times until you are at a prompt starting with C:Users if you are in Windows.
![]()
Iñigo
1,8777 gold badges23 silver badges53 bronze badges
answered Jan 23, 2020 at 10:31
![]()
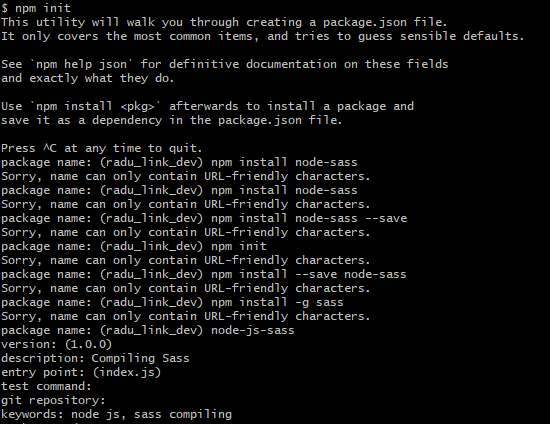
I also encountered the same problem when installing sass, because I watched some tutorials on YT where they instructed to use Live Sass Compiler, so I had to change some settings for saving the file. Then I uninstalled it, go through the traditional process of
npm init
npm install node-sass --save-dev
npm run compile:sass
and …..BAMMMM!!!! It worked
![]()
answered Sep 16, 2021 at 6:45
![]()
1
Press a few enter that will help you get out of npm init. then type the npm install comment. This worked for me.
![]()
Tyler2P
2,30425 gold badges22 silver badges31 bronze badges
answered May 16, 2022 at 7:37
![]()
I was also facing the same issue while installing the json-server …but got resolved actually the problem is not with the folder name….so, there is two way to sort this problem one by —- after npm init press 5-8 times enter or u can directly use (npm init -y) both will work fine
Happy coding
answered Oct 7, 2022 at 19:07
![]()
1
I wanted to update one of my websites with some new content, but I needed to compile some more Sass into CSS, and I didn’t want to use ScoutApp anymore.
Since I started learning Laravel, I got used to CLI more.
So, I went ahead and installed node.js to use the npm node-sass package.
I followed a guide which said that I had to run npm init, which will prompt some questions.
But I didn’t see anything that looked like a question, so I went ahead and started to spam npm install node-sass and other commands where it requested the package name:. 😄
I thought it was requesting the name of the package to install, which was node-sass in this case.
But I kept getting this error:
Sorry, name can only contain URL-friendly characters.
While searching for a solution, I saw many people on forums making the same mistake as me 😃. That’s why I decided to write this guide.
The Solution
The solution is simple, and it seems “duh” now that I understood what’s going on. 😃
The package name: is actually part of the info requested for the package.json file that is created when running npm init.
And it requests “URL-friendly characters”, which means you need to name your package using URL-type formatting, like this:
package name: example-package-name
Words separated by hyphens, without capital letters. It might work with only one word, but I haven’t tried that yet.
That’s a Wrap
I hope this post helped you out and you don’t get the “Sorry, name can only contain URL-friendly characters.” error anymore.
If some info is outdated or incorrect, or you have anything to add, say or ask, please contact me via Twitter or email.
#node.js #npm
Вопрос:
Я пробую учебник для Angular 12 из https://www.positronx.io/build-angular-crud-application-with-nodejs-and-express-rest-api/ и не может выполнить команду ниже:
npm install express cors body-parser mongoose
Ниже приведен код:
 PS D:VArdhanprojectsnode-angulartest> npm init

This utility will walk you through creating a package.json file.
It only covers the most common items, and tries to guess sensible defaults.

See `npm help init` for definitive documentation on these fields
and exactly what they do.

Use `npm install <pkg>` afterwards to install a package and
save it as a dependency in the package.json file.

Press ^C at any time to quit.

package name: (test) npm install express cors body-parser mongoose

Sorry, name can only contain URL-friendly characters.
Комментарии:
1.
package nameя ожидал увидеть имя, которое вы хотите использовать для своего пакета, а не список зависимостей, которые вы хотите установить.npm install ...это команда, которую нужно выполнить после успешного создания пакета для установки этих зависимостей.
I was getting the same issue trying to install express and I think I found the solution:
- First run npm init, set the characteristics of the project, (if creating a standard project, just press enter for name, version, description, etc)
You will get this on console:
This utility will walk you through creating a package.json file.
It only covers the most common items, and tries to guess sensible defaults.
See
npm help jsonfor definitive documentation on these fieldsand exactly what they do.
Use
npm install <pkg> --saveafterwards to install a package and
save it as a dependency in the package.json file.Press ^C at any time to quit.
name: (certinode)
version: (1.0.0)
description:
git repository:
keywords:
author:
license: (ISC)**
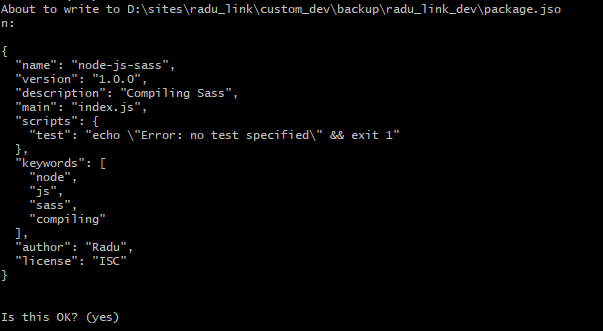
About to write to C:UsersusuarioDesktopprojectscertinodepackage.json:
{
«name»: «certinode»,
«version»: «1.0.0»,
«main»: «app.js»,
«scripts»: {
«test»: «echo «Error: no test specified» && exit 1″
},
«author»: «»,
«license»: «ISC»,
«dependencies»: {
«express»: «^4.15.2»
},
«devDependencies»: {},
«description»: «»
}Is this ok? (yes)
- Once you´ve finished the init accepting the characteristics, you can install all packages you need. Now yow can run as many npm install —save as you want.
Hope it helps you.
1 2 3 4 5 6 7 8 9 10 11 12 13 14 15 16 17 18 19 20 21 22 23 24 25 26 27 28 29 30 31 32 33 34 35 36 37 38 39 40 41 42 43 44 45 46 47 48 49 50 51 52 53 54 55 56 57 58 59 60 61 62 63 64 65 66 67 68 69 70 71 72 73 74 75 76 77 78 79 80 81 82 83 84 85 86 87 88 89 90 91 92 93 94 95 96 97 98 99 100 101 102 103 104 105 106 107 108 109 110 111 112 113 114 115 116 117 118 119 120 121 122 123 124 125 126 127 128 129 130 131 132 133 134 135 136 137 138 139 140 141 142 143 144 145 146 147 148 149 150 151 152 153 154 155 156 157 158 159 160 161 162 163 164 165 166 167 168 169 170 171 172 173 174 175 176 177 178 179 180 181 182 183 184 185 |
const express = require("express"); const bodyParser = require("body-parser"); const flash = require("connect-flash"); const expressSession = require("express-session"); const MySQLStore = require("express-mysql-session")(expressSession); const connection = require("./db/connection"); const helpers = require("./helpers"); const config = require("./config.json"); const moment = require("moment"); const passport = require("passport"); const LocalStrategy = require("passport-local").Strategy; const crypto = require("crypto"); const cookieParser = require("cookie-parser"); moment.locale("ru"); const app = express(); let listener = require("http").Server(app); passport.serializeUser(function (user, done) { done(null, user.id); }); passport.deserializeUser(function (id, done) { connection.query("select * from users where id = " + id, (err, rows) => { done(err, rows[0]); }); }); passport.use( "local-signup", new LocalStrategy( { usernameField: "email", passwordField: "password", passReqToCallback: true, }, (req, email, password, done) => { connection.query( "select * from users where email = ?", [email], (err, rows) => { if (err) { return done(err); } if (rows.length) { return done( null, false, req.flash("signupMessage", "That email is already taken.") ); } else { // create the user crypto.pbkdf2( password, email, 25000, 512, "sha256", (err, hash) => { let newUserMysql = new Object(); newUserMysql.email = email; newUserMysql.password = hash.toString("hex"); connection.query( "INSERT INTO users (email, password) values (?, ?)", [newUserMysql.email, newUserMysql.password], (err, rows) => { newUserMysql.id = rows.insertId; return done(null, newUserMysql); } ); } ); } } ); } ) ); passport.use( "local-login", new LocalStrategy( { usernameField: "email", passwordField: "password", passReqToCallback: true, }, (req, email, password, done) => { connection.query( "SELECT * FROM `users` WHERE `email` = ?", [email], (err, rows) => { if (err) { return done(err); } if (!rows.length) { return done( null, false, req.flash("loginMessage", "No user found.") ); } crypto.pbkdf2(password, email, 25000, 512, "sha256", (err, hash) => { password = hash.toString("hex"); if (!(rows[0].password == password)) { return done( null, false, req.flash("loginMessage", "Oops! Wrong password.") ); } }); return done(null, rows[0]); } ); } ) ); const routes = require("./routes.js")(express.Router(), passport); app .use( express.static("static", { maxage: "4h", }) ) .use(cookieParser()) /*.use(i18n.init)*/ .set("view engine", "ejs") .use(bodyParser.json()) .use( bodyParser.urlencoded({ extended: true, }) ) .use( expressSession({ secret: config.express.secret, store: new MySQLStore({}, connection), resave: false, saveUninitialized: false, }) ) .use(passport.initialize()) .use(flash()) .use(passport.session()) .use(async (req, res, next) => { res.locals.error = null; res.locals.helpers = helpers; res.locals.user = null; res.locals.moment = moment; res.locals.url = req.url; next(); }) .use(routes) .use((req, res, next) => { let err = new Error("Здесь ничего нет"); err.status = 404; next(err); }) .use((err, req, res, next) => { if (err.status != 404) { err.message = "Неизвестная ошибка"; } return res.status(err.status || 500).render("error", { message: err.message, error: req.app.get("env") === "development" ? err : null, status: err.status || 500, }); }); let server = listener.listen(config.express.port || 3000, () => { const host = server.address().address == "::" ? "localhost" : server.address().address; const port = server.address().port; console.log("Start at http://%s:%s", host, port); }); |
Осваиваю Gulp, решио написать первый таск, который собирает html файлы, вот его код:
'use strict';

var gulp = require('gulp'),
    watch = require('gulp-watch'),
    prefixer = require('gulp-autoprefixer'),
    uglify = require('gulp-uglify'),
    sass = require('gulp-sass'),
    sourcemaps = require('gulp-sourcemaps'),
    rigger = require('gulp-rigger'),
    cssmin = require('gulp-minify-css'),
    imagemin = require('gulp-imagemin'),
    pngquant = require('imagemin-pngquant'),
    rimraf = require('rimraf'),
    browserSync = require("browser-sync"),
    reload = browserSync.reload;
var path = {
    build: { //Тут мы укажем куда складывать готовые после сборки файлы
        html: 'build/',
        js: 'build/js/',
        css: 'build/css/',
        img: 'build/img/',
        fonts: 'build/fonts/'
    },
    src: { //Пути откуда брать исходники
        html: 'src/*.html', //Синтаксис src/*.html говорит gulp что мы хотим взять все файлы с расширением .html
        js: 'src/js/main.js',//В стилях и скриптах нам понадобятся только main файлы
        style: 'src/style/main.scss',
        img: 'src/img/**/*.*', //Синтаксис img/**/*.* означает - взять все файлы всех расширений из папки и из вложенных каталогов
        fonts: 'src/fonts/**/*.*'
    },
    watch: { //Тут мы укажем, за изменением каких файлов мы хотим наблюдать
        html: 'src/**/*.html',
        js: 'src/js/**/*.js',
        style: 'src/style/**/*.scss',
        img: 'src/img/**/*.*',
        fonts: 'src/fonts/**/*.*'
    },
    clean: './build'
};
var config = {
    server: {
        baseDir: "./build"
    },
    tunnel: true,
    host: 'localhost',
    port: 9000,
    logPrefix: "Frontend_Devil"
};
gulp.task('html:build', function () {
    gulp.src(path.src.html) //Выберем файлы по нужному пути
        .pipe(rigger()) //Прогоним через rigger
        .pipe(gulp.dest(path.build.html)) //Выплюнем их в папку build
        .pipe(reload({stream: true})); //И перезагрузим наш сервер для обновлений
});
При попытке запуска(через написание в консоль gulp html:build), выдаёт ошибку:Sorry, name can only contain URL-friendly characters.
Может я не правильно таск написал, может вызываю неправильно, вообщем, помогите.
Кирилл Пастухов
Добрый день! После инициализации npm при попытки создания каталога bin терминал просит, чтобы имя было URL-friendly. Что я упустил?
package name: (frontend-project-lvl1) mkdir bin
Sorry, name can only contain URL-friendly characters.
1
0
Сергей К.
Кирилл, приветствую! Сначала нужно пройти процедуру инициализации пакета, ответить на вопросы, которые запрашивает npm. На первом шаге он просит вас указать имя пакета (package name).
1
Используйте Хекслет по-максимуму!
-
Задавайте вопросы по уроку -
Проверяйте знания в квизах -
Проходите практику прямо в браузере -
Отслеживайте свой прогресс
Зарегистрируйтесь или
войдите в свой аккаунт
Рекомендуемые программы
профессия
•
от 6 300 ₽ в месяц
Разработка фронтенд-компонентов для веб-приложений
профессия
•
от 5 025 ₽ в месяц
Сбор, анализ и интерпретация данных
профессия
•
от 6 300 ₽ в месяц
Разработка веб-приложений на Django
профессия
•
от 6 300 ₽ в месяц
Разработка приложений на языке Java
профессия
•
от 6 300 ₽ в месяц
Разработка веб-приложений на Laravel
профессия
•
от 6 183 ₽ в месяц
Ручное тестирование веб-приложений
профессия
•
от 6 300 ₽ в месяц
Разработка бэкенд-компонентов для веб-приложений
профессия
•
от 10 080 ₽ в месяц
Разработка фронтенд- и бэкенд-компонентов для веб-приложений
профессия
•
от 5 840 ₽ в месяц
Создание веб-приложений со скоростью света
Верстка с использованием последних стандартов CSS
профессия
•
от 6 300 ₽ в месяц
Автоматизированное тестирование веб-приложений на JavaScript
в разработке
дата определяется
Запустить проект. Начало
27.07.2022, 19:28. Показов 2240. Ответов 23

Хочу разобраться с Node.js.
Использую проект.
Состав проекта смотри картинки.
Основная цель: просто посмотреть как это работает.
Какую IDE использовать?
Как его запустить?
Владею начальными навыками C#(ASP.NET(MVC)).
Использую:
— Windows 10×64;
У меня установлено:
— VSCode;
— Visual Studio 2022 Community(Установлено NodeJS);
— Node.js (c:Program Filesnodejsnode.exe);
— OpenServer;
1_NodeJS_start.bat
app.js
| Javascript | ||
|
config.js
| Javascript | ||
|
config.json
| JSON | ||
|
package.json
| JSON | ||
|
routes.js
| Javascript | ||
|
0
На прошлой неделе я опубликовал все нормально, но попробовал сегодня, и это не работает ни на одном из моих компьютеров. Это странно, сначала я подумал, что это проблема с сервисом, но потом я начал искать решения, которые нашел в Интернете, и теперь получаю следующее, когда пытаюсь npm adduser:
npm ERR! code E404
npm ERR! 404 Not Found - PUT https://npm.pkg.github.com/estebanpadilla/-/user/org.couchdb.user:ludusy
npm ERR! 404
npm ERR! 404  'org.couchdb.user:ludusy' is not in the npm registry.
npm ERR! 404 Your package name is not valid, because
npm ERR! 404  1. name can only contain URL-friendly characters
npm ERR! 404
npm ERR! 404 Note that you can also install from a
npm ERR! 404 tarball, folder, http url, or git url.

npm ERR! A complete log of this run can be found in:
npm ERR!     /Users/estebanpadilla/.npm/_logs/2020-08-11T03_27_17_364Z-debug.log
Я искал возможное решение, но ничего не помогло.
npm whoami дает такой результат:
npm ERR! code ENEEDAUTH
npm ERR! need auth This command requires you to be logged in.
npm ERR! need auth You need to authorize this machine using `npm adduser`

npm ERR! A complete log of this run can be found in:
npm ERR!     /Users/estebanpadilla/.npm/_logs/2020-08-11T03_29_57_501Z-debug.log
Есть ли у кого-нибудь идеи, как заставить его снова работать?
Спасибо.
2 ответа
Лучший ответ
Похоже, вы не вошли в систему. Думаю, вам нужно запустить npm adduser и следовать подсказкам.
Просто небольшой совет — обязательно внимательно прочтите сообщение об ошибке. Я думаю, эта строка говорит вам, что именно вам нужно делать! npm ERR! need auth You need to authorize this machine using npm adduser.
0
maecapozzi
11 Авг 2020 в 20:51
Сейчас он работает, по какой-то причине мне не удалось запустить npm adduser или npm whoami в каталоге проекта, но я смог в любом другом каталоге, поэтому я полагаю, что что-то не так с каким-то файлом конфигурации внутри проекта. Я удалил все ненужные файлы, и они заработали.
Спасибо за вашу помощь.
0
Esteban Padilla
13 Авг 2020 в 04:29
Loading