
предыдущая глава | содержание | следующая глава
- 10.1 «The server’s host key is not cached in the registry»
- 10.2 «WARNING — POTENTIAL SECURITY BREACH!»
- 10.3 «SSH protocol version 2 required by our configuration but remote only provides (old, insecure) SSH-1»
- 10.4 «The first cipher supported by the server is … below the configured warning threshold»
- 10.5 «Remote side sent disconnect message type 2 (protocol error): «Too many authentication failures for root»»
- 10.6 «Out of memory»
- 10.7 «Internal error», «Internal fault», «Assertion failed»
- 10.8 «Unable to use key file», «Couldn’t load private key», «Couldn’t load this key»
- 10.9 «Server refused our key», «Server refused our public key», «Key refused»
- 10.10 «Access denied», «Authentication refused»
- 10.11 «No supported authentication methods available»
- 10.12 «Incorrect MAC received on packet» or «Incorrect CRC received on packet»
- 10.13 «Incoming packet was garbled on decryption»
- 10.14 «PuTTY X11 proxy: various errors»
- 10.15 «Network error: Software caused connection abort»
- 10.16 «Network error: Connection reset by peer»
- 10.17 «Network error: Connection refused»
- 10.18 «Network error: Connection timed out»
- 10.19 «Network error: Cannot assign requested address»
This chapter lists a number of common error messages which PuTTY and its associated tools can produce, and explains what they mean in more detail.
We do not attempt to list all error messages here: there are many which should never occur, and some which should be self-explanatory. If you get an error message which is not listed in this chapter and which you don’t understand, report it to us as a bug (see appendix B) and we will add documentation for it.
10.1 «The server’s host key is not cached in the registry»
This error message occurs when PuTTY connects to a new SSH server. Every server identifies itself by means of a host key; once PuTTY knows the host key for a server, it will be able to detect if a malicious attacker redirects your connection to another machine.
If you see this message, it means that PuTTY has not seen this host key before, and has no way of knowing whether it is correct or not. You should attempt to verify the host key by other means, such as asking the machine’s administrator.
If you see this message and you know that your installation of PuTTY has connected to the same server before, it may have been recently upgraded to SSH protocol version 2. SSH protocols 1 and 2 use separate host keys, so when you first use SSH-2 with a server you have only used SSH-1 with before, you will see this message again. You should verify the correctness of the key as before.
See section 2.2 for more information on host keys.
10.2 «WARNING — POTENTIAL SECURITY BREACH!»
This message, followed by «The server’s host key does not match the one PuTTY has cached in the registry», means that PuTTY has connected to the SSH server before, knows what its host key should be, but has found a different one.
This may mean that a malicious attacker has replaced your server with a different one, or has redirected your network connection to their own machine. On the other hand, it may simply mean that the administrator of your server has accidentally changed the key while upgrading the SSH software; this shouldn’t happen but it is unfortunately possible.
You should contact your server’s administrator and see whether they expect the host key to have changed. If so, verify the new host key in the same way as you would if it was new.
See section 2.2 for more information on host keys.
10.3 «SSH protocol version 2 required by our configuration but remote only provides (old, insecure) SSH-1»
By default, PuTTY only supports connecting to SSH servers that implement SSH protocol version 2. If you see this message, the server you’re trying to connect to only supports the older SSH-1 protocol.
If the server genuinely only supports SSH-1, then you need to either change the «SSH protocol version» setting (see section 4.19.4), or use the -1 command-line option; in any case, you should not treat the resulting connection as secure.
You might start seeing this message with new versions of PuTTY (from 0.68 onwards) where you didn’t before, because it used to be possible to configure PuTTY to automatically fall back from SSH-2 to SSH-1. This is no longer supported, to prevent the possibility of a downgrade attack.
10.4 «The first cipher supported by the server is … below the configured warning threshold»
This occurs when the SSH server does not offer any ciphers which you have configured PuTTY to consider strong enough. By default, PuTTY puts up this warning only for Blowfish, single-DES, and Arcfour encryption.
See section 4.22 for more information on this message.
(There are similar messages for other cryptographic primitives, such as host key algorithms.)
10.5 «Remote side sent disconnect message type 2 (protocol error): «Too many authentication failures for root»»
This message is produced by an OpenSSH (or Sun SSH) server if it receives more failed authentication attempts than it is willing to tolerate.
This can easily happen if you are using Pageant and have a large number of keys loaded into it, since these servers count each offer of a public key as an authentication attempt. This can be worked around by specifying the key that’s required for the authentication in the PuTTY configuration (see section 4.23.8); PuTTY will ignore any other keys Pageant may have, but will ask Pageant to do the authentication, so that you don’t have to type your passphrase.
On the server, this can be worked around by disabling public-key authentication or (for Sun SSH only) by increasing MaxAuthTries in sshd_config.
10.6 «Out of memory»
This occurs when PuTTY tries to allocate more memory than the system can give it. This may happen for genuine reasons: if the computer really has run out of memory, or if you have configured an extremely large number of lines of scrollback in your terminal. PuTTY is not able to recover from running out of memory; it will terminate immediately after giving this error.
However, this error can also occur when memory is not running out at all, because PuTTY receives data in the wrong format. In SSH-2 and also in SFTP, the server sends the length of each message before the message itself; so PuTTY will receive the length, try to allocate space for the message, and then receive the rest of the message. If the length PuTTY receives is garbage, it will try to allocate a ridiculous amount of memory, and will terminate with an «Out of memory» error.
This can happen in SSH-2, if PuTTY and the server have not enabled encryption in the same way (see question A.7.3 in the FAQ).
This can also happen in PSCP or PSFTP, if your login scripts on the server generate output: the client program will be expecting an SFTP message starting with a length, and if it receives some text from your login scripts instead it will try to interpret them as a message length. See question A.7.4 for details of this.
10.7 «Internal error», «Internal fault», «Assertion failed»
Any error beginning with the word «Internal» should never occur. If it does, there is a bug in PuTTY by definition; please see appendix B and report it to us.
Similarly, any error message starting with «Assertion failed» is a bug in PuTTY. Please report it to us, and include the exact text from the error message box.
10.8 «Unable to use key file», «Couldn’t load private key», «Couldn’t load this key»
Various forms of this error are printed in the PuTTY window, or written to the PuTTY Event Log (see section 3.1.3.1) when trying public-key authentication, or given by Pageant when trying to load a private key.
If you see one of these messages, it often indicates that you’ve tried to load a key of an inappropriate type into PuTTY, Plink, PSCP, PSFTP, or Pageant.
You may have tried to load an SSH-2 key in a «foreign» format (OpenSSH or ssh.com) directly into one of the PuTTY tools, in which case you need to import it into PuTTY’s native format (*.PPK) using PuTTYgen – see section 8.2.12.
Alternatively, you may have specified a key that’s inappropriate for the connection you’re making. The SSH-2 and the old SSH-1 protocols require different private key formats, and a SSH-1 key can’t be used for a SSH-2 connection (or vice versa).
10.9 «Server refused our key», «Server refused our public key», «Key refused»
Various forms of this error are printed in the PuTTY window, or written to the PuTTY Event Log (see section 3.1.3.1) when trying public-key authentication.
If you see one of these messages, it means that PuTTY has sent a public key to the server and offered to authenticate with it, and the server has refused to accept authentication. This usually means that the server is not configured to accept this key to authenticate this user.
This is almost certainly not a problem with PuTTY. If you see this type of message, the first thing you should do is check your server configuration carefully. Common errors include having the wrong permissions or ownership set on the public key or the user’s home directory on the server. Also, read the PuTTY Event Log; the server may have sent diagnostic messages explaining exactly what problem it had with your setup.
Section 8.3 has some hints on server-side public key setup.
10.10 «Access denied», «Authentication refused»
Various forms of this error are printed in the PuTTY window, or written to the PuTTY Event Log (see section 3.1.3.1) during authentication.
If you see one of these messages, it means that the server has refused all the forms of authentication PuTTY has tried and it has no further ideas.
It may be worth checking the Event Log for diagnostic messages from the server giving more detail.
This error can be caused by buggy SSH-1 servers that fail to cope with the various strategies we use for camouflaging passwords in transit. Upgrade your server, or use the workarounds described in section 4.28.11 and possibly section 4.28.12.
10.11 «No supported authentication methods available»
This error indicates that PuTTY has run out of ways to authenticate you to an SSH server. This may be because PuTTY has TIS or keyboard-interactive authentication disabled, in which case see section 4.23.4 and section 4.23.5.
10.12 «Incorrect MAC received on packet» or «Incorrect CRC received on packet»
This error occurs when PuTTY decrypts an SSH packet and its checksum is not correct. This probably means something has gone wrong in the encryption or decryption process. It’s difficult to tell from this error message whether the problem is in the client, in the server, or in between.
In particular, if the network is corrupting data at the TCP level, it may only be obvious with cryptographic protocols such as SSH, which explicitly check the integrity of the transferred data and complain loudly if the checks fail. Corruption of protocols without integrity protection (such as HTTP) will manifest in more subtle failures (such as misdisplayed text or images in a web browser) which may not be noticed.
Occasionally this has been caused by server bugs. An example is the bug described at section 4.28.8, although you’re very unlikely to encounter that one these days.
In this context MAC stands for Message Authentication Code. It’s a cryptographic term, and it has nothing at all to do with Ethernet MAC (Media Access Control) addresses, or with the Apple computer.
10.13 «Incoming packet was garbled on decryption»
This error occurs when PuTTY decrypts an SSH packet and the decrypted data makes no sense. This probably means something has gone wrong in the encryption or decryption process. It’s difficult to tell from this error message whether the problem is in the client, in the server, or in between.
If you get this error, one thing you could try would be to fiddle with the setting of «Miscomputes SSH-2 encryption keys» (see section 4.28.10) or «Ignores SSH-2 maximum packet size» (see section 4.28.5) on the Bugs panel.
10.14 «PuTTY X11 proxy: various errors»
This family of errors are reported when PuTTY is doing X forwarding. They are sent back to the X application running on the SSH server, which will usually report the error to the user.
When PuTTY enables X forwarding (see section 3.4) it creates a virtual X display running on the SSH server. This display requires authentication to connect to it (this is how PuTTY prevents other users on your server machine from connecting through the PuTTY proxy to your real X display). PuTTY also sends the server the details it needs to enable clients to connect, and the server should put this mechanism in place automatically, so your X applications should just work.
A common reason why people see one of these messages is because they used SSH to log in as one user (let’s say «fred»), and then used the Unix su command to become another user (typically «root»). The original user, «fred», has access to the X authentication data provided by the SSH server, and can run X applications which are forwarded over the SSH connection. However, the second user («root») does not automatically have the authentication data passed on to it, so attempting to run an X application as that user often fails with this error.
If this happens, it is not a problem with PuTTY. You need to arrange for your X authentication data to be passed from the user you logged in as to the user you used su to become. How you do this depends on your particular system; in fact many modern versions of su do it automatically.
10.15 «Network error: Software caused connection abort»
This is a generic error produced by the Windows network code when it kills an established connection for some reason. For example, it might happen if you pull the network cable out of the back of an Ethernet-connected computer, or if Windows has any other similar reason to believe the entire network has become unreachable.
Windows also generates this error if it has given up on the machine at the other end of the connection ever responding to it. If the network between your client and server goes down and your client then tries to send some data, Windows will make several attempts to send the data and will then give up and kill the connection. In particular, this can occur even if you didn’t type anything, if you are using SSH-2 and PuTTY attempts a key re-exchange. (See section 4.20.2 for more about key re-exchange.)
(It can also occur if you are using keepalives in your connection. Other people have reported that keepalives fix this error for them. See section 4.14.1 for a discussion of the pros and cons of keepalives.)
We are not aware of any reason why this error might occur that would represent a bug in PuTTY. The problem is between you, your Windows system, your network and the remote system.
10.16 «Network error: Connection reset by peer»
This error occurs when the machines at each end of a network connection lose track of the state of the connection between them. For example, you might see it if your SSH server crashes, and manages to reboot fully before you next attempt to send data to it.
However, the most common reason to see this message is if you are connecting through a firewall or a NAT router which has timed the connection out. See question A.7.8 in the FAQ for more details. You may be able to improve the situation by using keepalives; see section 4.14.1 for details on this.
Note that Windows can produce this error in some circumstances without seeing a connection reset from the server, for instance if the connection to the network is lost.
10.17 «Network error: Connection refused»
This error means that the network connection PuTTY tried to make to your server was rejected by the server. Usually this happens because the server does not provide the service which PuTTY is trying to access.
Check that you are connecting with the correct protocol (SSH, Telnet or Rlogin), and check that the port number is correct. If that fails, consult the administrator of your server.
10.18 «Network error: Connection timed out»
This error means that the network connection PuTTY tried to make to your server received no response at all from the server. Usually this happens because the server machine is completely isolated from the network, or because it is turned off.
Check that you have correctly entered the host name or IP address of your server machine. If that fails, consult the administrator of your server.
Unix also generates this error when it tries to send data down a connection and contact with the server has been completely lost during a connection. (There is a delay of minutes before Unix gives up on receiving a reply from the server.) This can occur if you type things into PuTTY while the network is down, but it can also occur if PuTTY decides of its own accord to send data: due to a repeat key exchange in SSH-2 (see section 4.20.2) or due to keepalives (section 4.14.1).
10.19 «Network error: Cannot assign requested address»
This means that the operating system rejected the parameters of the network connection PuTTY tried to make, usually without actually trying to connect to anything, because they were simply invalid.
A common way to provoke this error is to accidentally try to connect to port 0, which is not a valid port number.
PuTTY is a free-to-use software used to connect to remote computers over a secure connection. It can be used to create a Secure Shell (SSH) between 2 devices, open a
PuTTY is a free-to-use software used to connect to remote computers over a secure connection. It can be used to create a Secure Shell (SSH) between 2 devices, open a Terminal Over A Network (telnet) connection, and offer a few other options as well. However, it can throw a few errors from time to time.
Today we are going to address a common fatal error that many users have experienced using the PuTTY software, which goes as follows:
Network Error: Connection Timed Out
A fatal error means the software throws an error without an intimation or warning without saving its state, and the user cannot perform any further actions.
An SSH connection can be established between a host (local) computer and a server (remote) device. This allows users to gain control of the remote device through a Command Line Interface (CLI) – which is very much similar to Remote Desktop Connection (RDC). The only difference is that the RDC has a Graphical User Interface (GUI).
Although SSH is mostly used to connect to devices having a CLI-based operating system (like Linux distros), it can also be used to connect to Windows computers as well.
A Windows 11/10 computer has a built-in SSH client and a server – meaning it can be used to connect to a remote PC using SSH, and it can be connected to as well. However, setting up the SSH server on a Windows computer needs some configuration, which we have discussed further down this post.
If you are an IT professional, then you must have used the PuTTY software at least once in your lifetime. Which is why you must understand that sometimes PuTTY displays this error message even when you have entered the correct information in it (which includes the IP address, the protocol, and the port number to be used).

Why “Connection Timed Out” Error Occurs
When the SSH protocol is establishing the connection between the 2 devices, the client sends out a message to the server, to which the server responds. However, if the client does not receive a reply after multiple attempts, the client prompts an error message stating “Connection timed out.”
Therefore, it can be concluded that PuTTY has been unsuccessful in establishing an SSH connection with the remote device. This can be due to several different reasons:
- The remote server’s IP address is inaccessible.
- The remote server’s firewall is blocking the respective SSH port.
- SSH and dependent services are disabled.
- Antivirus is blocking SSH traffic.
Let us now show you how to fix the problem so you can successfully connect to the remote device using the SSH protocol in PuTTY.
Fix PuTTY “Network Error: Connection Timed Out”
Confirm IP Access
To start with, confirm that the remote server is accessible from the client machine. This is most conveniently done by performing a ping test. Pinging the server from the client will ensure that the network connection between the 2 devices is valid.
Enter the following cmdlet in the Command Prompt while replacing IPAddress with the IP address of the remote PC you want to SSH.
ping IPAddress
If you find that the ping did not return a reply, this means that either the machine is not on the same network as yours, or the server’s firewall is up, which is blocking both the ping and the SSH connection.
Disable Windows Firewall
Windows firewall blocks most ports by default. Log into your server using the portal (or physically accessing the machine) and disable its firewall by performing these steps:
-
Open Windows Firewall by typing in firewall.cpl in the Run Command box.

Open firewall -
Now click Turn Windows Defender Firewall on or off from the left.

Manage Windows firewall -
Now select Turn off Windows Defender Firewall under every network profile visible. Once done, click OK to save the changes.
Turn off firewall


Now recheck if you can ping from the client machine. If yes, then retry the SSH connection and see if it works. If it still doesn’t, continue to perform the following solutions to mitigate the problem.
Check if SSH is Enabled
As we mentioned at the beginning of this post, an SSH server needs to be configured on a Windows PC before you can connect to it. Perform the following steps on the server to enable SSH:
-
Navigate to the following:
Settings app >> Apps >> Optional features
-
Here, click View features in front of “Add an optional feature.”

View optional features -
In the “Add an optional feature” window, search for “Open.” From the search results, select OpenSSH Server, and then click Next.
Select SSH feature -
In the next window, click Install.
Install SSH -
The feature will then be installed. When it does, you must manually enable the dependent services. Open the Services console by typing in services.msc in the Run Command box.
Open Services console -
Here, right-click OpenSSH SSH Server and click Properties from the context menu.
Open Properties -
In the Properties window, select “Startup type” as Automatic, then click Start to start the service. When it does, click Apply and Ok to save the changes.
Start service


Now that SSH is configured, you should be able to connect to this machine from the client PC using PuTTY.
If you still experience the same error, there are still a few more things you can do.
Disable Antivirus
The built-in Windows Defender Antivirus in Windows 11 and 10, or any other third-party antivirus, can cause hindrance in an SSH connection. Try disabling them and checking if it resolves the issue.
Learn how to disable Windows Defender temporarily. If you are using a third-party antivirus, you must disable it also.
Once disabled, check if you can successfully connect to the SSH server using PuTTY.
Conclusion
The “Network Error: Connection Timed Out” error in PuTTY occurs even before a user is asked to enter the credentials. Therefore, the error cannot be blamed on incorrect user account information. Thus, it is only possible that there is an issue with the connection itself.
If you are still unable to resolve the issue after performing all of the solutions above, then as a last resort, you can try rebooting the server as well as the client. This has often solved problems for many users, especially when certain responsible services are not behaving as they should. A system reboot usually fixes these things.
If this doesn’t work either, then it is likely that the default SSH port has been moved by someone. You can check the listening ports of a machine and find out which port is designated for SSH.
Webmasters have often come across PuTTY Fatal Error with a message ‘Network error: Connection Refused’ or ‘Network error: Connection timed out’. But here at Tech-Assured, our support Engineers have a solution for all kinds of network related issues.
CBD as a Steroid Sparing Treatment anazole cocrystal pharma announces plans to advance coronavirus program
Let’s see the causes and fixes to it…
Causes for PuTTY Fatal error
- SSH service not running
- No traffic in network
- Mismatch in IP address of host and virtual machine
Solution
- Steps
In order to make sure that the IP address of host and Linux virtual machine belongs to the same subnet,
-
- Open RUN command (Windows key + R)
- Type > ipconfig
- Check if SSH connection is enabled
- Configuration > Interfaces > ssh. enable the service
There are few other common solutions:
Disable firewall
- Steps
- Open RUN command (Windows key + R)
- Type > control panel > ok
- Click on System and Security > Windows firewall
- Click on Turn off windows firewall
- Disable anti-virus firewall
- Restart the computer
Ask for help –
If you need assistance at any point, please feel free to contact us and our Support Engineers will assist you.
Tech-Assured can help you deploy best IT practices and mitigate risks with a fully compliant IT framework.
Recommended Posts
10.18 ‘Network error: Connection timed out’
This error means that the network connection PuTTY tried to make to your server received no response at all from the server. Usually this happens because the server machine is completely isolated from the network, or because it is turned off.
Check that you have correctly entered the host name or IP address of your server machine. If that fails, consult the administrator of your server.
Unix also generates this error when it tries to send data down a connection and contact with the server has been completely lost during a connection. (There is a delay of minutes before Unix gives up on receiving a reply from the server.) This can occur if you type things into PuTTY while the network is down, but it can also occur if PuTTY decides of its own accord to send data: due to a repeat key exchange in SSH-2 (see section 4.19.2) or due to keepalives (section 4.13.1).
Тогда как новички используют для управления компьютером по сети удобные и простые программы вроде TeamViewer, опытные юзеры и администраторы сетей нередко предпочитают более сложное в использовании специализированное программное обеспечение. Например, PuTTY. Эта бесплатная программа служит для безопасного подключения и отправки команд на сетевой компьютер по протоколам SSH, Telnet и Rlogin.
А также приложение может использоваться для настройки устройств с помощью COM-портов.
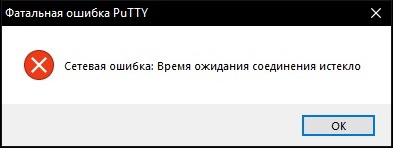
Программа PuTTY отличается высокой надежностью и стабильностью, но и она не застрахована от время от времени случающихся ошибок, среди которых наиболее часто встречающейся остается «Ошибка сети. Время ожидания подключения истекло».
Если судить по описанию, ошибка возникает, когда в течении определенного времени клиент не получает ответа от сервера, то есть PuTTY не удается установить SSH-соединение с удаленным устройством. В свою очередь, это может быть вызвано разными причинами.
Проверьте доступность сетевого устройства
Первое, что нужно сделать при появлении ошибки «Время ожидания подключения истекло», это проверить наличие соединения между устройствами.
Выполните в командной строке команду ping IP, заменив IP айпи-адресом сетевого устройства. Если пинг не проходит, имеет место либо кабельная проблема, либо соединение блокируется фаерволом, либо вы указали неверные данные для подключения в клиенте PuTTY.

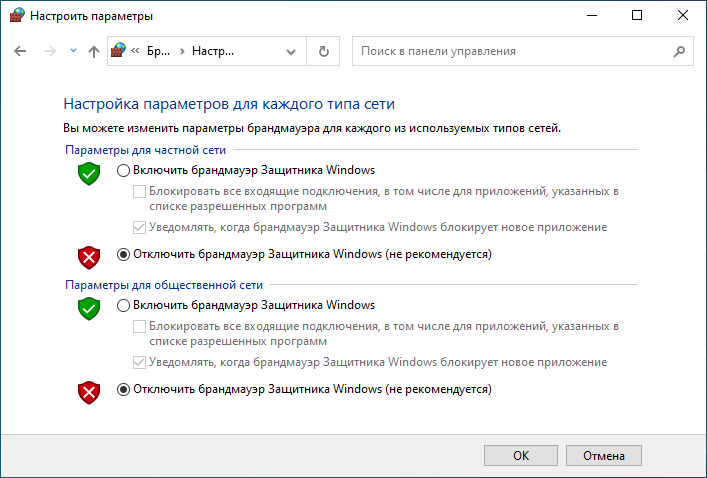
Отключите брандмауэр
По умолчанию штатный брандмауэр блокирует большую часть портов, поэтому нельзя исключать, что соединение не проходит как раз по причине блокировки используемых соединением портов на компьютере-сервере.
Отключите на удаленном компьютере фаервол и пропингуйте ПК повторно. Если пинг проходит, но попытка подключиться по SSH по-прежнему завершается ошибкой, проверьте настройки SSH на серверном компьютере.
Включите SSH
Прежде чем использовать PuTTY, на удаленном компьютере необходимо включить протокол SSH и запустить связанную с ним службу.
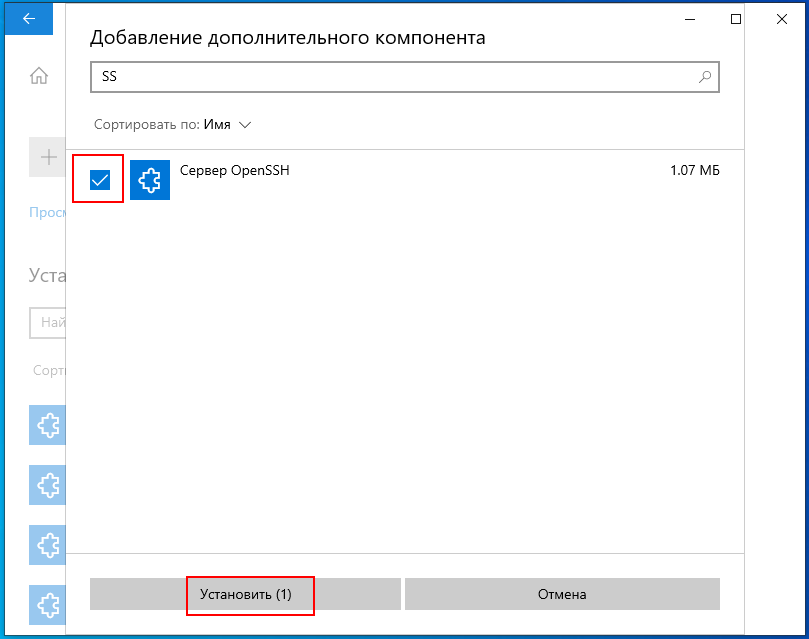
- Откройте приложение «Параметры» и перейдите в раздел «Приложения» -> «Дополнительные компоненты»;
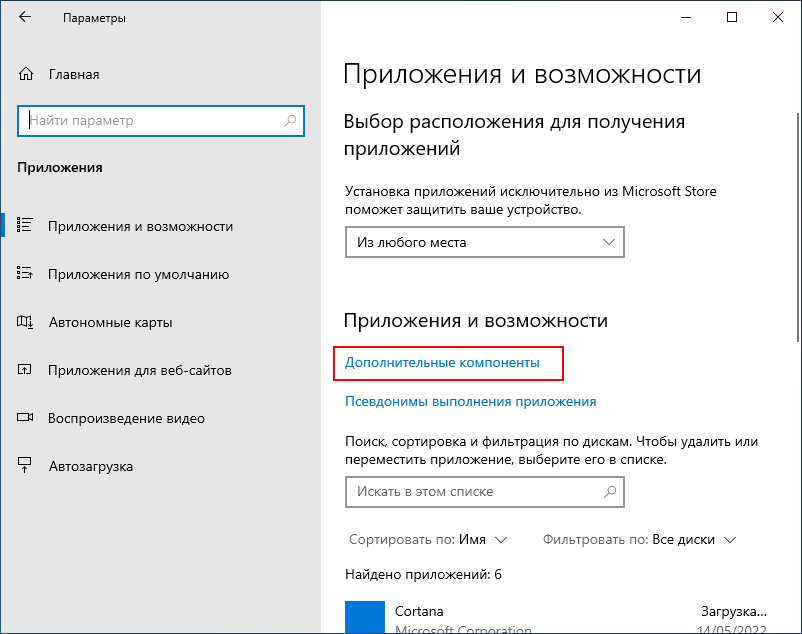
- Поищите в списке установленных компонентов «Сервер OpenSSH», если таковой отсутствует, нажмите «Добавить компонент»,
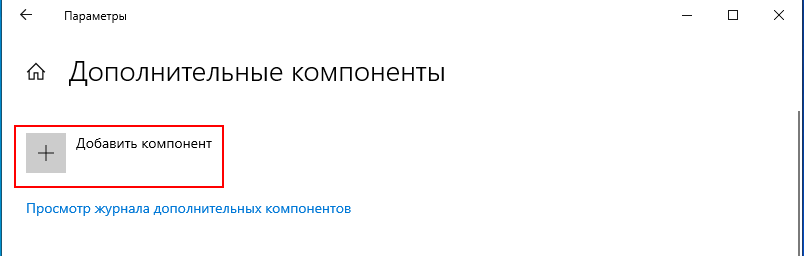
- выберите в списке «Сервер OpenSSH», отметьте его флажком и нажмите «Установить»;
- После того как модуль будет установлен, откройте оснастку управления службами командой services.msc;
- Отыщите службу «OpenSSH SSH Server», откройте ее свойства и, выставив тип запуска «Автоматически», запустите.
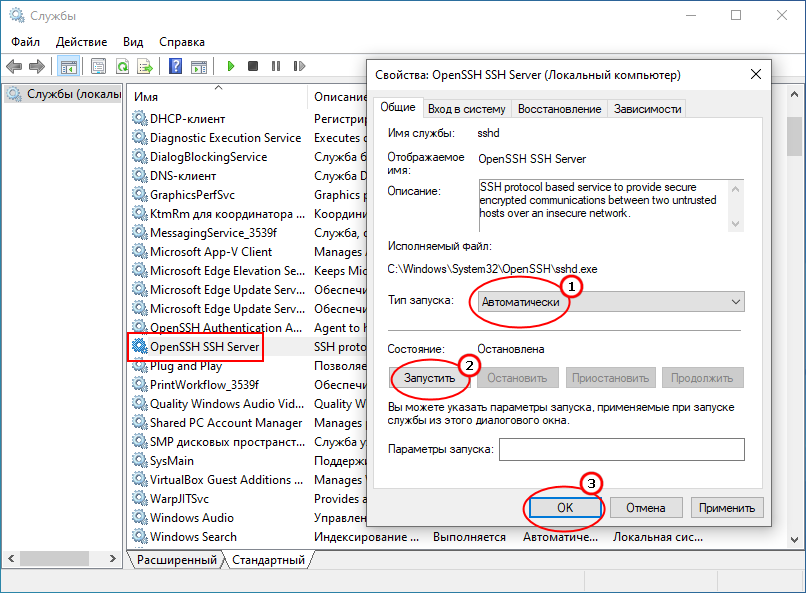
Сохраните настройки, перезагрузите компьютер и попробуйте подключиться к нему с помощью клиента PuTTY.
Если ошибка не исчезнет и после этого, стоит покопаться в сетевых настройках самого PuTTY, а заодно проверить, не занят ли на удаленном компьютере используемый приложением по умолчанию порт 22. Ну и не забывайте о существовании таких неплохих альтернатив PuTTY как OpenSSH, ZOC или Xshell.
![]() Загрузка…
Загрузка…