
| title | description | author | ms.date | ms.author |
|---|---|---|---|---|
|
Error handling |
An article on how to catch and handle errors in Power Query using the syntax try and otherwise. |
ptyx507x |
12/9/2022 |
miescobar |
Error handling
Similar to how Excel and the DAX language have an IFERROR function, Power Query has its own syntax to test and catch errors.
As mentioned in the article on dealing with errors in Power Query, errors can appear either at the step or cell level. This article will focus on how you can catch and manage errors based on your own specific logic.
[!Note]
To demonstrate this concept, this article will use an Excel Workbook as its data source. The concepts showcased here apply to all values in Power Query and not only the ones coming from an Excel Workbook.
The sample data source for this demonstration is an Excel Workbook with the following table.

This table from an Excel Workbook has Excel errors such as #NULL!, #REF!, and #DIV/0! in the Standard Rate column. When you import this table into the Power Query editor, the following image shows how it will look.

Notice how the errors from the Excel workbook are shown with the [Error] value in each of the cells.
In this article, you’ll learn how to replace an error with another value. In addition, you’ll also learn how to catch an error and use it for your own specific logic.
In this case, the goal is to create a new Final Rate column that will use the values from the Standard Rate column. If there are any errors, then it will use the value from the correspondent Special Rate column.
Provide an alternative value when finding errors
In this case, the goal is to create a new Final Rate column in the sample data source that will use the values from the Standard Rate column. If there are any errors, then it will use the value from the corresponding Special Rate column.
To create a new custom column, go to the Add column menu and select Custom column. In the Custom column window, enter the formula try [Standard Rate] otherwise [Special Rate]. Name this new column Final Rate.

The formula above will try to evaluate the Standard Rate column and will output its value if no errors are found. If errors are found in the Standard Rate column, then the output will be the value defined after the otherwise statement, which in this case is the Special Rate column.
After adding the correct data types to all columns in the table, the following image shows how the final table looks.

[!NOTE]
As an alternative approach, you can also enter the formulatry [Standard Rate] catch ()=> [Special Rate], which is equivalent to the previous formula, but using the catch keyword with a function that requires no parameters.The
catchkeyword was introduced to Power Query in May of 2022.
Provide your own conditional error logic
Using the same sample data source as the previous section, the new goal is to create a new column for the Final Rate. If the value from the Standard Rate exists, then that value will be used. Otherwise the value from the Special Rate column will be used, except for the rows with any #REF! error.
[!Note]
The sole purpose of excluding the#REF!error is for demonstration purposes. With the concepts showcased in this article, you can target any fields of your choice from the error record.
When you select any of the whitespace next to the error value, you get the details pane at the bottom of the screen. The details pane contains both the error reason, DataFormat.Error, and the error message, Invalid cell value '#REF!':

You can only select one cell at a time, so you can effectively only see the error components of one error value at a time. This is where you’ll create a new custom column and use the try expression.
Use try with custom logic
To create a new custom column, go to the Add column menu and select Custom column. In the Custom column window, enter the formula try [Standard Rate]. Name this new column All Errors.

The try expression converts values and errors into a record value that indicates whether the try expression handled an error or not, as well as the proper value or the error record.

You can expand this newly created column with record values and look at the available fields to be expanded by selecting the icon next to the column header.

This operation will expose three new fields:
- All Errors.HasError—displays whether the value from the Standard Rate column had an error or not.
- All Errors.Value—if the value from the Standard Rate column had no error, this column will display the value from the Standard Rate column. For values with errors this field won’t be available, and during the expand operation this column will have
nullvalues. - All Errors.Error—if the value from the Standard Rate column had an error, this column will display the error record for the value from the Standard Rate column. For values with no errors, this field won’t be available, and during the expand operation this column will have
nullvalues.

For further investigation, you can expand the All Errors.Error column to get the three components of the error record:
- Error reason
- Error message
- Error detail
After doing the expand operation, the All Errors.Error.Message field displays the specific error message that tells you exactly what Excel error each cell has. The error message is derived from the Error Message field of the error record.

Now with each error message in a new column, you can create a new conditional column with the name Final Rate and the following clauses:
- If the value in the All Errors.Errors.Message column equals
null, then the output will be the value from the Standard Rate column. - Else, if the value in the All Errors.Errors.Message column doesn’t equal
Invalid cell value '#REF!'., then the output will be the value from the Special Rate column. - Else, null.

After keeping only the Account, Standard Rate, Special Rate, and Final Rate columns, and adding the correct data type for each column, the following image demonstrates what the final table looks like.

Use try and catch with custom logic
Alternatively, you can also create a new custom column using the try and catch keywords.
try [Standard Rate] catch (r)=> if r[Message] <> "Invalid cell value '#REF!'." then [Special Rate] else null

More resources
- Understanding and working with errors in Power Query
- Add a Custom column in Power Query
- Add a Conditional column in Power Query
Это продолжение перевода книги Кен Пульс и Мигель Эскобар. Язык М для Power Query. Главы не являются независимыми, поэтому рекомендую читать последовательно.
Предыдущая глава Содержание Следующая глава
По мере усложнения ваших решений в Power Query вы столкнетесь со сценарием, в котором вам нужно выполнить в столбце некую логику. И хотя в Power Query есть инструмент для этого, он отличается от того что ожидает встретить профессионал Excel.
Допустим вы импортируете расписание из текстового файла:

Рис. 18.1. Текстовый файл содержит проблемы
Скачать заметку в формате Word или pdf, примеры в формате архива
Имя сотрудника не включено в строки. Как его извлечь из шапки? Для решения этой задачи будет применена условная логика. Создайте новую книгу Excel. Пройдите по меню Данные –> Получить данные –> Из файла –> Из текстового/CSV-файла. Выберите файл 2015-03-14.txt. Кликните Импортировать. В окне предварительного просмотра кликните Преобразовать данные. В редакторе Power Query –> Главная –> Удалить строки –> Удаление верхних строк –> 4. Кликните Использовать первую строку в качестве заголовков.

Рис. 18.2. Имя менеджера попала в столбце Out; чтобы увеличить изображение кликните на нем правой кнопкой мыши и выберите Открыть картинку в новой вкладке
У вас может возникнуть соблазн перенести имя Джона Томпсона в строки. Но есть и другие менеджеры, и вы понятия не имеете, сколько их. Решение может заключаться в том, чтобы добавить столбец с формулой, проверяющей, являются ли данные в столбце Out временем, и извлекающей данные, если тест не выполняется.
Поэкспериментируйте. Щелкните правой кнопкой мыши столбец Out –> Тип изменения –> Время. Как и следовало ожидать, все строки конвертируются красиво, но имя сотрудника возвращает ошибку:
)")
Рис. 18.3. У Джона Томпсона нет времени))
Это ожидаемо, но можно ли это как-то использовать? Вы можете применить функцию Time.From(), чтобы преобразовать данные в допустимое время. И основываясь на знаниях Excel, вы бы ожидали, что это сработает:
(1) =IFERROR(Time.From([Out]),null)
К сожалению, эта формула вернет ошибку, так как Power Query не распознает функцию IFERROR (ЕСЛИОШИБКА). Power Query имеет собственную функцию для такой проверки, хотя и с совершенно иным синтаксисом:
=try <operation> otherwise <alternate result>
Оператор try пытается выполнить операцию. Если это удастся, то возвратит результат операции. Если, результатом является ошибка, то try вернет иное значение (или иную логику), указанное в части otherwise.
Это означает, что формула (1) может быть записана в Power Query следующим образом:
(2) =try Time.From([Out]) otherwise null
Такая формула вернет значение null для любой строки, содержащей имя сотрудника в столбце Out, и время для любой строки, в которой есть допустимое время.
В редакторе Power Query удалите шаг Измененный тип 1. Перейдите на вкладку Добавление столбца, кликните Настраиваемый столбец. Введите формулу (2). Нажмите Ok.

Рис. 18.4. Новый столбец возвращает время и null вместо ошибки
Теперь можно добавить еще один столбец с простой логикой: если Пользовательская содержит null, верни значение из столбца Out, если это не так, верни null. Power Query использует для этого следующий синтаксис:
=if <logical test> then <result> else <alternate result>
Добавление столбца –> Настраиваемый столбец –> Присвойте ему имя Employee. Введите формулу:
=if [Custom]=null then [Out] else null

Рис. 18.5. Наконец, у Джона Томпсона есть своя собственная колонка
Любопытно, если нажать шестеренку рядом со строкой Добавлен пользовательский столбец, появится окно, подсказывающее, как работает условный оператор:

Рис. 18.6. Добавление условного столбца
Сейчас вы можете заполнить имя сотрудника в пустые строки. Щелкните правой кнопкой мыши столбец Employee (сотрудник) –> Заполнить –> Вниз.
Поскольку Power Query обрабатывает шаги последовательно, вам не нужно хранить промежуточные вычисления. Вы можете удалить столбец Пользовательская и очистить остальные данные. Щелкните правой кнопкой мыши столбец Пользовательская –> Удалить. Щелкните правой кнопкой мыши столбец Work Date –> Тип изменения –> Используя локаль –> Дата –> Языковый стандарт –> Английский (США). Перейдите на вкладку Главная. Выберите столбец Work Date –> Удалить строки –> Удалить ошибки. Щелкните правой кнопкой мыши столбец Out –> Тип изменения –> Используя локаль –> Время –> Языковый стандарт –> Английский (США). Выберите столбцы с Reg Hrs по Expense –> Тип изменения –> Используя локаль –> Десятичное число –> Языковый стандарт –> Английский (США). Переименовать запрос в Timesheet. Запрос готов к загрузке:

Рис. 18.7. Табель учета рабочего времени сотрудников
In this post, I am going to talk about the IFERROR function in Power Query. There is no explicit IFERROR function in Power Query but we have try and otherwise statement which works similar to the IFERROR function in Excel.
IFERROR in Power Query (try and otherwise) – Video
Power Query try and otherwise – Example 1
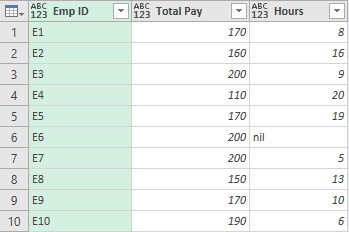
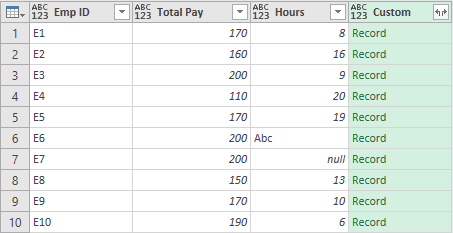
- Consider this sample data. I have Employee ID, Total Pay, and Hours.
- I created a Custom Column to calculate Pay per Hour
= [Total Pay] / [Hours]
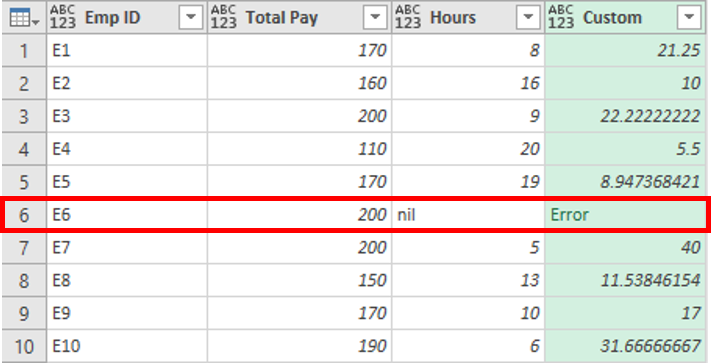
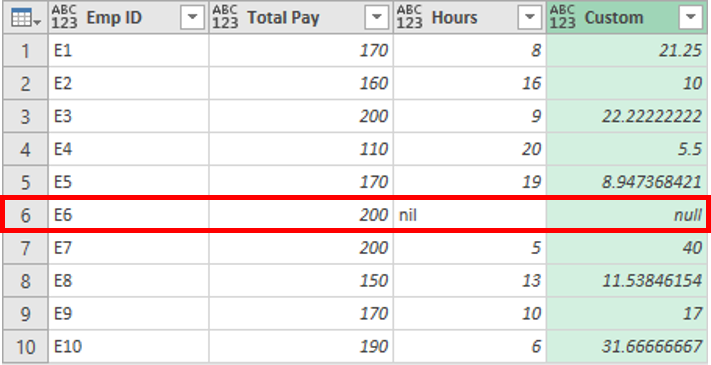
Note – Emp ID 6 returns an error because 200 is divided by a text = “nil”. To correct the above error, I am going use try and otherwise within the formula
= try [Total Pay]/[Hours] otherwise null
As an output, I got a null instead of an Error.
Power Query try and otherwise – Example 2
The try and otherwise statement can also be applied to the entire step.
- I deleted the Custom Column for Pay/Hours
- And Changed Type, results in an error since it wasn’t able to find the previous step
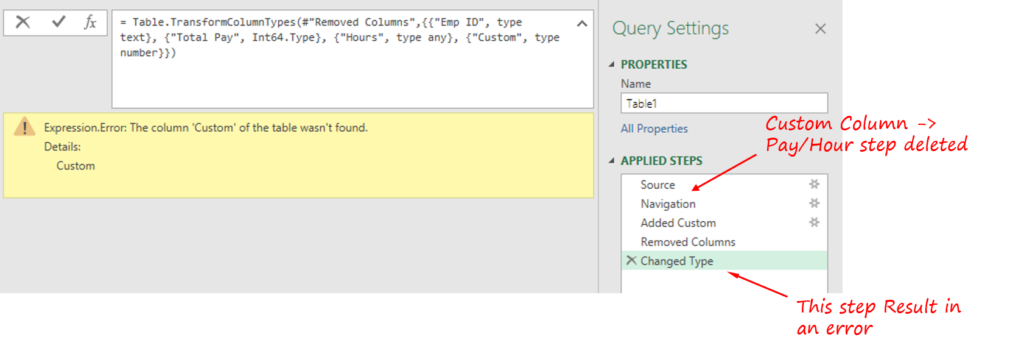
This is a step-level error that happened at the Changed Type Step.
To fix this error I will surround my entire formula with the try and otherwise statement in the formula bar.
= try
    Table.TransformColumnTypes(Source, {{'Pay/Hours', type number}})
otherwise
    #'Removed Columns'
If the above formula (which is trying to change the type of Pay/Hours) returns an error then the otherwise statement returns the previous step – Removed Columns. The query throws no errors.
Power Query try and otherwise – Example 3
This time let’s write the try statement (without otherwise). Let’s calculate Pay/Hours but this time with only the try keyword.
Create a new Custom column with the following formula,
= try [Total Pay]/[Hours]
As a result, it gives me a column that contains records.
Expanding Custom column is going to return 3 more columns.
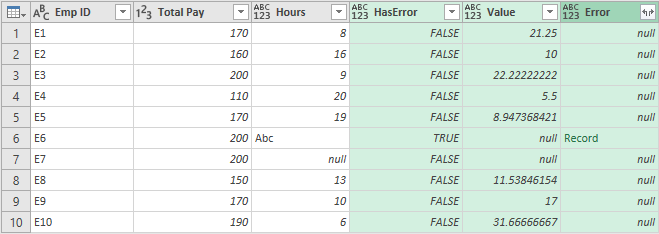
- HasError – Shows TRUE if the formula resulted in an Error.
- Value – Is the output of the formula with no errors.
- Error – Again contains records that will describe the error upon expanding.
Upon further expanding the Error column.
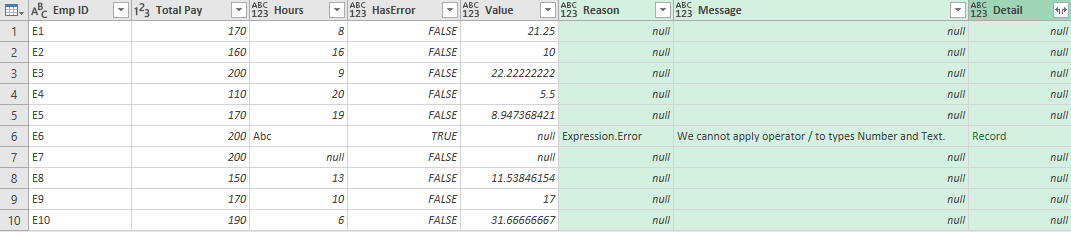
We again get 3 more columns,
- Reason – This tells the reason for the error.
- Message – This shows what actually the error is.
- Detail – Tells the information of the error, message about the error.
On further expanding Detail column we get even more details about the error on that particular row.

So this is a very crude way of doing some very basic error reporting on your data in case your Power Query steps result in any errors.
More on Power Query
Promote Double Headers in Power Query
5 Tricks to Reduce Steps in Power Query
Remove Top Rows and Combine Data from Multiple Excel Files
Quick VLOOKUP in Power Query
Dynamic Unpivoting in Power Query

Chandeep
Welcome to Goodly! My name is Chandeep.
On this blog I actively share my learning on practical use of Excel and Power BI. There is a ton of stuff that I have written in the last few years. I am sure you’ll like browsing around.
Please drop me a comment, in case you are interested in my training / consulting services. Thanks for being around
Chandeep
In this article we embark on an exciting journey to discover the power of the IF function in Power Query. You’ll learn why mastering this skill can transform your data analysis capabilities.
In this comprehensive guide, we’ll start from the basics and work our way up to advanced techniques. By the end of this article, you’ll be a Power Query IF statement pro.
Table of contents
- Introduction
- The IF Function in Power Query
- Why is the If Statement Important?
- Getting Started with IF Statements
- Syntax
- Basic Example
- Creating Your First IF Statement
- Conditional Logic in Power Query
- Comparison Operators
- Logical Operators
- Applying Operators to IF Statements
- IF statement with AND Logic
- IF statement with OR Logic
- IF statement with NOT Logic
- Intermediate IF Statement Examples
- Nested IF Statements
- IF Statement with Multiple Conditions
- Using the IF Statement to Categorize Data
- Working with Different Data Types
- Working with Text
- Working with Dates
- Advanced IF Statement Techniques
- In Operator Equivalent
- Coalesce Operator
- Type Compatibility Operator
- Error message
- Token Eof expected
- Expression.SyntaxError: Token Comma expected
- Expression.SyntaxError: Token Literal expected
- Expression.SyntaxError: Token Then/Else expected
- Conclusion

Chandeep
Welcome to Goodly! My name is Chandeep.
On this blog I actively share my learning on practical use of Excel and Power BI. There is a ton of stuff that I have written in the last few years. I am sure you’ll like browsing around.
Please drop me a comment, in case you are interested in my training / consulting services. Thanks for being around
Chandeep
In this article we embark on an exciting journey to discover the power of the IF function in Power Query. You’ll learn why mastering this skill can transform your data analysis capabilities.
In this comprehensive guide, we’ll start from the basics and work our way up to advanced techniques. By the end of this article, you’ll be a Power Query IF statement pro.
Table of contents
- Introduction
- The IF Function in Power Query
- Why is the If Statement Important?
- Getting Started with IF Statements
- Syntax
- Basic Example
- Creating Your First IF Statement
- Conditional Logic in Power Query
- Comparison Operators
- Logical Operators
- Applying Operators to IF Statements
- IF statement with AND Logic
- IF statement with OR Logic
- IF statement with NOT Logic
- Intermediate IF Statement Examples
- Nested IF Statements
- IF Statement with Multiple Conditions
- Using the IF Statement to Categorize Data
- Working with Different Data Types
- Working with Text
- Working with Dates
- Advanced IF Statement Techniques
- In Operator Equivalent
- Coalesce Operator
- Type Compatibility Operator
- Error message
- Token Eof expected
- Expression.SyntaxError: Token Comma expected
- Expression.SyntaxError: Token Literal expected
- Expression.SyntaxError: Token Then/Else expected
- Conclusion
Introduction
Power Query is an amazing tool within Excel and Power BI that helps you connect, clean, and transform data from various sources. The IF statement is a key building block for adding conditional logic to your Power Query transformations.
The IF Function in Power Query
The IF function is essential in your Power Query toolkit. It enables you to compare a value with a specified condition, leading to two possible results. It’s known as a conditional statement.
The function first checks if a condition is met. If the condition is true, Power Query returns one result. If it’s false, it returns another result.
Why is the If Statement Important?
IF statements are crucial in Power Query because they let you tailor data transformations according to your unique business rules. With the IF statement, you can set up conditional logic that tells Power Query what to do with your data based on specific conditions. This helps you extract valuable insights from your data quickly and efficiently.
For instance, imagine you have a table of sales data and want to create a new column. This column should indicate whether each sale was high or low value. You could use an IF statement to establish this conditional logic and create the new column with the results.
Eager to learn more? Let’s jump right in and build a strong foundation in IF statement basics.
Getting Started with IF Statements
In this chapter, you’ll learn the fundamentals of IF statements. That includes the syntax, basic examples, and how to create your first IF statement.
Syntax
Before we go any further, let’s understand how to write an IF statement in Power Query. Here’s the basic syntax of a Power Query IF statement:
if "condition" then "value-if-true" else "value-if-false"This can be broken down into three parts:
- condition: This is the condition you’re testing, such as comparing a value to a specific number, or combining multiple conditions using logical operators.
- value-if-true: This is the result or action you want when the condition is true.
- value-if-false: This is the result or action you want when the condition is false.
Remember, Power Query is case-sensitive, so use lowercase for “if”, “then”, and “else”.
Basic Example
Let’s start with a straightforward example to grasp the syntax. Imagine you have a list of numbers and want to label them as “positive value” or “negative value”. You could use an IF statement like this:
if [Value] > 0 then "Positive value" else "Non-positive value"In this example, the condition checks if the value is greater than 0. If it is, the “Positive value” is returned. If not, the “Non-positive value” is returned.
Creating Your First IF Statement
Now that you’ve got the basics, let’s make an IF statement together. Say you have a list of numbers and want to label them as “high” or “low”. You could use an IF statement like this:
if [Price] > 10 then "High Price" else "Low Price"Here’s how to create your an IF statement:
- Go to the Add Column tab in the ribbon
- Select Custom Column
- Provide a Column Name
- Enter your IF statement
- Click OK
After pressing the ‘Custom Column’ button in the ‘Add Column’ tab, a new column will be added to your dataset.

The ‘Custom Column’ pop-up will appear, where you can provide both a Column Name and a Column Formula. Be sure to write “if”, “then”, and “else” in lowercase, and click ‘OK’.

Voilà! You now have a table with a newly created column.
Under the hood, Power Query generates this code:
Table.AddColumn(
    #"Changed Type",
    "Category",
    each if [Price] > 10 then "High Price" else "Low Price" )
Here’s a quick breakdown:
- The Table.AddColumn function adds a new column to our table, called “Category”.
- The each keyword applies the IF statement to every row in the table.
- The condition checks if the number is greater than 10.
- If the condition is true, “High Price” is returned. If false, “Low Price” is returned.
As you can see, the IF statement’s conditional logic helps Power Query classify data based on specific conditions. With its easy-to-understand syntax, you can quickly and efficiently categorize data or gain valuable insights.
Conditional Logic in Power Query
With the basics in hand, it’s time to delve deeper into conditional logic in Power Query. Understanding conditions, comparison operators, and logical operators will enable you to create more powerful IF statements.
Comparison Operators
Comparison operators let you compare values within your conditions. Here are the most common operators in Power Query:
| Operator | Description |
|---|---|
| > | Greater than |
| >= | Greater than or equal |
| < | Less than |
| <= | Less than or equal |
| = | Equal |
| <> | Not equal |
For instance, to check if a product’s revenue equals $500, use the equal operator like this:
if [Revenue] = 500 then ... else ...To classify ages 18 or younger as “Youth” and the rest as “Other“:
if [Age] <= 18 then "Youth" else "Other"You get the idea. Now what if you want to combine multiple conditions?
Logical Operators
Logical operators allow you to combine multiple conditions. The main logical operators are:
| Operator | Description |
|---|---|
| and | Both conditions must be true |
| or | At least one condition must be true |
| not | Condition must not be true |
Remember to use lowercase for these operators. Let’s look at some examples.
Applying Operators to IF Statements
IF statement with AND Logic
It’s also useful to know how to add if statements with and logic to test multiple conditions. Let’s say you want to find products with revenue greater than $500 and less than $900. To test this, your conditional if statement should include two conditions. You’d use the and operator like this:
if [Revenue] > 500 and [Revenue] < 900 then "Relevant Products" else "Other"
This example only included a single and operator. You can add more conditions to the same expression:
if [Revenue] > 500 and [Revenue] < 900 and [Category] = "T-Shirts"
   then "Relevant Products"
   else "Other"
IF statement with OR Logic
In some cases you may want to test whether one of multiple conditions is true by combining if with or. Imagine you are looking for the top 2 selling clothing categories. In this case T-Shirt or Sweater. You could use the or operator in this way:
if [Category] = "T-Shirt" or [Category] = "Sweater" then "Best Seller" else "Other"
Do you have a need to incorporate a lot of values? Make sure to check out how to perform the IN operation in Power Query in the upcoming chapter on Advanced Techniques.
IF statement with NOT Logic
Sometimes, you need to test if something is not true, either to exclude a condition or because it’s shorter to write the negative form. For instance, let’s say you want to increase the price of everything except lemons by 10%
You can add the not operator right after the word if. Just make sure to put the entire condition between parentheses.
if not ( [Food] = "Lemon" ) then [Price] * 1.1 else [Price]These examples create a new column based on logic. If you want to replace values based on conditions, explore replacing values based on conditions. While slightly more complex, it’s closely related to the conditional logic in IF functions.
With a solid understanding of conditional logic, let’s move on to intermediate IF statement examples.
Intermediate IF Statement Examples
This chapter provides examples on how to work with nested IF statements, multiple conditions, and using the IF statement to categorize data effectively.
Nested IF Statements
Sometimes you need to check multiple conditions in sequence, and that’s when nested IF statements come in handy. You can include an IF statement inside another IF statement:
if [Condition1] then [Value1] else if [Condition2] then [Value2] else [Value3]Without formatting, any code is difficult to read. So from now on I will serve you formatted code. The results are identical, they are simply much easier to read. Here’s the same code but formatted:
if [Condition1]
then [Value1]
else if [Condition2]
then [Value2]
else [Value3]Let’s say you want to categorize products by revenue as “Low”, “Medium”, or “High”. You could use nested IF statements like this:
if [Revenue] < 500
   then "Low"
   else if [Revenue] < 1000
        then "Medium"
        else "High"
IF Statement with Multiple Conditions
You can also use logical operators to create more complex conditions. For instance, when you want to find products with revenue between $500 and $1000 and more than 50 units sold. You’d use both and and or operators like this:
if [Revenue] > 500 and [Revenue] < 1000 and [UnitsSold] > 50
   then "Match"
   else "No Match"
Using the IF Statement to Categorize Data
IF statements are great for categorizing data. Let’s say you have a table with student grades, and you want to add a column that shows the grade category (A, B, C, D, or F):
if [Grade] >= 90 then "A"
   else if [Grade] >= 80 then "B"
   else if [Grade] >= 70 then "C"
   else if [Grade] >= 60 then "D"
   else "F"
Working with Different Data Types
In this chapter we focus on how to use IF statements with various data types, such as text and dates, to expand your data manipulation toolkit.
Working with Text
Continuing with our IF statement journey, let’s explore how to work with text values. For instance, check if a product name contains a specific keyword and categorize it:
if Text.Contains([Product Name], "Widget")  // Does [ProductName] contain "Widget
   then "Widget"   // if yes, return "Widget"
   else "Other"    // else return "Other"
Or test if the combination of two text fields matches another field:
if [FirstName] & [LastName] = [FullName] then true else falseYou can also return a value whenever a part of a text string matches your test. Imagine that invoices starting with the text “MAR” relate to market revenue:
if Text.Start( [InvoiceID], 3 ) = "MAR" then "Marketing Revenue" else "Other"For more inspiration, here’s an article that covers all text functions in Power Query.
Working with Dates
Dates are another common data type you’ll work with in Power Query. You can use IF statements to manipulate and categorize dates. For example, you can check if a date falls within a specific range:
if [OrderDate] >= #date(2023, 1, 1) and [OrderDate] <= #date(2023, 12, 31)
   then "2023 Order"
   else "Other Year"
Or, you could categorize dates by day of the week:
if Date.DayOfWeek([OrderDate]) = 0         then "Sunday"
   else if Date.DayOfWeek([OrderDate]) = 6 then "Saturday"
   else "Weekday"
Advanced IF Statement Techniques
In this section, we’ll explore more advanced techniques for working with IF statements in Power Query. We’ll look at the “in” operator equivalent, the coalesce function, and the type compatibility operator.
In Operator Equivalent
Many programming languages have the in operator. The in operator allows you to check if a value exists in a list. It’s syntax sugar for a set of or statements. This can be helpful when you want to categorize data based on a predefined set of values.
For example, let’s say you have a list of favorite customers, and you want to add a column to your sales data that shows if a customer is your favorite or not. Power Query does not have the in operator, but you can replicate the in operator by using List.Contains:
if List.Contains(  {"Alice", "Bob", "Charlie"}, [Customer Name] )
   then "Favorite"
   else "Regular")

/* ------------------
-- is identical to
------------------ */

if [CustomerName] = "Alice" or [CustomerName] = "Bob" or [CustomerName] = "Charlie"
   then "Favorite"
   else "Regular"
List.Contains checks whether the “CustomerName” appears in the list of favorite customers. This example only uses three list values. But you can expand this list with as many values as you want. You can even reference a column with values to check!
Want to learn more about lists? Make sure to check out my complete guide to lists with numerous examples.
Coalesce Operator
The coalesce function returns the first non-null value from a list of expressions. This is useful when you have multiple columns with potentially missing data and want to return the first available value.
For example, let’s say you have a table with three columns: “PrimaryPhone”, “SecondaryPhone”, and “TertiaryPhone”. You want to add a new column that displays the first available phone number for each record.
Power Query uses the ?? construct as Coalesce operator. You can use the coalesce operator in combination with an IF statement to achieve this:
[PrimaryPhone] ?? [SecondaryPhone] ?? [TertiaryPhone]??"No Phone"

/* ------------------
-- is identical to
------------------ */

if [PrimaryPhone] = null then
   if [SecondaryPhone] = null then
      if [TertiaryPhone] = null then
         "No Phone"
         else [TertiaryPhone]
      else [SecondaryPhone]
   else [PrimaryPhone]
Type Compatibility Operator
Sometimes, columns with mixed data types can cause errors in your IF statements. To handle these situations, use the type compatibility operator to check if a value is of a specific type.
For example, let’s say you have a column called “Data” that contains different data types. You want to create a new column that categorizes the data as “Numeric”, “Text”, “Date” or “Other”:
if [MixedData] is number then "Numeric"
   else if [MixedData] is text then "Text"
   else if [MixedData] is date then "Date"
   else "Other"
In this example, we use the is operator to check if the value in the “Data” column is of number, text or date type. This way, we can handle mixed data types without causing errors.
Now you’re equipped with advanced IF statement techniques in Power Query! Next up we’ll be looking at error messages you might bump into.
Error messages
Power Query and Excel have small but important differences in their conditional statements. Small mistakes can easily cause errors in Power Query, and the error messages are often not very helpful. Let’s explore some common error messages and their causes.
Token Eof expected
You may get the error Token Eof expected when you mistake your capitalization or when using an incorrect function name. For example, you should write the words if, then, and else in lowercase for a working formula.
If you write any of these letters in uppercase in the Custom Column box, Power Query throws the error. The below example shows the word IF capitalized and you can see the error message: Token Eof expected.

Expression.SyntaxError: Token Comma expected
This error can occur when editing your formula in the formula bar. Interestingly, the error message suggests a missing comma is causing the error, which may not be the case. For example, using a capitalized “IF” can result in this error message.

Expression.SyntaxError: Token Literal expected
Another common error is the Token Literal expected. This error means the formula expects a condition, value, column name, or function somewhere in the formula but doesn’t receive one.
When adding conditions to your formula that include words like not, and, and or, you may get this error. In the example below, you can see the word and that suggests another condition is coming. Yet no additional condition is written. The word else follows after and indicates the second argument of the function should begin.
For as this an incorrect expression Power Query returns: “Expression.SyntaxError: Token Literal expected“.

Expression.SyntaxError: Token Then/Else expected
These errors can occur when the words “then” and “else” are missing or misplaced within the IF function. In Power Query, “then” and “else” separate arguments within the IF function. When writing nested IF statements, each statement needs to have a “then” and an “else” clause. If you omit the word and replace it with a separator, you’ll get one of these error messages:
Expression.SyntaxError: Token Then expected.
Expression.SyntaxError: Token Else expected.
These last two errors are a bit clearer, but the term “token” can still confuse users. In this context, a “token” refers to a specific word or symbol used in the Power Query language, such as “then” or “else.” When the error message mentions a missing or expected token, it means that particular word or symbol is missing or misplaced in your formula.
Conclusion
In this article, I showed several examples of how one could leverage if-statements in Power BI. One thing we didn’t cover is creating conditional statements by writing custom M-code using the advanced editor.
If you’re up for a challenge make sure to check out how to return values based on a condition. Mastering that skill will strongly improve the amount of data challenges you can tackle. That’s all I want to share about the Power Query/Power BI if statement. See you next time!
В Power Query существует функция для проверки условия – if. Чтобы записать определенное условие в Power Query, используется структура с оператором if-then-else.
Создать условие можно двумя способами:
- Через создание условного столбца,
- Написать на Power Query через редактор кода.
Рассмотрим все способы работы с конструкцией if-then-else.
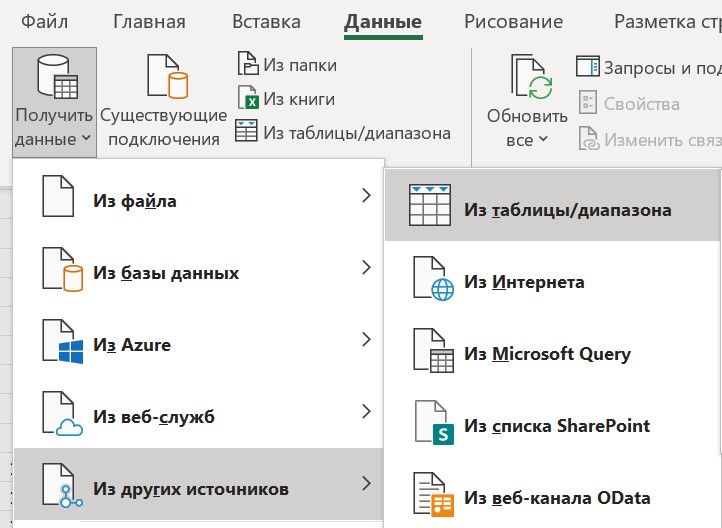
Необходимо проставить статусы для заказов. Статус «выполнен», если % выполнения – 100%. Если меньше 100%, то статус «в работе».
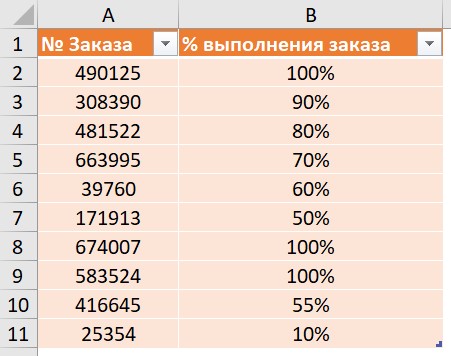
Выбираем: вкладка Данные → Получить данные → Из других источников → Из таблицы/диапазона. Для новых версий Excel: вкладка Данные → Из таблицы/диапазона:
Функцию if очень легко создать с помощью условного столбца. На вкладке Добавление столбца выбираем Условный столбец:

В диалоговом окне заполняем все необходимые поля:
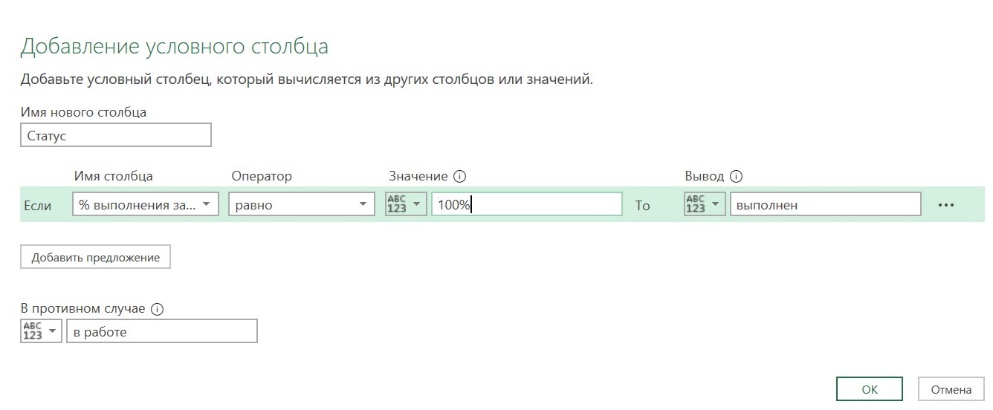
- В поле «Имя нового столбца» вводим имя будущего столбца «Статус».
- В поле «Имя столбца» указываем столбец для оценки условия. Выбираем столбец «% выполнения заказа».
- В поле «Оператор» представлен список операторов. Для нашего примера выбираем оператор «равно».
Для разных типов данных будет предложен разный список операторов сравнения:
- Текст: начинается с, не начинается с, равняется, содержит и т. д.
- Номера: равно, не равно, больше или равно и т. д.
- Время: до, после, равно, не равно и т. д.
Все множество значений будет проверено по первому условию. Если будут найдены результаты, удовлетворяющие первому условию, им будет присвоено значение по результатам выполнения первого условия.
- В поле «Значение» вводим конкретное значение для сравнения.
- В полях «Значение», «Имя столбца» и «Оператор» составляем наше условие.
- В поле «Вывод» указываем значение, которое будет возвращено, если условие выполнено.
- В поле «В противном случае» указываем другое значение, которое нужно вернуть, если условие не выполняется.
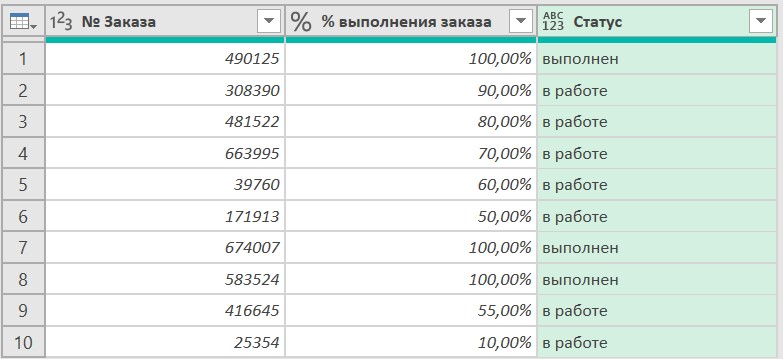
В результате получаем новый столбец со статусами:
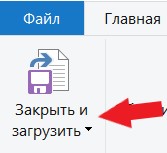
Осталось выгрузить получившийся отчет в Excel с помощью кнопки «Закрыть и загрузить» на вкладке Главная:
С помощью опции «Условный столбец» вы можете вставить дополнительные условия.
Выбранный столбец по условию
В таблице заказов необходимо перевести все суммы в рубли. Имеются данные по суммам заказов, в какой валюте заказ выполнен и конкретные курсы валют на дату заказа.
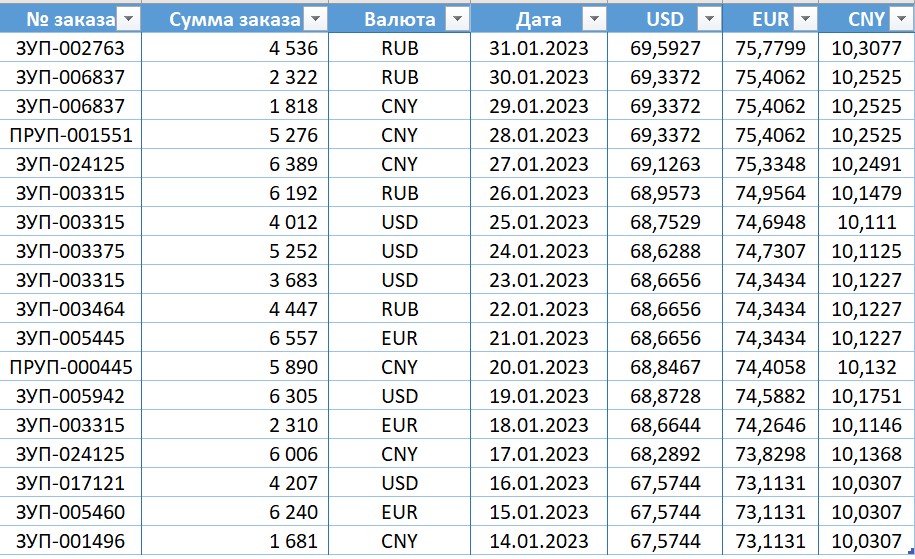
Выбираем: вкладка Данные → Получить данные → Из других источников → Из таблицы/диапазона. После загрузки данных в Power Query создаем условный столбец. На вкладке Добавление столбца выбираем Условный столбец:

В диалоговом окне заполняем все необходимые поля:
- В поле «Имя нового столбца» вводим имя будущего столбца «Курс валюты».
- В поле «Имя столбца» указывается столбец для оценки условия. Из выпадающего списка столбцов выбираем столбец «Валюта».
- В поле «Оператор» представлен список операторов. Выбираем для нашего примера оператор «содержит».
- В поле «Значение» вводим конкретное значение для сравнения USD.
Помните, что Power Query чувствителен к регистру: строчные и прописные буквы для него разные символы!
В поле «Вывод» выбираем из выпадающего списка команду «Выберите столбец»:
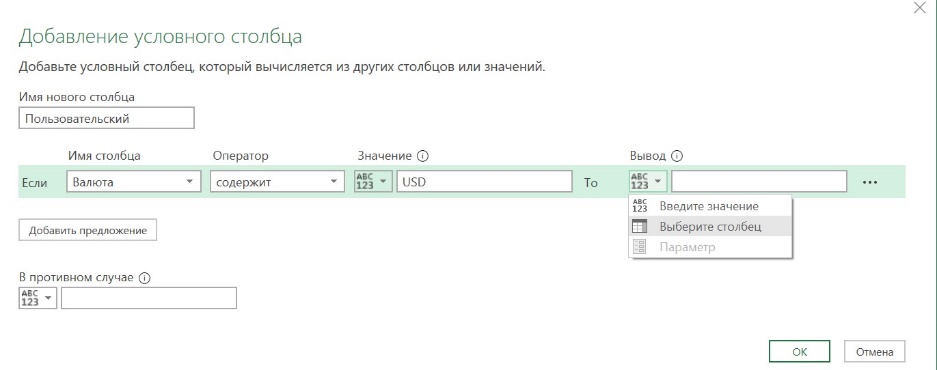
Далее из выпадающего списка имен столбцов выбираем столбец «USD»:
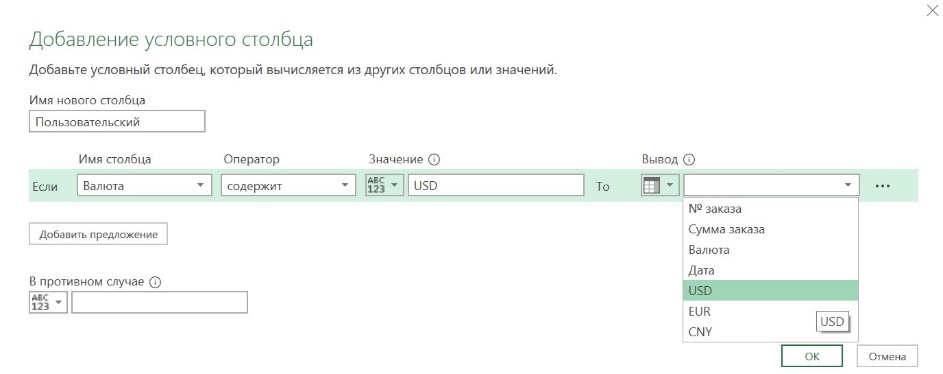
Теперь пропишем еще два условия. Нажимаем на кнопку «Добавить предложение». После этого появляется новая строчка «Иначе если», которую заполняем по аналогии с первым условием.
В поле «Имя столбца» выбираем столбец «Валюта». В поле «Оператор» выбираем оператор «содержит». В поле «Вывод» выбираем из выпадающего списка команду «Выберите столбец», далее указываем столбец EUR:
Добавляем аналогичное условие для валюты CNY. Осталось заполнить последнее поле в случае невыполнения ни одного из 3-х наших условий. В поле «В противном случае» указываем значение 1, которое нужно вернуть, если условия не выполняются. Это значение будет присвоено, если заказ был сделан в рублях (RUB):
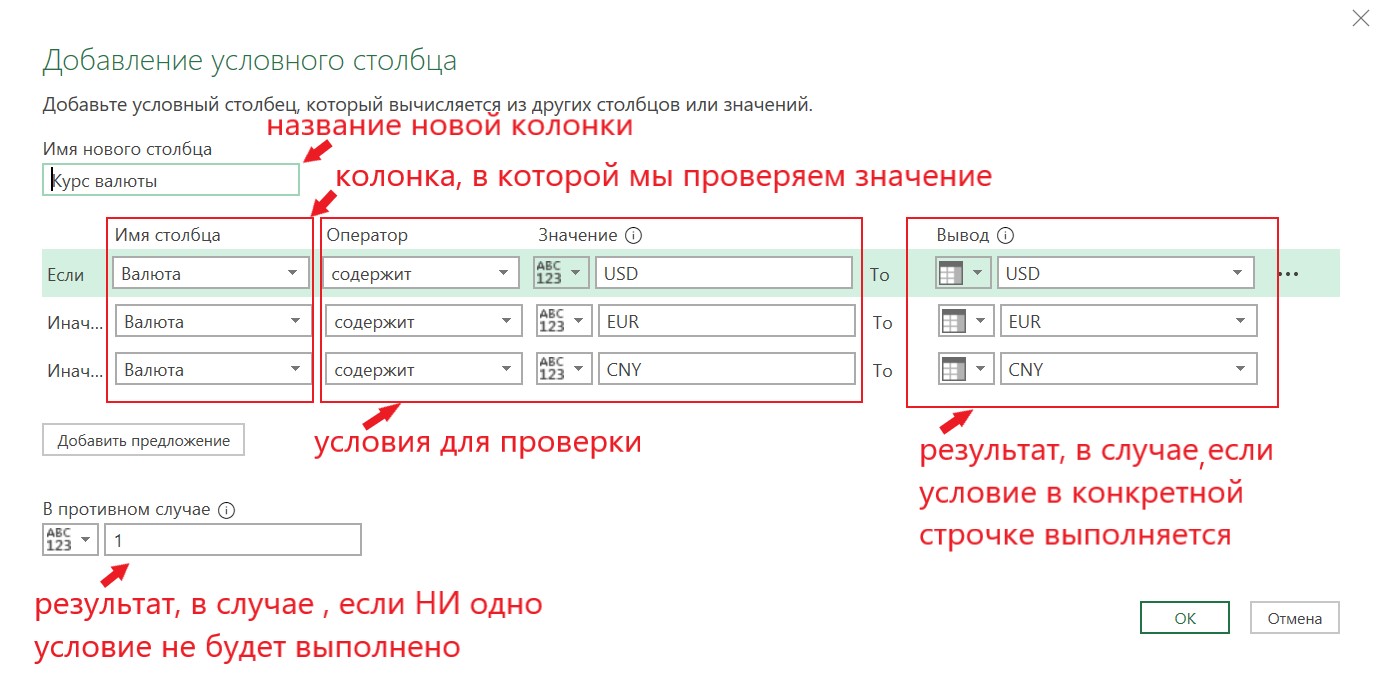
Рассмотрим, как работает условный столбец:
- Все множество значений будет проверено по первому условию. Если будут найдены результаты, удовлетворяющие первому условию, то для них будет присвоено значение по результатам выполнения первого условия.
- Для остальных значений из множества будет проверено следующее условие. И так далее до тех пор, пока не будут проверены все условия.
- Если для элементов множества не будет выполнено ни одно условие, то в условный столбец попадет значение из поля «В противном случае».
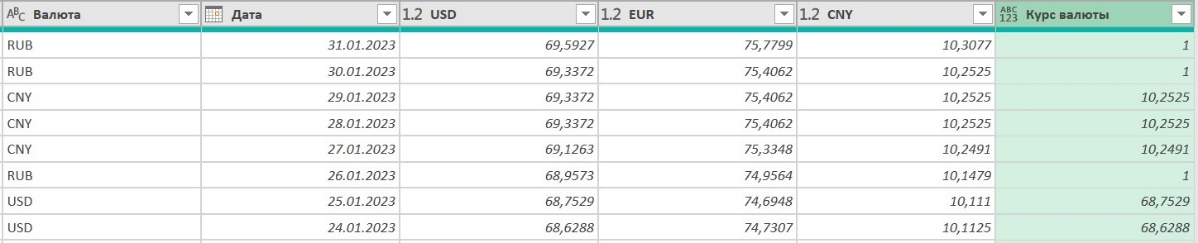
Получаем новый столбец с нужными курсами валют:
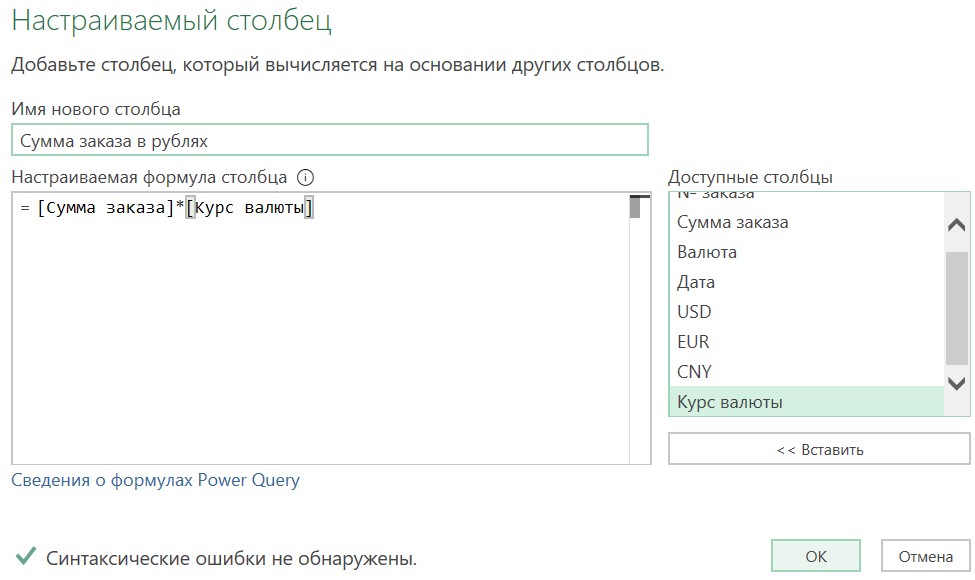
Для решения нашей задачи создаем настраиваемый столбец, в котором перемножаем столбец с суммами заказов и столбец с нужным курсом:

Присваиваем имя новому столбцу «Сумма заказа в рублях», прописываем формулу и нажимаем Ок:
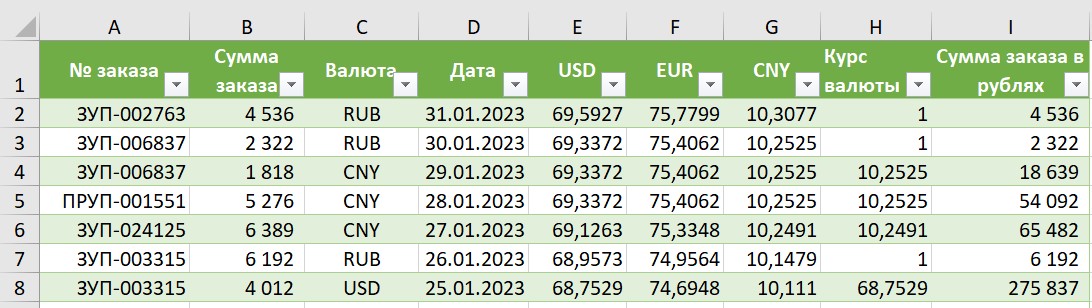
Осталось выгрузить получившийся отчет в Excel с помощью кнопки Закрыть и загрузить на вкладке Главная:
Базовые условия можно проверить с помощью условного столбца, но задать более сложные условия с вычислениями можно только на языке М через написание кода. Рассмотрим на примере ниже.
Настраиваемый столбец c конструкцией if-then-else
Необходимо присвоить скидку в 10% всем заказчикам со способом оплаты «аванс» и рассчитать цену со скидкой.
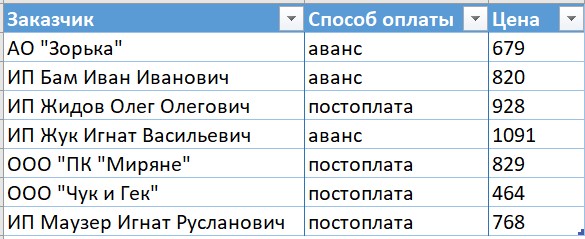
Выбираем: вкладка Данные → Получить данные → Из других источников → Из таблицы / диапазона. Для решения нашей задачи создаем настраиваемый столбец, в котором прописываем конструкцию if…then…else:

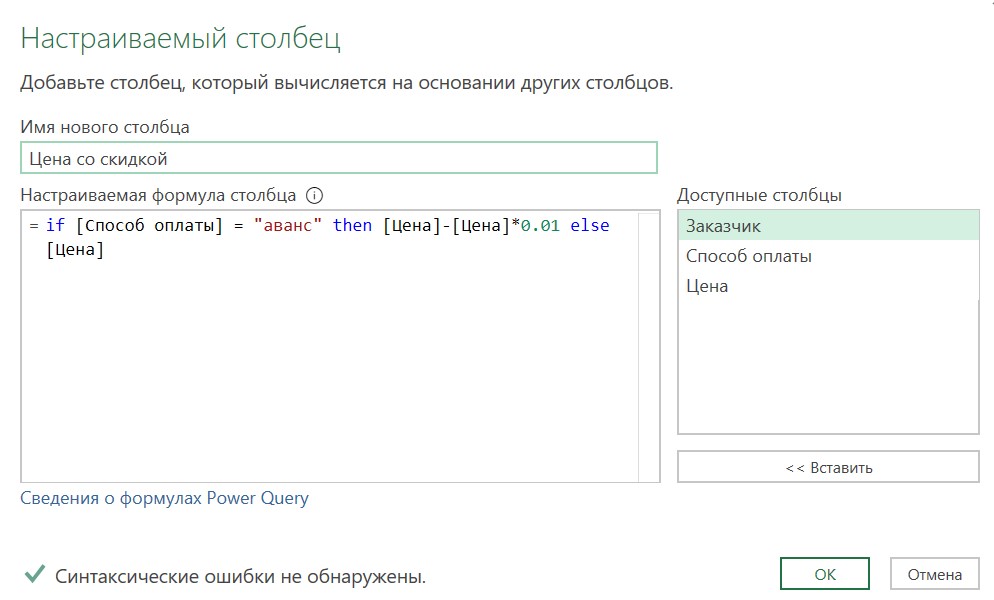
Присваиваем имя новому столбцу «Цена со скидкой» и прописываем формулу: если способ оплаты «аванс», то высчитываем цену со скидкой (Цена – Цена*10%). Если другие способы оплаты, то выводим обычную цену.
Обратите внимание, что в качестве разделителя десятичной части используется точка вместо запятой:
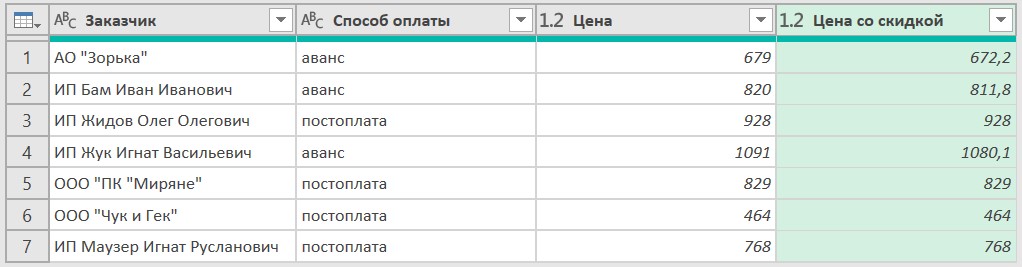
В результате работы нашей формулы получаем новый столбец уже с корректной финальной ценой:
Выгружаем получившийся отчет в Excel с помощью кнопки Закрыть и загрузить на вкладке Главная.
Условие с обработкой пустой ячейки null
Функция if имеет особенности в работе с пустыми ячейками (null). При попытке выполнить операции сравнения с null появится ошибка. Значения null можно проверить на равенство, но null равен только null. Если вы хотите сравнить null с любым другим значением при помощи относительного оператора (например, <, >, <=, >=), тогда результат сравнения будет не логическим значением типа true или false, а именно null. В этом случае выражение if…then…else покажет ошибку. Как избавиться от этой ошибки, если ваши данные содержат null, и замена его на другое значение не подходит?
Нужно увеличить стоимость заказа на стоимость доставки (200 руб.) во всех случаях, кроме самовывоза.
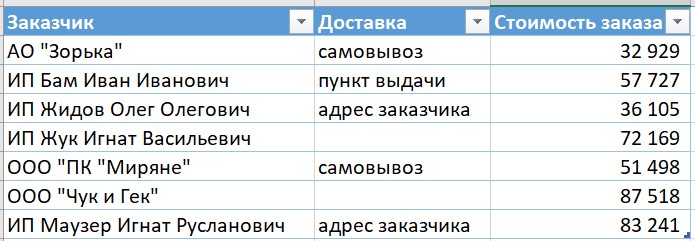
Загружаем данные в Power Query с помощью команд Данные → Получить данные → Из таблицы/диапазона. Создаем настраиваемый столбец, выбрав Добавление столбца – Настраиваемый столбец. В диалоговом окне присваиваем имя будущего столбца «Полная стоимость заказа» и прописываем формулу. В столбце «Доставка» имеются пустые ячейки, которые в Power Query считываются как null:
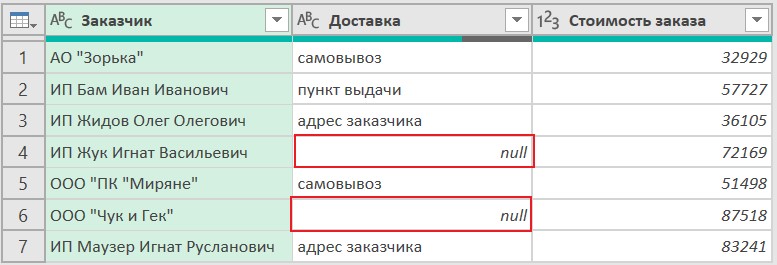
Сначала проверяем значения на равенство с null. Если ячейка в столбце «Доставка» пустая, то выводим значение из столбца «Стоимость заказа». На языке М эта запись будет выглядеть так:
if [Доставка] = null then [Стоимость заказа] elseТеперь записываем следующее условие:
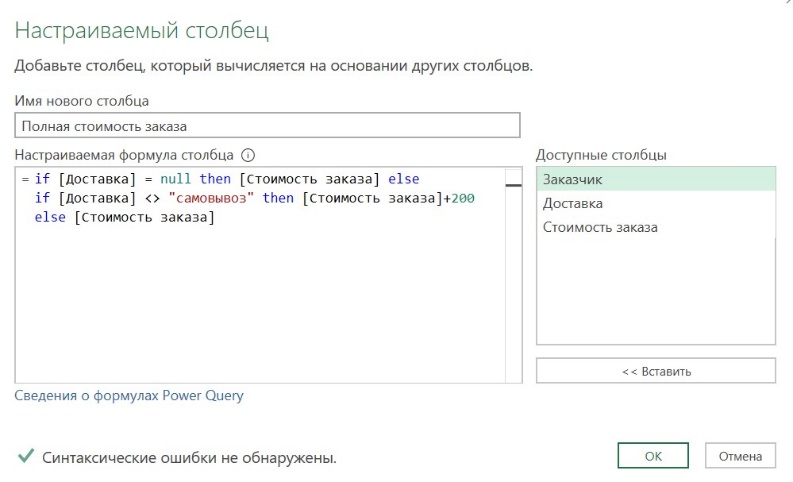
Выражение if…then…else выполняет последовательное вычисление условий. Если первым условием будет идти относительное сравнение, ошибка снова появится и останется до конца расчета выражения. Именно поэтому сначала проверяем значение на наличие null.
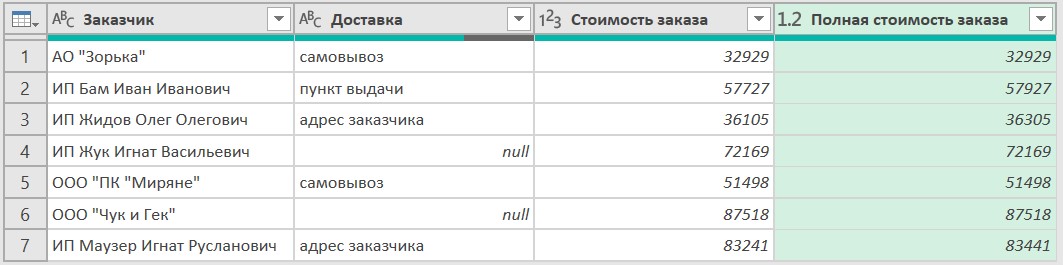
В итоге получаем готовый расчет, который выполнен с помощью всего одного шага:
Заключение
Мы разобрали, как писать простые условия с помощью условного столбца и рассмотрели более сложные варианты написания конструкции if…then…else.
Выделим следующие особенности работы с функцией if:
- Условие «if» в Power Query пишется в нижнем регистре, формулы Power Query чувствительны к регистру.
- Вместо запятых, разделяющих аргументы значение_если_истина и значение_если_ложь, используем then и else (в нижнем регистре).
- При попытке выполнить операции сравнения с null появится ошибка. Сначала проверяем на равенство null, а затем записываем последующие условия.
- Текстовый тип данных может сравниваться только с текстом, а числа сравниваются с числами.
- Для чисел можно использовать следующие логические операторы:
- = равно
- <> не равно
- > больше, чем
- >= больше или равно
- < меньше, чем
- <= меньше или равно
6. Для текста и операций сравнения используем разные функции:
- Text.Contains — содержит
- not Text.Contains — не содержит
- Text.StartsWith — начинается с
- not Text.StartsWith — не начинается с
- Text.EndsWith — заканчивается на
- not Text.EndsWith — не заканчивается на