
Your compiler just tried to compile the file named foo.cc. Upon hitting line number line, the compiler finds:
#include "bar"
or
#include <bar>
The compiler then tries to find that file. For this, it uses a set of directories to look into, but within this set, there is no file bar. For an explanation of the difference between the versions of the include statement look here.
How to tell the compiler where to find it
g++ has an option -I. It lets you add include search paths to the command line. Imagine that your file bar is in a folder named frobnicate, relative to foo.cc (assume you are compiling from the directory where foo.cc is located):
g++ -Ifrobnicate foo.cc
You can add more include-paths; each you give is relative to the current directory. Microsoft’s compiler has a correlating option /I that works in the same way, or in Visual Studio, the folders can be set in the Property Pages of the Project, under Configuration Properties->C/C++->General->Additional Include Directories.
Now imagine you have multiple version of bar in different folders, given:
// A/bar
#include<string>
std::string which() { return "A/bar"; }
// B/bar
#include<string>
std::string which() { return "B/bar"; }
// C/bar
#include<string>
std::string which() { return "C/bar"; }
// foo.cc
#include "bar"
#include <iostream>

int main () {
    std::cout << which() << std::endl;
}
The priority with #include "bar" is leftmost:
$ g++ -IA -IB -IC foo.cc
$ ./a.out
A/bar
As you see, when the compiler started looking through A/, B/ and C/, it stopped at the first or leftmost hit.
This is true of both forms, include <> and incude "".
Difference between #include <bar> and #include "bar"
Usually, the #include <xxx> makes it look into system folders first, the #include "xxx" makes it look into the current or custom folders first.
E.g.:
Imagine you have the following files in your project folder:
list
main.cc
with main.cc:
#include "list"
....
For this, your compiler will #include the file list in your project folder, because it currently compiles main.cc and there is that file list in the current folder.
But with main.cc:
#include <list>
....
and then g++ main.cc, your compiler will look into the system folders first, and because <list> is a standard header, it will #include the file named list that comes with your C++ platform as part of the standard library.
This is all a bit simplified, but should give you the basic idea.
Details on <>/""-priorities and -I
According to the gcc-documentation, the priority for include <> is, on a «normal Unix system», as follows:
 /usr/local/include
 libdir/gcc/target/version/include
 /usr/target/include
 /usr/include
For C++ programs, it will also look in /usr/include/c++/version, first. In the above, target is the canonical name of the system GCC was configured to compile code for; […].
The documentation also states:
You can add to this list with the -Idir command line option. All the directories named by -I are searched, in left-to-right order, before the default directories. The only exception is when dir is already searched by default. In this case, the option is ignored and the search order for system directories remains unchanged.
To continue our #include<list> / #include"list" example (same code):
g++ -I. main.cc
and
#include<list>
int main () { std::list<int> l; }
and indeed, the -I. prioritizes the folder . over the system includes and we get a compiler error.
Introduction
In this intermittent series, I’ll be looking at the most common error messages your C++ compiler (and linker) can produce, explaining exactly what they mean, and showing how they can be fixed (or, better still avoided). The article will specifically talk about the errors produced by the GCC command line compiler, but I’ll occasionally provide some coverage of Microsoft C++ as well. The articles are aimed at beginner to intermediate C++ programmers, and will mostly not be OS-specific.
Error Messages 101
Compiler error messages from the GCC g++ compiler generally look like something this:
main.cpp: In function 'int main()':
main.cpp:4:12: error: 'bar' was not declared in this scope
which was produced by this code:
int main() {
    int foo = bar;
}
The first line of the error says which function the following error(s) is in. The error message itself comes in four main parts; the file the error occurs in, the line number and character offset at which the compiler thinks the error occurs, the fact that it is an error, and not a warning, and the text of the message.
As well as error, the compiler can also produce warnings. These are usually about constructs that, while not being actually illegal in C++, are considered dubious, or constructs that the compiler has extensions to cover. In almost all cases, you don’t want to use such constructs, and you should treat warnings as errors; in other words, your code should always compile with zero warnings. You should also increase the level of warnings from the compiler’s default, which is usually too low. With g++, you should use at least the -Wall and -Wextra compiler options to do this:
g++ -Wall -Wextra myfile.cpp
No such file or directory
The error I’m looking at today most commonly occurs when you are including a header file using the preprocessor #include directive. For example, suppose you have the following code in a file called myfile.cpp:
#include "myheader.h"
and you get the following error message:
myfile.cpp:1:22: fatal error: myheader.h: No such file or directory
compilation terminated.
What could be causing it? Well, the basic cause is that the compiler cannot find a file called myheader.h in the directories it searches when processing the #include directive. This could be so for a number of reasons.
The simplest reason is that you want the compiler to look for myheader.h in the same directory as the myfile.cpp source file, but it can’t find it. this may be because you simply haven’t created the header file yet, but the more common reason is that you either misspelled the header file name in the #include directive, or that you made a mistake in naming the header file when you created it with your editor. Look very closely at the names in both the C++ source and in your source code directory listing. You may be tempted to think «I know that file is there!», but if the compiler says it isn’t there, then it isn’t, no matter how sure you are that it is.
This problem is somewhat greater on Unix-like system, such as Linux, as there file names are character case sensitive, so Myheader.h, MyHeader.h, myheader.h and so on would all name different files, and if you get the case wrong, the compiler will not look for something «similar». For this reason, a very good rule of thumb is:
Never use mixed case when naming C++ source and header files. Use only alphanumeric characters and the underscore when naming C+++ files. Never include spaces or other special characters in file names.
Apart from avoiding file not found errors, this will also make life much easier if you are porting your code to other operating systems which may or may not respect character case.
The wrong directory?
Another situation where you may get this error message is if you have split your header files up from your C++ source files into separate directories. This is generally good practice, but can cause problems. Suppose your C++ project is rooted at C:/myprojects/aproject, and that in the aproject directory you have two sub-directorys called src (for the .cpp files) and inc (for the header files), and you put myfile.cpp in the src directory, and myheader.h in the inc directory, so that you have this setup:
myprojects
  aproject
    inc
      myheader.h
    src
      myfile.cpp
Now if you compile the source myfile.cpp from the src directory, you will get the «No such file or directory» error message. The C++ compiler knows nothing about the directory structures of your project, and won’t look in the inc directory for the header. You need to tell it to look there somehow.
One thing some people try when faced with this problem is to re-write myfile.cpp so it looks like this:
#include "c:/myprojects/aproject/inc/myheader.h"
or the slightly more sophisticated:
#include "../inc/myheader.h"
Both of these are a bad idea, as they tie your C++ code to the project’s directory structure and/or location, both of which you will probably want to change at some point in the future. If the directory structure does change, you will have to edit all your #include directories.The better way to deal with this problem is to tell the compiler directly where to look for header files. You can do that with the compiler’s -I option, which tells the compiler to look in the specified directory, as well as the ones it normally searches:
g++ -Ic:/myprojects/aproject/inc myfile.cpp
Now the original #include directive:
#include "myheader.h"
will work, and if your directory structure changes you need only modify the compiler command line. Of course, writing such command lines is error prone, and you should put such stuff in a makefile, the use of which is unfortunately outside the scope of this article.
Problems with libraries
Somewhat similar issues to those described above can occur when you want to use a third-party library. Suppose you want to use the excellent random number generating facilities of the Boost library. If you are copying example code, you may well end up with something like this in your C++ source file:
#include "boost/random.hpp"
This will in all probability lead to yet another «No such file or directory» message, as once again the compiler does not know where «boost/random.hpp» is supposed to be. In fact, it is one of the subdirectories of the Boost installation, and on my system I can get the #include directive to work using this command line:
g++ -Ic:/prog/boost1461 myfile.cpp
where /prog/boost1461 is the root directory for my specific Boost library installation.
Can’t find C++ Standard Library files?
One last problem that beginners run into is the inability of the compiler to find header files that are part of the C++ Standard Library. One particular favourite is this one:
#include <iostream.h>
where you are learning C++ from a very, very old book. Modern C++ implementations have not contained a file called iostream.h for a very long time indeed, and your compiler is never going to find it. You need to use the correct, standard names for such headers (and to get a better book!):
#include <iostream>
If this still fails, then there is almost certainly something very wrong with your GCC installation. The GCC compiler looks for Standard Library files in a subdirectory of its installation, and locates that directory relative to the directory containing the compiler executable, so if the Standard Library headers are available, the compiler should always find them.
Conclusion
This article looked at the «No such file or directory» message of the GCC C++ compiler. If you get this message you should:
- Remember that the compiler is always right in situations like this.
- Look very closely at the file name to make sure it is correct.
- Avoid naming file using mixed-case or special characters.
- Use the -I compiler option to tell the compiler where to look for files.
- Make sure that GCC is correctly installed on your system.
Ошибка компиляции в Arduino
Даже опытные программисты-«ардуинщики» могут столкнуться с ошибками компиляции. Исправить их не сложно, а вот найти порой не так просто. Мы решили рассказать сегодня в деталях, какие системные ошибки чаще возникают на различных платах Ардуино, как их исправить и по возможности избежать.
Для начала рассмотрим базовые, так называемые синтаксические ошибки. Они встречаются чаще всего у новичков, но и опытные электронщики с ними точно знакомы не понаслышке. Искать их обычно супер-просто – в Arduino IDE некорректный синтаксис выделяется построчно (таким образом значительно легче отыскать неточность в кодах). Обычно это: отсутствие скобки в конце команды, пропуск этой самой служебной команды или слова, нехватка важных функций, неправильное их написание и т.д.
Для быстрого поиска ошибки советуем рассмотреть строку-подсказку. Ничего не помогло? Тогда для вас наша подборка наиболее распространенных синтаксических ошибок:
С синтаксисом все понятно – вставляем пропущенные символы, убираем лишние знаки, возвращаем функции по умолчанию.
Напомним, в среде разработки Ардуино IDE можно заливать скетчи для различных микроконтроллеров. По умолчанию обычно указана плата Genuino Uno. Если вы работаете с Mega, следует выбрать именно эту платформу (меню «Сервис»), иначе вас ожидает неприятное предупреждение: “programmer is not responding”.
Ошибка компиляции для платы Arduino Uno чаще всего возникает из-за проблем, связанных с библиотеками, например, неправильно подключили, не то ПО инсталлировали. В этом случае вы увидите напоминание “fatal error: … No such file or directory” (библиотека не перенесена в папку libraries) или “redefinition of void setup”.
Обозначенная на скриншоте ERROR означает, что программирование завершилось некорректно (расшифровываем: внутренние проблемы с компилятором, не обновили версию IDE, сбой в библиотеке, неправильный выбор разрядности операционной системы и др.).
Важно! Не забывайте использовать подсказки приложения – они очень помогают. Включаем тут: Файл -> Настройки -> «Показать подробный вывод во время компиляции».
Что делать, если произошла ошибка при загрузке скетча Arduino Nano. Тут могут быть те же причины, что мы описали выше. Особых отличий в компиляции плат нет, главное, их правильный выбор первоначально. Однако часто пользователи настраивают не те показатели скорости порта: 9600 вместо необходимых 57600 либо не имеют соответствующих драйверов на устройствах – все это нужно проверить и исправить!
Источник
Arduino.ru
- Войдите или зарегистрируйтесь, чтобы получить возможность отправлять комментарии
Всем добрый день.3 неделя в пустую сижу и не понимаю. Вроде все просто но нет. есть программа которая сто процентов работает так как 3 месяца после форматирования компа она вшилась в ардуинку. и вот собрав плату и в паяв ардуину решил поправить код, как говориться навести шик и блеск. но не успев это сделать началось ругательство ардуино иде. что только я не прововал переустанавливал менял папки библиотек. и даже другой ноут. что за фигня просто залить скеч это такая жжж. уже все готовое от автора и скеч и библиотеки, но не могу залить. BLINK работает. помогите спасите. Заранее благодарю Arduino: 1.8.16 (Windows 7), Плата:»Arduino Nano, ATmega328P» C:Program FilesArduinoarduino-builder -dump-prefs -logger=machine -hardware C:Program FilesArduinohardware -hardware C:Users1AppDataLocalArduino15packages -tools C:Program FilesArduinotools-builder -tools C:Program FilesArduinohardwaretoolsavr -tools C:Users1AppDataLocalArduino15packages -built-in-libraries C:Program FilesArduinolibraries -libraries C:Users1DocumentsArduinolibraries -fqbn=arduino:avr:nano:cpu=atmega328 -vid-pid=1A86_7523 -ide-version=10816 -build-path C:Users1AppDataLocalTemparduino_build_783368 -warnings=none -build-cache C:Users1AppDataLocalTemparduino_cache_854966 -prefs=build.warn_data_percentage=75 -prefs=runtime.tools.arduinoOTA.path=C:Users1AppDataLocalArduino15packagesarduinotoolsarduinoOTA1.1.1 -prefs=runtime.tools.arduinoOTA-1.1.1.path=C:Users1AppDataLocalArduino15packagesarduinotoolsarduinoOTA1.1.1 -prefs=runtime.tools.avrdude.path=C:Users1AppDataLocalArduino15packagesarduinotoolsavrdude6.3.0-arduino9 -prefs=runtime.tools.avrdude-6.3.0-arduino9.path=C:Users1AppDataLocalArduino15packagesarduinotoolsavrdude6.3.0-arduino9 -prefs=runtime.tools.avr-gcc.path=C:Users1AppDataLocalArduino15packagesarduinotoolsavr-gcc4.9.2-atmel3.5.4-arduino2 -prefs=runtime.tools.avr-gcc-4.9.2-atmel3.5.4-arduino2.path=C:Users1AppDataLocalArduino15packagesarduinotoolsavr-gcc4.9.2-atmel3.5.4-arduino2 -verbose C:Users1DesktopV.A.W Metr V2.0 INA 226-20211008T162125Z-001V.A.W Metr V2.0 INA 226Скетч и БиблиотекиV.A.W_metr_INA226V.A.W_metr_INA226.ino C:Program FilesArduinoarduino-builder -compile -logger=machine -hardware C:Program FilesArduinohardware -hardware C:Users1AppDataLocalArduino15packages -tools C:Program FilesArduinotools-builder -tools C:Program FilesArduinohardwaretoolsavr -tools C:Users1AppDataLocalArduino15packages -built-in-libraries C:Program FilesArduinolibraries -libraries C:Users1DocumentsArduinolibraries -fqbn=arduino:avr:nano:cpu=atmega328 -vid-pid=1A86_7523 -ide-version=10816 -build-path C:Users1AppDataLocalTemparduino_build_783368 -warnings=none -build-cache C:Users1AppDataLocalTemparduino_cache_854966 -prefs=build.warn_data_percentage=75 -prefs=runtime.tools.arduinoOTA.path=C:Users1AppDataLocalArduino15packagesarduinotoolsarduinoOTA1.1.1 -prefs=runtime.tools.arduinoOTA-1.1.1.path=C:Users1AppDataLocalArduino15packagesarduinotoolsarduinoOTA1.1.1 -prefs=runtime.tools.avrdude.path=C:Users1AppDataLocalArduino15packagesarduinotoolsavrdude6.3.0-arduino9 -prefs=runtime.tools.avrdude-6.3.0-arduino9.path=C:Users1AppDataLocalArduino15packagesarduinotoolsavrdude6.3.0-arduino9 -prefs=runtime.tools.avr-gcc.path=C:Users1AppDataLocalArduino15packagesarduinotoolsavr-gcc4.9.2-atmel3.5.4-arduino2 -prefs=runtime.tools.avr-gcc-4.9.2-atmel3.5.4-arduino2.path=C:Users1AppDataLocalArduino15packagesarduinotoolsavr-gcc4.9.2-atmel3.5.4-arduino2 -verbose C:Users1DesktopV.A.W Metr V2.0 INA 226-20211008T162125Z-001V.A.W Metr V2.0 INA 226Скетч и БиблиотекиV.A.W_metr_INA226V.A.W_metr_INA226.ino Using board ‘nano’ from platform in folder: C:Users1AppDataLocalArduino15packagesarduinohardwareavr1.6.20 Using core ‘arduino’ from platform in folder: C:Users1AppDataLocalArduino15packagesarduinohardwareavr1.6.20 Detecting libraries used. «C:Users1AppDataLocalArduino15packagesarduinotoolsavr-gcc4.9.2-atmel3.5.4-arduino2/bin/avr-g++» -c -g -Os -w -std=gnu++11 -fpermissive -fno-exceptions -ffunction-sections -fdata-sections -fno-threadsafe-statics -flto -w -x c++ -E -CC -mmcu=atmega328p -DF_CPU=16000000L -DARDUINO=10816 -DARDUINO_AVR_NANO -DARDUINO_ARCH_AVR «-IC:Users1AppDataLocalArduino15packagesarduinohardwareavr1.6.20coresarduino» «-IC:Users1AppDataLocalArduino15packagesarduinohardwareavr1.6.20variantseightanaloginputs» «C:Users1AppDataLocalTemparduino_build_783368sketchV.A.W_metr_INA226.ino.cpp» -o nul Alternatives for INA226.h: [[email protected]] ResolveLibrary(INA226.h) -> candidates: [[email protected]] «C:Users1AppDataLocalArduino15packagesarduinotoolsavr-gcc4.9.2-atmel3.5.4-arduino2/bin/avr-g++» -c -g -Os -w -std=gnu++11 -fpermissive -fno-exceptions -ffunction-sections -fdata-sections -fno-threadsafe-statics -flto -w -x c++ -E -CC -mmcu=atmega328p -DF_CPU=16000000L -DARDUINO=10816 -DARDUINO_AVR_NANO -DARDUINO_ARCH_AVR «-IC:Users1AppDataLocalArduino15packagesarduinohardwareavr1.6.20coresarduino» «-IC:Users1AppDataLocalArduino15packagesarduinohardwareavr1.6.20variantseightanaloginputs» «-IC:Program FilesArduinolibrariesINA226-master» «C:Users1AppDataLocalTemparduino_build_783368sketchV.A.W_metr_INA226.ino.cpp» -o nul Alternatives for SPI.h: [[email protected]] ResolveLibrary(SPI.h) -> candidates: [[email protected]] «C:Users1AppDataLocalArduino15packagesarduinotoolsavr-gcc4.9.2-atmel3.5.4-arduino2/bin/avr-g++» -c -g -Os -w -std=gnu++11 -fpermissive -fno-exceptions -ffunction-sections -fdata-sections -fno-threadsafe-statics -flto -w -x c++ -E -CC -mmcu=atmega328p -DF_CPU=16000000L -DARDUINO=10816 -DARDUINO_AVR_NANO -DARDUINO_ARCH_AVR «-IC:Users1AppDataLocalArduino15packagesarduinohardwareavr1.6.20coresarduino» «-IC:Users1AppDataLocalArduino15packagesarduinohardwareavr1.6.20variantseightanaloginputs» «-IC:Program FilesArduinolibrariesINA226-master» «-IC:Program FilesArduinolibrariesSPI-master» «C:Users1AppDataLocalTemparduino_build_783368sketchV.A.W_metr_INA226.ino.cpp» -o nul Alternatives for TFT_ST7735.h: [[email protected]] ResolveLibrary(TFT_ST7735.h) -> candidates: [[email protected]] «C:Users1AppDataLocalArduino15packagesarduinotoolsavr-gcc4.9.2-atmel3.5.4-arduino2/bin/avr-g++» -c -g -Os -w -std=gnu++11 -fpermissive -fno-exceptions -ffunction-sections -fdata-sections -fno-threadsafe-statics -flto -w -x c++ -E -CC -mmcu=atmega328p -DF_CPU=16000000L -DARDUINO=10816 -DARDUINO_AVR_NANO -DARDUINO_ARCH_AVR «-IC:Users1AppDataLocalArduino15packagesarduinohardwareavr1.6.20coresarduino» «-IC:Users1AppDataLocalArduino15packagesarduinohardwareavr1.6.20variantseightanaloginputs» «-IC:Program FilesArduinolibrariesINA226-master» «-IC:Program FilesArduinolibrariesSPI-master» «-IC:Program FilesArduinolibrariesTFT_ST7735-master» «C:Users1AppDataLocalTemparduino_build_783368sketchV.A.W_metr_INA226.ino.cpp» -o nul «C:Users1AppDataLocalArduino15packagesarduinotoolsavr-gcc4.9.2-atmel3.5.4-arduino2/bin/avr-g++» -c -g -Os -w -std=gnu++11 -fpermissive -fno-exceptions -ffunction-sections -fdata-sections -fno-threadsafe-statics -flto -w -x c++ -E -CC -mmcu=atmega328p -DF_CPU=16000000L -DARDUINO=10816 -DARDUINO_AVR_NANO -DARDUINO_ARCH_AVR «-IC:Users1AppDataLocalArduino15packagesarduinohardwareavr1.6.20coresarduino» «-IC:Users1AppDataLocalArduino15packagesarduinohardwareavr1.6.20variantseightanaloginputs» «-IC:Program FilesArduinolibrariesINA226-master» «-IC:Program FilesArduinolibrariesSPI-master» «-IC:Program FilesArduinolibrariesTFT_ST7735-master» «C:Program FilesArduinolibrariesINA226-masterINA226.cpp» -o nul Alternatives for Wire.h: [] ResolveLibrary(Wire.h)nolibrariesINA226-masterINA226.cpp:16:117: fatal error: Wire.h: No such file or directory -> candidates: [] #include // I2C Library definition // ^ compilation terminated. Используем библиотеку INA226-master версии 1.0.3 из папки: C:Program FilesArduinolibrariesINA226-master Используем библиотеку SPI-master версии 1.0 из папки: C:Program FilesArduinolibrariesSPI-master Используем библиотеку TFT_ST7735-master версии 0.17 из папки: C:Program FilesArduinolibrariesTFT_ST7735-master exit status 1 Ошибка компиляции для платы Arduino Nano.
- Войдите или зарегистрируйтесь, чтобы получить возможность отправлять комментарии

Надо комп отформатировать
- Войдите или зарегистрируйтесь, чтобы получить возможность отправлять комментарии
Надо комп отформатировать
- Войдите или зарегистрируйтесь, чтобы получить возможность отправлять комментарии
Просто, тогда мы ещё 3 недели тебя не увидим.
Источник
Arduino IDE ошибки компиляции скетча

Ошибки компиляции Arduino IDE возникают при проверке или загрузке скетча в плату, если код программы содержит ошибки, компилятор не может найти библиотеки или переменные. На самом деле, сообщение об ошибке при загрузке скетча связано с невнимательностью самого программиста. Рассмотрим в этой статье все возможные ошибки компиляции для платы Ардуино UNO R3, NANO, MEGA и пути их решения.
Ошибка компиляции для Arduino Nano, Uno, Mega
Самые простые ошибки возникают у новичков, кто только начинает разбираться с языком программирования Ардуино и делает первые попытки загрузить скетч. Если вы не нашли решение своей проблемы в статье, то напишите свой вопрос в комментариях к этой записи и мы поможем решить вашу проблему с загрузкой (бесплатно!).
Ошибка: avrdude: stk500_recv(): programmer is not responding
Что делать в этом случае? Первым делом обратите внимание какую плату вы используете и к какому порту она подключена (смотри на скриншоте в правом нижнем углу). Необходимо сообщить Arduino IDE, какая плата используется и к какому порту она подключена. Если вы загружаете скетч в Ардуино Nano V3, но при этом в настройках указана плата Uno или Mega 2560, то вы увидите ошибку, как на скриншоте ниже.
Ошибка Ардуино: programmer is not responding
Такая же ошибка будет возникать, если вы не укажите порт к которому подключена плата (это может быть любой COM-порт, кроме COM1). В обоих случаях вы получите сообщение — плата не отвечает ( programmer is not responding ). Для исправления ошибки надо на панели инструментов Arduino IDE в меню «Сервис» выбрать нужную плату и там же, через «Сервис» → «Последовательный порт» выбрать порт «COM7».
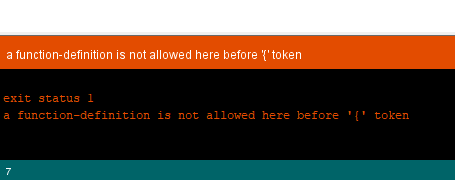
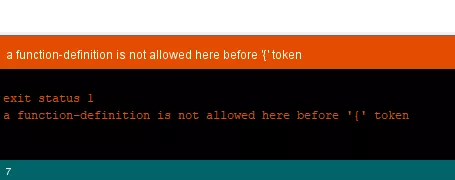
Ошибка: a function-definition is not allowed here before ‘<‘ token
Это значит, что в скетче вы забыли где-то закрыть фигурную скобку. Синтаксические ошибки IDE тоже распространены и связаны они просто с невнимательностью. Такие проблемы легко решаются, так как Arduino IDE даст вам подсказку, стараясь отметить номер строки, где обнаружена ошибка. На скриншоте видно, что строка с ошибкой подсвечена, а в нижнем левом углу приложения указан номер строки.
Ошибка: a function-definition is not allowed here before ‘<‘ token
Ошибка: expected initializer before ‘>’ token / expected ‘;’ before ‘>’ token
Сообщение expected initializer before ‘>’ token говорит о том, что вы, наоборот где-то забыли открыть фигурную скобку. Arduino IDE даст вам подсказку, но если скетч довольно большой, то вам придется набраться терпения, чтобы найти неточность в коде. Ошибка при компиляции программы: expected ‘;’ before ‘>’ token говорит о том, что вы забыли поставить точку с запятой в конце командной строки.
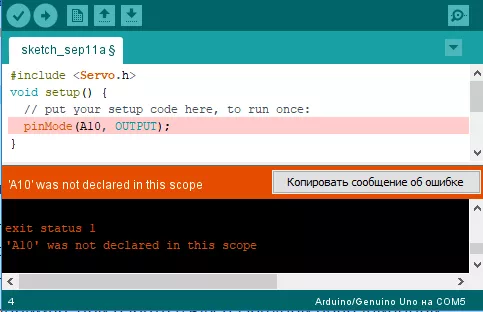
Ошибка: ‘ ‘ was not declared in this scope
Что за ошибка? Arduino IDE обнаружила в скетче слова, не являющиеся служебными или не были объявлены, как переменные. Например, вы забыли продекларировать переменную или задали переменную ‘DATA’, а затем по невнимательности используете ‘DAT’, которая не была продекларирована. Ошибка was not declared in this scope возникает при появлении в скетче случайных или лишних символов.
Ошибка Ардуино: was not declared in this scope
Например, на скриншоте выделено, что программист забыл продекларировать переменную ‘x’, а также неправильно написал функцию ‘analogRead’. Такая ошибка может возникнуть, если вы забудете поставить комментарий, написали функцию с ошибкой и т.д. Все ошибки также будут подсвечены, а при нескольких ошибках в скетче, сначала будет предложено исправить первую ошибку, расположенную выше.
Ошибка: No such file or directory / exit status 1
Данная ошибка возникает, если вы подключаете в скетче библиотеку, которую не установили в папку libraries. Например, не установлена библиотека ИК приемника Ардуино: fatal error: IRremote.h: No such file or directory . Как исправить ошибку? Скачайте нужную библиотеку и распакуйте архив в папку C:Program FilesArduinolibraries. Если библиотека установлена, то попробуйте скачать и заменить библиотеку на новую.
exit status 1 Ошибка компиляции для платы Arduino Nano
Довольно часто у новичков выходит exit status 1 ошибка компиляции для платы arduino/genuino uno. Причин данного сообщения при загрузке скетча в плату Arduino Mega или Uno может быть огромное множество. Но все их легко исправить, достаточно внимательно перепроверить код программы. Если в этом обзоре вы не нашли решение своей проблемы, то напишите свой вопрос в комментариях к этой статье.
Источник

Первая прошивка
Итак, разобрались со средой разработки, теперь можно загрузить прошивку. Рекомендую загрузить пустую прошивку, чтобы убедиться, что все драйвера установились и плата вообще прошивается. Также лучше делать это с новой или заведомо рабочей платой.
1. Плата подключается к компьютеру по USB, на ней должны замигать светодиоды. Если этого не произошло:
- Неисправен USB кабель.
- Неисправен USB порт компьютера.
- Неисправен USB порт Arduino.
- Попробуйте другой компьютер, чтобы исключить часть проблем из списка.
- Попробуйте другую плату, чтобы исключить часть проблем из списка.
- На плате Arduino сгорел диод по питанию USB.
- Плата Arduino сгорела полностью из-за неправильного подключения питания или короткого замыкания
2. Компьютер издаст характерный сигнал подключения нового оборудования, а при первом подключении появится окошко “Установка нового оборудования”. Если этого не произошло:
- См. предыдущий список неисправностей.
- Кабель должен быть data-кабелем, а не “зарядным”.
- Кабель желательно втыкать напрямую в компьютер, а не через USB-хаб.
- Не установлены драйверы для Arduino.
3. В списке портов (Arduino IDE/Инструменты/Порт) появится новый порт, отличный от COM1. Если этого не произошло:
- См. предыдущий список неисправностей.
- Некорректно установлен драйвер CH341.
- Если список портов вообще неактивен – драйвер Arduino установлен некорректно, вернитесь к установке
- Возникла системная ошибка, обратитесь к знакомому компьютерщику
4. Выбираем свою плату. Если это Arduino Nano, выбираем в ИнструментыПлатаArduino Nano. Если другая – выбираем другую. Нажимаем стрелочку в левом верхнем углу (загрузить прошивку). Да, загружаем пустую прошивку.
- [Для Arduino Nano] В микроконтроллер китайских нанок зашит “старый” загрузчик, поэтому выбираем ИнструментыПроцессорATmega328p (Old Bootloader). Некоторые китайцы зашивают в свои платы новый загрузчик, поэтому если прошивка не загрузилась (загрузка идёт минуту и вылетает ошибка avrdude: stk500_getsync()) – попробуйте сменить пункт Процессор на ATmega328p.
Если появилась надпись “Загрузка завершена” – значит всё в порядке и можно прошивать другие скетчи. В любом случае на вашем пути встретятся другие два варианта событий, происходящих после нажатия на кнопку “Загрузка” – это ошибка компиляции и ошибка загрузки. Вот их давайте рассмотрим более подробно.
Ошибки компиляции
Возникает на этапе компиляции прошивки. Ошибки компиляции вызваны проблемами в коде прошивки.
- В некоторых случаях ошибка возникает при наличии кириллицы (русских букв) в пути к папке со скетчем. Решение: завести для скетчей отдельную папочку в корне диска с английским названием.
- В чёрном окошке в самом низу Arduino IDE можно прочитать полный текст ошибки и понять, куда копать.
- В скачанных с интернета готовых скетчах часто возникает ошибка с описанием название_файла.h no such file or directory. Это означает, что в скетче используется библиотека <название файла>, и нужно положить её в Program Files/Arduino/libraries/. Ко всем моим проектам всегда идёт папочка с использованными библиотеками, которые нужно установить. Также библиотеки всегда можно поискать в гугле по название файла.
- При использовании каких-то особых библиотек, методов или функций, ошибкой может стать неправильно выбранная плата в “Инструменты/плата“. Пример: прошивки с библиотекой Mouse.h или Keyboard.h компилируются только для Leonardo и Micro.
- Если прошивку пишете вы, то любые синтаксические ошибки в коде будут подсвечены, а снизу в чёрном окошке можно прочитать более детальное описание, в чём собственно косяк. Обычно указывается строка, в которой сделана ошибка, также эта строка подсвечивается красным.
- Иногда причиной ошибки бывает слишком старая, или слишком новая версия Arduino IDE. Читайте комментарии разработчика скетча
- Ошибка недостаточно свободного места возникает по вполне понятным причинам. Возможно поможет урок по оптимизации кода.
Частые ошибки в коде, приводящие к ошибке компиляции
- expected ‘,’ or ‘;’ – пропущена запятая или точка запятой на предыдущей строке
- stray ‘320’ in program – русские символы в коде
- expected unqualified-id before numeric constant – имя переменной не может начинаться с цифры
- … was not declared in this scope – переменная или функция используется, но не объявлена. Компилятор не может её найти
- redefinition of … – повторное объявление функции или переменной
- storage size of … isn’t known – массив задан без указания размера
Ошибки загрузки
Возникают на этапе, когда программа успешно скомпилирована и производится загрузка в плату по кабелю. Ошибка может возникать как по причине неисправностей железа, так и из-за настроек программы и драйверов.
- USB кабель, которым подключается Arduino, должен быть Data-кабелем, а не кабелем только для зарядки. Нужным нам кабелем подключаются к компьютеру плееры и смартфоны.
- Причиной ошибки загрузки являются не установленные/криво установленные драйвера CH340, если у вас китайская NANO.
- Также будет ошибка avrdude: ser_open(): can’t open device, если не выбран COM порт, к которому подключена Arduino. Если кроме COM1 других портов нет – читай два пункта выше, либо попробуй другой USB порт, или вообще другой компьютер.
- Большинство проблем при загрузке, вызванных “зависанием” ардуины или загрузчика, лечатся полным отключением ардуины от питания. Потом вставляем USB и по новой прошиваем.
- Причиной ошибки загрузки может быть неправильно выбранная плата в “Инструменты/Плата”, а также неправильно выбранный процессор в “Инструменты/Процессор”. Также в свежих версиях IDE нужно выбирать ATmega328P (Old Bootloader) для китайских плат NANO.
- Если у вас открыт монитор COM порта в другом окне Arduino IDE или плата общается через СОМ порт с другой программой (Ambibox, HWmonitor, SerialPortPlotter и т.д.), то вы получите ошибку загрузки, потому что порт занят. Отключитесь от порта или закройте другие окна и программы.
- Если у вас задействованы пины RX или TX – отключите от них всё! По этим пинам Arduino общается с компьютером, в том числе для загрузки прошивки.
- Если в описании ошибки встречается bootloader is not responding и not in sync, а все предыдущие пункты этого списка проверены – с вероятностью 95% сдох загрузчик. Второй неприятный исход – загрузчик “слетел”, и его можно прошить заново.
Предупреждения
Помимо ошибок, по причине которых проект вообще не загрузится в плату и не будет работать, есть ещё предупреждения, которые выводятся оранжевым текстом в чёрной области лога ошибок. Предупреждения могут появиться даже тогда, когда выше лога ошибок появилась надпись “Загрузка завершена“. Это означает, что в прошивке нет критических ошибок, она скомпилировалась и загрузилась в плату. Что же тогда означают предупреждения? Чаще всего можно увидеть такие:
- # Pragma message… – это просто сообщения, оставленные разработчиком проекта или библиотеки. Чаще всего номер версии и прочая информация.
- Недостаточно памяти, программа может работать нестабильно – Чуть выше этого предупреждения обычно идёт информация о задействованной памяти. Память устройства можно добивать до 99%, ничего страшного не случится. Это флэш память и во время работы она не изменяется. А вот динамическую память желательно забивать не более 85-90%, иначе реально могут быть непонятные глюки в работе, так как память постоянно “бурлит” во время работы. НО. Это зависит от скетча и в первую очередь от количества локальных переменных. Можно написать такой код, который будет стабильно работать при 99% занятой SRAM памяти. Так что ещё раз: это всего лишь предупреждение, а не ошибка.
FAQ
Завершая раздел Введение в Arduino поговорим о вопросах, которые очень часто возникают у новичков:
- Ардуину можно прошить только один раз? Нет, несколько десятков тысяч раз, всё упирается в ресурс Flash памяти. А он довольно большой.
- Как стереть/нужно ли стирать старую прошивку при загрузке новой? Память автоматически очищается при прошивке, старая прошивка автоматически удаляется.
- Можно ли записать две прошивки, чтобы они работали вместе? Нет, при прошивке удаляются абсолютно все старые данные. Из двух прошивок нужно сделать одну, причём так, чтобы не было конфликтов. Подробнее в этом уроке.
- Можно ли “вытащить” прошивку с уже прошитой Ардуины? Теоретически можно, но только в виде нечитаемого машинного кода, в который преобразуется прошивка на С++ при компиляции, т.е. вам это НИКАК не поможет, если вы не имеете диплом по низкоуровневому программированию. Подробнее в этом уроке.
- Зачем это нужно? Например есть у нас прошитый девайс, и мы хотим его “клонировать”. В этом случае да, есть вариант сделать дамп прошивки и загрузить его в другую плату на таком же микроконтроллере.
- Если есть желание почитать код – увы, прошивка считывается в виде бинарного машинного кода, превратить который обратно в читаемый Си-подобный код обычному человеку не под силу.
- Вытащить прошивку, выражаясь более научно – сделать дамп прошивки, можно при помощи ISP программатора, об этом можно почитать здесь.
- Снять дамп прошивки можно только в том случае, если разработчик не ограничил такую возможность, например записав лок-биты, запрещающие считывание Flash памяти, или вообще отключив SPI шину. Если же разработчик – вы, и есть желание максимально защитить своё устройство от копирования – гуглите про лок-биты и отключение SPI
Видео
Полезные страницы
- Набор GyverKIT – большой стартовый набор Arduino моей разработки, продаётся в России
- Каталог ссылок на дешёвые Ардуины, датчики, модули и прочие железки с AliExpress у проверенных продавцов
- Подборка библиотек для Arduino, самых интересных и полезных, официальных и не очень
- Полная документация по языку Ардуино, все встроенные функции и макросы, все доступные типы данных
- Сборник полезных алгоритмов для написания скетчей: структура кода, таймеры, фильтры, парсинг данных
- Видео уроки по программированию Arduino с канала “Заметки Ардуинщика” – одни из самых подробных в рунете
- Поддержать автора за работу над уроками
- Обратная связь – сообщить об ошибке в уроке или предложить дополнение по тексту ([email protected])
Одна из самых неприятных ошибок — это ошибка компиляции для платы Аrduino Nano, с которой вам придется столкнуться не раз.
Содержание
- Синтаксические ошибки
- Ошибки компиляции плат Arduino uno
- Ошибка exit status 1 при компиляции для плат uno, mega и nano
- Ошибки библиотек
- Ошибки компилятора Ардуино
- Основные ошибки
- Ошибка: «avrdude: stk500_recv(): programmer is not responding»
- Ошибка: «a function-definition is not allowed here before ‘{‘ token»
- Ошибка: «No such file or directory / exit status 1»
- Ошибка: «expected initializer before ‘}’ token / expected ‘;’ before ‘}’ token»
- Ошибка: «… was not declared in this scope»
Синтаксические ошибки
Ардуино – одна из наиболее комфортных сред для начинающих инженеров, в особенности программистов, ведь им не приходится проектировать свои системы управления и делать множество других действий.
Сразу же при покупке они получают готовый набор библиотек на С99 и возможность, по необходимости, подтянуть необходимые модули в опен-соурс источниках.
Но и здесь не избежать множества проблем, с которыми знаком каждый программист, и одна из самых неприятных – ошибка компиляции для платы Аrduino nano, с которой вам придется столкнуться не раз. Что же эта строчка означает, какие у неё причины появления, и главное – как быстро решить данную проблему?
Для начала стоит немного окунуться в теорию, чтобы вы понимали причину возникновения данной строчки с текстом и не грешили лишний раз, что Ардуино уно не видит компьютер.
Как несложно догадаться, компиляция – приведение кода на языке Си к виду машинного (двоичного) и преобразование множественных функций в простые операции, чтобы те смогли выполняться через встроенные операнды процессора. Выглядит всё достаточно просто, но сам процесс компиляции происходит значительно сложнее, и поэтому ошибка во время проведения оной может возникать по десяткам причин.
Все мы уже привыкли к тому, что код никогда не запускается с первого раза, и при попытке запустить его в интерпретаторе вылезает десяток ошибок, которые приходится оперативно править. Компилятор действует схожим образом, за исключением того, что причины ошибок указываются далеко не всегда. Именно поэтому рекомендуется протестировать код сначала в среде разработки, и лишь затем уже приступать к его компиляции в исполняемые файлы под Ардуино.
Мы узнали, к чему приводит данный процесс, давайте разберёмся, как он происходит:
- Первое, что делает компилятор – подгружает все инклуднутые файлы, а также меняет объявленные дефайны на значения, которое для них указано. Это необходимо затем, чтобы не нужно было по нескольку раз проходиться синтаксическим парсером в пределах одного кода. Также, в зависимости от среды, компилятор может подставлять функции на место их объявления или делать это уже после прохода синтаксическим парсером. В случае с С99, используется второй вариант реализации, но это и не столь важно.
- Далее он проверяет первичный синтаксис. Этот процесс проводится в изначальном компилируемом файле, и своеобразный парсер ищет, были ли описаны приведенные функции ранее, подключены ли необходимые библиотеки и прочее. Также проверяется правильность приведения типов данных к определенным значениям. Не стоит забывать, что в С99 используется строгая явная типизация, и вы не можете засунуть в строку, объявленную integer, какие-то буквенные значения. Если такое замечается, сразу вылетает ошибка.
- В зависимости от среды разработки, иногда предоставляется возможность последний раз протестировать код, который сейчас будет компилироваться, с запуском интерпретатора соответственно.
- Последним идет стек из различных действий приведения функций, базовых операнд и прочего к двоичному коду, что может занять какое-то время. Также вся структура файлов переносится в исполняемые exe-шники, а затем происходит завершение компиляции.
Как можно увидеть, процесс не так прост, как его рисуют, и на любом этапе может возникнуть какая-то ошибка, которая приведет к остановке компиляции. Проблема в том, что, в отличие от первых трех этапов, баги на последнем – зачастую неявные, но всё ещё не связанные с алгоритмом и логикой программы. Соответственно, их исправление и зачистка занимают значительно больше времени.
А вот синтаксические ошибки – самая частая причина, почему на exit status 1 происходит ошибка компиляции для платы Аrduino nano. Зачастую процесс дебагинга в этом случае предельно простой.
Вам высвечивают ошибку и строчку, а также подсказку от оператора EXCEPTION, что конкретно не понравилось парсеру. Будь то запятая или не закрытые скобки функции, проблема загрузки в плату Аrduino возникнет в любом случае.
Решение предельно простое и логичное – найти и исправить непонравившийся машине синтаксис. Зачастую такие сообщения вылезают пачками, как на этапе тестирования, так и компилирования, поэтому вы можете таким образом «застопорить» разработку не один раз.
Не стоит этого страшиться – этот процесс вполне нормален. Все претензии выводятся на английском, например, часто можно увидеть такое: was not declared in this scope. Что это за ошибка arduino – на самом деле ответ уже скрыт в сообщении. Функция или переменная просто не были задекларированы в области видимости.
Ошибки компиляции плат Arduino uno
Другая частая оплошность пользователя, которая порождает вопросы вроде, что делать, если Аrduino не видит порт, заключается в том, что вы попросту забываете настроить среду разработки. IDE Ардуино создана под все виды плат, но, как мы указывали, на каждом контроллере помещается лишь ограниченное количество библиотек, и их наполнение может быть различным.
Соответственно, если в меню среды вы выбрали компиляцию не под тот МК, то вполне вероятно, что вызываемая вами функция или метод просто не будет найдена в постоянной памяти, вернув ошибку. Стандартно, в настройках указана плата Ардуино уно, поэтому не забывайте её менять. И обратная ситуация может стать причиной, по которой возникает проблема загрузки в плату на Аrduino uno.
Ошибка exit status 1 при компиляции для плат uno, mega и nano
И самое частое сообщение, для пользователей уно, которое выскакивает в среде разработки – exit 1. И оно же самое дискомфортное для отладки приложения, ведь тут необходимо учесть чуть ли не ядро системы, чтобы понять, где же кроется злополучный баг.
В документации указано, что это сообщение указывает на то, что не запускается ide Аrduino в нужной конфигурации, но на деле есть ещё десяток случаев, при которых вы увидите данное сообщение. Однако, действительно, не забывайте проверять разрядность системы, IDE и просматривать, какие библиотеки вам доступны для обращения на текущий момент.
Ошибки библиотек
Если произошла ошибка при компиляции скетча Ардуино, но не выводилось ни одно из вышеописанных сообщений, то можете смело искать баг в библиотеках МК. Это наиболее неприятное занятие для большинства программистов, ведь приходится лазить в чужом коде, но без этого никак.
Ведь банально причина может быть в устаревшем синтаксисе скачанного плагина и, чтобы он заработал, необходимо переписать его практически с нуля. Это единственный выход из сложившейся ситуации. Но бывают и более банальные ситуации, когда вы подключили библиотеку, функции из которой затем ни разу не вызвали, или просто перепутали название.
Ошибки компилятора Ардуино
Ранее упоминался финальный стек действий, при прогонке кода через компилятор, и в этот момент могут произойти наиболее страшные ошибки – баги самого IDE. Здесь конкретного решения быть не может. Вам никто не запрещает залезть в ядро системы и проверить там всё самостоятельно, но куда эффективнее будет откатиться до предыдущей версии программы или, наоборот, обновиться.
Основные ошибки
Ошибка: «avrdude: stk500_recv(): programmer is not responding»
Смотрим какая у нас плата? Какой порт используем? Сообщаем ардуино о правильной плате и порте. Возможно, что используете Nano, а указана Mega. Возможно, что указали неверный порт. Всё это приводит к сообщению: «programmer is not responding».
Решение:
В Arduino IDE в меню «Сервис» выбираем плату. В меню «Сервис → Последовательный порт» выбираем порт.
Ошибка: «a function-definition is not allowed here before ‘{‘ token»
Забыли в коде программы (скетча) закрыть фигурную скобку }.
Решение:
Обычно в Ардуино IDE строка с ошибкой подсвечивается.
Ошибка: «No such file or directory / exit status 1»
Подключаемая библиотека отсутствует в папке libraries.
Решение:
Скачать нужную библиотеку и скопировать её в папку программы — как пример — C:Program FilesArduinolibraries. В случае наличия библиотеки — заменить файлы в папке.
Ошибка: «expected initializer before ‘}’ token / expected ‘;’ before ‘}’ token»
Забыли открыть фигурную скобку {, если видим «initializer before». Ошибка «expected ‘;’ before ‘}’ token» — забыли поставить точку с запятой в конце командной строки.
Решение:
Обычно в Ардуино IDE строка с ошибкой подсвечивается.
Ошибка: «… was not declared in this scope»
Arduino IDE видит в коде выражения или символы, которые не являются служебными или не были объявлены переменными.
Решение:
Проверить код на использование неизвестных выражений или лишних символов.
17 июля 2018 в 13:23
| Обновлено 7 ноября 2020 в 01:20 (редакция)
Опубликовано:
Статьи, Arduino
It’s 11 PM on a Wednesday. You’ve just spent three hours toiling on your next Arduino project, and FINALLY, you’re ready to give your sketch a whirl. You hit upload, palms sweaty with anticipation to see all your hard work come to fruition. It’s then you see the error:
No such file or directory.
Surely this is a chance aberration. “Nothing to worry about,” you mutter, sleep-starved and semi-delirious as you hit upload again. And once more, those maddening words, “no such file or directory,” stare back at you in hostile gaslighting mockery.
Have you been here?
If you’re trying to run an Arduino sketch but keep coming across the “no such file or directory” error, don’t worry. This is actually a pretty common problem, and there are two easy fixes that almost always work.
Keep on reading. We’ll show you what they are.
No such file error!
Error messages can be such a pain. They do, however, serve a useful purpose by telling us something about what went wrong. At first glance, the no such file or directory error is particularly maddening because it seems to break that useful purpose rule. Of course there’s a file or directory! You just made the thing, and it’s right there, tucked inside a directory.
But hold up, let’s take a closer look. If you look at the bottom portion of the Arduino IDE where the error message shows up, there’s this handy little button that says “copy error messages.”

Click on that now. You probably won’t fall off your chair to learn that by clicking that button, you just copied the error message from the little window at the bottom of The Serial Monitor’s UI to the clipboard of your computer.
This copy feature is ridiculously useful. You could, for example, paste the error message into Google and learn more about the error. Or you could take advantage of the active Arduino community by asking for help in a forum. For this situation, however, we can be a bit more basic. All we’re going to do is take a closer look at what the message is actually saying. To do that, just fire up your PC’s text editor and paste it into the blank screen.
Decoding the no such file error
Here it is, that pesky error in all its freshly pasted glory.

I’ll break it down for you line by line.
- The first line is easy. It’s just describing the Arduino version in use, what operating system is running, and which board you have selected.
- Line 2 begins to zero in on the problem.
- The first bit, “knob,” is referring to the name of the program. This is your sketch, basically.
- The second bit is what usually begins to confuse people, but it’s easy once you know. The “10” in this example is telling you the error occurred on line 10 of your sketch. The “19” is telling you the length of the line of code in spaces and characters. The first number is usually the more helpful of the two because you can use it to locate the error in your sketch.
- Then we get to the smoking gun of the error. It says, “servo.h: No such file or directory”.
So this thing, “Servo.h.” That’s the thing we need to fix, and thanks to line 2, we know where to find it. Line 10. It’s always line 10.
Now that we know what’s going on a bit better, let’s get down to the business of implementing a fix.
The error of our ways
Let’s lay down some scrutiny on this accursed line 10.
It says “#include <servo.h>”
When we verify this code, this line is telling the Arduino IDE compiler, “Hey, for this program to work, you need to go get this file called servo.h”.
Let’s say you had a label-making machine, and you wanted to use it to print some cool motivational labels, like “Success!” and “Keep Trying!” and “Look, Nachos!” To make that happen, you’ll first have to load in a roll of labels. No roll of labels? Well, then the label maker isn’t gonna work.
The sketch you’re trying to upload is like the label maker. The file (in our example, the file named “servo.h”) is the roll of labels.

So the error message actually is saying something useful. It’s saying, “Hey programmer, you said I needed this other file. Well, I looked for it and it’s not there. What gives?”
Now we know the error message isn’t complete gibberish, let’s look at the two most common scenarios that cause it.
Scenario 1 – Fat fingers
This sketch is one that you’ve written. You’re actually the one who wrote the “#include” line. The first thing you should check is your spelling and capitalization. Maybe you spelled the name of the library incorrectly? Or (as with the example below) perhaps you capitalized the wrong letters.

So “servo.h” should actually have a capital “S.” In full and with correct capitalization, it should read, “Servo.h.” You’ll notice above that the word servo changes color when it’s correctly capitalized. That color change signifies that the library name “Servo” is recognized as a “keyword” in the Arduino IDE.
Keep in mind that might not be the case for all the libraries you’re using. In other words, the color change won’t always indicate you’re using the right spelling or capitalization, but it’s often a helpful visual reminder.
Oh, and it’s probably good to mention that everyone in the history of Arduino programming has misspelled or incorrectly capitalized a word at some point. It’s amazing how long you can stare at a line of code and miss something like that.
So don’t sweat it.
Scenario 2 – Missing files
This brings us to the next common scenario for the “no such file or directory” error.
So often, working with Arduinos involves taking code that someone else has developed and shared online and then tailoring it to your project. That’s part of what makes it so easy to get stuff done with Arduino. One problem that frequently happens when we do that, however, is we accidentally introduce code without a matching file.
An easy way to check to see if you have the file a sketch is looking for is to navigate to Sketch > Include Library from within the Arduino IDE. Then look for the name of that library.

Whatever library the #include statement was calling for, you want to look through this big long list for a library with the exact same name. If you don’t see the file name there, this means the library isn’t installed. You’ll have to add that library before the sketch will compile without errors.
So, how do you add that library?
The easiest way is to go to Sketch > Include Library > Manage Libraries. The Arduino IDE will open up a dialogue box from which you can search for the library you need.

Make sure you type the exact word that matches the #include line. Once you find the missing library, go ahead and click Install. The Arduino IDE will let you know that it’s installing the library you requested and updating the software accordingly.
Next, just double-check that the library has been successfully installed by going to Sketch > Include Library. You should see your new library in the dropdown list.
Good news! If the library is there, you should now be able to compile your sketch error-free.
Other library locations
OK, there’s one little fly in the ointment. How do these dang ointment flies always manage to complicate things so?
Here’s the thing. Not all libraries live in this convenient pop-up window inside the Arduino IDE. The Arduino community is bubbling with clever ideas, but cleverness (unlike processed cheese) doesn’t always come in conveniently standardized, individually wrapped slices. There are tons of different ways to find Arduino libraries on the web.
If you’re downloading or copying a program from the internet, just go to the page where you got that program and take a close look at the library the author is referencing. They may, for example, have a link to GitHub, which is a place where people keep a lot of code libraries.

Wherever you find it, usually the library will be included in a .zip file package. Once you’ve downloaded the .zip file, fire up the Arduino IDE and go to Sketch > Include Library > Add .ZIP library. Then navigate to the location you downloaded the file and select it. Assuming no additional ointment flies invade your workflow, the Arduino IDE will pop up the message “Library added to your libraries” just above the dark area where the original “no such file or directory” error appeared.
Now it’s business as usual! Just go to Sketch > Include Library, and the new library will appear in the drop-down list.
As the dyslexic Frenchman once said to the oversized violinist: “Viola!”
You now know not one but two ways to add a new library. What a time to be alive!
Review
A quick recap, then.
We’ve looked at the two main scenarios that cause the “no such file or directory” error to appear after you compile your sketch:
- The fat fingers phenomenon: Check your spelling and capitalization! If you wrote the sketch, there’s a mighty good chance you introduced a tiny error. And don’t beat yourself up over it! Literally every coder has done this.
- The missing files mixup: Failing that, if you copied code from someone else check that you have the correct libraries installed. Don’t see your library? Install it using the method described above, and you should be good to go.
There may be no such thing as a free lunch, a coincidence, or a luck dragon. But rest assured. Your files and directories? They’re alive and well.
g++/Code::Blocks/Ubuntu Gnome
При попытке компиляции из codeblocks указанного ниже кода вылетает ошибка. Но любопытен тот факт, что выполнение тех же команд из терминала компилирует код без ошибок.
#include <iostream>

using namespace std;

int main()
{
    cout << "Hello world!" << endl;
    return 0;
}
Лог в C::B:
————— Build: Debug in Test (compiler: GNU GCC Compiler)—————
g++ -Wall -fexceptions -g -c /home/egor/Документы/Projects/Test/main.cpp -o obj/Debug/main.o
g++ -o bin/Debug/Test obj/Debug/main.o
g++: error: obj/Debug/main.o: Нет такого файла или каталога
g++: fatal error: no input files
compilation terminated.
Process terminated with status 1 (0 minute(s), 0 second(s))
2 error(s), 0 warning(s) (0 minute(s), 0 second(s))
Проверил, файл по такому пути существует, папка obj/Debug существует.
- Печать
Страницы: [1] 2 3 Все Вниз

Тема: Ошибка компиляции, нет файла iostream.h (Прочитано 17079 раз)

0 Пользователей и 1 Гость просматривают эту тему.
F1asher_086

Начал изучать ЯП C++ переписал из учебника простенькую программку вывода
// Программа "Дважды два"
#include <iostream.h>
int main()
{	cout << "2 * 2 =" << 2 * 2 << end1;
	return 0;
}
При компиляции возникает ошибка импорта библиотеки iostream:
~$ gcc ~/2+2.cpp
~/2+2.cpp:3:22: фатальная ошибка: iostream.h: Нет такого файла или каталога
компиляция прервана.
Не могу понять в чем дело. Погуглил: в интернетах везде пишут, что ввод/вывод осуществляется библиотекой iostream.
В чем пробема?
yorik1984
#include <iostream>так надо )))
Плохо учите язык…
F1asher_086
// Программа "Дважды два"
#include <iostream>
int main()
{	cout << "2 * 2 =" << 2 * 2 << end1;
	return 0;
}
В том то и дело , что это тоже не работает:
~$ gcc '/home/some_user/2+2.cpp'
/home/some_user/2+2.cpp: В функции «int main()»:
/home/some_user/2+2.cpp:4:3: ошибка: нет декларации «cout» в этой области видимости
/home/some_user/2+2.cpp:4:3: замечание: suggested alternative:
/usr/include/c++/4.6/iostream:62:18: замечание:   «std::cout»
/home/some_user/2+2.cpp:4:33: ошибка: нет декларации «end1» в этой области видимости
Lifewalker
Господи, где вы находите учебники 15-летней давности? Эти ошибки свойственны древним как ГМ вариантам Си++
// Программа "Дважды два"
// ошибка
// #include <iostream.h>
// нужно так
#include <iostream>
int main()
{
// тут аж две ошибки. Во-первых пропущен std::
// во-вторых вместо end1 (end один) нужно писать std::endl (END Line)
// cout << "2 * 2 =" << 2 * 2 << end1;
// нужно так
std::cout << "2 * 2 =" << 2 * 2 << std::endl;
return 0;
}
Если задолбает каждый раз ставить std::, можно в начале импортнуть пространство имён
#include <iostream>
using namespace std;
// далее по тексту
А лучше всего забейте вы на идиотский Си++ и учите нормальный вменяемый язык типа Модула-2, Оберон-2 или Zonnon. Ну или Ада наконец 
« Последнее редактирование: 13 Мая 2012, 10:01:50 от Lifewalker »
F1asher_086
Lifewalker, Спасибо, помогло.
Подскажите кто-нибудь, пожалуйста, более новый учебник по c++, желательно на русском, а то, я так думаю, я неправильно выучу язык.
yorik1984
вариантов много. Все зависит от начального уровня. Вам надо изучить С++, или программированние с помощью С++. Это разное. В первом случае учебники ориентированны на людей, знакомых с программированием, но в других языках. А во втором случае для «чайников» в этой сфере.
VlaoMao
А лучше всего забейте вы на идиотский Си++ и учите нормальный вменяемый язык типа Модула-2, Оберон-2 или Zonnon. Ну или Ада наконец
Много ли программ на текущий момент актуальных на этих языках?
Вообще не советуйте человеку, на чём писать, он не для этого пришёл.
Lifewalker
Много ли программ на текущий момент актуальных на этих языках?
Вообще не советуйте человеку, на чём писать, он не для этого пришёл.
Второе утверждение вступает в логическую конфронтацию с первым. Сначала вы задаёте уточняющий вопрос, затем затыкаете мне рот, явно давая понять, что не желаете меня слушать. У программиста с логикой должна быть друуужба. Вы программист? 
Следует заметить, я дал не только совет, но и решил его проблему; возможно вы проглядели мою подсказку?
Достаточно того, что на подсказанных мною языках пишут программы для спутников, атомных электростанций, управления метрополитеном и так далее. На Си++ их не пишут, потому что Си++ чудовищен, труден, опасен… в общем непригоден для серьёзной работы. Так, баловство, используемое по инерционному недоразумению. Там, где программист на Обероне-2 закончит и сдаст в эксплуатацию модуль, программист на Си++ доберётся до решения проблемы с множественным наследованием, друзьями класса, перегрузкой операторов и разгребёт наконец запутанные вложенные импорты заголовков. В общем, продуктивность ого-го!
Señor_Gaga
А лучше всего забейте вы на идиотский Си++ и учите нормальный вменяемый язык типа Модула-2, Оберон-2 или Zonnon. Ну или Ада наконец
Много ли программ на текущий момент актуальных на этих языках?
Вообще не советуйте человеку, на чём писать, он не для этого пришёл.
В настоящее время язык Модула-2 используется для программирования бортового программного обеспечения спутников, запускаемых в рамках проекта ГЛОНАСС
—-
Проекты, использующие Модулу-3
Операционная система SPIN была написана на Модуле-3. Интерфейсы ядра совместимы с DEC Unix.
CVSup — программа для синхронизации репозиториев, также написана на Модуле-3.
—-
Операционные системы, написанные на Аде
MaRTE
RTEMS — ОС с открытым исходным кодом, разработана DARPA МО США
Ravenskar
RTOS-32 — проприетарная ОС
Lifewalker
Понимаете, уважаемый Señor_Gaga, в головах «профессионалов» язык, не позволяющий написать фигню вроде
int main(void)не язык вовсе, а так, недоразумение. И ведь этот бред компилируется без ошибок и даже выполняется! Лично я вообще не понимаю, что я тут написал и не представляю что вернёт i, но компилятор понимает и не ругается ни разу. «Профессионалы» видимо тоже увидят в этом сакральный смысл
{
int i;
if (i=i++ - ++i) --i;
return i;
}
VlaoMao
Уважаемый Lifewalker, я нисколько не сомневаюсь в Ваших возможностях насрать в теме, но всё же, ответ дали, прекращаем флудить-то, ок?
yorik1984
А лучше всего забейте вы на идиотский Си++ и учите нормальный вменяемый язык типа Модула-2, Оберон-2 или Zonnon. Ну или Ада наконец
А что вы скажете о скриптовых языках типа Руби, Питон, Перл ? Которые являются интерпретируемыми.
Мое мнение такое. Надо учить не конкретный язык и применять во всех местах. А то будет как в
. И еще один….
.
От себя добавлю. Начал учить руби. Пытался очень долго осилить Си и Си++. Так и не понял про ООП. Хотя руби тоже является ООП-ориентированнын языком. Но там как не страно, авторы учебников более наглядно и проще объясняют построение программ с помощью этого метода.
Не могу не согласится с высказыванием Вирта
Никлаус Вирт, создатель языков Паскаль и Модула, один из создателей структурного программирования, утверждает, что ООП — не более чем тривиальная надстройка над структурным программированием, и преувеличение её значимости, выражающееся, в том числе, во включении в языки программирования всё новых модных «объектно-ориентированных» средств, безусловно, вредит качеству разрабатываемого программного обеспечения. Никлаус очень удивлен тем вниманием, которое уделяется ныне ООП.
Взято отсюда http://blogerator.ru/page/oop_why-objects-have-failed
Сколько себя помню, всегда мыслил «процедурно», тоесть структурно.
Señor_Gaga
Lifewalker
if (i=i++ — ++i) —i; // самый отстойный код, какой я видел
Сам предпочитаю, за редкими исключениями вместо i++ писать i = i + 1;
Lifewalker
А что вы скажете о скриптовых языках типа Руби, Питон, Перл ? Которые являются интерпретируемыми.
А как вы думаете я отношусь к этим … средствам, если единственно расово-верными языками считаю Модулу и Оберон?
Руби представляет собой что-то интересное, любопытная игрушка. От Перла ничего кроме испуга испытать невозможно, это же катастрофа. Питон напомнил мне Фортран: я в ужасе от языка, в котором поведение программы можно изменить форматированием текста. В целом не понимаю, как можно писать что-то вменяемое на этих языках. Когда сегодня вижу пол-дистрибуитва на Питоне едва не рыдаю. От впустую потраченного времени программистов (на Обероне то же самое можно было сделать в два раза быстрее и надёжнее) и от изведённых впустую ресурсов (на Обероне то же самое может жрать в 10 раз меньше памяти и в 3 раза меньше тактов процессора).
« Последнее редактирование: 15 Мая 2012, 20:56:08 от Lifewalker »
RazrFalcon
Ваше мнение можно было бы учитывать, если бы оно было не настолько переполнено фанатизмом.
Еще бы услышать ваше мнение о java/С# и подобных языках, с виртуальной машиной-компилятором.
PS: пишу на Qt(который не c++, а moc ) И не сказал бы что доволен… Но аналогов не вижу, кроме D.
- Печать
Страницы: [1] 2 3 Все Вверх
не подключаются заголовочные файлы ((из поддиректорий include) /usr/include/*/…)
Модератор: Модераторы разделов
-
alexotmp
- Сообщения: 96
- ОС: OpenSUSE 11.2
не подключаются заголовочные файлы
при компиляции выдает: Нет такого файла или каталога
решается указанием папки в которой лежат .h файлы
т.е.:
#include <QCoreApplication> //не компилирует
#include <QtCore/QCoreApplication> //компилирует
проблема не только с qt:
error: Ogre.h: Нет такого файла или каталога
Ogre.h — лежит в /usr/include/OGRE/Ogre.h
подскажите, как поправить не прописывая полные пути к файлам
-

banzay
- Сообщения: 88
- ОС: openSUSE 12.1 (x86_64)

Re: не подключаются заголовочные файлы
Сообщение
banzay » 05.03.2009 22:14
alexotmp писал(а): ↑
05.03.2009 21:23
при компиляции выдает: Нет такого файла или каталога
решается указанием папки в которой лежат .h файлы
т.е.:
#include <QCoreApplication> //не компилирует
#include <QtCore/QCoreApplication> //компилируетпроблема не только с qt:
error: Ogre.h: Нет такого файла или каталога
Ogre.h — лежит в /usr/include/OGRE/Ogre.hподскажите, как поправить не прописывая полные пути к файлам
У Вас qt стоит из репа или сами собирали?
У меня такой проблемы нет, qt стоит пакетами отсюда http://ftp5.gwdg.de/pub/opensuse/repositor…/openSUSE_11.1/
Жить захочешь, не так раскарячишся…
-
banzay
- Сообщения: 88
- ОС: openSUSE 12.1 (x86_64)
Re: не подключаются заголовочные файлы
Сообщение
banzay » 05.03.2009 23:33
alexotmp писал(а): ↑
05.03.2009 23:28
qt из репозитрия,
и проблема не только в qt!зы: я новичок,
может какую обыденную вещь не догоняю?
Как собираете qmake -project ?
C qt такого быть не должно qmake всё должен подтянуть, а вот с остальным надо либо указывать явно путь, либо прописать пременные окружения…
Посмотрите ваш MakeFile там много интересного по этому поводу есть, там явно прописаны все пути к qt и конечно же к /usr/include ![]() …
…
Жить захочешь, не так раскарячишся…
-
Olegator
- Сообщения: 2493
- ОС: SuseLinux 11.2 KDE 4.3
Re: не подключаются заголовочные файлы
Сообщение
Olegator » 05.03.2009 23:59
alexotmp писал(а): ↑
05.03.2009 21:23
при компиляции выдает: Нет такого файла или каталога
решается указанием папки в которой лежат .h файлы
т.е.:
#include <QCoreApplication> //не компилирует
#include <QtCore/QCoreApplication> //компилируетпроблема не только с qt:
error: Ogre.h: Нет такого файла или каталога
Ogre.h — лежит в /usr/include/OGRE/Ogre.hподскажите, как поправить не прописывая полные пути к файлам
а как Вы думаете откуда берутся эти заголовки, если мы не прописываем полностью путь, например здесь #include <QtCore/QCoreApplication>? А берутся они из переменных окружения, где прописан путь /usr/include, зайдите в эту папке и Вы догадаетесь почему работает
alexotmp писал(а): ↑
05.03.2009 21:23
#include <QtCore/QCoreApplication> //компилирует
и не работает
alexotmp писал(а): ↑
05.03.2009 21:23
#include <QCoreApplication> //не компилирует