Content Navigation:
- What is a Failed Hard Drive & Why Need to Clone It?
- Hard Drive to SSD Cloning Failed with an Error Message
- #1. Troubleshooting: Clone a Failed Hard Drive
- #2. Troubleshooting: Cloning Process Failed
Speaking of a failed hard drive to SSD cloning, there are two cases you should think of. One is the hard drive itself is failed or damaged, and the other is you received an error message during the cloning process. In this article, we will introduce these two cases one by one and tell you how to fix the problem.
What is a Failed Hard Drive & Why Do You Need to Clone It?
A failed hard drive means when your HDD malfunctions and you can’t access the stored information even when the computer is properly configured. There are various causes that would lead to a hard disk failure. The hard drive failed reasons include human error, hardware failure, firmware corruption, media damage, heat, water damage, power issues, and mishaps.
The HDD (Hard Disk Drive) is prone to be damaged after long-term usage mainly because of its physical structure. The components of an HDD contain platters, a head, a spindle, and an actuator. The surface of the disk consists of a number of concentric rings called tracks; each of these tracks has smaller partitions called disk blocks. When an HDD is working, the platters rotate, and the electromagnetic read or write heads record data in tracks. The working process of HDD will cause the head and platter of the hard disk to gradually wear out.
When a hard disk drive failure occurs, your HDD malfunctions, and you will have trouble accessing the stored information. What’s worse, you might even not be able to boot your computer. In order to keep the stored information and system data on the hard disk, the best way you can choose is to clone the failed hard drive.
Hard Drive to SSD Cloning Failed with an Error Message? What Happened?
This part is about another case. When you clone the hard drive to SSD using software such as Macrium Reflect and Acronis, suddenly you received an error message that says «clone failed (Macrium Reflect)» or «Failed to clone the disk», and then the cloning process is stopped. The reason why the cloning process is suspended often relates to the state of your hard disk or SSD. For example, if your HDD has bad sectors or file system error, the cloning process might not be able to finish. Another case is about the partition size. When you clone from a larger HDD to a smaller SSD, part of the cloned partitions need to be resized, if the disk clone software can’t execute the resize, then you’ll see the error message.
#1. Troubleshooting: Clone a Failed Hard Drive
The core of cloning a failed hard drive to prevent data loss is you couldn’t use the common cloning method but should perform a sector-by-sector clone. That’s because most of the failed hard drives are not completely broken, there are only a few bad sectors on the hard drive. The purpose of sector-by-sector cloning is to clone as much data on each sector as possible, thereby minimizing the possibility of losing all data on a partition or disk.
The cloning software you can use is EaseUS Todo Backup, it is an all-in-one clone and backup tool you can trust. More importantly, EaseUS Todo Backup has the sector-by-sector clone function, so that you can use it to clone a failed hard drive. Here are the steps of how to use Todo Backup to clone a failed hard drive.
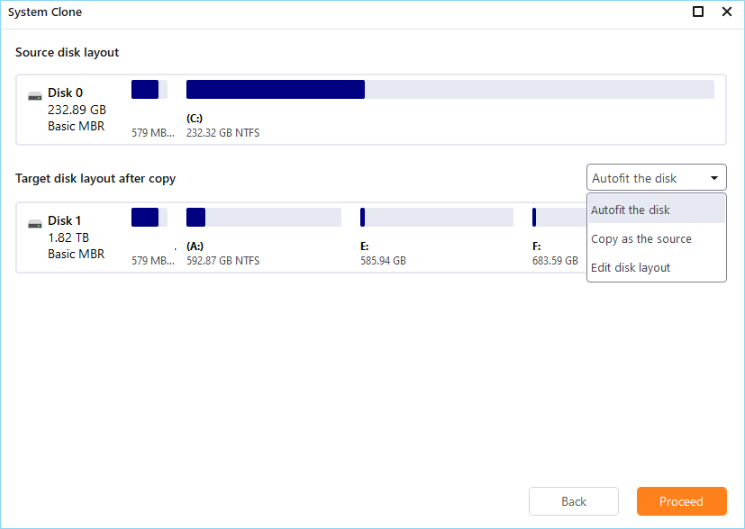
Step 1. Open EaseUS Todo Backup and click «Tools«, and then you can choose any function presented to you. Here choose Clone or System Clone as your need.

What is a Failed Hard Drive & Why Do You Need to Clone It?
A failed hard drive means when your HDD malfunctions and you can’t access the stored information even when the computer is properly configured. There are various causes that would lead to a hard disk failure. The hard drive failed reasons include human error, hardware failure, firmware corruption, media damage, heat, water damage, power issues, and mishaps.
The HDD (Hard Disk Drive) is prone to be damaged after long-term usage mainly because of its physical structure. The components of an HDD contain platters, a head, a spindle, and an actuator. The surface of the disk consists of a number of concentric rings called tracks; each of these tracks has smaller partitions called disk blocks. When an HDD is working, the platters rotate, and the electromagnetic read or write heads record data in tracks. The working process of HDD will cause the head and platter of the hard disk to gradually wear out.
When a hard disk drive failure occurs, your HDD malfunctions, and you will have trouble accessing the stored information. What’s worse, you might even not be able to boot your computer. In order to keep the stored information and system data on the hard disk, the best way you can choose is to clone the failed hard drive.
Hard Drive to SSD Cloning Failed with an Error Message? What Happened?
This part is about another case. When you clone the hard drive to SSD using software such as Macrium Reflect and Acronis, suddenly you received an error message that says «clone failed (Macrium Reflect)» or «Failed to clone the disk», and then the cloning process is stopped. The reason why the cloning process is suspended often relates to the state of your hard disk or SSD. For example, if your HDD has bad sectors or file system error, the cloning process might not be able to finish. Another case is about the partition size. When you clone from a larger HDD to a smaller SSD, part of the cloned partitions need to be resized, if the disk clone software can’t execute the resize, then you’ll see the error message.
#1. Troubleshooting: Clone a Failed Hard Drive
The core of cloning a failed hard drive to prevent data loss is you couldn’t use the common cloning method but should perform a sector-by-sector clone. That’s because most of the failed hard drives are not completely broken, there are only a few bad sectors on the hard drive. The purpose of sector-by-sector cloning is to clone as much data on each sector as possible, thereby minimizing the possibility of losing all data on a partition or disk.
The cloning software you can use is EaseUS Todo Backup, it is an all-in-one clone and backup tool you can trust. More importantly, EaseUS Todo Backup has the sector-by-sector clone function, so that you can use it to clone a failed hard drive. Here are the steps of how to use Todo Backup to clone a failed hard drive.
Step 1. Open EaseUS Todo Backup and click «Tools«, and then you can choose any function presented to you. Here choose Clone or System Clone as your need.
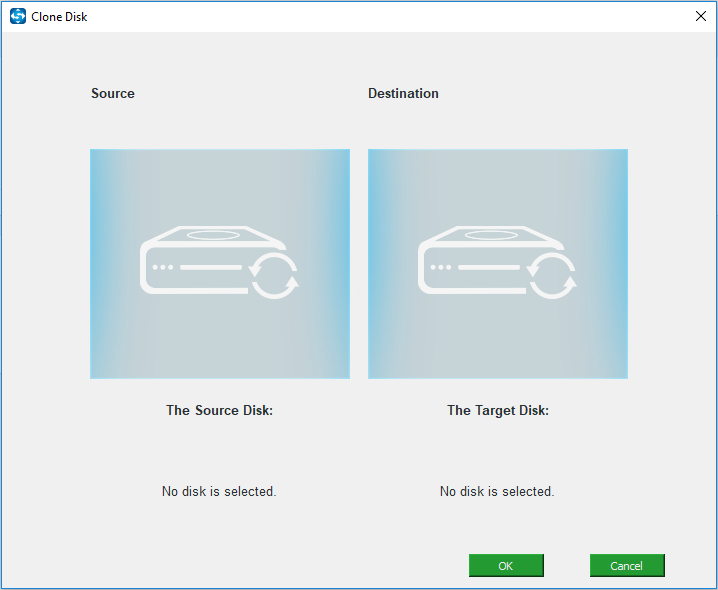
Step 2. Choose the source disk or partition as well as the target disk. (Make sure the space of the target disk is larger than that of the source disk or partition.)
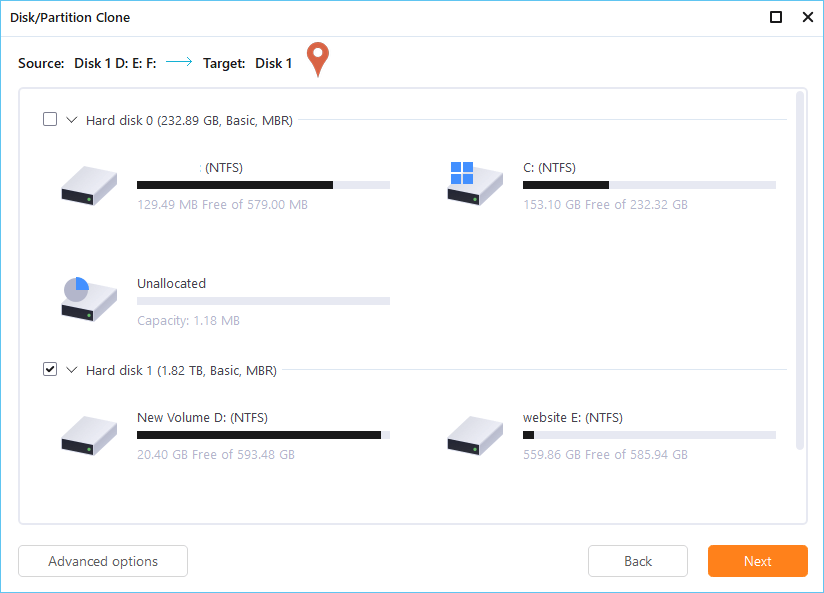
When click «Next«, you will see the warning message show as below. Make sure you are aware of the risk of cloning a hard drive, and click Continue.

When click «Next«, you will see the warning message show as below. Make sure you are aware of the risk of cloning a hard drive, and click Continue.
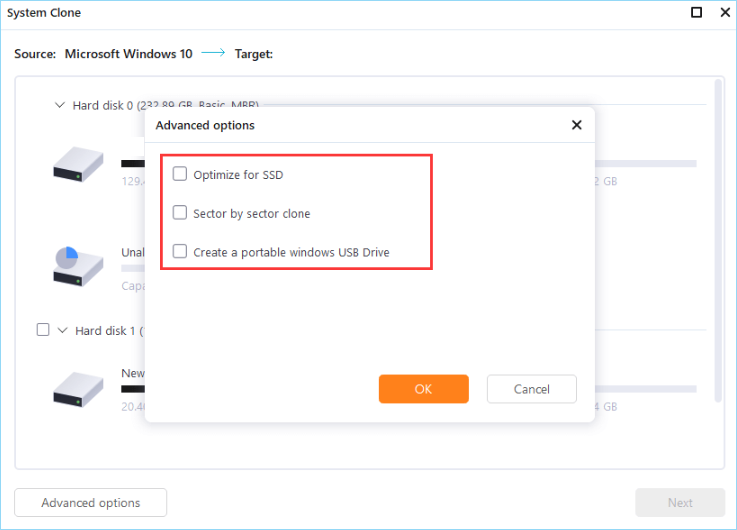
Step 3. In the advanced options, tick the Sector by sector clone option. Then the software will start a sector-level cloning. Once choose this option, the target disk will have exactly the same layout as that of the source disk.
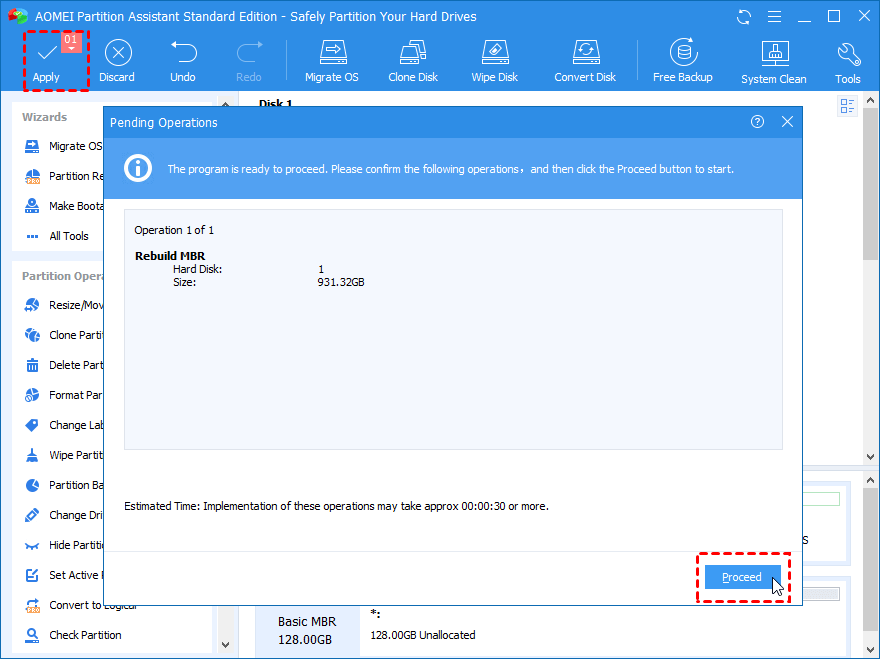
Step 4. Click «Proceed» to start cloning.
Step 4. Click «Proceed» to start cloning.
#2. Troubleshooting: Macrium Reflect/Acronis True Image Clone Failed
As mentioned above, there are several reasons the clone software failed to finish the cloning process — the source and target disks do not have equal logical sector size, the hard disk itself might be damaged, or the software can’t execute certain operations. In the following parts, check the solutions you can apply.
1. Check Hard Disk Logical Sector Size
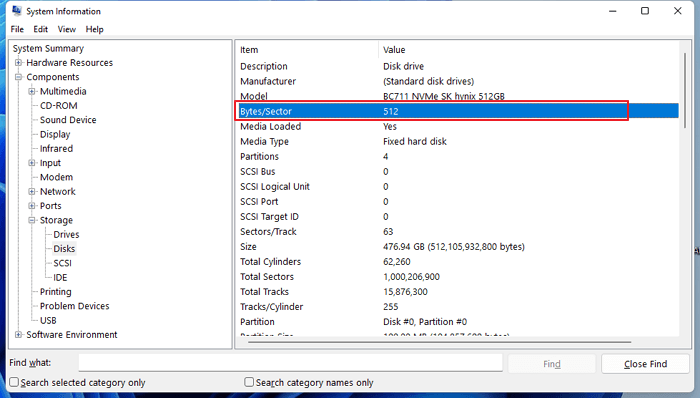
According to the support file of Acronis, you can’t clone to a disk with a different logical sector size. E.g., you can clone a 512 bytes/sector disk to 512 bytes/sector disk; you can clone a 4096 bytes/sector disk to 4096 bytes/sector disk, but you cannot clone a disk with a logical sector size of 512 bytes to disk with logical sector size 4096 bytes. Follow the steps below to see how to check the sector size of your hard disks.
Step 1. Press Win + R to open the Run box, type «msinfo32«, and press Enter to open System Information.
Step 2. Go to Components > Storage > Disks to check your desired disks.
Step 3. Bytes/Sector will show you the logical sector size of your disk. For example, as the screenshot shows below, the sector size of my disk is 512 bytes.
2. Repair Hard Disk with CHKDSK Command
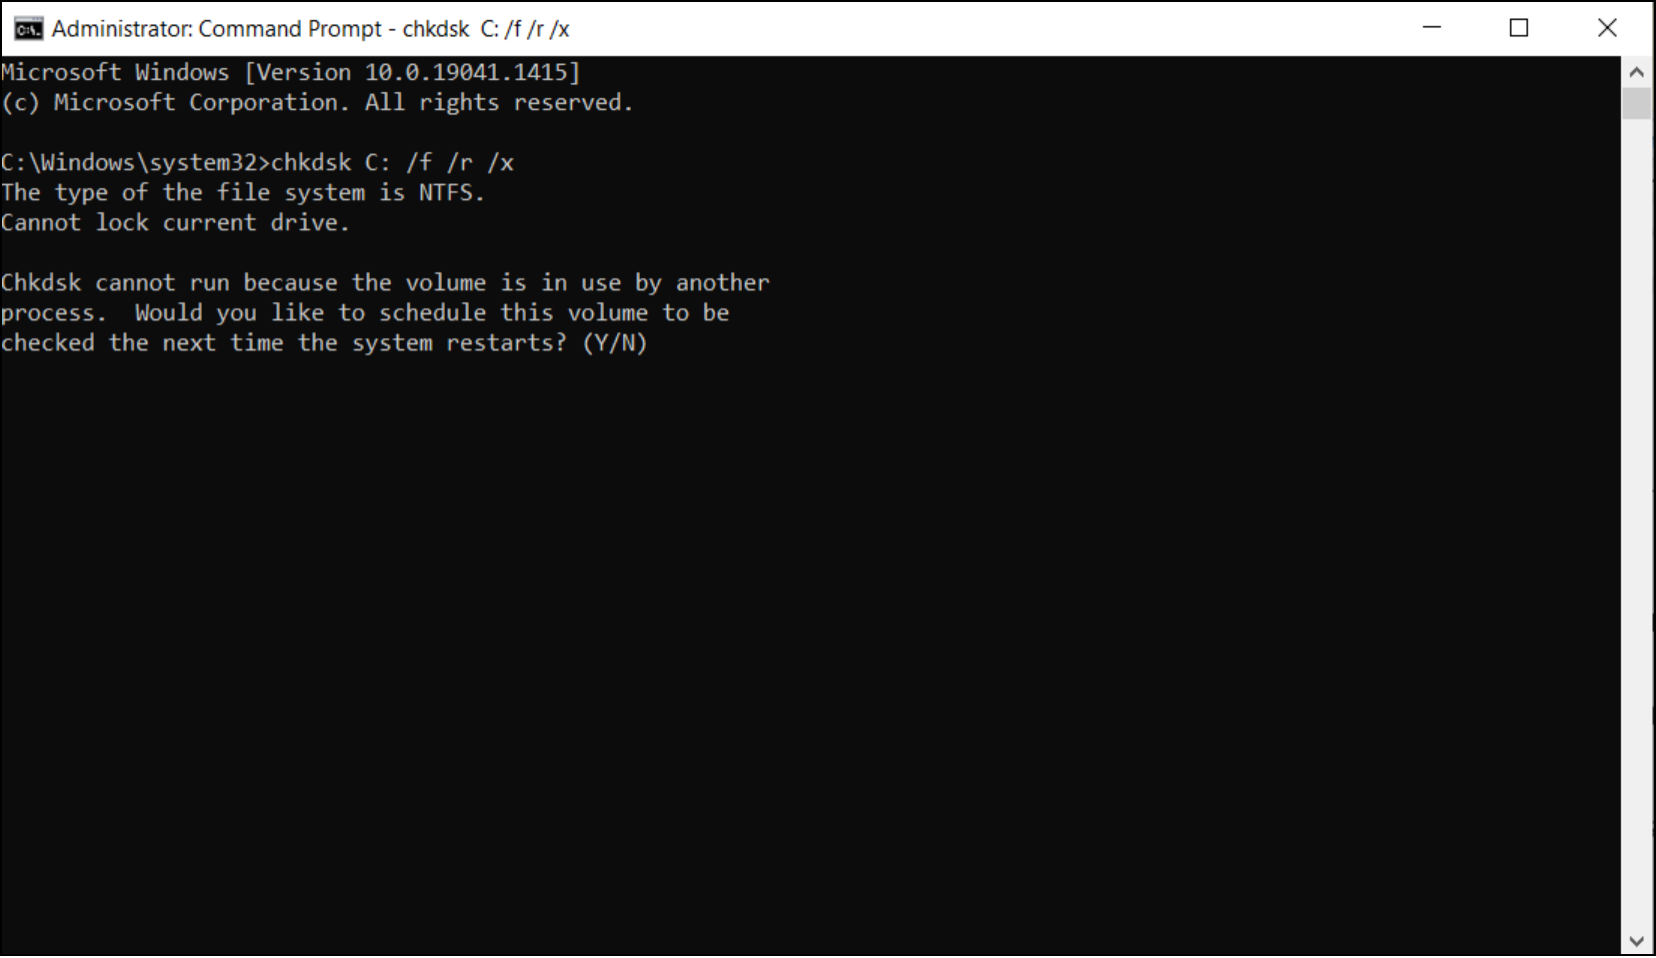
There is a Windows built-in tool that could help users quickly repair the hard disk. As you can still boot your computer, it means your disk couldn’t be badly damaged. So you can use the chkdsk command to try to repair your disk. Here are the steps.
Step 1. Press Win + R to open the Run box, type «cmd» and press Enter to open Command Prompt.
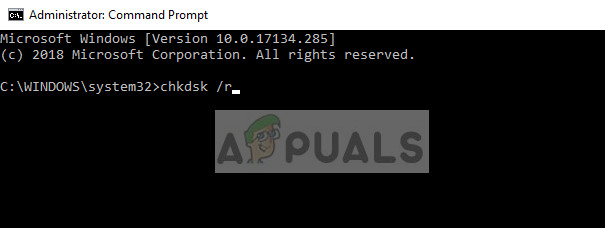
Step 2. Run Command Prompt as administrator, type the command line: chkdsk c /f /r. You can replace C with the drive letter of any other partitions.
Step 3. Press Enter and Windows would start to check and fix your disk.
2. Repair Hard Disk with CHKDSK Command
There is a Windows built-in tool that could help users quickly repair the hard disk. As you can still boot your computer, it means your disk couldn’t be badly damaged. So you can use the chkdsk command to try to repair your disk. Here are the steps.
Step 1. Press Win + R to open the Run box, type «cmd» and press Enter to open Command Prompt.
Step 2. Run Command Prompt as administrator, type the command line: chkdsk c /f /r. You can replace C with the drive letter of any other partitions.
Step 3. Press Enter and Windows would start to check and fix your disk.
After the process is finished, try to clone your disk again.
3. Change Another Cloning Software
If you’re sure that your hard disk works fine and there’s still shows a clone failed error message, you should consider changing to another tool. As recommended above, you can also take EaseUS Todo Backup as an alternative.
Below are reasons to choose EaseUS Disk cloning software as an alternative when you failed to complete disk cloning with other brands like Acronis, Macrium Reflect, and the open-source Clonezilla with an awkward user interface and wizard, which as well lacks tech support.
- A 10-year reliable brand with market domination status
- Specialized for disk clone with the ability of sector-by-sector clone on bad drives
- 24×7 online support and remote assistance from experienced IT group
- Less likely to let users make mistakes due to the simple and intuitive wizard guide
- Recommended as one of the top five hard drive cloning software by industry experts
The Bottom Line
For a failed hard drive, cloning it to another fully-functional disk could help you to transfer data from the failed hard drive to a safe location. Remember to choose the software that has the function of sector-by-sector cloning. EaseUS Todo Backup is one of the recommendations, you could also choose other software as an option.
For a failed disk cloning process, the reason for it can be unmatched logical sector size, hard drive bad sector, or cloning software crash. Check and repair your hard disk with the mentioned methods in this article. If it doesn’t work, choose an alternative.
Ошибка миграции SSD? Исправить с помощью этих 5 решений
После установки нового SSD в вашу систему, пришло время клонировать HDD на ваш SSD, чтобы в полной мере воспользоваться недавно установленным SSD. Однако иногда вы можете увидеть ошибку миграции SSD во время процесса клонирования. Это чаще всего встречается в программном обеспечении для переноса данных Samsung и твердотельных дисках Samsung.
Ошибка миграции SSD может возникать по нескольким причинам, включая проблемы с SSD и самим программным обеспечением. В этой статье мы поможем вам решить проблемы с процессом миграции SSD.
Как исправить ошибку миграции SSD
1. Изменить приложение клонирования

- Если проблема возникает при использовании программного обеспечения Samsung Data Migration, попробуйте использовать другое приложение, чтобы сделать то же самое.
- Двумя лучшими программами для клонирования являются Macrium Reflect и Acronis Disk Cloning.
- Бесплатная версия Macrium Reflect позволяет клонировать данные со старого диска на новый SSD.
- Загрузите Macrium Reflect с официального сайта и приступайте к процессу клонирования.
- Это должно помочь вам устранить ошибку миграции SSD на компьютере с Windows.
Как перенести Windows 10, 8.1 на SSD: простое руководство
2. Отключите исходный диск после клонирования

- Если ошибка возникает после успешного клонирования диска, проверьте, не отсоединили ли вы исходный диск от порта USB.
- По окончании клонирования выключите и отсоедините старый диск и дайте системе попытаться загрузиться с нового диска.
- Сохранение старого диска может создать проблемы во время процесса загрузки.
3. Отключить режим гибернации
- Нажмите Windows Key + R, чтобы открыть Run.
- Введите cmd, щелкните правой кнопкой мыши на опции командной строки и выберите Запуск от имени администратора.

- В командной строке введите следующую команду и нажмите Enter.
powercfg / спящий режим выключен - Закройте окно командной строки и попробуйте снова клонировать диск.

4. Отключить файлы подкачки
- Откройте проводник.
- На левой панели щелкните правой кнопкой мыши на этом ПК и выберите Свойства.

- На левой панели нажмите « Дополнительные параметры системы ».
- В окне « Свойства системы» перейдите на вкладку « Дополнительно ».
- Нажмите кнопку « Настройки» в разделе « Производительность ».

- Снова нажмите вкладку « Дополнительно » в параметрах производительности.
- В разделе «Виртуальная память» нажмите кнопку « Изменить» .

- Снимите флажок « Автоматически управлять размером файла подкачки для всех дисков ».
- Нажмите кнопку ОК, чтобы сохранить изменения.
- Закройте окно «Свойства системы» и попробуйте снова клонировать диск.


5. Другие решения, чтобы попробовать

- Удалите все ненужные данные и программное обеспечение, находящееся на исходном жестком диске.
- Запустите системную утилиту Check Disk, чтобы проверить исходный жесткий диск и Samsung SSD на наличие поврежденных секторов.
- Убедитесь, что вы расшифровали жесткий диск источника, если он зашифрован BitLock. Вы можете зашифровать жесткий диск из Панели управления> Система и безопасность> Шифрование диска BitLocker.
- Временно отключите все антивирусные и другие программы безопасности.
Ошибка миграции SSD обычно вызывается общими проблемами, такими как несовместимость программного обеспечения и т. Д. Следуйте советам по устранению неполадок в этой статье, чтобы исправить проблемы миграции с вашим SSD.
СВЯЗАННЫЕ ИСТОРИИ, КОТОРЫЕ ВЫ МОЖЕТЕ КАК:
- Как переместить Windows 10 на внешний жесткий диск [ПОЛНОЕ РУКОВОДСТВО]
- 10 лучших портативных SSD с поддержкой USB type-C
- Теперь вы можете отключить USB-устройства, не нажимая Safely Remove Hardware
На чтение 6 мин. Просмотров 5.1k. Опубликовано 28.04.2021
Macrium Reflect – это программа для создания образов дисков и резервного копирования для Microsoft Windows, которая создает резервные копии и образы с помощью службы Microsoft Volume Shadow Copy Service. Он выполняет резервное копирование и репликацию (клонирование) целых разделов на другой диск хранения одним нажатием кнопки.

Сообщение об ошибке « Macrium Reflect clone failed » – очень распространенная ошибка, которая возникает, в частности, при клонировании жесткого диска на твердотельный накопитель. Причины этого сообщения об ошибке очень разнообразны и варьируются от проблем с антивирусом до поврежденных секторов на диске.
Содержание
- Что вызывает ошибку «Ошибка клонирования Macrium»?
- Как исправить ошибку Macrium. ?
- Проверить диск на наличие плохих секторов
- Очистить целевой диск
- Попробуйте отключить антивирус
- Создайте образ вместо клонирования
- Игнорировать плохие сектора
- Проверьте подключение диска
- Попробуйте стороннее устройство Альтернативы
Как упоминалось ранее, это сообщение об ошибке может появиться по разным причинам. Некоторые из них перечислены ниже:
- соединение между диском и компьютером неправильно. Плохой соединительный кабель может нарушить процесс клонирования устройства хранения.
- На устройстве хранения есть поврежденные сектора . Программное обеспечение обычно выдает сообщение об ошибке при обнаружении поврежденных секторов во время клонирования.
- антивирус не позволяет Macrium клонировать диск. Это очень распространенная практика, когда антивирусное программное обеспечение блокирует любую попытку доступа к диску в течение длительного периода времени.
Как исправить ошибку Macrium. ?
Пользователи, столкнувшиеся с этой проблемой, сообщают, что они получают различные сообщения об ошибках, такие как «доступ запрещен» или «невозможно сопоставить раздел». Это сообщение об ошибке обычно также сопровождается цифрами ошибки, такими как «ошибка 9», «ошибка 0» и т. Д. В редких случаях, если разрешения установлены неправильно, может появиться сообщение «ошибка чтения 13 отказано в разрешении 32» или « write failed 22 invalid argument ‘вместе с исходной строкой ошибки.
Решения, перечисленные ниже, направлены на все эти проблемы. Убедитесь, что у вас есть активное подключение к Интернету и вы вошли в систему как администратор.
Проверить диск на наличие плохих секторов
Плохой сектор – это сектор на устройстве хранения, который недоступен для любого программного обеспечения из-за необратимого повреждения. Плохие сектора постоянно присутствуют на устройстве хранения. Чтобы противостоять этому, операционная система помечает эти сектора, чтобы они могли пропустить их при обычных операциях. Если у вас есть поврежденные сектора, вам следует запустить утилиту chkdsk, чтобы убедиться, что они не нарушают процесс клонирования.
- Нажмите Windows + S, введите « командная строка »в диалоговом окне, щелкните приложение правой кнопкой мыши и выберите« Запуск от имени администратора ».
- После входа с повышенными привилегиями в командной строке выполните следующую команду:
chkdsk/r

- Если вам будет предложено проверить после перезагрузки, нажмите ‘y’ и перезагрузите компьютер.. После перезапуска chkdsk уже будет запланирован операционной системой, и будет выполнено сканирование. Наберитесь терпения и позвольте процессу.
- После того, как утилита просканирует и удалит поврежденные сектора из обычного доступа, попробуйте снова клонировать устройство хранения.
Очистить целевой диск
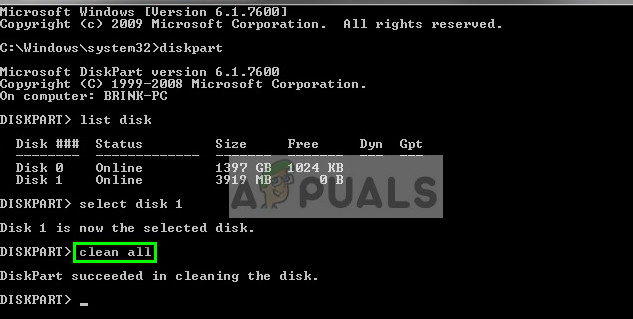
Если на целевом диске повреждена файловая система, Macrium не сможет клонировать его. Поврежденные файловые системы тоже не редкость и обычно возникают из-за логических ошибок. Мы можем использовать утилиту diskpart, чтобы очистить структуру целевого диска и посмотреть, решит ли это проблему.
- Нажмите Windows + R, введите « командная строка »в диалоговом окне, щелкните приложение правой кнопкой мыши и выберите« Запуск от имени администратора ».
- В командной строке выполните следующие команды по порядку.
diskpartlist diskselect disk [номер диска целевого диска] очистить все

- Перезагрузите компьютер после восстановления файловой структуры, убедитесь, что оба диска подключены правильно, и попробуйте клонировать снова.
Попробуйте отключить антивирус
Как упоминалось ранее, антивирусное программное обеспечение блокирует доступ к любой программе, которую они находят с подозрением на заражение компьютерной системы. Если процесс клонирования заблокирован антивирусом, вы можете получить сообщение об ошибке «Доступ запрещен» вместе с кодом ошибки.
Чтобы противостоять этой ситуации, вы можете отключить антивирус полностью, а затем повторите попытку клонирования. Если на вашем рабочем столе установлено несколько антивирусных программ, сделайте то же самое для всех. Если вы абсолютно уверены, что никакой антивирус не контролирует ваш компьютер, попробуйте снова запустить процесс клонирования.
Создайте образ вместо клонирования
Если у вас возникли проблемы с клонированием нашего жесткого диска, вы можете попробовать создать его образ. Между этими двумя процессами есть небольшие различия. Клонирование диска – это процедура копирования всего содержимого одного диска на другой, которое включает всю информацию, необходимую для загрузки операционной системы с диска. Он создает индивидуальную копию жесткого диска, и эти жесткие диски могут быть заменены друг на друга после процесса клонирования.
Создание образа диска – это процесс создания резервной копии содержимого жесткого диска. Образ диска – это тип файлов хранилища, который содержит все данные и информацию, необходимую для загрузки операционной системы. Однако для работы жесткого диска необходимо применить образ диска.
Здесь мы опишем процедуру создания образа вашего диска вместо клонирования .
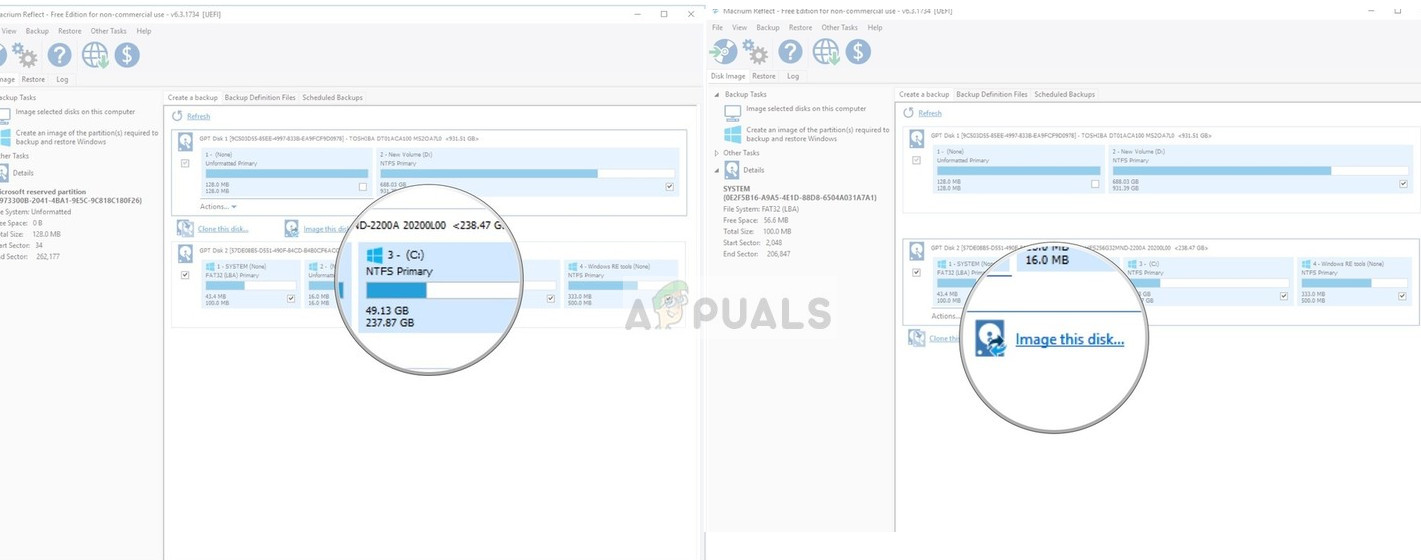
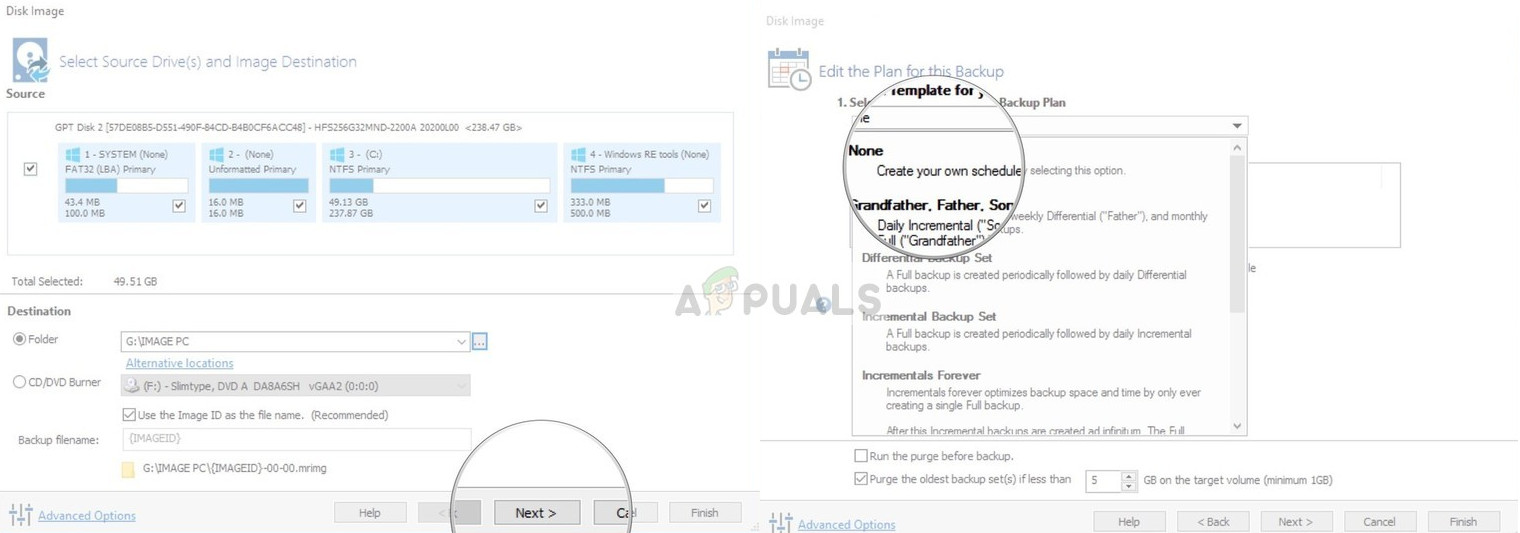
- Откройте Macrium и дайте ему заполнить все подключенные диски.. Затем выберите диск , для которого вы хотите создать изображение , и нажмите Изображение этого диска внизу.

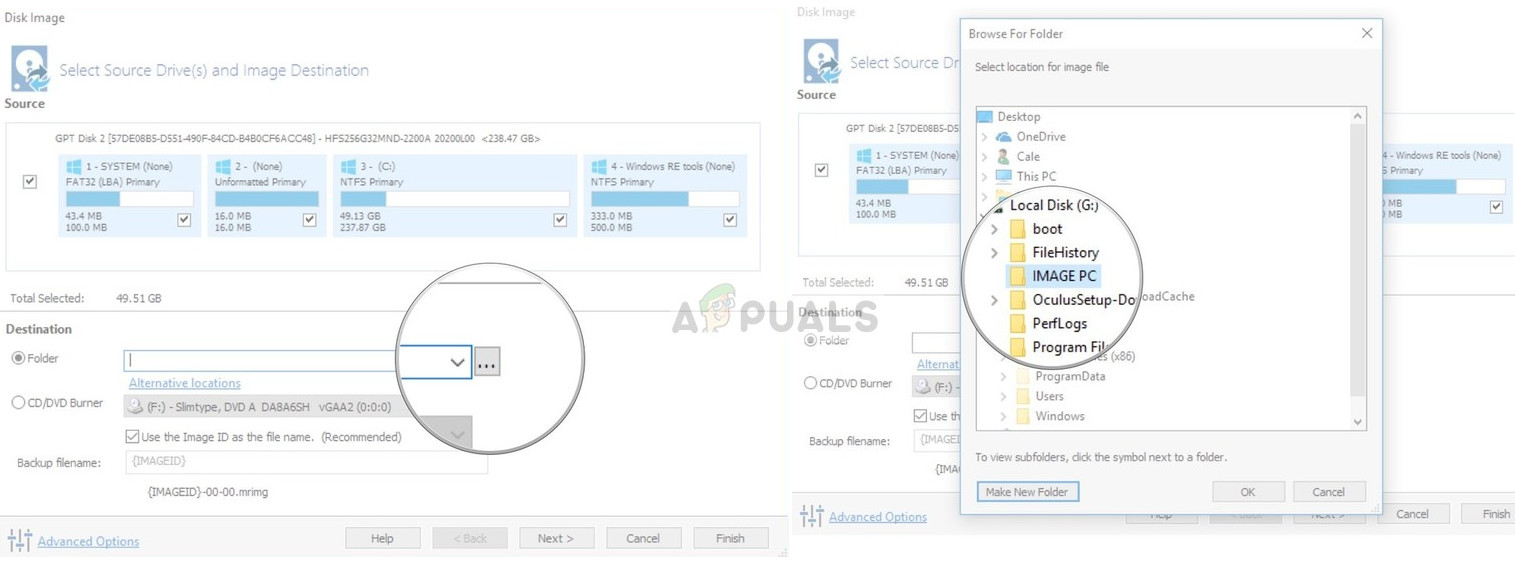
- Теперь нажмите кнопку обзора и выберите место , где вы хотите создать изображение. После выбора местоположения нажмите OK .

- Выбрать далее. Теперь вы можете выбрать шаблон для своей резервной копии. Если вы не знаете, что это, нажмите

- Нажмите Готово , и начнется создание изображения. Терпеливо дождитесь завершения процесса.
Игнорировать плохие сектора
Если вы получаете такое же сообщение об ошибке, когда Создавая образ, вы можете попробовать игнорировать битые секторы при создании образа. Обычно, следуя решению 1, все сбойные секторы удаляются из логического хранилища. Но если есть какие-то проблемные, которые все еще вызывают проблемы, это может решить проблему.
- Откройте Macrium и нажмите Advanced в верхней части экрана.
- Теперь установите флажок Игнорировать плохие секторы при создании изображений .

- Нажмите OK , чтобы сохранить изменения и выйти. Теперь попробуйте снова создать образ.
Проверьте подключение диска
Перед тем, как начать использовать сторонние альтернативы , вы должны проверить правильность физического соединения между обоими вашими дисками. Если вы подключаете твердотельный накопитель через порт USB, попробуйте подключить его к материнской плате и повторите попытку клонирования.

Измените соединение SATA для жесткого диска и, если возможно, попробуйте заменить кабель. Кабели можно легко повредить, и из-за них процесс клонирования может быть нарушен. Убедившись, что оба , целевой и целевой диски подключены правильно, переходите к процессу клонирования.
Попробуйте стороннее устройство Альтернативы
Если все вышеперечисленные методы не работают для вас, вы можете рассмотреть возможность использования другого альтернативного программного обеспечения. Согласно нашему опросу, было множество случаев, когда Macrium выдавал ошибку, тогда как другое программное обеспечение, такое как AOMEI , справлялось с этой задачей отлично.

Для информации пользователя мы рекомендуем программное обеспечение AOMEI . Вы можете скачать программный модуль с официального сайта и попробовать клонировать с него свой диск..
Примечание. Appuals не имеет отношения к какому-либо программному обеспечению. Все рекомендованное программное обеспечение предназначено исключительно для информации читателя.
Macrium Reflect is a very useful disk cloning and imaging tool. However, some users claim that they encounter Macrium Reflect clone failed issue when cloning disk. How to fix it? Don’t be panic. This article will show you how to fix Macrium Reflect clone failed issue with top 5 fixes.
You may come across Macrium Reflect clone failed error message when cloning your HDD to an SSD or a new HDD. When it happens, what should you do? The first step is to learn the reasons that give rise to Macrium Reflect clone failed. After learning the reasons, you can follow the solutions in this article to fix the error efficiently.
What Is Macrium Reflect
Some users don’t know what Macrium Reflect is. Actually it is a backup tool for Microsoft Windows developed by Paramount Software UK Ltd in 2006. It creates disk images and file backup archives with the use of Microsoft Volume Shadow Copy Service.
Macrium Reflect can clone one disk onto another, backup whole partitions or individual files and folders, which is a very convenient disk cloning utility. However, some users report that they encounter Macrium Reflect clone failed error when they clone hard drive with the backup software Macrium Reflect.
How to fix Macrium Reflect clone failed issue? Do you know the reasons that lead to Macrium Reflect clone failed? Here I summarize some reasons for Macrium Reflect clone failed error. You may have a look.
Reasons for Macrium Reflect Clone Failed Issue
Macrium Reflect clone failed problem could occur from time to time. There are many reasons that could lead to Macrium Reflect clone failed issue. Here are some typical reasons for your reference.
1. The cable connection is not proper:
If the cable between your device and computer is not connected properly, you may fail in cloning disk with the disk cloning software Macrium Reflect. So, make sure the proper cable connection between the drive and the computer.
2. The storage device has bad sectors:
You may encounter Macrium Reflect clone failed error when there are bad sectors on the source disk.
3. Antivirus software is enabled:
The antivirus software blocks the process to clone system files due to security reasons, leading to Macrium Reflect clone failed issue.
4. The disk has file system error:
When the destination or target disk has corrupted file system, you may receive Macrium Reflect clone failed error message.
Solution 1. Run CHKDSK Utility
Sometimes the Macrium Reflect clone failed issue is caused by bad sectors on hard disk. You can run CHKDSK Windows 10 to check and fix hard drive errors and bad sectors that may cause Macrium Reflect clone failed issue.
Well, how to run CHKDSK Windows 10 to scan and fix hard drive errors? If you don’t know, you can follow the steps as below to run CHKDSK utility in Windows 10 now.
Step 1. Launch the Command Prompt
- Input Command Prompt in the Windows 10 Cortana search box.
- Click the best match and right-click it to Run as administrator.
Step 2. Run CHKDSK
- Input chkdsk *: /f /r (* represents the letter of your source drive) and press Enter.
- This command will scan the source disk and repair all the errors, bad sectors or corruption it finds.
- When the process is done, you can input exit and hit Enter to close the command prompt window.
After that, you can run the software to clone your disk and see if the Macrium Reflect clone failed issue has been solved. If you still encounter Macrium Reflect clone failed error message, you have no choice but to the rest solutions.
Solution 2. Clean the target disk
If the target or destination disk has corrupted file system, it may also lead to Macrium Reflect free clone failed issue. In this way, you can clean the destination disk before cloning.
Step 1. Run Diskpart Windows 10
You can launch Diskpart via the following two ways.
- Right-click Windows 10 Start menu and choose Run. Then type diskpart in the pop-up Run window.
- Input diskpart in the Windows search box and clickthe best match
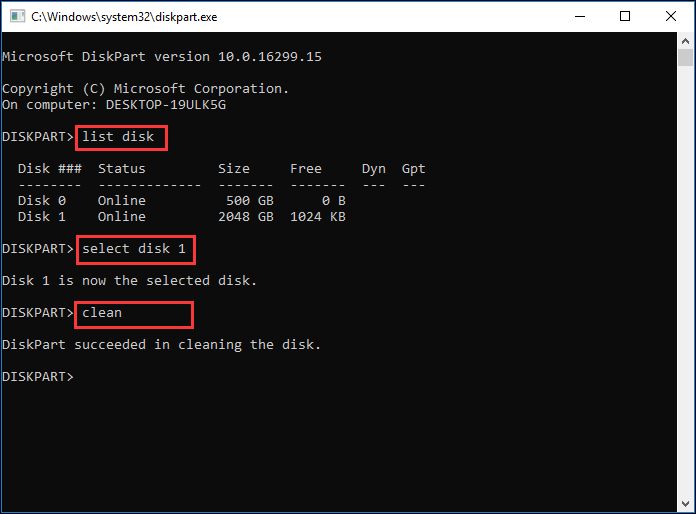
Step 2. Use Diskpart to Clean Disk
- Input list disk to show all the disks connected to your computer and hit Enter.
- Input select disk * (* represents disk number of your target disk) to select the destination hard drive. And then hit Enter.
- Input clean and hit Enter to remove all the data on the target disk.
After the disk is cleaned, you can restart your computer and clone disk with Macrium Reflect. Make sure that both the drives are connected properly and try cloning again.
Solution 3. Disable Antivirus Software
The Macrium Reflect clone failed issue may be caused by antivirus software. If the antivirus software on your computer is enabled, it will prevent access to any program they find likely to infect a computer system. This could be the reasons for Macrium Reflect clone failed error message.
In this case, you can disable the antivirus software installed on your computer temporarily and then clone your drive again. After you successfully clone hard drive with Macrium Reflect, you can enable the antivirus software to protect computer from virus attack.
If you still encounter Macrium Reflect clone failed issue, try the next method.
Solution 4. Make an Image Instead of Cloning
If you meet the Macrium Reflect failed to clone issue when cloning, you can make a disk image with Macrium Reflect.
A disk image is a type of storage files. It is a backup copy of the contents of a hard drive and it contains all the data and the necessary information to boot into the operating system.
You can backup hard drive to an external hard drive and then restore the image to your new hard drive or SSD. In this way, the system and other data will all be copied to the new disk as well. When you come across Macrium Reflect clone failed, you can make a disk image instead of cloning.
Solution 5. Try Macrium Reflect Alternative Backup Software
MiniTool Partition Wizard
If the above solutions cannot help you fix Macrium Reflect clone failed issue, you can try using other disk clone software to copy disk. MiniTool Partition Wizard is the best Macrium Reflect free alternative software.
MiniTool Partition Wizard is an all-in-one partition manager & disk cloning utility, which can help you perform many partition and disk management operations like resize partition, extend partition, convert FAT to NTFS, convert MBR to GPT, migrate OS to SSD/HD, copy disk, check file system and so on.
You can try using the drive cloning software when you encounter Macrium Reflect clone failed error during the cloning process. If you have never used the software and don’t know how to get and utilize the software, don’t worry. The following contents will show you how to copy disk with MiniTool Partition Wizard.
Before you start, connect a hard disk, for example, SSD or an external hard drive, to your computer.
Step 1. The first thing is to get the Macrium Reflect free alternative MiniTool Partition Wizard Free Edition by clicking the following button. Install the drive cloning and backup software on your computer. Then launch it to get the main interface.
Free Download
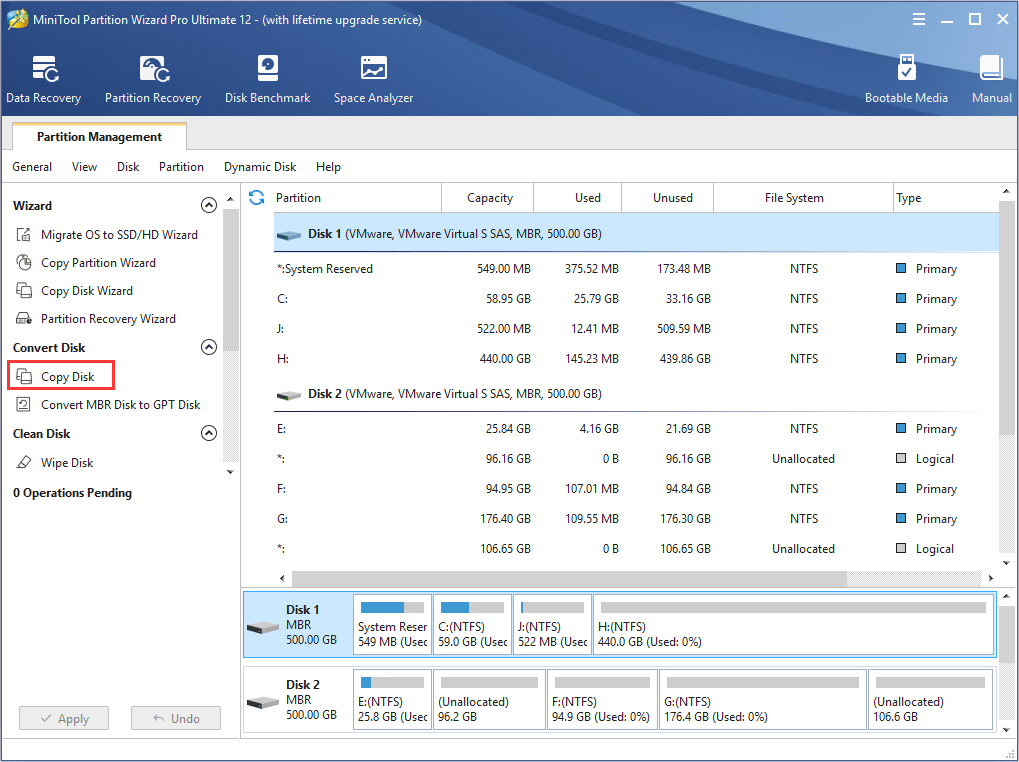
Step 2. On the main interface, select the disk you need to copy and choose Copy Disk from the left action panel. To clone system disk, MiniTool Partition Wizard Pro Ultimate is recommended.
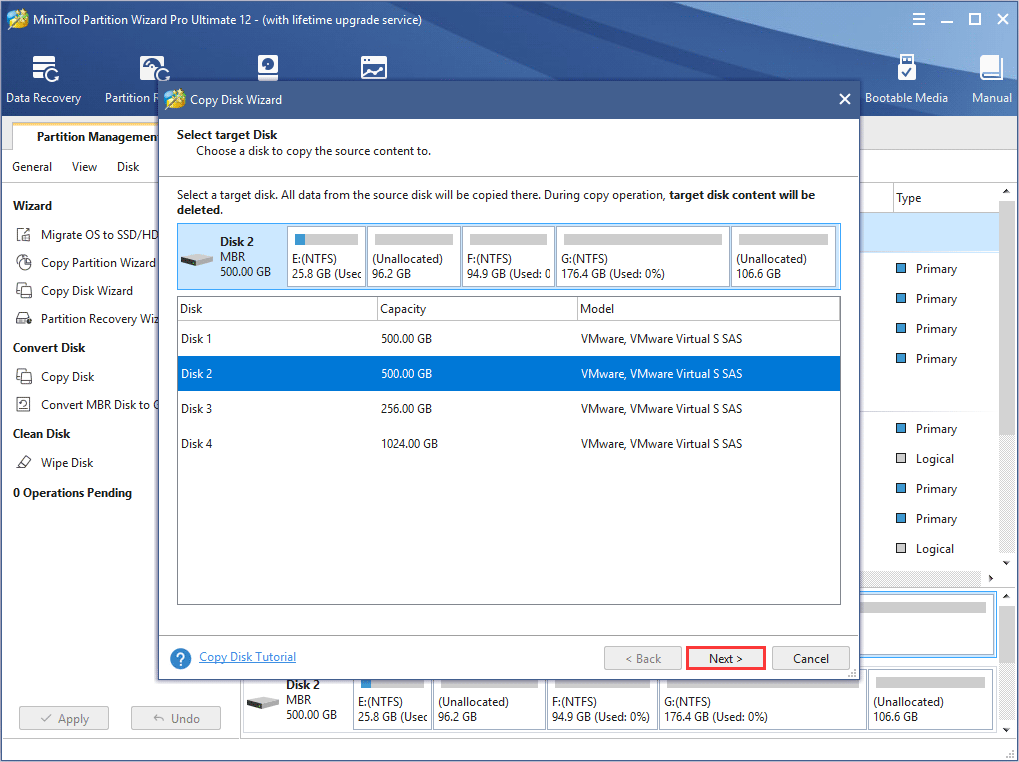
Step 3. Select a target disk from the disk list and click Next. When you click Next, it will remind you that all the data on the disk will be destroyed. Make sure there is no important file on the destination disk. Then click Yes to continue.
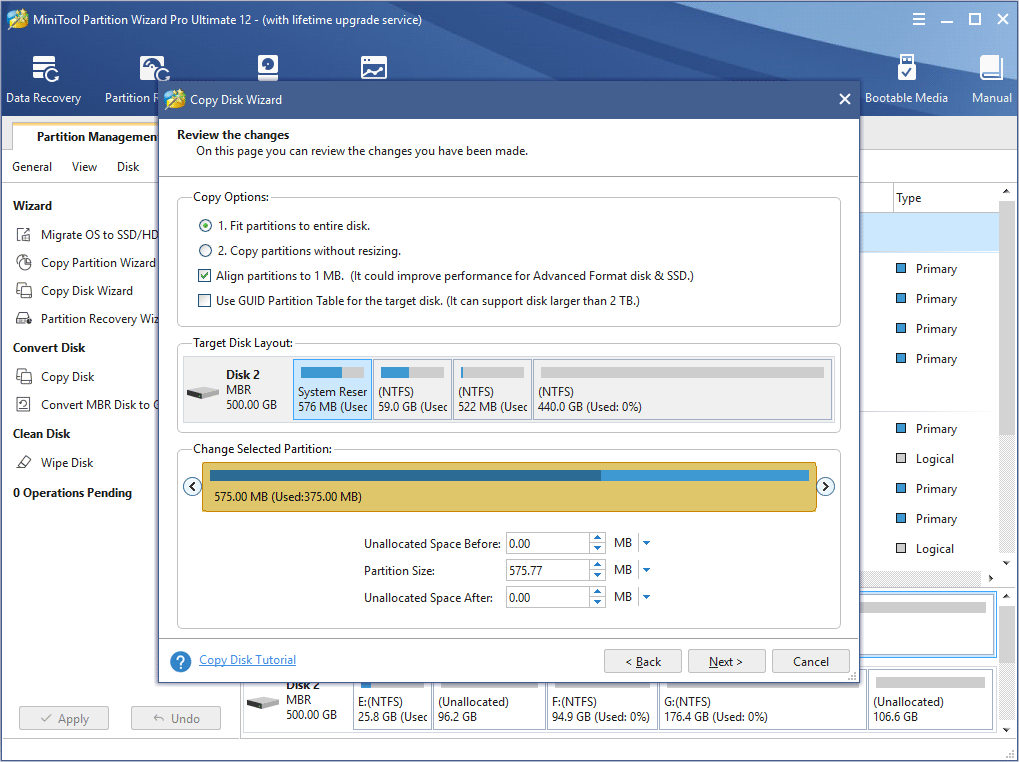
Step 4. You may change the copy options by yourself. Fit partition to entire disk means the selected disk will be copied to target disk with the whole disk filled proportionally. Copy partitions without resize means the selected disk will be copied with their original sizes.
Step 5. Then MiniTool Partition Wizard Free Edition will tell you how to boot from the new disk. Read the note and click Finish to go on.
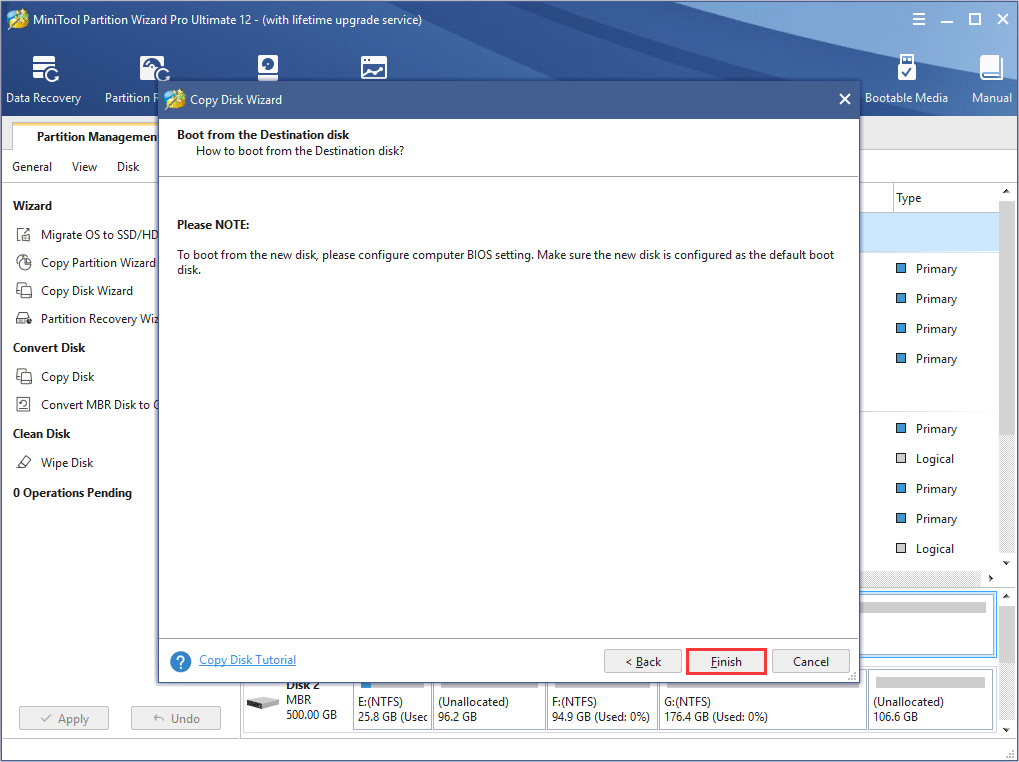
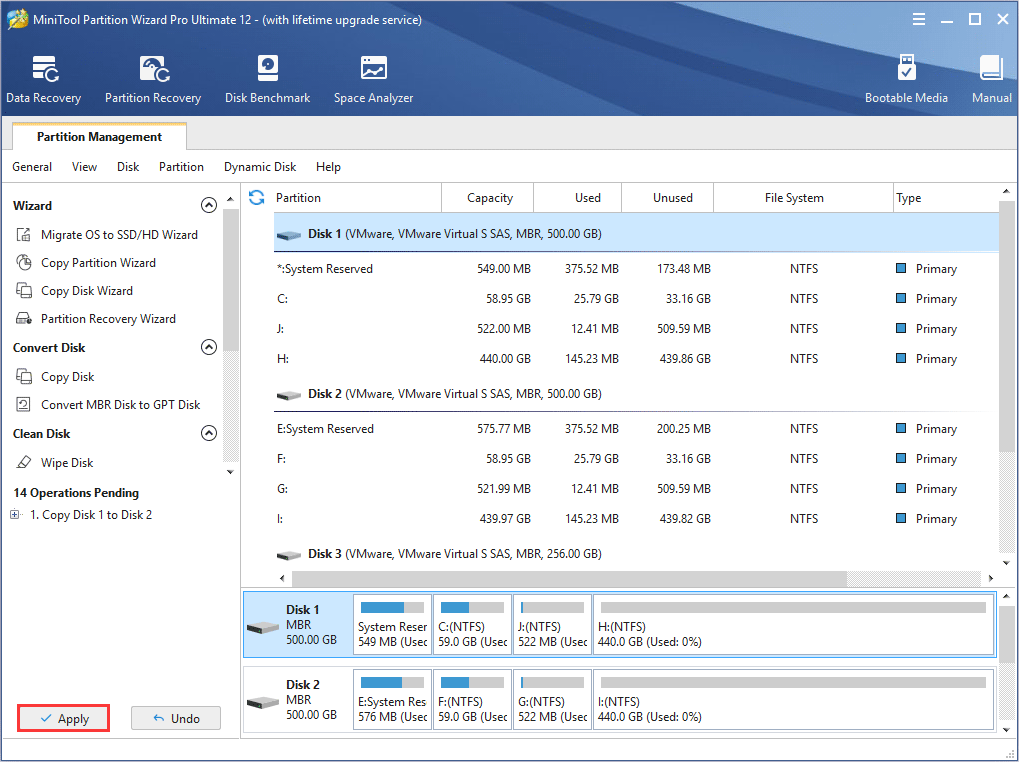
Step 6. Then click Apply to allow the pending operations and click Yes to allow changes.
This is how to copy disk with the Macrium Reflect free alterative MiniTool Partition Wizard. If you just want to copy a partition, you can choose Copy Partition function to copy a specific partition by yourself.
Actually, apart from this drive cloning utility, you can choose the professional backup software MiniTool ShadowMaker, which has the same magic like MiniTool Partition Wizard.
With the Macrium Reflect free alternative MiniTool Partition Wizard Free Edition, I successfully cloned hard drive without a hassle. This disk cloning software is worth trying if Macrium Reflect clone failed.Click to Tweet
MiniTool ShadowMaker
MiniTool ShadowMaker is a professional backup tool. It can help you backup files and folders, disks and partitions in just a few clicks. With this backup software, you are able to clone system disk or data disk on your computer without a hassle. When you encounter Macrium Reflect clone failed issue, you can try using MiniTool ShadowMaker to clone disk.
Here are detailed steps to clone disk with MiniTool ShadowMaker.
Step 1. Download MiniTool ShadowMaker by clicking the following button. Install it on your computer.
Free Download
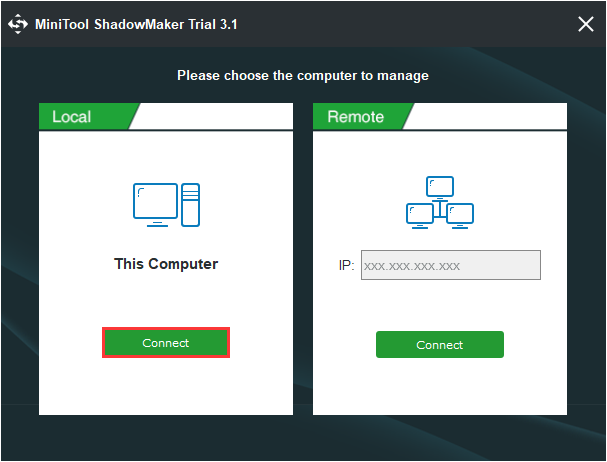
Step 2. Launch the Macrium Reflect free alternative MiniTool ShadowMaker. Click Keep Trial and choose Connect in This Computer to continue.
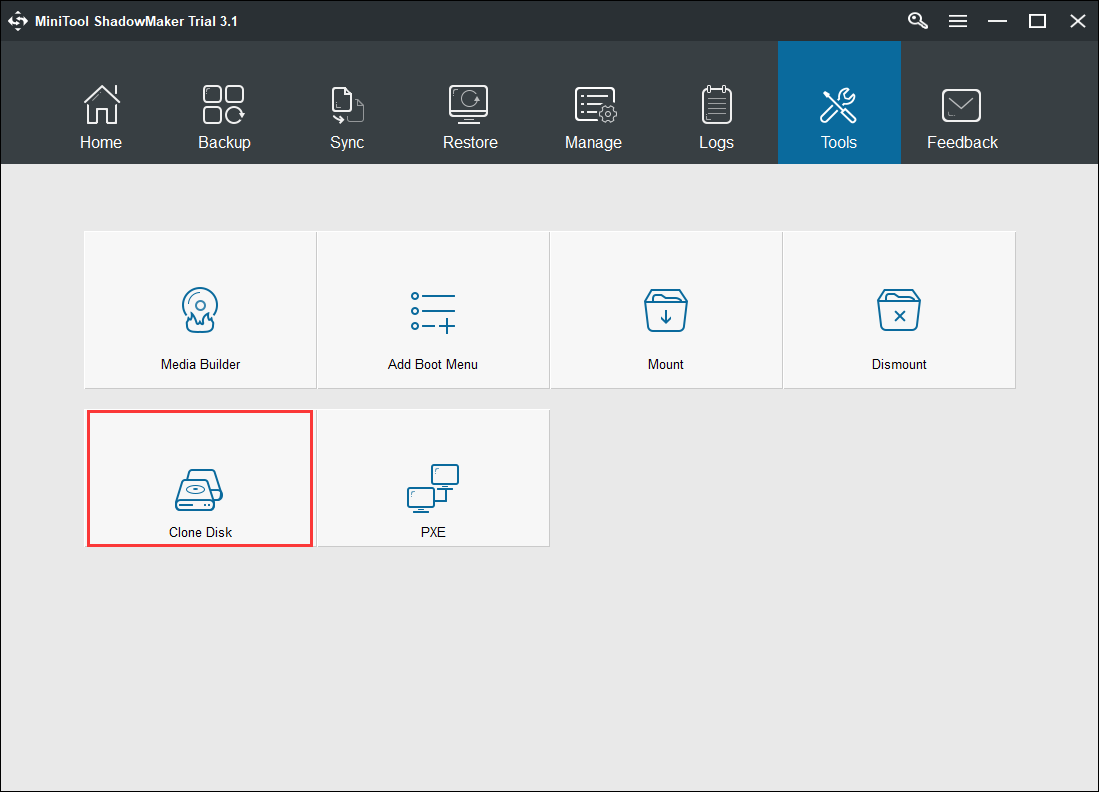
Step 3. When you get the main interface, go to the Tools page directly and choose Clone Disk to clone your disk.
Step 4. On this page, click The Source Disk and The Target Disk modules respectively to choose the hard drive you want to backup and choose the destination disk to save the copy.
Step 5. After selecting the source disk and target disk, you can click OK to continue. When you click OK, a pop-up window will remind you that data on target disk will be destroyed. So, backup important files on target disk in advance.

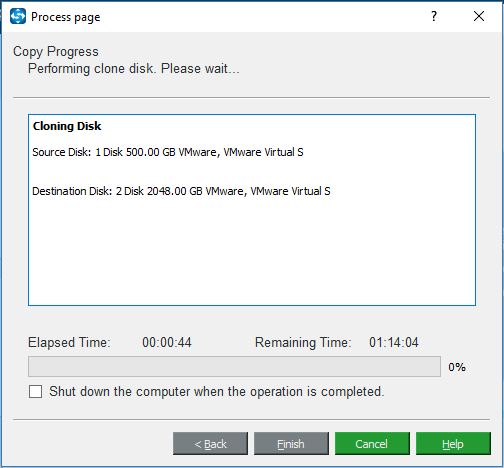
Step 6. Then the Macrium Reflect free alternative software will start cloning your source disk to target disk. The time for disk cloning depends on how many files you have stored on the source disk. Please wait patiently.
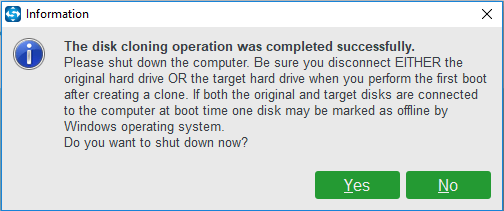
Step 7. When disk clone is finished, you will receive a message which tells you that the source disk and the target disk have the same signature and one disk will be marked as offline if both of them are connected to your computer.
Remove either of them when the disk clone process is finished. However, if you need to boot your computer from the target disk, you should go to the BIOS settings to change the boot order.
Now you have learned how to clone disk with the two Macrium Reflect free alternatives. If you encounter Macrium Reflect clone failed error or other Macrium Reflect errors like Macrium Reflect error 0 or Macrium Reflect error 9, you can try using the MiniTool Partition Wizard Free Edition and MiniTool ShadowMaker to clone disk and make backups.
Free Download
Free Download
Wrapping things Up
After reading this article, you should know how to resolve the Macrium Reflect clone failed error with the above 5 solutions. Even if you cannot fix Macrium Reflect clone failed error, you can try using the two awesome Macrium Reflect free alternatives.
If you have any question about how to fix Macrium Reflect clone failed issue or you have any other good drive cloning and backup software to recommend, you can leave a message on the following comment zone and we will respond as soon as possible. If you need any help when using MiniTool software, you can contact us via [email protected].
Macrium Reflect is a very useful disk cloning and imaging tool. However, some users claim that they encounter Macrium Reflect clone failed issue when cloning disk. How to fix it? Don’t be panic. This article will show you how to fix Macrium Reflect clone failed issue with top 5 fixes.
You may come across Macrium Reflect clone failed error message when cloning your HDD to an SSD or a new HDD. When it happens, what should you do? The first step is to learn the reasons that give rise to Macrium Reflect clone failed. After learning the reasons, you can follow the solutions in this article to fix the error efficiently.
What Is Macrium Reflect
Some users don’t know what Macrium Reflect is. Actually it is a backup tool for Microsoft Windows developed by Paramount Software UK Ltd in 2006. It creates disk images and file backup archives with the use of Microsoft Volume Shadow Copy Service.
Macrium Reflect can clone one disk onto another, backup whole partitions or individual files and folders, which is a very convenient disk cloning utility. However, some users report that they encounter Macrium Reflect clone failed error when they clone hard drive with the backup software Macrium Reflect.
How to fix Macrium Reflect clone failed issue? Do you know the reasons that lead to Macrium Reflect clone failed? Here I summarize some reasons for Macrium Reflect clone failed error. You may have a look.
Reasons for Macrium Reflect Clone Failed Issue
Macrium Reflect clone failed problem could occur from time to time. There are many reasons that could lead to Macrium Reflect clone failed issue. Here are some typical reasons for your reference.
1. The cable connection is not proper:
If the cable between your device and computer is not connected properly, you may fail in cloning disk with the disk cloning software Macrium Reflect. So, make sure the proper cable connection between the drive and the computer.
2. The storage device has bad sectors:
You may encounter Macrium Reflect clone failed error when there are bad sectors on the source disk.
3. Antivirus software is enabled:
The antivirus software blocks the process to clone system files due to security reasons, leading to Macrium Reflect clone failed issue.
4. The disk has file system error:
When the destination or target disk has corrupted file system, you may receive Macrium Reflect clone failed error message.
Solution 1. Run CHKDSK Utility
Sometimes the Macrium Reflect clone failed issue is caused by bad sectors on hard disk. You can run CHKDSK Windows 10 to check and fix hard drive errors and bad sectors that may cause Macrium Reflect clone failed issue.
Well, how to run CHKDSK Windows 10 to scan and fix hard drive errors? If you don’t know, you can follow the steps as below to run CHKDSK utility in Windows 10 now.
Step 1. Launch the Command Prompt
- Input Command Prompt in the Windows 10 Cortana search box.
- Click the best match and right-click it to Run as administrator.
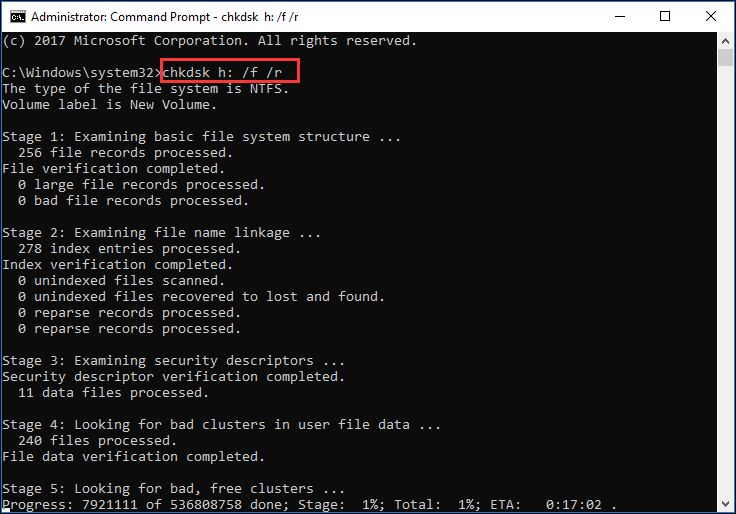
Step 2. Run CHKDSK
- Input chkdsk *: /f /r (* represents the letter of your source drive) and press Enter.
- This command will scan the source disk and repair all the errors, bad sectors or corruption it finds.
- When the process is done, you can input exit and hit Enter to close the command prompt window.
After that, you can run the software to clone your disk and see if the Macrium Reflect clone failed issue has been solved. If you still encounter Macrium Reflect clone failed error message, you have no choice but to the rest solutions.
Solution 2. Clean the target disk
If the target or destination disk has corrupted file system, it may also lead to Macrium Reflect free clone failed issue. In this way, you can clean the destination disk before cloning.
Step 1. Run Diskpart Windows 10
You can launch Diskpart via the following two ways.
- Right-click Windows 10 Start menu and choose Run. Then type diskpart in the pop-up Run window.
- Input diskpart in the Windows search box and clickthe best match
Step 2. Use Diskpart to Clean Disk
- Input list disk to show all the disks connected to your computer and hit Enter.
- Input select disk * (* represents disk number of your target disk) to select the destination hard drive. And then hit Enter.
- Input clean and hit Enter to remove all the data on the target disk.
After the disk is cleaned, you can restart your computer and clone disk with Macrium Reflect. Make sure that both the drives are connected properly and try cloning again.
Solution 3. Disable Antivirus Software
The Macrium Reflect clone failed issue may be caused by antivirus software. If the antivirus software on your computer is enabled, it will prevent access to any program they find likely to infect a computer system. This could be the reasons for Macrium Reflect clone failed error message.
In this case, you can disable the antivirus software installed on your computer temporarily and then clone your drive again. After you successfully clone hard drive with Macrium Reflect, you can enable the antivirus software to protect computer from virus attack.
If you still encounter Macrium Reflect clone failed issue, try the next method.
Solution 4. Make an Image Instead of Cloning
If you meet the Macrium Reflect failed to clone issue when cloning, you can make a disk image with Macrium Reflect.
A disk image is a type of storage files. It is a backup copy of the contents of a hard drive and it contains all the data and the necessary information to boot into the operating system.
You can backup hard drive to an external hard drive and then restore the image to your new hard drive or SSD. In this way, the system and other data will all be copied to the new disk as well. When you come across Macrium Reflect clone failed, you can make a disk image instead of cloning.
Solution 5. Try Macrium Reflect Alternative Backup Software
MiniTool Partition Wizard
If the above solutions cannot help you fix Macrium Reflect clone failed issue, you can try using other disk clone software to copy disk. MiniTool Partition Wizard is the best Macrium Reflect free alternative software.
MiniTool Partition Wizard is an all-in-one partition manager & disk cloning utility, which can help you perform many partition and disk management operations like resize partition, extend partition, convert FAT to NTFS, convert MBR to GPT, migrate OS to SSD/HD, copy disk, check file system and so on.
You can try using the drive cloning software when you encounter Macrium Reflect clone failed error during the cloning process. If you have never used the software and don’t know how to get and utilize the software, don’t worry. The following contents will show you how to copy disk with MiniTool Partition Wizard.
Before you start, connect a hard disk, for example, SSD or an external hard drive, to your computer.
Step 1. The first thing is to get the Macrium Reflect free alternative MiniTool Partition Wizard Free Edition by clicking the following button. Install the drive cloning and backup software on your computer. Then launch it to get the main interface.
Free Download
Step 2. On the main interface, select the disk you need to copy and choose Copy Disk from the left action panel. To clone system disk, MiniTool Partition Wizard Pro Ultimate is recommended.
Step 3. Select a target disk from the disk list and click Next. When you click Next, it will remind you that all the data on the disk will be destroyed. Make sure there is no important file on the destination disk. Then click Yes to continue.
Step 4. You may change the copy options by yourself. Fit partition to entire disk means the selected disk will be copied to target disk with the whole disk filled proportionally. Copy partitions without resize means the selected disk will be copied with their original sizes.
Step 5. Then MiniTool Partition Wizard Free Edition will tell you how to boot from the new disk. Read the note and click Finish to go on.
Step 6. Then click Apply to allow the pending operations and click Yes to allow changes.
This is how to copy disk with the Macrium Reflect free alterative MiniTool Partition Wizard. If you just want to copy a partition, you can choose Copy Partition function to copy a specific partition by yourself.
Actually, apart from this drive cloning utility, you can choose the professional backup software MiniTool ShadowMaker, which has the same magic like MiniTool Partition Wizard.
With the Macrium Reflect free alternative MiniTool Partition Wizard Free Edition, I successfully cloned hard drive without a hassle. This disk cloning software is worth trying if Macrium Reflect clone failed.Click to Tweet
MiniTool ShadowMaker
MiniTool ShadowMaker is a professional backup tool. It can help you backup files and folders, disks and partitions in just a few clicks. With this backup software, you are able to clone system disk or data disk on your computer without a hassle. When you encounter Macrium Reflect clone failed issue, you can try using MiniTool ShadowMaker to clone disk.
Here are detailed steps to clone disk with MiniTool ShadowMaker.
Step 1. Download MiniTool ShadowMaker by clicking the following button. Install it on your computer.
Free Download
Step 2. Launch the Macrium Reflect free alternative MiniTool ShadowMaker. Click Keep Trial and choose Connect in This Computer to continue.
Step 3. When you get the main interface, go to the Tools page directly and choose Clone Disk to clone your disk.
Step 4. On this page, click The Source Disk and The Target Disk modules respectively to choose the hard drive you want to backup and choose the destination disk to save the copy.
Step 5. After selecting the source disk and target disk, you can click OK to continue. When you click OK, a pop-up window will remind you that data on target disk will be destroyed. So, backup important files on target disk in advance.
Step 6. Then the Macrium Reflect free alternative software will start cloning your source disk to target disk. The time for disk cloning depends on how many files you have stored on the source disk. Please wait patiently.
Step 7. When disk clone is finished, you will receive a message which tells you that the source disk and the target disk have the same signature and one disk will be marked as offline if both of them are connected to your computer.
Remove either of them when the disk clone process is finished. However, if you need to boot your computer from the target disk, you should go to the BIOS settings to change the boot order.
Now you have learned how to clone disk with the two Macrium Reflect free alternatives. If you encounter Macrium Reflect clone failed error or other Macrium Reflect errors like Macrium Reflect error 0 or Macrium Reflect error 9, you can try using the MiniTool Partition Wizard Free Edition and MiniTool ShadowMaker to clone disk and make backups.
Free Download
Free Download
Wrapping things Up
After reading this article, you should know how to resolve the Macrium Reflect clone failed error with the above 5 solutions. Even if you cannot fix Macrium Reflect clone failed error, you can try using the two awesome Macrium Reflect free alternatives.
If you have any question about how to fix Macrium Reflect clone failed issue or you have any other good drive cloning and backup software to recommend, you can leave a message on the following comment zone and we will respond as soon as possible. If you need any help when using MiniTool software, you can contact us via [email protected].
|
Message |
|
|
Keith Weisshar |
Keith Weisshar posted 25 May 2022 9:41 AM HOT |
|
Advanced Member
Group: Forum Members |
Why am I getting Clone failed — Error 0 when I try to clone my 32GB bootable USB flash drive to my blank 16GB USB flash drive even though it only has 5GB of files? I was able to image the original USB flash drive and then restore it another USB flash drive without issues. My Windows 11 retail USB drive is 32GB read-only drive and my target drive is a standard 16GB flash drive. I was trying to make a backup copy of the original Windows 11 installation media but the clone failed but image and restore works fine. Edited |
|
|
|
|
dbminter |
dbminter posted 25 May 2022 1:11 PM |
|
Macrium Evangelist
Group: Forum Members |
There appear to be some lingering issues with Clone operations here and there lately. I’ve never used a Clone operation, so I can’t say anything on what you can do. Does the same thing happen if you make an image of the flash drive to a file first and then restore that backup image to the new flash drive? What make and model of flash drive is the destination device? How old is it? And it may be another case where the flash drive does some silly configurations where Reflect chokes on it. I had one where I had to send in my flash drive to Macrium and they discovered the issue was the hardware configuration of the flash drive. Turned out to be a very rare use case that I just happened to stumble across. |
|
|
|
|
Keith Weisshar |
Keith Weisshar posted 25 May 2022 4:11 PM |
|
Advanced Member
Group: Forum Members |
It only happens if I try to clone a larger USB flash drive to a smaller USB flash drive. It doesn’t happen if image to a file and then restore that backup to a new flash drive. The source drive is a brand new read-only 32GB Windows 11 USB drive inside the Windows 11 Pro retail box that I purchased from Amazon. The target drive is a 16GB Kanguru FlashBlu 3.0 USB drive. The used data is about 5GB. Edited |
|
|
|
|
dbminter |
dbminter posted 25 May 2022 4:26 PM |
|
Macrium Evangelist
Group: Forum Members |
I asked about how hold the target flash drive was because some older flash drives cause errors with certain restore operations in Reflect. Is the Kanguru flash drive a newer one or older? Seems the problem has to do with resizing images on the target restore. I came across a similar issue recently. Reflect only failed to properly write to the flash drive when the image had to be resized down to fit into the smaller space. As long as there was sufficient space on the target to write all of the data, of course. Writing a 512 GB flash drive’s contents to a 256 GB flash drive caused the problem. (The total written contents were under 256 GB.) When writing the 512 GB image to a 512 GB flash drive, it worked fine. If that’s the case here, you will probably need to open a support ticket or someone from Macrium may chime in here. |
|
|
|
|
Keith Weisshar |
Keith Weisshar posted 25 May 2022 4:33 PM |
|
Advanced Member
Group: Forum Members |
Older but I was able to clone the 16GB Kanguru drive to a 64GB Sandisk Ultra drive without any errors. The Clone failed — Error 0 occurs as soon as it finished checking the file system and starts processing volume. My Macrium support expired on May 18, 2022. Edited |
|
|
|
|
dbminter |
dbminter posted 25 May 2022 4:48 PM |
|
Macrium Evangelist
Group: Forum Members |
Generally, if it’s a reproduceable issue and Macrium can also reproduce it, they will still accept your tech support request. It’s technically a bug report at that stage, so Macrium will work with users to fix it. So, it may be best to see if Macrium asks you to submit a support ticket. |
|
|
|
|
Pim |
Pim posted 25 May 2022 7:16 PM |
|
Advanced Member
Group: Forum Members |
I have been working with support for over 4 months to solve an issue I have with cloning since upgrading from v7 to v8. When I clone a drive to another drive and one or more of the partitions of the source drive does not have a drive letter assigned the cloning process will fail with the error «Clone failed — Error 0 — Read failed — 21 — Device not ready. Error reading volume bitmap — Error code = 1. Please run ‘chkdsk : /r» right at the moment the cloning of the first partition without a drive letter on the source starts. At first Macrium could not reproduce it and I could only reproduce it on my own system, but I finally managed to prepare a VM that consistently had this error on several drives. Sometimes cloning would work, but after a reboot it would not anymore. I sent them my VM as well as an image of my system. Support has tried hard, but they could not find a cause and thus could not solve it. Edited |
|
|
|
|
Keith Weisshar |
Keith Weisshar posted 25 May 2022 8:41 PM |
|
Advanced Member
Group: Forum Members |
My support ticket number is 209691, please reply to this ticket. There is nothing in red after Clone failed — Error 0 in the final clone wizard. Edited |
|
|
|
|
iwj2017 |
iwj2017 posted 27 May 2022 1:38 AM |
|
New Member
Group: Forum Members |
I have had this issue a couple of times (again this morning when trying a clone) — couple of things to check — have you run a chkdsk on the source drive with the /r /v paramaters the second thing can you create a backup of the drive or does it error like it does with a clone? |
|
|
|
|
Keith Weisshar |
Keith Weisshar posted 27 May 2022 9:39 PM |
|
Advanced Member
Group: Forum Members |
Backup works, only cloning from larger to smaller drive fails. Cloning from smaller to larger works. There are no details after Clone 0 failed — Error 0. Edited |
|
|


Счет ноутбуков пересаженных с HDD на SSD перевалил за несколько десятков у меня уже. При этом вроде как занимаюсь этой фигней только для друзей.
Для переноса давно подсел на macrium — всегда давала стабильный положительный результат. Но в последний раз столкнулся с ошибкой — сбой клонирования ошибка 0 read failed 23.
При этом путь как правило всегда был приблизительно один — сначала чищу от хлама, потом проверка целостности ОС и тест диска. Никаких ошибок ни chkdsk ни sfc не выдавали.
Я уж испугался сначала, что новый SSD попался глючный, поставил Crystal Disk Info и ахнул — оказалось HDD у ноута начал сыпаться и все ошибки прут оттуда.
Можно конечно было забить на это все — воткнуть чистый диск, накатить винду, полдня обновлять все и ставить драйвера, но пошел другим путем — загрузился с LiveCD и натравил на диск Victoria HDD.
Запустил полную проверку c исправлением (remap) и вуаля — после исправлений диск стал читабельным для macrium.
ОС перелетела, все тесты после этого проведены, все работает. Софт, драйвера и обновления с данными на месте. Так что chkdsk от Микрософт можно доверять, если только диск не поплыл.
Ошибка миграции SSD? Исправить с помощью этих 5 решений
После установки нового SSD в вашу систему, пришло время клонировать HDD на ваш SSD, чтобы в полной мере воспользоваться недавно установленным SSD. Однако иногда вы можете увидеть ошибку миграции SSD во время процесса клонирования. Это чаще всего встречается в программном обеспечении для переноса данных Samsung и твердотельных дисках Samsung.
Ошибка миграции SSD может возникать по нескольким причинам, включая проблемы с SSD и самим программным обеспечением. В этой статье мы поможем вам решить проблемы с процессом миграции SSD.
Как исправить ошибку миграции SSD
1. Изменить приложение клонирования
- Если проблема возникает при использовании программного обеспечения Samsung Data Migration, попробуйте использовать другое приложение, чтобы сделать то же самое.
- Двумя лучшими программами для клонирования являются Macrium Reflect и Acronis Disk Cloning.
- Бесплатная версия Macrium Reflect позволяет клонировать данные со старого диска на новый SSD.
- Загрузите Macrium Reflect с официального сайта и приступайте к процессу клонирования.
- Это должно помочь вам устранить ошибку миграции SSD на компьютере с Windows.
Как перенести Windows 10, 8.1 на SSD: простое руководство
2. Отключите исходный диск после клонирования
- Если ошибка возникает после успешного клонирования диска, проверьте, не отсоединили ли вы исходный диск от порта USB.
- По окончании клонирования выключите и отсоедините старый диск и дайте системе попытаться загрузиться с нового диска.
- Сохранение старого диска может создать проблемы во время процесса загрузки.
3. Отключить режим гибернации
- Нажмите Windows Key + R, чтобы открыть Run.
- Введите cmd, щелкните правой кнопкой мыши на опции командной строки и выберите Запуск от имени администратора.
- В командной строке введите следующую команду и нажмите Enter.
powercfg / спящий режим выключен - Закройте окно командной строки и попробуйте снова клонировать диск.
4. Отключить файлы подкачки
- Откройте проводник.
- На левой панели щелкните правой кнопкой мыши на этом ПК и выберите Свойства.
- На левой панели нажмите « Дополнительные параметры системы ».
- В окне « Свойства системы» перейдите на вкладку « Дополнительно ».
- Нажмите кнопку « Настройки» в разделе « Производительность ».
- Снова нажмите вкладку « Дополнительно » в параметрах производительности.
- В разделе «Виртуальная память» нажмите кнопку « Изменить» .
- Снимите флажок « Автоматически управлять размером файла подкачки для всех дисков ».
- Нажмите кнопку ОК, чтобы сохранить изменения.
- Закройте окно «Свойства системы» и попробуйте снова клонировать диск.
5. Другие решения, чтобы попробовать
- Удалите все ненужные данные и программное обеспечение, находящееся на исходном жестком диске.
- Запустите системную утилиту Check Disk, чтобы проверить исходный жесткий диск и Samsung SSD на наличие поврежденных секторов.
- Убедитесь, что вы расшифровали жесткий диск источника, если он зашифрован BitLock. Вы можете зашифровать жесткий диск из Панели управления> Система и безопасность> Шифрование диска BitLocker.
- Временно отключите все антивирусные и другие программы безопасности.
Ошибка миграции SSD обычно вызывается общими проблемами, такими как несовместимость программного обеспечения и т. Д. Следуйте советам по устранению неполадок в этой статье, чтобы исправить проблемы миграции с вашим SSD.
СВЯЗАННЫЕ ИСТОРИИ, КОТОРЫЕ ВЫ МОЖЕТЕ КАК:
- Как переместить Windows 10 на внешний жесткий диск [ПОЛНОЕ РУКОВОДСТВО]
- 10 лучших портативных SSD с поддержкой USB type-C
- Теперь вы можете отключить USB-устройства, не нажимая Safely Remove Hardware
Макриум Рефлект — известная утилита для клонирования и создания образов дисков, но недавно несколько пользователей сообщили, что их экраны отображают ошибку VSS 0x8004231f, когда они пытаются создать полную и дифференциальную резервную копию с помощью Macrium Reflect.
Мы изучили эту проблему и обнаружили, что она может быть вызвана рядом факторов, таких как:
- Идентификатор VSS отключен — если служба отключена, вы не сможете создавать моментальные снимки или выполнять какие-либо соответствующие функции.
- Недостаточно места для хранения. Если для VSS выделено мало места для хранения, он не сможет создавать моментальные снимки сверх определенного предела.
Ниже перечислены несколько шагов по устранению неполадок, которые вы можете выполнить, чтобы решить проблему в кратчайшие сроки. Давайте приступим к делу:
Проверьте, запущена ли служба теневого копирования томов
Если на вашем ПК отключена служба теневого копирования томов (VSS), вы не сможете выполнять соответствующие операции и столкнетесь с такими проблемами, как ошибка VSS 0x8004231f. Вот почему важно убедиться, что служба запущена, прежде чем продолжить успешное создание теневых копий.
Вот как вы можете проверить, работает ли VSS:
- Введите services в области поиска на панели задач и нажмите «Открыть».
- В окне «Службы» найдите и дважды щелкните «Теневое копирование тома». Служба теневого копирования томов Windows
- Теперь проверьте статус службы. Если служба остановлена, нажмите кнопку «Пуск». Если он уже запущен, нажмите кнопку «Стоп», а затем нажмите «Пуск», чтобы перезапустить его.Запустить службу теневого копирования томов
- После этого нажмите «Применить», а затем нажмите «ОК», чтобы сохранить изменения.
Увеличьте пространство для теневого хранилища
Другая причина, по которой вы можете столкнуться с ошибкой VSS 0x8004231f, заключается в том, что вам может не хватать места для хранения шоу для создания новых копий.
Лучшее решение в этом случае — сначала проверить свое теневое хранилище, а затем при необходимости выделить больше места.
Вот что вам нужно сделать:
- Нажмите одновременно клавиши Windows + R на клавиатуре, чтобы открыть диалоговое окно «Выполнить».
- В текстовом поле диалогового окна введите cmd и нажмите клавиши Ctrl + Shift + Enter, чтобы запустить командную строку с повышенными правами.
- В окне командной строки введите команду, указанную ниже, и нажмите Enter, чтобы выполнить ее. Он отобразит ваше пространство для хранения теней.
vssadmin список теневых хранилищЗапустить команду Volume Shadow Storage
- Затем введите следующую команду, чтобы увеличить объем памяти. Вы можете заменить 10 ГБ объемом пространства, которое вы хотите увеличить.
vssadmin изменить размер теневого хранилища /For=C: /On=C: /MaxSize=10GB
- После этого попробуйте повторить действие, которое изначально вызвало проблему. Надеемся, что увеличение пространства исправит ошибку VSS 0x8004231f.
Windows автоматически создает точки восстановления во время выполнения рабочих задач для резервного копирования важных данных. Точки восстановления создают образы конфигурации системы, которые помогают восстановить систему на более ранний момент времени, но эти моментальные снимки занимают место на диске.
Если вы не можете увеличить объем теневого хранилища по какой-либо причине, попробуйте удалить старые снимки VSS.
- Нажмите одновременно клавиши Windows + R на клавиатуре, чтобы открыть диалоговое окно «Выполнить».
- В текстовом поле диалогового окна введите cmd и нажмите клавиши Ctrl + Shift + Enter, чтобы запустить командную строку с повышенными правами.
- В окне командной строки введите команду, указанную ниже, и нажмите Enter, чтобы выполнить ее. Он отобразит ваше пространство для хранения теней.
vssadmin удалить тени /всеУдалить старый снимок VSS из Windows
- Если вы хотите увидеть список снимков, выполните следующую команду:
vssadmin список тенейПосмотреть список снимков
- Чтобы удалить по идентификатору моментального снимка, выполните следующую команду. Вы можете заменить идентификатор идентификатором моментального снимка, который хотите удалить.
vssadmin удалить тени/ тень={56d1345d-6160-439b-82ec-1c2ab5a72eed
После выполнения команды снова выполните нужную задачу и проверьте, сталкиваетесь ли вы с ошибкой VSS 0x8004231f.
Macrium Reflect is a disk imaging and backup software for Microsoft Windows which creates backups and images using the service Microsoft Volume Shadow Copy Service. It backups and replicates (clones) entire partitions to another storage drive with a click of a button.
The error message “Macrium reflect clone failed” is a very common error which occurs particularly when you are cloning your HDD to an SSD. The reasons for this error message are very diverse and range from antivirus issues to bad sectors in the drive.
What causes the error ‘Macrium reflect clone failed’?
Like mentioned before, this error message can happen due to a number of different reasons. Some of them are listed below:
- The connection between the drive and the computer is not proper. A bad connecting cable can disrupt your process of cloning the storage device.
- The storage device has bad sectors. The software usually returns an error message when it encounters bad sectors while cloning.
- The antivirus software is not letting Macrium clone the drive. This is a very common practice for antivirus software to block any attempt to access the drive for prolonged periods of time.
Users facing this issue report that they get a variety of error messages such as ‘access denied’ or ‘unable to match partition’. This error message is usually also accompanied by error digits such as ‘error 9’, ‘error 0’ etc. In rare cases, if the permissions are not set correctly, you might experience the message ‘read failed 13 permission denied 32’ or ‘write failed 22 invalid argument’ along with the original error string.
The solutions listed below target all these issues. Make sure that you have an active internet connection and are logged in as an administrator.
Check the Disk for Bad Sectors
A bad sector is a sector in a storage device which is inaccessible by any software because of permanent damage. Bad sectors are present in storage device all the time. To counter these, the operating system flags these sectors so it can skip them in normal operations. If you have any bad sectors, you should run the ‘chkdsk’ utility to make sure they don’t disrupt the cloning process.
- Press Windows + S, type “command prompt” in the dialogue box, right-click on the application and select “Run as administrator”.
- Once in elevated command prompt, execute the following command:
chkdsk /r
- If you are prompted to check after a restart, press ‘y’ and restart your computer. Upon the restart, chkdsk will already be scheduled by the operating system a scan will be done. Be patient and let the process.
- After the utility has scanned and removed bad sectors from normal access, try cloning the storage device again.
Clean up Destination Disk
If your destination drive has a corrupt file system, Macrium will be unable to clone into it. Corrupt file systems are not rare either and are usually induced because of logical errors. We can use the utility ‘diskpart’ to clean the structure of your destination drive and see if this fixes the problem.
- Press Windows + R, type “command prompt” in the dialogue box, right-click on the application and select “Run as administrator”.
- Once in command prompt, execute the following commands one by one in order.
diskpart

list disk

select disk [disk number of the destination drive]

clean all
- Restart your computer after repairing the file structure, make sure that both the drives are connected properly and try cloning again.
Try Disabling Antivirus
As mentioned earlier, antivirus software block access to any program which they find suspicious of infecting the computer system. If the cloning process is blocked by an antivirus, you might receive the error “Access denied” along with an error code.
To counter this situation, you can disable your antivirus software completely and then try cloning again. If you have more than one antivirus software on your desktop, do the same for all of them. Once you are absolutely sure that no antivirus is monitoring your computer, attempt at running the cloning process again.
Create an image instead of cloning
If you are having issues cloning our hard drive, you can try making an image of it instead. There are slight differences between the two processes. Disk cloning is the procedure of copying entire contents of one drive to another which includes all the information needed to enable you to boot the operating system from the drive. It creates a one-to-one copy of the hard drive and these hard drives can be replaced with each other as well after the cloning process.
Disk imaging is a process of making a backup copy of the contents of a hard drive. A disk image is a type of storage files which contains all the data and the necessary information to boot into the operating system. However, disk image needs to be applied in order for the hard drive to work.
Here, we will outline the procedure how to image your drive instead of cloning.
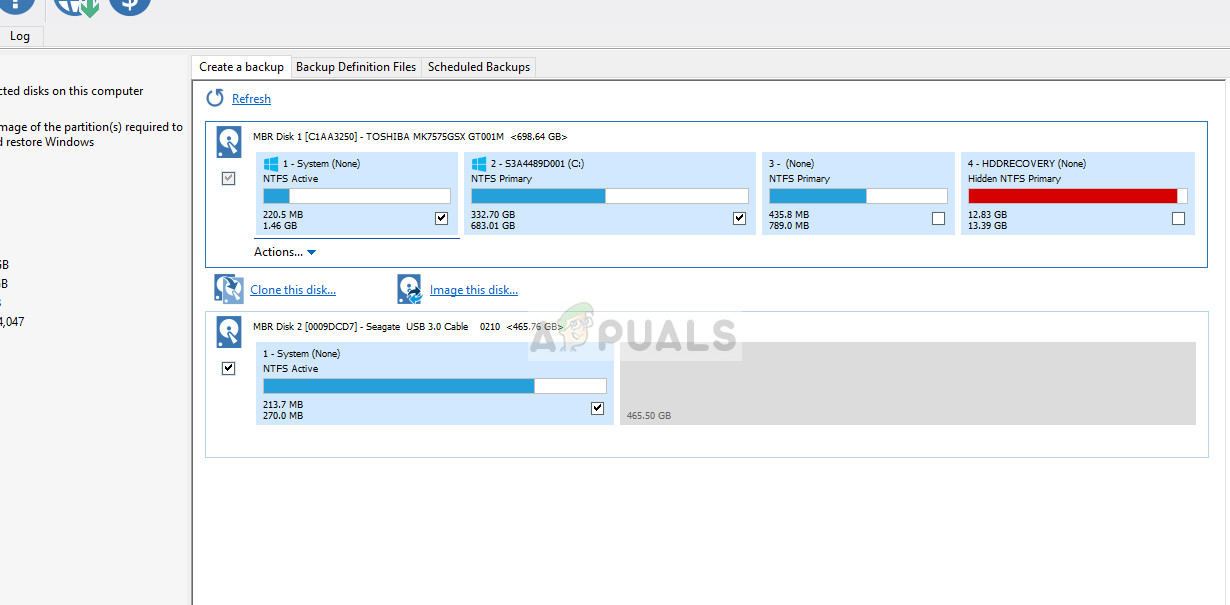
- Open Macrium and let it populate all the drives connected. Then select the drive which you want to image and click Image this disk present at the near bottom.
- Now click the browse button and select the location where you want the image to be created. Press OK when you have selected the location.
- Select next. Now you may choose a template for your backup. If you don’t know what this is, click None.
- Press Finish and your image creation will begin. Wait patiently for the process to finish.
Ignore Bad Sectors
If you get the same error message when creating an image, you can try ignoring the bad sectors when the image is being created. Usually, by following solution 1, all the bad sectors are removed from the logical storage. But if there are some problematic one’s which are still causing trouble, this can solve the issue.
- Open Macrium and click on Advanced from the top of the screen.
- Now check the box Ignore bad sectors when creating images.

- Press OK to save changes and exit. Now try creating the image again.
Check the Drive Connection
Before you start using third-party alternatives, you should check if the physical connection between both of your drives is proper. If you are connecting an SSD through a USB port, try plugging it inside the motherboard and try cloning again.
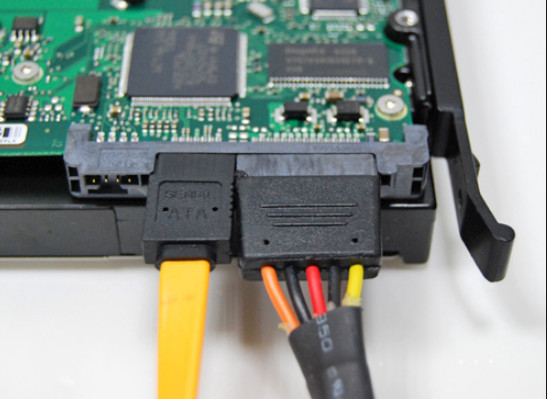
Change the SATA connection for the hard drive and if possible, attempt at changing the cable. Cables can get damaged easily and because of them, the cloning process can get disrupted. Once you are sure that both, the target and the destination drives are connected properly, move forward with the cloning process.
Try Third Party Alternatives
If all the above methods don’t work for you, you can consider using other alternative software. According to our survey, there were numerous cases where Macrium threw an error condition whereas other software such as AOMEI did the job perfectly.
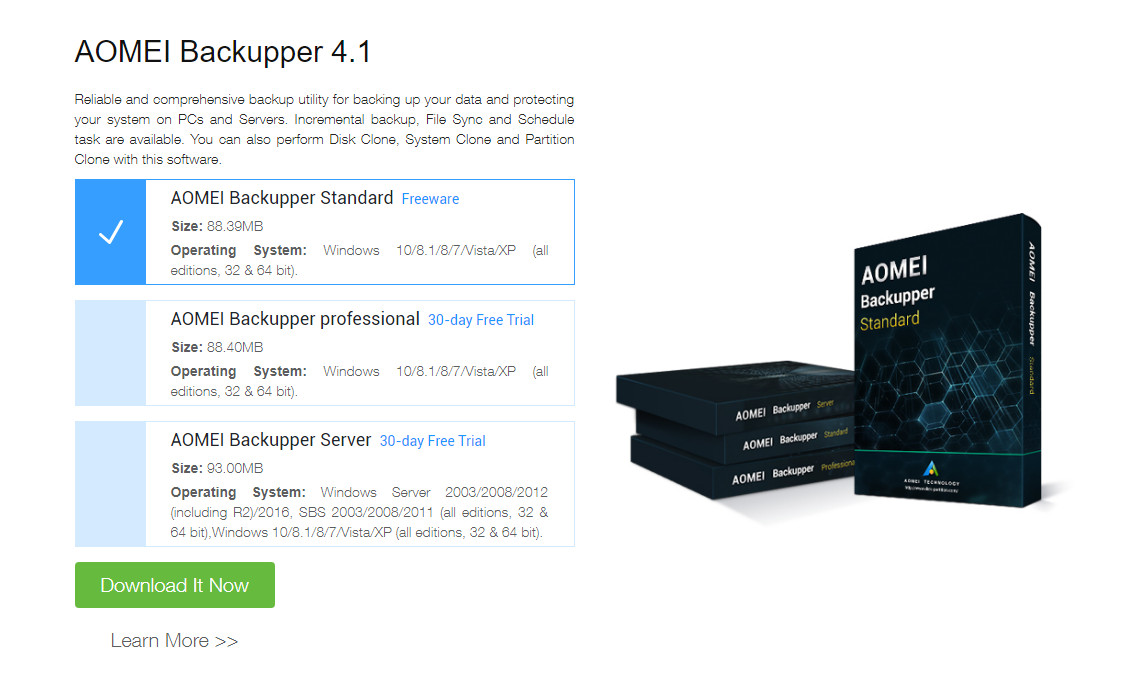
For information of the user, we recommend the software AOMEI. You can download the software module from its official website and try cloning your drive from it.
Note: Appuals has no affiliations with any software. All the software recommended are purely for information of the reader.

Kevin Arrows
Kevin is a dynamic and self-motivated information technology professional, with a Thorough knowledge of all facets pertaining to network infrastructure design, implementation and administration. Superior record of delivering simultaneous large-scale mission critical projects on time and under budget.
Проблема с клонированием диска
| Автор | Сообщение | ||||||||||||||||||||||||||||||||||||||||||||||||||||||||||||||||||||||||||||||||||||||||||||||
|---|---|---|---|---|---|---|---|---|---|---|---|---|---|---|---|---|---|---|---|---|---|---|---|---|---|---|---|---|---|---|---|---|---|---|---|---|---|---|---|---|---|---|---|---|---|---|---|---|---|---|---|---|---|---|---|---|---|---|---|---|---|---|---|---|---|---|---|---|---|---|---|---|---|---|---|---|---|---|---|---|---|---|---|---|---|---|---|---|---|---|---|---|---|---|---|
|