

На руках очередной ноутбук, на этот раз от производителя Dell – модель Inspiron 5759. Столкнулся с ошибкой Error Code 2000-0151 при включении ноутбука. Производитель встроил в линейку своих аппаратов диагностическое программное обеспечение, которое при включении ноутбука сканирует все основные аппаратные части на работоспособность перед запуском Windows.
Перечислю аппаратные компоненты, которые проходят проверку: матрица (монитор), система охлаждения — вентилятор, оперативная память (system memory), процессор (CPU), жесткий диск (HDD/SSD), DVD-привод.
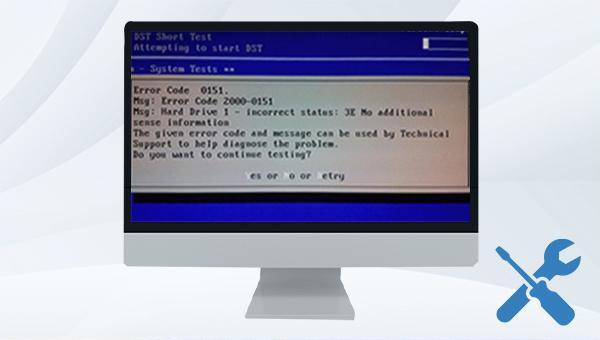
При включении ноутбука у меня появлялась ошибка с громкими сигналами:
DELL SupportAssist has detected a failing component on your system that requires immediate attention. Go to https://supportassist.dell.com and enter the issue description below.
Service Tag : 7S2B2G2
Error Code : 2000-0151
Validation : 108838
Hard Drive 0 – S/N (XXXXXXXXXXXX), incorrect status = 3E

Данное окно с ошибкой указывает на неисправность жесткого диска. Заменив HDD на рабочий, проблема уйдет, однако придется устанавливать операционную систему Windows. Проверить состояние нового вставленного носителя можно с помощью той же встроенной программы диагностики DELL — SupportAssist. Для этого сразу после включения ноутбука необходимо нажать клавишу F12 и выбрать Diagnostics, ПО просканирует все основные компоненты аппаратной части и если есть неисправность — выявит.
У Dell есть множество кодов ошибок, указывающих на неисправность HDD: 1000-0141, 2000-0141, 1000-0142, 2000-0142,1000-0143, 2000-0143, 1000-0144, 2000-0144, 1000-0145, 2000-0145, 1000-0146, 2000-0146, 2000-0151.
Симптомы перед появлением таких ошибок могут быть разные:
- Медленно работает или вовсе висит ноутбук (компьютер)
- При загрузке теряется Boot загрузчик
- Слышны щелчки жесткого диска
Если вы с техникой на ТЫ, то можете проверить состояние жесткого диска и по возможности исправить неполадки HDD. На жестком диске остались нужные данные? — тогда ознакомьтесь со статьей Как восстановить информацию.
- Для тех, у кого ноутбук на гарантии, рекомендую не проводить манипуляции, а нести в авторизированный сервисный центр DELL.
Все компоненты оборудования важны для работоспособного компьютера или ноутбука. Если один из компонентов не работает должным образом, BIOS или UEFI сообщит вам об этом. О BIOS и UEFI мы говорили в предыдущих статьях, если вы читали нашу статью, вы должны знать, что такое BIOS или UEFI. BIOS (базовая система ввода-вывода) загружается, когда вы включаете компьютер или ноутбук, и BIOS проверяет компоненты вашего оборудования на предмет их исправности или неисправности. UEFI является преемником BIOS с той же целью. В этой статье мы напишем о проблемах с жесткими дисками. Жесткий диск — это аппаратный компонент, в котором хранится операционная система, драйверы, приложения и наши данные. Если у вас проблемы с жестким диском, вы не сможете загрузить Windows, запустить приложение или получить доступ к данным. Есть разные проблемы с жестким диском, в том числе механические, электрические и логические. Итак, в чем разница между ними? Механическая проблема включает проблему с диском, головкой, рычагом привода или осью. Электронная проблема включает в себя проблему с платой, а логическая проблема включает проблемы с разделами, томами и жестким диском. Одна из проблем с жестким диском — ошибка: 2000-0151 Ошибка короткого теста жесткого диска DST. Ошибка 2000-0151 означает, что ваш жесткий диск (HDD) вышел из строя и, возможно, подходит к концу его срок службы. Независимо от того, есть ли у вас проблемы с жестким диском или нет, вам следует реализовать стратегию резервного копирования и восстановления. В случае сбоя вы можете восстановить данные из резервной копии. Представьте себе следующий сценарий: вы используете жесткий диск емкостью 2 ТБ, на котором хранятся все ваши личные или бизнес-данные. Кроме того, вы реализовали резервное копирование в реальном времени на NAS (сетевое хранилище) или облачное хранилище. Ваш жесткий диск перестал работать. Вы не беспокоитесь, потому что у вас есть резервная копия ваших данных, которую вы можете восстановить за короткое время. Вам будет очень грустно, если у вас нет резервной копии, возможно, вы заплатите много денег за восстановление данных или продолжите работу без данных. Резервное копирование — лучший способ для вашей домашней или бизнес-инфраструктуры, поэтому не игнорируйте его. Вы можете сделать резервную копию данных на внешний жесткий диск, NAS или облачное хранилище. Эта проблема возникает на жестком диске независимо от того, используете вы компьютер или ноутбук. Обратите внимание, что эта проблема связана не с операционной системой, а с оборудованием. Мы создали для вас несколько решений, включая устранение логических проблем, и последнее — замена жесткого диска на новый. В конце концов, вы должны быть готовы заменить свой жесткий диск, потому что, как мы уже говорили, ошибка 2000-0151 указывает на то, что ваш жесткий диск (HDD) вышел из строя и, возможно, подходит к концу его срок службы. Если вы не уверены, есть ли проблема с вашим жестким диском, вам следует запустить инструмент диагностики для вашего жесткого диска. Как вы это сделаете? Все производители предоставляют официальное программное обеспечение для тестирования своего жесткого диска. Мы покажем вам, как запустить WD Diagnostic Tool в Windows 10, используя жесткий диск WD 1 ТБ. Если вы можете загрузить Windows на свой компьютер, вам нужно будет загрузить и запустить это программное обеспечение. Если вы не можете загрузить Windows на свой компьютер, вам необходимо подключить жесткий диск к другому компьютеру или ноутбуку и установить программное обеспечение на этот компьютер или ноутбук. Это может быть странным решением, но немногие пользователи решили проблему с жестким диском путем форматирования жесткого диска и установки чистой операционной системы, драйверов и приложения. Мы рекомендуем вам попробовать это решение, гораздо лучше попробовать решение, чем покупать новый жесткий диск. Мы рекомендуем вам установить Windows 10. Если вам не нравится Windows 10 по вашим причинам, пожалуйста, не устанавливайте операционные системы старше Windows 7. Почему? Microsoft прекратила поддержку Windows XP и Windows Vista. Когда вы решите настроить разделы, буквы, тома или другие параметры на жестком или твердотельном диске, вы можете сделать это с помощью графического интерфейса или интерфейса командной строки. Одним из инструментов, которые мы будем использовать в этом методе, является ПРОВЕРИТЬ ДИСК (CHKDSK / R). Если у вас возникла проблема с повреждением системных файлов или вы не можете записывать или читать данные с жесткого диска, вам следует сделать CHKDSK / R. Check Disk — это утилита, которая поможет вам найти сбойные сектора и исправить их, если они есть. Процедура запуска chk disk одинакова для всех операционных систем от Windows XP до Windows 10. Как мы уже говорили в начале этой статьи, ваш жесткий диск не загрузит Windows, если возникнут логические проблемы. Если ваш жесткий диск не работает из-за логических проблем, вы не сможете получить доступ к своим данным из-за повреждения тома или раздела. Если вы реализовали стратегию резервного копирования и восстановления в своем офисе или дома, вы должны быть счастливы и проигнорировать этот метод. Если вы не реализовали стратегию резервного копирования и восстановления и ваш жесткий диск все еще работает, вам необходимо восстановить данные с поврежденного раздела или жесткого диска. Но как вы это сделаете, если не можете загрузить Windows? Вам нужно будет снять жесткий диск с ноутбука или компьютера и подключить к другому ноутбуку или компьютеру. Если вы не знаете, как это сделать, обратитесь к ИТ-специалисту. Если вы знаете, как это сделать, следуйте приведенной ниже процедуре. После подключения жесткого диска к ноутбуку или компьютеру вам нужно будет запустить программу для восстановления ваших данных. Этот метод совместим с операционной системой от Windows XP до Windows 10. Мы покажем вам, как это сделать с помощью программы Recuva. Перед тем как приобрести жесткий диск, мы рекомендуем вам проверить, находится ли ваш жесткий диск на гарантии. Как вы это сделаете? Мы покажем вам, как проверить гарантию на жесткий диск WD. Сначала вам нужно найти серийный номер. Сделать это можно двумя способами. Один из них — прочитать серийный номер с крышки жесткого диска. Другой способ — использовать программное обеспечение поставщика. Мы покажем вам, как это сделать с помощью программы WD Data Lifeguard Diagnostic для Windows, которую вы загрузили в способе 1. Поскольку на наш диск не распространяется гарантия, нам нужно будет купить еще один. Перед покупкой жесткого диска рекомендуем ознакомиться с технической документацией материнской платы. Существует два разных типа жестких дисков, включая жесткие диски ATA / IDE и жесткие диски SATA. Жесткие диски ATA / IDE ушли в прошлое, но если вы используете старый компьютер, вам нужно будет приобрести жесткие диски ATA / IDE. Существует четыре различных типа жестких дисков SATA, включая SATA 1, SATA 2, SATA 3 и SATA 3.1. Основное различие между ними — скорость передачи. Если ваша материнская плата поддерживает жесткий диск SATA 2, вам не нужно покупать жесткий диск SATA 3, потому что жесткий диск SATA 3 будет работать с ограничением порта SATA 2. Итак, как вы узнаете, что поддерживает ваша материнская плата? Пожалуйста, проверьте статью (Метод 13).

Содержание
Метод 1: запустить средство диагностики


Метод 2: переустановите Windows
Метод 3: CHKDSK / R
Метод 4: восстановить ваши данные


Метод 5: замените жесткий диск


When booting the Dell computer, you may encounter the error code 2000-0151. So, do you know how to fix the Dell error code 2000-0151? This post from MiniTool will show you how to fix the Dell error code 2000 0151.
What Is Dell Error Code 2000-0151?
If you are using a Dell computer, you may come across some error codes, such as 2000-0146, 2000-0142, 2000-0151, etc. when booting the computer. Meanwhile, this post will focus on Dell error code 2000-0151.
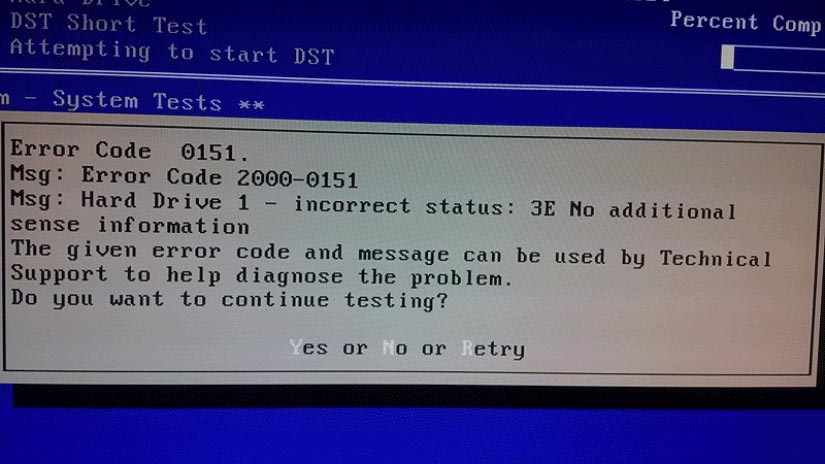
When booting the computer, the error message is shown below:
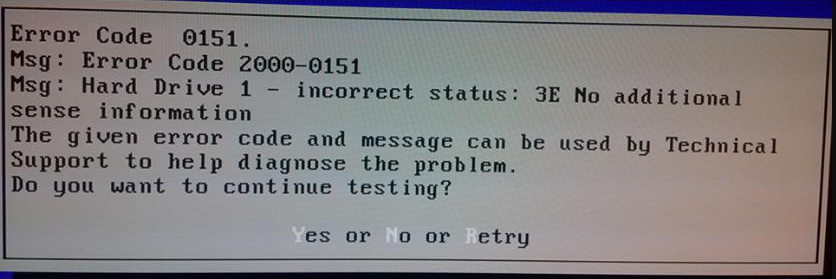
Error code 0151
Msg: Error Code 2000-0151
Msg: Hard Drive 1 – incorrect status: 3E No additional sense information
The given error code and message can be used by Technical Support to help diagnose the problem.
Do you want to continue testing?
Then what causes error code 2000-0151?
Although the Dell error code 0151 is not a frequent issue, it might appear for a few reasons. Dell error code 2000-0151 may be caused by the misconfigured system files that create registry errors within your OS or an outdated hard drive. The Dell error code 2000-0151 often indicates that your hard disk drive has failed or may be nearing the end of its life. What’s more, you can choose to run Dell diagnostics tool to check the reason for the error code 2000-0151 and the health of the hard drive.
When encountering the error code 2000 0151, the most important thing is to fix it. So, in this post, we will show some solutions.
However, since the Dell hard drive error code 2000-0151 indicates your hard drive is near to the end of its life or has failed, hence, before proceeding on the solutions, you need to back up data from the system if it is booting up or recover data from the failed hard drive.
How to Keep Data Safe When Encountering Dell Error Code 2000-0151
In this section, we will show you how to keep data safe when you encounter the Dell error code 2000-0151. To get your data off from the Dell computer with the error code 2000-0151, we will show you two different situations: the computer is bootable or the computer is unbootable. We will elaborate on them one by one.
Case 1: How to Back up Data When Computer Is Bootable
As the Dell error code 2000-0151 may indicate that the hard drive is near to the end of life. In this situation, you may still boot successfully. So, you need to back up your data from the system and then do some fixes to Dell error code 2000-0151.
To back up data, you can use the professional backup software – MiniTool ShadowMaker. It is designed to back up the operating system, disks, partitions, files and folders.
Now, we will show you how to back up data from the computer with error code 2000-0151.
1. Click the following button to download MiniTool ShadowMaker, install it and launch it.
Free Download
2. Click Keep Trial.
3. After entering its main interface, go to the Backup Then click SOURCE module to continue.
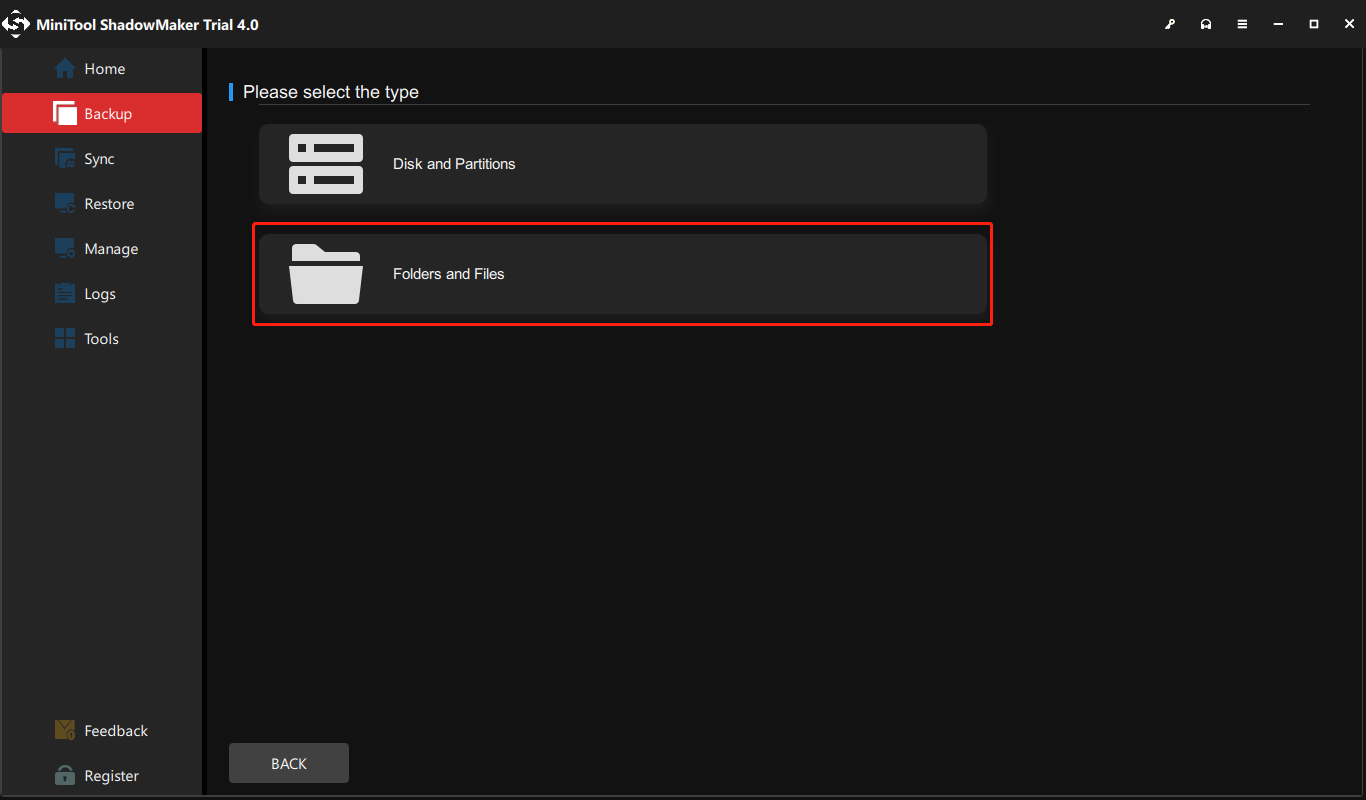
4. Then choose Folders and Files. Next, select the files you want to back up and click OK to continue.
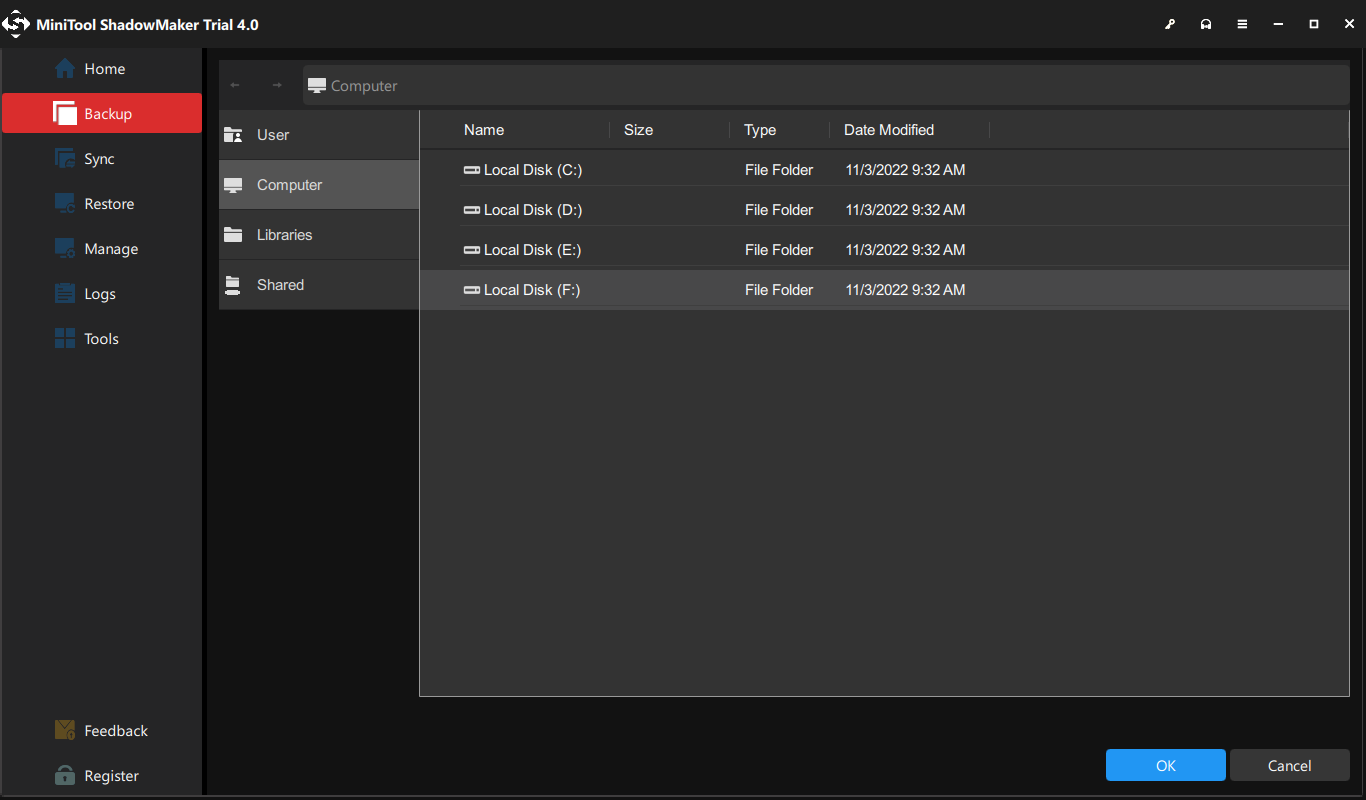
5. Then click DESTINATION module to choose a target disk. Here, it is recommended to choose an external hard drive and click OK to continue.
6. After selecting the backup source and destination, click Back Up Now to perform the backup task immediately.
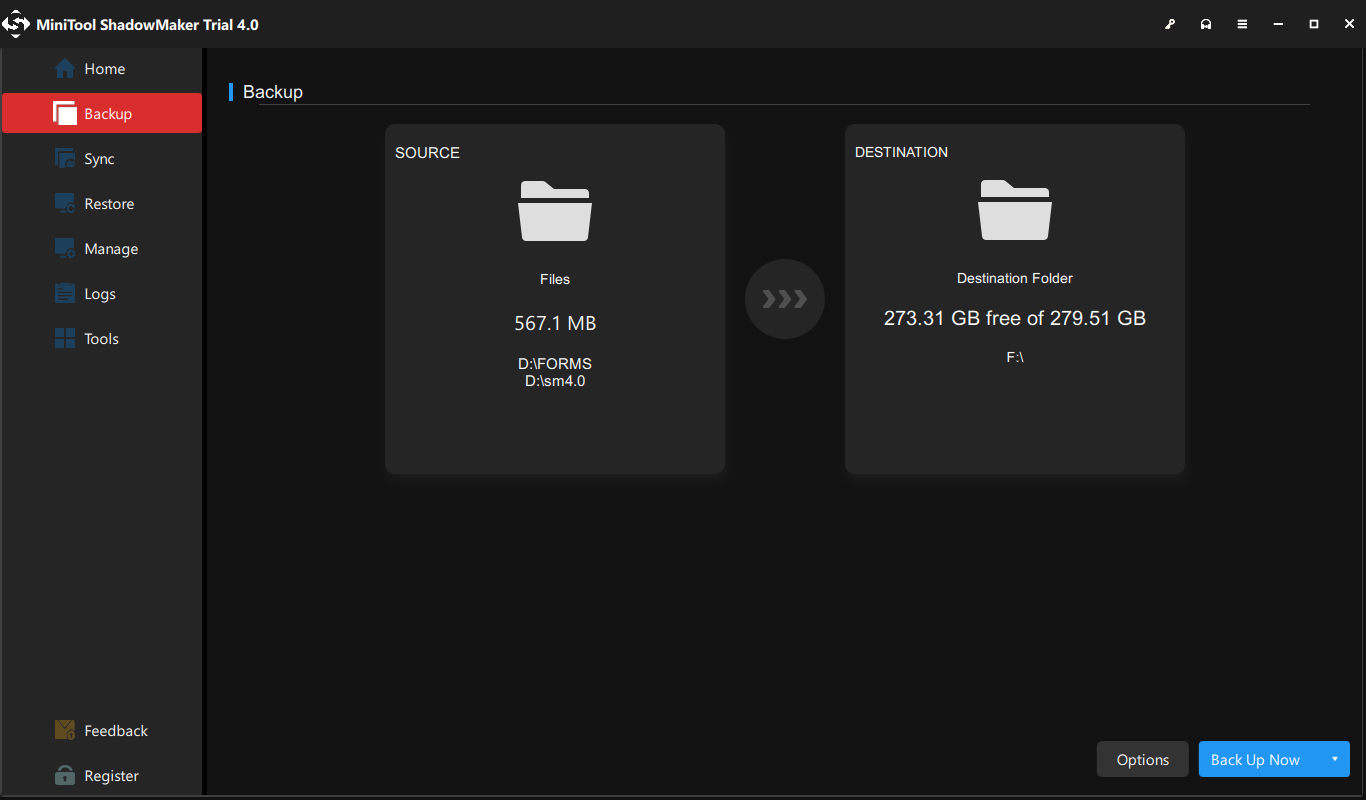
After all steps are finished, you have successfully backed up files from the hard drive with error code 2000 0151. If you have a mass of files and folders on the hard drive, you can choose to back up hard drive. Once you have kept data safe, you can go ahead to fix the Dell error code 2000-0151. For the solutions, please read the following part in this post.
Case 2: How to Recover Data If the Dell Computer Is Unbootable
As mentioned in the above part, the Dell error code 2000-0151 may also indicate the hard drive is failed. In this situation, you may fail to boot the computer. Thus, you need to recover your important data first from the unbootable computer with error code 2000-0151 and look for solutions to fix the Dell hard drive error.
So, to recover data from the unbootable computer, you come to the right place. To do that, you can use the third-party software – MiniTool Partition Wizard Pro Ultimate.
It is an all-in-one partition manager and data recovery utility. Its Data Recovery feature enables you to recover data from the unbootable computer with ease.
Now, here is the tutorial.
1. Click the following button to download MiniTool Partition Wizard Demo and install it on a normal computer.
Free Download
2. Then launch it and click Bootable Media feature to create the bootable media. (The demo edition does not support this feature.)
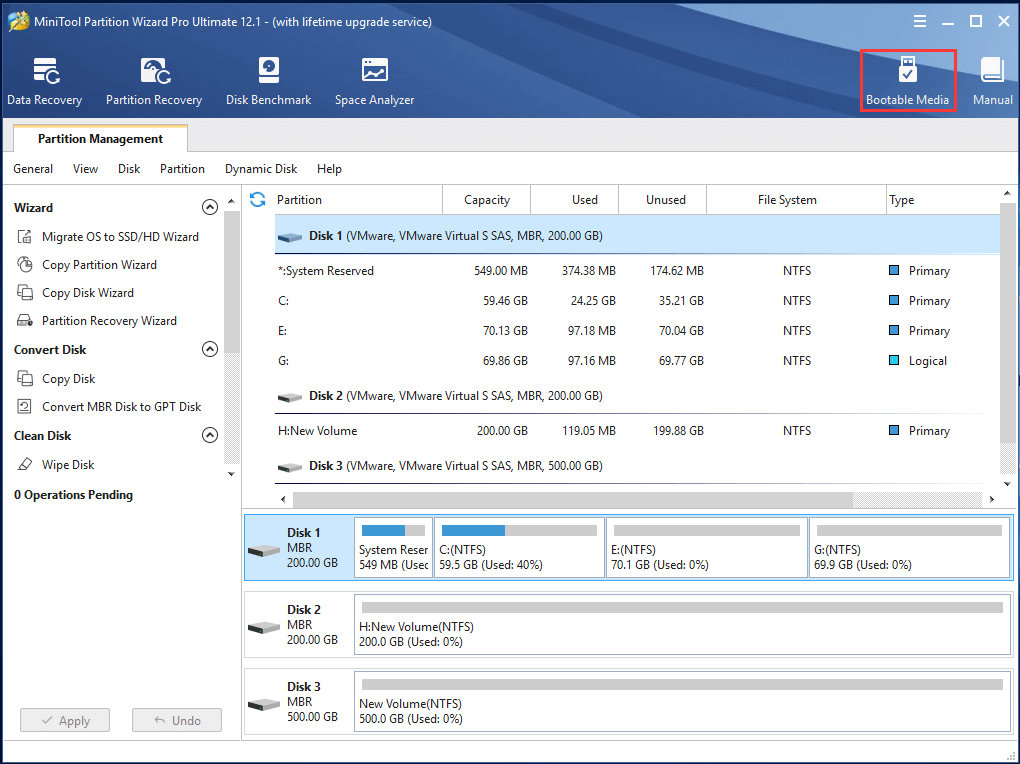
3. Then connect the bootable media to the unbootable computer with error code 2000-0151, change boot order and boot from it.
4. After entering the main interface of MiniTool Partition Wizard, click Data Recovery.
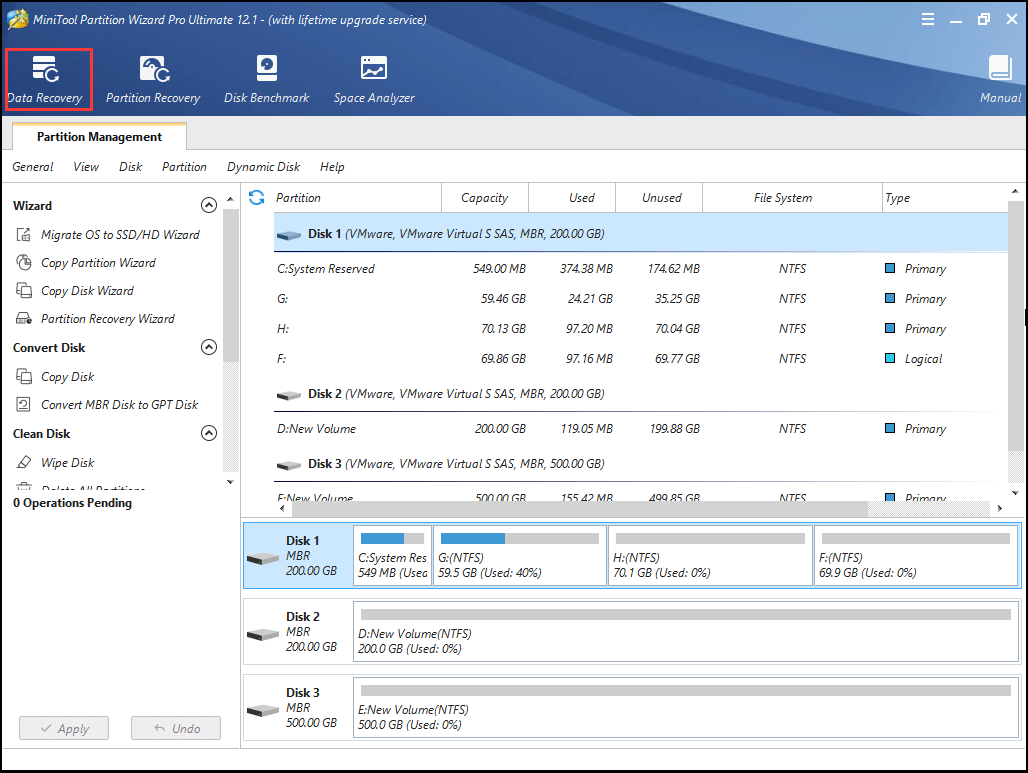
5. On the Data Recovery interface, all disks and partitions will be listed here. Select the partition containing important files and choose Scan to continue.

6. Then wait for the scanning process to be finished. During the process of scanning, you can choose to stop or pause it if you find the files you need.
7. After that, check the files you need and click Save to store them to another location.

After all steps are finished, you have successfully recovered files from the unbootable computer with error code 2000-0151. So, you can go ahead to fix the Dell error code 2000-0151. In the next content, we will show you how to solve the Dell error code 2000-0151.
How to Fix Dell Error Code 2000-0151
In this section, we will show you the solutions to the error code 2000-0151. Please note that all these solutions are demonstrated based on the unbootable computer. If your computer is bootable, you can ignore the steps of booting the computer from Windows installation media and just try the repairing steps.
The following solutions are not 100% effective because the Dell error code 2000-0151 indicates severe hardware issues. So, it may depend on your hardware conditions. Sometimes the error may be solved unless you replace the hard drive. However, the following solutions are still worth trying and you can try them one by one.
Way 1. Check BIOS Settings
The Dell error code 2000-0151 may be caused by the wrong BIOS settings. So, in order to fix this error, you need to check whether there are changes in the BIOS settings and reset it to the default settings.
Now, here is the tutorial.
- Restart your computer and press F12 continuously to enter the BIOS settings.
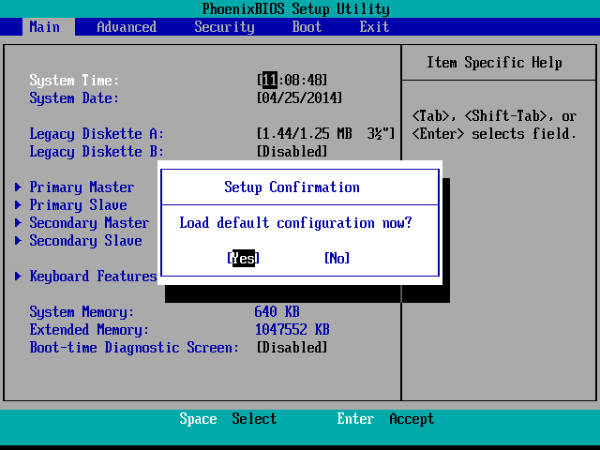
- Then select Load Default, Load Setup Defaults, Load Default Settings, Load Optimal Defaults, or similar option in BIOS Settings and hit Enter to reset the BIOS setting.
- Then press F10 to save the changes.
Once all steps are finished, reboot your computer and check whether the Dell error code 2000-0151 is removed.
Way 2. Run Surface Test
The Dell error code 2000-0151 may occur when there are bad sectors on your hard drive. So, it is necessary for you to check how many bad sectors on the hard drive. If there are too many, it means that your hard drive is imminent to fail.
So, how to check bad sectors on the hard drive? MiniTool Partition Wizard is able to help you. If you have created a MiniTool recovery USB drive in the above, you can connect it to the unbootable computer with error code 2000 0151 and boot from it. If not, create a bootable media first.
Free Download
Now, we will show you how to check bad sectors on the hard drive.
1. Connect the MiniTool recovery USB drive to the computer and boot from it.
2. Then enter the main interface of MiniTool Partition Wizard.
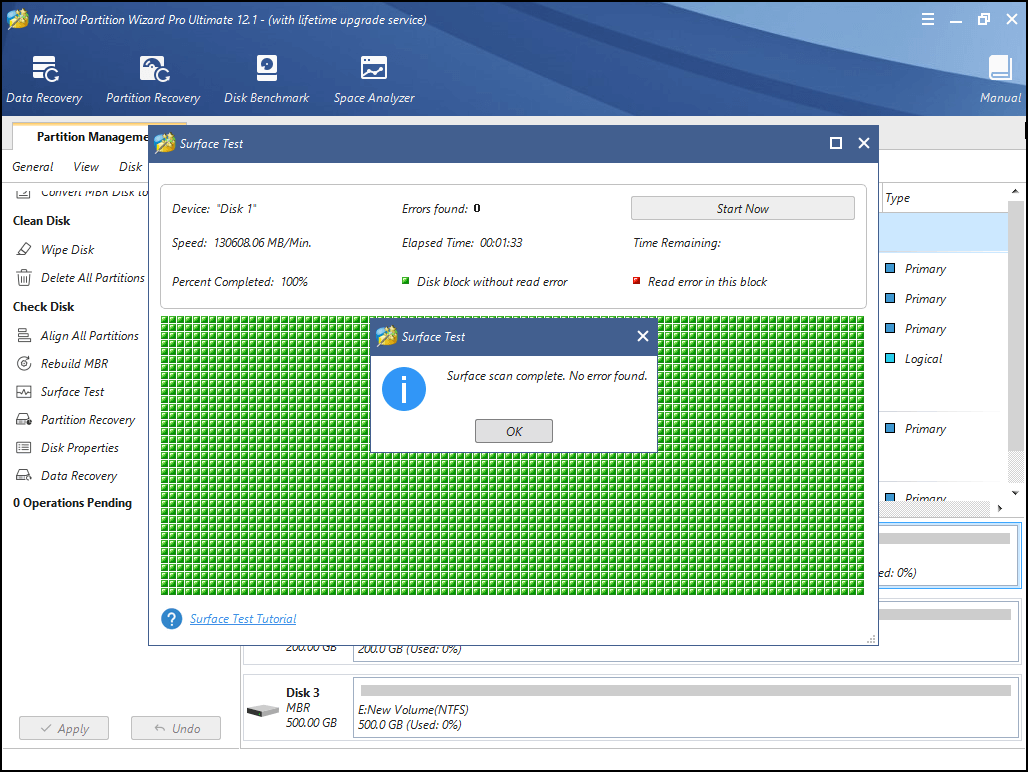
3. Then select the hard drive you want to scan and choose Surface Test.
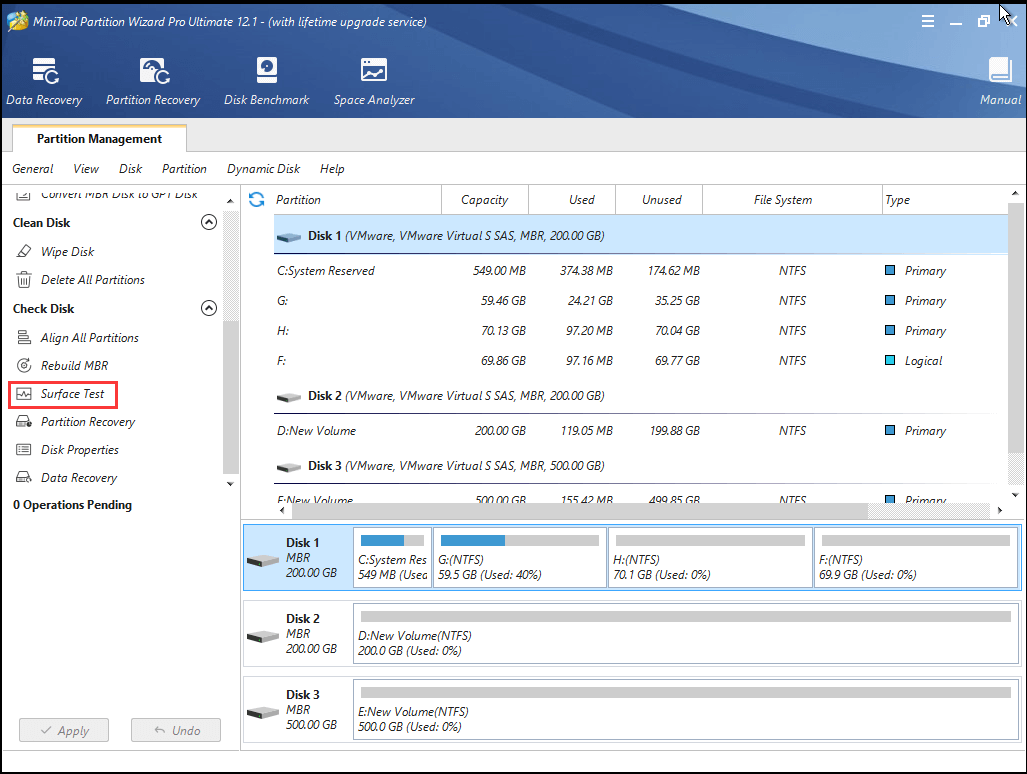
4. Then click Start Now to continue.
5. When the scanning process is finished, you can check the result. The disk block without reading error will be marked as green color, while the disk block with reading error will be marked as red color.
If there are few bad sectors on the hard drive, you can choose to shield them. If there are too many bad sectors, you need to back up your files and replace the hard drive.
Way 3. Run CHKDSK
CHKDSK is able to help you to fix some hard drive errors, such as bad sectors, improper shutdowns or corrupted software, etc. So, in order to fix the Dell error code 2000-0151, you can try running the CHKDSK tool.
Now, here is the tutorial.
1. Create a Windows installation disc with Windows Media Creation Tools.
Tip: If you have created a bootable USB drive with MiniTool Partition Wizard, you do not need to create the Windows installation disc any more. In the MiniTool PE loader, select Command Console and type the command directly.
2. Insert the Windows installation disc to the unbootable computer and boot from it.
3. Then select the language, keyboard input and time.
4. Next, click Repair your computer.
5. Next, choose Troubleshoot > Advanced Options > Command Prompt to continue.
6. Then type the command chkdsk c: /f /r in the Command Line window and hit Enter to continue. (C represents the drive letter and you can change it by yourself.)

Way 4. Replace the Hard Drive
If the above solutions cannot fix the Dell error code 2000 0151, the last option you should choose is to replace the hard drive. If you already recovered data before, you can replace the hard drive directly and reinstall the operating system.
However, if you do not want to reinstall the OS to the new hard drive, you can choose to migrate OS to new hard drive. After that, the Dell error code 2000-0151 will be removed from your computer.
Related article: How to Replace Laptop Hard Drive Without Reinstalling Windows?
Wow! It is an excellent post. I fixed the Dell error code 2000-0151 after reading it.Click to Tweet
Bottom Line
After reading this post, you may already know how to fix the Dell error code 2000-0151. If you come across the same error, try these solutions. If you have any better solution to fix it, you can share it in the comment zone.
In addition, if you have any problem with MiniTool products, please feel free to contact us via the email [email protected] and we will reply to you as soon as possible.

29 May 2023 Specialist of Customer Service Dept.
Summary
Our comprehensive article covers the causes and practical solutions to tackle the error code 2000-0151. Safeguard your important files by referring to our backup and transfer methods. Trust us to help you fix this issue and optimize your Dell computer’s performance.
I. What is error code 2000-0151?
Users of Dell computers may encounter error code 2000-0151, which may be caused by incorrect BIOS settings, a hard drive failure, or a hard drive that is near the end of its life. If you also encounter similar problems, and you can enter the system normally after restarting the computer, it is recommended that you back up important files in the computer as soon as possible.
If your computer fails to enter the system after restarting after error code 2000-0151, you can refer to the second part before fixing the problem, and you can back up or transfer important files in the computer without entering the system.
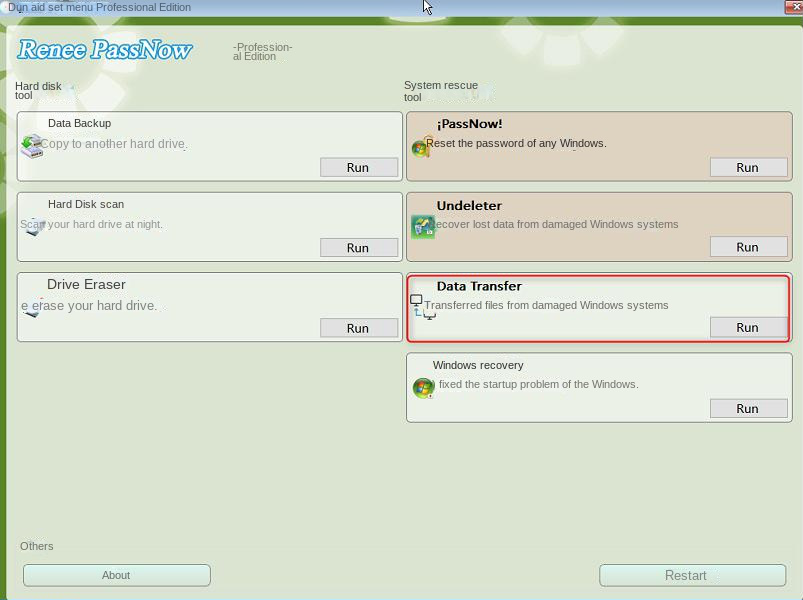
II. When unable to enter the system, use Renee PassNow to backup or transfer important data
1. What is Renee PassNow?
Renee PassNow is a system rescue software that integrates functions such as clearing Windows account passwords, creating new administrator accounts, backing up/transferring/recovering computer files, and repairing Windows startup problems. When the computer breaks down and cannot enter the system, this software can help you back up or transfer important files smoothly. As a system rescue tool with various functions, it is perfectly compatible with multiple systems including Windows 10/8.1/8/7/XP/Vista, and can meet the system rescue needs of different users.
Hot Topic — ADsRenee PassNow – 3 Steps to transfer data from the crashed system 
Easy to use 3 steps to transfer the files.
Transfer the files Transfer the important files of the computer without system.
Preview the files Preview the files while transferring the data.
Multifuctional Data recovery, Windows password reset, bootable problem recovery can be run without system.
Highly compatible Windows 10/8.1/8/7/XP/Vista. Also supports UEFI boot mode.
Easy to use 3 steps to transfer the files.
Transfer the files Transfer the important files of the computer without system.
Preview the files Preview the files while transferring the data.
Free TrialFree TrialNow 2000 people have downloaded!
2. How to use Renee PassNow to backup or transfer data?
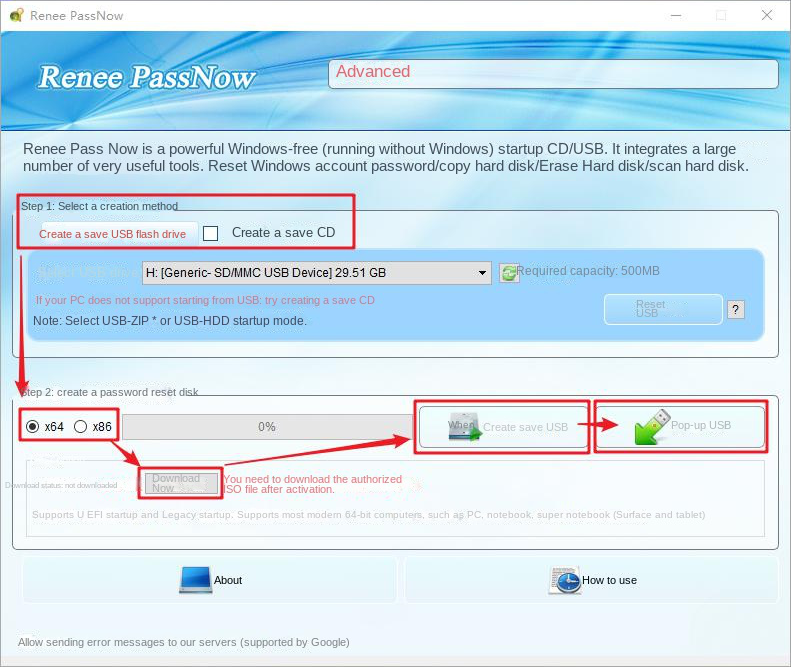
Step 1: Download and install Renee PassNow on another computer that can log in and run normally, then connect the USB flash drive to the computer, run Renee PassNow, and then check the (Create a rescue USB flash drive) option. (Note: The process of creating a rescue U disk may delete all data in the U disk, so please make sure that the important files in the U disk have been saved in other locations.)
Step 2: Next, select (x64) or (x86) according to the system type, click the (Download Now) button to download the ISO file, click the (Create Rescue USB) button after the file is downloaded, and click the (Eject USB) button.
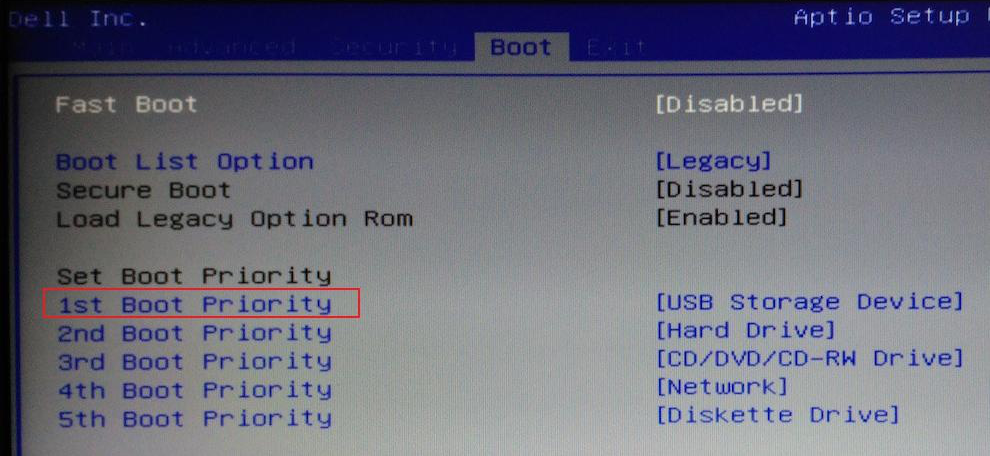
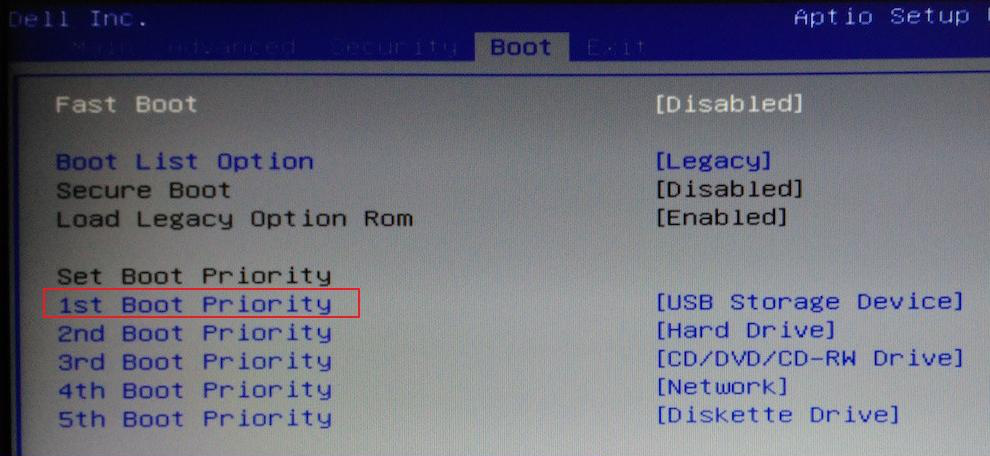
Step 3: Connect the created boot device to the Dell computer that needs to back up and transfer data, turn on the computer, and then the shortcut key to enter the BIOS will be displayed on the computer screen (this interface is displayed for a short time, maybe only a second or two) , click the BIOS shortcut key continuously to enter the BIOS setting interface, and then set the boot U disk as the first in the boot sequence (1st Boot Priority) in the (Boot) tab, then save the settings and restart the computer.
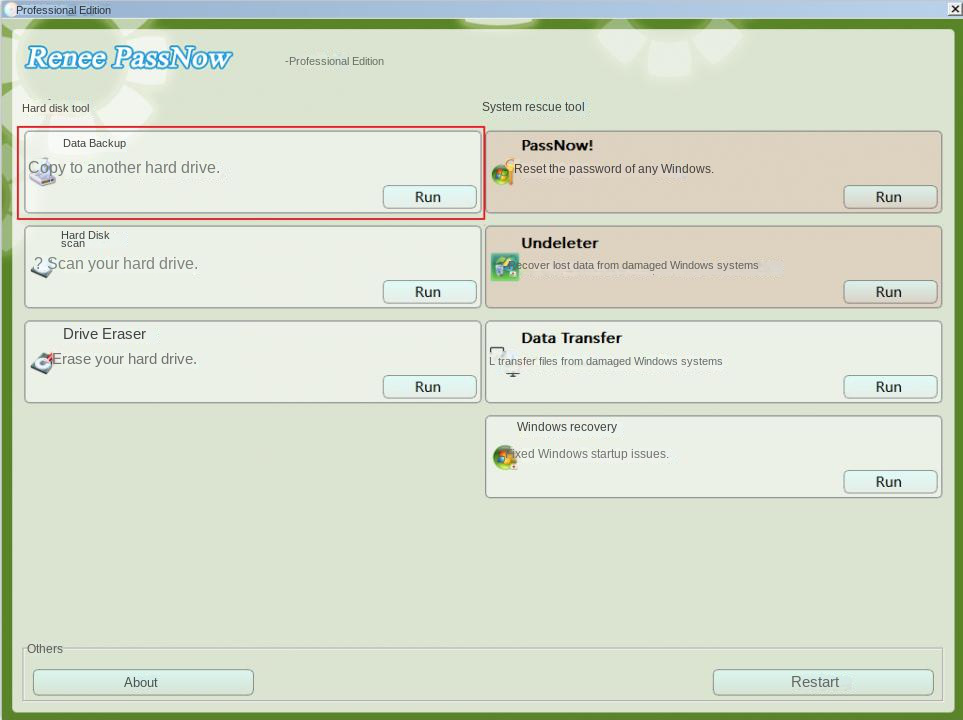
Step 4: After booting the computer from the bootable USB flash drive and entering the application, select the (data backup) option. This option is equivalent to completely cloning the hard disk to other hard disks, so the hard disk capacity for saving backup files needs to be larger.
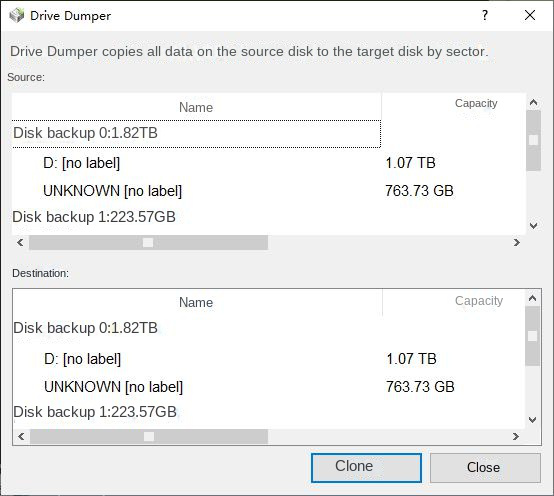
Step 5: Select the hard disk to back up files in the (source) list, select the hard disk to save files in the (destination) list, and finally click (clone) and wait for the cloning to complete to successfully back up the computer files.
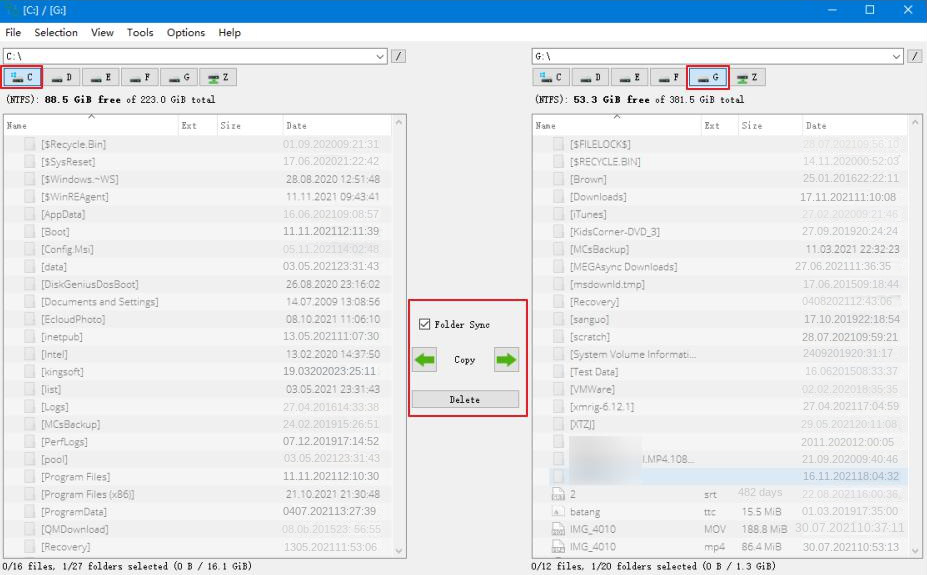
Step 6: If you only need to transfer some important files, the (Data Transfer) function will be more suitable for you.
Step 7: You can click on each disk drive letter (C/D/E/F, etc.) to find the files to be transferred. It is recommended that you transfer them to an external disk. The operation of transferring data is very simple. For example, if you want to transfer the data in the C drive to the G drive, you can first select the C drive on the upper left, select the G drive on the upper right, and then select the files in the C drive, and click the Copy function button in the middle. Disk data can be easily transferred. If there is a file you want to delete, you can also click the (Delete) button in the middle after selecting the file, but the deletion operation cannot be undone, please operate with caution.
Kind tips If you find that files are lost during the process of backing up or transferring data, please select the (Undeleter) option on the main function interface to perform data recovery operations.
After backing up or transferring the important files in the Dell computer, you can continue to use the following methods to solve the problem.
III. How to fix Dell computer error code 2000-0151?
1. Reset BIOS settings
If the problem occurred after you changed the BIOS settings, it is best to reset the BIOS to default settings and check if the problem is resolved.
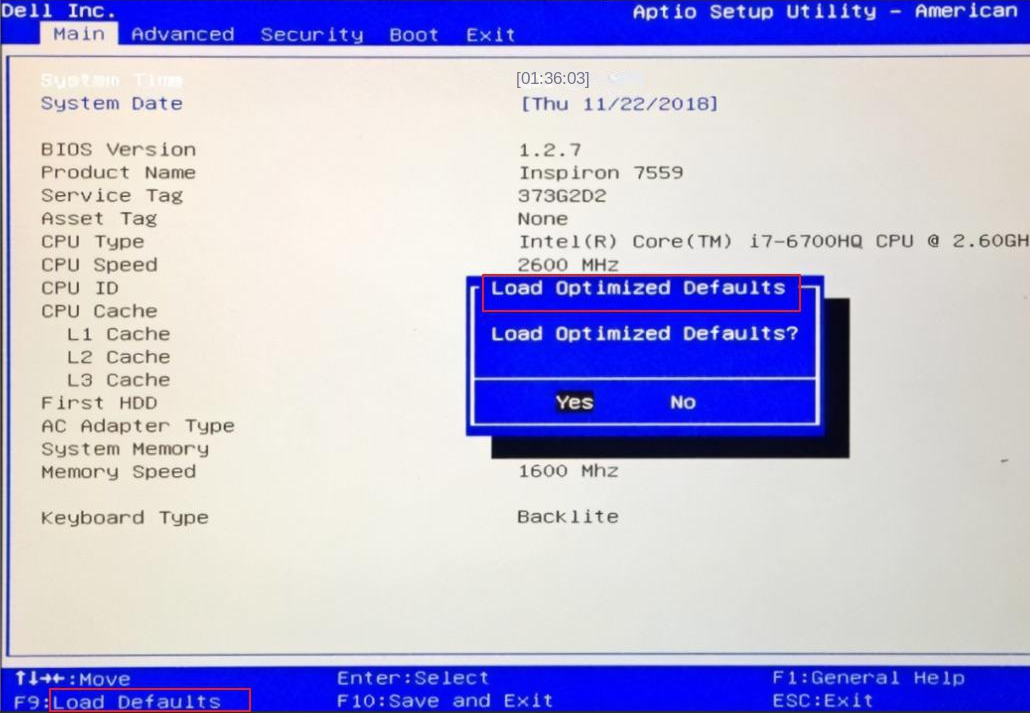
Step 1: Continuously click the shortcut key during the boot process (the following picture is an example, the shortcut key is F2) to enter the BIOSset up.

Step 2: After entering the BIOS setting interface, try to find the option containing “default”, such as (Load Defaults) or (Reset to Default) (Note: Different computer brands or different BIOS versions, the options may be slightly different). Take the following picture as an example, you can press F9 to reset the BIOS settings, save the settings at last, restart the computer to check whether the Dell computer starts normally.
2. Repair the hard disk through the chkdsk command
If the hard disk has bad sectors or file system problems, you can use the chkdsk command to repair them. When the Dell computer cannot be started, we can use the Windows installation disk to enter the recovery environment, and then run the chkdsk command through the command prompt to repair the hard disk. Here we take the Windows 10 system as an example, the specific operation steps are as follows:
Step 1: Download the Windows 10 Media Creation tool on another computer to create a Windows 10 installation disk.
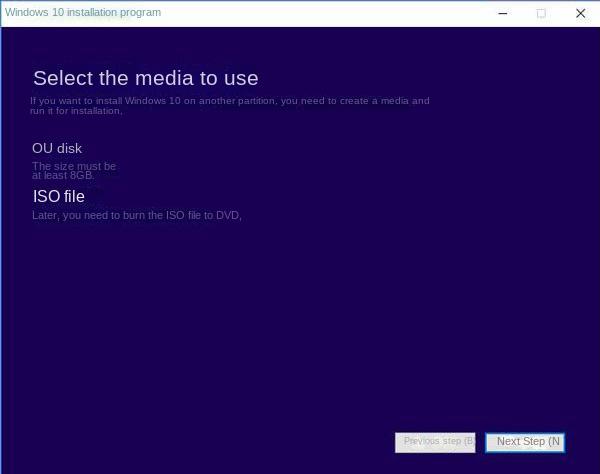
Step 2: Run the Windows 10 Media Creation tool, agree to the usage agreement, and then select (Create installation media (U disk, DVD, or ISO file) for another computer), and then click (Next).
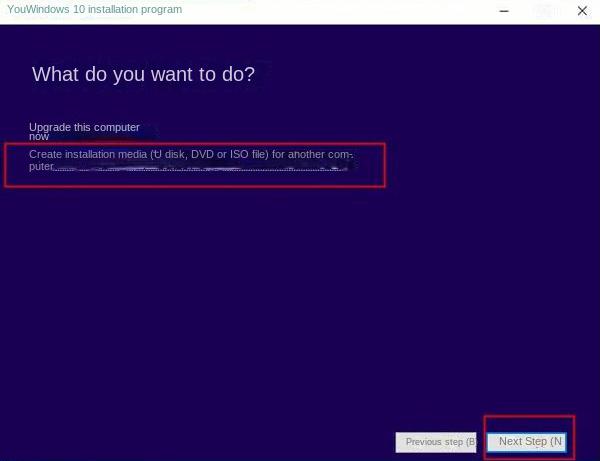
Step 3: When selecting the media to use, select the USB flash drive. It is necessary to ensure that the U disk space is at least 8GB, otherwise this step will prompt an error. When you are prompted that the Windows 10 installation file is being downloaded, please wait patiently for the download to complete.
Step 4: Connect the finished installation U disk to the target computer and press the shortcut key (such as F2/DEL/F10, etc., you can check the prompt in the boot interface) to enter the BIOS when starting the computer, then you can set the installation U disk as the first in the boot order (1st Boot Priority) in the (Boot) tab, then save the settings and restart the computer.
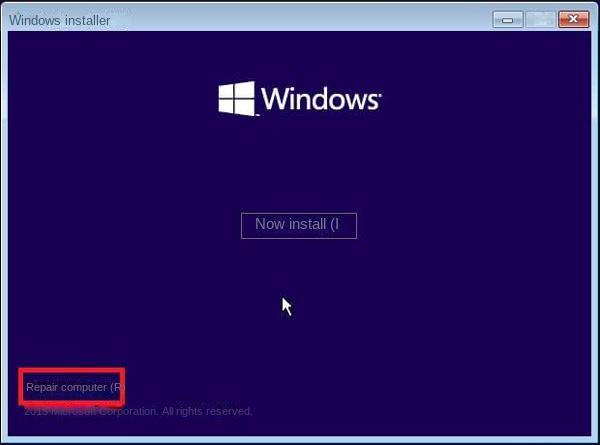
Step 5: After successfully booting from the installation U disk, you will enter the Windows 10 installation interface, click (Repair Computer) in the lower left corner of the (Install Now) interface to enter the Windows recovery environment.
Step 6: After entering the Windows Recovery Environment, please select the (Troubleshooting>Advanced Options>Command Prompt) option.
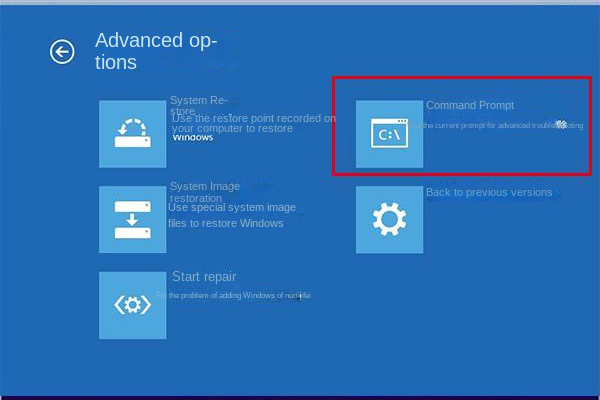
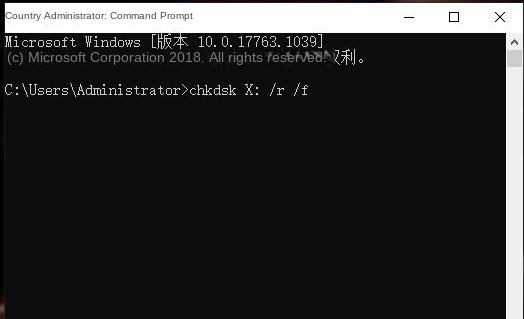
Step 7: Enter the command (chkdsk X: /r /f) in the command prompt window (X: refers to the hard disk drive letter that needs to be scanned and repaired; /r can find bad sectors and restore readable information, /f can repair the disk errors found on ), and press the (Enter) key to fix the error. After the fault repair is complete, remove the Windows 10 installation USB flash drive and restart the computer to check whether the problem is resolved.
3. Replace the hard drive of the Dell computer
If the above methods cannot solve the problem of error code 2000-0151, you can use Dell’s official diagnostic tool to diagnose the computer hardware. If the hard disk really has a serious failure, you need to replace it with a new hard disk. It should be noted that if you do not have a deep understanding of computers, please seek the help of professional maintenance organizations or professionals, and do not remove and install the hard disk by yourself, so as not to cause damage to other components. If it is within the warranty period, you can consult and go to an official maintenance agency for repairs.


 Что делать, если я обнаружил плохие сектора на жестком диске в Windows 10/8/7?


