
Как восстановить загрузчик EFI Windows 7 и Windows 10?

В этой статье мы попробуем восстановить загрузчик EFI для Windows 7/8/10. Чуть ранее мы уже разбирали восстановление загрузки для таблицы MFT на примере Windows 7. Сейчас же позволю себе сразу отметить, что повреждение загрузчика в нашем случае чаще всего (помимо прочего) вызывается:
- установкой второй операционной системы
- неправильными операциями по восстановлению системы (или неудачным её завершением)
- удалением неких данных из скрытых разделов
- битыми секторами на носителе с Windows
- действием зловредов.
С помощью представленных инструментов можно будет попробовать восстановить загрузчик EFI, который отказывается загрузить систему из-за отсутствующего или битого файла конфигурации по адресу:
Скрытый диск:EFIMicrosoftBootBCD
Вот, кстати, его примерное содержимое из Heren’s BootCD:

- Структура Windows 7/10 в режиме загрузки UEFI
- Попробуем переписать файл конфигурации напрямую
- Пересоздаём раздел EFI из-за Ошибки доступа в bootrec
- Не получается?
- На будущее: резервную копию BCD можно было создать самому.
Чтобы было понятно…
Структура разделов в таблице GPT на Windows, загруженной в режиме UEFI, чаще всего выглядит так:

где
- EFI — раздел ESP (Extensible Firmware Interface) — раздел, где хранится программное обеспечение с драйверами, обеспечивающими загрузку Windows;
- MSR — он же Microsoft Reserved — резервируемый во время установки Windows раздел; его вполне может и не быть на вашей машине
- Первичный раздел — том, где хранятся системные файлы: реестр, службы, системные утилиты, файлы настроек и т.д.
Windows 10 сюда добавляет ещё и диск Восстановления. По умолчанию (т.е. при установке Windows на НЕФОРМАТИРОВАННЫЙ диск), первые два раздела имеют чёткий объём. И потому по необходимости их легко вычленить, ориентируясь только лишь на размеры обоих. В Windows 7, например, это соответственно 100 Мб и 128 Мб. И это, как говорится, типовая конфигурация. Некоторые производители компьютеров создают разделы по своему усмотрению, например, засовывая туда среду восстановления Windows PE в файл winre.wim. Если вы обнаружили у себя такой файл, знайте, что именно он содержит в себе образ восстановления системы от производителя. Раздел EFI обязателен на GPT дисках с UEFI поддержкой. Когда компьютер включается, среда UEFI загружает загрузчик (EFIMicrosoftBootbootmgfw.efi) из раздела EFI (ESP), передавая той контроль над загрузкой самой Windows. Нет раздела — нет загрузки.

Раздел же MSR на диске создаётся для облегчения обзора разделов и используется для системных операций (типа конвертации диска из простого в динамический). Это резервный раздел, которому Windows никогда не присваивает опознавательные знаки. И данных пользователя он не содержит. В Windows 10 размер раздела MSR — 16 Мб (в Windows 8 — 128 Мб), тип файловой системы — NTFS.

Данные конфигурации загрузки Windows
О том, что файл по указанному выше адресу EFIMicrosoftBootBCD повреждён, вам может сообщить синий экран смерти BSOD с ошибкой следующего содержания:
The boot configuration data for your PC is missing or contains errors.
File :EFIMicrosoftBootBCD
Error code: 0xc0000***
Это означает, что данные в файле Boot Configuration Data не распознают конфигурацию загрузчика вашей Windows. Однако, пользователей, знакомых с утилитой восстановления загрузчика в MFT bcdedit.exe, в этот раз та не выручит. При попытке её запустить, пользователь увидит непривычное:
The boot configuration data store could not be found.
The requested system device cannot be found
Мол, ни данных, ни самого устройства не существует. Причина одна: раз конфигурация загрузчика BCD в UEFI-режиме загрузки лежит в специальном разделе EFI:

efi раздел в Windows 7

efi раздел в Windows 10
…то наша утилита просто его не видит. Т.е. не видит сам загрузчик, а то и весь раздел. В общем, не спасают и традиционные средства восстановления, созданные на такой случай:


У вас тоже с ошибкой написано?
Как восстановить загрузчик EFI Windows 10: в лоб.
- выбираем загрузочное устройство, вызвав меню быстрой загрузки клавишами в зоне F или через BIOS

- загружаем с флешки с Windows 10 PE;
- выходим на командную строку, зажав Shift + F10 после появления окна Установка Windows
- как и в предыдущем режиме, нам нужно определиться со списком разделов компьютера. Далее я предполагаю, что жёсткий диск установлен в единственном экземпляре:
diskpart
list volume
- обнаруживаем EFI раздел. Его размеры, повторюсь, невелики (100 Мб в W7 и W10), и он имеет файловую систему FAT32:

у меня EFI — это безымянный Том 3
- по умолчанию он скрыт, а значит не имеет буквы. Для дальнейшей работы она нам понадобится. Так что присваиваем букву прямо сейчас:
select volume *
assign letter Y:
exit

После закрытия программы отправляемся в этот раздел:
cd /d Y:EFIMicrosoftBoot
Здесь появляется небольшое отступление. Этот путь существует по умолчанию, и причин, чтобы консоль вам отказала в переходе в указанную папку, нет. Если ошибка появилась, см. абзац Возможные ошибки или сразу переходите к следующей части Как восстановить загрузчик EFI Windows 7/10: пересоздаём EFI.

меня ошибка Отказано в доступе настигла сразу
- создаём заново загрузочный сектор одноимённого раздела:
bootrec /fixboot
- используя утилиту bcdedit.exe создадим хранилище заново, копируя загрузочные файлы из системной папки:
bcdboot C:Windows /l ru-ru /s k: /f ALL
где
/f ALL – скопирует загрузочные файлы (и UEFI и BIOS режимов) для возможной поддержки загрузки на EFI и BIOS;
/l ru– ru — укажет на языковую локаль системы, которая будет использоваться, т.е. на русскую. Если всё проходит без ошибок, пропускайте абзац.
- выполняем последовательно следующие команды:
bootrec /scanos
bootrec /rebuildbcd
Перезагружаемся в Windows 10 на жёстком диске и проверяем.
Возможные ошибки
Администратора здесь могут подстерегать некоторые ошибки. Среди них наиболее часто появляются:
- BFSVC Error: Can not open the BCD template store. status – [c000000f] –
нужно проверить вводимые команды и путь к хранению системных файлов Windows; иногда ошибка появляется из-за неправильного указания языковой локали; - BFSVC Error: Error copying boot files from Last Error = 0x570 – ошибка является следствием самого явления, что Windows не загружается. Вероятно, плохие сектора появились не только в разделе загрузки EFI, но и на диске с системой; прогоните жёсткий диск утилитой chkdsk.exe тут же из консоли командой
chkdsk с: /а
где с — диск с системой
- Отказано в доступе — причин на то множество: от наличия плохих секторов до неверно выставленного режима загрузки (стоит Legacy вместо UEFI; нужно — только UEFI) с флешки. Однако. UEFI не был бы UEFI, если бы всё проходило вот так гладко: то, что раздел EFI не подпускает к своим файлам — это, скорее закономерность, чем исключение. Так что, если в доступе вам отказано, я советую вам просто сначала удалить сам раздел EFI (а он такой нам больше не нужен), воссоздать его заново с единственно необходимой для его работы директорией, а затем уже положиться на ремонтную bootrec, позволив ей завершить работу. Так что, если необходимость возникла, продолжаем работу с момента появления отказа команде
bootrec /fixboot
Как восстановить загрузчик EFI Windows 7/10: пересоздаём EFI.
Самое главное здесь — не промахнитесь с разделом/лами и не удалите тот из них, в котором хранятся данные Windows и ваша информация. Итак, раз bootrec.exe попасть в нужный нам раздел не смогла, раздел убираем. Для этого нам будет нужно вернуться в diskpart.exe, снова определиться с разделами и выбрать тот, что на 100 Мб. Возвращаемся в ремонтную консоль:
cd /d x:

И начинаем заново:
diskpart
select disk 0
list partition
select partition 2
удаляем его:
delete partition override

можно проверить результат:
list partition

У нас осталось некоторое нераспределённое пространство, в котором мы заново создаём удалённый только что раздел:
create partition efi size=100
list partition
select partition 2
format quick fs=fat32 label="System"


Но при попытке присвоить применявшуюся ранее букву Y, консоль ответила отказом (надо было её перезапускать). Я присвою разделу букву Z:
assign letter=Z
exit
Подготовим почву для bootrec.
- создаём папку загрузки:
mkdir Z:EFIMicrosoftBoot

- копируем туда файлы из состава среды EFI из папки установленной Windows (С — буква диска с системными файлами Windows):
xcopy /s C:WindowsBootEFI*.* Z:EFIMicrosoftBoot
- пусть bootrec с вашей флешки проверит диски на предмет системных файлов Windows:
bootrec /scanos
Никуда они не денутся, если вы их случайно не удалили, или они не попали в зону бэд-секторов. Остаётся…
- … заставить написать «правильный» файл BCD и прочие «конфиги»:
bootrec /rebuildbcd

Выключаем компьютер, флешку вынимаем и включаем машину. Ждём появления Windows. Дайте ей загрузиться до Рабочего стола и проверяйте, всё ли на месте.
Ошибка вновь появляется…
Не беспокойтесь. Если вы вникли в процесс, и все команды вводили осознанно и корректно, ситуация, скорее всего, уже исправлена. Просто следует учесть особенности своеобразных фильтров безопасности, принятых для режима UEFI, и не путать буквы дисков. Их можно пройти, проделав такие шаги:
- Разбудите BIOS:
— снимите крышку боковую компьютера или нижнюю ноутбука
— отключите жёсткий диск (отключив оба шлейфа на «стационарнике» или вынув из разъёмов на ноутбуке)
— включите машину, дождавшись ошибки загрузки;
— выключив компьютер, подключите жёсткий заново и снова, включив компьютер, проверьте; - проверьте UEFI меню платы компьютера на предмет правильной очерёдности разделов загрузки; первым должен стоять, как вы поняли, именно EFI;
- убедитесь, что метка Загрузочный стоит только напротив EFI раздела, и ни у какого больше. Проверить и исправить ситуацию из Windows PE, к сожалению, не получится. И для этого придётся воспользоваться дополнительными инструментами в виде загрузочной флешки. Сделайте это любым удобным вариантом из статьи Метка диска Загрузочный: как добавить или удалить?
У меня всё. Успехов.
Opening and accessing .EXE files can sometimes be difficult for Windows users, even if they are using the latest version of Windows. Many queries related to the same were submitted on Microsoft forums, and still, no viable solution was provided to resolve this query.
There are cases in which users even receive error messages when they try to open a .exe file, like Access Denied, Runtime Error, etc. So, what is the actual reason behind this problem?
Cause of .EXE Not Opening
According to Microsoft experts, this problem occurs due to corrupt registry settings, or system issues due to virus infection or third-party tool installations. Installation of third-party software can change the default configuration for running EXE files, which often leads to failures when you try to run EXE files.
Well, fixing this problem is very easy and convenient without using any third-party tools.
Methods to Open .EXE Files in Windows 10
There are multiple ways to resolve this error; here, we will cover the most useful methods for fixing “EXE files not opening in Windows 10.”
- By changing the registry values
Due to unknown reasons, the values in your system registry often get changed that prevent .exe files from opening. You can change the default registry settings, following the below steps:- Press Window + R on your system and type cmd to launch Command prompt.
- On the command prompt, type regedit and press enter.
- Registry Editor will appear on the screen, in the left pane, click HKEY_CLASSES_ROOT.exe.
- In the right pane, you’ll see Registry keys. Click the Default key and set the data value to exefile.
- After changing the key value, click HKEY_CLASSES_ROOTexefileshellopencommand key in the left pane.
- Just like above, click the Default key and change its value to “%1” %*.
- Now, restart your computer, and see if the problem is fixed or not.
For some users, this method might work in the Safe mode. However, if it still doesn’t work for you, then check other methods mentioned below.
- Turn off Windows Firewall
Every genuine Windows comes integrated with Firewall protection to protect the system from external malware attacks. Disabling Windows Firewall can also fix this issue, as reported by some users. To disable Windows Firewall, you’ll have to launch your computer in Safe Mode, and then follow the below steps:- After starting the computer in Safe Mode, press Window + S to enter Windows Firewall and select Windows Firewall from there.
- In the left pane, click Turn Windows Firewall on or off. In the opened wizard, select Turn Off Windows Firewall for both Private network settings and Public network settings, and then click OK to save changes.
- After turning off the Windows Firewall, check if the problem is still persisting or not.
Well, it is NOT RECOMMENDED to disable Windows Firewall on your system, as it protects your data from malicious attacks. But, if disabling it fixes some problems, then you can give it a try.
General Suggestions for Fixing .EXE File Errors
Using the above methods, you can easily resolve the problems in opening the .exe file. But, if you’re still unable to access your .exe file, then you can follow some general tips, such as:
- Use System File Checker
It is an in-built tool provided by Microsoft to help users repair their data files. Using this software, you can scan Windows and restore files. - Try Clean Boot for your System
Clean boot is the process of starting your Windows with minimal programs and services. And when your Windows start with minimal resources, you can use hit and trial method to find the third-party application that is harming your files.To start your system in Clean Boot, you need to run msconfig command in the Run dialog box, which will display the System Configuration Utility.
Go to the Services tab and hide all the Microsoft services, then click the Startup tab to locate the culprit software and disable it. Now, reboot your system, and you’ll not face the problem again.
- Install Latest Updates
Check for Windows 10 latest updates and install on your system. If the latest updates are not installed, then download and install it because sometimes .exe files are unable to open in old versions.
To check for Windows 10 updates, go to System settings>>Update & Security, and then click Windows Update.
In case, if the Windows system is corrupt, then none of the solution will work for you. However, you can use Windows Data Recovery software that will help you recover files of your system.
![]()
Conclusion
EXE is an executable file format used by various applications. But users sometimes find it difficult to open and access their .exe files on Windows systems. Windows Data Recovery will recover all the files present in Windows system including the EXE files. So, whenever you are facing problems or errors in opening the executable files, then you scan the drive using Windows Data Recovery and retrieve the EXE files that will run properly now.
If Windows refuses to let you open a file, try these fixes to gain access once more.

Did you just try to open a file on Windows and receive an error that said, «These files can’t be opened«? The error mostly occurs for .exe files, but some users have also encountered it with other file types too. The issue is most commonly encountered on Windows 7 and 8, but you can still encounter it on a Windows 10 PC.
Fortunately, fixing the error shouldn’t take you longer than finishing a cup of coffee. What could take a tad longer though is determining the cause of the error so you can apply the appropriate fix. From Internet Properties to Internet Explorer settings, there could be several reasons that could cause the error.
Whatever the cause, one of the following fixes will set you up so you can access those files again without feeling like pulling your hair out.
1. Check If Your File Is Blocked
Sometimes, when you download an executable file off the internet or transfer files among PCs, Windows may decide to block the file to protect your system. When this happens, you’ll witness the error «These files can’t be opened«, but a two-step fix is all you need to unblock this file.
To illustrate this behavior here, we downloaded the 4K Video Downloader’s setup file onto a PC. Windows didn’t block access to this file for us, but it did warn us under the Security section in the File Properties > General tab.
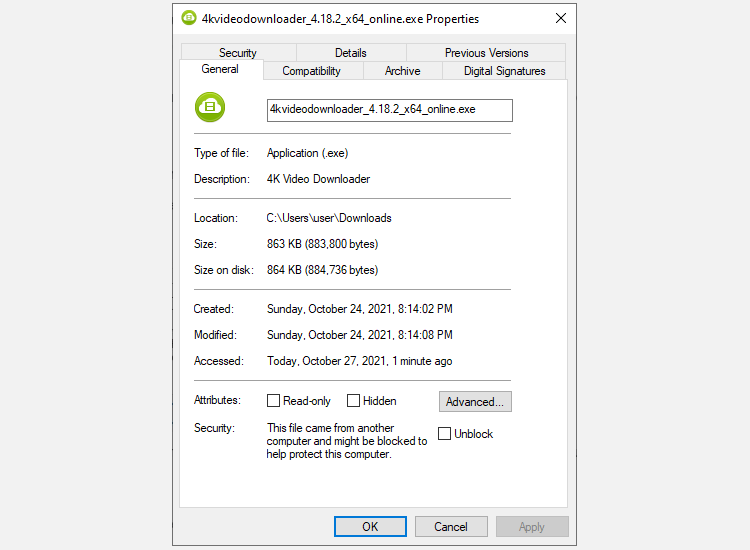
The message says «This file came from another computer and might be blocked to help protect this computer.» If you’re unable to access the file, you can fix it by checking the Unblock box and pressing OK. If you’re on a different version of Windows, you may see a button instead of a checkbox, but the process is the same.
Once you’re done, try running the file and see if everything is back on track.
2. Change Your Internet Properties
Windows checks your Internet Properties when deciding if a file should be allowed to run on your PC. If your Internet Properties marks a file as unsafe, Windows will give you the «These files can’t be opened» error. As such, to change Windows’ behavior, you’ll need to make some changes to your Internet Properties.
Note that this will require you to make your security settings less stringent from the Internet Properties. While you may be able to fix the error by doing this, it will also make your system vulnerable to security threats if you’re not mindful of which files you download onto your system.
If you decide to take this route, start by opening Internet Properties. To do this, press Win + R, type inetcpl.cpl, and press Enter. Switch to the Security tab in the Internet Properties window and click on the Custom level button.

You’ll now see a window called Security Settings — Internet Zone. Scroll through the list under the Settings section and look for Launching applications and unsafe files.
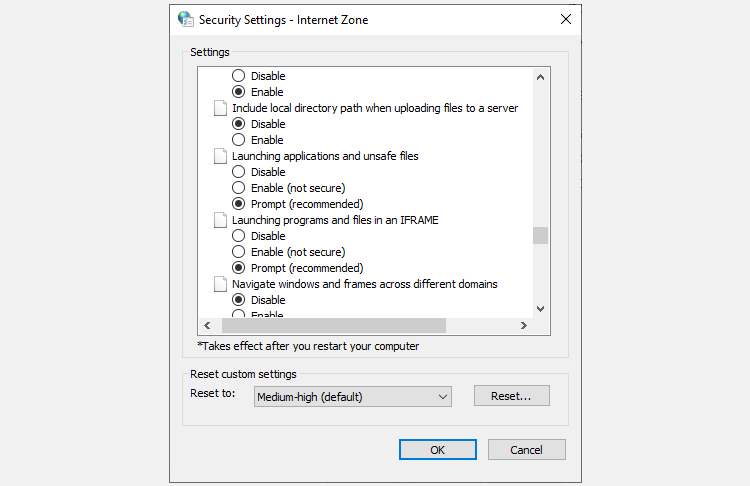
Make sure that the radio button for Prompt (recommended) is selected. This option is typically selected by default, but if you’ve tinkered with your internet properties in the past, you may have inadvertently changed it to Disable.
Once you’re done, click OK and see if you’re able to run the file.
3. Try Editing Values in the Windows Registry
If the previous fixes didn’t work for you, you can also try allowing unsafe files by editing the Windows registry. You’ll need to add a new registry entry using the Command Prompt. Start by launching elevated Command Prompt by pressing Win + R, typing cmd, and pressing Ctrl + Shift + Enter.
Execute the following commands one by one:
 reg add "HKCUSoftwareMicrosoftWindowsCurrentVersionPoliciesAssociations" /v "DefaultFileTypeRisk" /t REG_DWORD /d "1808" /f
reg add "HKCUSoftwareMicrosoftWindowsCurrentVersionPoliciesAttachments" /v "SaveZoneInformation" /t REG_DWORD /d "1" /f
This will add two new registry keys. Once you’re done, restart your PC and try opening the files.
4. Reset Internet Explorer
If you use Internet Explorer, resetting the settings to default could be helpful. To reset Internet Explorer’s settings, click on the ellipsis icon at the top-right of the browser and click on Internet Options. Switch to the Advanced tab and click on the Reset button.
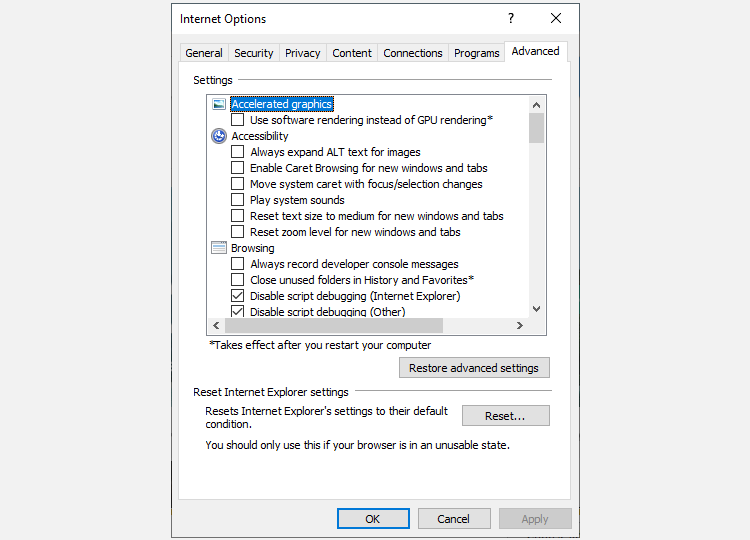
When prompted, confirm the reset and then reboot your PC.
If you still can’t run the files you want, perhaps it’s time for a last resort.
5. Revert Your Computer to a Previous System Restore Point
If you were able to run a particular file in the recent past but started getting this error after messing around with some settings, you could restore your system to a previous state where everything was going swimmingly.
To do this, you’ll first need to make sure that you have a system restore point created on your PC. Start by pressing Win + R, typing rstrui, and pressing Enter. This will launch the System Restore window. If you do have a restore point, you’ll see one under the Recommended restore option.
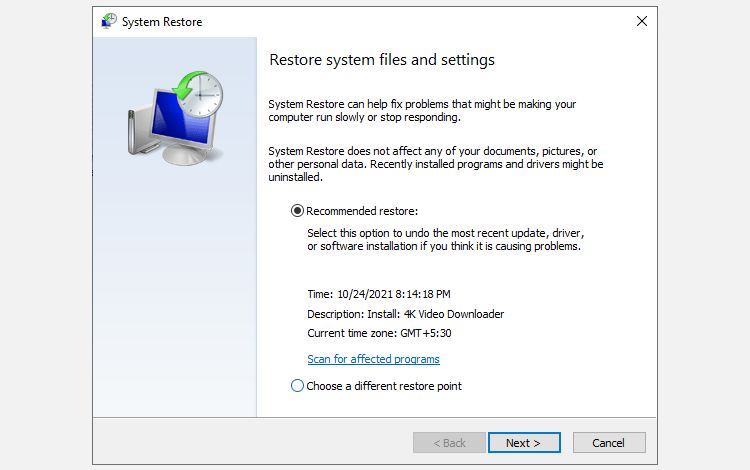
If you don’t have a restore point, you’ll see a message, «No restore points have been created on your computer’s system drive.» This means your PC has no point of reference in the past to revert to, and as such, you cannot use this method to fix your issue.
If you do have a restore point on your system, choose the recommended restore point or choose a different one based on when the problem started occurring, and click on Next. Continue following the wizard’s prompts. Once the system is restored, your PC will reboot and you should now be able to run the files you want.
Can You Open the Files Now?
Hopefully, one of these fixes worked for you and you’re no longer receiving the These files can’t be opened error. If you still are, however, you could try to reset your PC. All settings on your Windows will revert back to default, and some of your files may be lost in the process, so it’s good practice to create a backup before you reset.
Windows 8 Enterprise Windows 8 Pro Windows 8 Windows 7 Enterprise Windows 7 Professional Windows 7 Ultimate Windows 7 Home Premium Windows 7 Home Basic Windows 7 Starter Windows Vista Enterprise Windows Vista Ultimate Windows Vista Business Windows Vista Home Premium Windows Vista Home Basic Windows Vista Starter Microsoft Windows XP Professional Microsoft Windows XP Home Edition Microsoft Windows XP Starter Edition More…Less
Summary
When you try to access or work with files and folders in Windows, you experience one or more of the following issues:
-
Issue 1: You receive an «Access Denied» error message or a similar message.
-
Issue 2: You cannot access, change, save, or delete files and folders.
-
Issue 3: You cannot open a file or folder after you install a new version of Windows.
Resolution
To resolve a particular issue, follow the steps for the issue that best describes your situation. Use the method for your version of Windows.
Note You may not always receive an “Access Denied” error message for these kinds of issues. If particular steps do not resolve the issue, try a different set of steps.
Cause
An «Access Denied» error message can occur for one or more of the following reasons:
-
The folder ownership has changed.
-
You do not have the appropriate permissions.
-
The file is encrypted.
Resolution
Windows 8
You may not have ownership of a file or folder
If you recently upgraded your computer to Windows 8 from an earlier version of Windows, some of your account information may have changed. Therefore, you may no longer have ownership of some files or folders. You might be able to resolve this issue by restoring your ownership of the files and folders.
To take ownership of a file or folder, follow these steps:
-
Press and hold the folder that you want to take ownership of, then tap Properties. (If you are using a mouse, right-click the folder, and then click Properties.)
-
Tap or click the Security tab, tap or click Advanced, then tap or click Change. If you are prompted for an administrator password or for confirmation, type the password or provide confirmation.
-
Type the name of the person that you want to give ownership to, and then click Check Names.
Note The account name for the person that you are assigning ownership to is displayed.
-
Click OK.
-
If you want this person to be the owner of the files and subfolders that are contained in this folder, select the Replace owner on subcontainers and objects check box.
-
Click OK.
You may not have the appropriate permissions
Issues that you experience when you try to access files and folders may be related to permissions. Permissions are rules that determine whether you can access or change files and folders. To check permissions on a file or folder, follow these steps:
-
Press and hold or right-click the file or folder, and then click Properties.
-
Tap or click the Security tab.
-
Under Group or user names, tap or click your name to see the permissions that you have.
To open a file, you have to have the Read permission. To change the permissions of a file or folder, follow these steps.
Important You must be logged on as an administrator to change permissions on files and folders.
-
Press and hold or right-click the file or folder, and then tap or click Properties.
-
Tap or click the Security tab.
-
Under Group or user names, tap or click your name to see the permissions that you have.
-
Tap or click Edit, tap or click your name, select the check boxes for the permissions that you must have, and then click OK.
The file or folder may be encrypted
Encryption can help protect files and folders from unwanted access. You cannot open an encrypted file or folder without the certificate that was used to encrypt it. To determine whether a file or folder is encrypted, follow these steps:
-
Press and hold or right-click the file or folder, and then tap or click Properties.
-
Tap or click the General tab, and then tap or click Advanced.
If the Encrypt contents to secure data check box is selected, you have to have the certificate that was used to encrypt the file or folder to be able to open it. In this situation, you should obtain the certificate from the person who created or encrypted the file or folder, or have that person decrypt the file or folder.
Windows 7
You may not have ownership of a file or folder
If you recently upgraded your computer to Windows 7 from an earlier version of Windows, some of your account information may have changed. Therefore, you may no longer have ownership of some files or folders. You might be able to resolve this issue by restoring your ownership of the files and folders.
To take ownership of a file or a folder, follow these steps:
-
Right-click the folder that you want to take ownership of, then click Properties.
-
Click the Security tab, click Advanced, then click the Owner tab.
-
Click Edit.
Note If you are prompted for an administrator password or for confirmation, type the password or provide confirmation.
-
Click the name of the person that you want to give ownership to.
-
If you want this person to be the owner of files and subfolders in this folder, select the Replace owner on subcontainers and objects check box.
-
Click OK.
You may not have the appropriate permissions
Issues that you experience when you try to access files and folders may be related to permissions. Permissions are rules that determine whether you can access or change files and folders. To determine the permissions of the file or folder, follow these steps:
-
Right-click the file or folder, then click Properties.
-
Click the Security tab.
-
Under Group or user names, click your name to see the permissions that you have.
To open a file, you have to have the Read permission. To change permissions on a file or folder, follow these steps.
Important You must be logged on as an administrator to change permissions on files and folders.
-
Right-click the file or folder, and then click Properties.
-
Click the Security tab.
-
Under Group or user names, click your name to see the permissions that you have.
-
Click Edit, click your name, select the check boxes for the permissions that you must have, and then click OK.
For more information about permissions, see What are permissions?.
The file or folder may be encrypted
Encryption can help protect files and folders from unwanted access. You cannot open an encrypted file or folder without the certificate that was used to encrypt it. To determine whether a file or folder is encrypted, follow these steps:
-
Right-click the file or folder, and then click Properties.
-
Click the General tab, then click Advanced.
If the Encrypt contents to secure data check box is selected, you have to have the certificate that was used to encrypt the file or folder to be able to open it.
You should obtain the certificate from the person who created or encrypted the file or folder, or have that person decrypt the file or folder.
For more information, see Import or export certificates and private keys.
Cause
A problem that prevents you from accessing or working with files and folders can occur for one or more of the following reasons:
-
The folder ownership has changed
-
You do not have the appropriate permissions
-
The file is encrypted
-
The file is corrupted
-
The user profile is corrupted
Resolution
Windows 8
You may not have ownership of a file or folder
If you recently upgraded your computer to Windows 8 from an earlier version of Windows, some of your account information may have changed. Therefore, you may no longer have ownership of some files or folders. You might be able to resolve this issue by restoring your ownership of the files and folders.
To take ownership of a file or folder, follow these steps:
-
Press and hold the folder that you want to take ownership of, then tap Properties. (If you are using a mouse, right-click the folder, and then click Properties.)
-
Tap or click the Security tab, tap or click Advanced, then tap or click Change. If you are prompted for an administrator password or for confirmation, type the password or provide confirmation.
-
Type the name of the person that you want to give ownership to, and then click Check Names.
Note The account name for the person that you are assigning ownership to is displayed.
-
Click OK.
-
If you want this person to be the owner of the files and subfolders that are contained in this folder, select the Replace owner on subcontainers and objects check box.
-
Click OK.
You may not have the appropriate permissions
Issues that you experience when you try to access files and folders may be related to permissions. Permissions are rules that determine whether you can access or change files and folders. To check permissions on a file or a folder, follow these steps:
-
Press and hold or right-click the file or folder, and then click Properties.
-
Tap or click the Security tab.
-
Under Group or user names, tap or click your name to see the permissions that you have.
To open a file, you have to have the Read permission. To change the permissions of a file or folder, follow these steps.
Important You must be logged on as an administrator to change permissions on files and folders.
-
Press and hold or right-click the file or folder, and then tap or click Properties.
-
Tap or click the Security tab.
-
Under Group or user names, tap or click your name to see the permissions that you have.
-
Tap or click Edit, tap or click your name, select the check boxes for the permissions that you must have, and then click OK.
For more information about permissions, see What are permissions?.
The file or folder may be encrypted
Encryption can help protect files and folders from unwanted access. You cannot open an encrypted file or folder without the certificate that was used to encrypt it. To determine whether a file or folder is encrypted, follow these steps:
-
Press and hold or right-click the file or folder, and then tap or click Properties.
-
Tap or click the General tab, and then tap or click Advanced.
If the Encrypt contents to secure data check box is selected, you have to have the certificate that was used to encrypt the file or folder to be able to open it. In this situation, you should obtain the certificate from the person who created or encrypted the file or folder, or have that person decrypt the file or folder.
The file or folder may be corrupted
Files can become corrupted for several reasons. The most common reason is that you have a file open when your computer crashes or loses power. Most corrupted files cannot be repaired. In this situation, you should either delete the file or restore the file from a backup copy.
For more information about corrupted files and how to fix them, see Corrupted files: frequently asked questions.
Your local user profile may be corrupted
Occasionally, Windows might not read your local user profile correctly. This may prevent you from accessing files and folders. In this situation, you may have to use a new local user profile. To create the profile, you must first create a local user account. When the new account is created, the profile is also created. To create a local user account, follow these steps:
-
Swipe from the right edge of the screen, tap Settings, and then tap Change PC settings. (If you are using a mouse, point to the upper-right corner of the screen, move the mouse pointer down, click Settings, and then click Change PC settings)
-
In the navigation pane, tap or click Users.
-
Tap or Click Add a User, then tap or click Can they sign in without a Microsoft account?
-
Tap or click Local account.
-
Enter your new account name.
-
If you want to use a password, enter and verify the password that you want to use. If you decide not to use a password, tap or click Next without entering a password.
-
Tap or click Finish.
Windows 7
You may not have ownership of a file or folder
If you recently upgraded your computer to Windows 7 from an earlier version of Windows, some of your account information may have changed. Therefore, you may no longer have ownership of some files or folders. You might be able to resolve this issue by restoring your ownership of the files and folders.
To take ownership of a file or a folder, follow these steps:
-
Right-click the folder that you want to take ownership of, and then click Properties.
-
Click the Security tab, click Advanced, and then click the Owner tab.
-
Click Edit. If you are prompted for an administrator password or for confirmation, type the password or provide confirmation.
-
Click the name of the person that you want to give ownership to.
-
If you want that person to be the owner of files and subfolders in this folder, select the Replace owner on subcontainers and objects check box.
-
Click OK.
You may not have the appropriate permissions
Issues that you experience when you try to access files and folders may be related to permissions. Permissions are rules that determine whether you can access or change files and folders. To check permissions on a file or a folder, follow these steps:
-
Press and hold or right-click the file or folder, and then click Properties.
-
Tap or click the Security tab.
-
Under Group or user names, tap or click your name to see the permissions that you have.
To open a file, you have to have the Read permission. To change permissions on a file or folder, follow these steps.
Important You must be logged on as an administrator to change permissions on files and folders.
-
Right-click the file or folder, and then click Properties.
-
Click the Security tab.
-
Under Group or user names, click your name to see the permissions you have.
-
Click Edit, click your name, select the check boxes for the permissions that you must have, and then click OK.
For more information about permissions, see What are permissions?.
The file or folder may be encrypted
Encryption can help protect files and folders from unwanted access. You cannot open an encrypted file or folder without the certificate that was used to encrypt it. To determine whether a file or folder is encrypted, follow these steps:
-
Right-click the file, then click Properties.
-
Click the General tab, and then click Advanced.
If the Encrypt contents to secure data check box is selected, you have to have the certificate that was used to encrypt the file or folder to be able to open it.
You should obtain the certificate from the person who created the file. For more information, see Import or export certificates and private keys.
The file or folder may be corrupted
Files can become corrupted for several reasons. The most common reason is that you have a file open when your computer crashes or loses power. Most corrupted files cannot be repaired. In this situation, you should either delete the file or restore the file from a backup copy.
For more information about corrupted files and how to fix them, see Corrupted files: frequently asked questions.
Your user profile may be corrupted
Occasionally, Windows might not read your local user profile correctly. This may prevent you from accessing files and folders. In this situation, you may have to use a new local user profile. To create the profile, you must first create a local user account. When the new account is created, the profile is also created.
For more information about how to create user profiles, see Fix a corrupted user profile. After the new user profile is created, you can copy your existing user files to the new profile so that you can access them.
Cause
Problems that prevent you from accessing files and folders after you upgrade to a new version of Windows can occur for one or more of the following reasons:
-
The folder ownership has changed.
-
The files are being stored in a Windows.old folder from your previous system.
Resolution
Windows 8
You may not have ownership of a file or folder
If you recently upgraded your computer to Windows 8 from an earlier version of Windows, some of your account information may have changed. Therefore, you may no longer have ownership of some files and folders. You might be able to resolve this issue by restoring your ownership of the files and folders.
To take ownership of a file or a folder, follow these steps:
-
Press and hold the folder that you want to take ownership of, then tap Properties. (If you are using a mouse, right-click the folder, and then click Properties.)
-
Tap or click the Security tab, tap or click Advanced, then tap or click Change. If you are prompted for an administrator password or for confirmation, type the password or provide confirmation.
-
Type the name of the person that you want to give ownership to, and then click Check Names.
Note The account name for the person that you are assigning ownership to is displayed.
-
Click OK.
-
If you want this person to be the owner of the files and subfolders that are contained in this folder, select the Replace owner on subcontainers and objects check box.
-
Click OK.
You have to recover files from the Windows.old folder
If you recently upgraded your computer to Windows 8 from an earlier version of Windows, and you did not reformat the hard disk, you might still be able to access your old files from the Windows.old folder.
To fix this problem automatically, click the Fix it button or link. In the File Download dialog box, click Run, and then follow the steps in the Fix it Wizard. If you prefer to fix this problem yourself, go to the «Let me fix it myself» section.
Fix it for me
Notes
-
This wizard may be in English only. However, the automatic fix also works for other language versions of Windows.
-
If you are not on the computer that has the problem, save the Fix it solution to a flash drive or a CD, and then run it on the computer that has the problem.
Let me fix it myself
To manually retrieve the files, follow these steps:
-
Open the desktop, tap the folder icon, and then click Computer. Or, press the Windows logo key+E.
-
Double-tap or double-click the drive that Windows is installed on (typically, drive C).
-
Double-tap or double-click the Windows.old folder.
-
Double-tap or double-click the Users folder.
-
Double-tap or double-click your user name.
-
Open the folders that contain the files that you want to retrieve. For example, to retrieve files in the Documents folder, double-tap or double-click Documents.
-
Copy the files that you want from each folder and paste them to a folder in Windows 8. For example, if you want to retrieve everything from the Documents folder, copy all the files and folders from the Documents folder in the Windows.old folder, and then paste them to the Documents library in Windows 8.
-
Repeat steps 5-7 for each user account on your computer.
For more information about how to recover data from an earlier version of Windows, see Recover lost or deleted files.
Windows 7
You may not have ownership of a file or folder
If you recently upgraded your computer to Windows 7 from an earlier version of Windows, some of your account information may have changed. Therefore, you may no longer have ownership of some files and folders. You might be able to resolve this issue by restoring your ownership of the files and folders.
To take ownership of a file or a folder, follow these steps:
-
Right-click the folder that you want to take ownership of, and then click Properties.
-
Click the Security tab, click Advanced, and then click the Owner tab.
-
Click Edit. If you are prompted for an administrator password or confirmation, type the password or provide confirmation.
-
Click the name of the person that you want to give ownership to.
-
If you want that person to be the owner of files and subfolders in this folder, select the Replace owner on subcontainers and objects check box.
-
Click OK.
You may have to recover files from the Windows.old folder
If you recently upgraded your computer to Windows 7 from an earlier version of Windows, and you did not reformat your hard disk, you might still be able to access your old files from the Windows.old folder.
To fix this problem automatically, click the Fix it button or link. In the File Download dialog box, click Run, and then follow the steps in the Fix it Wizard.If you prefer to fix this problem yourself, go to the «Let me fix it myself» section.
Fix it for me
Notes
-
This wizard may be in English only. However, the automatic fix also works for other language versions of Windows.
-
If you are not on the computer that has the problem, save the Fix it solution to a flash drive or a CD, and then run it on the computer that has the problem.
Let me fix it myself
To manually retrieve the files, follow these steps:
-
Click Start, then click Computer.
-
Double-click the drive that Windows is installed on (typically, drive C).
-
Double-click the Windows.old folder.
-
Double-click the Users folder.
-
Double-click your user name.
-
Open the folders that contain the files that you want to retrieve. For example, to retrieve files in the Documents folder, double-click Documents.
-
Copy the files that you want from each folder and paste them to a folder in Windows 7. For example, if you want to retrieve everything from the Documents folder, copy all the files and folders from the Documents folder in the Windows.old folder, and then paste them to the Documents library in Windows 7.
-
Repeat steps 5-7 for each user account on your computer.
For more information about how to recover data from an earlier version of Windows, see Recover lost or deleted files.
Need more help?
Want more options?
Explore subscription benefits, browse training courses, learn how to secure your device, and more.
Communities help you ask and answer questions, give feedback, and hear from experts with rich knowledge.
This App Can’t Open Windows 10 PC error can occur when you are trying to open the applications or when you start the Windows. You may get This App Can’t Open Windows error when you are going to open Calculator application or any photos on your Windows PC. This is a type of error problem with the Windows Store. This App Can’t Open Windows a prevalent error issue that many users face in their Windows 10 PC.
This App Can’t Open Windows Microsoft Edge can’t be opened using the built-in Administrator Account. Sign in with a different account and try again
Causes of This App Can’t Open Windows Error Issue:
- Windows 10 PC error
- Microsoft Edge problem
- Account issue
Apps are always an essential part of Windows. But sometimes they fail to open. So how to fix & solve This App Can’t Open Windows issue? Let’s explore this further below.
How to Fix & Solve This App Can’t Open Windows Error Issue
1. Making sure that Windows Update Service is Running –
If the windows update service is not running, it may be the cause of This App Can’t Open Windows 10 calculator PC problem. So first check this by following these simple This App Can’t Open Windows 8 steps.
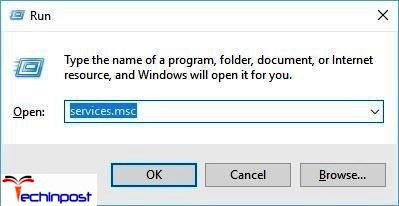
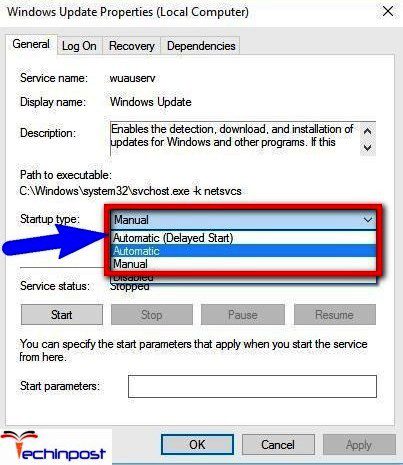
- Press Windows Key + R and open the Run dialog. Here enter service.msc and click ok

- See Windows Update on the services list. The Startup Type must be set to Manual or Automatic
- If it’s not, double-click the Windows Update service and open its properties
- Find Startup Type section and choose Manual or Automatic

- Click on Apply
So by trying This App Can’t Open Windows 10 Photos method, you can get rid out of this error.
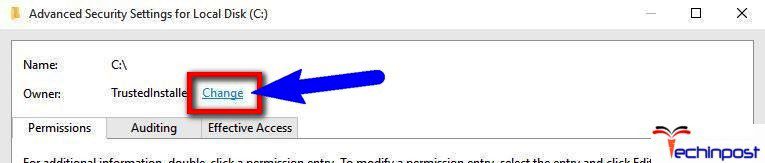
2. Changing the Ownership of C Drive –
This can create an issue with the opening of the app. To fix Windows 10, This App Can’t Open there’s a problem with photos issue then follow these steps.
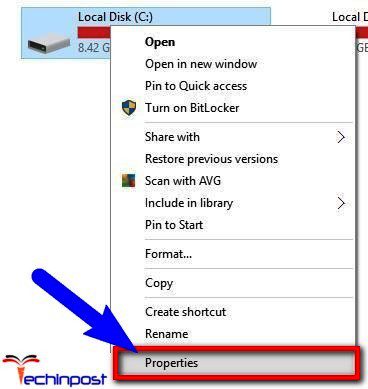
- Open This PC and locate installation directory of Windows. It must be C by default
- Right-click and select Properties

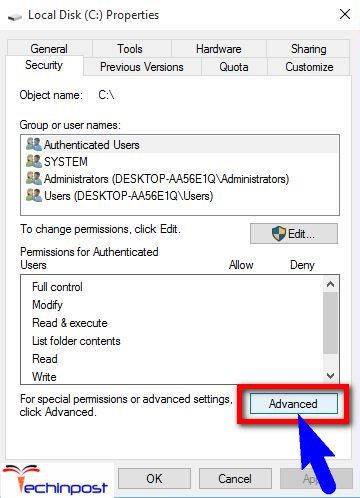
- Security ->Advanced

- In the Owner section, click Change

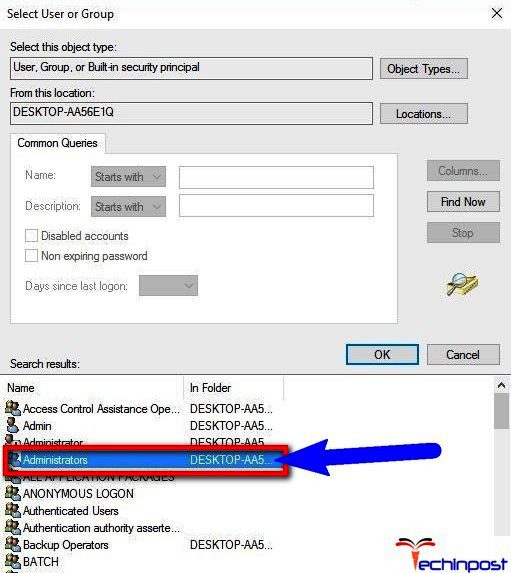
- Click on the Advanced button in the Select User or Group
- Click on Find Now Select Administrators and then OK

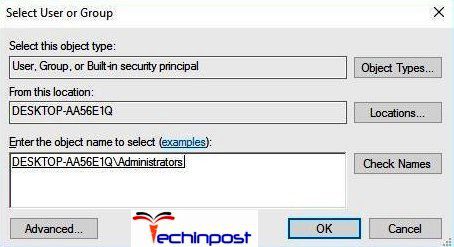
- Click OK in Select User or Group

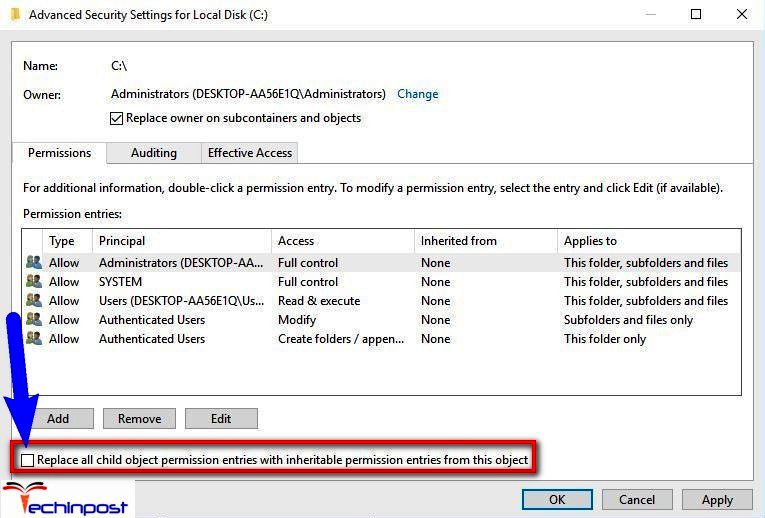
- In Advanced Security Settings owner must be Administrators and Administrators group must be added to Permission entries Check to Replace owner on sub containers and objects

- Click Apply and wait for the process to complete
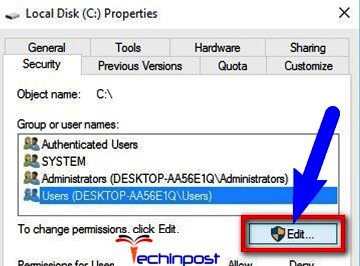
Besides, it is possible to add Full Control permissions to the drive for ALL APPLICATION PACKAGES group,
- Open disk partition Properties and then go to Security
- Click on Edit

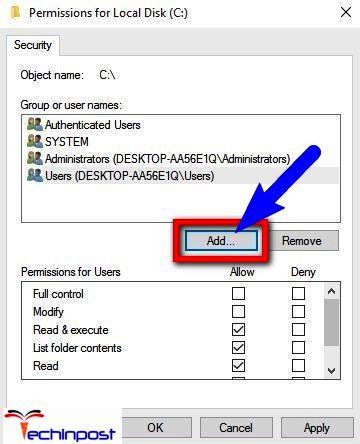
- Permissions for Local Disk will open. Click on Add

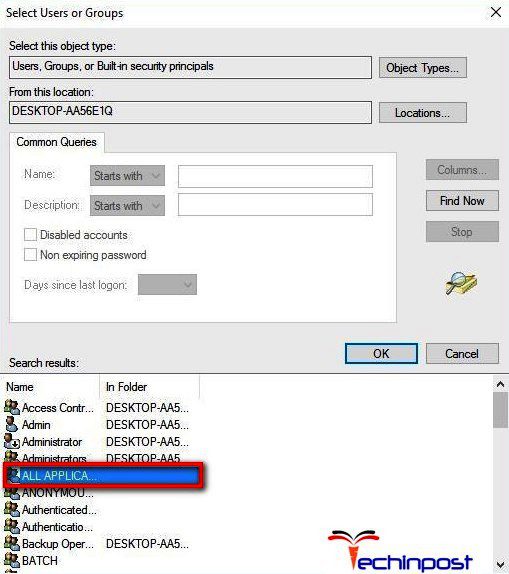
- Select User or Group window will now appear. Click on Advanced button, and then on Find Now
- Find ALL APPLICATION PACKAGES and then select it and click OK

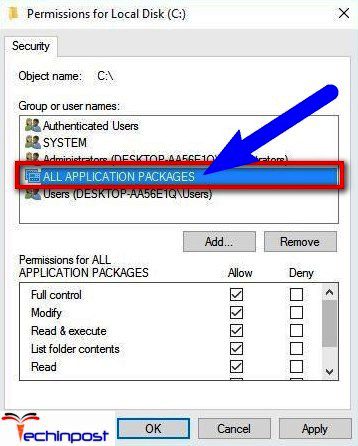
- Click on OK
- ALL APPLICATION PACKAGES are now added to the list. Click on it and select Full Control. Click on Apply and then on

- If there is still a problem, open Properties -> Security tab and then add the Full control to the Users
By trying This App Can’t Open Windows 10 sticky notes Guide, you can get back from this problem.
3. Creating a New User Account –
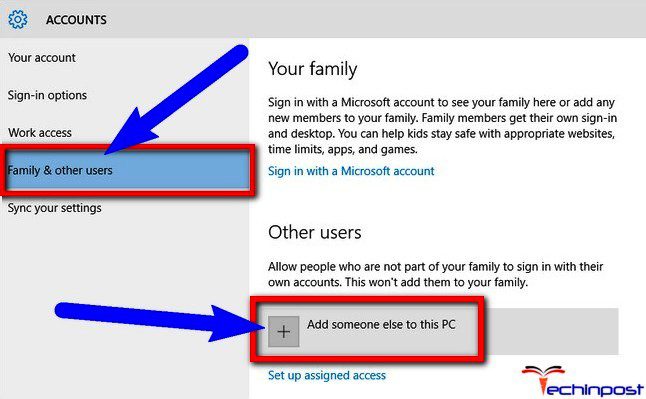
This App Can’t Open Windows 10 built-in administrator account issue can be linked to one of your contemporary accounts. If you try creating a new account and switching to it, the issue can be resolved as observed in many cases. So here are a few simple This App Can’t Open sticky notes steps for creating a new user account and then logging on to it:
- Type add a user in the Search Bar and select Add, edit, or remove other users from the list of results. You can easily do this by navigating to these: Settings > Accounts > Family & other users

- In the Family & other users, section clicks on the tab, add someone else to this PC. This will then take you further towards the new user setup page
- Click on This person I want to add doesn’t have an email
- Click on this option. Add a user without a Microsoft Account. This is for creating a new email address
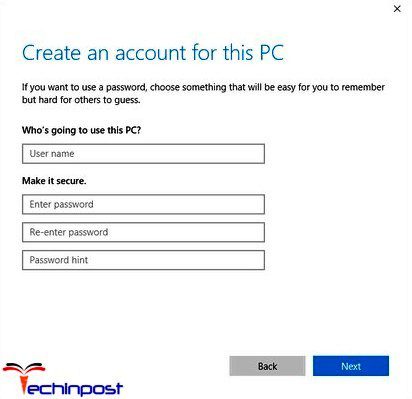
- Now comes the screen where we have to enter Username and Password. This will be for the local account

- After a new account has been created, we shall switch to it and check whether the Calculator app is running or not
- If everything works fine, it is even safe and possible to delete your old account. But keep in mind to copy all the necessary files and documents to the new account. And it is worth mentioning that even though you are using a local account, it can be easily converted to a Microsoft account so that it is possible to get access towards all of the apps that you had before.
So by applying this method, you can get back from This App Can’t Open there’s a problem with calculator error.
4. Changing the FilterAdministratorToken in Registry Editor –
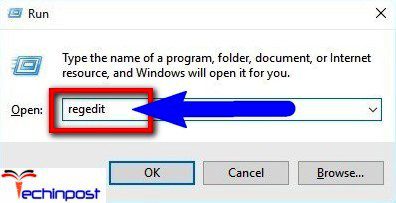
- Open Run dialog. Then type Regedit and click OK

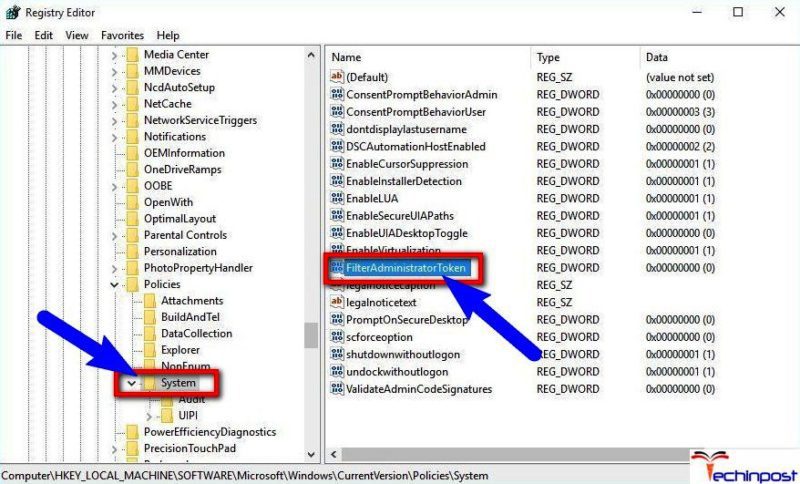
- After it opens go the following key:
HKEY_LOCAL_MACHINESOFTWAREMicrosoftWindowsCurrentVersionPoliciesSystem

- On the right side, find the 32-bit DWORD called FilterAdministratorToken. If it is available, go to the next step. If not available then add it by choosing New > DWORD (32-bit) Now change this new value to FilterAdministratorToken
- Double click on the FilterAdministratorToken Enter 1 in the Value data field and click OK

- Now restart your computer
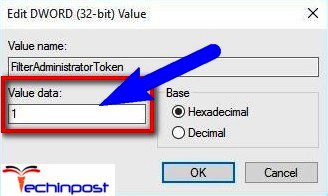
So by doing the step, you can get rid out of This App Can’t Open Windows 10 issue.
5. Running the Troubleshooter –
Download the troubleshooter and run it if you are facing Windows 10 This App Can’t Open error problems.
6. Reinstall the Problematic Application –
Reinstalling and then downloading the app again may remove This App Can’t Open using the built-in administrator account error.
So here we show you some very best natural methods & solutions for getting rid out of this type of error This App Can’t Open Windows 10 PC problem from your Windows PC completely. Hope these tips will undoubtedly helpful for you for getting back from This App Can’t Open Windows 10 an issue.
I hope you have figured out a This App Can’t Open Windows 10 PC error solution with all of the above steps. If not, then do contact us for any suggestion by commenting below. Thank you!