
Pretty sure each of us here is a big fan of how exciting Minecraft can be as a game.
The USP of the game is that gives it gives the players the freedom to choose their own goals in the game and play it the way they want to.
Players can mess around with digital representations of real-life objects and construct their pathway to move forward in the game and unlock new exciting levels.
But, sadly sometimes some of you might meet a dead-end when it comes to solving technical glitches in the game, which can even manifest as a launching problem restructuring the game to function as usual.
Read on to know how you can battle these issues-
What Does “Launching The Game Failed” Mean In Minecraft?
“Launching the game failed” in Minecraft means that the game is not opening up or functional as usual on your device.
There might be a background app/process on your system that might be causing the app to crash whenever you try to open it.
Why Did Launching The Game Failed In Minecraft?
If your Minecraft Launcher shows you an error message that says “launching the game failed”, it might mean the following things-
For reasons unknown, the most justifiable cause behind the failure to launch the Minecraft game is the launcher profiles already present on your system.
At times, the profile documents might be not in the best shape, which can cause the game to malfunction or simply not function as usual.
It can likewise be set off by wrong items in the “authentication Database” segment in the documents.
One more conceivable reason for the issue could be the presence of questionable third-party software on your system.
A launching issue can happen when a third-party software/app/process becomes an obstruction in its way to functioning as usual and, subsequently, it can’t launch as expected.
How To Fix “Launching The Game Failed” In Minecraft?
Here are the different ways you can patch up this problem-
Fix 1: Access The Minecraft Game As An Administrator
Administrators have special privileges when it comes to fixing a technical glitch in a game.
So it isn’t unbelievable that the first trick to solve this launching issue would be to run the game as an administrator.
Use special privileges that an administrator has and try to eliminate the background software/app/process that is interrupting the smooth functioning of the game, and preventing the launching of Minecraft on your device.
Steps to Access The Minecraft Game As An Administrator:
- Right-click on the launcher shortcut. A drop-down menu will appear on the screen.
- Now, Choose the “Run as Administrator” option in the drop-down menu.
- A User Access Control Dialog Box will appear. Click on “Yes”.
Fix 2: Delete All The Minecraft Launcher Profile
Minecraft Launcher profiles are automatically saved on your computer system whenever you open Minecraft Launcher.
At times, these profiles might be damaged and thus, can prevent the normal launch of the game.
Corrupted profiles should be wiped off the system.
You might lose all your launcher settings if you choose to try this solution but it’s still one of the safest bets you have when you run into a launching issue with Minecraft.
- On your system, press the Windows key and “R” on your keyboard together to access the “run” option.
- Type “%AppData%” on the Run Dialog Box and hit the Enter key.
- A File Explorer window appears. Click on the “.minecraft” folder.
- Delete the “launcher_profiles.json” file in the folder. You can opt to simply move it to a different location.
- Try launching the game again.
Fix 3: Use Clean Boot To Get Rid Of Unnecessary Apps
Your device is probably jam-packed with multiple unused apps, and one among them might be causing issues.
Most often, we download various apps without verifying if they are safe in the wrong run.
Sometimes, certain antivirus apps keep running in the background and prevent other apps from launching normally.
It might take a lot of time to assess which app is causing the actual problem.
The best way out of this situation is to use the Clean Boot feature on your device.
It successfully restarts the Windows Operating System only with the apps that you need.
It removes suspicious third-party background apps that might be causing Minecraft to malfunction.
- Type “MSConfig” under the Start Menu.
- Press “System Configuration”.
- After this, click on the “Services” button on the “System Configuration” window.
- Click on the “Hide all Microsoft services” option.
- Now, Click on the “Disable all” option that disables all the third-party background services.
- Click on the “Startup” option beside the “Services” button, and then click on “Open Task Manager”.
- Disable all third-party apps on the Task Manager Window. Close the window and press “OK” on the System Configuration window.
- Restart the system. Check whether Minecraft is functioning normally.
Fix 4: Try Reinstalling Minecraft
What happens if all the above solutions fail to fix the issue?
You are left with no option but to reinstall the game because the damaged Minecraft Installation files on your system might be the main culprit.
So, try to uninstall the game from your system and then download and install it again.
Fix 5: Reach Out To The Support
In case none of the methods mentioned above helped you, you can also contact the Minecraft support team to get a resolution for the issue.
Visit https://help.minecraft.net/hc/en-us/requests/new?ticket_form_id=360001225811 and choose the issue that you are facing.
Submit your request and then the team will call you back.
Minecraft Launching The Game Failed Unable To Create Directory
Minecraft Launching The Game Failed Unable To Create Directory means that the Minecraft application can not create or find the game directory, leading to the crashing of the application.
The error “Unable to create directory” pops up because of faulty settings or configurations of the Minecraft game, which obstructs the game from building a folder to store all the plugins required to run the game.
There are 3 easy ways to solve this problem-
1. User Permission Reset
If Minecraft keeps saying that it is unable to create a directory, it might be because of the sudden change in your system’s permission regarding the creation of a directory.
The only way this problem can be fixed is by resetting the user permission on your system.
2. Disabling The Firewalls
Antiviruses and Firewalls might not be good friends with Minecraft and view it as a potential threat.
Temporarily disabling them while you play the game might be a quick solution to the “unable to create a directory” problem.
3. Eliminating ByteFence
The software, ByteFence is always at loggerheads with Minecraft stopping the game from launching itself, installing necessary updates, and much more.
It is advisable to find an alternative for this software if you wish to continue playing Minecraft without any unnecessary interruptions.
Also Read: How To Enable Multiplayer On Minecraft
Minecraft Launching The Game Failed Unable To Locate The Java Runtime
Minecraft Launching The Game Failed Unable To Locate The Java Runtime means that the Minecraft application is not able to find the Java Runtime on your system.
The error “Unable to locate the Java runtime” pops up when you might be working with an older or un-updated version of JRE software, which might cause an error when a user is trying to run the game.
There are 4 easy ways to eliminate this issue-
1. Inspect The Launcher Program
An un-updated launcher can become a huge headache for Minecraft gamers!!
It is advisable to regularly check whether the launcher is the latest one.
Try to open the game again after you have updated the launcher.
2. Inspect The Java Runtime Directory
Launching Minecraft can become difficult if there is a sudden change or an update to Java which in turn messes up its ability to examine the runtime directory.
You can solve this issue by following the steps below-
- Open the launcher and then access “Launcher options”.
- Look for the “Java executable” option, and uncheck it.
- Save the settings.
- Try re-launching Minecraft.
3. Reinstall JAVA
When nothing works, you will have to walk a difficult route.
Reinstall the entire JAVA application and lay its foundations with the game right from the beginning.
Conclusion
When you have chosen to be a fan of Minecraft, you will run into technical glitches from time to time.
The game comes with its issues, but we can’t blame it.
No game or software is 100% perfect.
But, we have easy and perfect solutions and now that we know them, these glitches won’t be able to bother us anymore.
Similar Posts:
К некоторым ошибкам при запуске игры, лаунчер НЕ может подобрать решение, поэтому вызывается «Консоль разработчика», для ручного поиска проблемы. В данной статье будут даны рекомендации по работе с данной консолью.
Minecraft closed with exit code:
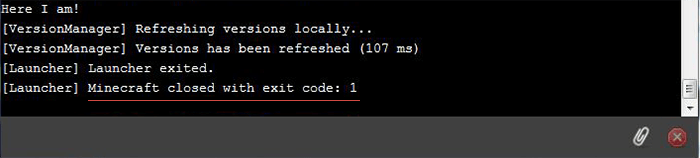
После того, как игра не запустится и покажется консоль, в конце данной консоли можно найти указанный выше текст. Обычно, после двоеточия, указывается специальный код ошибки, по нему можно поискать решение.
Список кодов с ссылками на их решения:
Minecraft closed with exit code: -1073740791
Бывает множество ТАКИХ КОДОВ, если в нашем списке нет такого кода, то используйте поисковую систему (Яндекс или Google) с примерно таким запросом «Minecraft closed with exit code: НОМЕР КОДА ИЗ КОНСОЛИ», возможно на форумах или на каких-либо сайтах есть решение.
Minecraft closed with exit code: -1 или 1
Самая частая проблема с таким кодом, из-за модов. Обычно в логах можно опознать какой мод вызвал ошибку, но если это вызывает у вас затруднение, пробуйте следующее решения:
1) Полностью удалите все моды и устанавливайте по 1-3 моду, если работает, добавляйте еще по немного модов. Так, вы найдете тот, который вызывает краш.
2) Для модов, мы рекомендуем использовать нашу систему мод-паков, подробнее о ней можно узнать на отдельной странице.
3) Если вылетает такой код даже без модов, то попробуйте «Полный сброс» в настройках TLauncher (иконка «Шестерёнки» -> «Настройки» -> Вкладка «Настройки TLauncher» -> кнопка «Полный сброс».).
Java Error: Problematic frame
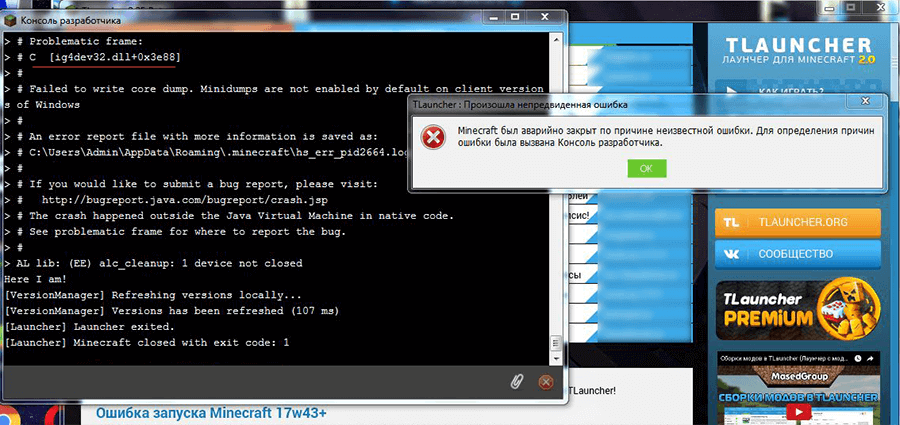
Если вы наблюдаете в конце консоли подобный текст (возможно такого и не будет, тогда переходим дальше), где есть надписи «A fatal error has been detected by the Java Runtime Environment:», то необходимо найти «Problematic frame».
На следующей строке находим ***.dll , в котором и происходит ошибка (например, ig4dev32.dll), используйте наши гайды для решения проблемы:
Problematic frame: ig4dev32.dll / ig4dev64.dll
Problematic frame: ig9icd32.dll / ig9icd64.dll
Если гайда у нас по ошибке нет, можно искать в поисковой системе, примерно с таким текстом: «***.dll error minecraft», где *** название после problematic frame (например, ig4dev32.dll).
Изучите нашу справку, для получение дополнительной информации по ошибкам игры и лаунчера.
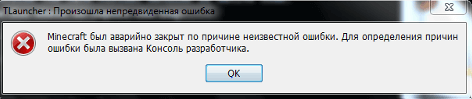
Полный текст ошибки:
Minecraft был аварийно закрыт по причине неизвестной ошибки. Для определения причин ошибки была вызвана Консоль разработчика.
Читайте также:
— Как установить HD скин в TLauncher
— Как установить плащ в TLauncher
Пишите в комментариях какой способ помог, а так же если нечего не помогло, свяжитесь с нами: [email protected]
-
Search
-
Search all Forums
-
Search this Forum
-
Search this Thread
-
-
Tools
-
Jump to Forum
-
-
#1
Oct 25, 2012
Nashulee-
View User Profile
-
View Posts
-
Send Message

- Tree Puncher
- Location:
Ft.Worth Texas
- Join Date:
7/26/2012
- Posts:
24
- Minecraft:
Nashulee
- Xbox:
Rockcrawler_OMM
- Member Details
good afternoon, when trying to updated this morning before I came to work, I got this error.
Failed to Launch:
Fatal error occured (4) : /users/nashulee/library/applicationsupport/minecraft.jar
retrieving : lwjgl_util.jar 17%When I launched it asked if I wanted to updated, I said yes, and it would start the download process then give me this error.
I am running a MAC and I am running optifine.
Any help would be greatly appreciated
God Bless
-
-
#3
Oct 25, 2012
jjlin98-
View User Profile
-
View Posts
-
Send Message
- Iron Miner
- Join Date:
1/13/2012
- Posts:
265
- Minecraft:
Left4Dead
- Xbox:
Nicole Darrow
- Member Details
Optifine is not for 1.4.2 yet force update to get rid of optifine and update in one process. If you need optifine to play your going to have wait for it to update.
-
-
#4
Oct 25, 2012
Optifine was released for 1.4.2 yesterday, while 1.4.2 was still a prerelease.
Smexy has it right, delete the bin folder and try launching it again. It kinda sounds like the servers went down while you were updating, and caused problems for you.
-
#5
Oct 25, 2012
jjlin98-
View User Profile
-
View Posts
-
Send Message
- Iron Miner
- Join Date:
1/13/2012
- Posts:
265
- Minecraft:
Left4Dead
- Xbox:
Nicole Darrow
- Member Details
Crap sorr
Optifine was released for 1.4.2 yesterday, while 1.4.2 was still a prerelease.
Smexy has it right, delete the bin folder and try launching it again. It kinda sounds like the servers went down while you were updating, and caused problems for you.
Sorry for the bad info, next time I’ll check before I give help.
-
-
#6
Oct 25, 2012
Nashulee-
View User Profile
-
View Posts
-
Send Message
- Tree Puncher
- Location:
Ft.Worth Texas
- Join Date:
7/26/2012
- Posts:
24
- Minecraft:
Nashulee
- Xbox:
Rockcrawler_OMM
- Member Details
Thank you guys for the help. I deleted the BIN files and restarted, worked like a charm!
-
-
#7
Nov 17, 2012
dsk8-
View User Profile
-
View Posts
-
Send Message
- Newly Spawned
- Join Date:
11/17/2012
- Posts:
1
- Member Details
I have the same problem. I deleted the bin folder and forced an update which resolved the issue. The only problem now is I have lost all my mods. I made a backup copy of all the files before doing this. Is there any other way to fix without losing everything???
-
- To post a comment, please login.


")

Posts Quoted:
Reply
Clear All Quotes
Logs (Most issues require logs to diagnose):
Spoiler
Please post logs using one of the following sites (Thank you Lumber Wizard for the list):
https://gist.github.com/: 100MB Requires member (Free)
https://pastebin.com/: 512KB as guest, 10MB as Pro ($$$)
https://hastebin.com/: 400KB
Do NOT use sites like Mediafire, Dropbox, OneDrive, Google Drive, or a site that has a countdown before offering downloads.
What to provide:
…for Crashes and Runtime issues:
Minecraft 1.14.4 and newer:
Post debug.log
Older versions:
Please update…
…for Installer Issues:
Post your installer log, found in the same place you ran the installer
This log will be called either installer.log or named the same as the installer but with .log on the end
Note for Windows users:
Windows hides file extensions by default so the installer may appear without the .jar extension then when the .log is added the log will appear with the .jar extension
Where to get it:
Mojang Launcher: When using the Mojang launcher debug.log is found in .minecraftlogs.
Curse/Overwolf: If you are using the Curse Launcher, their configurations break Forge’s log settings, fortunately there is an easier workaround than I originally thought, this works even with Curse’s installation of the Minecraft launcher as long as it is not launched THROUGH Twitch:
Spoiler
- Make sure you have the correct version of Forge installed (some packs are heavily dependent on one specific build of Forge)
- Make a launcher profile targeting this version of Forge.
- Set the launcher profile’s GameDir property to the pack’s instance folder (not the instances folder, the folder that has the pack’s name on it).
- Now launch the pack through that profile and follow the «Mojang Launcher» instructions above.
Video:
Spoiler
or alternately,
Fallback («No logs are generated»):
If you don’t see logs generated in the usual place, provide the launcher_log.txt from .minecraft
Server Not Starting:
Spoiler
If your server does not start or a command window appears and immediately goes away, run the jar manually and provide the output.
Reporting Illegal/Inappropriate Adfocus Ads:
Spoiler
Get a screenshot of the URL bar or copy/paste the whole URL into a thread on the General Discussion board with a description of the Ad.
Lex will need the Ad ID contained in that URL to report it to Adfocus’ support team.
Posting your mod as a GitHub Repo:
Spoiler
When you have an issue with your mod the most helpful thing you can do when asking for help is to provide your code to those helping you. The most convenient way to do this is via GitHub or another source control hub.
When setting up a GitHub Repo it might seem easy to just upload everything, however this method has the potential for mistakes that could lead to trouble later on, it is recommended to use a Git client or to get comfortable with the Git command line. The following instructions will use the Git Command Line and as such they assume you already have it installed and that you have created a repository.
- Open a command prompt (CMD, Powershell, Terminal, etc).
- Navigate to the folder you extracted Forge’s MDK to (the one that had all the licenses in).
-
Run the following commands:
- git init
-
git remote add origin [Your Repository’s URL]
- In the case of GitHub it should look like: https://GitHub.com/[Your Username]/[Repo Name].git
- git fetch
- git checkout —track origin/master
- git stage *
- git commit -m «[Your commit message]»
- git push
-
Navigate to GitHub and you should now see most of the files.
- note that it is intentional that some are not synced with GitHub and this is done with the (hidden) .gitignore file that Forge’s MDK has provided (hence the strictness on which folder git init is run from)
- Now you can share your GitHub link with those who you are asking for help.
[Workaround line, please ignore]
One of the most frustrating things that can happen when you’re trying to play Minecraft is the “Launching the game failed” error. This error can be caused by a number of things, but there are a few easy fixes that you can try to get the game up and running again.
In this article, we’ll walk you through some of the possible causes of the error and how to fix them. We’ll also explain what you can do to prevent the error from happening in the first place.
So if you’re ready to get back to Minecraft, read on for our guide on how to fix the “Launching the game failed” error.
This issue has been widely spread over a lot of players. If you are facing this issue, then dont be disappointed you are not alone. In this article we will try to fix this issue.
Issues with Frame or Pixel Format
If the Minecraft launcher won’t start or if you see an error that says “Pixel format not accelerated,” you may have outdated visual card drivers.
Frame errors, often known as “Pixel format not accelerated” errors, are frequently caused by out-of-date or broken video card drivers.
The majority of the time, this error is caused by out-of-date video card drivers, but it can also be caused by a gamepad or something that is mistaken for one (headphones, controller, etc.). Consider disconnecting every other connected device to your computer if it’s possible before restarting Minecraft.
Update your Video Card Drivers
It is generally advised to conduct a system-wide upgrade, starting with the graphics drivers, if you are experiencing such problems that are not related to server or internet failures. In order to update your graphics drivers, go to the URL that corresponds to the GPU you are using.
AMD:- https://www.amd.com/en/support
Nvidia:- https://www.nvidia.com/Download/index.aspx
Intel:- https://www.intel.in/content/www/in/en/download-center/home.html
Fix DLL Missing Error
Generally, as a rule of thumb, a file is missing if you encounter this error when attempting to run the Minecraft: Java Edition launcher. Check for software updates on your PC.
Search for and install any updates that your machine requires. Specifically, any system or graphics card changes. Once the updates are finished, restart your computer. After reinstalling the missing files, the problem should be resolved.
Try an Alternative Minecraft Launcher
If you are experiencing problems with the standard Java launcher, refer to the alternative download choices for Minecraft: Java Edition guide and select the alternative launcher or any other option that best meets your requirements.
Error or Crash When Loading Resource Packs
You must remove and reinstall each mod or resource pack separately to determine which one is to blame if it prevents your game from loading or crashing.
A helpful hint is to remove them in the opposite of the order they were installed, testing after each removal.
Pink and Black Checkered Boxes Appear Where Textures Should Be
The game uses pink and black checkered boxes in place of resource pack images when they don’t load properly. This occurs when the textures are not in the game’s allocated directory folder or when they were wrongly downloaded.
To restore textures, you must take them out and download your textures once more.
Open Minecraft and choose Resource Packs from the Options menu.
Remove all textures from the Resources Pack folder by opening it.
Download the textures to the folder once again.
Game Out of Memory Error
You need to investigate any memory-related system problems if you try to play the game and see this error message. A straightforward system reset (reboot) could cure it, but it might also have to do with how much RAM your device has been allotted.
Players frequently set their game settings higher than what is suggested for their system or device setup. See whether making these changes allows you to free up enough RAM to run your game.
Reducing the Video Settings in the Pause menu
It is possible to make the game operate a little bit more easily by lowering some or all of the settings’ quality.
There are occasions when the amount of RAM on your computer or server is insufficient compared to the memory requirements of Minecraft. As your game may have too many objects or settings to load and not enough RAM to keep up with what has to be created, this may necessitate server reduction for Java users especially.
Verify that your system meets the minimum system requirements.
If required, scale back your server. Modify your settings to accommodate lower quality standards.
Once you’ve completed these steps, restart your server.
If you are using any game modifications that could be affecting your memory, see those specific sources for more assistance.
You might need to update the RAM on your server if nothing else works.