
![]()
Adobe Support Community
![]()
-
Global community
- Language:
-
Deutsch
-
English
-
Español
-
Français
-
Português
- 日本語コミュニティ
- 한국 커뮤니티
Exit
-
-
Home
-
After Effects
-
Discussions
-
- Re: AFTER EFFECTS «ERROR: CACHED PREVIEW NEEDS 2 O…

1 Correct answer

Explorer
,
Sep 26, 2018
Sep 26, 2018
I tried all of the advice online, and nothing worked for me. I was using the puppet tool on photoshop assets, as soon as I changed the puppet engine from Advanced to Legacy, my content reappeared in the preview window, and I was able to Ram Preview like normal. If this is happening in your comp, make sure to change the puppet engine on all your layers that are using it.

14
Replies
14
![]()
After Effects Community Recap
Getting started with After Effects
I found 16 different ways to fix this error.
1. Purge RAM
2. Empty Disk Cache
3. Change RAM Reserved for Other Applications
4. Close Out Unnecessary Applications
5. Change Preview Quality
6. Increase Disk Cache Size
7. Uncheck ‘Reduce Cache Size When System is Low on Memory’
8. Change Disk Cache Location
9. Save and Close After Effects
10. Clean Database and Cache
11. Set Work Area to the Appropriate Duration
12. Set Your Region of Interest
13. Optimize Your Effects
14. Organize Your Project
15. Render Instead of Previewing
16. Optimize Your Machine.
I actually wrote a pretty extensive blog post about how to do each one of these steps. Hopefully it helps! https://www.schoolofmotion.com/blog/cached-preview
Если все перечисленное выше не помогло (или просто вам неохота возиться, пробуя все подряд), значит, скорее всего ошибка происходит из-за конкретного проекта. При возникновении ошибки или другой проблемы обратите внимание на таймкод (время) ошибки. Если баг возникает каждый раз в одном и том же месте, то есть вероятность, что он вызывается каким-нибудь конкретным эффектом или анимацией, которую придется изучить и, возможно, изменить. Например, при работе с частицами можно выбрать другой режим работы CPU/GPU в плагине (если поддержка есть), уменьшить количество частиц, для Element 3D упростить геометрию, уменьшить количество полигонов, проверить материалы, текстуры, размер и т.п.
Для уточнения проблемного слоя или эффекта мне несколько раз помогал такой способ. Вы выбираете половину слоев в композиции и удаляете их все. Рендерите видео, ну или как вы там предпочитаете проверять. Тут возможны два варианта:
- Если ошибка пропала, значит, она была в удаленных слоях композиции, отменяем удаление, и теперь удаляем только половину удаленных ранее слоев. И снова запускаем рендер.
- Если ошибка осталась, то продолжаем дальше удалять слои, упрощая проект.
Если ошибку вызывает что-то конкретное, рано или поздно мы найдем виновника таким методом. Я понимаю, что это долгий, муторный и неудобный способ, но если вы знаете лучше, то пишите мне, буду благодарен! ![]()
А если ошибка возникает каждый раз в случайных местах композиции, то можно попробовать рендерить не готовое видео, а набор кадров Image Sequence. В After Effects есть несколько пресетов для этой цели под общим названием Multi-Machine Settings/Sequence в очереди рендера Render Queue.
В таком случае каждый кадр будет отдельным изображением на диске, и если рендер оборвется, вы не потеряете уже просчитанный готовый материал. А когда вы продолжите рендер (можно продублировать задание в очереди рендера Render Queue), After Effects пропустит уже существующие на диске кадры и начнет считать со следующего места. За это отвечает отдельная настройка в Render Settings — Skip existing files (allows multi-machine rendering) («Пропустить существующие файлы (позволяет осуществлять рендеринг на нескольких компьютерах)«).
Но, естественно, звук в таком виде не получится вывести из программы After Effects и придется потом дополнительно его считать как WAV файл без видео и объединять с набором отрендеренных кадров композиции. Их, конечно же, надо предварительно импортировать в любую программу для работы с видео — After Effects, Premiere Pro, да любую. Даже мой любимый FFMPEG может это сделать, да все нормальные программы умеют делать такое. Только проверьте частоту кадров, так как куча файлов на диске не имеет такой информации, и это надо задавать руками.
Вообще, это было сделано для рендеринга по сети несколькими компьютерами одновременно, чтобы они не считали одинаковые кадры, назначенные другому After Effects. А самое интересное, что такое можно провернуть и на одной машине для ускорения рендера, ведь одна копия After Effects не задействует ресурсы процессора CPU на полную. Уменьшение времени рендера в After Effects
If you are familiar with After Effects, you’ve probably come across the dreaded disk cache error message. If you’re not sure what it means, it is quite easy to click past and carry on with your work, but previewing it will be challenging. Fortunately, we have 10 quick fixes for the After Effects preview error to get you back to animating.
Part 1: 10 Smart Fixes for the Cached Preview Error in After Effects
When you preview your work in After Effects, the software creates render files, which are saved to your hard drive and RAM. The After Effect preview error lets you know that it doesn’t have enough space to render your project thoroughly and won’t preview your work. The lack of space can result in a low-quality playback, and in some cases, no preview at all.
If you are using 3D cameras in your project or a third-party plugin such as Element 3D, the solutions might be a little more in-depth. But first, go through our list of 10 quick fixes until the error is resolved.
1. Purge RAM Cache
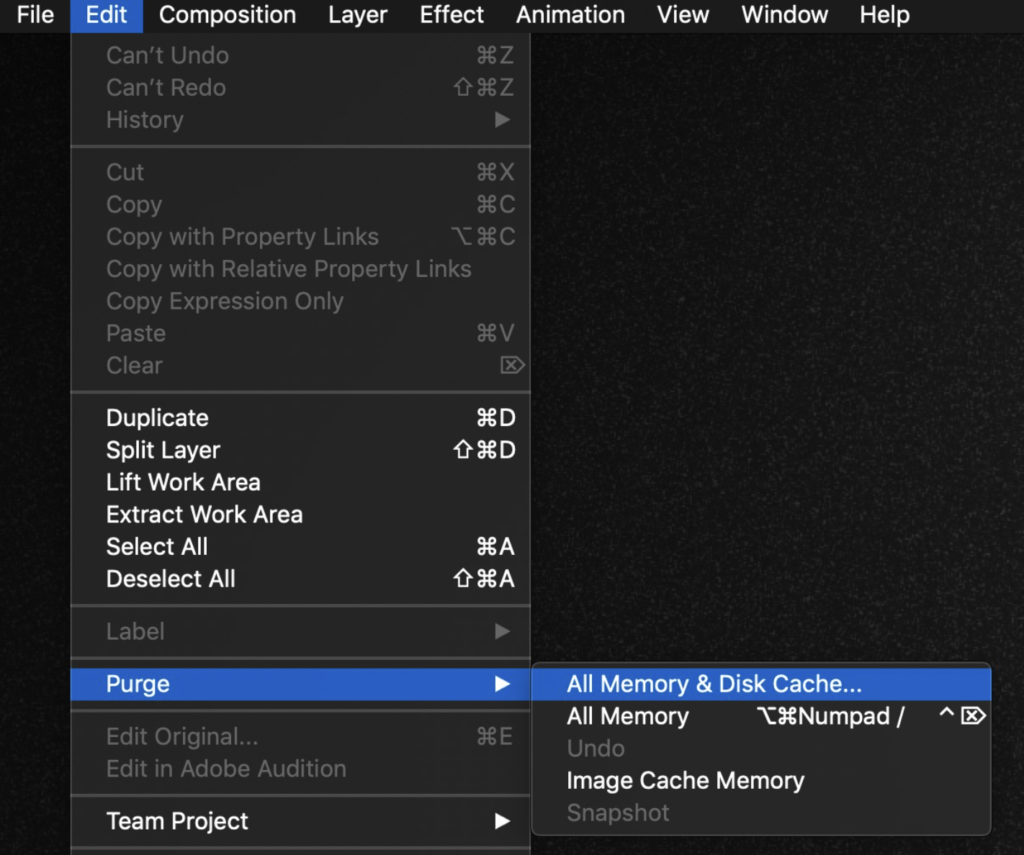
Your RAM cache is where After Effects saves all the rendered preview files associated with your projects. While these files are not massive on their own, they can quickly build up to cause issues with your storage. To purge the cache, go to Edit > Purge > All Memory. This will clear all of the cache files saved to your machine’s RAM.
![]()
2. Empty Disk Cache
After Effects saves cache files to both your RAM and your hard drive, if you have cleared your RAM and still get the error message, it is worth trying to empty your disk cache as well. This handy function is located just above the RAM option – Edit > Purge > All Memory & Disk Cache.
3. Close Out Unused Programs
To prevent programs from competing over your system memory, make sure you close all other applications. This can be annoying when working between After Effects, Adobe Premiere Pro, or Adobe Illustrator, but working your system too hard can cause ongoing issues.
4. Increase the RAM
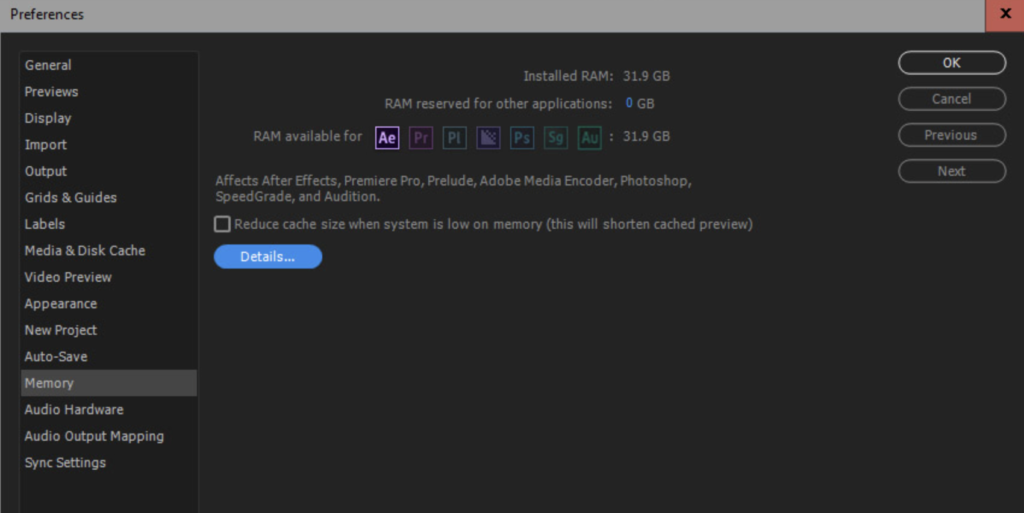
If you do need to have multiple programs open simultaneously, Adobe will let you set how much RAM is allocated to those other programs. Go to Preferences > Memory to view the RAM allocated to Adobe and drag the RAM number as high as it will go. You can always change this later if you need more RAM for other programs.
5. Change Disk Cache Location
A typical problem animators don’t know about is that Adobe After Effects will struggle to read and write files to the same location. You should have a separate storage solution for your project files and your cache files for the best workflow. Most AE users will create their project on an external drive, while the cache files are saved to the local drive.
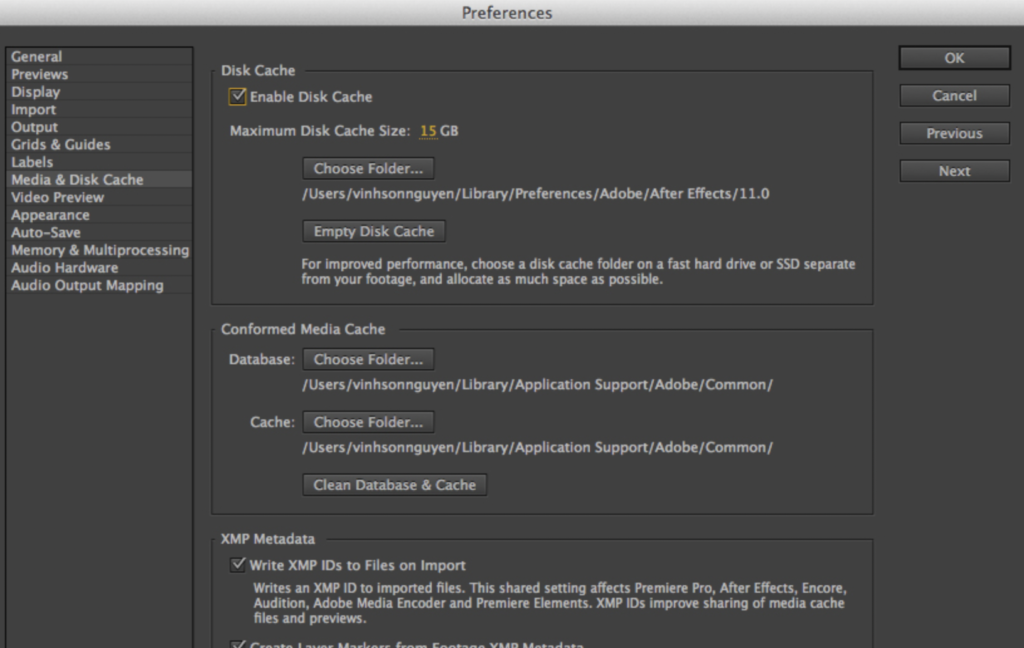
To change the disk cache locations, go to After Effects > Preferences > Media and Disk Cache > select ‘Choose Folder‘ under Disk Cache.
6. Clean Database & Cache
Another way to clean the media database and cache can also be found in the Preferences menu. However, this method will only delete files associated with footage where the source file is no longer available. Nevertheless, this is an excellent option for using AE consolidation methods when you want to archive a project with the render files.
Go to After Effects > Preferences > Media and Disk Cache and choose Clean Database & Cache.
7. Organize & Simplify Your Project
There are several ways you can organize and simplify your projects to give After Effects a more accessible time rendering your work. AE struggles in having too many pre-comps within pre-comps, so check how your project is structured and see if you can simplify it. If it is an extensive project, try dividing it into smaller ones to work on in sections.
You should also check your pre-comp sizing. When importing graphics, you can quickly end up with huge composition sizes. These large comps will then be scaled down as a whole, but AE still needs to read the pre-comp file.
You can also simplify your project by removing any unused footage or imported files. This is usually done once a project is finished and you want to archive it, but it can help speed up your system. Go to File > Dependencies > Remove Unused Footage.
A final option to consider for simplifying your project is to optimize your effects. Some of the After Effect effects can be pretty difficult to render. Try turning your effects off to see if the playback is improved. If you can, move your effects to adjustment layers that can be switched on and off easily.
8. Set Your Region of Interest and Work Area
Minimizing your region of interest and work area can help AE create smaller, quicker render files because it looks at a smaller or shorter portion of your composition.
To change your work area, drag the in and out points of your timeline to view only the portion you want to preview. You can also place your playhead on the timeline and use the B and N keys to create in and out points.
To set your region of interest, choose the Region icon from the bottom of the viewer and draw a box on our screen covering the area you wish to view. Once you’ve watched your preview, uncheck the Region icon to go back to the full view.
9. Re-Import Your Rendered Clips
Re-importing your rendered clips should be used as the very last choice, as it can create an incredibly challenging workflow. Essentially, you would render out portions of your video and re-import them as video files.
Exporting and importing sections of your project can be incredibly helpful when you have a clear workflow, for example, rendering out video footage with heavy effects and re-importing them as clips for a motion graphics frame. However, if you might need to go back and change elements in your exported comps, it can create an incredibly convoluted workflow.
10. Optimize Your Machine
If you’ve given these methods a go and are still getting the preview error message, it might be time to look at your overall device. If you have recently updated your software or operating system, there may be some conflicts causing the issue. Adobe has all the system spec information available on its website.
Part 2: 3 Additional Tips to Avoid Slow Preview in After Effects
If you are not getting the After Effects preview error but your playback is still struggling, there are a few things you can try to preview your work better.
1. Skip Frames
After Effects lets you choose the frame rate you preview your composition without changing the project frame rate. You can also choose to skip frames, which can help After Effects smooth the look of your preview.
- To open the Preview settings, go to Window > Preview.
- In the Preview panel, choose your preferred Preview Frame Rate.
- Choose to skip every 2 frames.
![]()
2. Change Preview Quality
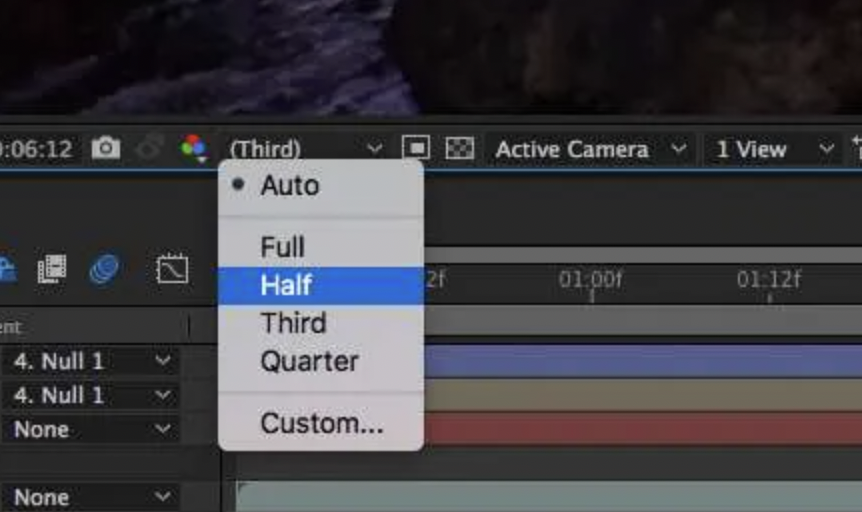
If you want to preview the speed and flow of your animation but are not too worried about seeing it in HD, you can change the preview quality. For example, changing your playback to just Half the quality will result in smaller and quicker to create render files.
![]()
3. Speed Up Rendering
There are also a couple of boxes you can check to help After Effect speed up the rendering process.
- Go to After Effects > Preferences > hold Shift and click on General.
- In the left-hand column, select Secret.
- Select Disable Layer Cache and Ignore Sequence Rendering Errors.
- Under Purge Every, adjust the number of frames to 2.
As you can see, preview errors are a common occurrence in animation work. Ensuring your machine is kept organized and well maintained will go a long way to preventing an error in the first place. Hopefully, you have reached the bottom of this tutorial, and your After Effects preview error has been fixed. If you’re having problems rendering your projects, check out these 5 troubleshooting tips.


Do you see a cached preview error on After Effects?
Adobe After Effects is an essential tool for creative and professional video editors. This is one of the most used tools for content creation and is arguably one of the best post-processing software.
While it’s one of the best, this doesn’t mean that Adobe After Effects is flawless.
Sadly, there are a handful of errors that you might encounter while using Adobe After Effects. One of these errors is the ‘cached preview error’, which occurs when viewing the progress of your projects.
In this guide, we will show you how to fix the cached preview error on Adobe After Effects.
1. Restart After Effects.
One of the quickest ways to fix the cached preview error on After Effects is to restart the program. Adobe After Effects might be using too many system resources, which causes the software to run into errors.
To fix this, simply save your project and close the app. After a few seconds, relaunch it, and preview should work as it should.
2. Restart Your Computer.
Before tweaking your configurations, the first thing you should do when you encounter errors on After Effects is to restart your system. This should allow your computer to reload its resources and eliminate temporary bugs and glitches.
For Windows users, here’s what you need to do:
- On your keyboard, press the Windows key to open the Start Menu.
- After that, click on the Power Options tab.
- Finally, choose Restart from the menu.
If you’re using a Mac, see the steps below:
- First, open the Apple Menu in the upper left corner of your display.
- Now, select the Restart option.
- Lastly, confirm your action by clicking the Restart button in the dialog box.

Once done, go back to After Effects to check if the problem is solved.
3. Purge Your RAM & Disk.
As you apply more effects to your After Effects project, it uses more disk space and RAM. If your system runs out of resources, After Effects might struggle to load the preview of your project, which explains the cached preview error.
To avoid this, see the steps below to purge your RAM and disk space:
- First, open Adobe After Effects on your computer.
- After that, click on Edit and hover your cursor over the Purge tab.
- Lastly, click All Memory & Disk Cache.
Restart the software afterward and check if the cached preview error still occurs.
4. Tweak Your Memory Settings.
If you’re using multiple Creative Cloud apps at the same time, you might want to dedicate more memory to After Effects if you use it more. This way, other Adobe CC apps won’t consume your system memory, and the cached preview error will be avoided.
Here’s what you need to do:
- On Adobe After Effects, click on the After Effects tab.
- Now, navigate to Preferences > Memory.
- Finally, change the value of ‘RAM Reserved for Other Applications’ to a lower number.
Save the changes afterward and see if you’ll still encounter the cached preview error on Adobe After Effects.
5. Close Unused Applications.
For low to mid-level systems, it’s advisable to close unnecessary applications in the background when running After Effects. Since the software uses a lot of resources, leaving unused applications open will only put more load on your system.
Check your Taskbar (Windows) or Dock (macOS) and close the applications you don’t need for your project.
Go back to After Effects afterward and check if the problem is solved.
6. Change Your Preview Quality.
Another way to reduce the load on your system when running After Effects is to reduce the preview quality. Instead of running your previews at full resolution, you can tone it down to make it easier for your computer to render the preview.
Here’s how you can change your preview quality:
- Launch Adobe After Effects on your computer.
- After that, click the Resolution tab in the preview window. It will be located at the bottom of the window next to the timeline indicator.
- Finally, set your preview quality to Half or lower.
Once done, try viewing your project to see if the error message still occurs.
7. Increase Your Disk Cache.
After Effects uses disk caching to improve its performance. Basically, the software stores data that has been recently processed to a cache in case you need it again. This is a lot faster than retrieving the data from your storage every time.
Check out the guide below to increase your disk cache size:
- First, open After Effects on your system.
- After that, go to the After Effects tab and click on Preferences.
- Now, access the Media & Disk Cache tab.
- Lastly, increase the value of the Maximum Disk Cache Size tab.
Save the changes and restart After Effects. Try working on your project as you would and see if the cached preview error still occurs.
8. Clean Database Cache.
At this point, we recommend clearing your cache media database if you still encounter the cached preview error on After Effects. This should eliminate corrupted files from your project and reduce the load on your system.
Follow the steps below to guide you through the process:
- First, open Adobe After Effects on your computer.
- After that, navigate to After Effects > Preferences > Media and Disk Cache.
- Lastly, click the Clean Database & Cache option under the Cache section.
Go back to your project afterward and check if the problem is solved.
9. Reinstall Adobe After Effects.
If none of the solutions above worked for you, the last thing you can do is reinstall the software on your computer. This should ensure that you have the latest version of After Effects and there are no corrupted data on your system.
On Windows, here’s how you can delete After Effects:
- Launch the Control Panel on your computer.
- Next, click on Uninstall a Program and find Adobe After Effects.
- Finally, right-click on the app and choose Uninstall.
For macOS users, launch Finder on your computer, go to the Applications tab and drag Adobe After Effects to the Trash.
After removing After Effects, reinstall the app and see if the problem is solved.
That ends our guide on how to fix the cached preview error on Adobe After Effects. If you have questions, please let us know in the comment section, and we’ll do our best to answer them.
If this guide helped you, please share it. 🙂
-

John is a staff writer at Saint and comes from a SAP ABAP development background. He has a Bachelors in IT and has been writing since 2018, with over 500 posts published. He loves to build PCs and has a deep curiosity in understanding how different components and configurations work. John spends hundreds of hours at a time, researching and testing the software and apps, before he proceeds to write about it. LinkedIn
Twitter
