
Операционная система Android иногда преподносит пользователям смартфонов и планшетов проблемы в виде разных ошибок. Одна из них, Unfortunately [название программы] has stopped, возникает при включении или в процессе работы разных мобильных приложений.
Причина появления ошибки
Ошибка Unfortunately android has stopped говорит об остановке работающего или запускаемого приложения. Происходит это при использовании камеры, Google Play, приложений социальных сетей (Вконтакте, Facebook, Instagram и пр.), а также многих других программ или мобильных игр.
Причины связаны в некорректным функционированием конкретного приложения или его конфликтами с другим установленным программным обеспечением. Избавиться от ошибки Unfortunately [название программы] has stopped можно разными способами.
Очистка памяти
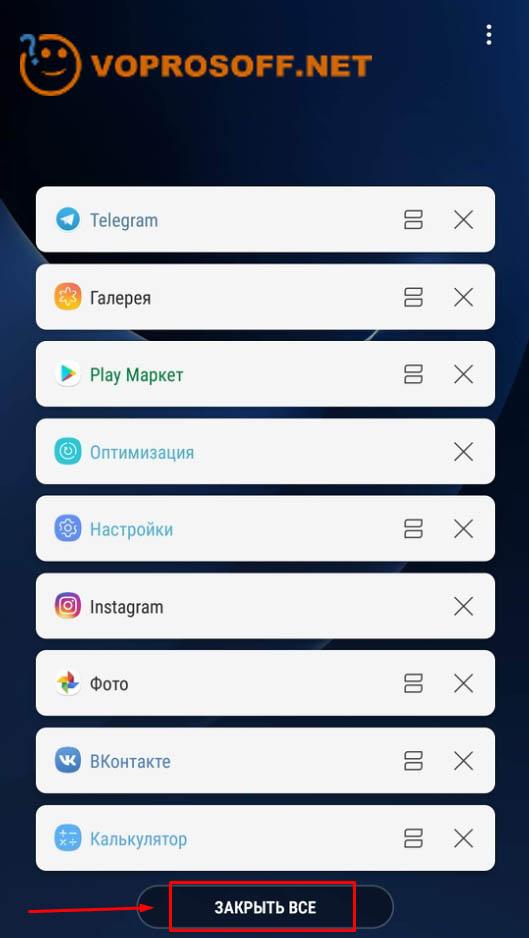
Требовательные к ресурсам приложения могут выдавать ошибку, когда занята вся оперативная память мобильного устройства. Откройте диспетчер задач и закройте все запущенные в фоновом режиме приложения. В зависимости от версии Android, эта операция может быть выполнена по-разному. Обычно диспетчер задач запускается кнопкой в нижней части экрана или на корпусе телефона, после чего остается нажать на «Закрыть все».
Перезагрузка устройства
Если самый простой метод не помог, перезагрузите свой смартфон или планшет. После этого попробуйте запустить проблемное приложение. Если ошибка снова появится, переходите к следующему шагу.
Очистка кэша
Перейдите в «Настройки» и найдите пункт «Приложения». Отыщите в списке программу, которая выдает ошибку Unfortunately [название android-приложения] has stopped, и нажмите на нее. На экране появится информация о приложении, а вам нужно проделать следующее:
- Найти пункт «Память» и нажать на него.
- Нажать кнопку «Очистить данные», а затем подтвердить их удаление.
- Нажать кнопку «Очистить кэш», и тоже подтвердить операцию.
После этих действий попробуйте снова запустить приложение и проверить его работоспособность.
Автор считает, что эти материалы могут вам помочь:

Переустановка приложения
Следующий шаг, если три предыдущих не помогли, заключается в переустановке программы. Откройте Google Play и перейдите в «Мои приложения». Найдите в списке нужную программу и нажмите на кнопку «Удалить».
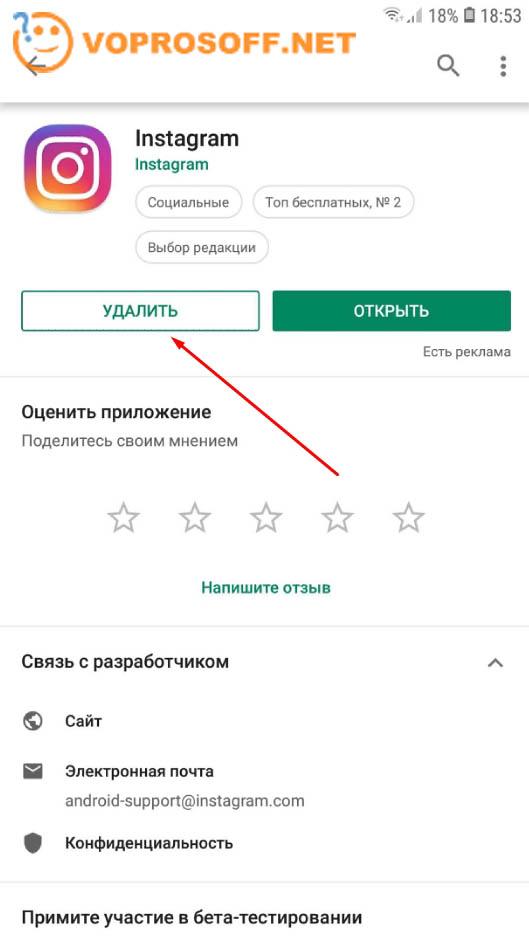
Подтвердите удаление, а после этого перезагрузите смартфон и установите приложение заново, проделав те же операции, но вместо кнопки «Удалить» в Google Play нужно нажать на «Установить».
Сброс данных
Переходим в «Настройки» и находим пункт «Общие настройки». В нем нас интересует «Сброс», где нужно выбрать «Сброс данных». Это самый действенный метод решения проблемы, при котором с устройства удалится вся информация, в том числе установленные приложения и файлы.
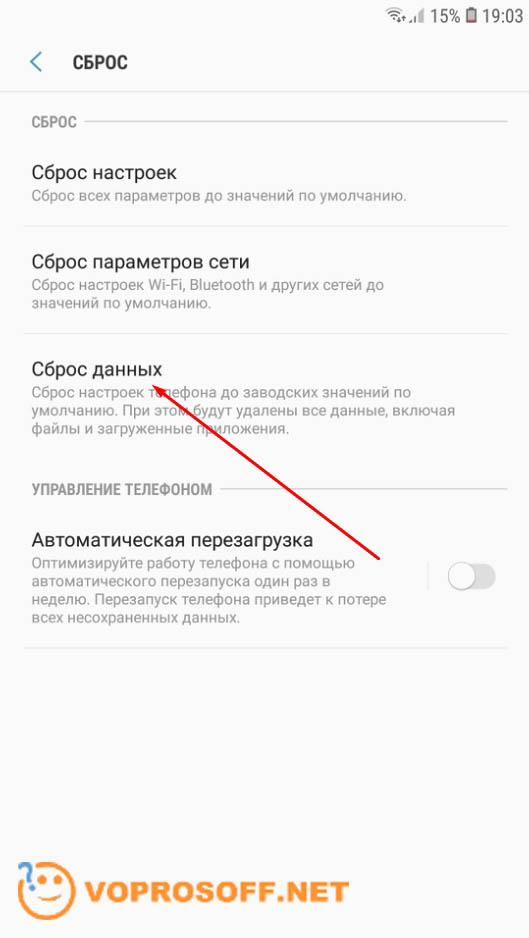
Вам придется настраивать все заново (на устройстве установятся заводские настройки). Если и после таких действий при запуске или работе приложения будет появляться ошибка Unfortunately [название программы] has stopped, проблема не в вашем телефоне, а в программном обеспечении.
Каждый раз, когда вы делитесь этой статьей в социальной сети, ее автор становится немного счастливее! Пожалуйста нажмите на одну из кнопок выше!

Discover Few Essential Methods to Fix ‘Voice Command Has Stopped’ Issue In Your Android Phone!
Summary: In the present time, when Android phones are an integral part of life, having errors like “Unfortunately, voice command has stopped” or any app has stopped working can be an inconvenience. It might hamper your experience or prevent you from using an app. If you experience a similar situation, this post here will help you fix ‘voice command has stopped’ error.
- Method 1 – Fix By Clearing Cache
- Method 2 – Reset App Data To Fix the Issue
- Method 3 – Re-Install The Voice Command App
- Method 4 – Use Recovery Mode Wipe Cache Partition
- Method 5 – Fix The Issue By Performing a Factory Reset
- Method 6 – Fix “Unfortunately, Voice Command Has Stopped” Error Using Android System Repair Software
![]() Expert Tip: One of the effective yet easiest methods to fix the “Unfortunately, voice command has stopped” error is by utilizing Android System Repair software. Android users popularly use it because of the efficient fixes it is capable of doing.
Expert Tip: One of the effective yet easiest methods to fix the “Unfortunately, voice command has stopped” error is by utilizing Android System Repair software. Android users popularly use it because of the efficient fixes it is capable of doing.
Utilization of this Android repair tool ensures that one can –
- Repair their Android devices in just a few clicks.
- Easily follow the on-screen instructions and operate the tool to repair their Android device.
- Fix “Unfortunately, voice command has stopped” issue in over 1000 Android phone models.
Free Download Trial Version/Buy Now Android Repair Tool To Fix Unfortunately Voice Command Has Stopped On Android
However, you should ensure to create a backup of your Android phone or tablet data before performing the methods mentioned-below as it may delete data for the purpose of repair.
Moving further, these system crashes followed by error messages like “Unfortunately, voice command has stopped” can be annoying. You are back to your home screen and lose the current app status right in the middle of a task. Or, it is possible that applications won’t open at all.
Let see real-user practical scenario!
How do I fix “Unfortunately, voice command has stopped,” message?
how can i fix it? i cant use my phone because it pops up always even i click its option “ok”
Source: Android Central Forums
Now, let us first know the reasons responsible for situations where you see “voice command has stopped” error message.
Also Read: How To Fix “Unfortunately, Gallery Has Stopped” On Android
What Is the Causes For The Occurrence Of ‘Unfortunately, Voice Command Has Stopped?
Voice command has stopped or not working is quite similar to other scenarios wherein you get error messages like ‘This app is not working’. The reason for such error messages on your Android device is data crash.
A situation of data crash can be explained as the abnormal situation wherein Android OS, the concerned application, or the software stops functioning as it should. As a result, the app crashes with an error message as such.
These scenarios can happen due to multiple reasons, such as –
- Unsecured or unstable cellular and Wi-Fi connections, preventing the app from connecting to the internet.
- Uncleared and corrupted cache files.
- Improper or incomplete application installation may cause this error.
Even though the situation is annoying, fortunately, you can resolve “Unfortunately, voice command has stopped” error by adhering to the methods mentioned below, whichever seems to be working well for you.
Note: The below-mentioned methods can be applied on any Android phone such as Samsung, OnePlus, Google Pixel, Xiaomi, LG, HTC, Sony, Motorola, Lenovo, Techno, ZTE, Oppo, Vivo and all other Android phone present in the market.
Method 1 – Fix By Clearing Cache
The cache memory of an application stores all the data from your previous app usage, which needs to be cleared from time to time. It is possible that you are encountering this issue because of uncleared cache memory.
Here, follow the steps mentioned below to clear the cache data of the concerned application which says “Unfortunately, voice command has stopped” –
Step 1 – Open ‘Settings’ on your Android device.
Step 2 – Next, Scroll through the list or search for ‘Voice Command App’ and click on it.
Step 3 – Scroll down the list of applications and find the dedicated app showing glitch.
Step 4 – Tap on ‘Storage’ option followed by ‘Clear cache’ option.
This should clear the cache memory of the concerned android application and will probably fix the issue. If the error persists, try other methods as mentioned below.
Also Read: Snapchat Not Working On Android [10 Solutions]
Method 2 – Reset App Data To Fix the Issue
If the error persists even after clearing the cache, you can try to reset the app data which is causing this error. However, it is to note that it will delete all prior settings, information, and app data. So, if you need the existing data, first create a backup and then perform the steps mentioned underneath.
Step 1 – Open ‘Settings’ on your Android device.
Step 2 – Next, Scroll through the list or search for ‘Apps’ and click on it.
Step 3 – Scroll down the list of applications and click on the respective application showing glitch.
Step 4 – Tap the ‘Storage’ option next.
Step 5 – Out of the two options present there, choose ‘Clear data’.
Now, re-launch the app and sign in using your credentials to see if the error persists.
Method 3 – Re-Install The Voice Command App
Sometimes, an application might show error commands like “Unfortunately, voice command has stopped” if it hasn’t been installed correctly. To avoid this situation, you can uninstall the app and re-install it in your android device from Google Play Store.
Here, follow the steps to ensure you complete the process of uninstallation and re-install smoothly.
Step 1 – Go to ‘Settings’ on your Android device first.
Step 2 – In the search bar, type in ‘Apps’ or ‘Application manager’ and tap to open them.
Step 3 – Scroll through the list of applications and choose the concerned app.
Step 4 – Finally, tap on the ‘Uninstall’ option to remove the app from your android device.
Step 5 – Now, open Google Play store and search for the same application there.
Step 6 – Hit the ‘Install’ button and wait for it to be downloaded and installed on your device.
Once the installation is complete, you should be able to use the voice command in the application without any interference. However, if the need is, you can rely on other methods for fixing the issue.
Also Read: [Fixed] “Unfortunately, YouTube Has Stopped” On Android
Method 4 – Use Recovery Mode Wipe Cache Partition
This method has been observed to be working for some occasions. You can try entering into the recovery mode and perform these steps before checking of the error is gone for good.
Step 1 – Push the up volume key and power button together to switch to the Recovery mode.
Step 2 – You can use volume up and down keys for scrolling up and down through the options and use the power button for ‘Ok’.
Step 3 – Select the option for ‘Wipe cache partition’ and push the power button on your android device.

Step 4 – Finally, choose ‘Reboot system now’.
However, performing these steps may cause you to lose app data, and you need to make sure to create back up from the beginning.
Also Read: [Fixed] Instagram Won’t Open On Android
Method 5 – Fix The Issue By Performing a Factory Reset
Performing a factory reset on your android device may fix the issue. However, this method should be chosen only when you have tried all the other alternatives and yet didn’t get a result.
It isn’t a preferred method as performing a factory reset will erase all media, contacts, messages, etc. from your android device. Therefore, make sure to back up your data before following this method.
Here, follow the steps mentioned below to complete the process of factory reset in your android device.
Step 1 – Go to ‘Settings’ and look for the ‘Backup and Reset’ option from the list and click on it.
Step 2 – Tap on the option of ‘Factory data reset’ followed by tapping on ‘Reset Device’.
Step 3 – Choose the option ‘Erase Everything’ to initiate the process of factory reset.

Step 4 – This will take a few minutes, and your device will restart after a while.
You May Also Like
- How To Retrieve Deleted Voice Recordings On Android
- Solved: ‘Unfortunately, Bluetooth Has Stopped’ Error
- How To Fix “Unfortunately, Google App has Stopped” Error on Android
- How To Fix “Unfortunately, Messenger Has Stopped” Error on Android
Method 6 – Fix “Unfortunately, Voice Command Has Stopped” Error Using Android System Repair Software
While the methods mentioned above are useful at times, there is still uncertainty about whether or not you will be able to fix the issue. And methods like factory data reset can not only be time-consuming but requires a lot of effort. Therefore, having an alternative that allows you to fix “voice command has stopped” errors conveniently is much preferred.
Luckily, Android System Repair Software has got you covered. It allows you to fix “Unfortunately, Voice Command Has Stopped” on Android and other various Android OS issues by repairing the Android OS to normal. The software quickly detects the problem and solves it in a matter of a few clicks.
The software has an easy interface and doesn’t require you to be technically proficient for following the instructions. You can simply follow the on-screen instructions and get the job done efficiently.
Here follow step-by-step guide on how to use Android Repair to fix Android to normal thereby fixing ‘Unfortunately, Voice Command Has Stopped” error message using Android Repair Tool.
Bonus Tip: Since data is crucial for Android users, they must create a backup of their mobile data before performing methods like app data reset, factory data reset, etc. Here, the threat of data loss is possible. However, if you haven’t had the backup and your critical mobile data got lost, you can check out the Android Data Recovery app to recover the lost files.
Conclusion
Mentioned above are five methods that can help you resolve “Unfortunately, voice command has stopped on Android” error. You can follow the method you find suitable and make sure to back up your files before it.
However, for more efficient and assured results, make sure to choose Android System Repair Software and fix the issue in just a few clicks.

Max Field is a founder of recoverandroid-data.com. He is an Android lover and loves to write tips, tricks, fixes for errors, data recovery solutions and more related to Android.
I am new to programming for android, I am developing an application in android studio in which I have to press buttons to enter numbers, like a calculator, my problem is to test the application on a phone in debug mode, when I opened the app is closed immediately by sending this message: Unfortunately «App» has Stopped, I’m using an LG-E425g (Android 4.1.2)
The Main_Activity
<LinearLayout xmlns:android="http://schemas.android.com/apk/res/android"
    android:id="@+id/LytContenedor"
    android:layout_width="match_parent"
    android:layout_height="match_parent"
    android:orientation="vertical"
    android:weightSum="1">


    <TextView android:id="@+id/LblNombre"
        android:layout_width="wrap_content"
        android:layout_height="wrap_content"
        android:text="@string/ingrese"
        android:textSize="25sp"
        android:layout_weight="0.06"
        android:layout_gravity="center_horizontal" />

    <EditText
        android:layout_width="345dp"
        android:layout_height="wrap_content"
        android:id="@+id/editText"
        android:layout_gravity="center_horizontal"
        android:inputType="text" />

    <RelativeLayout xmlns:android="http://schemas.android.com/apk/res/android"
        android:id="@+id/RytContenedor"
        android:layout_width="563dp"
        android:layout_height="wrap_content"
        android:orientation="vertical"
        android:weightSum="1"
        android:layout_gravity="left">


        <Button
            style="?android:attr/buttonStyleSmall"
            android:layout_width="wrap_content"
            android:layout_height="wrap_content"
            android:text="1"

            android:id="@+id/button"
            android:layout_alignParentTop="true"
            android:layout_gravity="center"
            android:height="75dp"
            android:width="75dp"
            android:paddingStart="10dp"
            android:paddingEnd="10dp"
            android:padding="10dp"
            android:paddingLeft="10dp"
            android:paddingTop="10dp"
            android:paddingRight="10dp"
            android:paddingBottom="10dp"
            android:textSize="20sp" />

        <Button
            style="?android:attr/buttonStyleSmall"
            android:layout_width="wrap_content"
            android:layout_height="wrap_content"
            android:text="2"
            android:id="@+id/button2"
            android:layout_alignParentTop="true"
            android:layout_toRightOf="@+id/button"
            android:layout_toEndOf="@+id/button"
            android:width="75dp"
            android:elegantTextHeight="false"
            android:height="75dp"
            android:textSize="20sp" />

        <Button
            style="?android:attr/buttonStyleSmall"
            android:layout_width="wrap_content"
            android:layout_height="wrap_content"
            android:text="3"
            android:id="@+id/button3"
            android:layout_alignParentTop="true"
            android:layout_toRightOf="@+id/button2"
            android:layout_toEndOf="@+id/button2"
            android:height="75dp"
            android:width="75dp"
            android:textSize="20sp" />

        <Button
            style="?android:attr/buttonStyleSmall"
            android:layout_width="wrap_content"
            android:layout_height="wrap_content"
            android:text="4"
            android:id="@+id/button4"
            android:layout_below="@+id/button"
            android:layout_alignParentLeft="true"
            android:layout_alignParentStart="true"
            android:height="75dp"
            android:width="75dp"
            android:textSize="20sp" />

        <Button
            style="?android:attr/buttonStyleSmall"
            android:layout_width="wrap_content"
            android:layout_height="wrap_content"
            android:text="5"
            android:id="@+id/button5"
            android:width="75dp"
            android:height="75dp"
            android:layout_alignTop="@+id/button4"
            android:layout_toLeftOf="@+id/button3"
            android:layout_toStartOf="@+id/button3"
            android:textSize="20sp" />

        <Button
            style="?android:attr/buttonStyleSmall"
            android:layout_width="wrap_content"
            android:layout_height="wrap_content"
            android:text="6"
            android:id="@+id/button6"
            android:height="75dp"
            android:width="75dp"
            android:layout_alignTop="@+id/button5"
            android:layout_toRightOf="@+id/button5"
            android:layout_toEndOf="@+id/button5"
            android:textSize="20sp" />

        <Button
            style="?android:attr/buttonStyleSmall"
            android:layout_width="wrap_content"
            android:layout_height="wrap_content"
            android:text="7"
            android:id="@+id/button7"
            android:width="75dp"
            android:height="75dp"
            android:layout_below="@+id/button4"
            android:layout_gravity="center_horizontal"
            android:layout_toStartOf="@+id/button5"
            android:layout_toLeftOf="@+id/button5"
            android:textSize="20sp" />

        <Button
            style="?android:attr/buttonStyleSmall"
            android:layout_width="wrap_content"
            android:layout_height="wrap_content"
            android:text="8"
            android:id="@+id/button8"
            android:height="75dp"
            android:width="75dp"
            android:layout_alignTop="@+id/button7"
            android:layout_toRightOf="@+id/button7"
            android:layout_toEndOf="@+id/button7"
            android:textSize="20sp" />

        <Button
            style="?android:attr/buttonStyleSmall"
            android:layout_width="wrap_content"
            android:layout_height="wrap_content"
            android:text="9"
            android:id="@+id/button9"
            android:layout_below="@+id/button5"
            android:layout_toRightOf="@+id/button5"
            android:layout_alignBottom="@+id/button8"
            android:layout_alignRight="@+id/button6"
            android:layout_alignEnd="@+id/button6"
            android:textSize="20sp" />

        <Button
            style="?android:attr/buttonStyleSmall"
            android:layout_width="wrap_content"
            android:layout_height="wrap_content"
            android:text="0"
            android:id="@+id/button10"
            android:layout_above="@+id/button6"
            android:layout_toRightOf="@+id/button3"
            android:layout_toEndOf="@+id/button3"
            android:textSize="20sp"
            android:width="75dp"
            android:height="75dp" />

        <Button
            style="?android:attr/buttonStyleSmall"
            android:layout_width="wrap_content"
            android:layout_height="wrap_content"
            android:text="K"
            android:id="@+id/button11"
            android:height="75dp"
            android:layout_below="@+id/button10"
            android:layout_alignLeft="@+id/button10"
            android:layout_alignStart="@+id/button10"
            android:width="75dp"
            android:textSize="20sp" />

        <Button
            android:layout_width="wrap_content"
            android:layout_height="wrap_content"
            android:text="Ingresar"
            android:id="@+id/button12"
            android:layout_toRightOf="@+id/button10"
            android:layout_marginLeft="82dp"
            android:layout_marginStart="82dp"
            android:layout_above="@+id/button9"
            android:width="120dp"
            android:height="80dp"
            android:textSize="20dp" />

        <Button
            style="?android:attr/buttonStyleSmall"
            android:layout_width="wrap_content"
            android:layout_height="wrap_content"
            android:text="Borrar"
            android:id="@+id/button13"
            android:textSize="20dp"
            android:width="75dp"
            android:height="75dp"
            android:layout_gravity="right"
            android:layout_weight="0.06"
            android:layout_alignParentTop="true"
            android:layout_alignRight="@+id/button12"
            android:layout_alignEnd="@+id/button12"
            android:layout_alignLeft="@+id/button12"
            android:layout_alignStart="@+id/button12" />

        <Button
            android:layout_width="wrap_content"
            android:layout_height="wrap_content"
            android:text="-"
            android:id="@+id/button14"
            android:height="75dp"
            android:textSize="20dp"
            android:width="75dp"
            android:layout_below="@+id/button11"
            android:layout_toRightOf="@+id/button9"
            android:layout_alignRight="@+id/button11"
            android:layout_alignEnd="@+id/button11" />

    </RelativeLayout>
</LinearLayout>


    ## JAva Class:##
    public class Ingreso extends ActionBarActivity {
    private EditText Scr;
          private ButtonClickListener btnClick;

        @Override
        protected void onCreate(Bundle savedInstanceState) {
            super.onCreate(savedInstanceState);
            setContentView(R.layout.activity_ingreso);
            Scr =(EditText) findViewById(R.id.editText);

            int idList[]={ R.id.button,R.id.button2,R.id.button3,R.id.button4,R.id.button5,R.id.button6,
                    R.id.button7,R.id.button8,R.id.button9,R.id.button10,R.id.button11,R.id.button14,R.id.button13};

            for(int id:idList){
                View v = (View) findViewById(id);
                v.setOnClickListener(btnClick);
            }
        }


    @Override
    public boolean onCreateOptionsMenu(Menu menu) {
        // Inflate the menu; this adds items to the action bar if it is present.
        getMenuInflater().inflate(R.menu.menu_ingreso, menu);
        return true;
    }

    public void getKeyboard(String Str){
        String ScrCurrent= Scr.getText().toString();
        ScrCurrent +=Str;
        Scr.setText(ScrCurrent);
    }

    private class ButtonClickListener implements View.OnClickListener{
        public void onClick(View v){
            switch (v.getId())
            {
                case R.id.button13:
                    Scr.setText("");

                    break;
                default:
                    String numb =((Button) v).getText().toString();
                    getKeyboard(numb);
                    break;
            }
        }
    }


    @Override
    public boolean onOptionsItemSelected(MenuItem item) {
        // Handle action bar item clicks here. The action bar will
        // automatically handle clicks on the Home/Up button, so long
        // as you specify a parent activity in AndroidManifest.xml.
        int id = item.getItemId();

        //noinspection SimplifiableIfStatement
        if (id == R.id.action_settings) {
            return true;
        }

        return super.onOptionsItemSelected(item);
    }
}
На чтение 3 мин Просмотров 6 Опубликовано 18.04.2022
Система Андроид, несмотря на постоянные обновления и новые версии, все равно имеет множество багов. Тоже стоит сказать и про устанавливаемые приложения. Так, пользователи использующие англоязычные настройки Android или такие же программы, получают уведомления «Unfortunately, [приложение] has stopped». Сегодня мы расскажем что делать для решения подобных проблем в смартфоне.
Содержание
- Что это за сбой
- Что делать для исправления
- Заключение
Что это за сбой
По сути, это окно является сообщением о критической ошибке, из-за которой процесс был остановлен системой. Буквально, баг читается как — «К сожалению, этот процесс был завершен».
Ошибка «Unfortunately, the process com.android.phone has stopped»
Сам сбой может быть вызван многими причинами — устарелыми обновлений программы, перегруженной системой, битой прошивкой Андроида, вирусами, несоответствием поддерживаемых версий.
Что делать для исправления
Наиболее часто подобная проблема встречается в следующих процессах: com.android.settings, Google Play Services, com.android.phone, Setup Wizard, Launcher, System UI, Bluetooth. Например, мы уже писали про решение сбоев в com.android.settings и системной службе System UI. В любом случае, решения для всех подобных ошибок, практически одинаковые и потребуют нескольких действий.
- Для начала, с указанным в ошибке приложением нужно сделать стандартное действие: стираем кэш, очищаем данные и останавливаем. Искать эти службы надо в Настройках — Диспетчер приложений — вкладка «Все».
Пример очистки данных
- Также почистите телефон от другого мусора — примените менеджер очистки Андроид (клинер). Отключите автоустановку времени и даты.
- Стоит отметить, что любая прошивка нуждается в обновлении, установите актуальные апдейты для вашего Android.
- Бывает и обратный эффект — сама ошибка проявляется после плановых обновлений Андроида. Вот пример возникшей проблемы после апдейтов Окей Google. При таких проблемах следует удалить апдейты проблемной софтины — это можно сделать через то же меню (1-й пункт), либо через Плей Маркет — жмите там на кнопку «Удалить».
Откат системного приложения Google
- Хорошим методом определения источника будет переход в безопасный режим. Такой режим запуска автоматически отключает все сторонние программы, если ошибка исчезнет, тогда поочередно сносите, либо переустанавливайте программки. Вот как войти в этот режим на Samsung.
- Если ошибка останется даже в безопасном режиме, тогда вы имеете дело с проблемной ОС. В таком случае поможет сброс до заводских, либо прошивка устройства.
Заключение
Мы описали общие шаги, которые подскажут что следует делать в первую очередь со сбоем «Unfortunately, process has stopped». Подробнее в Рунете следует искать русскоязычные вариации «В приложении произошла ошибка» и «Процесс остановлен», добавив к ним сам источник бага.
Are you also facing issues on your phone? I am sharing here a few ways to fix the ‘Unfortunately app has stopped‘ error on Android. Using an Android phone is one part, and using with errors on the phone is another part. Getting errors on Android is not new, moreover, an Android phone is never been 100% stable these days, so we can expect such errors from time to time.
How to fix ‘Unfortunately app has stopped’ errors? —
One of the readers commented «My messaging app has been lagging, freezing and then ‘Unfortunately App has stopped‘. How can I solve this?» what are the steps to fix, Unfortunately, (App Name) Has Stopped. Why the app stops working suddenly?
Its the month-end and ever after the Android update, still, most of the popular errors are;
- Unfortunately, app has stopped in android emulator,
- Unfortunately, app has stopped solution,
- Unfortunately, app has stopped android studio,
- Unfortunately, WhatsApp has stopped,
- Unfortunately, app has stopped Android solution,
- Unfortunately, Google play store has stopped [SOLVED],
- Unfortunately, app has stopped Android development,
- Unfortunately, app has stopped eclipse.
Most of the Android users are seems to search; How do I fix unfortunately phone has stopped? How do you solve Unfortunately WhatsApp has stopped? How do I fix unfortunately Settings has stopped on Android? Why do my apps keep crashing? And so on…
While running the Android, the custom interface crashes and people got the error «Unfortunately app has stopped error» or «Unfortunately, Process com.android.phone has stopped unexpectedly».
As I told, one of the readers asked the question, Unfortunately, MyApp has stopped. How can I solve this? To answer him and to know how to fix Android errors for all you stuck people, this tutorial is made. Learn how to get rid of these Android errors in simple steps.
![[Fixed] Unfortunately app has stopped error](https://4.bp.blogspot.com/-v0xDnMzNDo4/VoO9fhkjHwI/AAAAAAAAFQg/cka6q8h-H4I/s1600/%255BFixed%255D%2BUnfortunately%2Bapp%2Bhas%2Bstopped%2Berror.jpg "[Fixed] Unfortunately app has stopped error")
Last time you have seen, how to Fix 48 Common Google Play Store Error Codes Quickly and today we are going to see how to fix error caused by apps. These days many experts coming forward with their own style of solving frequent technical issues related to operating systems, software, non-software and many.
{tocify} $title={Table of Contents}
What is the cause of unfortunately app has stopped?
The error message means that you can not properly use the application without having to reproduce this error again. To be honest, Google cannot be entirely responsible as there are app developers are involved; usually poor Android programming or coding causes these kinds of errors.
You may also like to read; Where Are Google Offline Maps Stored? | Google Maps | Android
Maybe you receive on your Android phone the following error if you open an app, such as the phone app:
«Unfortunately, the process.android.process.acore has stopped»
Since this is a bug, which is not too easy to solve, we would like to present you a few suggestions that may perhaps resolve this.
The following are the methods that have proven to be able to get rid of the «Unfortunately, (app name) has stopped» issue:
1: RESET APP.
We need to clear the storage data & cache for the app. Initially reseting the app is simple way to solve this if its not that much criticle issue to the phone.
- Go to SETTINGS >> Application Manager >> All >> Select your desired app >> touch the Clear data and Clear cache >> Choose FORCE STOP.
- Reboot mobile and check.
If above steps didn’t worked then;
- Go to SETTINGS >> Application Manager >> All >> Select your desired app >> Choose UNINSTALL/REMOVE APP.
- Reinstall app and check.
As an Android user, you must know; Top 12 Things YOU SHOULD STOP TO DO on Mobile Right Now
2: Reset all app preferences.
If the problem is criticle, and didnt solved by first solution, then follow this step.
- Go to Settings >> Application Manager >> All >> Menu >> Reset App Preferences.
- Reboot phone immediately.
RECOMMENDED: Top 25 Reasons Why Android Is Better Than iPhone in The Market
You may also like to read; Top 35 Best Android Tips, Tricks & Hacks That Will Blow Your Mind | Smartphone Tricks
3: Factory Reset (OPTIONAL).
This is not the best solution, but if you have stuck on the critical issue, then I would like to go for factory reset. This is an optimum method for solving this problem, it is not a recommended method because you are going to lose your internal and application data by using this method of clearing the issues.
Dear valuable reader one can go with this method unless you cannot clear the issue by moving with all the above-suggested methods. A factory reset wipes your phone’s internal memory clean and restores everything back to its default. So suggesting to do a backup before resetting.
- Go to Settings >> General >> Backup and Reset.
- Follow steps and reboot.
I tried here to explain most working methods that could help you to fix the most common crashes on Android phones; hope you have been got out of your issue now by using this guide.
So, the error «Unfortunately the process com.android.phone has stopped» should no longer appear while using your Android phone next time.

Published by
Vinayak SP
A passionate web geek, digital columnist, and a successful solo entrepreneur who has been dedicatedly working on ProBlogBooster. Don’t miss out on his insights — Join the PBB tribe & follow on social media and subscribe to email newsletter to stay updated with the latest tech trends & internet buzz!