
I ran into this problem today, and I’ve come up with a few solutions. The root cause is that the default folder that Nexus Mod Manager wants to install into is not typically writable by normal users. They want you to install into a subfolder of C:, and if you don’t have administrator rights, chances are you can’t create the «Games» folder you need (C:Games).
You’ve got a few options:
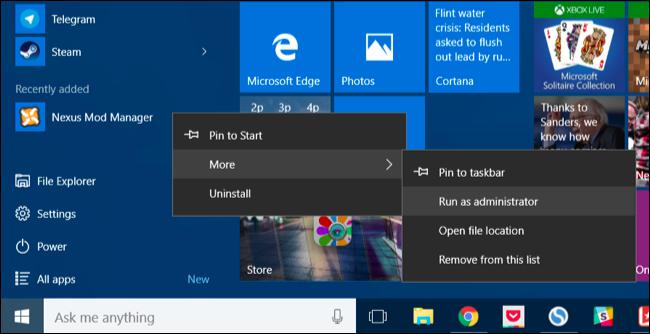
Run the program as administrator. This way, it will have permissions to write to the root of C:, and then you can create the files/folders there. Just right click, and choose the «Run as Administrator» option.
Get write permission on C:Games. You can do this if you have administrator rights by:
- Open your C: in Windows Explorer
- If the «Games» folder does not exist, right click, choose «New Folder» and name it «Games»
- Right click on the «Games» folder, and choose «Properties»
- Click the «Security» tab
- Click the «Edit» button
- Click the «Add» button
- Type your login name (if you log in as «bobsmith» then you’d type «bobsmith» here)
- Click «Check Names» and if the name becomes underlined, you did it right! Click OK. If not, double check your login name from step 7.
- On the bottom half of the «Permissions» dialog, click «Full Control» for the user you just added.
- Click OK to dismiss this dialog, and then click OK on the properties dialog.
Now you can write to C:Games, which ought to make NMM happy.
Put your Nexus Mod Manager files somewhere else. If you install to some subdirectory of your home directory, you won’t have to worry about permissions and so forth. When the Mod Manager asks you where you want to save the mod files, pick someplace under C:Users(your user name) or C:Documents and Settings(your user name), depending on the version of Windows you’re using. You could potentially put this in your Documents folder, but I have «projects» folder I created in my home directory, which works well for me.
You do not want to set these directories to something under C:Program Files or in the Steam folder, etc. This is a Bad Idea.
If you’ve already selected the default mod directories, you won’t be asked if you want to change them when you get this error. If that’s the case, you can edit or delete the config file so that you can pick a new directory.
The config file for Nexus Mod Manager is stored in %LOCALAPPDATA%Black_Tree_Gaming — you can copy and paste this into the address bar of Windows Explorer to go there, or paste it into the «Run» or «Search» dialog on the Start menu. Alternatively, from your user’s home directory, look for «AppData» and then «Local» and then «Black_Tree_Gaming»
The name of the directories in this folder depend on your version of NMM, but the file you’re looking for is user.config. You can delete this file, but you’ll lose any other NMM settings (including the location of any games that were scanned previously). You can also edit it with a text editor.
Look for a block that looks like:
    <setting name="ModFolder" serializeAs="Xml">
        <value>
            <PerGameModeSettingsOfString>
                <item modeId="Skyrim">
                    <string>C:GamesNexus Mod ManagerSkyrimMods</string>
                </item>
            </PerGameModeSettingsOfString>
        </value>
    </setting>
    <setting name="InstallInfoFolder" serializeAs="Xml">
        <value>
            <PerGameModeSettingsOfString>
                <item modeId="Skyrim">
                    <string>C:GamesNexus Mod ManagerSkyrimInstall Info</string>
                </item>
            </PerGameModeSettingsOfString>
        </value>
    </setting>
The directories here are the ones you’d want to change to some folder you can write to.
Moved from original location to the new Tutorials and Guides section — RC
NMM users:
This thread is a WIP. I will try to regularly inform you about all updates, troubleshooting and bugs about NMM. The most important updates and tips will be placed here, and other info and news will be posted in the thread.
All information is collected from various sources: Nexus site, NMM troubleshooting forums, various experienced users and personal experience.
— All versions of NMM 0.61.+ were tested on Windows 7 Professional 64 bit.
Although I created this thread, I have no exclusive rights for providing answers/help. You can all participate in helping others. So, if there is a need for help and you know how to help, please do, do not wait for me to answer first. You don’t need my approval. It’s your right. 
****provocations like: MO is better than NMM and advertising MO in this thread will be immediately reported to moderators.
————————————————————————————————————————————————————————————————————————————————————————————-
NMM 0.61.+ is very tricky for to install. Be careful in how you do it. Here are some tips that can help you and save you from «going mad».
We cannot stress enough that we are still in the beta stage of NMM. NMM is in a very good state and will be usable by nearly everyone, but Beta stages are typically used for testing and bug fixing, and some of you will find bugs.
We are using a bug tracker system on our forums that allows you to post any bugs you might have with NMM. We cannot fix a bug if you do not report it! Using the tracker system is as intuitive as making a post on a forum, and you can login to it using your Nexus username and password.
We also have a beta test subforum that contains all the information you need to know to get started, report bugs and help us with development of NMM.
Limitations
We don’t want to make you think that NMM is the solution to your problems getting 1,000 mods to all work together right now. It’s our aim to to reach that point and it’s what we’re working towards. However, even simple mods can be a complex business and trying to get many mods to all work together is something people in the community have been working hard to do since the start of this community. NMM is designed to make your life downloading, installing, updating and managing mods easier, but it will not currently be the wonder pill that will make all your conflicts and compatibility issues disappear. Load orders, conflicts and compatibility issues still exist with NMM at this time.
Mods may not work for a number of different reasons, and not all of them are the fault of NMM or the mod author who created the mod(s). Please remember this before you verbally abuse us, or the file authors, for not being able to get your mods to work.
Having said that, development is ongoing with NMM to make these difficult aspects of modding as easy to overcome as is possible within the limits of the game. We are working hard to not only ensure these issues are mitigated as much as possible within NMM, but also to ensure our program is compatible with any other tools and utilities you might use at the moment to deal with them.
IMPORTANT!!! IMPORTANT!!! IMPORTANT!!!
Before you do any changes to your game (mod upgrades, uninstallation, new mods installation … ) :
— back up your present game and the mods from Games/Nexus Mod Manager/Skyrim/Mods. (You might loe them … Not necessary, but precautions … one can never be sure enough … Seriously — Do back up)
Beginners guide to modding for NMM users (by gromulos)
READ! Read the description pages for each mod. Read the install instructions for each mod or utility. Read the Skyrim owners manual. No one was ever hurt by just reading.
while this was primarily made for Skyrim, it also works for Fallout 3 and Fallout New Vegas, FO4
This guide will NOT work for any unofficial version of Skyrim, Fallout New Vegas, Fallout 3 or FO4.
1) You need to run LOOT, Wrye Bash and TES5Edit, in that order.
Loot is not 100% and if that is all you’re using you’re going to have many problems as you progress through your play through, BOSS is no longer being supported and thus is out of date with newer mods. With many mods loaded, you should be using 2 other programs, Wrye Bash and TES5Edit. Sort the plugins with loot then click apply.
LOOT = load order
Wrye Bash = verification of load order and primary and secondary file load
TES5Edit = verification of primary and secondary file load
2) Wrye Bash 306-beta — Standalone Executable
2.1) When you run Wrye Bash if any checkmarks are not green, those mods are causing problems in your game, you make them turn green by dragging them up or down in your load order in wrye bash till they do turn green.
2.2) You HAVE to have either a merged patch or bashed patch file, once again Wrye Bash is your friend because it will automatically make you a bashed patch file when it loads your mods. A bashed patch file makes all your weapon and armor and other mods play nice together, it also keeps track of leveled lists in the game and makes them work better together also.
2.3) One other thing, make sure you enable ( check mark ) the bashed patch Wrye Bash makes, then right click it and choose rebuild patch as the one Wrye Bash makes is empty, which should always be last in your load order unless you’re using an ENB, SUM, ASIS, or the Reproccer.
2.4) Make sure you go through both lists on the left and right panes of the window and make sure each entry that has a listing also has a check mark for the box next to it. Rebuilding the bashed patch is not going to help you if EVERYTHING is not included.
2.5) Concerning what the red, orange, and green check marks mean in Wrye Bash.
Red means a missing master file — basically a guaranteed CTD on startup.
Orange means that some ESP has requested its master files in an order that is different to the the order that you currently have them in. Orange mods are arguably more dangerous, because you won’t necessarily get an immediate CTD every time, so you may be lulled into a false sense of security, whereas in reality you have an unstable load order.
Clicking on the orange/red mods will show you what masters they have, and what order they want them in. From here on in, it becomes like a puzzle: you need to manually drag and drop the various masters in your load order until their order is harmonious ( IE:. you’ve managed to provide the desired order of master files for every single ESP in your list simultaneously ) and all of your oranges have disappeared.
Green means you are good to go for that mod
If it’s not possible to eliminate all orange mods, you may need to do one of the following:
- Manually download and manually install the mod — sometimes they are corrupted, this has worked for other people in the past that I have helped one-on-one
- Ditch one or two mods / patches — last resort
- Sort the master files for the orange mod in TES5Edit — see appendix 1
Appendix 1 —
open WRYE
find an orange mod
when tes5 opens and lists all your mods, right click the window
load in Tes5Edit only that mod and tes5 will load the rest ( best to do one at a time )
then right click the orange mod and pick sort masters
then close and save
The first 9 files should ALWAYS be in this order, no exceptions.

DO NOT USE A MERGED PATCH AND A BASHED PATCH AT THE SAME TIME, ONE OR THE OTHER.
#1 rule — NEVER delete a mod once you install it unless you are making a new character — N E V E R !!!
3) TES5EDIT is used to do 2 things,
— verify that your load order is not missing any files that your mods need and
— verify that no primary files are being loaded after secondary files. When you run TES5EDIT it will throw up an error box and the error will be displayed at the bottom of the right pane / panel. All you have to do is read what it says and it will tell you exactly how to fix the problem in Wrye Bash. Yes, you can open Wrye Bash while TES5EDIT is open so you don’t even have to write down what the error is 
Please remember that while LOOT is a great program it is NOT 100 %
All the files in here are in my siggy, just run them in the order I have them listed
EDIT: SKYui should be loaded directly above your bashed patch. SKYui is a menu management mod and thus should be loaded AFTER any other mods except the patch file, Reproccer, ASIS, or an ENB
Additional info that may be of use for some people below:
1) MotoSxorpio — If you have removed a plugin or changed load order, a reference ID for objects being missing could cause CTD.
2) Oubliette — Error checking mod combos isn’t impossible it’s just a pain to do and no one wants to do it for anyone but themselves — which answers your other question.
The following is standard trouble shooting for mod issues not pinned to a single mod (this is why you test every single mod in your install as you go, individually and with all your other mods — to pinpoint problems at the mod from the very beginning).
First — have you verified your game files through steam and updated to the latest patch?
Second — uncheck all your mods, start a new game, save after the chargen. This will be your ‘tester save.’ Do Not Overwrite or Delete this save.
Third — Enable five mods.
Four — Go into game with your tester save. Run from one end of the game world to the other. Go into a few cities. Interact with a few things that are mod related. See if anything crashes.
Five — No sign of problems? Repeat 3-5. It crashed or something’s not right? Go to step 6.
Six — something crashed? uncheck one of the five mods then go back to your tester save, repeat step 4.
Continue until you have found and fixed your error.
Intermediate guide by — Tony971 — http://www.nexusmods…im/mods/56894/?
Advanced guide by — GrandBulwark — http://www.nexusmods…im/mods/32363/?
How many mods and plugins does NMM support
Skyrim(!) only understands 255/256 Bethesda plugins. These will be files that have either the ESM or ESP file extension. Prefix is inbuilt for 32 bit game. Period.
You can pile up SKSE plugins, textures and meshes above that number, because they do not have Bethesda plugin extensions at all.
Load order only understands plugins. It does not care or manage anything else.
Your ability to pile up other mods above plugins depends on your computer. You can have 1,000,000,000 texture mods overwriting each other, but both Skyrim and your computer still needs to go through each and every one of them. This is why it is recommended to use a limited number of mods overwriting each other.
While bashed patches can allow for some mods to be integrated into it, and while in the actual program it marks this as merging mods, this is not a true merge. The only mods that can be compiled into a bashed patches are basic mods that only touch Skyrim’s setting files or basic information regarding levelled lists, or very basic fiddling with other base information such as biped slots, so it is more compiling a group of settings changes that previously would need an esp slot to be picked up on by the game.
This is an AUTOMATIC process and you cannot get it to accept any mods that are not set up to be merged with a bashed patch by the author. Some mods (such as multiple floor sandboxing) have an alternate version that is specifically designed for Wrye Bash to recognise it so that it can be integrated.
Inactive plugins in your load order also counts towards the plugin limit, for instance, let’s say that you have 100 active plugins and 10 inactive plugins, so the plugin count will be 110, and not 100 !!!!
[/spoiler]
How to install Skyrim and FO4 mods mods using NMM (link and video)
http://wiki.tesnexus.com/index.php/How_to_install_Skyrim_mods
How to make Backup and how to restore your Backup
How to back up NMM:
- Create a backup folder on your Desktop or somewhere on your hard-drive that has plenty of space
- Create the following folders inside your backup folder:
— Data
— ini
— Install Info
— Plugins
3. Backup your game’s Data folder (eg. C:SteamsteamappscommonskyrimData for Skyrim) by copying (not moving) all the files and folders from the game’s Data folder to your newly created Backup/Data folder (for games like Skyrim you can skip the default BSA files that the game installs in the data folder if you so wish)
4. Go to your NMM folder for the game you’re backing up (eg. C:Nexus Mod ManagerSkyrim for Skyrim) and copy (not move) the content of the Install Info folder to your BackupInstall Info folder.
5. Go to where your game’s .ini files are located (eg. My DocumentsMy GamesSkyrim for Skyrim) and copy (not move) the Skyrim.ini and SkyrimPrefs.ini files in to your Backupini folder.
6. Go to where your game’s plugins.txt and loadorder.txt files are located (eg. C:Users{Your User Name}AppDataLocalSkyrim for Skyrim). You might need to find this folder by using the address bar if you have not turned on hidden files in your computer settings. Copy (not move) the loadorder.txt and plugins.txt files to your BackupPlugins folder you previously created.
Restoring NMM back to your backup settings
- Go to your the game’s Data folder and copy the contents of your BackupData folder to it (overwriting if asked)
- Go to your NMM folder for that game, open the Install Info folder and delete everything that’s in this folder. Then copy the contents of your BackupInstall Info folder in to it.
- While still in your NMM game’s folder, go in to the Mods folder and delete the ModProfiles and VirtualModActivator folders if they exist.
- Go to where the .ini files are located and overwrite them with the ones from your backup in Backupini.
- Go to where the loadorder.txt and plugins.txt files are located and overwrite them with the ones from your BackupPlugins folder.
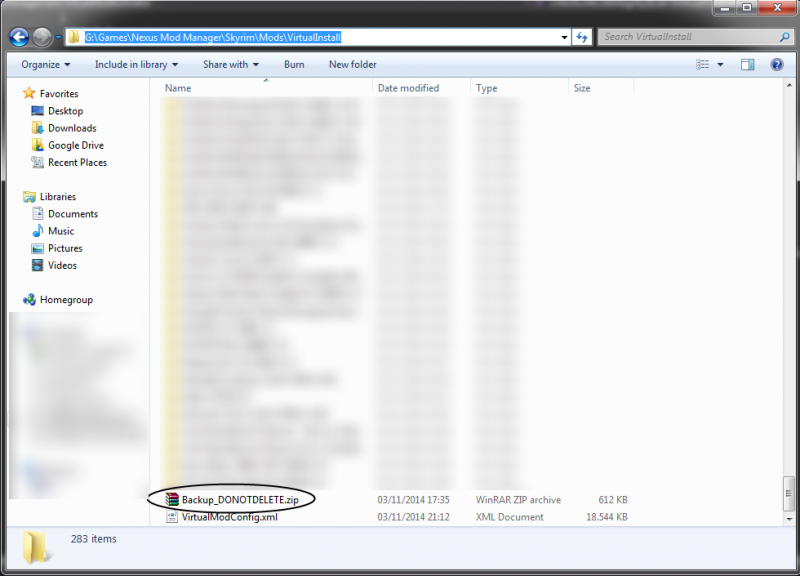
The backup file is created automatically and it is named Backup_DONOTDELETE.zip, it will be placed in the selected VirtualInstall folder (usually in your Mods folder for that specific game).
Restoring your Backup
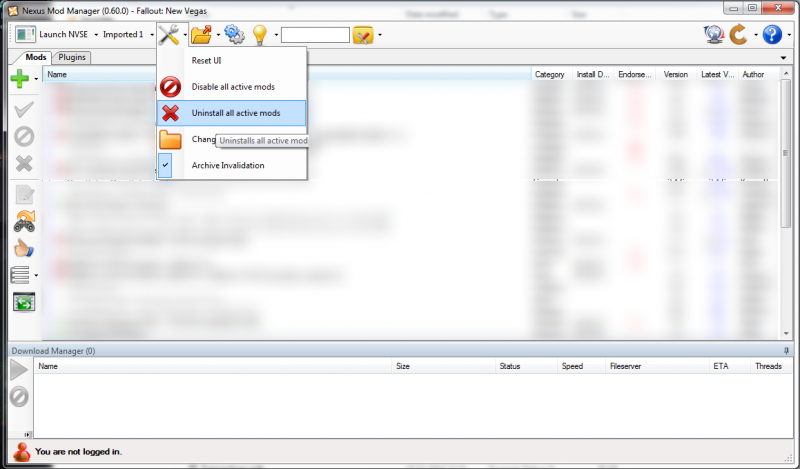
If you installed any mod using the Profiles version of NMM, or you just allowed it to migrate your mod install, it’s better if you uninstall all mods using this version: go in the Tools menu (check the picture), and select Uninstall all active mods , this will automatically and properly clean your mod installation and any file link created by this build, you can now close and uninstall this NMM version.
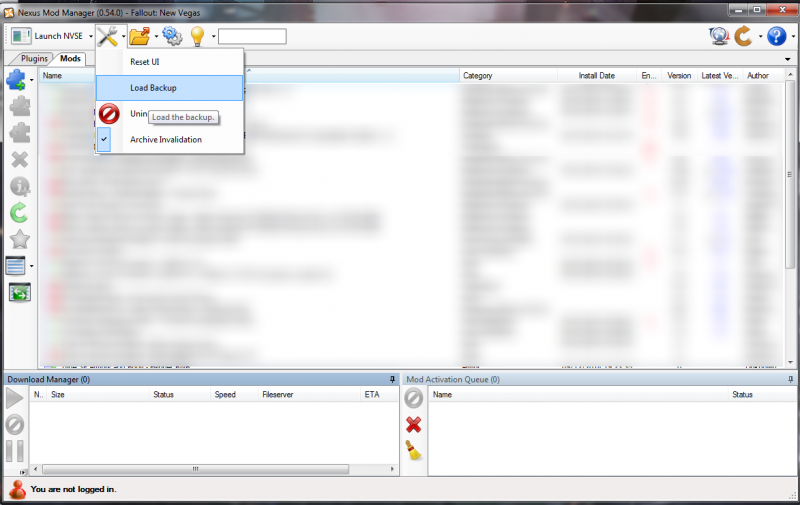
Open your NMM version 0.54.0 (or higher), go in the Tools menu and select Load Backup (check the picture for reference), find and select the Backup_DONOTDELETE.zip file, confirm, and NMM will automatically restore your previous mod install (keep in mind that you will be required to interact with scripted installers, like the one used by the mod «A Quality World Map» for Skyrim), this procedure will take several minutes or even hours based on the number and size of mods, and the performances of your system.
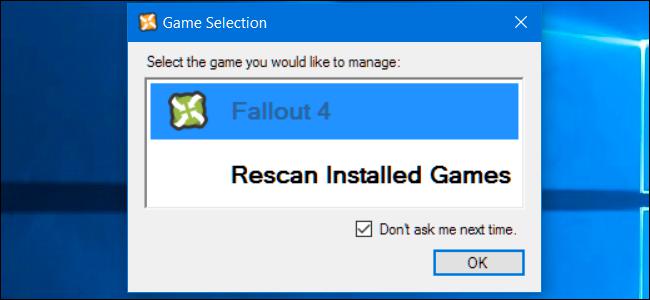
What to do on first installation/upgrading of NMM 0.61.+ (VERY IMPORTANT)
This prompt informs you that NMM needs to uninstall all your mods and then asks you a question.
If you click YES, NMM attempts to reinstall all your mods how they were before the update.
If you click NO, NMM will uninstall all your mods and leave you to reinstall your mods how you see fit.
If you click Cancel then none of the above will happen, but you won’t be able to use version 0.61, allowing you to gracefully roll-back to your original NMM version through the normal method (installing the last version over the top of the usual NMM location). If you do this, nothing will have been changed and you’ll be completely back to normal on the old build of NMM.
How can I disable «Updating message»
Spoiler
You can disable the update messages in NMM, just go to Settings and under Options, uncheck the box where it says «Check for updates on start up«.
How to create load order list (in pictures)
Adding more supporting tools (text and pictures)
Spoiler
If you want to add more supporting tools to your manager, tools like Wrye bash, Tes5edit, Bodyslide path and similar, the procedure is very simple.
1. Click on your «Settings» Icon
The new box will pop up with new options. Go to «Supported tools» tab and you will see new options. Now, Since I have Wrye bash (WB) , I added it to my «Supported tools. I clicked on «…» beside the line and a new box popped up. All I had to do is to find the root directory of my WB and when found, click on OK. NMM adds WB to my supported tools. Now I can run WB directly from the manager. This is a great advantage since NMM can directly pass its master list and load order to WB where you can manually move mods up and down in your list. Change you make in either manager are visible and implied in both..
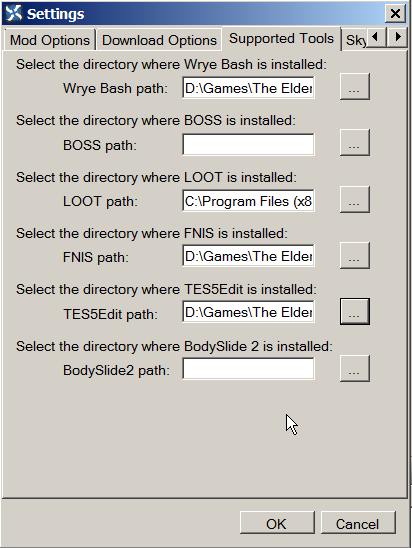
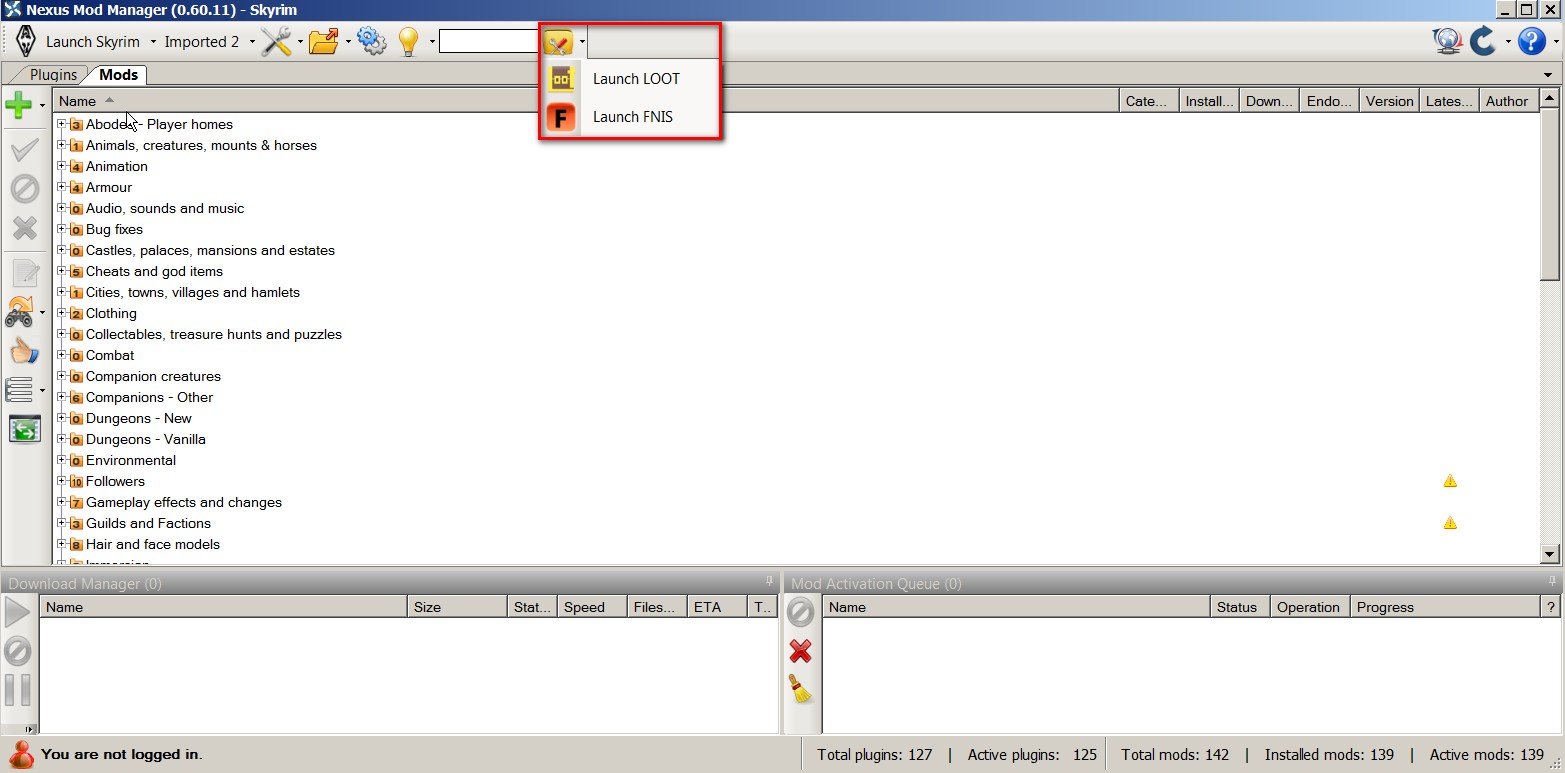
2. To check if your new tool is added to NMM, click on your supported Tools Icon and you will expand it. You’ll see that there are already two Icons in it: LOOT and FNIS that you can run directly from your manager. The integration with these two tools is great so you can use them without fear.
If you haven’t managed to add a new tool to NMM, don’t worry, NMM will not let you leave the box until you properly add the tool’s path. You’ll see red blinking «!» at the right side of the desired tool path line and you will got a small warning box. So, NMM will not let you make a mistake. Once you add your line correctly, the box will close.
I can no longer interact with mods that have scripted installers after I’ve installed them. How do I redo the options?
Spoiler
NMM now has three mod states; active, inactive and uninstalled.
If a mod is active, it’s installed and turned on in your profile so should show in your game.
If it’s inactive the mod is installed, but it’s not turned on in your current profile so should not show in your game. It may, however, be active in other profiles you have.
If it’s uninstalled then the mod is not installed and it’s not active in any of your profiles.
When you interact with a scripted installer for a mod it will install the mod with the options you set. If you want to reinstall that mod and go through the scripted installer again you need to uninstall it, not deactivate it. To do so, simply right-click it and select «uninstall». When you go to install the mod again you’ll then be prompted with the scripted installer, as per normal.
I can’t install downloaded mod because NMM sees it as «Read only»
Spoiler
In that case, browse to the place where you download your mod, right click on it and disable «Read only»
How to properly install and use NMM (basic important tips)
Spoiler
Download latest NMM manager from here: http://www.nexusmods…ds/modmanager/?
Download latest NMM manager from here: http://www.nexusmods…ds/modmanager/?
1. Install the manager.
— at the end of NMMs installation, you’ll be asked to run FNIS and will be warned about some problems if creating multiple profiles. Choose to «Run FNIS». FNIS box will pop up and run FNIS. If FNIS works, you’re OK. If doesn’t, reinstall FNIS using NMM.
— although this version is very fast, it is slow when installing/uninstalling big size mods (over 80 MB). It takes time and sometimes it shows «Not responding» on the top of framework. Do not cancel or stop installation/uninstallation process because you will need to repeat the operation. Be patient and wait. When finish, NMM will report about completing operation on the bottom of the manager.
— 0.61.+ versions supports creating multiple profiles. After the installation of the manager, you will see «New profile» tab under toolbar. I would suggest you to create at least one more profile beside the default one. If something goes wrong, you can always go back to your original (default) profile. You can check this under:. You can check this under: How to play (create) multiple characters
2. Mod installation is much «smarter» now and autonomous. Searching files and integration with Master files is improved.
— If you are doing new installation of the manager, be very careful where will you place your VirtualInstall folder (see the topic 4)
— When starting, NMM 0.61+ will uninstall your mods first and then reinstall them. During that process you’ll be asked to choose/confirm certain installation from some mods like, FOMODS, XP32 Maximum Skeleton, SOS and other mods you had installed and you did these steps before.
3. After mod installation you should run FNIS and LOOT from the manager. NMM co-works with LOOT, Wrye bash, Tes5edit and FNIS much better now.
4. On the first installation of NMM 0.61+, be careful to NOT TO install «Virtualinstall» in the «Nexus Mod Manager/Skyrim folder». When asked, chose ONLY main, Nexus Mod Manager folder.

— You should never move your VirtualInstall folder to another location manually, nowhere else because some mods requires that their .exe, .esp or .esm files be in game installation directory. (But, if you are persistant to do it, do it at your own risk)
— if you want to move your mod folder back where they were using NMM. Open NMM, to change the VirtualInstall go into the Tools menu, click on Change Virtual Install and then select the new path, NMM will automatically uninstall stuff from the old location and activate it in the new folder
5. Upgrading your manager:
— upgrading to the new version is 99% successful and works great. If something goes wrong during and after upgrading the manager, you can try to do it again and if it still not working, disable your mods, uninstall present version and install a new one. Before you do that, check How to completely uninstall/remove NMM and Answers to various NMM problems first.
— If you upgraded NMM to 0.61.+ from previous versions, recheck your mods. Some of them will not be installed even after NMM’s mods re installation. Not installed mods will be greyed in your manager. Here is one serious bug. Some of the mods will be showed in manager as reinstalled, but they aren’t. So how can you know which ones aren’t reinstalled. Thanks heavens for SKSE 1.7.3 and its .ini modification.
— If you start the game and got info box «Some mods are missing», that means you don’t have needed line in your SKSE.ini file and therefore you don’t know which ones are missing since NMM showed all your mods as (re)installed.
Open SKSE.ini (SteamApps/Common/Skyrim/Data/SKSE. You can create the folder, if it does not already exist), and add line: «EnableDiagnostics=1» under [General]. So, next time you start the game, you’ll see which mods are missing. Then go back to NMM, uninstall them (see topic and install them again. Yeap, this is the bad side of upgrading your NMM to present game.
— When running the LOOT after upgrading, you will have to clean again some mods using Tes5edit. It depends on what LOOT will report as mods with dirty files.
6. NMM supports Wrye bash. You can download it from here: http://www.nexusmods…rim/mods/1840/? or any other site that contains this program. Just google.
After the installation of NMM, FNIS and LOOT, Wrye bash is the third tool that NMM users need. What does it do?
— Basically what Wrye Bash is in a nutshell is a way for you to manage many, many mods in a very simple yet very powerful interface.
— When a package is installed, it will override files installed by lower order packages, but not files already installed by higher order packages.
Similarly when a package is uninstalled, an «annealing» process will automatically reinstall files from lower level packages that were previously obscured.
— It fixes mod conflicts
— Lifting of the 255 plugin limit through automatic merging of compatible mods
— editing your saves and lets you fix them manually
… and many other great features.
For more details about this program, check here: http://guides.tesfan…ral Readme.html
7. If you have SKYUI 5.+, NMM might report error and presence of SKYUI 4.+ files during re installation process. (It happens on new game installation). The box will pop up with description of the «old files» and suggestion for their deletion. Go to the that location and delete all 4 files. When done, click on «Refresh». After that, NMM will proceed with further installation.
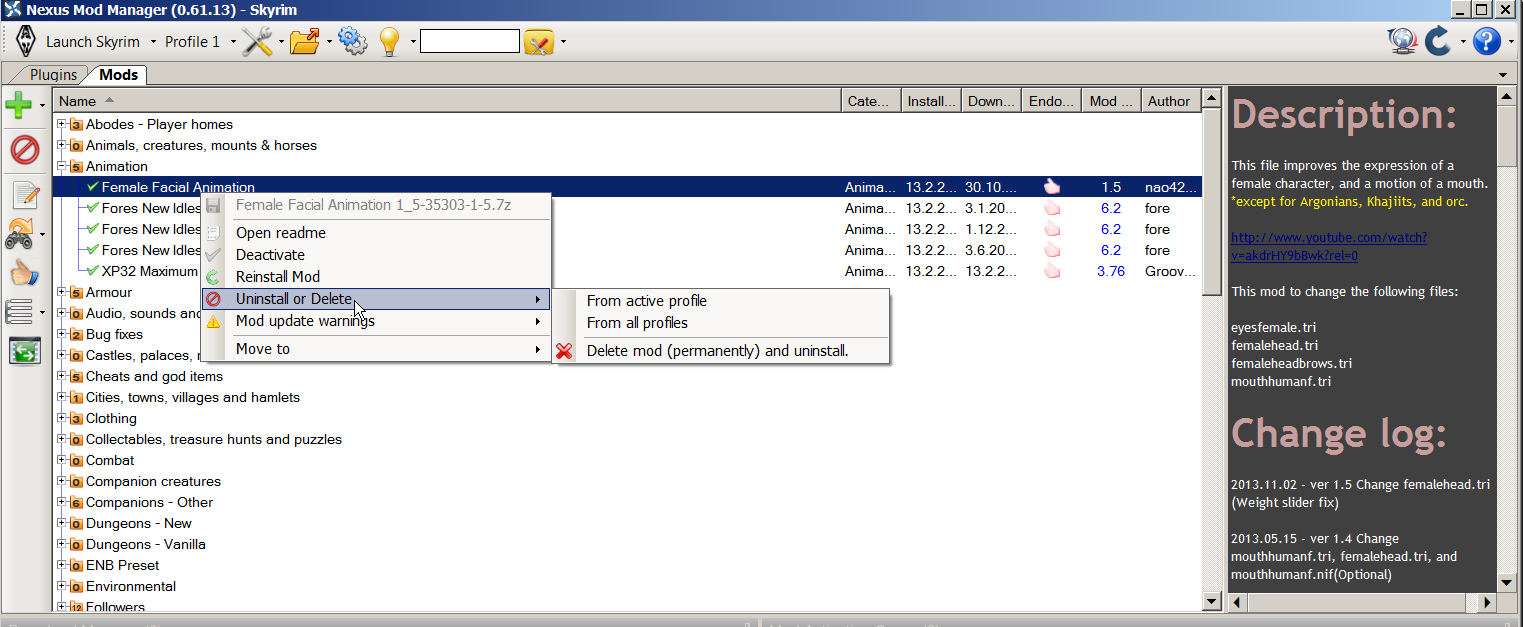
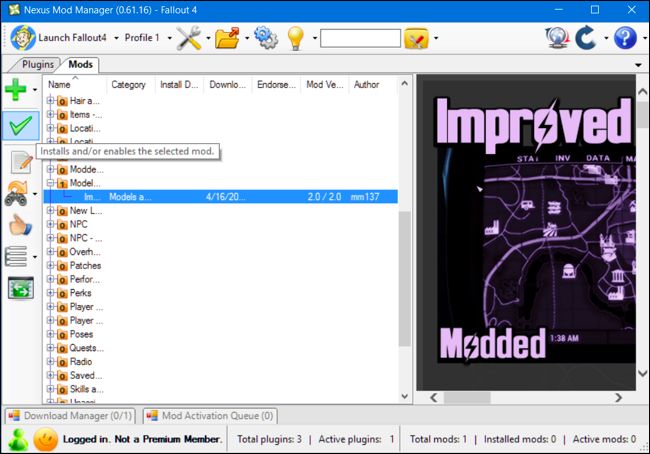
8. Uninstallation of the mods: right mouse click on desired mod, choose «Uninstall or Delete». Correct uninstallation of the mod will be like this — uninstalled mod will turn into grey color and will not have red crossed circle on the front. I usually disable the mod first and then uninstall it. There are several more options… see the picture.
9. If you get: «Unable to get write permissions for: C:GamesNexus Mod ManagerSkyrimInstall Info» message, run NMM as administrator.
10. If you use LOOT via NMM, LOOT will arrange your load order directly from the Master list it receives from NMM. Do not use external LOOT since it will/might change your load order bit differently from NMM and you might experience game problems when loading it via NMM. Use either one, not both.
11. If you want to uninstall several mods in row, it is recommended to uninstall them one by one waiting for manager to finish the task first and then uninstall another mod because the manager sometimes hangs on processing multiple processes and freezes. It that happens, close the manager, reopen it and repeat the task.
12. After every installation/uninstallation of animation mods or/and skeleton, run FNIS to avoid CTDing, or t-posing.
Well, this is basic info and tips. I just wanted to share them with all NMM users and help them to not became frustrated (as I almost was) when installing NMM 0.61.+ version.
NMM — downloads (Virus free rar and .exe installers. All files were checked for viruses by Kaspersky AV and Anti Malware & Spyware PRO):
— Latest versions : 0.61.3, 0.61.4, 0.61.5, 0.61.6, 0.61.7, 0.61.10, 0.61.12, 0.61.14, 0.61.15, 0.61.16 — requirements and installation
— (0.61.+ hotfixes description)
Warning: This versions requires .Net Framework 4.6 (If you’re not using Windows 10, you can download it HERE )
How to completely uninstall/remove NMM
Spoiler
1. Open NMM and press «Tools» icon. Select «Uninstall all active mods»
2. Delete Games/Nexus mod manager (It is placed in your Skyrim installation directory)
3. Delete My documetns/Games/Skyrim folder
4. Use Revo uninstaller or CCleaner or any other Win tool to remove NMM traces from your computer and clean up registry
NMM 0.56.1 and older versions download and video: how to revert to earlier NMM workable version)
Spoiler
here: Nexus Mod Manager-0.56.1.rar
Other older versions:
http://forums.nexusm…download-links/
Note: installation might report broken installation file. If this happens:
1. delete all NMM files in My Document,
2. delete NMM folders in …Games/Nexus Mod manager/Skyrim/Install info (Do not delete «Mods» folder from this directory)
3. delete Games/Nexus Mod manager/Skyrim/VirtualInstall folder
4. Clean your registry.
5. Restart your computer and try to install older version
If this doesn’t help you install previous version, sorry, no help, you’re stack with the one you don’t like.
How to manually revert NMM to older version (before 0.61.+)
Spoiler
You can restore your mods in the previous NMM by doing the following:
- Uninstall currently installed NMM, remove all config files when asked
- Install a pre-0.60.x build (in my case 0.56.1)
- Launch 0.56.1 and go through all the setup
- With NMM loaded to the mod list screen, click on Tools (wrench and screwdriver icon) and select Restore Backup
- Find the file Backup_DONOTDELETE.zip located in the VirtualInstall folder and open it
- Restoration of all your mods should commence
NMM and load order tweaking
Spoiler
NMM greatly co-wroks with LOOT. When LOOT sorts your installed mods and creates load order, NMM memorize it and saves it in its clipboard. According to your settings for update master files list (default is every third day but you can change it as you like) NMM updates your master list (yaml) and «Informs» LOOT about all changes that are made in meantime. Then LOOT adopts and change your load order according to received informations from NMM. Well, this is the sword with two blades. Let’s assume you had a load order that worked fine, but you installed and de-installed some mods in the meantime. All worked fine untill LOOT change your master mods load order, and suddenly your game doesn’t run as it use to. LOOT rearranged your mods according to the yaml informations from NMM and the game behaves «weird». So what can you do to return your game stability into previous state? Here is the answer.
1. When you installed all mods and you are satisfied with the stability of your game, open NMM and press «Plugins» tab.
2. On the left panel you’ll see two blank pages with arrows pointing to the right. Click on the first one in the row (Export the current load order) and choose «Export to the clipboard». Now, you saved your present load order into NMM’s clipboard.
3. When LOOT change your load order and your game doesn’t run well, open NMM again and this time choose the second blank page icon (Import load order) and choose (Import load order from clipboard). Now, you restored your load order that ran well. All new installed mods and changes, LOOT will adopt to your load order until your master mods list change it again. Just repeat this operation again.
If you aren’t satisfied with LOOT’s work, you can manually change your load order by moving mod(s) up or down using big green arrows under «Plugins» After that run LOOT directly from NMM. If you like the way your game behaves, export your current load order to clipboard.
Mods downloading, but not activating on NMM 0.61.+
Spoiler
If you downloaded certain mod using NMM manager and it «refuse» to activate it, there can be several reasons for that:
1. manager downloaded mod but with errors
(suggestions):
— check for error reports in Mod activation Quene Monitor. If there are no errors report(s) do next step:
— delete downloaded mod, exit NMM, restart NMM and download mod again
— If the problem remain, download the mod manually
If NMM reported error in downloaded mod or during downloading process there can be several reasons:
— server error
(suggestions): try to download later
— mod’s error
— NMM manager error
2. Mod is probably not meant to be installed via NMM
(suggestions):
— install mod manually following mod’s author insturctions
— after installation open NMM and activate mod in Plugins tab
— if NMM still doesn’t acivate mod then it’s a probably bug in NMM.
3. Mod was uploaded with errors
(suggestions):
— check often the author’s info and read the users posts on his original site about bug reports and author’s notes. Report error to the author of the mod.
4. Probable bug in NMM
(suggestions):
— report bug to NMM bug report on Nexus. http://forums.nexusm…x.php?/tracker/
To be able to report bug, you have to be a registered member on Nexus.
Before installing mod, always check downloaded mod with decent Anti virus program.
Single profile users tip (where to install armour, meshes, textures)
Spoiler
Question: Let’s say I installed an armor mod with NMM. If i made a texture or mesh that I wanted to overwrite from that NMM install, should I put it in the main Skyrim directory? Or In the virtual install? Which filepath is prioritized when you’re just dragging and dropping certain things in the main Skyrim install folder?
Answer: Skyrim will always run the files in the Data folder. The texture and mesh files in there are actually links going back to the Virtual Install folder. In essence, the mod files in the Data file that NMM installs are «fake» files linking to the original files in the Virtual Install folder. You should do so in the Virtual Install folder. If it is not installed through NMM, you can edit them in the Data folder as usual.
How to play (create) multiple characters.
Spoiler
Lets assume you want to create two different characters, one an Imperial and the second a Redguard.
1.In NMM press New profile. New box will pop up where you can name it as Imperial or whatever you want.
2.Start the game via NMM and create the Imperial character, save and exit.
3.In NMM click on «New profile» and save it as Redguard or whatever you like
4.Start the game via NMM and create the Redguard. Save and exit.
5.Once you create those two profiles in order to play the one you want, you need to start NMM and choose the desired profile and then press «Launch Skyrim» unless you using mods needing SKSE to start the game. In that case, press «Launch SKSE»
This might work also in already created multiple characters, but no guaranties. It’s recommended to use it on the new game. If you want try anyway, all you have to do is «Rename profile» in NMM then load your character’s save via NMM (SKSE or Skyrim) then save and exit. Repeat for other character(s).
— I have three main profiles that I treat as «masters». I know exactly what I want and do not want to install on them. So, here is example: I have one profile with «basic» mods (armour, textures, weapons and similar and SexLab). I call it Basic. On the second one, I have mods related to creatures (call it Creatures) and on the third one, I have mods with RCOTS (call it RCOTS). So, I made a copy of each of them and called them: Basic1, Creatures1 and RCOTS1. So whenever I install any new mod I install it on the copies, not on «masters». If anything goes wrong in any of them and I if I can’t fix the problem, I just delete their copy. In that case, I don’t have to do reinstallatin of all mods.
You can install certain mod in one profile and NMM install it in all profiles, but if you don’t want that mod in other profiles, you just open wanted profile and choose «Uninstall from active profile». It’s important to do it before you want to play the game without unwanted mod in your profile. Otherwise, when you uninstall that mod later from the profile where you didn’t want to have it, and when you load that profile, the game will report «missing mod» and you’ll have to do a clean save later.
How to install mods from URLs. (Note: it works only with URLs from Nexus site):
Spoiler
you can download the mod directly from the mod page. For instance if you want to do that you have to:
![]()
If you haven’t managed to add a new tool to NMM, don’t worry, NMM will not let you leave the box until you properly add the tool’s path. You’ll see red blinking «!» at the right side of the desired tool path line and you will got a small warning box. So, NMM will not let you make a mistake. Once you add your line correctly, the box will close.
I can no longer interact with mods that have scripted installers after I’ve installed them. How do I redo the options?
Spoiler
NMM now has three mod states; active, inactive and uninstalled.
If a mod is active, it’s installed and turned on in your profile so should show in your game.
If it’s inactive the mod is installed, but it’s not turned on in your current profile so should not show in your game. It may, however, be active in other profiles you have.
If it’s uninstalled then the mod is not installed and it’s not active in any of your profiles.
When you interact with a scripted installer for a mod it will install the mod with the options you set. If you want to reinstall that mod and go through the scripted installer again you need to uninstall it, not deactivate it. To do so, simply right-click it and select «uninstall». When you go to install the mod again you’ll then be prompted with the scripted installer, as per normal.
I can’t install downloaded mod because NMM sees it as «Read only»
Spoiler
In that case, browse to the place where you download your mod, right click on it and disable «Read only»
How to properly install and use NMM (basic important tips)
Spoiler
Download latest NMM manager from here: http://www.nexusmods…ds/modmanager/?
Download latest NMM manager from here: http://www.nexusmods…ds/modmanager/?
1. Install the manager.
— at the end of NMMs installation, you’ll be asked to run FNIS and will be warned about some problems if creating multiple profiles. Choose to «Run FNIS». FNIS box will pop up and run FNIS. If FNIS works, you’re OK. If doesn’t, reinstall FNIS using NMM.
— although this version is very fast, it is slow when installing/uninstalling big size mods (over 80 MB). It takes time and sometimes it shows «Not responding» on the top of framework. Do not cancel or stop installation/uninstallation process because you will need to repeat the operation. Be patient and wait. When finish, NMM will report about completing operation on the bottom of the manager.
— 0.61.+ versions supports creating multiple profiles. After the installation of the manager, you will see «New profile» tab under toolbar. I would suggest you to create at least one more profile beside the default one. If something goes wrong, you can always go back to your original (default) profile. You can check this under:. You can check this under: How to play (create) multiple characters
2. Mod installation is much «smarter» now and autonomous. Searching files and integration with Master files is improved.
— If you are doing new installation of the manager, be very careful where will you place your VirtualInstall folder (see the topic 4)
— When starting, NMM 0.61+ will uninstall your mods first and then reinstall them. During that process you’ll be asked to choose/confirm certain installation from some mods like, FOMODS, XP32 Maximum Skeleton, SOS and other mods you had installed and you did these steps before.
3. After mod installation you should run FNIS and LOOT from the manager. NMM co-works with LOOT, Wrye bash, Tes5edit and FNIS much better now.
4. On the first installation of NMM 0.61+, be careful to NOT TO install «Virtualinstall» in the «Nexus Mod Manager/Skyrim folder». When asked, chose ONLY main, Nexus Mod Manager folder.
— You should never move your VirtualInstall folder to another location manually, nowhere else because some mods requires that their .exe, .esp or .esm files be in game installation directory. (But, if you are persistant to do it, do it at your own risk)
— if you want to move your mod folder back where they were using NMM. Open NMM, to change the VirtualInstall go into the Tools menu, click on Change Virtual Install and then select the new path, NMM will automatically uninstall stuff from the old location and activate it in the new folder
5. Upgrading your manager:
— upgrading to the new version is 99% successful and works great. If something goes wrong during and after upgrading the manager, you can try to do it again and if it still not working, disable your mods, uninstall present version and install a new one. Before you do that, check How to completely uninstall/remove NMM and Answers to various NMM problems first.
— If you upgraded NMM to 0.61.+ from previous versions, recheck your mods. Some of them will not be installed even after NMM’s mods re installation. Not installed mods will be greyed in your manager. Here is one serious bug. Some of the mods will be showed in manager as reinstalled, but they aren’t. So how can you know which ones aren’t reinstalled. Thanks heavens for SKSE 1.7.3 and its .ini modification.
— If you start the game and got info box «Some mods are missing», that means you don’t have needed line in your SKSE.ini file and therefore you don’t know which ones are missing since NMM showed all your mods as (re)installed.
Open SKSE.ini (SteamApps/Common/Skyrim/Data/SKSE. You can create the folder, if it does not already exist), and add line: «EnableDiagnostics=1» under [General]. So, next time you start the game, you’ll see which mods are missing. Then go back to NMM, uninstall them (see topic and install them again. Yeap, this is the bad side of upgrading your NMM to present game.
— When running the LOOT after upgrading, you will have to clean again some mods using Tes5edit. It depends on what LOOT will report as mods with dirty files.
6. NMM supports Wrye bash. You can download it from here: http://www.nexusmods…rim/mods/1840/? or any other site that contains this program. Just google.
After the installation of NMM, FNIS and LOOT, Wrye bash is the third tool that NMM users need. What does it do?
— Basically what Wrye Bash is in a nutshell is a way for you to manage many, many mods in a very simple yet very powerful interface.
— When a package is installed, it will override files installed by lower order packages, but not files already installed by higher order packages.
Similarly when a package is uninstalled, an «annealing» process will automatically reinstall files from lower level packages that were previously obscured.
— It fixes mod conflicts
— Lifting of the 255 plugin limit through automatic merging of compatible mods
— editing your saves and lets you fix them manually
… and many other great features.
For more details about this program, check here: http://guides.tesfan…ral Readme.html
7. If you have SKYUI 5.+, NMM might report error and presence of SKYUI 4.+ files during re installation process. (It happens on new game installation). The box will pop up with description of the «old files» and suggestion for their deletion. Go to the that location and delete all 4 files. When done, click on «Refresh». After that, NMM will proceed with further installation.
8. Uninstallation of the mods: right mouse click on desired mod, choose «Uninstall or Delete». Correct uninstallation of the mod will be like this — uninstalled mod will turn into grey color and will not have red crossed circle on the front. I usually disable the mod first and then uninstall it. There are several more options… see the picture.
9. If you get: «Unable to get write permissions for: C:GamesNexus Mod ManagerSkyrimInstall Info» message, run NMM as administrator.
10. If you use LOOT via NMM, LOOT will arrange your load order directly from the Master list it receives from NMM. Do not use external LOOT since it will/might change your load order bit differently from NMM and you might experience game problems when loading it via NMM. Use either one, not both.
11. If you want to uninstall several mods in row, it is recommended to uninstall them one by one waiting for manager to finish the task first and then uninstall another mod because the manager sometimes hangs on processing multiple processes and freezes. It that happens, close the manager, reopen it and repeat the task.
12. After every installation/uninstallation of animation mods or/and skeleton, run FNIS to avoid CTDing, or t-posing.
Well, this is basic info and tips. I just wanted to share them with all NMM users and help them to not became frustrated (as I almost was) when installing NMM 0.61.+ version.
NMM — downloads (Virus free rar and .exe installers. All files were checked for viruses by Kaspersky AV and Anti Malware & Spyware PRO):
— Latest versions : 0.61.3, 0.61.4, 0.61.5, 0.61.6, 0.61.7, 0.61.10, 0.61.12, 0.61.14, 0.61.15, 0.61.16 — requirements and installation
— (0.61.+ hotfixes description)
Warning: This versions requires .Net Framework 4.6 (If you’re not using Windows 10, you can download it HERE )
How to completely uninstall/remove NMM
Spoiler
1. Open NMM and press «Tools» icon. Select «Uninstall all active mods»
2. Delete Games/Nexus mod manager (It is placed in your Skyrim installation directory)
3. Delete My documetns/Games/Skyrim folder
4. Use Revo uninstaller or CCleaner or any other Win tool to remove NMM traces from your computer and clean up registry
NMM 0.56.1 and older versions download and video: how to revert to earlier NMM workable version)
Spoiler
here: Nexus Mod Manager-0.56.1.rar
Other older versions:
http://forums.nexusm…download-links/
Note: installation might report broken installation file. If this happens:
1. delete all NMM files in My Document,
2. delete NMM folders in …Games/Nexus Mod manager/Skyrim/Install info (Do not delete «Mods» folder from this directory)
3. delete Games/Nexus Mod manager/Skyrim/VirtualInstall folder
4. Clean your registry.
5. Restart your computer and try to install older version
If this doesn’t help you install previous version, sorry, no help, you’re stack with the one you don’t like.
How to manually revert NMM to older version (before 0.61.+)
Spoiler
You can restore your mods in the previous NMM by doing the following:
- Uninstall currently installed NMM, remove all config files when asked
- Install a pre-0.60.x build (in my case 0.56.1)
- Launch 0.56.1 and go through all the setup
- With NMM loaded to the mod list screen, click on Tools (wrench and screwdriver icon) and select Restore Backup
- Find the file Backup_DONOTDELETE.zip located in the VirtualInstall folder and open it
- Restoration of all your mods should commence
NMM and load order tweaking
Spoiler
NMM greatly co-wroks with LOOT. When LOOT sorts your installed mods and creates load order, NMM memorize it and saves it in its clipboard. According to your settings for update master files list (default is every third day but you can change it as you like) NMM updates your master list (yaml) and «Informs» LOOT about all changes that are made in meantime. Then LOOT adopts and change your load order according to received informations from NMM. Well, this is the sword with two blades. Let’s assume you had a load order that worked fine, but you installed and de-installed some mods in the meantime. All worked fine untill LOOT change your master mods load order, and suddenly your game doesn’t run as it use to. LOOT rearranged your mods according to the yaml informations from NMM and the game behaves «weird». So what can you do to return your game stability into previous state? Here is the answer.
1. When you installed all mods and you are satisfied with the stability of your game, open NMM and press «Plugins» tab.
2. On the left panel you’ll see two blank pages with arrows pointing to the right. Click on the first one in the row (Export the current load order) and choose «Export to the clipboard». Now, you saved your present load order into NMM’s clipboard.
3. When LOOT change your load order and your game doesn’t run well, open NMM again and this time choose the second blank page icon (Import load order) and choose (Import load order from clipboard). Now, you restored your load order that ran well. All new installed mods and changes, LOOT will adopt to your load order until your master mods list change it again. Just repeat this operation again.
If you aren’t satisfied with LOOT’s work, you can manually change your load order by moving mod(s) up or down using big green arrows under «Plugins» After that run LOOT directly from NMM. If you like the way your game behaves, export your current load order to clipboard.
Mods downloading, but not activating on NMM 0.61.+
Spoiler
If you downloaded certain mod using NMM manager and it «refuse» to activate it, there can be several reasons for that:
1. manager downloaded mod but with errors
(suggestions):
— check for error reports in Mod activation Quene Monitor. If there are no errors report(s) do next step:
— delete downloaded mod, exit NMM, restart NMM and download mod again
— If the problem remain, download the mod manually
If NMM reported error in downloaded mod or during downloading process there can be several reasons:
— server error
(suggestions): try to download later
— mod’s error
— NMM manager error
2. Mod is probably not meant to be installed via NMM
(suggestions):
— install mod manually following mod’s author insturctions
— after installation open NMM and activate mod in Plugins tab
— if NMM still doesn’t acivate mod then it’s a probably bug in NMM.
3. Mod was uploaded with errors
(suggestions):
— check often the author’s info and read the users posts on his original site about bug reports and author’s notes. Report error to the author of the mod.
4. Probable bug in NMM
(suggestions):
— report bug to NMM bug report on Nexus. http://forums.nexusm…x.php?/tracker/
To be able to report bug, you have to be a registered member on Nexus.
Before installing mod, always check downloaded mod with decent Anti virus program.
Single profile users tip (where to install armour, meshes, textures)
Spoiler
Question: Let’s say I installed an armor mod with NMM. If i made a texture or mesh that I wanted to overwrite from that NMM install, should I put it in the main Skyrim directory? Or In the virtual install? Which filepath is prioritized when you’re just dragging and dropping certain things in the main Skyrim install folder?
Answer: Skyrim will always run the files in the Data folder. The texture and mesh files in there are actually links going back to the Virtual Install folder. In essence, the mod files in the Data file that NMM installs are «fake» files linking to the original files in the Virtual Install folder. You should do so in the Virtual Install folder. If it is not installed through NMM, you can edit them in the Data folder as usual.
How to play (create) multiple characters.
Spoiler
Lets assume you want to create two different characters, one an Imperial and the second a Redguard.
1.In NMM press New profile. New box will pop up where you can name it as Imperial or whatever you want.
2.Start the game via NMM and create the Imperial character, save and exit.
3.In NMM click on «New profile» and save it as Redguard or whatever you like
4.Start the game via NMM and create the Redguard. Save and exit.
5.Once you create those two profiles in order to play the one you want, you need to start NMM and choose the desired profile and then press «Launch Skyrim» unless you using mods needing SKSE to start the game. In that case, press «Launch SKSE»
This might work also in already created multiple characters, but no guaranties. It’s recommended to use it on the new game. If you want try anyway, all you have to do is «Rename profile» in NMM then load your character’s save via NMM (SKSE or Skyrim) then save and exit. Repeat for other character(s).
— I have three main profiles that I treat as «masters». I know exactly what I want and do not want to install on them. So, here is example: I have one profile with «basic» mods (armour, textures, weapons and similar and SexLab). I call it Basic. On the second one, I have mods related to creatures (call it Creatures) and on the third one, I have mods with RCOTS (call it RCOTS). So, I made a copy of each of them and called them: Basic1, Creatures1 and RCOTS1. So whenever I install any new mod I install it on the copies, not on «masters». If anything goes wrong in any of them and I if I can’t fix the problem, I just delete their copy. In that case, I don’t have to do reinstallatin of all mods.
You can install certain mod in one profile and NMM install it in all profiles, but if you don’t want that mod in other profiles, you just open wanted profile and choose «Uninstall from active profile». It’s important to do it before you want to play the game without unwanted mod in your profile. Otherwise, when you uninstall that mod later from the profile where you didn’t want to have it, and when you load that profile, the game will report «missing mod» and you’ll have to do a clean save later.
How to install mods from URLs. (Note: it works only with URLs from Nexus site):
Spoiler
you can download the mod directly from the mod page. For instance if you want to do that you have to:
2. The new box will show up:
![]()
3. Open the page you want to install mod from and highlight the URL and right click on «Copy».
![]()
3. Open the page you want to install mod from and highlight the URL and right click on «Copy».
4. Paste the URL into the box:
5. It should looks like this: (press OK, and that’s it)
5. It should looks like this: (press OK, and that’s it)
WARNING — Although this type of mods installation works in most cases, sometimes it causing installation errors. But, have no worries, it will not damage your game, but the mod won’t install properly. If installation fails, you can always install the mod with provided download link/option under «Files».
How to work with problematic large size mods that NMM can’t install (sometimes)
Spoiler
Sometimes some large mods can cause installation troubles in sense that NMM reports errors or simply refuse to install them. If that happens, you can do following steps as Slorm (thank you) did with «Interesting NPCs 3.09 mod.
This was done using Interesting NPC’s v3.09 (later versions give a lot of log spam)
IMPORTANT — Make sure you keep a copy of your 3DNPC mod in a safe place as a backup as it’s a large download if you need to get it from nexus again
1/ Extract the Interesting NPC’s.7z into a folder (also known as 3DNPC)
2/ Navigate down the folders until you find Sound
3/ Cut the whole Sound folder and paste somewhere else
4/ Now re-archive the remaining Data folder with 7z. (If you copy the name from the original mod it will keep the mod author details and link back to nexus as well)
5/ Create a folder called Data and move the Sounds folder into it
6/ Make a new 7z archive and call it something like Interesting NPCs Sound Files (so you know what it is). This will take a long time as it’s around 2Gb
7/ Check both new archives to ensure the file structure is correct
8/ Now you have a choice. If you want to keep the mod connected to nexus then go to where nexus stores your mods (for me it’s /games/nexus mod manager/skyrim/mods) delete the original 3DNPC mod and copy the new version over which you used the same name for.
9/ If you don’t care about the link to nexus then just open NMM delete the old mod from the database and upload the two new ones
10/ Install the two new mods
11/ Get coffee, beer, porn mags/vids as the sound files takes around 40 minutes to install on a high end pc
How to fix missing mod files after migration to lastest NMM version:
Spoiler
There was an issue with the migration process that caused some mods to be unable to properly reinstall.
We fixed this issue in version 0.60.5.
If you already tried the migration process and it failed to properly reinstall everything, follow these instructions:
1. Download&Install version before latest one
2. Run it, go in the Tools menu and select «Restore the Backup Profile».
3. Switch to the newly created Backup profile.
This should fix all the missing mod files.
Also remember that you could be required to rerun some patchers after the migration (Skyproc, PerkusMaximus, Dual Sheat, TES5Edit, FNIS, etc etc..).
How to export your NMM load order:
NMM is not working, how to fix it:
Spoiler
go to Documents/My games/Skyrim and open skyrimprefs.ini and in the [Launcher] line add this:
bEnableFileSelection=1
bShowAllResolutions=1
uLastAspectRatio=3
bLoadLooseFiles=1
NMM is crashing to Desktop (important tips for all NMM new users):
Spoiler
Most common cause of NMM problems is an overzealous firewall or antivirus. Trend Micro is notorious for not playing nice with NMM. There is an entire topic on that in the forums.
Javascript must be enabled and not blocked for NMM to work.
be sure you are logged into windows as a administrator.
be sure you have NMM running with admin privileges ( NOT the same thing as being logged in as an admin)
http://s1.zetaboards…opic/4912979/1/
Be sure that Windows UAC isn’t blocking you ( it won’t bother to tell you if it is)
Make sure your firewall is not blocking you
Make sure your antivirus is not blocking you
Have you tried using a different browser?
Try with a portable browser and NO add ons. Here is a link to find portable browsers.
http://portableapps…. both of these.
Are you using any download accelerator or download manager? Some will cause NMM to not download properly.
Be sure to disable them for testing.
Are you running any browser add ons that block anything — ads, scripts, cookies — anything.
I can’t download mods via NMM (for FireFox users):
Spoiler
Go to options > Applications > scroll down to where it says «nxm» and then click on it and select «use nexus mod manager». If nexus mod manager isn’t already listed, click «use other», then browse to where nexus mod manager.exe is, and select it.
(If you are using Mod Organizer, the instructions are the same but you would set it to use nxmhandler.exe).
Answers to various NMM problems:
http://forums.nexusmods.com/index.php?/topic/721054-problems-read-here-first-nexus-mod-manager-frequent-issues/
What zip files NMM reads and support?
Spoiler
NMM can read and install following types of files: 7zip, Zip, Rar, Gzip, BZip2, Tar, jar and X2.
— If you have mod that is not compatible with NMM you can do following:
1. Download and install one of NMM compatible extractors like 7Zip or Rar
2. Right click on the mod and choose «Add to 7Zip» or if you have Rar, choose «Add to XXX.Rar»
3. Start NNM, choose destination of your zipped mod and install the mod.
How to fix «unfixable» mess that NMM 0.61+ caused
Spoiler
First of all, NMM doesn’t kill your game. It makes a lot of mess but all is fixable. I’m not saying that «Killing your game» can’t happened, but if that happens, it must be that something seriously went wrong. Honestly, other mod managers can «kill your game» too, only if your manager got «broken» or you don’t know what you’re doing.
1. Before you do any changes to your mods (upgrades, uninstall, install new mods…) make back up of your present game.
— you can do it by clicking on the «Imported2» tab in your tool bar and press «save current profile». Then, simply follow the wizard. If something goes wrong and you don’t know how to fix it, click on the «Tools icon» in your tool bar and choose «Restore the backup profile»
2. If the tip from the first topic doesn’t help you, click on the «Tools icon» again and click on «Uninstall all active mods». When operation is finished, close NMM.
— Start NMM again and click «Reset UI» in «Tools icon».
— After that, click on «Install all mods» and let NMM insall them.
— Run FNIS
— Run LOOT
…. and that’s it
How to report NMM bug to Nexus?
Spoiler
1. You must be registered user on Nexus to report bug.
2. After registration on Nexus, start NMM, click on the question mark in big blue balloon in the upper right corner and do as showed on the picture:
http://www.loverslab…-1442718436.png
Fundamental fixes and tweaks for smooth Skyrim running
————————————————————————————————————————————————————————————————————
Credits and biiiiiiiig «thank you» for help and support, bug reports and tutorials:
— Calliban44 (+ correcting my typing errors and English grammar)
— Slorm
— CPU
— ritualclarity
— prinyo
Вопрос о том, как пользоваться Nexus Mod Manager, впервые возник у фанатов Skyrim. В особенности у любителей «обмазывать» игру всевозможными модами, многие из которых требуют наличия упомянутой утилиты. Подробнее о том, как пользоваться, пойдет речь в статье.
Что вообще происходит?
Геймер, привыкший к классическому методу загрузки модификаций, недоумевает, когда сталкивается с упомянутым выше системным требованием. Где это видано, чтобы у обычного мода были какие-либо условия установки? Оказывается, апгрейд «Скайрима» идет семимильными шагами.
По сути, утилиту можно сравнить с клиентом µTorrent, которым пользуются для файлообмена с различными торрент-трекерами. У Nexus Mod Manager аналогичный принцип работы — требуется зарегистрироваться на официальном сайте и загружать архивы посредством нажатия соответствующей кнопки.
Как пользоваться?
Поистине переход от классического скачивания изменений к Nexus Mod Manager можно назвать историческим событием. Система настолько усложнилась, что возникла необходимость получать апгрейды не отдельными файлами (как это было прежде), а целыми папками, объединенными логической структурой.
Установка производится опять-таки посредством все той же утилиты. Если открыть сам архив, то в нем можно будет увидеть лишь набор файлов и не обнаружить ярлыка запуска Setup.
Все потому, что процедура осуществляется посредством Nexus Mod Manager и весь мод был «заточен» исключительно под данную программу. Инсталляция подразумевает выбор ряда опций. Овладение этим навыком требует наличия элементарной логики, потому у геймера не возникнет вопроса о том, как пользоваться программой Nexus Mod Manager.
Для Skyrim, например, установка ретекстур брони дает возможность выбрать, когда и при каких погодных условиях будет наилучший эффект от комплекта. Другими словами, замерзнет ли женский персонаж в реалиях суровой зимы на вершине Глотки Мира, надев, грубо говоря, один лишь «бронелифчик».
Как пользоваться Nexus Mod Manager, уже понятно. Остается разобраться, какими полезными опциями утилита способна облегчить жизнь рядовому пользователю (помимо принудительного изучения английского языка).
Свойства открываются путем выбора ярлыка Settings в окне программы:
- есть возможность выбрать директорию для хранения модов;
- периодичность автоматической проверки обновлений;
- запросить последние версии интересующих геймера изменений;
- указать формат, в котором будут храниться архивы (rar, zip, 7zip) и уровень компрессии;
- выбрать сервер (Европа или США).
Возможности
Еще одна из причин, почему следует задаться вопросом, как пользоваться Nexus Mod Manager, является возможность отрегулировать порядок загрузки файлов при запуске игры. Все дело в том, что модов от разных разработчиков выпущено очень много, у каждого свои принципы программирования. Потому малейшие нестыковки в функционировании вышеописанных апгрейдов могут привести к сбоям в игре, багам и вылетам.
Утилита позволяет отрегулировать порядок загрузки обновлений, чтобы игра функционировала на высшем уровне. Но для соблюдения подобного баланса рекомендуется устанавливать файлы только посредством этой программы и никак иначе.
Требования
Утилита весьма неприхотливая и не отличается особо высокими критериями для корректной работы. Тем не менее все началось с релиза версии для Windows XP, в которой постепенно исправлялись различные баги и «допиливались» новые возможности, а также базы модов и ответы на вопросы о том, как пользоваться.
Nexus Mod Manager 0.54.10 уже был адаптирован под такие операционные системы, как Windows 7, 8 и Vista. Последующие обновления уже включали в себя доработки для всех наиболее востребованных ОС.
Поддерживаемые проекты
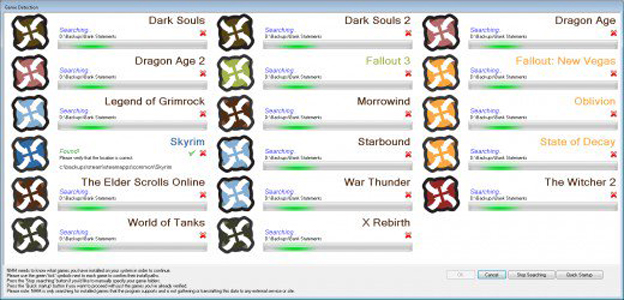
Это далеко не вся информация о том, как пользоваться Nexus Mod Manager. В последних версиях проекта реализована автоматическая проверка обновления игр, установленных на компьютере.
Таковых довольно много, потому рекомендуется отключить сканирование тех проектов, которые отсутствуют на ПК, во избежание бессмысленного генерирования пустых папок программой и достижения лучшего понимания того, как пользоваться Nexus Mod Manager. Fallout 4, Skyrim и Dragon Age: Origins — самые популярные из поддерживаемых релизов. Полный перечень игр можно увидеть в описании к устанавливаемой версии.
При запуске пройдет быстрое сканирование, утилита зафиксирует наличие необходимых игр, после чего будет предложено выбрать файлы для апгрейда. Все остальное — полностью автоматически.
Баги
Увы, ни одна программа не застрахована от сбоев. Причины могут быть разные: от наличия какого-либо вредоносного ПО на игровой платформе, влияющего на утилиту, до недоработок создателей, реализовавших новую версию Nexus Mod Manager.
Как пользоваться приложением, если наблюдаются баги? Все очень просто: в сети имеется достаточно русскоязычных форумов и пабликов, где можно получить ответ на вопрос.
Например, программа корректнее всего работает с дистрибутивом .Net Framework 4.6.1. Если при установке происходит откат к версии 4.0 и высвечивается ошибка 0x80070643, дело может быть в установленных обновлениях операционной системы. Следует найти через «Панель Управления» дистрибутивы KB2918614, KB3008627, KB3072630 и KB3000988 и удалить их.
Ошибка несовместимости, которая выглядит как Unable to get write permissions, решается посредством запуска NMM от имени администратора. В основном наблюдается на Windows Vista.
Все остальные сбои, связанные с недоступностью профилей, поддерживаемостью модов для определенных проектов были связаны с постепенным добавлением игр в утилиту и решались с выходом новой версии. Потому первый совет, как пользоваться Nexus Mod Manager, если возникла ошибка — переустановить программу, заменив на более свежую версию.
Заключение
Интерес к такому приложению (как уже упоминалось выше) возрос, благодаря желанию геймеров буквально забивать игры серии The Elder Scrolls всевозможными модификациями. В особенности это касается Skyrim.
Впрочем, каждый второй игрок по-прежнему прибегает к стандартной загрузке модов, пока не натолкнется на фанатский релиз, где в системных требованиях прописано обязательное наличие NMM. В этот момент и возникают вопросы: что это такое, как с помощью утилиты запускать Skyrim и как пользоваться?
Nexus Mod Manager хорош тем, что полностью сводит на нет вероятность скачать вредоносное ПО, ведь сканированию обновлений подвергаются проверенные файлы. Кроме того, существует только англоязычная версия. Если вдруг встречается русификатор или русскоязычный релиз утилиты, рекомендуется обходить стороной данный продукт, так как с высокой вероятностью там может быть вирус или шпионская программа, которая навредит компьютеру.
NMM весьма удобен. Функционал системы позволяет установить в тот же пресловутый Skyrim великое множество модов. Важно лишь упорядочить их, чтобы избежать бесконечного количества всплывающих окон инструкций при запуске игры и неизбежного вылета.
В этом случае еще и следует обращать внимание на описание. Чаще всего разработчик указывает, с какими модификациями функционирует корректно, а с какими нет. Аналогично и с обязательным наличием других апгрейдов: некоторые могут не работать, если загружаются раньше других или в списке нет необходимых файлов. Опять же следует упорядочить релизы.
На данный момент NMM позволяет установить обновления для таких игр, как «Ведьмак 3», Dark Souls, Dragon’s Dogma, все проекты серии Fallout и многие другие. Новые игры добавляются, ошибки, связанные с релизами, устраняются. Все делается для удобного пользования системой и комфортной игры.
Остается только соблюдать меру в плане тотального скачивания модов и не перегнуть палку, чтобы не нарушить игровой баланс и не испортить все впечатление от проекта. Известны случаи, когда геймер устанавливает Skyrim, в течение одного или двух дней «обмазывает» модификациями буквально «с ног до головы» проект, а потом решает полностью деинсталлировать.
История, которая уже давно стала шуткой, но все же отражает суровую действительность. Удачной игры!
I ran into this problem today, and I’ve come up with a few solutions. The root cause is that the default folder that Nexus Mod Manager wants to install into is not typically writable by normal users. They want you to install into a subfolder of C:, and if you don’t have administrator rights, chances are you can’t create the «Games» folder you need (C:Games).
You’ve got a few options:
Run the program as administrator. This way, it will have permissions to write to the root of C:, and then you can create the files/folders there. Just right click, and choose the «Run as Administrator» option.
Get write permission on C:Games. You can do this if you have administrator rights by:
- Open your C: in Windows Explorer
- If the «Games» folder does not exist, right click, choose «New Folder» and name it «Games»
- Right click on the «Games» folder, and choose «Properties»
- Click the «Security» tab
- Click the «Edit» button
- Click the «Add» button
- Type your login name (if you log in as «bobsmith» then you’d type «bobsmith» here)
- Click «Check Names» and if the name becomes underlined, you did it right! Click OK. If not, double check your login name from step 7.
- On the bottom half of the «Permissions» dialog, click «Full Control» for the user you just added.
- Click OK to dismiss this dialog, and then click OK on the properties dialog.
Now you can write to C:Games, which ought to make NMM happy.
Put your Nexus Mod Manager files somewhere else. If you install to some subdirectory of your home directory, you won’t have to worry about permissions and so forth. When the Mod Manager asks you where you want to save the mod files, pick someplace under C:Users(your user name) or C:Documents and Settings(your user name), depending on the version of Windows you’re using. You could potentially put this in your Documents folder, but I have «projects» folder I created in my home directory, which works well for me.
You do not want to set these directories to something under C:Program Files or in the Steam folder, etc. This is a Bad Idea.
If you’ve already selected the default mod directories, you won’t be asked if you want to change them when you get this error. If that’s the case, you can edit or delete the config file so that you can pick a new directory.
The config file for Nexus Mod Manager is stored in %LOCALAPPDATA%Black_Tree_Gaming — you can copy and paste this into the address bar of Windows Explorer to go there, or paste it into the «Run» or «Search» dialog on the Start menu. Alternatively, from your user’s home directory, look for «AppData» and then «Local» and then «Black_Tree_Gaming»
The name of the directories in this folder depend on your version of NMM, but the file you’re looking for is user.config. You can delete this file, but you’ll lose any other NMM settings (including the location of any games that were scanned previously). You can also edit it with a text editor.
Look for a block that looks like:
    <setting name="ModFolder" serializeAs="Xml">
        <value>
            <PerGameModeSettingsOfString>
                <item modeId="Skyrim">
                    <string>C:GamesNexus Mod ManagerSkyrimMods</string>
                </item>
            </PerGameModeSettingsOfString>
        </value>
    </setting>
    <setting name="InstallInfoFolder" serializeAs="Xml">
        <value>
            <PerGameModeSettingsOfString>
                <item modeId="Skyrim">
                    <string>C:GamesNexus Mod ManagerSkyrimInstall Info</string>
                </item>
            </PerGameModeSettingsOfString>
        </value>
    </setting>
The directories here are the ones you’d want to change to some folder you can write to.
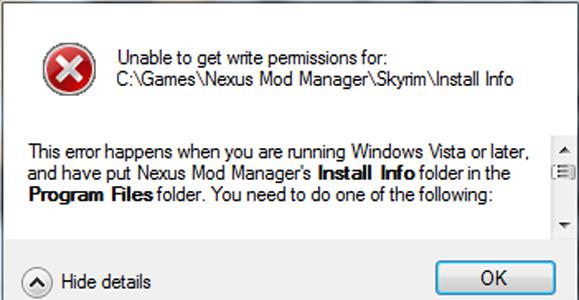
Nexus Mod Manager says «Unable to get write permissions for: C:GamesNexus Mod ManagerSkyrimInstall Info
I downloaded Skyrim from Steam, and I have a few mods from the Steam Workshop.
I decided to start using the Nexus Mod Manager (0.46.0) only to find that when it scanned my games it showed the error message:
Unable to get write permissions for: C:GamesNexus Mod ManagerSkyrimInstall Info
I believe that I moved the file to the appropriate folder, etc. I’m sorry for being somewhat vague, but I am not computer savvy.
5 Answers 5
I ran into this problem today, and I’ve come up with a few solutions. The root cause is that the default folder that Nexus Mod Manager wants to install into is not typically writable by normal users. They want you to install into a subfolder of C:, and if you don’t have administrator rights, chances are you can’t create the «Games» folder you need (C:Games).
You’ve got a few options:
Run the program as administrator. This way, it will have permissions to write to the root of C:, and then you can create the files/folders there. Just right click, and choose the «Run as Administrator» option.
Get write permission on C:Games. You can do this if you have administrator rights by:
Now you can write to C:Games, which ought to make NMM happy.
Put your Nexus Mod Manager files somewhere else. If you install to some subdirectory of your home directory, you won’t have to worry about permissions and so forth. When the Mod Manager asks you where you want to save the mod files, pick someplace under C:Users(your user name) or C:Documents and Settings(your user name), depending on the version of Windows you’re using. You could potentially put this in your Documents folder, but I have «projects» folder I created in my home directory, which works well for me.
You do not want to set these directories to something under C:Program Files or in the Steam folder, etc. This is a Bad Idea.
If you’ve already selected the default mod directories, you won’t be asked if you want to change them when you get this error. If that’s the case, you can edit or delete the config file so that you can pick a new directory.
The name of the directories in this folder depend on your version of NMM, but the file you’re looking for is user.config. You can delete this file, but you’ll lose any other NMM settings (including the location of any games that were scanned previously). You can also edit it with a text editor.
Look for a block that looks like:
The directories here are the ones you’d want to change to some folder you can write to.
Источник
Cannot run Nexus Mod Manager on Windows 8!
I wasn’t sure which forum was right to post this thread. If this is the wrong forum, I apologize to the admins
Last night I downloaded the current version of NMM and tried to run it. It went through the scan process, and found two games that NMM works with. I tried to get NMM to start just so I could see what it looked like. It would not load, stating the following:
Unable to get write permissions for: C:GamesNexus Mod ManagerSkyrimInstall Info
There was a details button at the bottom so I clicked on that to see what solutuons there were, if any. This is what it said:
This error happens when you are running Windows Vista or later, and have put Nexus Mod Manager’s Install Info folder in the Program Files folder. You need to do one of the following:
1. Disable UAC (not recommended).
2. Move Nexus Mod Manager’s Install Info folder outside of the Program Files folder (for example, to C:GamesModManagerInfoInstall Info).
3. Run Nexus Mod Manager as Administrator. You can try this by right clicking on Nexus Mod Manager’s shortcut and selecting Run as Admin. Alternatively, right click on the shortcut, select Properties->Compatibility and check Run this program as an Admin.
Options 1 and 3 did not seem good to me, so I went with option two, only the Install Info folder is not in the Nexus Mod Manager folder. I’m not sure what to do at this point. I’m new to mods (playing with them, not making them) and if I screwed up somehow, any help to get me on the right path would be great.
Delete everything in your games folder and install NMM there. The games folder should be empty until you install NMM.
Delete everything in your games folder and install NMM there. The games folder should be empty until you install NMM.
That’s the other thing, and I forgot to mention it in my initial post. I can’t find the C:Games directory at all. I look in the C drive, but it’s not there.
Edit: I bought Skyrim on Steam but that shouldn’t be a problem, should it?
Just make the directory called Games on the C: drive. Steam is what you need.
Just make the directory called Games on the C: drive. Steam is what you need.
Okay, I did that and I went ahead and took the entire NMM folder and dropped it into the directory, now it works. Thanks for the info. Much appreciated.
I’m trying to remember what I did to fix this same problem, it happened to me when I first installed this a month or so back, now the only problem I have is getting it to start up. I click it it doesn’t open and I have to use task manager to close it out multiple times and keep trying so I just leave mine open at all times. If I can remember what I did I’ll let you know in a personal massage.
Hi can someone help my via E-mail. My E-mail address is
and this is the problem.
I can’t get my Mod Manager to work cause it keeps telling me about the Proxie message keeps coming up i am attaching the latest trace log and i have like 40 of em so here it gots.
We have do a built in site private message ability that does not advertise your email for every scammer, spammer and identity thief to find you.
I put the email into a spoiler that should keep most of the trash away that haven’t already found it.
im having the same problem I don’t see a NMM folder and where am I supposed to drop it??
my issue with win 8 is nmm is not installing at all it keeps saying out of memory please help me

Источник
«Unable to get write permissions for: C:gamesfallout3installinfo
This happens when I try to open the mod manager. I believe I need to do something along the lines of moving the steam directory or something, but I’m not sure. If someone could tell me what I need to do and how to do it that would be great.
Try running the mod manager as admin, I had the same problem, it fixed by doing this, hope I helped
I had a title once, but I forgot what it was.
RIGHT click again. this time click on ‘ Run as Administrator’ It will close the list again.
Right click again, select ‘ Properties» at he bottom of the list. on the pop up that appears, click on the ‘ Security‘ tab.
Now find ‘Group or user names’ and click on ‘ Administrators‘ to highlight it
Look down to find ‘ Permissions for program name‘.
You will need a check mark in the ‘ allow’ column for all categories (click edit & make changes)
When you have them all checked, click on ‘ Apply‘ then on ‘ OK‘
check to see if the directory in question is somehow write-protected
Try running the mod manager as admin, I had the same problem, it fixed by doing this, hope I helped
Try running the mod manager as admin, I had the same problem, it fixed by doing this, hope I helped
Источник
Как пользоваться Nexus Mod Manager для Skyrim?

Вопрос о том, как пользоваться Nexus Mod Manager, впервые возник у фанатов Skyrim. В особенности у любителей «обмазывать» игру всевозможными модами, многие из которых требуют наличия упомянутой утилиты. Подробнее о том, как пользоваться, пойдет речь в статье.
Что вообще происходит?
Геймер, привыкший к классическому методу загрузки модификаций, недоумевает, когда сталкивается с упомянутым выше системным требованием. Где это видано, чтобы у обычного мода были какие-либо условия установки? Оказывается, апгрейд «Скайрима» идет семимильными шагами.
По сути, утилиту можно сравнить с клиентом µTorrent, которым пользуются для файлообмена с различными торрент-трекерами. У Nexus Mod Manager аналогичный принцип работы — требуется зарегистрироваться на официальном сайте и загружать архивы посредством нажатия соответствующей кнопки.
Как пользоваться?
Поистине переход от классического скачивания изменений к Nexus Mod Manager можно назвать историческим событием. Система настолько усложнилась, что возникла необходимость получать апгрейды не отдельными файлами (как это было прежде), а целыми папками, объединенными логической структурой.
Установка производится опять-таки посредством все той же утилиты. Если открыть сам архив, то в нем можно будет увидеть лишь набор файлов и не обнаружить ярлыка запуска Setup.
Все потому, что процедура осуществляется посредством Nexus Mod Manager и весь мод был «заточен» исключительно под данную программу. Инсталляция подразумевает выбор ряда опций. Овладение этим навыком требует наличия элементарной логики, потому у геймера не возникнет вопроса о том, как пользоваться программой Nexus Mod Manager.
Для Skyrim, например, установка ретекстур брони дает возможность выбрать, когда и при каких погодных условиях будет наилучший эффект от комплекта. Другими словами, замерзнет ли женский персонаж в реалиях суровой зимы на вершине Глотки Мира, надев, грубо говоря, один лишь «бронелифчик».
Свойства NMM
Как пользоваться Nexus Mod Manager, уже понятно. Остается разобраться, какими полезными опциями утилита способна облегчить жизнь рядовому пользователю (помимо принудительного изучения английского языка).
Свойства открываются путем выбора ярлыка Settings в окне программы:
Возможности
Еще одна из причин, почему следует задаться вопросом, как пользоваться Nexus Mod Manager, является возможность отрегулировать порядок загрузки файлов при запуске игры. Все дело в том, что модов от разных разработчиков выпущено очень много, у каждого свои принципы программирования. Потому малейшие нестыковки в функционировании вышеописанных апгрейдов могут привести к сбоям в игре, багам и вылетам.
Утилита позволяет отрегулировать порядок загрузки обновлений, чтобы игра функционировала на высшем уровне. Но для соблюдения подобного баланса рекомендуется устанавливать файлы только посредством этой программы и никак иначе.
Требования
Утилита весьма неприхотливая и не отличается особо высокими критериями для корректной работы. Тем не менее все началось с релиза версии для Windows XP, в которой постепенно исправлялись различные баги и «допиливались» новые возможности, а также базы модов и ответы на вопросы о том, как пользоваться.
Nexus Mod Manager 0.54.10 уже был адаптирован под такие операционные системы, как Windows 7, 8 и Vista. Последующие обновления уже включали в себя доработки для всех наиболее востребованных ОС.
Поддерживаемые проекты
Это далеко не вся информация о том, как пользоваться Nexus Mod Manager. В последних версиях проекта реализована автоматическая проверка обновления игр, установленных на компьютере.
Таковых довольно много, потому рекомендуется отключить сканирование тех проектов, которые отсутствуют на ПК, во избежание бессмысленного генерирования пустых папок программой и достижения лучшего понимания того, как пользоваться Nexus Mod Manager. Fallout 4, Skyrim и Dragon Age: Origins — самые популярные из поддерживаемых релизов. Полный перечень игр можно увидеть в описании к устанавливаемой версии.
При запуске пройдет быстрое сканирование, утилита зафиксирует наличие необходимых игр, после чего будет предложено выбрать файлы для апгрейда. Все остальное — полностью автоматически.
Увы, ни одна программа не застрахована от сбоев. Причины могут быть разные: от наличия какого-либо вредоносного ПО на игровой платформе, влияющего на утилиту, до недоработок создателей, реализовавших новую версию Nexus Mod Manager.
Как пользоваться приложением, если наблюдаются баги? Все очень просто: в сети имеется достаточно русскоязычных форумов и пабликов, где можно получить ответ на вопрос.
Ошибка несовместимости, которая выглядит как Unable to get write permissions, решается посредством запуска NMM от имени администратора. В основном наблюдается на Windows Vista.
Все остальные сбои, связанные с недоступностью профилей, поддерживаемостью модов для определенных проектов были связаны с постепенным добавлением игр в утилиту и решались с выходом новой версии. Потому первый совет, как пользоваться Nexus Mod Manager, если возникла ошибка — переустановить программу, заменив на более свежую версию.
Заключение
Интерес к такому приложению (как уже упоминалось выше) возрос, благодаря желанию геймеров буквально забивать игры серии The Elder Scrolls всевозможными модификациями. В особенности это касается Skyrim.
Впрочем, каждый второй игрок по-прежнему прибегает к стандартной загрузке модов, пока не натолкнется на фанатский релиз, где в системных требованиях прописано обязательное наличие NMM. В этот момент и возникают вопросы: что это такое, как с помощью утилиты запускать Skyrim и как пользоваться?
Nexus Mod Manager хорош тем, что полностью сводит на нет вероятность скачать вредоносное ПО, ведь сканированию обновлений подвергаются проверенные файлы. Кроме того, существует только англоязычная версия. Если вдруг встречается русификатор или русскоязычный релиз утилиты, рекомендуется обходить стороной данный продукт, так как с высокой вероятностью там может быть вирус или шпионская программа, которая навредит компьютеру.
NMM весьма удобен. Функционал системы позволяет установить в тот же пресловутый Skyrim великое множество модов. Важно лишь упорядочить их, чтобы избежать бесконечного количества всплывающих окон инструкций при запуске игры и неизбежного вылета.
В этом случае еще и следует обращать внимание на описание. Чаще всего разработчик указывает, с какими модификациями функционирует корректно, а с какими нет. Аналогично и с обязательным наличием других апгрейдов: некоторые могут не работать, если загружаются раньше других или в списке нет необходимых файлов. Опять же следует упорядочить релизы.
На данный момент NMM позволяет установить обновления для таких игр, как «Ведьмак 3», Dark Souls, Dragon’s Dogma, все проекты серии Fallout и многие другие. Новые игры добавляются, ошибки, связанные с релизами, устраняются. Все делается для удобного пользования системой и комфортной игры.
Остается только соблюдать меру в плане тотального скачивания модов и не перегнуть палку, чтобы не нарушить игровой баланс и не испортить все впечатление от проекта. Известны случаи, когда геймер устанавливает Skyrim, в течение одного или двух дней «обмазывает» модификациями буквально «с ног до головы» проект, а потом решает полностью деинсталлировать.
История, которая уже давно стала шуткой, но все же отражает суровую действительность. Удачной игры!
Источник
Nexus Mod Manager | Установка и управление модами
Эта программа Nexus Mod Manager предназначена для автоматической установки модов в Skyrim LE-SE-AE и Fallout 4 и других игр, удобного их хранения, отключения ненужных и т.д. Программа на английском языке, но всё понятно.
Обновление:0.83.3
* На левой панели добавлена новая кнопка: теперь вы можете фильтровать моды, требующие обновления (пока это работает только в обычном режиме, а не в режиме по категориям).
* Исправлен сбой при добавлении локальных модов в офлайн-режиме.
* Исправлена ошибка, из-за которой столбцы не меняли размер при использовании «Сбросить пользовательский интерфейс».
* Исправлен редкий сбой при установке/удалении модов.
Обновление:0.83.2
* Исправлена проблема с нарушением периодической проверки обновлений модов.
* Подправлен поиск отсутствующего идентификатора загрузки.
Журнал изменений:
— Список изменений всех предыдущих версий читайте в ридми в архиве
— ВАЖНО. Новая версия NMM начиная от 0.60.х и выше, включает профили для модов, которые является замечательной особенностью новой версии, которая позволяет Вам иметь несколько различных установок модов без необходимости постоянно устанавливать и удалять ваши коллекции модов. Однако для того, чтобы все заработало, эта новая версия NMM выполнит некоторые крупные изменения в способе установки и сделает использование модов на вашем жестком диске. В результате, NMM менеджер удалит и затем повторно попытается переустановить ваши моды как они были раньше. Менеджеру понадобится немного работы, чтобы ваши настройки снова работали правильно. Если вы торопитесь и просто хотите играть в игры без поспешной установки, сейчас не лучшее время для установки данной версии NMM. Если у вас есть 5 минут, то сейчас самое время для установки данной версии NMM и использовать новые функциональные возможности данной версии.
Возможности программы:
— выбирайте и устанавливайте скачанные моды
— ручная сортировка установленных модов
— корректное удаление установленных модов (не надо искать в папках игры файлы для удаления,программа сама всё подчистит)
— поддержка Archive Invalidation
— запуск игры.
Поддерживаемые игры:
Skyrim Legendary Edition
Skyrim Special Edition
Skyrim Anniversary Edition
The Elder Scrolls Online
Fallout 3
Fallout: New Vegas
Fallout 4
Oblivion
Morrowind
Monster Hunter World
Witcher 2
Witcher 3
Enderal
Enderal Special Edition
X: Rebirth
Cyberpunk 2077
XCOM 2
World of Tanks
War Thunder
State of Decay
Starbound
Legends of Grimrock
Dragon’s Dogma
Dragon Age: Origins
Dragon Age 2
Dark Souls
Dark Souls 2
Breaking Wheel
No Man’s Sky
The Sims 4
Stardew Valley
Subnautica
Subnautica Below Zero
Mount&Blade II: Bannerlord
Baldur’s Gate 3
Как добавить мод:
— Выбираете вкладку «Mods»
— Слева жмете «Add Mod from file» (выбор архива с модом)
— Выбранный мод появляется в списке
— Выбираете мод из списка и слева жмем «Activated the selected mod» или двойной щелчок мыши по строке с модом
— Всё готово,мод установился в игру
Как отключить мод:
— Выбираем из списка мод, и слева жмем «Diactivates the selected mod» или двойной щелчок мыши по строке с модом
Как обновить NMM с предыдущей версии до новой версии:
— Просто запускаете инсталлятор Nexus Mod Manager.exe и жмете всегда «Да» при установке, ничего в процессе установки не надо менять и ничего не отмечайте, NMM сам установится
Если у кого то после обновления NMM не запускается:
— Если обновились и NMM начал странно себя вести или что то подобное, то лучше всего удалить NMM полностью через «Удаление программ», при этом не удалив моды которые у вас уже установлены, делаем так:
1. Заходим в «Пуск» (Windows), далее идем в «Панель управления», там же идем в «Программы» или «Удаление программ», находим NMM в списке установленных программ и жмем правой кнопкой мышки и жмем «Удалить», появится первое окошко, в нем жмем «Да», тут же появится второе окошко с вопросом «Удалить все конфигурационные файлы или нет?» (на английском), тут мы жмем «Нет, в итоге сам NMM удалится начисто, а плей лист с модами останется
2. Далее просто запускаем инсталлятор Nexus Mod Manager.exe и жмете всегда «Да» при установке, ничего в процессе установки не надо менять и ничего не отмечайте, NMM сам установится, вот и все, NMM установлен с чистого листа, а ваши моды останутся в NMM
Если после «неудачной» установки архива мода, переустановка архива мода не работает:
* Бывает такое, например при установке какого либо архива мода, случаются сбои как самой установки или сбои в самом менеджере, вариантов багов может быть много, в итоге архив просто не устанавливается и выдается лог ошибки, вы решаете снова переустановить архив мода и снова ошибки. Так вот, нужно почистить виртуальную папку менеджера которая создается отдельно и так же папку кэша, все дело как раз таки в этом может быть, в общем может помочь чистка виртуальной папки, идем по пути такому: папка Games на диске например D (это может быть любой диск указаный вами в настройках менеджера куда устанавливается путь виртуального склада менеджера), в этой папке Games смотрите папку Nexus Mod Manager, путь в общем такой Games/Nexus Mod Manager/Fallout4/Mods/ смотрите архив того мода с каким у вас приключилась беда и удалите его, и там же смотрите папку cache, в ней должна быть уже папка этого же мода что и архив, удалите ее, и там же смотрите папку VirtualInstall, в ней удалите все файлы и папки, это кэш он может мешать установке после сбоя, ну и переустановите потом архив мода снова.
Источник
Windows — одна из самых популярных операционных систем с более чем миллиардом пользователей. Весь этот успех обусловлен множеством функций, которые были интегрированы в операционную систему на протяжении многих лет. Последней и лучшей версией Windows является операционная система Windows 10, до которой Microsoft настоятельно рекомендует своим пользователям выполнить обновление.
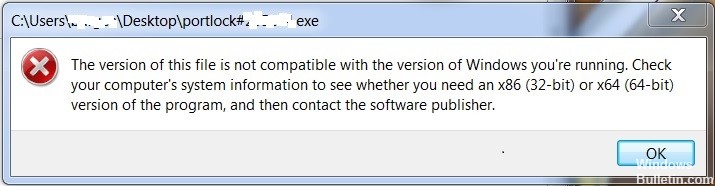
Тем не менее, обновление сопровождается некоторыми проблемами, большинство пользователей неохотно обновлять, потому что были сообщения об ошибках «Эта версия этого файла не совместима с версией Windows, которую вы используете» с некоторыми приложениями и установщиками после обновления из старая версия Windows. В этой статье мы обсудим причину этой ошибки и предложим вам практическое решение, чтобы полностью устранить ее.
Сообщение об ошибке:
Версия этого файла не совместима с версией Windows, которую вы используете. Проверьте системную информацию вашего компьютера, чтобы узнать, нужна ли вам версия программы x86 (32-bit) или x64 (64-bit), а затем обратитесь к издателю программного обеспечения.
Как исправить эту ошибку:
Убедитесь, что вы используете 32-битную или 64-битную версию Windows.
Чтобы выяснить, работает ли ваш компьютер в 32-битной или 64-битной Windows, выполните следующие действия:
- Откройте систему, нажав кнопку «Начать изображение», нажав «Панель управления», затем «Система».
- В разделе Система вы можете увидеть тип системы. Здесь описывается, есть ли у вас биты 32 или биты 64.
Обновить:
Теперь мы рекомендуем использовать этот инструмент для вашей ошибки. Кроме того, этот инструмент исправляет распространенные компьютерные ошибки, защищает вас от потери файлов, вредоносных программ, сбоев оборудования и оптимизирует ваш компьютер для максимальной производительности. Вы можете быстро исправить проблемы с вашим ПК и предотвратить появление других программ с этим программным обеспечением:
- Шаг 1: Скачать PC Repair & Optimizer Tool (Windows 10, 8, 7, XP, Vista — Microsoft Gold Certified).
- Шаг 2: Нажмите «Начать сканирование”, Чтобы найти проблемы реестра Windows, которые могут вызывать проблемы с ПК.
- Шаг 3: Нажмите «Починить все», Чтобы исправить все проблемы.

Вы также можете попробовать режим совместимости.
Если программа не совместима, вы можете попробовать установить и запустить программу в режиме совместимости.
Выполните следующие действия:
1) Щелкните правой кнопкой мыши программу
2) Нажмите на свойства
3) Нажмите на вкладку «Совместимость».
4) Выберите «Запустить эту программу в режиме совместимости» и выберите Windows Vista или другую операционную систему, которая успешно запустила программу.
Изменение настроек совместимости
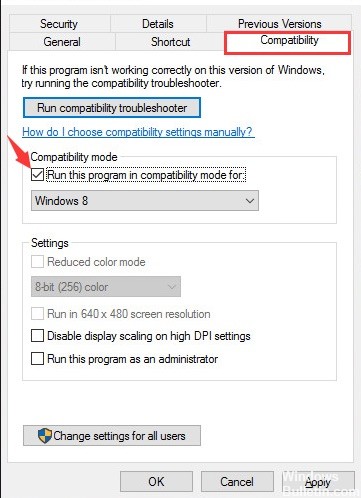
Если программное обеспечение не совместим с версией Windows вы используете, эта ошибка произойдет. Поэтому на этом этапе мы изменим некоторые параметры совместимости. Для этого:
- Откройте каталог установки программы, которую вы хотите запустить.
- Щелкните правой кнопкой мыши по основному файлу «.exe» программы.
- Выберите «Свойства» и нажмите на вкладку «Совместимость».
- Нажмите «Запустить средство устранения неполадок совместимости для Windows 10 / 8» и помогите выбрать параметры для Windows 7.
- Нажмите «Проверить рекомендуемые параметры» и нажмите «Проверить».
- Если программа запущена, нажмите «Да, сохранить эти настройки» и, если она не выберет «Не проверять другие настройки».
- Следуйте инструкциям на экране и повторяйте, пока программа не заработает.
Запустить в режиме совместимости
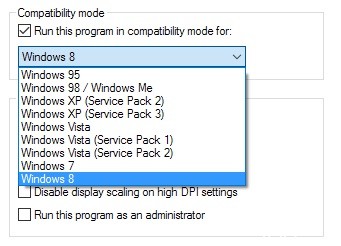
Этот вариант является хорошим выбором, если вы точно знаете, под какой версией Windows ваша программа работает хорошо. Например, если ваша программа была запущена в то время, когда Windows XP была текущей версией Windows, рекомендуется выбрать переключатель «Запустить эту программу в режиме совместимости» и выбрать Windows XP из раскрывающегося списка.
Обратите внимание, что режим совместимости предлагает множество вариантов, начиная от Windows 95 до Windows 8. Также обратите внимание, что вы можете даже запустить свою программу в режиме совместимости для разных пакетов обновления в одной и той же операционной системе.
Обратите внимание, что в Windows 10 есть новая опция, которая называется «Устранение неполадок совместимости», которая анализирует программу для вас и автоматически пытается найти лучшие настройки.
Когда вы запустите его, вы можете попробовать рекомендуемые настройки, которые попытаются автоматически выбрать правильные настройки, или вы можете выбрать программу устранения неполадок, которая спросит вас о проблемах, а затем рекомендует настройки.
Невозможно запустить 16-битные приложения непосредственно в 64-битной Windows. Вам нужен либо компьютер с 32-битной Windows (который всегда обратно совместим с 16-битным программным обеспечением), либо решение для сортировки или виртуализации для эмуляции 32-битной или 16-битной среды.
Если ваше 16-битное приложение на самом деле является приложением DOS, вы можете использовать эмулятор DOS, такой как DOSBox или vDos.
Если это 16-битное приложение Windows, лучше всего запускать его непосредственно на 32-битном ПК с Windows. Если это невозможно, вы можете использовать VirtualBox или другое решение для виртуализации, чтобы установить 32-битную версию Windows в качестве виртуального ПК. Если вы используете Windows 7 Professional, Enterprise или Ultimate, вы можете использовать режим Windows XP.

CCNA, веб-разработчик, ПК для устранения неполадок
Я компьютерный энтузиаст и практикующий ИТ-специалист. У меня за плечами многолетний опыт работы в области компьютерного программирования, устранения неисправностей и ремонта оборудования. Я специализируюсь на веб-разработке и дизайне баз данных. У меня также есть сертификат CCNA для проектирования сетей и устранения неполадок.
Источник
Версия этого файла несовместима с используемой версией Windows – что делать


Многим пользователям ПК, при запуске инсталяторов игр и приложений, система пишет ошибку “Версия этого файла несовместима с используемой версией Windows”. После этого сообщения установщик можно просто закрыть. Сегодня мы расскажем о том, отчего данная проблема возникает, какие есть нюансы в её появлении и как быстро исправить ситуацию.

Ошибка совместимости версий при запуске файла в Windows
Причины ошибки
Основной причиной ошибки запуска, является несоответствие версий разрядности вашей Windows c установочным файлом. Дело в том, что у вас стоит 32-разрядная версия системы, а скачанная софтина предназначена для 64-разрядной версии. Все устроено так, что в версии x32 можно запустить только софт с такой же разрядностью, в то время как x64 поддерживает обе версии. Проблема эта актуальна для всех Windows – 7, 8, 8.1 и 10. Можете лишний раз проверить свой тип операционки, открыв “Панель управления” -> “Система и безопасность” -> “Система”. Там, среди прочих значений, будет вся информация.

Проверка разрядности ОС
В данном случае, у вас есть несколько вариантов решения:
- Найти и загрузить софт с подходящей версией (x32), которых, кстати, становится все меньше. Разработчики игр уже давно ушли от этой устаревшей разрядности. Например, здесь вы уже не сможете запустить игры типа GTA 5 или PUBG.
- Перевести свою ОС на x64. Такой переход разом уберет множество неудобств.
- Если у вас семерка, то можно просто перейти на десятку, причем сделать это можно бесплатно, подробнее в нашем прошлом материале.
Как перейти на x64 правильно?
Если вы еще не поняли что делать, тогда читаем дальше. Есть два способа, при которых вы можете перейти на новую разрядность. В любом из них вам потребуется установочный образ Виндовс. Я бы рекомендовал загружать чистые сборки, без примесей лишнего ПО, которые пачками создают профаны. Например, есть качественный ресурс all-best.pro, где выкладываются проверенные образы.
- Итак, в первом варианте вам не нужно будет даже заходить в БИОС. Вы просто загружаете сам iso-образ, скачиваете Daemon Tools Lite. После, открываете установщик в виртуальном приводе и начинаете загрузку. Вот видео-урок, по этому поводу, где указаны все плюсы и минусы.
- Второй вариант, который я бы рекомендовал, полная переустановка системы на чистый раздел. В таком случае потребуется правильно записать образ на флешку или диск, выставить в BIOS загрузку с носителя и начинать переустановку. В сети множество информации по этому поводу. Я считаю такой переход правильным, так как он позволит получить новую систему (без мусора) но при этом программы, драйвера и прочее, будут снесены.
Внимание! Бывают случаи, когда многие неправильно запускают установщик образа, из-за чего и получают данную ошибку. Также возможен момент, когда ваш ISO-образ не полностью загружен, либо в сборке есть битые файлы. Тут же стоит сказать о железе – если ваш процессор очень древний, то он может попросту не поддерживать новую архитектуру.
Другие примеры появления ошибки
Помимо основной причины, бывают и другие моменты с появлением сбоя “Версия этого файла несовместима с используемой версией Windows” в уже x64 версии OS, которые чаще всего связаны с запуском игр. Что в таком случае следует проверить.
- Пробуйте запуститься в безопасном режиме и из-под администратора.
- Пробуйте все варианты со подключением совместимости (XP, Vista).
- Там же включите “Средство исправления проблем с совместимостью”.

Параметры совместимости в Windows 10
Заключение
Эти моменты помогут исправить эту проблему с несовместимостью версии файла. Также хотелось бы сказать про актуальные апдейты компонентов от Microsoft (Visual C++, .NET Framework) и DirectX. Не забывайте загружать предлагаемые пакеты обновлений для самой системы. Многие “умные юзеры” воспринимают эти слова, как что-то стандартное и не действующее, но, как показывает практика, на чистых и обновленных ОС (x64) такие проблемы не появляются.
Источник
Версия этого файла несовместима с используемой версией Windows (32 или 64)
Некоторые пользователи сталкиваются с ошибкой – Версия этого файла несовместима с используемой версией Windows (32 или 64) при запуске программ и игр. Все что им остается сделать после такого сообщения – это закрыть окно и установщик программы. В статье мы расскажем подробнее об этой ошибке и о том, как ее исправить или избежать.
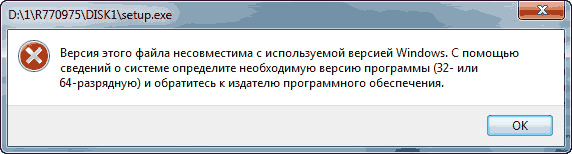 Ошибка совместимости версий Виндовс
Причины, по которым появляется ошибка
Обычно, причина заключается в несоответствии разрядности операционной системы Windows и разрядности запускаемого приложения. Скорее всего у вас установлена ОС с 32-битной архитектурой обмена информации, а программа, которую вы пытаетесь установить разработана для 64-битной системы. В связи с этим вы получаете ошибку «Версия этого файла несовместима с используемой версией Windows».
Важно помнить! Особенностью 32-битной системы есть тот факт, что она может запускать программы только с такой же разрядностью. В свою очередь 64-разрядная система может работать с файлами, которые созданы как для 32, так и для 64-битной системы Виндовс. Это относится ко всем операционным системам, начиная с 7 версии Windows.
Чтобы проверить какая архитектура ОС у вас на компьютере, нужно:
- Открыть «Панель управления».
- Зайти в «Система и безопасность».
- Далее открыть «Система». И на этой страницы можно увидеть разрядность вашей Виндовс на против строки «Тип системы».
В этом случае ошибку несовместимости 32 и 64 битной Виндовс можно решить несколькими вариантами.
- Скачать ту же программу или игру (iso или mdf) для операционной системы с 32-битной системой и установить. Нужно отметить, что разработчики игр стараются постепенно переходить на лучшую 64-битную архитектуру обмена файлами, потому что она позволяет работать с максимальным объемом оперативной памяти – 32 Гб. В то время как 32-битная Виндовс работает лишь с 4 Гб ОП. Если компьютер имеет более 4 Гб ОП, они будут игнорироваться. Часто можно встретить случай, когда вместо 32 бит программа имеет х86 архитектуру. Это тоже самое значение, оно имеет некую историю, связанную с микропроцессорами компании Intel.
- Перейти с 32-битной операционной системы на 64. Для этого вам понадобится новый дистрибутив с соответствующей архитектурой. Вы можете установить 2 системой ОC 64-битную Windows и запускать с нее игры и приложения которые этого требую. Такой вариант позволит вам сохранить старую систему, в которой вы наверняка имеете множество важных файлов, таких как фото, видео, фильмы и прочее.
- Можно устранить причину ошибки обновление Windows до 10 (последней) версии.

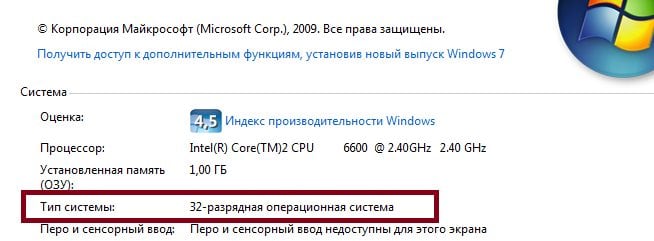
Перейти на Виндовс с 64-битной архитектурой
Если вы не знаете, как это сделать, то сейчас будет описано 2 возможных варианта. В каждом необходимо приобрести образ диска с Windows 64 bit. Можно порекомендовать исключительно «чистые сборки», без всяких дополнительных программ, типа «крякнутых» фотошопов и т.д. Найдите её в Интернете и загрузите.
- Вам не надо будет даже заходить в BIOS, как это необходимо при обычном варианте. Скачиваете образ диска с дистрибутивом, затем скачиваете и устанавливаете Daemon Tools Lite. Открываете через эту программу образ и устанавливаете.
- Обычная установка с форматированием диска и созданием новых разделов. Этот вариант является самым надежным, но при его использовании будут удалены с диска все ваши файлы, программы и драйвера устройств. Поэтому нужно будет перед установкой перенести все необходимые файлы на другой диск или флешку. Ошибка может возникнуть при установке Windows 64 на «старый» компьютер, железо которого попросту не поддерживают эту архитектуру. В этом случае результатом установки будет сообщение — версия этого файла несовместима с используемой версией Windows. Выход из этой ситуации только один – покупка нового, более современного компьютера с поддержкой 64-битной архитектуры операционной системы.
Другие причины ошибки «Версия этого файла несовместима с используемой версией Windows»
Помимо основных причин появление этой ошибки, она также возможна уже в установленной 64-разрядной ОС. Чаще всего ошибка возникает в результате запуска современных игр. В этом случае:
 Контроль учетных записей
- Запустите программу или игру, использую учетную запись администратора.
- Попробуйте «поиграть» с разными вариантами совместимости версий. Для этого необходимо нажать правой кнопкой по лаунчеру игры или кликнуть правой кнопкой. В выпавшем меню выбрать «Свойства» и во вкладке «Совместимости» поставить галочку «Запустить приложение в режиме совместимости с:» и выбрать ОС из списка.
- Если предыдущий вариант не помог, запустите «Исправление проблем с совместимостью».
- Иногда ОС не имеет в наличие архиватора. В этом случае при распаковке архивов установочного файла система будет выдавать эту ошибку. Для того чтобы системе удалось закончить установку и распаковать установочные файлы нужно скачать один из архиваторов. Найти их можно в интернете.
Источник
На чтение 13 мин Просмотров 1к.
Содержание
- DirectX
- Skyrim.ini
- Видеокарта
- Несоответствие соотношения сторон и разрешение экрана в игре
- Изменение прав
- Вирусы
- Причины возникновения ошибки в Скайрим
- Решения которые исправят ошибку
- Заключение
Всё пропало! Любимая игра не запускается, начинается паника. А всё потому, что на экране ошибка failed to initialize renderer в Skyrim. Как исправить её? Есть способы, с помощью которых можно разрешить проблему и войти в увлекательный мир Skyrim.
DirectX
Проверьте свою версию DirectX, возможно, её придётся обновить. Ну а если DirectX последней версии и другие игры прекрасно работали? Обратите внимание на саму ошибку, если там написано следующее: Try to install DirectX 9 or newer, то программу придётся переустановить. Для этого нужно найти DirectX Happy Uninstall. Попробуйте теперь запустить игру.
Skyrim.ini
Могут быть не те настройки в Skyrim.ini, из-за них выходит ошибка failed to initialize renderer. В Skyrim как исправить ее, не все знают. Нужно найти эти файлы и изменить их. На диске C найдите папку «Пользователь» (User, ваше имя), там понадобятся Documents и My games, а в ней Skyrim. Найдите Skyrim.ini. и SkyrimPrefs.ini. На них необходимо щёлкнуть мышью, правой кнопкой, из выпавшего меню выберите «Свойства», посмотрите, стоит ли галочка в «Параметры атрибутов» в поле «Только для чтения». Если стоит, снимите её, нажмите «Применить», «ОК». Не помогает? Значит, придётся удалить их. Затем следует запустить SkyrimLauncher.exe, тогда игра сама создаст новые файлы ini. Теперь пробуйте запуск и проверяйте, получилось теперь или нет. Чаще всего это срабатывает.
Видеокарта

Всё еще возникает ошибка failed to initialize renderer в Skyrim? Как исправить, думаете вы? А ларчик просто открывался: обновите драйвера для своей видеокарты. Лучше всего сделать это с официальных сайтов. Если вы без понятия, какая у вас видеокарта, нажмите «Пуск», затем «Стандартные» и «Выполнить». Появится окошко, надо вписать туда dxdiag и запустить. Нужно найти вкладку «Экран», раздел «Устройство», поле «Имя». В разделе «Драйверы» посмотрите на дату. Чем больше прошло времени, тем желательнее обновление. Рекомендуется перейти на сайт производителя ПК/ноутбука и скачать драйвера оттуда. Если там нет, тогда поможет сайт производителя видеокарты.
Для Windows 8 помогает выбор встроенной видеокарты (интегрированной). Найдите в папке SkyrimLauncher.exe, щёлкните мышкой на нём, правой кнопкой, посмотрите, если ли Run with graphics processor. Если есть, перейдите по стрелочке, выберите Integrated graphics и нажмите.
Несоответствие соотношения сторон и разрешение экрана в игре
Да-да, это тоже может приводить не только к ошибкам, даже к синим экранам смерти, а потом геймеры сидят и думают, как запустить Skyrim, если пишет failed to initialize renderer. В игре найдите меню «Разрешение экрана», далее «Параметры». Теперь выберите соотношение сторон, потом разрешение экрана. Если не отображается желаемое разрешение, выберите другое соотношение.
Изменение прав
Первое, что надо сделать, – найти на диске C папку Program files(x86), в ней steam, а далее steamapps и common. Отыщите Skyrim, по нему следует щёлкнуть мышкой, именно правой кнопкой, далее выбрать в меню «Безопасность». Нажмите «Изменить», после чего дайте всем пользователям полные разрешения. Нажмите «ОК» и попробуйте войти в игру.

Всё это не помогает, появляется failed to initialize renderer в Skyrim, как исправить?? У вас есть МО или Mod Organizer? Наверняка у вас стоит там профиль по умолчанию. Так вот, создайте ваш собственный профиль. Попробуйте теперь запустить игру из этого профиля.
Вирусы
Да, это банально, но если ранее всё работало, а сейчас нет, то откуда-то появился вирус, который вредит системе. Следует запустить антивирус и проверить. Не поленитесь зайти на сайт Dr.Web CureIt. На нём можно найти утилиту и проверить.
Надеемся, что наши советы были для вас полезны, и что Skyrim благополучно запустился.

Причины возникновения ошибки в Скайрим
Очень многие пользователи сталкиваются с ошибкой в игре Skyrim – “Failed to initialize renderer”. Данная проблема вызвана сбитыми или неверными настройками графики, которые конфликтуют с требованиями Windows. К счастью, в сети и на официальных форумах много дельных советов по её решению. Мы выбрали самые простые в исполнении методы, которые помогут исправить эту ошибку в Скайрим.
Ошибка запуска “Failed to initialize renderer”
Решения которые исправят ошибку
Вся суть нижеописанных решений сводится к дерганью настроек графических опций, сбросу некоторых функций, остановке модов и обновлению приложений. Начните с наиболее простых решений, ведь удалять и сносить можно всегда, а вот где-нибудь клацнуть, большого ума не стоит.
- Наиболее частая причина – неверное разрешение. В самом начале проверьте настройки лаунчера (Detail, Display) – установите то, которые подходят вашей видеокарте и монитору, либо на уровень ниже.
- Если не помогло – заходим в Steam – кликаем по Скайриму правой кнопкой и запускаем “Свойства”. Там во вкладке “Локальные файлы” выбираем опцию “Проверка целостности кеша”. Нередко столь простая операция помогает.
- Инсталлируйте в Windows (7/8/10) последнюю версию DirectX.
- Проверьте, корректно ли работает в Windows служба WINMGMT. По её назначению и работе прогуглите и все поймете.
- Установите формат звука – 16 Бит, 48000 Гц (Диск DVD) – делается это в свойствах звука.

Изменение свойств опции “Динамики”


Поочередное отключение модов в Скайрим
Заключение
Мы подобрали все наиболее действенные и простые решения сбоя “Failed to initialize renderer”, один из них наверняка вам поможет. Большая просьба указать в комментариях – какой пункт оказался действенным. Если и здесь вы счастья не найдете, тогда классическим образом – все сносим, чистим Windows, обновляем все дрова и заново устанавливаем.
I’m new to this forum. I’m hoping someone can help me fix the issues i’m having with my Skyrim.
Let me start by saying I’ve had Skyrim for over a year and have had no problems running it in the past. I haven’t played it in a while and when I tried to run it today these issues presented themselves.
My specs are an i7 3770k, 8 GB DDR3 1600, Radeon HD 6950 2GB. I am running Windows 7 64-bit. I also have a 128gb SSD that I use just for windows and some programs. My steam games are installed in a second hard drive.
When I click play on the game, the launcher comes up. I click play and get the following error message. – «Failed to initialize renderer.
Your display doesn’t support the selected resolution. Please set a different
resolution in Skyrim’s Launcher under ‘Display Settings’.»
I click play again and bring up the launcher. I click on ‘options’. The default aspect ratio is 16:10 and the default resolution is 1024×640(letterbox). The windowed mode box is not checked.
I change the aspect ratio to that of my monitor 16:9 and resolution to that of my monitor 1080p. Then I click ‘ok’. I then click play and again get the same error message.
I bring up the launcher again and noticed the settings are back to the default. I change them again to the correct ones then click ok. Just to test I click options and I see they are back to the default.
Whatever changes I make in the options don’t work. They revert to the default settings.
I also tried checking the windowed mode box to see if that works but no, that change also doesn’t work. It just goes back to the default and then when I click play it gives me the error message.
I tried going into the SkyrimPrefs.ini file and made the following changes. bFull Screen=1
iSize H=1080 iSize W=1920
After doing that I hit play and again same error. changing that file does nothing.

hi guys this happen to me when i uninstall the nvidia driver. i was already using and amd video card
then i install the ati driver, and it works ok

«Failed to initialise rendereer» is caused by the game not recognising either your monitor, resolution or your graphics device.
Open the game Launcher, goto Options, click «Default» button and let it re-detect your hardware.
. just incase someone else googles this.


I don’t have any mods installed. Also, I already confirmed the DirectX
install as well as the vcredist and dotnetfx. This didn’t solve the
problem.
However, I was able to solve the issue yesterday.
The problem was the SkyrimPrefs.ini file was set to read only. But not the
one in my steamapps.The file located in – steamapps>common>skyrim>Skyrim, *was not* set to read only.
The file with the problem was located in – documents>My Games>Skyrim. Both
files SkyrimPrefs.ini and Skyrim.ini were set to read only. I unchecked the
read only box from both files and the problem was fixed.
I then was able to change the aspect ratio and resolution and the changes
were saved. I can now play the game with no issues.
Thank you so much for your help!

i have the same problem but use mods with MO. this only recently started happening and i have no idea how to fix it. but i run it though SKSE


I recently ran into this issue myself. I was able to trace my issue down to a piece of software interfering with the renderer.
If you use any piece of hardware that requires the DisplayLink Core software (e.g. an external video card, the HP U160 USB monitor, some video glasses) then you may need to uninstall that software before playing the game. This will show up in your Programs and Features (for Windows 7 and 8/8.1 users) on the Control Panel.
This is a very specific fix and won’t apply for most users, but it’s definitely something to look out for!

Double clicking on game twice may cause this, because the computer is now reading and trying to load the game twice, remove icon at bottom of window page and let game load the second time, should be fine.

I recently ran into this issue myself. I was able to trace my issue down to a piece of software interfering with the renderer.
If you use any piece of hardware that requires the DisplayLink Core software (e.g. an external video card, the HP U160 USB monitor, some video glasses) then you may need to uninstall that software before playing the game. This will show up in your Programs and Features (for Windows 7 and 8/8.1 users) on the Control Panel.
This is a very specific fix and won’t apply for most users, but it’s definitely something to look out for!

Hello, guys just had this happen to me, what I did was back up all my files into another Drive (mods and saves) then got rid of everything Nexus and skve and all that good jazz. When nothing was on my C:/drive Skyrim related I reinstalled the game. started fresh. Afterwards, I noticed the thing still kept popping up. I thought mabey turning the computer off might have some effect on it, AND IT DID!. Works fine now
Hope this helps, by the way I did not have to download any of these upgrade your video card.


I’m new to this forum. I’m hoping someone can help me fix the issues i’m having with my Skyrim.
Let me start by saying I’ve had Skyrim for over a year and have had no problems running it in the past. I haven’t played it in a while and when I tried to run it today these issues presented themselves.
My specs are an i7 3770k, 8 GB DDR3 1600, Radeon HD 6950 2GB. I am running Windows 7 64-bit. I also have a 128gb SSD that I use just for windows and some programs. My steam games are installed in a second hard drive.
When I click play on the game, the launcher comes up. I click play and get the following error message. – «Failed to initialize renderer.
Your display doesn’t support the selected resolution. Please set a different
resolution in Skyrim’s Launcher under ‘Display Settings’.»
I click play again and bring up the launcher. I click on ‘options’. The default aspect ratio is 16:10 and the default resolution is 1024×640(letterbox). The windowed mode box is not checked.
I change the aspect ratio to that of my monitor 16:9 and resolution to that of my monitor 1080p. Then I click ‘ok’. I then click play and again get the same error message.
I bring up the launcher again and noticed the settings are back to the default. I change them again to the correct ones then click ok. Just to test I click options and I see they are back to the default.
Whatever changes I make in the options don’t work. They revert to the default settings.
I also tried checking the windowed mode box to see if that works but no, that change also doesn’t work. It just goes back to the default and then when I click play it gives me the error message.
I tried going into the SkyrimPrefs.ini file and made the following changes. bFull Screen=1
iSize H=1080 iSize W=1920
After doing that I hit play and again same error. changing that file does nothing.
[I FIXED IT FOR ME – WINDOWS 10] – Permissions was the problem
1. C:Users[user]Documentsmy games
2. right click, properties
3. Security – Advanced
4. Click ‘Change’ next to owner
5. Find your username, if not there click advanced, find now and administrators
6. Click ok, check «Replace owner on subcontainers and objects»
7. Go back to ‘skyrim’ folder properties, security then click ‘edit’ on system
8. check full control box with all groups&users
9. should be done.. lemme know
caNexus Mod Manager is a popular tool used by gamers to manage mods for their games. However, users may occasionally encounter a problem where the Nexus Mod Manager cannot obtain write permissions. This indicates that the program lacks the licenses to modify your game files or the mod files you want to install. Even though this can be a frustrating issue, there are steps you can take to resolve it. In this article, we will explore why the Nexus Mod Manager cannot get write permissions and offer solutions to help resolve the issue.
The Nexus Mod Manager can be run as an administrator to resolve this problem, or you can check the target folder’s permissions. A firewall or antivirus program should not prevent the program from accessing the required files, so it is advised to double-check this.
Here, we’ll examine the reasons behind this problem and suggest potential solutions for being unable to get write permissions for Nexus mod manager.
If you are encountering issues with Nexus mod manager, unable to get write permissions for Skyrim, here are a few steps you can try to resolve the problem:
- Run Nexus Mod Manager as an administrator: Right-click the Nexus Mod Manager icon and select “Run as administrator.”

- Check your antivirus software: Antivirus software may prevent Nexus Mod Manager from writing to the Skyrim folder. Ensure the software is not blocking access to the folder.

- Check folder permissions: Ensure that the folder where you have installed Skyrim has the proper permissions. Right-click on the folder, select “Properties,” then “Security,” and then check that the “Everyone” user has “Full control” permissions.

- Disable UAC (User Account Control): If you have UAC enabled, try disabling it temporarily to see if it resolves the issue.

- Try a different mod manager: You may need to try a different mod manager, like Mod Organizer, if none of these steps fix the problem.
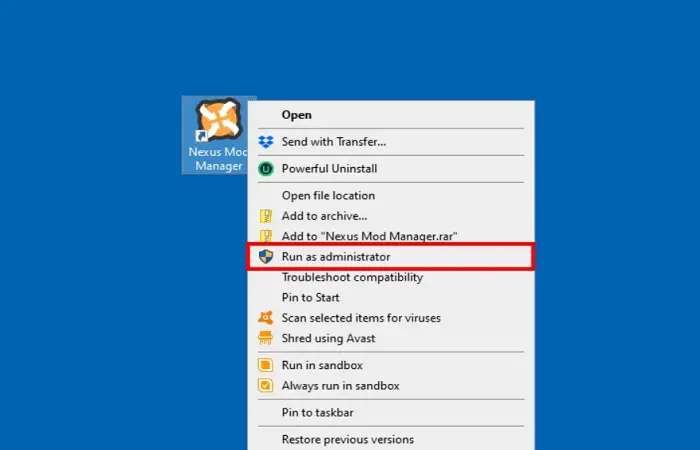

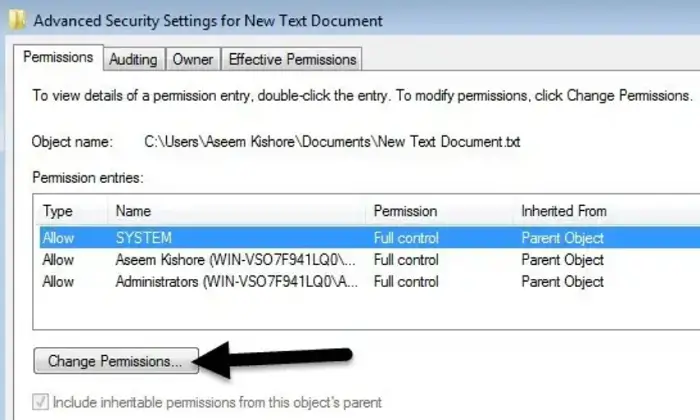

In case these actions don’t cure the problem, you might seek more help on Skyrim modding forums or the Nexus Mod Manager community. If Skyrim isn’t launching, Read this article.
Unable To Get Write Permissions Nexus Mod Manager
You could be unable to obtain write rights in Nexus Mod Manager for several reasons, including the following:
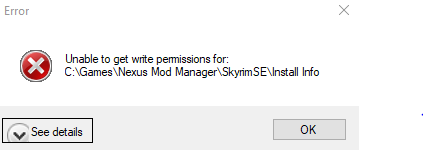
- User Account Control (UAC): If UAC is enabled, it may prevent Nexus Mod Manager from having write permissions to the game folder. To resolve this, right-click on the Nexus Mod Manager icon and select “Run as administrator.”
- Antivirus software: Some programs can block write permissions to prevent the software from installing harmful files. Disable your antivirus software temporarily and try installing again.
- Permissions on the game folder: The user account you are using must have complete access to the game folder where Nexus Mod Manager is set up. Select “Properties” by performing right-clicking on the game folder. Then, under the “Security” option, ensure your user account has full power.
- Incorrect installation location: If Nexus Mod Manager was installed in a location that needs administrative rights. It might not have write permissions. Installing Nexus Mod Manager in a different location, like your Documents folder, might be possible.
If none of these fixes work, you might have to reinstall Nexus Mod Manager or contact their support to get more help.
Ways To Resolve The Issue
Nexus Mod Manager is a popular tool for gamers to manage and install mods for their games. It is an essential tool for players who want to enhance their gaming experience by adding new content, fixing bugs, and improving the overall performance of their games. However, users often encounter an error message that says “unable to get permission for nexus mod manager” when installing mods.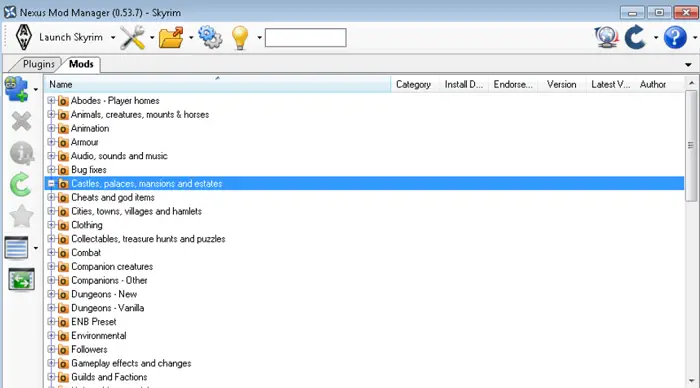
Several solutions to the Nexus Mod Manager can’t Get Permission issue exist.
Changing The Installation Directory
The operating system restricting the installation directory is one of the most frequent causes of the problem.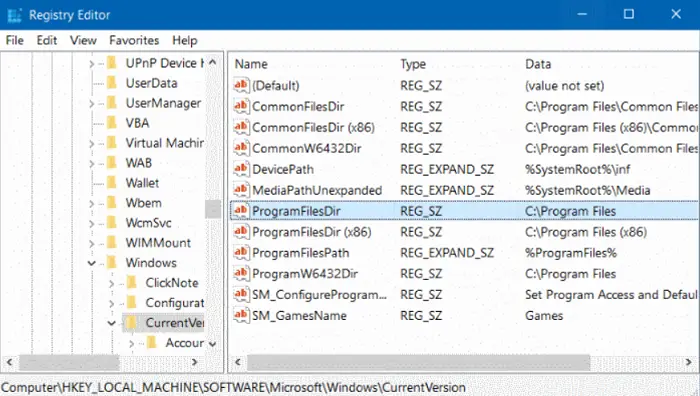 Changing the installation directory to a location with full write permissions can resolve the issue.
Running As Administrator
Nexus Mod Manager requires administrative privileges to install mods.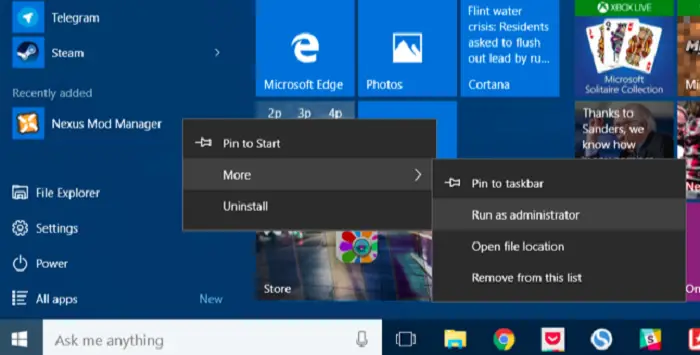
You can fix the problem by running the program as an administrator.
Disabling Antivirus
Antivirus software can sometimes prevent the Nexus Mod Manager from getting write permissions.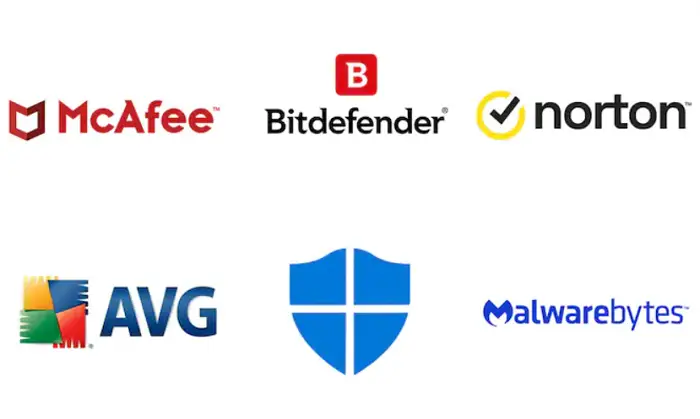 You can fix the problem by short-term antivirus software disablement.
Checking The File Permissions:
The issue can also occur if the files and folders required by Nexus Mod Manager do not have the proper write permissions.
Checking the file permissions and setting them to allow write access can resolve the issue.
Updating Nexus Mod Manager
It’s also possible to resolve the issue by installing the most recent Nexus Mod Manager version.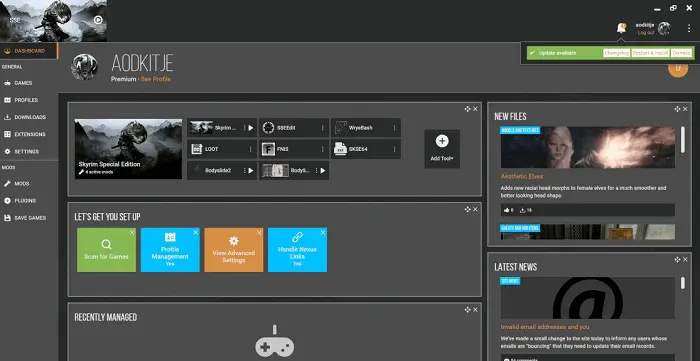 The updated version could present bug fixes and enhanced operating system compatibility.
Uninstalling And Reinstalling Nexus Mod Manager
If all the above methods fail, uninstalling and reinstalling Nexus Mod Manager can resolve the issue. This will remove all previously installed mods. Thus a backup is advisable.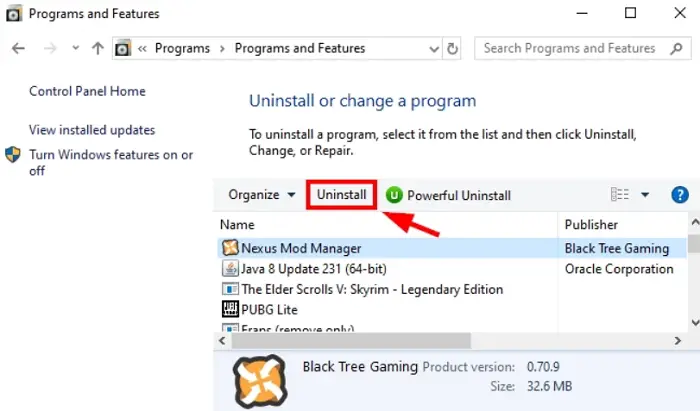
The Nexus Mod Manager cannot gain write rights method works using the above mentioned techniques. Be Patient and Solve the problem with various approaches.
FAQ
What is the error message I receive when Nexus Mod Manager doesn’t have write permissions?
You may receive the error message ‘Unable to obtain write permissions for the installation folder.’
What causes the error message ‘Unable to get write permissions for the installation folder’?
This error occurs when the Nexus Mod Manager doesn’t have the necessary permissions to write files to the folder where the game is installed.
How do I fix the ‘Unable to get write permissions for the installation folder’ error?
You can fix the error by granting Nexus Mod Manager the necessary permissions to write files to the game’s installation folder. You can achieve this by right-clicking the folder, selecting ‘Properties,’ then clicking the ‘Security’ tab and granting the necessary permissions.
Is it safe to grant Nexus Mod Manager write permissions?
Yes, it is safe to grant Nexus Mod Manager write permissions. The program is designed to manage mods for your game and requires writing permissions to install and manage mods properly.
What if I still can’t get write permissions for Nexus Mod Manager?
If you still can’t get write permissions, you may need to run Nexus Mod Manager as administrator or change the installation folder to one that you have full control over, such as a Documents or Desktop folder.
What if my antivirus software prevents Nexus Mod Manager from getting write permissions?
Some antivirus software may block Nexus Mod Manager from getting write permissions. You can try adding Nexus Mod Manager as an exception in your antivirus software’s settings or temporarily disabling your antivirus software while installing mods.
Can I still use Nexus Mod Manager if it doesn’t have write permissions?
No, you cannot use Nexus Mod Manager if it doesn’t have write permissions. The program requires writing permissions to install and manage mods properly.
See Also: The Best Moddable PC Games You Can Try In 2023
Conclusion
In conclusion, the Nexus Mod Manager error, unable to get write permissions, is a common issue many players face. Security settings, antivirus software, or improper mod manager installation are just a few causes.
To resolve this error, players can try disabling their antivirus software. Also, running the mod manager as an administrator or reinstalling the mod manager with administrative privileges.
Overall, Players should be able to fix the Nexus mod manager unable to get write permissions by using these steps and can resume using their mods. To learn about the best WhatsApp mods, check out this article.
See Also: How To Fix Nexus 5x Won’t Turn On – Complete Guide For 2023
#1

Posted 06 March 2012 — 02:14 pm
vitalaeon
-
- Banned
-
- 2 posts
Stranger


I am unable to run the program because I get this error.
Unable to get write permissions for:
C:Program files (x86)The Elder Scrolls V Skyrim
I even have it set as administrator privileges.
- Back to top
 Back to top
#2
Rabbit1251
Posted 06 March 2012 — 02:17 pm
Rabbit1251
-
- Premium Member
-
- 4,217 posts
Resident Rabbit

I am unable to run the program because I get this error.
Unable to get write permissions for:
C:Program files (x86)The Elder Scrolls V SkyrimI even have it set as administrator privileges.
What is the full directory path that you have your game installed to?
Rabbit
- Back to top
#3
vitalaeon
Posted 06 March 2012 — 02:31 pm
vitalaeon
-
- Banned
-
- 2 posts
Stranger
Isnt that the full path?
Here is the tracelog that I forgot to include.
Trace file has been created: TraceLog20120306092839.txt
Mod Manager Version: 0.15.13.0
OS version: Microsoft Windows NT 6.1.7601 Service Pack 1
Installed .NET Versions:
CDF SP 0
v2.0.50727 SP 2
v3.0 SP 2
v3.5 SP 1
v4 SP 0
v4.0 SP 0
Tracing is forced: True
Discovering Game Mode Factories…
Looking in: C:Program FilesNexus Mod ManagerGameModes
Checking: Fallout3.CSharpScript.dll
Cannot load C:Program FilesNexus Mod ManagerGameModesFallout3.CSharpScript.dll: cannot find dependency CSharpScript, Version=1.1.0.0, Culture=neutral, PublicKeyToken=null
Checking: Fallout3.dll
Initializing: Nexus.Client.Games.Fallout3.Fallout3GameModeFactory
Checking: Fallout3.XmlScript.dll
Cannot load C:Program FilesNexus Mod ManagerGameModesFallout3.XmlScript.dll: cannot find dependency XmlScript, Version=1.1.0.0, Culture=neutral, PublicKeyToken=null
Checking: FalloutNV.CSharpScript.dll
Cannot load C:Program FilesNexus Mod ManagerGameModesFalloutNV.CSharpScript.dll: cannot find dependency CSharpScript, Version=1.1.0.0, Culture=neutral, PublicKeyToken=null
Checking: FalloutNV.dll
Initializing: Nexus.Client.Games.FalloutNV.FalloutNVGameModeFactory
Checking: FalloutNV.XmlScript.dll
Cannot load C:Program FilesNexus Mod ManagerGameModesFalloutNV.XmlScript.dll: cannot find dependency XmlScript, Version=1.1.0.0, Culture=neutral, PublicKeyToken=null
Checking: GamebryoBase.dll
Checking: Oblivion.dll
Initializing: Nexus.Client.Games.Oblivion.OblivionGameModeFactory
Checking: Oblivion.ModScript.dll
Cannot load C:Program FilesNexus Mod ManagerGameModesOblivion.ModScript.dll: cannot find dependency ModScript, Version=1.1.0.0, Culture=neutral, PublicKeyToken=null
Checking: Skyrim.CSharpScript.dll
Cannot load C:Program FilesNexus Mod ManagerGameModesSkyrim.CSharpScript.dll: cannot find dependency CSharpScript, Version=1.1.0.0, Culture=neutral, PublicKeyToken=null
Checking: Skyrim.dll
Initializing: Nexus.Client.Games.Skyrim.SkyrimGameModeFactory
Checking: Skyrim.XmlScript.dll
Cannot load C:Program FilesNexus Mod ManagerGameModesSkyrim.XmlScript.dll: cannot find dependency XmlScript, Version=1.1.0.0, Culture=neutral, PublicKeyToken=null
Determining Game Mode: Skyrim
Game Mode Factory Selected: Skyrim (Skyrim)
Creating Game Mode mutex.
Messaging to bring to front.
Getting listener on: ipc://Nexus Mod Manager-SkyrimIpcServer/SkyrimListener
Tracing an Unhandled Exception:
Exception:
Message:
The trace has already been written. Cannot change file path.
Full Trace:
System.InvalidOperationException: The trace has already been written. Cannot change file path.
at Nexus.Client.HeaderlessTextWriterTraceListener.ChangeFilePath(String p_strNewFileName)
at Nexus.Client.Bootstrapper.RunMainForm(String[] p_strArgs)
at Nexus.Client.Program.Main(String[] p_strArgs)
Running Threads (0)
- Back to top
#4
Rabbit1251
Posted 06 March 2012 — 03:01 pm
Rabbit1251
-
- Premium Member
-
- 4,217 posts
Resident Rabbit
Where is your Steam directory installed to?
Look, go into your Program Files(x86)-Steam-SteamApps-common-skyrim-Data and tell me what is there.
Rabbit
- Back to top
#5
Labby7
Posted 07 March 2012 — 09:39 pm
Labby7
-
- Members
-
- 1 posts
Stranger

I’m getting the same error. I know where my Steam directory is. What should I be looking for Rabbit?
- Back to top
#6
bishop212
Posted 08 March 2012 — 08:26 pm
bishop212
-
- Members
-
- 12 posts
Newbie

i am getting the same error.
I installed NMM into this path
Program Files(x86)-Steam-SteamApps-common-skyrim
here are the folders
— data
— GameModes
— ModFormats
— ScriptTypes
— Uninstall
and bunch of .dll files and NexusClient and NexusClient.exe.config file.
- Back to top
#7
Fonger
Posted 08 March 2012 — 09:04 pm
Program Files(x86)-Steam-SteamApps-common-skyrim
simple UAC issue caused by installing anything into this cursed directory
{thank you Micro$haft}
cured by reading the steam forums on how to move either your steam install itself, or the game directory
out of this [censored!!] directory
- Back to top
#8
Dovahkill4285
Posted 26 August 2012 — 08:15 pm
Dovahkill4285
-
- Members
-
- 1 posts
Stranger

cant set up oblivion to mod wtf
- Back to top
#9
bben46
Posted 26 August 2012 — 09:25 pm
bben46
-
- Premium Member
-
- 24,973 posts
I had a title once, but I forgot what it was.

You can move Steam out of the UAC protected folder. Simple process from Steam. You don’t lose any games and steam will immediately start using the new location.
How to Move your Steam to another location Without having to reinstall anything.
https://support.stea…php?p_faqid=231
Steam is required to legally play — we do NOT support any other versions — Steam only.
- Back to top
#10
aerozord
Posted 19 October 2012 — 12:04 am
aerozord
-
- Members
-
- 4 posts
Stranger

I am getting this error but my steam library isn’t even located on my boot drive, I did try installing the mod manager into the same directory (my secondary harddrive) but it gave me «CreateFile failed; Code 5 Access is denied»
and of course while I can get it installed onto the C drive (though I put it into normal program files and not the x86) I get the «unable to write permission» error
- Back to top