
Windows 7 Enterprise Windows 7 Home Basic Windows 7 Home Premium Windows 7 Professional Windows 7 Starter Windows 7 Ultimate Windows Server 2008 R2 Datacenter Windows Server 2008 R2 Enterprise Windows Server 2008 R2 Standard Windows Server 2012 Datacenter Windows Server 2012 Datacenter More…Less
Symptoms
When you try to upgrade from Windows Vista to Windows 7, from Windows Server 2008 to Windows Server 2008 R2, from Windows Server 2003 to Windows Server 2008 R2, or from Windows Server 2008 R2 to Windows Server 2012, the upgrade fails.
In this situation, you receive the following error message:
The following issues are preventing Windows from upgrading. Cancel the upgrade, complete each task, and then restart the upgrade to continue.
There is not enough free space on partition (drive:). A total of space_size megabytes (MB) of free disk space is required. Try Disk Cleanup, or moving files to an external location such as a CD, DVD, or external hard drive, and then restart the installation.
This problem does not occur during the new client setup experience for Windows 8.
Cause
This problem occurs when the size of the virtual memory paging file falls below the recommended limit. Windows upgrade requires that the page file be the recommended size and that sufficient space be available on the drive to accommodate a default sized page file. By default, Windows stores the paging file on the system volume. Therefore, there is insufficient free space on the system volume when you try to upgrade to Windows 7, Windows Server 2008 R2, or Windows 2012.
Resolution
To resolve this problem, use one of the following options.
Option 1: Free up space on the system volume
Use Disk Cleanup, or try to move files to an external location such as a CD, DVD, or external hard disk drive. Then, restart the installation. Make sure that required free space is available on the system drive.
To free up space on your hard disk, Disk Cleanup finds and then removes temporary files on your computer that you decide you no longer need. If you have more than one drive or partition on your computer, you are prompted to select the drive that you want Disk Cleanup to clean.
To start Disk Cleanup, click Start  , click All Programs, click Accessories, click System Tools, and then click Disk Cleanup.
Option 2: Move the paging file to another volume
-
Log on to the computer as Administrator.
-
Click Start, right-click Computer, and then click Advanced system settings.
-
In the System Properties dialog box, click the Advanced tab, and then click Settings under Performance.
-
In the Performance Options dialog box, click the Advanced tab, and then click Change.
-
Click to clear the Automatically manage paging file size for all drives check box.
-
In the Drive [Volume Label] list, click a drive other than the one on which Windows is installed (typically, this is drive C). Under Total paging file size for all drives, note the value that is displayed next to Recommended.
-
Check the Custom size box, and then type the recommended value in the Initial size (MB) box.
-
Type the maximum size that you want to allow for paging in the Maximum size (MB) box, and then click Set.
-
In the Drive [Volume Label] list, click the drive on which Windows is installed, click to select the No paging file check box, and then click Set.
-
Click Yes when you are prompted.
-
Click OK three times, and then restart the computer.
Need more help?
Want more options?
Explore subscription benefits, browse training courses, learn how to secure your device, and more.
Communities help you ask and answer questions, give feedback, and hear from experts with rich knowledge.
This articles provides multiple solutions to fix «There is not enough free space on partition or disk» error which may happen to C partition, system upgrade or USB drives. It is annoying operations can’t be completed on account that disk or partition is running out of space. If you are confused by this low disk space issue, continue reading and find solutions to free up disk space and extend partition. This low disk space issue is discussed in four cases and you can click following links to reach corresponding content.
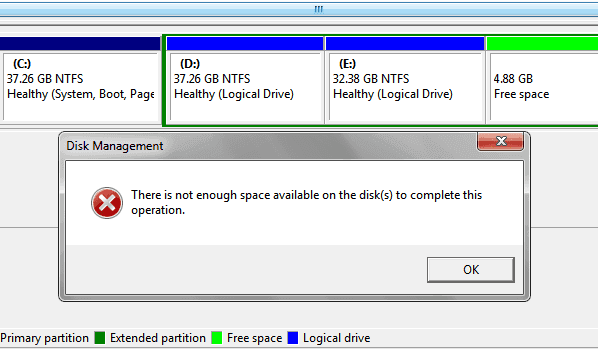
Case 1: There is not enough space available on the disk(s) to complete this operation
You may encounter this issue when creating, shrinking or extending volume or converting basic disk to dynamic in Disk Management. For example, when you shrink a volume, it only allows a little space to shrink even though there is a lot of free space in this volume. Sometimes, you may receive the error «There is not enough space available on the disk(s) to complete this operation».
Disk Management is a Windows built-in tool used to manage hard drive and partitions on hard drive. Disk Management is able to initialize disks, create or format volumes with FAT, FAT32 and NTFS file system. Besides, it has ability to perform disk related tasks without restarting system such as extend and shrink partitions. Useful as it is, Disk Management can’t fulfill all operations users demand and gives errors.
What are the reasons for this error?
Reasons behind this not enough space issue can be many, and this section list the most common ones:
- The limitation of extended partition and disk management tool.
- After disk management is open, other partition management software changed disk size. Disk Management doesn’t refresh the actual partition status, thus it fails to show the real volume size.
- You are shrinking a volume beyond the point where some unmovable files are located.
- The volume you want to shrink is indeed running out of space and it does not have enough free space to complete required operations.
Solutions to fix this problem
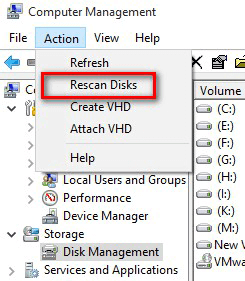
Solution 1: Rescan disks
This approach aims to update disk information so that Disk Management shows what disk and partition’s status really is. Partitions and disks will be reloaded and Disk Management will be able to recalculate free space for disk resizing. It’s easy to rescan disk in Computer Management: click «Action» menu and select option «Rescan Disks». If you still get the low disk space error, you should try steps in solution 2.
Solution 2: Resize partition using free partition manager
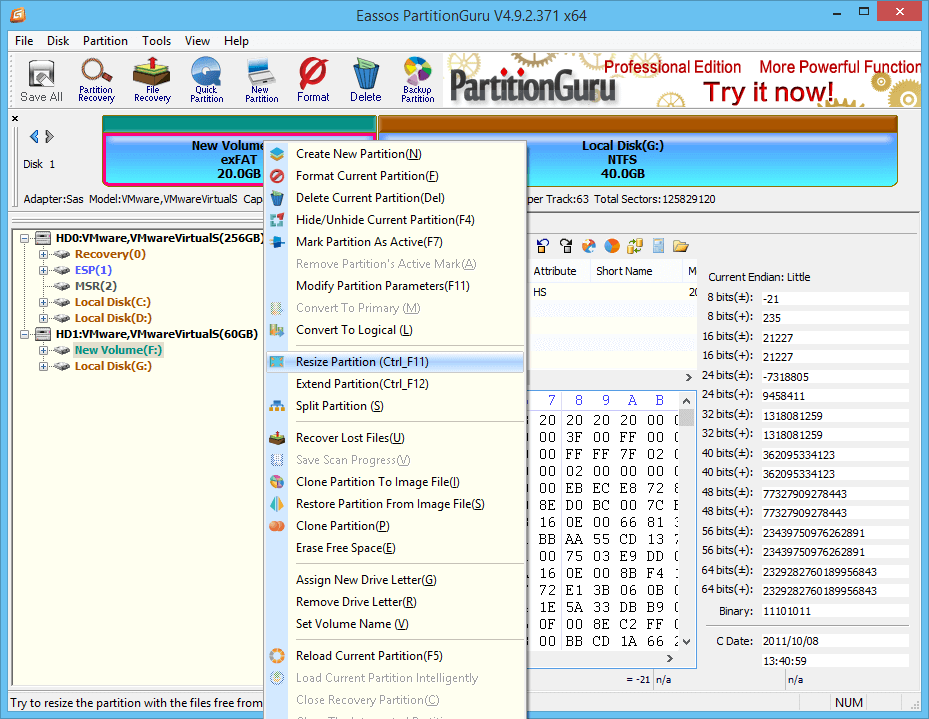
If Disk Management fails to complete operation because of not enough free space, you can use third-part disk management alternative to continue the operation. In this case, the most recommended tool is free partition manager DiskGenius which provide basic & advanced disk and partition management functions, including resize / extend / shrink/ split partition without disturbing current data. Thus you can resolve the low disk space issue with this free tool easily. Download and install Eassos free partition manager on your PC and you can follow steps below to resize any partition.

Step 1 Run DiskGenius and locate the partition you want to shrink or resize. Select the partition and right-click it to choose «Resize Partition» option, as follows:
Step 2 Set partition size you want to move and click Start button. DiskGenius provides two ways to define volume size: you can move mouse to the either edge the partition and drag mouse after it turns to a double arrow; another way is entering exact size in following column. Resized space can be set to keep unallocated, move to other partition or create a new partition.
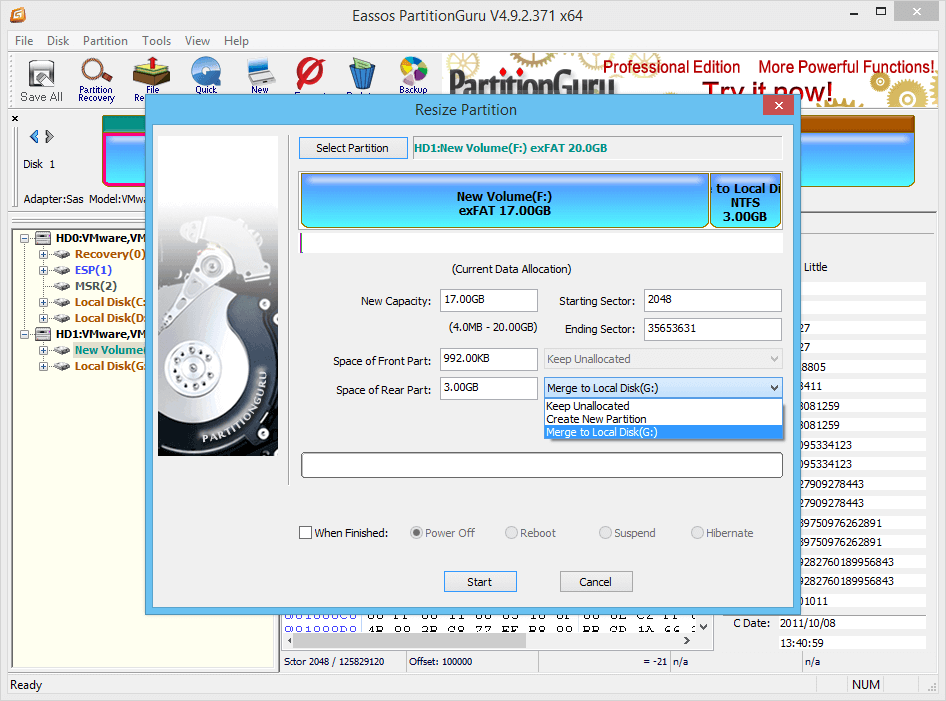
Step 3 Wait for the resizing process to complete and then close software.
Case 2: Not enough free space on USB flash drive
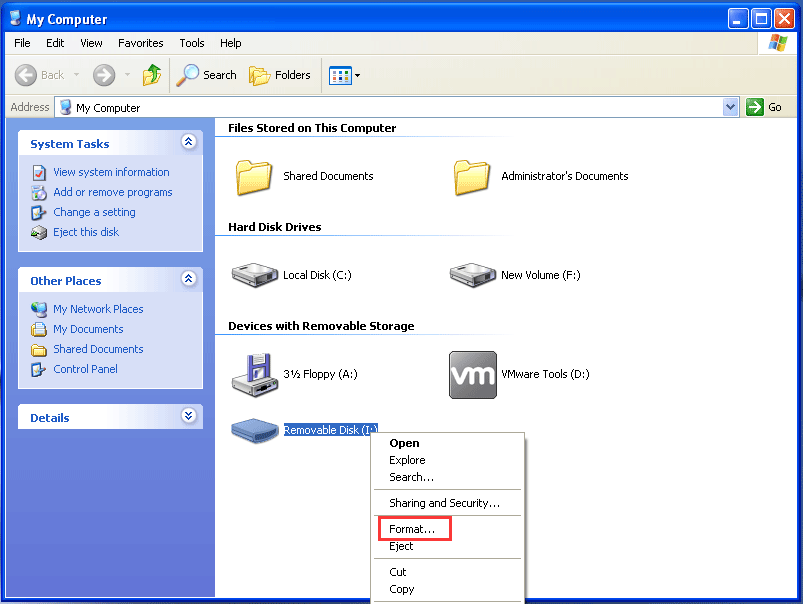
An error may appear when you attempt to transfer data to a USB drive whose free space is not enough, and the error message appears on a box called «Error Copying File or Folder», saying there is not enough free disk space. Delete one or more files to free disk space, and then try again. To free space on this drive by deleting old or unnecessary files, click Disk Cleanup. In addition to that, another error may occur if you copy a file larger than 4GB to a USB drive. In that case, the USB flash drive also reports there is not enough free disk space even though there is plenty of free space.
Causes of this error
Many flash drives are sold at a very cheap price, many of which are faulty or have a fake size. For example, a flash drive is tagged as 32GB which is actually only 4GB. The unscrupulous manufacturers play tricks to make the 4GB flash drive display as 32GB in Windows. However, it is not able to store that much data. When you copy large amount data to it, it will report free space is not enough.
The cause of this problem is that many USB flash drives are formatted as FAT32 files system which has a limitation of 4GB on per file size. Thus you can’t storage a file larger than 4GB to the disk no matter how much free space it contains. Thus, you should check available free disk space and file system type on the USB flash drive. If file is too large for the destination file system, you can fix it by converting FAT32 to exFAT or NTFS file system which does not have single file size limit.
Fix not enough free space on USB flash drive
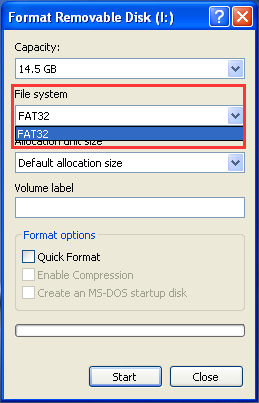
Solution 1: Format USB flash drive into exFAT file system
Windows offers formatting function, but it can’t format USB flash drive into exFAT if the capacity is too large. If that is the case, you can use the disk management alternative – DiskGenius to complete the formatting. In consideration of data safety, take a full backup for files on the flash drive such as copy all data to your computer before proceeding following steps.
Step 1 Insert the USB flash drive to computer and launch DiskGenius. In the main interface, you can see all disks attached to computer and partitions they contain.
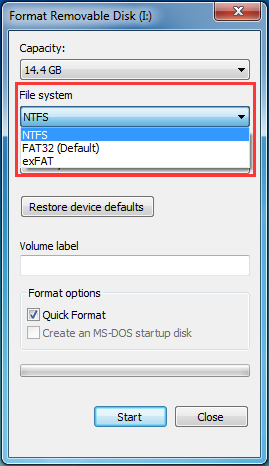
Step 2 Select the partition on USB flash drive that reports error and click «Format» button from tool bar. Then you can see a Format window popping up.
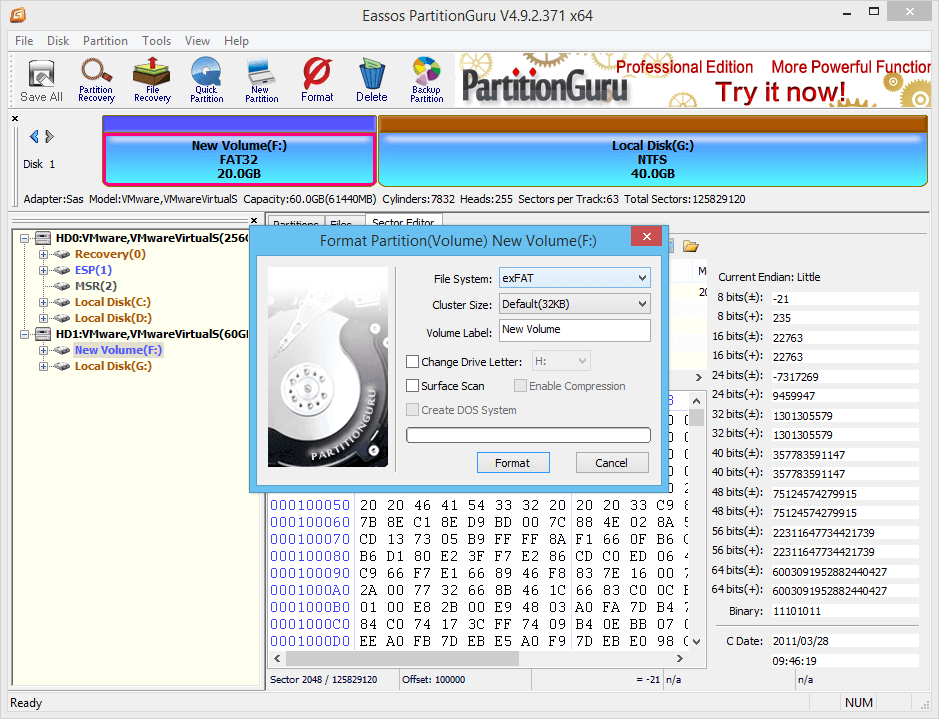
Step 3 Select «exFAT» in the drop down list for Files System and click «Format» button.
Solution 2: Convert FAT32 to NTFS with Command Prompt
Command line is able to convert FAT32 to NTFS file system without erasing file on the disk and there is the guide:
Step 1 Insert USB drive to computer and wait for a while so that Windows can recognize it. Open File Explorer to view and remember its drive letter.
Step 2 Open Command Prompt. Click Start button and enter cmd in the searching box. Right click «cmd.exe» from searching list and select Run as administrator. Click Yes or give permission if you are asked by UAC.
Step 3 Type chkdsk G: /f and press Enter. Note: G is the drive letter of the USB flash drive and it can be other letter on your computer.
Step 4 Type convert G: /FS:NTFS and press Enter. When the process is done, go to File Explorer to check whether file system is properly converted.
If your flash drive has been converted to exFAT or NTFS and still gets the error, then you should check disk’s correct capacity or contact manufacturer to fix it.
Case 3: There is not enough free space on partition (c:)
Symptoms of this issue
It’s like to get this error when you try to upgrade Windows but failed, such as from Vista to Windows 7, from Server 2008 to 2008 R2, from Server 2003 to 2008 R2, from 2008 R2 to Server 2012. The error message could be «The following issues are preventing Windows from upgrade, complete each tack, and then restart the upgrade to continue. There is not enough space on partition (C:). A total space size megabytes (MB) of free disk space is required. Try Disk Cleanup, or moving files to an external location such as CD, DVD, or external hard drive, and then restart the installation.»
Another scenario of this error happens when operating system is nearly full. When you open Windows Explorer you can see the system partition shows red and Windows gives an alert on taskbar to ask you to free up disk space. The error message could be «Low Disk Space You are running out of disk space on system (C:). To free space on this drive by deleting old or unnecessary files, click here…»
Besides, similar issue that Windows needs more space occurs when you upgrade computer to Windows 10. People who do not know how much space Windows 10 takes upgrade current system to Windows 10 and gets error message: Windows needs more space. We need 5.00 GB of space on the drive C: for the upgrade. To make space available for upgrade, remove any files and apps that you no longer need or try one of these options: Use Disk Cleanup to free up space. Choose another drive or attach an external drive with 12.0 GB available. Sometimes, you may get error codes such as 0x80070070-0x50011, 0x80070070-0x50012, or 0x80070070-0x60000.
How to free up disk space for partition C?
It can be a stressful experience especially when you are working on an important project. You should fix this issue as soon as you can, because low disk space problem slows down computer, blocks installation of system updates or software, or even cause system crash if free space is extremely low. The good news is that you can follow solutions here to free up disk space as well as extend system partition easily.
Solution 1: Run Windows Cleanup
Cleanup is Windows built-in utility which can be used to delete temporary files to free up disk space. You can do the cleanup for your computer on a regular basis. There is the process:
Step 1 Open Disk Cleanup. Click Start button and enter Disk Cleanup in the search box and click Disk Cleanup from the search result.
Step 2 If you get a message box asking you to select drive, select C and click OK.
Step 3 A message box pops up and analyzes data that can be cleaned. Then the Disk Cleanup dialog box comes up where you should click «Clean up system files.» If you are prompted to select drive, set it to C and click OK.
Step 4 Click tab «Disk Cleanup» and select file types you want to delete by check boxes, such as Downloaded Program files, Temporary Internet Files, Recycle Bin, etc. If you want to delete data from a previous system installation, select Previous Windows installation(s). Click OK button, and click Delete files button from the popped up message box.
Step 5 Open File Explorer and right click partition C to click Refresh.
Solution 2: Uninstall software you no longer need
Step 1 Click Start button and then click Control Panel where you should click Uninstall a program under Programs. If you are prompted for an administrator password or confirmation, type the password or provide confirmation.
Step 2 Select the application that you don’t need any more and click Uninstall/Change button.
Step 3 Uninstall or Yes button on the dialog box.
Solution 3: Move the paging file to another partition
Step 1 Right-click Computer and click Properties to view system properties, and then click Advanced system settings. Please note that you should log on computer as administrator first.
Step 2 On the System Properties dialog box, choose Advanced tab and click Settings button under Performance.
Step 3 The Performance Options window pops up. Click Advanced tab and click Change button.
Step 4 Unselect «Automatically manage paging file size for all drives». Click any drive except system partition in the drive list column, and pay attention to the value next to Recommended in the section «Total paging file size for all drives».
Step 5 Select Custom size option and enter the recommended value in the Initial size (MB) box. Enter the maximum size that you want to allocate to paging in the «Maximum size (MB)» box and click Set.
Step 6 Select system drive in the drive list and select «No paging file» in the lower part. Click Set button again. Click Yes if you are prompted.
Step 7 Click OK buttons on dialog box to close them and restart computer to make setting take effect.
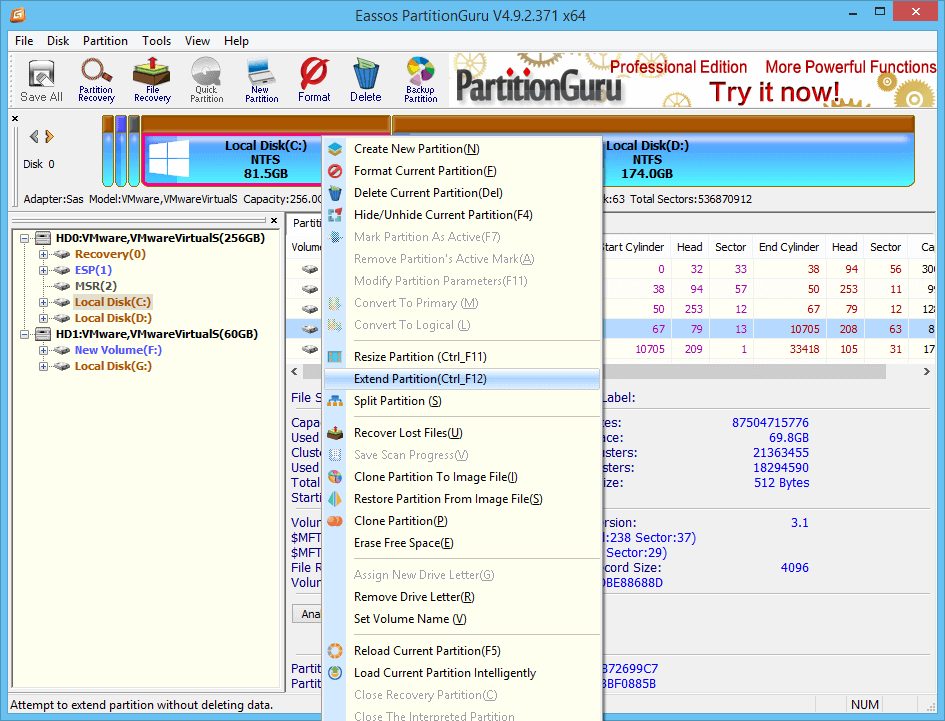
Solution 4: Extend C drive
Eassos DiskGenius can help you easily change partition size including system partition. If system partition is running low disk space, you can use this partition manager to extend or move volume space. Install and launch DiskGenius and follow the guide to extend C drive.
Step 1 Right-click the system partition you want to extend and select «Extend Partition» from the menu.
Step 2 The Extend Partition dialog box asks to select a partition from which you can move free disk space to system partition.
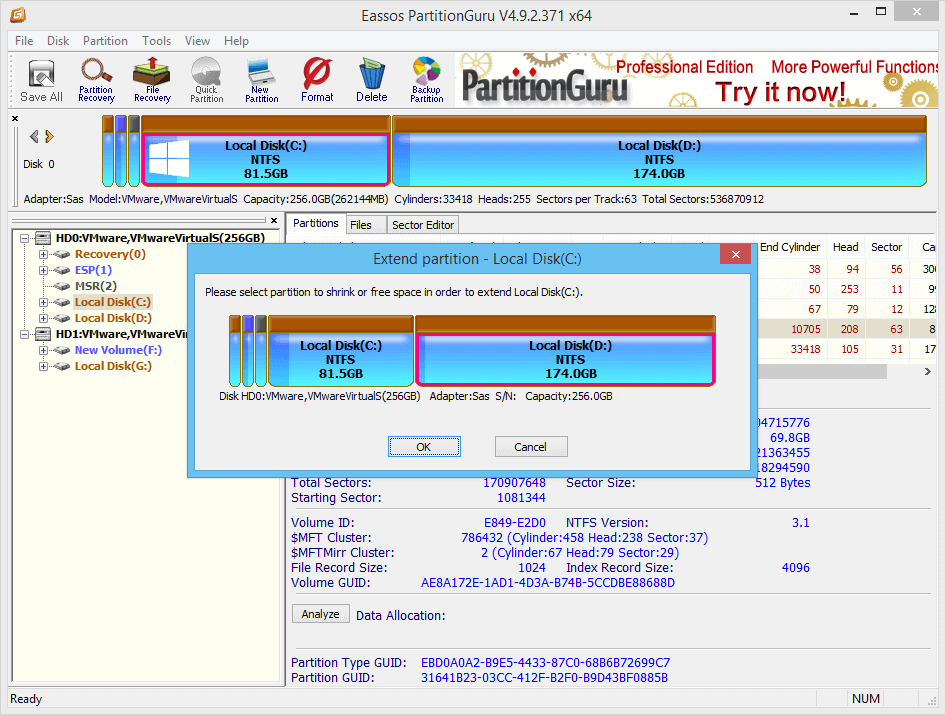
Step 3 Set partition size you want to change. In this example, system partition is extended to 100GB.
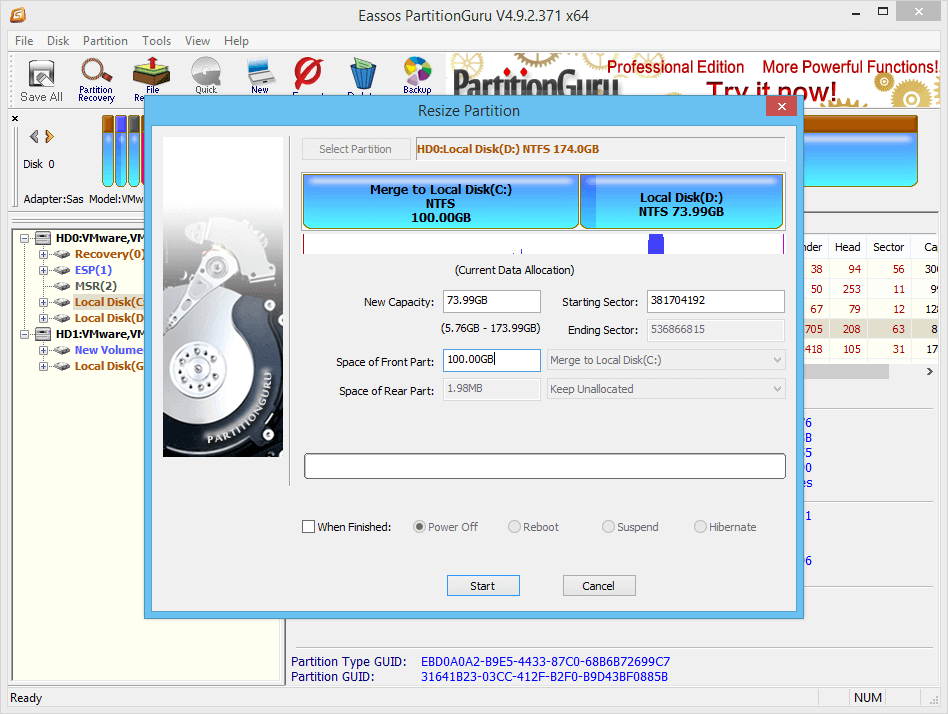
Step 4 Click Start button to resize partition. Do not close the software or computer while resizing is ongoing.
Summary
Low disk space can happen to any storage devices such as system partition and USB flash drive. When there is not enough free space on your disk, you can follow this guide to free up disk space or extend / resize partitions without losing data. If you have any questions about this issue, please feel free to leave a comment or contact us via email.
![]() Работа с операционной системой Windows Server не бывает скучной, так как, порой, можно получить сюрприз с загадкой в самом неожиданном месте. Казалось бы, что можно ожидать от привычной функции, которую уже приходилось использовать десятки раз. С таким, абсолютно невозмутимым настроем, на одном из хостов виртуализации Hyper-V на базе Windows Server 2012 R2 я решил выполнить сжатие дискового тома NTFS (Shrink Volume) с ОС, чтобы освободить немного места на конце диска.
Работа с операционной системой Windows Server не бывает скучной, так как, порой, можно получить сюрприз с загадкой в самом неожиданном месте. Казалось бы, что можно ожидать от привычной функции, которую уже приходилось использовать десятки раз. С таким, абсолютно невозмутимым настроем, на одном из хостов виртуализации Hyper-V на базе Windows Server 2012 R2 я решил выполнить сжатие дискового тома NTFS (Shrink Volume) с ОС, чтобы освободить немного места на конце диска.
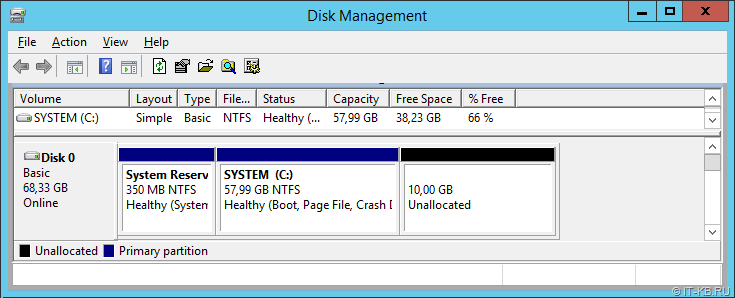
Стандартным способом, используя консоль Disk Management, я попытался выполнить сжатие выбранного NTFS тома.
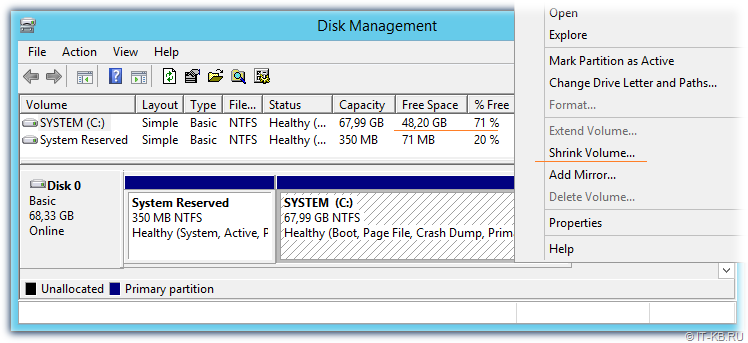
Свободного места на томе было более чем достаточно, и было решено отрезать 10GB.
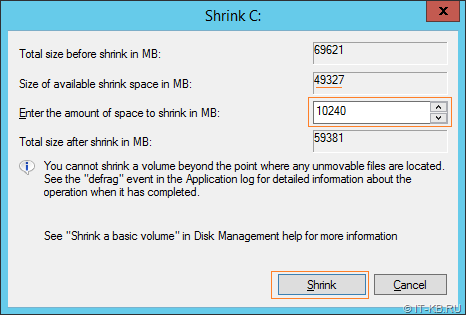
Однако, к моему удивлению, возникла ошибка, говорящая о нехватке доступного места для проведения операции «There is not enough space available on the disk(s) to complete this operation«
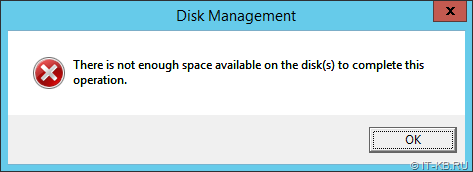
Повторная попытка провести операцию сжатия привела к той же ошибке.
Обратившись к консоли Event Viewer, было обнаружено, что в логе Windows LogsApplication в момент попытки сжатия фиксируется предупреждение с кодом 260 из источника Defrag с сообщением «Error: during volume shrink initiated on volume C: we failed to move a movable file extent«. В этом событии в деталях диагностической информации фигурирует отсылка на некий файл last unmovable file, который, как я понял, и препятствует перемещению дискового кластера.
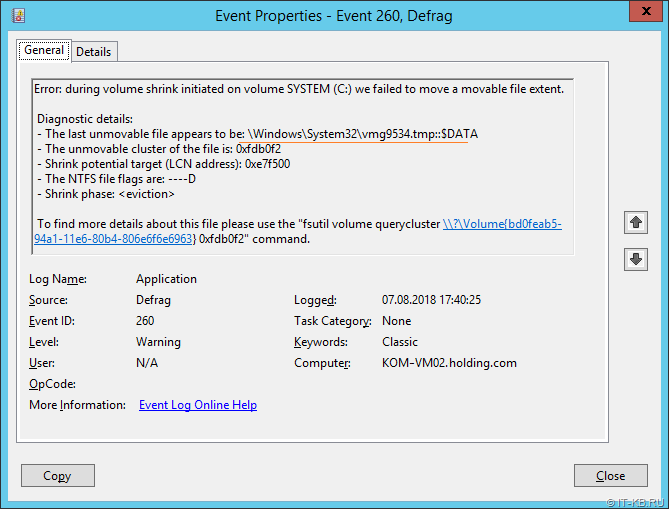
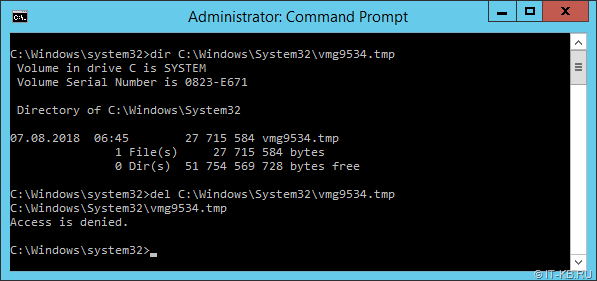
Возникло подозрение, что удаление указанного файла, возможно решило бы проблему с невозможностью сжатия диска. Но что это за tmp-файл такой, да ещё и в системном каталоге, понимания пока не было. Попытка вручную удалить файл завершилась ошибкой «Access is denied«.
Стало понятно, что либо файл удерживается каким-то процессом, либо имеет какие-то хитрые разрешения. Прежде чем погружаться в дальнейшее изучение вопроса с проверкой прав доступа и вычислением процесса, блокирующего доступ к файлу, сделал быстрый заход в поисковую систему по маске имени файла vmg.tmp и тут же нашёл одну интересную ветку обсуждения. Намёк в сторону управляющего процесса Hyper-V, порождающего временные файлы типа vmg.tmp при работе с ISО-образом компонент интеграции, привёл меня в лог MicrosoftWindowsHyper-V-VMMSStorage, который оказался переполнен ошибками типа:
Log Name:      Microsoft-Windows-Hyper-V-VMMS-Storage
Source:        Microsoft-Windows-Hyper-V-VMMS
Event ID:      27000
Level:         Error
User:          SYSTEM
Computer:      KOM-VM02.holding.com
Description:   Failed to open attachment 'C:Windowssystem32vmguest.iso'. Error: 'One or more arguments are invalid'.
Это напомнило мне ранее описанную ситуацию с невозможностью обновления ISO-образа компонент интеграции из-за того, что файл образа %windir%system32vmguest.iso был занят запущенной виртуальной машиной.
И действительно, просмотрев свойства виртуальных машин, запущенных на хосте, было обнаружено, что в одной из ВМ был подключен ISO-образ компонент интеграции.
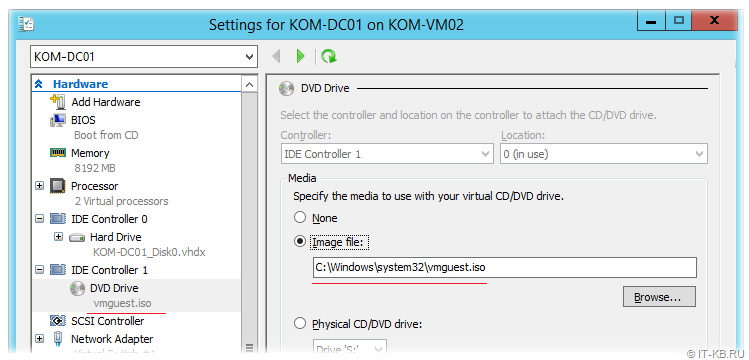
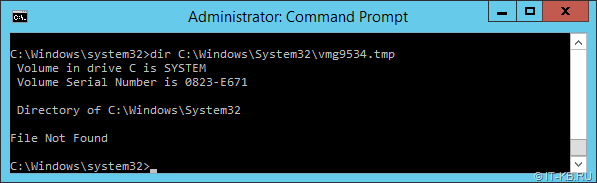
Отключение данного ISO-образа из свойств виртуальной машины привело к исчезновению недоступного для удаления временного файла.
После чего была предпринята новая попытка сжатия диска, которая на этот раз прошла успешно.
В ходе выполнения операций сжатия в Application-логе событие из источника Defrag оповестило об успешной оптимизации перед непосредственным процессом усечения тома.
Log Name:      Application
Source:        Microsoft-Windows-Defrag
Event ID:      258
Level:         Information
Keywords:      Classic
Computer:      KOM-VM02.holding.com
Description:   The storage optimizer successfully completed shrink on SYSTEM (C:)
На этом дело о неработающем сжатии можно было считать закрытым, но при этом остался осадок изумления от самой возможности появления причинно-следственной связи между, казалось бы, несвязанными обстоятельствами – установленным в свойствах виртуальной машины образом компонент интеграции и неработающим сжатием системного тома NTFS.
Комичность всей описанной ситуации дополняет то, что в самом начале, когда я получил ошибку невозможности сжатия, в качестве профилактического мероприятия была выполнена дефрагментация тома и утилита дефрагментации с честными глазами сказала мне, что теперь на томе всё красиво.
PS5 Error CE-100028-1 – There is not enough free space on your console SSD?
The screen might also read ce-100028-1 something went wrong?
Returnal something went wrong ce-100028-1 error indicates that there is not enough free space on your console’s Solid State Drive (SSD). PS5 Error Code CE-100028-1 usually occurs when you try to update your games or install the ps5 system software update version.
This can possibly give you ps5 update something went wrong error. It can also spot on screen if you try to download and install a new game. These are some of the reasons why returnal ce 10028 1 occurs on your PS5 screen.
How do I Fix PS5 Error Code CE 100028 1?
Since PS5 error ce-100028-1 occurs when you’re running out of free space on your SDD, freeing up some space should fix it.
Take Note Of: Sony has already confirmed that PS5 users won’t be able to expand their SSD storage which is quite unfortunate. Therefore, you must free up some space on your SSD to get rid of ps5 returnal ce-100028-1 error.
Below are step-by-step instructions to fix error code CE 100028 1 and resolve ps5 says not enough storage issue permanently.
How to Fix PS5 Controller Drift
Solution 1 – Check For Storage Space to Fix PS5 Error CE-100028-1
Try to check the storage space on your console’s SSD to check if ps5 memory is full. To do this:
- Go to the Settings Menu from the PlayStation’s home screen.
- Select Storage > System Storage.
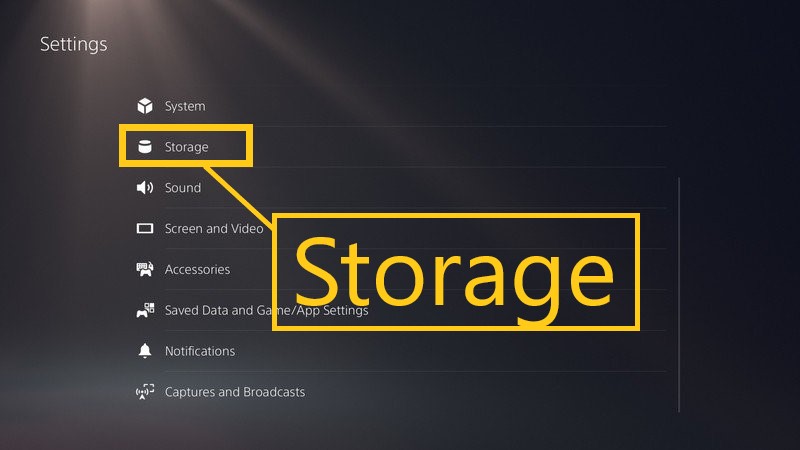
If you see no space left on to install or download any new data on your PS5, try deleting some of the unused or unnecessary content from the system to free up some storage space.
This method will fix Error Code CE-100028-1.
How to Fix PlayStation 5 Error Code NW-102216-2 “Unable to Connect to the Server”.
Solution 2 – Delete Data from PS5 to Fix ps5 something went wrong ce-100028-1
Delete the unused data from the system to free storage space. Here’s how to do this:
- Highlight the unused Data you want to Delete.
- Press ‘Select’ then ‘Delete’.
- This will remove the data from the system storage.
Now go back to home screen, press options button and select Delete to remove the data from the home screen.
Note: If your PS5 have enough storage space left, yet you see PS5 Error CE 10028 something went wrong then perform a factory reset. Therefore, take a cloud data backup of your games, saved game data, and settings etc.
Fixed: Stuck PS5 Black Screen After PS5 Logo
Solution 3 – Factory Reset
Factory Reset can also solve server connectivity, download queue error, ps5 memory full, and other issues related to PS5 system. However, remember that on reset, everything will be rubbed out from the console and the system whether it be a game, data or any other content.
If you think it is okay to do, then first perform a backup of the date on your cloud storage.
- Launch Settings Menu > Saved Data and Game/App Settings, then select Saved Data
- Choose the type of the data you want to backup and click Next. Backup will begin.
Once its done, proceed to Factory Reset to fix ps5 error ce-100028-1.
- Now choose the type of data you want to backup and click Next.
- And PS5 backup will begin
If you think it is okay to do and have done a backup of these, then do the following.
- Launch the Settings Menu from the PS home screen.
- Choose System > System Software > Reset Options > Reset Your Console > Reset.
- Wait for the process to complete.
- Reboot your console.
Once everything is up, sign in to your account again and install the previously installed games or apps.
How To Fix PS5 Error Code NP-103105-0 | This service is currently under maintenance
Solution 4 – Extent Storage Via USB Drive to fix ps5 system update something went wrong Error
If you want to extend the storage space without deleting anything from your console, then try to use the USB Drive Storage. Here’s how to do this.
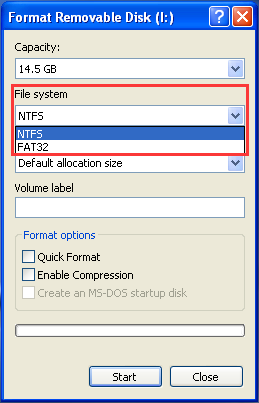
- Format the USB Flash Drive in FAT (File Allocation Table) type as extended storage on your console and it’ll be ready to use.
PlayStation Plus Subscription packs users can easily use storage to save data in the cloud. This will keep your system storage free to some point.
These methods will help you to solve ps5 something went wrong ce-100028-1 error.
Some Important FAQ’s Regarding the Topic
Below are some FAQ’s that will help you to understand the issue properly and resolve PS5 error CE-100028-1.
What SSD does PS5 use?
PS5 is equipped with 825GB NVMe SSD, which provides blazing fast load times. However, only 667GB is only there for use. This can be due to any updates probably.
Are you receiving there is not enough free space on the drive to complete some operations on USB flash drive? If you can confirm Windows says not enough disk space but there is plenty, you can try solutions in this post.
Flash Drive Says Not Enough Space but There Is Plenty
I’m trying to copy a large MS Outlook PST file from my work computer to a flash drive and am getting an error message saying I don’t have enough free disk space. The drive is 8 gigs, I’ve got various files on there that take up ~2+ gigs, and about 5.7 gigs of space remaining. The PST file is ~5.0 gigs and has already been compressed down from ~10 gigs. Can anyone help me out? Seems like I’ve got plenty of free disk space to do this.
While attempting to create or transfer large files onto an USB flash drive/external hard drive, an error message may appear:» There is not enough free space on the hard drive. Delete one or more files to free disk space, and then try again.«
Meanwhile, Windows suggests you to click «Disk Cleanup» to free disk space by deleting old or unnecessary files, which seems exactly the same with «hard drive is full» issue. But the fact is that: there is enough free space on the drive to save these files. How could this error message appear?
Kind remind: In most cases, this error message appears as «the file is too large for the destination file system». And this post [Solved] — The File Is Too Large for the Destination File System tells more on this report.
Why There Is Not Enough Free Space on the Drive
This may seem confusing, but if you try copying more other files to this external hard drive, you may find something important: you can copy the smaller files to this external drive just fine. Only when you attempt to copy a large file equal or larger than 4GB to the external drive, Windows gives you such an error.
Does this 4GB file size limit make sense?
The answer is positive. «Not enough free space on flash drive» error is caused due to the destination hard drive running an FAT32 file system. FAT32 was first established in Windows 95 and is now recognized by most computer operating systems.
The total size of the files that you can copy to a FAT32 drive could be as large as 2TB, however, it has a 4GB file creation and transfer limitation, which means that files cannot be created or transferred to the hard drive if they are larger than 4GB.
Now we know the cause for «not enough disk space but there is plenty». Next, we will show you effective solutions to not enough disk space error — splitting large file OR converting file system and formatting hard drive.
Solution 1: Split Large File into 4G Chunks — No Data Loss
If you want to remove «there is not enough free space on the drive» and transfer a large file to a removable hard drive, a solution should be breaking the large file into several parts, with each one smaller than 4GB. As to the file splitting tools, we think many software are competent to do this job, such as WinRAR, which only takes three simple steps!
For more information about splitting large files, you can visit How to Split a Large File with WinRAR.
Solution 2: Convert FAT32 with NTFS — No Data Loss
Converting FAT32 to NTFS should be the most ideal way to fix «not enough disk space on flash drive», for it keeps your data intact. For many times we have explained their differences, thus we are not going to repeat. You can read NTFS vs. FAT32 vs. exFAT – Differences and How to Format to for more information.
Note: The older versions of Windows such as Windows 95, Windows 98, or Windows Millennium do not support the NTFS file system; while the recent versions of Windows like Windows 2000, Windows XP, Windows Vista, Windows 7/8/10 work well with the NTFS drives.
There are two ways to convert FAT32 to NTFS. In our case, we use a 16GB USB flash drive marked as I: to show users step-by-step tutorials on fixing «not enough disk space error».
1. Use Partition Wizard
The first option to convert FAT32 to NTFS is to employ MiniTool Partition Wizard Free Edition. The reason why we recommend this freeware is that you can use it in Windows XP/Vista/7/8/10, both 32 bits and 64 bits, to convert FAT32 to NTFS without entering so much commands and should finish the conversion in only a few clicks.
Free Download
Here is how you can operate using MiniTool Partition Wizard:
Tip: Before you carrying out file system conversion by using Partition Wizard, we strongly recommend you to check file system to ensure nothing is going wrong.
Step 1: Launch MiniTool Partition Wizard to its main interface, there you can see all your hard drives connected to your computer are listed in the middle pane (you may need to drag the slider to view more).
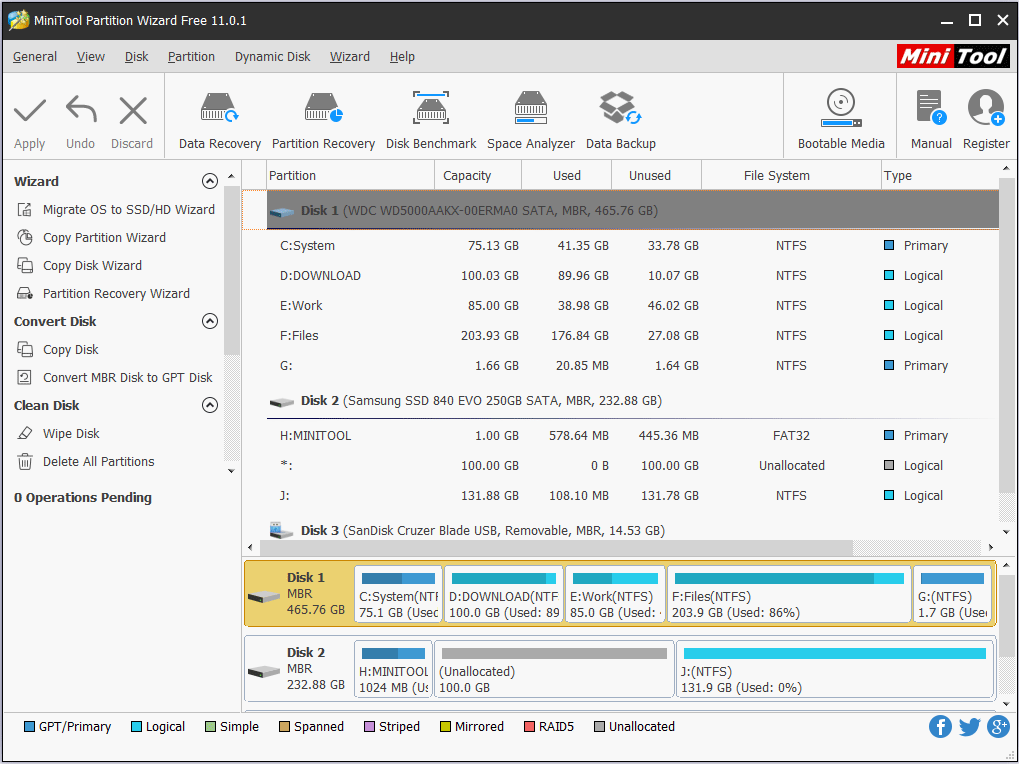
Step 2: Click on the USB hard drive to be converted and select Convert FAT to NTFS.
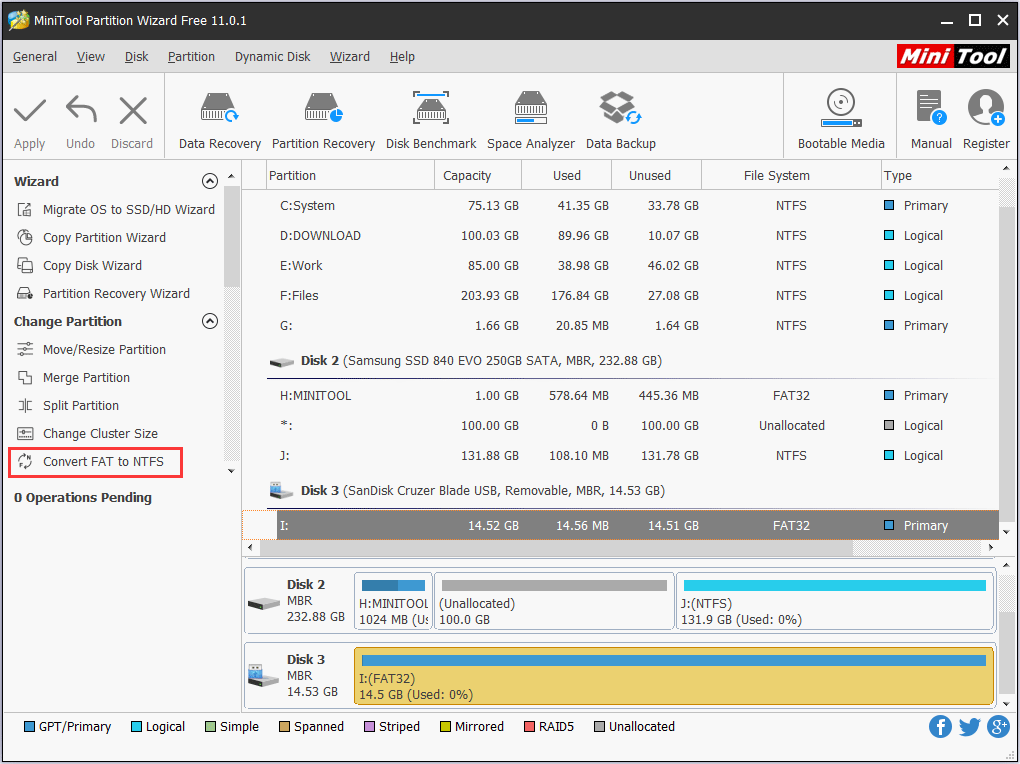
Step 3: A new window will come out on which you should click Start to begin the conversion.

Step 4: When Partition Wizard shows the conversion is completed, you just click Close to end the small window and then exit MiniTool Partition Wizard. By doing these, not enough free space on flash drive.
This video tells how to convert FAT 32 to NTFS using Partition Wizard:
2. Use Command Prompt
Command prompt is also known as CMD, which is used to carry out entered commands. Normally, people use commands to automate tasks via scripts and batch files, perform advanced administrative functions, or try to solve certain kinds of Windows issues.
Here is how to disable not enough disk space error by using command prompt:
Step 1: press WIN+R keys to call out the Run box. In this box enter CMD and press OK.
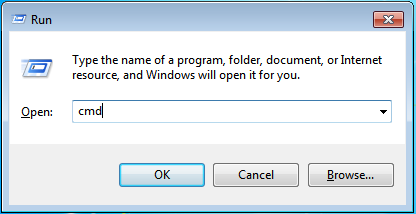
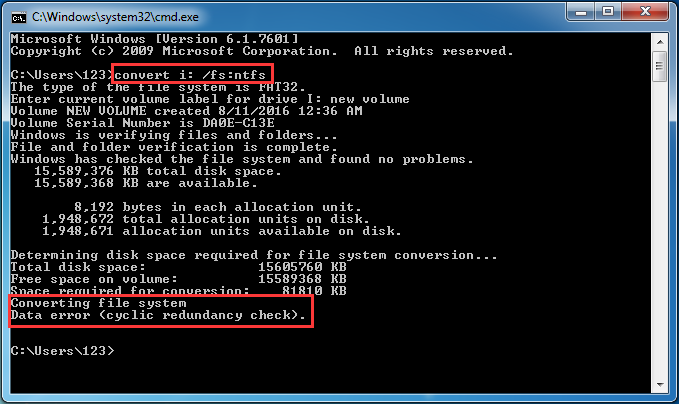
Step 2: in the command window, enter convert [drive letter] /fs:ntfs and wait for the process to finish. Note that you may encounter «Data error <cyclic redundancy check> «, don’t mind because the selected partition has already been converted into NTFS.
Step 3: enter Exit to drop out the command window.
Attention:
- You should know that this convert command is a one-way conversion. It does not provide a way to convert the file system back to FAT32.
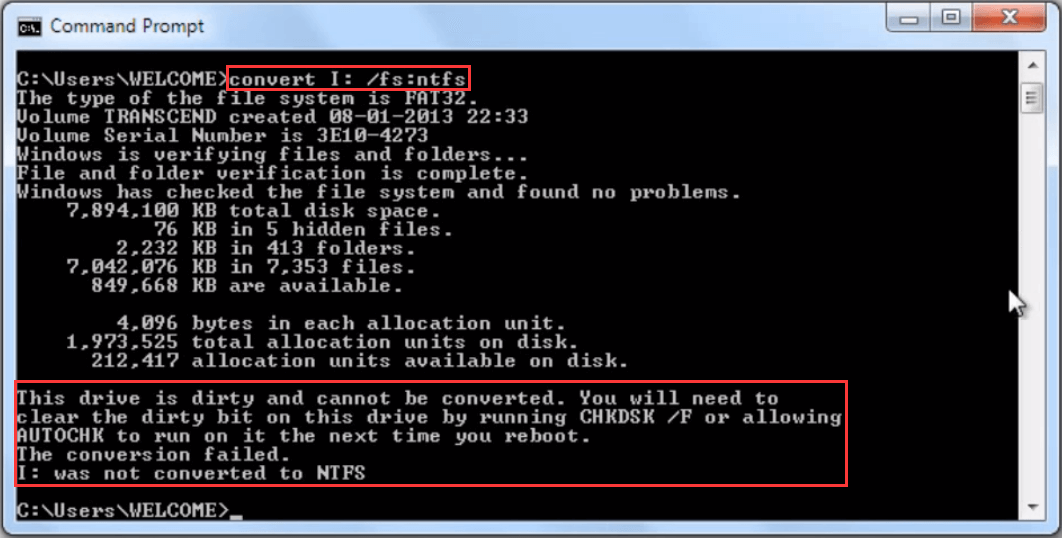
- During the process of file system conversion, you may encounter Dirty Hard Drive Error which reports: «This drive is dirty and cannot be converted. You will need to clear the dirty bit on this drive by running CHKDSK /F or allowing AUTOCHECK to run on it the next time you reboot». To fix this error, you just need to enter «CHKDSK /F» as suggested and then repeat the convert command.
“Here are 2 ways to resolve there is not enough space on the disk Windows 10/8/7, and the solution is data lossless.”Click to Tweet
Solution 3: Format FAT32 with NTFS — Absolute Data Loss
The third solution we put forward is to format the external hard drive to NTFS partition. Windows itself offers the NTFS format option. You can format the drive with the NTFS system and use it to disable «there is not enough free space on the drive» and then transfer large files.
Attention: Formatting FAT32 to NTFS will definitely cause data loss. Thus, you had better make a full backup of the USB drive before you carry out this formatting. However, if nothing is important, just go ahead.
There are four ways to format FAT32 with NTFS. Also take drive I: for example:
1: Format in Partition Wizard
As we have introduced in the former part, Partition Wizard do help to convert FAT32 to NTFS file system without data loss. Besides, it is also competent in formatting hard drives as it offers concise interface and multiple formatting options.
Free Download
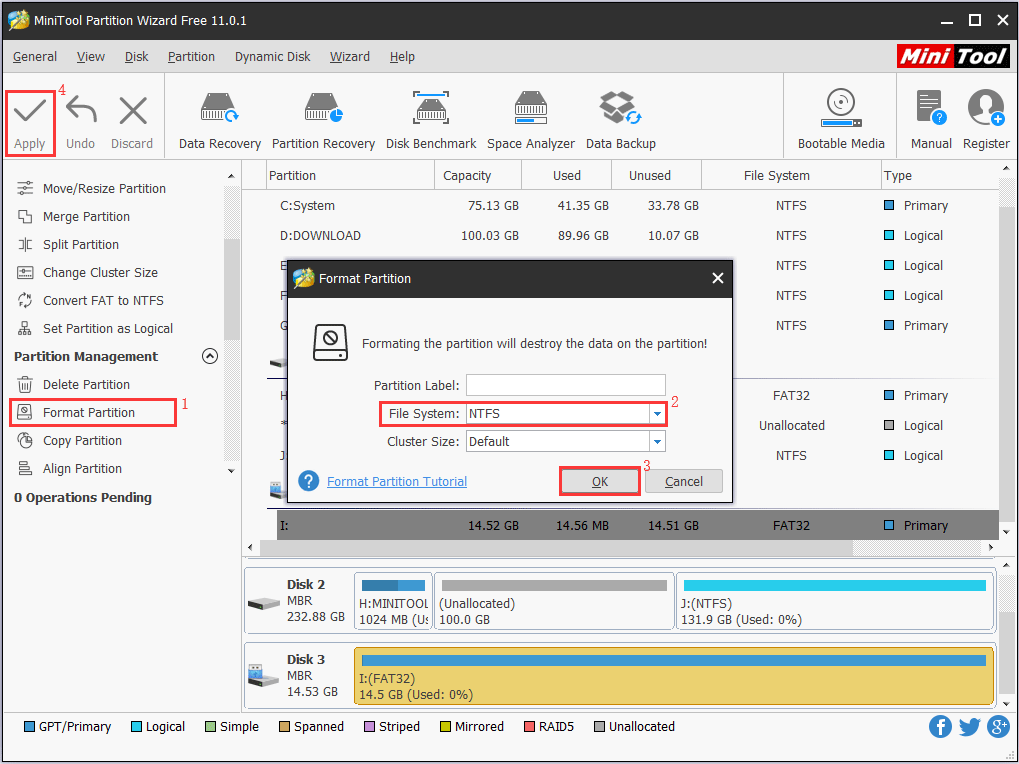
Step 1: Launch MiniTool Partition Wizard to its main interface, then click on the USB hard drive to be formatted and select Format Partition.
Step 2: Customize the parameters in the new window. Please choose NTFS as the target File System.
Step 3: Click OK after file system selection.
Step 4: Click Apply to finish.
Tip: If you regret of formatting a hard drive before you carry out any further operation to the USB drive, you can use its Data Recovery feature (available in Pro Ultimate edition) to help recover data from formatted hard drive.
Free Download
2. Format in Command Prompt
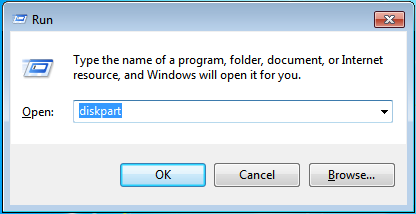
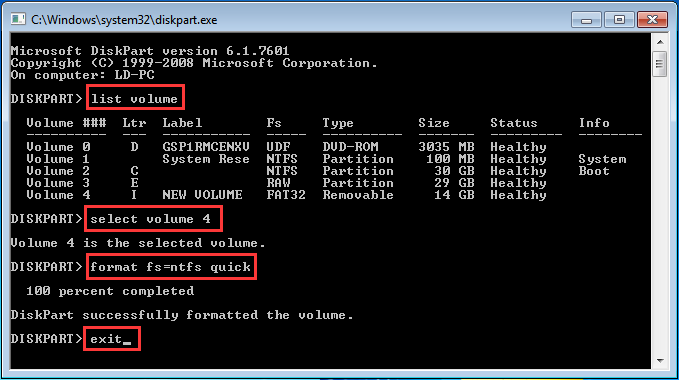
Step 1: Press WIN+R keys to call out the Run box, then type «diskpart» to pop up the Disk Management window. Note you may need to allow User Account Control.
Step 2: In the command window, type the following commands in order, and end each one with Enter key:
- List volume
- Select volume n (n is the volume number of your external hard drive)
- Format fs=ntfs quick
- Exit
For a more intuitive guide, please refer to this screenshot:
3: Format in Disk Management
Disk Management is another utility that can be used to convert FAT32 to NTFS, and is easier to operate than using Diskpart.
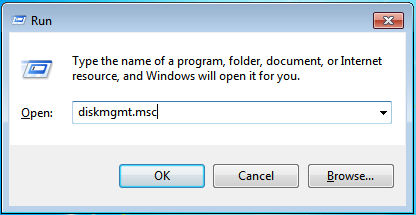
Step 1: Press Win+R keys to call out the Run box, then type diskmgmt.msc to popup the Disk Management window.
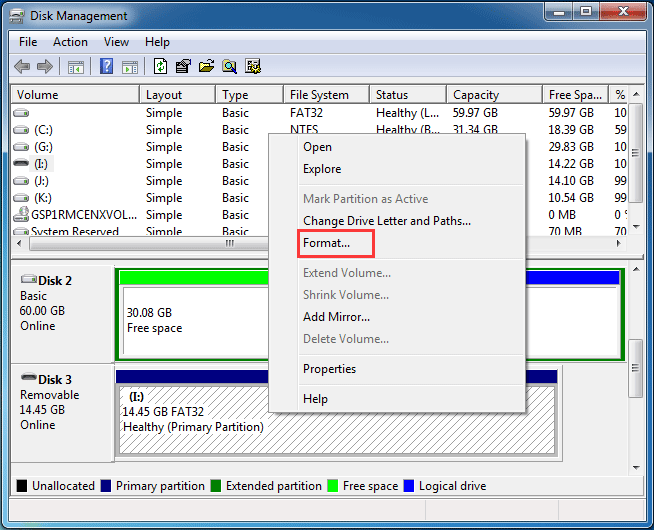
Step 2: Right click on the hard drive you want to convert its file system and choose Format.
Step 3: In the popup window, specify the file system as NTFS, and change the volume label and the cluster size by your needs. Also, you may want to check the Perform a quick format option, which should speed up the formatting process considerably.
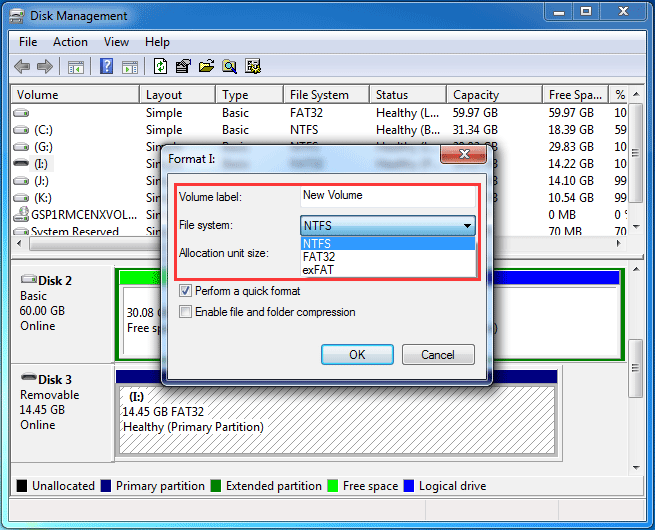
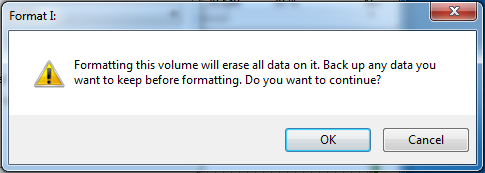
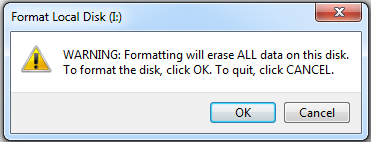
Step 4: Windows will warn you all data on this drive will be erased. Just click OK if you have already made a backup in advance. The formatting will begin immediately and finally you will get a NTFS external hard drive.
4: Format in My Computer
My Computer (equals to This PC in Windows 10) is a location that all drives connected to this computer with drive letter are shown, and users can open them directly to manage files in each partition. To format a partition with NTFS file system, you just do the following steps:
Step 1: Double click the Computer icon to load the hard drives. Then right click on the partition you want to convert to NTFS and choose Format.
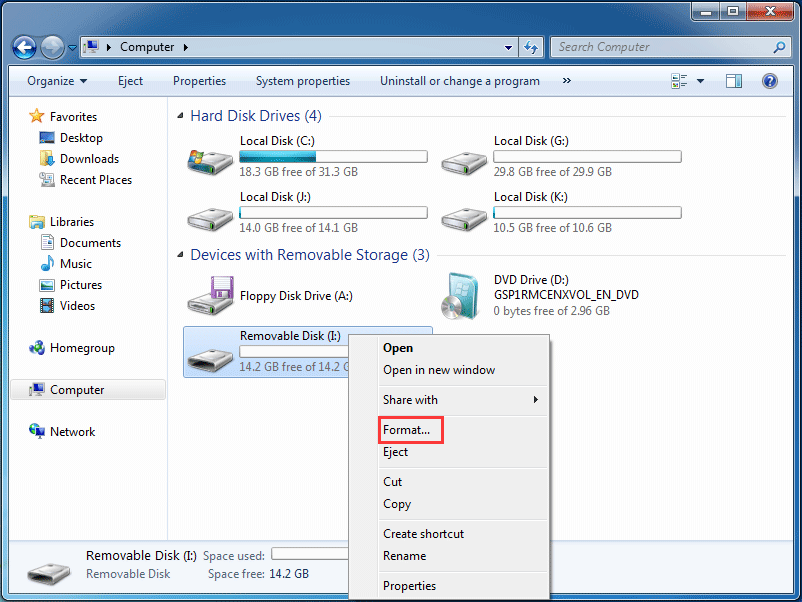
Step 2: In the pop-up window, select NTFS as the formatting option. Then press Start button.
Step 3: Windows should warn you about erasing all data on the drive. Again, if you confirm that you want to proceed with the formatting, click OK.
Further Reading: What if NTFS Does Not Showing up in Format Option?
If you are using Windows XP, you may find Windows does not offer NTFS as a format option in the drop-down menu.
Why there is no NTFS option?
This may happen if your flash drive is treated by Windows XP as a removable drive. Generally speaking, all external drives are treated as removable disk, unless you set removable drives as local drives. For the local drives, Windows XP offers the NTFS format option right from the start; but for removable disks, NTFS is not showing up in the format option.
Read and learn: How to Set Removable Drive to Local Drive.
But there is still a way to fix this bug — not going for another OS of course. Please follow the guidance below:
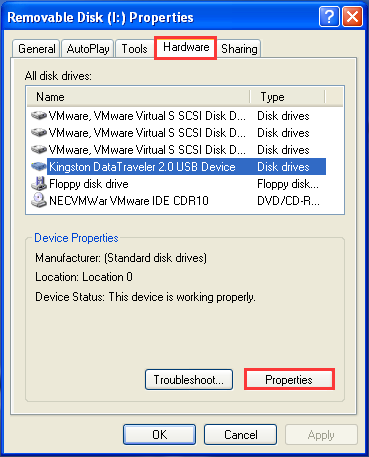
Step 1: Under My Computer, right-click on the removable drive and select Properties from the shortcut menu. Then in the new window select the Hardware tab. There, find and select the removable drive in the list and press the Properties button.
Step 2: On the next screen, select the Policies tab, and there select the Optimize for performance option.
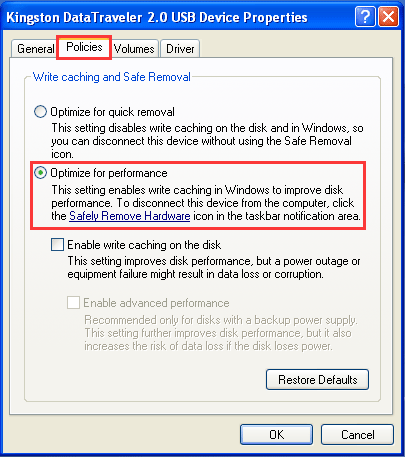
Step 3: Now press OK for several times to close these windows, and try to format the drive again. This time, the NTFS option should appear in the list for you to remove “there is not enough usable space for this operation error”.
“If Windows tells there isn’t enough space left on the disk to perform this operation, you can try the simple solutions in this post.»Click to Tweet
Bottom Line
In this post, we have gone through 3 ways to cope with «not enough disk space error»: to split large files to smaller chunks, to convert FAT32 to NTFS and to format external hard drive to NTFS file system, with detailed steps and the explanations to related issues.
Now it is your turn to have a try if you are troubled by «not enough disk space but there is plenty» issue. For any suggestions and questions, you can leave a comment below or contact us via [email protected]. Thanks in advance!