
If your WordPress site is returning an error message such as “Updating Failed” or “Publishing Failed” when you try to make changes, the results can be not only frustrating but can also prevent visitors from accessing what they need.
Fortunately, there are a few common causes and workarounds that can help you resolve this issue if you encounter it. With a little troubleshooting, you should be back to your regular posting schedule in no time.
In this article, we’ll discuss what causes the “Updating Failed” and “Publishing Failed” errors in WordPress. Then we’ll explain four ways you can fix or work around the problem, to get your content up for readers.
Let’s get to it!
Why WordPress Sometimes Fails to Update or Publish Content
The Block Editor has been around for a while now. It’s still being met with mixed reactions, however, and there are also new challenges and errors that WordPress users can face because of it.
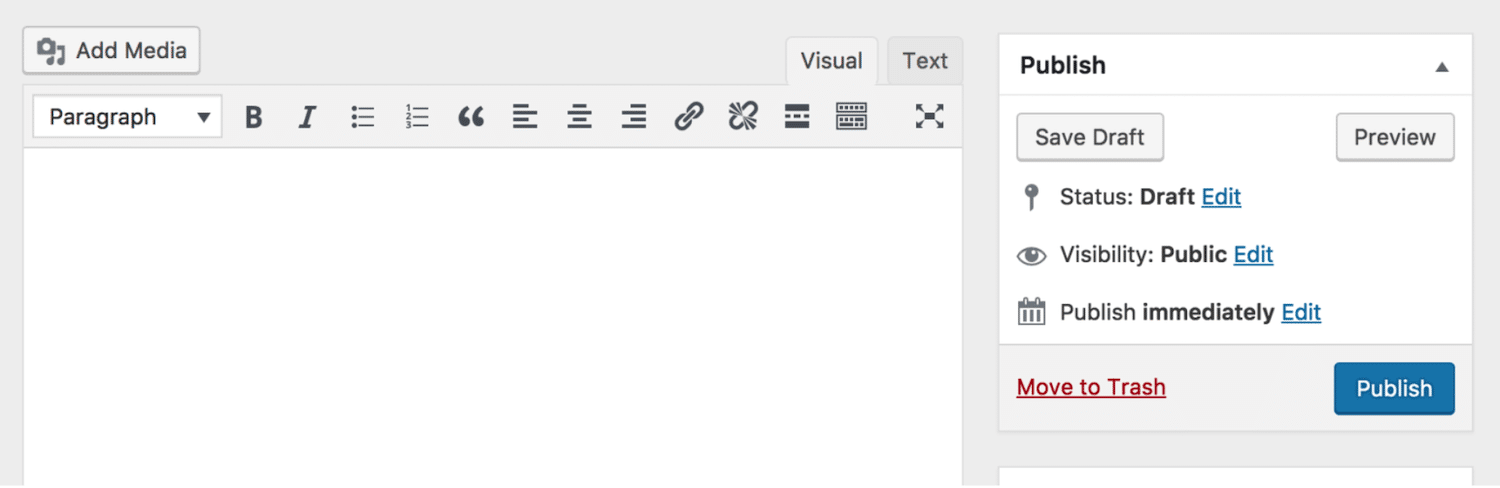
One such issue is a message reading “Publishing Failed” in the WordPress editor:
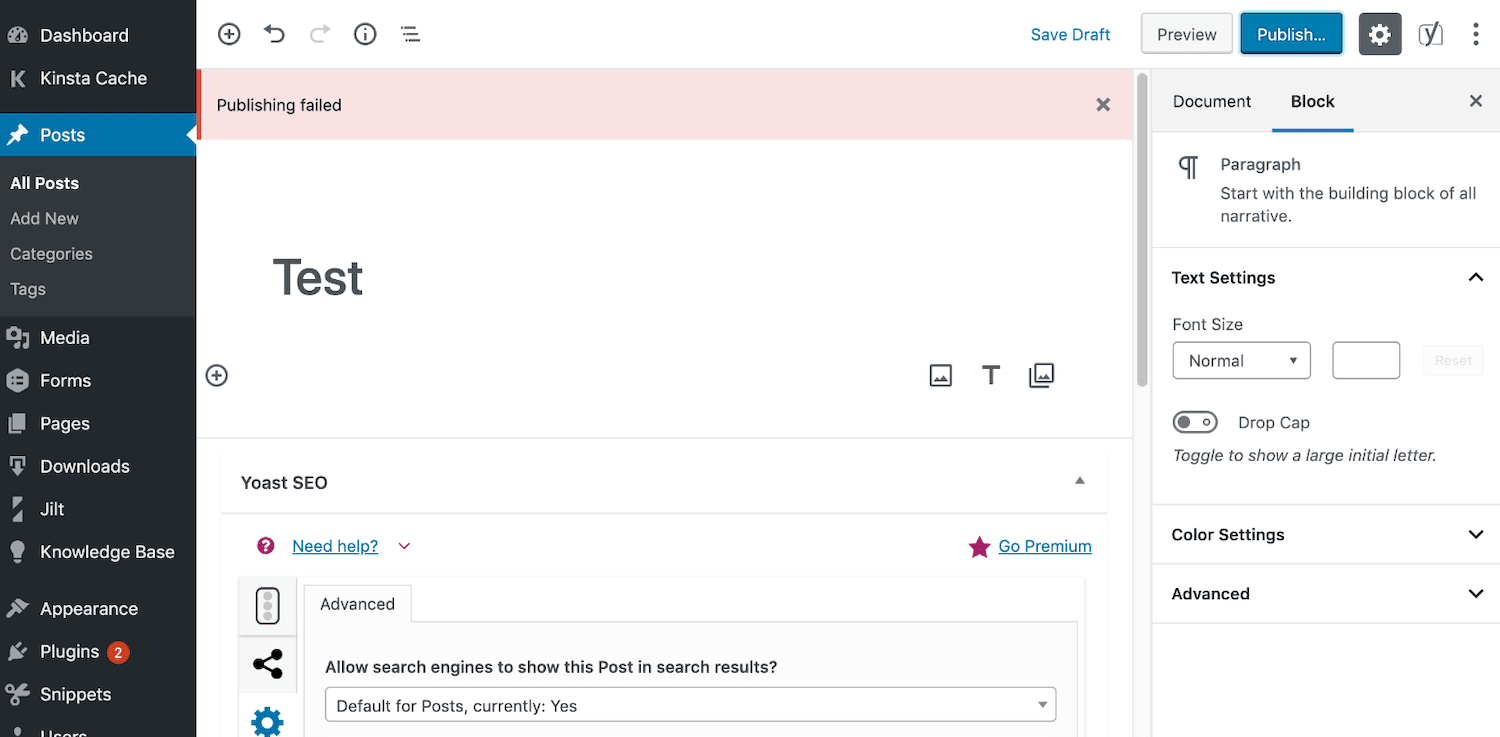
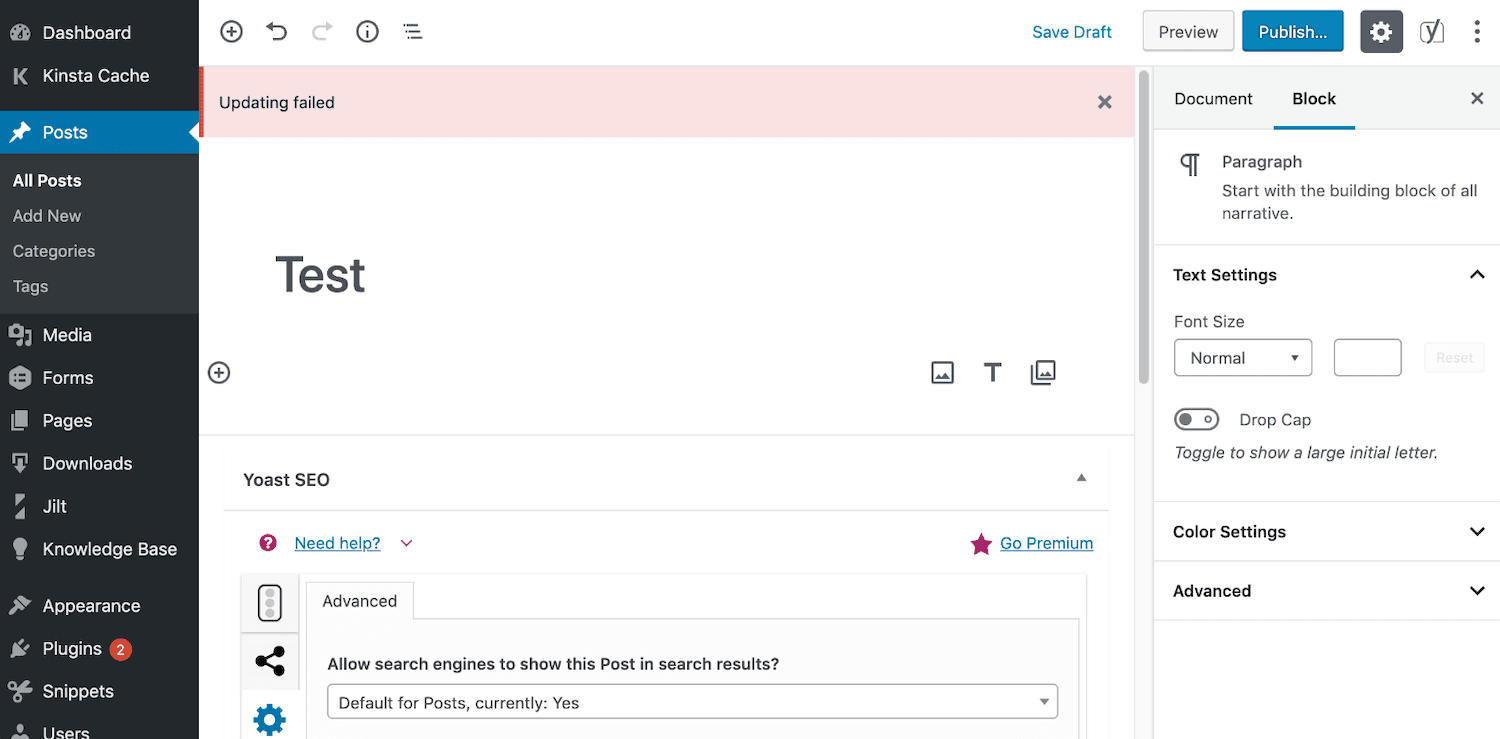
This message may appear after you click on the blue Publish button, in an attempt to make your content live. A variation of this error is the “Updating Failed” message, which may show up when you attempt to make changes to a post or page that you’ve already published:
As you can imagine, this problem can be an especially frustrating one for bloggers, as well as any site owner who finds themselves needing to update key information on their web pages.
There are a few different causes of the “Publishing Failed” error, but one in particular is linked to the Block Editor. The new WordPress editing interface relies on the REST API to create, save, and publish posts. In the event that something is blocking or disabling this process on your site, you won’t be able to launch new content.
If you’re a beginner or just a less-technical user, any mention of the REST API can seem intimidating. However, in this case, there’s no need to worry.
All you need to understand for the purposes of resolving the “Publishing Failed” error is that the REST API is how the Block Editor communicates with WordPress.
When this communication is broken or disabled, the Block Editor’s publishing functionality breaks. If that is what’s causing the error on your site, you’ll need to get the REST API working again in order to fix it.
How to Fix the WordPress Updating Failed and Publishing Failed Errors (In 4 Steps)
Once you understand why your WordPress content is failing to update or publish, resolving the problem becomes easier. Here are four steps you can take to go about fixing this problem on your site.
Step 1: Determine Whether the REST API Is Being Blocked
A common cause of the “Publishing Failed” error in WordPress (since the Block Editor was launched) is that the REST API is being blocked or disabled. If you’re seeing this message, a wise place to start troubleshooting is by testing the REST API to make sure it’s working.
You can do this directly in WordPress using the Site Health tool. To access it, navigate to Tools > Site Health:
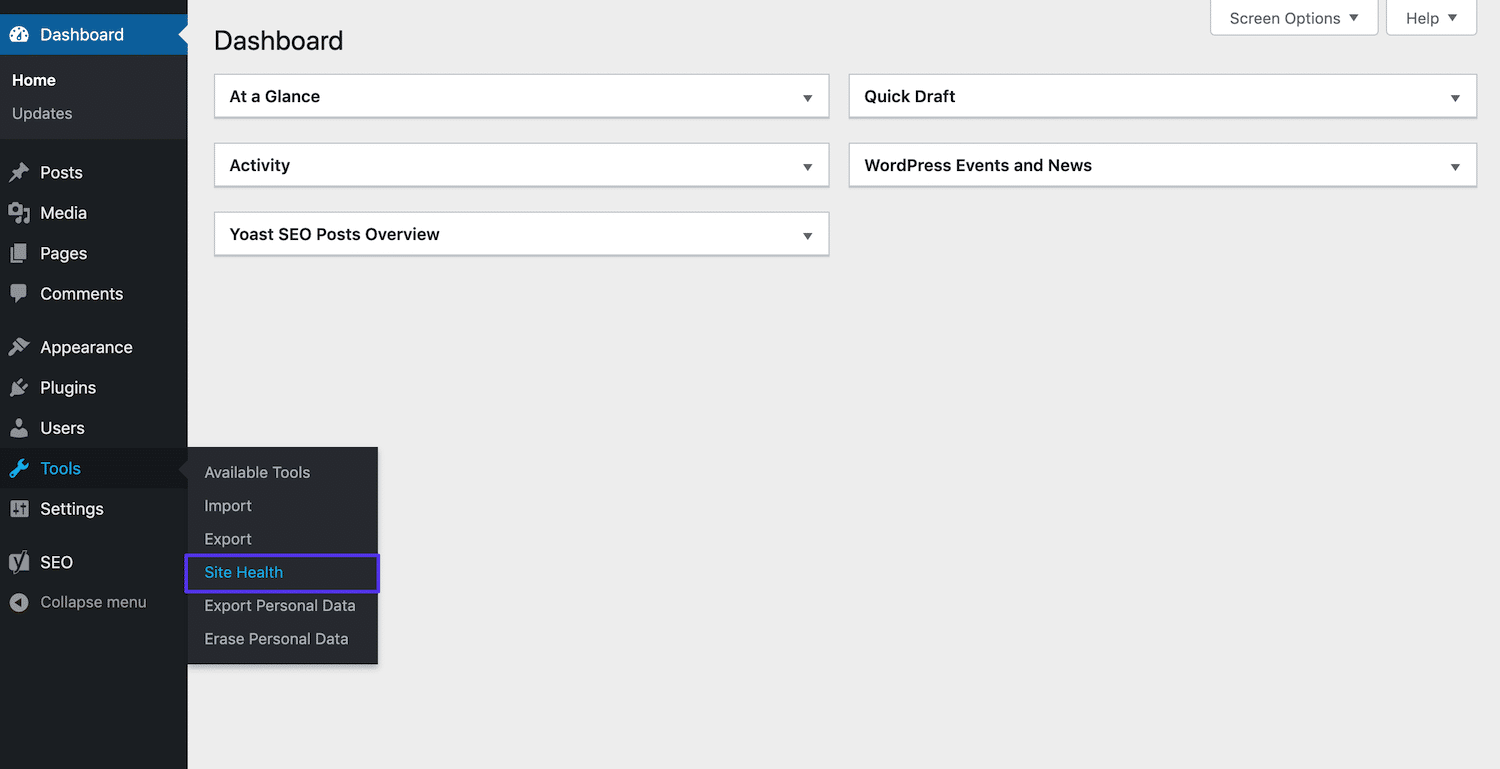
Under the Status tab, WordPress will list any existing problems with your installation. If the REST API is being blocked, you’ll see the following message:
“The REST API encountered an unexpected result.
The REST API is one way WordPress and other applications communicate with the server. One example is the block editor screen, which relies on this to display and save your posts and pages.”
The Site Health tool will also display a specific error that is producing the ‘unexpected result’. This could be a “401 Not Authorized” response, an operation timeout, a “403 Cookie Nonce Is Invalid” message, or another error.
How you should go about resolving this problem and enabling the REST API again will depend somewhat on the error you see listed here.
Step 2: Re-Enable the REST API by Resolving the Specified Error
Ideally, the Site Health tool will provide some indication as to how you can re-enable the REST API on your WordPress site. Some common solutions include:
- Checking to see if Cloudflare is blocking the REST API. If you’re a Cloudflare user, your firewall may be inadvertently blocking legitimate requests. Check your Rule Set to determine if the REST API is being blocked, and disable rules as necessary to let it through.
- Making sure a plugin is not blocking or disabling the REST API. Some plugins may block the REST API as well. Disabling your plugins one at a time can help you determine which one, if any, is causing the problem. You may then remove, replace, or change the settings for that plugin to enable the REST API again. Security and performance optimization plugins are common culprits.
- Authenticating your WordPress site with the REST API via your .htaccess file. The REST API requires your website to authenticate itself before it can connect. In the event that your site is not doing so, you can make a small edit to your .htaccess file to resolve this issue.
- Determining if the issue is server related. Some users have found that they encounter this problem when running WordPress on a Windows server. You’ll need to edit your web.config file to fix it.
Plugins and firewall applications are the source of the problem most of the time, so it would be wise to start your troubleshooting attempts there.
Chances are, you’ll be able to find the tool that’s causing the “Publishing Failed” error in WordPress and disable it or change its settings to resolve the issue.
Step 3: Enable Debugging Mode to Search for Errors
If you can’t re-enable the REST API using one of the solutions listed in Step 2, you can try turning on WordPress’ debug mode. This feature is meant for temporary use as a troubleshooting tool.
When activated, the debug mode will log all PHP responses in a file named debug.log in your site’s wp-content directory. You can search this file for errors that may be preventing WordPress from connecting to the REST API, and therefore from publishing or updating posts.
To activate debug mode, add the following code to your wp-config.php file before the line that reads “/* That’s all, stop editing! Happy blogging. */”:
// Enable WP_DEBUG mode

define( 'WP_DEBUG', true );

// Enable Debug logging to the /wp-content/debug.log file

define( 'WP_DEBUG_LOG', true );
Make sure to remove this code from wp-config.php once you’ve resolved the error.
As an alternative, Kinsta customers can access the error logs available in their MyKinsta dashboard.
To access yours, log in to your MyKinsta and navigate to the Sites tab:
Click on the name of the website experiencing the error in the resulting list. Then navigate to Logs and select error.log from the drop-down menu:

You should then see a list of any issues your WordPress site is currently experiencing.
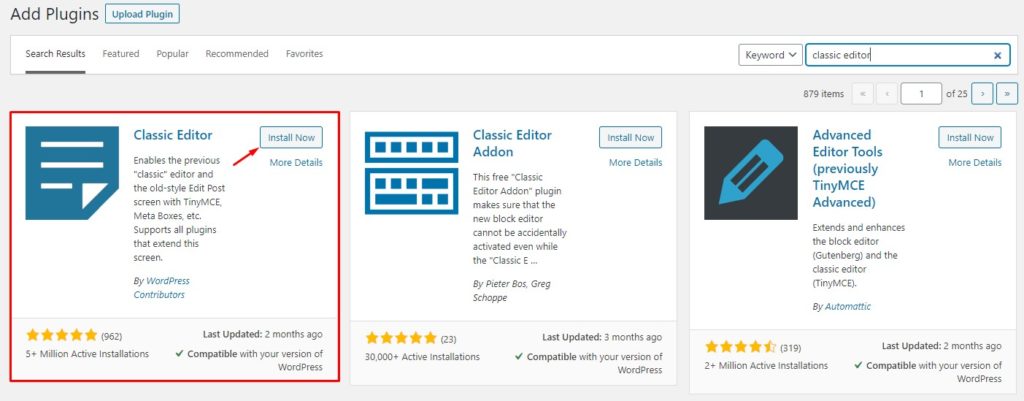
Step 4: Install and Activate the Classic Editor Plugin as a Temporary Solution
In the unlikely event that the above steps are not helpful in resolving the “Publishing Failed” error in WordPress, you’ll likely need to seek support from one of the following sources:
- Your hosting provider if you believe the issue is related to your server or if your host provides WordPress support.
- A specific plugin or firewall application, such as Cloudflare, if you believe a tool that is integral to your site is blocking the REST API and you’re unable to remedy the problem yourself.
- The WordPress Support forums, if you feel you need further guidance, such as for a free plugin that does not provide user support.
While you work with a relevant support provider to resolve the “Publishing Failed” error, you may wish to install the Classic Editor plugin as a temporary workaround:
Since the TinyMCE editor does not require the use of the REST API to publish or update posts, you should be able to make the necessary changes to your content with it.
However, this is only a stopgap measure. You’ll still want to resolve the root cause of the error in the Block Editor and then re-enable it.
Is the annoying ‘Updating Failed’ or ‘Publishing Failed’ WordPress error preventing you from pushing new content live? That has to stop! Check out how to fix this issue with this guide 🎉💪Click to Tweet
Summary
Not being able to publish or update your WordPress site’s content can be a serious problem. Fortunately, there are a few common causes of these errors that you can quickly troubleshoot to put things back in order.
If you’re receiving an “Updating Failed” or “Publishing Failed” message in the WordPress Block Editor, try:
- Determining whether the REST API is being blocked.
- Re-enabling the REST API by resolving the specified error.
- Enabling debugging mode to search for errors.
- Installing and activating the Classic Editor plugin as a temporary solution.
Themeisle content is free. When you purchase through referral links on our site, we earn a commission. Learn More
Did you just come across the “Updating failed. The response is not a valid JSON response.” error when working in the WordPress block editor?
⚠️ It’s a common WordPress error and it appears on your site due to reasons like plugin and theme conflict, SSL certificate or mixed content issue, .htaccess file corruption, etc.
It’s frustrating to encounter the JSON response error. It doesn’t tell you why it’s occurring or how to remove it – it forces you to drop everything you are doing and find a way to remove the error from your website.
Luckily, the solution is straightforward.
💡 In this tutorial, you will learn what caused the error on your site and the steps you need to take to remove it.
Let’s get started.
When you upload an image or publish or update a post on your WordPress website, WordPress communicates the request to your web server. The server responds in JSON format.
If, for some reason, the server doesn’t respond in JSON format or doesn’t respond at all, then WordPress throws “The response is not a valid JSON response.” error.
You must be wondering: What causes the miscommunication or lack of communication between your website and the server?
The answer is that there is more than one cause. It could be a bug in a plugin or theme, an issue with the SSL certificate, .htaccess file corruption, REST API conflict, etc.
In the next section, we are going to explore these causes and figure out which one led to the error on your website.
But before we proceed to the next section, it’s worth noting that WordPress shows different variations of the same JSON error.
- You will see this variation when you are trying to update a post: “Updating failed. The response is not a valid JSON response.”
- This one appears when you are trying to publish a post: “Publishing failed. The response is not a valid JSON response.”
- And a simple, “The response is not a valid JSON response.” error appears when you are uploading an image.
ℹ️ No matter which variation you see, the solutions are the same.
How to fix “The Response is Not a Valid JSON Response.” error 🔨
Since we don’t know what causes the error on your site, trying different solutions is the best way forward.
But before we begin, take a backup of your entire WordPress website.
In this tutorial, you will need to make modifications to your site. This is risky business. It can break your site. When something goes wrong, a backup will help you restore the site back to normal. Therefore, you need to take a backup of your WordPress site before you proceed.
🔧 Now, let’s begin with the solutions:
- Generate a new .htaccess file to fix permalinks issues
- Check your WordPress site address settings
- Fix mixed content warnings/problems
- Deactivate plugins and themes to find conflicts
- Other ways to troubleshoot the invalid JSON response error
Generate a new .htaccess file to fix permalinks issues
One of the most common causes behind the JSON error is an issue with your site’s .htaccess file or permalinks.
To remove the error from your site, you will need to refresh your site’s permalinks, which you can accomplish in two ways.
The simplest option is to force WordPress to generate a new .htaccess file from your WordPress dashboard.
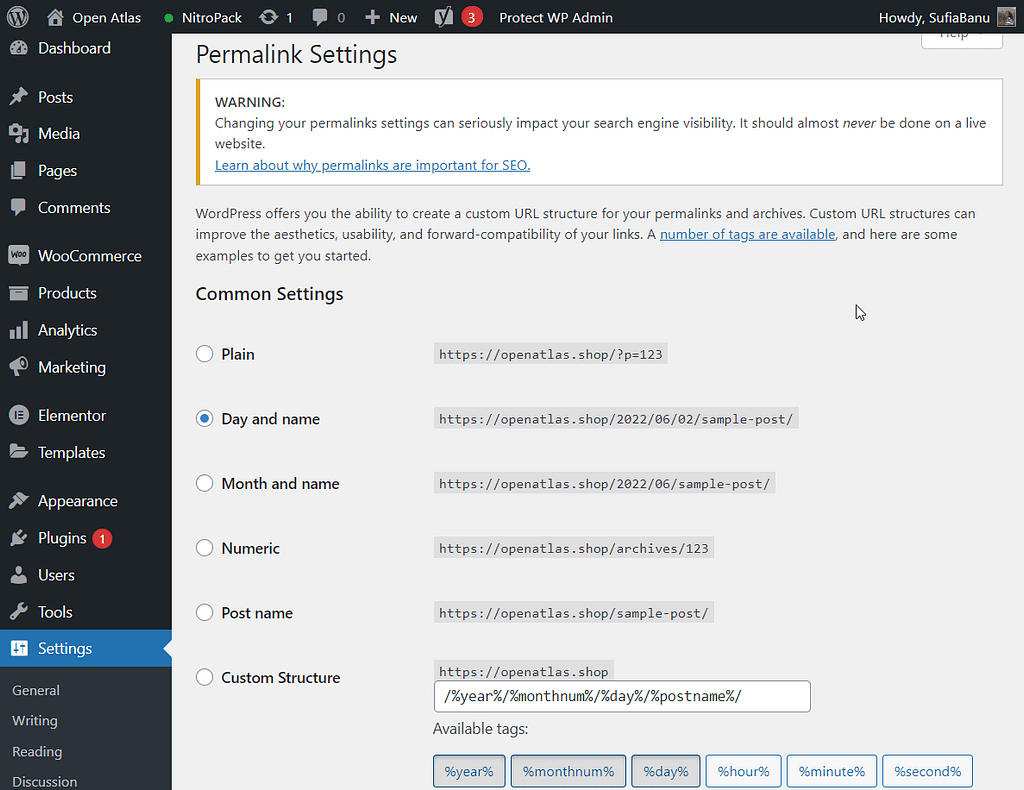
Go to Settings → Permalink. Scroll down on the Permalink page and hit the Save Changes button.
Now go back to your editor and check if the error is gone.
Still, seeing the error? Then there’s one more solution you can try before moving to the next method. You can completely delete your existing .htaccess file and then make WordPress create a new one:
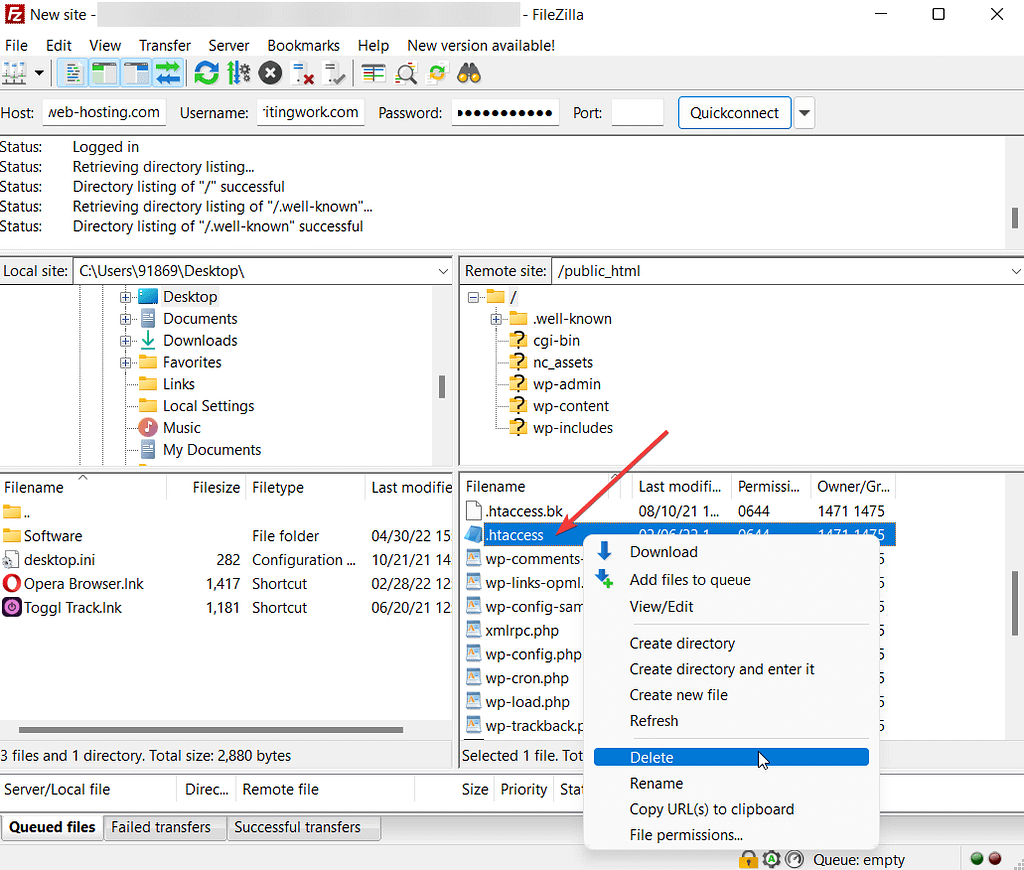
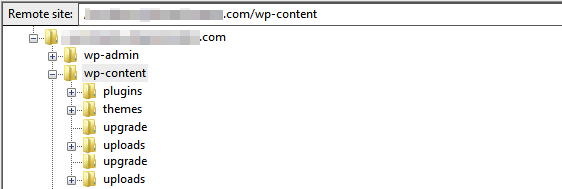
1. Install FileZilla, an FTP client on your desktop. Here’s a guide on how to install FileZilla.
2. Open FileZilla and connect it with your website. This guide will show you how to make that connection.
3. Next, go to public_html and locate the .htaccess file.
4. Right-click on the file and select Download to save a copy to your local computer. This will act as a backup just in case you need it.
5. Once you have the backup, right-click on the file and select the Delete button to delete the file.
6. Open your WordPress dashboard and go to Settings → Permalink. Scroll down on the Permalink page and hit the Save Changes button. This will force WordPress to create a new .htaccess file.
👉 This should remove the error from your site if it was being caused by .htaccess/permalink issues. If not, then try the following solutions.
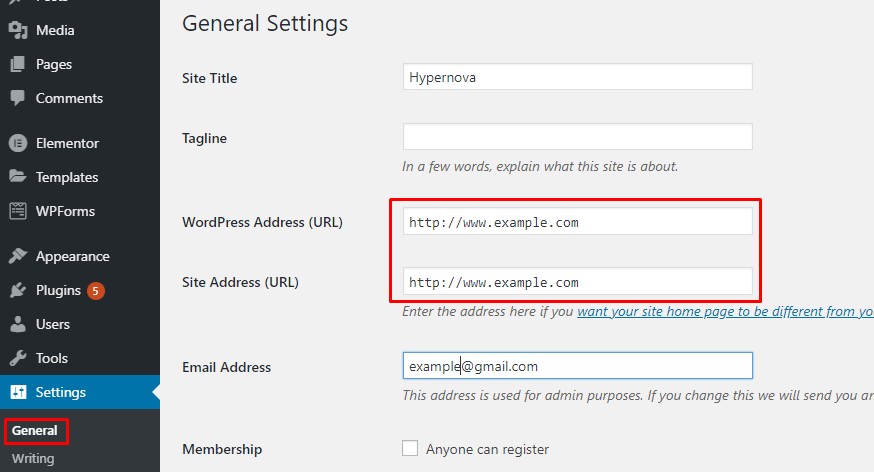
Check your WordPress site address settings
The JSON response error could be appearing because your website addresses on the Settings page are not configured properly.
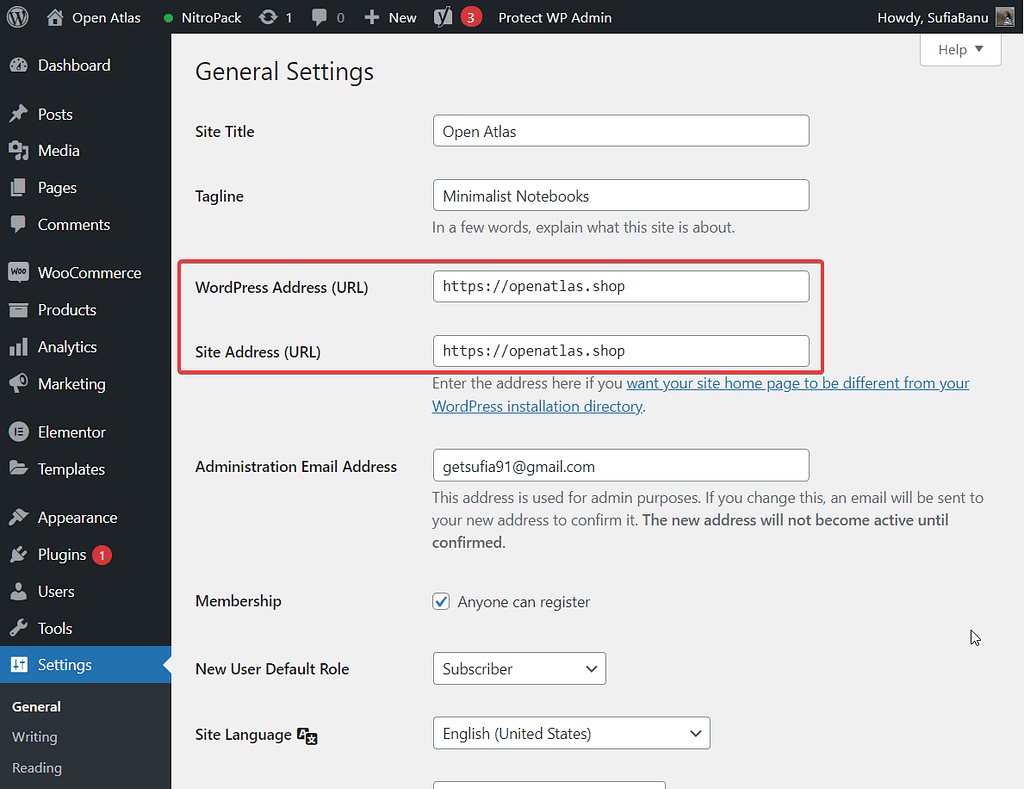
To set things right, go to Settings → General and you should be able to see the two following fields:
- WordPress Address (URL)
- Site Address (URL)
Make sure your website URL is inserted in both fields. Both URLs have to be identical. And they should start with HTTPS, not HTTP (as long as you’ve installed an SSL certificate).
Then, save your changes.
Even if you don’t make any changes on the page, be sure to hit the Save Changes button.
Fix mixed content warnings/problems
Nowadays, all websites should be using an SSL certificate, which allows you to use the HTTPS connection on your site.
However, if you migrate an older website from HTTP to HTTPS, you might end up with a situation where some older resources are still loading over HTTP instead of HTTPS. This can trigger something called a mixed content warning, which can lead to the invalid JSON response error.
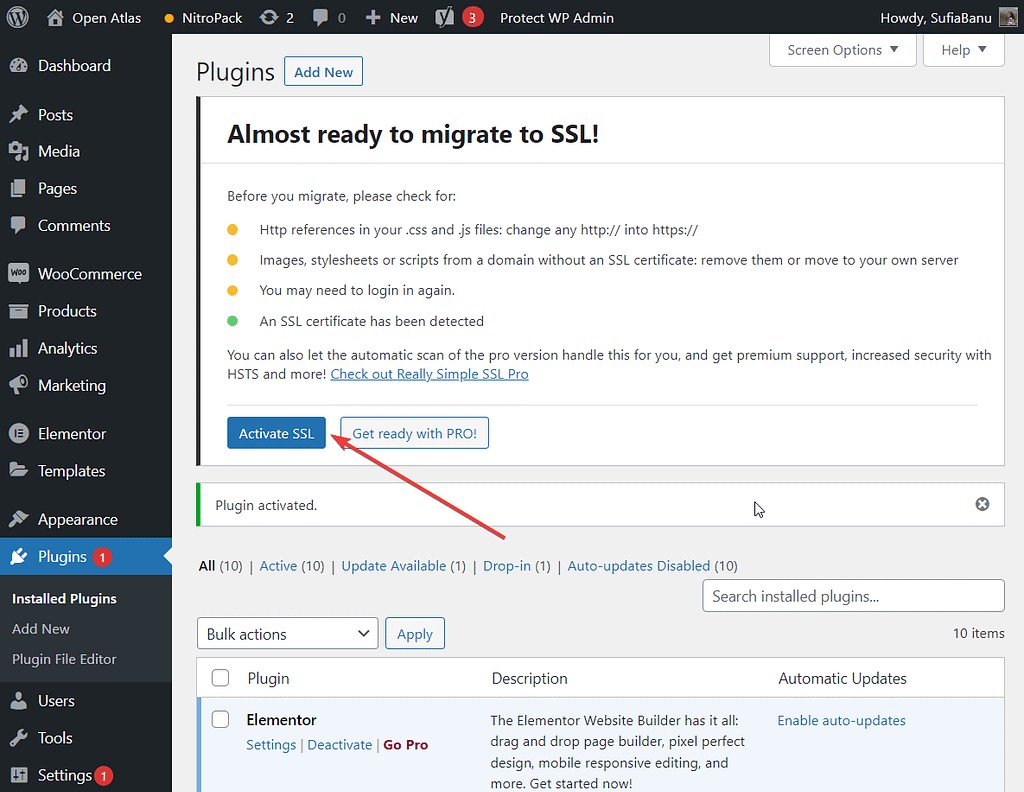
In the previous section, you made sure that both WordPress Address and Site Address starts with HTTPS. This could have already fixed the mixed content issue. But just to be on the same side, install and activate this plugin: Really Simple SSL.
After installing you should see a popup with this button: Activate SSL! Click on the button. The plugin will set to work and log you out. Don’t worry. Just login in and check if the JSON error on your Gutenberg editor is gone.
If you need help setting up the plugin, take a look at this guide.
Deactivate plugins and themes to find conflicts
Theme and plugin conflict is a common cause of WordPress errors. So in this section, we will help you figure out whether a theme or a plugin is causing the JSON response error on your website.
First, a small disclosure: Deactivating the plugins and themes may cause your site to break. You could lose some of your configurations. But if you have a backup in place, this won’t be a problem.
After you deactivate the plugins and themes and figure out which plugin or theme is causing the error, you can restore your site back to normal. Then delete the culprit theme or plugin from your website. This way, all your configurations will remain intact and the culprit will be gone.
Now, go to Appearance → Themes and activate the default WordPress theme (like Twenty Twenty, Twenty Twenty One, etc). Check if the JSON error is fixed.
If the error is gone, then delete the theme. If not, reactivate your previous theme.
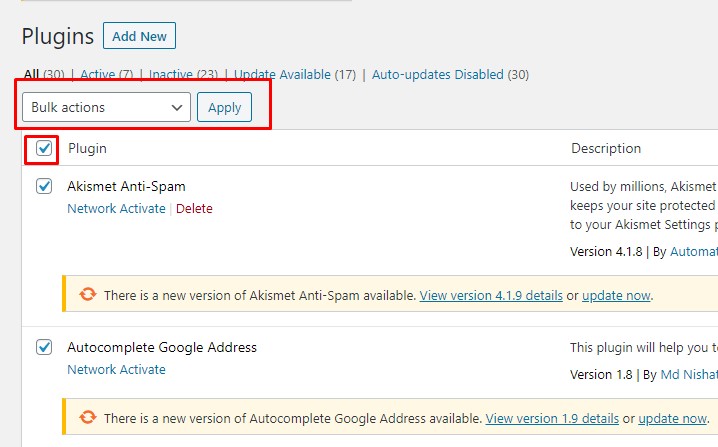
Next, go to Installed Plugins, select all your plugins and under Bulk Actions, choose Deactivate and hit Apply.
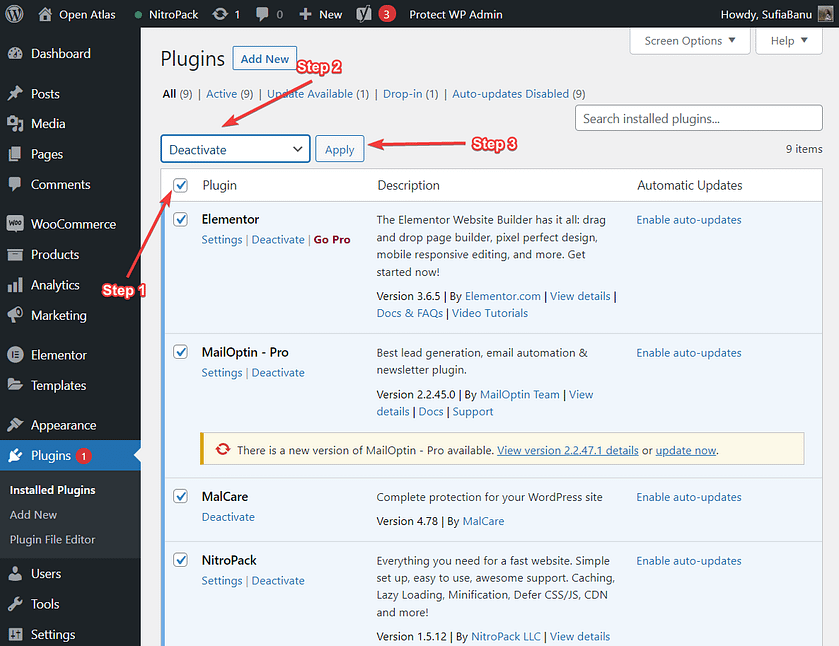
If the error doesn’t appear on your Gutenberg Editor, one of your plugins was causing it. All you need to do is figure out which of the plugins is the culprit. Start reactivating the plugins one by one. Every time you reactivate a plugin, check if the JSON error has returned.
When you find the culprit, delete the plugin. If it’s an essential part of your site, reach out to the developer of the plugin and ask for help.
Other ways to troubleshoot the invalid JSON response error
The first four solutions should enable you to remove the “Updating failed. The response is not a valid JSON response.” but if it persists, then try the following methods:
Look for REST API conflicts
WordPress uses the REST API to communicate with the server. If the communication fails for some reason, you will encounter the JSON error.
To learn if the REST API is the root of the problem, open your Gutenberg editor where the JSON error is showing, right-click on the error and select the Inspect option.
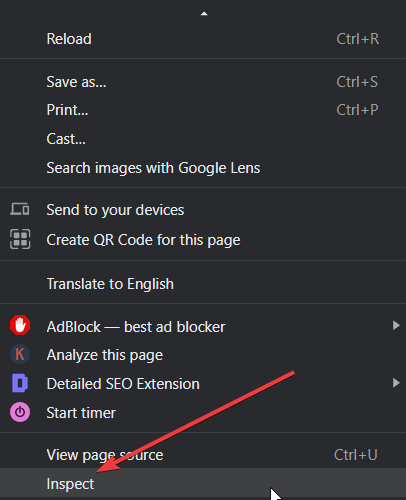
Under Console, look for a REST API error. If you find it then the error is being caused by the API.
To remove the error, you will need to seek help from your hosting provider.
Upload images in a different way
If uploading images on your post is triggering the error, try uploading them via the Media Library.
Make sure you are not using any invalid characters in the title. Just use English letters and numbers in the title of the image.
Switch to Classic Editor (temporarily or permanently)
If everything fails, then consider switching to the Classic editor. All you need to do is install the official Classic Editor plugin.
For a more detailed look, check out our guide on how to disable Gutenberg and use the Classic TinyMCE editor.
That said, if you prefer to keep using the Gutenberg editor, you will need to find a way to remove the JSON response error from your site.
👉 If you tried all the solutions listed above and still can’t remove the error, then you need professional help. Reach out to your hosting provider and tell them about all the solutions you tried. They will assist you in removing the error.
Fix the WordPress invalid JSON response error for good
The “Updating failed. The response is not a valid JSON response.” error is one of the most common WordPress errors. It can appear when uploading an image or publishing/updating a piece of content using the new block editor (Gutenberg).
The real cause could be anything from a rogue plugin or theme to an SSL certificate issue. Removing the error is just a matter of figuring out the reason behind it and weeding it out of your site.
We hope with the help of our tutorial you were able to remove the JSON response error from your site.
For some other tips on fixing common WordPress errors, you can check out our beginner’s guide to WordPress troubleshooting. 😎
If you have any questions about the “The response is not a valid JSON response.” error, let us know in the comment section below.
Are you trying to fix the WordPress updating failed or publishing failed error on your website?
Sometimes when editing a post or page, you may see the updating failed or publishing failed error. This error message does not give any clues, which makes it particularly difficult for beginners.
In this article, we will show you how to easily fix the WordPress updating failed error. We will also explain what causes this issue and how to avoid it in the future.

What Causes the Updating Failed or Publishing Failed Error in WordPress?
Failure to communicate with the WordPress REST API causes the ‘Updating Failed’ or ‘Publishing Failed’ error in WordPress.

Basically, WordPress sometimes uses a set of APIs (programming methods) called REST API to send and receive requests to the WordPress database.
If it fails to send and receive those requests, then some parts of your WordPress website may not be able to function. These include the WordPress block editor, which uses the API to send update and publish requests to WordPress.
Why Is WordPress Unable to Use the REST API?
You might be wondering: if I didn’t make any changes to my website, then why did the REST API stop working on its own?
There are a number of scenarios that can prevent WordPress from using the REST API. For example, you may not be connected to the internet or have lost connectivity.
Other reasons may be a little more complicated. For instance, you may have accidentally changed the site URL, a WordPress plugin might be causing the issue, or a third-party service may be blocking the API calls.
That being said, let’s take a look at how to troubleshoot and fix the WordPress updating failed error.
Step 1: Check Your Internet Connection and Site URL
The most common cause for the updating failed error in WordPress is losing the WiFi connection. If your computer loses the internet connection as you are writing a blog post, then WordPress will fail to save your changes.
Make sure you are connected to the internet by visiting other websites in a new browser tab.
If your internet is working fine, then the next thing you need to check is your WordPress site URL setting.
Simply go to the Settings » General page and make sure that the ‘Site Address’ and ‘WordPress Address’ options are correct. For most websites, you should have the same URLs in both fields.

If your site URL settings look ok, and you are connected to the internet, then you can move on to further troubleshooting.
Step 2: Check REST API Status Using WordPress Site Health
WordPress comes with a built-in site health tool, which shows important information about your site’s security and performance.
Simply go to the Tools » Site Health page to view the report. If REST API is not working, then you will see it under recommended improvements as ‘The REST API encountered an unexpected result’.

It might also show you some debugging information, which may explain what happened when WordPress made the REST API call. Studying this may give you clues about which plugin or third-party service is causing the issue.
However, if it doesn’t give you any clues, then you can move on to the next step.
Step 3: Disable All Your WordPress Plugins
If a WordPress plugin is causing the REST API to misbehave, then the easiest way to find it out is by deactivating all your WordPress plugins.
You can go to the Plugins » Installed Plugins page and check the box at the top to select all plugins. After that, use the ‘Bulk Actions’ dropdown, select ‘Deactivate’, and then click ‘Apply’ to deactivate all plugins.

After that, you can go to the post edit screen and try to update. If the Updating Failed error disappears, then this means that one of your plugins was causing the issue.
You can now start activating your WordPress plugins one at a time and try to reproduce the error. Once you find the plugin causing the issue, you can seek support from the plugin author or find an alternative plugin.
On the other hand, if disabling all WordPress plugins didn’t make the error go away, then continue to the next step.
Step 4: Check Website Firewall Service
If you are using a website firewall service like Sucuri or Cloudflare, then there is a chance that these services may block REST API requests.
This could happen if their firewall filters consider your IP address to be suspicious. They may also block REST API requests if your website is currently facing a DDOS attack.
If you are using Cloudflare, then you can temporarily disable it to see if this resolves your issue.
Normally, you will find Cloudflare settings under the Domains section of your hosting dashboard. Bluehost users can find them under My Sites » Manage » Performance tab.

If you are using Sucuri, then you can reach out to their support team, and they can whitelist your IP address or let you know what’s causing the issue.
Plugins and firewall services are the most common cause of the updating failed error. However, if you are still seeing the WordPress updating failed error, then there are a few more things you can do.
Step 5: Enable and Review WordPress Debug Log
WordPress comes with a built-in feature to keep a log of all WordPress errors. It does not log the REST API errors, but it will help you see if there are some other issues that may be causing the error.
Simply add the following lines to your wp-config.php file.
// Change WP_DEBUG to true

define( 'WP_DEBUG', true );

// Keep a log of WordPress errors

define( 'WP_DEBUG_LOG', true );
Don’t forget to save your changes and upload the file back to your server. You can now try to publish or update a post in WordPress to reproduce the error.
After that, you need to connect to your WordPress hosting account using an FTP client and go to the /wp-content/ folder. From here, simply download the debug.log file to your computer.

Next, you must open the debug file in a plain text editor like Notepad.
It may contain a few errors, warnings, or notices caught by WordPress as you worked on your site or a user visited it.

If you see something that points to a plugin or theme file, then this can be a useful hint. You can then mention this error when asking for support on WordPress.org forums or from your hosting provider.
Step 6: Temporarily Switch to the Classic WordPress Editor
A temporary solution to this error is to enable the classic editor. It is the old WordPress editor that does not rely on REST API to update and publish content.
You can enable it by simply installing and activating the Classic Editor plugin. For more details, see our step-by-step guide on how to enable the classic editor in WordPress.
Upon activation, you can simply edit the post you were working on. You would be able to save and publish it without seeing the updating failed or publishing failed error in WordPress.

Final Step: Ask for Support
If all else fails, then you may need to ask for support. You can start by directly contacting your hosting provider. They have access to server logs and additional tools. The error could also be caused by a misconfigured server or glitch on their end.
You can also seek help on WordPress.org forums or in the WPBeginner Facebook Group, where other experts and users can help you fix the error.
For more details, see our article on how to properly ask for WordPress support and get it.
We hope this article helped you fix the WordPress updating failed or publishing failed error. You may also want to bookmark our complete guide on the most common WordPress errors and how to fix them, along with our top picks for the best managed WordPress hosting providers.
If you liked this article, then please subscribe to our YouTube Channel for WordPress video tutorials. You can also find us on Twitter and Facebook.
Disclosure: Our content is reader-supported. This means if you click on some of our links, then we may earn a commission. See how WPBeginner is funded, why it matters, and how you can support us.
Editorial Staff at WPBeginner is a team of WordPress experts led by Syed Balkhi with over 16 years of experience building WordPress websites. We have been creating WordPress tutorials since 2009, and WPBeginner has become the largest free WordPress resource site in the industry.
Do you get the “WordPress updating failed” error message while updating your site? Failures when updating and publishing in WordPress can be very annoying. That’s why we have put together this guide that will show you how to address the possible reasons and methods to fix the WordPress update failed error.
WordPress has auto-update features that make the update process easier. If you enable auto-updates, your site will automatically install all the new releases, e.g., 5.7.1 to 5.7.2, in the background. For any major updates, you get a notification that asks you to update WordPress and within a few clicks, you can update your site to the latest version.
As you probably know, keeping your site up to date is really important. Each new release contains crucial bug fixes, optimizations, and new features. However, sometimes the update fails and you get the WordPress update failed error. In that case, you will be stuck with the current version and will miss out on the latest features.
Now let’s have a look at how to fix the WordPress update failed error.
Identifying the cause of the WordPress Update Failed Error
To fix the failed updating problem, you have to identify the root cause of the failure first. Depending on the failure reason, you can apply different fixes.
If you have a look at the WordPress update failed error message, it states the possible cause. For example, let’s say your current WordPress version is 5.7.1, and you want to update to 5.7.2, but the update fails. The error message you get will be something like this:
Downloading update from http://wordpress.org/wordpress-5.7.2.zip...
Unpacking the update...
Verifying the unpacked files...
Installing the latest version...
Could not copy the file.: /httpdocs/wordpress/wp-admin/js/list table.dev.js
Installation Failed
If you check line 5, it states that WordPress is unable to copy the mentioned file. Similarly, you may receive an error message that contains the possible reason for your update failure.
How to fix the WordPress Update Failed Error
Several reasons can cause the WordPress update failed error. In this section, we’ll have a look at different solutions:
- Delete the .maintenance file
- File permissions
- Turn off safe mode
- Add FTP details to the wp-config file
- Update WordPress manually
Let’s have a look at each of these solutions that can help you solve the WordPress updating failed issue.
1. Delete the .maintenance file
Usually, after a failed WordPress update you get locked out of your site. This means that you will no longer have access to your WP Admin Dashboard or any page of your website. The end-user visiting your site will see a message that says “Briefly unavailable for scheduled maintenance. Check back in a minute.”
This happens because during the update process WordPress puts the site in maintenance mode. Now since the update failed, it remains in maintenance mode. This info is stored in the .maintenance file (remember that the file name starts with a “dot”) in your WordPress directory.
To solve this issue, all you need to do is find your way to your site’s root directory and delete the .maintenance file. For this, you need FTP access to the root directory of your WordPress site, which you can get via the server’s control panel or by using an FTP Client like FileZilla.
Once you have removed the .maintenance file, you will get access to your website again. You can then login and check the error message that caused the update to fail.
2. File Permissions
Another reason that may cause the WordPress update failed error is when the server is unable to create a temporary file that is required during the update in the /upgrade/ directory. To create the temporary file, the server needs permission to write to that directory.
To solve this issue, you need to route again to the WordPress root directory. In the root directory, locate the /upgrade/ directory and give write permissions to it. You can either give it the required 755 (CHMOD) permissions or go with full 777 permissions for a short time.
Once you have given the directory proper file permissions, you can attempt to update your site again. If the auto-update still fails, delete the /upgrade/ directory, re-create it, and give it the required permissions. After that, initiate the update again and it should work.
Keep in mind that if you give the /upgrade/ directory full 777 permissions, you should change it back to strict 755 permissions after the update. Allowing full 777 permissions to the server isn’t a recommended practice, so you should keep them as short as possible.
3. Turn Off Safe Mode
Turning off safe mode might help you with the WordPress update failed issue. However, safe mode is deprecated as of PHP version 5.3.0, and removed in version 5.4, as per the PHP manual. The manual states:
This feature has been DEPRECATED as of PHP 5.3.0 and REMOVED as of PHP 5.4.0.
If you are working with an older version of PHP, you might want to turn off the safe mode as it may resolve some issues that are hindering the update. You can turn off the safe mode via the server’s control panel or editing the php.ini file via an FTP client. Simply open the php.ini file in an editor and change the line
safe_mode = on
to
safe_mode=off
Afterward, restart Apache and log in to your site. You should be able to update WordPress without any issues.
4. Add FTP details to the wp-config file
Sometimes the update may fail in WordPress because your FTP credentials aren’t updated. This might happen because your site has been moved recently, or you have updated things like passwords, permissions, and so on.
In such cases, you can provide WordPress with the updated credentials manually by editing the wp-config file.
First, make sure you have the correct FTP credentials with you. Then, make your way to the wp-config file through the cPanel or an FTP client.
Open the wp-config file with a text editor like Notepad and paste the following lines to the file just above the line that says, “/* That’s all, stop editing! Happy blogging. */”.
define(‘FS_METHOD’, ‘ftpext’);
define(‘FTP_HOST’, ‘ftp.website.com’);
define(‘FTP_USER’, ‘username’);
define(‘FTP_PASS’, ‘password’);
NOTE: You need to replace the FTP_HOST, FTP_USER, and FTP_PASS with your website, username, and password respectively.
Finally, try again and you should be able to update WordPress.
5. Manually Update WordPress
Are you still getting the WordPress update failed error even after trying all the above methods? In that case, a manual update might be your best bet.
Though it is a bit technical, it isn’t as complex as it may seem. WordPress has put up a detailed guide on how to manually update it for those who don’t know how to proceed. If you follow all the instructions correctly, you will have no problems updating your site.
It’s worth noting that you won’t have to apply all future updates manually like this. Once you finish with this update, all future updates will be applied automatically, as they should.
By following the methods explained above, you will be able to fix the WordPress update failed error.
However, that’s not the only common issue that you may experience. Let’s see how to fix the publishing failed error in WordPress.
BONUS: How to Fix WordPress Publishing Failed Error
Another common error is the WordPress Publishing Failed or WordPress updating failure. This error happens when WordPress is unable to publish or update a post or page. The error is quite common and causes a lot of frustration among users.
Why does the Publishing Failed Error happen?
In most cases, the WordPress update failed error is caused due to issues with the REST API. This API manages the requests that are sent and received from the WordPress database, so when it fails it can cause problems on your site.
And what are the causes of the REST API issues? There could be several reasons but the most common ones are connectivity issues, conflicts with plugins or themes, or problems with third-party services.
As you can imagine, this error can be quite annoying as you won’t be able to update anything or add new posts on your website. Below, we have compiled a list of solutions that will help you fix the publishing failed error in WordPress.
1. Check Internet Connection and Site URL
In most cases, WordPress failed to publish something because there’s a connectivity problem. If your internet connection is weak or lost, you may not be able to publish or update a post/page and WordPress will show an error message. That’s why you should make sure that you have a stable working internet connection.
Though it’s not actually a solution, it’s worth mentioning because it’s the most common reason that causes the publishing issue.
On the other hand, if your internet connection is working correctly, you should check your WordPress and site URLs. You can do so by going to the WP Admin Dashboard and navigating to Settings > General. Make sure both the WordPress URL and site URL are correct, otherwise, they can create problems.
If you don’t have connection problems and the URLs are correct but you are still experiencing the publishing failed error, it’s time to troubleshoot other things.
2. Check REST API Status using Site Health
As mentioned above, the REST API is a way that WordPress and other applications like the block editor communicate with the server. Issues with the REST API can create issues when publishing or updating something.
The first step to troubleshoot this is to make sure that the REST API is working properly. One way to identify if the REST API is blocked is via the built-in WordPress Site Health tool. It shows recommendations and any issues that may require user attention.
To check the Site Health, simply go to the WP Admin Dashboard and navigate to Tools > Site Health.
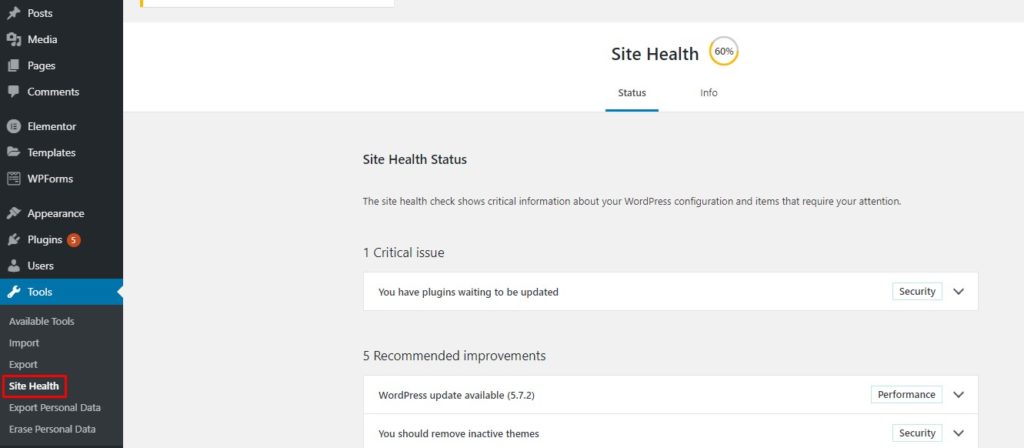
If there is an issue with the REST API, you will see it under the recommended improvements section as “The REST API encountered an unexpected result.” If you expand the message, you will see the details or at least a hint about the actual cause of the failed REST API call. Once you have identified the cause, you can take measures accordingly to re-enable the REST API.
3. Disable all the Plugins
If you don’t get any practical hints and are unable to locate the cause for a failed REST API call, you can try disabling all your plugins and see if that resolves your issue. The idea behind this is that one of the plugins on your site might be interfering with the API calls.
There are different ways to deactivate the plugins in bulk. If you’re not sure how to do it, check out our guide. The easiest way is to select all the plugins from your WordPress dashboard and deactivate them using the bulk actions.
If after disabling all the plugins you’re able to publish or update your posts/pages, it will indicate that one of the plugins is causing the problem. Then, start activating them one by one and updating a post until you find the plugin that is creating the issues.
Once you have identified the plugin, you can contact their support team for assistance.
4. Enter Debugging Mode
If none of the above solutions worked, you should try troubleshooting with the WordPress Debug mode. This mode will log all the PHP responses in the debug.log file under the wp-content directory. You can then inspect the log file to identify the errors blocking the REST API calls and take corrective measures.
To enable debug mode, you will need to edit the wp-config file through your cPanel or an FTP client. Open the wp-config file using a text editor like Notepad and add the following lines of code just above the line that reads “/* That’s all, stop editing! Happy blogging. */”
// Enable WP_DEBUG mode
define( 'WP_DEBUG', true );
// Enable Debug logging to the debug.log file
define( ‘WP_DEBUG_LOG’, true );
Note that you should only use the debugging mode as a troubleshooting tool. Once you have resolved the error, make sure to remove these lines from the wp-config file to disable debugging mode.
5. Alternative Solution: Switch back to Classic Editor
If none of the solutions worked for you or you are not comfortable editing core WordPress files, you can try switching back to the Classic Editor. The WordPress publishing failed error is mainly associated with the new block editor (Guttenberg) since it relies on API calls to communicate with WordPress.
If you switch back to the Classic Editor, you shouldn’t face the publishing failed error anymore. So until you fix the error, switching back to the Classic Editor can be a quick temporary solution.
To install the Classic Editor, go to the WP Admin Dashboard and navigate to Plugins > Add new. Search for the Classic Editor, click on the Install button, and then activate it.
That’s it! These are all the possible methods that will help you fix the WordPress Publishing Failed error.
Conclusion
All in all, WordPress updates are very important as they include crucial bug fixes, optimizations, and extra features. Not being able to update your WordPress can cause many problems and you would miss out on important functionalities.
In this guide, we’ve had a look at different solutions to fix the WordPress Update Failed Error. Additionally, we understood what may cause the Publishing failed error and explained different solutions depending on the root cause of the problem.
In summary, in this post we’ve seen:
- Five methods to fix the WordPress update failed error
- Deleting the .maintenance file
- Giving proper file permissions
- Turning off safe mode
- Adding FTP details to the wp-config file
- Manually updating WordPress if everything else fails
- Five methods to fix WordPress Publishing failed error
- Checking internet connections and site URLs
- Checking REST API status using WordPress site health
- Disabling all the plugins and then re-enabling one by one
- Inspecting the debug.log file by entering debug mode
- Switching back to Classic Editor as a temporary fix
If you’re looking for more information to solve the most common issues in WordPress, have a look at the following guides:
- How to Fix the “Link You Followed Has Expired” Error in WordPress
- Learn to Fix Maximum Execution Time Exceeded Error in WordPress
- WordPress login not working? How to fix it
Have you faced any of these issues before? What was your experience and how did you solve it? Let us know in the comments section below.
![]()
Firefox includes a Software Update feature that automatically checks for updates and prompts you to install them when necessary.
- For more information about the Software Update feature, see Update Firefox to the latest release.
Sometimes, the updater fails and displays an Update Failed error message. This article presents possible solutions and workarounds to get Firefox updated.
Manual update
One solution is to update Firefox by manually downloading and installing the new version over top of your current version. See How to install Firefox on WindowsInstall Firefox on LinuxHow to download and install Firefox on Mac for instructions.
Check for updates after restarting the computer
It’s possible that another running program or a previous instance of Firefox that did not close properly is interfering with the Firefox update process. This error can also occur if you share your computer with other users, and another user’s account is still logged in with Firefox running. The easiest way to resolve such problems is to restart your computer. Once the computer starts up again:
- Start Firefox.
- Click the menu button
 and click .On the Menu bar, click the menu.
- Select . Firefox will begin checking for updates.
 and click .
Close other running programs
Some programs that can interfere with Firefox are set to start up automatically when you start your computer. Before updating Firefox, try closing or disabling such programs; for example, Spybot TeaTimer and Logitech QuickCam software have been known to interfere with Firefox updates.
Run as Administrator
If you are using Windows 7 or Vista:
- Restart the computer so that no Firefox processes are active.
- Open the Windows Start Menu, type firefox and right-click on the Mozilla Firefox entry that appears.
- Select and if the User Account Control dialog comes up.
If the issue is not resolved, close Firefox and restart the computer again, but, this time, open the program folder where Firefox is installed (e.g., open the C:Program FilesMozilla Firefox folder or, on 64-bit windows, the C:Program Files (x86)Mozilla Firefox folder), right-click on the firefox or firefox.exe file icon and select .
Still can’t update Firefox?
If you’re using a school or work computer, IT admins may lock updates to a specific version to prevent users from updating the application. As a result, when users try to manually update Firefox to a newer version, they won’t see any updates available, or they’ll see the message that they’re already running the latest version as set by their IT admin.
These fine people helped write this article:
AliceWyman, Bo102010, Tonnes, Michele Rodaro, Michael Verdi, MickM, scoobidiver, Swarnava Sengupta, Mozinet, Mike Cooper, user917725, Fabi

Volunteer
Grow and share your expertise with others. Answer questions and improve our knowledge base.
Learn More