
Обновлено: 12.06.2023
Видеокарта ATI Radeon HD 2600 PRO, моник Samsung S22C300H.
— AMD Catalyst AUTODetect выдаёт следующее — «Мы не можем найти драйвер для вашей системы, поддерживаемое оборудование AMD не найдено.
Полазив по интернету, понял что проблема не нова и, я так понимаю, надо либо ждать новых драйверов от AMD (интересно сколько ждать?) либо обратно ставить Windows 7 (т.к. маловероятно, что переустановка W10 поможет). Или может есть какой другой способ отключить EDID? Подскажите! Неохото заниматься переустановкой, поленился перед обновлением W10 сделать образ системы.
Ошибка: catalyst control center не поддерживается версией драйвера включенного видеоадаптера

Включил апарат УЗИ, а намнем данная ошибка: catalyst control center не поддерживается версией драйвера включенного видеоадаптера. обновите версию графического драйвера ati или включите адаптер ati с помощью менеджера дисплеев.
До этого ничего не делал с драйверами.. Попробую переставить драйвера. А как включить адаптер ati в менеджере дисплеев?
Проблема с Catalyst Control Center. Что делать?

Catalist control center не поддерживается версией драйвера включенного видеоадаптера . Oбновите версию графического драйвера ADM или включите адаптер ADM в помощью менеджера дисплеев.
При этом игра запускалась. Был черный экран и слышен только звук игры
The Catalyst Control Center is not supported by the driver version of your
enabled graphics adapter. Please update your ATI graphics driver, or enable
your ATI adapter using the Displays Manager.
При этом игра запускалась. Был черный экран и слышен только звук игры
Перевести онлайн переводчиком текст ошибки не составит тебе труда.

Перевод: обновите драйвер ати,для управления видеокартой ати в менеджере дисплея.
Дайка угадаю- ноутбук?!)
обновляться надо с сайта производителя ноутбука, там ищите драйвер для дискретной видеокарты ати!
Перевод: обновите драйвер ати,для управления видеокартой ати в менеджере дисплея.
Дайка угадаю- ноутбук?!)
обновляться надо с сайта производителя ноутбука, там ищите драйвер для дискретной видеокарты ати!
Так проблема началась тогда когда я обновил драва Intel® HD Graphics 3000 на офф сайте.
Не устанавливается AMD catalyst control center
Доброго времени суток. Сначала у меня возникли проблемы с драйверами экрана:
В поисках проблемы я обнаружил что AMD catalyst control center, не запускается и вообще пропал из списка приложения. Всё что осталось в списке приложений:
Затем я зашел в Диспетчер устройств, видеоадаптеры там выглядели так:
Я решил переустановить драйвера. Для этого удалил видеоадаптеры из диспетчера устройств, затем решил по новой установить AMD catalyst control center. Но тут возникла проблема, AMD catalyst control center не как не желает устанавливаться. При установке компьютер либо зависает и появляется серый экран:
Либо установка зависает после этапа определения оборудования:
Пробовал установку в безопасном режиме, не помогло:
Пробовал устанавливать драйвера через Drive Pack Solution, драйвера на видеокарту всё равно не установился:
Читайте также:
- Cash control что это
- Сколько весит f1 2021
- Как в симс фриплей затянуть игру в шахматы
- Couldn t load default cfg medal of honor что делать
- Что же делать если в гта хе нужен целый лям
The VGA card is a type of expansion card that generates a feed of output images to the display devices. Some user has faced issues and error message that indicates “the VGA card is not supported by UEFI driver” while booting up the device with a new VGA card. It seems pretty much annoying for anybody who encountered this issue. In this article, we will be discussing the troubleshooting methods for this issue. Keep reading this article to know more about this.

What Does It Mean When VGA Card Is Not Supported by UEFI Driver?
This error message means that the UEFI mode BIOS does not fully support the VGA card. This issue doesn’t have any relation to the original operating system settings. It’s unfortunate, and you cannot do much about it, except for some troubleshooting methods that were effective for some of the users who experienced this issue on their devices. Some experts have recommended changing PCIe settings to resolve this issue.
As mentioned before, this error message doesn’t have any specific troubleshooting method to resolve the issue. If you are encountering this issue on your device; then it’s a matter of unfortunate. Still, you can try some troubleshooting methods to resolve this issue. Here are the troubleshooting methods that you could try to resolve this issue;
Fix 1. Use an HDMI Cable
Using the HDMI cable to connect the VGA card to the device motherboard is a solution that could resolve this issue. If the BIOS of your motherboard supports the feature of multiple displays at the same time; this method could be an effective option for you.
Get connected with these HDMI cables for a seamless display.
Fix 2. Clear the CMOS
The issue could possibly have been triggered by corrupted BIOS/UEFI settings. If so, the only viable way to resolve this issue is to remove the CMOS battery. It will reset all the cached configurations of BIOS/UEFI and this does imply that all HDDs are functional and working properly.
Removing the CMOS battery isn’t a hard nut to crack, you just have to shut down your device and remove all the cables from it. Thereafter, unbox the motherboard and find the tiny (watch battery-like) battery in the middle of the motherboard. Once located, remove it from the motherboard and then re-insert it into the motherboard. Now, you are all done.
Resolve BIOS/UEFI issues and restore device functionality with a new CMOS battery.
Fix 3. Changing the PCI-Express Settings
PCI-Express is a high-speed serial computer expansion bus standard that ensures better performance
Step-1
Open the BIOS menu and select the Advanced tab by using the arrow keys of your device keyboard. Afterward, select the Video Configuration option and press enter.
Step-2
Thereafter, select the PCI-Express Graphics option and press enter. Afterward, change the PCI-Express settings into Gen 3 from auto. Press F10 to save the changes you made into the BIOS.
How Do I Know If My Graphics Card Supports UEFI?
It is not a hard nut to crack to know whether your graphics card supports UEFI or not. You can check it from the Setup act log or System Information by following these below-described steps;
1. From setupact Log;
Step-1
Press the Windows + E key to open the Windows File Explorer, and navigate through C:/ Windows/ Panther. From there locate the setupact and open it with Notepad.
Step-2
Afterward, press ctrl + F to open the find feature on the notepad, type Detected boot environment on the box and press enter. Once you find it, you will notice the words BIOS or UEFI mentioned below;
Callback_BootEnvironmentDetect: Detected boot environment: BIOS
Or,
Callback_BootEnvironmentDetect: Detected boot environment: UEFI
Or,
Callback_BootEnvironmentDetect: Detected boot environment: EFI
2. From System Information;
Step-1
Open the Run Dialog Box by pressing the Windows + R button of your device keyboard, type msinfo32 on the Dialog Box and press enter to open the System Information window of your device.
Step-2
Thereafter, find BIOS Mode to check whether your Graphics Card supports UEFI, EFI (Extensible Firmware Interface), or BIOS.
Frequently Asked Questions and Answers
Do I Need UEFI for Windows 10?
Windows 10 is compatible with both BIOS and UEFI. For this reason, you can use any of those on your device. Though, the storage device may require UEFI.
Is UEFI Necessary?
The necessity of UEFI depends on whether the device supports UEFI or BIOS. If the device only supports UEFI, then it is necessary for the device. Otherwise, it is not necessary.
Can I Change BIOS to UEFI?
Windows includes a simple conversation tool named MBR2GPT that automates the process of repartitioning the hard disk for UEFI-enabled hardware. It is possible to integrate the conversion tool into the in-place upgrade process.
Finishing Lines
Being here, you have already known enough about the not supported issue of the VGA cards. Though it is nearly impossible to resolve this issue without replacing the VGA card, still you need to follow these above-described troubleshooting methods to resolve this annoying issue. Hope one of these above-described troubleshooting methods helped you to resolve this issue. That’s all for today, have a great day.
Try running the audio troubleshooter or rolling back audio drivers
by Sagar Naresh
Sagar is a web developer and technology journalist. Currently associated with WindowsReport and SamMobile. When not writing, he is either at the gym sweating it out or playing… read more
Updated on March 22, 2023
Reviewed by
Alex Serban

After moving away from the corporate work-style, Alex has found rewards in a lifestyle of constant analysis, team coordination and pestering his colleagues. Holding an MCSA Windows Server… read more
- Several users reportedly face Realtek HD Audio Manager this device type is not supported error.
- You can first try to update the audio drivers, then run the audio troubleshooter and possibly fix the problem.

XINSTALL BY CLICKING THE DOWNLOAD FILE
This software will keep your drivers up and running, thus keeping you safe from common computer errors and hardware failure. Check all your drivers now in 3 easy steps:
- Download DriverFix (verified download file).
- Click Start Scan to find all problematic drivers.
- Click Update Drivers to get new versions and avoid system malfunctionings.
- DriverFix has been downloaded by 0 readers this month.
If you have turned on your PC and getting the Realtek HD Audio Manager This device type is not supported error, well, you may end up with no sound from your laptop or PC. In such cases, you can try the solutions below to help you resolve the problem.
What causes Realtek HD Audio Manager This device type is not supported error?
The Realtek HD Audio Manager: This device type is not supported error usually occurs when you have installed an incompatible driver or haven’t updated your driver. However, a few other possible causes might trigger the problem:
- Incompatible, outdated, or corrupted audio driver – Your audio driver might be incompatible or corrupt. Updating your Windows 11 drivers is the key out.
- Misconfigured audio settings: Often, tweaked sound settings do not work for every device, or you might not have correctly configured sound settings in Windows 11.
- The sound device is not correctly connected: Your speakers or headphones might not be correctly plugged into your PC.
- Audio services disabled: The audio services might be disabled.
Now that we know where these problems arise, let’s see what we can do about it.
How can I fix Realtek HD Audio Manager This device type is not supported error?
Before you attempt any advanced troubleshooting, there are a few preliminary checks you should perform:
- Check whether the device is connected properly to your PC and if the cables aren’t damaged or broken.
- Try restarting your PC, because often many complex problems are resolved by a quick restart.
- Reinstall your audio drivers and check if this fixes the issue or not.
- Connect the device to another PC and check if the device has no problems.
- Make sure the device is plugged into the right port if you have multiple ones.
If you are done with all the above checks but still experiencing the problem, proceed to the next solutions.
1. Run the audio troubleshooter
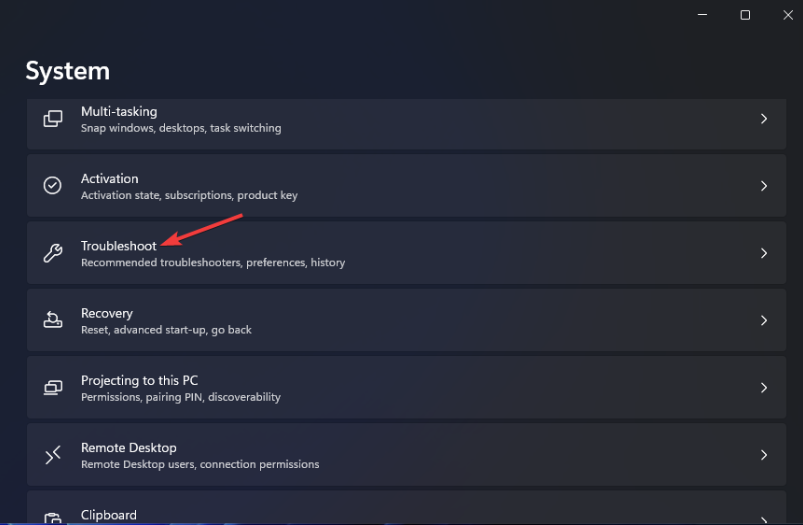
- Press the Win + I keys to open Settings.
- Select Troubleshoot.

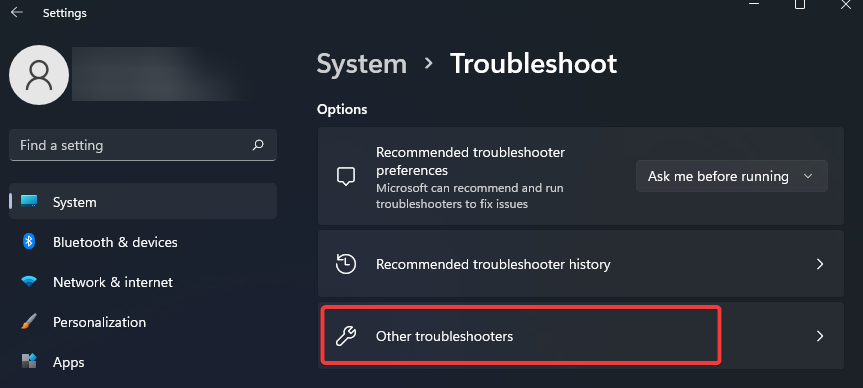
- Click on Other troubleshooters.

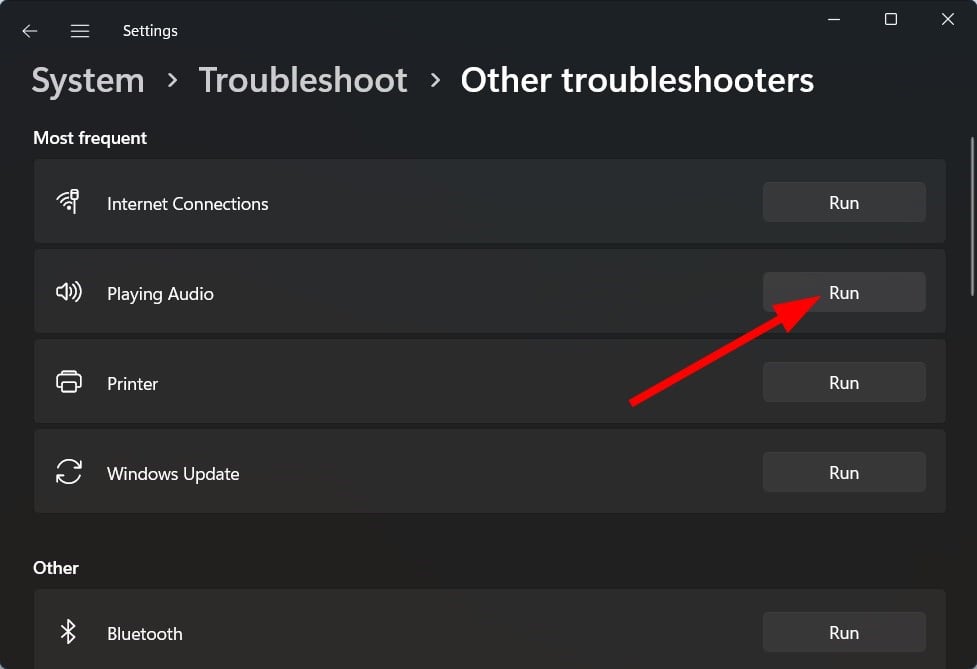
- Press Run in front of Playing Audio.

2. Rollback the audio drivers
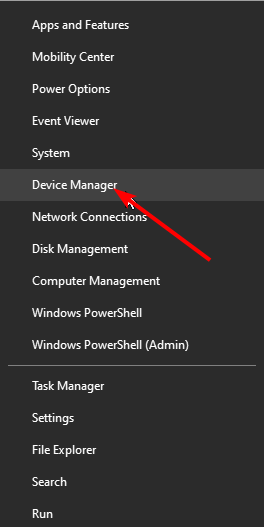
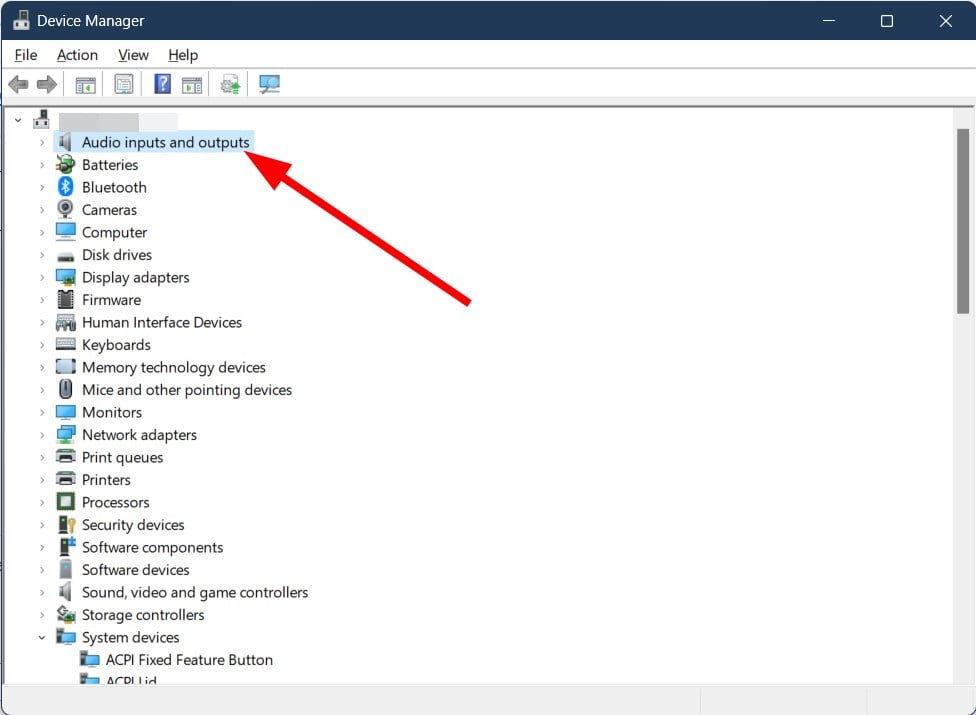
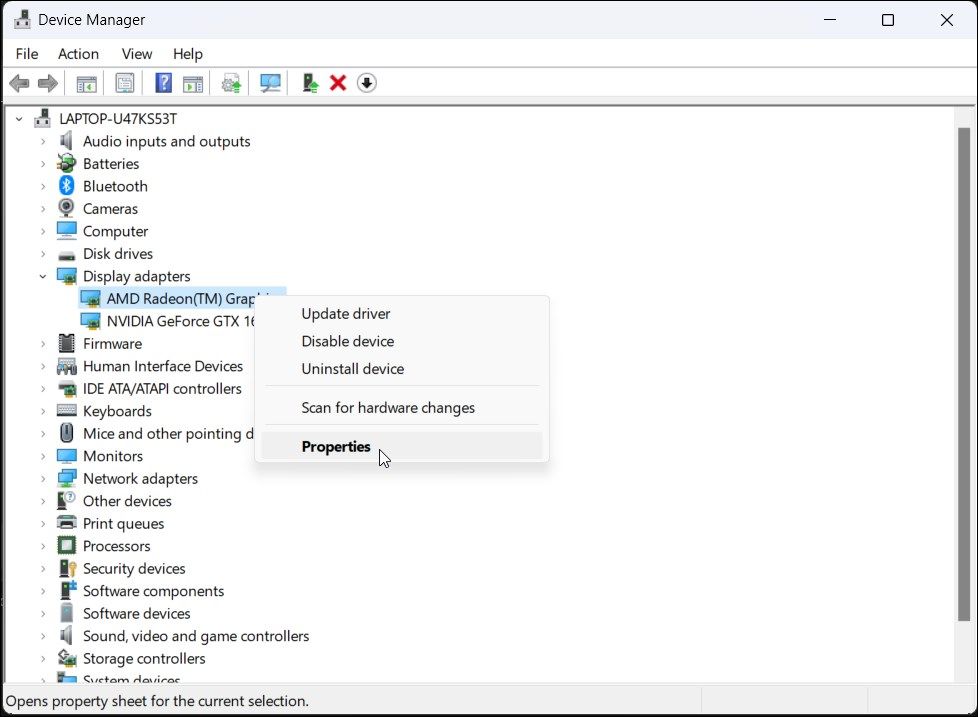
- Right-click on the Start menu and select Device Manager.

- Expand the Audio inputs and outputs section.

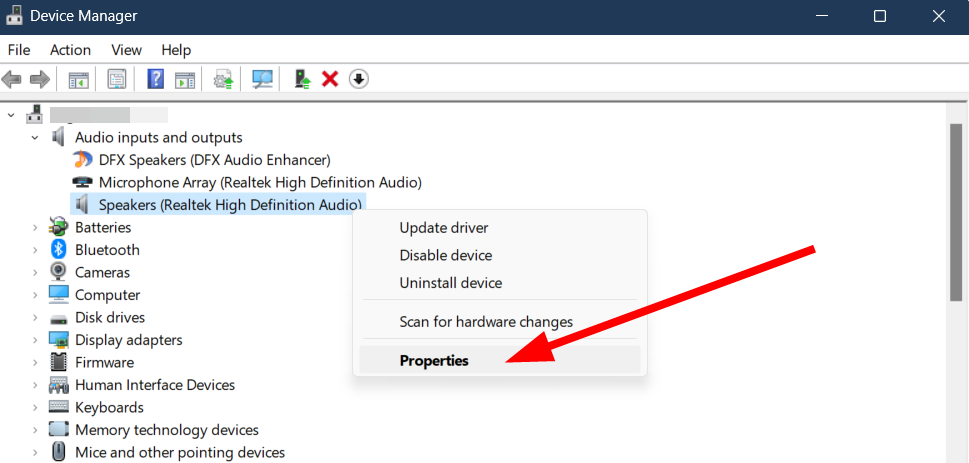
- Right-click on the Realtek driver and select Properties.

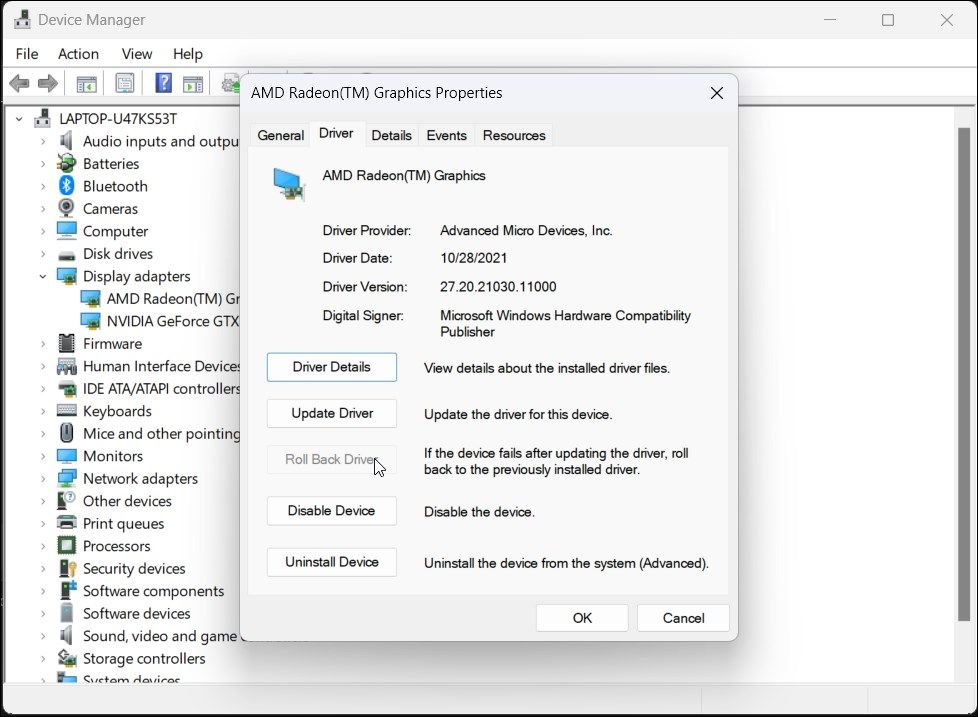
- Hit the Roll Back Driver button.


Rolling back drivers often helps when the device worked perfectly fine before you installed the update.
Also, this could be helpful if the latest update has introduced a bug or glitch that is triggering the Realtek HD Audio Manager this device type is not supported error.
However, if the Roll Back Driver option is grayed out for you, you don’t have an older driver to go back to, and you should go to the next solution.
- RtkAudUService64.exe: What is It & Should You Disable It?
- USB Drive is Showing Wrong Size? Fix it in 2 Steps
- Fix: You Can’t Make This Change Because Selection is Locked
- Event ID 4726: A User Account Was Deleted [Fix]
- Fix: Memory Integrity Cannot be Turned on Due to Ftdibus.sys
3. Use a Generic High Definition Audio Device driver
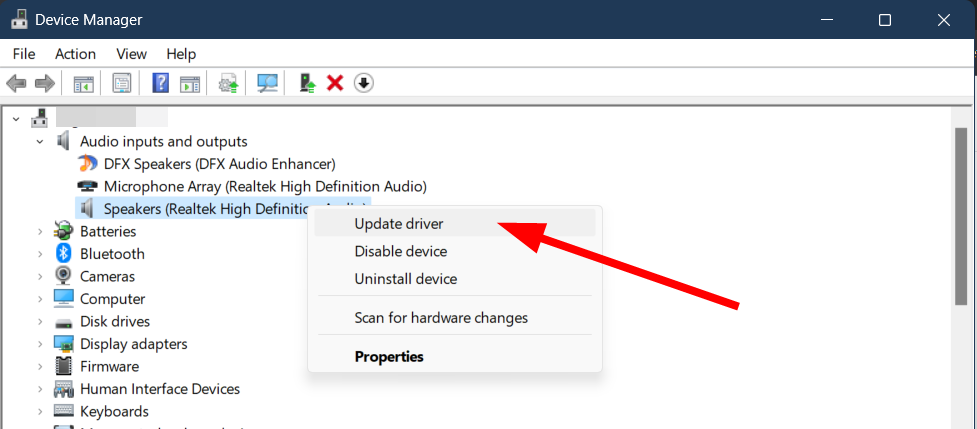
- Right-click on the Start menu and select Device Manager.
- Expand the Audio inputs and outputs section.
- Right-click on the Realtek driver and select Update driver.

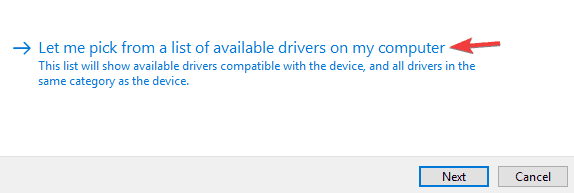
- Select the Browse my computer for driver software option.

- Choose Let me pick from a list of available drivers on my computer.

- Click on High Definition Audio Device driver from the list, and click Next.


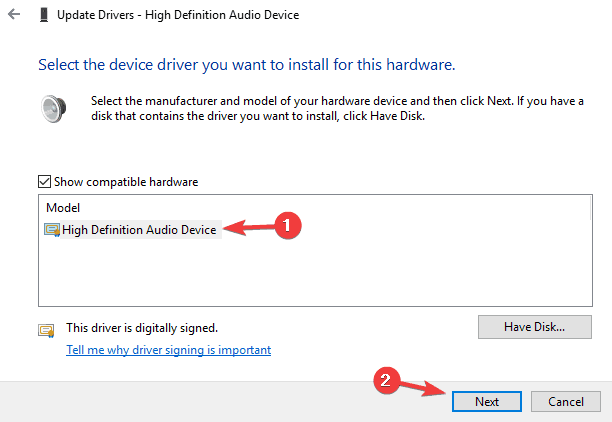
Often such issues can be fixed using the generic driver available on your Windows 11 PC or laptop.
Outdated drivers are the main reason for errors & system issues. If some of your files are missing or crashing, an automated solution like DriverFix can solve these problems in just a couple of clicks. And it’s also lightweight on your system!
There are chances that the device you have connected isn’t compatible with the version of Realtek driver or Realtek driver altogether. In such cases, switching to the generic audio driver might help.
If you want a program that can handle this situation automatically, we recommend using DriverFix. It’s a specialized driver update tool that scans your device for out-of-date drivers that can cause serious errors.
Afterward, it offers you a list of your drivers and finds them the latest updates from its continuously revised database.

DriverFix
Increase your device health and regularly update all your drivers with this great software.
5. Disable the exclusive control option
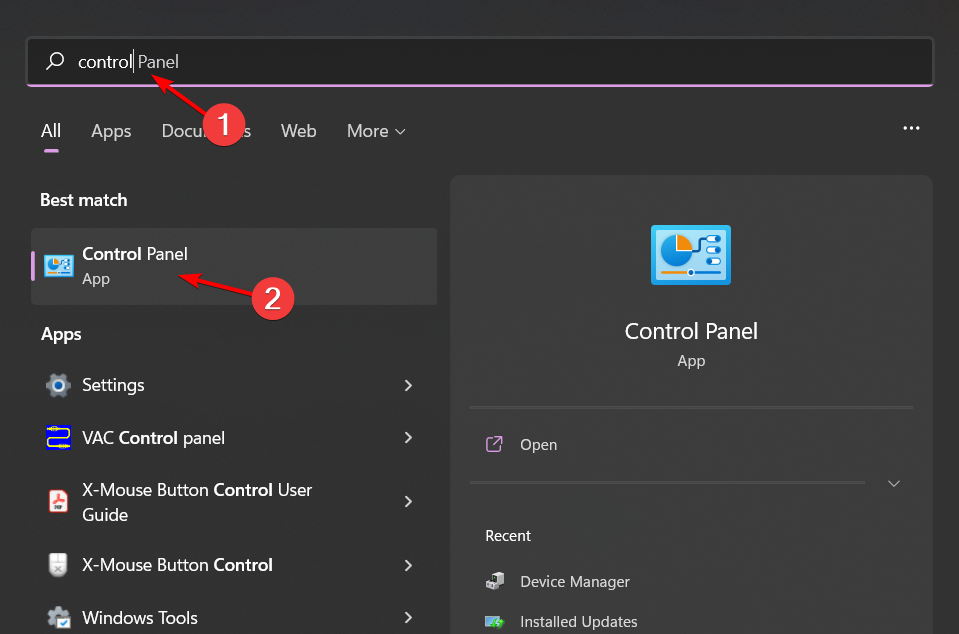
- Click the Search icon, type Control Panel and open it.

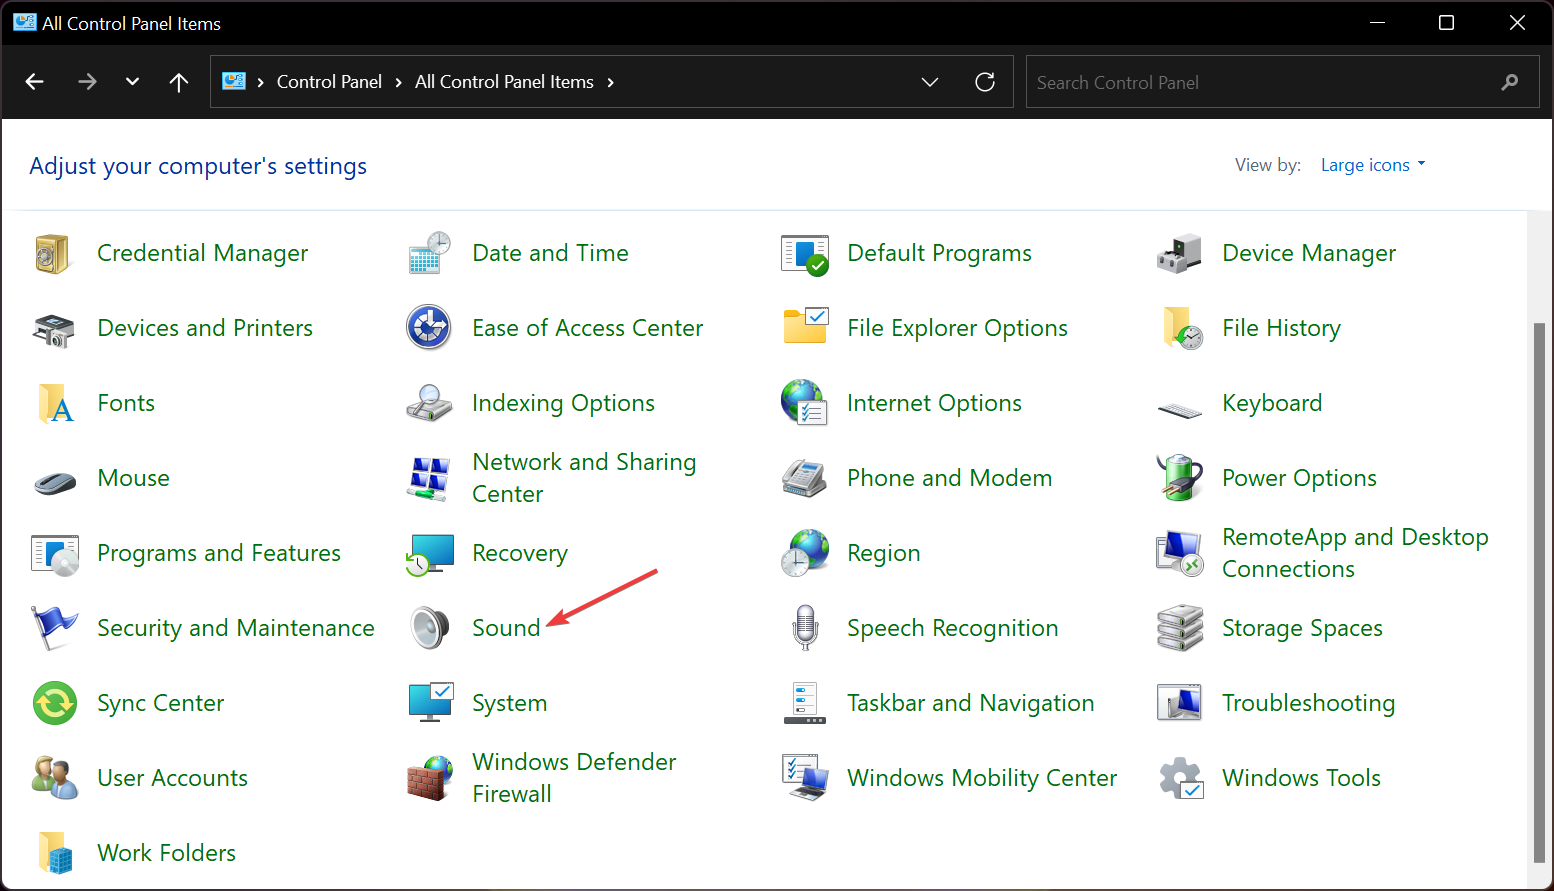
- In View by, select Large icons.
- Select Sound.

- Double-click on your audio device, switch to the Advanced tab, and uncheck Allow applications to take exclusive control of this device option.
- Press Apply, then OK.
- Restart your PC and check if this fixes the issue or not.
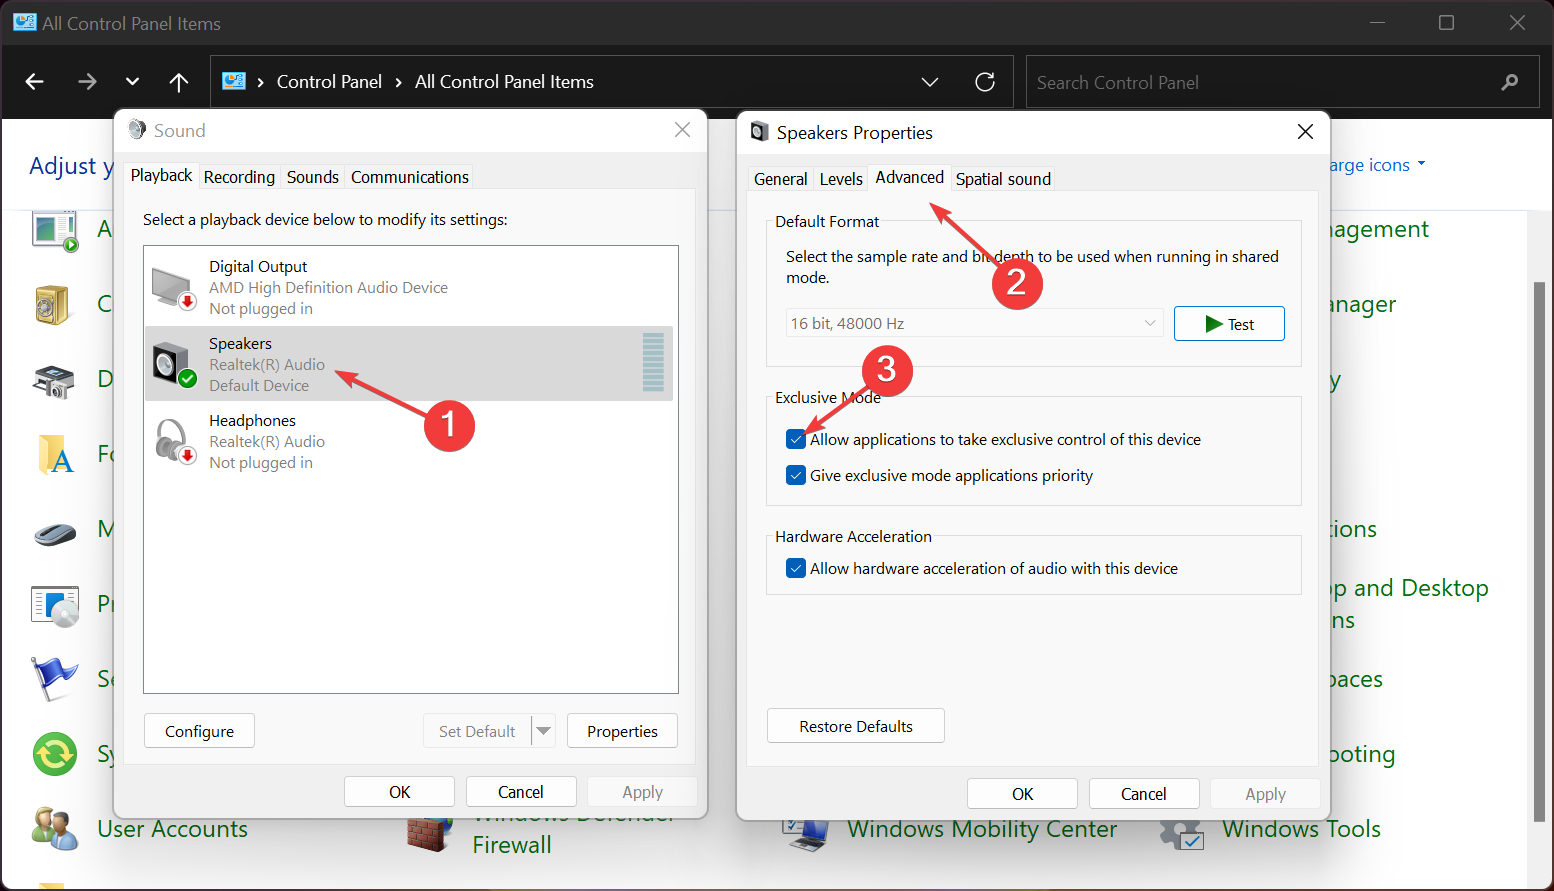
Multiple users confirmed unchecking the allow applications to take exclusive control of this device option fixed the problem for them.
When this option is enabled, no other program can use the sound card. In such a case, if you want to use your device with a different program, then you could end up with the error at hand. Try unchecking the option and see if this resolves the issue or not.
How do I update my Realtek audio driver manually?
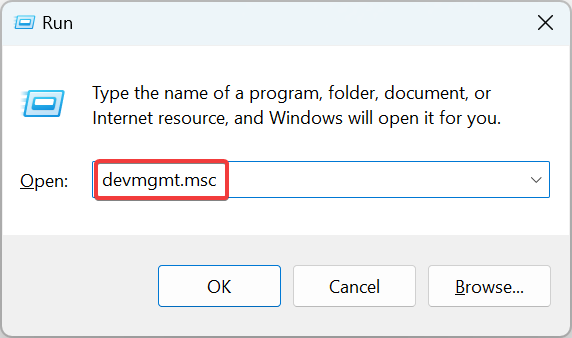
- Press Windows + R to open Run, type devmgmt.msc, and hit Enter.

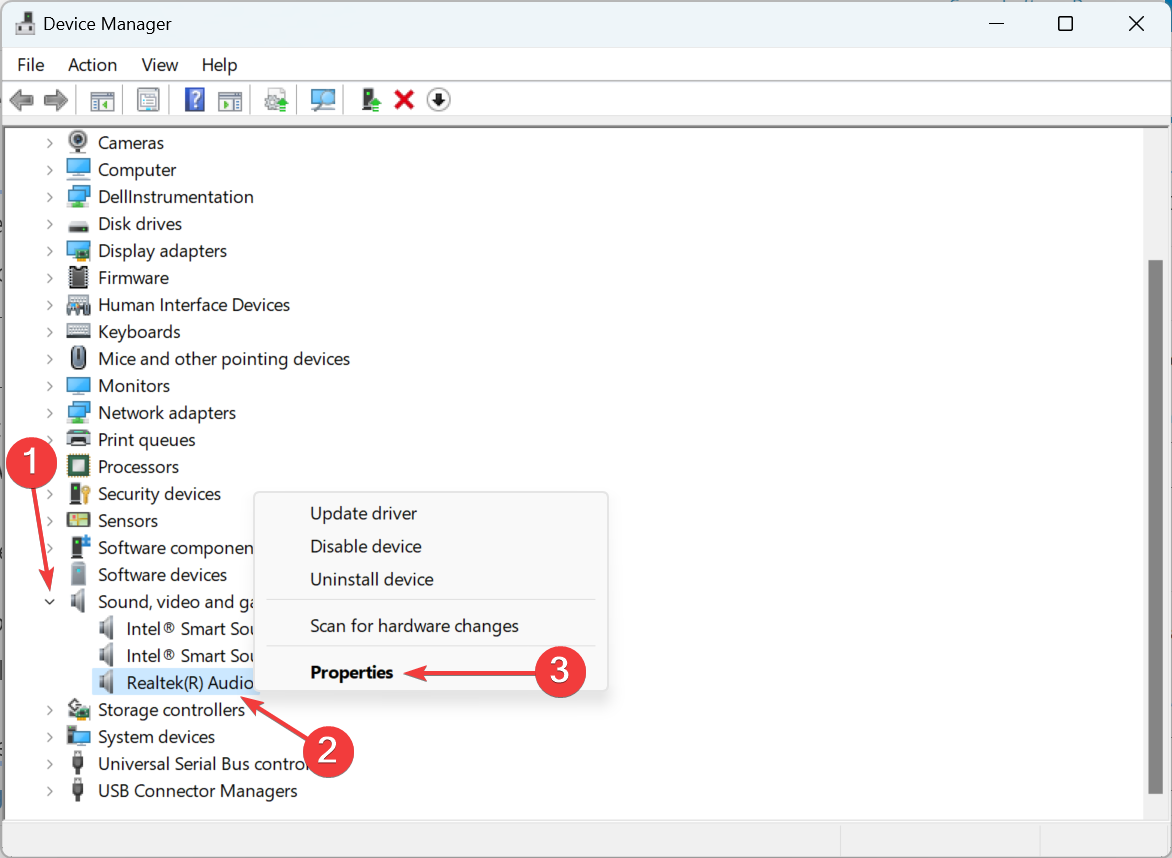
- Expand the Sound, video, and game controllers category, right-click on the Realtek entry, and then select Properties.

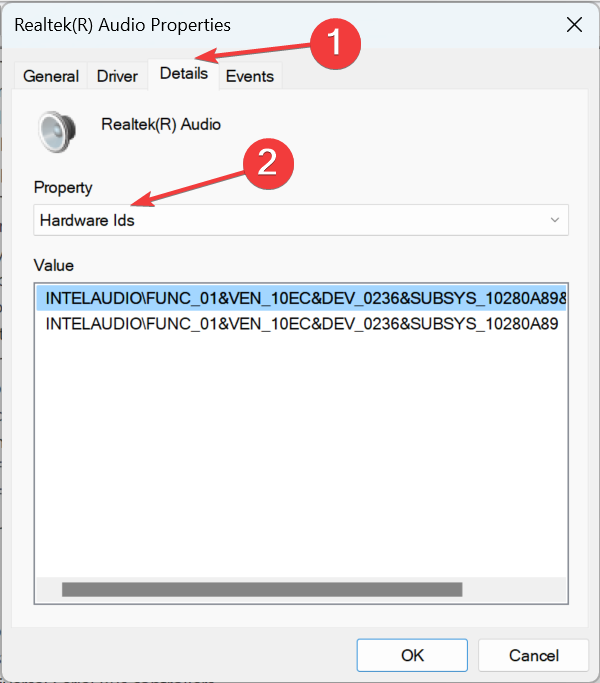
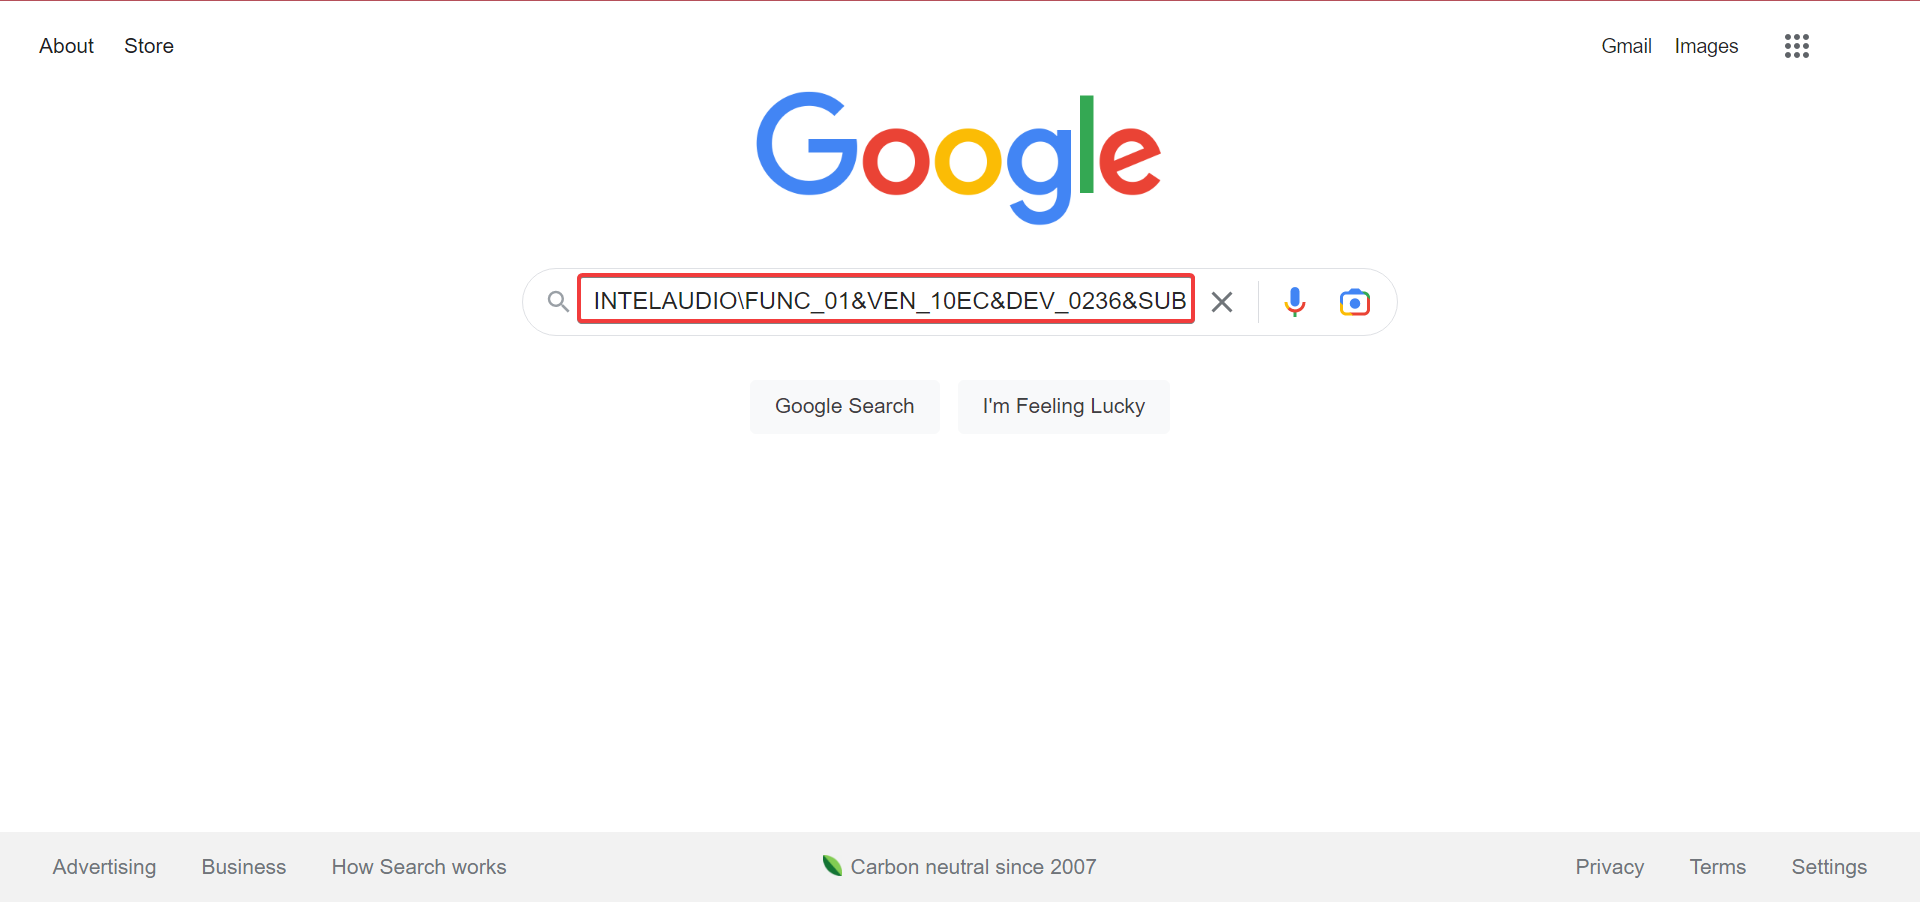
- Now, navigate to the Details tab, and select Hardware IDs from the Property dropdown menu.

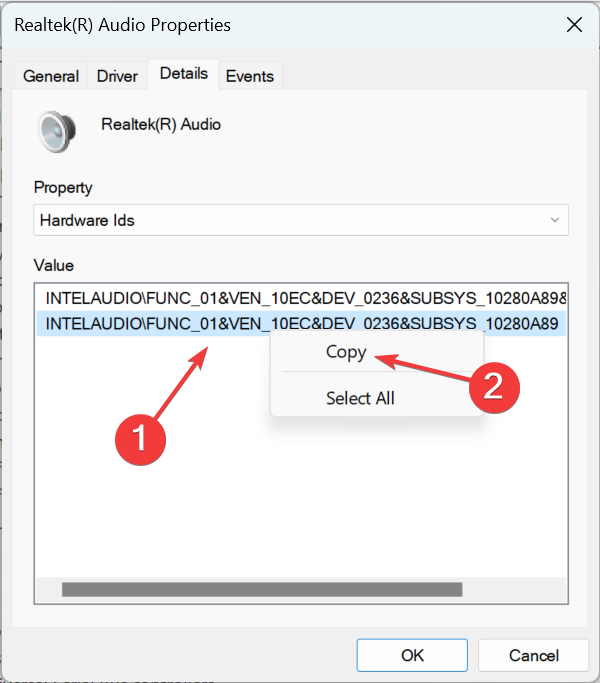
- Right-click on the hardware ID and select Copy.
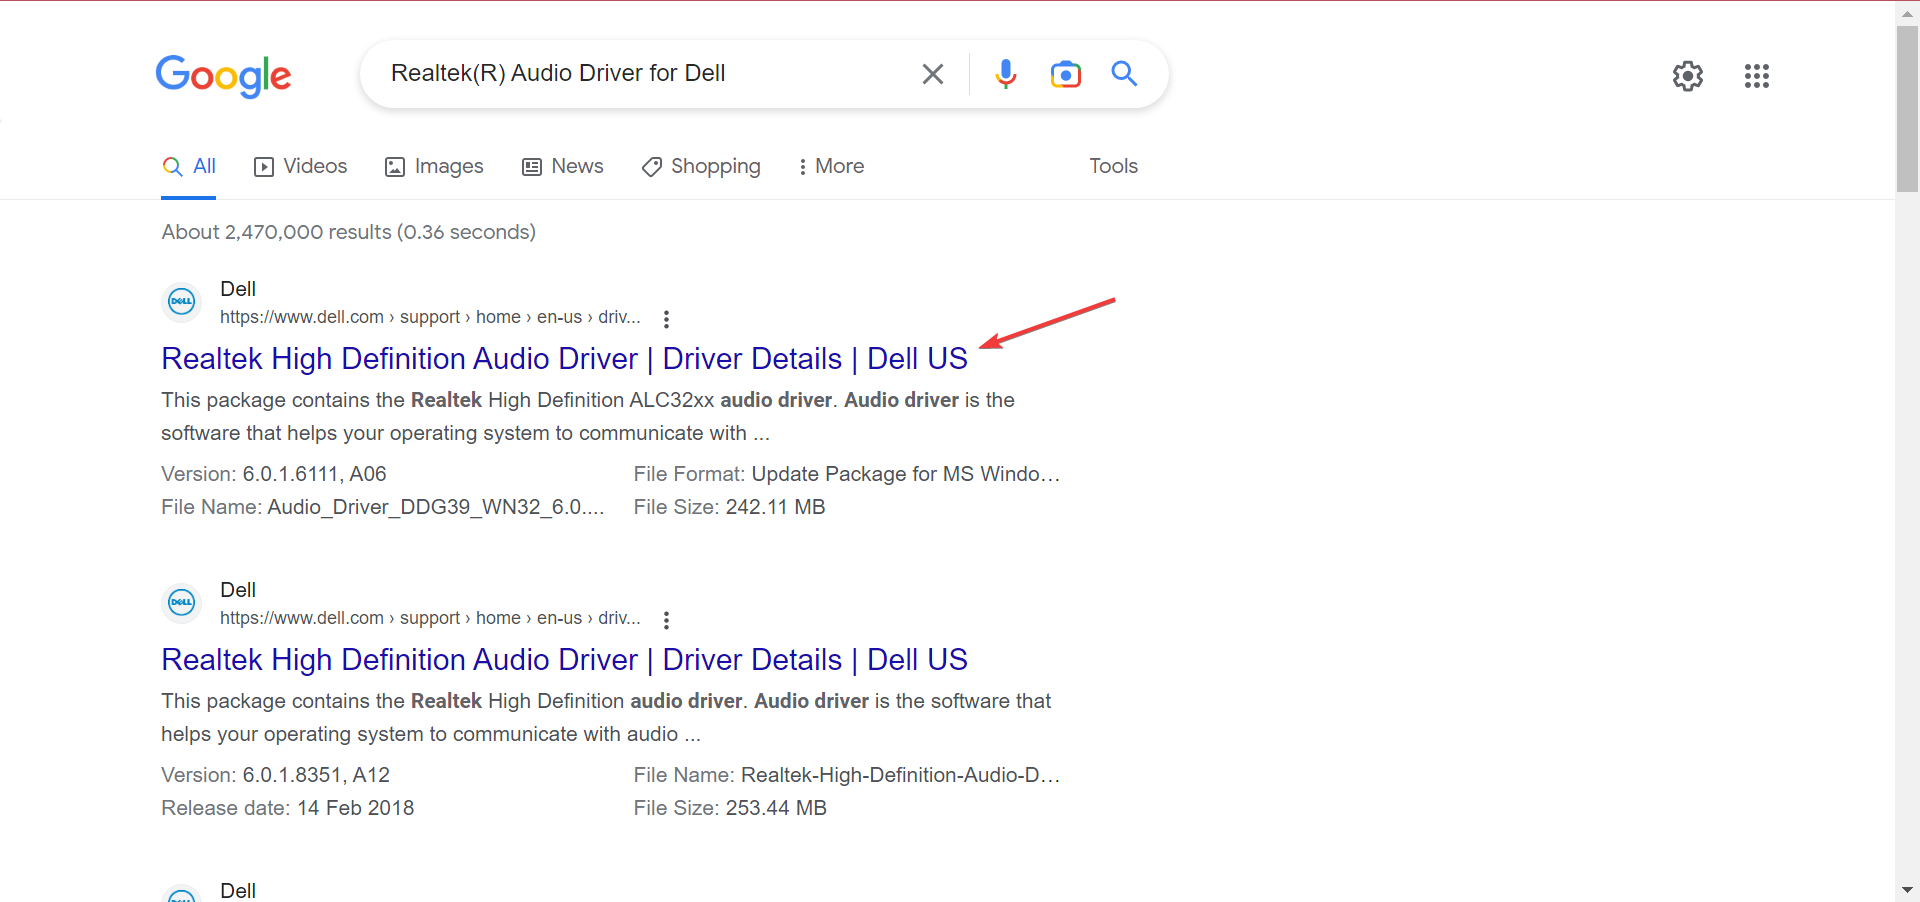
- Now, open Google in a web browser, and search for the hardware ID you copied earlier.

- Identify the driver from the search results.
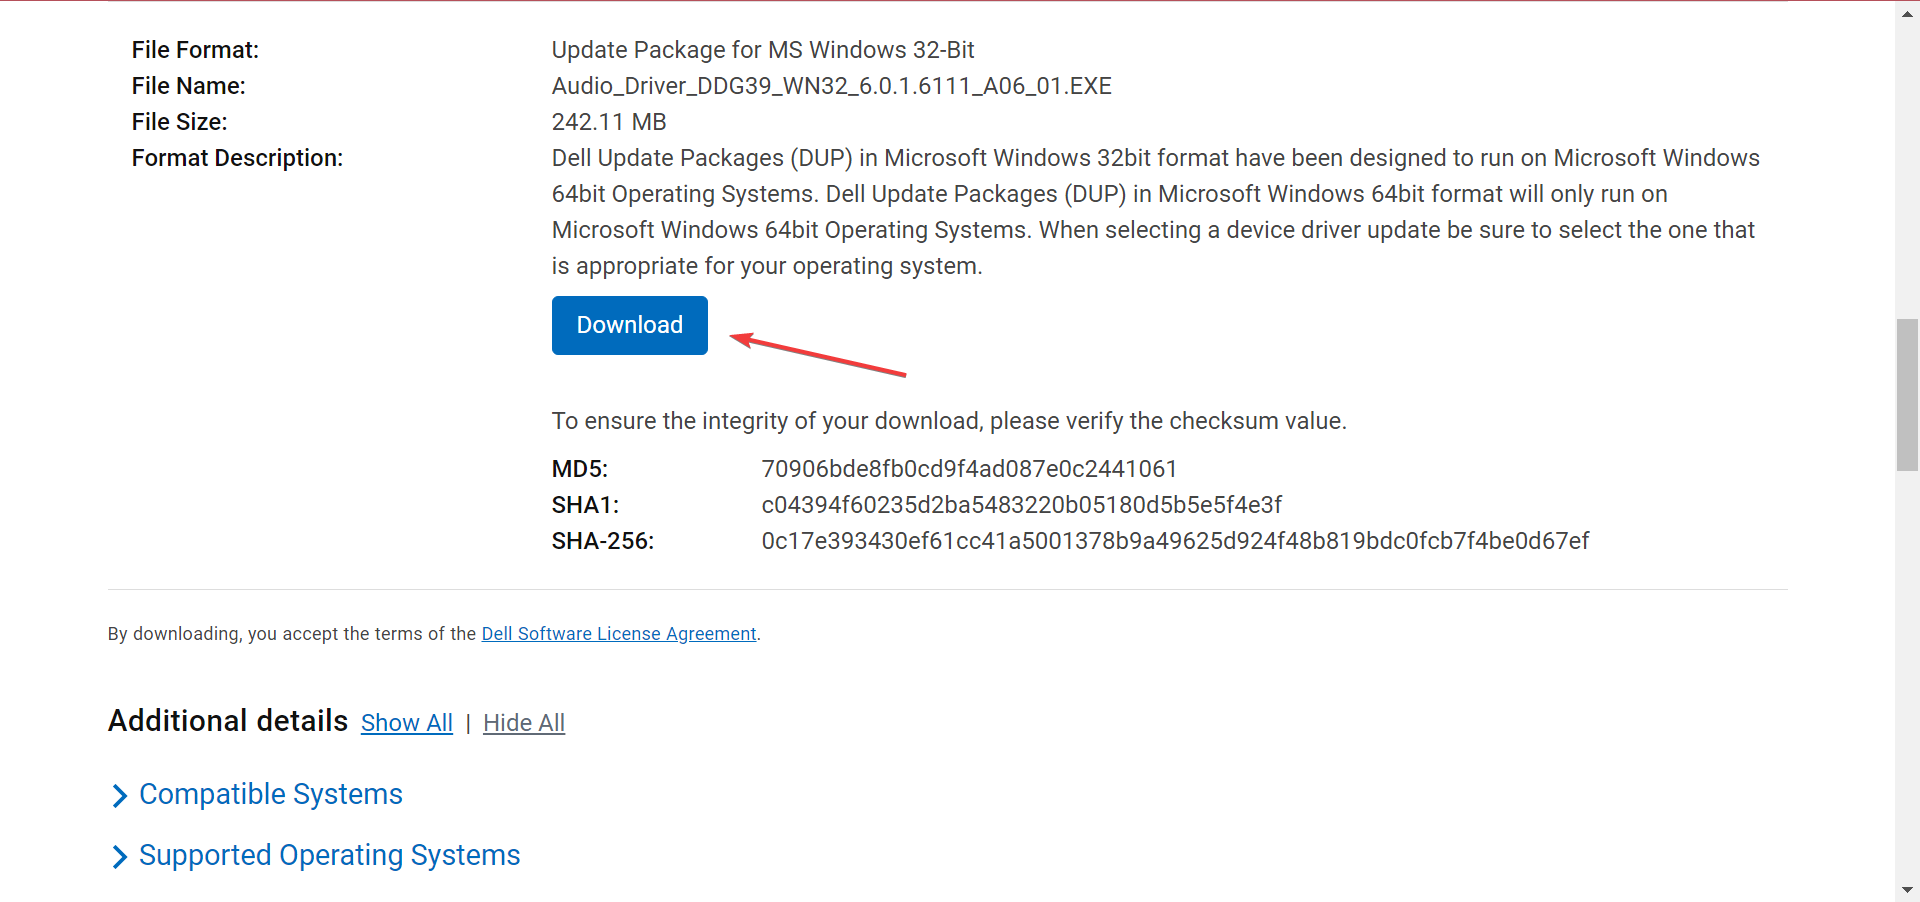
- Next, search for the driver using the relevant information, and click on the OEM’s website from the results.
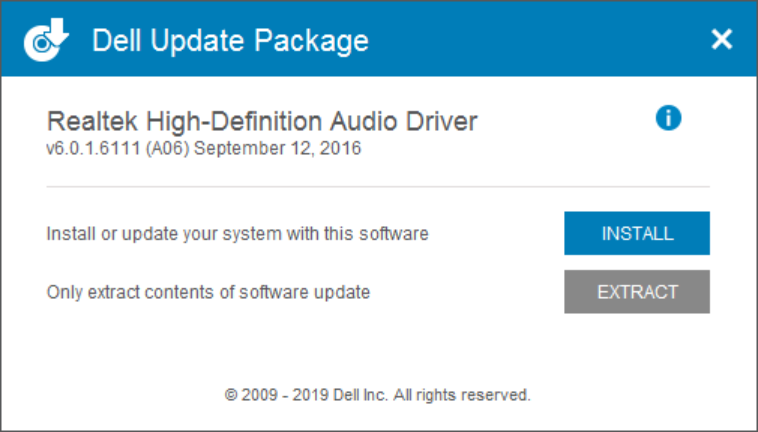
- Once here, click on Download to get the setup. Remember, the interface for every manufacturer will look different.
- Now, run the downloaded setup, and follow the on-screen instructions to complete the process.


When downloading manually, you can get the Realtek Audio driver for Windows 10 64-bit or any other OS and architecture.
Apart from This device not supported error, you could also encounter audio latency issues on your Windows 11 PC. Thankfully, we have a guide that helps you resolves the problem.
Well, this is not the only error you would encounter using Realtek. You can also come across Realtek HD Audio Manager not opening issues, which you can quickly resolve by following the solutions in this guide.
If you are experiencing any other sound-related problems in your Windows 11 PC, then you can check out our guide, which lists some effective ways to fix different Realtek audio driver problems.
Let us know in the comments below which one of the solutions helped you resolve the problem.
Still having issues? Fix them with this tool:
SPONSORED
Some driver-related issues can be solved faster by using a dedicated tool. If you’re still having problems with your drivers, just download DriverFix and get it up and running in a few clicks. After that, let it take over and fix all of your errors in no time!
![]()
If you’re having issues getting Miracast to play nicely with your graphics driver, try these tricks for Windows 11.
If you can’t find the Connect (known as Wireless Display on Windows 11) app on your PC, you can check for Miracast compatibility using the DirectX Diagnostic Tool (Dxdiag) app in Windows 11. However, when doing so, you may encounter the Miracast not supported by graphics driver message.
So, how do you fix it? Let’s discuss this and more to help you restore the Miracast functionality on your PC.
What Triggers the «Miracast Not Supported by Graphics Driver» Message?
This message often indicates issues with your graphics driver or a missing Wireless Display feature. Only in rare instances, it may indicate that your system doesn’t support Miracast.
To find the cause, check if your PC has the Wireless Display feature installed. Press Win + S, type Wireless Display (formerly known as the Connect app), and launch the app. Alternatively, check your Optional features configuration in Settings to see if Wireless Display is installed.
To do this:
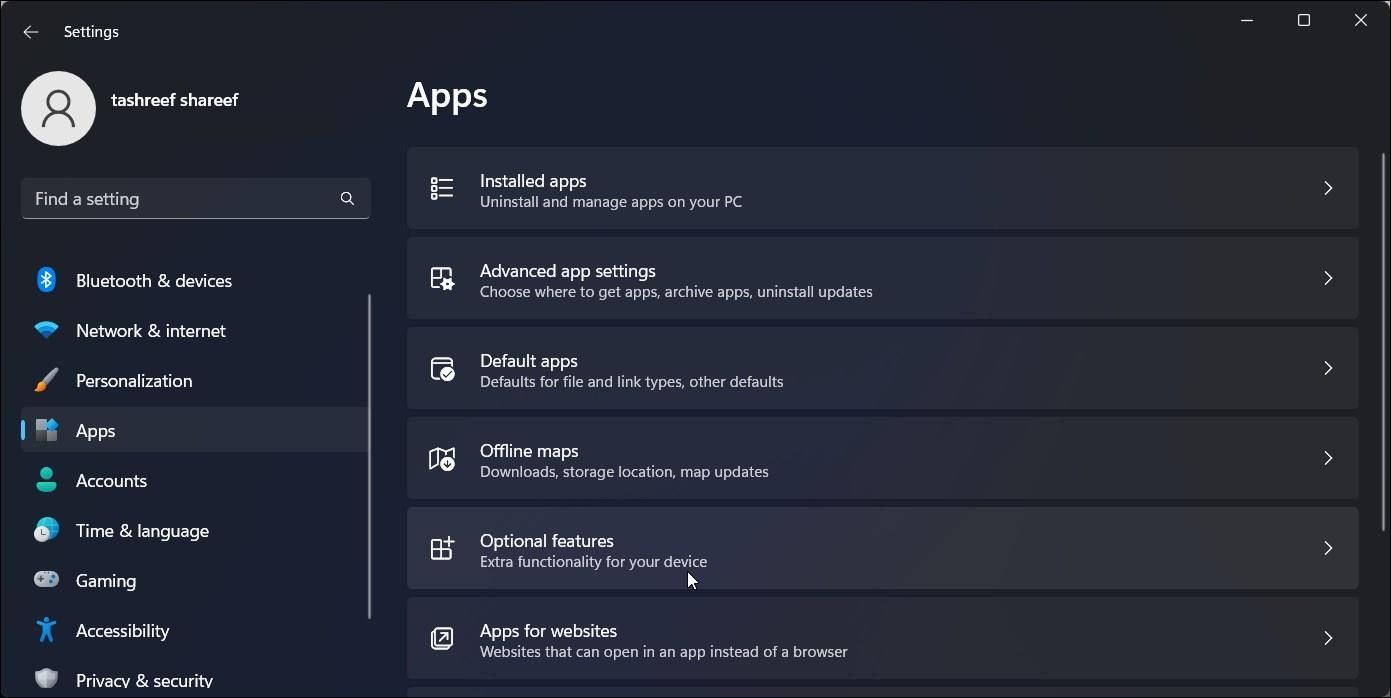
- Go to Settings and open the Apps tab.

- Scroll down and click on Optional features.
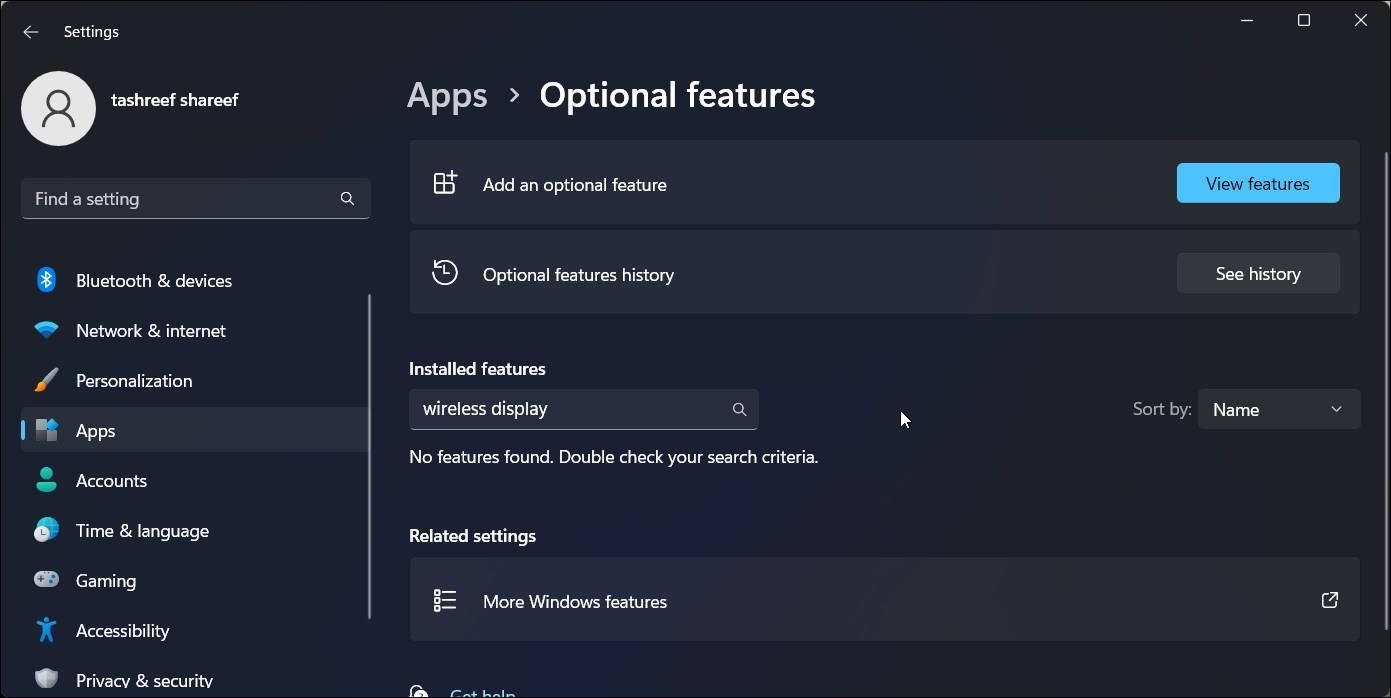
- Type wireless display in the installed features search bar. If no such feature is installed, you may need to install it from Settings.
If Wireless Display is installed, you need to update your graphics driver on Windows to fix the problem.
1. Install the Wireless Display Feature using Settings
You can fix the Miracast not supported by graphics driver message by installing the Wireless Display feature in Windows 11. You can install the Wireless Display app from the Settings panel as well as the Command Prompt.
To install Wireless Display via Settings:
- Press Win + I to open the Settings page.
- Next, in the left pane, open the Apps tab.
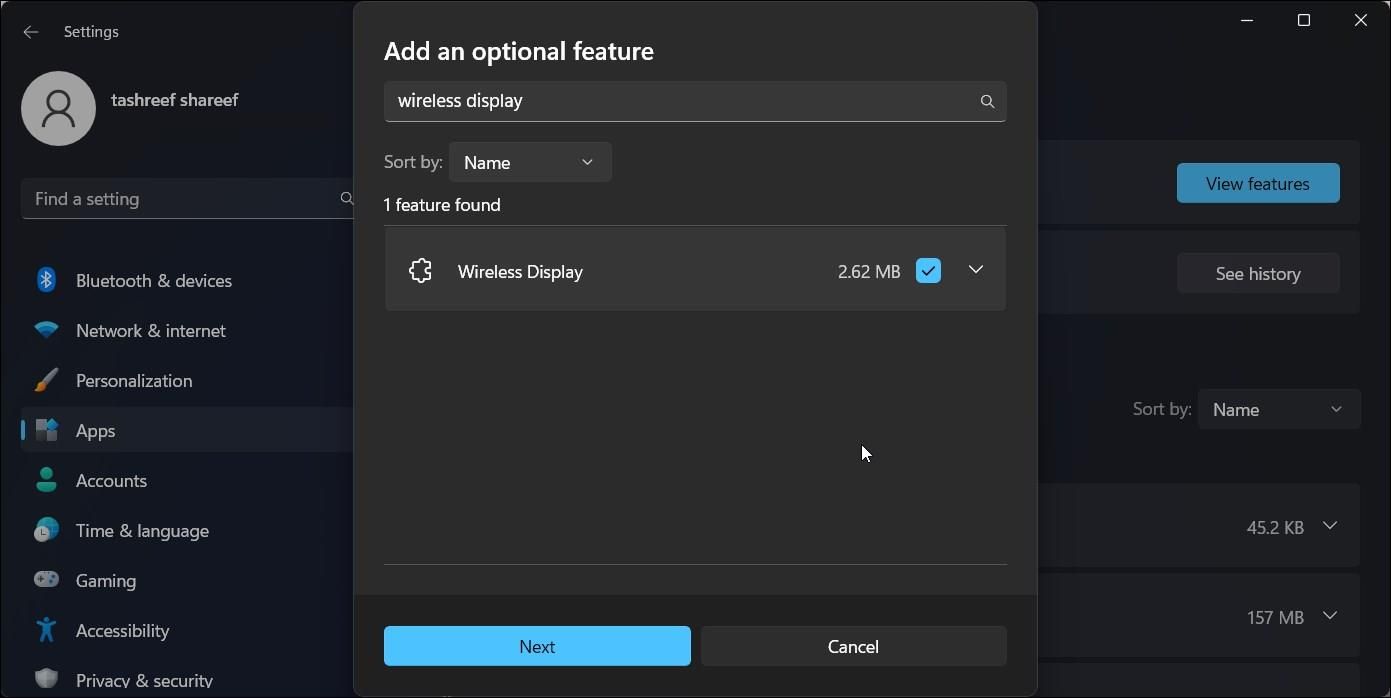
- In the right pane, scroll down and click on Optional features.
- Next, click the View features button for Add an optional feature.
- In the Add an optional feature dialog, type wireless display.
- Select the Wireless Display feature and click Next.
- Click Install to download and install the app. If you encounter an error, proceed with the Command Prompt method to install Wireless Display below.
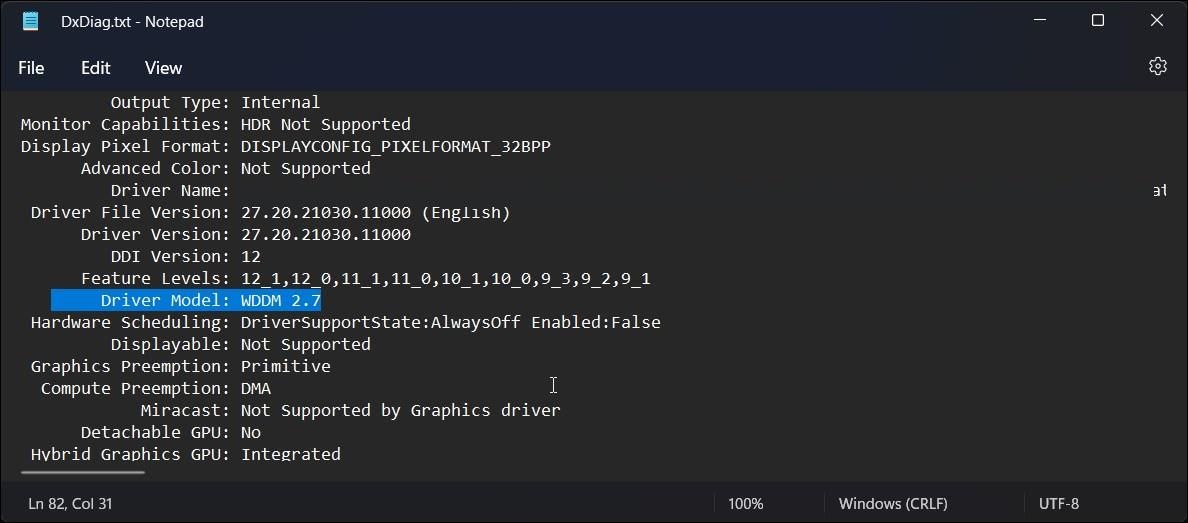
Once installed, restart your PC to apply the changes. After the restart, run the Dxdiag tool and export the system information to a Dxdiag.txt file. If you scroll down to the Miracast section, it will show as Supported.
2. Install Wireless Display Using the Command Prompt
You can also use the Command Prompt to install the Wireless Display feature. This seems to be a foolproof solution when you are unable to install the feature and get Wireless Display couldn’t install error in Settings.
To Install Wireless Display using Command Prompt:
- Press Win + S to open Run.
- Type cmd and right-click on Command Prompt from the search result. Then, select Run as administrator to open it with admin privileges.
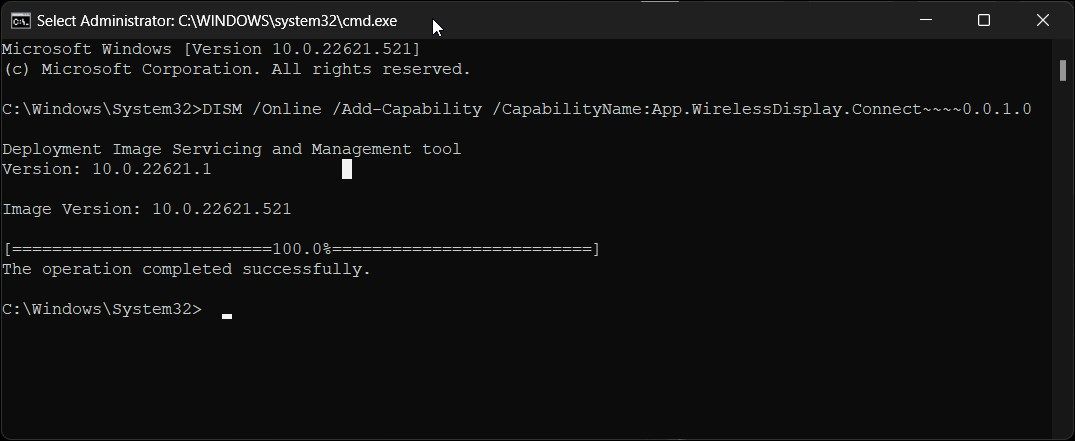
- In the Command Prompt window, type the following and hit Enter:
DISM /Online /Add-Capability /CapabilityName:App.WirelessDisplay.Connect~~~~0.0.1.0 - Now Windows will download and install the Wireless Display feature on your PC. This process may take some time, so wait for the progress bar to reach 100%.
- Once done, close the Command Prompt and restart your PC. After the restart, you should be able to use the Wireless Display app making your Windows 11 computer Miracast compatible.
3. Verify and Update Your Graphics Driver Model
The Miracast not supported by graphics driver issue often occurs on a fresh Windows 11 installation. This is due to your PC using a generic or outdated graphics driver.
To fix the issue, check if your PC meets the Windows Display Driver Model (WDDM) requirement to support Miracast. Follow the steps below to check your WDDM version using the DxDiag tool:
- Press the Win + R to open Run.
- Type DxDiag.exe and click OK to open the DirectX Diagnostic Tool.
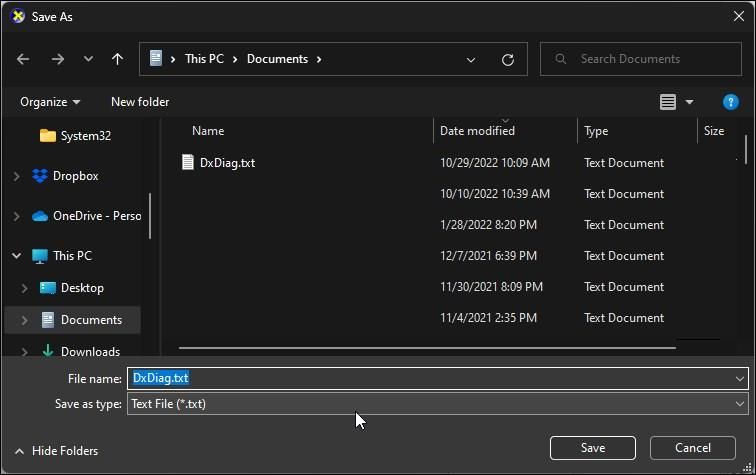
- Next, click on the Save All Information button.

- Choose a save location and click Save. If you have an existing dxdiag file, modify the name, and save the file.

- Next, navigate to the dxdiag.txt file location and open the file in Notepad.

- Here, scroll down and locate the Driver Mode entry. If it is 1.3 or below, you may need to update your display driver to fix the Miracast compatibility issue.

Update Your Graphics Driver
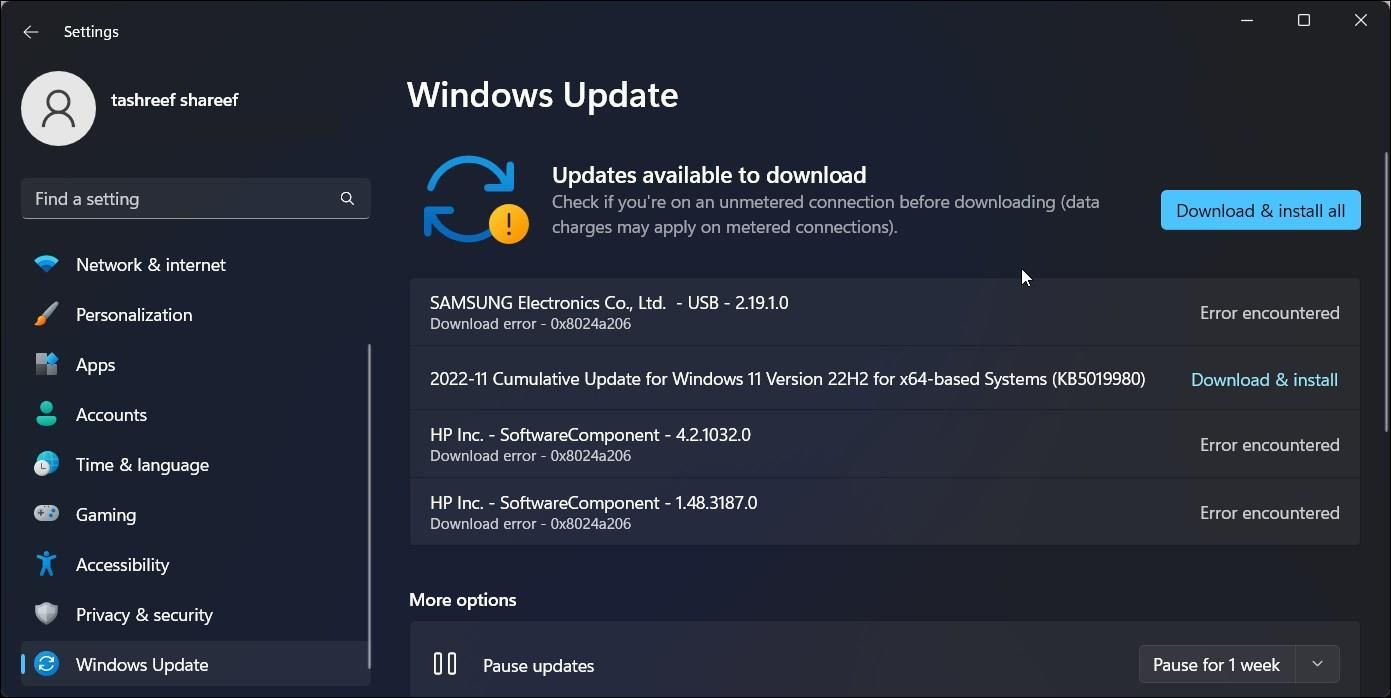
If you’re running a fresh Windows installation, you are likely using a generic graphics driver. Old or outdated graphics drivers can limit your access to some features in Windows 11. To install the latest graphics driver update, look for and install pending Windows updates. To do this, go to Settings > Windows Updates and click on Download & install updates.
You can also use the Nvidia GeForce Experience and AMD Radeon Software to find and install the latest GPU driver updates for their respective GPUs. If you are using an Intel-powered computer, explore Intel’s download section for display driver updates.
In addition, you can use the Windows Device Manager to update your display driver. However, it often doesn’t find the latest drivers for your graphics unit.
4. Roll Back Display Driver
As a last resort, try to roll back the update for your display driver (if any). You can use Device Manager to roll back driver updates on Windows. If not, installing an older version of the driver is also an option.
To roll back the display driver update:
- Press Win + R to open Run.
- Type devmgmt.msc and click OK to open Device Manager.
- In Device Manager, expand the Display adapters section.

- Right-click on your display adapter and select Properties.
- In the Properties dialog, open the Driver tab.
- Next, click the Roll Back Driver button and follow the on-screen instructions.
- If the rollback option is greyed out, you would have to install the older version of the driver manually.
Restoring Miracast Compatibility on Windows 11
Most modern PCs running Windows 10 and 11 are Miracast compatible out of the box. So, when you encounter an error, it is likely due to an incorrect configuration or a glitch. To fix it, check if you have the Wireless Display feature installed. Additionally, update your graphics drivers to the latest version to eliminate display driver-related issues.
System information:
- MacOS Big Sur v11.3
- DBeaver Version 21.0.3.202104181339
- Additional extensions
Connection specification:
- PostgreSQL with PostGIS
- PostgreSQL 13.2 (postgresql-42.2.3.jre7.jar, postgis-jdbc-2.2.1.jar, postgis-geometry-2.5.0.jar)
- No
Describe the problem you’re observing:
SCRAM authentication is not supported by this driver. You need JDK >= 8 and pgjdbc >= 42.2.0 (not «.jre» versions)
Steps to reproduce, if exist:
Attempting to connect to a PostgreSQL 13.1 database on a docker instance with TLSv1.2 installed, I get the error
Include any warning/errors/backtraces from the logs
dbeaver-debug.log
dbeaver-instance.properties contains
#DBeaver instance server properties
#Thu Apr 29 10:47:50 NZST 2021
port=55324
dbeaver-workspace.properties contains
#DBeaver workspace version
#Thu Apr 29 10:47:45 NZST 2021
product-version=21.0.3.202104181339
workspace-id=D13781O419EFGO
product-name=DBeaver