
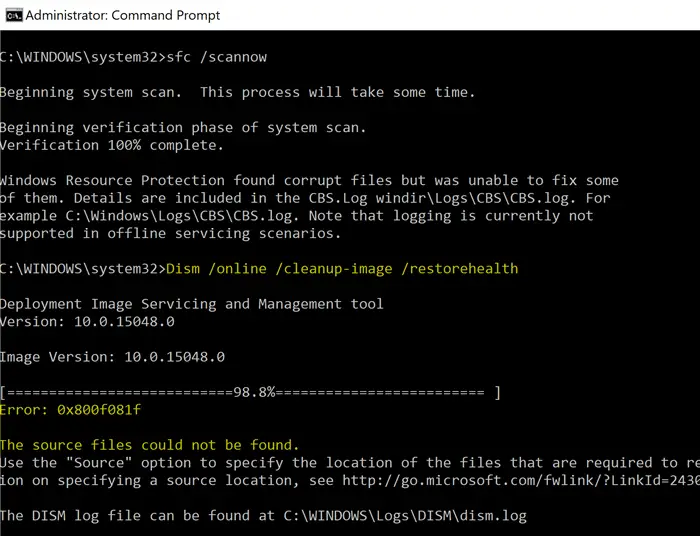
I was having some issues with Cortana on the recently released windows 10, so decided to run a SFC /Scan Now and DISM /Online /Cleanup-Image /restorehealth.
DISM Failed with
«Error: 0x800f081f
The source files could not be found.
Use the «Source» option to specify the location of the files that are required to restore the feature. For more information on specifying a source location, see http://go.microsoft.com/fwlink/?LinkId=243077.
The DISM log file can be found at C:WINDOWSLogsDISMdism.log»
The log is here: https://app.box.com/s/9ing5w3gs7b538d8nzqvz7r4y0msr78r
I could not understand the errors, only that it can’t seem to find the source and google searching has gotten me no where fast.
SFC Fails with:
«Windows Resource Protection found corrupt files but was unable to fix someof them. Details are included in the CBS.Log windirLogsCBSCBS.log. For example C:WindowsLogsCBSCBS.log. Note that logging is currently not supported in offline servicing
scenarios.»
Again I have had no luck in finding a fix.
CBS log is here: https://app.box.com/s/0zrlj0dnfx0mcjpoen7olqqawy1rp1ck
Thanks in advance for your kind assistance.
When running the following DISM command, the error 0x800F081F may appear in some systems. The same error occurs when installing the .NET Framework in Windows 10.
Dism /Online /Cleanup-Image /RestoreHealth
Error: 0x800f081f
The source files could not be found.
Use the "Source" option to specify the location of the files that are required to restore the feature. For more information on specifying a source location, see http://go.microsoft.com/fwlink/?LinkId=243077.
DISM.log
Error DISM DISM Package Manager: PID=13368 TID=5124 Failed finalizing changes. - CDISMPackageManager::Internal_Finalize(hr:0x800f081f)
Error DISM DISM Package Manager: PID=13368 TID=5124 The source files could not be found; their location must be specified using the /source option to restore the feature. - GetCbsErrorMsg
Error DISM DISM Package Manager: PID=13368 TID=5124 Failed processing package changes with session option CbsSessionOptionRepairStoreCorruption - CDISMPackageManager::RestoreHealth(hr:0x800f081f)
Error DISM DISM Package Manager: PID=13368 TID=5124 The source files could not be found; their location must be specified using the /source option to restore the feature. - GetCbsErrorMsg
Error DISM DISM Package Manager: PID=13368 TID=5124 Failed to restore the image health. - CPackageManagerCLIHandler::ProcessCmdLine_CleanupImage(hr:0x800f081f)
Error DISM DISM Package Manager: PID=13368 TID=5124 Failed while processing command cleanup-image. - CPackageManagerCLIHandler::ExecuteCmdLine(hr:0x800f081f)
CBS.log
CBS    Exec: Processing complete, session(Corruption Repairing): 30459372_734419507 [HRESULT = 0x800f081f - CBS_E_SOURCE_MISSING]
CBS    Session: 30459372_734419507 failed to perform store corruption detect and repair operation. [HRESULT = 0x800f081f - CBS_E_SOURCE_MISSING]
CBS    Session: 30459372_734419507 finalized. Download error: 0x80240022 [Unknown Error], Reboot required: no [HRESULT = 0x800f081f - CBS_E_SOURCE_MISSING]
CBS    Failed to FinalizeEx using worker session [HRESULT = 0x800f081f]
The same error (0x800F081F – CBS_E_SOURCE_MISSING) may occur when you attempt to install .NET Framework 3.5 via Optional Features.
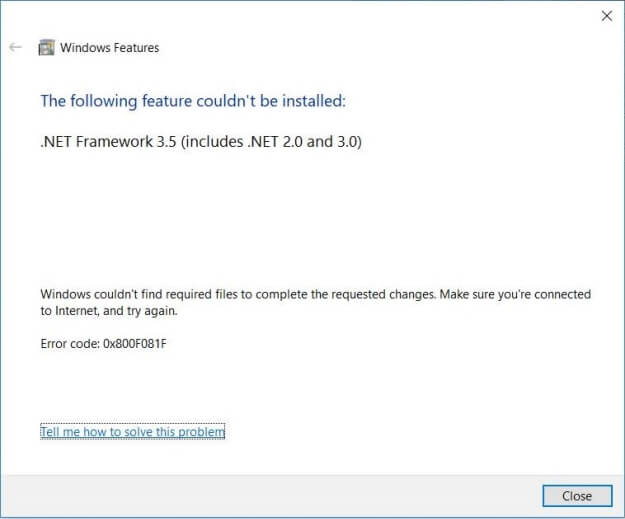
Windows couldn't find required files to complete the requested changes. Make sure you're connected to Internet, and try again:

Error code: 0x800F081F
DISM.log
The source files could not be found.
Use the "Source" option to specify the location of the files that are required to restore the feature. For more information on specifying a source location, see http://go.microsoft.com/fwlink/?LinkId=243077.
The DISM log file can be found at C:WindowsLogsDISMdism.log
0x800F081F - CBS_E_SOURCE_MISSING
This post tells you how to fix the .NET Framework installation and the DISM error 0x800f081f in Windows 10.
Cause
The error 0x800F081F when running DISM or .NET Framework installation can occur due to one of the following reasons:
- The component store is corrupted, or several files are missing in the store.
- The system is unable to access the Microsoft Update servers to restore the missing files.
- The location specified by the path does not contain the files required to install the feature.
- The user who tries installing the feature does not have at least READ access to the location and files.
- The set of installation files is corrupted, incomplete, or invalid for the version of Windows that you are running.
Contents
- Solution 1: Bypass WSUS before installing .NET Framework or running DISM
- Solution 2: Run DISM or Install .NET Framework from a local source (offline)
- Install .NET Framework error from a local source
- Run DISM from a local source
Option 1: Bypass WSUS
If your computer is configured to use your company’s WSUS server or SCCM, temporarily bypass WSUS/SCCM using the following registry edit (requires administrator privileges).
- Right-click Start, and click Run
- Type
regedit.exeand click OK - Go to the following registry key if it exists:
HKEY_LOCAL_MACHINESOFTWAREPoliciesMicrosoftWindowsWindowsUpdateAU
(If the above registry branch or the value
UseWUServerdoesn’t exist, then it means that the WU server policy is not set. In that case, skip to Step 5.) - In the right pane, if the value named
UseWUServerexists, set its data to0 - Go to the following key:
HKEY_LOCAL_MACHINESOFTWAREPoliciesMicrosoftWindowsWindowsUpdate
- Delete the value named
DisableWindowsUpdateAccessif it exists. - Exit the Registry Editor
- Restart Windows.
Now, your computer is configured to fetch files or packages from Microsoft’s Windows Update servers rather than your office network’s WSUS/SCCM server.
After restarting Windows, you should be able to run the DISM command or install .NET Framework successfully. Run the DISM command (or install .NET Framework) after connecting your computer to the internet. DISM fetches the missing files from Microsoft’s servers automatically.
Install .NET Framework
Now, run this command if you want to install .NET Framework:
dism /online /enable-feature /featurename:NetFX3 /All
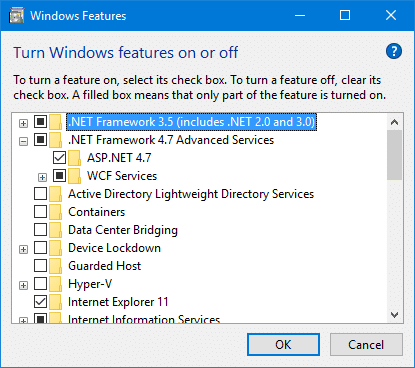
Alternatively, you can install it via Windows Features (optionalfeatures.exe)
If that doesn’t work, follow the instructions in Option 2 below.
Option 2: Run DISM or Install .NET Framework from local installation source (offline)
Fix for .NET Framework error 0x800f081f
To fix the error 0x800F081F when installing .NET Framework, mention the local source path (i.e., mounted ISO or USB setup disk).
1) Download a fresh copy of Windows 10 or 11 ISO from Microsoft.
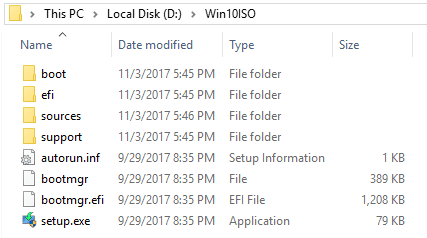
2) Mount the ISO to a drive letter — e.g., E:.
The sourcessxs folder on the ISO or USB setup disk contains the following on-demand package files that are needed to install .NET Framework offline:

- microsoft-windows-netfx3-ondemand-package~31bf3856ad364e35~amd64~~.cab
- Microsoft-Windows-NetFx3-OnDemand-Package~31bf3856ad364e35~amd64~en-US~.cab
(If you have a multi-architecture Windows 10 setup disk, be sure to use the correct “Sources” folder. For x64 version, the path could be H:x64sourcessxs and for x86, the path H:x86sourcessxs.)
3) To install .NET Framework using the local install source (e.g., H:Sources from the USB Setup disk or mounted ISO), run the appropriate command:
dism /online /enable-feature /featurename:NetFX3 /All /Source:H:sourcessxs /LimitAccess

(or)

dism /online /enable-feature /featurename:NetFX3 /All /Source:H:x86sourcessxs /LimitAccess

(or)

dism /online /enable-feature /featurename:NetFX3 /All /Source:H:x64sourcessxs /LimitAccess
You should see the following output:
Enabling feature(s)
[==========================100.0%==========================]
The operation completed successfully.
Or, if you prefer PowerShell instead of DISM, then use this command to install .NET Framework using a local installation source:
Enable-WindowsOptionalFeature –Online –FeatureName "NetFx3" –Source H:sourcessxs -LimitAccess

(or)

Enable-WindowsOptionalFeature –Online –FeatureName "NetFx3" –Source H:x86sourcessxs -LimitAccess

(or)

Enable-WindowsOptionalFeature –Online –FeatureName "NetFx3" –Source H:x64sourcessxs -LimitAccess
Fix for DISM error 0x800f081f
The solution for DISM Error 0x800f081f would be to download a fresh ISO from Microsoft, slipstream the Windows 10 setup disk, and mention it as the repair source when running the DISM command. Slipstreaming is a process of integrating updates (and drivers, optionally) and making an updated Windows 10 or 11 Setup disk or ISO.
- Follow the steps in the article Slipstream Windows 10/11 to create a slipstreamed Windows 10 setup disk.

- Then, open an elevated or admin Command Prompt.
- The ISO files downloaded from Microsoft have multiple Windows 10 Editions in them. You need to find the index that corresponds to the edition of Windows you’re going to repair. You can find it using DISM’s
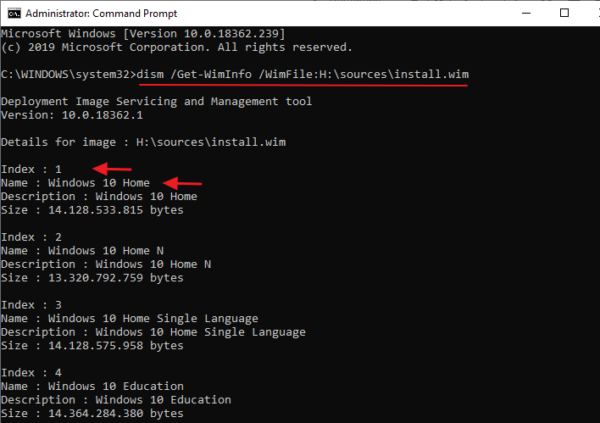
Get-Wiminfocommand-line. - Find the list of indexes and the corresponding editions found in the
install.wim, by running the following command:dism /get-wiminfo /wimfile:"E:sourcesinstall.wim"
… where
E:is the drive letter of the mounted ISO or Windows Setup DVD.In the case of ISOs downloaded from Microsoft, you’ll see more indexes (Meaning: Multiple windows images or different editions combined into the install.wim). For example, here’s the list of indexes found inside the Windows 10 ISO (may vary from ISO build to ISO build) from Microsoft:
Index : 1
Name : Windows 10 Home
Description : Windows 10 Home
Size : 14,168,728,218 bytes

Index : 2
Name : Windows 10 Home N
Description : Windows 10 Home N
Size : 13,409,860,497 bytes

Index : 3
Name : Windows 10 Home Single Language
Description : Windows 10 Home Single Language
Size : 14,168,323,899 bytes

Index : 4
Name : Windows 10 Education
Description : Windows 10 Education
Size : 14,413,769,870 bytes

Index : 5
Name : Windows 10 Education N
Description : Windows 10 Education N
Size : 13,651,680,505 bytes

Index : 6
Name : Windows 10 Pro
Description : Windows 10 Pro
Size : 14,413,947,833 bytes

Index : 7
Name : Windows 10 Pro N
Description : Windows 10 Pro N
Size : 13,649,482,925 bytes

Index : 8
Name : Windows 10 Pro Education
Description : Windows 10 Pro Education
Size : 14,413,708,288 bytes

Index : 9
Name : Windows 10 Pro Education N
Description : Windows 10 Pro Education N
Size : 13,651,618,023 bytes

Index : 10
Name : Windows 10 Pro for Workstations
Description : Windows 10 Pro for Workstations
Size : 14,413,739,079 bytes

Index : 11
Name : Windows 10 Pro N for Workstations
Description : Windows 10 Pro N for Workstations
Size : 13,651,649,264 bytes
- Let’s say you have Windows 10 Home Edition. The index is
1as per the above output. Therefore, run the following command:Dism /Online /Cleanup-Image /RestoreHealth /Source:wim:"E:SourcesInstall.wim":1 /limitaccess
That’s it! the DISM operation has now been completed successfully!

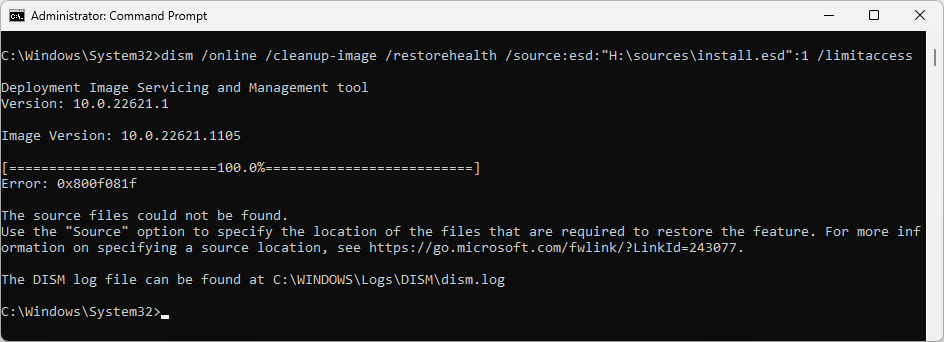
*Important*: Don’t use ESD!
If you have
install.esd(instead ofinstall.wim) in the Windows 10/11 setup disk, you must convert the ESD file into WIM for the above DISM command to work. In our tests, DISM was unable to useInstall.esdas the source and the command ended up with the0x800f081ferror every time, regardless of the syntax (/source:wim:h:sourcesinstall.esdor/source:esd:h:sourcesinstall.esd) used.
The following command is absolutely useless. Don’t use it. It does nothing.
Dism /Online /Cleanup-Image /RestoreHealth /Source:esd:"E:SourcesInstall.esd":1 /limitaccess
After converting the ESD file to WIM, I ran DISM mentioning the
Install.wimfile as the source. It ran perfectly fine, and it restored the missing manifest files indeed!
Please keep this important point in mind when running DISM.
If you don’t use a slipstreamed Windows 10/11 disk (integrated with the latest updates), the error
0x800f081fmay still appear. The ISO/repair source must be the same build your system is running. For instance, you can’t repair a Windows 10 build16299.98using the Windows 10 Build16299.15ISO.
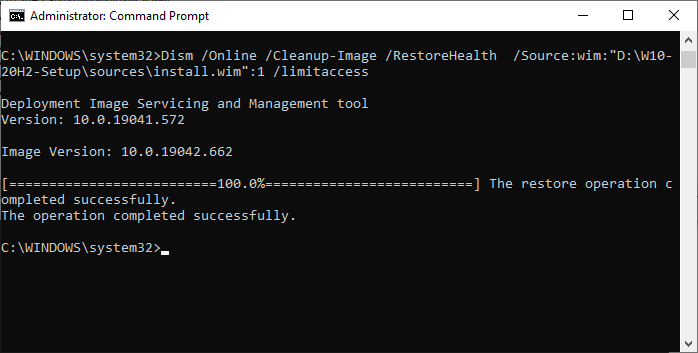
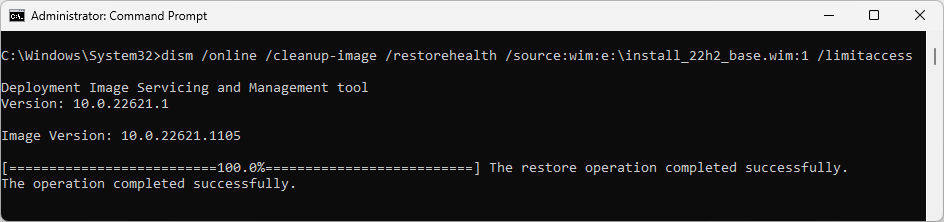
This fixes the DISM error 0x800f081f, and you should now see the message “The restore operation completed successfully.”
Once the DISM command completes successfully, follow up with the sfc /scannow command (from elevated Command Prompt) if necessary. For more information, check out the article Repair Windows 10 Using DISM and SFC.
One small request: If you liked this post, please share this?
One «tiny» share from you would seriously help a lot with the growth of this blog.
Some great suggestions:
- Pin it!
- Share it to your favorite blog + Facebook, Reddit
- Tweet it!
So thank you so much for your support. It won’t take more than 10 seconds of your time. The share buttons are right below. 
«The source files could be found» error, after running the «DISM /Online /Cleanup-Image /RestoreHealth» command, is a common problem on Windows 10 and 8 based computers. ( DISM’s source files could be found error codes: 0x800f081f or 0x800f0906 or 0x800f0907 )

The error «The Sources files could not be found files» in DISM tool, is commonly caused because of the following reasons:
Reason 1. DISM tool cannot find online (in Windows Update or WSUS) the files needed to perform the repair, when using this command: «DISM /Online /Cleanup-Image /RestoreHealth»
Reason 2. You have specified a wrong Windows Image (install.wim) file as the repair source, when using this command: «DISM /Online /Cleanup-Image /RestoreHealth /Source«
Reason 3. The install.wim or the install.esd file, that you ‘re using as a repair source, contains multiple install.wim files.
Reason 4. The Windows.ISO file that you ‘re using as the repair source may be damaged or wrong {it is not the same Windows Version, Edition & Architecture (32 or 64-bit) as the installed Windows}.
Related articles:
- FIX DISM 0x800f081f Error in Windows 10/8
- How to Extract Install.ESD to Install.WIM (Windows 10/8)
- How to Extract an INSTALL.WIM file that contains several INSTALL.WIM files.
In this troubleshooting guide you will find several methods to resolve the following DISM errors: «The Source Files Could not be Found», «0x800f081f», «0x800f0906», «0x800f0907».
How to FIX: DISM /RestoreHealth Could not Find Source Files to Repair Windows 10 or Windows 8/8.1.
Method 1. Clean and Analyze the WinSXS folder.
Method 2. Specify an alternative Repair Source in DISM by using the /Source switch.
Method 3. Specify an alternative Repair Source by using Policy Editor or Registry.
Method 4. Fix DISM Source Files Cannot be Found Error with Windows Repair Upgrade
Method 5. Fix DISM errors by examine the CBS.LOG file.
Method 6. Repair (Reinstall) Windows 10.
Method 1. Clean and Analyze the WinSXS folder.
The Windows Component Store folder, aka WinSXS (C:Windowswinsxs), contains all the files needed during servicing operations in Windows, such as the installation of updates, hotfixes, etc. Additionally, the WinSXS folder, contains all the files needed for a Windows installation or repair.
In time, the size of WinSXS folder becomes large or corrupted, because of updates and new features that are added to the installation, so it needs cleaning before running the DISM tool. To do that:
1. Right click at Start menu ![]() and select Command Prompt (Admin).
and select Command Prompt (Admin).
2. Type the following commands in order:
- DISM /Online /Cleanup-Image /StartComponentCleanup
- SFC /SCANNOW
- DISM /Online /Cleanup-Image /AnalyzeComponentStore
- SFC /SCANNOW
3. Restart your computer.
4. After the restart, open command prompt (as admin) again and run DISM.
- DISM /Online /Cleanup-Image /RestoreHealth
Method 2. Specify an alternative Repair Source in DISM by using the /Source switch.
By default DISM looks online to find the required files to repair the Windows Image. But in most cases, this doesn’t work, so you need to specify a local source for the known good files by using the /Source switch.
Requirements: To accomplish this task you need the install.wim file (X:sources.install.wim) or the install.esd file (X:sources.install.wim) , from a Windows installation media (USB, DVD or ISO), that has the same Windows version, edition and language with the installed version.
If you don’t own a Windows installation media (USB, DVD or ISO), then you can obtain one, by using these options:
- Option A. Download Windows by using the Media Creation tool, or
- Option B. Download Windows in a ISO file by using the Windows ISO Downloader tool, by following the instructions on this article: How to Download Any Version of Windows or Office w/o a Product Key (Legally & Free)
To specify an alternative Repair Source in DISM:
1. Attach the Windows installation media (or mount the ISO file), on your system and notice the drive letter in Windows Explorer. (e.g. «D:»)
2. Open Windows Explorer and explore the contents of «sources» directory, and see if it contains a file named «install.wim» or a file named «install.esd».
3. Next, open Command Prompt as Administrator.
4. According the file type of the «install» file: (.wim or .esd), give the corresponding command to list all the included Windows versions:
a. If you see an «install.wim» file in «sources» folder, give this command:
- dism /Get-WimInfo /WimFile:X:sourcesinstall.wim
b. If you see an «install.esd» file in «sources» folder, give this command:
- dism /Get-WimInfo /WimFile:X:sourcesinstall.esd
* Note: Replace the «X» drive letter according the drive letter of the attached installation media. For example, if the Windows installation media is at drive «H» and the «sources» folder contains an «install.wim» file, then the command will be:
- dism /Get-WimInfo /WimFile:H:sourcesinstall.wim
5. According to your Windows 10 installed version take note of the index number. *
* e.g.: If you have installed the Windows 10 Home edition on your system, then the Index number is «1».
6. Once you find out the index number of your installed Windows version, proceed and repair Windows 10, with the corresponding command, below:
a. If the sources folder contains an «install.wim» file, give this command:
- DISM /Online /Cleanup-Image /RestoreHealth /Source:WIM:X:sourcesinstall.wim:IndexNumber /LimitAccess
b. If the sources folder contains an «install.esd» file, give this command:
- DISM /Online /Cleanup-Image /RestoreHealth /Source:ESD:X:sourcesinstall.esd:IndexNumber /LimitAccess
* Note: Replace the «X» drive letter and the index number, according to your case. For example, if the Windows installation media is at drive «D», and contains an «install.wim» file on «sources» folder, and the index number is «1» (for Windows 10 Home), then the command will be:
- DISM /Online /Cleanup-Image /RestoreHealth /Source:WIM:D:sourcesinstall.wim:1 /LimitAccess

7. Be patient until DISM repairs the Windows image component store.
8. When the operation is completed, you should be informed that the «operation is completed successfully». *
* Note: If the DISM tool fails again with «Error 0x800f081f: The Sources files could not be found», then:
- Extract a corresponding to your Windows version «install.wim» file from the installation media. **
- Use the extracted «install.wim» file as the repair source in DISM, with the below command (see the detailed instructions here).
- DISM /Online /Cleanup-Image /RestoreHealth /Source:WIM:c:install.wim:1 /LimitAccess
** To extract the corresponding to your Windows version «install.wim» file, follow the instructions below according your case:
1. If you have used the Media creation tool (option A), to download Windows 10, then extract the according to your Windows version install.wim file from the install.esd file (X:sourcesinstall.esd), by using the instructions in this article: How to Extract Install.ESD to Install.WIM (Windows 10/8)
2. If you have used the Windows ISO Downloader tool (option B), to download Windows 10/8 ISO, then extract the according to your Windows version install.esd file from the install.wim file (X:sourcesinstall.esd) file, by using the instructions on this article: How to Extract an INSTALL.WIM file that contains several INSTALL.WIM files.
9. Finally, to complete the repairs run the sfc /scannow command:
- SFC /SCANNOW

10. When the SFC scan is completed successfully, you ‘re done!
Method 3. Specify an alternative Repair Source by using Policies or Registry.
1. Attach the Windows installation media on your system and use the steps 1-5 from the method 2 above, to find out the index number for the installed Windows 10 version.
2. Copy the install.wim file from the Windows installation media (e.g. (X:sources.install.wim) to the C: drive (root folder).
3. According to your Windows version (Pro or Home), follow the instructions below to specify the C:install.wim file, as the default source to repair the Windows Image.
2A. Windows 10 Pro & Windows 8/8.1 Pro
– Specify DISM /Source in Local Group Policy Editor:
1. Press Windows ![]() + R keys on your keyboard to load the Run dialog box.
+ R keys on your keyboard to load the Run dialog box.
2. Type gpedit.msc and press Enter to open the Local Group Policy Editor.

3. In Group Policy Editor navigate (from the left side) to:
- Computer Configuration > Administrative Templates > System
4. At the right pane open the «Specify settings for optional component installation and component repair» setting.

5. Apply the following settings:
1. Check Enabled
2. At «Alternate source file path» type: *
wim:C:install.wim:IndexNumber
3. Check Never attempt to download payload from Windows Update
* Note: Replace the IndexNumber according your case. For example, if the index number is «1», type: «wim:C:install.wim:1″

6. Click OK and close Policy Editor.
7. Restart your computer.
8. After the restart, run the «DISM /Online /Cleanup-Image /RestoreHealth» command again.
10. When the repair is completed, then undo the changes in Policies.
2B. Windows 10 Home & Windows 8/8.1 Home
– Specify DISM /Source in Windows Registry:
1. Press “Windows” ![]() + “R” keys to load the Run dialog box.
+ “R” keys to load the Run dialog box.
2. Type regedit and press Enter to open the Windows Registry Editor.

3. At the left pane, navigate to this key:
- HKEY_LOCAL_MACHINESOFTWAREMicrosoftWindowsCurrentVersionPolicies
4. Right click at Policies key and select New > Key
5. Give at the new key the name: Servicing

6. Highlight the Serving key.
7. Right click at the right pane and choose New > Expandable String Value
8. Give at the new value the name: LocalSourcePath

9. Double click at «LocalSourcePath» and at the value data box, type: wim:C:install.wim:IndexNumber
* Note: Replace the IndexNumber according your case. For example, if the index number is «1», type: «wim:C:install.wim:1″
10. Click OK.

11. Right click again at the right pane, and choose New > DWORD (32-bit) Value.
12. Give at the new value the name: UseWindowsUpdate

13. Double click at «UseWindowsUpdate» and at the value data box, type: 2
14. Click OK
* 2 = Do Not use Windows Update
")
15. Close registry editor and restart your computer.
16. After the restart, run the «DISM /Online /Cleanup-Image /RestoreHealth» command again.
17. When the repair is completed, then undo the changes in Windows Registry.
Method 4. Fix DISM Source Files Cannot be Found Error with Windows Repair Upgrade.
The other method to fix DISM errors is to perform a repair upgrade of Windows 10.
Step 1. Repair/Upgrade Windows 10 by using the Media Creation Tool.
1. Download and run the media creation tool according to your OS Version.
- Download Windows 10
- Download Windows 8.1
2. Accept the License Terms.
3. Choose the option Upgrade this PC now and press Next.

4. Wait until Windows is upgraded.
Step 2. Use DISM and SFC tools to complete repairs.
– After Windows upgrade:
1. Right click at Start menu ![]() and select Command Prompt (Admin).
and select Command Prompt (Admin).
2. At the command prompt window give the following command in order to complete the repairs:
- DISM /Online /Cleanup-Image /StartComponentCleanup
- Dism /Online /Cleanup-Image /RestoreHealth
- sfc /scannow
Method 5. Fix DISM errors by examine the CBS.LOG file.
(UPDATED on 17/5/2017)
After it’s execution, DISM creates a log file named «CMS.log» at «C:WindowsLogCBS» directory (e.g. C:WindowsLogCBS CBS.log), that captures any issues found, when DISM command tool is executed.
So, the last method to fix DISM’s «Source Files Cannot be Found» error, is to examine the CBS.LOG file, in order to find out and remove the installed package(s) that causes the problem.
Step 1. Examine DISM’s log file (CBS.LOG).
1. Navigate to C:WindowsLogCBS directory and open the CBS file.

2. Using the Find tool (View > Find), search for «Checking System Update Readiness».

3. Now look under the «Checking System Update Readiness» line, to find out the corrupted package(s). *
* e.g As you can see at the below screenshot, the corrupted package is named: «Microsoft-Windows-TestRoot-and-FlightSigning-Package~31bf3856ad364e35~amd64~~10.0.15063.0«

4. Once, you find out, the name of the corrupted package, then continue to the next step.
Step 2. Remove the corrupted package’s registry entry.
1. Simultaneously press the Windows ![]() + R keys to open the RUN command box.
+ R keys to open the RUN command box.
2. Type regedit and press Enter to open the Windows Registry Editor.
IMPORTANT: Before you continue to modify the registry, first take a backup. To perform a registry backup:
a. From the main menu, go to File & select Export.
b. Specify a destination location (e.g. your Desktop), give a filename (e.g. “RegistryBackup”) and press Save.
3. From the left pane navigate and select this key:
- HKEY_LOCAL_MACHINESOFTWAREMicrosoftWindowsCurrentVersionComponent Based Servicing

5. With the Component Based Servicing key highlighted, go to Edit > Find (from the menu) and search for the corrupted package name in the registry. To do that, just copy and paste in the search box, the name of the corrupted package from the CBS.LOG. (e.g. «Microsoft-Windows-TestRoot-and-FlightSigning-Package~31bf3856ad364e35~amd64~~10.0.15063.0«)

6. At this occasion, the name of the corrupted package was found at the following two (2) registry locations/keys:
-
- HKEY_LOCAL_MACHINESOFTWAREMicrosoftWindowsCurrentVersionComponent Based ServicingPackageIndexMicrosoft-Windows-TestRoot-and-FlightSigning-Package~31bf3856ad364e35~amd64~~0.0.0.0
- HKEY_LOCAL_MACHINESOFTWAREMicrosoftWindowsCurrentVersionComponent Based ServicingPackagesMicrosoft-Windows-TestRoot-and-FlightSigning-Package~31bf3856ad364e35~amd64~~10.0.15063.0
7. Now, for safety reasons, backup all the registry key(s) you found, by right-clicking on each of them (on the left pane) and choose Export. *
* Note: Save the registry keys on your desktop, in order to easy import them backup if something goes wrong. (Double click at the exported key(s) and Merge).

8. Then, assign full control permissions, to the all key(s) you found, to Administrators. To do that:
1. Right click on each key and select Permissions.

2. Highlight Administrators, place a check mark on Full Control checkbox and click OK.

9. Finally, delete all the registry key(s) you found. (Right click on each key and Delete)

10. Close Registry Editor.
Step 3. Move the corrupted packages to other location on disk.
1. Navigate to C:WindowsServicingPackages folder.
2. Now find and move to your desktop, all the packages that their name begins with the name of the damaged package in the CBS.LOG.
e.g. At this occasion I found (and moved to my desktop) the following four (4) files, that their name begins with the name of the corrupted package: Microsoft-Windows-TestRoot-and-FlightSigning-Package
-
- Microsoft-Windows-TestRoot-and-FlightSigning-Package~31bf3856ad364e35~amd64~~10.0.15063.0
- Microsoft-Windows-TestRoot-and-FlightSigning-Package~31bf3856ad364e35~amd64~~10.0.15063.0.mum
- Microsoft-Windows-TestRoot-and-FlightSigning-WOW64-Package~31bf3856ad364e35~amd64~~10.0.15063.0
- Microsoft-Windows-TestRoot-and-FlightSigning-WOW64-Package~31bf3856ad364e35~amd64~~10.0.15063.0.mum
 ,
,
3. Restart you computer.
4. Run the «DISM /Online /Cleanup-Image /RestoreHealth» command again.
5. If DISM is completed without errors, then proceed and delete permanently the exported registry key(s) and the moved packages from your desktop.
Method 6. Repair Windows 10.
If after applying all the above methods, you still receive the error «Source Files Could not be Found» in DISM, then I suggest to perform a Repair Installation of Windows 10.
Good luck! Let me know if this guide has helped you by leaving your comment about your experience. Please like and share this guide to help others.
If this article was useful for you, please consider supporting us by making a donation. Even $1 can a make a huge difference for us in our effort to continue to help others while keeping this site free:

If you want to stay constantly protected from malware threats, existing and future ones, we recommend that you install Malwarebytes Anti-Malware PRO by clicking below (we
do earn a commision from sales generated from this link, but at no additional cost to you. We have experience with this software and we recommend it because it is helpful and useful):
Full household PC Protection — Protect up to 3 PCs with NEW Malwarebytes Anti-Malware Premium!
Такие проблемы dism.log обычно вызваны повреждением файла, связанного с Microsoft Windows, или, в некоторых случаях, его случайным или намеренным удалением. Большую часть проблем, связанных с данными файлами, можно решить посредством скачивания и установки последней версии файла LOG. В некоторых случаях реестр Windows пытается загрузить файл dism.log, который больше не существует; в таких ситуациях рекомендуется запустить сканирование реестра, чтобы исправить любые недопустимые ссылки на пути к файлам.
Вы можете скачать новую копию файла dism.log для %%os%% (и ряда операционных систем Windows) в таблице ниже. В некоторых случаях в настоящее время в нашей базе могут отсутствовать некоторые версии dism.log, но их можно запросить, нажав на кнопку Request (Запрос) ниже. В редких случаях, если вы не можете найти версию необходимого вам файла ниже, мы рекомендуем вам обратиться за дополнительной помощью к Microsoft Corporation.
Как правило, при размещении файла dism.log в надлежащем каталоге, проблемы, связанные с данным файлом, больше не возникают, однако следует выполнить проверку, чтобы убедиться в том, что проблему удалось устранить. Вы можете проверить результат, запустив приложение Microsoft Windows и проверить, появляется ли проблема.
| Dism.log Описание файла | |
|---|---|
| Тип файла: | LOG |
| Группа: | |
| Софт: | Microsoft Windows |
| ID: | 6.3.9600.16384 |
| Автор: | Microsoft Corporation |
| Имя файла: | dism.log |
| KB: | 19178 |
| SHA-1: | 414155c34d051f4541e05c167aa61773327f247d |
| MD5: | 0a5c63055f575f20f7b0cdc5e22bf704 |
| CRC32: |
Продукт Solvusoft
Загрузка
WinThruster 2023 — Сканировать ваш компьютер на наличие ошибок реестра в dism.log
Windows
11/10/8/7/Vista/XP
Установить необязательные продукты — WinThruster (Solvusoft) | Лицензия | Политика защиты личных сведений | Условия | Удаление
LOG
dism.log
Идентификатор статьи: 951233
Dism.log
| Имя файла | Идентификатор файла (контрольная сумма MD5) | Размер (в байтах) | Загрузить | |||||||||||||||||
|---|---|---|---|---|---|---|---|---|---|---|---|---|---|---|---|---|---|---|---|---|
| + dism.log | 0a5c63055f575f20f7b0cdc5e22bf704 | 18.73 KB | ||||||||||||||||||
|
Распространенные сообщения об ошибках в Dism.log
Вопросы, связанные с dism.log и Microsoft Windows:
- «Ошибка в файле Dism.log.»
- «Dism.log удален, отсутствует или перемещен. «
- «Файл не найден: dism.log»
- «Не удалось загрузить модуль для dism.log. «
- «Отсутствует модуль: не удалось зарегистрировать dism.log»
- «Ошибка Dism.log во время выполнения. «
- «Ошибка загрузки: dism.log. «
Ошибки Dism.log возникают во время установки Microsoft Windows, при запуске приложений, связанных с Dism.log (Microsoft Windows), во время запуска или завершения работы или во время установки ОС Windows. При появлении ошибки dism.log запишите вхождения для устранения неполадок Microsoft Windows и чтобы HelpMicrosoft Corporation найти причину.
Причины ошибок в файле Dism.log
Проблемы dism.log вызваны поврежденным или отсутствующим dism.log, недопустимыми ключами реестра, связанными с Microsoft Windows, или вредоносным ПО.
В частности, проблемы dism.log, созданные:
- Раздел реестра dism.log поврежден.
- Вредоносные программы заражены и повреждены dism.log.
- dism.log злонамеренно или ошибочно удален другим программным обеспечением (кроме Microsoft Windows).
- Другое программное обеспечение, конфликтующее с Microsoft Windows, dism.log или общими ссылками.
- Поврежденная установка или загрузка Microsoft Windows (dism.log).
Последнее обновление: 07/05/2022
[Среднее время чтения статьи: 4,7 мин.]
Файлы Log, такие как dism.log, считаются разновидностью файла Текст (Журнал). Они соотносятся с расширением LOG, разработанным компанией Microsoft для Microsoft Office Access 2010 14.
Первая версия dism.log для Trillian 6.1.0.17 увидела свет 09/04/2019 в Windows 10.
Последним обновлением версии [v14] для Microsoft Office Access 2010 является 14, выпущенное 07/04/2011.
В этой статье приведены подробные сведения о dism.log, руководство по устранению неполадок с файлом LOG и список версий, доступных для бесплатной загрузки.
Что такое сообщения об ошибках dism.log?
Общие ошибки выполнения dism.log
Ошибки файла dism.log часто возникают на этапе запуска Microsoft Office Access 2010, но также могут возникать во время работы программы.
Эти типы ошибок LOG также известны как «ошибки выполнения», поскольку они возникают во время выполнения Microsoft Office Access 2010. К числу наиболее распространенных ошибок выполнения dism.log относятся:
- Не удается найти dism.log.
- dism.log — ошибка.
- Не удалось загрузить dism.log.
- Ошибка при загрузке dism.log.
- Не удалось зарегистрировать dism.log / Не удается зарегистрировать dism.log.
- Ошибка выполнения — dism.log.
- Файл dism.log отсутствует или поврежден.
Библиотека времени выполнения Microsoft Visual C++
![]()
Ошибка выполнения!
Программа: C:WindowsLogsDISMdism.log
Среда выполнения получила запрос от этого приложения, чтобы прекратить его необычным способом.
Для получения дополнительной информации обратитесь в службу поддержки приложения.

В большинстве случаев причинами ошибок в LOG являются отсутствующие или поврежденные файлы. Файл dism.log может отсутствовать из-за случайного удаления, быть удаленным другой программой как общий файл (общий с Microsoft Office Access 2010) или быть удаленным в результате заражения вредоносным программным обеспечением. Кроме того, повреждение файла dism.log может быть вызвано отключением питания при загрузке Microsoft Office Access 2010, сбоем системы при загрузке или сохранении dism.log, наличием плохих секторов на запоминающем устройстве (обычно это основной жесткий диск) или заражением вредоносным программным обеспечением. Таким образом, крайне важно, чтобы антивирус постоянно поддерживался в актуальном состоянии и регулярно проводил сканирование системы.
Как исправить ошибки dism.log — 3-шаговое руководство (время выполнения: ~5-15 мин.)
Если вы столкнулись с одним из вышеуказанных сообщений об ошибке, выполните следующие действия по устранению неполадок, чтобы решить проблему dism.log. Эти шаги по устранению неполадок перечислены в рекомендуемом порядке выполнения.
Шаг 1. Восстановите компьютер до последней точки восстановления, «моментального снимка» или образа резервной копии, которые предшествуют появлению ошибки.
Чтобы начать восстановление системы (Windows XP, Vista, 7, 8 и 10):
- Нажмите кнопку «Пуск» в Windows
- В поле поиска введите «Восстановление системы» и нажмите ENTER.
- В результатах поиска найдите и нажмите «Восстановление системы»
- Введите пароль администратора (при необходимости).
- Следуйте инструкциям мастера восстановления системы, чтобы выбрать соответствующую точку восстановления.
- Восстановите компьютер к этому образу резервной копии.
Если на этапе 1 не удается устранить ошибку dism.log, перейдите к шагу 2 ниже.

Шаг 2. Если вы недавно установили приложение Microsoft Office Access 2010 (или схожее программное обеспечение), удалите его, затем попробуйте переустановить Microsoft Office Access 2010.
Чтобы удалить программное обеспечение Microsoft Office Access 2010, выполните следующие инструкции (Windows XP, Vista, 7, 8 и 10):
- Нажмите кнопку «Пуск» в Windows
- В поле поиска введите «Удалить» и нажмите ENTER.
- В результатах поиска найдите и нажмите «Установка и удаление программ»
- Найдите запись для Microsoft Office Access 2010 14 и нажмите «Удалить»
- Следуйте указаниям по удалению.
После полного удаления приложения следует перезагрузить ПК и заново установить Microsoft Office Access 2010.
Если на этапе 2 также не удается устранить ошибку dism.log, перейдите к шагу 3 ниже.
![]()
Microsoft Office Access 2010 14
Microsoft Corporation
Шаг 3. Выполните обновление Windows.
Когда первые два шага не устранили проблему, целесообразно запустить Центр обновления Windows. Во многих случаях возникновение сообщений об ошибках dism.log может быть вызвано устаревшей операционной системой Windows. Чтобы запустить Центр обновления Windows, выполните следующие простые шаги:
- Нажмите кнопку «Пуск» в Windows
- В поле поиска введите «Обновить» и нажмите ENTER.
- В диалоговом окне Центра обновления Windows нажмите «Проверить наличие обновлений» (или аналогичную кнопку в зависимости от версии Windows)
- Если обновления доступны для загрузки, нажмите «Установить обновления».
- После завершения обновления следует перезагрузить ПК.
Если Центр обновления Windows не смог устранить сообщение об ошибке dism.log, перейдите к следующему шагу. Обратите внимание, что этот последний шаг рекомендуется только для продвинутых пользователей ПК.

Если эти шаги не принесут результата: скачайте и замените файл dism.log (внимание: для опытных пользователей)
Если ни один из предыдущих трех шагов по устранению неполадок не разрешил проблему, можно попробовать более агрессивный подход (примечание: не рекомендуется пользователям ПК начального уровня), загрузив и заменив соответствующую версию файла dism.log. Мы храним полную базу данных файлов dism.log со 100%-ной гарантией отсутствия вредоносного программного обеспечения для любой применимой версии Microsoft Office Access 2010 . Чтобы загрузить и правильно заменить файл, выполните следующие действия:
- Найдите версию операционной системы Windows в нижеприведенном списке «Загрузить файлы dism.log».
- Нажмите соответствующую кнопку «Скачать», чтобы скачать версию файла Windows.
- Скопируйте этот файл в соответствующее расположение папки Microsoft Office Access 2010:
Windows 10: C:WindowsLogsDISM
Windows 10: C:WindowsLogsDISM
Windows 10: C:WindowsLogsDISM
Windows 10: C:WindowsLogsDISM
Windows 10: C:WindowsLogsDISM
Показать на 26 каталогов больше +Windows 10: C:WindowsLogsDISM
Windows 10: C:WindowsLogsDISM
Windows 10: C:WindowsLogsDISM
Windows 10: C:WindowsLogsDISM
Windows 10: C:WindowsLogsDISM
Windows 10: C:WindowsLogsDISM
Windows 10: C:WindowsLogsDISM
Windows 10: C:WindowsLogsDISM
Windows 10: C:WindowsLogsDISM
Windows 10: C:WindowsLogsDISM
Windows 10: C:WindowsLogsDISM
Windows 10: C:WindowsLogsDISM
Windows 10: C:WindowsLogsDISM
Windows 10: C:WindowsLogsDISM
Windows 10: C:WindowsLogsDISM
Windows 10: C:WindowsLogsDISM
Windows 10: C:WindowsLogsDISM
Windows 10: C:WindowsLogsDISM
Windows 10: C:WindowsLogsDISM
Windows 10: C:WindowsLogsDISM
Windows 10: C:WindowsLogsDISM
Windows 10: C:WindowsLogsDISM
Windows 10: C:WindowsLogsDISM
Windows 10: C:WindowsLogsDISM
Windows 10: C:WindowsLogsDISM
Windows 10: C:WindowsLogsDISM - Перезагрузите компьютер.
Если этот последний шаг оказался безрезультативным и ошибка по-прежнему не устранена, единственно возможным вариантом остается выполнение чистой установки Windows 10.
СОВЕТ ОТ СПЕЦИАЛИСТА: Мы должны подчеркнуть, что переустановка Windows является достаточно длительной и сложной задачей для решения проблем, связанных с dism.log. Во избежание потери данных следует убедиться, что перед началом процесса вы создали резервные копии всех важных документов, изображений, установщиков программного обеспечения и других персональных данных. Если вы в настоящее время не создаете резервных копий своих данных, вам необходимо сделать это немедленно.
Скачать файлы dism.log (проверено на наличие вредоносного ПО — отсутствие 100 %)
ВНИМАНИЕ! Мы настоятельно не рекомендуем загружать и копировать dism.log в соответствующий системный каталог Windows. Microsoft, как правило, не выпускает файлы Microsoft Office Access 2010 LOG для загрузки, поскольку они входят в состав установщика программного обеспечения. Задача установщика заключается в том, чтобы обеспечить выполнение всех надлежащих проверок перед установкой и размещением dism.log и всех других файлов LOG для Microsoft Office Access 2010. Неправильно установленный файл LOG может нарушить стабильность работы системы и привести к тому, что программа или операционная система полностью перестанут работать. Действовать с осторожностью.
Файлы, относящиеся к dism.log
Файлы LOG, относящиеся к dism.log
| Имя файла | Описание | Программа (версия) | Размер файла (байты) | Расположение файла |
|---|---|---|---|---|
| SRUtmp.log | Log | Microsoft Office Access 2010 14 | 65536 | C:WindowsSystem32sru |
| setupact.log | Log | Microsoft Office Access 2010 14 | 136440 | C:$WINDOWS.~BTSourcesPanther |
| setupapi.dev.log | Log | Microsoft Office Access 2010 14 | 1023186 | C:Windowsinf |
| dism.log | Log | Microsoft Office Access 2010 14 | 50772 | C:WindowsLogsDISM |
| MpCmdRun.log | Log | Microsoft Office Access 2010 14 | 93360 | C:WindowsServiceProfilesNetworkServiceAppDa… |
Вы скачиваете пробное программное обеспечение. Для разблокировки всех функций программного обеспечения требуется покупка годичной подписки, стоимость которой оставляет 39,95 долл. США. Подписка автоматически возобновляется в конце срока (Подробнее). Нажимая кнопку «Начать загрузку» и устанавливая «Программное обеспечение», я подтверждаю, что я прочитал (-а) и принимаю Лицензионное соглашение и Политику конфиденциальности компании Solvusoft.