
How to solve “Diskpart Virtual Disk Service error: The disk is not empty” without data loss? MiniTool Partition Wizard provides you with a full tutorial in this post. Back up the data or volumes on dynamic disks and then follow the given methods to finish the conversion.
«Virtual Disk Service error: The disk is not empty» occurs when you are converting a dynamic disk with volumes or data to basic disk.
Back up data or volumes with MiniTool Partition Wizard before you delete them and convert the disk. Then use the Convert Dynamic Disk to Basic feature of this software to finish the process.
Free Download
You can also delete volumes on the dynamic disk and convert it to basic disk via Disk Management and Diskpart after you back up them.
About Virtual Disk Service Error: The Disk Is Not Empty
Virtual Disk Service (VDS), introduced in Windows Server 2003, is a set of application programming interfaces. It provides you with a unified disk management interface, allowing you to create/format/delete volumes, assign drive letters for volumes, convert a basic disk into a dynamic disk, etc.
VDS is supported on Windows Server 2003, Windows Vista, and newer systems. Besides, it works with tools like Disk Management, Diskpart, and DiskRAID. With the help of VDS, you can handle various storage devices with only one suitable storage application. However, VDS may prompt you with errors like all other programs.
The “Virtual Disk Service error: The disk is not empty” is one of the Diskpart Virtual Disk Service errors. It usually occurs when you are converting a dynamic disk to a basic one.
Why does this error happen to you? The error generally indicates that the dynamic disk to delete contains data or volumes. As you know, the disk can’t be converted to a basic one unless all the volumes and data on it are removed. However, you will experience irreversible data loss after you delete the volumes. How to avoid that?
Well, you can back up volumes or data on the dynamic disk with a piece of data backup software before converting it. Then convert the dynamic disk to a basic one with one of the offered methods. By doing so, you can get rid of “Diskpart Virtual Disk Service error: The disk is not empty” without data loss.
Back up the Data Before Converting the Dynamic Disk
MiniTool Partition Wizard is a great solution for data backup. You can directly copy the whole disk to another one or just copy a single partition to other storage devices. As for dynamic volume backup, you should use the Copy Volume feature of this application.
Tips:
MiniTool ShadowMaker is a data backup/cloning/restoring tool that enables you to clone dynamic volumes (simple volumes). Moreover, you are also allowed to back up files/folders/systems/disks and then restore them with it. In a word, it is worth having a try!
Free Download
Here’s the tutorial for backing up dynamic volumes with MiniTool Partition Wizard.
Step 1: Get MiniTool Partition Wizard installed on your computer and then launch it.
Note:
The free edition of this software doesn’t allow you to perform dynamic disk management, so you should buy its pro or higher editions. Go to this page to learn more about the MiniTool Partition Wizard edition comparison.
Free Download
Step 2: Choose the dynamic volume that you would like to copy and tap the Copy Volume feature in the left panel. Alternatively, you can right-click on the target dynamic volume and click Copy Volume.
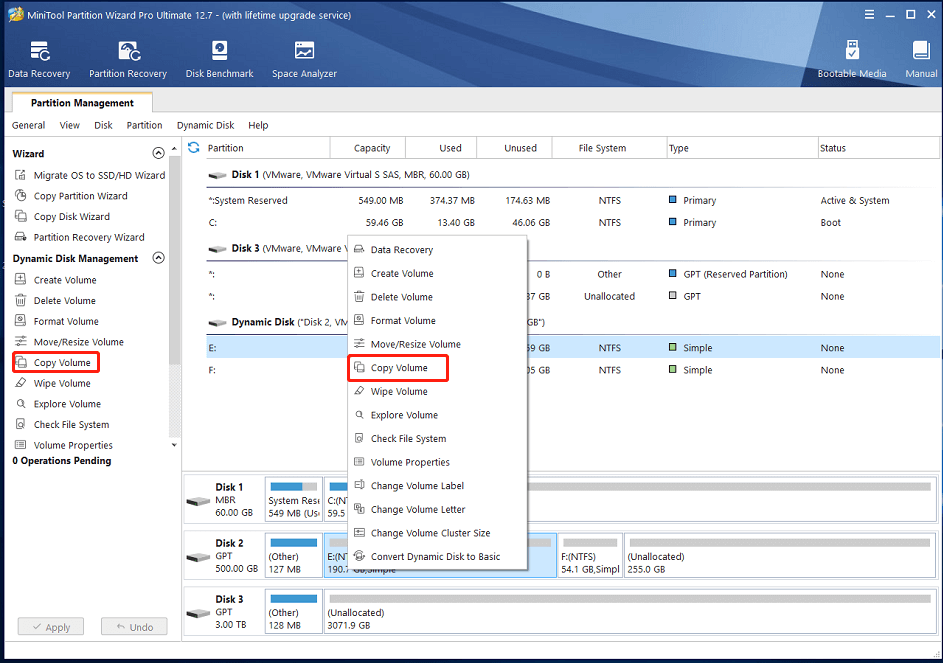
Step 3: Select a disk and set the position where you want to create the copy of the chosen volume. After that, click the Next button to continue.
Warning: Dynamic volumes can’t be copied to a partition or a basic disk. You should copy a dynamic volume to unallocated space on a basic disk, or the disk would be converted to dynamic.
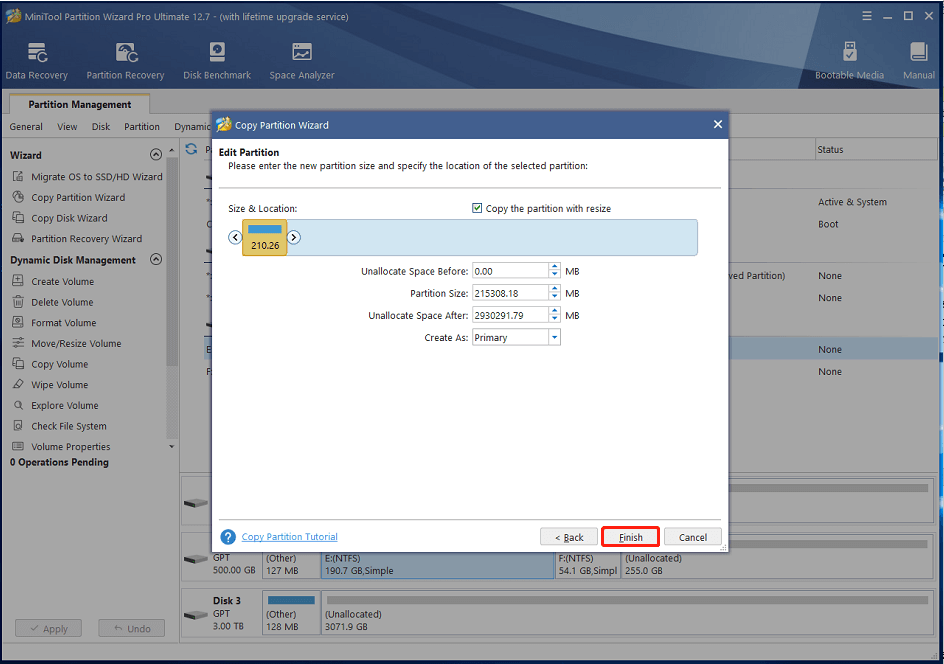
Step 4: According to your needs, edit the size and specify the location of the new partition. Then click the Finish button to save the changes you’ve made.
Step 5: After you back to the main interface, you can preview the copied volume on the disk. To make the operation take effect, you should click the Apply button.
Tips:
In the prompted window, click Yes to carry out the operation. If you are required to restart the computer, click Restart Now to complete the operation.
Since you have backed up the data on your dynamic disk, it’s time to convert it to the basic disk now! There are 3 reliable and effective ways for you to do that. Simply choose one from them based on your preference to finish the process.
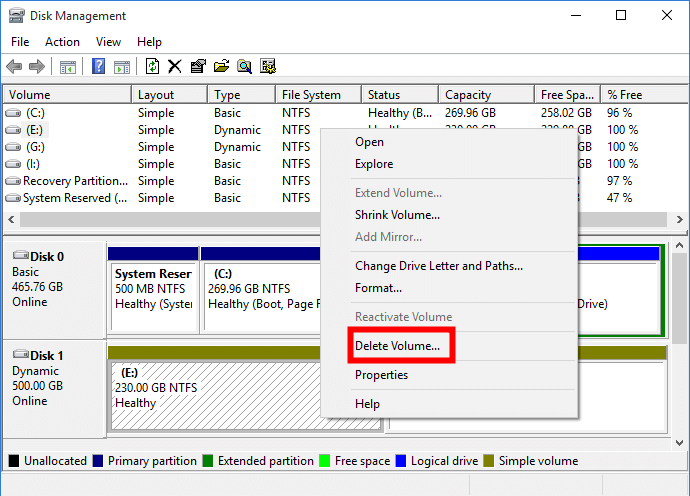
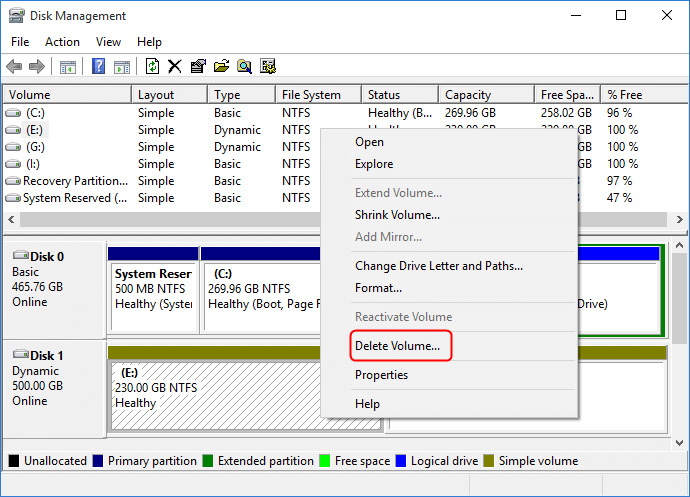
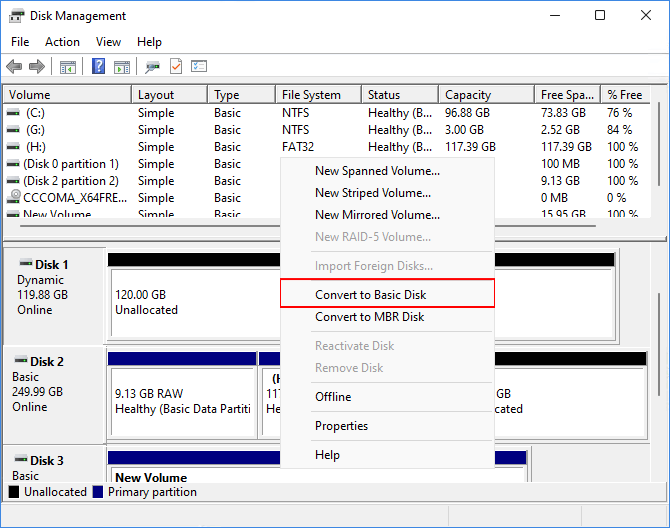
Method 1: Convert to Basic Disk via Disk Management
Disk Management, a built-in utility in Windows PCs, allows you to perform various disk/partition-related operations such as converting to dynamic/MBR disk, creating/formatting/extending/shrinking/deleting volume, setting as active, changing drive letters and paths, etc.
Now, follow the steps below to convert a dynamic disk to a basic one with Disk Management.
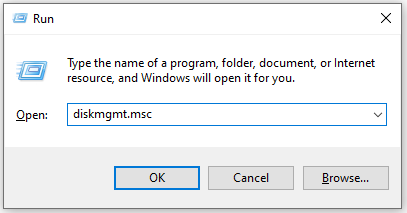
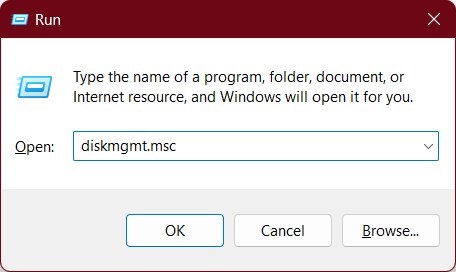
Step 1: Open the Run window by pressing Windows and R keys.
Step 2: Type diskmgmt.msc in the Run window and hit Enter.
Step 3: Right-click on the volumes on the dynamic disk that you want to convert and click Delete Volume. Repeat this operation until all the volumes on the dynamic disk are deleted.
Tips:
1. If Delete Volume greyed out in Disk Management, refer to the methods offered in this post to solve it.
2. If you have backed up the data on the volume, click Yes in the prompted waring window.
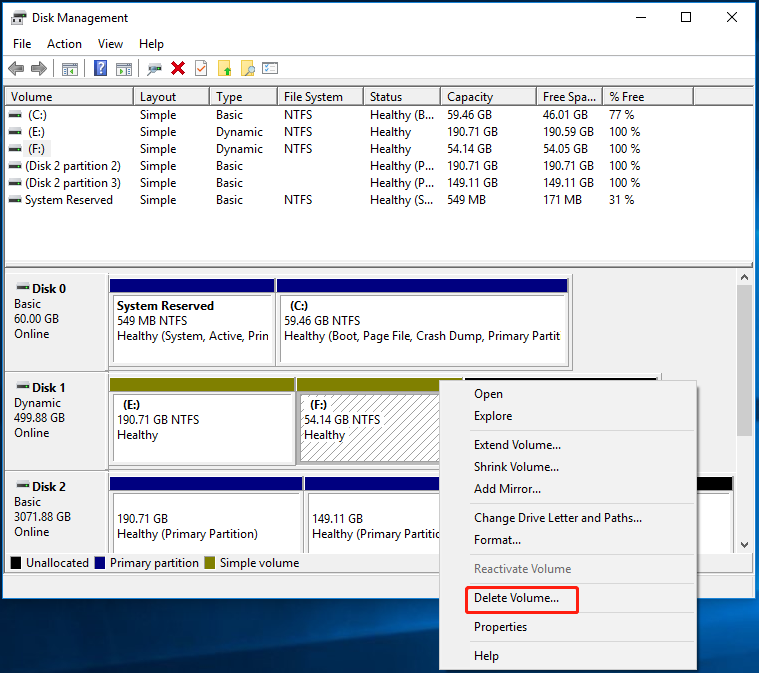
Step 4: After you delete all the volumes on the disk, it will be marked as Basic automatically. If it’s still a dynamic one, right-click on it and tap the Convert to Basic Disk option.
Though Disk Management works well most time, it sometimes goes wrong. For instance, you may suffer from Disk Management not working/responding/loading and other confusing issues while using it. In cases like that, its alternatives like MiniTool Partition Wizard and Diskpart.
MiniTool Partition Wizard is a comprehensive partition manager, enabling you to conduct a lot of drive/partition-related operations. For instance, you can create/format/extend/move/shrink/copy/delete/recover partitions, copy disk, migrate OS to SSD/HDD, wipe disk, check file system, recover data, and do other operations on this program.
If you are going to convert a dynamic disk to a basic one, MiniTool Partition Wizard is a good choice, which helps you do that within a few clicks. Different from Disk Management, it is capable of converting the dynamic disk directly.
Tips:
This software only helps you convert a dynamic disk containing simple volume and mirrored volume. For dynamic disks with mirrored volumes, you should break the mirrored volume in Disk Management first and then convert the disk.
Free Download
Step 1: Launch the software on your computer.
Step 2: Right-click on the target dynamic disk and then tap the Convert Dynamic Disk to Basic option in the pop-up menu.
Step 3: Click the Apply button to carry out the pending operation.
Step 4: In the prompted window, click Yes to confirm the operation.
Method 3: Convert to Basic Disk via Diskpart
Like Disk Management, Diskpart is also a utility that comes with Windows computers. It allows you to do various operations by executing corresponding command lines. To convert a disk to basic via Diskpart, you can follow these steps.
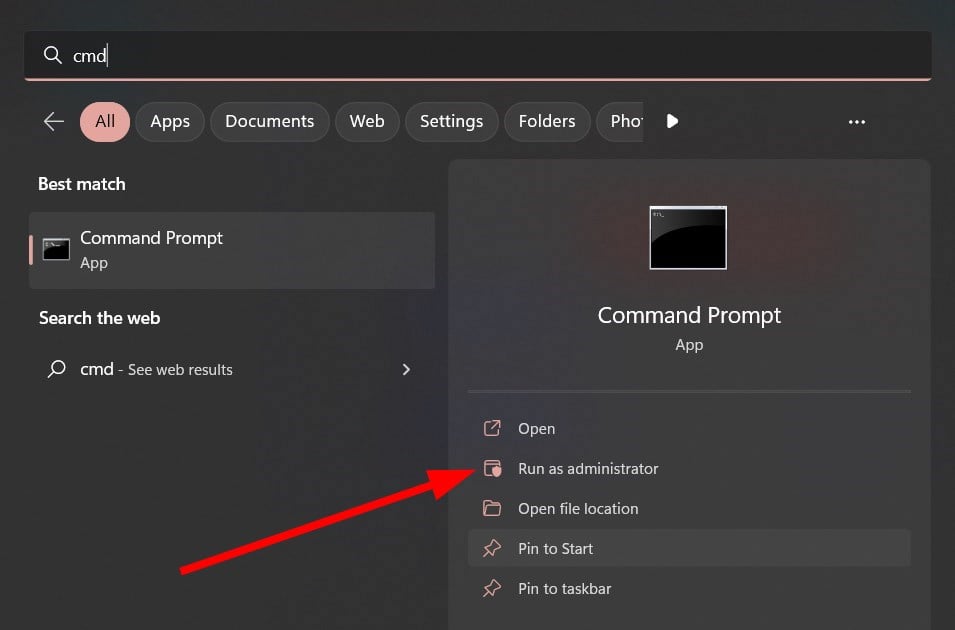
Step 1: Type cmd in the search box, right-click on Command Prompt under the Best match section, and then click Run as administrator.
Step 2: In the pop-up window, type the commands below and hit Enter after each.
- diskpart
- list disk
- select disk N (N is the number that stands for the dynamic disk to convert.)
- list volume
- select volume D (D stands for volume number in the target dynamic disk.)
- delete volume
- select disk N
- convert basic
- exit
Step 3: Restart your computer.
Further reading:
In addition to “the disk is not empty error”, you may receive other Diskpart Virtual Disk Service errors. For instance, you might receive error messages like “Diskpart Virtual Disk Service error: The operation is not supported by the object”. How to solve it effectively?
There are two available methods for you. The first one is to delete the partition override via Diskpart command lines. To do that, run Command Prompt as administrator and then execute the commands below.
- diskpart
- list disk
- select disk M (replace M with the number that represents your disk)
- list partition
- select partition F (replace F with the number of the partition to be deleted)
- delete partition override
- exit
The second method is to delete and recreate partitions. You can do that in Disk Management, Command Prompt, or third-party software like MiniTool Partition Wizard. According to your needs, choose a way to handle the error.
Are you bothered by the Virtual Disk Service error: The disk is not empty? If so, this post is what you need. It provides you with 3 methods to convert a dynamic disk to a basic one without the “the disk is not empty error”.Click to Tweet
Conclusion
How to escape from “Diskpart Virtual Disk Service error: The disk is not empty”? This post offers you 3 methods to do that. To avoid data loss, back up the volume or data on the dynamic disk with MiniTool Partition Wizard in advance. When you encounter issues while using it, you can seek help on the FAQ page of our website.
Alternatively, you are able to contact us by sending an email to [email protected]. We will make a reply as soon as possible.
We would recommend you use a dedicated third-party tool to fix this issue
by Sagar Naresh
Sagar is a web developer and technology journalist. Currently associated with WindowsReport and SamMobile. When not writing, he is either at the gym sweating it out or playing… read more
Updated on February 16, 2023
Reviewed by
Alex Serban

After moving away from the corporate work-style, Alex has found rewards in a lifestyle of constant analysis, team coordination and pestering his colleagues. Holding an MCSA Windows Server… read more
- Virtual Disk Service Error: The Disk Is Not Empty error appears when converting a dynamic disk to a basic one.
- This issue is caused if there are data or volumes in the dynamic disk.
- You can quickly resolve this issue using the Diskpart command.
![]()
XINSTALL BY CLICKING THE DOWNLOAD FILE
This software will repair common computer errors, protect you from file loss, malware, hardware failure and optimize your PC for maximum performance. Fix PC issues and remove viruses now in 3 easy steps:
- Download Restoro PC Repair Tool that comes with Patented Technologies (patent available here).
- Click Start Scan to find Windows issues that could be causing PC problems.
- Click Repair All to fix issues affecting your computer’s security and performance
- Restoro has been downloaded by 0 readers this month.
You will encounter the Virtual Disk Service Error: The Disk Is Not Empty error when you convert a disk and attempt to restore the basic disk settings.
Usually, you will be able to convert a basic disk to a dynamic disk; however, changing a dynamic disk back to a basic disk is where the problem arises.
This guide will give you a bunch of solutions to help you fix the Virtual Disk Service Error: The Disk Is Not Empty error on your PC. We will also give you some reasoning behind this error. So let us get right into it.
Why am I getting Virtual Disk Service Error: The Disk Is Not Empty error?
The Virtual Disk Service Error: The Disk Is Not Empty error happens when your dynamic disk contains some data or volumes. This error triggers if it contains some data or volumes and you are trying to convert the dynamic disk to a basic disk.
So, before proceeding, you need to delete all the information, data, or volume in the dynamic disk. But deleting the partitions can’t be reverted. So, you have to create a backup and delete all the disk’s partitions.
How to fix Virtual Disk Service Error: The Disk Is Not Empty error?
- Why am I getting Virtual Disk Service Error: The Disk Is Not Empty error?
- How to fix Virtual Disk Service Error: The Disk Is Not Empty error?
- 1. Use a dedicated tool
- 2. Use Disk Management
- 3. Use Diskpart
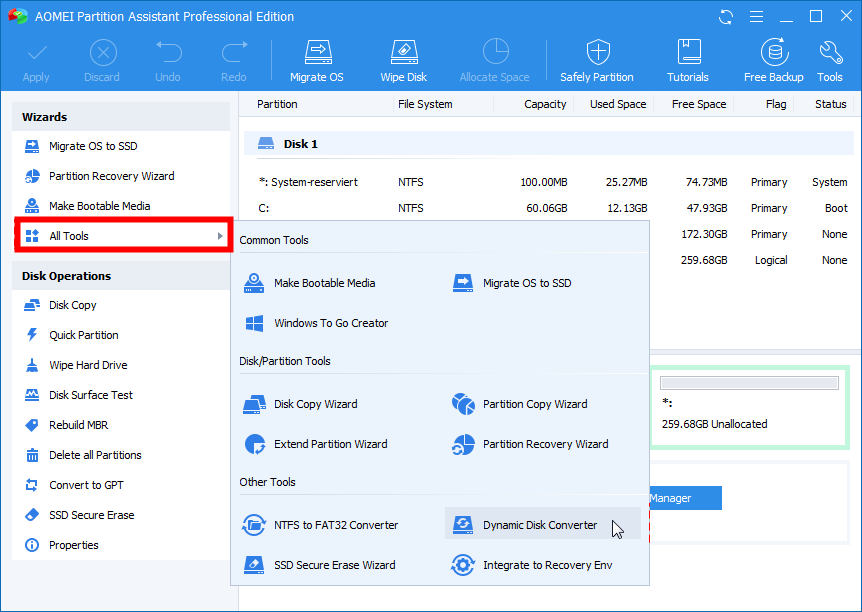
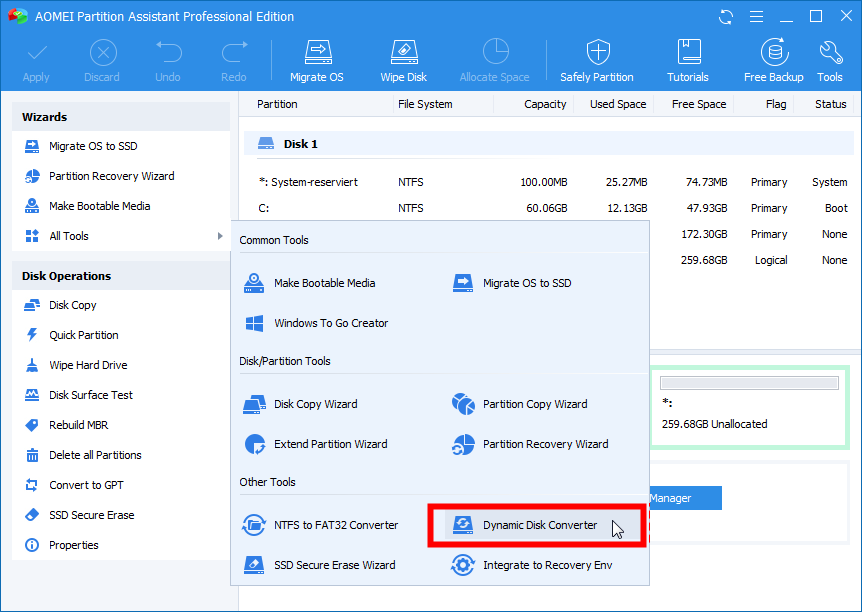
1. Use a dedicated tool
- Download the AOMEI Partition Assistant Professional tool.
- Install the program.
- Launch the program.
- Click on All Tools on the left pane.

- Select Dynamic Disk Converter.
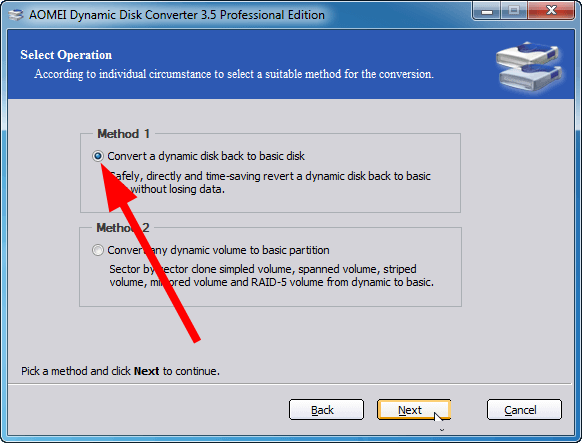
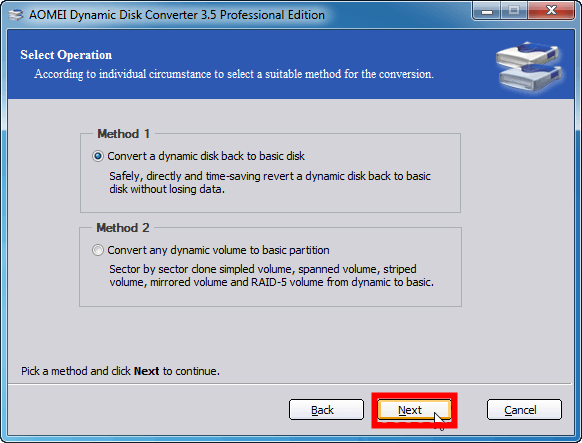
- Choose a conversion method based on your needs;
- Convert a dynamic disk back to a basic disk
- Convert any dynamic volume to a basic partition
- For our case, we need to choose the Convert a dynamic disk back to a basic disk option.

- Click Next.
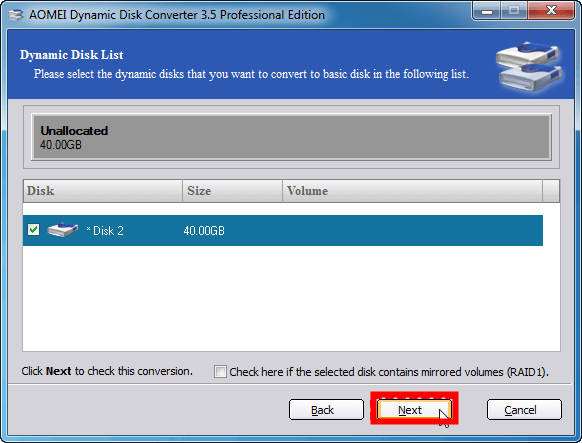
- On the next page, you will see all the dynamic disks listed.
- Choose the dynamic disk you wish to convert and click Next.
- Click Yes in the prompt that appears.
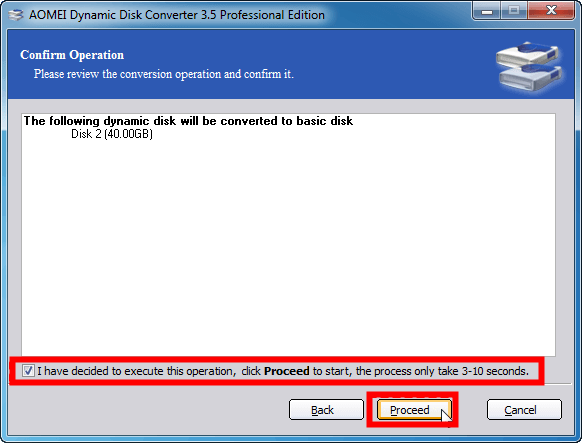
- Hit the checkbox that reads I have decided to execute this operation and click Proceed button to start the conversion process.
With AOMEI Partition Assistant you can safely format drives into different file systems. You can also use this tool to create bootable media or for data recovery.
- Fix: You Must be an Administrator Running a Console Session
- Fix: Page Fault in Nonpaged Area on Windows 10
- Office 365 is Running Slow? How to Boost Its Performance
- Fix: the new Outlook could not successfully launch error
- OBS Stuttering When Recording? 3 Ways to Quickly Fix it
2. Use Disk Management
- Press the Win + R keys to open the Run dialogue.
- Type diskmgmt.msc and press Enter.

- Right-click on the disk you wish to convert to basic and select Delete Volume.

- If the disk is still marked as Dynamic, right-click and select Convert to Basic Disk.


3. Use Diskpart
- Press the Win key to open the Start menu.
- Open Command Prompt as an admin.

- Type the below commands and press Enter after each one.
diskpartlist diskselect disk n(n refers to the dynamic disk number)list volumeselect volume m(m is the number of volume in the dynamic disk)delete volumeselect disk nconvert basicexit
- Restart your PC and see if this fixes the Virtual Disk Service Error: The Disk Is Not Empty error or not.
Some PC issues are hard to tackle, especially when it comes to corrupted repositories or missing Windows files. If you are having troubles fixing an error, your system may be partially broken.
We recommend installing Restoro, a tool that will scan your machine and identify what the fault is.
Click here to download and start repairing.
That is it from us in this guide that will help you fix the Virtual Disk Service Error: The Disk Is Not Empty error.
If you are one of those users who are facing the There are no fixed disks to show DiskPart error; then we would recommend you follow our guide and apply the solutions mentioned to resolve the problem.
You can also refer to our guide that gives you ten ways to convert MBR to GPT Disk without data loss.
If you are confused and want to know the differences between the FAT32 and NTFS file systems, then you should read our dedicated and comprehensive guide on it.
We will also suggest you check out our guide that explains the solutions to fix the format of the external HDD if it isn’t formatting problem.
In the comment below, let us know which of the above solutions helped you resolve the problem at hand.
Still having issues? Fix them with this tool:
SPONSORED
If the advices above haven’t solved your issue, your PC may experience deeper Windows problems. We recommend downloading this PC Repair tool (rated Great on TrustPilot.com) to easily address them. After installation, simply click the Start Scan button and then press on Repair All.
![]()
Virtual Disk Service (VDS) was introduced in Windows Server 2003 as a collection of application programming interfaces (APIs) that provide a unified disk management interface. VDS is a storage management solution that lets you manage storage drives while creating volumes on those disks.
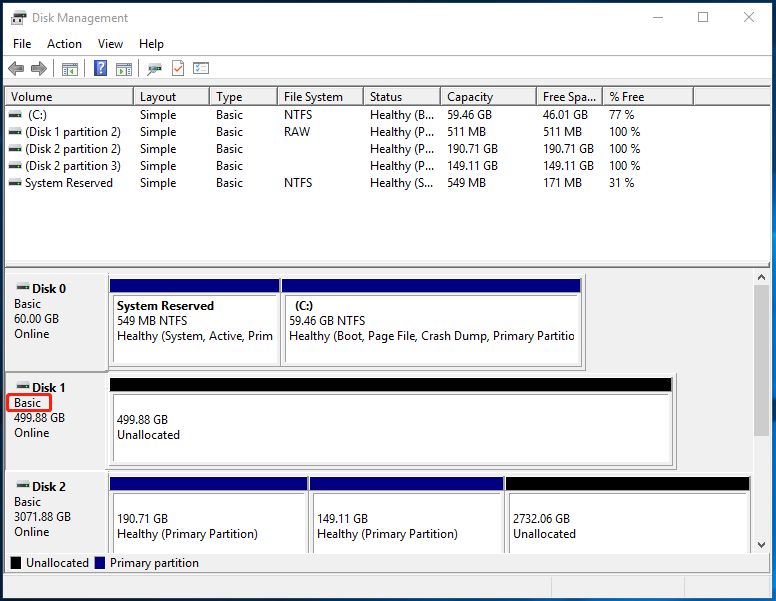
Windows provides two types of disk storage: basic vs dynamic disk. A basic disk typically has MBR- 3 or 4 primary partitions and one extended partition, sufficient to meet your basic requirements. Dynamic Disk has 2000 volumes, primarily for initializing dynamic storage. You can easily switch between these disk settings using Virtual Disk Services.
When you convert a disk and attempt to restore the basic disk settings, you may face the «Virtual Disk Service Error: The Disk is Not Empty.»

In this article, we go over three simple and quick solutions for converting a dynamic disk to a basic disk and also deal with the Virtual Disk Service Error: The Disk is Not Empty. But before we get to the solution, let’s look at why this error occurs.
Why Virtual Disk Service Error: The Disk Is Not Empty Happens
The «Virtual Disk Service Error: The Disk is Not Empty» generally indicates that your dynamic disk contains data or volumes when you attempt to convert it back to a basic disk. The disk cannot be changed back to a basic disk until it is empty of all volumes and data.
Before proceeding, you’ll need to delete all of the dynamic disk’s volumes and data. Unfortunately, deleting the partitions will result in irreversible data loss. So, can the dynamic disk be converted to a basic disk without losing data? Yes.
The best course of action is to create a backup of all your data and then successfully delete all of the partitions on the disk. Let us see how we can do this further in the article.
How to Fix Virtual Disk Service Error: The Disk Is Not Empty
Converting a dynamic disk to a basic disk is not challenging if you follow the right steps. But because you have to delete all the partitions before the conversion, your data is at a high risk of getting permanently deleted.
The following three ways help you convert your dynamic disk to a basic disk and easily deal with the «Virtual Disk Service Error: The Disk Is Not Empty.»
Fix 1. Convert to Basic Disk via EaseUS Partition Master
Fix 2. Convert to Basic Disk via Disk Management
Fix 3. Convert to Basic Disk via Diskpart Command
However, out of the 3, I recommend using the EaseUS Partition Master tool for the most reliable and secure performance while converting your drive.
Fix 1. Convert to Basic Disk via EaseUS Partition Master
EaseUS Partition Master allows you to convert a dynamic disk to a basic disk with a few clicks. You can use this tool to perform the conversion while preserving all the volumes and without losing any data. It’s secure and easy to easy. You can become a professional with this tool.
Follow the steps given below to convert to a basic disk using EaseUS Partition Master:
Step 1. Install and open EaseUS Partition Master and go to Disk Converter.
Step 2. Select the disk conversion mode that suits your need:
- Convert Basic to Dynamic: change a Basic disk to Dynamic.
- Convert Dynamic to Basic: change a Dynamic disk to Basic.
Step 3. Select the target disk — Basic or Dynamic, confirm you’ve select the correct disk and click «Convert» to start.
0:00 — 0:18 Convert Basic to Dynamic Disk; 0:19- 0:36 Convert Dynamic to Basic Disk.
Once you have converted to the basic disk, you can resize partitions on your basic disk using the «Resize/Move Partition» feature.
Also, if you want to convert to a dynamic disk, you can use this software for basic to dynamic disk conversion. Additionally, using its «Disk Health» tools to check hard drive health, you can analyze the disk performance quickly.
Besides, if you have any other needs for conversion, click the buttons below to to solve your problem:
Fix 2. Convert to Basic Disk via Disk Management
Disk Management is the built-in tool available on your Windows PC to convert the dynamic disk to a basic disk. You can use Disk Management to solve issues with your disk and even fix bugs like the «Virtual Disk Service Error: The Disk Is Not Empty.»
Note: Before beginning with the step-by-step guide to use the Disk Management tool for the conversion, make sure you create a backup for your disk. Not taking a backup may lead to forever data loss.
Follow the process given below to convert to Basic Disk via the Disk Management tool:
Step 1. Hit the «Win+R» keys to open the «Run» box. Type diskmgmt.msc and press the «Enter» key.
Step 2. In the Disk Management tool, right-click the disk you want to convert to a basic disk and select «Delete Volume» on the pop-up window.
- Notice:
- If you find the Delete Volume greyed out, there may exist some page files or you are trying to delete the system partition. Seek help for EaseUS Partition Master.
Step 3. If the disk is still marked as «Dynamic,» you can right-click it and select «Convert to Basic Disk.» This will convert the disk and rename it to «Basic.»
You can recover the data backup and recover all your data after converting your dynamic disk to a basic disk. If you are unable to convert dynamic to basic, fix it or try the next method.
Fix 3. Convert to Basic Disk via Diskpart Command
Diskpart is a free command interpreter tool to manage your computer’s disk volumes and partitions. So this can also be used to convert the dynamic disk to a basic disk and help you with the «Virtual Disk Service Error: The Disk Is Not Empty» issue.
Let’s see how we can use the «diskpart» command to convert your dynamic disk to a basic disk:
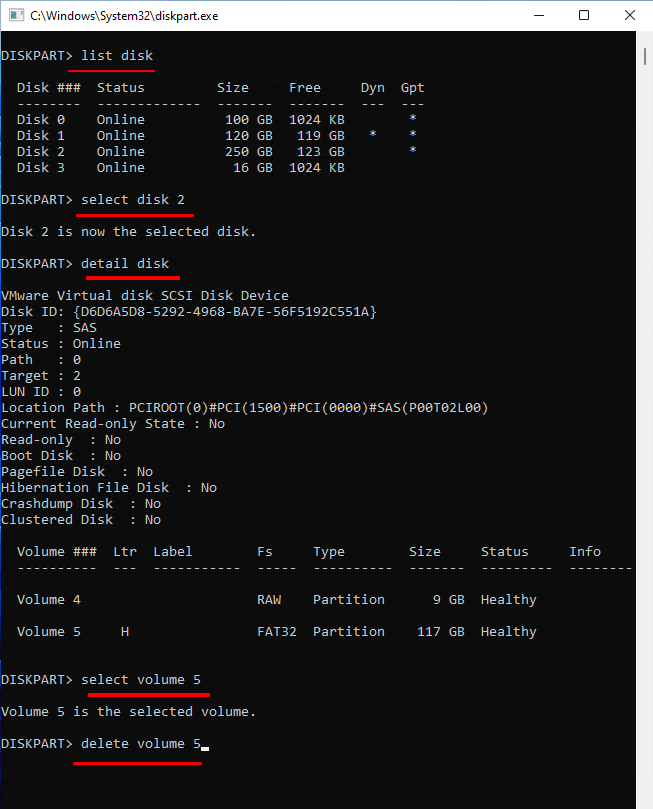
Step 1. Input «cmd» in the Run box to open the command prompt. You can get the «Run» box by hitting the «Win+R» keys.
Step 2. Now enter the following commands and press «Enter» after each one to delete the volume.
diskpart
list disk
select disk 2
detail disk
select volume 5(5 refers to the number of the volume on the dynamic disk)
delete volume (you may have to repeat the above two commands to delete all volumes)
You can recover the data backup and recover all your data after converting your dynamic disk to a basic disk. If you are unable to convert dynamic to basic, fix it or try the next method.
Fix 3. Convert to Basic Disk via Diskpart Command
Diskpart is a free command interpreter tool to manage your computer’s disk volumes and partitions. So this can also be used to convert the dynamic disk to a basic disk and help you with the «Virtual Disk Service Error: The Disk Is Not Empty» issue.
Let’s see how we can use the «diskpart» command to convert your dynamic disk to a basic disk:
Step 1. Input «cmd» in the Run box to open the command prompt. You can get the «Run» box by hitting the «Win+R» keys.
Step 2. Now enter the following commands and press «Enter» after each one to delete the volume.
diskpart
list disk
select disk 2
detail disk
select volume 5(5 refers to the number of the volume on the dynamic disk)
delete volume (you may have to repeat the above two commands to delete all volumes)
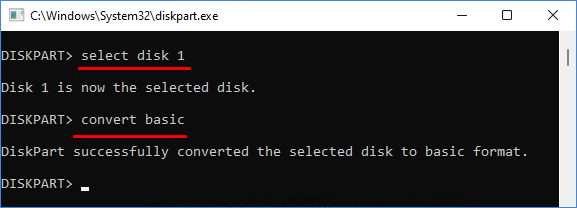
Step 3. After you delete the volume, continue to type the following commands and hit Enter to convert to basic.
select disk n
convert basic
exit
If you follow everything mentioned, your drive will be converted to a basic disk with your data kept intact. Just recover the backup, and you’ll have all your information back.
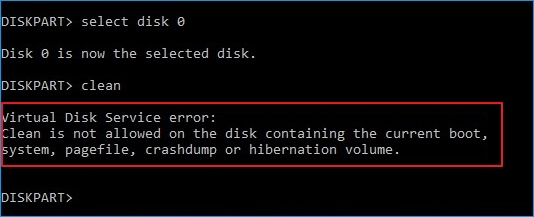
If you want to know more about virtual disk service errors, such as «Delete is not allowed on the current boot, system, pagefile, crashdump or hibernation volume» or «Clean is not allowed on the disk containing the current boot, system, pagefile, crashdump or hibernation volume» and other errors, click the link below for more details.
![]()
If you follow everything mentioned, your drive will be converted to a basic disk with your data kept intact. Just recover the backup, and you’ll have all your information back.
If you want to know more about virtual disk service errors, such as «Delete is not allowed on the current boot, system, pagefile, crashdump or hibernation volume» or «Clean is not allowed on the disk containing the current boot, system, pagefile, crashdump or hibernation volume» and other errors, click the link below for more details.
How to Fix DiskPart Virtual Disk Service Errors in 2023
DiskPart Virtual Disk Service errors are common issues while using diskpart command lines to clean or deleting disk partitions, convert a disk from MBR to GPT or vice versa, or format disk to the FAT32 file system, etc.
Conclusion
Converting your dynamic disk to a basic disk is easy if you follow our guide. The guide also helps you fix any errors or bugs with your drive. Because Disk Management and Diskpart do not guarantee data security, you must create a disk backup before proceeding with the conversion. On the other hand, with EaseUS Partition Master, you don’t have to be concerned about data security.
The EaseUS tool is great for dealing with disk partition and management needs. Thus, we recommend using it to repair the Virtual Service Error: The Disk is Not Empty.
So, what are you waiting for? Proceed to convert your dynamic disk to a basic disk using the three methods described above.
FAQs How to Fix Virtual Disk Service Error: The Disk Is Not Empty
I hope the information described above was helpful to you. The above methods are safe, efficient, and, most importantly, help you fix all disk errors. However, if you still have questions, please check the FAQs below.
1. How do I get rid of the virtual disk service error?
You can use many methods to eliminate the virtual disk service error. One such way is using a third-party tool to resolve the virtual disk service error without losing your data. EaseUS Partition Master is a one-stop solution for your drive management needs. Plus, you can use it to fix all disk errors, including the virtual disk service error.
You can also use the Disk Management tool to fix the virtual disk service error. Follow the process below, and you’ll be able to improve your drive:
Step 1: Run the Disk Management tool
Step 2: Now, right-click a disk and select «Delete Volume»
This will delete all data on your drive and fix the error. However, back up your drive to keep your data safe.
2. Can I stop the virtual disk service?
Yes, you can stop the virtual disk service. Follow the steps below to terminate Virtual Disk Service:
Step 1: Launch the Control Panel.
Step 2: Select Administrative Tools.
Step 3: Go to the «Services» tab.
Step 4: Navigate to «Virtual Disks» and right-click it. Select «STOP» to terminate the Virtual Disk Service.
3. What is virtual disk service used for?
Virtual Disk Service allows you to perform various disk management operations. It handles different storage setups, ranging from single-disk desktops to external storage arrays.
It is compatible with the Disk Management user interface and the diskpart command. The service also adds API (Application Programming Interface) support to conventional volume and disk management features in Windows.
диск не пустой, что делать? Программы пишут, что диски не пустые. Я пытаюсь записать видео с помощью ImgBurn, но он говорит, что диск не пустой. Я попытался очистить диск той же программой, но ничего не вышло. Я пробовал форматировать диск — безуспешно. Пробовал с помощью программы Unlocker — тоже самое. Пользуюсь дисками: DVD-RW, DVD + R. Ответ
Привет,
Попробуйте переустановить драйверы CD / DVD-ROM.

У вас могут быть их от другого производителя, попробуйте обновить через Интернет, если это не сработает, драйверы можно скачать с сайта производителя.
Источник: https://answers.microsoft.com/ru-ru/windows/forum/all/disc-not-empty-what/cf541702-bd82-4b11-8875-405d29822354
This is from today.
I 12:23:33 ImgBurn Version 2.5.6.0 started!
I 12:23:33 Microsoft Windows Vista Home Premium Edition (6.0, Build 6002 : Service Pack 2)
I 12:23:33 Total Physical Memory: 3.104.448 KB — Available: 1.118.692 KB
I 12:23:33 Initialising SPTI…
I 12:23:33 Searching for SCSI / ATAPI devices…
I 12:23:33 -> Drive 1 — Info: HL-DT-ST DVDRAM GSA-T50N RP05 (D:) (ATAPI)
I 12:23:33 Found 1 DVD±RW/RAM!
I 12:23:47 Operation Started!
I 12:23:47 Source File: C:UsersRoncancioNintendo DSDenizUFC Personal Trainer [MULTI5][WII-Scrubber][PAL][iMARS][WwW.GamesTorrents.CoM]imars-ufcpt.iso
I 12:23:47 Source File Sectors: 2.294.912 (MODE1/2048)
I 12:23:47 Source File Size: 4.699.979.776 bytes
I 12:23:47 Source File Volume Identifier: UFC Personal Trainer
I 12:23:47 Source File File System(s): Special
I 12:23:47 Destination Device: [0:1:0] HL-DT-ST DVDRAM GSA-T50N RP05 (D:) (ATAPI)
I 12:23:47 Destination Media Type: DVD-R (Disc ID: RITEKG05)
I 12:23:47 Destination Media Supported Write Speeds: 4x; 8x
I 12:23:47 Destination Media Sectors: 2.297.888
I 12:23:47 Write Mode: DVD
I 12:23:47 Write Type: DAO
I 12:23:47 Write Speed: 1x
I 12:23:47 Link Size: Auto
I 12:23:47 Lock Volume: Yes
I 12:23:47 Test Mode: No
I 12:23:47 OPC: No
I 12:23:47 BURN-Proof: Enabled
W 12:23:47 Write Speed Miscompare! — MODE SENSE: 4.155 KB/s (3x), GET PERFORMANCE: 11.092 KB/s (8x)
W 12:23:47 Write Speed Miscompare! — MODE SENSE: 4.155 KB/s (3x), GET PERFORMANCE: 11.092 KB/s (8x)
W 12:23:47 Write Speed Miscompare! — MODE SENSE: 4.155 KB/s (3x), GET PERFORMANCE: 11.092 KB/s (8x)
W 12:23:47 Write Speed Miscompare! — MODE SENSE: 4.155 KB/s (3x), GET PERFORMANCE: 11.092 KB/s (8x)
W 12:23:47 Write Speed Miscompare! — Wanted: 1.385 KB/s (1x), Got: 4.155 KB/s (3x) / 11.092 KB/s (8x)
W 12:23:47 The drive only supports writing these discs at 4x; 8x.
I 12:23:48 Filling Buffer… (40 MB)
I 12:23:49 Writing LeadIn…
I 12:24:38 Writing Session 1 of 1… (1 Track, LBA: 0 — 2294911)
I 12:24:38 Writing Track 1 of 1… (MODE1/2048, LBA: 0 — 2294911)
I 12:43:42 Synchronising Cache…
I 12:43:58 Exporting Graph Data…
I 12:43:58 Graph Data File: C:UsersRoncancioAppDataRoamingImgBurnGraph Data FilesHL-DT-ST_DVDRAM_GSA-T50N_RP05_WOENSDAG-16-NOVEMBER-2011_12-23_RITEKG05_1x.ibg
I 12:43:58 Export Successfully Completed!
I 12:43:58 Operation Successfully Completed! — Duration: 00:20:10
I 12:43:58 Average Write Rate: 4.012 KB/s (2.9x) — Maximum Write Rate: 4.217 KB/s (3.0x)
I 12:43:58 Cycling Tray before Verify…
W 12:44:16 Waiting for device to become ready…
I 12:46:17 Device Ready!
I 12:46:19 Operation Started!
I 12:46:19 Source Device: [0:1:0] HL-DT-ST DVDRAM GSA-T50N RP05 (D:) (ATAPI)
I 12:46:19 Source Media Type: DVD-R (Book Type: DVD-R) (Disc ID: RITEKG05)
I 12:46:19 Source Media Supported Write Speeds: 4x; 8x
I 12:46:19 Image File: C:UsersRoncancioNintendo DSDenizUFC Personal Trainer [MULTI5][WII-Scrubber][PAL][iMARS][WwW.GamesTorrents.CoM]imars-ufcpt.iso
I 12:46:19 Image File Sectors: 2.294.912 (MODE1/2048)
I 12:46:19 Image File Size: 4.699.979.776 bytes
I 12:46:19 Image File Volume Identifier: UFC Personal Trainer
I 12:46:19 Image File File System(s): Special
I 12:46:19 Read Speed (Data/Audio): MAX / MAX
I 12:46:20 Verifying Session 1 of 1… (1 Track, LBA: 0 — 2294911)
I 12:46:20 Verifying Track 1 of 1… (MODE1/2048, LBA: 0 — 2294911)
I 12:56:11 Exporting Graph Data…
I 12:56:11 Graph Data File: C:UsersRoncancioAppDataRoamingImgBurnGraph Data FilesHL-DT-ST_DVDRAM_GSA-T50N_RP05_WOENSDAG-16-NOVEMBER-2011_12-23_RITEKG05_1x.ibg
I 12:56:11 Export Successfully Completed!
I 12:56:11 Operation Successfully Completed! — Duration: 00:09:50
I 12:56:11 Average Verify Rate: 7.792 KB/s (5.6x) — Maximum Verify Rate: 11.353 KB/s (8.2x)
I 17:41:45 Close Request Acknowledged
I 17:41:45 Closing Down…
I 17:41:46 Shutting down SPTI…
I 17:41:46 ImgBurn closed!