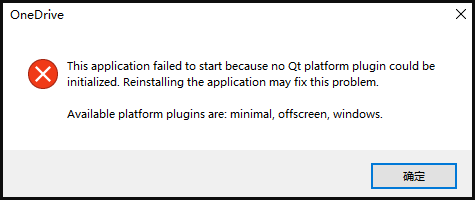
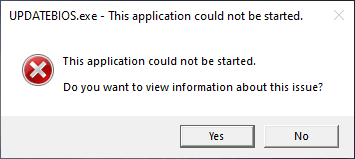
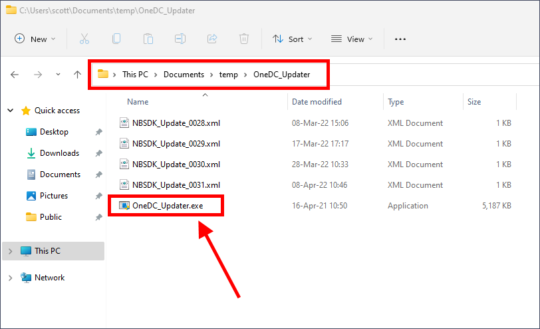
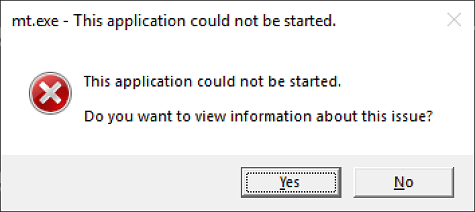
Troubleshooting a ‘This application could not be started’ error message

Error causes
This error typically indicates one of the following conditions:
How to fix the error
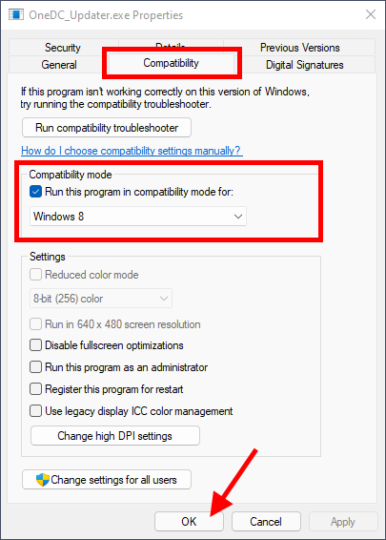
To address this issue so that you can run your application, do the following:


If your application runs successfully, select the Finish button. Otherwise, select the Next button.

| Windows version | .NET Framework installation |
|---|---|
| Windows 10 Anniversary Update and later versions | .NET Framework 4.8 Runtime |
| Windows 10, Windows 10 November Update | .NET Framework 4.6.2 |
| Windows 8.1 | .NET Framework 4.8 Runtime |
| Windows 8 | .NET Framework 4.6.1 |
| Windows 7 SP1 | .NET Framework 4.8 Runtime |
| Windows Vista SP2 | .NET Framework 4.6 |
.NET Framework 4.8 is preinstalled on Windows 11 and Windows 10 May 2019 Update and later versions.
Attempt to launch the application.
Источник
Comments
antdude commented Jun 9, 2019
The text was updated successfully, but these errors were encountered:
mika76 commented Jun 9, 2019 •
antdude commented Jun 9, 2019
antdude commented Jun 9, 2019
mika76 commented Jun 9, 2019 •
Seems the latest paint.net uses 4.7. I would have thought that would work with mamesaver too. You could always try install 4.6 and see what happens. Shouldn’t give a you any problems.
mika76 commented Jun 9, 2019
Or maybe you have an older paint.net with an older framework? Here Microsoft’s instructions on how to determine which is installed : https://docs.microsoft.com/en-us/dotnet/framework/migration-guide/how-to-determine-which-versions-are-installed
antdude commented Jun 9, 2019
From my regedit.exe:
Windows Registry Editor Version 5.00
[HKEY_LOCAL_MACHINESOFTWAREMicrosoftNET Framework SetupNDPv4]
[HKEY_LOCAL_MACHINESOFTWAREMicrosoftNET Framework SetupNDPv4Client]
«Version»=»4.7.02558»
«TargetVersion»=»4.0.0»
«Install»=dword:00000001
«MSI»=dword:00000001
«Servicing»=dword:00000000
«InstallPath»=»C:WindowsMicrosoft.NETFramework64v4.0.30319»
«Release»=dword:000709fe
[HKEY_LOCAL_MACHINESOFTWAREMicrosoftNET Framework SetupNDPv4Client1033]
«Version»=»4.7.02558»
«TargetVersion»=»4.0.0»
«Install»=dword:00000001
«Servicing»=dword:00000000
«Release»=dword:000709fe
[HKEY_LOCAL_MACHINESOFTWAREMicrosoftNET Framework SetupNDPv4Full]
«Version»=»4.7.02558»
«TargetVersion»=»4.0.0»
«Install»=dword:00000001
«MSI»=dword:00000001
«Servicing»=dword:00000000
«InstallPath»=»C:WindowsMicrosoft.NETFramework64v4.0.30319»
«Release»=dword:000709fe
[HKEY_LOCAL_MACHINESOFTWAREMicrosoftNET Framework SetupNDPv4Full1033]
«Version»=»4.7.02558»
«TargetVersion»=»4.0.0»
«Install»=dword:00000001
«Servicing»=dword:00000000
«Release»=dword:000709fe
antdude commented Jun 9, 2019
I am using paint.net v4.1.6. BTW, I’m going to sleep soon.
mika76 commented Jun 9, 2019
Seems you have 4.7 which should run it without problems. Hmm I’ll have to play around with it a bit and see if I can figure it out.
antdude commented Jun 9, 2019
I was able to reproduce it in a clean, updated 64-bit W7 HPE SP1 in a virtual machine (VM) with VirtualBox. Its registry shows:
Windows Registry Editor Version 5.00
[HKEY_LOCAL_MACHINESOFTWAREMicrosoftNET Framework SetupNDPv4]
[HKEY_LOCAL_MACHINESOFTWAREMicrosoftNET Framework SetupNDPv4Client]
«Version»=»4.6.01055»
«TargetVersion»=»4.0.0»
«Install»=dword:00000001
«MSI»=dword:00000001
«Servicing»=dword:00000000
«Release»=dword:0006041f
«InstallPath»=»C:WindowsMicrosoft.NETFramework64v4.0.30319»
[HKEY_LOCAL_MACHINESOFTWAREMicrosoftNET Framework SetupNDPv4Client1033]
«Version»=»4.6.01055»
«TargetVersion»=»4.0.0»
«Install»=dword:00000001
«Servicing»=dword:00000000
«Release»=dword:0006041f
[HKEY_LOCAL_MACHINESOFTWAREMicrosoftNET Framework SetupNDPv4Full]
«Version»=»4.6.01055»
«TargetVersion»=»4.0.0»
«Install»=dword:00000001
«MSI»=dword:00000001
«Servicing»=dword:00000000
«InstallPath»=»C:WindowsMicrosoft.NETFramework64v4.0.30319»
«Release»=dword:0006041f
[HKEY_LOCAL_MACHINESOFTWAREMicrosoftNET Framework SetupNDPv4Full1033]
«Version»=»4.6.01055»
«TargetVersion»=»4.0.0»
«Install»=dword:00000001
«Servicing»=dword:00000000
«Release»=dword:0006041f
Источник
Go to here C:Program Files (x86)SteamsteamappscommonFINAL FANTASY FFX&FFX-2 HD Remaster or where ever you install it at. Run FFX.exe, or run as admin on FFX.exe if it works, then you have a launcher problem, it could be a number things.
Software conflicting with your game, as there was a case with Avest would remove some of the files for the game that was needed and was read as a false virus scan. Could have missing, out of date update/firmware, or bad installs of the content of the software, or hardware support. There a number of things it could be, but for now can you share your specs, or the model of your PC?
If you don’t want to use CPUID CPU-Z then tell me your PC model number if it’s pre-build, this is a how to video how to find the model number.
https://www.youtube.com/watch?v=OsrZS1SoSNA
Run as admin didn’t worked.
Here we go:
CPU: Intel Core i5 750 2.67GHz
GPU: Nvidia GeForce 750 Ti 2GB
Memory: 8GB DDR3
Mainboard: ASUSTeK Computer INC, Model: P7H55-M BR
Verifying the game cache for now, it gonna take some time! But really thank you for the help!
Источник
ServerManager.exe – This application could not be started
The Windows Server Manager enables the IT staff to keep a tab on all the servers hosted on a network. The Server Manager tool gives IT staff the ability to manage server roles without having physical access to the servers. If you’re unable to get the Server Manager working, whereby when you click on Server Manager, you encounter the error message ServerManager.exe – This application could not be started, then the solutions presented in this post are intended to help you resolve the issue.

When you encounter this issue, you’ll receive the following full error message;
ServerManager.exe – This application could not be started. L?.
This application could not be started.
Do you want to view Information about this issue?
ServerManager.exe – This application could not be started
Let’s take a look at the description of the process involved concerning each of the listed solutions.
1] Run DISM command
Afterward, the server manager application should open without the error.
2] Manually delete user.config file
3] Edit the ServerList.xml
If you have multiple server OS installations running, you may discover that one of the servers is responsible for the Server Manager error. You can determine this by opening Server Manager on the other servers and try adding servers. All goes well until you try doing the same on a particular server, that’s when the server manager would crash and stop working again. In this case, you can edit the ServerList.xml, and remove the problematic server. The Server Manager should work fine now.
4] Perform System Restore
Similar to the client operating system Windows 10, you can perform a system restore and see if that helps. This is applicable if you are unable to start Server Manager only recently and that things worked fine prior to that.
5] Perform In-place Upgrade Repair
Also, similar to the client OS Windows 10, you can perform an In-place Upgrade Repair and see if that helps.
6] Format and clean install Server OS
As a last resort, you can format and clean install the server OS.
Hope something here helps you.
Date: February 26, 2021 Tags: Errors, Server
Источник
How to Fix the Error «This App Can’t Run On Your PC»?
Read this article to learn how to fix the problem with running an application on PC, and we will find out why this error appears and how to solve the problem.

The core of the problem
On the Internet, there are lots of websites offering to install various applications and programs. At an early stage, Windows 10 operating system can detect and warn the user of possible issues, or even block a harmful application or program at once.
For this purpose, Microsoft has improved greatly the built-in defense component, SmartScreen. Its main task is to protect the user from apps provided by questionable developers. SmartScreen helps to reveal any previously detected malware, applications or websites created for malicious purposes, and takes informed decisions on blocking their access, download or use on your personal computer or another computing device.
At the first stage, SmartScreen analyzes all applications, programs and webpages for any suspicious activities. The next step will be to compare suspicious apps and webpages with the list of programs and websites recognized to be harmful. In case of a coincidence, SmartScreen will block download or installation for such a program, and display a corresponding notification for the user.
Obviously, SmartScreen is quite a useful feature in Windows 10 and using it seems absolutely justified. However, frequent error messages or warning notifications displayed while you are working with an application or website that you trust can become quite irritating. In that case, SmartScreen is easy to disable – if you know the app we are talking about is absolutely safe.
This security feature can display quite a number of various warnings and error messages, but most of these can be sorted out on your own. Mostly, these are issues related to providing additional permissions or signing in to an account with administrator’s rights.
Still, cases when you see a SmartScreen message saying This app can’t run on your PC are totally different. Such messages only suggest that you contact the program’s developer for advice – and that’s all. Also, you can face such messages when apps that used to run seamlessly on your computer, suddenly can’t start, for no evident reason. Yet don’t worry: even if you see the error This app can’t run on your PC in Windows 10, here’s what you can do.
The error This app can’t run on your PC
If you see such a message, it means there is a compatibility error. The application you are trying to install is incompatible with your operating system, Windows 10. You may also encounter this error if the application requires special permissions to run – and the current user account lacks them. This error only appears when you are trying to install an application, and never does when you start one. If an application is already installed to your computer, starting it will never trigger this error. There are two ways to fix it.

Use your account with administrator rights
When you see this error message, it might be due to your signing in to an account which doesn’t have administrator rights. To exclude this one out, check the account you are using now. If the current account is not the administrator’s one, switch to that account, and try installing the application again. If this method doesn’t work, try another one on the list.
32-bit or 64-bit application
If you’re using the 32-bit version of Windows 10 and trying to run a 64-bit version of the program, the error should have been expected. Similarly, if you’re trying to install a 32-bit program onto a 64-bit version of Windows 10, this error may also take place. If the problem comes from bitness, there’s only one solution – you’ve got to find the proper version of the necessary application and install it.
Disable SmartScreen in Windows 10
Sometimes, the error This app can’t run on your PC may be false. That’s why if the advice I have given you in this article didn’t help you and you still face this error, and you still need to run this app despite the warning, try disabling SmartScreen filter. In this tutorial, we will show you three ways to disable the security feature, as it is applied to the entire Windows 10 operating system, to applications received from Microsoft Store, and to the system’s featured browser, Microsoft Edge.
Disable SmartScreen in Windows 10 with Windows Defender Security Center
In this case, you should open Windows Defender Security Center. It can be done in a few ways.
Click on the Start button on the Taskbar, and open the main Windows menu, then click the gearwheel symbol. Alternatively, drag the scroll bar down until you find the line Settings.

In the application window, drag the slider down and select the section Update and Security.

On the left, select Windows Security, and on the right click on Open Windows Defender Security Center.

It opens the main window of Windows Defender Security Center.

In the side menu on the right, select App & browser control. You will be redirected to the page where you can configure SmartScreen for applications and browsers.

Here, you can disable Check apps & files, SmartScreen for Microsoft Edge and SmartScreen for Microsoft Store apps. Check the Off option in corresponding sections.
When the pop-up notification from Windows User Account Control asks Do you want to allow this app to make changes to your device? click Yes for the changes to take effect.
Disable SmartScreen in Windows 10 with the Registry Editor
Note: It is important to remember that anything you do to the registry is on your own responsibility. Any actions involving the registry may cause irreversible consequences. Windows 10 may begin working with errors, some apps or programs may not be able to start, the operating system can crash or have problems when booting. Before you start modifying the registry, we strongly recommend backing it up, just in case. To do it, open the Registry Editor, choose the File tab in the main menu, and select Export. The operating system will suggest you to give a name to the registry backup and select the directory where to save it. Choose a name that will help you to remember when exactly this backup was created. The best name would be the date of creation, for example, 02-04-2019. After that, click Save. Now you will have a registry backup file which you can use to restore it if necessary.
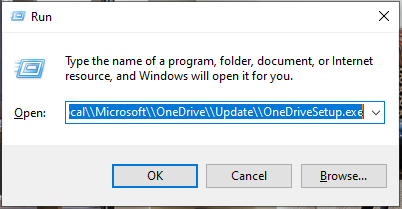
One more time, open the Run dialogue box in any of the ways described in this article (for example, by pressing the keyboard shortcut Windows + R for quick access to the Runwindow). In the command prompt field, type the command for opening the Registry Editor (regedit) and click ОК to perform the command.

When the pop-up notification from Windows User Account Control asks Do you want to allow this app to make changes to your device? click Yes and open the Registry Editor window.

In the left-side part of the window, follow the path:
You can also use a different method for accessing this particular section of the registry. Just copy and paste it into the address bar of the Registry Editor (it’s under the main menu). This way, you can avoid possible errors when selecting the registry section, as the left panel displays many similar directories, and this specific method helps you make sure you use the correct address.

Right-click on an empty area on the right, select New from the context menu that appears, and click on the nested menu option DWORD value (32 bit).

Give the new DWORD value the name EnableSmartScreen. Double-click on it, or right-click on it and select Modify from the menu.

In the window Edit DWORD value (32 bit) set the Value data to0 (this value data will be used by default). Click ОК or press Enter on your keyboard to save the changes to the value.

Now close the Registry Editor window and restart your computer. After that, SmartScreen will be disabled.
Disable SmartScreen in Windows 10 with the Local Group Policy Editor
If your computer is running Windows 10 Home Edition, you won’t be able to use the functionality of the Local Group Policy Editor, as this utility is not excluded into this particular version of the operating system. For other versions of Windows 10, do the following.
Open the Run dialogue box in any of the ways described in today’s article (for example, right-click on the Start button in the Taskbar, and select the Run dialogue box in the menu that opens). In the Command Prompt window, type the command gpedit.msc.

Click ОК or press Enter on your keyboard to confirm your action, and the Local Group Policy Editor window will appear.

In the left-side panel, follow this path:
Computer Configuration – Administrative Templates – Windows Components – Windows Defender SmartScreen.

There are two subsections, Explorer and Microsoft Edge. Each of them contains a policy setting Configure Windows SmartScreen that allows you to enable or disable the filter as you like. Double-click on it, or right-click on it and select Edit from the menu.

In the window that opens, check the option for Disabled, then click Apply and ОК to save the changes you have made.

Apply this algorithm to every subsection: Explorer and Microsoft Edge. In the first subsection, it disables checking files in Windows 10, and in the second subsection it turns off SmartScreen in Microsoft Edge. After saving the changes, close the Local Group Policy Editor, and the SmartScreen feature will be disabled.
There is also a way to disable SmartScreen in Microsoft Edge in the browser settings. Open Microsoft Edge and click on the three-dot button in the top right corner to open the main menu.


Then click View advanced settings.

Scroll down to find the line Help protect me from malicious sites and downloads with Windows Defender SmartScreen and set the slider to Off.

Finally, when the SmartScreen feature is disabled, make sure that your application starts and works correctly now. If you see the error again, the problem must be in the application itself, not in the security feature.
Then all you can do is to wait for another update to fix this issue, or find another program to replace the faulty app. If you disabled the SmartScreen feature, make sure you turn it on again after the necessary application is installed. It’s not a good idea to leave your system open to threats and without protection, so turn the feature on again and improve the security of your operating system.
See the full article with all additional video tutorials. If you still have any questions, please ask in a comments. Also visit our Youtube channel, there are over 400 video tutorials.
Источник
Содержание
- Устранение неполадок при получении сообщения об ошибке «Не удалось запустить это приложение» Troubleshooting a ‘This application could not be started’ error message
- Application windows не может
- Описание ситуации
- Причины ошибки: Windows не удается получить доступ к указанному устройству, пути или файлу
- Ошибка при удалении приложения
- Ошибка запуска из-за UAC (User Account Control)
- Просмотр разрешений на exe и lnk файлы и их блокировка
- Ошибка «Windows не удается получить доступ к указанному устройству, пути или файлу» при запуске файла .exe с флешки или другого USB-носителя
- Если не запускается ярлык программы или игры
- Отключите антивирусное программное обеспечение
- Восстановите файл, который был удален, удален или поврежден
- Проверка политики ограниченного использования программ SRP
Устранение неполадок при получении сообщения об ошибке «Не удалось запустить это приложение» Troubleshooting a ‘This application could not be started’ error message
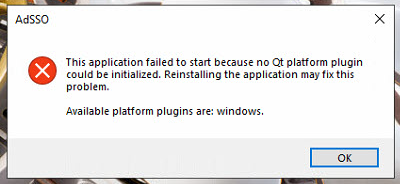
Для приложений, разработанных для .NET Framework, обычно требуется, чтобы на компьютере была установлена определенная версия .NET Framework. Applications that are developed for .NET Framework typically require that a specific version of .NET Framework be installed on your system. В некоторых случаях вы можете попытаться запустить приложение без установленной или ожидаемой версии .NET Framework. In some cases, you may attempt to run an application without either an installed version or the expected version of .NET Framework present. В результате этого часто выводится примерно такое диалоговое окно с сообщением об ошибке: This often produces an error dialog box like the following:
Эта ошибка указывает на то, что выполняется одно из следующих условий: This error typically indicates one of the following conditions:
установка .NET Framework в системе повреждена; A .NET Framework installation on your system has become corrupted.
не удалось обнаружить версию .NET Framework, необходимую для приложения. The version of .NET Framework needed by your application cannot be detected.
Чтобы устранить эту проблему и запустить приложение, сделайте следующее: To address this issue so that you can run your application, do the following:
Скачайте средство восстановления .NET Framework (NetFxRepairTool.exe). Download the .NET Framework Repair Tool (NetFxRepairTool.exe). Средство запускается автоматически после завершения скачивания. The tool runs automatically when the download completes.
Если средство восстановления .NET Framework рекомендует какое-либо дополнительное действие, подобное показанному на следующем рисунке, нажмите кнопку Далее. If the .NET Framework Repair Tool recommends any additional action, such as those shown in the following figure, select Next.
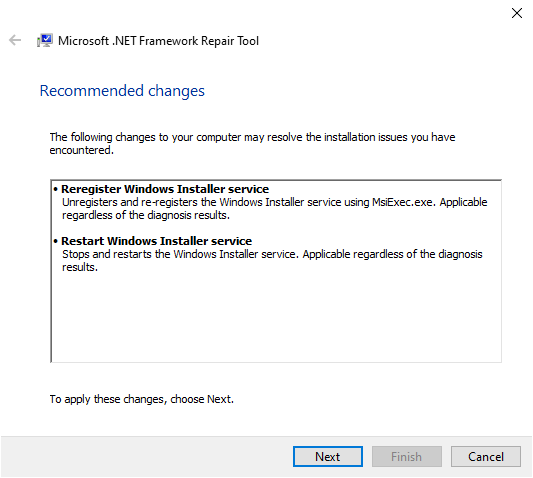
В средстве восстановления .NET Framework отображается диалоговое окно, показанное на следующем рисунке, в котором указано, что изменения внесены. The .NET Framework Repair Tools displays a dialog box shown in the following figure to indicate that changes are complete. Не закрывайте диалоговое окно, пока выполняется повторная попытка запуска приложения. Leave the dialog box open while you to try rerun your application. Запуск должен быть выполнен успешно, если средство восстановления .NET Framework обнаружило и устранило поврежденную установку .NET Framework. This should succeed if the .NET Framework Repair Tool has identified and corrected a corrupted .NET Framework installation.
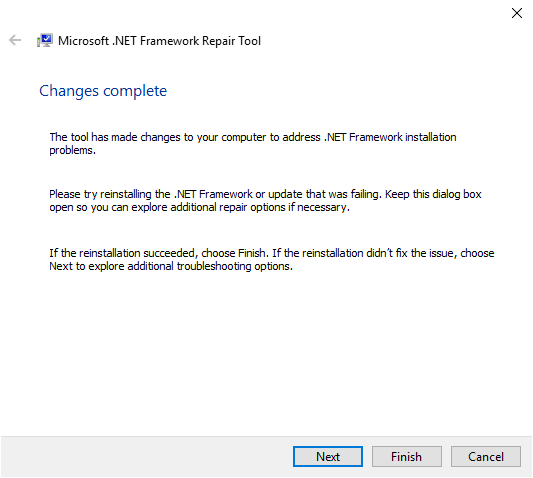
Если приложение успешно запускается, нажмите кнопку Готово. If your application runs successfully, select the Finish button. В противном случае нажмите кнопку Далее. Otherwise, select the Next button.
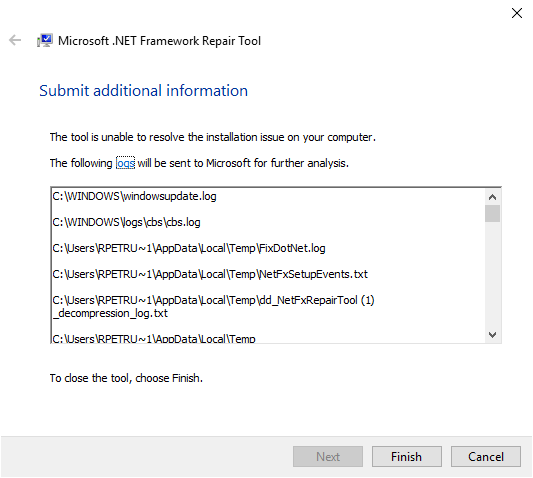
Если вы нажали кнопку Далее, в средстве восстановления .NET Framework отобразится диалоговое окно, как показано ниже. If you selected the Next button, the .NET Framework Repair Tool displays a dialog box like the following. Нажмите кнопку Готово, чтобы отправить диагностические данные в корпорацию Майкрософт. Select the Finish button to send diagnostic information to Microsoft.
Если по-прежнему не удается запустить приложение, установите последнюю версию .NET Framework, поддерживаемую вашей версией Windows, как показано в следующей таблице. If you still cannot run the application, install the latest version of .NET Framework that’s supported by your version of Windows, as shown in the following table.
| Версия Windows Windows version | Установка .NET Framework .NET Framework installation |
|---|---|
| Юбилейное обновление Windows 10 или более поздние версии Windows 10 Anniversary Update and later versions | Среда выполнения .NET Framework 4.8 .NET Framework 4.8 Runtime |
| Windows 10, Windows 10 с обновлением за ноябрь Windows 10, Windows 10 November Update | .NET Framework 4.6.2 .NET Framework 4.6.2 |
| Windows 8.1 Windows 8.1 | Среда выполнения .NET Framework 4.8 .NET Framework 4.8 Runtime |
| Windows 8 Windows 8 | .NET Framework 4.6.1 .NET Framework 4.6.1 |
| Windows 7 с пакетом обновления 1 (SP1) Windows 7 SP1 | Среда выполнения .NET Framework 4.8 .NET Framework 4.8 Runtime |
| Windows Vista SP2 Windows Vista SP2 | .NET Framework 4.6 .NET Framework 4.6 |
.NET Framework 4.8, предустановленная в Windows 10 с обновлением за май 2019 г. .NET Framework 4.8 is preinstalled on Windows 10 May 2019 Update.
Попытайтесь запустить приложение. Attempt to launch the application.
В некоторых случаях отображается диалоговое окно, подобное приведенному ниже, с предложением установить .NET Framework 3.5. In some cases, you may see a dialog box like the following, which asks you to install .NET Framework 3.5. Выберите Скачать и установить этот компонент, чтобы установить .NET Framework 3.5, а затем запустите приложение еще раз. Select Download and install this feature to install .NET Framework 3.5, then launch the application again.
Application windows не может
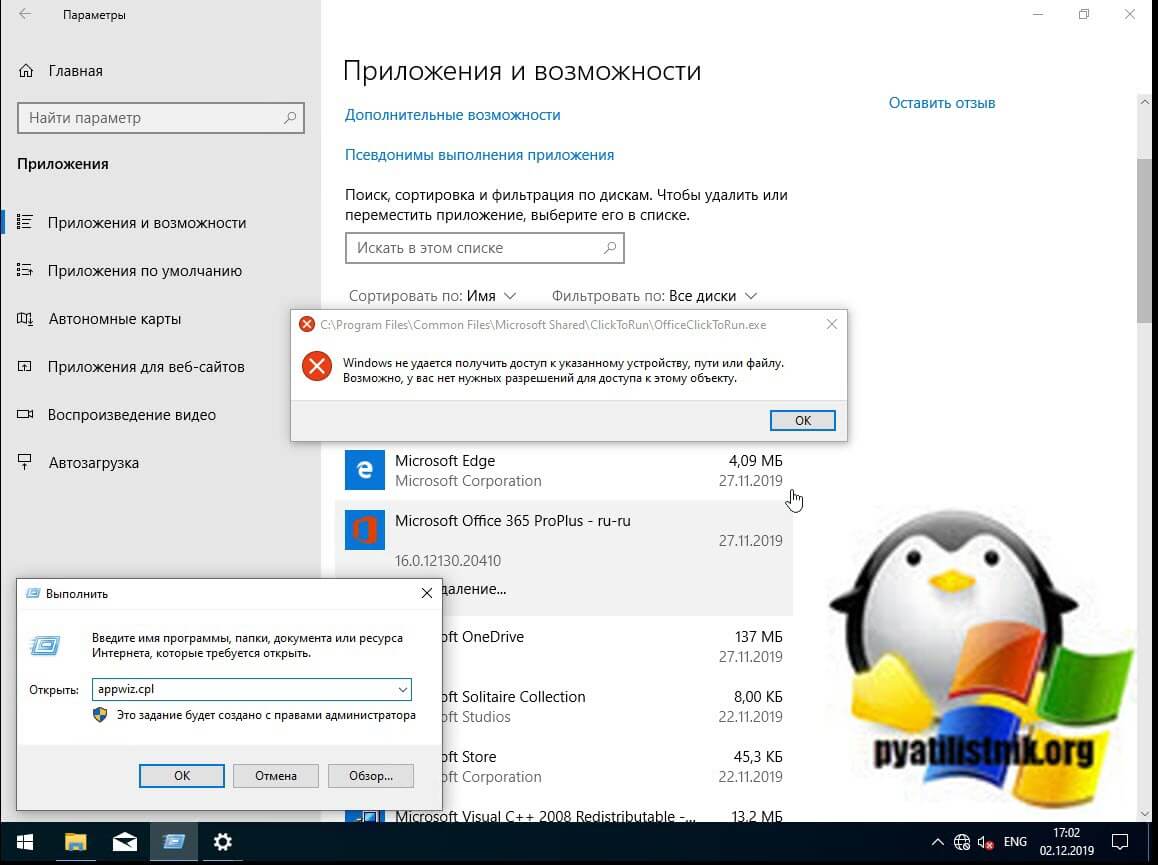
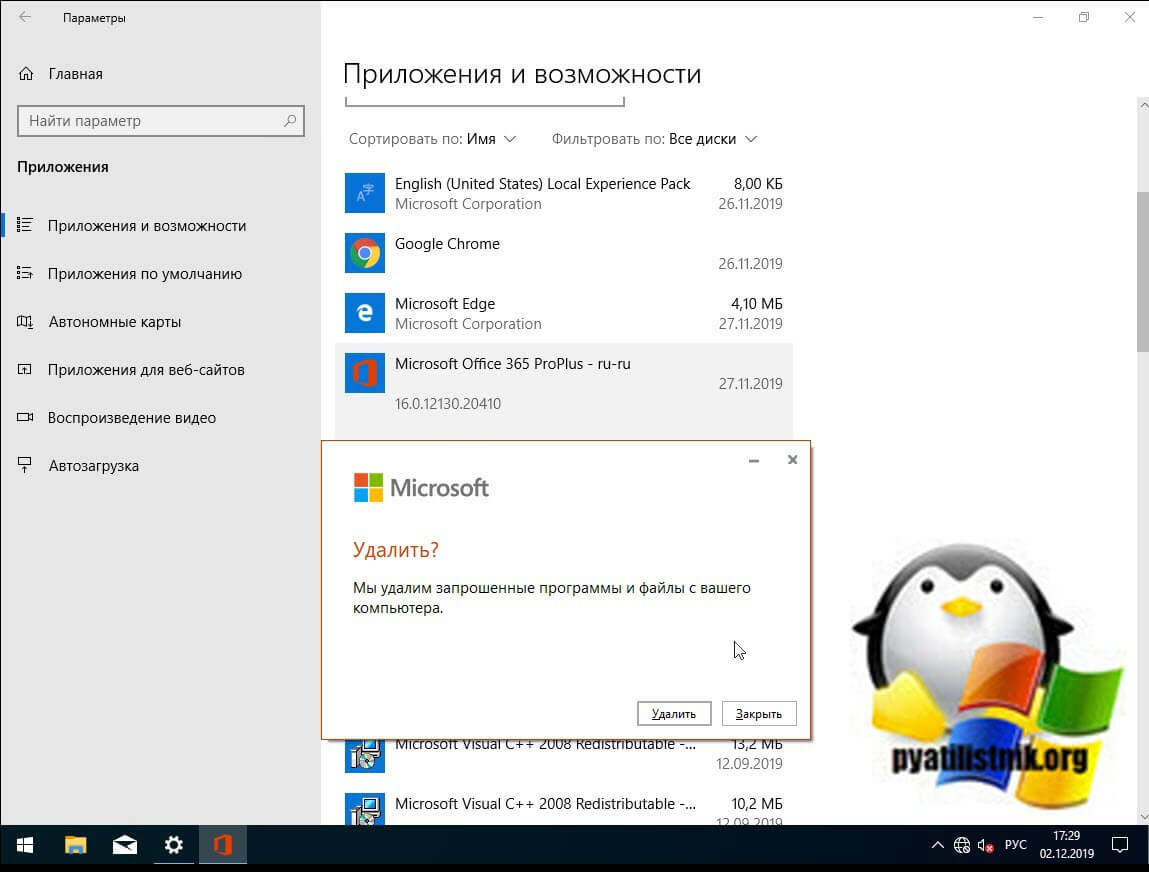
Добрый день! Уважаемые читатели и гости одного из крупнейших IT блогов на просторах рунета Pyatilistnik.org, В прошлый раз я вам подробнейшим образом рассказал, как устанавливается и используется утилита Iperf для проверки вашей локальной сети. В сегодняшней статье я хочу рассмотреть частую ошибку в операционной системе Windows 10 при попытке удалить приложение в моем случае office 365, звучит она вот так: Windows не удается получить доступ к указанному устройству, пути или файлу. Возможно у вас нет нужных разрешений для доступа к этому объекту. Давайте разбираться в чем дело.
Описание ситуации
И так есть операционная система Windows 10, мне необходимо было удалить Office 365, при попытке это сделать из параметров Windows я получил ошибку
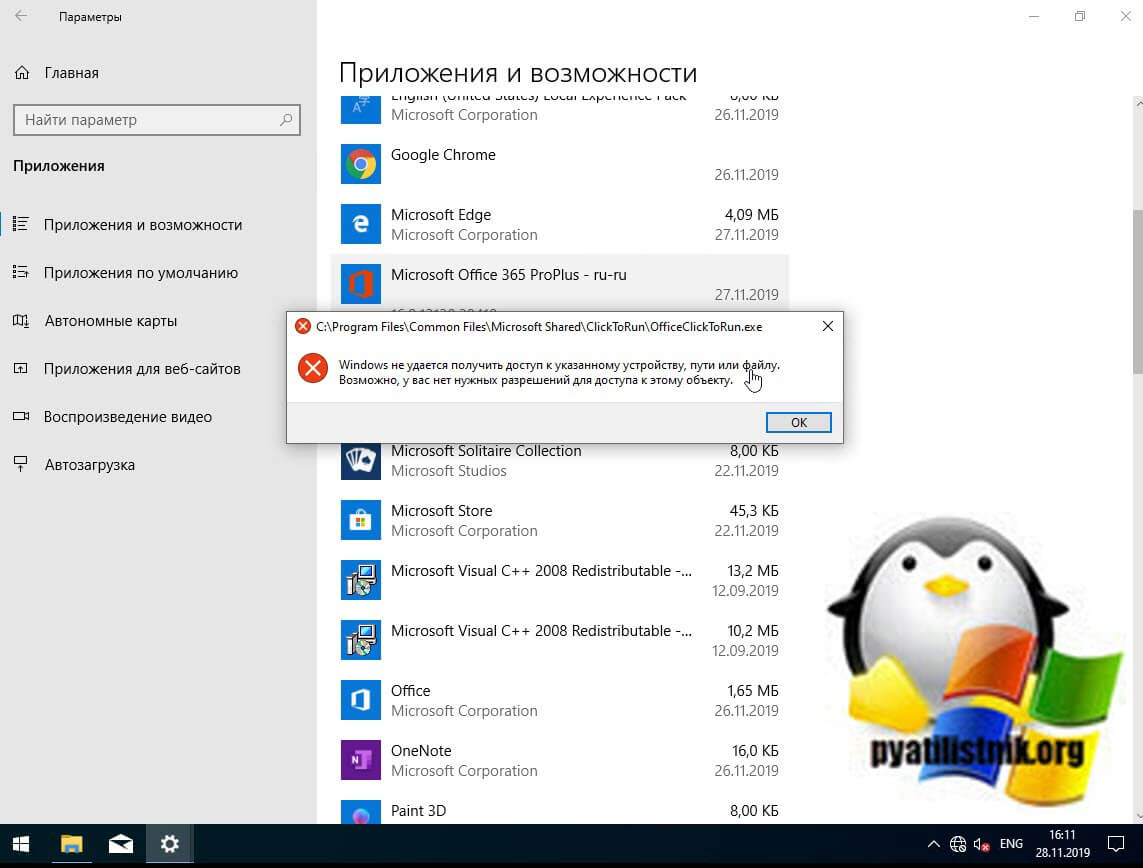
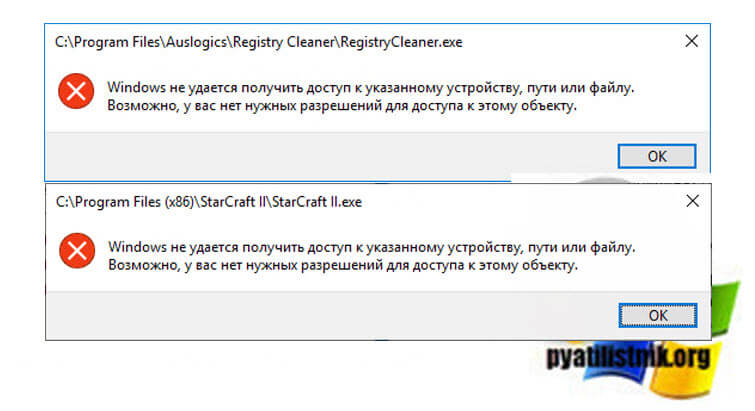
На своей богатой практике данную ошибку я встречал в разных вариантах и на разных операционных системах. 90% это запуск исполняемых файлов в формате exe или ярлыка lnk, 10%, например при удалении приложений. Вот вам несколько примеров:
- Registry Cleaner
- StarCraft 2
- Steam
- Файлы офисного пакета MS Office, например Word или Exel
- Ярлыки различных приложений
Причины ошибки: Windows не удается получить доступ к указанному устройству, пути или файлу
Если детально разобрать текст ошибки, то из нее видно, что у вашей учетной записи либо нет прав на файл, либо самого файла уже просто нет, поэтому он и не доступен. Из совсем специфичных причин, это повреждение самого файла, а так же его блокировка.
Ошибка при удалении приложения
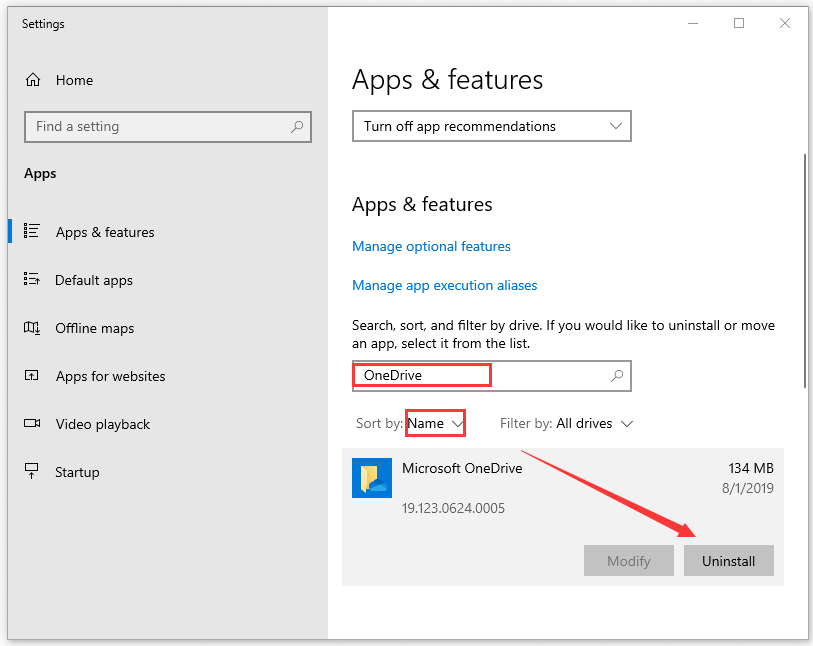
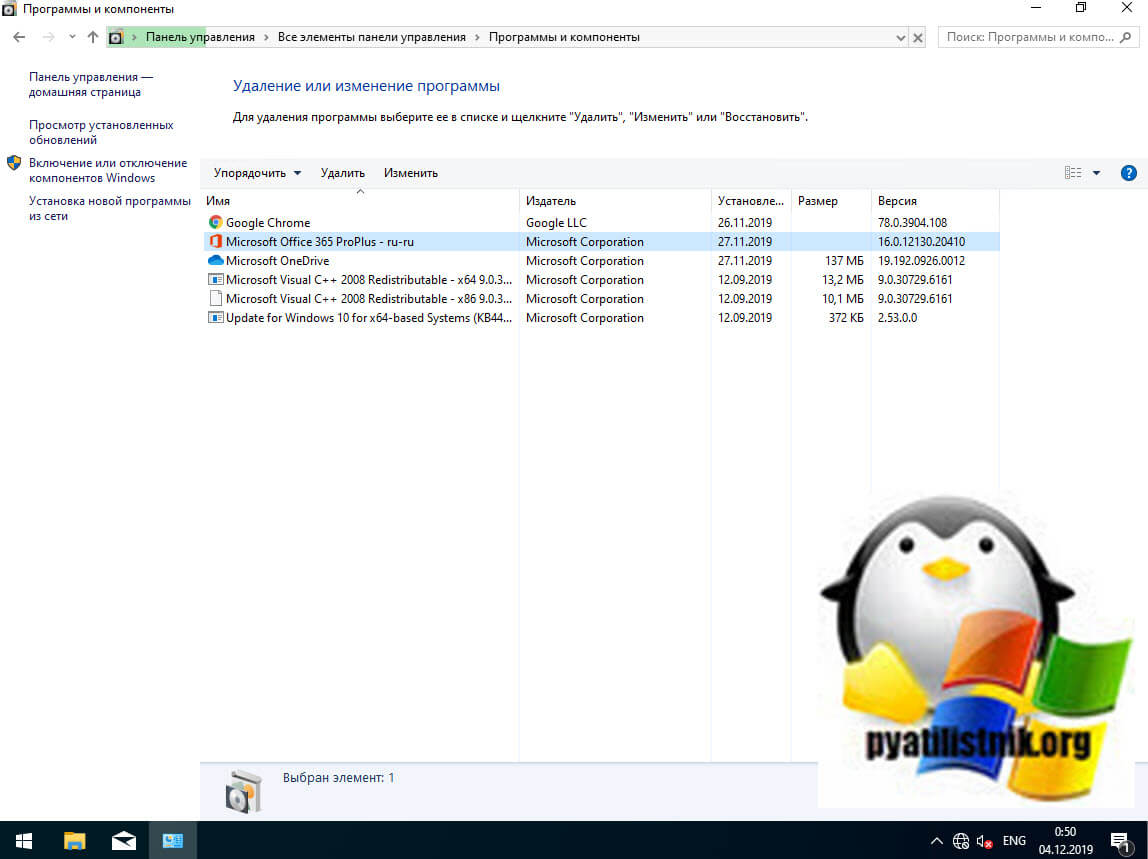
В самом начале я вам показал ситуацию, когда я обладая административными правами в операционной системе Windows 10, не могу элементарно удалить приложение из окна параметров Windows. Перед тем как начинать шаманство с правами или настройками политик, я вам советую попробовать окно «Программы и компоненты«. Открыть его можно вызвав окно «Выполнить» и введя appwiz.cpl.
В списке найдите нужное приложение и попробуйте его деинсталлировать, в 99% случаев у вас не возникнет проблем.
Ошибка запуска из-за UAC (User Account Control)
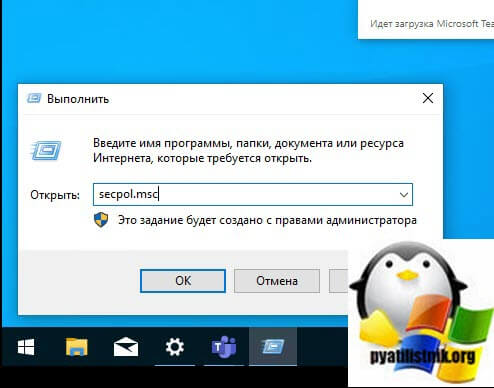
Если у вас доменный компьютер, то вы легко можете иметь некоторые ограничения из-за политик и конкретно UAC (User Account Control). Я авторизовался в системе под встроенной, локальной учетной записью «Администратор» и увидел, что из под нее проблема не наблюдается. Имея данную информацию, можно точно утверждать, что дело в политике. Откройте окно выполнить и введите secpol.msc.
Посмотрите внимательно на ошибку запуска вашего приложения, в самом верху вы увидите полный путь до его месторасположения.
Далее вам необходимо перейти в раздел «Локальная политика — Параметры безопасности«, где необходимо найти пункт «Контроль учетных записей: использование режима одобрения администратором для встроенной учетной записи администратора (User Account Control: Admin Approval Mode for the Built-in Administrator account)»
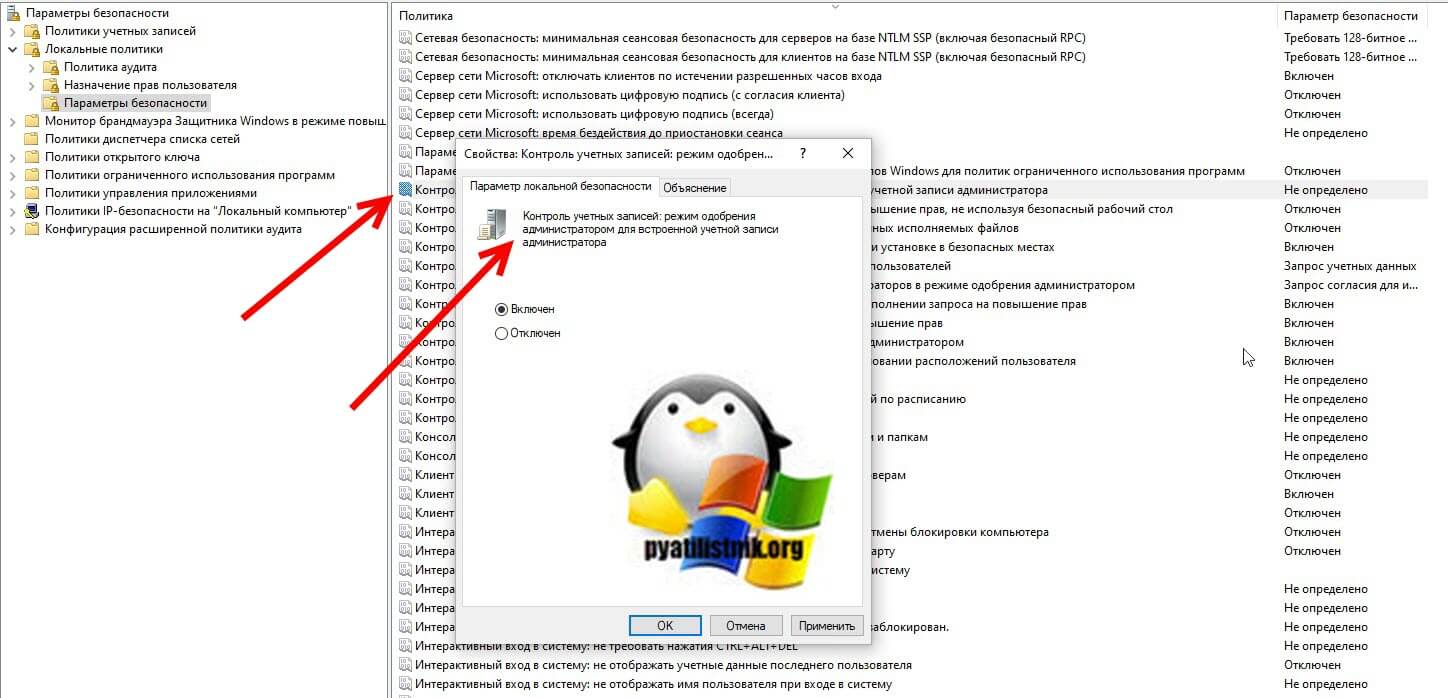
• Включено. Для встроенной учетной записи администратора используется режим одобрения администратором. По умолчанию любая операция, требующая повышения привилегий, предлагает пользователю подтвердить операцию.
• Отключено (по умолчанию). Встроенная учетная запись администратора выполняет все приложения с полными привилегиями администратора.
Далее я советую вам произвести выход из системы и заново залогиниться. После входа в ОС проверьте появилась ли возможность запуска приложения или его удаление, в моем случае сработало.
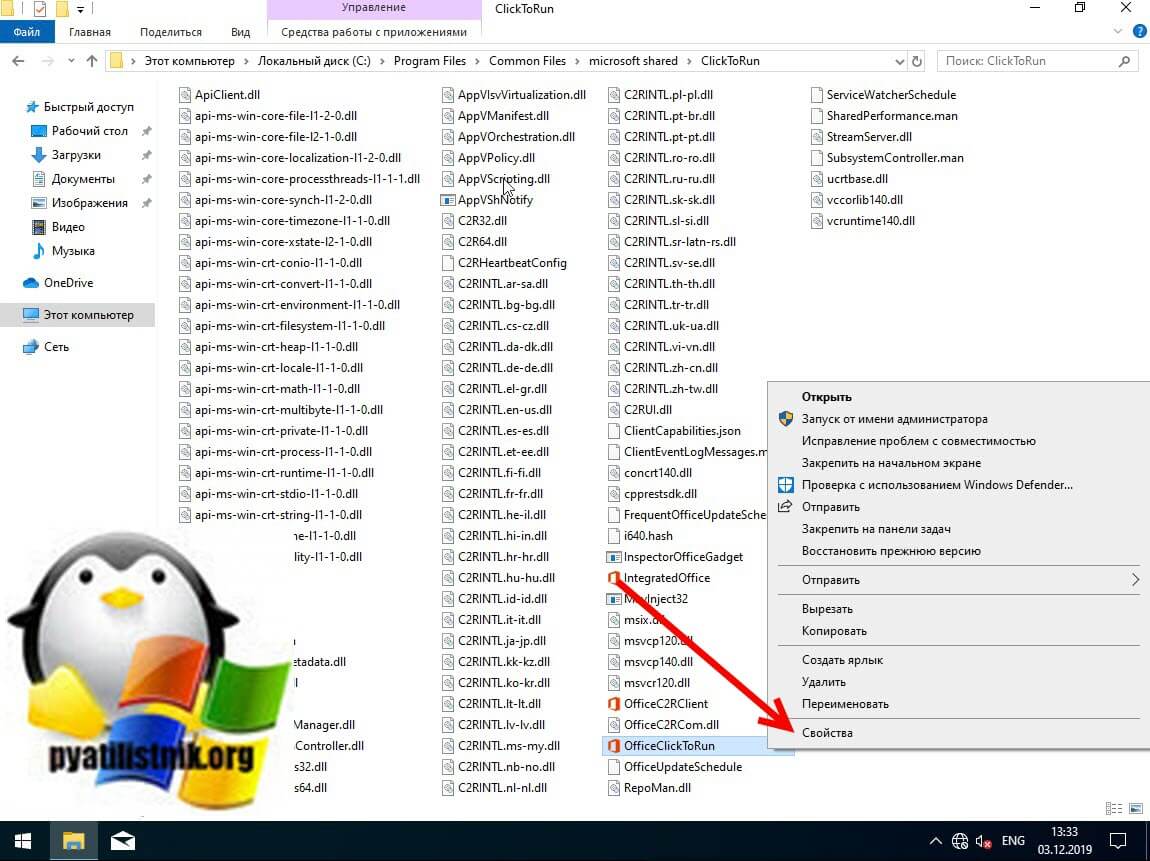
Просмотр разрешений на exe и lnk файлы и их блокировка
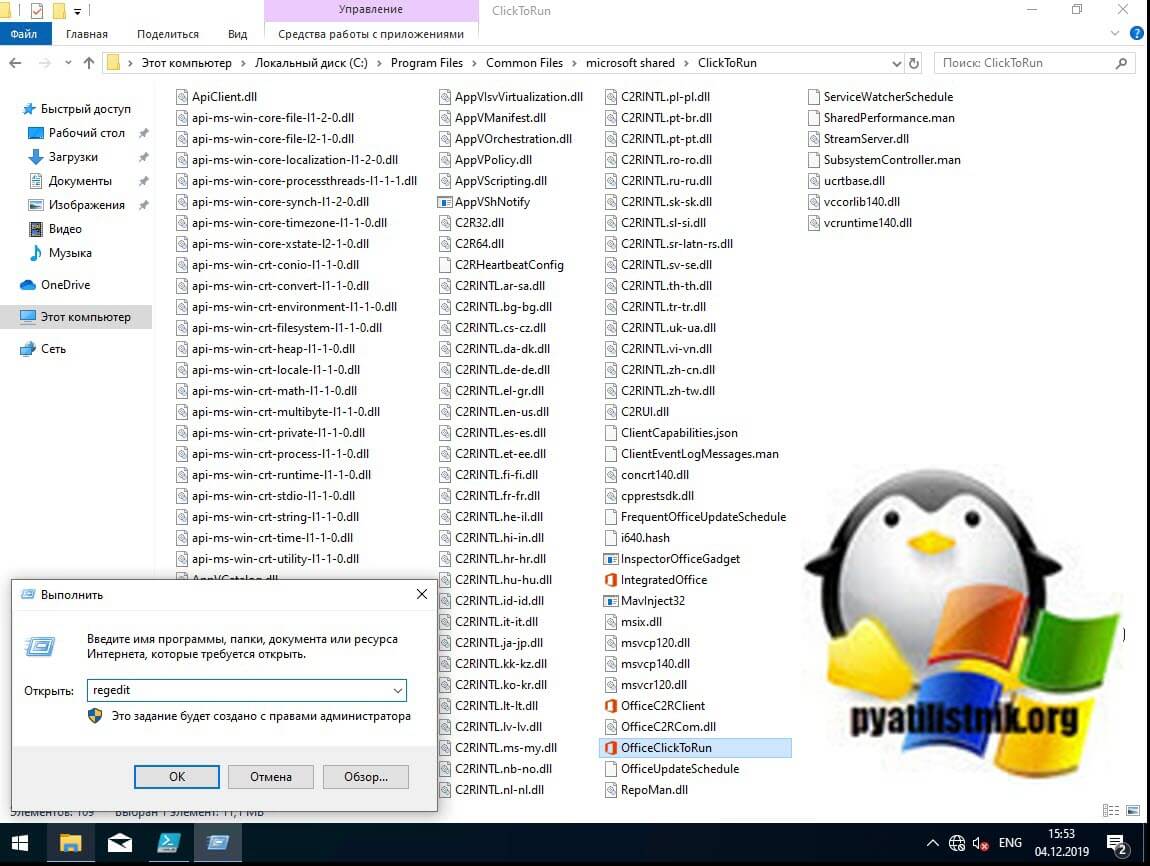
Если по каким-то причинам вам не помогли первые два метода и вы до сих под при запуске исполняемого файла exe или ярлыка, получаете окно с ошибкой «Windows не удается получить доступ к указанному устройству, пути или файлу», то следует посмотреть какие разрешения выставлены в его свойствах, это очень важно. В моем примере, это файл OfficeClickToRun.exe. Открываем его месторасположение и смотрим его свойства.
далее открываете вкладку «Безопасность» и смотрите права доступа и запрета на все объекты перечисленные в списке ACL (Access Control List). В моем примере есть такие фигуранты доступа:
- Все пакеты приложений
- Все ограниченные пакеты приложений
- Система
- Администраторы
- Пользователи
Обратите внимание, что для того чтобы просто запустить исполняемый exe файл, относящийся к определенному приложению, у вас должны быть минимум права на чтения, в редких случаях на запись. Удостоверьтесь, что они присутствуют для всех участников. Так же нужно проверить, что у системы и администраторов, были полные права, И САМОЕ ГЛАВНОЕ нет запретов.

У вас вполне может быть ситуация, что для группы «Администраторы» у вас могут быть полные права, а вот на уровне пользователя запрет, а так как пользователь может являться членом группы «Администраторы» и вроде бы иметь права на доступ, но его явные запреты перевесят и будут вызывать ошибку «Windows не удается получить доступ к указанному устройству, пути или файлу»
Понимая принцип работы приоритетов на доступ, вам необходимо снять ограничения запрета на данный файл, для этого нажмите кнопку «Изменить«. В открывшемся окне найдите нужную группу или пользователя и назначьте ему полный доступ на данный файл (или снимите явные запрещения).

Пробуем теперь запустить файл с которым были проблемы, у вас должно все получиться.
Как я и писал ваш файл или ярлык могут находиться в режиме блокировки, это ограничивает его открытие, подобное мы видели в ситуации когда скачали из интернета ISO образ и при его открытии наблюдали сообщение с ошибкой «К сожалению при подключении файла возникла проблема». Чтобы проверить блокировку файла нужно так же пройти в его свойства на вкладку «Общие». Как видно из моего примера он имеет статус:
Справа у вас будет возможность поставить галочку «Разблокировать«, дабы снять это ограничение запуска. Нажмите применить и закройте окно.
Повторно откройте свойства exe файла или ярлыка и удостоверьтесь, что сообщение о блокировке отсутствует. После чего попробуйте запустить ваше приложение или игру, ошибка запуска «Windows не удается получить доступ к указанному устройству, пути или файлу» должна пропасть.
Ошибка «Windows не удается получить доступ к указанному устройству, пути или файлу» при запуске файла .exe с флешки или другого USB-носителя
У всех из нас есть съемные носители, это удобно держать нужные данные всегда под рукой. Очень часто на них могут присутствовать портативные программы, которые запускаются не требуя установки, мини игры, проекты у программистов. Всех их объединяет запуск через исполняемые файлы exe. Предположим, что в вашей системе Windows 8.1 или другой не наблюдается проблем с запуском встроенных и установленных в нее приложений, которые чаще всего лежат на диске C:, а вот с флешки вы получаете пресловутую, где якобы нет доступа, вы проверили блокировки, права и все они присутствуют, но вот эффекта нет. В такой ситуации вы можете действовать таким образом:
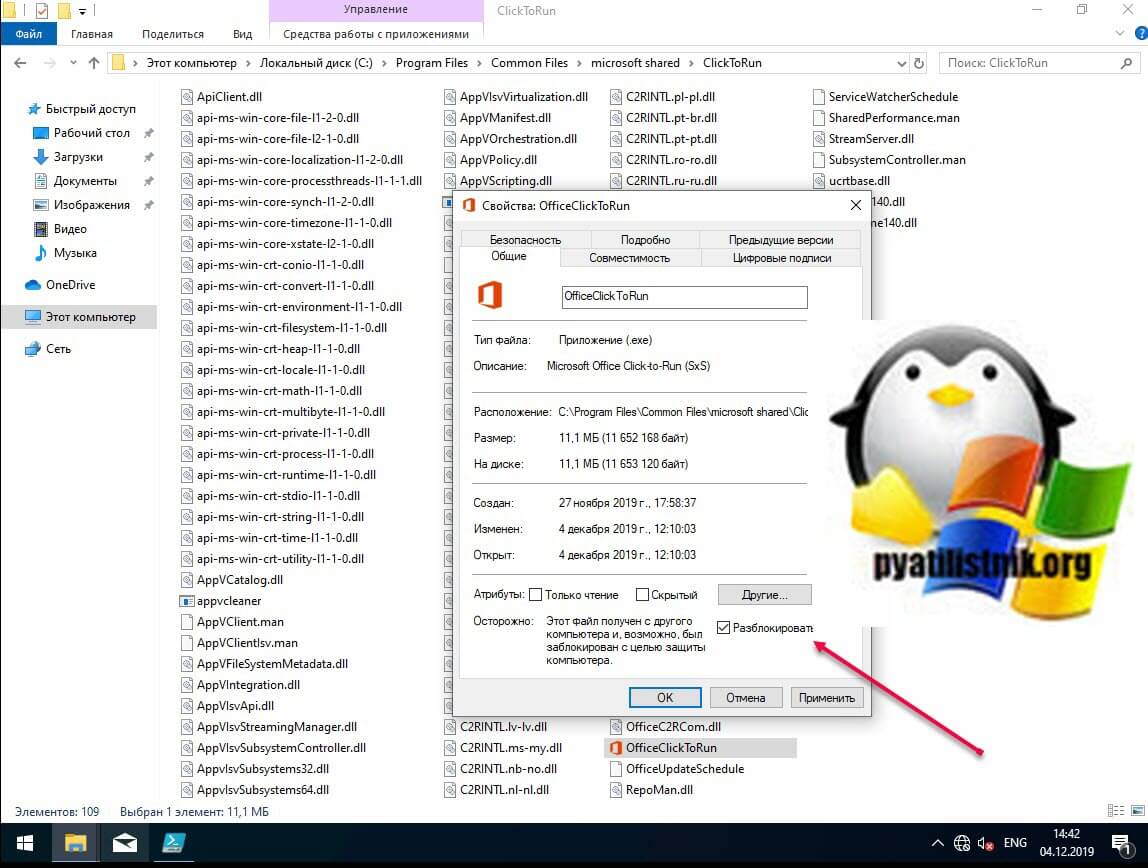
- Для операционных систем Windows 7 до 10 с редакцией Максимальная, PRO или корпоративная вы открываете окно выполнить вводите знакомый нам уже gpedit.msc.
- Далее перейдите в раздел «Конфигурация компьютера — Административные шаблоны — Система — Доступ к съемным запоминающим устройствам«. Убедитесь, что политика «Съемные диски: Запретить выполнение» и других политик, связанных со съемными дисками» имеет статус не задано или отключено. Если же она активирована, то вы не сможете запускать с USB носителей исполняемые файлы exe.
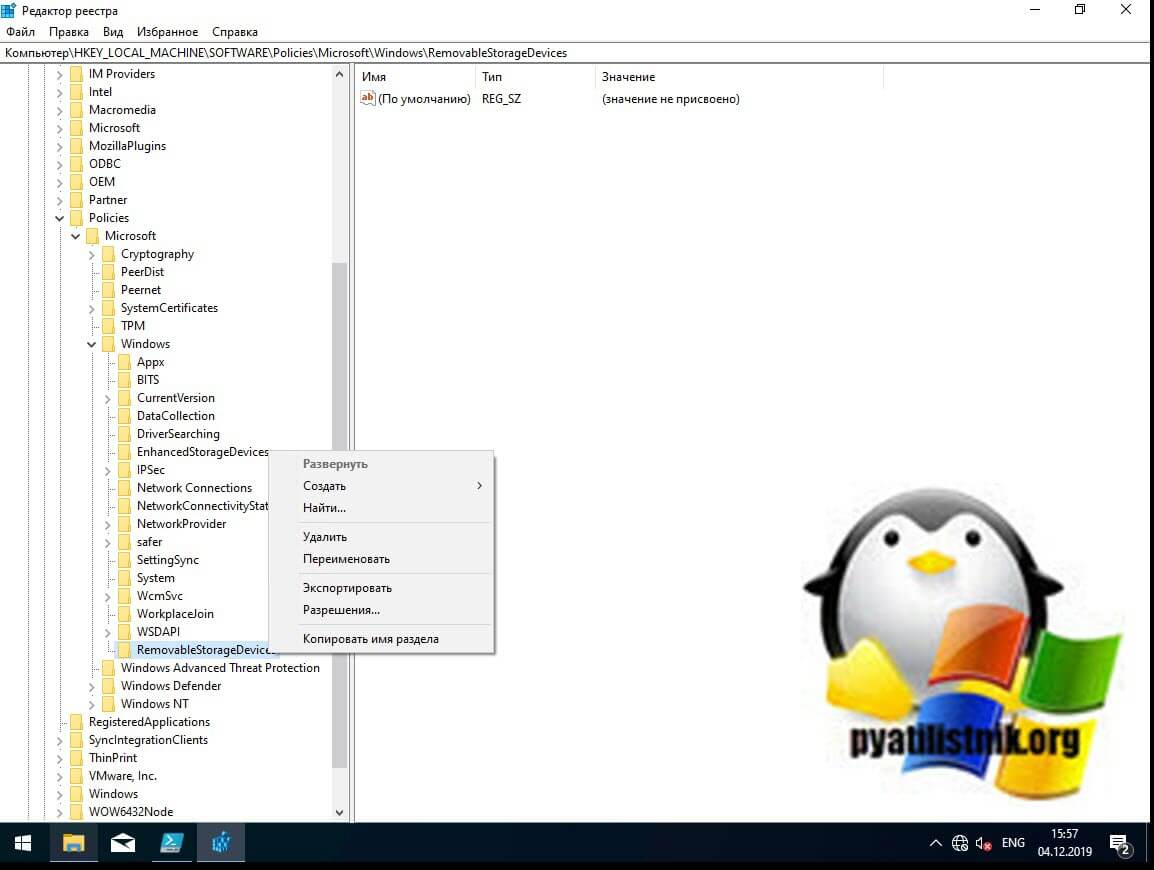
описанный выше метод подходил для старших редакций «Максимальная», «Корпоративная», «Профессиональная», но они есть не у всех, у многих людей дома редакции «Home (Домашняя)» и в ней нет редактора локальных политик, его конечно можно вернуть, я об этом рассказывал, но не всем это нужно. Чтобы убрать запрет на запуск exe файлов со съемных носителей мы воспользуемся редактором реестра. Запустите редактор реестра Windows (Нажмите WIN и R, в окне введите regedit).
Переходите там по пути:
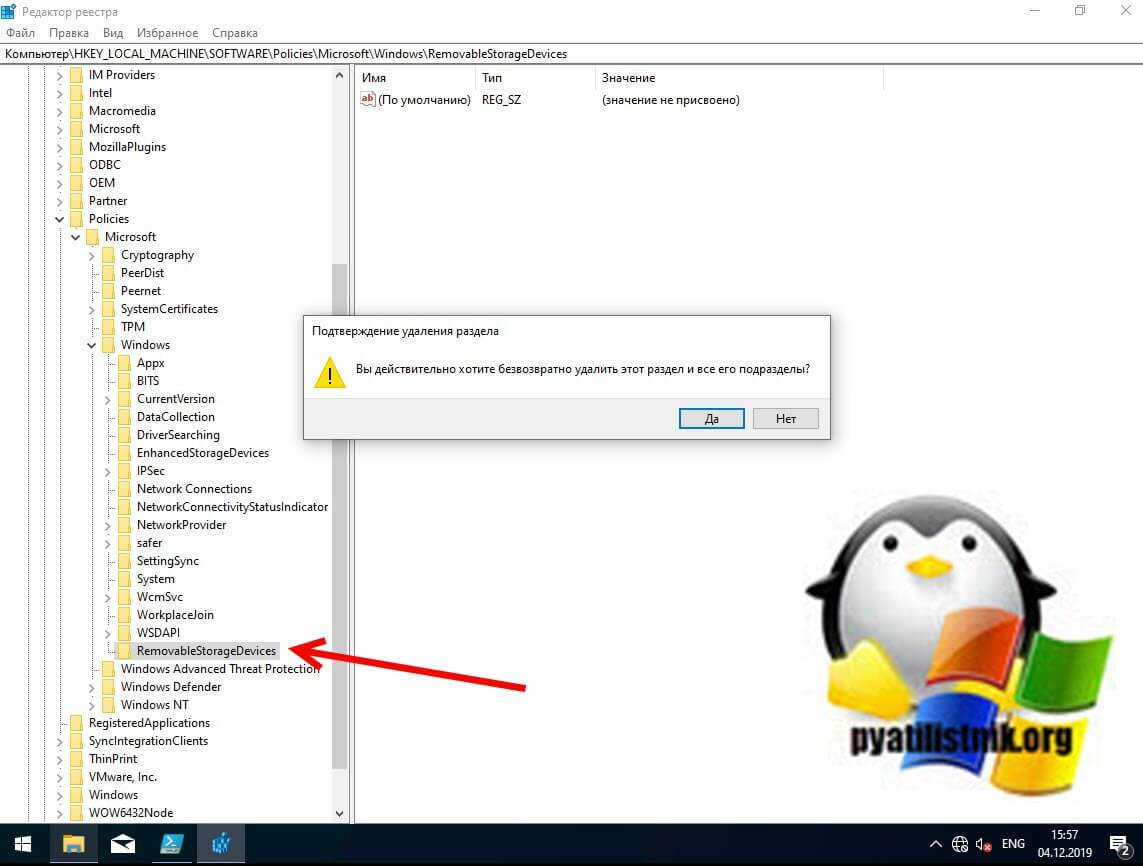
Убедитесь, что в нем нет раздела RemovableStorageDevices. Если раздел RemovableStorageDevices присутствует, то просто щелкаем по нему правой кнопкой мыши и удаляем его.
Подтверждаем удаление раздела.
Как только вы произвели манипуляции с реестром, то настройки вступят в силу сразу .но я советую перезагрузить систему или как минимум правильно извлечь ваш съемный носитель, после чего заново подключить. Пробуем запускать с USB исполняемые файлы exe, это должно было устранить ошибку с доступом.
Если не запускается ярлык программы или игры
Как я упоминал ранее, Windows не может запустить программу или открыть файл с внешнего или сетевого диска, который в данный момент не подключен. Поэтому, если вы получили ошибку при нажатии на ярлык, проверьте местоположение его целевого файла и посмотрите, находится ли файл в недоступном месте. Чтобы это проверить, откройте свойства и перейдите на вкладку «Ярлык». Убедитесь, что пути в строке «Объект» и «Рабочая папка» ведут к нужному файлу, чуть ниже вы можете это проверить, нажав на кнопку «расположение файла», что в результате вызовет месторасположение файла в проводнике Windows.

Если путь в ярлыке ведет не туда, то логично получение сообщения с ошибкой доступа к объекту.
Отключите антивирусное программное обеспечение
Антивирусное программное обеспечение также может блокировать ваши файлы. Поэтому вы можете временно отключить антивирусное программное обеспечение на своем компьютере, а затем попытаться открыть файл.
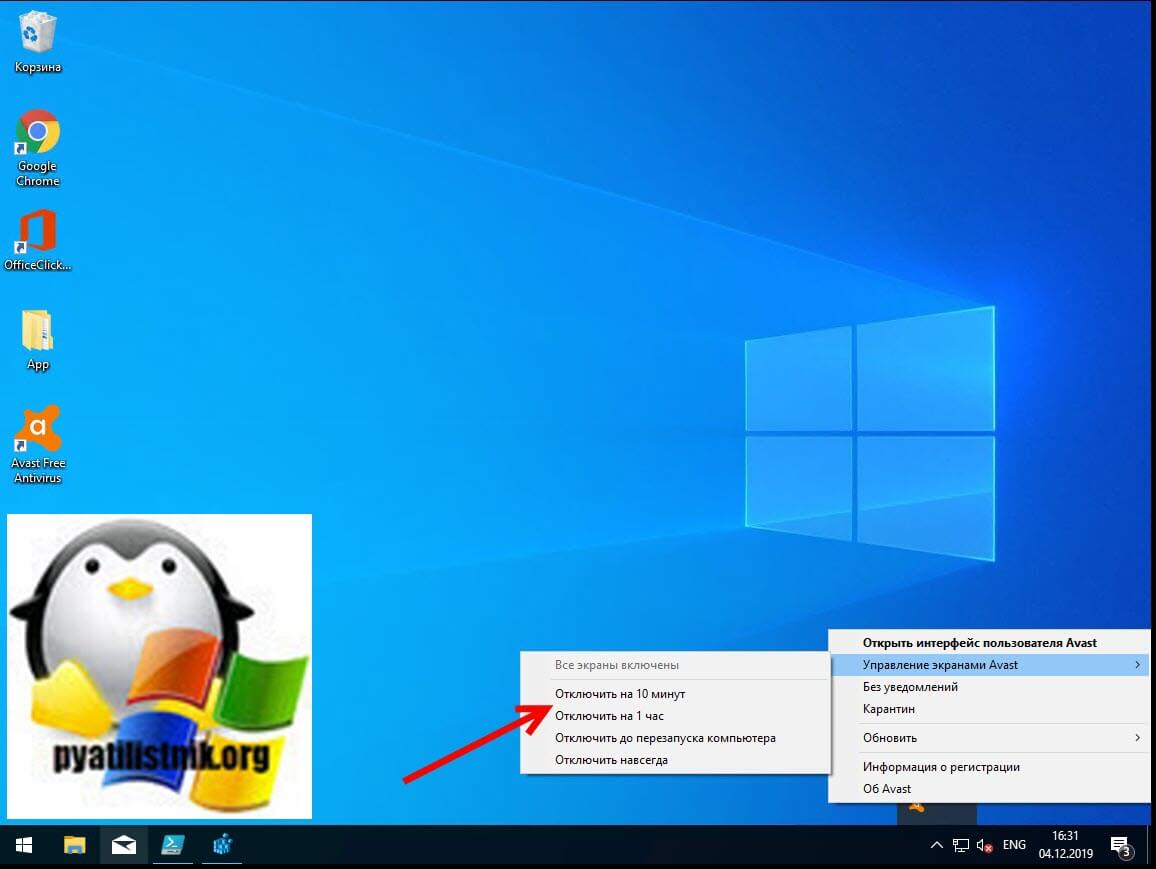
Если вы можете получить доступ к файлу, когда антивирусное программное обеспечение отключено, оно явно блокирует файл. Вы можете удалить антивирусное программное обеспечение или отключить программное обеспечение, когда вам нужно использовать файл. Например у Avast, приостановка делается очень просто, в области уведомлений Windows щелкаете по значку антивируса и из контекстного меню выбираете пункт «Управление экранами Avast — отключить на 10 минут или час», этого достаточно понять в нем дело или нет.
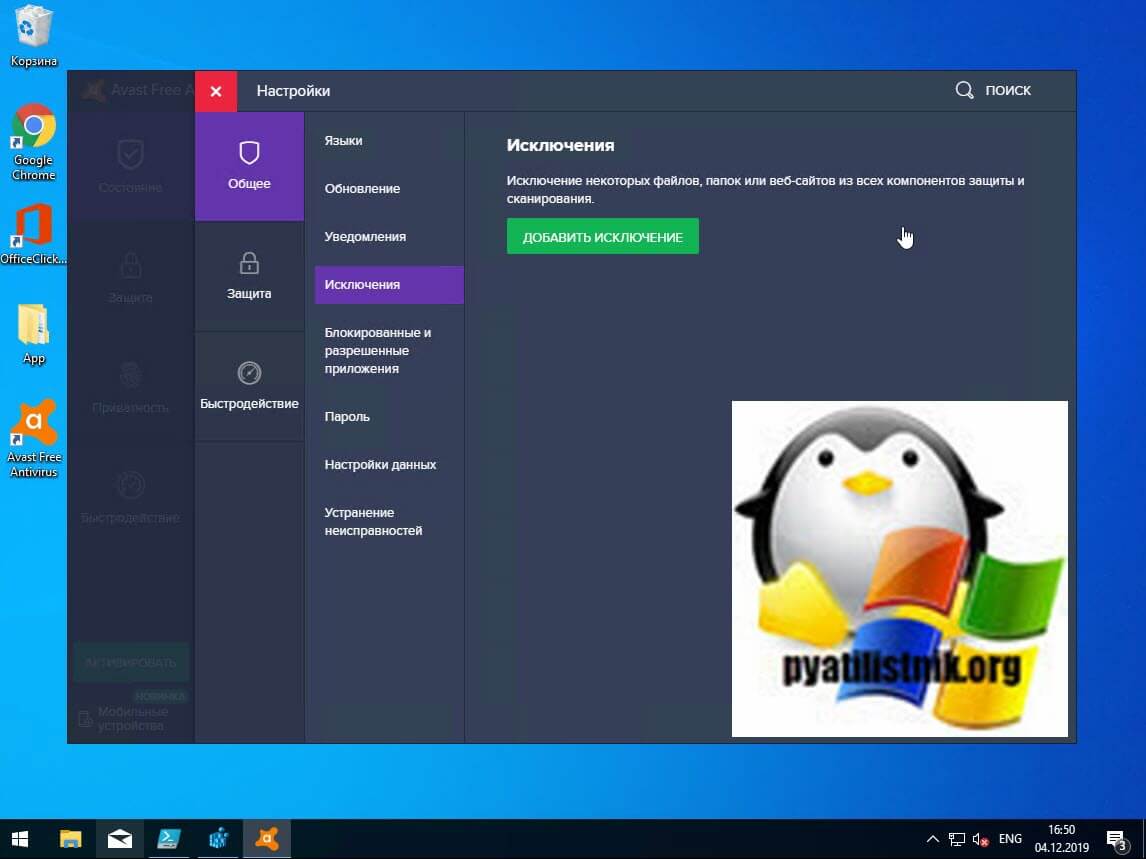
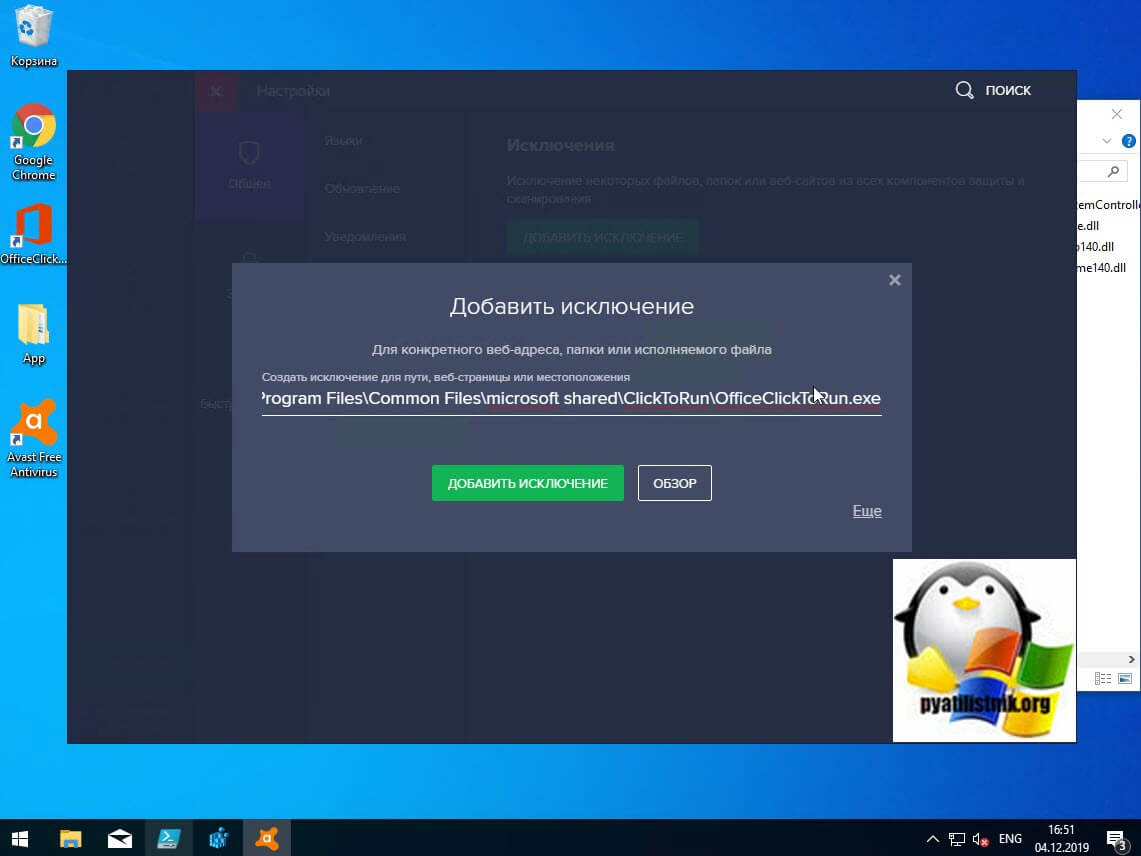
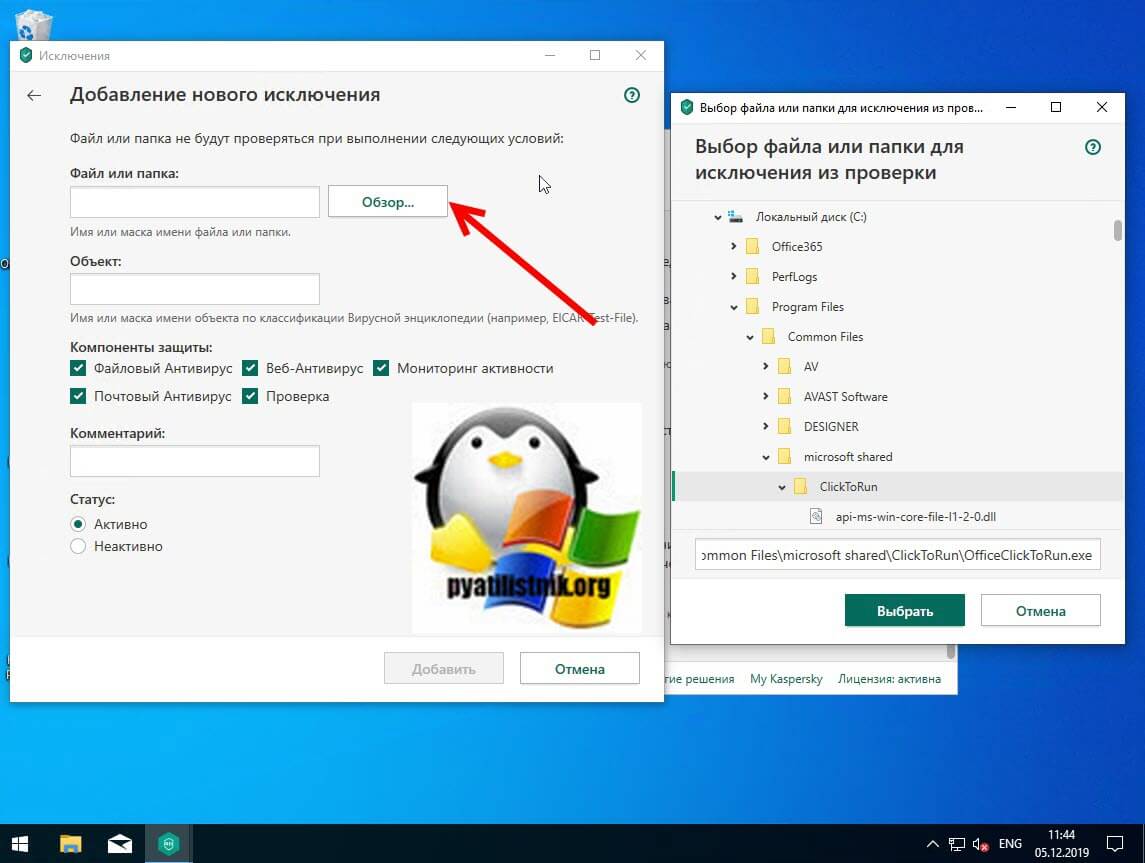
Далее если блокировку вызывал антивирус, в моем примере Avast, то идем в его настройки и добавляем исключение, путь до нашего файла, чтобы антивирус его не трогал и признавал за своего.
Через кнопку обзор найдите свой exe файл и добавьте его.
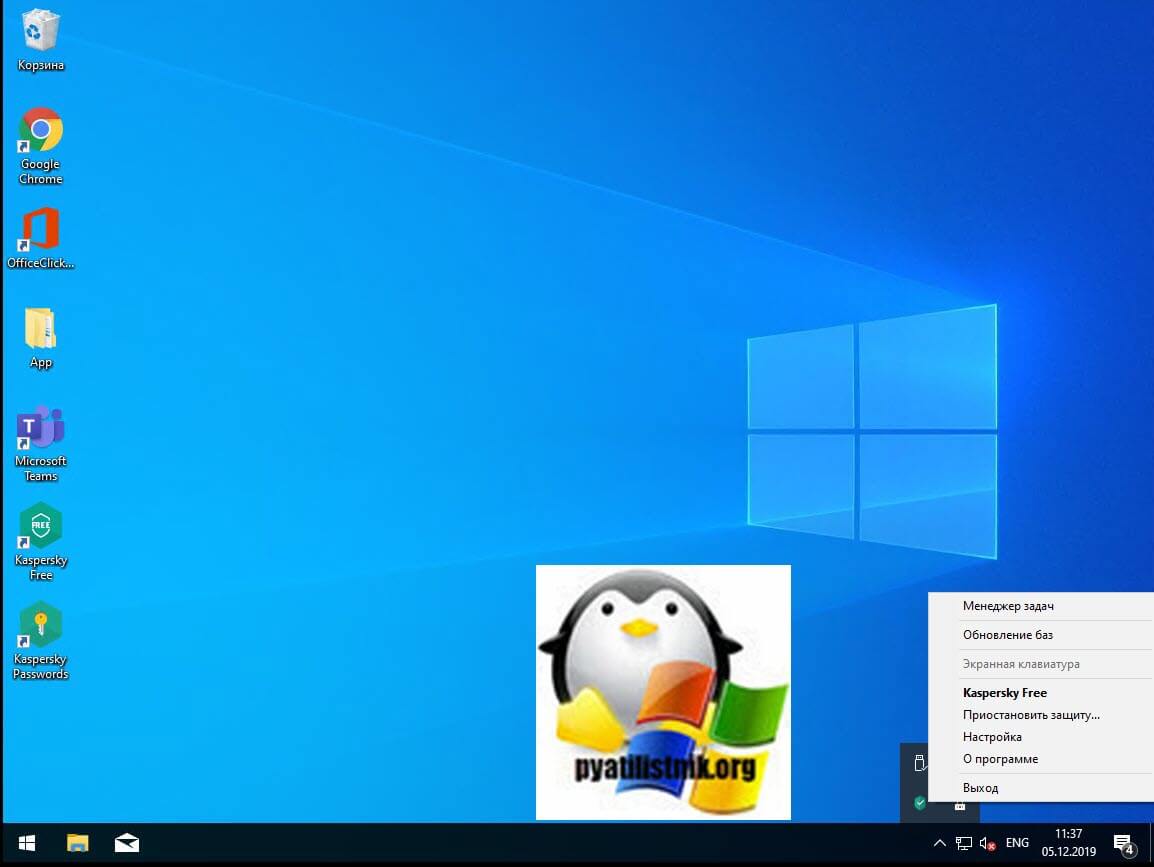
То же самое можно осуществить и в распространенном антивирусе Kaspersky, для этого также в области системных уведомлений найдите его значок и из контекстного меню выберите пункт «Приостановить защиту».
Чтобы исключить нужный исполняемый файл вам необходимо открыть настройки Kaspersky, перейти в раздел «Дополнительно» и выбрать там пункт «Угрозы и исключения».

Далее в разделе «Исключения» нажмите на пункт «Настроить исключения»

Далее нажимаем кнопку «Добавить»
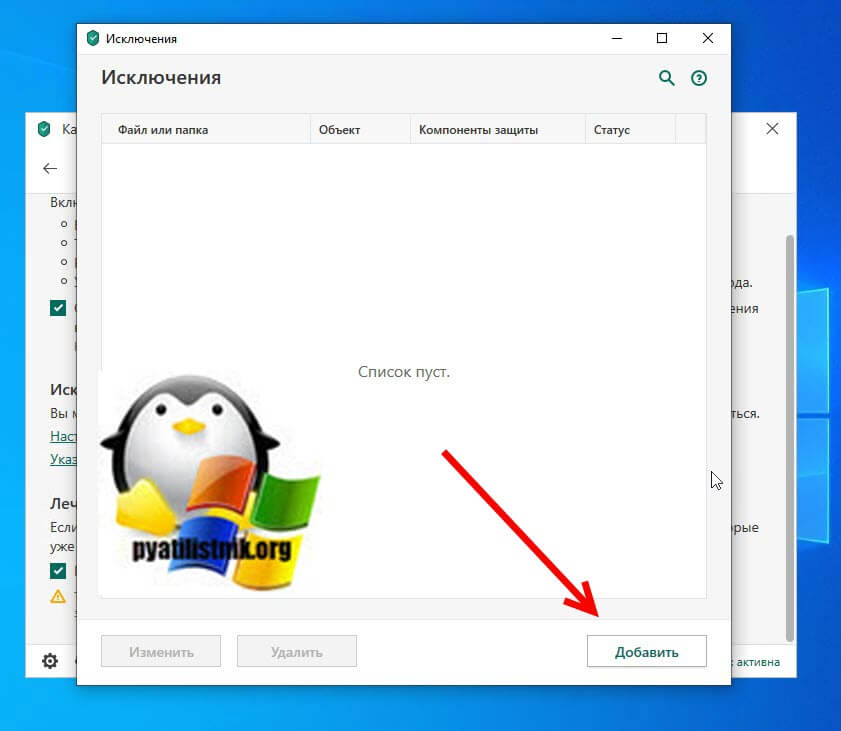
Через кнопку обзор укажите путь до вашего файла.
У любого антивируса есть свои системные события, которые он записывает к себе в лог, там будут и упоминания, о блокировке файла. Если ошибка «Windows не удается получить доступ к указанному устройству, пути или файлу. Возможно, у вас нет нужных разрешений для доступа к этому объекту» появилась, то смотрим журнал угроз. Если причина была в антивирусе, то подобным методом вы устраните ошибку запуска exe файла и вызов ошибки «Windows не удается получить доступ к указанному устройству, пути или файлу».
Восстановите файл, который был удален, удален или поврежден
Если доступ к файлу невозможен из-за того, что файл поврежден или удален, внешний диск поврежден или поврежден вирусом, вы можете восстановить потерянный файл с помощью различных программ, например, DiskGenius, EaseUS Data Recovery Wizard, FonePaw Data Recovery.
Проверка политики ограниченного использования программ SRP
Есть такая политика Software Restriction Policies (Политики ограниченного использования программ) — это функция, основанная на групповых политиках, которая определяет программы, работающие на компьютерах в домене Active Directory, и управляет возможностью их запуска. Политики ограничения программного обеспечения являются частью стратегии безопасности и управления Microsoft, которая помогает предприятиям повысить надежность, целостность и управляемость своих компьютеров.
Вы также можете использовать политики ограниченного использования программ для создания сильно ограниченных конфигураций для компьютеров, в которых вы разрешаете запускать только специально определенные приложения. Политики ограниченного использования программ интегрированы с Microsoft Active Directory и групповой политикой. Вы также можете создавать политики ограниченного использования программ на автономных компьютерах. Политики ограниченного использования программ — это политики доверия, которые представляют собой правила, установленные администратором для ограничения работы сценариев и другого кода, который не является полностью доверенным.
Вы можете определить эти политики с помощью расширения политик ограниченного использования программ редактора локальной групповой политики или оснастки «Локальные политики безопасности» в консоли управления (MMC).
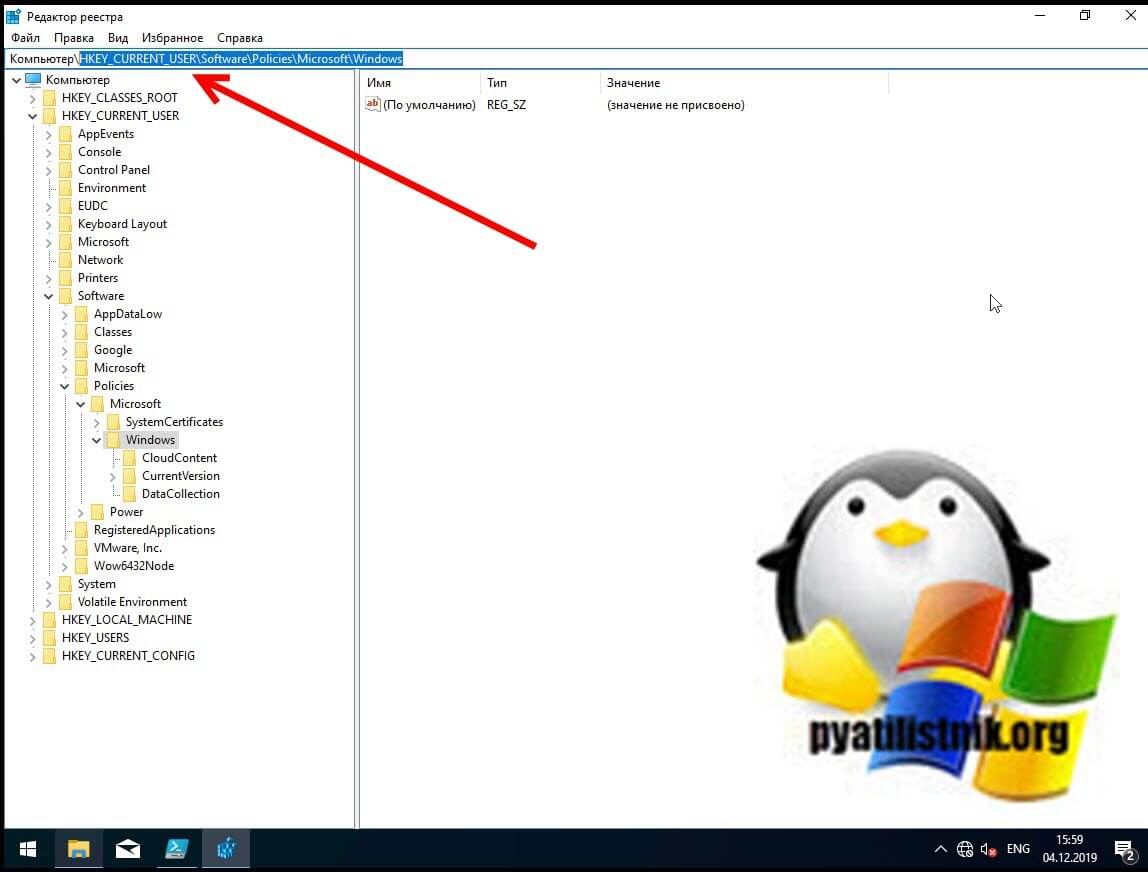
Проверить наличие на компьютере политики SRP можно через RSOP или реестр, давайте я покажу какую ветку реестра нужно изучить.
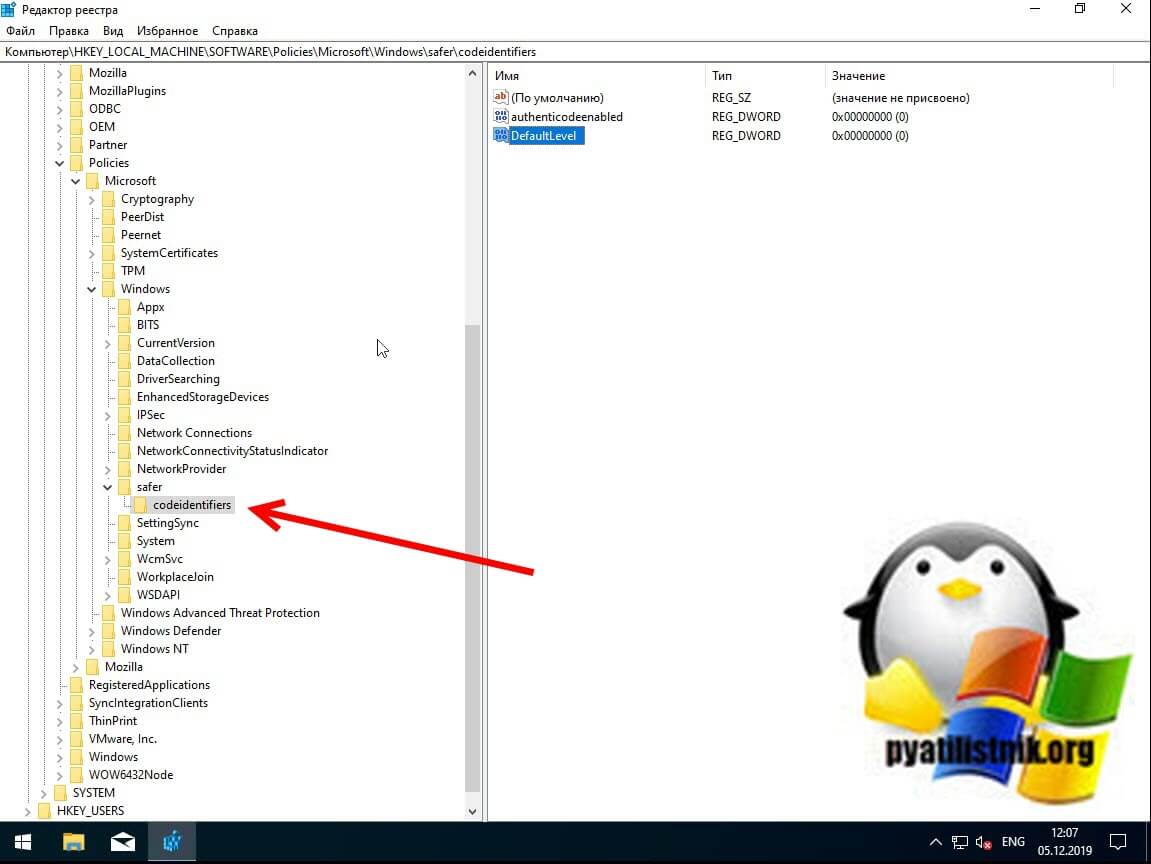
Наличие раздела safercodeidentifiers уже говорит, о применении политик SRP. Регулируется она ключом DefaultLevel. Чтобы приостановить действие политики SRP установите у ключа DefaultLevel значение .
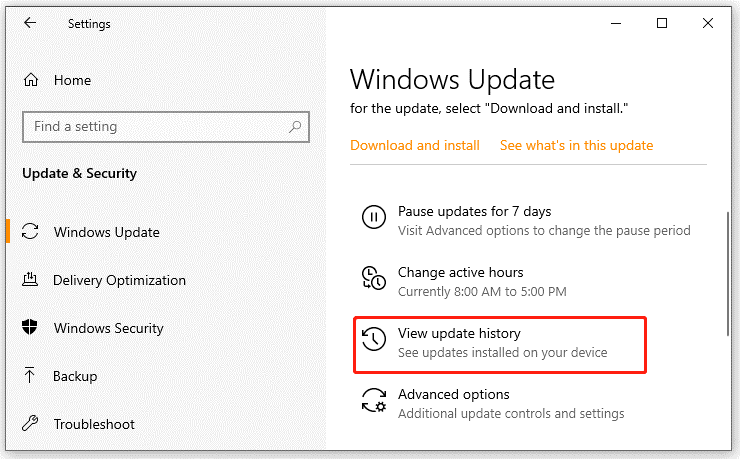
Последнее обновление: 07/09/2022
[Среднее время чтения: 4,5 мин.]
Файлы Registry Repair Wizard Scheduler, такие как RCHelper.exe, считаются разновидностью файла Win32 EXE (Исполняемое приложение). Они соотносятся с расширением EXE, разработанным компанией SmartPCTools для Registry Repair Wizard.
Файл RCHelper.exe изначально был выпущен с Registry Repair Wizard 2012 6.72 06/10/2012 для ОС Windows 10.
Это не только самый последний выпуск от компании SmartPCTools, но и, насколько известно, единственная существующая версия.
Ниже приведены исчерпывающие сведения о файле, инструкции для простого устранения неполадок, возникших с файлом EXE, и список бесплатных загрузок RCHelper.exe для каждой из имеющихся версий файла.
Что такое сообщения об ошибках RCHelper.exe?
RCHelper.exe — ошибки выполнения
Ошибки выполнения — это ошибки Registry Repair Wizard 2012, возникающие во время «выполнения». Термин «выполнение» говорит сам за себя; имеется в виду, что данные ошибки EXE возникают в момент, когда происходит попытка загрузки файла RCHelper.exe — либо при запуске приложения Registry Repair Wizard 2012, либо, в некоторых случаях, во время его работы. Ошибки выполнения являются наиболее распространенной разновидностью ошибки EXE, которая встречается при использовании приложения Registry Repair Wizard 2012.
В большинстве случаев ошибки выполнения RCHelper.exe, возникающие во время работы программы, приводят к ненормальному завершению ее работы. Большинство сообщений об ошибках RCHelper.exe означают, что либо приложению Registry Repair Wizard 2012 не удалось найти этот файл при запуске, либо файл поврежден, что приводит к преждевременному прерыванию процесса запуска. Как правило, Registry Repair Wizard 2012 не сможет запускаться без разрешения этих ошибок.
Таким образом, крайне важно, чтобы антивирус постоянно поддерживался в актуальном состоянии и регулярно проводил сканирование системы.
Поиск причины ошибки RCHelper.exe является ключом к правильному разрешению таких ошибок. Несмотря на то что большинство этих ошибок EXE, влияющих на RCHelper.exe, происходят во время запуска, иногда ошибка выполнения возникает при использовании Registry Repair Wizard. Причиной этого может быть недостаточное качество программного кода со стороны SmartPCTools, конфликты с другими приложениями, сторонние плагины или поврежденное и устаревшее оборудование. Кроме того, эти типы ошибок RCHelper.exe могут возникать в тех случаях, если файл был случайно перемещен, удален или поврежден вредоносным программным обеспечением. Таким образом, крайне важно, чтобы антивирус постоянно поддерживался в актуальном состоянии и регулярно проводил сканирование системы.
Как исправить ошибки RCHelper.exe — 3-шаговое руководство (время выполнения: ~5-15 мин.)
Если вы столкнулись с одним из вышеуказанных сообщений об ошибке, выполните следующие действия по устранению неполадок, чтобы решить проблему RCHelper.exe. Эти шаги по устранению неполадок перечислены в рекомендуемом порядке выполнения.
Шаг 1. Восстановите компьютер до последней точки восстановления, «моментального снимка» или образа резервной копии, которые предшествуют появлению ошибки.
Чтобы начать восстановление системы (Windows XP, Vista, 7, 8 и 10):
- Нажмите кнопку «Пуск» в Windows
- В поле поиска введите «Восстановление системы» и нажмите ENTER.
- В результатах поиска найдите и нажмите «Восстановление системы»
- Введите пароль администратора (при необходимости).
- Следуйте инструкциям мастера восстановления системы, чтобы выбрать соответствующую точку восстановления.
- Восстановите компьютер к этому образу резервной копии.
Если на этапе 1 не удается устранить ошибку RCHelper.exe, перейдите к шагу 2 ниже.

Шаг 2. Если вы недавно установили приложение Registry Repair Wizard 2012 (или схожее программное обеспечение), удалите его, затем попробуйте переустановить Registry Repair Wizard 2012.
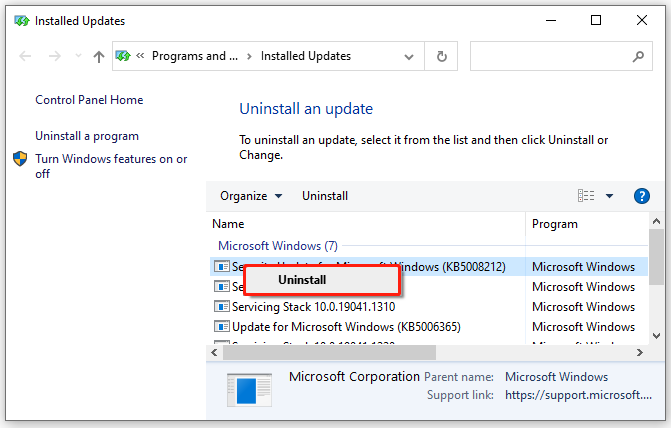
Чтобы удалить программное обеспечение Registry Repair Wizard 2012, выполните следующие инструкции (Windows XP, Vista, 7, 8 и 10):
- Нажмите кнопку «Пуск» в Windows
- В поле поиска введите «Удалить» и нажмите ENTER.
- В результатах поиска найдите и нажмите «Установка и удаление программ»
- Найдите запись для Registry Repair Wizard 2012 6.72 и нажмите «Удалить»
- Следуйте указаниям по удалению.
После полного удаления приложения следует перезагрузить ПК и заново установить Registry Repair Wizard 2012.
Если на этапе 2 также не удается устранить ошибку RCHelper.exe, перейдите к шагу 3 ниже.
![]()
Registry Repair Wizard 2012 6.72
SmartPCTools
Шаг 3. Выполните обновление Windows.
Когда первые два шага не устранили проблему, целесообразно запустить Центр обновления Windows. Во многих случаях возникновение сообщений об ошибках RCHelper.exe может быть вызвано устаревшей операционной системой Windows. Чтобы запустить Центр обновления Windows, выполните следующие простые шаги:
- Нажмите кнопку «Пуск» в Windows
- В поле поиска введите «Обновить» и нажмите ENTER.
- В диалоговом окне Центра обновления Windows нажмите «Проверить наличие обновлений» (или аналогичную кнопку в зависимости от версии Windows)
- Если обновления доступны для загрузки, нажмите «Установить обновления».
- После завершения обновления следует перезагрузить ПК.
Если Центр обновления Windows не смог устранить сообщение об ошибке RCHelper.exe, перейдите к следующему шагу. Обратите внимание, что этот последний шаг рекомендуется только для продвинутых пользователей ПК.

Если эти шаги не принесут результата: скачайте и замените файл RCHelper.exe (внимание: для опытных пользователей)
Если ни один из предыдущих трех шагов по устранению неполадок не разрешил проблему, можно попробовать более агрессивный подход (примечание: не рекомендуется пользователям ПК начального уровня), загрузив и заменив соответствующую версию файла RCHelper.exe. Мы храним полную базу данных файлов RCHelper.exe со 100%-ной гарантией отсутствия вредоносного программного обеспечения для любой применимой версии Registry Repair Wizard 2012 . Чтобы загрузить и правильно заменить файл, выполните следующие действия:
- Найдите версию операционной системы Windows в нижеприведенном списке «Загрузить файлы RCHelper.exe».
- Нажмите соответствующую кнопку «Скачать», чтобы скачать версию файла Windows.
- Скопируйте этот файл в соответствующее расположение папки Registry Repair Wizard 2012:
Windows 10: C:Program Files (x86)SmartPCToolsRegistry Repair Wizard
- Перезагрузите компьютер.
Если этот последний шаг оказался безрезультативным и ошибка по-прежнему не устранена, единственно возможным вариантом остается выполнение чистой установки Windows 10.
СОВЕТ ОТ СПЕЦИАЛИСТА: Мы должны подчеркнуть, что переустановка Windows является достаточно длительной и сложной задачей для решения проблем, связанных с RCHelper.exe. Во избежание потери данных следует убедиться, что перед началом процесса вы создали резервные копии всех важных документов, изображений, установщиков программного обеспечения и других персональных данных. Если вы в настоящее время не создаете резервных копий своих данных, вам необходимо сделать это немедленно.
Скачать файлы RCHelper.exe (проверено на наличие вредоносного ПО — отсутствие 100 %)
ВНИМАНИЕ! Мы настоятельно не рекомендуем загружать и копировать RCHelper.exe в соответствующий системный каталог Windows. SmartPCTools, как правило, не выпускает файлы Registry Repair Wizard 2012 EXE для загрузки, поскольку они входят в состав установщика программного обеспечения. Задача установщика заключается в том, чтобы обеспечить выполнение всех надлежащих проверок перед установкой и размещением RCHelper.exe и всех других файлов EXE для Registry Repair Wizard 2012. Неправильно установленный файл EXE может нарушить стабильность работы системы и привести к тому, что программа или операционная система полностью перестанут работать. Действовать с осторожностью.
Файлы, относящиеся к RCHelper.exe
Файлы EXE, относящиеся к RCHelper.exe
| Имя файла | Описание | Программа (версия) | Размер файла (байты) | Расположение файла |
|---|---|---|---|---|
| OneDriveUpdaterService… | Updater Service | Microsoft OneDrive (19.222.1110.0006) | 2485096 | C:UsersTesterAppDataLocalMicrosoftOneDriv… |
| FileSyncHelper.exe | Microsoft OneDriveFileSyncHelper | Microsoft OneDrive (19.222.1110.0006) | 2134376 | C:UsersTesterAppDataLocalMicrosoftOneDriv… |
| OneDrive.exe | Microsoft OneDrive | Microsoft OneDrive (19.222.1110.0006) | 1584488 | C:UsersTesterAppDataLocalMicrosoftOneDrive |
| RCleaner.exe | Registry Repair Wizard | Registry Repair Wizard (2012, 6, 7, 2) | 3537688 | C:Program Files (x86)SmartPCToolsRegistry Re… |
| unins000.exe | Setup/Uninstall | Registry Repair Wizard 2012 6.72 | 754970 | C:Program Files (x86)SmartPCToolsRegistry Re… |
Другие файлы, связанные с RCHelper.exe
| Имя файла | Описание | Программа (версия) | Размер файла (байты) | Расположение файла |
|---|---|---|---|---|
| setupact.log | Log | Registry Repair Wizard 2012 6.72 | 62521 | C:WindowsPantherUnattendGC |
| setupact.log | Log | Registry Repair Wizard 2012 6.72 | 24622 | C:WindowsSystem32SysprepPanther |
| setupapi.dev.log | Log | Registry Repair Wizard 2012 6.72 | 684126 | C:Windowsinf |
| WmiApRpl.ini | Windows Initialization | Registry Repair Wizard 2012 6.72 | 29736 | C:WindowsinfWmiApRpl009 |
| api-ms-win-core-synch-… | ApiSet Stub DLL | Microsoft® Windows® Operating System (10.0.17134.12) | 13160 | C:UsersTesterAppDataLocalMicrosoftOneDriv… |
Вы скачиваете пробное программное обеспечение. Для разблокировки всех функций программного обеспечения требуется покупка годичной подписки, стоимость которой оставляет 39,95 долл. США. Подписка автоматически возобновляется в конце срока (Подробнее). Нажимая кнопку «Начать загрузку» и устанавливая «Программное обеспечение», я подтверждаю, что я прочитал (-а) и принимаю Лицензионное соглашение и Политику конфиденциальности компании Solvusoft.
В нашей базе содержится 3 разных файлов с именем rshelper.exe . You can also check most distributed file variants with name rshelper.exe. Чаще всего эти файлы принадлежат продукту RemoteStation Helper Application. Наиболее частый разработчик — компания BUFFALO INC.. Самое частое описание этих файлов — RemoteStation Helper. Это исполняемый файл. Вы можете найти его выполняющимся в диспетчере задач как процесс rshelper.exe.

Registry Repair Wizard 2012 6.72
SmartPCTools
Шаг 3. Выполните обновление Windows.
Когда первые два шага не устранили проблему, целесообразно запустить Центр обновления Windows. Во многих случаях возникновение сообщений об ошибках RCHelper.exe может быть вызвано устаревшей операционной системой Windows. Чтобы запустить Центр обновления Windows, выполните следующие простые шаги:
- Нажмите кнопку «Пуск» в Windows
- В поле поиска введите «Обновить» и нажмите ENTER.
- В диалоговом окне Центра обновления Windows нажмите «Проверить наличие обновлений» (или аналогичную кнопку в зависимости от версии Windows)
- Если обновления доступны для загрузки, нажмите «Установить обновления».
- После завершения обновления следует перезагрузить ПК.
Если Центр обновления Windows не смог устранить сообщение об ошибке RCHelper.exe, перейдите к следующему шагу. Обратите внимание, что этот последний шаг рекомендуется только для продвинутых пользователей ПК.