
|
0 / 0 / 0 Регистрация: 12.11.2019 Сообщений: 2 |
|
|
1 |
|
|
12.11.2019, 01:35. Показов 9586. Ответов 3
Кто с этим сталкивался, подскажите что деалть Миниатюры
0 |


|
4697 / 2346 / 476 Регистрация: 09.09.2017 Сообщений: 8,583 |
|
|
12.11.2019, 02:46 |
2 |
|
System fan can not be detected Please verify to make sure fan cable is plug in correctly. The system will shut to prevent any potential damage.
1 |

|
0 / 0 / 0 Регистрация: 12.11.2019 Сообщений: 2 |
|
|
12.11.2019, 09:58 [ТС] |
3 |
|
Всё верно подключено, но ошибка остаеться
0 |
|
Модератор
22151 / 12854 / 2246 Регистрация: 23.11.2016 Сообщений: 64,387 Записей в блоге: 25 |
|
|
12.11.2019, 17:45 |
4 |
|
Николай2305, поищите можно ли там отключить в биосе этот мониторинг, либо заменить вентилятор.
0 |
Чёрный экран с непонятной надписью вместо привычного окна Windows пугает, но проблема решается довольно просто.
Что означает ошибка CPU Fan Error
Полный текст описания такой неполадки выглядит как CPU Fan Error! Press F1 to Resume или CPU Fan Error! Press F1 to Run SETUP. Как можно догадаться по названию, система самодиагностики компьютера сообщает об ошибке вентилятора охлаждения процессора и предлагает продолжить или запустить настройки.
По сути, можно нажать клавишу F1 для загрузки системы и работать в обычном режиме. Но делать это стоит лишь в том случае, если уверены, что с охлаждением всё в порядке и нет риска перегрева процессора.
Из‑за чего возникает ошибка CPU Fan Error
Перед запуском и во время работы компьютера BIOS контролирует напряжение и другие параметры оборудования, включая обороты вентиляторов. Работоспособность последних определяется по их частоте вращения.
Ошибка CPU Fan Error! появляется в тех случаях, когда система фиксирует низкие обороты вентилятора или их полное отсутствие. Без активного охлаждения процессор быстро перегреется, поэтому пользователя предупреждают об этом.
Как исправить ошибку CPU Fan Error
1. Убедитесь, что вентилятор вращается
Загляните внутрь системного блока, а лучше аккуратно снимите боковую крышку с левой стороны и проверьте вращение вентилятора процессора.
Если кулер не крутится, то ему, вероятно, что‑то мешает. Чаще всего вращение лопастей блокируют свисающие от блока питания провода или большое скопление пыли.
Решение простое и понятное: кабели подвязать с помощью пластиковых стяжек, а пыль — удалить сжатым воздухом и кисточкой. При сильных загрязнениях вентилятор, возможно, придётся снять, отвернув винты или отщёлкнув фиксаторы. Делать всё это нужно, разумеется, когда компьютер выключен.
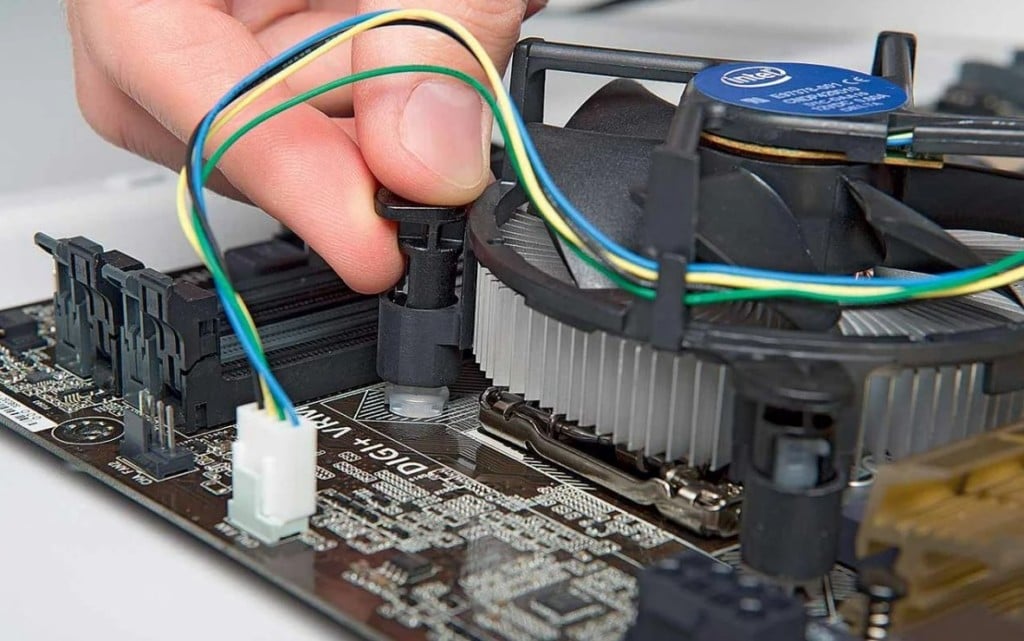
2. Проверьте правильность подключения
Если вентилятор чист и легко крутится от руки, но при этом во время работы ПК не вращается — скорее всего, он неправильно подсоединён к разъёму на материнской плате.
На коннекторе есть специальный ключ, не дающий вставить его в предусмотренное место неправильно. И всё же по незнанию или невнимательности это можно сделать. Особенно если подключать вентилятор с тремя проводами.
Иногда пользователи путаются и подсоединяют кулер не к тому разъёму. На плате их несколько, и вентилятор процессора нужно подключить к тому, который обозначен как CPU_FAN. Его легко спутать с находящимся неподалеку CHA_FAN, который на самом деле предназначен для корпусного кулера.
В обоих случаях нужно лишь вставить штекер в правильный разъём и так, чтобы пазы на коннекторах совпали. При следующем включении всё заработает как надо.
3. Увеличьте обороты вентилятора
В настройках BIOS можно изменять скорость вращения кулера. И ошибка CPU Fan Error! часто появляется, если установлены слишком низкие обороты. Система попросту считает, что вентилятор не вращается.
Если вы изменяли эти настройки, нужно отключить функцию управления оборотами Smart Q‑FAN и нажать F10 для сохранения. Еще можно подобрать частоту вращения, при которой ошибка не будет появляться. Для этого надо постепенно повышать обороты, сохранять параметры и перезагружаться для проверки.
4. Замените вентилятор
В очень редких случаях отсутствие вращения может быть вызвано поломкой самого кулера. Проверить его работоспособность можно, подав на разъём напряжение от 5 до 12 вольт. Удобнее всего использовать батарейку «Крона» или четыре последовательно соединённых элемента AA.
Для этого «минус» батарейки соединяют с контактом разъёма под номером 1 (чёрный провод), а «плюс» — с выводом номер 2 (красный или жёлтый провод). Если вентилятор не включится, придётся заменить его новым.
5. Отключите слежение за оборотами
Если кулер подсоединён к другому разъёму на материнской плате или вы намеренно снизили его обороты, чтобы добиться бесшумной работы, — можно отключить функцию контроля вращения и, соответственно, избавиться от надоедливой ошибки. Делать это стоит лишь в том случае, если вы понимаете риск перегрева или отдельно контролируете температуру с помощью дополнительного ПО вроде SpeedFan.
Для этого найдите в BIOS опцию CPU FAN Fail Warning и отключите её, установив значение Disabled или Ignored, а затем сохраните настройки и перезагрузите компьютер. В некоторых платах она может называться CPU FAN Speed или немного иначе, но примерно так же по смыслу.
Читайте также 🖥💽🔧
- Как сбросить BIOS и реанимировать компьютер
- Что делать, если не работают USB-порты компьютера
- Что делать, если пропал интернет на Windows
- Что делать, если тормозит компьютер с Windows
- Как восстановить жёсткий диск
Очевидно, что ошибка 511 CPU Fan not detected ссылается на кулер процессора, который не удается обнаружить. То есть BIOS не видит вентилятор ЦП и экстренно завершает работу компьютера, чтобы предотвратить его перегрев и выход из строя. При этом бывают ситуации, когда вентилятор продолжает вращаться и даже на максимальных оборотах. Также встречаются и случаи, когда кулер раскручивается и останавливается прямо перед появление ошибки. Наша текущая цель – разобраться с причинами неполадки и восстановить правильную работу Windows.
Содержание
- Причины ошибки 511
- Как исправить ошибку 511 CPU Fan not detected?
- Проверить качество подключения вентилятора
- Очистить систему охлаждения
- Заменить кулер
- Настроить скорость вращения BIOS
Причины ошибки 511
CPU Fan not detected может появляться из-за нескольких основных причин:
- Неисправность кулера и не только его. Реже, но поломка может быть у материнской платы или блока питания.
- Слишком большое количество пыли и грязи, которые мешают работе вентилятора и его нормальному обнаружению.
- Плохой контакт на разъемах кулера материнской платы.
- Несовместимость кулера с материнской платой, радиатором охлаждения.
- Некорректная скорость работы вентиляторов.
Как исправить ошибку 511 CPU Fan not detected?
Начать следует с того, чтобы открыть корпус системного блока или снять заднюю крышку ноутбука и посмотреть на реакцию кулера на кнопку запуска. Если он не вращается совсем, вполне может быть заклинившим или поврежденным. В остальных случаях проблему могут быть в BIOS или контактах кулера.
Проверить качество подключения вентилятора
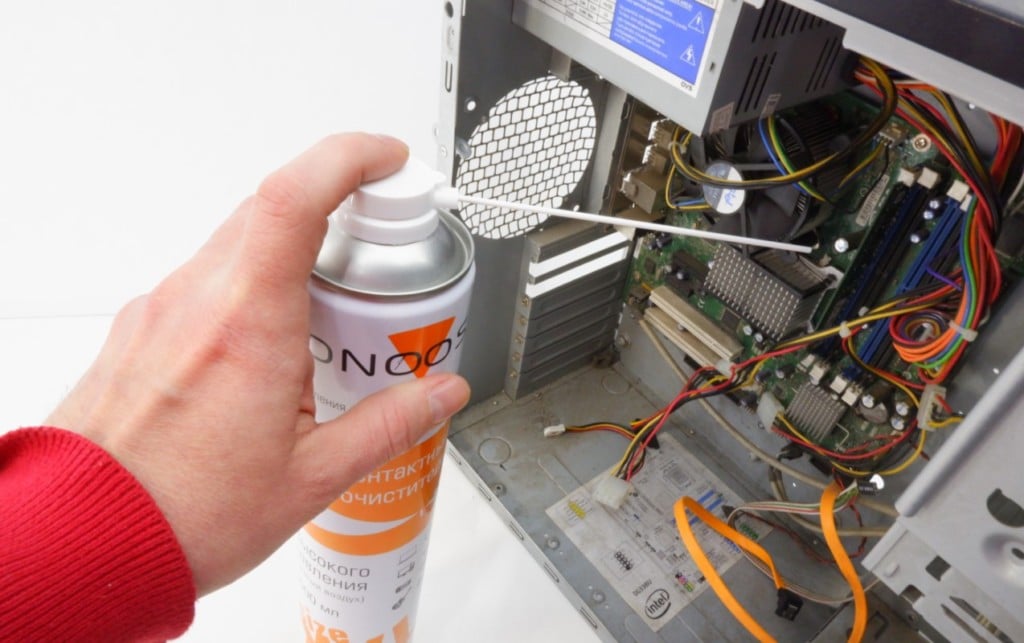
Самое первое и простое в реализации действие – извлечь разъем кулера, очистить его сжатым воздухом и подключить заново. Только обязательно перед этим нужно выключить компьютер, как и перед любыми другими действиями внутри него.
Очистить систему охлаждения
Очень много пользователей написало, что после очистки системы охлаждения ошибка 511 исчезла. У нас есть 2 пути: быстрый и более качественный. В роли простого решения можно использовать баллончик со сжатым воздухом. Стоит продуть им лопасти и радиатор, а также вручную проверить, что он вращается легко, без посторонних звуков. Еще рекомендуется осмотреть кулер на наличие физических повреждений.
Мы рекомендуем снять вентилятор процессора полностью и очистить все с помощью пылесоса и кисточки. Для этого нужно открутить винты или откинуть защелки, на которых он держится. Еще следует извлечь кабель из разъема на материнской плате. Также стоит нанести новую термопасту. Подобное обслуживание следует проводить каждый год, а оно, скорее всего, не выполнялось уже достаточно давно.
Заменить кулер
К сожалению, даже визуально рабочий кулер может быть неисправным. То есть он крутится, все как обычно, но система не обнаруживает вентилятор из-за обрыва цепи управления. В подобном случае лучшим решением будет замена. Также стоит учитывать, что нестандартные кулера от других производителей могут работать неправильно. Лучше использовать оригинальный вентилятор.
Настроить скорость вращения BIOS
Похоже, что слишком низкая скорость вращения кулера тоже может стать причиной проблемы. Самый эффективный способ вернуть ее в рабочее состояние – сделать сброс BIOS. Однако куда проще использовать программы SpeedFan, конечно же, при условии, что есть возможность запустить компьютер, то есть ошибка появляется не при каждом пуске.
Если отобразилась ошибка 511 CPU Fan not detected, вам нужно проверить качество контактов, очистить кулер и радиатор процессора и уже тогда подключить другой вентилятор. На одном из этапов все должно запуститься нормально. Правда, есть один хитрый способ – подключить кулер процессора к другому разъему (обычно есть вентилятор на корпусе), а его уже – к входу на вентилятор ЦП. Мы такое решение не одобряем, так как при повышенной мощности работы железо может перегреться.
А что вы знаете о данной ошибке? Поделитесь своим опытом с другими читателями.
На чтение 3 мин. Просмотров 11 Опубликовано 15.12.2019
Автор Кристина Олещук задал вопрос в разделе Железо
После того как я переставил батарею процессора,при загрузке винды пишет «system fan can not be detected»что делать? и получил лучший ответ
Ответ от Ёергей .[гуру]
что за батарея процессора?

I am working on a computer that is giving me a error saying «515 — Power supply fan not dectected I tested with another power supply from a
working workstation and same issue. I reset the bios by holding down the yellow button on the motherboard for 5 seconds. and same issue.
I have tried two different power supply’s and the same issue. As soon as I turn the computer on the power supply fan start spinning like an airplane engine. I thought it was the CPU and tested with another CPU. Same issue. I had never seen this issue before. And I’ve been working with desktop for a long time.
Here is the solution to fix HP 515 error Power Supply Fan Not Detected error.
For those of you who are here who have installed a new power supply into your HP machine and want to get rid of the power supply fan error (515), there are a couple of possible solutions.
The problem is based on the fact that the original power supply provides a tachometric signal from the OEM PSU (tacho- meaning speed, and metric meaning the measure of) to the motherboard that tells it if our PSU fan is spinning and everything is ok. When the power supply is replaced, that signal is no longer provided to the motherboard.
To fix the 515 Power Supply Fan error, you must find some other way of providing the tachometric signal that the motherboard is expecting to see at boot to avoid encountering the fan error.
We could take the easy route and take advantage of the fact that we already have places on our motherboard outputting the tachometric signal that the other part of the motherboard is expecting! This signal is found on any fan connector on the motherboard for which a fan is connected and spinning. For a generic fan connector this signal is outputted from the SENSE signal or pin 3 on this diagram below.
So our goal really becomes, find which pin on our motherboard that is expecting to have a tachometric signal provided to it (for 8000 series it is pin 2 on the P2 connector according to below picture and send the signal from our cpu or case fan (pin 3 on a generic connector), to that pin on the motherboard using a single piece of insulated wire.
This is the finished wire on HP 8000 series machine and it successfully bypasses the fan error at little to no cost.
CPU fan is different from the casing fans in the sense that the CPU fan has a failsafe connection. That is to say, if it is not connected to the system, the system will not even start to protect the integrity of the CPU.
So, when your PC shows the “CPU Fan Not Detected” error, it usually means that the fan connection is not made properly. But sometimes, the system may not be able to detect the fan due to hardware issues or software bugs.
In this guide, we have provided the most probable causes for the error and the ways to fix them.
What Causes “CPU Fan Not Detected” Error
Here are the major causes for the “CPU Fan Not Detected” Error in your PC.
- Loose fan connection
- Fan connected to incorrect fan header.
- Accumulation of dust and dirt
- BIOS error
- Fan blades not rotating
- Bent or broken fan header Pins
Before hopping on to the fixes, open your fan casing and power on your system to see if the CPU fan rotates. If it does and the error appears on the screen, then it may be a BIOS error or an incorrect fan header connection.
But if the CPU fan does not rotate at all, then there may be some other issues.
Whatever the case, let’s move on to the fixes straight away.
Check For Hardware Defects
The first to do is to check for any physical damages and defects in the fan. If you have bought a replacement, then it may have been dead on arrival. Or, its cable or connector may be faulty.
Similarly, bent or broken pins in the motherboard port will also prevent the system from detecting the CPU fan.
You can look for the hardware defects by following the steps below.
- Power off your system and remove all the cables from it.
- Unscrew your PC casing’s side panel nuts and remove it.
- Find the CPU fan and the port on the motherboard.

- See if the pins are bent or damaged on the port. If some pins are bent, carefully bring them back to position. Make sure not to break them off.
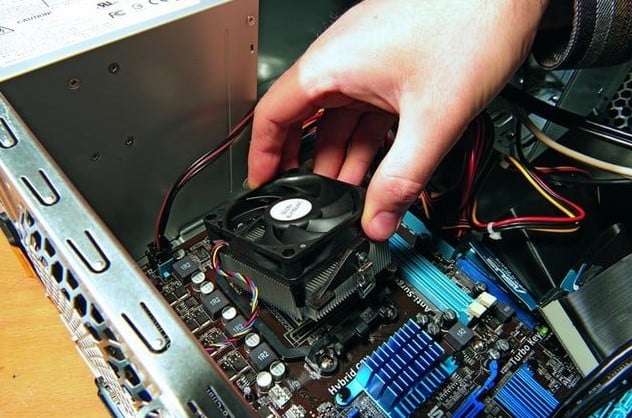
- Loosen the fan screws, remove the locks, and take the fan out. Look for any damage underneath. place the fan in the correct orientation.
- Place the fan in the correct orientation and press the locks diagonally to ensure appropriate placement. Tighten the screws properly.

- If you have a spare CPU fan, connect it and run the system to see if it’s detected.


If the spare fan worked, then your CPU fan may be damaged. Try checking it in another system. You can send for a replacement if you just got it.
You should also perform a thorough cleaning of your system before reassembling it.
Clean the PC and CPU Fan
A dirty system is equally responsible for a CPU Fan to not being detected. Sometimes, the dust may even accumulate on the blades and rotor in such a way that the fan blades cannot rotate at all. This will result in the BIOS not detecting the CPU fan.
So, while you are checking for hardware defects, let’s clean your system and CPU fan.
- Access your motherboard and remove all the cables connected to it.
- Unscrew the nuts and remove the motherboard.
- Obtain a blower and apply compressed air from the side.
- Clean the remaining dust with a clean microfiber cloth or brush.
- Do this for the CPU fan as well. If some solid substance is stuck on the fan blade, remove it.
- Clean the remaining dust with a clean microfiber cloth or brush.
- Do this for the CPU fan as well. If some solid substance is stuck on the fan blade, remove it.
- If possible, apply oil to the rotor for smooth rotation.
- Reconnect all the components by looking at the manual or instructions specific to your motherboard.


Start your system to see if the BIOS detects the fan now.
Inspect and Reinsert the Fan Cable
There are a number of ports in the motherboard to accommodate the CPU fan and chassis fans. So, it is totally possible to confuse one for the other.
If you add a CPU fan to the chassis fans’ port, the PC will not detect the fan. Similarly, adding the CPU fan to the CPU_OPT header instead of the CPU_FAN header may cause the same issue. Even if the fan cable is connected to the appropriate header, it may be loose.
So, in short, you should inspect the proper connection of the fan cable in the motherboard by following ways.
- Disassemble your system by following the steps given in the earlier section.
- Disconnect the Fan cable.
- Find the CPU_FAN port in the motherboard. It is usually near the CPU or the motherboard’s end region.
- Insert the PWM connector, DC, or Molex connector to the CPU_FAN header. Do not connect the cable to SYS_FAN or CHA_FAN as they are for casing fans.

- If your system has an AIO Pump, connect the AIO Radiator Fan to the CPU_FAN header.

Boot the system after reconnecting the components to see if the error is gone now.
Reset or Update BIOS
If the above solution did not fix your problem, your system’s BIOS or its settings might have some bug. Or, the fan you bought may not be compatible with the older BIOS version.
You should update the BIOS as the manufacturers usually resolve the bugs in the latest version. And the newer version may support your CPU fan.
But before that, you should try resetting the BIOS. It will fix the error if it was just caused by some faulty settings.
- Restart your system and enter the BIOS page by pressing the respective key such as F2, F12 or Delete.
- Press F9 or the key associated with performing a factory reset.
- Save the settings and restart your system by pressing F10 or the required button.
If resetting BIOS did not solve your problem, let’s see the way to update your BIOS.
- Press Windows + ‘R’ and type
msinfo32in the Run dialog box to open System Information. - Note the motherboard’s model and BIOS version.

- Go to the official website of your motherboard and find Support, Driver downloads, or similar.
- Choose your operating system type and see if they have provided a new BIOS update by comparing your BIOS version and the one on the site.
- Download the update file.

- Go to the official website of your motherboard and find Support, Driver downloads, or similar.
- Choose your operating system type and see if they have provided a new BIOS update by comparing your BIOS version and the one on the site.
- Download the update file.
- Double-click on the file and follow the instructions to complete the process.


Make sure to have a UPS or a steady power source to prevent your system from shutting down in the middle of the update. Interrupting the update can brick your PC permanently.
Not all the systems provide the BIOS update method as simple as above. So, we have prepared a comprehensive guide with the precautions and safe ways to update your BIOS.
See if the BIOS detects the fan now.
Related Questions
My Fan is Not Cooling the CPU. What Should I do?
The sensor in the CPU detects high temperatures when it does not receive any cooling effect. This can happen if the fan speed is not optimum to cool the CPU, hence the error. So, changing the fan speed may solve the issue.
Many motherboards provide the feature to change fan speed nowadays. Let’s see how you can use the feature.
- Restart your system and press the respective key to get into the BIOS page. Most of the systems have F2, F12, Esc, or Delete keys for the purpose.
- Find the Q-Fan option in BIOS and click on it. The name may vary for different manufacturers, such as Fan Info for MSI, Smart Fan for Gigabyte, etc.

- If your Fan has a PWM header, keep the mode to PWM.
- Set the fan speed using the Curve for different temperatures. You can also set the speed to the given standard modes, such as Silent, Turbo, etc.

- Click Apply and press the key associated with saving the settings.


Restart the system to see if the fan is detected now. If your system does not have the option to modify fan speed in BIOS, you can use third-party applications to do so.
How do I Fix the “CPU Over Temperature“ Error Message?
If your system shuts down in the middle and shows the error, it may be that your CPU is overheating. Excessive load to the fan may cause it to fail, thus displaying the error.
You should try lowering your CPU temperature by using less intensive programs or a dedicated GPU for heavy work. Similarly, the CPU may be heating up due to the depletion of thermal paste. Applying thermal paste should lower the CPU temperature and load on the fan accordingly.
Let’s see how you can re-apply thermal paste on your CPU and fan.
- Unscrew the fan and remove the locks properly to disassemble the fan from the motherboard.
- Scrub the remnant thermal paste by using a piece of clean cloth and isopropyl alcohol.
- Let it dry for a while.
- Apply an appropriate amount of thermal paste in the middle of the CPU. You can also apply it in any other pattern.
- Place the fan properly and press the lock diagonally to make it steady.
- Tighten the screws and connect the fan cable to the CPU_FAN header.


Run your system to see if the problem has gone away now.