

Не запускается стим. Для обновления он должен быть онлайн. Что делать?
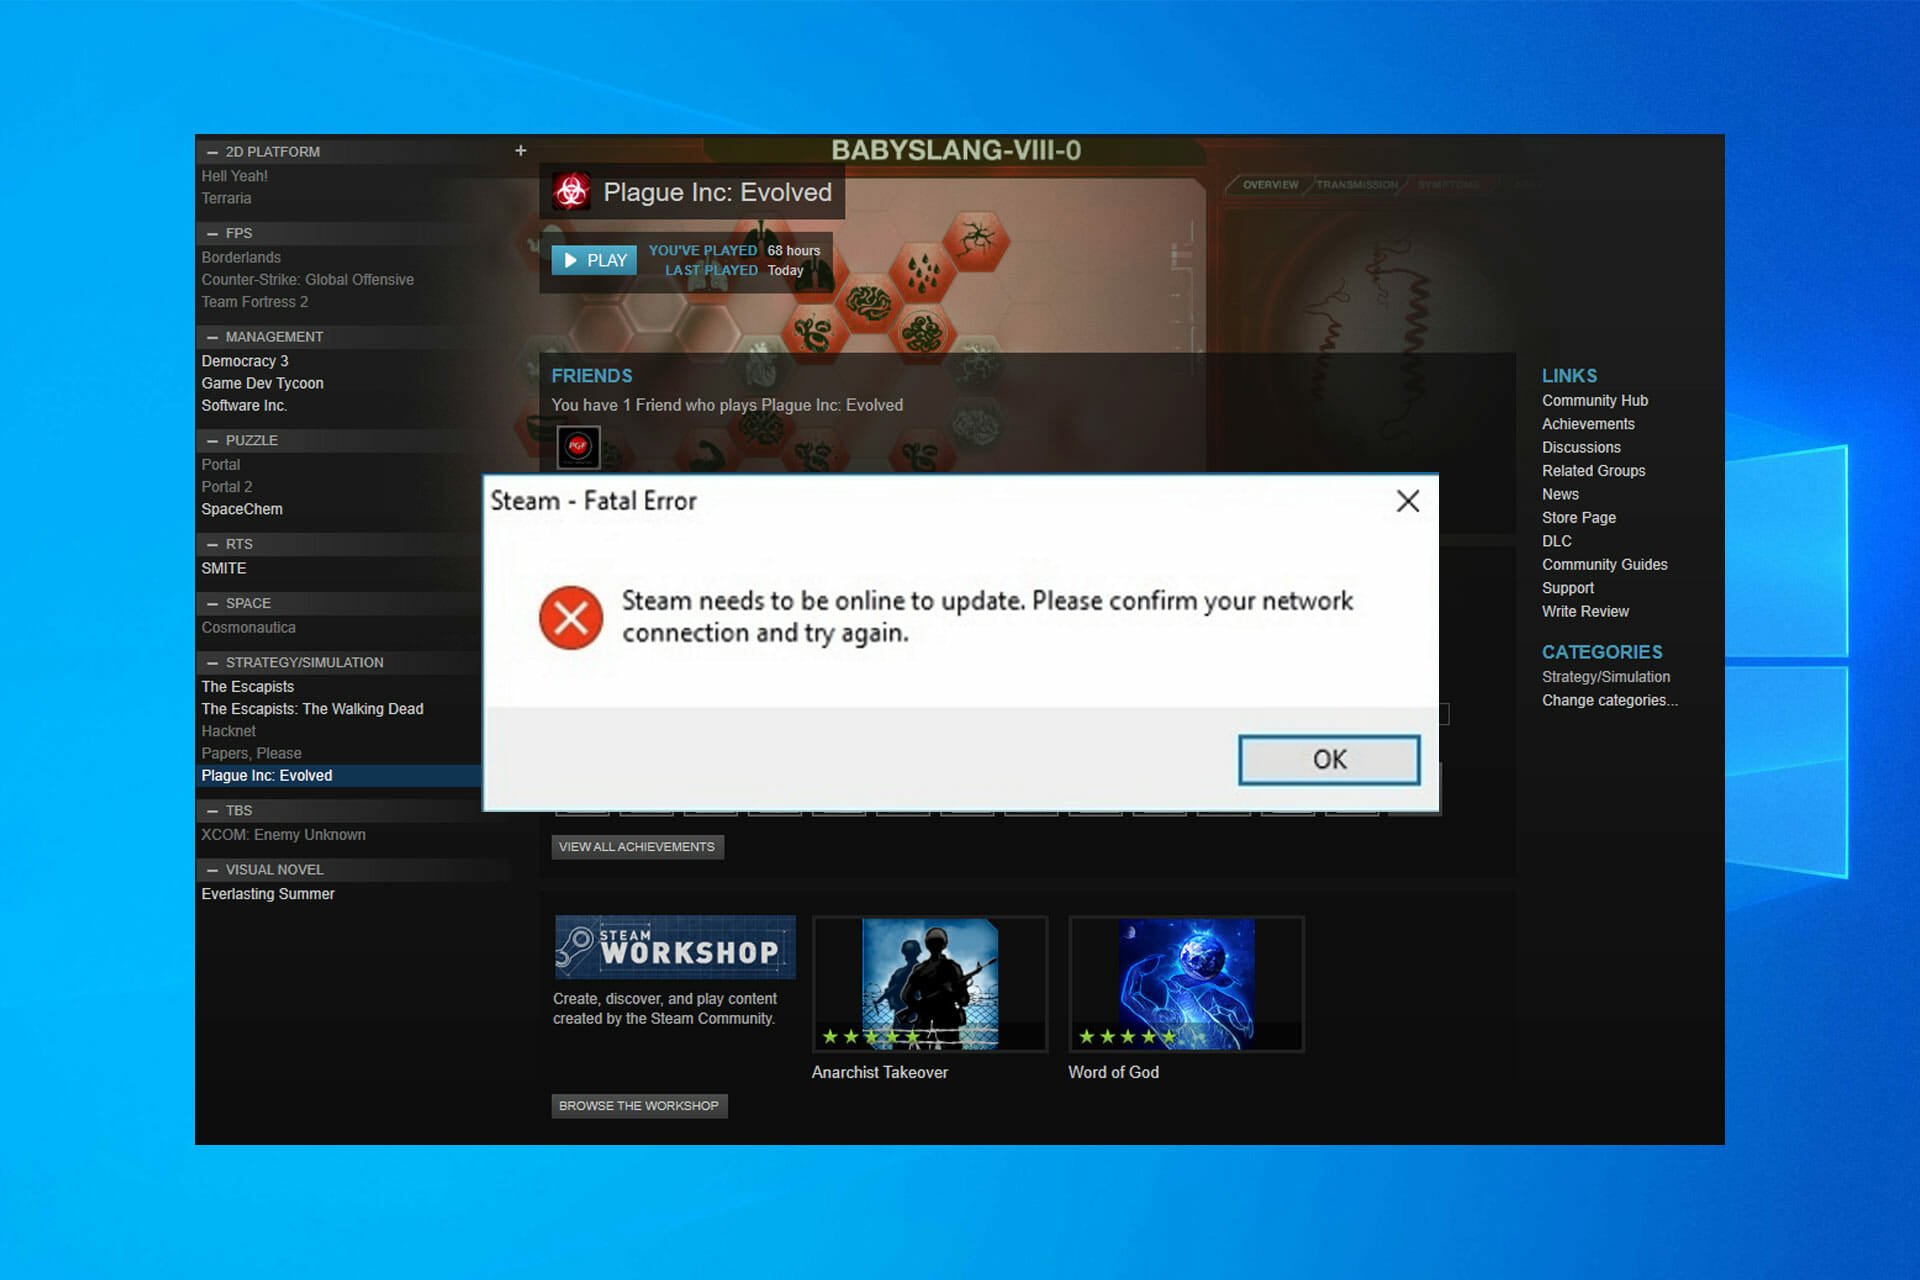
Steam уже достаточно давно стал популярным среди любителей поиграть в компьютерные игры. Несмотря на то, что разработчики постоянно улучшают и обновляют данное приложение, проблем с ним хватает. Вот например одна из них: при очередной попытке запуска Steam появляется окно с заголовком Fatal Error, а далее в тексте сообщения говорится о том, что для обновления steam должен быть онлайн. В английской версии в тексте ошибки сказано “‘Steam needs to be online to update”. При этом интернет на компьютере работает и непонятно, почему появляется данная ошибка.
В данной статье мы расскажем о том, как можно попробовать избавиться от нее и тем самым вернуть работоспособность программы.
Как исправить ошибку?
Первые действия довольно банальны, но начинать решение проблемы нужно именно с них. А именно, первым делом попробуйте запустить Steam от имени администратора, кликнув по значку правой кнопкой мыши и выбрав соответствующее значение.
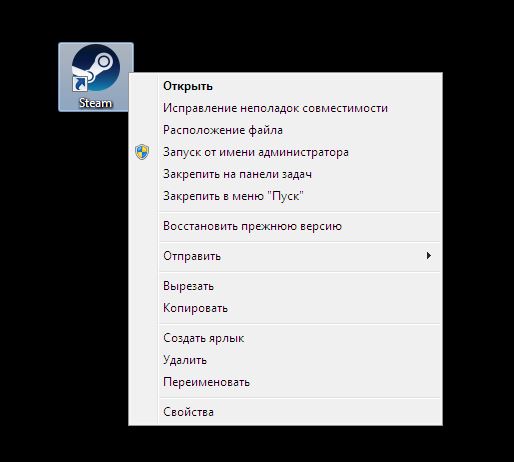
Запуск Steam от имени администратора
Далее обязательно отключите брандмауэр и антивирус после чего снова попробуйте запускать Steam от имени администратора.

Отключаем брандмауэр Windows 10
Последним действием, которое обязательно должно помочь в решении данной проблемы, будет отключение автоматического определения параметров браузера.
Чтобы это сделать, нужно зайти в панель управления. Далее в правом верхнем углу переключиться на вид крупных значков.
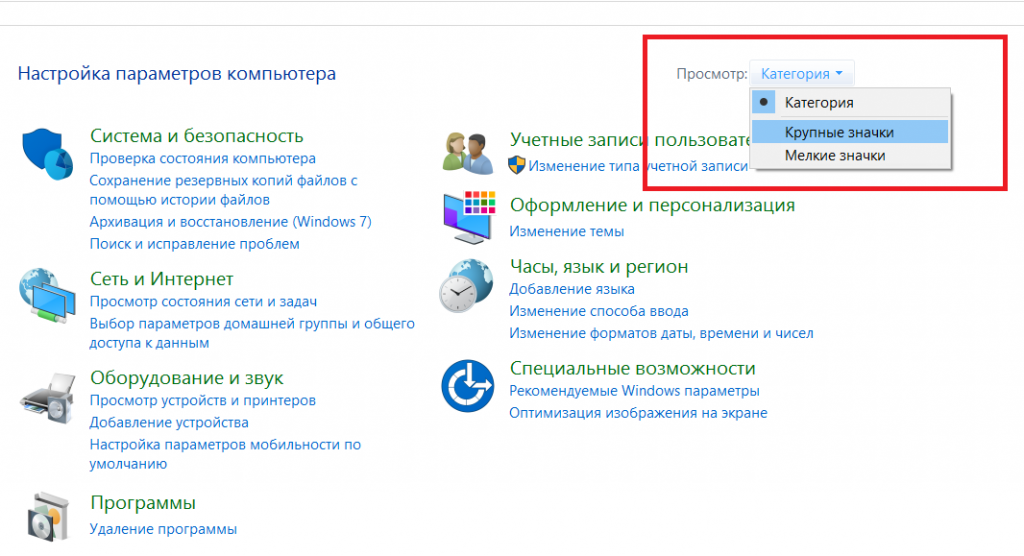
Переключение вида значков
Затем находим “Свойства браузера” и кликаем по нему.
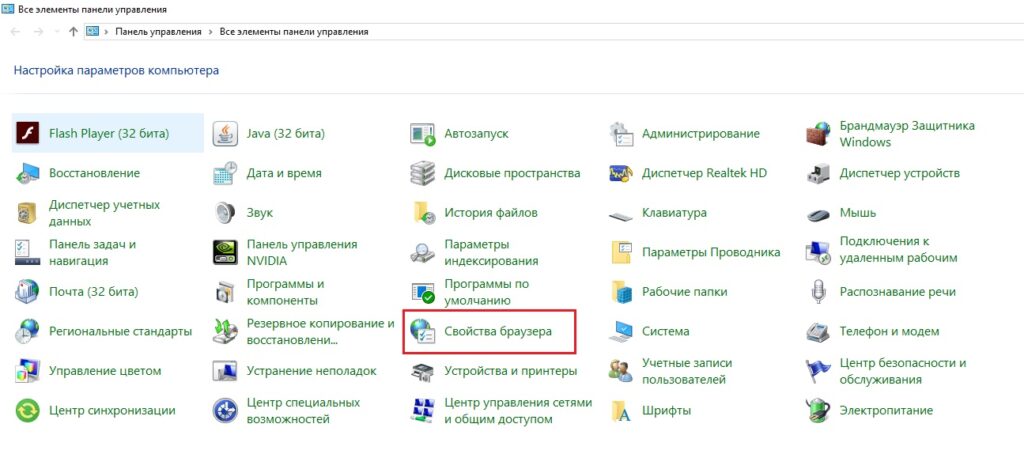
Свойства браузера в панели управления
В открывшемся окне переходим на вкладку “Подключения” и справа внизу нажимаем на кнопку “Настройка сети”.
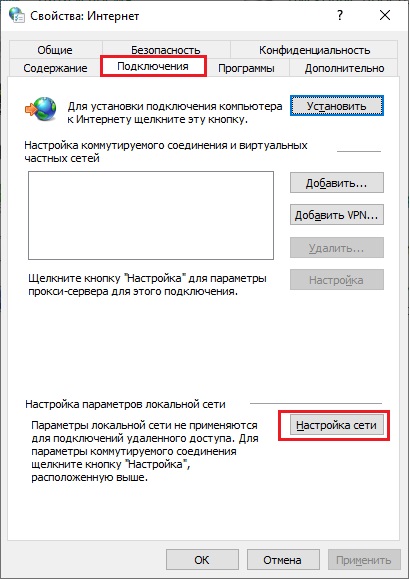
Настройка сети
Далее в окне “настройка параметров локальной сети” нужно снять первую галочку “Автоматическое изменение/определение параметров”.
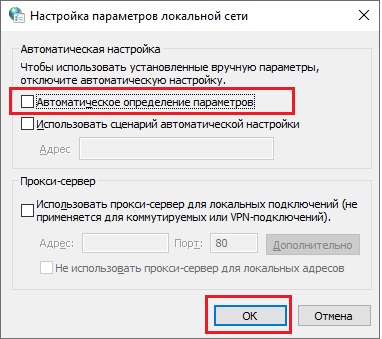
Отключение автоматического определения параметров
После этого во всех открытых окнах жмем “ок” для применения настроек, перезапускаем ПК и пробуем запускать Steam.
Лучшая благодарность автору — репост к себе на страничку:
Многие пользователи 10-ой версии виндовс сталкиваются с ошибкой «Для обновления Стима необходимо быть в сети». Это странная проблема, которая мешает играть, но, к счастью, есть несколько решений.

Запустить стим в режиме совместимости
- Щелкните правой кнопкой мыши ярлык программы, нажмите «Свойства».
- Перейдите на вкладку Совместимость.
- Проверьте Запуск этой программы в режиме совместимости, выберите виндовс из списка параметров.

Отключить брандмауэр Windows
- Нажмите клавишу Windows + S, введите «Брандмауэр», найдите «Брандмауэр Windows».
- Когда он запускается, кликните «Включить или отключить брандмауэр виндовс».

- Кликните «Отключить брандмауэр», затем «ОК».
- Отключение брандмауэра не рекомендуется, поэтому после обновления обязательно включите его снова.
Удалить файлы из каталога
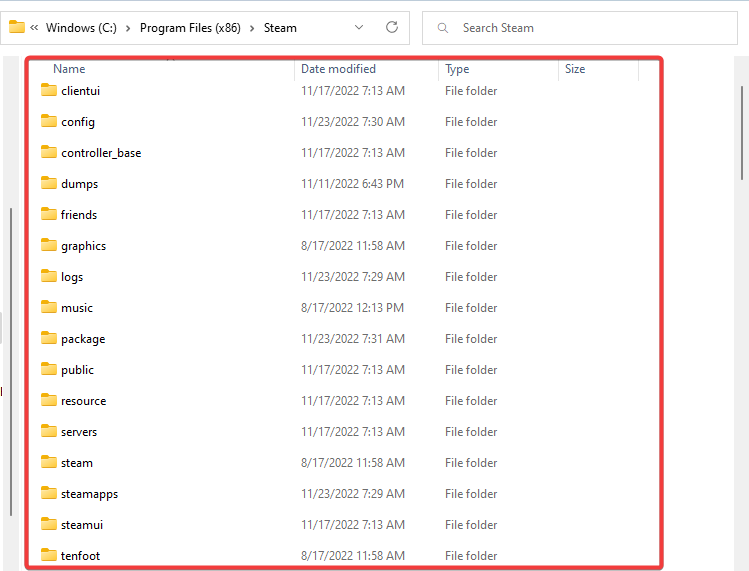
- Зайдите в каталог установки. По умолчанию это должны быть C: Program FilesSteam или C: Program Files (x86) Steam.
- Удалите все, кроме Steam.exe и папки Steamapps.
- Перезагрузите компьютер.
- После загрузки вашего компьютера вернитесь к каталогу установки, запустите Steam.exe.
Использовать редактор реестра
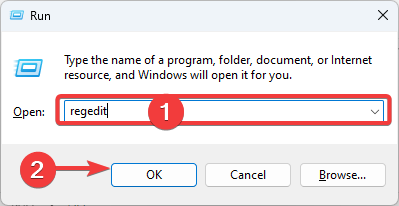
- Наберите комбинацию Win + R, введите regedit. Далее «ОК» или «Ввод».

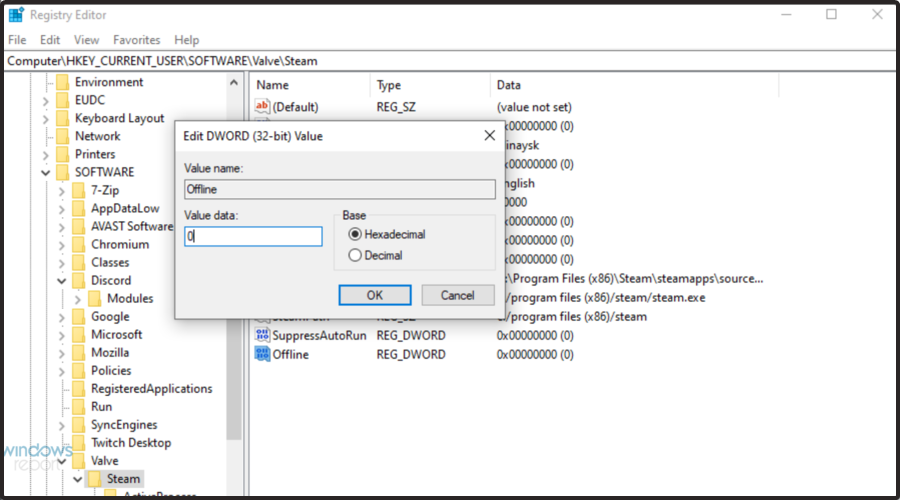
- Когда откроется редактор реестра, перейдите в HKEY_CURRENT_USER / Software / Valve / Steam.
- В правой панели кликните «Offline DWORD», установите для нее нулевое значение.

Скопировать файлы с другого компьютера
Понадобится другой ПК с рабочей версией программы и флешка.
- Скопируйте все из каталога установки, кроме папки Steamapps, на USB-накопитель.
- Подключите флешку к компьютеру, вставьте все в каталог установки Стима.
Добавить параметр-tcp в ярлык
- Найдите ярлык стим, щелкните по нему правой кнопкой мыши.
- Выберите «Свойства».
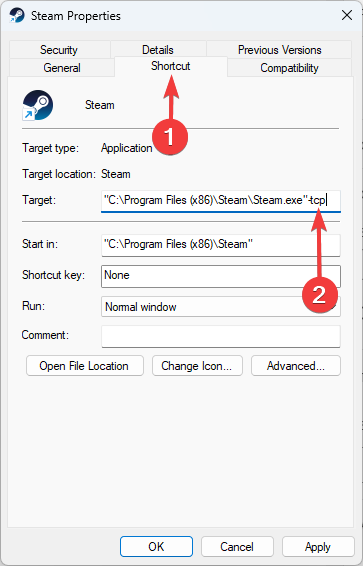
- Перейдите на вкладку «Ярлык», в разделе «Целевой» добавьте -tcp после кавычек.

- Кликните «Применить», «ОК».
- Дополнительно: откройте вкладку Совместимость, установите флажок Запустить эту программу как администратор
Отключение настроек прокси-сервера Internet Explorer
- Наберите комбинацию Windows + S, введите Internet Explorer. Найдите Internet Explorer из списке результатов.
- Когда Internet Explorer запустится, щелкните значок «Сервис», выберите «Свойства обозревателя».

- Перейдите во вкладку «Подключения», нажмите «LAN».

- Убедитесь, что использование прокси-сервера для вашей локальной сети не проверяется.
Временно отключить свой антивирус
Иногда ошибка возникает из-за антивирусного ПО. Добавьте программу к списку исключений из вашего антивируса. Если это не работает, отключите антивирус. Если проблема не устранилась, временно удалите антивирус или используйте другой.
Использовать DNS Google
Иногда эта ошибка может быть вызвана вашими настройками DNS. Если это так, вам рекомендуется переключить DNS на DNS Google. Для этого выполните следующие действия:
- Наберите комбинацию Win + S, введите «Сеть и общий доступ». Найдите Центр совместного доступа.
- Кликните «Изменить настройки адаптера».

Вы увидите список сетевых адаптеров. Щелкните правой кнопкой мыши текущий сетевой адаптер, выберите «Свойства».
- Выберите «Протокол Интернета версии 4» (TCP / IPv4), кликните «Свойства».
- Появится окно свойств интернет-протокола версии 4 (TCP / IPv4), выберите «Дополнительно».
- Перейдите к вкладке DNS.
- Нажмите «Добавить», введите 8.8.8.8 или 8.8.4.4.

- Сохраните изменения и перезапустите сетевое подключение.
Редактировать файл hosts
- Наберите комбинацию Win + S, введите «Блокнот». ПКМ по Блокноту, нажмите «Запуск от имени администратора».
- Откроется Блокнот, нажмите «Файл»> «Открыть».
- Откройте папку C: WindowsSystem32driversetc.
- Дважды щелкните hosts. Если вы не видите никаких файлов, обязательно измените текстовые документы на все файлы.

- Когда hosts открывается, в конце добавляются следующие строки:
- 68.142.122.70 cdn.steampowered.com
- 208.111.128.6 cdn.store.steampowered.com
- 208.111.128.7 media.steampowered.com
- Сохраните изменения и закройте Блокнот.
- Наберите комбинацию Win + X, впишите «Командная строка».
- В командной строке напишите ipconfig /flushdns, далее Enter

Задать автоматический запуск
- Наберите команду Win + R, впишите services.msc.
- Когда появится окно «Службы», найдите службу «Клиент Steam», дважды щелкните по ней.
- В службе клиентов найдите тип запуска, измените его с ручного на автоматический.

- ЛКМ «Применить», «ОК», чтобы сохранить изменения.
Отключить от автоматического запуска
- Откройте программу, зайдите в Настройки.
- Перейдите во вкладку «Интерфейс», снимите флажок «Запуск при включении», затем «ОК».

Запустить SteamTmp.exe
Попробуйте запустить SteamTmp.exe из каталога установки.
Yes, you can play games in Steam even if you are offline
by Milan Stanojevic
Milan has been enthusiastic about technology ever since his childhood days, and this led him to take interest in all PC-related technologies. He’s a PC enthusiast and he… read more
Updated on November 23, 2022
Reviewed by
Alex Serban

After moving away from the corporate work-style, Alex has found rewards in a lifestyle of constant analysis, team coordination and pestering his colleagues. Holding an MCSA Windows Server… read more
- Steam needs to be online to update in Windows 10/11, and, likely, the platform won’t work correctly.
- Changing the compatibility mode for the app is one of the best solutions you can try.
- Because they can interfere with Steam, we recommend disabling Windows Firewall and your antivirus software.
XINSTALL BY CLICKING THE DOWNLOAD FILE
This software will repair common computer errors, protect you from file loss, malware, hardware failure and optimize your PC for maximum performance. Fix PC issues and remove viruses now in 3 easy steps:
- Download Restoro PC Repair Tool that comes with Patented Technologies (patent available here).
- Click Start Scan to find Windows issues that could be causing PC problems.
- Click Repair All to fix issues affecting your computer’s security and performance
- Restoro has been downloaded by 0 readers this month.
Many Windows 10 users use Steam regularly, but a few reported an error message saying that Steam needs to be online to update. It seems like this can happen on both Windows 10 and 11.
This strange problem will prevent you from playing your favorite games, so we understand how annoying it can be.
Fortunately, a few solutions are available, and we’re discussing them below. Before discovering them, we consider properly presenting some of the most common causes that can lead to the problem.
Why does Steam needs to be online to update error appear?
Different user experiences show a few common reasons for encountering this issue. Ranking on the top of this list are the following:
- Local client connection issues – If Steam fails to connect with the local client, you might get an error message regarding your Internet connection.
- Restricted online components – Another issue that users reported is Unable to initialize Steam API, and if this happens, it means that certain online components aren’t accessible to you.
- Access rights – Sometimes you might have permission errors, and if that happens, you’ll encounter this Steam access denied error; however, all these issues can be easily resolved.
With these significant triggers in mind, some solutions have proven effective.
How can I fix Steam needs to be online to update error?
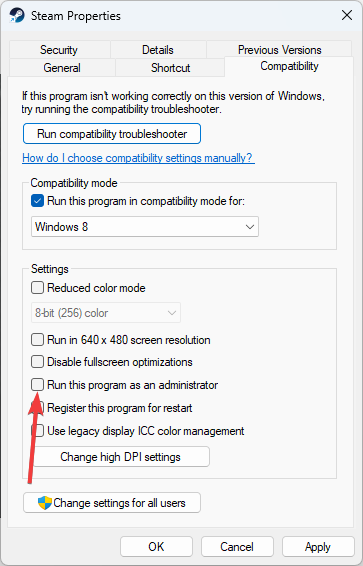
1. Run Steam in Compatibility mode
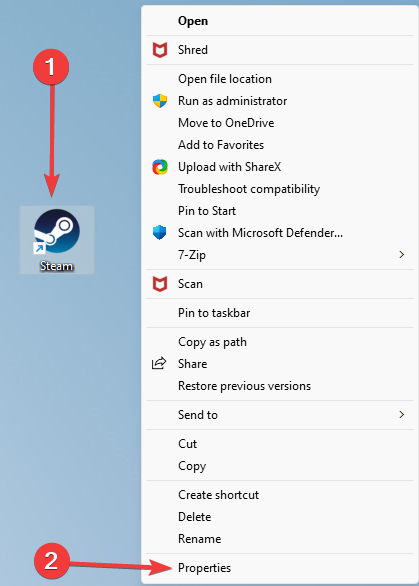
- Right-click the Steam shortcut and select Properties.

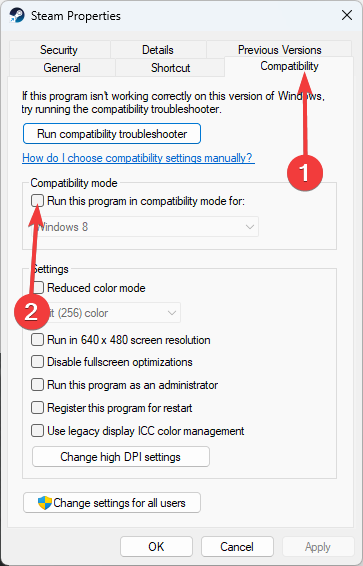
- Go to the Compatibility tab, then checkmark the Run this program in compatibility mode for box.

- Now, choose Windows 8 from the list of options.
- Check Run this program as an administrator option.
- Try starting Steam again.

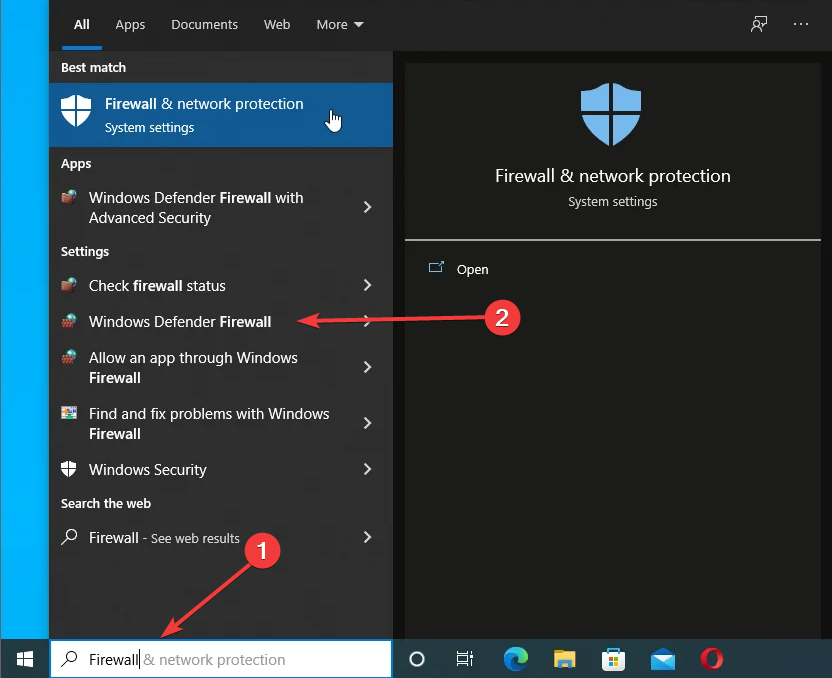
2. Disable the Windows Firewall
- Press the Windows + S keys, type firewall, and select Windows Defender Firewall from the result list.

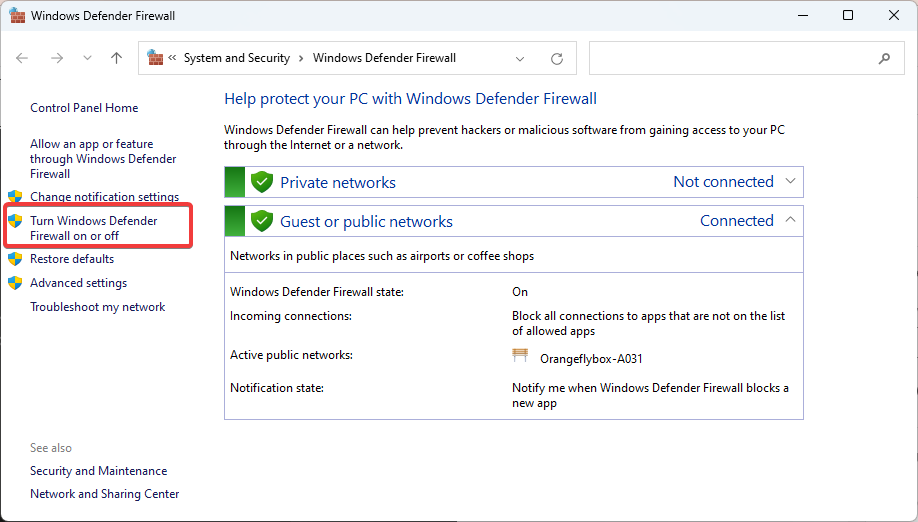
- Click on Turn Windows Defender Firewall on or off.

- Select Turn off Windows Firewall (not recommended) for private and public network settings.

- Click OK to save the changes.

Disabling the firewall isn’t recommended, so after you’ve updated Steam, turn on Windows Firewall again.
To prevent data Internet connection-related errors in Steam, it’s also advised to see if Windows Firewall is blocking a port or program.
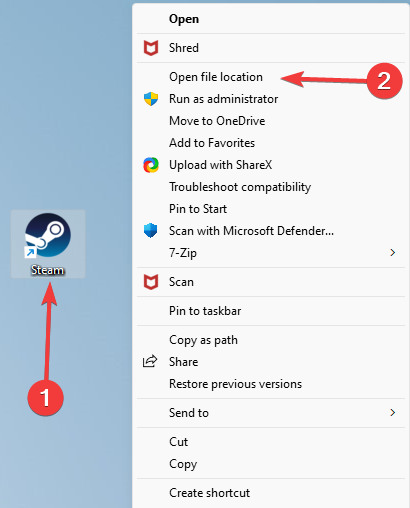
3. Delete files from the Steam folder
- Right-click on your Steam shortcut, then choose to Open file location.

- There, delete all files except these: Steam.exe and Steamapps folder.

- Restart your computer.
- After your computer boots, go to Steam’s installation directory and run Steam.exe.
4. Use the Registry Editor
- Open the Windows Run dialog box by pressing Windows + R combination.
- Type regedit, then click on OK.

- Go to the following key:
HKEY_CURRENT_USERSoftwareValveSteam - In the right pane, click on Offline DWORD.
- If not available, right-click the right pane choose New, and select DWORD (32-bit) Value.
- Set the name to Offline, then double-click on it.
- Set its Value Data to 0 and save the changes.
- Close the Registry Editor, restart your computer, and check if the problem is resolved.


5. Temporarily disable your antivirus
If you’re using Norton, visit our uninstall guide for Norton Antivirus for more information.
In case you’re running McAfee, read our guide on how to remove McAfee antivirus for more information.
For those who are unsure how to perform the process in your particular case, we recommend visiting the manufacturer’s official website for info regarding this subject.
We suggest using the best antivirus software to avoid potential Steam problems.
6. Copy the Steam files from another computer
- Connect a flash drive on a working PC and copy all files from Steam’s installation directory except the Steamapps folder.
- Connect the USB flash drive to the initial PC and paste all the files to your Steam installation directory.
- When asked to overwrite files, click on the option to replace them.
- Run Steam.exe to check if the issue is resolved.
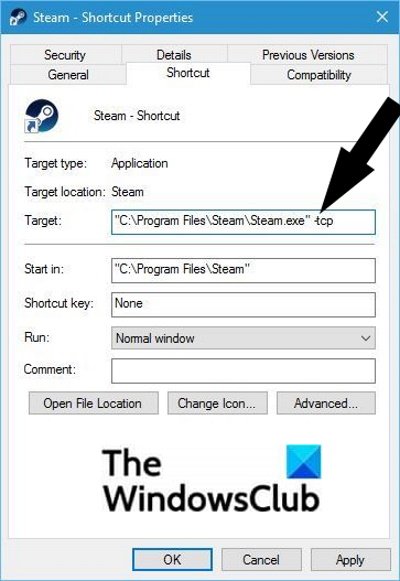
7. Add the -tcp parameter to the Steam shortcut
- Locate the Steam shortcut and right-click it. Choose Properties from the menu.
- Go to the Shortcut tab and, in the Target section, add -tcp after the quotation marks.
- Click Apply and OK to save the changes.
- Go to the Compatibility tab and check Run this program as administrator.
- Run the shortcut and check if the issue is resolved.
- Fix: Failed to find Steam error [Complete Guide]
- Steam won’t go online / stuck in offline mode [Fixed]
- Microsoft roadmap: What’s next for the Halo franchise?
- What can you do with Bing’s new visual input feature?
- Winbox not Working on Windows 10? How to Fix it
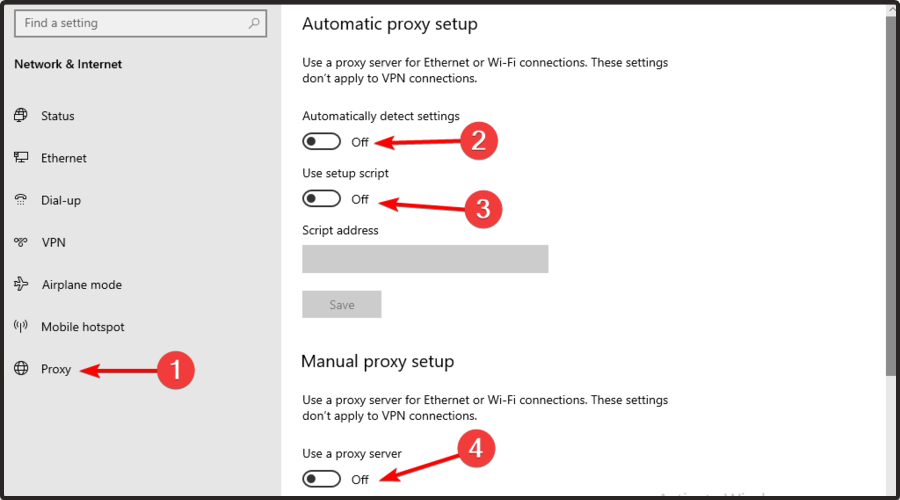
8. Turn off your Proxy
- Use the following hotkey to open Windows Settings: Windows + I
- Now, go to the Network & Internet section.
- Select Proxy from the left pane, and in the right pane, disable all options.

If you’re unfamiliar with proxy and how it works, read our proxy vs. VPN guide to learn more about it.
The Steam needs to be online to update error can cause lots of problems with your gaming, but we hope that our solutions were helpful to you.
Note that these solutions for Steam needs to be online to update will also work on a school computer.
If you’re aware of an alternative solution, leave it in the comments below. Also, leave any other questions, and we’ll check them out.
Still having issues? Fix them with this tool:
SPONSORED
If the advices above haven’t solved your issue, your PC may experience deeper Windows problems. We recommend downloading this PC Repair tool (rated Great on TrustPilot.com) to easily address them. After installation, simply click the Start Scan button and then press on Repair All.
![]()
Here is a guide on how to fix the Steam needs to be online to update error on Windows PC. Steam is a video game distribution service developed by Valve Corporation. It is a great platform for gaming enthusiasts, however, it is usual for Steam users to run down in errors. One such error is the Steam Fatal Error error that occurs while downloading or updating games. When triggered, it displays the following error message:
Steam needs to be online to update. Please confirm your network connection and try again.
While this error may occur if there are problems with your network connection, there are several other factors that may trigger the Steam needs to be online to update error. Let us discuss the reasons for this Steam error.

Why does my Steam say it needs to be online to update?
Here are the causes that may trigger the Steam needs to be online to update error on Windows PC:
- First of all, make sure that you are connected to an active internet connection as it might cause this error.
- Insufficient administrator access to run Steam can result in this error.
- Your firewall and antivirus can also interfere with Steam processes and tasks and cause this error.
- Enabled proxy settings can be another reason for this error.
- It can also cause due to DNS settings issues.
- The corrupted Steam files also cause this fatal error.
These are some scenarios that may trigger the Steam needs to be online to update error. Now, if you are facing this error on Steam, this guide will help you. Here, we are going to mention possible solutions to counter this problem. Let us check out the solutions now.
Here are the fixes that you can try to resolve the Steam needs to be online to update error:
- Disable Firewall and Antivirus.
- Disable Proxy Settings.
- Add –tcp parameter to Steam.
- Grant Steam Administrative Access.
- Use Ipconfig.
- Change the DNS Server.
- Refresh Steam files.
Before trying the above solutions, try troubleshooting your network and internet problems and then restart your system to fix any temporary glitch.
Let us discuss the above methods in detail now!
1] Disable Firewall and Antivirus
While Steam is downloading updates in the background, it might conflict with your firewall. Your firewall might suspect Steam processes as malicious tasks and might interfere with them resulting in this error. So, in case your firewall is blocking Steam processes, try disabling your firewall protection and see if the issue is fixed. If yes, the main culprit was your Firewall. Similarly, your antivirus can also cause this error on Steam. Hence, disable your antivirus and check if the issue is gone or not.
If you don’t want to completely disable your firewall or antivirus, you can whitelist the Steam app through your firewall and antivirus. In Firewall, you can allow the Steam app through it. While in antivirus, add Steam to the Exclusions list of your antivirus.
See: An error occurred while installing or updating the Steam game
2] Disable Proxy Settings
Turning off the proxy settings might help you fix this error. To disable proxy settings, you can use Chrome or Network Settings. Let us check out how!
Disable Proxy Settings in Chrome:
Here are the main steps to turn off proxy settings using your Chrome browser:
- Launch Chrome and go to the three-dot menu.
- Click on the Settings options.
- In the search bar, enter the proxy keyword and then press the Open your computer’s proxy settings option.
- Make sure you have disabled the Use a proxy server option.
- Relaunch Steam with administrator privilege and see if the issue is fixed or not.
Disable Proxy Settings from Network Settings:
- Open the Run dialog box using the Windows + R hotkey.
- Enter inetcpl.cpl in the Open field and press the OK button.
- In the Internet Properties window, go to the Connections tab.
- Tap on the LAN Settings button.
- Uncheck the Use Proxy Server for your LAN option and press the OK button.
3] Add –tcp parameter to Steam
Steam uses UDP (User Datagram Protocol) for transmission of data which you try changing to TCP (Transmission Control Protocol). TCP is more reliable and can help fix the Steam needs to be online to update error. If it doesn’t fix the problem for you or in any case, you can switch back to the default settings at any time.
To add –tcp parameter to Steam, here are the steps you can follow:
- Go to the Steam shortcut on your PC and right-click on it.
- Select the Properties option from the right-click context menu.
- Move to the Shortcut tab.
- In the Target field, type -tcp after the quotation mark.
- Pree the Apply and then OK button to save changes.
- Start the Steam Shortcut as an administrator and see if the issue is fixed or not.
Now, check if the issue is resolved or not. If not, move to the next fix.
4] Grant Steam Administrative Access
If Steam doesn’t have enough administrator privilege, you might encounter this error as well as experience some other problems in your gaming experience. As Steam doesn’t have full administrator access by default, you need to provide it admin access. Before that, make sure you are logged in to your PC with an admin account or admin privileges.
Here are the steps you can follow to grant administrative access to Steam:
First, open File Explorer and go to the installation directory of Steam; you will most probably find it at C:Program Files (x86)Steam.
Then, right-click on the Steam.exe file and click on the Properties option. Now, go to the Compatibility tab in the Properties dialog window and enable the Run this program as an administrator checkbox. After that, press the Apply > OK buttons to save changes.
Again, select and right-click on the GameOverlayUI.exe file from the Steam installation directory and press the Properties option. Then, check the Run this program as an administrator option in the Compatibility tab and save changes.
Next, you have to grant full control to the Steam files. For that, you can follow the below steps:
- Locate the Steam directory in your File Explorer.
- Right-click on the Steam folder and then choose the Properties option.
- Navigate to the Security tab and click on the Advanced button present at the bottom of the dialog window.
- From the Permission Entries, double click the row you want to edit.
- Click on the Full Control checkbox and save changes.
- Restart Steam with all administrator privileges and hopefully, you won’t receive this error anymore.
Read: How to Fix Steam Error Codes 53 and 101 on Windows PC
5] Use Ipconfig
You can try refreshing Dynamic Host Configuration Protocol (DHCP) and Domain Name System (DNS) settings using Ipconfig (internet protocol configuration). This might fix this error for you. Now, there is a set of commands that you need to enter to use Ipconfig. You can simply follow the below steps and commands:
Firstly, open the Command Prompt on your PC. Now, type the below commands one by one:
ipconfig /release
ipconfig /renew
ipconfig /flushdns
Enter one after one command and let the command execute completely. When all the commands are executed, reboot your PC.
Now, open the Services app and locate the DNS Client service. First, stop the service and then start the service again.
Finally, relaunch the Steam app as an administrator and then see if the issue is resolved.
See: Steam games won’t launch; Stuck on Preparing to Launch on Windows
6] Change the DNS Server
If your default DNS server is causing this error on Steam, you can try changing the DNS server and see if the issue is fixed. You can use the Google DNS server. Change the Google DNS server and restart Steam and see if the issue is gone.
7] Refresh Steam files
If nothing works for you, try refreshing your Steam files. It basically deletes all Steam client configurations files and reinstalls them. To refresh Steam files, you can use the below-listed steps:
- First, close all the Steam processes from the Task Manager.
- Next, go to the Steam directory on your PC.
- Now, select all the files except the steamapps folder and the Steam.exe application file.
- After that, use the Delete option to clear all the files.
- Then, restart your PC and relaunch Steam with administrator privilege.
Hopefully, this resolves the Steam needs to be online to update error.
Read: Fix Steam App Configuration Missing or Not available error
How do I make sure Steam is online?
To make sure Steam is online, you can use its dedicated Go Online feature. You can turn Steam online by following the below steps:
- Firstly, launch the Steam client.
- Now, go to the Steam menu from the top toolbar.
- Next, from all the options, select the Go Online option.
- After that, click on the Restart and Go Online option.
Steam will restart and it will be online.
Hope this helps you resolve the Steam needs to be online to update error on your Windows PC.
Now read: Fix Steam error Initializing or Updating Transaction.
Experiencing the “Steam needs to be online to update” error? Disable your antivirus or switch on Compatibility mode – other easy fixes and solutions to the issue!
Steam is a platform for gamers to play, purchase, and communicate with other gamers. The games downloaded and installed through the Steam platform then need to be updated from time to time. However, in certain cases, users have reported experiencing the following fatal error message:
Steam needs to be online to update. Please confirm your network connection and try again.
This error is fine if you are not connected to the internet at all. But what to do when you have an active internet connection that is working fine, but you still get this error?
Today we are going to discuss how to resolve this issue so that you can refocus on what’s really important – gaming.
Table of contents
- Why Steam Needs to be Online to Update?
-
Fix «Steam needs to be online to update» in Windows 11/10
- Disable Proxy Settings
- Disable Windows Firewall
- Disable Antivirus
- Run Steam in Compatibility Mode
- Grant Steam Full Control & Administrative Rights
- Change Steam Protocol from UDP to TCP
- Refresh Steam Files
- Switch DNS
- Change Steam’s Windows Registry
- Closing Words
Why Steam Needs to be Online to Update?
The error message states that you are not online to update Steam or any of the installed games. Sometimes, this error still appears even when you are online. This is the scenario we will be addressing today.
This error can occur due to any one of the following reasons:
- Your computer is not connected to the internet.
- A proxy, firewall, or antivirus software blocks Steam from connecting to its respective server(s).
- Your user account does not have the elevated privileges required to perform the update.
- DNS Server is incorrectly configured.
After considering the user feedback online, it was concluded that even reinstalling the game or the Steam client didn’t resolve the issue. With that, we are going to address the plausible issues listed above and get Steam up and running again.
Fix “Steam needs to be online to update” in Windows 11/10
Disable Proxy Settings
Proxy servers are devices that are put between you, an end-user, and the internet. Contrary to a user directly connected to his router at home, a proxy server is an additional router that sits between you and the actual router. Your computer then needs to be configured to communicate with the proxy server.
In case of an improper proxy setting, Steam can be blocked from communicating with its respective server(s). When it is unable to communicate, it can no longer update itself or any of the games in its library.
Therefore, you must disable the proxy settings on your Windows computer. Here is how:
-
Navigate to the following:
Settings app >> Network and internet >> Proxy
-
Toggle the slider in front of “Automatically detect settings” into the Off position.

Disable automatic detection of settings -
Click “Edit” in front of “Use a proxy server.”
Note: If you see “Set up” instead of “Edit,” it means that manual proxy configuration has not been made on your computer. Therefore, you do not need to perform this or any of the following steps.
Edit proxy settings -
Toggle the slider to the Off position under “Use a proxy server” and then click Save.
Toggle off proxy


The proxy settings will now be disabled. Try rerunning the update and see if the problem is still there. If so, then continue to perform the solutions discussed below.
Alternatively, you can also try other methods to disable proxy if you do not prefer to use the Settings app.
Disable Windows Firewall
Windows firewall can be blocking ports by default. The ports are used to listen to incoming traffic, and if they are blocked, Steam will be unable to perform any updates.
Follow these steps to disable the firewall entirely:
Note: We do not recommend that you keep the firewall disabled indefinitely, since it is a security risk. Thus, we suggest that you disable it only while performing the Steam update.
-
Open Windows Firewall by typing in “firewall.cpl” in the Run Command box.
Open firewall -
Click “Turn Windows Defender Firewall on or off” from the left.

Manage Windows firewall -
Select “Turn off Windows Defender Firewall” under every network profile visible, then click OK.
Turn off firewall


Once the firewall is turned off, recheck Steam to see if you still get the same fatal error. If so, keep these firewall settings and proceed with the given solutions below until the problem is resolved.
Disable Antivirus
The built-in Windows Security software in Windows 11 and 10, or any other third-party antivirus, can also hinder Steam’s communication with its server(s). Try disabling them and check if it resolves the issue.
Learn how to disable Windows Defender temporarily. If you are using a third-party antivirus, you must disable it also.
Once disabled, check if you are now able to update the game(s) inside the Steam library or the Steam client itself.
Run Steam in Compatibility Mode
Running software in “Compatibility Mode” allows it to use settings intended for earlier versions of Windows. Try running the Steam client in Compatibility Mode using the following steps:
-
Right-click on Steam’s icon and then click “Properties” from the context menu.

Open Properties -
Switch to the “Compatibility” tab, check the box next to “Run this program in compatibility mode for:” and then select “Windows 8.”
Run in Compatibility Mode -
Once done, click Apply and Ok to save the changes.


Now re-run the Steam app and check to see if the issue persists. If it does, try giving it complete administrative access.
Grant Steam Full Control & Administrative Rights
Sometimes the lack of privileges for the Steam app throws the “Steam needs to be online to update” error. Here is how you can give them the rights required to perform the updated action:
-
Navigate to the Steam installation folder using File Explorer.
The default installation path for Steam is:
C:Program Files (x86)Steam
-
Right-click on the “Steam.exe” application and then click “Properties” from the context menu.

Open Properties -
Switch to the “Compatibility” tab, check the box next to “Run this program as an administrator” in the Settings section, then click Apply and Ok.
Run Steam.exe as admin -
Repeat steps 2 & 3 for “GameOverlayUI.exe” and allow it to run with administrative privileges as well.
Run GameOverlayUI.exe as an admin -
Go back a folder (to Program Files (x86)) in the Explorer, right-click on the “Steam” directory, and then click “Properties.”
Open Steam Properties -
Switch to the “Security” tab, and then click “Advanced.’
Open Advanced settings -
Click “Disable inheritance” from the Advanced Security Settings window.
When asked what you would like to do with the currently inherited permissions, click “Convert inherited permissions into explicit permissions on this object.”

Disable inheritance -
From the “Permission entries,” double-click the row you want to edit (not with “Full Control”).
Double click permission entry -
From the pop-up window, select “Full Control,” and then click Ok.

Give full control -
Now click Apply and OK in the Advanced Security Settings window to save the changes.


Now restart your Steam client and you should not be having the same error message again. If you still do, there are still a few tricks up our sleeves that can mitigate the issue.
Change Steam Protocol from UDP to TCP
Steam uses User Datagram Protocol (UDP), which is a connectionless protocol, by default. We can change this to Transmission Control Protocol (TCP) instead, which often works in resolving the “Steam needs to be online to update” error.
Here is how to change the protocol from UDP to TCP:
-
Right-click on the Steam shortcut on your desktop and click “Properties” from the context menu.
Open Properties -
Switch to the “Shortcut” tab and type in “-tcp” at the end of the “Target” field.
The Target text field should look something like this:
"C:Program Files (x86)SteamSteam.exe" -tcp
Change protocol to TCP -
Once done, click Apply and Ok.

With TCP protocol, administrative privileges for the Steam client, and compatibility mode, you should no longer experience the annoying error.
However, if the issue still persists, here’s what we can do.
Refresh Steam Files
It may be possible that some of the Steam files have been corrupted and are thus no longer able to update themselves or any games within the library. You can recreate Steam files by deleting the old ones, and the client will fetch new ones automatically.
Follow these steps to safely delete the Steam files:
-
Navigate to the Steam installation folder using File Explorer.
-
Select all the files using the CTRL + A shortcut keys. Once all are selected, continue holding down the CTRL key and unselect the following 2 items:
- Steamapps (folder)
- Steam.exe (application)
-
Hit the “Delete” button and remove everything except those 2 items.
Only the aforementioned 2 items should remain.

Undeleted items -
Now restart your computer.

Once it reboots, return to the Steam directory and run the Steam app. The files will then be downloaded automatically.

Check now to see if you still get the “Steam needs to be online to update” error.
If so, continue to perform the following possible solutions:
Switch DNS
The cause of the problem could be a misconfigured DNS. You can therefore try changing it to Google’s Domain Name Server (DNS) using the following guide:
-
Navigate to the following:
Settings app >> Network and internet >> Advanced network settings
-
Expand the network adapter you are using (Wi-Fi or ethernet) then click “View additional properties” under it.
View additional properties -
Click “Edit” in front of “DNS server assignment.”
Edit DNS You will now see an “Edit DNS settings” popup.
-
Perform the following configurations:
- From the drop-down menu: Manual
- Toggle the slider under “IPv4” into the On position.
- Preferred DNS: 8.8.8.8
- Alternate DNS: 8.8.4.4
Configure DNS Once done, click Save.
-
Now reset the TCP/IP stack.


After performing the steps, try updating your Steam game and check if the issue is still there. If you still see the error message, there is one more thing you can do to fix the problem.
Change Steam’s Windows Registry
You can manually edit the system registry to configure Steam to not detect that it is offline, ever. This can be done using the following steps:
Note: Misconfiguration of critical values in the system’s registry could be fatal for your operating system. Therefore, we insist that you create a system restore point before proceeding with the process.
-
Open the Registry Editor by typing in “regedit” in the Run Command box.
Open Registry Editor -
Paste the following into the navigation bar at the top for quick navigation:
ComputerHKEY_CURRENT_USERSoftwareValveSteam

Quick navigation to Windows Registry -
Right-click on the “Steam” key in the left pane, expand New, and then click “DWORD (32-bit) Value.”
Create new DWORD -
Name this DWORD “Offline.”
-
Double-click “Offline” and set its Value Data to “0.” Click Ok when done.
Set Value Data -
Now restart your computer for the changes to take effect.


Note: The steps above will still allow you to run the Steam client offline to play games whilst offline.
Now check to see if you can update the Steam library games and the client itself.
Closing Words
It can be frustrating when a game cannot update itself. Most modern-day updates include new maps, security patches, skins, characters, and so much more. It would be a shame if you are unable to get them before your friends do.
You can fix the issue yourself, without having to reinstall the Steam client. If you have a proxy enabled, disable it. Also, disable any firewalls or antivirus software to mitigate the issue. If that does not work, try running the client with administrative privileges.
If the problem still does not go away, try using Google’s DNS, or perform a registry trick to keep Steam online.