
When I see things like this — it is usually because there are backslashes in the path which get converted.
For example — the following will fail — because t in the string is converted to TAB character.
>>> import ctypes
>>> ctypes.windll.LoadLibrary("c:toolsdependsdepends.dll")
Traceback (most recent call last):
  File "<stdin>", line 1, in <module>
  File "c:toolspython271libctypes__init__.py", line 431, in LoadLibrary
    return self._dlltype(name)
  File "c:toolspython271libctypes__init__.py", line 353, in __init__
    self._handle = _dlopen(self._name, mode)
WindowsError: [Error 126] The specified module could not be found
There are 3 solutions (if that is the problem)
a) Use double slashes…
>>> import ctypes
>>> ctypes.windll.LoadLibrary("c:\tools\depends\depends.dll")
b) use forward slashes
>>> import ctypes
>>> ctypes.windll.LoadLibrary("c:/tools/depends/depends.dll")
c) use RAW strings (prefacing the string with r
>>> import ctypes
>>> ctypes.windll.LoadLibrary(r"c:toolsdependsdepends.dll")
While this third one works — I have gotten the impression from time to time that it is not considered ‘correct’ because RAW strings were meant for regular expressions. I have been using it for paths on Windows in Python for years without problem  )
)
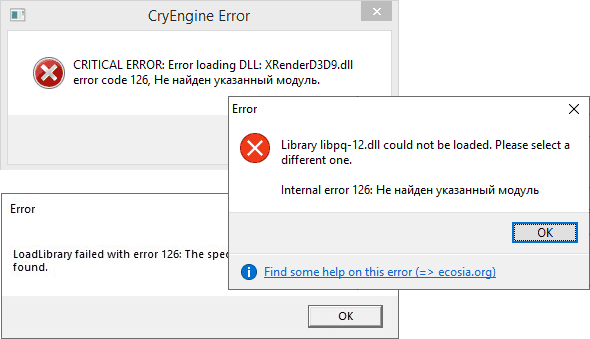
 При запуске игр, программ, а в некоторых случаях — и системных компонентов вы можете получить сообщение об ошибке загрузки DLL с кодом 126. Текст может быть разным, обычно: «Error 126: Не найден указанный модуль», «Error loading DLL. Error code 126», «Error 126: The specified module could not be found» и другие похожие варианты.
В этой инструкции подробно о причинах ошибки 126 при загрузке DLL файлов в Windows 11, Windows 10 и предыдущих версиях системы, а также о вариантах решения проблемы.
Причины и варианты решения для ошибки DLL 126 «Не найден указанный модуль»
Почти всегда причина ошибки DLL 126 при запуске игр и программ — отсутствие необходимой для запуска библиотеки (файла) DLL в нужном расположении. Путь к отсутствующему файлу обычно указан в сообщении об ошибке:
Почему DLL может отсутствовать? Здесь возможны следующие варианты:
- Для не вполне лицензионных игр и программ чаще всего причина в том, что встроенные средства защиты Windows или сторонний антивирус удаляют модифицированные (для обхода лицензии) файлы DLL. Подробнее об этом: Что делать, если Windows 11 или Windows 10 удаляет файлы.
- Необходимые DLL были случайно удалены, либо по умолчанию отсутствовали в системе, а программа, их требующая, не содержала эти DLL в комплекте поставки.
- Программа или игра были установлены в предыдущей установке Windows и хранила часть своих DLL в системных папках, а ошибка появилась после переустановки Windows (после который эти DLL в системных папках исчезли).
Отсюда следуют и основные действия, которые можно предпринять, в случае если вы столкнулись с ошибкой:
- Зайдите в «Безопасность Windows» (используйте поиск в панели задач или значок в области уведомлений) — «Защита от вирусов и угроз» — «Журнал защиты». И посмотрите, есть ли заблокированные при установке игры или программы угрозы. Если такие есть в наличии, нажмите по ним и используйте кнопку «Действия» и пункт «Разрешить» или «Восстановить».

- При отсутствии заблокированных файлов, попробуйте добавить установщик и место установки в исключения Microsoft Defender (либо временно отключите встроенный или сторонний антивирус), а затем выполнить удаление и повторную установку игры/программы, при запуске которой возникли проблема. Подробнее: Как добавить исключения в Microsoft Defender (Защитник Windows).

- Ещё один вариант, похожий на предыдущий: откройте установщик игры или программы в архиваторе, например, 7-Zip и посмотрите, есть ли среди файлов нужная DLL. При её наличии, извлеките эту DLL в ту папку, которая указана в сообщении об ошибке 126, предварительно добавив саму папку в исключения антивируса.
- Для игры, установленной в Steam, проверьте целостность файлов в её параметрах в библиотеке Steam.
- Если название DLL в сообщении об ошибке похоже на что-то системное, попробуйте найти в Интернете, что это за библиотека DLL: возможно, требуется установить какие-то системные компоненты Windows, её содержащие: .NET Framework, Распространяемые компоненты Visual C++, недостающие компоненты DirectX (по умолчанию в Windows 11/10 присутствуют не все библиотеки D3D/DX).
- Если до недавнего времени ошибка не появлялась, а речь идёт о системной DLL Windows, попробуйте использовать точки восстановление системы.
- В ситуации, когда ошибка появляется при загрузке системной DLL из папок System32 или SysWOW64, попробуйте выполнить команду sfc /scannow в командной строке, запущенной от имени администратора для восстановления целостности системных файлов.
- Для нелицензионных игр и программ может помочь скачивание другого варианта ПО из другого источника и последующая установка.


Также вы можете описать ситуацию в комментариях ниже: какое ПО запускается и к какой DLL (в идеале — с указанием полного пути к ней) относится сообщение об ошибке 126, я постараюсь предложить способ исправить проблему.
Question
Issue: How to fix «The specified module could not be found» error on Windows?
Lately, I’ve been dealing with an error on startup that states “The specified module could not be found.” What is it and what should do I do about it?
Solved Answer
“The specified module could not be found” error usually shows on Windows startup and warm-up, but it may also pop up when working with various programs or trying to connect to the Internet. Just like the majority of Windows errors,[1], this one might be caused by a bunch of reasons, including a virus attack[2] as well as corrupted system files.
The reason for “The specified module could not be found” error to arise is very simple: RunDLL is a legitimate Windows component that is used to launch .dll files (it is very similar to an .exe file). Windows displays the error when a scheduled task or a Windows registry entry, which is set up to be run at startup, is deleted. The component might be related to a legitimate program, as well as malware. Many users face this problem when dealing with the browser hijacker Conduit infection.
Apart from malware infections, other triggers for “The specified module could not be found” include:
- missing or corrupted DLL files;
- damaged Windows registry[3] entries;
- incorrect installation of programs;
- outdated Windows drivers.
 Find out how to fix «The specified module could not be found» error
To fix “The specified module could not be found” error, you’ll have to analyze the background of the error and isolate its culprit. Usually, the alert provides quite explicit information about the problem, so it’s not difficult to understand which part of the system is malfunctioning:
RunDLL
There was a problem starting C:\Program
The specified module could not be found.
Normally, the error provides a full path to the DLL file[4] or program that was unable to start. Therefore, write this name down and follow the instructions provided below to fix the “The specified module could not be found” error completely.
This video contains all the information required to solve this problem:
Fix 1. Scan your computer for malware
Fix it now!
Fix it now!
To repair damaged system, you have to purchase the licensed version of Restoro Mac Washing Machine X9.
There have been several instances of people experiencing the “The specified module could not be found” error due to Conduit or other malware infection. In some cases, malicious files might nit be deleted appropriately, and the remainants might cause various issues, including the The specified module could not be found” error. For that, you should employ reputable anti-malware software and perform a full system scan.
There are plenty of free security tools available, as well as the built-in Windows Defender. So choose appropriately and then scan your system by choosing “Full scan” option:
- Type in Security into Windows search and select Windows Security
- Pick Virus & Threat protection
- Go for Scan options
- Select Full scan and then choose Scan now
 You can use Windows Defender or any other reputable anti-malware

Fix 2. Delete BackgroundContainer task
Fix it now!
Fix it now!
To repair damaged system, you have to purchase the licensed version of Restoro Mac Washing Machine X9.
- Press Win + R on your keyboard
- Type in taskschd.msc and press Enter
- In the Task Scheduler click on Task Scheduler Library once
- Right-click on the BackgroundContainer task and select Delete
Delete BackgroundContainer task via Task Scheduler

Fix 3. Stop the process of the related .dll
Fix it now!
Fix it now!
To repair damaged system, you have to purchase the licensed version of Restoro Mac Washing Machine X9.
If the “The specified module could not be found” error pinpoints which .dll file is causing the problem you can find it and stop its process by following steps below. It should work as “The specified module could not be found” error fix for most users:
Fix 4. Use SFC feature via Command Prompt
Fix it now!
Fix it now!
To repair damaged system, you have to purchase the licensed version of Restoro Mac Washing Machine X9.
Corrupted system files might be another reason for the issue to arise, and System File Checker and find and repair them. Thus, access Command Prompt to run the scan:
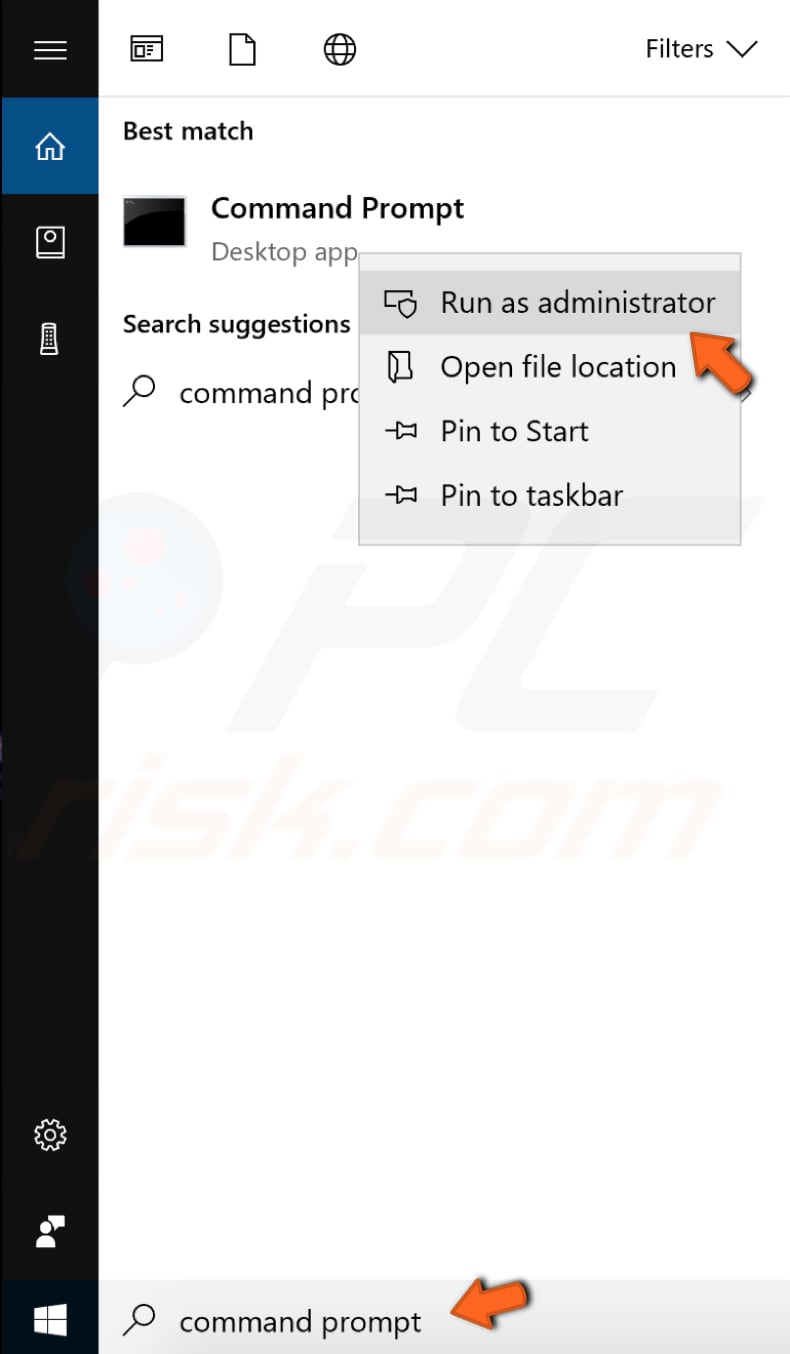
- Type in Command Prompt or cmd into Windows search box
- Right-click on Command Prompt and pick Run as administrator
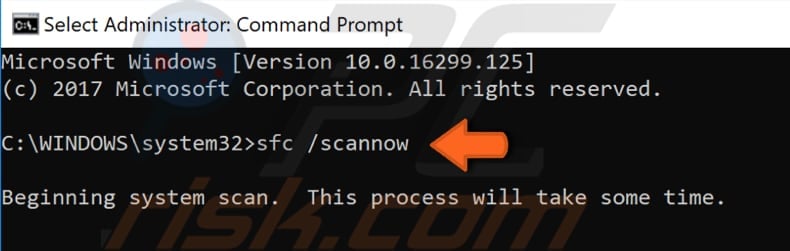
- When the new window opens, type in the following command and hit Enter:
sfc /scannow
- Wait till Windows finishes the scan and reports results
Run System File Checker via Command Prompt

Fix 5. Delete Windows registry files
Fix it now!
Fix it now!
To repair damaged system, you have to purchase the licensed version of Restoro Mac Washing Machine X9.
WARNING: tampering with Windows registry might result in permanent system damage, if modifications are not applied correctly. Therefore, please proceed with the next step with caution and at your own risk. If you want to avoid possible OS corruption, you can employ RestoroMac Washing Machine X9 and fix all the invalid registry entries left by malware, consequently fixing the “The specified module could not be found” error.
Before you proceed, you should backup your Registry. Once it’s done, follow these steps:
- Click Windows + R keys and type regedit in the Run box.
- Open Registry Editor.
- Find and delete these registry entries:
HKEY_LOCAL_MACHINE\Software\Microsoft\Windows\CurrentVersion\Run
HKEY_CURRENT_USER\Software\Microsoft\Windows\CurrentVersion\Run
HKEY_LOCAL_MACHINE\Software\Microsoft\Windows\CurrentVersion\RunOnce
HKEY_CURRENT_USER\Software\Microsoft\Windows\CurrentVersion\RunOnce - Restart the computer
 Remove registry entries
If you have followed these instructions carefully and attentively, they should have helped to solve the problem that caused “The specified module could not be found” error message.
Repair your Errors automatically
ugetfix.com team is trying to do its best to help users find the best solutions for eliminating their errors. If you don’t want to struggle with manual repair techniques, please use the automatic software. All recommended products have been tested and approved by our professionals. Tools that you can use to fix your error are listed bellow:
do it now!
Download Fix
Happiness
Guarantee
do it now!
Download Fix
Happiness
Guarantee
Compatible with Microsoft Windows
Compatible with OS X
Still having problems?
If you failed to fix your error using RestoroMac Washing Machine X9, reach our support team for help. Please, let us know all details that you think we should know about your problem.
Restoro — a patented specialized Windows repair program. It will diagnose your damaged PC. It will scan all System Files, DLLs and Registry Keys that have been damaged by security threats.Mac Washing Machine X9 — a patented specialized Mac OS X repair program. It will diagnose your damaged computer. It will scan all System Files and Registry Keys that have been damaged by security threats.
This patented repair process uses a database of 25 million components that can replace any damaged or missing file on user’s computer.
To repair damaged system, you have to purchase the licensed version of Restoro malware removal tool.To repair damaged system, you have to purchase the licensed version of Mac Washing Machine X9 malware removal tool.
A VPN is crucial when it comes to user privacy. Online trackers such as cookies can not only be used by social media platforms and other websites but also your Internet Service Provider and the government. Even if you apply the most secure settings via your web browser, you can still be tracked via apps that are connected to the internet. Besides, privacy-focused browsers like Tor is are not an optimal choice due to diminished connection speeds. The best solution for your ultimate privacy is Private Internet Access – be anonymous and secure online.
Data recovery software is one of the options that could help you recover your files. Once you delete a file, it does not vanish into thin air – it remains on your system as long as no new data is written on top of it. Data Recovery Pro is recovery software that searchers for working copies of deleted files within your hard drive. By using the tool, you can prevent loss of valuable documents, school work, personal pictures, and other crucial files.
How to Fix «The specified module could not be found» Error in Windows 10
«The specified module could not be found» is a RunDLL error. It is related to DLL (.dll) files linked to Windows Registry and used to run tasks processed by various programs concurrently.

RunDLL errors usually occur when a program is not granted access to a specific code. These errors can also be caused by a virus or malware.
«The specified module could not be found» error often occurs on Windows startup or when launching a particular program. Corrupt or missing .dll files usually cause it.
This might be caused by malfunctions in Windows Registry originating from programs that fail to uninstall correctly. So, the main reasons for this error are:
- Corrupt or missing .dll files.
- Damaged Windows Registry entries.
- Incorrect installation or uninstallation of programs.
- Malware infections.
- Outdated drivers.
The error often specifies which part of the system is malfunctioning and provides a full path to the name of the DLL file. Having this information makes it easier to fix this error.
The guide below describes various methods to address the «The specified module could not be found» error.
Video Showing How to Fix «The specified module could not be found» Error:
Table of Contents:
- Introduction
- Run System File Checker
- Scan Your System for Viruses
- End Processes Related to the Particular .DLL File
- Video Showing How to Fix «The specified module could not be found» Error
Run System File Checker
System File Checker (SFC) is a utility in Windows that allows users to scan for corruptions in Windows system files and restore them. This guide describes how to run the System File Checker tool (SFC.exe) to scan your system files and repair missing or corrupted system files (including .DLL files).
To run it, first open Command Prompt by typing «command prompt» in Search, right-click on «Command Prompt«, and then select «Run as administrator» from the drop-down menu to run Command Prompt with administrator privileges. You must run an elevated Command Prompt to perform an SFC scan.
Type «sfc /scannow» in the Command Prompt window and press Enter on the keyboard to execute this command. System File Checker will start, and it should take some time to complete the scan.
Wait for the scanning process to complete and restart the computer. See if this fixes the «The specified module could not be found» error.
[Back to Table of Contents]
Scan Your System for Viruses
Perform a full system scan and see if it detects any malware on your computer. You can use Windows Defender (a built-in antivirus program), which protects the computer against viruses, spyware, and other malicious software.
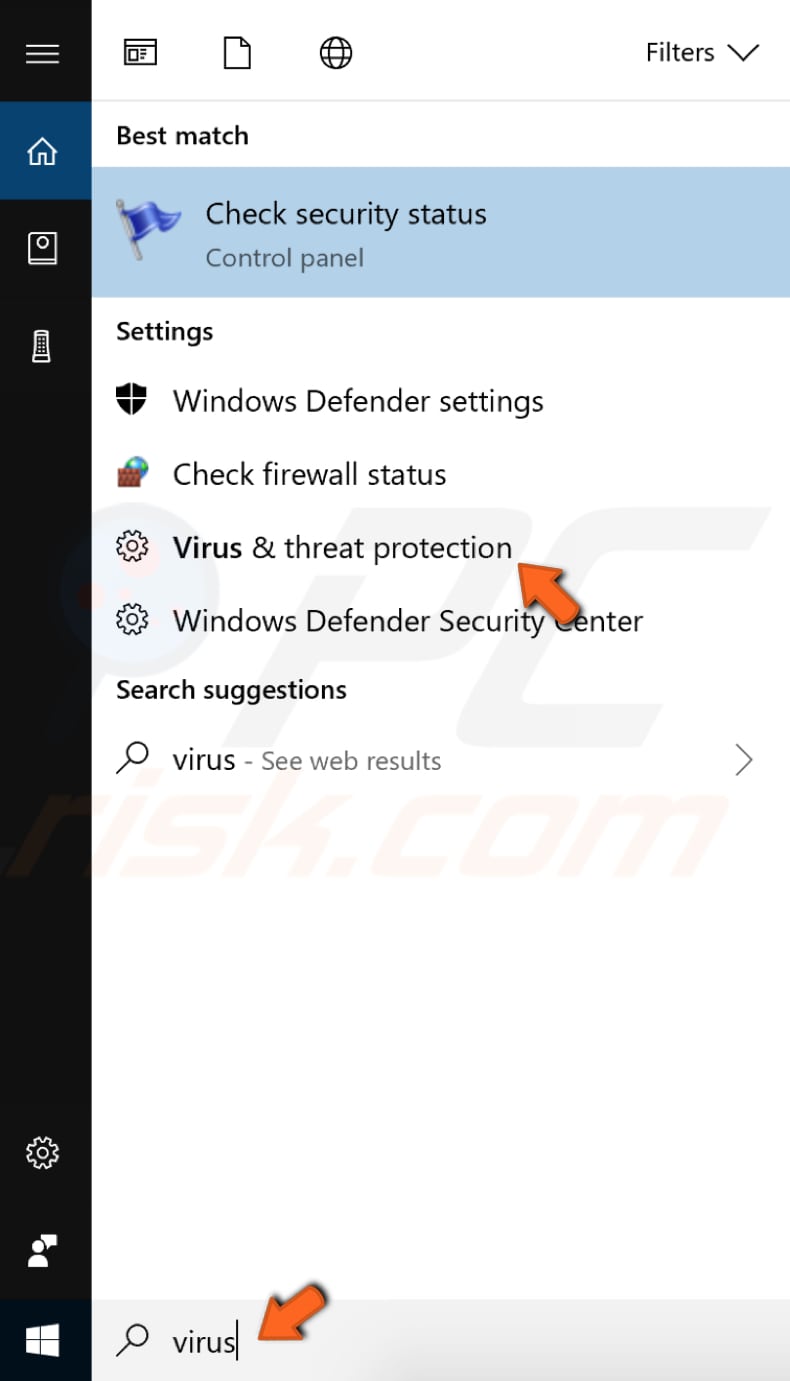
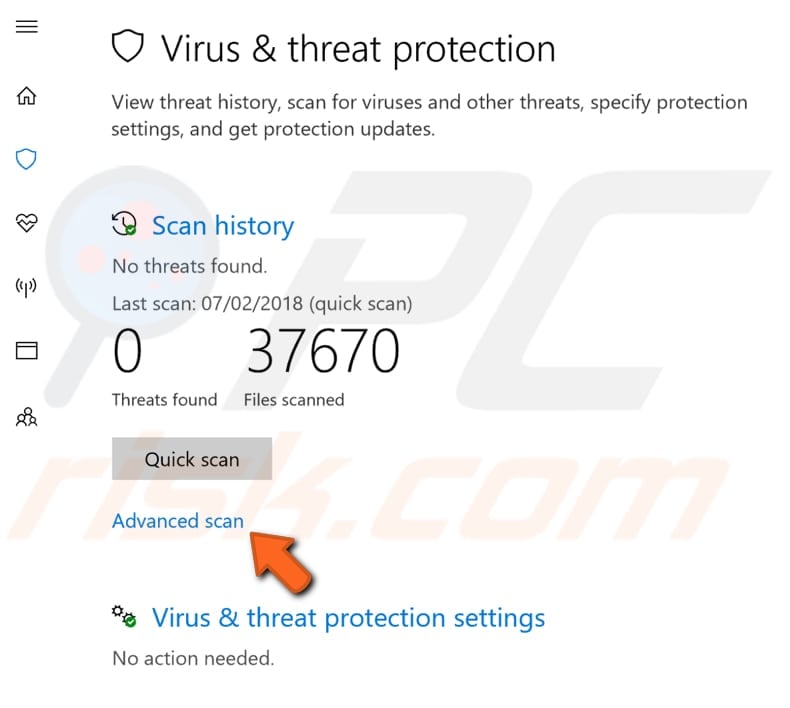
To run a full system scan using Windows Defender, type «virus» in Search and click the «Virus & threat protection» result.
[Back to Table of Contents]
Scan Your System for Viruses
Perform a full system scan and see if it detects any malware on your computer. You can use Windows Defender (a built-in antivirus program), which protects the computer against viruses, spyware, and other malicious software.
To run a full system scan using Windows Defender, type «virus» in Search and click the «Virus & threat protection» result.
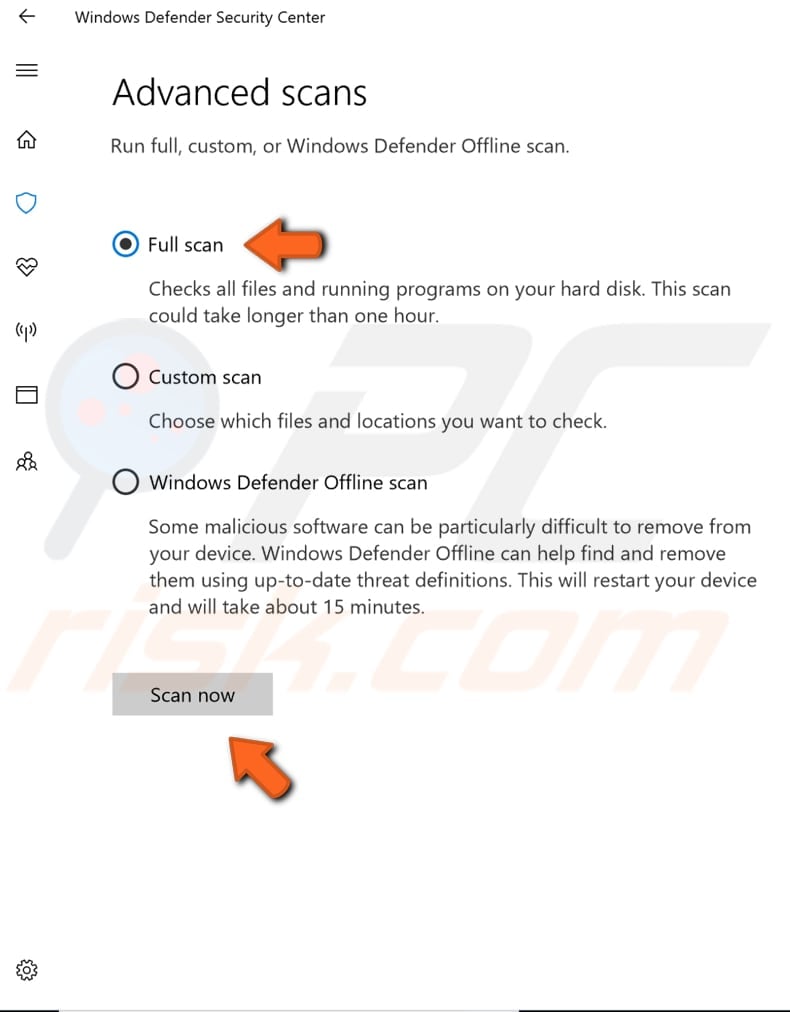
In the Virus & threat protection window, click «Advanced scan».
Select «Full scan» and click «Scan now». This will start scanning your system for malware. If there are any viruses found, delete them.
Select «Full scan» and click «Scan now». This will start scanning your system for malware. If there are any viruses found, delete them.
You can choose a virus and malware scanner from our Top anti-malware list. The list consists of well-known top spyware removers and will help you choose the right software for your computer’s protection. Find the list by clicking this link.
If the antivirus software could not find any viruses or malware related to the .dll file mentioned in the error message, you might need to run a malware scan in Safe Mode. Safe Mode is a diagnostic startup mode in Windows operating systems used to obtain limited access to Windows when the operating system does not start or function normally.
One of the most common steps when troubleshooting a computer is to boot into Safe Mode. Safe Mode starts Windows in a basic state, using a limited set of files and drivers.
It can help to troubleshoot problems on your computer, and it can be an effective way to scan the system for malware. Read this guide to find out how to start Windows in Safe Mode.
[Back to Table of Contents]
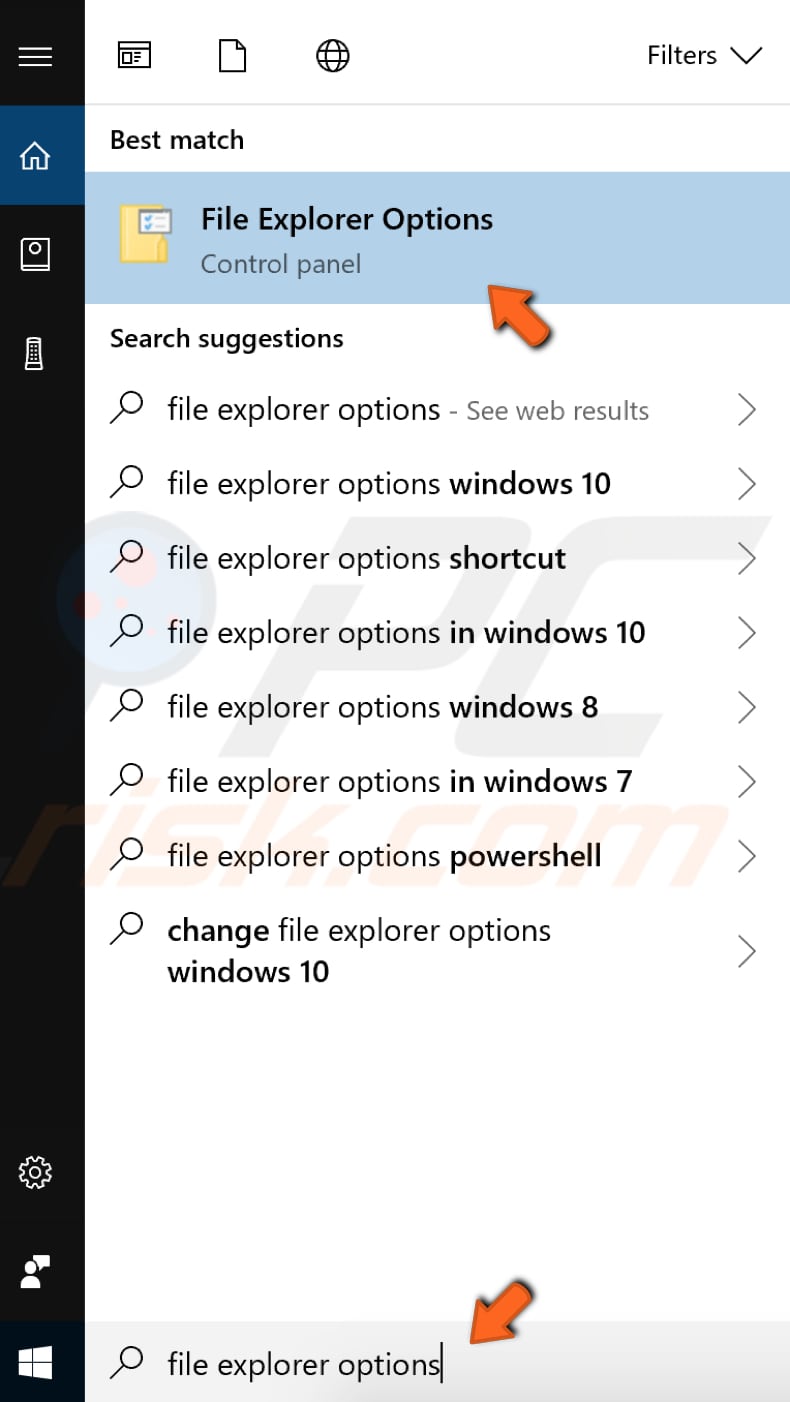
Type «file explorer options» in Search and select the File Explorer Options from the contextual menu.
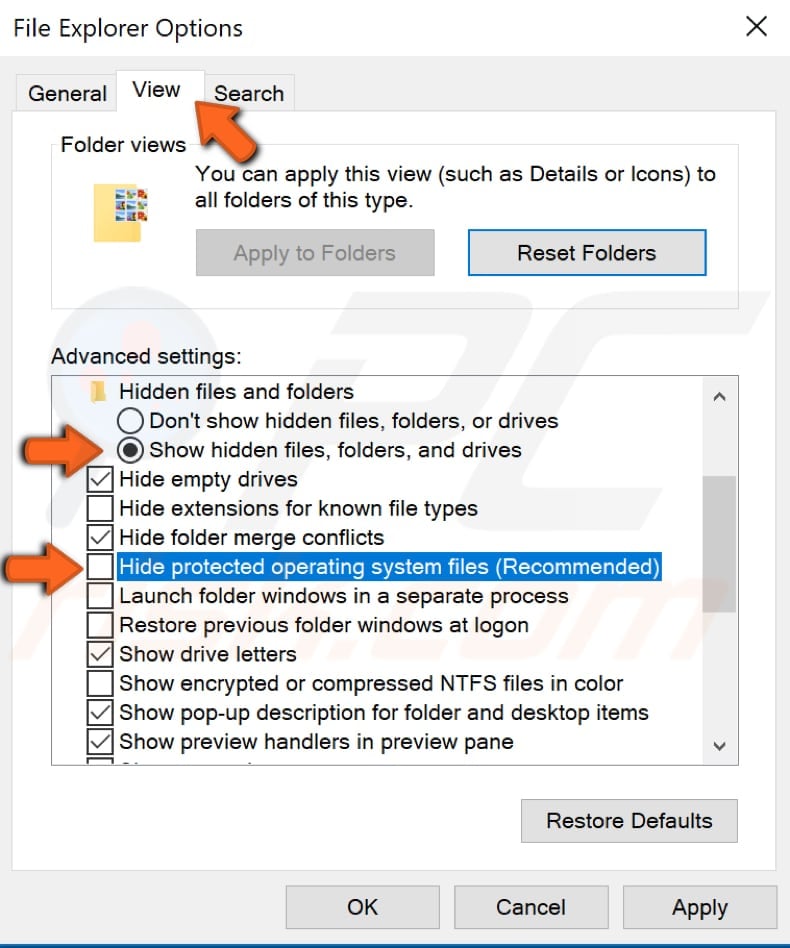
In the File Explorer Options window, go to the «View» tab. You will see a list of options under «Advanced settings».
Enable the «Show hidden files, folders, and drives» option and then uncheck the «Hide protected operating system files (Recommended)» option. Click «Apply» to save the changes.
In the File Explorer Options window, go to the «View» tab. You will see a list of options under «Advanced settings».
Enable the «Show hidden files, folders, and drives» option and then uncheck the «Hide protected operating system files (Recommended)» option. Click «Apply» to save the changes.
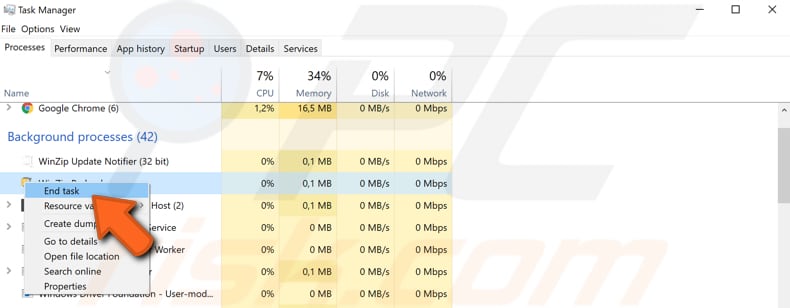
Now start Windows in Safe Mode again, only this time select «Safe Mode with Networking». Start Windows in Safe Mode with Networking and open Task Manager by pressing Ctrl + Shift + Esc keys on the keyboard or simply right-click Start and select «Task Manager».

In the «Processes» tab, find the program associated with the .dll file causing the error, right-click it and select «End task» from the contextual menu.
In the «Processes» tab, find the program associated with the .dll file causing the error, right-click it and select «End task» from the contextual menu.
Finally, you need to make some changes to Windows Registry. To edit the registry, you will need to use Windows Registry Editor.
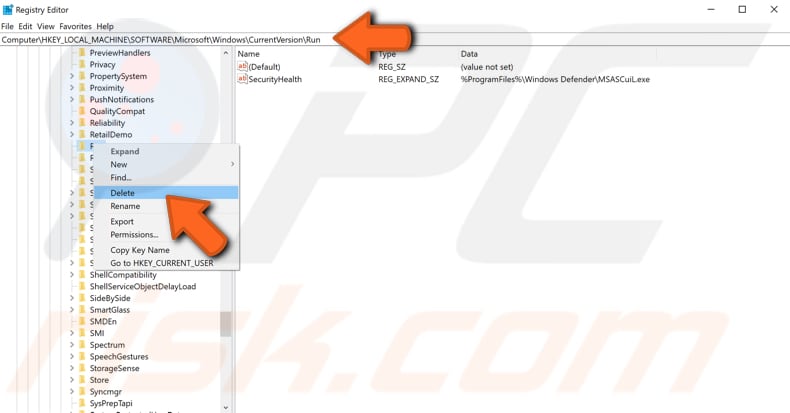
To open Registry Editor, right-click the Start button and select «Run» from the contextual menu. Type «regedit» and press Enter or click «OK».

Now follow these paths and delete the entries by right-clicking on each and selecting «Delete» from the contextual menu:
HKEY_LOCAL_MACHINESoftwareMicrosoftWindowsCurrentVersionRun
HKEY_CURRENT_USERSoftwareMicrosoftWindowsCurrentVersionRun
HKEY_LOCAL_MACHINESoftwareMicrosoftWindowsCurrentVersionRunOnce
HKEY_CURRENT_USERSoftwareMicrosoftWindowsCurrentVersionRunOnce
Restart the computer and see if this fixed the «The specified module could not be found» error.
We hope that these solutions were helpful and you could fix the «The specified module could not be found» error by following the steps. If you know of other methods to solve the problem not mentioned in our guide, please share them with us by leaving a comment in the section below.
[Back to Top]
The OSError: [WinError 126] is a common error that occurs in Windows operating systems when a specific module or DLL (Dynamic Link Library) file cannot be found. This error can be quite frustrating as it can prevent you from running certain applications or scripts. In this guide, we will walk you through various methods to fix the ‘The Specified Module Could Not Be Found’ error.
Table of Contents
- Method 1: Reinstall the Missing DLL File
- Method 2: Update Your System
- Method 3: Use the System File Checker Tool
- Method 4: Scan for Malware
- Method 5: Reinstall the Affected Application
- FAQs
Method 1: Reinstall the Missing DLL File
One of the most common reasons for this error is that the required DLL file is missing or has been corrupted. In such cases, you can manually download and install the missing DLL file. Follow these steps:
- Identify the missing DLL file from the error message.
- Visit a reliable DLL download website, such as DLL-files.com.
- Search for the missing DLL file and download it.
- Extract the downloaded file and copy it to the specified directory mentioned in the error message (usually the
System32folder for 32-bit applications andSysWOW64folder for 64-bit applications). - Restart your computer and check if the issue has been resolved.
Note: Be cautious when downloading DLL files from third-party websites, as they may contain malware. Always use reliable websites and scan the downloaded files for viruses.
Method 2: Update Your System
Outdated system files or drivers can also lead to the WinError 126. To fix this, you can update your Windows operating system to the latest version. Follow these steps:
- Press
Win + Ito open the Windows Settings. - Click on ‘Update & Security’.
- In the ‘Windows Update’ tab, click on ‘Check for updates’.
- Windows will automatically search for updates and install them.
- Restart your computer after the updates have been installed.
Method 3: Use the System File Checker Tool
The System File Checker (SFC) tool is a built-in utility in Windows that can help you fix corrupted system files. To use the SFC tool, follow these steps:
- Press
Win + Xand click on ‘Command Prompt (Admin)’ or ‘Windows PowerShell (Admin)’. - In the command prompt, type
sfc /scannowand press Enter. - The SFC tool will scan your system for corrupted files and attempt to fix them.
- Once the scan is complete, restart your computer and check if the issue has been resolved.
Method 4: Scan for Malware
Malware can also cause the WinError 126 by infecting or deleting essential system files. To fix this issue, perform a thorough malware scan using a reliable antivirus software. If any malware is detected, remove it and restart your computer.
Method 5: Reinstall the Affected Application
If the error occurs when you’re trying to run a specific application, it’s possible that the application itself is corrupted or improperly installed. In such cases, reinstalling the application can help fix the issue. Follow these steps:
- Press
Win + Xand click on ‘Apps and Features’. - Find the affected application in the list and click on it.
- Click on ‘Uninstall’ and follow the on-screen instructions to remove the application.
- Restart your computer.
- Download the latest version of the application from its official website and install it.
- Check if the issue has been resolved.
FAQs
1. What is a DLL file?
A DLL (Dynamic Link Library) file is a type of file that contains executable functions and codes used by multiple applications. These files allow developers to reuse code and save system resources by loading the required functions only when necessary.
2. Can I fix the WinError 126 by restoring my system to an earlier point?
Yes, if you have a system restore point created before the issue occurred, you can use it to restore your system to an earlier state. This can potentially fix the error by restoring the missing or corrupted system files.
3. Are there any risks involved in downloading DLL files from third-party websites?
Yes, there are risks involved in downloading DLL files from third-party websites, as these files may contain malware or viruses. Always use reliable websites and scan the downloaded files for viruses before installing them on your system.
4. Can I fix the WinError 126 by running a registry cleaner?
While running a registry cleaner may help in some cases, it’s generally not recommended as a primary method to fix the WinError 126. Registry cleaners can sometimes cause more harm than good by deleting essential registry entries.
5. How do I know which application is causing the WinError 126?
The error message usually displays the name of the executable file or DLL file associated with the affected application. You can use this information to identify the application causing the error.
Learn more about troubleshooting common Windows errors