
When you try to access a website, you may encounter an ERR_NAME_NOT_RESOLVED error message. This means that, for some reason, the web page cannot be reached. If the site is yours, this error can harm your reputation and drive away potential customers.
Fortunately, you can do a few things to resolve this issue. Sometimes, the problem may be caused by a misconfiguration on your computer, which can easily be fixed. Other times, you might need to make a small change to your domain settings.
In this post, we’ll look closely at the ERR_NAME_NOT_RESOLVED error and what causes it. We’ll also show you how to fix it on a computer and an Android device. Finally, we’ll look at a few other similar problems (and what they mean). Let’s get started!
Check Out Our Video Guide to Fixing the “ERR_NAME_NOT_RESOLVED” Error:
What Does “ERR_NAME_NOT_RESOLVED” Mean?
Before we look at the ERR_NAME_NOT_RESOLVED error, we’ll need to ensure that you understand how the Domain Name System (DNS) works. This is like an address book that contains information about each registered domain name on the web.
A domain name is basically the address or URL of a website (e.g., kinsta.com). When you enter a domain into a search engine, your browser will run a DNS request to get the IP address of the website.
If the DNS is unable to find the IP address and complete the request, the browser will return an ERR_NAME_NOT_RESOLVED error. This is typically accompanied by one of the following messages:
- “This webpage is not available”
- “This site can’t be reached”
When this happens, you can’t access the content on that website. However, you might not be the only person to experience this error.
What Are the Causes of “ERR_NAME_NOT_RESOLVED”?
The ERR_NAME_NOT_RESOLVED error typically indicates a problem with your internet or computer. For example:
- The website may have moved to another IP address, and your browser is getting the outdated address from the cached data.
- You have a poor internet connection.
- Your firewall might be blocking access to the website.
However, there might also be a problem with the website’s DNS records. If that’s the case, other visitors will experience the same error, and there’s nothing you can do to fix it (unless the site is yours).
Alternatively, the error might be caused by a poor hosting service. If you often encounter the “This site can’t be reached” message when trying to access your site, it might be time to switch to a better web host.
At Kinsta, we offer reliable web hosting for individuals and businesses. Plus, our plans come with an APM tool that enables you to identify and resolve performance issues on your site.
If you run into problems, our team is always available to help. Every Kinsta plan comes with 24/7 expert support so you can resolve any issues promptly.
At some point when trying to access a website, you may encounter this error message. 😅 Don’t panic- this guide is here to help. 😌Click to Tweet
6 Proven Methods to Fix the “ERR_NAME_NOT_RESOLVED” Error
Now that we know what causes the “ERR_NAME_NOT_RESOLVED” error, let’s look at a few effective ways to fix the problem and regain access to your site.
1. Test Your Internet Connection
The first step is to establish whether a problem with your internet connection is causing the error. To do this, try to access the site from a different WiFi network.
If it works, then you may simply need to restart your router. Don’t worry if this doesn’t solve the problem — there are several other things you can try!
2. Clear the DNS Cache on Your Computer
The “ERR_NAME_NOT_RESOLVED” error might also be caused by outdated cache items on your device. To fix this issue, you’ll need to flush the DNS cache on your computer.
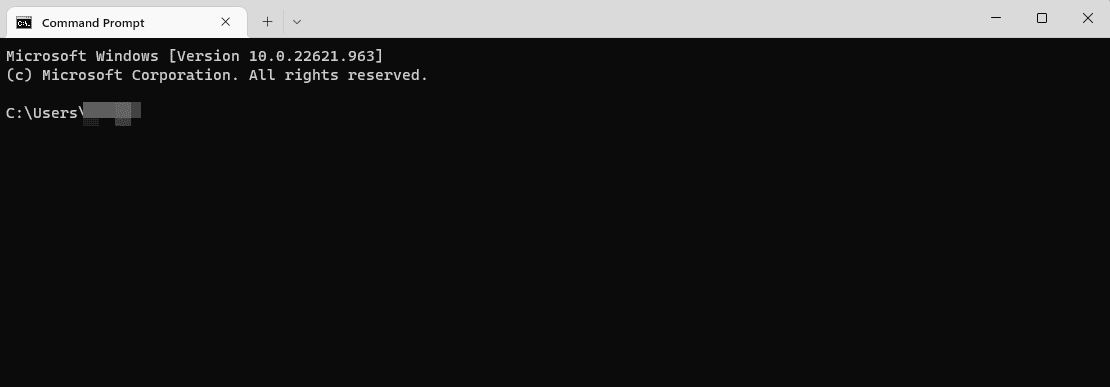
If you use Windows, open the Command Prompt app. You can use the keyboard shortcut Windows + r to launch the Run window, then enter cmd to open the command prompt:
Type in the following command and hit Enter:
ipconfig /flushdns
Windows will now clear and reset your DNS cache files. When it’s ready, you should see a message that says, “Successfully flushed the DNS resolver cache”.
If you have a macOS device, you’ll need to enter the following command in the terminal:
dscacheutil -flushcache
If you use Linux, flush the DNS cache with nscd by entering the following command line in the init.d subdirectory:
sudo /etc/init.d/nscd restart
To flush the DNS cache with systemd, enter this command line:
systemd-resolve --flush-caches
Then, enter the following command to make sure it’s worked:
systemd-resolve --statistics
Now, try accessing the website again. If you’re still unsuccessful, you can move on to the next step.
3. Check the Browser Settings
If you’re still unable to access the website, the problem may be rooted in your browser. For example, Google Chrome has its own DNS cache, so you’ll need to clear it as well.
To do this, open Google Chrome and enter the following line into the address bar:
chrome://net-internals/#dns
This will produce the following screen:

Now, simply click on the Clear host cache button.
We also recommend checking the page preloading setting in Google Chrome. When enabled, this feature will preload the contents of websites you’ve visited in the past, including the DNS data, so they render more quickly. This means it might be storing outdated information, so you’ll need to disable it.
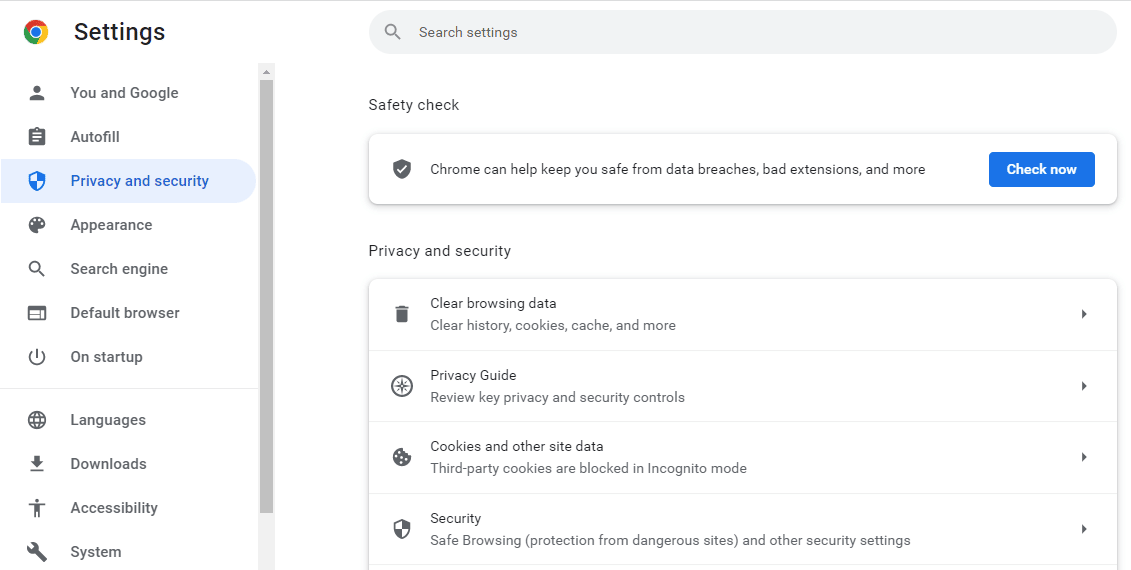
In your Google Chrome window, click on the three dots at the top-right corner and select Settings. Then, navigate to Privacy and security:
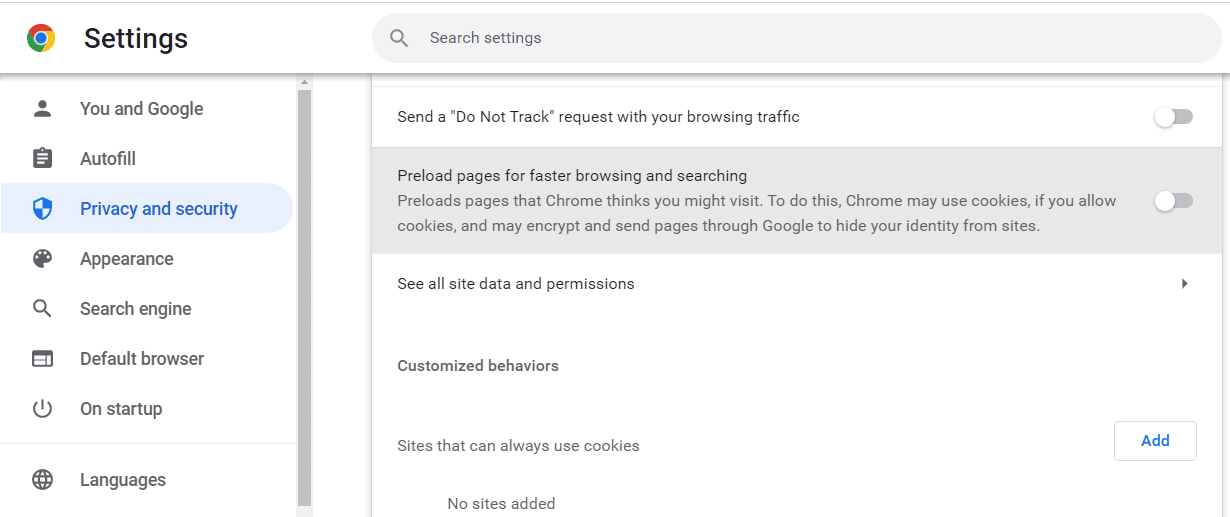
Next, select Cookies and other side data. Locate the Preload pages for faster browsing and searching setting, and switch it off:
While you’re here, you might also want to clear your browser cache. To do this, return to the Privacy and security page and select Clear browsing data.
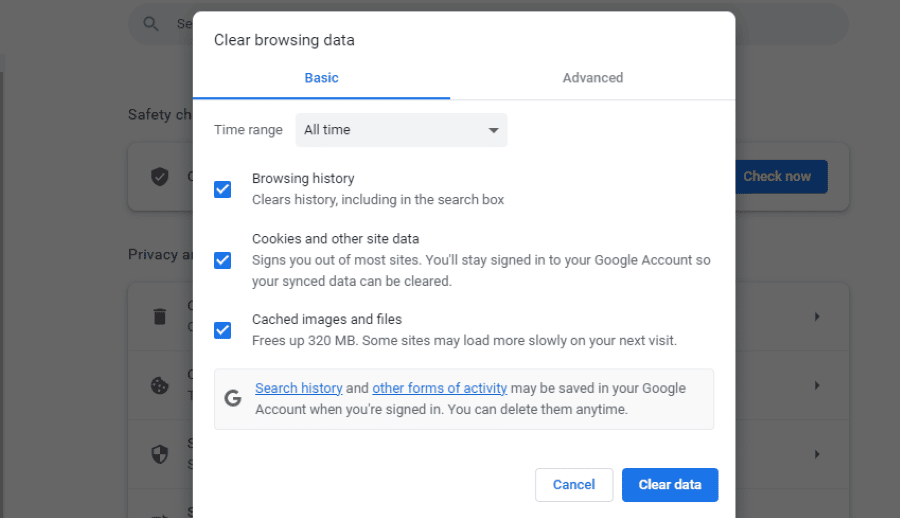
In the popup window, set the time range to All time, ensure all the boxes are checked and hit Clear data:
If you use a different browser, we have you covered. We’ve put together a guide that shows you how to clear the cache in all major browsers!
4. Reset Your Firewall Settings
If you’re still getting an ERR_NAME_NOT_RESOLVED error after clearing your DNS and cache, it’s time to try resetting your firewall settings. If you use a security program, it might be identifying a false threat on the site and blocking access to it.
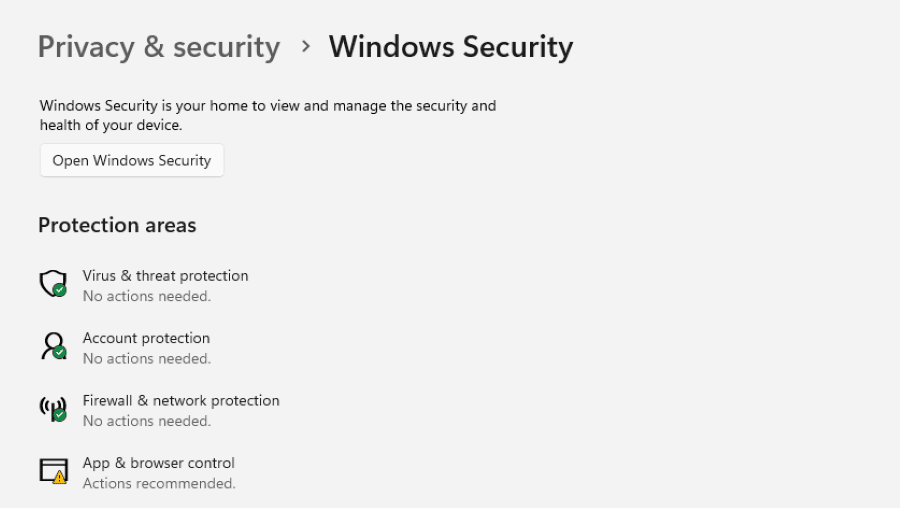
In Windows, open the Settings app and select Privacy & Security. Then, click on Windows Security:

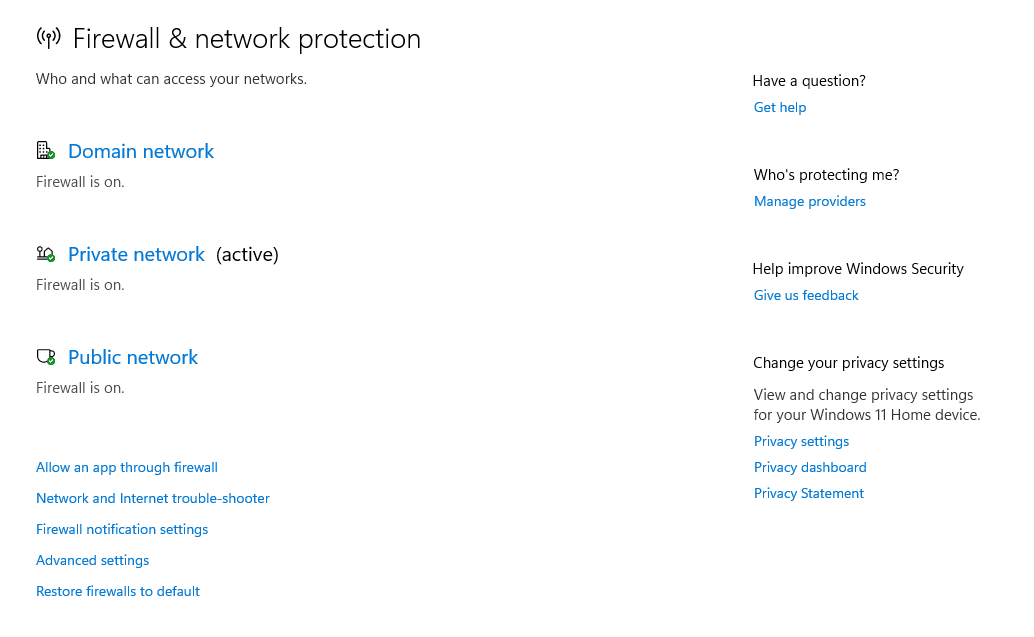
On the next page, select Firewall & network protection:
Then, click on the Restore firewalls to default option at the bottom of the page:
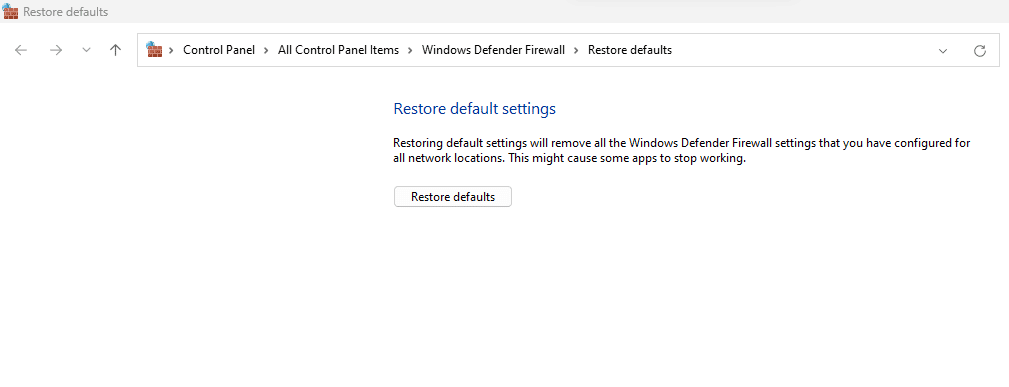
Finally, click on the Restore defaults button:
Now, try accessing the site. If you’re still unsuccessful, proceed to the next step in this troubleshooting guide.
5. Configure the DNS Server on Your Computer
The DNS server may not be working correctly, resulting in the ERR_NAME_NOT_RESOLVED error. To troubleshoot this issue, you’ll need to use a DNS server address from Google’s public servers.
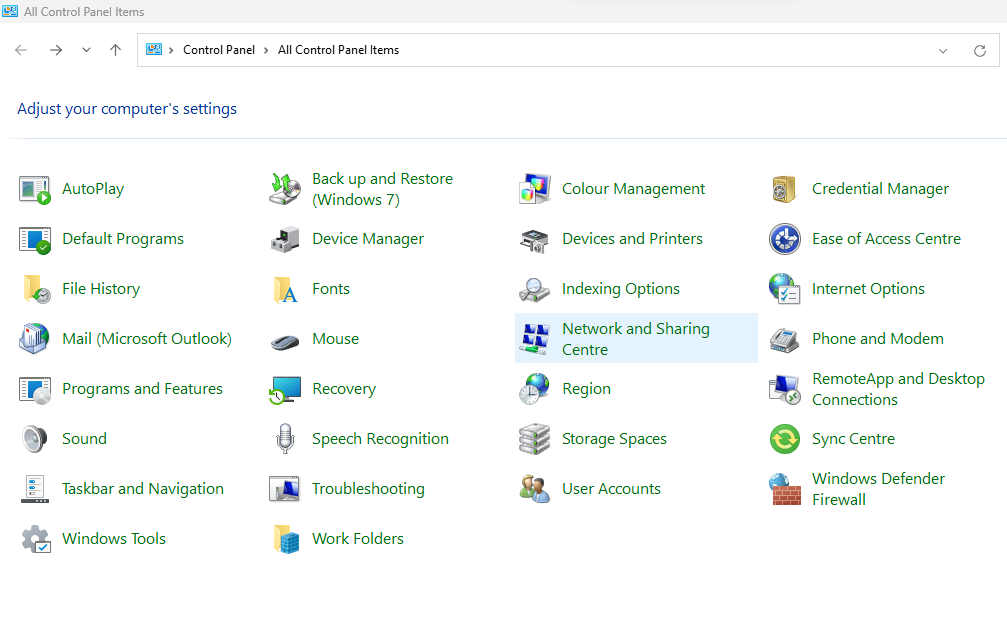
In Windows, open the Control Panel and navigate to Network and Sharing Centre:
On the next page, select Change adapter settings:

Then, find your current network, right-click on it, and select Properties:
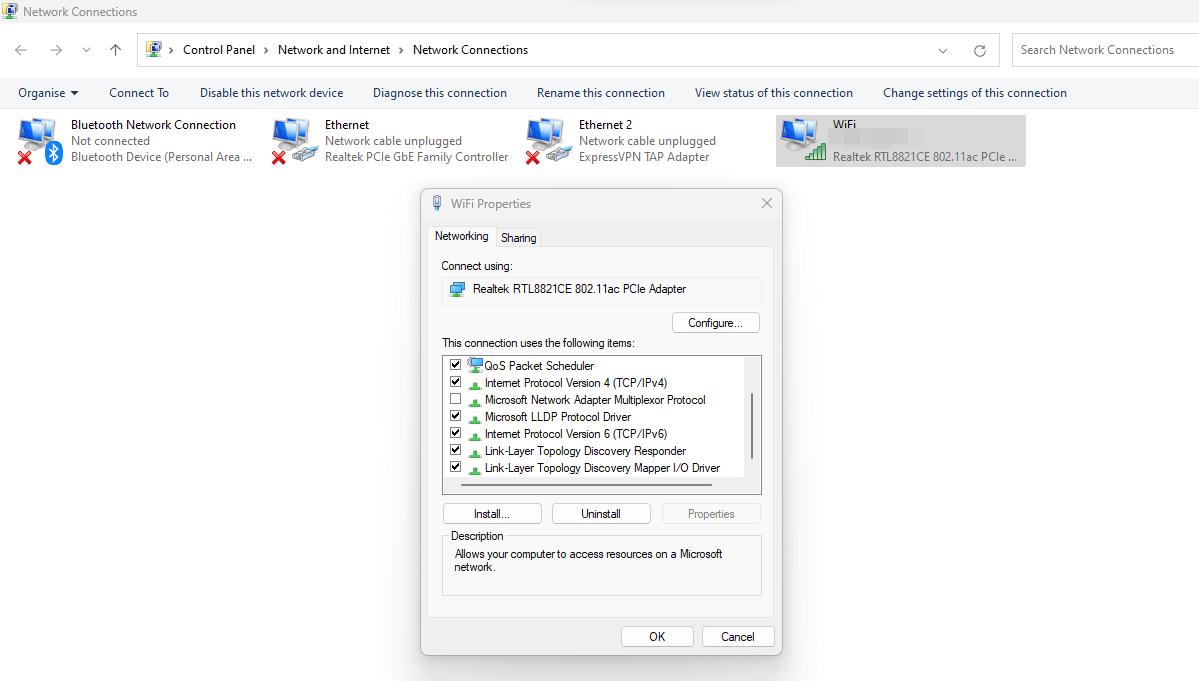
In the Properties window, double-click on Internet Protocol Version 4 (TCP/IPv4) or Internet Protocol Version 6 (TCP/IPv6). In the next popup window, select Use the following DNS server addresses and enter the information for Google’s servers:
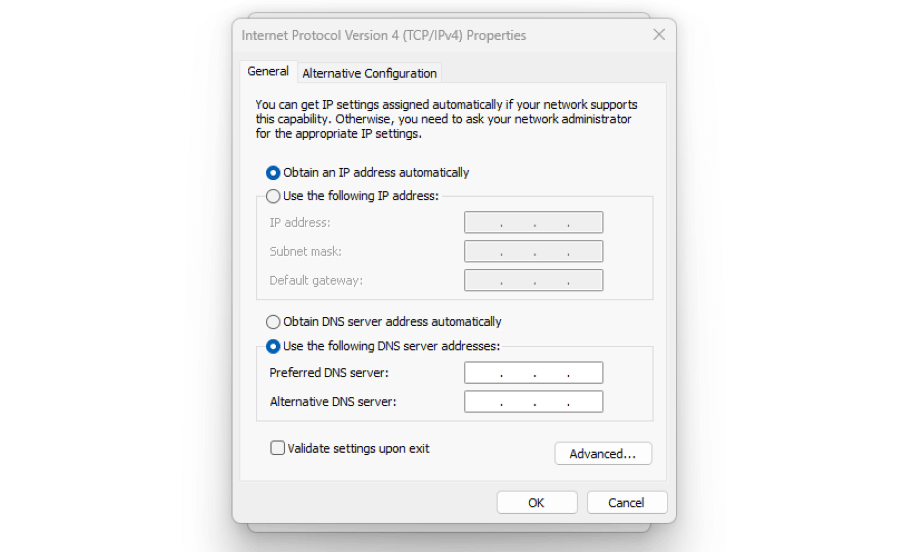
There are the IP addresses of the Google DNS servers:
- For IPv4: 8.8.8.8 and/or 8.8.4.4.
- For IPv6: 2001:4860:4860::8888 and/or 2001:4860:4860::8844.
If you’re using macOS, open System Preferences and select Network. Then, click on Advanced and open the DNS tab.
Click on the + button to add a new DNS server, and enter the addresses of Google’s public DNS servers. When you’re ready, select OK and Apply.
6. Disable DNSSEC for Your Domain
If none of the methods we’ve covered above have resolved the issue, there might be a problem with the site’s DNS records. If the website you’re trying to access is not yours, there isn’t anything you could do.
However, if the website is yours, you can try disabling the DNSSEC for your domain. This is a security extension that protects your DNS records from unauthorized access.
However, if you’ve recently switched to a new web host, the DNSSEC might be preventing the domain from propagating properly.
To check if DNSSEC is enabled for your domain, you can run a WHOIS search:

Simply enter your domain, then look for the DNSSEC field:
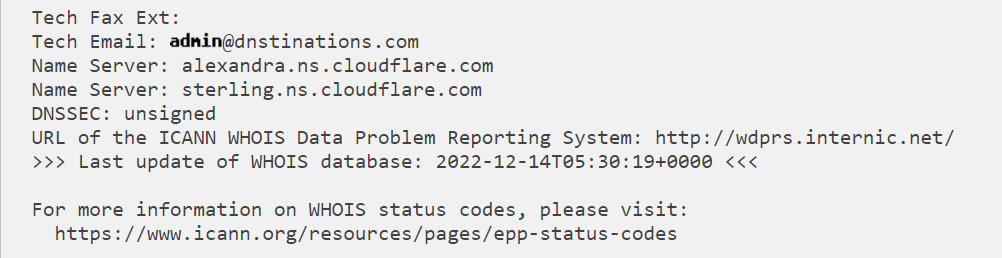
If it says “signed”, then you’ll need to disable it. You should be able to do this from your domain registrar account or your hosting dashboard (if you purchased your domain through your host).
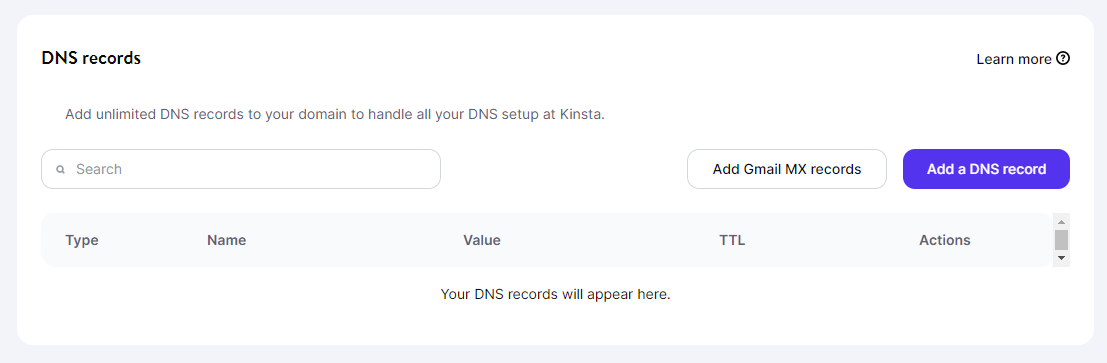
If you’re a Kinsta client, you can access your DNS records from your MyKinsta dashboard. Select the DNS tab, followed by your domain name:
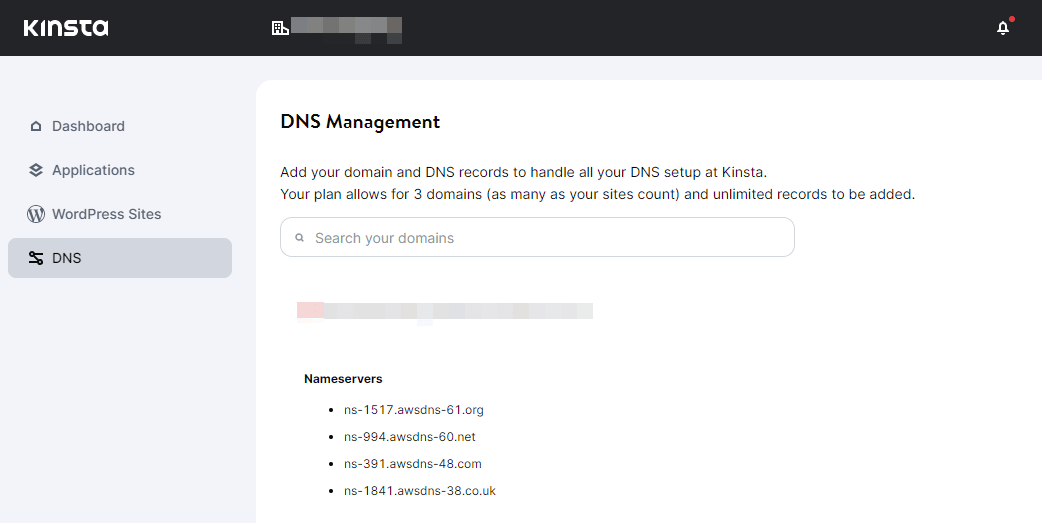
In the DNS records section, check to see if there’s a DNSSEC record. Then, go ahead and delete it:
If you’re unable to access or edit your DNS records, we recommend contacting your hosting provider for assistance.
How To Fix “ERR_NAME_NOT_RESOLVED” on Android
You may also wonder how to resolve the “ERR_NAME_NOT_RESOLVED” error on an Android device.
First, try turning off the preloading pages setting in Chrome, as shown above. Simply click on the three dots in the top-right corner of the screen, select Settings, and follow the instructions outlined in method 3.
If you have an antivirus app on your Android device, you might want to disable it and try accessing the site again. Alternatively, reboot your phone in safe mode. If the error doesn’t appear in this mode, it might have been caused by a recently installed app on your device.
Finally, you could try restoring the Chrome App to the factory version. To do this, navigate to Settings > Apps on your phone. Then, look for the Chrome app, open it, and click on the Disable button.
This will ask you to confirm your selection. Click on Disable app and wait for the process to complete. Then, try reaccessing the site.
What are some other common DNS errors?
ERR_NAME_NOT_RESOLVED is just one of several DNS errors you can encounter. Other common issues include:
- DNS_PROBE_FINISHED_NXDOMAIN
- DNS Server Not Responding
- ERR_NAME_RESOLUTION_FAILED
These DNS problems typically have similar troubleshooting methods. In most cases, you’ll want to start by clearing your browser cache and flushing the DNS cache on your computer.
If the problem is on the server side, consider contacting your hosting provider for help. Provide as much information as you can, and your host should be able to assist you.
Don’t let this frustrating error message drive away potential customers. 🙅♂️ Learn how to fix it- fast- with a little help from this guide ✅Click to Tweet
Summary:
The ERR_NAME_NOT_RESOLVED error occurs when the DNS cannot find a site’s IP address. It is typically caused by outdated data in the cache, a sensitive firewall, or a configuration problem with the DNS server on your computer.
You can try to resolve the issue by testing your internet connection, clearing the DNS cache on your computer, and checking the browser settings. It’s also worth clearing the browser cache and resetting your firewall settings. If the problem is on the server side, consider contacting your host for assistance.
At Kinsta, we offer 24/7 expert support to help you fix WordPress errors and other configuration issues. Get in touch with us today!
The internet gives you access to a seemingly unlimited number of websites of all kinds. All you need in order to access a particular web project is an internet browser and the project’s domain name. You type the domain name into your browser’s address bar to represent the page’s numerical IP address. DNS servers (Domain Name System) handle this automatic translation which is referred to as domain name resolution. If the domain name cannot be resolved, you will inevitably encounter errors, which prevent you from accessing the website. When this happens, the Google Chrome browser will display the error message “ERR_NAME_NOT_RESOLVED”.
In the following sections, you will learn more about what might cause DNS domain name resolution errors. We will also provide you with the best troubleshooting solutions for fixing the Chrome browser error “ERR_NAME_NOT_RESOLVED”.
Contents
- What does the error message “ERR_NAME_NOT_RESOLVED” mean?
- Possible causes for the “ERR_NAME_NOT_RESOLVED” error
- How to fix the ERR_NAME_NOT_RESOLVED error in Chrome
- Solution 1: restart the router
- Solution 2: delete your browsing data
- Solution 3: clear your operating system’s DNS cache
- Solution 4: reset the Winsock catalog
- Solution 5: change the DNS server
- Solution 6: disable Chrome predictions
- Solution 7: temporarily disable security software
- Solution 8: check for malware
$1 Domain Names
Register great TLDs for less than $1 for the first year.
Why wait? Grab your favorite domain name today!
Matching email
SSL certificate
24/7/365 support
What does the error message “ERR_NAME_NOT_RESOLVED” mean?
When you receive the “ERR_NAME_NOT_RESOLVED” error message, Chrome is saying that it could not find the IP address which matches the website domain name you entered. If this has happened, you will not be able to access the page since the IP address is required to establish a connection with the web server. You can encounter this error regardless of whether you are using Chrome on a desktop PC (Windows, macOS or Linux) or on a mobile device (Android or iOS). This error is not exclusive to the Chrome browser; you can also encounter this error on other browsers, such as Firefox or Safari. However, they will display a different error message than Google Chrome if the DNS fails to resolve the domain name when trying to access a website.
Possible causes for the “ERR_NAME_NOT_RESOLVED” error
There are a number of reasons why a DNS domain name resolution might fail. One of the more common reasons is that the DNS server is (temporarily) unavailable. In this situation, if there are no entries for the website you are trying to access in your browser cache or in your operating system’s DNS cache, the DNS will not able to resolve the domain name. The previously mentioned address entries can themselves also be a possible cause for the “ERR_NAME_NOT_RESOLVED” error in Chrome. For example, this error can occur if the browser tries to answer a DNS query using a cached address when the IP address has since been changed.
Other possible causes of this error include router problems, incorrectly configured internet settings, Chrome’s prediction service for faster page loading, malware and faulty security software.
How to fix the ERR_NAME_NOT_RESOLVED error in Chrome
Since there are many different reasons for why you may have encountered a DNS problem, there is no universal solution. However, if you still want to try to tackle the “ERR_NAME_NOT_RESOLVED” error message on your own, we will cover the solutions which have the highest chances of working in the following sections.
Solution 1: restart the router
Before you start fiddling with the settings for Chrome or your operating system, you should first check the router connecting your device to the internet. Even if it looks like the internet connection is fine, there is still a chance that this might not be the case. Therefore, you should restart the network device for a possible quick and easy solution to the “ERR_NAME_NOT_RESOLVED” error. To restart the device, disconnect the power supply for at least 30 seconds by unplugging the power cable. Then, reconnect the router to the power supply.
Note
If you have temporarily disconnected the router from the power supply, it will take a while for it to fully resume operation after you reconnect it. Wait for the internet/DSL light to turn green before testing whether the DNS problem has been fixed by restarting the router.
Solution 2: delete your browsing data
Chrome stores data on all the websites you have visited in the past by default. This cached data helps pages load faster when reloading them and auto-completes addresses as you type. As useful as this function is, it can quickly become a problem and result in the “ERR_NAME_NOT_RESOLVED” error when using Android, Windows, and so on. A possible solution is thus to delete all your browser data. To do this, open the Chrome menu using the three-dot icon and select “More tools”. Then click “Clear browsing data”.

Now, select the types of browser data Chrome should delete from the cache, with “Browser history” and “Cookies and other site data” being a must. You should also make sure that you have selected the “All time” option under “Time range”, otherwise it will only delete your most recent browser history. Once you have made your selection, click “Clear data”.

Solution 3: clear your operating system’s DNS cache
People often only associate cached web addresses with the browser being the user interface for accessing the internet. However, standard operating systems such as Windows, macOS and Linux also have web address books, which automatically cache DNS entries for websites you have accessed in the past. Just like a browser’s cache, the DNS cache can also lead to some errors like the “ERR_NAME_NOT_RESOLVED” error in Chrome when the stored entry for an address is incorrect or out of date. In this situation, the solution is also to clear the cache, which is sometimes referred to as a DNS flush.
On Windows 10, you can perform a DNS flush by typing a single command into the command prompt window. To do this, first open the Start menu. Then, click the “Command Prompt” option. Alternatively, you can also use the search function to find it. Once you have opened the command prompt window, enter the following command to clear the DNS cache:
After a few seconds, you will receive a message stating that the cache has been emptied if it was successful.

You can find more detailed information about the DNS cache and further instructions on how to clear the DNS memory cache on other operating systems in our article on how to flush your computer’s DNS.
Solution 4: reset the Winsock catalog
If neither the browser cache nor the DNS cache was behind the “ERR_NAME_NOT_RESOLVED” problem, Windows users should take a look at the interface and system application Winsock (also known as Windows Sockets). Winsock helps programs communicate using TCP/IP, and to do so, it creates entries for every connection established. Since this data can also prevent a website from being accessed, resetting the Winsock catalog is a possible solution to connection problems in the Chrome browser. Just like the DNS flush, you can perform this reset from the command prompt window. However, this situation requires you to run the command as an administrator as described below:
- Open the Start menu by clicking the Windows icon.
- Look for the “Command Prompt” icon located under “Accessories” or “Windows System”, depending on your operating system version.
- Right-click “Command Prompt” and select “Run as Administrator”.

Once you have opened the Windows command prompt window, enter the following command to reset the Winsock catalog:
Press the Enter key to run the command. Then, restart the system to finish resetting it.
Solution 5: change the DNS server
If the “ERR_NAME_NOT_RESOLVED” error message is displayed in Chrome because the responsible DNS server is not working, there is not much you can do to fix this. However, it is possible to switch to a different DNS server by configuring your DNS address settings to use the IPv4 or IPv6 protocol. For example, Cloudflare’s public DNS servers are a good choice. These are available at the IPv4 addresses 1.1.1.1 and 1.0.0.1 as well as the IPv6 addresses 2606:4700:4700::1111 and 2606:4700:4700::1001.
On Windows, you can enter these DNS servers, which are designed to be fast and secure, as the default option by following the steps below:
- Open the Control Panel through the Start menu.
- Click “Network and Sharing Center” (in the icon view).
- Then click “Change Adapter Settings”.
- Right-click on the network adapter which connects you to the internet and select “Properties”.
- Double-click on “Internet Protocol Version 4 (TCP/IPv4)” or “Internet Protocol Version 6 (TCP/IPv6)”.
- Enter the above-mentioned addresses under “Use the following DNS server addresses” for the preferred and the alternate server.
- Confirm the changes by clicking “OK”.
Tip
The Digital Guide also explains how to change the DNS server on macOS, iOS and Android as well as on older versions of Windows.
Solution 6: disable Chrome predictions
Google Chrome implemented the prediction function to provide faster loading times over the long term. To accomplish this, the function automatically collects information related to any links on the currently open website in order to speed up the load times for those linked pages if you happen to click on one of them. However, this prediction service is known to lead to errors such as the ERR_NAME_NOT_RESOLVED error, so disabling this function in Chrome may solve your DNS problem.
To turn off the prediction function, first open the Chrome menu by clicking the three-dot icon. Then select “Settings”. On the following menu, scroll all the way down the page and click “Show advanced settings”. Under “Privacy and security”, move the slider to the left for the option “Preload pages for faster browsing and searching”.

Solution 7: temporarily disable security software
Any security software you may have installed can also cause the Chrome “ERR_NAME_NOT_RESOLVED” error on Android, Windows and so on. For example, antivirus software or a firewall can prevent access to certain websites, which would result in the browser responding with the error message. You can easily check whether the applications you are using are causing problems like this by temporarily disabling them. If the domain name can then be resolved, you will know that that was the source of the error. If this is the case, you can either contact the faulty software’s publisher or replace it with a suitable alternative.
Solution 8: check for malware
As is the case with many computer issues, malicious software on your system may be the cause of the “ERR_NAME_NOT_RESOLVED” error. For example, malware can change your DNS server configurations, alter your browser history or prevent the domain name from being resolved in some other way. It is therefore important to check your system for a possible malware infection if the solutions described above do not work. Use either your security software or Microsoft’s Malicious Software Removal Tool (MSRT) to perform a scan. It should be noted that the MSRT is only available for Windows users and can only be used with administrator rights.
Related articles

How to Fix Windows Error 0x80004005
The big problem with many Windows error messages is that users hardly ever understand them. For instance, messages with the code “0x80004005” indicate an “unspecified” error. Since these kinds of errors can occur in all sorts of scenarios, we present a range of solution strategies that can prove helpful.
How to Fix Windows Error 0x80004005
INET_E_RESOURCE_NOT_FOUND: How to fix the Microsoft Edge error
Via the Windows Update feature, Microsoft provides users with the latest features and fixes for Windows or installs Microsoft services and apps. Since the Creators Update V1703, some users have been receiving the message “INET_E_RESOURCE_NOT_FOUND” when they try to access the Microsoft Edge browser. But what exactly does this error mean and how can it be rectified?
INET_E_RESOURCE_NOT_FOUND: How to fix the Microsoft Edge error

ERR_CONNECTION_CLOSED: How to fix the connection error
If Chrome displays the message «ERR_CONNECTION_CLOSED» instead of the website you want to access, it means that the contacted server has interrupted the connection. Reloading the URL is often not enough to fix the problem. Unfortunately, determining the source of the error is anything but a simple task. To fix the «ERR_CONNECTION_CLOSED» error, you need a good amount of patience.
ERR_CONNECTION_CLOSED: How to fix the connection error
How to fix the ERR_CONNECTION_RESET 101 error in Chrome, etc.
The message “ERR_CONNECTION_RESET” reveals that the connection has not been carried out as usual, or that is has been reset. However, the reason for these issues and possible solutions are not given. We explain why the error occurs, why it happens particularly frequently in Google Chrome and how to fix ERR_CONNECTION_RESET.
How to fix the ERR_CONNECTION_RESET 101 error in Chrome, etc.
Correcting the error “Err_Connection_Timed_Out”
The error message “Err_Connection_Timed_Out” appears frequently on Google Chrome and means that an error has occurred when trying to access a webpage. This is usually caused by the target server taking too long to send a reply, which results in the browser terminating the communication attempt. Find out in our guide what “Err_Connection_Timed_Out” means, what measures you can take to correct the…
Correcting the error “Err_Connection_Timed_Out”
If you’re facing the issue of Resolving Host Error In Google Chrome causing the websites to load slowly or DNS server not found then don’t worry as in this guide we will talk about several fixes that will resolve the issue.
If you’re not able to open a website or the website is loading very slowly in Google Chrome then if you look closely you will see the “Resolving Host” message in the status bar of the browser which is the root cause of the issue. This issue is experienced by most of the users but they don’t actually know the reason behind this and they simply ignore the message until they are not able to open the website. Not only Google Chrome but all the other browsers are also affected by this problem such as Firefox, Safari, Edge, etc.

Note: This message may vary from browser to browser like in Chrome it shows “Resolving host”, in Firefox it shows “Looking up”, etc.
Table of Contents
1
Why Did Resolving Host happen on Chrome?
To open any website the first thing you do is enter the URL of the website in the browsers address bar and hit Enter. And if you think this is really how the website opens then you are wrong my friend as in reality there is a complex process involved to open any website. In order to open any website, the URL which you enter is first converted into the IP address so that the computers can understand it. The resolution of the URL into an IP address happens through Domain Name System (DNS).
When you enter any URL, it goes to a multilevel hierarchy of DNS and as soon as the correct IP address is found for the entered URL, it is sent back to the browser and as a result, the webpage is displayed. The reason for resolving the host issue can be your Internet Service Provider (ISP) as the DNS servers configured by them is taking a long time to find a mapping IP address for the entered URL. Other reasons for the issues are a change in ISP or change in the DNS settings. Another reason is the stored DNS cache may also cause a delay in finding the correct IP address.
Below are given several methods using which you can fix Resolving host error in Chrome:
Method 1: Disable DNS Prediction or Prefetching
Chrome Prefetch option allows web pages to load quickly and this feature works by storing the IP addresses of the web pages visited or searched by you in the cache memory. And now whenever you try to visit the same URL, then instead of searching for it again, the browser will directly search for the IP address of the entered URL from the cache memory improving the loading speed of the website. But this option can also cause the Resolving host issue on Chrome, so you need to disable the prefetch feature by following the below steps:
1.Open Google Chrome.
2.Now click on the three dots icon available at the top right corner and select Settings.
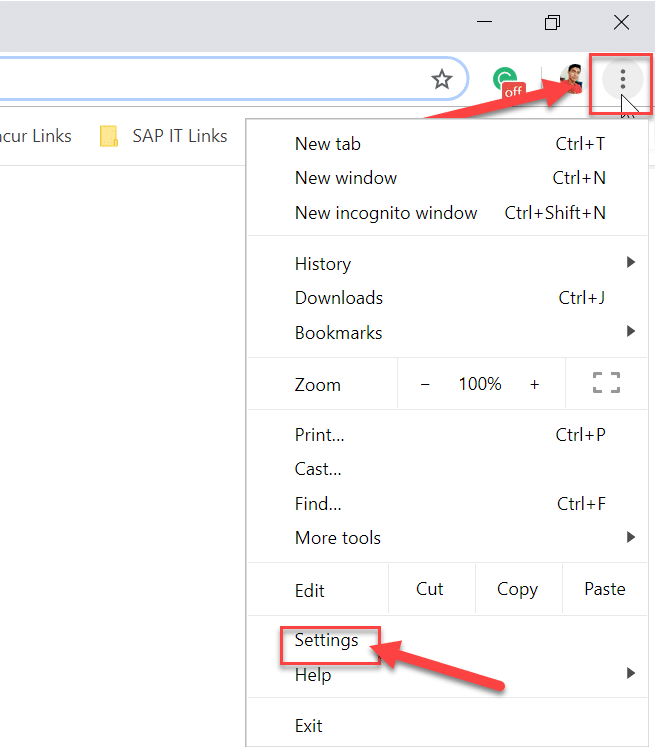
3.Scroll down to the bottom of the window and click on Advanced option.

4.Now under the Privacy and security section, toggle OFF the button next to the option “Use a prediction service to load pages more quickly“.

After completing the above steps, the Prefetch resources option will be disabled and now you will be able to visit the webpage earlier showing Resolving Host error.
Method 2: Use Google DNS Server
Sometimes the default DNS server provided by the ISP can cause the error in Chrome or sometimes the default DNS isn’t reliable, in such cases, you can easily change DNS servers on Windows 10. It is recommended to use Google Public DNS as they are reliable and can fix any issues related to DNS on your computer.

Method 3: Clear DNS Cache
1.Open Google Chrome and then go to Incognito Mode by pressing Ctrl+Shift+N.
2.Now type the following in the address bar and hit Enter:
chrome://net-internals/#dns
3.Next, click Clear host cache and restart your browser.

Recommended: 10 Ways To Fix Slow Page Loading In Google Chrome
Method 4: Flush DNS & Reset TCP/IP
1.Right-click on Windows Button and select “Command Prompt(Admin).“

2.Now type the following command and press Enter after each one:
ipconfig /release
ipconfig /flushdns
ipconfig /renew

3.Again open elevated Command Prompt and type the following and hit enter after each one:
ipconfig /flushdns
nbtstat –r
netsh int ip reset
netsh winsock reset

4.Reboot to apply changes. Flushing DNS seems to Fix Resolving Host Error In Google Chrome.
Method 5: Disable VPN & Proxy
If you’re using a VPN to unblock the blocked sites in schools, colleges, business places, etc then it can also cause the Resolving Host problem in Chrome. When the VPN is activated, the user’s real IP address is blocked and instead some anonymous IP address is assigned which can create confusion for the network and it can block you from accessing the webpages.
Since the IP address assigned by the VPN can be used by a large number of users which can lead to Resolving Host issue on Chrome, it is advised to temporarily disable VPN software and check if you’re able to access the website or not.

If you have VPN software installed on your system or browser then remove you can remove them by following the below steps:
- Generally, if a VPN is installed on your browser, its icon will be available at the Chrome address bar.
- Right-click the VPN icon then select the “Remove from Chrome” option from the menu.
- Also, if you have a VPN installed on your system then from the notification area right-click on the VPN software icon.
- Click on the Disconnect option.
After performing the above steps, the VPN will either be removed or temporarily disconnected and now you can try to check if you’re able to visit the webpage which earlier was showing the error. If you’re still facing the issue then you also need to disable Proxy on Windows 10 by following the below steps:
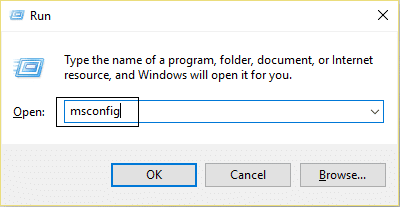
1.Press Windows Key + R then type msconfig and click OK.
2.Select boot tab and check Safe Boot. Then click Apply and OK.

3.Restart your PC and once restarted again press Windows Key + R then type inetcpl.cpl.

4.Hit Ok to open internet properties and from there select Connections.
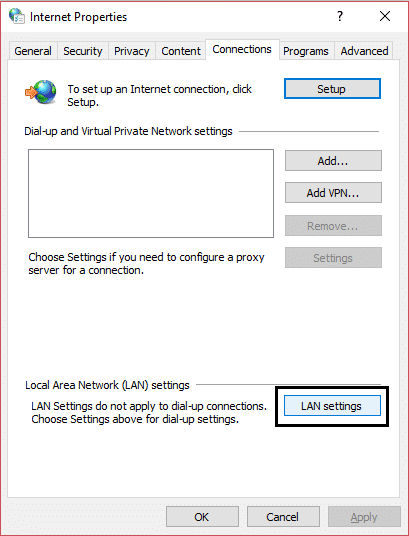
5.Uncheck “Use a proxy server for your LAN“. Then click OK.

6.Again open MSConfig window and uncheck Safe boot option then click apply and OK.
7.Restart your PC and you may be able to Fix Resolving Host Error In Google Chrome.
Method 6: Clear Browsing Data
As you browse anything using Chrome, it saves the URLs you have searched, download history cookies, other websites, and plugins. The purpose of doing so is to increase the speed of the search result by searching first in the cache memory or your hard drive and then go to the website to download it if not found in the cache memory or the hard drive. But, sometimes this cache memory becomes too large and it ends up slowing down the page loading giving Resolving Host error in Chrome. So, by clearing the browsing data, your problem may be resolved.
To clear the entire browsing history, follow the below steps:
1.Open Google Chrome and press Ctrl + H to open history.
2.Next, click Clear browsing data from the left panel.

3.Now you need to decide the period for which you are deleting the history date. If you want to delete from the beginning you need to choose the option to delete browsing history from the beginning.

Note: You can also select several other options such as Last hour, Last 24 hours, Last 7 days, etc.
4.Also, checkmark the following:
- Browsing history
- Cookies and other site data
- Cached images and files

5.Now click Clear data to start deleting the browsing history and wait for it to finish.
6.Close your browser and restart your PC.
Method 7: Modifying Hosts Profile
A ‘hosts’ file is a plain text file, which maps hostnames to IP addresses. A host file helps in addressing network nodes in a computer network. If the website which you are trying to visit but unable to due to the Resolving Host Error is added in the hosts file then you to remove the particular website and save the hosts file to fix the issue. Editing the hosts file is not simple, and therefore it is advised that you go through this guide. To modify the host’s file follow the below step:
1.Press Windows Key + Q then type Notepad and right-click on it to select Run as administrator.

2.Now click File then select Open and browse to the following location:
C:WindowsSystem32driversetc

3.Next, from the file type select All Files.
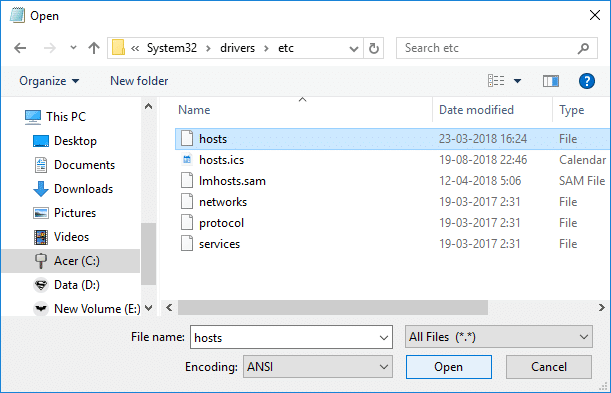
4.Then select hosts file and click open.
5.Delete everything after the last # sign.

6.Click File>save then close notepad and restart your PC.
After completing the above steps, your host’s file will be modified and now try to run the website, it may load perfectly now.
But if you’re still not able to open the website then you can control the resolution of the domain name to the IP address using the host file. And the resolution of the host file takes place before the DNS resolution. So you can easily add the IP address and it’s corresponding domain name or the URL in the host file to fix the Resolving Host error in Chrome. Thus whenever you visit the particular website, the IP address will get resolved from the hosts file directly and the resolution process will be much faster for the sites you visit frequently. The only downside of this method is that it is not possible to maintain the IP addresses of all the websites you visit in the hosts file.
1.Type Notepad in Start Menu search bar and then right-click on it and select Run as administrator.
2.Now click File from notepad menu then select Open and browse to the following location:
C:WindowsSystem32driversetc
3.Next, from the file type select All Files then select hosts file and click open.
4.The hosts file will open, now add the required IP address & its domain name (URL) in the hosts file.
Example: 17.178.96.59 www.apple.com

5.Save the file by pressing the Ctrl + S button on your keyboard.
After completing the above steps, your hosts file will be modified and now you can again try to open the website and this time it may load without any issues.
Method 8: Disable IPv6
1.Right click on the WiFi icon on the system tray then click on “Open Network and Internet Settings“.
![]()
2.Now scroll down in the Status window and click on Network and Sharing Center.
3.Next, click on your current connection in order to open its Properties window.
Note: If you can’t connect to your network then use Ethernet cable to connect and then follow this step.
4.Click on the Properties button in the Wi-Fi Status window.

5.Make sure to uncheck Internet Protocol Version 6 (TCP/IPv6).

6.Click OK then click Close. Reboot your PC to save changes.
Method 9: IP Address Conflict
Even though it is not something occurs frequently, still, IP address conflicts are extremely real problems and troubles a lot of users. Conflicting of IP address happens when 2 or more systems, connection end-points or hand-held devices in the same network wind up being allocated the same IP address. These endpoints can be either PCs, mobile devices, or other network entities. When this IP conflict occurs between 2 endpoints, it causes trouble to use the internet or connect to the internet.

If you are facing the error Windows has detected an IP address conflict on your computer then this means another device on the same network has the same IP address as your PC. The main issue seems to be the connection between your computer and the router, so try to restart the modem or router and the problem may get resolved.
Method 10: Contact Your Internet Service Provider
If none of the above methods work then the last option is to contact your Internet Service Provider (ISP) and discuss the issue with them. You also need to provide them with all the URLs of the websites that you’re trying to access but unable to because of the Resolving Host Error in Chrome. Your ISP will check the issue on their end and will either fix the problem or let you know that they are blocking these websites.
Recommended:
- Always Show Scrollbars in Windows 10 Store Apps
- 8 Ways to Fix Laptop Touchpad Not Working
So, hopefully by using any of the above-explained solutions you could able to fix your Resolving host issue in Google Chrome.
I tried running the move again.. it failed after a few successful moves. Here are the last two with -d option.
s3cmd cp -v -d —recursive s3://[domain].com-host2-backup/cpbackup/ s3://[domain].com-host2-backup/dailys/`date +%A`/
----------------------
DEBUG: signature-v4 headers: {'x-amz-content-sha256': u'[snip]', 'content-type': 'application/xml', 'Authorization': u'[snip]/20171019/us-west-2/s3/aws4_request,SignedHeaders=content-type;host;x-amz-content-sha256;x-amz-date,Signature=[snip]', 'x-amz-date': '20171019T154956Z'}
DEBUG: Processing request, please wait...
DEBUG: get_hostname([domain].com-host2-backup): [domain].com-host2-backup.s3.amazonaws.com
DEBUG: ConnMan.get(): re-using connection: https://[domain].com-host2-backup.s3.amazonaws.com#68
DEBUG: format_uri(): /dailys/Thursday/2017-10-13/accounts/[accntname].tar.gza?acl
DEBUG: Sending request method_string='PUT', uri=u'/dailys/Thursday/2017-10-13/accounts/[accntname].tar.gza?acl', headers={'x-amz-content-sha256': u'[snip]', 'content-type': 'application/xml', 'Authorization': u'[snip]/20171019/us-west-2/s3/aws4_request,SignedHeaders=content-type;host;x-amz-content-sha256;x-amz-date,Signature=[snip]', 'x-amz-date': '20171019T154956Z'}, body=(441 bytes)
DEBUG: ConnMan.put(): connection put back to pool (https://[domain].com-host2-backup.s3.amazonaws.com#69)
DEBUG: Response:
{'data': '',
 'headers': {'connection': 'close',
             'content-length': '0',
             'date': 'Thu, 19 Oct 2017 15:49:57 GMT',
             'server': 'AmazonS3',
             'x-amz-id-2': 'M328Z/[snip]=',
             'x-amz-request-id': '[snip]'},
 'reason': 'OK',
 'status': 200}
remote copy: 's3://[domain].com-host2-backup/cpbackup/2017-10-13/accounts/[accntname].tar.gza' -> 's3://[domain].com-host2-backup/dailys/Thursday/2017-10-13/accounts/[accntname].tar.gza'
DEBUG: CreateRequest: resource[uri]=/cpbackup/2017-10-13/accounts/[accntname].tar.gzb
DEBUG: Using signature v4
DEBUG: get_hostname([domain].com-host2-backup): [domain].com-host2-backup.s3.amazonaws.com
DEBUG: canonical_headers = host:[domain].com-host2-backup.s3.amazonaws.com
x-amz-content-sha256:[snip]
x-amz-date:20171019T154956Z

DEBUG: Canonical Request:
GET
/cpbackup/2017-10-13/accounts/[accntname].tar.gzb
acl=
host:[domain].com-host2-backup.s3.amazonaws.com
x-amz-content-sha256:[snip]
x-amz-date:20171019T154956Z

host;x-amz-content-sha256;x-amz-date
[snip]
----------------------
DEBUG: signature-v4 headers: {'x-amz-content-sha256': u'[snip]', 'Authorization': u'AWS4-HMAC-SHA256 Credential=[snip]/20171019/us-west-2/s3/aws4_request,SignedHeaders=host;x-amz-content-sha256;x-amz-date,Signature=[snip]', 'x-amz-date': '20171019T154956Z'}
DEBUG: Processing request, please wait...
DEBUG: get_hostname([domain].com-host2-backup): [domain].com-host2-backup.s3.amazonaws.com
DEBUG: ConnMan.get(): re-using connection: https://[domain].com-host2-backup.s3.amazonaws.com#69
DEBUG: format_uri(): /cpbackup/2017-10-13/accounts/[accntname].tar.gzb?acl
DEBUG: Sending request method_string='GET', uri=u'/cpbackup/2017-10-13/accounts/[accntname].tar.gzb?acl', headers={'x-amz-content-sha256': u'[snip]', 'Authorization': u'AWS4-HMAC-SHA256 Credential=[snip]/20171019/us-west-2/s3/aws4_request,SignedHeaders=host;x-amz-content-sha256;x-amz-date,Signature=[snip]', 'x-amz-date': '20171019T154956Z'}, body=(0 bytes)
DEBUG: Response:
{}
ERROR: [Errno -2] Name or service not known
ERROR: Connection Error: Error resolving a server hostname.
Please check the servers address specified in 'host_base', 'host_bucket', 'cloudfront_host', 'website_endpoint'
interesting that the last request says zero bytes.. Wonder if that is a clue. Not sure what exactly is zero bytes..
I will try the dig..
Thanks!
DNS errors such as temporary failure in name resolution can easily cripple your server. You will not be able to install any yum packages, you will even not be able to ping google.com, because as you can see this is a name resolution error, which means your server can not resolve domain names to their respective IP Addresses (if you know about DNS, you will know that this is something the whole internet relies on).
In this article we will see how to resolve temporary failure in name resolution error, we will discuss various reasons and their respective solutions.
Missing DNS Server IPs
Every server needs IP of DNS servers to which they can send their DNS queries. So if IPs of DNS servers are not configured then your server doesn’t know how to resolve domain names to IP Address thus you will end up getting temporary failure in name resolution.
In UNIX based system (Linux servers). DNS servers are usually configured in a file called /etc/resolv.conf. So if you don’t have this file or it is empty then you can not resolve domain names, make sure to create one and put the following contents in it:
nameserver 1.1.1.1
nameserver 8.8.8.8
Network Manager
Recently most of the Linux based servers are shipped with NetworkManager. NetworkManager help your connect your server automatically to the internet, for this task network manager auto-generates some configuration files. NetworkManager reads your interface file (eth0 or ifcfg) and then auto-generates /etc/resolv.conf file.
Now if you have not defined DNS servers in your /etc/sysconfig/network-scripts file, then /etc/resolv.conf will remain empty, thus you end up getting temporary failure in name resolution error. You can also fix this issue by just populating /etc/resolv.conf file as described above.
Also, make sure that in your /etc/sysconfig/network-scripts file set NM_CONTROLLED=no. So that NetworkManager will not update your /etc/resolv.conf file again.
Having issues installing packages on Ubuntu
You might see something like
Err:1 http://security.ubuntu.com/ubuntu xenial-security InRelease
Temporary failure resolving ‘security.ubuntu.com’
Err:2 http://dl.google.com/linux/mod-pagespeed/deb stable InRelease
Temporary failure resolving ‘dl.google.com’
Err:3 http://mirrors.digitalocean.com/ubuntu xenial InRelease
Temporary failure resolving ‘mirrors.digitalocean.com’
Err:4 http://mirrors.digitalocean.com/ubuntu xenial-updates InRelease
Temporary failure resolving ‘mirrors.digitalocean.com’
Err:5 http://mirrors.digitalocean.com/ubuntu xenial-backports InRelease
Temporary failure resolving ‘mirrors.digitalocean.com’
Err:6 https://repos.sonar.digitalocean.com/apt main InRelease
Could not resolve host: repos.sonar.digitalocean.com
This is an example of temporary failure in name resolution error, as apt can not resolve these mentioned domains to their IP Address. Make sure to allow these ports in UFW using the command below :
sudo ufw allow out 53,113,123/udp
Restrictions in your Firewall
There might also be a firewall restriction preventing your DNS queries. That is why we always recommend installing CyberPanel for free, CyberPanel will open all default ports for you, it will also help you run a super-fast website. Install CyberPanel for free using the install guide. You can also learn how CyberPanel will help you run the super fast website by reading our OpenLiteSpeed vs NGINX article.
Let see if this is actually a firewall error by stopping the firewall.
Firewalld
systemctl stop firewalld
Or CSF
csf -f
Now test and see if your issue is resolved if so, it means that your firewall is preventing your DNS queries.
Fix for Firewalld
You can add port 53 (UDP) and 43 (whois) to your firewalld. Following commands can be used
firewall-cmd — permanent — add-port=56/udp
firewall-cmd — permanent — add-port=43/tcp
This will open DNS related ports in FirewallD. If you are using CyberPanel you can easily go to CyberPanel firewalld interface and add these ports without going to CLI.
Go to -> https://<IP Address>:8090/firewall/
There you can easily open these two ports.
Fix for CSF
Open file /etc/CSF/csf.conf, then find the line containing TCP_IN and TCP_OUT then add your desired ports. Once your desired ports are added simply restart CSF so that your changes can take effect
csf -r
To remove any ports, you can just remove those ports from same lines and restart CSF.
Again if you are using CyberPanel and you have installed CSF (this will disable Firewalld interface). You can easily go to -> https://<IP Address>:8090/firewall/csf
From there you can add your ports and CyberPanel will take care of everything.
Wrong permissions on /etc/resolv.conf file
In some rare cases it is possible that your resolver file have wrong owner or permissions, execute following commands to implement correct permissions
chown root:root /etc/resolv.conf
chmod 644 /etc/resolv.conf
This should fix any permissions related issues with the resolver file.
Conclusions
I hope by now you have a general idea of what actually is a temporary failure in name resolution error because to fix any error we first need to know what actually it is. Then we’ve also discussed various ways to fix this error in different situations.
If you are a system administrator, then the first rule to solving any problem is stay calm and debug the problem. However, if you don’t have much time and looking for experts to manage your server, you are in the right place, you can hire our managed vps service. We offer 3 days free trial (no credit card required).