
Что делать если пропал CDS Information
Ошибка отсутствия CDS Information связана со сбоем в системной памяти и утерей номера IMEI. Ошибка распространена на смартфонах с операционной системой Android. При этой ошибке телефон перестает распознавать сим-карту. Справиться с возникшей проблемой можно несколькими способами.
Что означает эта ошибка
Телефон с возникшей ошибкой не распознает сеть, не может обнаружить сим-карты в слотах. Использование смартфона в этом случае, фактически, невозможно. Пользователь сможет выполнять базовые операции на устройстве (подключаться к Wi-Fi, делать фото и видео, запускать программы и т.д.). Совершать звонки, отправлять СМС-сообщения будет невозможно.
В каких случаях появляется проблема
Потеря номера IMEI становится последствием различных действий:
- На телефон установлена прошивка кустарного производства;
- Был произведен hard reset (полная перезагрузка) с ошибками;
- Неудачный откат к заводским настройкам с частичной или полной потерей заводских данных.
При запросе IMEI через USSD-команду *#06#, приходит ответ с сообщением о неверном коде.

Как восстановить IMEI?
Восстановление проводится либо через возможности самого смартфона, либо с использованием дополнительного программного обеспечения. Перечисленные способы подходят для большинства смартфонов китайского производства с операционной системой Android. Если один из способов не принес результата, нужно попробовать следующий. В большинстве случаев IMEI восстанавливается после применения первого способа.
Ручное восстановление с помощью инженерного меню
Инженерное меню – особый раздел телефона, дающий доступ к заводскому программному обеспечению и памяти. Меню позволяет администрировать устройство на уровне заводских настроек. На многих китайских телефонах доступ к этому меню предоставляется сразу. С помощью инженерного меню и нескольких команд номер IMEI прописывается в память телефона.
Найти этот код можно на корпусе телефона или коробке от него. Если в смартфон предусмотрена установка 2х сим-карт, при вводе команд необходимо учитывать это.
Вход в инженерное меню осуществляется с помощью разных команд для смартфонов от разных производителей:
Перед применением способа необходимо удалить сим и флеш-карты из телефона:
- Перейти в меню набора номера, набрать команду *#3646633#. Если эта команда не сработает, следует попробовать другую: *#*#3646633#*#*.
- Пользователя автоматически направит в инженерное меню. Здесь необходимо перейти в раздел «CDS Informatiop»
- Выбрать пункт Radio Information, затем Phone1.
- Поместить курсор в область для ввода после надписи АТ+.
- Ввести команду: EGMR=1,7,«номер IMEI».
- Нажать кнопку «SEND AT COMMAND».
- Выйти из меню и перезагрузить смартфон.
- После полного включения ввести USSD-команду *#06#, должен отобразиться IMEI код.


Если у телефона 2 сим-карты, команда изменяется. В инженерном меню вводится команда AT+EGMR=1,10,«номер IMEI».
В некоторых случаях ввод команды в инженерном меню провоцирует ошибку: «This command is not allowed in this user build». Это значит, на данном устройстве нужно изменить команду, поставив пробел между AT+ и EGMR.
Если код IMEI появился в памяти телефона, необходимо вставить сим-карты на место. После этого можно пользоваться устройством в привычном режиме.
На некоторых телефонах инженерное меню имеет другой внешний вид. Команды и последовательность действий в этом случае отличаются:
- Войти в инженерное меню с помощью одной из команд из первого способа;
- Перейти в раздел «Telephony»;
- Найти и нажать на подраздел «GPRS»;
- Войти в меню сим-карты (если их несколько, то провести действие для каждой);
- В поле IMEI ввести номер и нажать на кнопку «Write IMEI»;
- Перезагрузить телефон, проверить код USSD-командой.
Если ни один из перечисленных способов не сработал, можно воспользоваться специальным программным обеспечением для восстановления IMEI.
Восстановление с помощью программ
При использовании программного обеспечения понадобятся права Root.
При смене прошивке на телефоне часто теряется архив, где содержится номер IMEI. Программа позволяет считать и ввести номер IMEI:
- Скачать архив с дистрибутивом;
- Распаковать файл;
- Выключить телефон, удалить сим-карту;
- Установить приложение на смартфон;
- Программа выдаст основную информацию о телефоне и версии операционной системы, а также считает IMEI;
- Если последнего действия не произошло, нужно запустить поиск номера вручную;
- Снять галочку с пункта «Одинаковые IMEI»;
- Ввести нужную комбинацию;
- Перезагрузить устройство.

Новые настройки вступят в силу после включения телефона.
Приложение для восстановления IMEI. Дополнительно понадобится программа Root Browser. Пользоваться ADB RUN нужно так:
- Установить программу;
- Войти в меню по пути Manual Command -> Restore Imei;
- Выбрать тип устройства с 1 или 2мя сим-картами;
- Ввести комбинацию IMEI;
- Найти на рабочем столе файл под названием MP0B_001;
- Через приложение Root Browser переместить это файл по адресу /data/nvram/md/NVRAM/NVD_IMEI/MP0B_001 или /nvram/md/NVRAM/NVD_IMEI/MP0B_001;
- Перезагрузить телефон, проверить работоспособность IMEI.

Chamelephon
Скачать и установить приложение можно бесплатно на сервисе GooglePlay. После установки:
- Запустить программу;
- Ввести номер IMEI (можно также сгенерировать новые);
- Перезагрузить телефон.

IMEI&SN Write
Данная программа не требует установки прав Root на телефоне. Необходимо подключить устройство к компьютеру или ноутбуку. Программа IMEI&SN Write устанавливается на ПК. Потребуется также установить драйвера от телефон на компьютер:
- Запустить программу IMEI&SN Write;
- В поле «PlatForm» ввести комбинацию «Smart Phone»;
- Выбрать пункт USB;
- Заполнить комбинации IMEI 1/2, коды должны совпадать;
- Нажать кнопку «SelectDB»;
- В открывшемся окне нажать на файлы системной части, они начинаются с буквенных аббревиатур BPLGU;
- Выбрать файлы процессорной части, начинаются с аббревиатуры APDB;
- Программа направит пользователя в главное меню, где нужно нажать кнопку «Start»;
- Важно, чтобы смартфон был подключен к компьютеру в течение работы программы;
- Когда действия утилиты завершатся, можно отсоединить устройство и перезагрузить его.

Если все действия проведены верно, номер IMEI станет доступен в памяти телефона.
Hyperterminal
Восстановление IMEI этим способом возможно, если владелец предварительно сохранил комбинацию в эмуляторе терминала для Android. Существует несколько версий для смартфонов, бесплатно скачать их можно в GooglePlay. После переустановки прошивки, в случае потери IMEI, необходимо провести следующие действия:
- Ввести команду «su», согласиться с получением прав Root;
- Прописать команду: echo ‘AT+EGMR=1,7,«номер IMEI_1» ‘ > /dev/pttycmd1, если на телефоне предусмотрена 1 сим-карта;
- Команда echo ‘AT+EGMR=1,7,«номер IMEI_2» ‘ > /dev/pttycmd1, если в телефоне 2 слота под сим-карты.
Один из перечисленных способов поможет восстановить IMEI, устранить ошибки эксплуатации смартфона. В случаях, когда узнать код не представляется возможным, доступна генерация нового номера через приложения или программы.
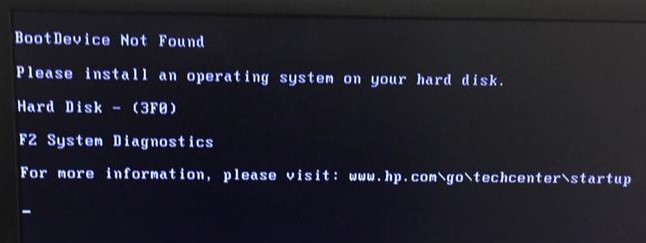
Иногда при включении ноутбука или ПК вы можете увидеть сообщение об ошибке «Boot Device Not Found. Please install an operating system on your hard disk, Hard Disk (3f0)» и будет предложено нажать F2 для диагностики системы. Дело в том, что когда вы устанавливаете систему Windows на диск HDD или SSD, то диск становится главным загрузочным устройством. Когда ноутбук или ПК загружается, то BIOS или UEFI ищет установленную систему Windows на этом главном загрузочном диске, и когда не находит ни одного устройства, с которого он может загрузиться, выдает ошибку, что загрузочное устройство не может быть найдено (Boot Device Not Found). Давайте разберем, что делать и как исправить эту ошибку?
1. Проверьте соединение с загрузочным диском
Если вы используете ПК, то его нужно разобрать и посмотреть провода SATA. Отключите для начало ПК от сети 220 и потом снимите крышку на самом ПК. Далее посмотрите внимательно все провода, которые идут от материнской платы до HDD или SSD. При возможно высуньте провода, продуйте фишки, и вставьте обратно. Если вы используете ноутбук, то нужны навыки, которые помогут вам открыть его и проверить наличие слабого соединения. Если нет таких навыков, то отнесите его в сервисный центр.
2. Изменить порядок загрузки
Если у вас всунута USB флешка в ПК или ноутбук, то попробуйте её извлечь и загрузиться. Если не помогло, то скорее всего, у вас стоит первым загрузочным устройством не диск на котором установлена ОС Windows. Давайте зайдем в BIOS и первом, какое загрузочное устройство стоит на первом месте.
При загрузке ПК или ноутбука нажмите DEL или F2, чтобы попасть в настройки BIOS. Далее перейдите в параметр Boot и выставьте HDD, где установлена сама система Windows, на первое место (Boot Option #1) и при следующей загрузке, ошибка Boot Device Not Found должна пропасть.
Это руководство поможет вам попасть в BIOS и выставить на первое место загрузчик в разных версиях BIOS.
3. Исправить загрузочную запись
Нужно запустить командную строку с дополнительных параметров загрузки. Чтобы попасть в эти параметры, нужно выключить и включить ПК, три и более раз, когда он доходит до ошибки.
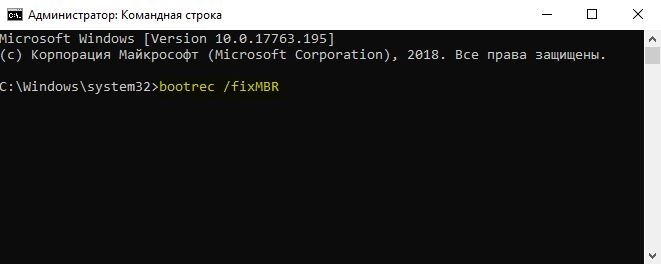
Если вы не можете попасть в такие параметры, то вам следует создать установочную флешку с Windows и начать процесс установки, но не устанавливать, а нажать ниже на кнопку «Восстановление системы«. Далее вас перебросит в дополнительные параметры загрузки, где вы сможете запустить командную строку, как показано выше на картинке.
В командной строке введите команды по очереди, чтобы восстановить загрузчик и исправить ошибку Boot Device Not Found:
- bootrec /fixmbr
- bootrec /fixboot
- bootrec /scanos
- bootrec /rebuildbcd
Если вы уверены, что у вас проблема в загрузчике, то смотрите это руководство по восстановлению загрузчика Windows 10 .
4. Проверьте, активен ли основной раздел
Если выше перечисленные способы не помогли исправить ошибку Boot Device Not Found, то нужно проверить, активен ли основной раздел. Раздел на диске, где установлена система Windows — называется основным и он должен быть активен. Запустите командную строку и следуйте ниже указаниям, чтобы проверить и активировать, если будет нужно:
- diskpart — Запуск инструмента.
- list disk — Список подключенных дисков к компьютеру.
- select disk 0 — Выбор жесткого диска на котором нужно активировать раздел. В моем случае, основной жесткий диск 0.
- list volume — Показывает разделы на выбранном жестком диски.
- select volume 2 — Выбрать локальный диск для активации. Выбирайте тот, где установлена сама система widows.
- active — Активировать раздел.
ADB: device not found
Если при использовании ADB возникает ошибка error: device not found , не обязательно переключать/перезапускать телефон/эмулятор, достаточно перезапустить демон adb:
adb kill-server, после чего следует подождатьне менее 5 сек. После этого любая adb-команда снова запустит демона, и в большинстве случаев связь восстанавливается и все девайсы обнаруживаются.
Но, если даже несколько перезапусков не решили проблему, то есть ещё вариант решения проблемы: в эмуляторе/на телефоне в настройках отладки выключить и снова включить галочку «Разрешать отладку», это вызовет соответствующий перезапуск сервиса отладки, но только уже со стороны Андроида.
Отлично, спасибо 
не понял!что за демон adb?
Демон adb — процесс на копьютере, тот самый «сервер» adb (хотя он является лишь клиентом). Также на телефоне есть adbd — adb-хост, отвечающий на запросы с компьютера или другого клиента.
добрый день! помогите пожалуйста. При установки у меня всегда выходит ошибка device not found, и я не знаю что делать у меня телефон nokia xl
Pttycmd1 device not found что делать
Версия для печати
dimon374
две карты не стартуют, один радик тоже.
Да хрен с ним, с «радиком». Комп то стартует? Грузится?
При загрузке в таблице PCI устройств присутствует строка типа:
VGA controller Vendor ID 1002 PCI ID xxxx ?
dimon374
Компьютер может запускаться и с отсутствующим БИОСом на видеокарте. Можно сам видеобиос
добавить в состав системного (программа modbin, версия 2.07).
Попробуйте для начала добавить в системный БИОС родной видеоБИОС от 9550 — может подхватится. Может после этого Atiflash заработает. А как прошить — искать сервис, программатор, донора и тд.
Дату своего последнего сообщения посмотрите .
Что за системная плата, ссылку на ее БИОС, ссылка на родной видеоБИОС?
Такое делал как-то для i740 для ASUS P3B-F и DFI AK-75EC (понадобилась микросхема от видеоБИОСа).
Попробовал вставить в данный БИОС видеоБИОС от Радеон 8500 — нет свободного места, увы.
Ищите другого донора, желательно что-то под П-2, что-бы в настройках БИОС была возможность загрузки с PCI VGA.
У меня вот тоже не хочет шиться, но флешер адаптер видит:
цитата: *** NVFLASH LOG FILE ***
Command: flash
NOTE: Unconfigured display adapter found, device not accessible:
GeForce FX 5200 (10DE,0322,1043,80DF) B:01,AGP,D:00,F:00
ERROR: No NVIDIA display adapters found
Exit Code: 2 Мож с какими ключами надо шить?
Pttycmd1 device not found что делать
Add swipe gestures to any Android, no root
One handed mode
Make your phone easier to use with one hand, no root
XDA Forum App
The best way to access XDA on your phone
An app store for independent developers
Hyperion Launcher
A sweet, feature-filled launcher with a beautiful UX.
Sites we like
XDA’s official marketplace for buying and selling tech
I ‘whole formatted’ my MT6572 based Walton Primo F2 phone with SP Flash Tool.
Then I flashed the official firmware of this phone with SP Flash Tool.
Now the phone works fine but it does not detect SIM.
Also, the IMEI is shown as ‘Invalid’ for both SIM slots when I input *#06#.
When I try to fix IMEI from MTK Droid Tools it shows ‘ERROR : pttycmd1 device NOT found!’.
Also, MTK Droid Tools shows ‘Baseband v: ——‘.
I am sure the problem is that when I formatted the phone it wiped the NVRAM region too.
So the phone has no baseband or radio files right now.
Although, WiFi still works perfectly.
Now the official firmware of Primo F2 does not contain any nvram.bin file.
It does contain a BPLGU file but I can’t seem to modify IMEI with SN Write Station or Maui META etc.
Probably SN Write Station and Maui META etc. only modify IMEI when baseband or radio files are already present on the phone.
So I think the only way out for me is to flash a nvram.bin with SP Flash Tool.
Any ideas whether I am on the right track or not?
If I am, then how can I get nvram.bin file for my phone?
Can it be generated from BPLGU file somehow?
As you people can see that I have tried a lot of things, so please suggest/advise accordingly.
Any help would be appreciated
same problem arived for me but my chipset is MT6598T.
please help anybody.

MTK Droid Tools errors and solutions
Since Many Android Users complained of getting many errors whenever they tried to backup their rom using mtkdroid tools on PC.
Some of them have neglect the act of backing up ROM especially their stock ROM due to this errors but which backing up of stock up is compulsory because of unforeseeable bricking.
This made us to research for some major errors they normally encountered and how to easily fix this errors without stress.
MAJOR ERRORS & SOLUTIONS:
*ERROR: The device isn’t revealed. Connect or reconnect the cable!
SOLUTION: Ensure to install Mediatek drivers using PdaNet and enable USB debugging on the phone.
*ERROR: file adbd not install
SOLUTION: Exit PdaNet in system tray if open
Close MTK droid tools
Disconnect the phone from PC
Download Busybox apk from the link below
DOWNLOAD BUSYBOX APK
“NB: After clicking the download link. To proceed, wait for 5 sec and click SKIP AD at the top right corner of your device screen.”
Install Busybox on the phone and click Open after installation
Wait for initialization to finish (100%)
Still in Busybox, click Install wand wait till you get a prompt saying installation was successful
Re-launch MTK droid tools
Reconnect the phone to PC
If it persists then:
Download ADBD Insecure apk from the link below
DOWNLOAD ADB INSECURE APK
“NB: After clicking the download link. To proceed, wait for 5 sec and click SKIP AD at the top right corner of your device screen.”
Install it on the phone and launch
Tick Enable insecure adbd
Re-launch MtK droid tools.
*ERROR: Insufficient space on device
SOLUTION: Ensure there’s at least 4GB free space on both phone storage and SD card (if supported).
*ERROR: Preparation of files for FlashTool is impossible, file isn’t found
SOLUTION: Remove all scatter files in the backup folder except one and rename this last one to MT65??_Android_scatter ( where “??” represents the number for your phone model e.g MT6572_Android_scatter).
*ERROR: Zero file, no space left on device!
SOLUTION: Ensure to have at least 15 GB free on the PC, 4GB free on both SD card and Phone storage.
*ERROR: TotalBytesPerChunk Not Found. Set default Page/Spare=2048/64 !!!
SOLUTION: Slot in an SD card into the phone and install Busybox on the phone
Ensure the phone is an MTK phone
Download MTK Droid Tools froma different source.
*ERROR: ATTENTION! Fake Hardware in kernel or firmware doesn’t correspond to the phone!
SOLUTION: Ignore it. If MTK droid tools still refuses to work then download another copy from a different source.
ERROR: Preparation of files for flash Tool is impossible . file isn’t found: C:.…MT****_Android_scatter.txt
SOLUTION: Either the backup is incomplete (missing scatter file) or the backup contains two scatter files; in which case you should delete one and try again.
*ERROR: SU inaccessible
SOLUTION: Ensure the phone is rooted. After clickking ROOT, click Yes on PC and Grant on phone. Check the super user application on the phone (might vary with rooting technique) to be sure that ADB is granted root permissions.
*ERROR: dev/radio/pttycmd1 inaccessible , should be Root Shell OR pttycmd1 device NOT found!
SOLUTION: Fix Unknown Baseband by flashing a compatible Stock ROM.
*ERROR: During copying files between phone and PC
SOLUTION: Download MTK Droid tools from a different source.
*ERROR: It is impossible to start ADB
SOLUTION: Download MTK Droid tools from a different source.
“Don’t Hesitate To Use The Comment Box”
Ensure to see the MTK Droid tools guides @ https://www.hovatek.com/forum/thread-468.html and https://www.hovatek.com/forum/thread-455.html to be sure you’re doing things right.
MTK Droid Tools errors and solutions
Below is a list of MTK Droid Tools errors and how to fix them
See the video tutorial below or @ http://youtu.be/AJLgSD9zHb8
- The device isn’t revealed. Connect or reconnect the cable!
Solution: Ensure to install Mediatek drivers using PdaNet and enable USB debugging on the phone
- Error: file adbd not install
Solution: Read https://www.hovatek.com/forum/thread-1219.html to fix it - Insufficient space on device
Solution: Ensure there’s at least 4GB free space on both phone storage and SD card (if supported) then install Busybox on the phone
- Preparation of files for FlashTool is impossible, file isn’t found
Solution: Remove all scatter files in the backup folder except one and rename this last one to MT65??_Android_scatter ( where «??» represents the number for your phone model e.g MT6572_Android_scatter)
- ERROR: Zero file, no space left on device!
Solution: Read https://www.hovatek.com/forum/thread-6407.html
- — ERROR : — TotalBytesPerChunk Not Found. Set default Page/Spare=2048/64 !!!
Solution: Slot in an SD card into the phone and install Busybox on the phone
Ensure the phone is an MTK phone
Download MTK Droid Tools froma different source - ATTENTION! Fake Hardware in kernel or firmware doesn’t correspond to the phone!
Solution: Ignore it. If MTK droid tools still refuses to work then download another copy from a different source
- Preparation of files for flash Tool is impossible . file isn’t found: C:….MT****_Android_scatter*.txt
Solution: Either the backup is incomplete (missing scatter file) or the backup contains two scatter files; in which case you should delete one and try again
- SU inaccessible
Solution: Ensure the phone is rooted. After clickking ROOT, click Yes on PC and Grant on phone. Check the super user application on the phone (might vary with rooting technique) to be sure that ADBis granted root permissions
- — ERROR :No find KernelGZ — ERROR :No Split Boot Image
Solution: Try using the TWRP recovery porting method @ https://www.hovatek.com/forum/thread-5162.html or the Carliv Touch Recovery porting method @ https://www.hovatek.com/forum/thread-182.html
- — ERROR :dev/radio/pttycmd1 inaccessible , should be Root Shell
— ERROR :pttycmd1 device NOT found!Solution: Fix Unknown Baseband by flashing a compatible Stock ROM
- — ERROR during copying files between phone and PC
Solution: Download MTK Droid tools from a different source
- It is impossible to start ADB
Solution: Download MTK Droid tools from a different source
Note!
We have a reply schedule for Free Support. Please upgrade to Private Support if you can’t wait.
(This post was last modified: 25-05-2018, 07:24 PM by hovatek.)
![]()
Posts: 130
Threads: 45
Joined: Oct 2015
Reputation:
0
Pls sir I encounter an error. (It is impossible to start ADB) during d MTK Droid root process… Pls how can I fix it… Email: [email protected]
![]()
Posts: 49,469
Threads: 1,451
Joined: Oct 2013
Reputation:
432
(15-10-2015, 03:48 AM)ridohbest Wrote: Pls sir I encounter an error. (It is impossible to start ADB) during d MTK Droid root process… Pls how can I fix it… Email: [email protected]
Download MTK droid tools from a different source
Note!
We have a reply schedule for Free Support. Please upgrade to Private Support if you can’t wait.
![]()
Posts: 130
Threads: 45
Joined: Oct 2015
Reputation:
0
When I try another source this is what i encounter ‘Error: file adbd not install’
![]()
Posts: 49,469
Threads: 1,451
Joined: Oct 2013
Reputation:
432
(15-10-2015, 03:38 PM)ridohbest Wrote: When I try another source this is what i encounter ‘Error: file adbd not install’
the solution to that is in the guide above
Note!
We have a reply schedule for Free Support. Please upgrade to Private Support if you can’t wait.
![]()
Posts: 130
Threads: 45
Joined: Oct 2015
Reputation:
0
I encounter this error » Preparation of files for FlashTool is impossible, file isn’t found» and have the solution above, but will I delete all the file in the backup file, and which file will leave, also how will I rename the file I leave undelete, with tecno H7
![]()
Posts: 49,469
Threads: 1,451
Joined: Oct 2013
Reputation:
432
(16-10-2015, 04:10 PM)ridohbest Wrote: I encounter this error » Preparation of files for FlashTool is impossible, file isn’t found» and have the solution above, but will I delete all the file in the backup file, and which file will leave, also how will I rename the file I leave undelete, with tecno H7
only the scatter file if there’s more than one
Note!
We have a reply schedule for Free Support. Please upgrade to Private Support if you can’t wait.
![]()
Posts: 130
Threads: 45
Joined: Oct 2015
Reputation:
0
sir what is comfusing is how to identiy the scatter file that i will delete and the one that i will rename
![]()
Posts: 22,062
Threads: 571
Joined: Jul 2014
Reputation:
332
(16-10-2015, 06:26 PM)ridohbest Wrote: sir what is comfusing is how to identiy the scatter file that i will delete and the one that i will rename
* check the backup folder if there is no scatter file then the backup wasn’t successful
* If on the other hand there are 2 scatter files then delete one (anyone)
![]()
Posts: 130
Threads: 45
Joined: Oct 2015
Reputation:
0
i check all the file in the backup folder but there is no file name scatter file and during the backup it write task is complete at the end
[Tutorial] List of MTK Droid Tools -Errors And HowTo Solve Them.
20:11
Alex
0 Comments
MTK Droid Tools errors and solutions

Since many users were complaining that they are facing many errors while they triyng to backup their rom using MTKDroid Tools on PC.
Some users didn’t bother to backup there stock rom and flashed wrong baseband in attempt to update there device or they just wanted to make a custom recovery for there device on there own. Read This : How to port Custom Recovery for your device.
Also Read:
- Permanently IMEI Fix for MTK Device
- How To Port boot.img And Port Kernel- Unpack/Repack
- List of SP Flash Tool errors and how to solve them
- CWM Errors and how to fix them
This made me research for some major errors users normally encounter and how to easily fix this errors without stress.
Drivers Required For MTK Tools to work :
Your device drivers if there are any,
Note : Always check if all drivers are installer properly, Also check in device manager that not driver is showing errors(yellow triangle)
MAJOR ERRORS & SOLUTIONS:
Error : The device isn’t revealed. Connect or reconnect the cable!
Solution : Ensure to install Mediatek drivers and enable USB debugging on the phone. revoke usb debugging.
Error : File adbd not install.
Solution : Exit PdaNet in system tray if open close MTK droid tools disconnect the phone from PC download and install Busybox from the playstore.
If it persists then: Download ADBD Insecure install and enable it within the app. then try again.
Error : Insufficient space on device.
Solution : Ensure there’s at least 4GB free space on both phone storage and SD card (if supported).
Error : Preparation of files for FlashTool is impossible, file isn’t found
Solution : Remove all scatter files in the backup folder except one and rename this last one to MTxx??_Android_scatter ( where “??” represents the number for your phone model e.g MT6572_Android_scatter).
Error : Zero file, no space left on device!
Solution : Ensure to have at least 15 GB free on the PC, 4GB free on both SD card and Phone storage. batter if possible format phone and SDcard.
Error : TotalBytesPerChunk Not Found. Set default Page/Spare=2048/64 !!!
Solution : Insert an SD card into the phone and install Busybox on the phone Ensure the phone is an MTK phone. Download MTK Droid Tools from a different source.
Error : ATTENTION! Fake Hardware in kernel or firmware doesn’t correspond to the phone!
Solution : Ignore it. If MTK droid tools still refuses to work then download another copy from a different source.
Error : Preparation of files for flash Tool is impossible . file isn’t found: C:. MT****_Android_scatter.txt
Solution : Either the backup is incomplete (missing scatter file) or the backup contains two scatter files; in which case you should delete one and try again.
Error : SU inaccessible
Solution : Ensure the phone is rooted. After clicking ROOT, click Yes on PC and grant on phone. Check the super user application on the phone (might vary with rooting technique) to be sure that ADB is granted root permissions, revoke USB debugging.
Error : dev/radio/pttycmd1 inaccessible , should be Root Shell OR pttycmd1 device NOT found!
Solution : Fix Unknown Baseband by flashing a compatible Stock ROM.
Error : During copying files between phone and PC
Solution : Download MTK Droid tools from a different source.
Error : It is impossible to start ADB
Solution : Download MTK Droid tools from a different source.
Also Read:
- Permanently IMEI Fix for MTK Device
- How To Port boot.img And Port Kernel- Unpack/Repack
- List of SP Flash Tool errors and how to solve them
- CWM Errors and how to fix them
- How to port Custom Recovery for your device.
как его лучше восстановить? Имей я восстановила.
ты его не восстановила…. он просто остался… Nvram я то слить могу но ты будешь ходить с моим имеем что мне не нравится
как его лучше восстановить? Имей я восстановила.
полный сброс делала ?? может просто хренова закешировался и так пишет?
тут смотрела http://lenovo-forums.ru/topic/2771-информация-о-nvram-на-mtk-устройствах-резервирование/ ???
смотри вот тоут Как восстановить nvram (если НЕТ даже донорского бэкапа)?
Блин потратил 2 часа своего врени чтоб те угадить и помочь нашёл оригиналку для твоего тела в которой есть всё для восстановления полностью ушатаного тела Тема китайского сайта полная прошивка в принцы пе если с переводчиком гугл лазить по китайсайтам то в той нескладушке что выдаст переводчик чтото додуматься можно.
Отредактировал 2 января, 2015 psihipofigist
Что делать если пропал CDS Information
Ошибка отсутствия CDS Information связана со сбоем в системной памяти и утерей номера IMEI. Ошибка распространена на смартфонах с операционной системой Android. При этой ошибке телефон перестает распознавать сим-карту. Справиться с возникшей проблемой можно несколькими способами.
Что означает эта ошибка
Телефон с возникшей ошибкой не распознает сеть, не может обнаружить сим-карты в слотах. Использование смартфона в этом случае, фактически, невозможно. Пользователь сможет выполнять базовые операции на устройстве (подключаться к Wi-Fi, делать фото и видео, запускать программы и т.д.). Совершать звонки, отправлять СМС-сообщения будет невозможно.
В каких случаях появляется проблема
Потеря номера IMEI становится последствием различных действий:
- На телефон установлена прошивка кустарного производства;
- Был произведен hard reset (полная перезагрузка) с ошибками;
- Неудачный откат к заводским настройкам с частичной или полной потерей заводских данных.
При запросе IMEI через USSD-команду *#06#, приходит ответ с сообщением о неверном коде.
Как восстановить IMEI?
Восстановление проводится либо через возможности самого смартфона, либо с использованием дополнительного программного обеспечения. Перечисленные способы подходят для большинства смартфонов китайского производства с операционной системой Android. Если один из способов не принес результата, нужно попробовать следующий. В большинстве случаев IMEI восстанавливается после применения первого способа.
Ручное восстановление с помощью инженерного меню
Инженерное меню – особый раздел телефона, дающий доступ к заводскому программному обеспечению и памяти. Меню позволяет администрировать устройство на уровне заводских настроек. На многих китайских телефонах доступ к этому меню предоставляется сразу. С помощью инженерного меню и нескольких команд номер IMEI прописывается в память телефона.
Найти этот код можно на корпусе телефона или коробке от него. Если в смартфон предусмотрена установка 2х сим-карт, при вводе команд необходимо учитывать это.
Вход в инженерное меню осуществляется с помощью разных команд для смартфонов от разных производителей:
Перед применением способа необходимо удалить сим и флеш-карты из телефона:
- Перейти в меню набора номера, набрать команду *#3646633#. Если эта команда не сработает, следует попробовать другую: *#*#3646633#*#*.
- Пользователя автоматически направит в инженерное меню. Здесь необходимо перейти в раздел «CDS Informatiop»
- Выбрать пункт Radio Information, затем Phone1.
- Поместить курсор в область для ввода после надписи АТ+.
- Ввести команду: EGMR=1,7,«номер IMEI».
- Нажать кнопку «SEND AT COMMAND».
- Выйти из меню и перезагрузить смартфон.
- После полного включения ввести USSD-команду *#06#, должен отобразиться IMEI код.
Если у телефона 2 сим-карты, команда изменяется. В инженерном меню вводится команда AT+EGMR=1,10,«номер IMEI».
В некоторых случаях ввод команды в инженерном меню провоцирует ошибку: «This command is not allowed in this user build». Это значит, на данном устройстве нужно изменить команду, поставив пробел между AT+ и EGMR.
Если код IMEI появился в памяти телефона, необходимо вставить сим-карты на место. После этого можно пользоваться устройством в привычном режиме.
На некоторых телефонах инженерное меню имеет другой внешний вид. Команды и последовательность действий в этом случае отличаются:
- Войти в инженерное меню с помощью одной из команд из первого способа;
- Перейти в раздел «Telephony»;
- Найти и нажать на подраздел «GPRS»;
- Войти в меню сим-карты (если их несколько, то провести действие для каждой);
- В поле IMEI ввести номер и нажать на кнопку «Write IMEI»;
- Перезагрузить телефон, проверить код USSD-командой.
Если ни один из перечисленных способов не сработал, можно воспользоваться специальным программным обеспечением для восстановления IMEI.
Восстановление с помощью программ
При использовании программного обеспечения понадобятся права Root.
При смене прошивке на телефоне часто теряется архив, где содержится номер IMEI. Программа позволяет считать и ввести номер IMEI:
- Скачать архив с дистрибутивом;
- Распаковать файл;
- Выключить телефон, удалить сим-карту;
- Установить приложение на смартфон;
- Программа выдаст основную информацию о телефоне и версии операционной системы, а также считает IMEI;
- Если последнего действия не произошло, нужно запустить поиск номера вручную;
- Снять галочку с пункта «Одинаковые IMEI»;
- Ввести нужную комбинацию;
- Перезагрузить устройство.
Новые настройки вступят в силу после включения телефона.
Приложение для восстановления IMEI. Дополнительно понадобится программа Root Browser. Пользоваться ADB RUN нужно так:
- Установить программу;
- Войти в меню по пути Manual Command -> Restore Imei;
- Выбрать тип устройства с 1 или 2мя сим-картами;
- Ввести комбинацию IMEI;
- Найти на рабочем столе файл под названием MP0B_001;
- Через приложение Root Browser переместить это файл по адресу /data/nvram/md/NVRAM/NVD_IMEI/MP0B_001 или /nvram/md/NVRAM/NVD_IMEI/MP0B_001;
- Перезагрузить телефон, проверить работоспособность IMEI.
Chamelephon
Скачать и установить приложение можно бесплатно на сервисе GooglePlay. После установки:
- Запустить программу;
- Ввести номер IMEI (можно также сгенерировать новые);
- Перезагрузить телефон.
IMEI&SN Write
Данная программа не требует установки прав Root на телефоне. Необходимо подключить устройство к компьютеру или ноутбуку. Программа IMEI&SN Write устанавливается на ПК. Потребуется также установить драйвера от телефон на компьютер:
- Запустить программу IMEI&SN Write;
- В поле «PlatForm» ввести комбинацию «Smart Phone»;
- Выбрать пункт USB;
- Заполнить комбинации IMEI 1/2, коды должны совпадать;
- Нажать кнопку «SelectDB»;
- В открывшемся окне нажать на файлы системной части, они начинаются с буквенных аббревиатур BPLGU;
- Выбрать файлы процессорной части, начинаются с аббревиатуры APDB;
- Программа направит пользователя в главное меню, где нужно нажать кнопку «Start»;
- Важно, чтобы смартфон был подключен к компьютеру в течение работы программы;
- Когда действия утилиты завершатся, можно отсоединить устройство и перезагрузить его.
Если все действия проведены верно, номер IMEI станет доступен в памяти телефона.
Hyperterminal
Восстановление IMEI этим способом возможно, если владелец предварительно сохранил комбинацию в эмуляторе терминала для Android. Существует несколько версий для смартфонов, бесплатно скачать их можно в GooglePlay. После переустановки прошивки, в случае потери IMEI, необходимо провести следующие действия:
- Ввести команду «su», согласиться с получением прав Root;
- Прописать команду: echo ‘AT+EGMR=1,7,«номер IMEI_1» ‘ > /dev/pttycmd1, если на телефоне предусмотрена 1 сим-карта;
- Команда echo ‘AT+EGMR=1,7,«номер IMEI_2» ‘ > /dev/pttycmd1, если в телефоне 2 слота под сим-карты.
Один из перечисленных способов поможет восстановить IMEI, устранить ошибки эксплуатации смартфона. В случаях, когда узнать код не представляется возможным, доступна генерация нового номера через приложения или программы.
Boot Device Not Found: Исправить ошибку при включении ПК
Иногда при включении ноутбука или ПК вы можете увидеть сообщение об ошибке «Boot Device Not Found. Please install an operating system on your hard disk, Hard Disk (3f0)» и будет предложено нажать F2 для диагностики системы. Дело в том, что когда вы устанавливаете систему Windows на диск HDD или SSD, то диск становится главным загрузочным устройством. Когда ноутбук или ПК загружается, то BIOS или UEFI ищет установленную систему Windows на этом главном загрузочном диске, и когда не находит ни одного устройства, с которого он может загрузиться, выдает ошибку, что загрузочное устройство не может быть найдено (Boot Device Not Found). Давайте разберем, что делать и как исправить эту ошибку?
1. Проверьте соединение с загрузочным диском
Если вы используете ПК, то его нужно разобрать и посмотреть провода SATA. Отключите для начало ПК от сети 220 и потом снимите крышку на самом ПК. Далее посмотрите внимательно все провода, которые идут от материнской платы до HDD или SSD. При возможно высуньте провода, продуйте фишки, и вставьте обратно. Если вы используете ноутбук, то нужны навыки, которые помогут вам открыть его и проверить наличие слабого соединения. Если нет таких навыков, то отнесите его в сервисный центр.
2. Изменить порядок загрузки
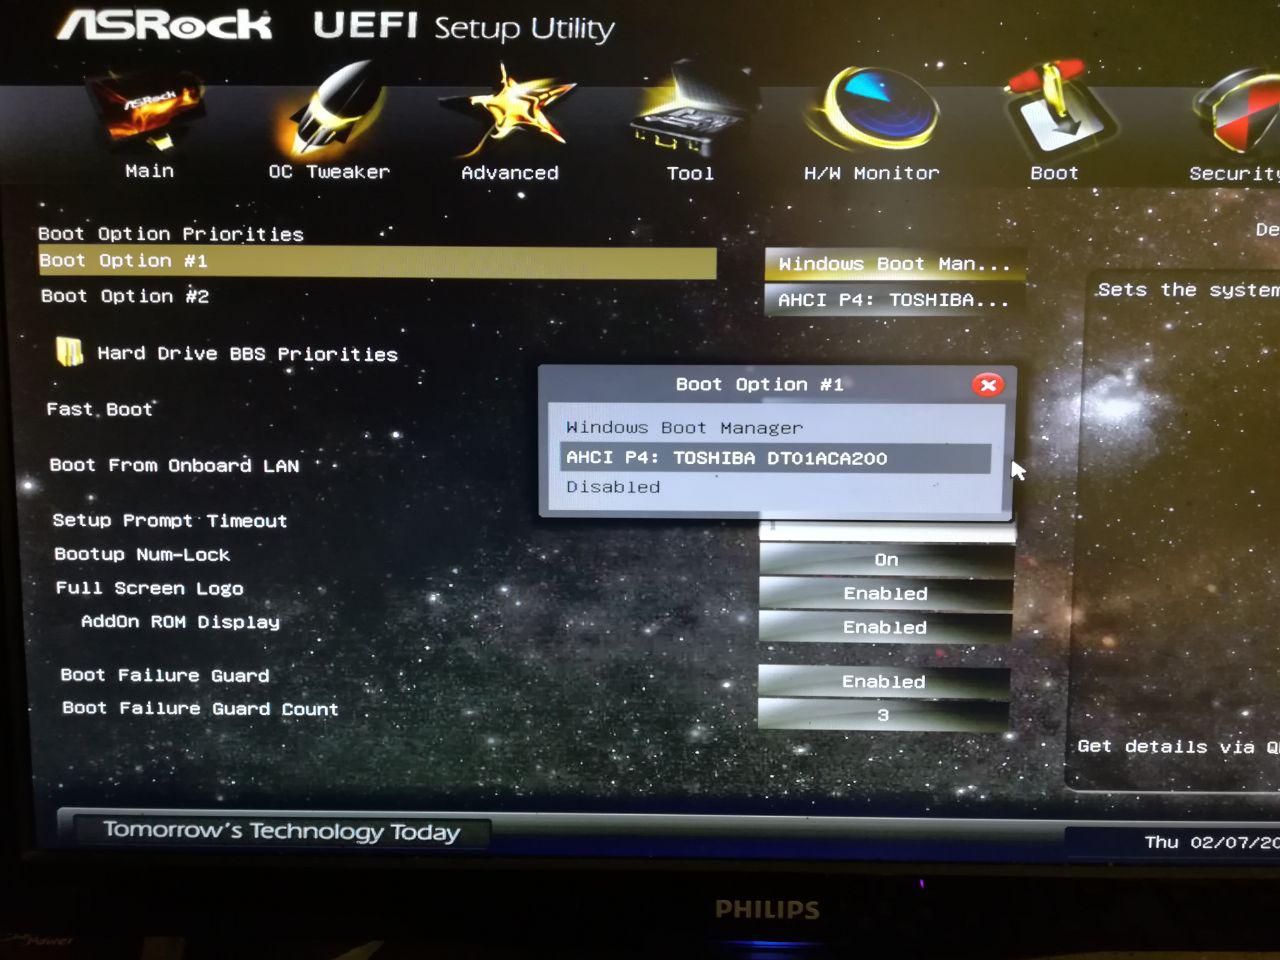
Если у вас всунута USB флешка в ПК или ноутбук, то попробуйте её извлечь и загрузиться. Если не помогло, то скорее всего, у вас стоит первым загрузочным устройством не диск на котором установлена ОС Windows. Давайте зайдем в BIOS и первом, какое загрузочное устройство стоит на первом месте.
При загрузке ПК или ноутбука нажмите DEL или F2, чтобы попасть в настройки BIOS. Далее перейдите в параметр Boot и выставьте HDD, где установлена сама система Windows, на первое место (Boot Option #1) и при следующей загрузке, ошибка Boot Device Not Found должна пропасть.
Это руководство поможет вам попасть в BIOS и выставить на первое место загрузчик в разных версиях BIOS.
3. Исправить загрузочную запись
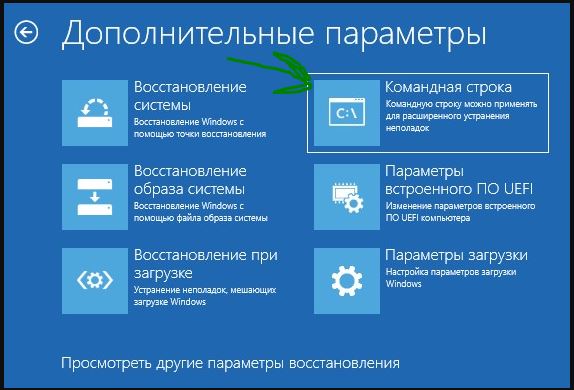
Нужно запустить командную строку с дополнительных параметров загрузки. Чтобы попасть в эти параметры, нужно выключить и включить ПК, три и более раз, когда он доходит до ошибки.
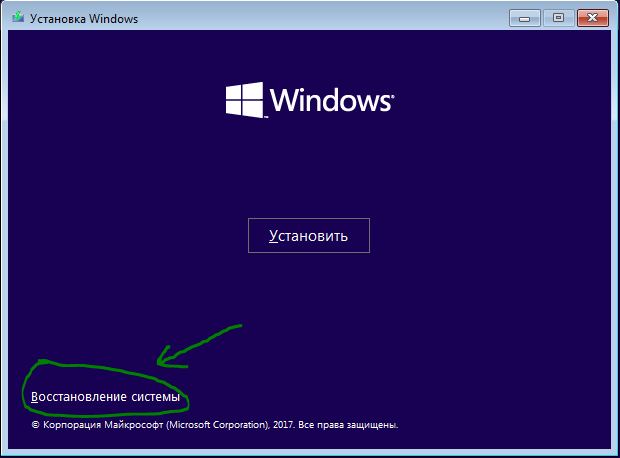
Если вы не можете попасть в такие параметры, то вам следует создать установочную флешку с Windows и начать процесс установки, но не устанавливать, а нажать ниже на кнопку «Восстановление системы«. Далее вас перебросит в дополнительные параметры загрузки, где вы сможете запустить командную строку, как показано выше на картинке.
В командной строке введите команды по очереди, чтобы восстановить загрузчик и исправить ошибку Boot Device Not Found:
- bootrec /fixmbr
- bootrec /fixboot
- bootrec /scanos
- bootrec /rebuildbcd
Если вы уверены, что у вас проблема в загрузчике, то смотрите это руководство по восстановлению загрузчика Windows 10 .
4. Проверьте, активен ли основной раздел
Если выше перечисленные способы не помогли исправить ошибку Boot Device Not Found, то нужно проверить, активен ли основной раздел. Раздел на диске, где установлена система Windows — называется основным и он должен быть активен. Запустите командную строку и следуйте ниже указаниям, чтобы проверить и активировать, если будет нужно:
- diskpart — Запуск инструмента.
- list disk — Список подключенных дисков к компьютеру.
- select disk 0 — Выбор жесткого диска на котором нужно активировать раздел. В моем случае, основной жесткий диск 0.
- list volume — Показывает разделы на выбранном жестком диски.
- select volume 2 — Выбрать локальный диск для активации. Выбирайте тот, где установлена сама система widows.
- active — Активировать раздел.
ADB: device not found
Если при использовании ADB возникает ошибка error: device not found , не обязательно переключать/перезапускать телефон/эмулятор, достаточно перезапустить демон adb:
adb kill-server, после чего следует подождатьне менее 5 сек. После этого любая adb-команда снова запустит демона, и в большинстве случаев связь восстанавливается и все девайсы обнаруживаются.
Но, если даже несколько перезапусков не решили проблему, то есть ещё вариант решения проблемы: в эмуляторе/на телефоне в настройках отладки выключить и снова включить галочку «Разрешать отладку», это вызовет соответствующий перезапуск сервиса отладки, но только уже со стороны Андроида.
Отлично, спасибо
не понял!что за демон adb?
Демон adb — процесс на копьютере, тот самый «сервер» adb (хотя он является лишь клиентом). Также на телефоне есть adbd — adb-хост, отвечающий на запросы с компьютера или другого клиента.
добрый день! помогите пожалуйста. При установки у меня всегда выходит ошибка device not found, и я не знаю что делать у меня телефон nokia xl
Pttycmd1 device not found что делать
Версия для печати
dimon374
две карты не стартуют, один радик тоже.
Да хрен с ним, с «радиком». Комп то стартует? Грузится?
При загрузке в таблице PCI устройств присутствует строка типа:
VGA controller Vendor ID 1002 PCI ID xxxx ?
dimon374
Компьютер может запускаться и с отсутствующим БИОСом на видеокарте. Можно сам видеобиос
добавить в состав системного (программа modbin, версия 2.07).
Попробуйте для начала добавить в системный БИОС родной видеоБИОС от 9550 — может подхватится. Может после этого Atiflash заработает. А как прошить — искать сервис, программатор, донора и тд.
Дату своего последнего сообщения посмотрите .
Что за системная плата, ссылку на ее БИОС, ссылка на родной видеоБИОС?
Такое делал как-то для i740 для ASUS P3B-F и DFI AK-75EC (понадобилась микросхема от видеоБИОСа).
Попробовал вставить в данный БИОС видеоБИОС от Радеон 8500 — нет свободного места, увы.
Ищите другого донора, желательно что-то под П-2, что-бы в настройках БИОС была возможность загрузки с PCI VGA.
У меня вот тоже не хочет шиться, но флешер адаптер видит:
цитата: *** NVFLASH LOG FILE ***
Command: flash
NOTE: Unconfigured display adapter found, device not accessible:
GeForce FX 5200 (10DE,0322,1043,80DF) B:01,AGP,D:00,F:00
ERROR: No NVIDIA display adapters found
Exit Code: 2 Мож с какими ключами надо шить?
Pttycmd1 device not found что делать
Add swipe gestures to any Android, no root
One handed mode
Make your phone easier to use with one hand, no root
XDA Forum App
The best way to access XDA on your phone
An app store for independent developers
Hyperion Launcher
A sweet, feature-filled launcher with a beautiful UX.
Sites we like
XDA’s official marketplace for buying and selling tech
I ‘whole formatted’ my MT6572 based Walton Primo F2 phone with SP Flash Tool.
Then I flashed the official firmware of this phone with SP Flash Tool.
Now the phone works fine but it does not detect SIM.
Also, the IMEI is shown as ‘Invalid’ for both SIM slots when I input *#06#.
When I try to fix IMEI from MTK Droid Tools it shows ‘ERROR : pttycmd1 device NOT found!’.
Also, MTK Droid Tools shows ‘Baseband v: ——‘.
I am sure the problem is that when I formatted the phone it wiped the NVRAM region too.
So the phone has no baseband or radio files right now.
Although, WiFi still works perfectly.
Now the official firmware of Primo F2 does not contain any nvram.bin file.
It does contain a BPLGU file but I can’t seem to modify IMEI with SN Write Station or Maui META etc.
Probably SN Write Station and Maui META etc. only modify IMEI when baseband or radio files are already present on the phone.
So I think the only way out for me is to flash a nvram.bin with SP Flash Tool.
Any ideas whether I am on the right track or not?
If I am, then how can I get nvram.bin file for my phone?
Can it be generated from BPLGU file somehow?
As you people can see that I have tried a lot of things, so please suggest/advise accordingly.
Any help would be appreciated
same problem arived for me but my chipset is MT6598T.
please help anybody.
MTK Droid Tools errors and solutions
Since Many Android Users complained of getting many errors whenever they tried to backup their rom using mtkdroid tools on PC.
Some of them have neglect the act of backing up ROM especially their stock ROM due to this errors but which backing up of stock up is compulsory because of unforeseeable bricking.
This made us to research for some major errors they normally encountered and how to easily fix this errors without stress.
MAJOR ERRORS & SOLUTIONS:
*ERROR: The device isn’t revealed. Connect or reconnect the cable!
SOLUTION: Ensure to install Mediatek drivers using PdaNet and enable USB debugging on the phone.
*ERROR: file adbd not install
SOLUTION: Exit PdaNet in system tray if open
Close MTK droid tools
Disconnect the phone from PC
Download Busybox apk from the link below
DOWNLOAD BUSYBOX APK
“NB: After clicking the download link. To proceed, wait for 5 sec and click SKIP AD at the top right corner of your device screen.”
Install Busybox on the phone and click Open after installation
Wait for initialization to finish (100%)
Still in Busybox, click Install wand wait till you get a prompt saying installation was successful
Re-launch MTK droid tools
Reconnect the phone to PC
If it persists then:
Download ADBD Insecure apk from the link below
DOWNLOAD ADB INSECURE APK
“NB: After clicking the download link. To proceed, wait for 5 sec and click SKIP AD at the top right corner of your device screen.”
Install it on the phone and launch
Tick Enable insecure adbd
Re-launch MtK droid tools.
*ERROR: Insufficient space on device
SOLUTION: Ensure there’s at least 4GB free space on both phone storage and SD card (if supported).
*ERROR: Preparation of files for FlashTool is impossible, file isn’t found
SOLUTION: Remove all scatter files in the backup folder except one and rename this last one to MT65??_Android_scatter ( where “??” represents the number for your phone model e.g MT6572_Android_scatter).
*ERROR: Zero file, no space left on device!
SOLUTION: Ensure to have at least 15 GB free on the PC, 4GB free on both SD card and Phone storage.
*ERROR: TotalBytesPerChunk Not Found. Set default Page/Spare=2048/64 !!!
SOLUTION: Slot in an SD card into the phone and install Busybox on the phone
Ensure the phone is an MTK phone
Download MTK Droid Tools froma different source.
*ERROR: ATTENTION! Fake Hardware in kernel or firmware doesn’t correspond to the phone!
SOLUTION: Ignore it. If MTK droid tools still refuses to work then download another copy from a different source.
ERROR: Preparation of files for flash Tool is impossible . file isn’t found: C:.…MT****_Android_scatter.txt
SOLUTION: Either the backup is incomplete (missing scatter file) or the backup contains two scatter files; in which case you should delete one and try again.
*ERROR: SU inaccessible
SOLUTION: Ensure the phone is rooted. After clickking ROOT, click Yes on PC and Grant on phone. Check the super user application on the phone (might vary with rooting technique) to be sure that ADB is granted root permissions.
*ERROR: dev/radio/pttycmd1 inaccessible , should be Root Shell OR pttycmd1 device NOT found!
SOLUTION: Fix Unknown Baseband by flashing a compatible Stock ROM.
*ERROR: During copying files between phone and PC
SOLUTION: Download MTK Droid tools from a different source.
*ERROR: It is impossible to start ADB
SOLUTION: Download MTK Droid tools from a different source.
“Don’t Hesitate To Use The Comment Box”
|
Thread Rating:
Forum Jump: Users browsing this thread: 1 Guest(s) |
|
![[-]](https://www.chinaphonearena.com/forum/images/collapse.png "[-]")


 SORRY for my BAD ENGLISH

Ensure to see the MTK Droid tools guides @ https://www.hovatek.com/forum/thread-468.html and https://www.hovatek.com/forum/thread-455.html to be sure you’re doing things right.
MTK Droid Tools errors and solutions
Below is a list of MTK Droid Tools errors and how to fix them
See the video tutorial below or @ http://youtu.be/AJLgSD9zHb8
- The device isn’t revealed. Connect or reconnect the cable!
Solution: Ensure to install Mediatek drivers using PdaNet and enable USB debugging on the phone
- Error: file adbd not install
Solution: Read https://www.hovatek.com/forum/thread-1219.html to fix it - Insufficient space on device
Solution: Ensure there’s at least 4GB free space on both phone storage and SD card (if supported) then install Busybox on the phone
- Preparation of files for FlashTool is impossible, file isn’t found
Solution: Remove all scatter files in the backup folder except one and rename this last one to MT65??_Android_scatter ( where «??» represents the number for your phone model e.g MT6572_Android_scatter)
- ERROR: Zero file, no space left on device!
Solution: Read https://www.hovatek.com/forum/thread-6407.html
- — ERROR : — TotalBytesPerChunk Not Found. Set default Page/Spare=2048/64 !!!
Solution: Slot in an SD card into the phone and install Busybox on the phone
Ensure the phone is an MTK phone
Download MTK Droid Tools froma different source - ATTENTION! Fake Hardware in kernel or firmware doesn’t correspond to the phone!
Solution: Ignore it. If MTK droid tools still refuses to work then download another copy from a different source
- Preparation of files for flash Tool is impossible . file isn’t found: C:….MT****_Android_scatter*.txt
Solution: Either the backup is incomplete (missing scatter file) or the backup contains two scatter files; in which case you should delete one and try again
- SU inaccessible
Solution: Ensure the phone is rooted. After clickking ROOT, click Yes on PC and Grant on phone. Check the super user application on the phone (might vary with rooting technique) to be sure that ADBis granted root permissions
- — ERROR :No find KernelGZ — ERROR :No Split Boot Image
Solution: Try using the TWRP recovery porting method @ https://www.hovatek.com/forum/thread-5162.html or the Carliv Touch Recovery porting method @ https://www.hovatek.com/forum/thread-182.html
- — ERROR :dev/radio/pttycmd1 inaccessible , should be Root Shell
— ERROR :pttycmd1 device NOT found!Solution: Fix Unknown Baseband by flashing a compatible Stock ROM
- — ERROR during copying files between phone and PC
Solution: Download MTK Droid tools from a different source
- It is impossible to start ADB
Solution: Download MTK Droid tools from a different source
Note!
We have a reply schedule for Free Support. Please upgrade to Private Support if you can’t wait.
(This post was last modified: 25-05-2018, 07:24 PM by hovatek.)
![]()
Posts: 130
Threads: 45
Joined: Oct 2015
Reputation:
0
Pls sir I encounter an error. (It is impossible to start ADB) during d MTK Droid root process… Pls how can I fix it… Email: [email protected]
![]()
Posts: 49,469
Threads: 1,451
Joined: Oct 2013
Reputation:
432
(15-10-2015, 03:48 AM)ridohbest Wrote: Pls sir I encounter an error. (It is impossible to start ADB) during d MTK Droid root process… Pls how can I fix it… Email: [email protected]
Download MTK droid tools from a different source
Note!
We have a reply schedule for Free Support. Please upgrade to Private Support if you can’t wait.
![]()
Posts: 130
Threads: 45
Joined: Oct 2015
Reputation:
0
When I try another source this is what i encounter ‘Error: file adbd not install’
![]()
Posts: 49,469
Threads: 1,451
Joined: Oct 2013
Reputation:
432
(15-10-2015, 03:38 PM)ridohbest Wrote: When I try another source this is what i encounter ‘Error: file adbd not install’
the solution to that is in the guide above
Note!
We have a reply schedule for Free Support. Please upgrade to Private Support if you can’t wait.
![]()
Posts: 130
Threads: 45
Joined: Oct 2015
Reputation:
0
I encounter this error » Preparation of files for FlashTool is impossible, file isn’t found» and have the solution above, but will I delete all the file in the backup file, and which file will leave, also how will I rename the file I leave undelete, with tecno H7
![]()
Posts: 49,469
Threads: 1,451
Joined: Oct 2013
Reputation:
432
(16-10-2015, 04:10 PM)ridohbest Wrote: I encounter this error » Preparation of files for FlashTool is impossible, file isn’t found» and have the solution above, but will I delete all the file in the backup file, and which file will leave, also how will I rename the file I leave undelete, with tecno H7
only the scatter file if there’s more than one
Note!
We have a reply schedule for Free Support. Please upgrade to Private Support if you can’t wait.
![]()
Posts: 130
Threads: 45
Joined: Oct 2015
Reputation:
0
sir what is comfusing is how to identiy the scatter file that i will delete and the one that i will rename
![]()
X3non
Recognized Contributor
![]()
![]()

![]()
![]()
![]()
Posts: 22,062
Threads: 571
Joined: Jul 2014
Reputation:
332
(16-10-2015, 06:26 PM)ridohbest Wrote: sir what is comfusing is how to identiy the scatter file that i will delete and the one that i will rename
* check the backup folder if there is no scatter file then the backup wasn’t successful
* If on the other hand there are 2 scatter files then delete one (anyone)
![]()
Posts: 22,062
Threads: 571
Joined: Jul 2014
Reputation:
332
(16-10-2015, 06:26 PM)ridohbest Wrote: sir what is comfusing is how to identiy the scatter file that i will delete and the one that i will rename
* check the backup folder if there is no scatter file then the backup wasn’t successful
* If on the other hand there are 2 scatter files then delete one (anyone)
Posts: 130
Threads: 45
Joined: Oct 2015
Reputation:
0
i check all the file in the backup folder but there is no file name scatter file and during the backup it write task is complete at the end