
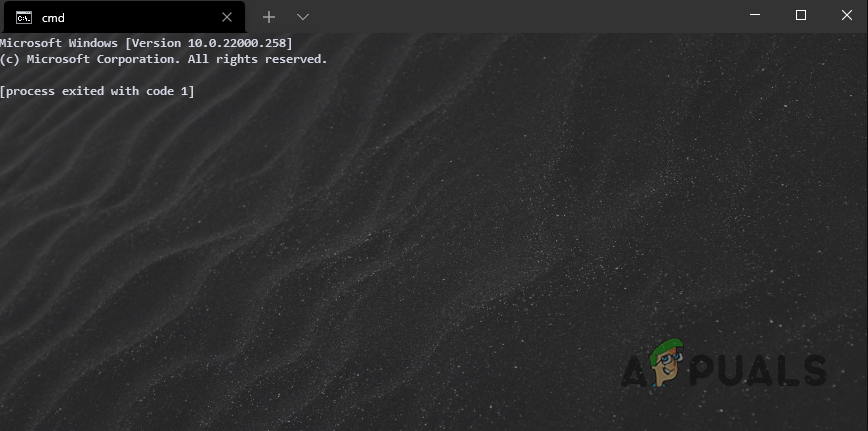
As it turns out, upon opening up a command prompt window, the “Process exited with code 1” error message is shown. In addition to that, there’s no prompt so users cannot use the command prompt at all. This problem usually comes up when you have Anaconda installed on your system which comes with its own Anaconda Prompt along with many other things. In this article, we are going to show you how to resolve the problem in question quite easily so just follow through with the given guidelines.
As it turns out, Anaconda is a famous toolkit for data science that mainly uses the Python and R languages. Since this is a toolkit, there are a number of different tools that come packed with Anaconda. While, normally, the command prompt is not used that much, there are still a lot of cases where it can be really helpful. Like we have mentioned above, the error message in question appears usually when you have installed Anaconda on your system and there is quite an easy remedy to the problem at hand. Thus, without any further ado, let us get started and show you how to resolve the “Process exited with code 1” error message.
Delete Command Processor AutoRun Key
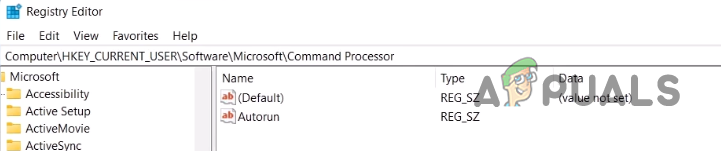
In order to resolve the problem in question, you will have to delete a specific Windows Registry key. As it turns out, it is no surprise that Windows Registry is responsible for how your system behaves and operates. There exists a key inside Windows Registry for Command Processor which essentially refers to the command prompt called AutoRun.
The key is basically used for running a specific task or program automatically when the command prompt is launched. Thus, the name AutoRun. To fix the error message, you will have to get rid of the mentioned key.
Now, there are two ways you can achieve this, one is using a simple command that requires it to be entered in a Powershell window. We would recommend this if you are not versed with using or navigating the Windows Registry. Secondly, you can choose to remove the key manually by navigating to the respective path. We will be mentioning both ways so you can choose whichever suits you best.
Use Powershell
If you wish to go for the simpler approach, simply follow the instructions that are given down below:
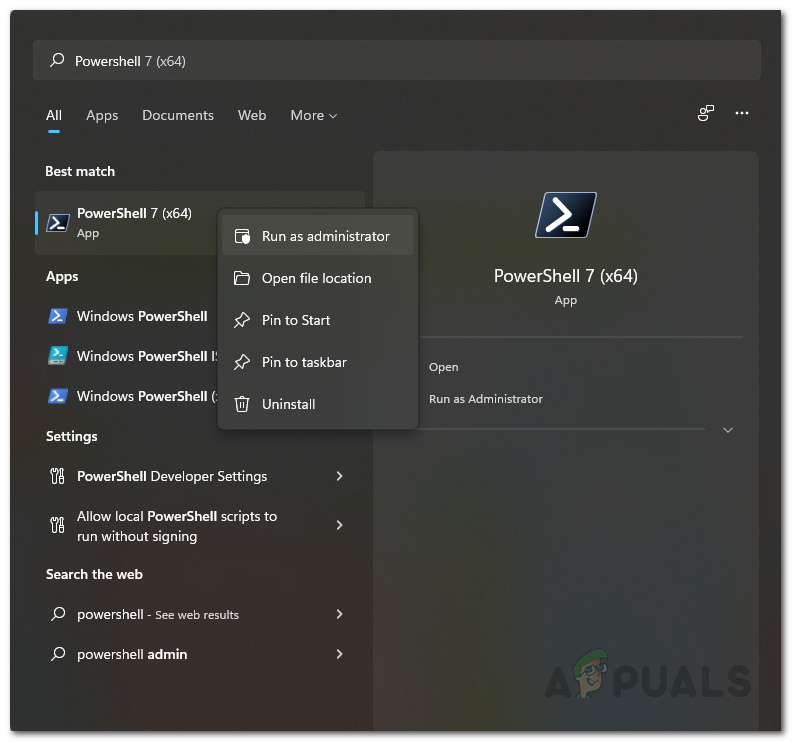
- First of all, open up the Start Menu and search for Powershell. Right-click on it and from the drop-down menu, choose the Run as administrator option.

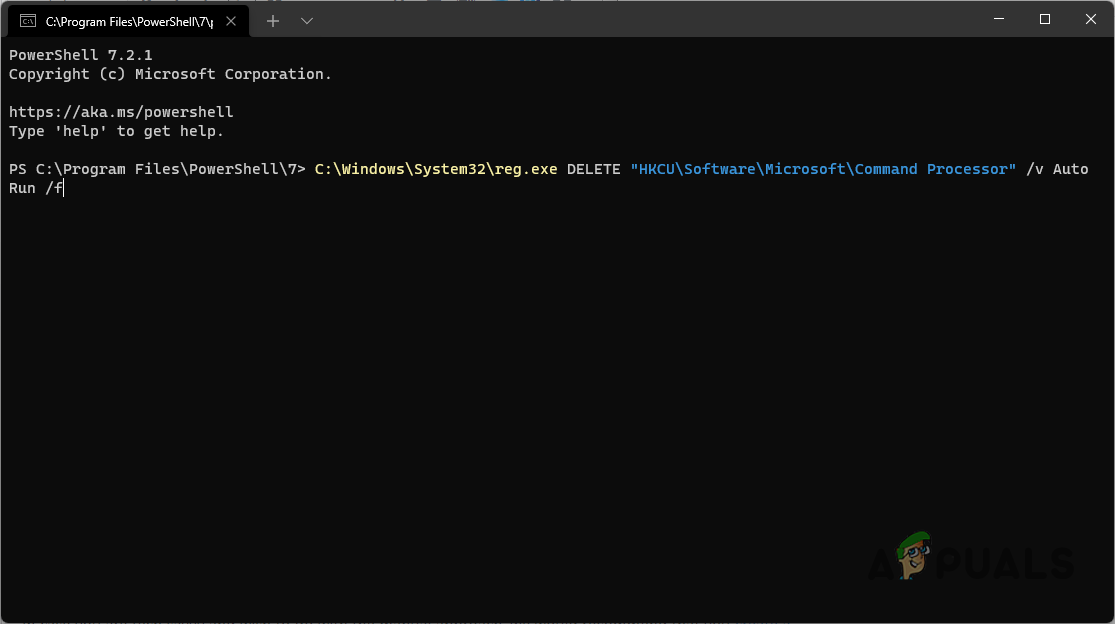
Opening up Powershell as an Administrator - Once the Powershell window is up, type in the following command or simply copy-paste it and then hit the Enter key:
C:WindowsSystem32reg.exe DELETE "HKCUSoftwareMicrosoftCommand Processor" /v AutoRun /f
Deleting AutonRun Key via Powershell - After doing that, go ahead and restart your computer.
- Once your PC boots up, try opening up a command prompt window to see if the error message still appears.
Manually Delete AutoRun Key
In case you are tech-savvy and wish to go with the manual approach, we would recommend that you create a backup of the Windows Registry before proceeding. This is important because any unwanted mistake can render your PC stuck or something of the sort. With that said, follow the instructions that are given down below to do this:
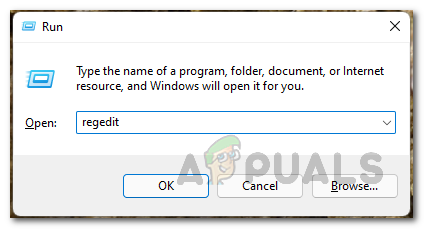
- First of all, open up the Run dialog box by pressing Windows key + R on your keyboard.
- In the Run dialog box, type in Regedit and then hit the Enter key.

Opening up Windows Registry - This will open up the Windows Registry window.
- In the address bar provided at the top, copy and paste the following path:
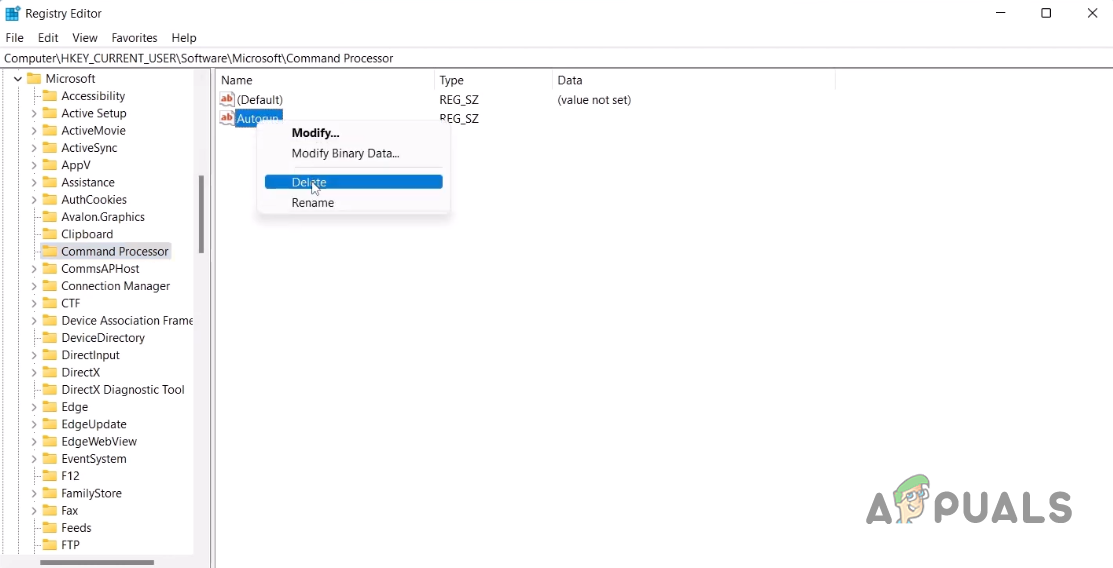
ComputerHKEY_CURRENT_USERSoftwareMicrosoftCommand Processor
Navigating to Command Processor Path in Windows Registry - Once you are there, on the right-hand side, right-click on the AutoRun key provided, and from the drop-down menu, choose the Delete option.

Deleting AutonRun Key - With that done, go ahead and perform a system restart.
- As your PC boots up, open up a command prompt window and see if the error message is still there.
Create a New User Account
Finally, if the above solution has not fixed the problem for you, then in such a case, you can try creating a new user account on your system. This has been reported by other users facing the same error message and who were able to circumvent the problem by creating a new user account. Once you have created a new user account, you can choose to transfer your data to the new user account.
Follow the instructions given down below to create a user account:
- First of all, open up the Windows Settings app by pressing Windows key + I on your keyboard.

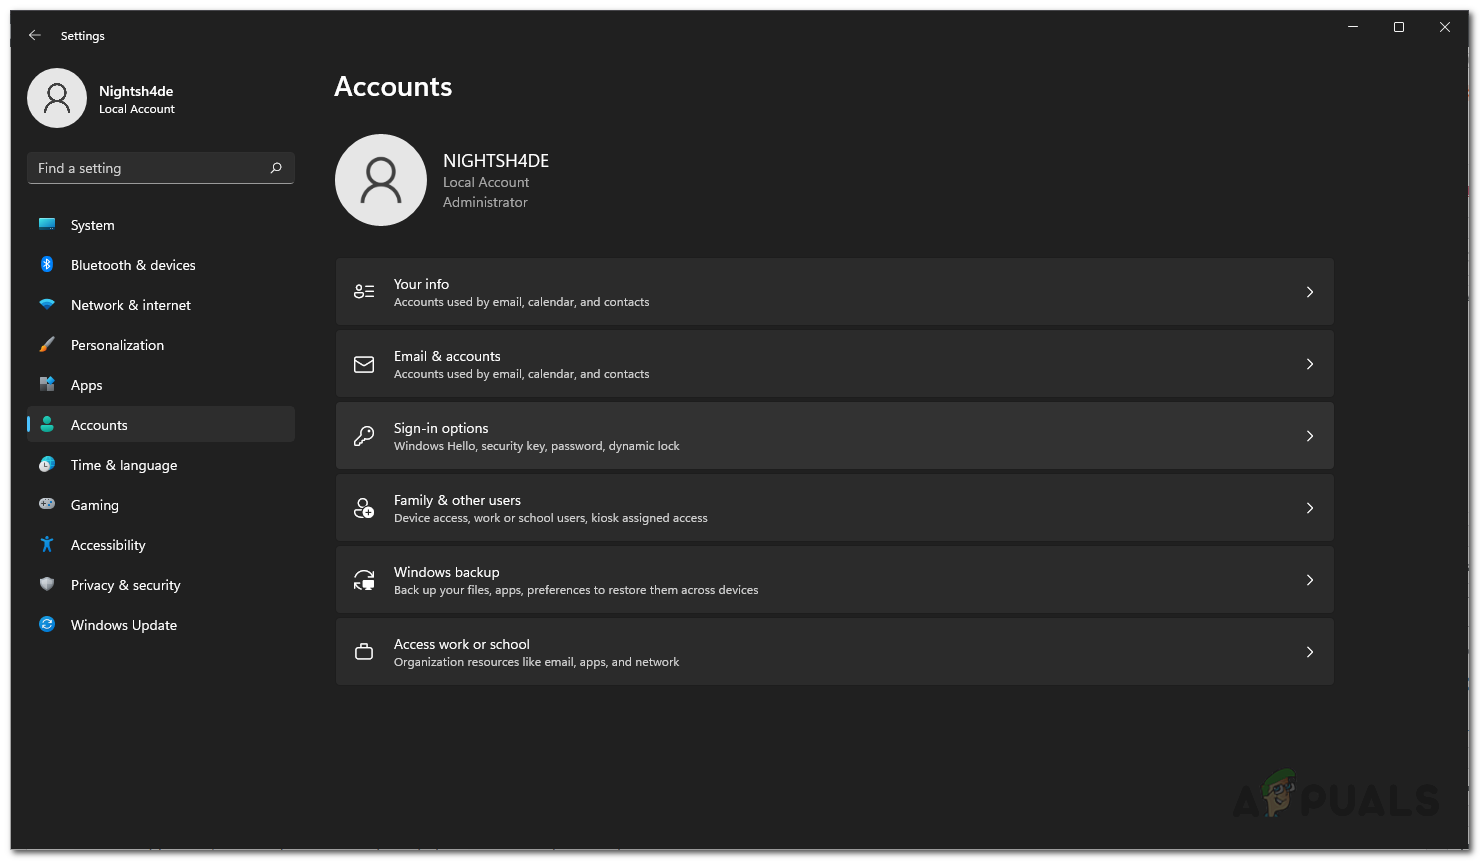
Windows Settings - Then, on the Settings app, navigate to Accounts.
- On the Accounts page, click on the Family & other users option provided.
Accounts Settings - Once you are there, click on the Add account button provided in front of Add other user.

Adding New User Account - Follow the on-screen prompts to create a new user account.


Kamil Anwar
Kamil is a certified MCITP, CCNA (W), CCNA (S) and a former British Computer Society Member with over 9 years of experience Configuring, Deploying and Managing Switches, Firewalls and Domain Controllers also an old-school still active on FreeNode.
Why do I get this error?
«This error», to be clear, is:
2021-03-14T16:04:29.3381472Z ##[error]Process completed with exit code 1.
The process that completed is the shell:
2021-03-14T16:04:29.0215326Z shell: /usr/bin/bash -e {0}
which ran some commands in a script; obviously one of those commands must have exited with status code 1 («generic failure»), which led bash -e to also exit with status code 1.
We can see each command’s output, so we can correlate each command to its output based on knowing what commands print what stuff. Here is the script:
git config --local user.email "action@github.com"
git config --local user.name "GitHub Action"
git checkout -B deploy
git add -f public/
git commit -m "Build front-end assets"
git push -f origin deploy
(I took out the color-changing ESC [ … m sequences since they just get in the way, and stripped the timestamps since they’re not really relevant.) You should recognize these commands: they are the ones you supplied in your YAML file.
Here is the output from each of those commands:
Switched to a new branch 'deploy'
On branch deploy
nothing to commit, working tree clean
Now, git config normally prints nothing, so the two git configs probably succeeded because we saw something printed (the first line). What we saw printed was Switched to a new branch 'deploy'.
This is exactly what the third command, git checkout -B deploy, would print when it succeeds. So we must have reached the third command, which succeeded. That would let us move on to the fourth command, git add -f public/.
The git add command normally prints nothing. So we can’t really be sure if it worked or not at this point, but we do see further output, beginning with On branch .... That definitely doesn’t come from git add, so presumably git add succeeded, which would let us move on to the fifth command, git commit -m [message]. This command does print things, on both success and failure: on success we get a message showing the new commit’s abbreviated hash ID, and on failure, we get git status output:
$ git status
On branch master
Your branch is up to date with 'origin/master'.

nothing to commit, working tree clean
$ git commit -m test
On branch master
Your branch is up to date with 'origin/master'.

nothing to commit, working tree clean
This is, in fact, a failure of sorts: there is nothing to commit, so Git does not make a new commit. Why is there nothing to commit? Because Git’s index matches the current (HEAD) commit. That is, git add -f public/ updated no files. Either public/ is empty, or the files inside public/ match those in the HEAD commit.
If we check the actual exit status from a git commit that fails in this way, it is 1:
$ echo $?
1
So the git commit command is the one that failed, and it failed because there was nothing new to commit.
You have multiple choices for how to proceed:
-
Figure out why there was nothing to commit, when you clearly expected there to be something to commit.
-
Check whether there is anything to commit, and if not, commit nothing.
-
Use
git commit --allow-emptyto instruct Git to make a new commit even if there’s no need for a new commit. (This has the advantage of being extremely simple.) -
Forcibly assume that the
git commitsucceeds even when it fails, by using the(cmd || true)construct, just as you did here:(git push) || true
I put these in approximate order of increasing badness, though some of this is a matter of opinion / judgment.
Note that when diagnosing some script’s failure, there are several approaches that can help if it’s not immediately obvious which command within the script failed. For instance, here, it was clear that git commit failed, because only git commit winds up acting like git status, and it does that precisely when it’s going to fail with a «nothing to commit» message. But what if it were some other, more-ambiguous failure? One can narrow down these failures by adding echo commands, so that we know which part(s) of the script are running. Or, if it doesn’t interfere too much with other things, we can set -x in a bash script: this causes the shell to print out, to standard error output, a + line for each command it actually runs, just before running it. This would immediately pin the exit status to the command that produced it.
EDIT: I have appended the output of cat /etc/default/grub to the question below
This was in fact the key to solving the issue. I think it’s worth noting that not having quotes around the OS assigned to GRUB_DEFAULT in /etc/default/grub didn’t actually present a problem for quite some time after I had set it(months). This may be because GRUB_DEFAULT was initially set from another linux in my dual boot setup.
I have looked at other questions regarding this error, but haven’t found one that helps me, so far.
I am getting the below error when I do:
sudo apt-get upgrade
or a dist-upgrade
I have tried purging the packages mentioned in the error(as per answers to other questions with the same error)
linux-image-extra-3.19.0-25-generic
linux-image-3.19.0-25-generic
with
sudo apt-get remove --purge <the packages>
and
sudo dpkg --purge <the packages>
But in both instances, I get basically the same error output as below. Can anyone help me resolve this?
Error:
yerman@DeepThought:~$ sudo apt-get upgrade
Reading package lists... Done
Building dependency tree
Reading state information... Done
Calculating upgrade... Done
The following packages will be REMOVED
  linux-image-3.19.0-25-generic linux-image-extra-3.19.0-25-generic
0 to upgrade, 0 to newly install, 2 to remove and 0 not to upgrade.
5 not fully installed or removed.
After this operation, 209 MB disk space will be freed.
Do you want to continue? [Y/n] y
(Reading database ... 529837 files and directories currently installed.)
Removing linux-image-extra-3.19.0-25-generic (3.19.0-25.26) ...
depmod: FATAL: could not load /boot/System.map-3.19.0-25-generic: No such file or directory
run-parts: executing /etc/kernel/postinst.d/apt-auto-removal 3.19.0-25-generic /boot/vmlinuz-3.19.0-25-generic
run-parts: executing /etc/kernel/postinst.d/initramfs-tools 3.19.0-25-generic /boot/vmlinuz-3.19.0-25-generic
update-initramfs: Generating /boot/initrd.img-3.19.0-25-generic
grep: /boot/config-3.19.0-25-generic: No such file or directory
depmod: WARNING: could not open /tmp/mkinitramfs_6wsANd/lib/modules/3.19.0-25-generic/modules.order: No such file or directory
depmod: WARNING: could not open /tmp/mkinitramfs_6wsANd/lib/modules/3.19.0-25-generic/modules.builtin: No such file or directory
run-parts: executing /etc/kernel/postinst.d/pm-utils 3.19.0-25-generic /boot/vmlinuz-3.19.0-25-generic
run-parts: executing /etc/kernel/postinst.d/unattended-upgrades 3.19.0-25-generic /boot/vmlinuz-3.19.0-25-generic
run-parts: executing /etc/kernel/postinst.d/update-notifier 3.19.0-25-generic /boot/vmlinuz-3.19.0-25-generic
run-parts: executing /etc/kernel/postinst.d/zz-update-grub 3.19.0-25-generic /boot/vmlinuz-3.19.0-25-generic
/usr/sbin/grub-mkconfig: 6: /etc/default/grub: Syntax error: "(" unexpected
run-parts: /etc/kernel/postinst.d/zz-update-grub exited with return code 2
dpkg: error processing package linux-image-extra-3.19.0-25-generic (--remove):
 subprocess installed post-removal script returned error exit status 1
Removing linux-image-3.19.0-25-generic (3.19.0-25.26) ...
Examining /etc/kernel/postrm.d .
run-parts: executing /etc/kernel/postrm.d/initramfs-tools 3.19.0-25-generic /boot/vmlinuz-3.19.0-25-generic
update-initramfs: Deleting /boot/initrd.img-3.19.0-25-generic
run-parts: executing /etc/kernel/postrm.d/zz-update-grub 3.19.0-25-generic /boot/vmlinuz-3.19.0-25-generic
/usr/sbin/grub-mkconfig: 6: /etc/default/grub: Syntax error: "(" unexpected
run-parts: /etc/kernel/postrm.d/zz-update-grub exited with return code 2
Failed to process /etc/kernel/postrm.d at /var/lib/dpkg/info/linux-image-3.19.0-25-generic.postrm line 328.
dpkg: error processing package linux-image-3.19.0-25-generic (--remove):
 subprocess installed post-removal script returned error exit status 1
Errors were encountered while processing:
 linux-image-extra-3.19.0-25-generic
 linux-image-3.19.0-25-generic
E: Sub-process /usr/bin/dpkg returned an error code (1)
Output of cat /etc/default/grub
# If you change this file, run 'update-grub' afterwards to update
# /boot/grub/grub.cfg.
# For full documentation of the options in this file, see:
#   info -f grub -n 'Simple configuration'

GRUB_DEFAULT=Windows 7 (loader) (on /dev/sda2)
#GRUB_HIDDEN_TIMEOUT=0
GRUB_HIDDEN_TIMEOUT_QUIET=true
GRUB_TIMEOUT=30
GRUB_DISTRIBUTOR=`lsb_release -i -s 2> /dev/null || echo Debian`
GRUB_CMDLINE_LINUX_DEFAULT="acpi=noirq acpi=force apm=power_off"
GRUB_CMDLINE_LINUX=""

# Uncomment to enable BadRAM filtering, modify to suit your needs
# This works with Linux (no patch required) and with any kernel that obtains
# the memory map information from GRUB (GNU Mach, kernel of FreeBSD ...)
#GRUB_BADRAM="0x01234567,0xfefefefe,0x89abcdef,0xefefefef"

# Uncomment to disable graphical terminal (grub-pc only)
#GRUB_TERMINAL=console

# The resolution used on graphical terminal
# note that you can use only modes which your graphic card supports via VBE
# you can see them in real GRUB with the command `vbeinfo'
#GRUB_GFXMODE=640x480

# Uncomment if you don't want GRUB to pass "root=UUID=xxx" parameter to Linux
#GRUB_DISABLE_LINUX_UUID=true

# Uncomment to disable generation of recovery mode menu entries
#GRUB_DISABLE_RECOVERY="true"

# Uncomment to get a beep at grub start
#GRUB_INIT_TUNE="480 440 1"
Introduction
The error message “Sub-process /usr/bin/dpkg returned an error code (1)” indicates a problem with the package installer. This can happen in Ubuntu after a failed software installation, or if the installer becomes corrupted.
The key phrase in this error is /usr/bin/dpkg. This refers to the dpkg package installer for Linux. A package installer is an application that tracks software, updates, and dependencies. If it is damaged, any new software installation will cause this error message.
We cover several possible solutions, from easily-solved and straightforward solutions to more complex processes. This guide will help you resolve the dpkg returned an error code 1 on an Ubuntu operating system.
Prerequisites
- A user account with sudo privileges
- A terminal window/command-line (Ctrl–Alt–T)

Method 1: Reconfigure dpkg Database
If your package database has become corrupted, reconfiguring it can repair it.
Enter the following command:
sudo dpkg --configure -aThis command reconfigures packages that have been unpacked but not necessarily installed. An interruption at the wrong time can cause this database to become corrupt. This is especially helpful if you were running installation and the process was interrupted.
Method 2: Force-Install the Software
If Method 1 does not work, you can attempt to fix the dependencies in the package installer.
Enter the following:
sudo apt-get install -fThe -f option means fix-broken. It repairs any broken dependencies in your package manager. Broken dependencies occur when a download is interrupted, or there is a problem with the cached download.
Note: Dependencies are other software packages that are required by the software you are installing. A package manager helps keep track of dependencies for you.
Method 3: Remove Bad Software Package
If you know which software caused the errors on your system, you can remove it.
Enter the command and package_name with the name of the software that is causing the problem:
sudo apt-get remove --purge package_nameThe --purge option directs the system to remove config files in addition to uninstalling. This helps get rid of all traces of the offending software.
Method 4: Clean Out Unused Software Packages
If an old, outdated, or unused package is causing the problem, you can solve the problem by removing unused software packages.
Enter the following command in the terminal:
sudo apt autoremoveNote: Avoid the next 2 options unless all other methods have failed.
Method 5: Remove Post Files
If you know the name of the package that is causing problems, you can delete the files manually. The installation files are usually located in the /var/lib/dpkg/info file.
Type in the following command and replace package_name with the name of the broken software.:
sudo ls -l /var/lib/dpkg/info | grep -i package_nameThis will generate a list of all references to the software you installed.
You can then remove them by entering:
sudo mv /var/lib/dpkg/info/package_name.* /tmpThis command moves the files to the /tmp directory, where they cannot affect your package manager.
Next, update the package manager:
sudo apt-get updateAfter which you can re-install the broken software again.
Method 6: Overwrite Package File
If you know the name of the package that is causing a problem, you can force an overwrite.
Use the following command and replace full_name_of_package with the actual package name:
sudo dpkg -i --force-overwrite /var/cache/apt/archives/full_name_of_packageNote: If you do not know the actual name of the package, you can search for it with the following command:
ls /var/cache/apt/archies/*package_name*Replace package_name with the name of your software. This should return any instances of that package name. Note the exact filename, and type it into the previous command.
Conclusion
The dpkg error message indicates that there is a problem with the package installer, which is commonly caused by an interrupted installation process or a corrupted database.
By following these steps, you should now have several methods to fix the dpkg error message and attain a working package installer.
I’m having trouble upgrading rsyslog on a Debian server.
root@trip:/home# apt-get upgrade
Reading package lists... Done
Building dependency tree
Reading state information... Done
Calculating upgrade... Done
0 upgraded, 0 newly installed, 0 to remove and 0 not upgraded.
1 not fully installed or removed.
After this operation, 0 B of additional disk space will be used.
Do you want to continue? [Y/n] y
Setting up rsyslog (8.4.2-1+deb8u2) ...
Job for rsyslog.service failed. See 'systemctl status rsyslog.service' and 'journalctl -xn' for details.
invoke-rc.d: initscript rsyslog, action "start" failed.
dpkg: error processing package rsyslog (--configure):
 subprocess installed post-installation script returned error exit status 1
Errors were encountered while processing:
 rsyslog
E: Sub-process /usr/bin/dpkg returned an error code (1)
Output of systemctl status rsyslog.service:
â rsyslog.service - System Logging Service
   Loaded: loaded (/lib/systemd/system/rsyslog.service; enabled)
   Active: failed (Result: start-limit) since Mon 2016-01-25 09:54:17 CET; 3min 43s ago
     Docs: man:rsyslogd(8)
           http://www.rsyslog.com/doc/
  Process: 27385 ExecStart=/usr/sbin/rsyslogd -n (code=exited, status=1/FAILURE)
 Main PID: 27385 (code=exited, status=1/FAILURE)

Jan 25 09:54:16 trip systemd[1]: Failed to start System Logging Service.
Jan 25 09:54:16 trip systemd[1]: Unit rsyslog.service entered failed state.
Jan 25 09:54:17 trip systemd[1]: rsyslog.service start request repeated too quickly, refusing to start.
Jan 25 09:54:17 trip systemd[1]: Failed to start System Logging Service.
Jan 25 09:54:17 trip systemd[1]: Unit rsyslog.service entered failed state.
Jan 25 09:54:17 trip systemd[1]: rsyslog.service start request repeated too quickly, refusing to start.
Jan 25 09:54:17 trip systemd[1]: Failed to start System Logging Service.
Output of journalctl -xn:
-- Logs begin at Sun 2016-01-24 18:29:42 CET, end at Mon 2016-01-25 09:54:17 CET. --
Jan 25 09:54:16 trip systemd[1]: Unit rsyslog.service entered failed state.
Jan 25 09:54:16 trip systemd[1]: rsyslog.service: main process exited, code=exited, status=1/FAILURE
Jan 25 09:54:16 trip systemd[1]: Failed to start System Logging Service.
-- Subject: Unit rsyslog.service has failed
-- Defined-By: systemd
-- Support: http://lists.freedesktop.org/mailman/listinfo/systemd-devel
--
-- Unit rsyslog.service has failed.
--
-- The result is failed.
Jan 25 09:54:16 trip systemd[1]: Unit rsyslog.service entered failed state.
Jan 25 09:54:17 trip systemd[1]: rsyslog.service start request repeated too quickly, refusing to start.
Jan 25 09:54:17 trip systemd[1]: Failed to start System Logging Service.
-- Subject: Unit rsyslog.service has failed
-- Defined-By: systemd
-- Support: http://lists.freedesktop.org/mailman/listinfo/systemd-devel
--
-- Unit rsyslog.service has failed.
--
-- The result is failed.
Jan 25 09:54:17 trip systemd[1]: Unit rsyslog.service entered failed state.
Jan 25 09:54:17 trip systemd[1]: rsyslog.service start request repeated too quickly, refusing to start.
Jan 25 09:54:17 trip systemd[1]: Failed to start System Logging Service.
-- Subject: Unit rsyslog.service has failed
-- Defined-By: systemd
-- Support: http://lists.freedesktop.org/mailman/listinfo/systemd-devel
--
-- Unit rsyslog.service has failed.
--
-- The result is failed.
Jan 25 09:54:17 trip systemd[1]: Unit syslog.socket entered failed state.
I’ve removed rsyslog and then tried to reinstall it, but that didn’t help. And apt-get -f install throws the same error as apt-get upgrade. So now I seem to be stuck with a half-configured rsyslog. How can I fix this?
Edit: the output of systemctl status syslog.service:
â rsyslog.service - System Logging Service
   Loaded: loaded (/lib/systemd/system/rsyslog.service; enabled)
   Active: failed (Result: start-limit) since Mon 2016-01-25 11:14:36 CET; 3min 49s ago
     Docs: man:rsyslogd(8)
           http://www.rsyslog.com/doc/
  Process: 31319 ExecStart=/usr/sbin/rsyslogd -n (code=exited, status=1/FAILURE)
 Main PID: 31319 (code=exited, status=1/FAILURE)

Jan 25 11:14:36 trip systemd[1]: Failed to start System Logging Service.
Jan 25 11:14:36 trip systemd[1]: Unit rsyslog.service entered failed state.
Jan 25 11:14:36 trip systemd[1]: rsyslog.service start request repeated too quickly, refusing to start.
Jan 25 11:14:36 trip systemd[1]: Failed to start System Logging Service.
Jan 25 11:14:36 trip systemd[1]: Unit rsyslog.service entered failed state.
Jan 25 11:14:36 trip systemd[1]: rsyslog.service start request repeated too quickly, refusing to start.
Jan 25 11:14:36 trip systemd[1]: Failed to start System Logging Service.