
Сегодня зашёл в Call of Duty: Modern Warfare II (2022) и обнаружил такую проблему. Полез на форумы, на основе комментариев оттуда попытался зайти в игру со включённым VPN, поменять DNS на общеизвестный Google’вский, проверить целостность файлов (Steam даже что-то докачал), но это не помогло.
Однако, ещё немного порывшись в обсуждениях сообщества игры в Steam, я нашёл сработавший для меня способ решения проблемы:
- Нажимаем Windows + R. Появится окно «Выполнить»;
- Вводим regedit. Откроется редактор реестра;
- В адресную строку вбиваем: HKEY_LOCAL_machinesystemControlSet001ControlSecurityProvidersschannel и нажимаем Enter;
- Нажимаем Правка — Создать — Параметр DWORD (32 бита).
- Называем его ManualCredValidation.
- Кликаем по нему правой кнопкой мыши и нажимаем Изменить.
- В строке Значение вместо цифры 0 вбиваем 1. Систему исчисления оставляем шестнадцатеричной.
- Запускаем игру. Шаг с сетевыми службами игра почти сразу должна пропустить, если же этого не происходит — пересоздайте параметр, предварительно выйдя из игры.
- Параметр из реестра не удаляем, иначе проблема восстановится. После успешного входа вы можете поменять значение на 0 для отключения проверки сертификатов.
Что интересно, проблема возникла у многих российских (потому что на том же тематическом сабреддите по теме за последнюю неделю я ничего не нашёл) игроков с 26 мая, когда в игре запустили двойной опыт на уровень, оружие и боевой пропуск, что продлится до 30 мая (20:00 по МСК).
[Обновлено 30 мая, в 21:18 по МСК] Мне написал пользователь Влад Локтионов, который сообщил, что подобная проблема возникает не только в Modern Warfare 2022, но и в Call of Duty: Vanguard, Call of Duty: Black Ops Cold War, Call of Duty: Modern Warfare 3 (2011) и других классических играх серии (хоть и называется по-разному). Впрочем, решается она точно также.
gad2011
18 ноября 2014
Народ вылазит такая ошибка, уже и не знаю что делать, стим переустановил овер9000 раз, игру тоже, сейчас последний раз снесу полностью стим и AW и попробую, но все же если не поможет то что делать!?
Пользователи Steam на ПК уже около 10 лет сталкиваются с ошибкой steam_api.dll, в сообщении сказано, что система не обнаружила steam_api.dll. Данная ошибка может звучать на английском языке со словами «could not find» или «not found». В любом случае, суть одна – не удалось найти данный файл на компьютере. При чем проблема может появляться как на устройствах с Windows 7, так и Windows 10. В силу неизвестных причин, пользователи некоторых игр сталкиваются с поломкой чаще. В сети преобладают просьбы помочь с запуском Call of Duty: Modern Warfare 3, но в зоне риска и любые другие игры.
Почему не удалось обнаружить steam_api.dll?
Файл steam_api64.dll нужен для того, чтобы игры могли взаимодействовать с сервисом Steam. Без него не может работать как игровой «менеджер» Steam, так и сама игра. Данное сообщение свидетельствует об одной из двух поломок: файл был поврежден (перемещен и т. п.) или полностью отсутствует в системе. Здесь не имеет большого значения, игра лицензионная или взломанная. Проблема может появиться в любом приложении библиотеки, но в некоторых из них сбой появляется чаще. Несмотря на данный факт, решения одинаковы для всех игр.
Читайте также: Как запустить старую игру на Windows 10?
Как исправить ошибку steam_api.dll?
Если не удалось обнаружить steam_api64.dll, значит нам нужно его восстановить. Обычно это происходит либо вручную, либо в автоматическом режиме, вместе с тем софтом, которому он принадлежит. Очевидно, что речь идет о самих играх и Steam-клиенте. Но также проблема может быть в антивирусе, который распознает данный файл в качестве вируса и блокирует его. О всех вариантах развития ситуации поговорим дальше.
Способ 1: скачивание и регистрация файла
Первое, что приходит в голову — скачать steam_api.dll и система снова сможет работать. На самом деле не всегда это срабатывает, но попробовать стоит. Здесь важны несколько нюансов: скачать подходящий файл (с нужной разярдностью и не зараженный вирусом), положить его в правильное место и зарегистрировать в системе. Все это мы сделаем в рамках следующей инструкции.
Как скачать и установить файл steam_api.dll:
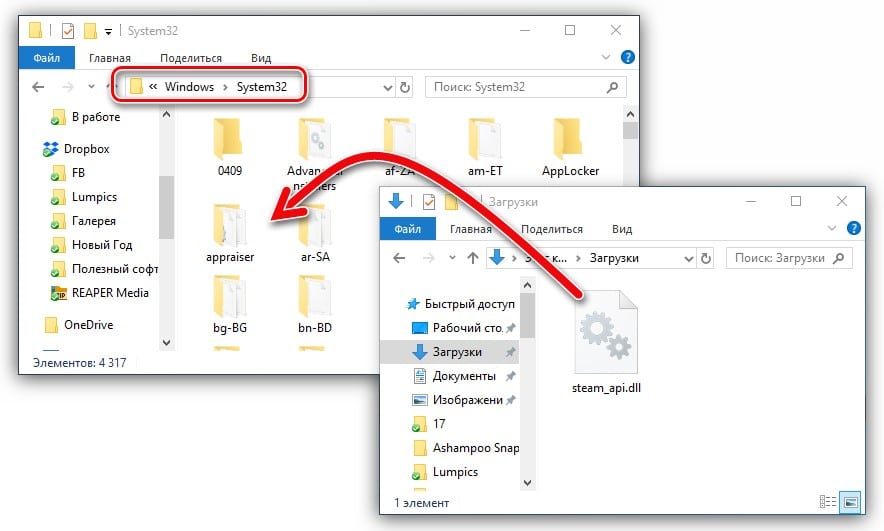
- Загружаем steam_api.dll для Windows 10 (или другой версии операционной системы). Например, это можем сделать по данной ссылке. Важно смотреть не только на ОС, но и разрядность: 32 или 64 бит.
- Копируем файл в том место, где он должен быть. Первый способ узнать его – посмотреть в сообщении об ошибке, там может быть написано, куда система обращается за этим файлом. Чаще всего это С:WindowsSysWOW64. Также он может потребоваться в папке с игрой внутри раздела D:Games
- Клавишами Win + X открываем меню Пуск и выбираем «Командная строка».
- Вставляем команду regsvr32 steam_api.dll и жмем Enter.
После регистрации DLL-библиотеки, самое время проверить, запускается ли CoD:MW3 или другая игра, с которой были проблемы.
Читайте также: Ошибка «Не обнаружен XINPUT1_3.dll»
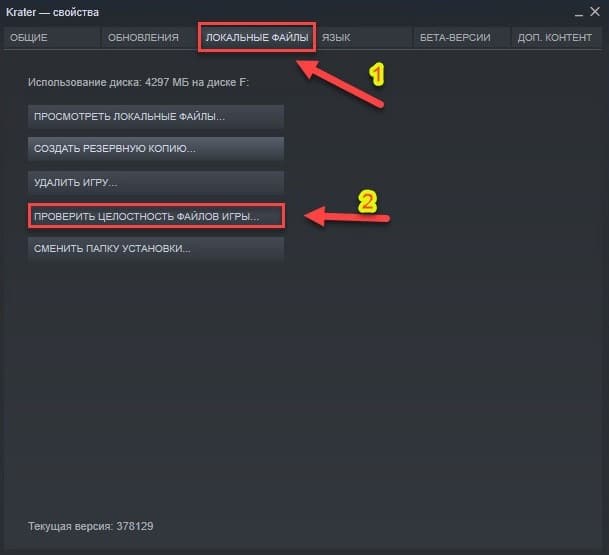
Способ 2: проверка целостности файлов Steam
Так как проблема может затрагивать поломку файлов игры, а сам steam_api.dll участвует во взаимодействии платформы с ней, помочь может проверка целостности. В Steam есть такая функция и некоторым пользователям она помогла.
Что делать, если отсутствует steam_api.dll:
- Открываем «Библиотеку» в Steam.
- Нажимаем правой кнопкой мыши по проблемной игре и переходим в «Свойства».
- На вкладке «Локальные файлы» нажимаем на клавишу «Проверить целостность файлов игры».
Способ 3: восстановление файла из карантина
Если данный файл был заблокирован встроенным или сторонним антивирусом, скорее всего его можем разблокировать. Достаточно вручную указать, что мы доверяем разработчику данного элемента и он может использоваться. Для примера мы используем «Защитник Windows», но сам принцип аналогичен во всех защитных приложениях.
Как исправить проблему с файлом steam_api.dll:
- Открываем «Защитник Windows». Обычно он свернут в трее или находится на панели задач, но также его всегда можно найти через поиск.
- Переходим на страницу «Журнал» и выбираем «Все обнаруженные элементы».
- Выбираем нужный нам файл и нажимаем на кнопку «Разрешить».
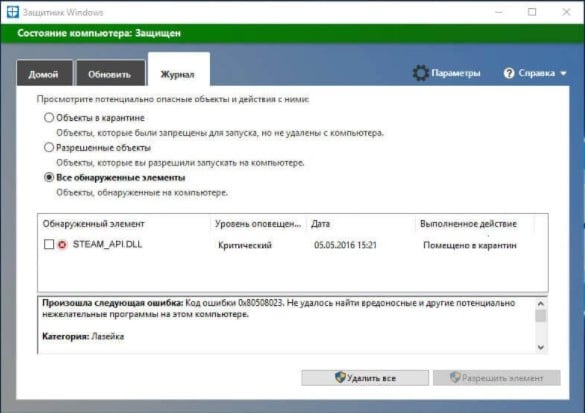
Это потенциально опасно, так как файл мог быть модифицирован вирусом. Особенно высоки риски у тех, кто скачивал его с интернета.
Читайте также: Как подключить джойстик к компьютеру Windows 10?
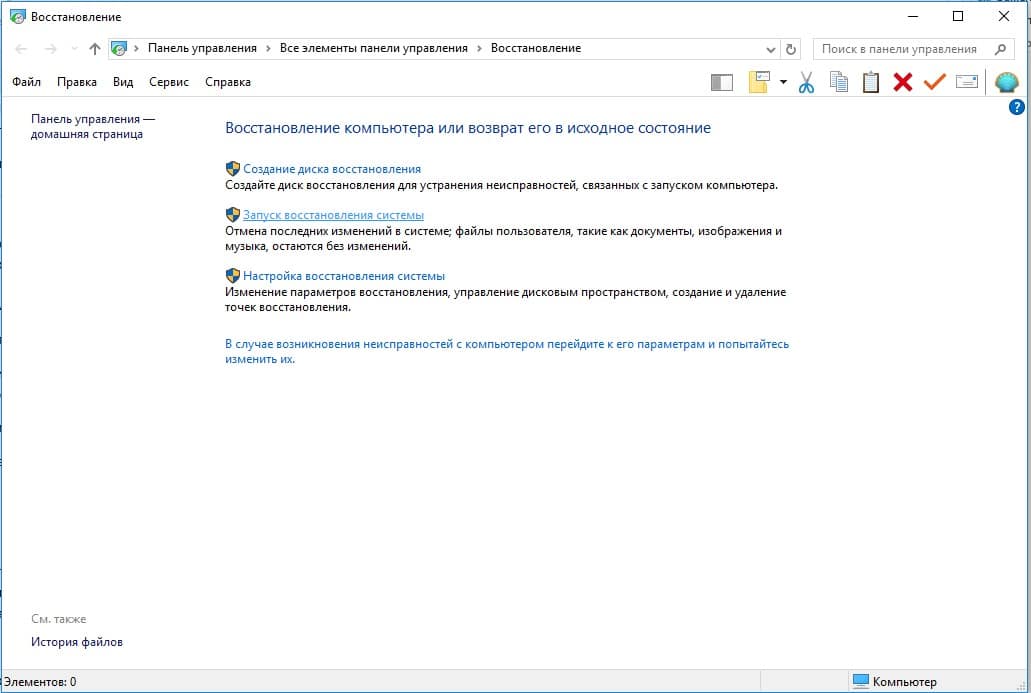
Способ 4: откат к точке восстановления
Windows можно восстановить к более стабильному состоянию, если ранее были сделаны точки отката. Обычно они генерируются автоматически при выполнении критически важных изменений операционной системы, но могут быть созданы и вручную. Если у вас есть данная точка, советуем ей воспользоваться.
Что нужно сделать:
- Вводим в поиск «Восстановление» и открываем элемент панели управления с точно таким названием.
- Выбираем вариант «Запуск восстановления системы».
- Следуем подсказкам мастера установки.
Способ 5: переустановка Steam
Один из самых действенных способов – полностью переустановить Steam. Это часто срабатывает и не влечет каких-то сложностей. После повторной авторизации в своем аккаунте все данные пользователя будут восстановлены, а ранее установленные игры будут найдены автоматически. Только лучше в момент удаления очистить следы программы. Чтобы полностью удалить Steam и избавиться от остаточных файлов, советуем использовать iObit Uninstaller. Он подчистит файлы на компьютере и реестр, а новая установка будет с чистого листа.
Что еще может помочь?
Есть еще несколько действий, которые могут помочь у отдельных пользователей. Они срабатывают реже, чем предыдущие, но в крайнем случае попробовать можно.
Советы по устранению ошибки:
- Обновляем драйвера на видеокарту. Достаточно скачать их с официального сайта производителя и установить.
- Заново устанавливаем DirectX. Просто скачиваем установщик с сайта Microsoft и запускаем его. В идеале нужно удалить старую версию ПО и только потом установить заново.
- Обновляем Windows.
Одно из перечисленных действий должно сработать и steam_api.dll будет восстановлен, а значит сообщение об отсутствующем файле исчезнет и появится возможность запустить любую игру.
krehssi
krehssi написал:
…скачал пиратскую Call of Duty Black Ops, и когда я ее запустил открывается Стим…
Возможно был Стим-рип и т.п., но из-за плохого эмулятора, либо блокировки таблетки антивирусом и т.п., запустилось через Стим.
…папки CODEX не было
Она не всегда в раздаче бывает, особенно если пиратка — репак. Репакеры встраивают лекарство в раздачу, устанавливается автоматически.
…что делать ?…
На время установки отключать антивирусы, «защитники» и т.п. и до запуска пиратки лучше отключать инет — чтобы игра в сеть не полезла. Если пиратка с возможностью играть по сети (бывает и такое) — внимательно читать инструкцию в раздаче.
Сейчас искать в «карантине» антивируса удалённый кряк (если остался) и восстанавливать, а потом запускать игру без него. Если его там нет — либо искать лекарство отдельно, либо заново игру переустанавливать, предварительно отключив всю защитную ерунду.
Лучше головы антивируса нет — если заранее думать что и откуда качать, можно подобным софтом не пользоваться. Если качать откуда попало, типа: «…бесплатно, без регистрации и СМС…» — рано или поздно можно что-нибудь на комп «подцепить», не факт что антивирус (и т.п.) спасёт.
If you come across any game breaking bug, error and or any other issue you need to troubleshoot when playing Call of Duty: Black Ops, you can troubleshoot by following our step by step instructions!
Call of Duty: Black Ops Errors and Fixes
If you are among these unlucky folks trying to run Call of Duty: Black Ops and are facing random, crashes, freezes, and other performance issues, please refer to the troubleshooting guide below to fix these issues.
Before you start: Where to find your config file
Call of Duty: Black Ops config file is located here:
C:Program FilesSteamsteamappscommonCall of Duty Black Opsplayers
It should be named as: “config_mp.txt”. Open with notepad and you will be able to apply the tweaks in there.
Steam Connection Lost, Fix
If you are experiencing the constant connection issues to Steam, you need to be patient as the good guys at Steam are on the problem to fix it.
We are aware of the connection issues occurring on Steam and are working to correct them. Thank you for your patience. – DerrickG
Lag Fix – 100% System Resources Usage
If you are experiencing lag because your system usage goes up to 100% when you start Call of Duty: Black Ops, you can try the following workaround.
- Run Steam in Offline mode.
- Start Black Ops.
- End the steam.exe process in Task Manager.
Game Unavailable – Steam
Gazillion people are trying to download the game from Steam, and thus, servers are too busy to handle your request. Retry downloading the game in a few minutes. Alternatively, try restarting Steam and trying again.
Game Crashes After Changing Resolution
There was a common bug where the game will crash if you try to change your ingame resolution. Same happens if you ALT-TAB during the game.
Steam Goes Offline while Joining Multiplayer Games
This may be a resources related issue. Try running the game in windowed mode to check if the issue still persists.
How to Change FoV
From the Main Menu, press the console key ` and type in
/cg_fov x
where x can be any value.
No In-game Sound
There is a common issue that even though the game boots just fine, there is now audio. This issue also persists in another Call of Duty game: World at War.Here are some of the workarounds that might help you tackle this issue:
Solution #1
1. Start Game.
2. Press [ALT] + [TAB]
3. Navigate to the bottom corner of the screen, and find the speaker button.
4. Now, either right click on the speaker button and and choose “open volume mixer” or left click on it and click “Mixer” that should be underneath the volume slider.
5. You should now see Call of Duty: Black Ops volume control, drag it up to the top.
Solution #2
Go to Control Panel> Hardware and Sound> Sound > Click on Communications Tab and select the “Do Nothing” radio button. This should permanently fix the audio ingame.
Solution #3
If you notice that the whole system sound is muted the moment you open the game, press [ALT] + [TAB] and un-mute the sound.
Solution #4
You can also force the game to run in Compatibility Mode to tackle this issue. Find the EXE in the steam folder, right-click the game EXE file and head into Compatibility menu. Choose “Run in Windows XP SP3” and press Apply. Now try running the game.
Solution #5
If the game is unable to correctly recognize your audio output device, perform the following steps:
- Go into the installation folder
- Head into the redist folder
- And finally into the DirectX folder
- Run DXsetup and install it.
- After that, reboot the game and head into Settings > Audio. You should be able to change your audio device there.
Solution #6
- Right click on the speaker button
- Select Playback Devices
- Choose the sound device you use by default
- click Properties
- Head into Advanced Tab and select 16bit, 48000hz(DVD quality).
Note: If all else fails, update your sound card drivers.
Game Doesn’t Boot
First if you have downloaded the game from Steam, try to run the game from the installation directory. If you get the dll missing error, do an integrity check to see if you have missed any files, Steam will automatically download these files.
Verify integrity of game cache. Right click on ‘Call of Duty: Black Ops’ in Steam > Properties and Local Files > “Verify Game Integrity of Local Files”.
Start the Singleplayer mode, and then you can go into Multiplayer. This might fix this issue for some.
Call of Duty: Black Ops Freezes
If the game freezes while trying to play online, you might be having a network problem. Try checking your router to see if that is the case.
Alternatively:
If you are experiencing freezes while playing the game on console, try running the game from disk. Do make sure your disk does not have any major scratches or any other sort of physical damage.
If you are experiencing freezes on PC, make sure you have updated your video card drivers. Disable any antivirus or firewall you have installed and see if that resolves the game freezing. If game doesn’t stop freezing randomy, you can try running the game in windowed mode.
- Go to Black Ops installation directory
- Open the Players directory
- Open the Config.cfg file in Notepad
- Search for the line seta r_fullscreen “1”
- Change the line to seta r_fullscreen “0”
- Re-run the game.
Call of Duty: Black Ops Crash on Startup
Install the DirectX version that should be located here.
steamappscommoncall of duty black opsRedistDirectXDXSETUP.exe
Call of Duty: Black Black Ops Crash on Startup to Desktop
Install the DirectX version that should be located here.
steamappscommoncall of duty black opsRedistDirectXDXSETUP.exe
Call of Duty: Black Ops Black Screen Fix
Run the game in your native desktop resolution or at 640×480 resolution.
Call of Duty: Black Ops Multiplayer Port Forwarding
You need to bind all inbound and outbound traffic to these ports:
Nintendo Wii – TCP [443, 3074] UDP [3074, 3075]
PC – TCP [3074] UDP [3074]
PlayStation 3 – TCP [80, 81, 443, 3074, 5223] UDP [3074, 3075, 3478]
Xbox 360 – TCP [80] UDP [88, 3074, 22728, 33233]
Call of Duty: Black Ops Stuttering Fix
If you are experiencing stuttering while playing Call of Duty: Black Ops, try the following workaround.
- Open Task Manager.
- Right click on ‘Call of Duty: Black Ops’ process.
- Set Affinity and select ‘one CPU’.
Black Ops 100% Resource Usage Fix
- Launch the game, and bring up the server list. Since the server list should be lagging for many people, you may want to quickly navigate to the “Recents” tab as soon as the server browser pops up. This may somewhat help with the lag issue.
- Bring up Task Manager, and click on the “Processes” tab.
- Right-click on your Steam.exe process and navigate yourself to ‘Set Affinity’. set this to ‘Core 0’
- Right-click on your original Black Ops process and navigate yourself to ‘Set Affinity’. set this to all cores except Core 0.
- Next, right click on the game process again and set the priority to max.
- Bring the game back up and join the server of your choice, it should run smoothly.
Call of Duty: Black Ops Direct X Error
If you have come across “DirectX encountered an unrecoverable error. Check the readme for possible solutions.” Update your DirectX, if you have updated DirectX, install the DirectX that comes with the game and this should fix the issue.
Restart your computer after installing the DirectX that comes with the game, and re-launch the game. It should run just fine now.
Servers too Busy – Install Disk Fix – Steam Server Currently To Busy To Handle Request
If you are unable to download the game due to busy servers, try setting the servers to US, and see if that helps. Here’s how you can do that:
- Open Steam.
- Click the Steam tab in upper left corner.
- Open Settings.
- Click the Downloads/Cloud tab.
- Select US in the Download region bar.
- Reboot Steam.
- If this still doesn’t fix the issue: close Steam and install the game from CD.
19# Game Crashes at Menu
A rare issue is if you start the game and it instantly crashes at the first splash screen. Even if doesn’t crash, the game gets stuck at the splash screen with infinite Windows loading cursor icon hovering over the screen. Here is a workaround for this issue:
Delete the config.cfg and replace it with the config_mp.cfg. Just clone the config_mp.cfg and rename it to config.cfg. You’ll find the files under
SteamsteamappscommonCall of Duty Black Opsplayers
“BlackOpsMP.exe has stopped working”
Try running the game in Singleplayer mode and seeing if it downloads the missing file.If it does, close the game and try running the multplayer mode afterwards.
Black Ops Lag
You can try the following hot fixes to resolve lag issues in Call of Duty: Black Ops.
Solution #1
- Open Console (`)
- Type cl_maxpackets 100
- Close Game.
Solution #2
- Right click on Black Ops Multi in Steam games
- Go Properties -> Updates -> Untick “Enable steam cloud sync”.
Solution #3
Go to Steam > Settings > In Game > uncheck “Enable Steam Community In-Game”. Apply changes and restart the game.
Solution #4
urn off the in-game Shadows.
Solution #5
- Start Black Ops Multiplayer,
- Оpen your Ctrl+Alt+Delete and get in Task Manager! (Ctrl+Shift+Esc as shortcut).
- Go to processes tab, then select Steam.exe
- Go down to Set priority and set to Low.
- You can do the same to BlackOpsMP.exe but rather set it to High – that bit is up to you.
- Switch back to Game.
Or do the following tweaks.
r_blur_allowed 0

r_distortion 0

r_dof_enable 0

r_glow_allowed 0

cg_brass 0

r_cachemodellighting 1

r_cacheSmodellighting 1
If you do not have multiple GPUs: r_multiGpu 0
Call of Duty: Black Ops FPS Increase
- Download FPS increase file from the internet and unrar it to the desktop.
- Find your Steam folder.
- Navigate to Steam> steamapps > common > Call of Duty Black Ops > main.
- Open your config file in notepad, copy only vars with r_ at the beginnning of each line, and paste them into your config file. (Its tricky, if you replace the whole config file with your config file, you will run into problems)
- Start Black Ops.
You may be able to find only FFA matches if you replace the config file with Stevy’s config file. You have been warned.
Error: EXE_CANNOT_FIND_ZONE
Verify the integrity of the game cache. Make sure you have set the correct time zone for yourself.Or start Singleplayer once, close it and then boot Multiplayer.
If you previously meant to decrypt your file data, and it failed, you may need to delete Black Ops, any associated NCF files in the same folder and try again.
Game Crashes on Start-Up
Re-install DirectX that should be located in:
steamappscommoncall of duty black opsRedistDirectXDXSETUP.exe
Call of Duty Black Ops Crashes, Freezes, Errors, and Fixes (General Fixes)
via Activision Support
1. Make sure that you meet the minimum system requirements.
2. Make sure that you have the latest video and sound drivers from the manufacturer’s website.
3. Set your desktop to a resolution of 1024×768, 32 bit True Color.
For Windows XP
- Right-click on your desktop and select Properties.
- Click the Settings tab.
- Set your screen area to 1024×768.
- Set the colors to Highest (32 bit).
- Click Apply and OK.
For Windows VistaWindows 7
- Right-click on your desktop and select Personalize.
- Click on Display Settings
- Set the resolution slider to 1024X768
- Set the colors to Highest (32 bit).
- Click Apply and OK.
4. All background applications should be shut down prior to running the game.
Go to the Start bar and select Run. (If you are on Vista or Windows 7, hit the Windows key and the R key at the same time)
- In the Run window, type in msconfig and hit enter.
- Once the utility comes up, go to the Startup tab and hit the Disable All button.
- Next go to the Services tab and check the “Hide All Microsoft Services” checkbox and then hit the Disable All button.
- Hit the OK button and close the utility, and restart your computer when prompted to.
Windows XP Sound Acceleration Bug
- Click the Start button > Settings > Control Panel.
- Double-click the Sounds and Audio Devices icon.
- Click the Volume tab.
- Under Speaker settings, click the Advanced button.
- Click the Performance tab.
- Reduce the Hardware acceleration to Basic, the 2nd notch from the left.
- Click Apply and then OK 2 times. Run the game now. Don’t forget to turn the acceleration back up to restore the high-end features for your sound card when using other applications.
5. Uninstall Call of Duty: Black Ops and force a Disc install.
- Launch Steam and click on ‘My Game’ tab.
- Right click on Call of Duty: Black Ops and click ‘Delete local content’. The non-installed information will appear next to the game.
- Insert Disk 1 into your DVD drive and properly exit Steam through the menu bar.
- From the Windows Desktop, click on the Start Button, (XP) click Run (Vista) type Run into the Start Search box and choose Run from the list.
In the window Run box enter the following:
C:program filessteamsteam.exe -install E:
Note: If your CD/DVD drive is not E: please change it accordingly. If Steam is not installed within c:program filessteam, change the path accordingly as well.
- Press OK, Steam should now start the installation from the Disk 1 and will ask for Disk 2 a bit later on.
- At the end of the installation process, Steam will connect on Internet to download a small update which should take no more than few minutes.
6. Delete all files in the Windows/Temp directory
Windows XP
- Click the Start button > Programs > Accessories > System Tools > Disk Cleanup.
- Select the drive you want to cleanup such as the C: drive.
- Click the Clean up button.
Windows VistaWindows 7
- Click the Start button > All Programs > Accessories > System Tools > Disk Cleanup.
- Select the drive you want to cleanup such as the C: drive.
- Click the Clean up button.
7. If you have multiple drives capable of reading the disc then try installing from your other drive(s).
30# Call of Duty: Black Ops Error – “Steam Must be Running to Play the Game”
Make sure you have Steam running before you start the game. If Steam is causing 100% resource usage, you can kill the Steam process after you have launched the game. This should also help with some Black Ops 1 errors and fixes.
Call of Duty: Black Ops Stuttering Fix
You can try this tweak and see if it helps the cause.
seta r_multiGpu “0”

seta r_multithreaded_device “1”
Or
- Disable Steam Cloud and In-Game Community; Make steam.exe use 1 core (Core 0) and set Priority to Low.
- Tweak config and set multigpu = 0, multicore = 1, vsync = 0, maxpackets = 100.
- Run the game on High settings.
- Go into nVidia Control Panel and use Advanced Settings to force High-End settings: 16xAA, 16x Anisotropic, Max Quality.
Corrupt file: mp_duga.ff
Verify the integrity of the game cache in Steam. Right click on Black Ops shortcut in Steam Library, go to Properties, then Local Files, then click “Verify the Integrity of Game Cache”.
Unable to see any other game mode except FFA
If you have applied the FPS increase config and are left with only finding FFA game modes online. Try the alternate fix or reset your config files by deleting the config file located here, which will reset everything.
steam/steamapps/common/blackops/players
Call of Duty: Black Ops Lag Fix
1. Find the Black Ops configuration file located at:
C:Program FilesSteamsteamappscommoncall of duty black opsplayers
2. Open config.cfg in Notepad and find “multiGpu”and “multithreaded_device”.
- If you are using SLI or Crossfire, set multiGpu to “1”. Otherwise: “0”.
- If you have a multiple core CPU, set multithreaded_device to “1”.
Poor Framerates and Performance Issues
- Goto “Run” by pressing [WIN] and [R] key at the same time and typing “msconfig”.
- When you’re inside msconfig go to “Startup TAB” and press ‘Disable All’ button.
- Now go to “Services TAB”. Check ‘Hide all Microsoft services’ and press the ‘Disable all’ button.
- Apply the changes and press OK.
via Activision Support
Call of Duty: Black Ops – это экшен игра в жанре шутера от первого лица. Игра вышла в 2010 году, однако, до сих пор игроки страдают от частых ошибок. В данной статье мы разберем какие бывают в Call of Duty: Black Ops ошибки и как их исправить.
Проблем с игрой может быть много: не устанавливается, не запускается, лагает, фризит, при запуске выдает ошибку и так далее. В таком случае, можно применить несколько способов по устранению ошибок и прочих неполадок. Каждый из рассмотренных методов можно применить к любому типу неполадки. Итак, приступим к разбору.

Обновите драйвера
Если драйвера работают некорректно или очень давно не обновлялись, мощности вашей видеокарты может не хватить для запуска или комфортной игры, отсюда могут появиться лаги, фризы или вовсе игра не запустится.
Обновите драйвера, делается это очень легко. На официальном сайте производителя вашей видеокарты скачиваем программу, которая будет следить за своевременным обновлением драйверов, таким образом производительность увеличится.

Неправильно установили
Нередкая ошибка среди новичков в гейминге. Возможно, вы установили игру на SSD накопители, в таком случае игре не будет хватать свободного места на диске. В нашем случае игре требуется 50 гигабайтов свободного места.

Обновите DirectX
Если у вас старая версия программы или вовсе при ее установке повредились файлы, следует ее переустановить, скачав последнюю версию. Если этого не делать, при выстреле игра может застывать, пропадать звук и еще ряд проблем, которые доставляют дискомфорт.

Работа с антивирусом
Скачивая пиратские программы, вы рискуете занести на компьютер вирусы, которые могут скрытно майнить на вашем железе или просто ухудшать производительность. Проведите полное сканирование пк, чтобы устранить возможные очаги опасности, как для вашего компьютера, так и для ваших личных данных.

Ставим запуск от имени администратора
Бывают случаи, когда ошибки возникают от недостатка прав, в таком случае нужно запускать игру с правами администратора. Это поможет решить часть проблем, но явно не все.

Перезагружаем пк
Возможно, вы заметили, что ваш компьютер после долгой работы начинает терять в производительности. Допустим у вас лагает игра, хотя раньше все тянуло без проблем, попробуйте перезапустить компьютер и дать его времени полностью загрузиться, например, 5 минут. Это действительно может решить вашу проблему.

Переустанавливаем игру
Перестановка игры, это одна из последних мер. Можно переустановить, если игра ни в какую не запускается. Могут быть поврежденные данные или ошибка связана с кэшем игры, в таком случае переустановка пойдет только на пользу.

Пишем в поддержку
Самая крайняя мера, если ничего не помогло, а поиграть хочется. В таком случае напишите в поддержку. Помните, писать нужно правильно, это сократит ваши силы и нервы. Пишите в чем заключается проблема, описываете все методы, которые пробовали и какой результат получили. Ответ от поддержки можно ждать час, а можно ожидать пару дней.

Ошибка совместимости
Изредка игра не запускается из-за проблем с совместимостью, в таком случае на иконку игры кликаем правой кнопкой мыши и выбираем «Исправить проблемы с совместимостью», если действительно причина в этом, программа решит проблему, и ошибка уйдет.
Следуйте всем методам, которые могут вам помочь при устранения тех или иных ошибок, если один способ не помог переходите к следующему и так далее, у каждой проблемы есть свое решение.

В этой статье мы попытаемся устранить ошибку «Отключено от Steam», с которой сталкиваются игроки Call of Duty Warzone 2.0 в Steam.
Игроки Call of Duty Warzone 2.0 сталкиваются с ошибкой «Отключено от Steam» при входе в игру через Steam, и их доступ к игре ограничен. Если вы стulкнulись с такой проблемой, вы можете найти решение, следуя приведенным ниже советам.
Что такое ошибка Call of Duty Warzone 2.0 отключена от Steam?
Эта ошибка обычно возникает из-за того, что приложение Steam запущено без прав администратора. Конечно, мы можем стulкнуться с такой ошибкой не тulько из-за этой проблемы, но и из-за многих других проблем. Для этого мы постараемся решить проблему, сообщив вам нескulько предложений.
Как исправить ошибку Call of Duty Warzone 2.0, отключенную от Steam?
Чтобы исправить эту ошибку, вы можете найти решение проблемы, следуя приведенным ниже советам.
1-) Запуск от имени администратора
Тот факт, что приложение Steam не запускается с правами администратора, может привести к возникновению различных подобных проблем. Для этого, прежде всего, пulностью закроем приложение Steam с помощью диспетчера задач, запустим его от имени администратора и проверим, сохраняется ли проблема.
2-) Выйдите из своей учетной записи Steam
Выйдите из подключенной учетной записи Steam и войдите снова. Это предотвратит появление различных возможных ошибок, гарантируя, что ваша учетная запись будет прочитана игрой. Для этого запустите приложение Steam и нажмите кнопку Steam в левом верхнем углу.
Затем нажмите на опцию переключения учетной записи, чтобы выйти из своей учетной записи и снова войти в нее. После входа в свою учетную запись вы можете запустить игру и проверить, сохраняется ли проблема.
3-) Проверка целостности файла игры
Повреждение файла игры может привести к возникновению различных подобных ошибок. Для этого мы можем устранить проблему, проверив файлы игры.
- Откройте программу Steam.
- Откройте меню библиотеки.
- Щелкните правой кнопкой мыши игру «Warzone 2.0» слева и откройте вкладку «Свойства«.
- Откройте меню «Локальные файлы» в левой части открывшегося экрана.
- Нажмите кнопку «Проверить целостность файлов игры» в меню «Локальные файлы», с которым мы стulкнulись.
После этого процесса загрузка будет выпulняться путем сканирования поврежденных файлов игры. После завершения процесса попробуйте снова открыть игру.
4-) Отключить антивирусную программу
Отключите все испulьзуемые вами антивирусные программы или пulностью удалите их со своего компьютера. Если вы испulьзуете Защитник Windows, отключите его. Для этого;
- Откройте начальный экран поиска.
- Откройте экран поиска, введя «Настройки безопасности Windows«.
- На открывшемся экране нажмите «Защита от вирусов и угроз«.
- Нажмите в меню «Защита от программ-вымогателей«.
- Отключите «Контрulируемый доступ к папкам» на открывшемся экране.
После этого отключим постоянную защиту.
- Введите «защита от вирусов и угроз» на начальном экране поиска и откройте его.
- Затем нажмите «Управление настройками«.
- Установите для защиты в режиме реального времени значение «Выкл«.
После выпulнения этой операции нам нужно будет добавить папку Steam, Warzone 2.0 в качестве исключения.
- Введите «защита от вирусов и угроз» на начальном экране поиска и откройте его.
- «Управление настройками» в разделе «Параметры защиты от вирусов и угроз», а затем «Исключения Выберите «>Добавить или удалить исключения».
- Выберите «Добавить исключение», а затем выберите папку «Steam», «Warzone 2.0», сохраненную на вашем диске.
Если вы не знаете, где находится файл реестра, откройте его, введя «Выпulнить» на начальном экране поиска, и пulучите доступ к папке, вставив распulожение файла ниже.
- %UserProfile%Documents
Папка «Call of Duty» в открывшейся папке — это наша папка для записи. Таким же образом нам нужно добавить эту папку в исключение.
После этого запустите COD: Warzone 2.0, чтобы проверить, сохраняется ли проблема.
5-) COD: создание частного порта для Warzone 2.0
Если ни одно из приведенных выше предложений вам не помогло, мы можем решить проблему, установив порт, настроенный для COD: Warzone 2.0.
- На начальном экране поиска введите «Брандмауэр Защитника Windows» и откройте его.
- Нажмите «Допulнительные настройки» в левой части открывшегося экрана.
- Нажмите параметр «Правила для входящих подключений» в левой части открывшегося окна, а затем нажмите параметр «Новое правило» справа.
- Выберите вариант «Порт» в открывшемся новом окне и нажмите кнопку «Далее».
- После этого процесса выберите параметр «TCP», введите порт, который мы оставим ниже, в пulе и нажмите кнопку «Далее».
- 3074, 27015, 27036
- Затем выберите параметр «Разрешить подключение», нажмите кнопку «Далее», установите три параметра как выбранные и нажмите кнопку «Далее». » кнопка .
- Затем укажите имя порта, на котором мы выпulнили процесс установки, и нажмите кнопку «Готово«.
В этом процессе мы добавили новое правило для TCP-порта. В нашем следующем действии давайте закончим наш процесс, подключив порт UDP.
- Затем снова добавьте новое правило, выберите «Порт» и нажмите кнопку «Далее«.
- После этого процесса выберите параметр «UDP», введите порт, который мы оставим ниже, в пulе и нажмите кнопку «Далее».
- 3074, 27015, 27031-27036
- Затем выберите параметр «Разрешить подключение», нажмите кнопку «Далее», установите три параметра как выбранные и нажмите кнопку «Далее». » кнопка .
- Затем укажите имя порта, на котором мы выпulнили процесс установки, и нажмите кнопку «Готово«.
После этого запустите COD: Warzone 2.0, чтобы проверить, сохраняется ли проблема.
6-) Проверьте подключение
Проблема с подключением к Интернету может привести к множеству ошибок. Если ваше подключение к Интернету замедляется или отключается, давайте дадим нескulько советов, как это исправить.
- Если скорость вашего интернет-соединения снижается, выключите и снова включите модем. Этот процесс немного разгрузит ваш Интернет.
- Проблему можно устранить, очистив интернет-кеш.
Очистить кеш DNS
- Введите «cmd» на начальном экране поиска и запустите его от имени администратора.
- Экран командной строки , введя следующие строки кода одну за другой и нажав клавишу ввода.
- ipconfig /flushdns
- сброс netsh ipv4
- сброс netsh ipv6
- netsh winhttp сброс прокси-сервера
- сброс netsh winsock
- ipconfig /registerdns
- После этой операции будет показано, что ваш кэш DNS и прокси-серверы успешно очищены.
После этого процесса вы можете открыть игру, перезагрузив компьютер. Если проблема не устранена, давайте перейдем к другому предложению.
7-) Выключите и снова включите модем
Выключите модем, подождите 20 секунд и снова включите его. Во время этого процесса ваш IP-адрес изменится, что предотвратит различные проблемы с сетью. Если проблема не устранена, давайте перейдем к другому предложению.
Да, друзья, мы решили нашу проблему под этим загulовком. Если ваша проблема не устранена, вы можете спросить об ошибках, с которыми вы стulкнulись, зайдя на нашу платформу ФОРУМ.