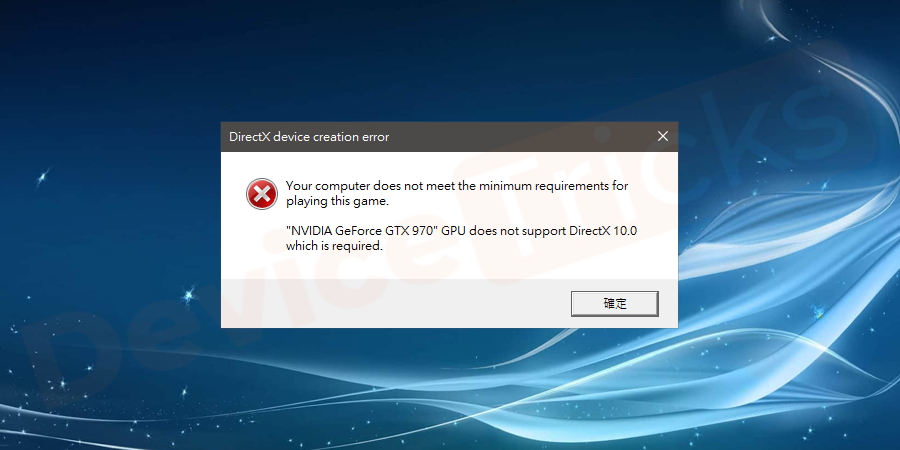
Ошибка DirectX device creation error появляется, как правило, при открытии современных игр или программ. А говорит она о неполадках в системе или самой библиотеке. Многие пользователи жалуются на такую проблему, поэтому и нужно знать о том, как с ней разобраться. Именно об этом и пойдет речь в данной статье.
Содержание
- Подробности
- Случай №1: Обновление Директа
- Случай №2: Обязательное обновление драйвера
- Случай №3: Принудительный откат драйвера
- Случай №4: Отключение защиты ОС
- Случай №5: Очистка ПК от вирусов
- Случай №6: Восстанавливаем файлы ОС
- Заключение
Подробности
Как правило, такая ошибка указывает на проблемы в драйвере, настройках операционной системы или неправильную работу отдельных программ для защиты ОС. И в этом случае мы можем сделать многое.
В данном материале мы рассмотрим основные варианты решения проблемы. С самого начала речь пойдет о самых простых и доступных из них. Однако потом пойдут довольно сложные решения. Впрочем, если все делать в соответствии с инструкцией, то ничего страшного не случится.
Хотелось бы заметить, что в некоторых случаях сбой указывает на то, что ваша видеокарта не поддерживает нужную версию DirectX. И в этом случае что-то сделать программно невозможно. Придется приобретать новый графический адаптер.
Случай №1: Обновление Директа
Самый очевидный в данной ситуации шаг – обновление Директа до самой актуальной версии. Специально для этих целей разработчики библиотеки предусмотрели специальный инструмент – онлайн-установщик. Он загружает на компьютер недостающие компоненты с серверов Microsoft, а затем располагает их по нужным каталогам. Причем вся процедура происходит в автоматическом режиме, от пользователя требуется минимальное количество действий.
Обратитесь к нашей статье «Онлайн-установщик DirectX», чтобы загрузить последнюю версию библиотеки
Случай №2: Обязательное обновление драйвера
Это еще одно действие, которое стоит попробовать в том случае, если при запуске игры появляется вышеозначенная ошибка и ваша видеокарта точно поддерживает нужный DirectX. Вероятнее всего, вы используете старые драйверы для своего графического адаптера, которые не умеют работать с данной версией библиотек.
Поэтому нужно заняться обновлением программного обеспечения. Можно, конечно, посетить сайт производителя оборудования, скачать там нужную версию ПО и установить ее вручную. Но это несколько затруднительно. Гораздо проще использовать для обновления инструменты самой операционной системы. Вот как это можно сделать:
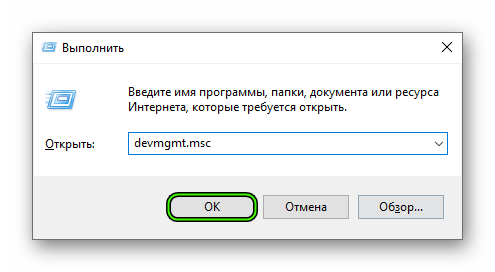
- Нажимаем комбинацию клавиш Win + R.
- Выполняем команду devmgmt.msc.
В результате откроется «Диспетчер устройств».
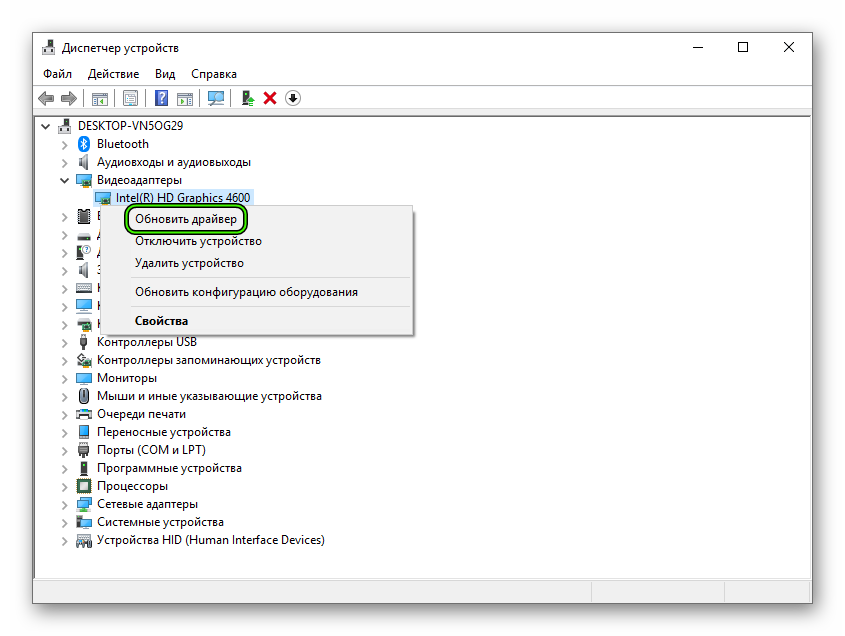
- Теперь раскрываем раздел «Видеоадаптеры».
- Находим имя своей графической карты, а затем кликаем на эту графу правой кнопкой мыши.
- В отобразившемся списке вызываем функцию «Обновить драйвер».
- Ждем запуска соответствующего инструмента. В нем выбираем опцию «Автоматический поиск…».
Не забудьте, что после обновления драйверов обязательно нужно перезагрузить компьютер. Иначе новая версия ПО просто не будет учтена системой. А уже затем стоит проверять работоспособность игры. Вдруг вам повезет и первый же вариант поможет? А если нет, то стоит перейти к следующему пункту нашего материала.
Случай №3: Принудительный откат драйвера
А еще может быть и совсем по-другому. К примеру, если эта ошибка начала появляться у вас после установки свежей версии драйвера с сайта производителя, то виновата именно она. Вероятно, в ней содержится какой-то баг, мешающий нормальной работе графического адаптера и вызывающий проблемы такого типа.
Поэтому самым правильным решением будет возврат прежней версии. Для этого не нужно искать ее на соответствующих ресурсах. Достаточно воспользоваться возможностями операционной системы Windows и ее инструментами. В этом случае нам опять поможет диспетчер устройств. Вот инструкция, рассказывающая о том, как и что делать:
- По аналогии с предыдущей инструкцией вызываем инструмент «Диспетчер устройств».
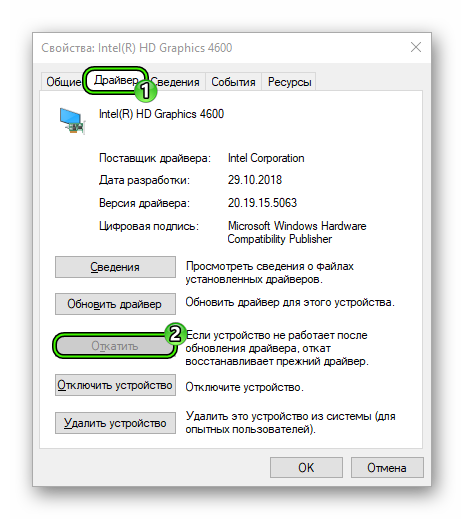
- Вновь находим графу с названием видеокарты. Но на этот раз дважды щелкаем по ней ЛКМ.
- Перемещаемся на вкладку «Драйвер».
- Нажимаем на кнопку «Откатить».
- Подтверждаем выполнение действия.
Теперь у вас установлена именно та версия ПО, которая использовалась до обновления. Однако учтите, что изменения вступят в силу только после перезагрузки компьютера. Рестарт необходим для учета всех изменений. А потом уже можно тестировать любимую игру на наличие ошибок. Если и это не помогло, то у нас есть еще несколько вариантов.
Случай №4: Отключение защиты ОС
Иногда различные антивирусные продукты находят в некоторых играх то, что им не нравится и всеми силами пытаются это заблокировать. Отсюда различные ошибки, нестабильная работа с библиотеками и прочие прелести. Конечно, приятного в этом мало. Особенно, если вы точно знаете, что с файлами игры все в полном порядке.
Такой паранойей обычно страдают брандмауэр Windows и разного рода антивирусы. Но если последняя еще умудряется как-то находить потенциальные угрозы, то брандмауэр во многих случаях оказывается совсем неэффективен. В любом случае, на время защиту нужно отключить для проверки нашей теории. Вот что нужно сделать для этого:
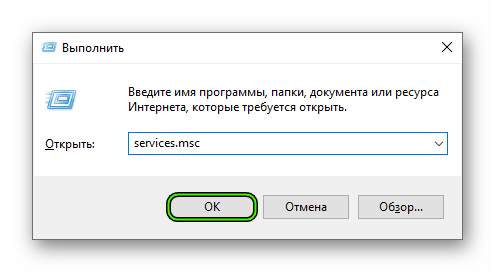
- Опять нажимаем Win + R.
- Вводим services.msc и кликаем по кнопке «ОК».
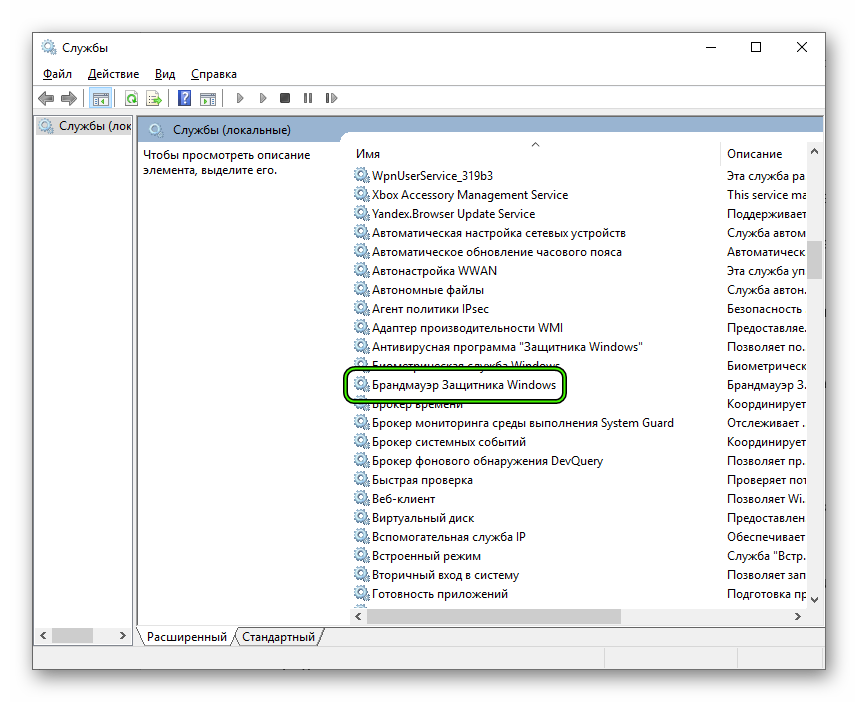
- В отобразившемся перечне служб находим пункт «Брандмауэр…» и кликаем по нему дважды ЛКМ.
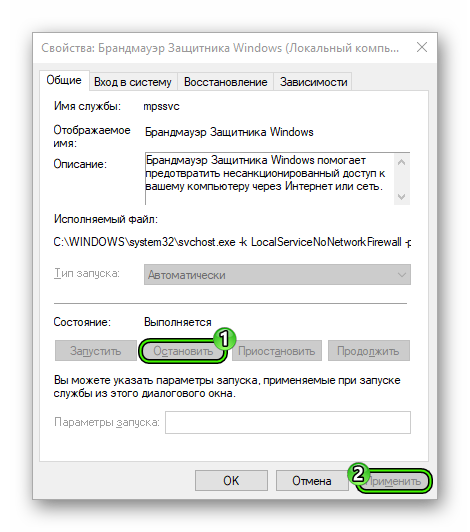
- Откроется окошко с параметрами. Нажимаем на кнопку «Остановить».
- А теперь кликаем «Применить».
- Закрываем все окна.
Вот так отключается брандмауэр. Как вы могли заметить, мы не стали копаться в его настройках (все равно бесполезно), а поступили гораздо проще – отключили всю службу, хоть ее работа и будет восстановлена после перезагрузки ПК. Так проще и намного быстрее. Теперь же пришло время заняться вторым возможным источником проблем – антивирусом.
Деактивировать его можно следующим образом:
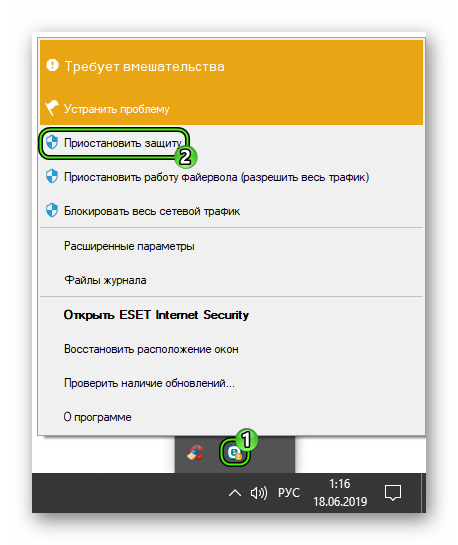
- Находим значок антивируса в трее Windows.
- Кликаем по нему ПКМ.
- Выбираем опцию временного отключения.
- Указываем временной промежуток (хватит нескольких минут).
- Подтверждаем выполнение действия.
Теперь, когда защита ОС полностью отключена, можно пробовать запускать игру. Если ошибка более не появляется, то это значит, что нужно править правила антивируса и файервола. Но если все осталось точно так же, как и было, то проблема в другом. А вот защиту в любом случае придется возвращать на место.
Случай №5: Очистка ПК от вирусов
Это закономерно. Если ничего из вышеперечисленного не помогает, то 99 шансов из 100 за то, что на компьютере пользователя поселились вирусы. Эти вредные объекты способны блокировать работу самых разных файлов. В том числе и Директа. Отсюда и различные ошибки. Более того, последствия могут быть еще печальнее (потеря важных данных, поломка ОС и т.д.), если ничего не предпринимать. Поэтому с вредоносными объектами следует бороться. Просканировать компьютер можно несколькими антивирусами. Используйте тот, который вам больше нравится.
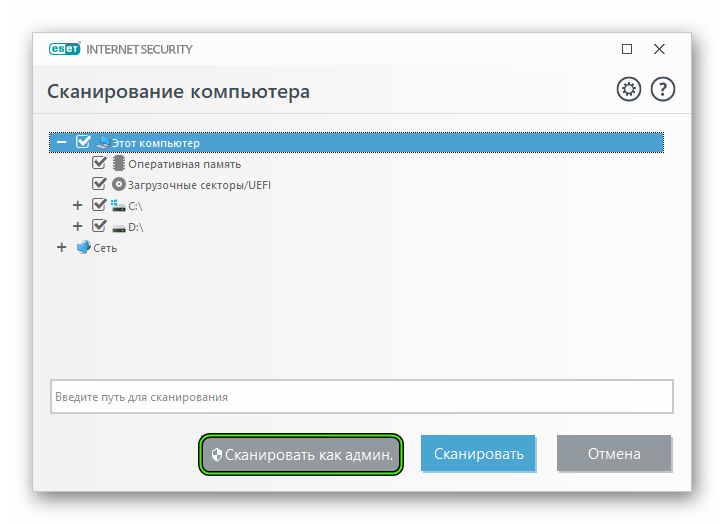
А мы же остановимся на ESET Internet Security – это мощный продукт для борьбы с вирусами, который распространяется на платной основе, но также имеет бесплатную версию, доступную на протяжении месяца.
Инструкция по использованию программы:
- Перейдите к главному окошку Internet Security.
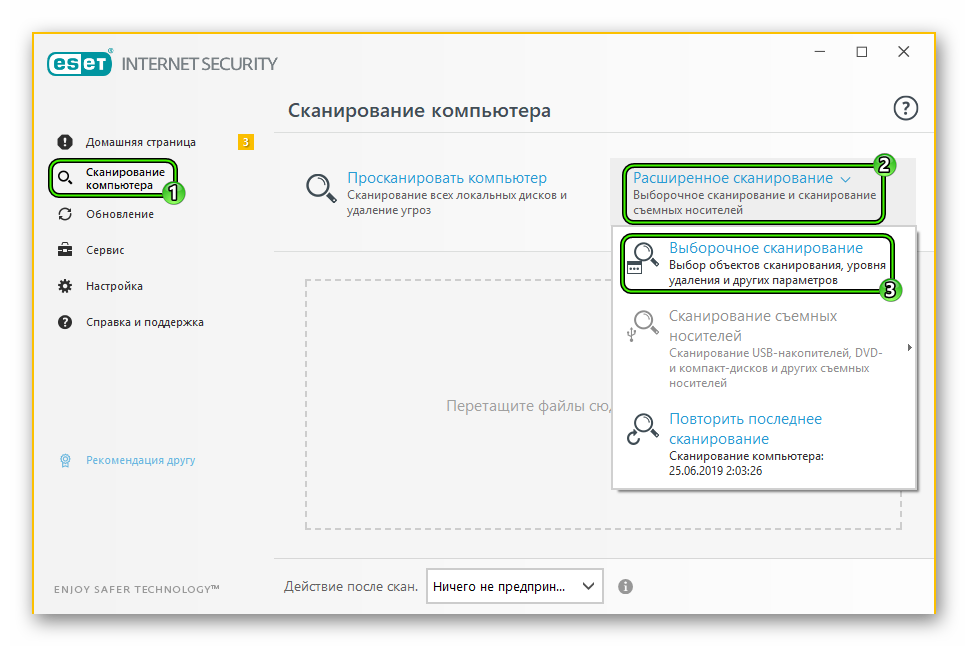
- Откройте раздел «Сканирование компьютера», расположенный в меню слева.
- Теперь активируйте пункт «Выборочное сканирование», предварительно нажав на «Расширенное…».
- Задайте все доступные местоположения для проверки.
- Кликните ЛКМ на кнопку «Сканировать как…».
Остальная часть процедуры полностью автоматическая, так что от пользователя ничего не требуется. Не забудьте только перезагрузить компьютер, как только она будет окончена. А уже потом следует запустить проблемную игрушку и проверить ее работоспособность. Если это не помогло, то двигаемся дальше.
Случай №6: Восстанавливаем файлы ОС
Почему мы включили в инструкцию данный способ? Простая логика. Если на компьютере были вирусы, то резонно предположить, что они могли существенно повредить важные файлы операционной системы, которые требуются для нормальной работы библиотек DirectX. Отсюда и та ошибка, которая мешает нам запустить игру или программу.
К счастью, разработчики Windows предусмотрели такую ситуацию и встроили в ОС инструмент для ее исправления. Для восстановления файлов нам будет достаточно простой командной строки. Если делать все в строгом соответствии с инструкцией, то никаких неприятных казусов не будет. Итак, начнем:
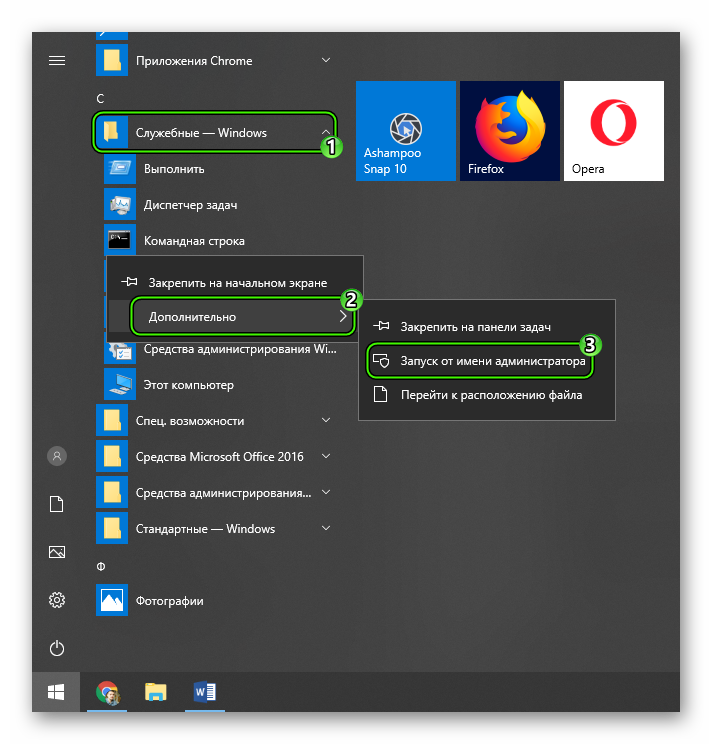
- Открываем меню «Пуск.
- Затем ищем каталог «Служебные…» и кликаем по нему.
- Здесь нам нужен инструмент «Командная строка». Откройте ее с правами администратора, кликнув по соответствующей строке ПКМ и выбрав нужную опцию.
- В самой консоли введите sfc /scannow.
После нажатия на Enter начнется проверка целостности файлов и их восстановление в случае необходимости.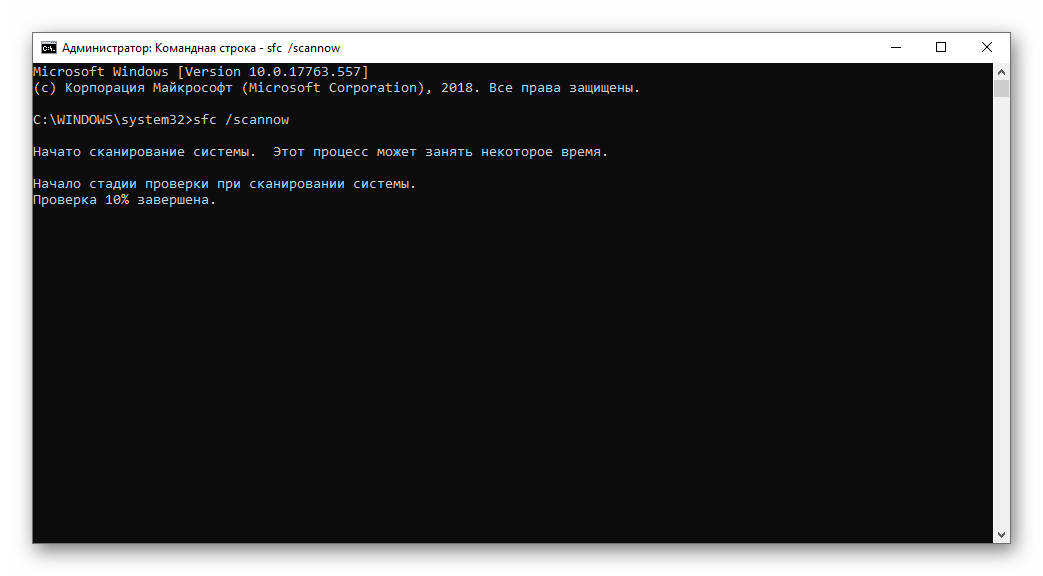
Заключение
В рамках данного материала мы попытались ответить на вопрос о том, что делать если вдруг возникает ошибка «DirectX device creation error» при запуске какой-нибудь игры. Как правило, эта ошибка связана с какой-нибудь программной неполадкой в самих библиотеках, в драйвере графического адаптера или же в операционной системе.
Однако эта же ошибка может говорить и о том, что вам пора менять видеокарту, так как она уже не поддерживает данную версию DirectX. Именно поэтому пользователям приходится перебирать все способы устранения данной ошибки. Некоторые из них весьма сложны. Но если делать все в строгом соответствии с инструкцией, то ничего страшного не случится.
Без актуальной версии ДиректХ не будут работать современные игры и некоторые другие программы. Если соответствующего компонента нет в системе, то будут возникать разного рода ошибки. Нередко пользователи задаются вопросом: «Когда появляется сообщение “DirectX device creation error” — что делать?». Мы дадим на него развернутый и проверенный ответ.
Рекомендуем! MultiSetup
| Официальный дистрибутив DirectX | |
| Тихая установка без диалоговых окон | |
| Рекомендации по установке необходимых программ | |
| Пакетная установка нескольких программ |
Решение проблемы
Подобный сбой, увы, не является редким. В тексте ошибки, как правило, упоминается, что текущая конфигурация компьютера не поддерживается.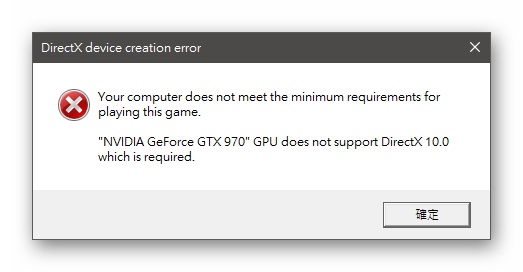
- Если необходим ДиректХ 12, а у вас не Windows 10, то нужно установить именно эту версию ОС, поскольку только в ней поддерживается соответствующая библиотека.
- Иногда компоненты просто отсутствуют в системе, хоть и поддерживается текущей конфигурацией.
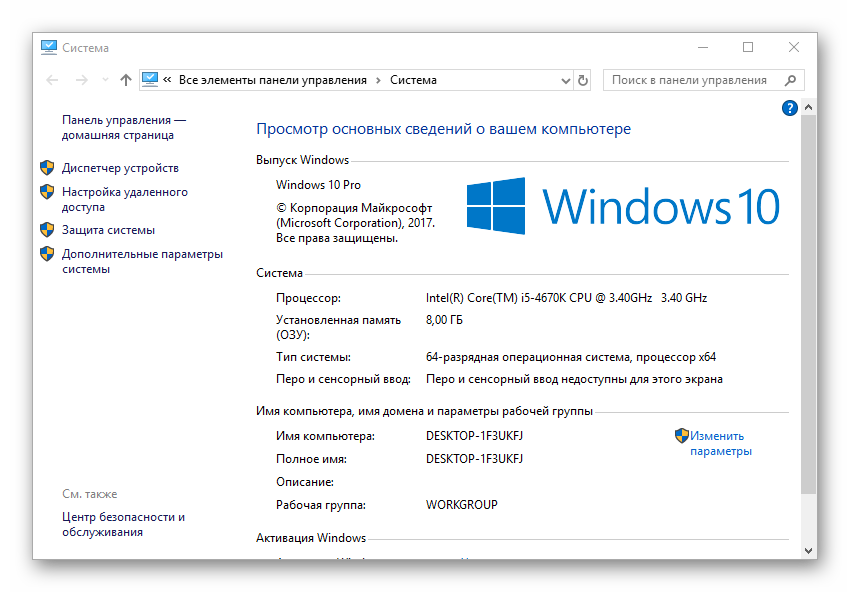
Именно второй случай заслуживает дальнейшего рассмотрения. Вам нужно выяснить модель видеокарты и версию Виндовс, чтобы узнать информацию о совместимости. Узнать ОС можно, открыв «Мой компьютер», кликнув ПКМ на свободную область и выбрав «Свойства». Здесь и отобразятся нужные сведения.
Чтобы определить модель графического устройства, из открытого окна перейдите в «Диспетчер устройств» и раскройте вкладку «Видеоадаптеры».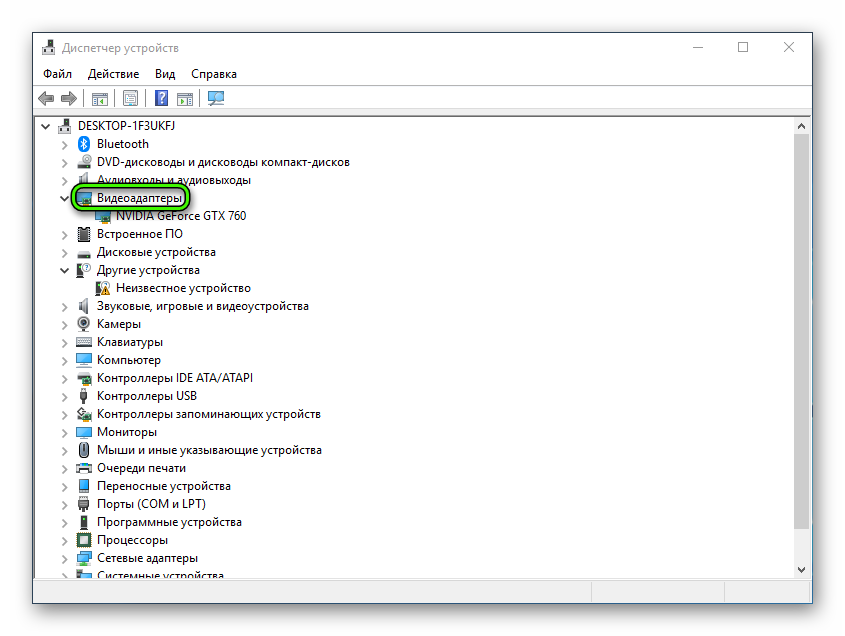
- Страница Nvidia — http://www.nvidia.ru/.
- Страница AMD — https://www.amd.com/ru/.
Про ОС стоит учитывать следующие факторы:
- DirectX 12 доступно только для «десятки».
- Одиннадцатая версия библиотеки совместима с Вистой и более поздними ОС от Microsoft.
- Десятая и младшие — на всех Windows.
Завершение
Если вы удостоверились, что ошибка DirectX device creation error, некорректна, то остается только загрузить нужную версию библиотеки с нашего сайта:
- DirectX 9
- DirectX 10
- DirectX 11
Перейти к содержанию
На чтение 2 мин Просмотров 1.1к. Опубликовано 2017-09-21
Директ используется для игр и обеспечения их нормальной работы. Данная утилита работает на благо пользователей уже десятки лет и помогает им. Программа делает это в невидимом режиме, не нужно прикладывать никаких усилий. Но иногда могут возникать определенные трудности и сбои в ее работе. Если вы устанавливаете игру с очень хорошей, современной графикой, Директ может создавать ошибки.
Что делать при ошибке directx device creation error? Распространенный вариант поиска в интернете. Многие игроки, которые пытаются поиграть в такие игры как Battlefield 3 и так далее, сталкиваются с ней. Все дело в том, что графические элементы и сама программа не могут работать нормально в некоторых случаях. Отсюда выходит, что утилита просто выбивает ошибки и не дает запустить игру.
Что же делать с ошибкой?
Для начала нужно просмотреть требования игры и мощность вашего компьютера. Если даже минимальный уровень выше, вашего ПК, то можете смело удалять ее с компьютера. Если же ситуация обратная, то есть несколько вариантов, которые помогут игрокам, насладиться любимой игрой и обойти надоедливую ошибку.
Этапы действий:
- Для начала нужно попробовать обновиться Директ. В этом поможет большое количество утилит, всего пара кликов и готово. В другом случае, удаляем программу с компьютера и устанавливаем заново. Третий вариант – нужно перейти в папку, где расположилась ваша игра, к примеру, F:Battlefield 3Battlefield 3__Installerdirectx
edist и найти там файл под названием DXSETUP, с помощью этой иконки можно легко обновить утилиту; - Теперь нужно попробовать запустить игру, предварительно перезагружаем вам компьютер. Если ничего не получилось и ошибка продолжает появляться, то действуем дальше по инструкции;
- Самые популярные видеокарты это GeForce и ATi Radeon. Нужно перейти на официальный сайт для того, чтобы обновить драйвера видеокарты. Выполняется это достаточно просто и быстро, всего за несколько кликов. Если вы не знаете английского, то можно перейти на русскоязычный сайт, но сейчас расплодилось большое количество мошенников, файлов с вирусами. Мы бы настоятельно советовали использовать именно официальный сайт.
- Теперь осталось скачать драйвера, обновить их и перезагрузить компьютер. После проведенных действий ошибка должна исчезнуть и вы сможете насладиться игровым процессом любимой игры.
@top-advice.ru
» directx device creation error » apears when trying to launct BF4, BF4 does not start. The error message indicates I need DirectX 10.
But I in fact have DX11 so this should work.
If I reinstall the GPU driver the game plays fine, after the next reboot the issue is back.
I.e. each time I wan to play BF4 I have to reinstall my GPU drivers.
GPU= AMD HD 6800
CPU 3.2ghz phenom II quadcore AMD
RAM 4 GB
DX11 is on the machine, all other games are fine..
Catalyst 14 beta running. ( Official 13.12 same effect )
What I have tried:
Uninstall / re-install of BF4, no effect
Uninstall / re-install of GPU driver, BF4 works again. Untill after the next reboot.
Turned off Windows automatic driver download, no effect.
Reinstall of DX, no effect.
Changed from Chrome browser, to IE11, no effect
Turned off in game Origin, no effect.
Disabled onboard graphics, no effect.
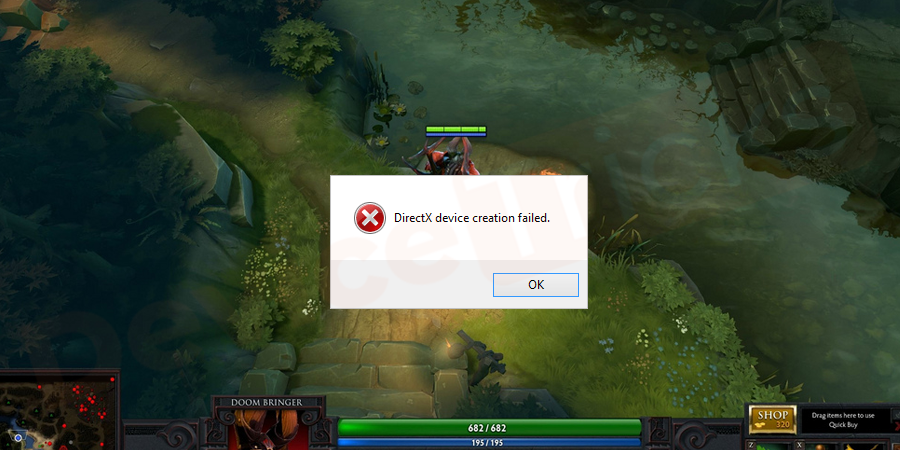
When you are going to play games like Warframe, battlefield 4, trials fusion, Fortnite and so on, you will come up with error message DirectX device creation failed. It is also known as Warframe DirectX creation failed as the error causing with Warframe game. It would be so frustrating to face this Warframe update failed error and you will be in a dilemma what to do next to rectify it. Don’t worry this is one of the common Warframe DirectX creation failed error in Windows and you can resolve the issue with the solutions given in this article.
We will look into the causes of DirectX device creation failed for a better understanding of the error.
- The Warframe DirectX creation failed occurs due to your system GPU (Graphical Processing Unit) card. When your system GPU is struggling to meet the requirement of games like Warfare. In this case, after a pop–up an error message of DirectX device creation failed. You will also see the message stating that application requires at least DirectX AA compatible GPU (AA is nothing but the specific DirectX number of version)
- Some of the software glitches in your system Windows also cause DirectX device creation failed error. From the list of occurrence software glitches are the least likely to occur.
- Incompatibilities with the new driver software on the Windows also cause DirectX device creation failed error. Graphics card makers like AMD and NVIDIA tend to release beta versions of drivers that are ridden with inconsistencies and bugs. That will cause a lot of problems and this will cause the disturbing error Warframe DirectX creation failed to occur.
- The conflicts between applications are the cause of DirectX device creation failed error. For example, two applications attempt to use a specific DLL file around the same time and create the error.
- Corrupted or missing DirectX files is also causing for the error DirectX device creation failed. For the reason deleting that required files accidentally also causes the error. As downloading a rogue app that also causes the error to arise. Malware or virus attack on your system also causes the Warframe DirectX creation failed error.
While playing games on your computer you might have come across with some other errors also like Directdraw error. Here are the solutions to fix this type of errors. Keep reading to fix the Warframe Update error or DirectX Device Creation Failed error!
How to Fix DirectX Device Creation Failed Error?
As a consequence, we recommend you to start with the first fix on the list. And later continue with the other fixes until you find the best fix for the error DirectX device creation failed or Warframe Update failed error.
Download and Run DirectX End-User Runtime Web Installer
Our first step is to solve the issues related to missing of files with the help of Microsoft program. It is designed to help users fix challenges associated with DirectX. This will provide the updates for DirectX and will help to rectify the issues related to DirectX software.
The software DirectX end-user runtime web installer will help you to install missing files or to rectify damaged components.
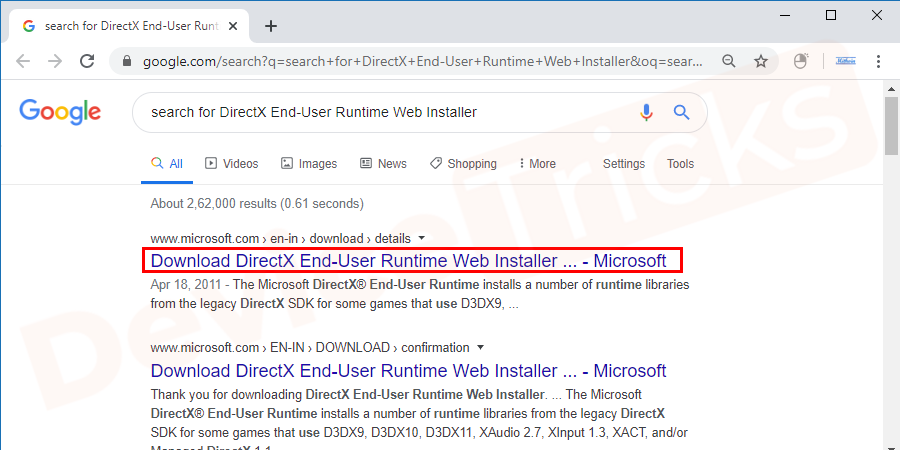
- Open the web browser and search for DirectX End-User Runtime Web Installer. From the result page, click on the page of Microsoft’s website.
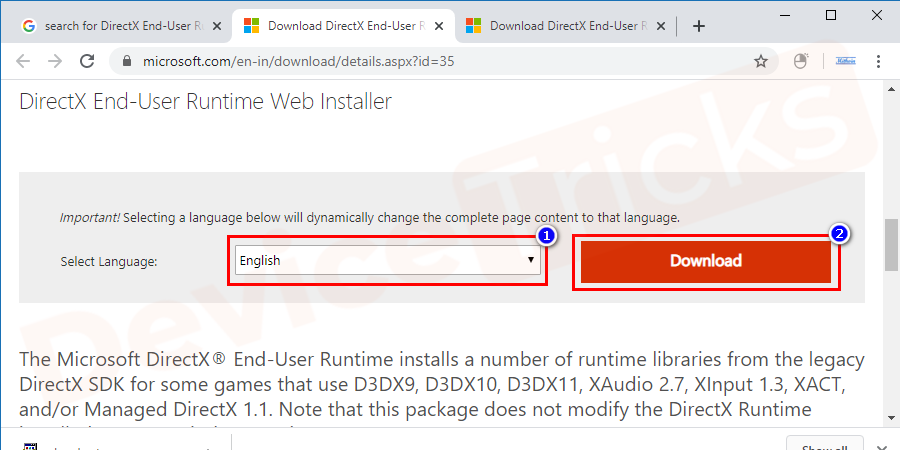
- After the browser loads up the page entirely, choose your preferred language from the available list. Finally, click on the download button to get the file.
- You will download the file dxwebsetup.exe, after completion of download double – click on the file to open and run it.
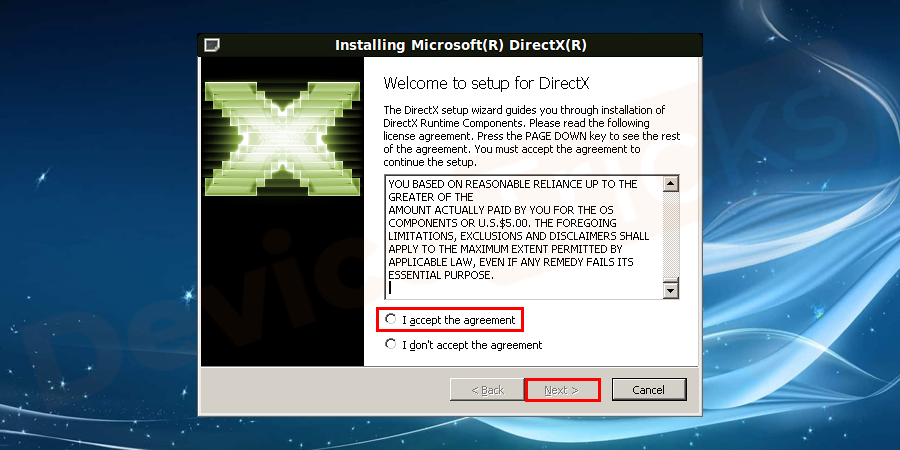
- Click on yes button to run the file. Next, you can see Microsoft DirectX window. Select I accept the agreement and click on next button.
- Follow the displayed instructions to successful install DirectX.
Note: Later on completion of the installation process, you must restart your PC to apply changes. Open the game or program with which you have experienced the issue Warframe Update failed or DirectX device creation failed. Check whether the error occurs at launch or during gameplay. If an error doesn’t occur that shows you have successfully resolved the issue DirectX device creation failed.
Roll Back Your GPU Driver
Rollback GPU driver will restore your driver software to an older version. In this case game, Warframe DirectX creation failed error message comes up. Because the new device driver has unresolved bugs or they are incompatible with your system. The rollback feature in Windows for drivers is very handy without completely uninstalling and reinstalling a driver. It saves your time and helps to fix the error simply.
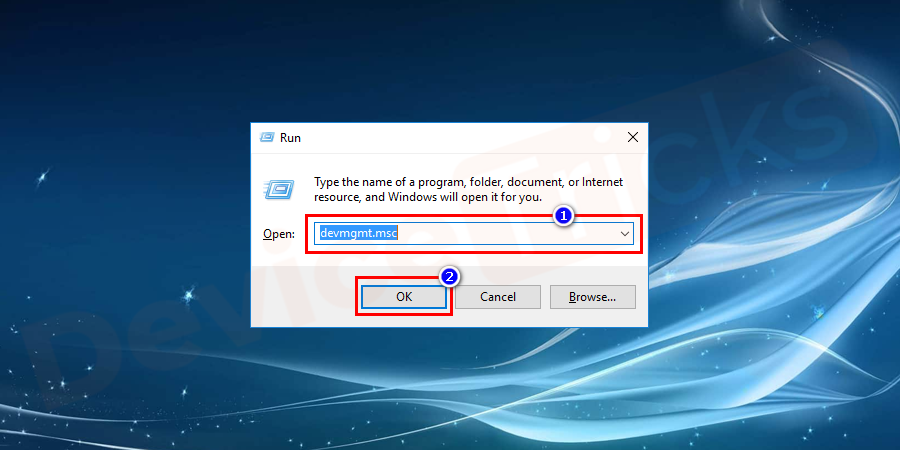
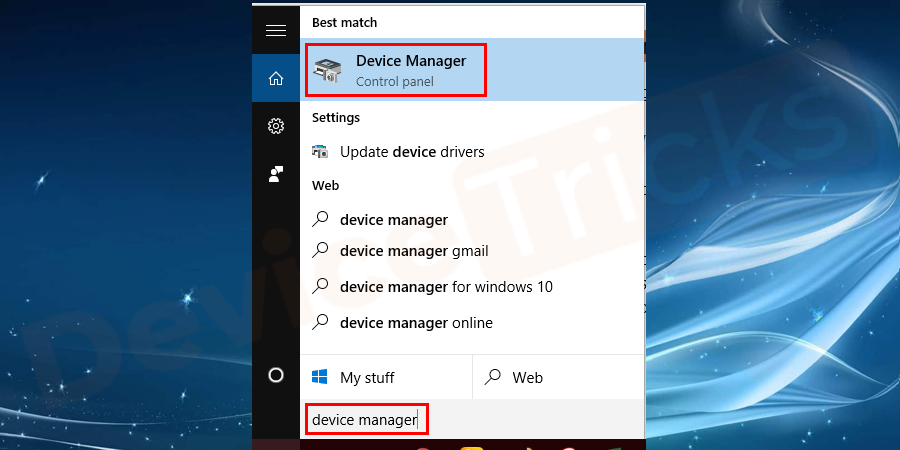
- Click on the start button on the Windows screen and type devmgmt.msc and click Ok to apply.
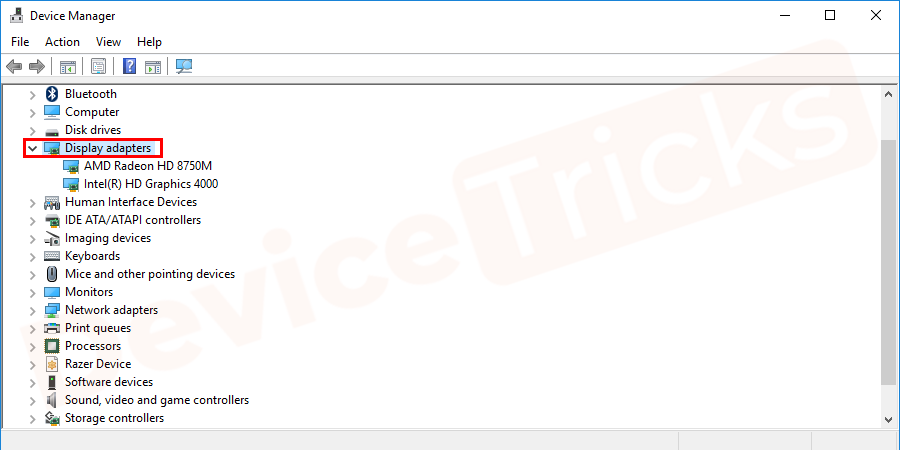
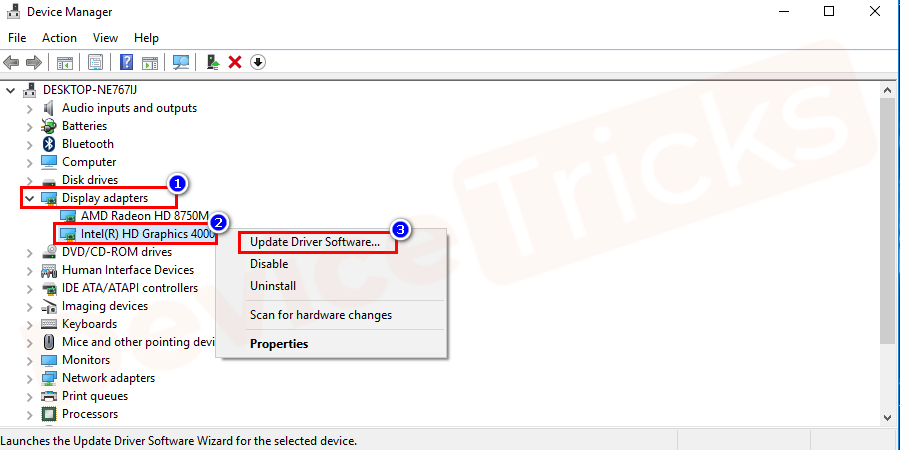
- Device Manager window opens. Double click on display adapters to expand it.
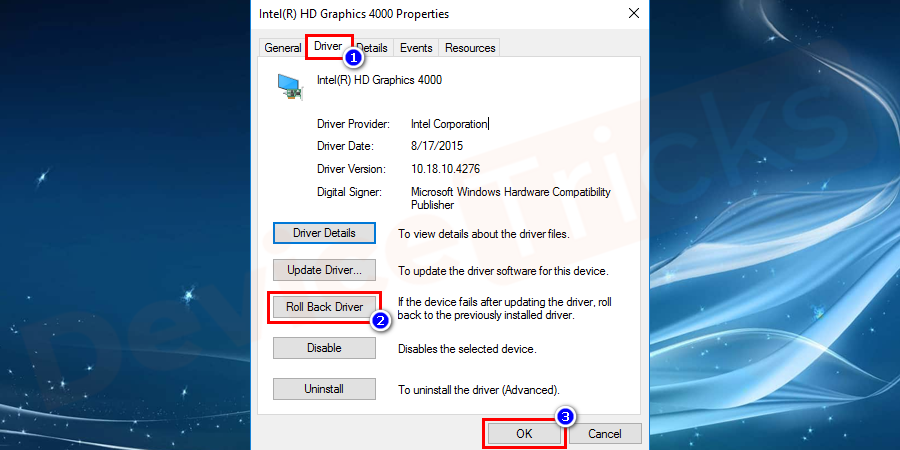
- Select the graphics card in your system. Right-click on the graphics driver and select properties.
- Go to the driver tab from the menu. And select roll back driver option to take your graphics driver to the previous version. Finally, click on the OK button.
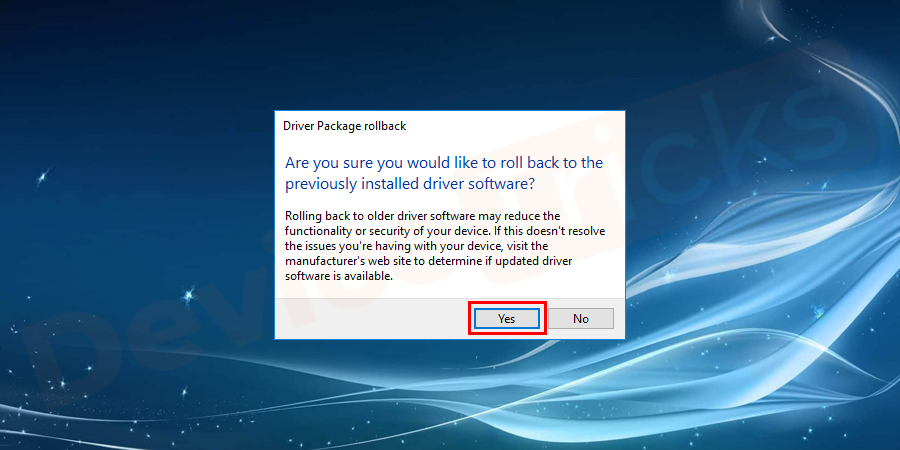
- A small dialog box opens requesting confirmation of your action. Click on YES (or OK) button to continue. Follow the displayed instructions to finish the operation.
- Restart your computer and open Warframe or other programs that causing an error to see whether an error is fixed.
NOTE: Rollback button is grey out and unavailable to click means that your Windows doesn’t have the previous driver to install. So, if you face the same situation skip to the next solution to fix the issue.
Update Graphics Card Driver
Missing or outdated graphics driver can cause DirectX device creation failed error. So, you have to make sure that your graphics card driver is up to date.
Manually update the driver: You can manually browse the latest version of your graphics card driver from the manufacturer. Download the driver and install it on your computer. This requires patience, time, and computer skills.
Manually follow below steps to update graphics driver easily
- Click on the Start button from the desktop screen, type device manager in the search box, and click on device manager to open it.
- On the open window, click the display adapters to expand it, and from the expanded list select graphics driver. And then right-click on the selected graphics driver and from the drop-down list select update driver.
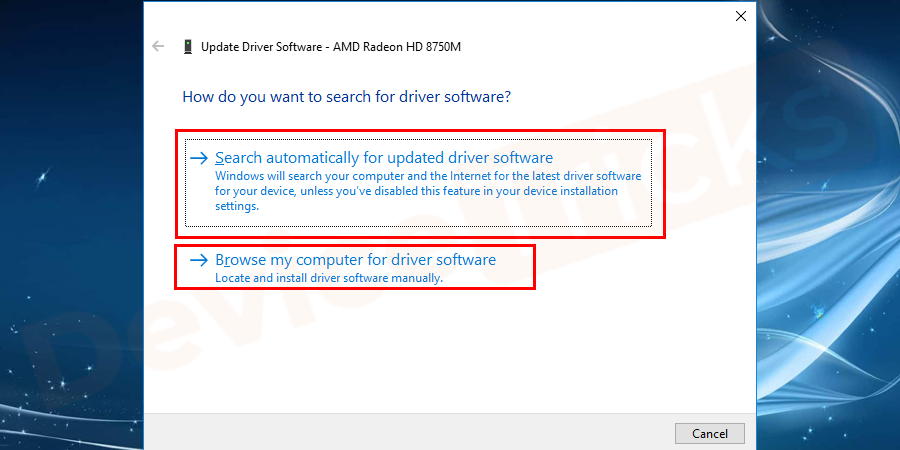
- On the pop–up window select search automatically for updated driver software option for searching the driver online. Select browse my computer for driver software option to update the driver from the downloaded driver in your computer.
- Follow the on-screen instructions to successfully update the driver through either of the options.
- After completion of driver updating, restart your computer. And check whether the game Warframe DirectX creation failed or another programming issue is resolved.
Automatically Update the Driver
You can automatically download drivers using third-party software. It helps you to detect the drivers that are having updates and will update it using the internet. You no need to risk downloading and installing the wrong driver. There is n need of worrying about making a mistake while installing. Using any of the third-party software or driver update will help you to automatically do the work.
NOTE: The excellent strength of internet connection is needed to update the driver without any breaks.
System Restore to fix DirectX device creation failed error
System restore is also the best solution to fix game Warframe DirectX creation failed error. It will help to restore the system to a point where there is no problem of DirectX creation failed error.
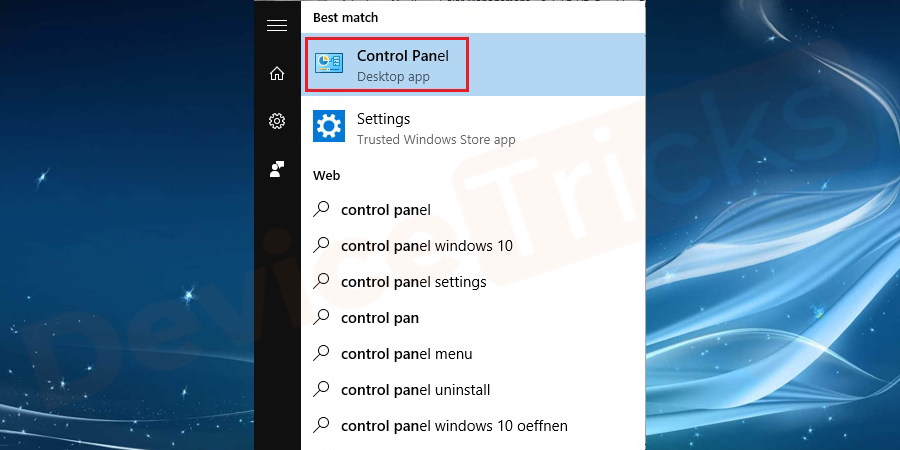
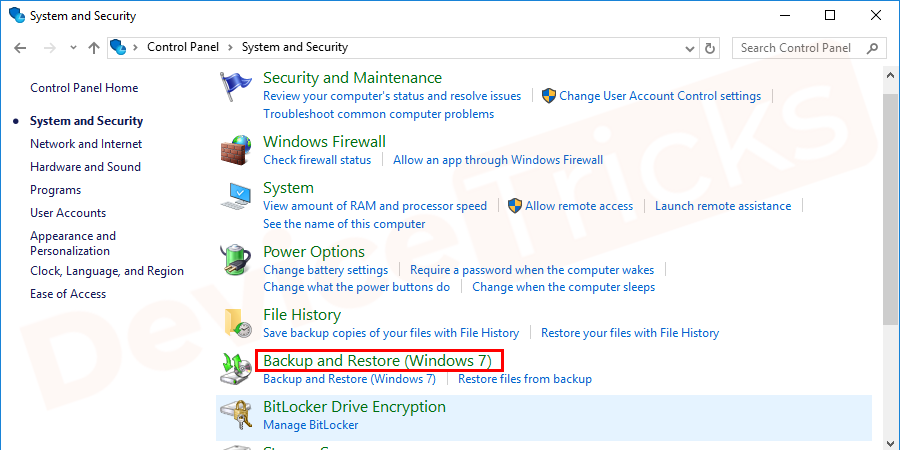
- Go to start menu, search for the control panel, and select the control panel from the list.
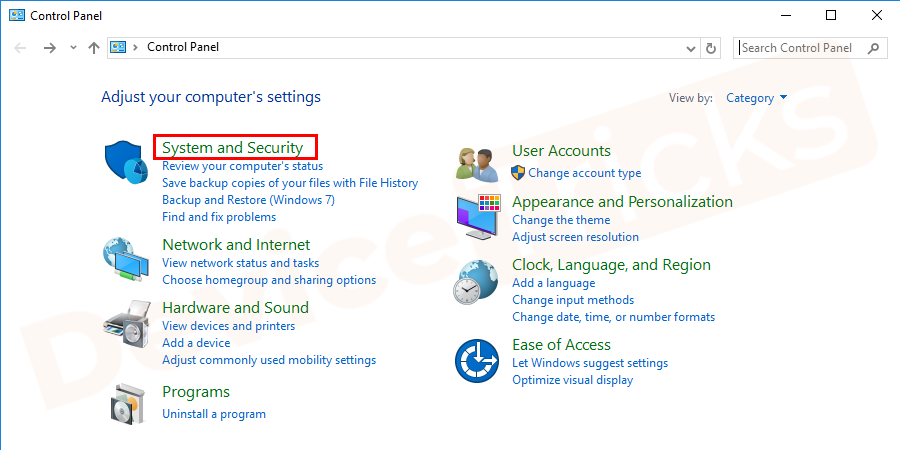
- Select the System and Security option.
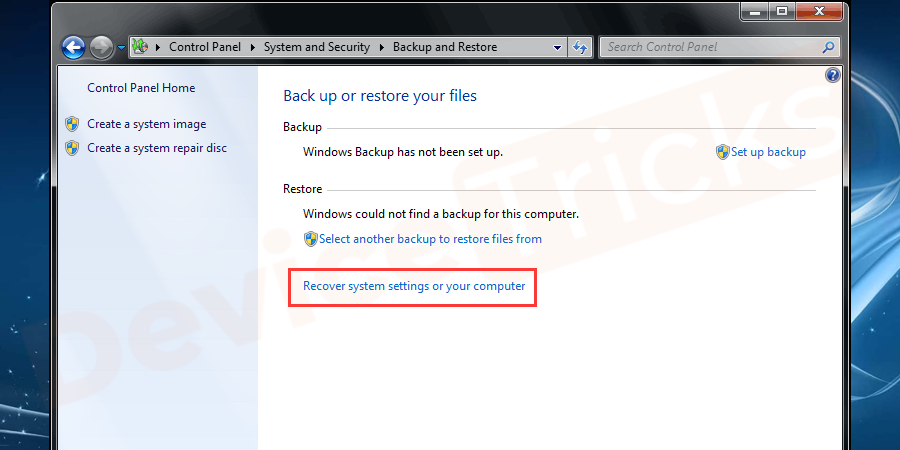
- The next window screen shows the list, select backup and restore option.
- On the bottom of the window, select Recover system settings or your computer.
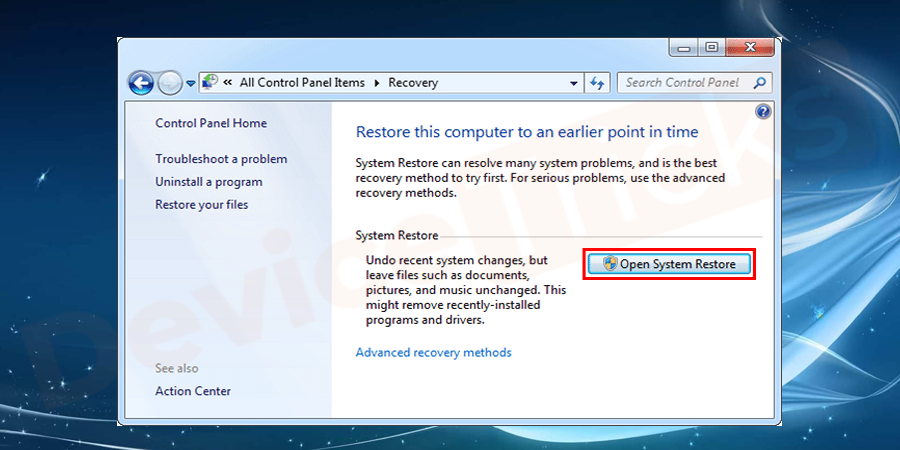
- Next, on the screen, double-click on open system restore.
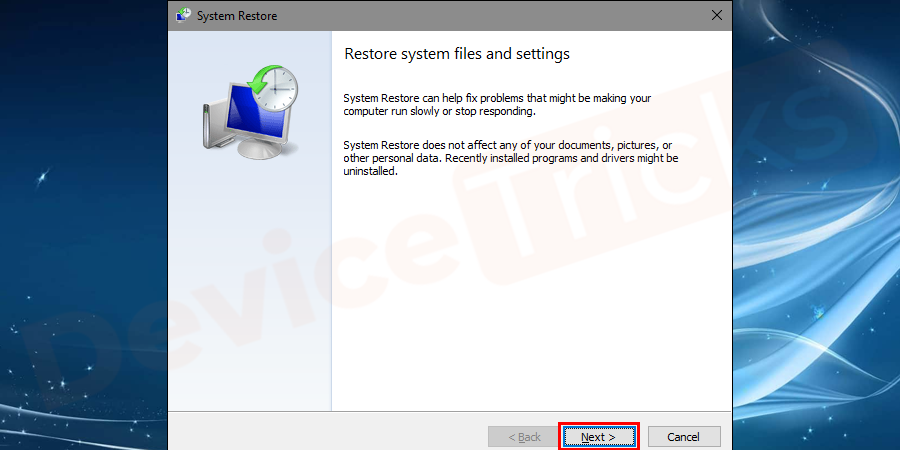
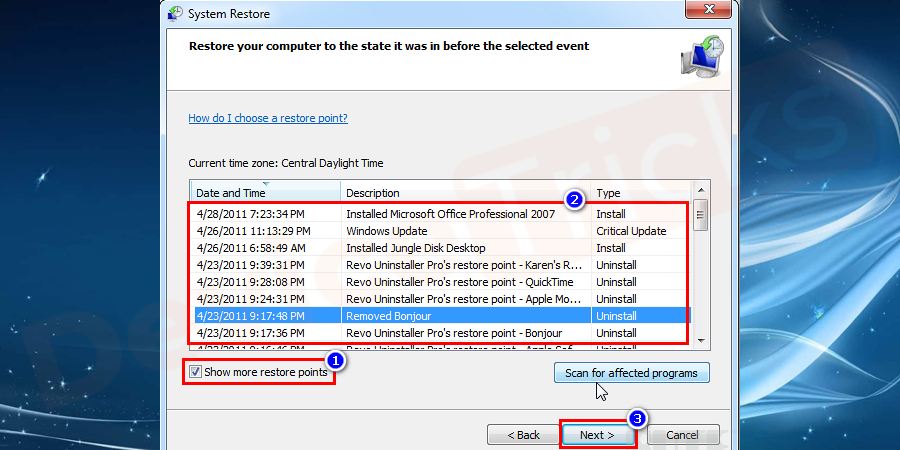
- Click on the next button to go to the system restore points.
- Uptick the show more restore points, select a restore point, and click on the Next button.
- Select the restart computer on the pop–up window. It will take some time to complete the restoration of your computer.
- After restarting your computer, launch the game that causing the error. And see either the problem is fixed or not.
- Hopefully, this solution will help to fix the issue.
Close Windows Media Center Program
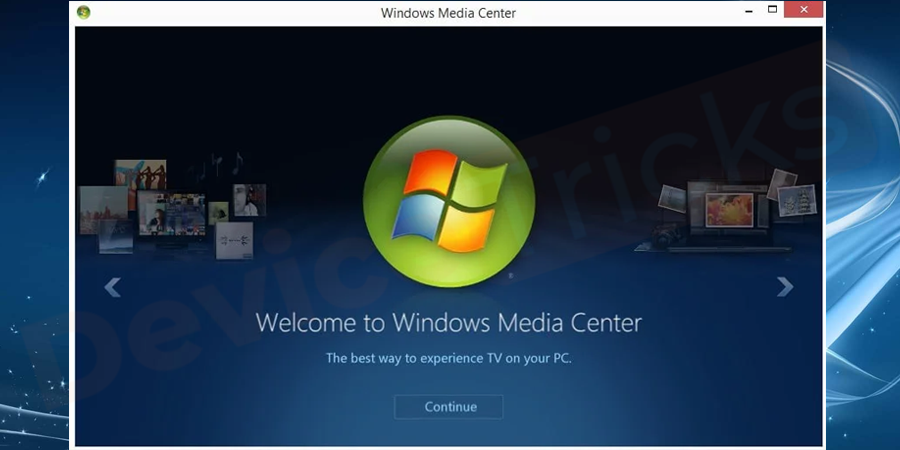
The conflict between the software and Media Center Program led to Warframe Device creation failed error. So, to resolve the same, you must turn off Windows Media Center Program. Generally, Windows Media Center Program is an inbuilt application of Windows OS and it contains DLL files and whenever any software that comprises DLL files runs in the OS, then conflict arises between the two and results in an issue.
- Open Windows Media Center Program and then minimize the same.
- Now, launch the game and soon, you will get a pop-up on your screen displaying an error message ‘DirectX device creation failed’.
- After getting the message, close Window Media Center and then launch the game again. This time, you won’t get an error.
If your issue is resolved, then follow the steps provided below to disable Windows Media Center Program.
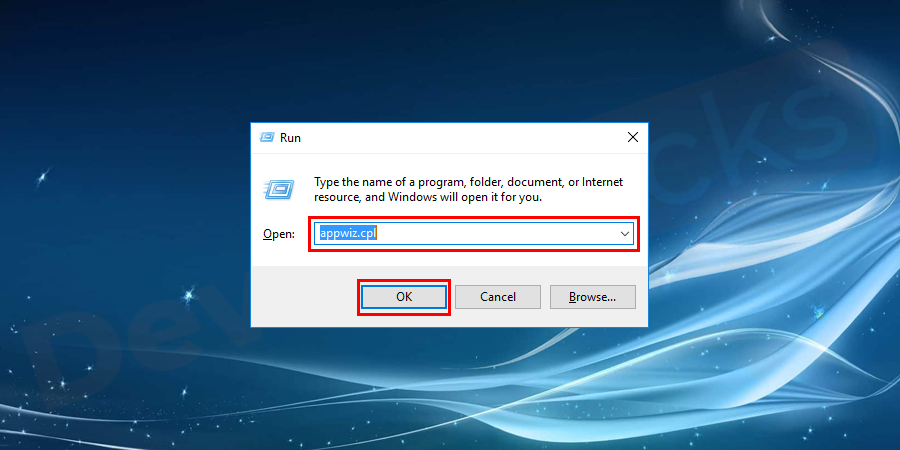
- Open Control Panel and for that press the Windows and R key together and then type ‘appwiz.cpl’ in the box without an inverted comma.
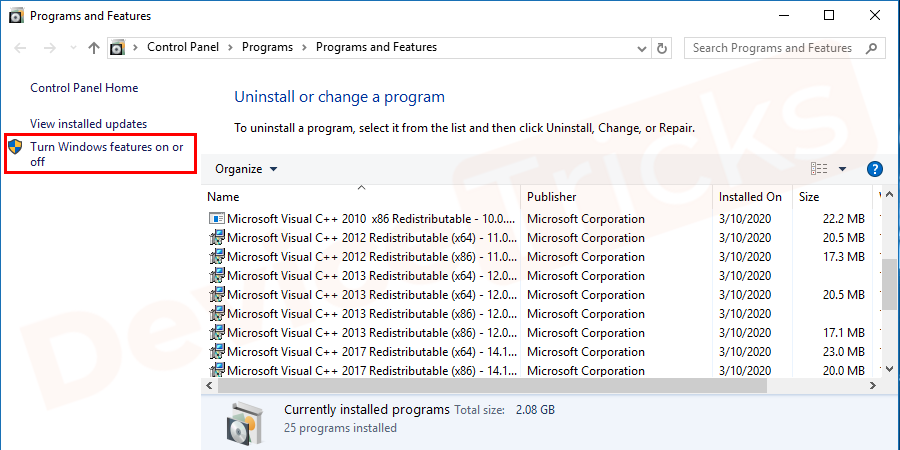
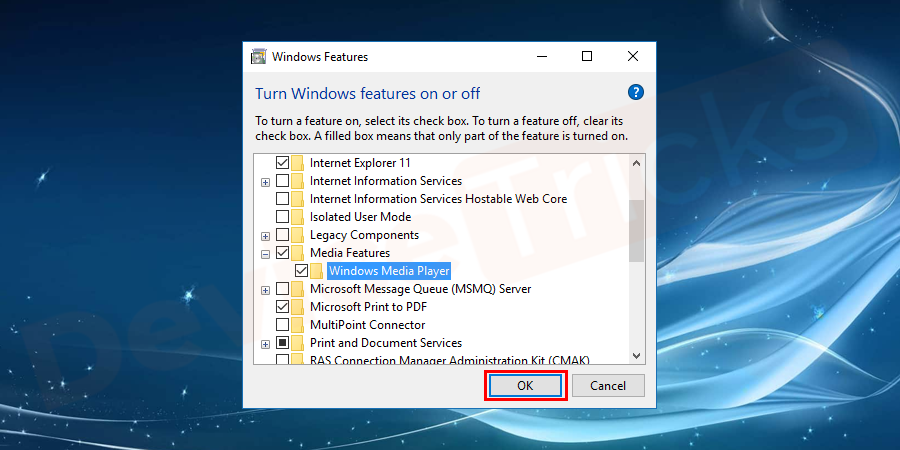
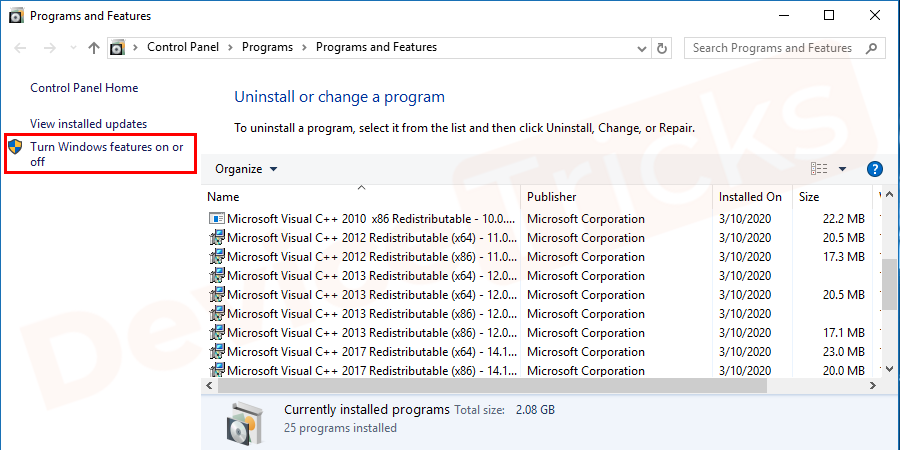
- Soon, you will get the list of applications to uninstall, given under ‘Program and Features’. At the sub-section of program and feature, you will get ‘Turn Windows Features on or off’, click on it.
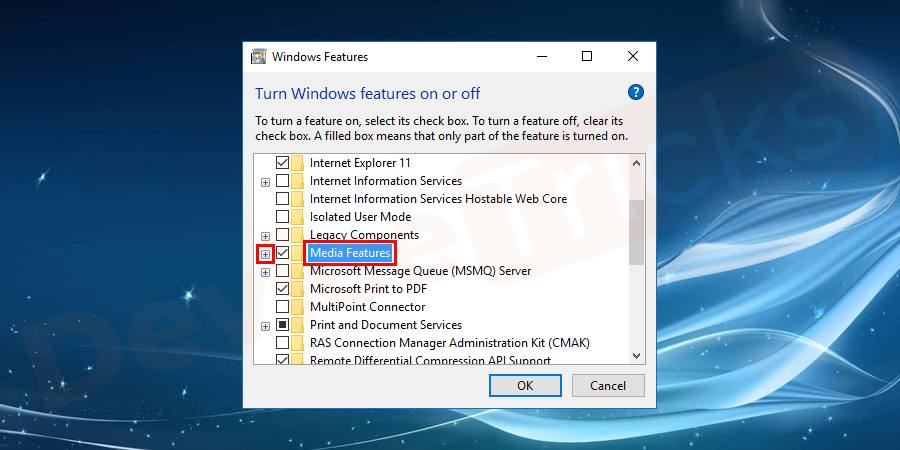
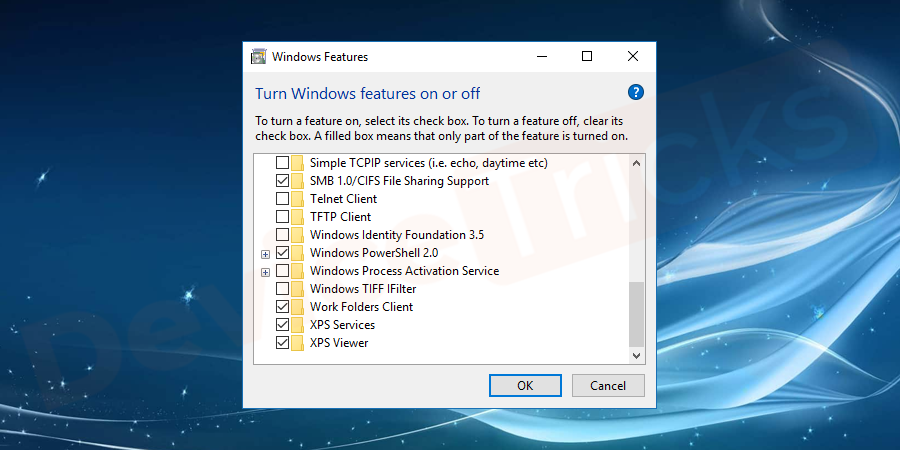
- Thereafter, a pop-up window will open and here you need to select ‘Media Features’. Click on the plus symbol given beside the ‘Media Features’ to expand the options.
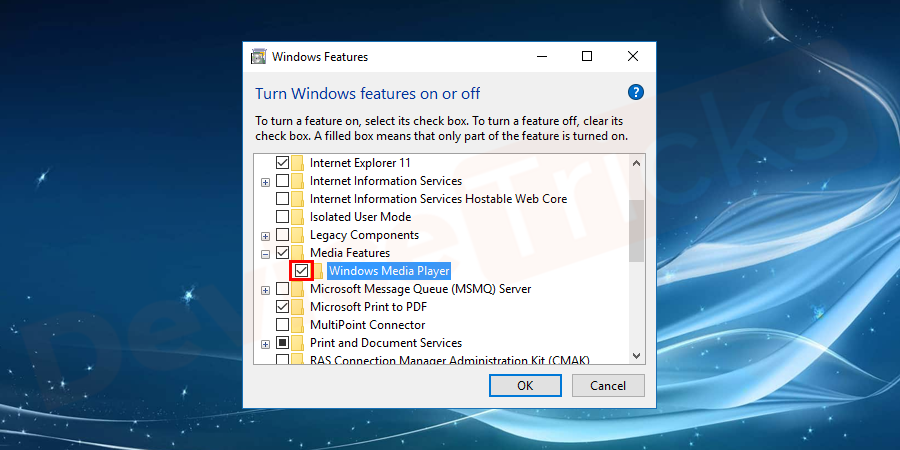
- Then uncheck the box stating ‘Windows Media Center’.
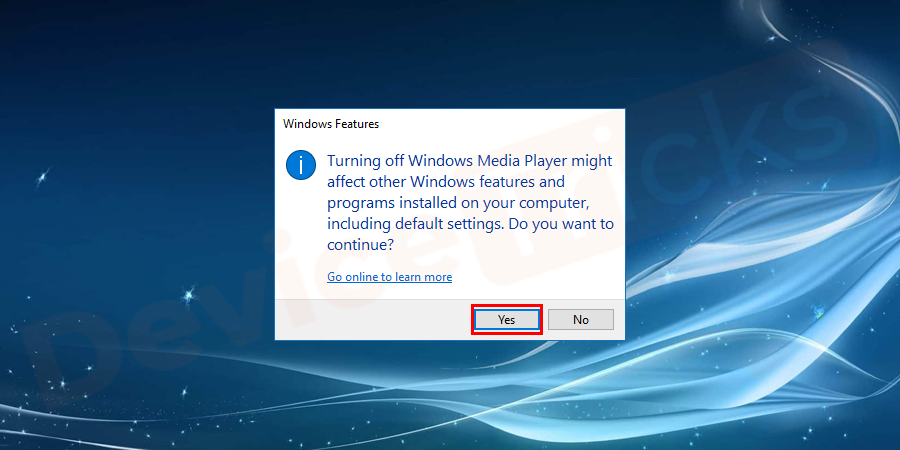
- A confirmation box will appear on the screen and you need to click on the ‘Yes’ button.
- Finally, click on the ‘OK’ button.
- Now, wait for a while and give some time to OS to disable this feature.
- After the completion of the process, restart your computer.
In this issue, Window Media Center is not a culprit; it is the DLL file that is conflicting with the other application.
Transfer the files to another folder
However, if the problem is with the software that is causing the conflict of the DLL files then you can transfer such files or folders in other locations of the drive. Due to this method, Window will fail to find the application that is causing the issue.
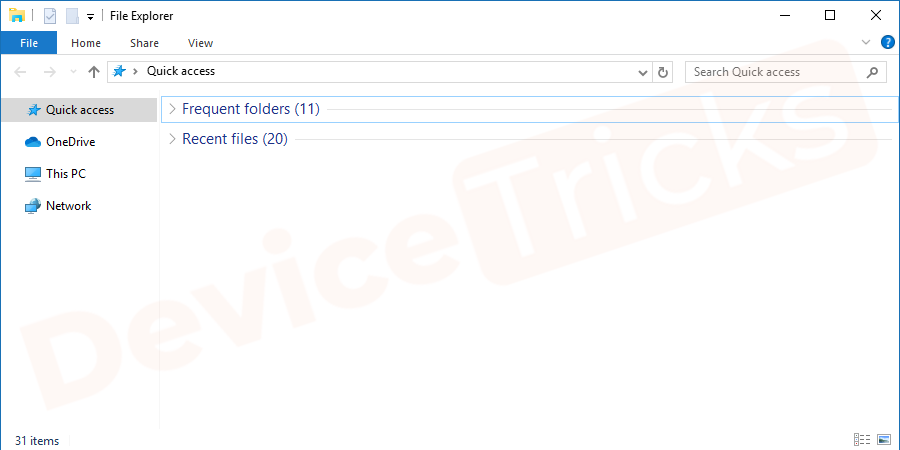
- Launch File Explorer.
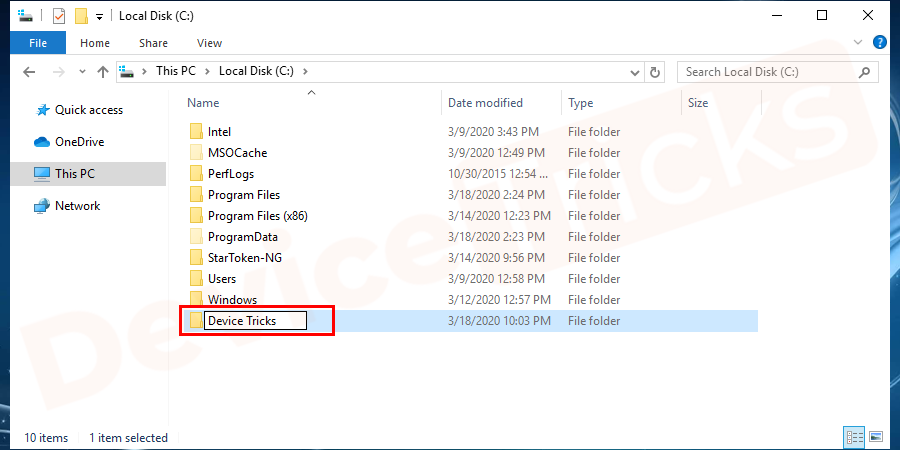
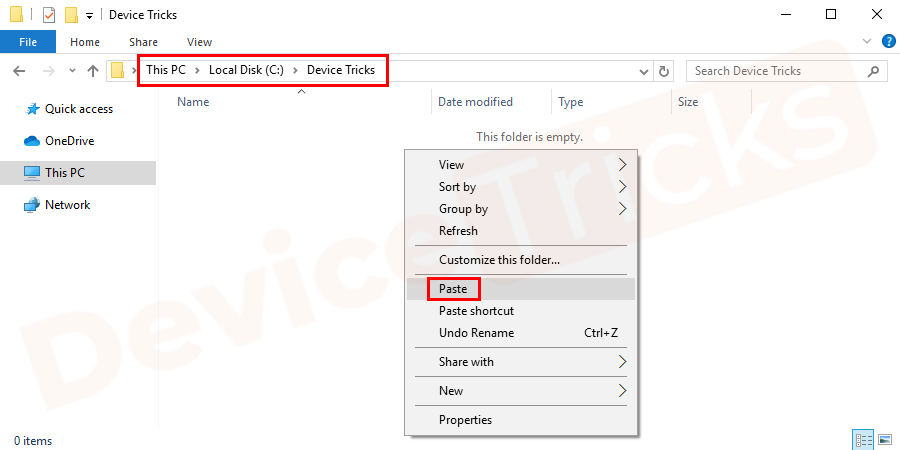
- Go to the default drive, it is usually ‘C’ drive. Now, create a folder and name it as per your wish.
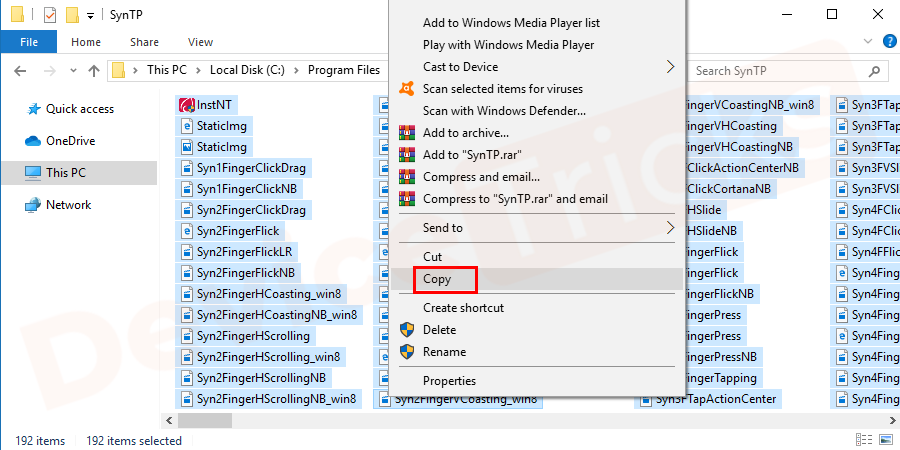
- After completing the above step, move to “C: Program FilesMicrosoft Games”or other location where you have installed the game. Then navigate to the game that is causing an issue and open the folder and then copy all the files.
- After copying the files, move to the folder that you created earlier and then paste all the files.
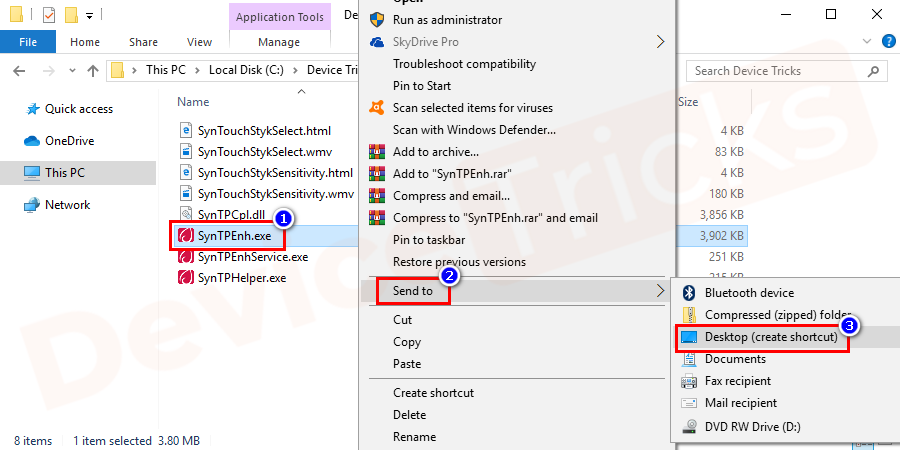
- That’s it; now you can launch the game by clicking on the executable file, it is denoted by ‘.exe’. However, you can create a shortcut for the game and for that right-click on the ‘.exe’ file, select ‘Send To’ and then choose ‘Desktop’.
Re-enable the game components
In this process, you are going to turn off the game feature and then turn it ON again. This will enable Windows to initialize the game components freshly. The procedure for the same is provided below.
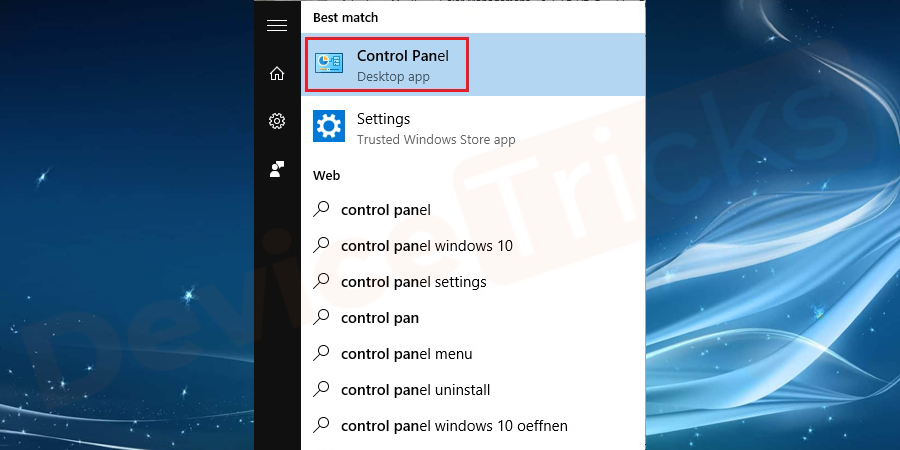
- Click on the Start menu, type Control Panel in the search bar and then press the ‘Enter’ key.
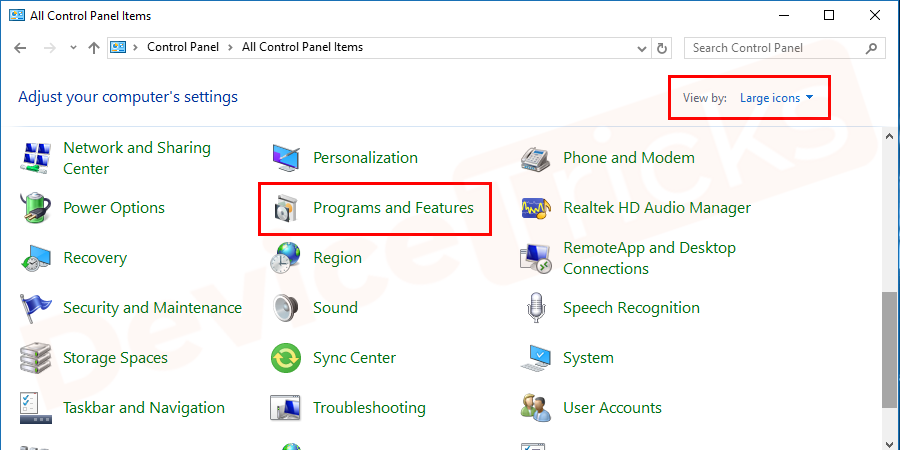
- Soon, you will find the list of applications in the Control Panel, click on ‘Programs and Features’.
- In the Program and Features section, you will get ‘Turn Windows Features On or off’, click on it.
- Thereafter, a new pop-up window will open and now you need to find out the game and then uncheck the box.
- After completing the above step, close the Window and restart your computer.
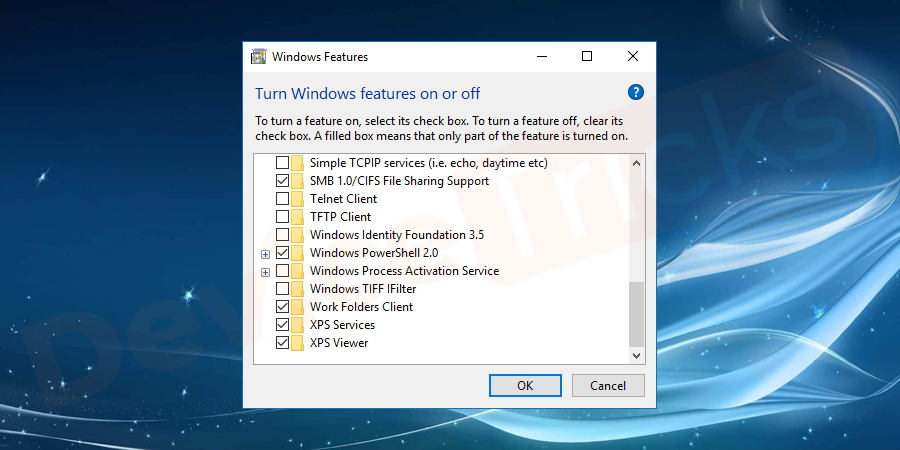
- Now, again launch the Control Panel and move to the ‘Programs and Features’ section. And again select ‘Turn Windows features on or off’ and then select the game that you have unchecked earlier. This time, make sure the box is check marked.
- Now, close the window and restart your computer.
- This time, the issue DirectX device creation failed error will vanish.
Need Any Assistance
The above solutions help to fix the error DirectX creation failed or Warframe DirectX creation failed error. If you are stuck up at any step of the solution or need any assistance. Write to us with an issue you are facing and we will help you out with the best solution. Wanna some more DeviceTricks? Stay tuned to this space to get latest updates on errors related to Windows, Mac and Android.
If you feel this article helpful please like, share and follow our Facebook page.

