
There appear to be several ways to launch the SDK Manager:
SDK Manager.exein the root of the Android SDK.SDK Manager.exeinsdktoolslibof the Android SDK.Window -> Android SDK Managermenu in Eclipseandroid.batinsdktoolsof the Android SDK.
In my case, it looks like android.bat fails on the line:
for /f %%a in ('%java_exe% -jar libarchquery.jar') do set swt_path=lib%%a
As far as what that line is doing… if I manually run: "[path_to_java]java" -jar libarchquery.jar
It successfully returns: x86_64
But when the batch file runs that same command, I don’t know why but it fails with the error message:
Unable to access jarfile libarchquery.jar
So the variable swt_path gets set to an empty string. Everything breaks down from there.
The batch file sets the correct value for the variable java_exe. Others have commonly reported this as a problem, but those workarounds weren’t relevant in my case.
People have recommended commenting out the problem line by adding REM to the beginning of it, and adding a line to manually set the swt_path variable, which is a valid workaround:
REM for /f %%a in ('%java_exe% -jar libarchquery.jar') do set swt_path=lib%%a
set swt_path=libx86
BUT, the critical issue in my case is that it’s choosing to load a jar file from either the libx86 or the libx86_64 folder here. At some point, things were getting confused between the BAT file error, a 32-bit JDK, and a 64-bit Android SDK.
SO, the workaround in my case was to:
- Uninstall ALL versions of Java
- Install the JDK
- You can either use the 32-bit Android SDK and install the 32-bit JDK
- Or use the 64-bit Android SDK and install the 64-bit JDK
- But the «bitness» of the JDK should match the Android SDK. It appears that either of the 32-bit or the 64-bit will work on a 64-bit computer, AS LONG AS the JDK bitness matches the Android SDK bitness.
-
Edit «android.bat»
-
If using the 32-bit Android SDK/JDK, use
libx86:REM for /f %%a in ('%java_exe% -jar libarchquery.jar') do set swt_path=lib%%a set swt_path=libx86 -
If using the 64-bit Android SDK/JDK, use
libx86_64:REM for /f %%a in ('%java_exe% -jar libarchquery.jar') do set swt_path=lib%%a set swt_path=libx86_64
-
After doing this, I can successfully run the SDK Manager by running android.bat, or from the Eclipse menu (but still not by running either of the SDK Manager.exe files directly).
I was also stuck with this…i tried everything mentioned above, but could not get through.
Then I was about to uninstall and reinstall the IDE as mentioned above.
When I was about to uninstall, to my surprise, I found Android SDK Tools in control Panel -> Programs and Features, which was the thing I was looking for!
Android SDK Tools in Control Panel -> Programs and features
I didn’t know how to find the path of that, because even after searching in my computer, I didn’t get it. So, I went on further and clicked on uninstall.
There, I found the path of Android SDK Tools «C:Program Files (x86)Androidandroid-sdk». I did not uninstall anything.
I linked this path in the dialogue box, the error was gone!
Whoever encounters the same error, should look for the «Android SDK Tools» in the programs and features in control panel, and then go for uninstalling the same.
There you will find the path of the tools folder.
Copy and paste that path, and you shall get through.
Android SDK is one of the most useful components which is required to develop Android Applications. Android SDK is also referred to as the Android Software Development Kit which provides so many features which are required in Android which are given below:
- A sample source code.
- An Emulator.
- Debugger.
- Required set of libraries.
- Required APIs for Android development with their documentation.
- Tutorials required for Android OS development.
What’s the Error?
Sometimes when the developer import an Eclipse-Android-Project into Android Studio then there may be a possibility of getting the following error
“Please select Android SDK”
Now the point that comes here is how we can fix the “Select Android SDK” error in Android Studio. So in this article, we are going to discuss four different methods to fix the “Select Android SDK” error in Android Studio.
Method 1
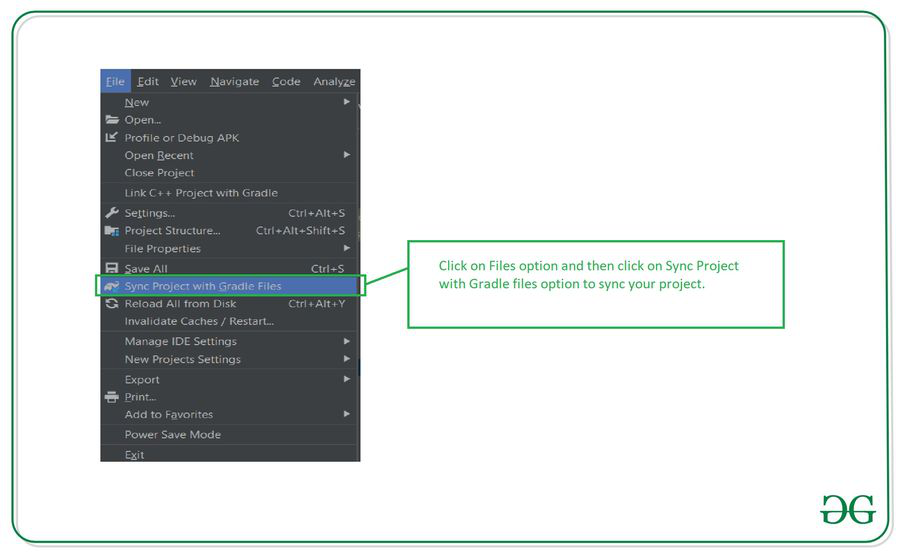
Sync your project with Gradle files
When you open your project now simply sync your project. To sync your project. Click on the Files option. In that option, you will get to see the option as Sync Project with Gradle Files. Click on that option to sync your project. After your project sync, this issue will be resolved. Please refer to the below screenshot.
Method 2
Step 1: Opening project structure
Navigate to the File > Click on Project structure which is shown in the list and click on the Project structure option. After clicking that option you will get to see the below screen.

Inside the above screen, click on the SDK Location option you will get to see the below screen.
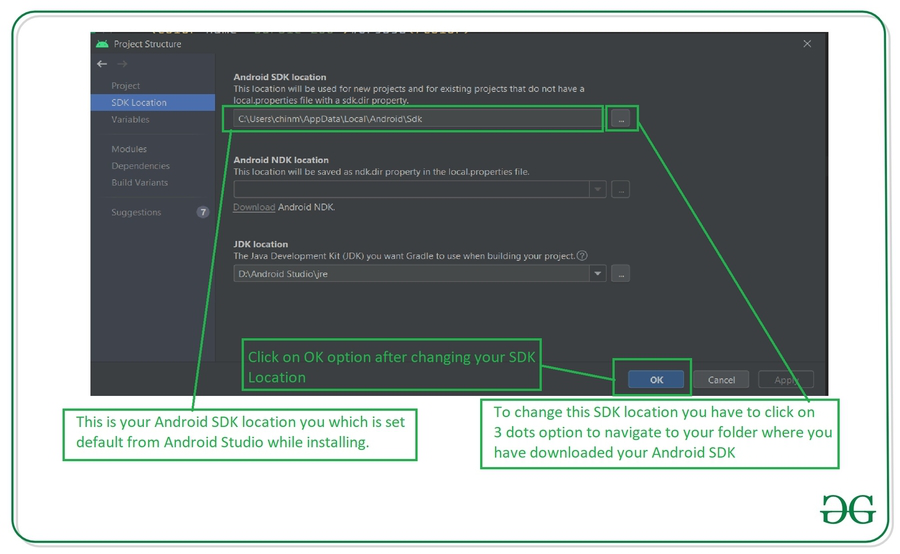
In the above image, you will get to see the current SDK location for your Android Studio. To change this SDK location you have to click on the 3 dots which are being displayed and then select your SDK location folder. After selecting this folder click on the OK option to save your SDK path.
Step 2: Sync your project after adding your SDK path
Now sync your project with Gradle files to check that SDK is working fine. To do this click on File > you will get to see the option as Sync Project With Gradle files option click on that option and sync your project. On successful sync of your project, your SDK location is set perfectly and now you are good to go in developing Android Applications.
Method 3
Step 1: Opening Android Studio Settings
Navigate to the File > Settings option you will get to see below dialog screen. Inside that screen. Click on Appearance and Behavior option > System Settings options and then click on the Android SDK option to get to see the below screen.

Inside this screen, you will get to see your SDK path. You can update your SDK path by clicking on the Edit option. After that select your SDK path, then click on Apply option, and then click on the OK option.
Step 2: Sync your project after adding your SDK path
Now sync your project with Gradle files to check that SDK is working fine. To do this click on File > you will get to see the option as Sync Project With Gradle files option click on that option and sync your project. On successful sync of your project, your SDK location is set perfectly and now you are good to go in developing Android Applications.
Method 4
Step 1: Opening project structure
Inside your Android Studio in the top right corner, You can get to see the icon below the image for opening the project structure. Click on that option to open your project structure option. You will get to see the below screen. For opening this Project Structure we can also use a shortcut key as:
|
Operating System |
Shortcut Key |
|---|---|
| Windows | Ctrl + Alt + Shift + S |
| Mac OS | Command + ; (semi-colon) |
| Linux | Ctrl + Alt + Shift + S |

After clicking on this option we simply have to follow Step 1 to update our Android SDK.
Inside the above screen, click on the SDK Location option you will get to see the below screen.
In the above image, you will get to see the current SDK location for your Android Studio. To change this SDK location you have to click on the 3 dots which are being displayed and then select your SDK location folder. After selecting this folder click on the OK option to save your SDK path.
Step 2: Sync your project after adding your SDK path
Now sync your project with Gradle files to check that SDK is working fine. To do this click on File > you will get to see the option as Sync Project With Gradle files option click on that option and sync your project. On successful sync of your project, your SDK location is set perfectly and now you are good to go in developing Android Applications. On successful sync of your project, your SDK location is set perfectly and now you are good to go in developing Android Applications.
Last Updated :
31 Oct, 2022
Like Article
Save Article
Error SDK Problem — Your Android SDK is missing out of date or corrupted
I recently ran into the Android Studio SDK Problem «Your Android SDK is missing, out of date or corrupted» while starting my newly installed Android Studio 4.0. When I clicked on «Open SDK Manager» it opened the prompt on installed packages but didn’t let me select anything. So I had to restart my Android Studio and it took me back to the «Android Studio Setup Wizard» and eventually had to install all the required packages like the below
Android Emulator
235 MB
Android SDK Build-Tools 29.0.3
52.6 MB
Android SDK Platform 29
74.6 MB
Android SDK Tools
149 MB
Intel x86 Emulator Accelerator (HAXM installer)
2.63 MB
SDK Patch Applier v4
1.74 MB
Sources for Android 29
37.6 MB
Preparing "Install Android SDK Platform-Tools (revision: 30.0.1)".
Downloading https://dl.google.com/android/repository/platform-tools_r30.0.1-windows.zip
"Install Android SDK Platform-Tools (revision: 30.0.1)" ready.
Installing Android SDK Platform-Tools in C:Usersc2cAppDataLocalAndroidSdkplatform-tools
"Install Android SDK Platform-Tools (revision: 30.0.1)" complete.
"Install Android SDK Platform-Tools (revision: 30.0.1)" finished.
Preparing "Install Intel x86 Emulator Accelerator (HAXM installer) (revision: 7.5.6)".
Downloading https://dl.google.com/android/repository/extras/intel/haxm-windows_v7_5_6.zip
java.net.NoRouteToHostException: No route to host: connect
Warning: An error occurred while preparing SDK package Intel x86 Emulator Accelerator (HAXM installer):
No route to host: connect.Solution: It seems like while I was installing the Android Studio afresh I had internet problems that failed to download the above-required packages. This issue got resolved after downloading them. I hope it helps someone!
|ADsADsAdss|
В этой небольшой заметке мне хотелось бы затронуть ситуацию. Компьютер разработчика не запускает SDK Manager.
Напомним, что утилита Android SDK Manager входит в состав Android SDK. Который, как мы знаем, имеет модульную структуру. Составные части (такие как документация, примеры, необходимые инструменты и дополнения). Представлены в виде отдельных сущностей, пакетов. Вот для менеджмента этих пакетов, в частности, для загрузки новых. Также для удаления и обновления существующих, и используется приложение SDK manager.exe. С необходимостью его запуска можно столкнуться уже на этом шаге. При настройке инструментария для разработки программ для Android.
Из-за чего не запускается программа?
Везде ниже мы рассматриваем ситуацию, когда SDK Manager не запускается. Окно либо не появляется, либо появляется и сразу же исчезает. В случае если выскакивает какое-либо предупреждение. Для запуска менеджера достаточно просто внимательно это предупреждение прочитать. Наверное, не стоит упоминать топорные решения, связанные с переустановкой Android SDK или созданием в системе нового пользователя с последующей повторной инсталляцией инструментария под его аккаунтом (хотя часто такие решения помогают). Стоит отметить, что иногда утилита может запуститься из Eclipse или с помощью файла android.bat.

Самая банальная причина, по которой может не запускаться Android SDK Manager – это несоблюдение одинаковой разрядности (32-bit, 64-bit) операционной системы и устанавливаемых инструментов. Второй банальной причиной является путаница между ‘/’ и ‘’ в настройках, связанных с путями (верно второе).
Чаще всего SDK Manager не запускается из-за неправильно прописанных путей. Для решения этой проблемы достаточно в переменной среды Path прописать путь к директории JDK/bin установленной Java. Следует помнить о том, что в том же Path перед данной записью могут располагаться записи путей к JRE и (реже) к System32. Это может «сбить с толку» SDK Manager, поэтому стоит проследить, чтобы запись пути к JavaJDKbin стояла перед упомянутыми. Выполним ремонт экрана iphone, делаем замену деталей, записаться к нам.
Как ни странно, но в львиной доле случаев, когда SDK Manager.exe не запускается в Windows, дело успешно решается с помощью запуска приложения от имени администратора.
В ряде случаев помогает добавление в переменные среды новой переменной JAVA_PATH, значением которой будет путь до каталога с JDK.
Иногда помогает создание новой переменной среды ANDROID_SDK_HOME, значением которой является путь до каталога android-sdk.
Иногда помогает создание новой переменной среды ANDROID_SDK_HOME, значением которой является путь до каталога android-sdk.
Прописка расположения файлов до папки SDK
Если SDK Manager не запускается, возможно, стоит сделать так, чтобы путь до этой утилиты не содержал пробелов. Например, можно поместить всё содержимое папки с Android SDK в корень диска. Эквивалентным этому действием можно назвать заключение пути с пробелами в кавычки везде, где это возможно.
В папке lib находится bat-файл «find_java». Если открыть его текстовым редактором, найти строку
%java_exe% -version 2>nul
и исправить её на
%java_exe% -version 2>null
То есть шанс, что Android SDK Manager запустится.
В абсолютном большинстве случае вышеприведенные советы помогают запустить SDK Manager. Интересно было бы узнать в комментариях об опыте тех, кто сталкивался с подобной ситуацией.