Время прочтения: 4 мин.
35 484
Содержание
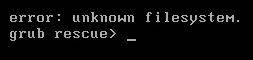
В случае возникновения проблем с загрузчиком появляется надпись grub rescue. Чаще всего проблема появляется, когда на компьютере установлено сразу две операционные системы: Linux и Windows. Обычно установка производится в такой последовательности.
Сначала на жёсткий диск устанавливается Windows после чего на отдельный раздел производится установка Linux. При такой схеме в загрузочную область диска добавится загрузчик grub2 что позволяет выбирать в какую из систем производить запуск.
Но бывает так, что в таком состоянии компьютер работает длительное время. У Windows как известно разрастается реестр, и система начинает работать медленно. Тут вы приняли решение переустановить Винду, а заодно затёрли загрузчик Linux. Загрузочная область оказывается повреждена и при старте системы появляется сообщение на чёрном экране: grub rescue unknown filesystem.

Ещё вы могли что-нибудь нахимичить с файлом конфигурации grub.cfg в директории
/boot/grub/. Его вообще не рекомендуется править редакторами поскольку в будущем он всё равно окажется перезаписан автоматически. Вместо этого сконфигурируйте файл/etc/default/grubи выполните команду:sudo update-grub
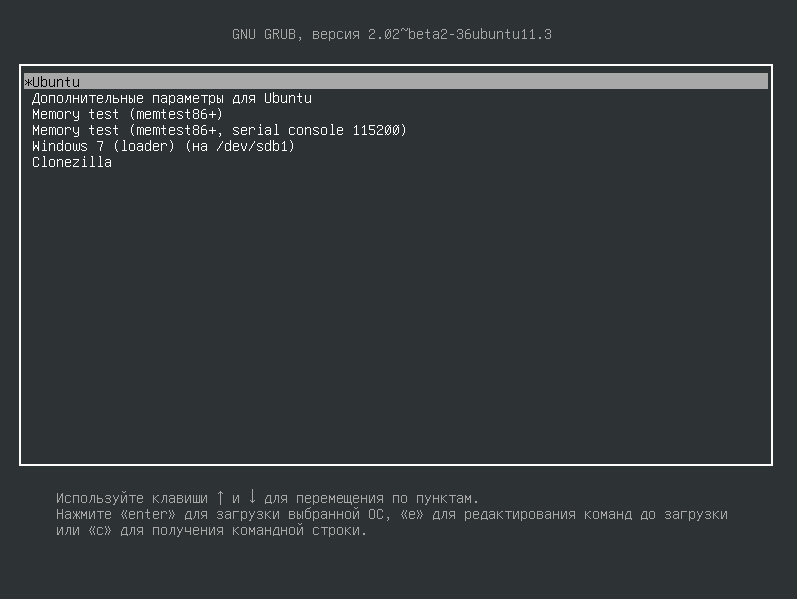
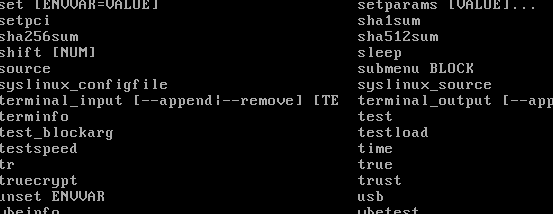
Итак, мы находимся консоли загрузчика. Она имеет небольшой командный интерпретатор наподобие bash. Список всех доступных команд можно получить, набрав:
help
Введите команду для просмотра существующих разделов:
ls
В данном примере всего один раздел msdos1 на жёстком диске hd0.
Убедимся, что это нужный раздел. Для этого выводим список файлов загрузчика:
ls (hd0,msdos1)/boot/grub/Находим файл grub.cfg значит всё в порядке, продолжаем. Если каталог не обнаружен, то перебираем остальные разделы дисков пока не найдём.

Следующая команда создаёт префикс для каталога загрузчика:
set prefix=(hd0, msdos1)/boot/grubУстановим раздел в качестве корневого:
set root=(hd0, msdos1)/boot/grubЗатем необходимо подключить ещё пару модулей и стартовать загрузку системы:
insmod ext2
insmod normal
normal
После успешной загрузки в Linux не забудьте переустановить загрузчик командой:
sudo grub-install /dev/sd_(вместо «_» введите букву загрузочного жёсткого диска).
Далее выполните команду обновления конфигурации файла grub.cfg:
sudo update-grubОбычно grub2 автоматически определяет установленные системы, в том числе Windows, и добавляет их в список загрузки.
Восстановление ubuntu с флешки
Если все проделанные выше действия не помогли, то придётся раздобыть загрузочную флешку.
Лучше подготовить USB или CD носитель с Ubuntu той же версии и разрядности что и восстанавливаемая система. Я покажу на примере системы Ubuntu 18.04 LTS x64. Загрузитесь в Live режиме и откройте терминал комбинацией Ctrl+Alt+T.
Для удобства сразу активируйте права суперпользователя root. Знак минус в конце команды означает перемещение в домашний каталог:
sudo su -
Теперь нужно посмотреть список дисков и разделов программой fdisk:
fdisk -l
Обнаруживаем раздел с установленной системой Linux. В этом примере раздел /dev/sda1 единственный, он же корневой и загрузочный.
ВНИМАНИЕ
Выбирайте раздел аккуратно, буква диска может отличаться от моих примеров. Не потеряйте свои данные!
Смонтируем его в каталог /mnt/:
mount /dev/sda1 /mntУбедитесь, что каталог /boot/ находится на этом же разделе диска выполнив команду:
ls -l /mnt/boot/В случае отсутствия каталога, монтируйте его отдельно. Для этого нужно найти раздел в результате вывода утилиты fdisk (на скриншоте выше) и смонтировать командой:
mount /dev/sdaX /mnt/bootX = номер вашего раздела с файлами каталога /boot/.
Сейчас необходимо произвести логин в ту систему, которую будем чинить. Но перед этим смонтируем из Live системы несколько служебных разделов:
mount --bind /dev /mnt/dev && mount --bind /proc /mnt/proc && mount --bind /sys /mnt/sysДвойной амперсанд
&&между командами означает проверку выполнения предыдущей команды. Выполнение последующей команды происходит только при условии, что предыдущая завершена успешно.
Переходим в окружение chroot, то есть заходим под пользователем root в систему, установленную на жёстком диске:
chroot /mntВсё, мы в системе. Можно устанавливать загрузчик и обновлять его конфигурацию. Будьте внимательны, используется именно корневой раздел диска /dev/sda без цифры:
grub-install /dev/sda && update-grub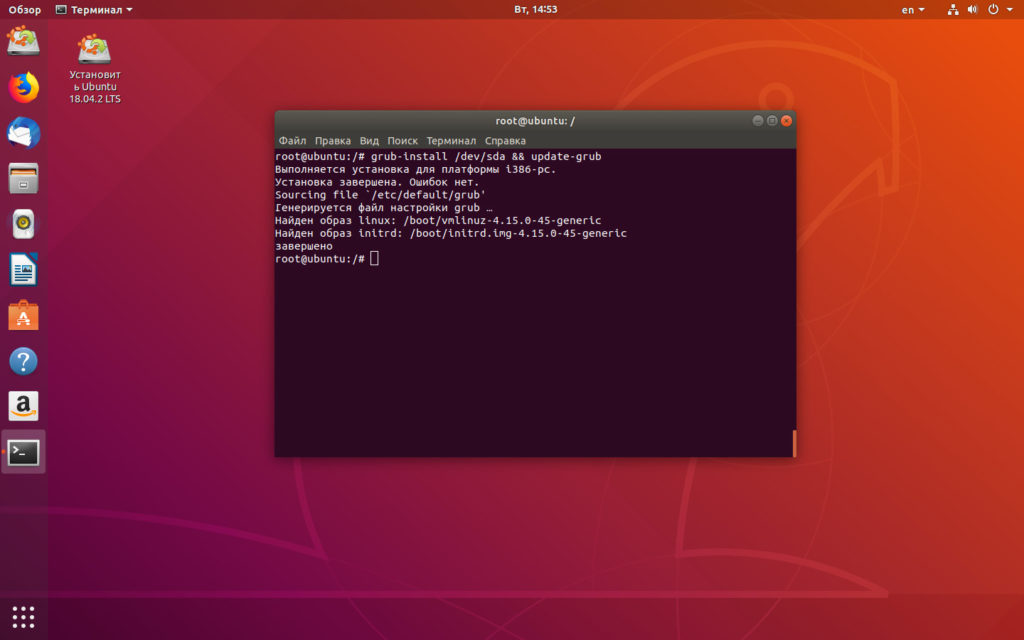
Посмотрите, чтобы не было ошибок в результате выполнения команд. Далее набираем один раз exit, или комбинацию Ctrl+D и выходим в консоль Live системы.
На всякий случай размонтируем корректно разделы и перезагружаемся:
umount –R /mnt; rebootПроцедура восстановления загрузчика grub2 на этом завершена.
Применение статьи на практике: https://onstartup.ru/forum/po-motivam-grub-rescue/
Видео
Contents
- Overview
-
GRUB 2 Terminal Commands
- Normal
- grub>
- grub rescue>
-
General Troubleshooting Preparation
- Boot-Repair
-
Search & Set
- How & Where to Search
-
Specific Troubleshooting
- grub>
- grub rescue>
- GRUB
-
Editing the GRUB 2 Menu During Boot
- Key Points About Terminal Menu Editing:
- Menu Editing Examples
- Post Boot Follow Up
- Fallback mode
-
GRUB 2 Errors
-
Selected Problems and Bugs
- External Drive Installs and »grub-pc» Updates
- External Drive Installs and MBR Selection
- Boot Partition is in Logical Volume whose Volume Group contains a snapshot
- insmod fails with «error: no such disk»
-
Selected Problems and Bugs
- Links
This page provides the user with information on options available for repairing GRUB 2 boot issues and specific instructions on how to use the GRUB 2 terminal. The instructions are written for GRUB 1.99, which is the version of GRUB 2 which is included on Ubuntu 11.04, Natty Narwhal, and later. Differences for version 1.98 (Ubuntu 10.4, Lucid Lynx) are noted when the procedures differ.

GRUB 2’s ability to fix boot problems is greatly improved over the original GRUB bootloader. In addition to an automatic fallback mode if booting from a menuentry in a submenu, GRUB 2 allows the user to edit its menu before the operating system is loaded. The rescue mode GRUB 2 terminal can help boot an operating system so that permanent repairs to system files can be made.
The instructions on this page are written for a fully-installed Ubuntu operating system. WUBI boot problems are not covered in detail although they are addressed in several sections.
Overview
GRUB 2 boot problems can leave the system in several states. The user may see one of the following displays on the monitor when a boot fails. The display provides the first indication of what might be causing the failure to boot. Here are the failure prompts and displays, and the possible cause of each:
-
grub> prompt: GRUB 2 loaded modules but was unable to find the grub.cfg file.
-
grub rescue> prompt: GRUB 2 failed to find its grub folder, or failed to load the normal module.
-
grub>: — The grub prompt on a blank screen.
-
GRUB 2 has found the boot information but has been either unable to locate or unable to use an existing GRUB 2 configuration file (usually grub.cfg).
-
-
grub rescue>: — The rescue mode.
-
GRUB 2 is unable to find the grub folder or its contents are missing/corrupted. The grub folder contains the GRUB 2 menu, modules and stored environmental data.
-
-
GRUB — a single word at the top left of the screen, with no prompt and no cursor.
- GRUB has failed to find even the most basic information, usually contained in the MBR or boot sector.
-
Busybox or Initramfs: GRUB 2 began the boot process but there was a problem passing control to the operating system. Possible causes include an incorrect UUID or root= designation in the ‘linux’ line or a corrupted kernel.
-
Frozen splash screen, blinking cursor with no grub> or grub rescue prompt. Possible video issues with the kernel. While these failures are not of GRUB 2’s making, it may still be able to help. GRUB 2 allows pre-boot editing of its menu and the user may restore functionality by adding and/or removing kernel options in a menuentry before booting.
Each of the GRUB 2 failure modes can normally be corrected either from the GRUB 2 terminal or by using an Ubuntu LiveCD. Additionally, there are compatible 3rd party bootable «rescue» CD/USB options which may also work. If using an Ubuntu LiveCD, it is recommended, but not always necessary, to use the same version CD as the system you are trying to repair. This ensures compatability of any modules and configuration files that may be loaded while attempting to repair the system.
GRUB 2 Terminal Commands
 Here are some useful tips and features for use with the GRUB 2 terminal:
-
Turning off the splash image. This may make viewing the terminal easier. Press c at the GRUB 2 menu to get to the command line and then type: set color_normal=white/blue or the color combination you wish to use. «black» as the second entry retains the menu’s transparency and should be avoided as a selection if the user wants to work with a solid background color.
-
TAB completion. This feature is very handy. At any point, pressing the TAB key may complete an entry, if the element is unique, or display available options. Typing a few additional characters and pressing TAB again may allow tab completion to finish the entry.
-
set pager=1 To prevent text from scrolling off the screen, type set pager=1.
-
Help. Type help to view a list of all the commands. Type help x to view help commands beginning with the letter «x». Tab completion and using the up arrow to repeat commands work the same as in a normal terminal.
Normal
When GRUB 2 is fully functional, the GRUB 2 terminal is accessed by pressing c. If the menu is not displayed during boot, hold down the SHIFT key until it appears. If it still does not appear, try pressing the ESC key repeatedly.
From a GRUB 2 terminal with the grub> prompt, a wide variety of commands are available.
- A few of the more important commands:
Command
Result / Example
boot
Initiate the boot sequence, also F10 or CTRL-x
cat
Display the contents of readable files; cat (hd0,1)/boot/grub/grub.cfg
configfile
Load a GRUB 2 configuration file such as grub.cfg; configfile (hd0,5)/boot/grub/grub.cfg
initrd
Loads the initrd.img, necessary for booting; initrd (hd0,5)/initrd.img
insmod
Loads a module; insmod (hd0,5)/boot/grub/normal.mod, or insmod normal
linux
Loads the kernel; insmod /vmlinuz root=(hd0,5) ro
loop
Mount a file as a device; loopback loop (hd0,2)/iso/my.iso
ls
Lists the contents of a partition/folder; ls, ls /boot/grub, ls (hd0,5)/, ls (hd0,5)/boot
lsmod
List loaded modules
normal
Activate the normal module, if loaded
search
Search for a device. Type help search for the available options.
set
Review current settings, or set XXX to set a variable such as colors, prefix, root
vbeinfo
Display GRUB 2 available resolutions
To view the complete command list, type help. For details on a particular command, type help [command]
grub>
When GRUB 2 is unable to boot or display the GRUB 2 menu the system will be left at a GRUB 2 terminal if possible. If the system boots to the grub> prompt, the usual modules and commands are normally available. The user may need to manually load modules using the insmod [module] command before some commands will work.
grub rescue>
In the grub rescue mode, only a limited set of commands are available. These commands are sufficient to investigate the contents of the drives, set prefix (path to the grub folder) and root (partition), load modules and boot.
The rescue mode provides fewer commands than the normal GRUB prompt line, but also provides these additional commands:
-
Command
Result / Example
dump
Clears memory
exit
Exit GRUB 2
normal
Return to the standard «grub>» mode if possible.
Among the commands which can be used in the grub rescue mode:
-
boot
cat
chain
help
insmod
linux
ls
multiboot
normal
search
set
unset
General Troubleshooting Preparation
Boot-Repair
The majority of this guide is devoted to working with the GRUB 2 terminal, which is used to enter commands to attempt to repair a broken bootloader. Boot-Repair is a GUI application which can automatically analyze boot problems and select the proper course of action to repair them. Its simple interface provides beginners as well as experienced Linux users an easy method of repairing the majority of GRUB 2 problems.
Additionally, Boot-Repair contains an automated method to run a boot info script which performs a series of tests and provides a file containing much valuable information regarding the status of the computer’s operating and boot systems. This file can be inspected by community helpers on forums or IRC channels to help diagnose boot problems.
Boot-Repair can be run from a LiveCD or an operating Linux system. To download the package run the following commands:
-
sudo add-apt-repository ppa:yannubuntu/boot-repair && sudo apt-get update
sudo apt-get install -y boot-repair && boot-repair
Visit the Boot-Repair community document for more information.
Boot-Repair is available from the Launchpad repositories and can be run from a CD or a working Linux OS.
Search & Set
A great many boot problems are due to incorrect paths to required files. The GRUB 2 terminal, in either ‘failure’ mode, provides a robust ability to search hard drive(s) and partitions and to inspect their contents.
In order to boot successfully, the root, prefix, linux and initrd variables must be correct. The user must verify the paths and names of these items. If they are incorrect, use the commands below to find and fix them. GRUB 2 variable settings can be viewed with the set command.
In the following examples, X is a hard drive number; Y is a partition number. If a command example includes either of these replace them with the appropriate value.
How & Where to Search
In the graphic below, the text in red are commands to be entered by the user, and text in green is the output of the command on an operating system (i.e. what you would like to see if your Ubuntu installation is on sda1).

-
The first hard drive is 0. The first partition is 1. Thus sda1 becomes (hd0,1), sdb5 is (hd1,5).
-
Use the ls command in the follow manner
- «Tab completion» may work — enter part of the filename and press the TAB key.
|
Command |
Purpose |
|
ls |
Search the entire computer for devices and partitions: (hd0) (hd1) (hd0,1) (hd0,5) (hd1,1) |
|
ls / |
Search the root directory of the device designated as root (use the set command to check root). |
|
ls (hdX,Y) |
View information about a partition — format, size, UUID, etc. |
|
ls (hdX,Y)/ |
View the root contents of a partition. Use this command to look for the presence of vmlinuz and initrd.img symlinks |
|
ls (hdX,Y)/boot/ |
View the contents of a folder |
|
ls (hdX,Y)/boot/ |
Inspect the /boot folder. It should contain the actual kernel (linux-3.2…) and initrd image (initrd.img-3.2….) |
|
ls (hdX,Y)/boot/grub/ |
Inspect the /boot/grub folder. It should contain grub.cfg and many *.mod files. If looking for a specific file, include the name in the search to limit the number of returns. If available, the command set pager=1 will also limit returns to a single screen. |
|
What to Look For |
Where It Should Be (Default Installation) |
Specific / General Search Example |
|
grub.cfg |
(hdX,Y)/boot/grub/ or /boot/grub/ |
ls (hdX,Y)/boot/grub/grub.cfg or ls /boot/grub/ |
|
vmlinuz |
(hdX,Y)/ or / |
ls (hdX,Y)/vmlinuz or ls /vmlinuz or ls / |
|
linux-3.2.0-14* |
(hdX,Y)/boot/ or /boot/ |
ls (hdX,Y)/boot/vmlinuz-3.2.0-14 |
|
initrd |
(hdX,Y)/ or / |
ls (hdX,Y)/ or ls /initrd |
|
initrd.img-3.20-14 |
(hdX,Y)/ or /boot/ |
ls (hdX,Y)/boot/initrd.img-3.20-14 or ls (hdX,Y)/boot/ |
* Note: Use the full kernel name, including -generic, when searching or setting a kernel variable. Using the «TAB completion» technique may eliminate some typing and be more accurate if available.
Use the following commands to set these parameters (if incorrect). Substitute the correct value for X and Y. (Example: set root=(hdX,Y) becomes set root=(hd0,5) )
|
Task |
Command |
Notes |
|
Set the prefix |
set prefix=(hdX,Y)/boot/grub |
Use the actual location of the grub folder |
|
Set root |
set root=(hdX,Y) |
|
|
Set the kernel |
linux /vmlinuz root=/dev/sda1 ro |
Set the kernel if the symlink vmlinuz exists in / |
|
Set the kernel |
linux (hdX,Y)/boot/vmlinuz-3.0.2-14 root=/dev/sda1 ro |
Set the kernel itself |
|
Set the initrd image |
initrd /initrd.img |
Set the initrd image if the symlink exists in / |
|
Set the initrd image |
initrd (hdX,Y)/boot/initrd.img-3.0.2-14 |
Set the initrd image itself |
Specific Troubleshooting
Use the section below based on the type of GRUB 2 terminal prompt displayed on the monitor.
 The commands which follow assume you have determined the proper parameters for prefix, root, linux, and initrd. Review the Search & Set section of this page for guidance .
grub>
Terminal Display: The GRUB 2 header/version information and a grub> prompt.

If GRUB 2 leaves you at the grub> prompt, it has normally found the grub folder and loaded at least some basic modules. The configuration file (grub.cfg) may be missing, misnamed, or corrupted.
Quick Fix:
-
Use the Search & Set section to confirm the correct paths are set. Inspect the contents of the /boot/grub folder. Look for the grub.cfg file. It could be misnamed or missing. If not located in /boot/grub, use the ls command look for another .cfg file or look in /boot or other locations. If you locate the correct .cfg file:
-
configfile /boot/grub/grub.cfg or configfile (hdX,Y)/boot/grub/grub.cfg
If a .cfg with another name is located, substitute its path/filename in the command.
If the configuration file is loaded and not corrupt, when the above command is executed the GRUB 2 menu should appear and the user can make a selection to boot. Once booted into the system, correct the filename or move the configuration file to its proper location. Run update-grub. If the configuration file is not found, a message will be generated and the user must enter the boot commands manually.
Extended Fix:
The following commands should set the root and prefix paths and load the kernel and initrd image. With this information, GRUB 2 does not need a configuration file and should be able to boot the system if the only problem was a corrupted or missing menu.
-
Press ENTER after completing each line. Some entries will not provide feedback. This is normal.
-
If a «file not found» or similar error message is displayed while running these commands, ensure you are using the correct X,Y values and the correct paths are set.
|
1. set root=(hdX,Y) |
Confirm the correct X,Y values and press ENTER. |
|
Example: If the Ubuntu system is on sda5, enter: set root=(hd0,5) |
|
|
2. linux /vmlinuz root=/dev/sdXY ro |
Example: linux /vmlinuz root=/dev/sda5 ro |
|
If the vmlinuz symlink does not exist, use the full path to the kernel in /boot |
|
|
Example: linux /boot/vmlinuz-3.2.0-14-generic root=/dev/sda1 ro |
|
|
If successful, after ENTER there will be a slight delay and no messages. |
-
Wubi users only — substitute these commands in Steps 1 and 2:
-
1.set root=(loop0)
2. linux /vmlinuz root=/dev/sdXY loop=/ubuntu/disks/root.disk ro
|
3. initrd /initrd.img |
Selects the latest initrd image. |
|
If the vmlinuz symlink does not exist, use the full path to the initrd image in /boot |
|
|
If successful, after ENTER there will be a slight delay and no messages. |
|
|
4. boot |
Boot to the latest kernel on the selected partition. |
If the system fails to boot:
-
Attempt to find the GRUB 2 configuration file. The normal name is grub.cfg file. If not found, look for a misnamed .cfg file or in alternate locations. The menu configuration file may contain settings required for a successful boot (such as non-standard kernel options) even if the paths/filenames are correct.
-
Use the set command to confirm the correct root and prefix settngs. Also inspect the folders’ actual contents with the ls command. The grub prompt normally means the GRUB 2 folder is intact but doesn’t guarantee the integrity of other system files.
-
root= should point to the drive and partition on which Ubuntu is installed. If you use the ls / command you should see the main Ubuntu system folders.
-
If the system boots, please refer to the [[#Post-Boot Follow Up|Post Boot Follow Up] section
If the system fails to boot, proceed to the [#grub rescue|grub rescue]] section for more detailed troubleshooting options.
grub rescue>
The GRUB 2 rescue mode is a major enhancement to the GRUB bootloader. The presence of the grub rescue> prompt signifies that GRUB 2 has failed to find the grub folder, the grub.cfg file, and/or the associated modules. The rescue prompt is presented so the user can provide the path to the grub folder, load the necessary modules, and provide the proper boot commands.

A common reason for the grub rescue> prompt is an incorrect path to the grub folder. Reasons for the prompt also include a failure to update GRUB 2 after certain system or partition operations, improper designation of the grub folder location, missing linux or initrd.img symlinks in /, or a failed installation.
To successfully boot from the grub rescue> prompt:
-
The grub folder must exist and contain the necessary GRUB 2 files and modules.
-
The proper paths must be set via the set prefix command.
- Many GRUB 2 commands will not work until the correct path is set.
If the path to the grub folder (normally /boot/grub) is not correct, an unknown command or file not found message is likely.
- Many GRUB 2 commands will not work until the correct path is set.
- The necessary modules must be loaded.
- The kernel cannot be loaded until the ‘linux’ module is loaded.
- A Linux kernel and initrd.img must be located and loaded.
Use the General Troubleshooting Preparation section to locate the correct partitions and file locations. Once the user has confirmed the paths and existence of the proper folders using the Search & Set section, run the following commands:
|
1. set prefix=(hdX,Y)/boot/grub |
Use the values determined earlier. |
|
Example: If the Ubuntu system is on sda5, enter: set prefix=(hd0,5)/boot/grub |
|
|
2.* set root=(hdX,Y) |
Confirm the correct X,Y values and press ENTER. |
|
Example: If the Ubuntu system is on sda5, enter: set root=(hd0,5) |
|
|
3. insmod normal |
Load the normal module. |
|
If the module loads there will be no message. |
|
|
If the module fails to load, try the full path: insmod (hdX,Y)/boot/grub/normal.mod |
|
|
4. normal |
Transition to the normal GRUB 2 mode with increased functionality. |
|
If the module loads there will be no message. |
|
|
If the module loads, HELP, TAB completion and command recall using the UP/DN keys should be available. |
|
|
5. set |
(Optional) Review the current settings. |
|
6. insmod linux |
Load the linux module. An error message usually means the path is incorrect. |
|
7.* linux /vmlinuz root=/dev/sdXY ro |
Selects the latest kernel. |
|
Example: linux /vmlinuz root=/dev/sda5 ro |
|
|
If the vmlinuz symlink does not exist in /, use the full path to the kernel in /boot |
|
|
Example: linux /boot/vmlinuz-3.2.0-14-generic root=/dev/sda1 ro |
|
|
8. initrd /initrd.img |
Selects the latest initrd image. |
|
If the initrd symlink does not exist in /, use the full path to the initrd image in /boot |
|
|
If successful, after ENTER there will be a slight delay and no messages. |
|
|
9. boot |
Boot to the latest kernel on the selected partition. |
-
* Wubi users only — substitute these commands in Steps 2 and 7:
-
1.set root=(loop0)
2. linux /vmlinuz root=/dev/sdXY loop=/ubuntu/disks/root.disk ro
Some additional considerations:
-
The current prefix and root settings may be checked at any time with the set command. To remove a setting, use the unset command.
-
Example: unset prefix
-
-
Modules must be loaded before they can be used. If a module has not been loaded a unknown command error is displayed. If an incorrect path is specified, a file not found error message may be displayed.
-
The linux module must be loaded to be able to load both the kernel and the initrd image unless the normal module is loaded first.
-
If the modules cannot be found in the /boot/grub folder, the user may be able to load them from the /usr/lib/grub/i386-pc folder. The address if Ubuntu was installed on sda1 would be (hd0,1)/usr/lib/grub/i386-pc and the command would be:
-
insmod (hd0,1)/usr/lib/grub/i386-pc/normal.mod
-
Refer to the Post Boot Follow Up section if the system successfully boots.
GRUB
Presence of the word GRUB at the top left of the monitor with no blinking cursor indicates that GRUB 2 can not even find the Master Boot Record (or equivalent) information. Thus, the core.img file, the /boot and /grub folder locations and contents are completely unknown to GRUB 2.

The seriousness of the problem cannot be assessed without the use of another operating system or an Ubuntu LiveCD or equivalent. The Ubuntu partition should be mounted for inspection and the user can then check to see if the system files are intact. If so, the user can use the »ChRoot» procedure from the LiveCD to reinstall GRUB 2 and rewrite the information to the MBR.
Details on this procedure are contained in the Grub2/Installing community documentation.
Following a failed boot, GRUB 2 is designed to display the GRUB 2 menu on the next boot and await user input. This will happen even if the user has set the system to boot without displaying the GRUB 2 menu. This provides the user the opportunity to select a different menu option or edit a menuentry to change boot parameters. While this can cause problems on a server, for most users it is a benefit which will prevent constant rebooting during unmonitored operations.

In addition to its troubleshooting benefits, pre-boot editing of the GRUB 2 menu also allows users to add or remove kernel options, change operating modes, and accomplish other tasks such as testing fonts and splash images. For users who like to experiment, the settings altered via the GRUB 2 terminal are non-persistent and won’t affect future boots.
- If the menu is displayed, the automatic countdown may be stopped by pressing any key other than the ENTER key.
- If the menu is not normally displayed during boot, hold down the SHIFT key as the computer attempts to boot to display the GRUB 2 menu.
- In certain circumstances, if holding the SHIFT key method does not display the menu pressing the ESC key repeatedly may display the menu.
- Press the ‘e’ key to reveal the selection’s settings.
- Use the UP/DN/Left/Right cursor keys to navigate to the desired point for editing.
-
Make a single or numerous changes at any spot in the menu. Do not use ENTER to move between lines.
-
TAB completion is available, which is useful in entering kernel and initrd entries.
- After starting to type the kernel or initrd name, press TAB.
- If additional characters are not added, look at the bottom of the menu as there may be multiple choices. Add characters until only one entry is visible at the bottom, then TAB again.
- When editing is complete:
-
CTRL-x or F10 — boot with the changed settings (highlighted for emphasis).
-
CTRL-c or F2 — jump to the command line to perform diagnostics, load modules, change settings, etc.
-
If an edit is incomplete and GRUB 2 detects an error in the kernel or initrd line it will return to the line when exiting this mode.
-
-
ESC — Discard all changes and return to the main menu.
- The choices are listed at the bottom of the screen as a reminder.
-
- Edits made to the menu in this manner are non-persistent. They remain in effect only for the current boot.
-
Once successfully booted, the changes can be made permanent by editing the appropriate file, saving the file, and running update-grub as ‘root’.
-
- Change a kernel version if one is available but not listed on the GRUB 2 menu.
-
Use the TAB key after entering part of the kernel or initrd version to see which ones are available.
-
-
Add or remove kernel options from the linux line.
-
Remove quiet to display system messages during boot.
-
Remove existing options and add nomodeset to avoid module loading, especially if having video issues.
-
- Boot to the recovery mode even if it is not listed on the menu.
-
Remove existing kernel options from the linux line and add single
-
- Remove references to UUIDs
-
Remove the entire search line
-
On the linux line, replace «root=UUID=<some alphanumeric>» with «root=/dev/sdXY»
-
Post Boot Follow Up
Any changes made from the GRUB 2 terminal are not permanent. After successfully booting into the system the user must take several steps to ensure the problem is permanently fixed.
- Update the GRUB 2 configuration file
-
sudo update-grub
-
-
Reinstall GRUB 2 to the drive’s MBR or equivalent
-
Install to the drive, not to the partition. Example: sda, not sda1
sudo grub-install /dev/sdX
-
-
Inspect the GRUB 2 configuration file. The default is /boot/grub/grub.cfg
-
For problems with booting the main linux kernel, verify the search, linux, and initrd lines in the [### BEGIN /etc/grub.d/10_linux ###] section of the file.
- Ensure the paths and kernel/initrd image versions are correct.
- Confirm the UUID numbers.
-
UUIDs can be checked with the sudo blkid command.
-
- Verify the existence and contents of the system boot folders.
-
/ should contain the symlinks vmlinuz and initrd.img
-
/boot/ should contain the actual kernel (vmlinuz-X.X.X-XX…) and initrd image (initrd.img-X.X.X-XX…)
-
/boot/grub should contain grub.cfg and numerous module files (*.mod)
-
For a corrupted GRUB 2 installation, purging and reinstalling GRUB 2 is very easy if the user has a working Internet connection. Refer to Grub2/Installing#Purging & Reinstalling GRUB 2 for guidance.
Fallback mode
It is possible to configure Grub2 to fall back to a known good menu-entry if the default menu-entry for some reason fails to boot. An example script that can be used for this is available at this webpage (in German).
GRUB 2 Errors
GRUB 2 does not report error numbers. If a number is associated with an error, it is a problem with the transition from GRUB legacy to GRUB 2.
A GRUB 2 error will leave the user at the grub> or grub rescue> prompt, the word GRUB with no cursor, or a hung boot caused by improper system path designations or a corrupted operating system. These issues are addressed earlier on this page — go to the General Troubleshooting Preparation section to start the recovery process.
Selected Problems and Bugs
External Drive Installs and »grub-pc» Updates
Launchpad Bug 496435 Installs of Ubuntu on external drives can cause problems as grub-install uses device names (e.g. sda, sdb) rather than UUIDs in certain circumstances. If connected to another machine when an update of grub-pc is made, the upgrade may be written to the incorrect device and make the computer unbootable.
A workaround is posted on the bug link above.
External Drive Installs and MBR Selection
Launchpad Bug 414996
When installing Ubuntu to a USB drive, the potential exists for GRUB 2 to write to the hard drive’s MBR or split the installation between the hard drive and the USB drive (rather than completely on the USB device). This can render the main drive unbootable.
Workaround: During the final stages of the install there is an «Advanced» button which allows the user to select the install location. See the bug report for more details.
Boot Partition is in Logical Volume whose Volume Group contains a snapshot
Launchpad Bug 563895
When your boot partition (the one providing /boot) is a LV, make sure not to have any LVM snapshots inside the containing VG. At reboot this will render your system unbootable, dropping you in a «grub rescue>«-shell with the following message: «error: no such disk.»
The grub-rescue-shell provided does not help you, because all modules (esp. lvm) are unreachable. You’ll have to boot from a install medium and remove all snapshots that are in the same VG as your boot partition by hand.
This issue is extremely annoying if your server is in a remote datacenter since the origin of the problem cannot be spotted easily and repairing the system may be hard.
While this will be fixed in the upcoming Maverick Meerkat 10.10 release, the current Lucid Lynx LTS 10.04 is affected.
A workaround would be to install ubuntu using a separated non-LVM partition for /boot if you are using LVM snapshots regularly.
There’s some kind of irony that if you’re careful and take a LVM snapshot before upgrading (and possibly rebooting) your system, this will trigger the bug.
insmod fails with «error: no such disk»
Several grub2 modules, such as the linux-module depends on other modules, which is attempted to be auto-loaded. For this to work, the variable $prefix, must be set to where the grub2 modules can be found. Usually, this is accomplished with the command «set prefix=/boot/grub«.
Links
Grub2
Grub2/Displays
Grub2/Installing
Grub2/Submenus
Grub2/Upgrading
Boot-Repair
CategoryBootAndPartition
Ошибка Grub Rescue чаще всего встречается на компьютерах с двойной загрузкой, когда на компьютер установлен сначала Linux, а потом Windows.
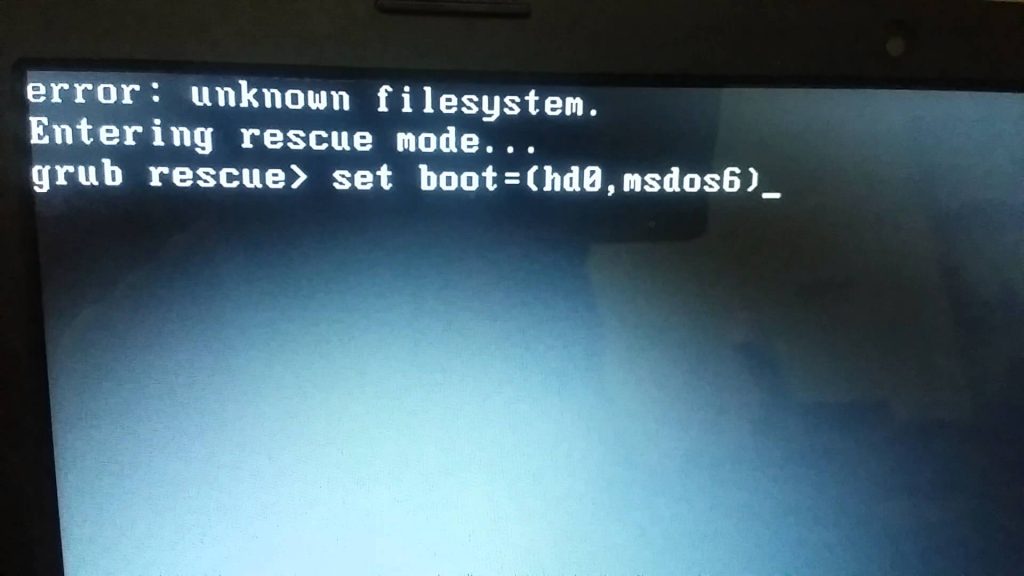
Windows при установке может стереть загрузчик Linux и при загрузке вместо меню с выборов ОС для загрузки появляется ошибка:
Error: unknown filesystem
Entering rescue mode
Или
Error: no such partition
И перед вами открывается консоль Grub rescue.
Консоль загрузчика grub поддерживает ряд простейших команд. Их список можно вывести, набрав:
help
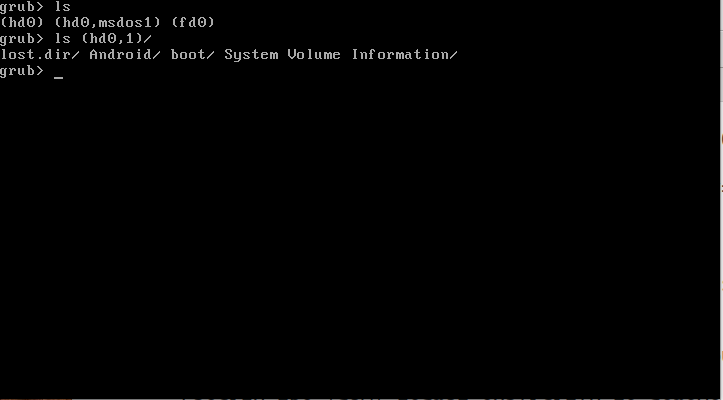
Выведите список разделов на диске:
ls

В нашем примере есть один диск hd0 с разделом msdos1.
Проверьте есть ли файлы загрузчика grub на этом разделе:
ls (hd0,msdos1)/boot/grub/
Проверьте, что в указанном каталоге есть файл grub.cfg. Если у вас больше разделов и дисков, проверьте их все.
![]()
Создайте префикс для каталога загрузчика:
set prefix=(hd0, msdos1)/boot/grub
Сделайте раздел основным:
set root=(hd0, msdos1)/boot/grub
Загрузите дополнительные модули и загрузите Linux:
insmod ext2
insmod normal
normal
После загрузки Linux нужно переустановить загрузчик:
sudo grub-install /dev/sda
Используйте свою букву загрузочного диска вместо sda.
Обновите конфигурацию загрузчика grub2 в файле grub.cfg:
sudo update-grub
Grub должен автоматически обнаружить установленные операционные системы и добавить их в автозагрузку.
Если вы не смогли восстановить загрузчик описанным выше способом, можно исправить grub с помощью загрузочной флешки.
Я загрузил компьютер с LiveCD образа Ubuntu.
Откройте терминал и выполните команду:
sudo su -
Выведите список дисков и разделов:
fdisk -l
Найдите раздел с установленной Linux (sda1 в моем случае).
Смонтируйте этот раздел в каталог /mnt:
mount /dev/sda1 /mnt
Проверьте, что на этом разделе есть каталог /boot/:
ls -l /mnt/boot/
Если каталога boot нет, смонтируйте его отдельно:
mount /dev/sdaX /mnt/boot
Смонтируйте следующие разделы с Live образа:
mount --bind /dev /mnt/dev
mount --bind /proc /mnt/proc
mount --bind /sys /mnt/sys
Войдите в локальную систему на диске с помощью chroot:
chroot /mnt
Теперь можно переписать конфигурацию загрузчика на диске:
grub-install /dev/sda
update-grub
Отмонтируйте разделы и перезагрузите компьютер.
umount –R /mnt
reboot
Теперь ваш заручик grub исправен и должен вывести меню выбора загрузки операционных систем.
Did you receive this error message: «error: unknown filesystem. grub rescue» when starting the computer? This article from MiniTool Partition Wizard shows you the possible cause of «error unknown filesystem grub rescue.» Also, you can find some possible ways to fix grub rescue unknown filesystem in Windows 10.
My one is an uefi bios mode Dell laptop. I dual booted my laptop with kali linux and windows 10. The both operating systems runs smoothly. I can choose any operating from the grub. After going to windows, it says important updates install them. So, I restart my laptop to update. It says in the bottom your pc may restart several times. After 75% when it restarts it says error: file’/grub/x86_64-efi/ normal.mod ‘not found.https://answers.microsoft.com/en-us/windows/forum/all/dual-boot-laptop-entering-to-the-grub-rescue-error/301e095c-1faa-4358-84bd-a0999b2fad0c
Have you ever been stuck in the same situation as stated in the post «Error unknown filesystem grub rescue»? If you encounter this error now, this post is what you need.
Grub Rescue Unknown Filesystem: Meaning and Cause
In this error, GRUB is a boot loader that loads configuration information at boot time and allows modification at boot time which means the computer cannot boot when the error. So, when the error » grub rescue unknown file system» appears, it means that there is a boot issue on the computer.
Well, what triggers the boot issue? After an investigation, we find the issue appears after people make adjustments to the two operating system partitions (delete the system partition, resize partition or reinstall Ubuntu OS, etc.) on the same hard disk. Any of these operations may cause the boot file missing or dislocating, and GRUB can’t find the original partition where the boot file is located.
You already know the reason, so how to fix the error: unknown filesystem grub rescue in Windows 10? Keep reading to know about it.
How to Fix Error: Unknown Filesystem Grub Rescue in Windows 10?
When this «unknown filesystem grub rescue» error occurs, how should you fix it to ensure that the operating system can start normally? Here are three solutions, you can try them one by one.
Solution 1: Enter Grub Mode
For «unknown filesystem grub rescue» errors, one of the most common methods is to use the command line to fix grub.
Step 1: Find the partition where Linux installs and the grub directory.
- After entering rescue mode, type grub rescue > ls and press the Enter key on your keyboard to list all disks and partitions. For example, (hd0), (hd0, msdos1), (hd0, msdos2) …
- Type grub rescue > ls (hd0) and press Enter Repeat this step and try each partition one by one until the contents of the partition appear instead of appearing the message:» Filesystem is unknown «.
Assume that when it is (hd0, msdos8), the content appears successfully.
Step 2: Type grub rescue > set root= (hd0, msdos8) and press the Enter key.
Step 3: Type grub rescue > set prefix= (0,8)/boot/grub and press the Enter key.
Step 4: Type grub rescue > insmod normal and press the Enter key. Then you have now exited the grub rescue mode and entered the grub mod that you should be familiar with.
Step 5: Type grub > normal and press the Enter key.
Step 6: Fix grub.
After entering Linux system, you need to update the grub part of the MBR to adapt to the new partition situation, input sudo update-grub in the terminal and press Enter.
Step 7: Type sudo grub-install/dev/sda and press the Enter key. And sda is your boot disk.
In this way, the next time you boot up the computer, there will be a normal grub boot option.
Solution 2: Automatic Repair BCD Files Using Windows 10
When Windows 10 fails to start, you can restart the system multiple times and the system will enter WinRE mode. Sometimes the Windows 10 system will automatically enter the Automatic Repair interface. If not, you can use the Windows 10 installation tool to enter this recovery environment.
In WinRE mode, you can follow the step-by-step instructions to repair the system.
Step 1: Boot your PC from Windows 10 installation media.
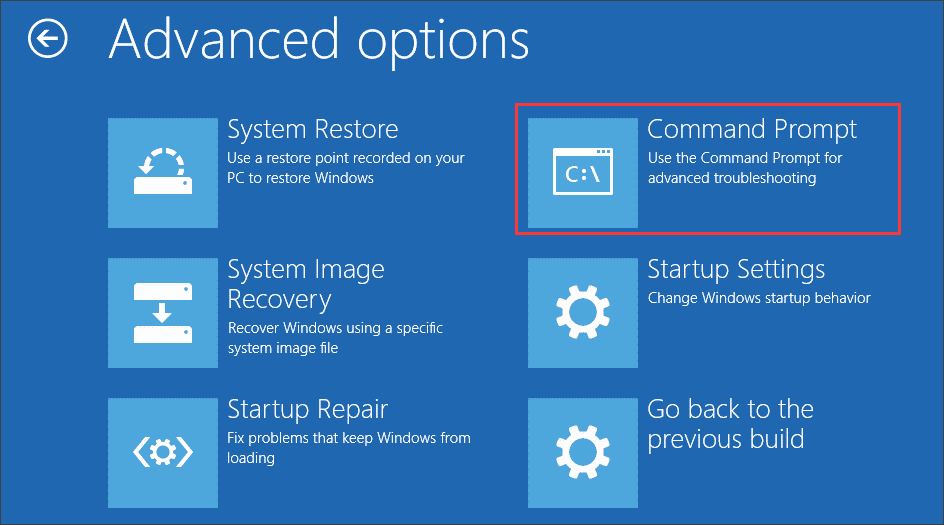
Step 2: On the Install window, click the Repair your computer option. And then choose the Troubleshoot option.
Step 3: Under the Advanced options, click the Command Prompt option.
Step 4: Type the following commands one by one in the Command Prompt and hit the Enter key after each typing to rebuild the MBR:
bootrec / fixmbr
bootrec / fixboot
bootrec / scanos
bootrec / rebuildbcd
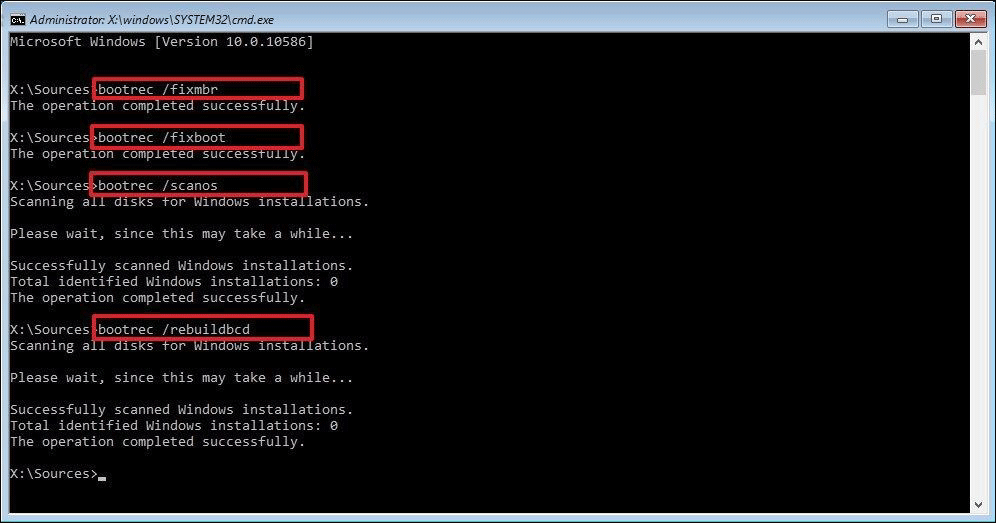
After finishing the commands above, you should be able to successfully boot into your computer.
However, if the problem still exists, you can refer to Solution 3 to rebuild MBR.
Solution 3: Rebuild MBR Using a Reliable Software
If you think it is too complicated to rebuild MBR by typing commands one by one, you can use an MBR repair tool — MiniTool Partition Wizard. Compared with the above method, using this software is much easier, with only 2 steps.
Free Download
Note: Since Windows 10 cannot start, you can use the Bootable Media Builder feature to create a bootable USB drive on a normally running computer.
Step 1: Use the bootable disk to start the computer.
Step 2: Please wait for MiniTool Partition Wizard to launch itself.
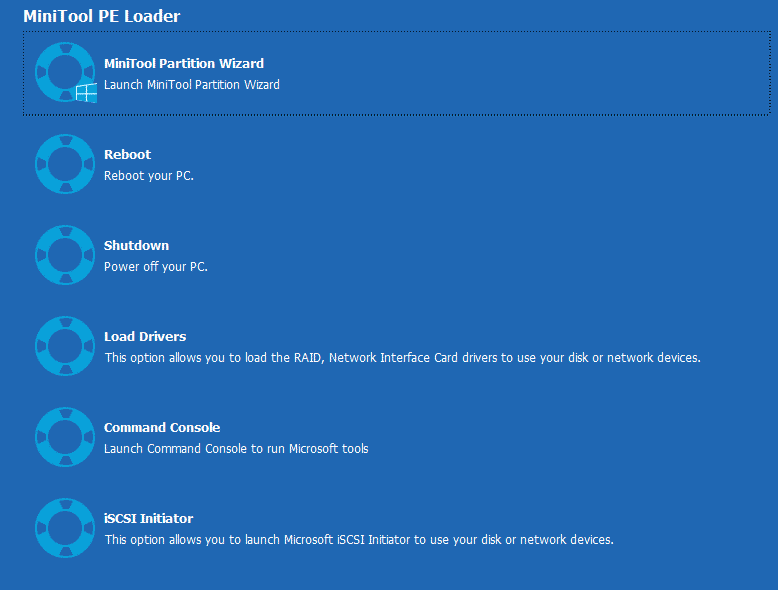
Step 2: Right click the problematic system disk and select the Rebuild MBR option. Finally, click the Apply button.
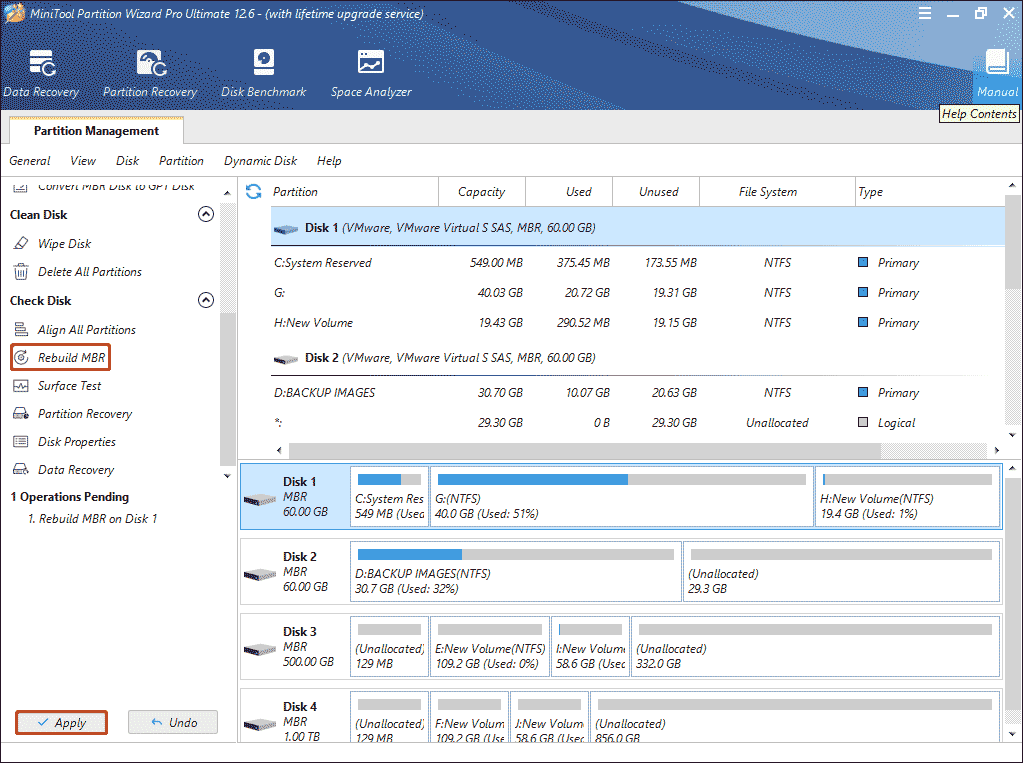
Note: After repairing the MBR, it is recommended to back up the Windows operating system to avoid system damage.
In this way, you have known some ways to solve this problem «grub rescue filesystem is unknown». Give it a try.
If you started your laptop one day, you see a black screen with a message «Unknown File System». How to deal with that? The detailed and illustrated guide may come to help.Click to Tweet
Bottom Line
Now we have reached the end of this article. In this article, we have introduced to you what the «grub rescue unknown filesystem» error is, the cause of this error, and the detailed solutions to solve it.
After trying so many solutions, you may have successfully solved your problem. If you have any suggestions about this article, you can leave a comment below. If you have any problems about MiniTool Partition Wizard, you are welcome to send us an email at [email protected]. Thank you in advance.

Grub представляет собой универсальный загрузчик для Linux и других ОС. Например, с его помощью пользователь может иметь несколько операционных систем на одном компьютере, выбирая при включении нужную систему для загрузки. Но в некоторых случаях пользователь сталкивается с ошибкой Grub Rescue Unknown Filesystem.
Почему возникает эта ошибка?
Причины разные: например, загрузочные файлы отсутствуют либо они были перемещены. Кроме того, метрики раздела /boot могли быть изменены либо этот раздел был отформатирован, то есть он больше не существует.
Прежде всего, надо понимать, что Grub инсталлируется в 2 места. Одно из них — таблица разделов MBR. Тут места немного, поэтому весь загрузчик сюда не помещается. Однако он обладает модульной структурой, то есть все основные модули, ресурсы и конфигурационные файлы размещаются на обычном разделе (монтируется после загрузки в /boot). При этом программа в MBR «помнит», в каком месте располагается раздел /boot, однако если с данным разделом что-либо произойдет, то программа не загрузит привычные модули, следовательно, появится ошибка unknown filesystem. Значит все это следующее: если раздел уже не существует, остается лишь брать LiveCD диск и выполнять переустановку загрузчика. Если же раздел просто изменен, то есть возможность исправить ситуацию.
Как исправить?
Прежде всего, воспользуйтесь командой ls, чтобы узнать список доступных разделов:

Далее просмотрите содержимое каждого раздела — это позволит понять, где именно располагаются файлы модулей, пример:
Если увидели папку boot, то это нужный раздел. Далее инсталлируем данный раздел значением переменной root и посредством команды set:
set prefix=(hd0,1)/boot/grubПотом загружаем и запускаем модуль normal — он загрузит все, что необходимо:
Если раздел /boot поврежден не был, загрузчик корректно определит все файлы и запустит привычное меню. Конечно же, после загрузки надо будет восстановить загрузчик Grub для того, чтобы не вводить вышеописанные команды при каждой загрузке ОС. Если же вышерассмотренным способом проблему решить не удастся, придется пройти процедуру переустановки загрузчика с помощью LiveCD-диска.
По материалам блога https://losst.ru/.