
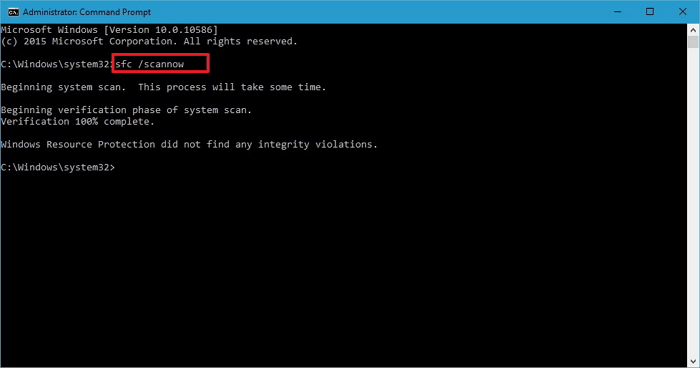
Повреждение системных файлов далеко не всегда означает крах Windows, всё зависит от того, какие именно компоненты были повреждены. Если они не являются для системы критичными, проблемы ограничатся сбоями в работе отдельных приложений и функций, к тому же такие неполадки часто удаётся устранить, запустив командой sfc /scannow встроенное средство восстановления системных файлов. Но и здесь пользователя может поджидать неприятность. Инструмент или не запускается, или запускается, но вскоре начатое сканирование завершается ошибкой «Защита ресурсов Windows не может выполнить запрошенную операцию».
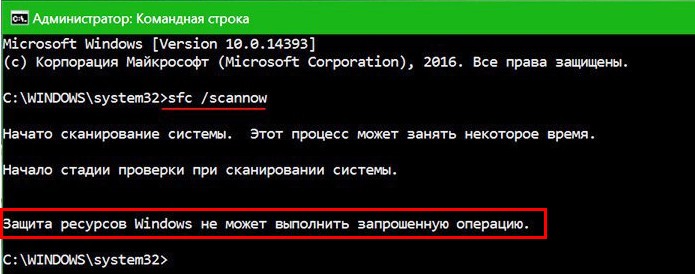
Означает ли это, что всё так плохо, что даже SFC не работает? Не всегда, просто во время проверки в системе происходит сбой или инструмент не может получить доступ к каталогу WinSxS, в коем расположены важные файлы. Вероятны и другие причины — повреждение файловой системы, наличие физически нечитаемых секторов на диске, отсутствие у пользователя соответствующих прав доступа. Что делать и с чего начинать поиск причин неполадки?
Для начала убедитесь, что командная строка запущена от имени администратора,
хотя вообще-то Windows должна сама об этом предупреждать. Если вы запускаете инструмент как положено с админскими привилегиями, а ошибка всё равно появляется, проверьте состояние файловой системы, выполнив тут же в консоли команду chkdsk C:
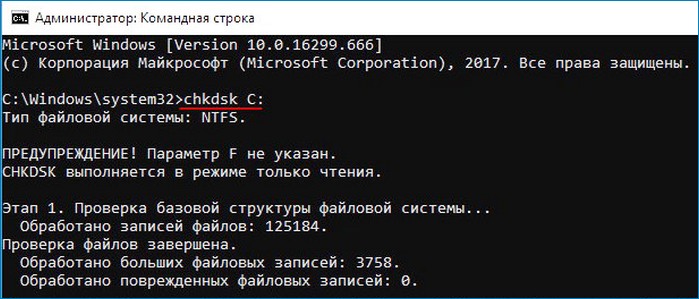
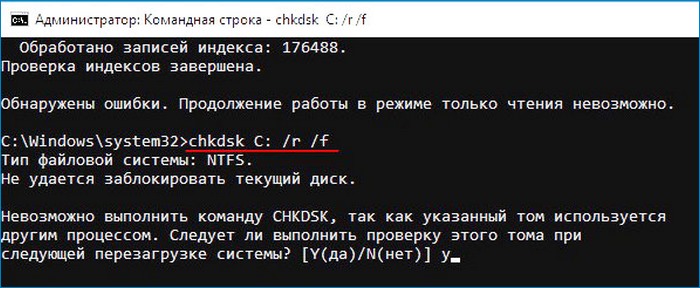
Если будут обнаружены ошибки, повторите команду, но уже с параметрами /r /f, как показано на скриншоте. Действие потребуется подтвердить вводом Y, при этом компьютер будет перезагружен, а сканирование и исправление выполнено до загрузки рабочего стола.
Причиной ошибки сканирования может быть ограничение доступа SFC к каталогу WinSxS. Попробуйте снять их, выполнив в консоли CMD команду
icacls c:windowswinsxs
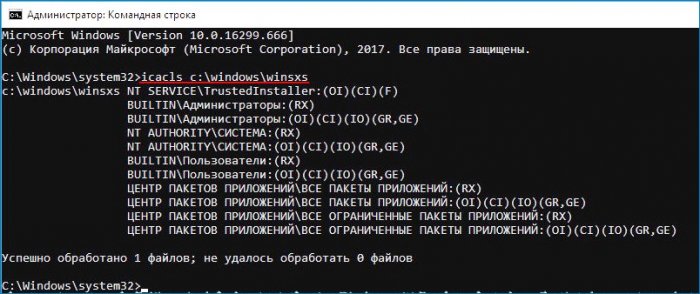
и перезагрузив компьютер.
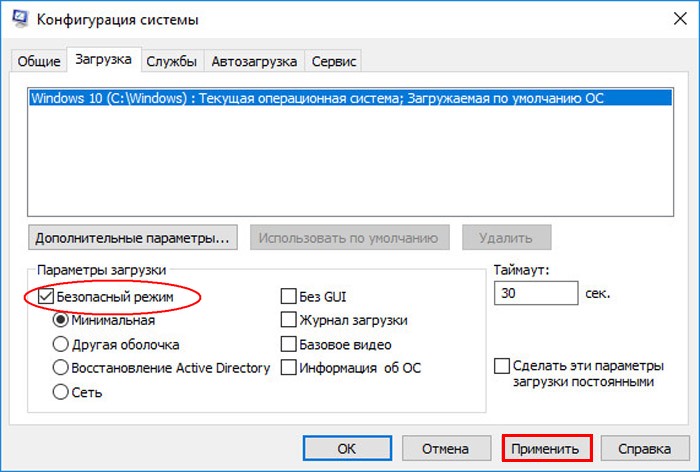
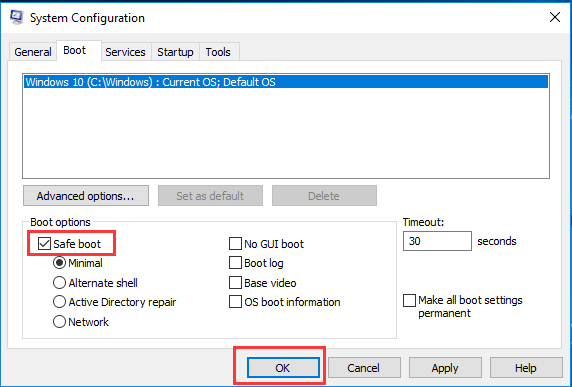
Следующий шаг — запуск процедуры сканирования SFC в безопасном режиме. Загрузиться в него проще всего с помощью утилиты msconfig, переключившись на вкладку «Загрузка» и установив галочку в соответствующем чекбоксе.
Далее всё как обычно, открываем командную строку с повышенными привилегиями и выполняем команду sfc/scannow.
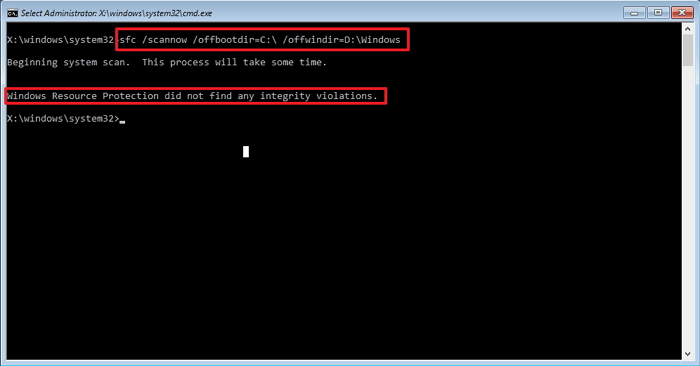
Будет еще лучше, если запустить сканирование SFC оффлайн. Для этого нужно загрузиться с установочного диска Windows, при появлении окна мастера установки нажать Shift + F10,
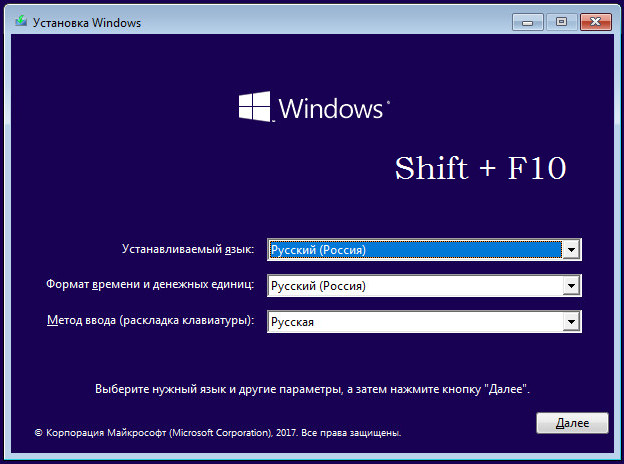
открыв тем самым командную строку, определить в ней буквы дисков, а затем выполнить такую команду:
sfc /scannow /offbootdir=D: /offwindir=C:Windows
Где:
offbootdir=D: раздел, содержащий папку WinSxS.
offwindir=C:Windows — раздел с установленной ОС.
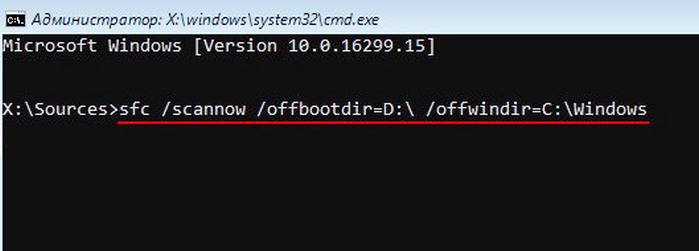
- Примечание: определить буквы томов в загрузочной среде проще всего с помощью Блокнота, запустив его командой notepad и выбрав Файл → Сохранить как.
Если приведенные выше способы не дали результатов, высока вероятность, что отказ защиты ресурсов Windows вызван повреждением самого хранилища системных компонентов, то есть содержимого папки WinSxS. Проверить его состояние можно командой
Dism /Online /Cleanup-Image /ScanHealth
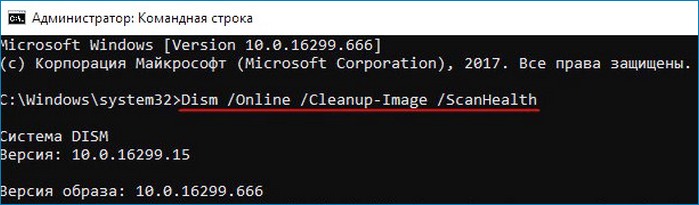
если она выдает сообщение о необходимости восстановление хранилища, выполняем в консоли такую команду:
Dism /Online /Cleanup-Image /RestoreHealth
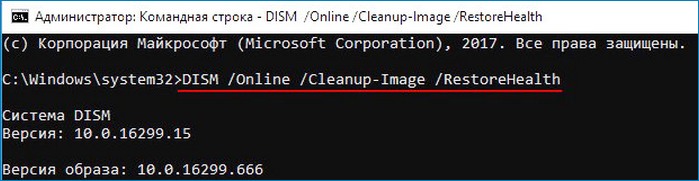
Компьютер при этом должен быть подключен к интернету, поскольку Windows может потребоваться подключиться к серверу Microsoft и скачать недостающие файлы. По завершении процедуры перезагружаемся. Теперь, когда хранилище восстановлено, sfc/scannow должна заработать как надо.
 Среди распространенных ошибок при запуске проверки и восстановления целостности системных файлов с помощью SFC /scannow сообщение «Защите ресурсов Windows не удается запустить службу восстановления».
В этой пошаговой инструкции подробно о способах исправить ошибку «Защите ресурсов Windows не удается запустить службу восстановления» при выполнении команды sfc /scannow в Windows 11, Windows 10 и предыдущих версиях системы.
Прямое указание пути к sfc.exe в команде
Первый метод решить проблему, не гарантированно работающий, но очень быстрый: указать прямой путь к файлу sfc.exe в команде для запуска проверки и восстановления системных файлов.
Шаги будут следующими:
- Запустите командную строку от имени Администратора, Терминал Windows или Windows PowerShell от администратора также подойдут. Как запустить командную строку Windows 11 от администратора, Как запустить командную строку Windows 10 от администратора.
- Введите команду
C:WindowssysNativesfc.exe /scannow
и нажмите Enter.


С большой вероятностью вы увидите стандартное сообщение «Начато сканирование системы. Этот процесс может занять некоторое время».
Командная строка x86 и x64
В 64-разрядных системах Windows присутствует 32-битные (x86) и 64-битные (x64) версии приложений командной строки и Windows PowerShell. При этом, если в 64-битной системе попробовать выполнить команду sfc /scannow в x86 варианте консоли, вы получите сообщение об ошибке «Защите ресурсов Windows не удается запустить службу восстановления».

При использовании стандартных средств Windows для запуска командной строки от имени администратора, почти всегда запускается «нужная», x64 версия. Однако, при использовании запуска из сторонних средств: какого-либо виджета, стороннего файлового менеджера, может быть запущена 32-битная x86 версия, что и будет являться причиной ошибки.
Если есть предположения о том, что это ваш случай, вы можете:
- Запустить командную строку от имени Администратора средствами Windows (ссылки на способы приведены в первой части этой инструкции).
- Зайти в папку C:WindowsSystem32 (независимо от разрядности Windows), найти файл cmd.exe, нажать по нему правой кнопкой мыши и выбрать «Запуск от имени администратора», выполнить команду sfc /scannow
Запуск служб Установщик модулей Windows и Установщик Windows
В случае, если в системе отключены необходимые службы, sfc /scannow также может сообщать о рассматриваемой ошибке. Проверить службы и включить их можно следующим образом:
- Откройте «Службы». Для этого нажмите клавиши Win+R на клавиатуре, введите services.msc и нажмите Enter.
- В списке служб найдите «Установщик Windows» и «Установщик модулей Windows».

- Дважды нажмите по имени службы, чтобы открыть её свойства. По умолчанию для этих служб в «Тип запуска» должен быть установлен в значение «Вручную». Если это не так — измените тип запуска и примените настройки. В этом же окне можно вручную запустить службы с помощью соответствующей кнопки (кнопка не активна, если тип запуска — «Отключена»).

- После применения всех настроек снова запустите командную строку от имени администратора и попробуйте выполнить команду sfc /scannow


Исправление букв дисков при выполнении команды
Если ошибка «Защите ресурсов Windows не удается запустить службу восстановления» возникает при выполнении команд вида:
sfc /scannow /offbootdir=C: /offwindir=C:Windows
с загрузочного накопителя, причиной этого может быть то, что буквы разделов диска при загрузке с флешки отличаются и в результате папка Windows находится не на привычном диске C. Способ определить актуальную букву системного диска:
- В командной строке по порядку вводим команды
diskpart
list volume
- Отобразится список разделов с текущими буквами, где мы и можем посмотреть букву системного раздела, чтобы в дальнейшем использовать в командах sfc
- В некоторых случаях системный раздел может не иметь буквы. В этом случае её можно назначить командами (здесь N — номер системного тома, а Z — назначаемая буква):
select volume N
assign letter=Z
- По завершении работы с diskpart введите команду exit
Запуск проверки целостности системных файлов в среде восстановления
Если ни один из способов выше не сработал, попробуйте выполнить команду в командной строке среды восстановления Windows 11 или Windows 10:
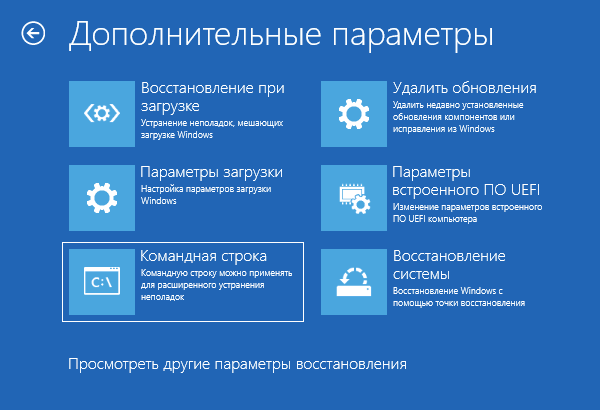
- Зайдите в среду восстановления — Как зайти в среду восстановления Windows 11, Как зайти в среду восстановления Windows 10.
- Перейдите в раздел Поиск и устранение неисправностей — Дополнительные параметры — Командная строка.

- Запустите сканирование sfc /scannow
Запуск sfc /scannow с загрузочной флешки
Если у вас есть загрузочная флешка с вашей версией Windows или возможность создать её, можно использовать команду sfc /scannow с неё. Для этого:
- После загрузки компьютера с флешки, нажмите клавиши Shift+F10 (на некоторых ноутбуках — Shift+Fn+F10) откроется командная строка.
- В командной строке используйте команду
sfc /scannow /offbootdir=C: /offwindir=C:Windows
Внимание: при загрузке с флешки буква системного диска может отличаться от C и в этом случае приведенная выше команда также сообщит о том, что защите ресурсов Windows не удается запустить службу восстановления. Чтобы исправить ситуации, прочтите раздел «Исправление букв дисков при выполнении команды» выше в статье.
Безопасный режим
И ещё один вариант, который иногда может сработать, если причина ошибки — какие-либо сторонние службы и процессы, мешающие выполнению команды: попробуйте запуск проверки в безопасном режиме. Здесь могут быть полезными материалы: Как зайти в безопасный режим Windows 11, Как зайти в безопасный режим Windows 10.
SFC is not working to repair corrupted files on Windows 10, help!
«Hi there, how many of you have ever met this issue that the System File Checker stops working suddenly on Windows PC while applying it to repair and fix the corrupted files?
I got this issue that my E: drive becomes inaccessible. I thought that some corrupted files and bad sectors might exist on the drive. So I tried to run the SFC —sfc / scannow command line to repair the corrupted files on the drive so to make it work again.
Then the problem burst that SFC wouldn’t run on my Windows 10 computer. Is there an alternative way that can help me fix this issue even if the SFC has stopped working? How?«
According to the Microsoft Windows Support, SFC, also called System File Checker, is a utility in Windows that allows users to scan for corruptions in Windows system files and restore corrupted files.
However, sometimes, Windows users may not be able to run the sfc / scannow command line to repair the corrupted files on their Windows 10/8/7 PCs due to some reasons. So how to quickly restore corrupted system files and make SFC work again? Just follow the below parts and resolve this issue on your own now:
Part 1. Check and View ‘SFC Won’t Run’ Error Details
Before starting fixing the SFC not working error on your PC, we highly recommend that you follow the below tips to check and view the details of this issue:
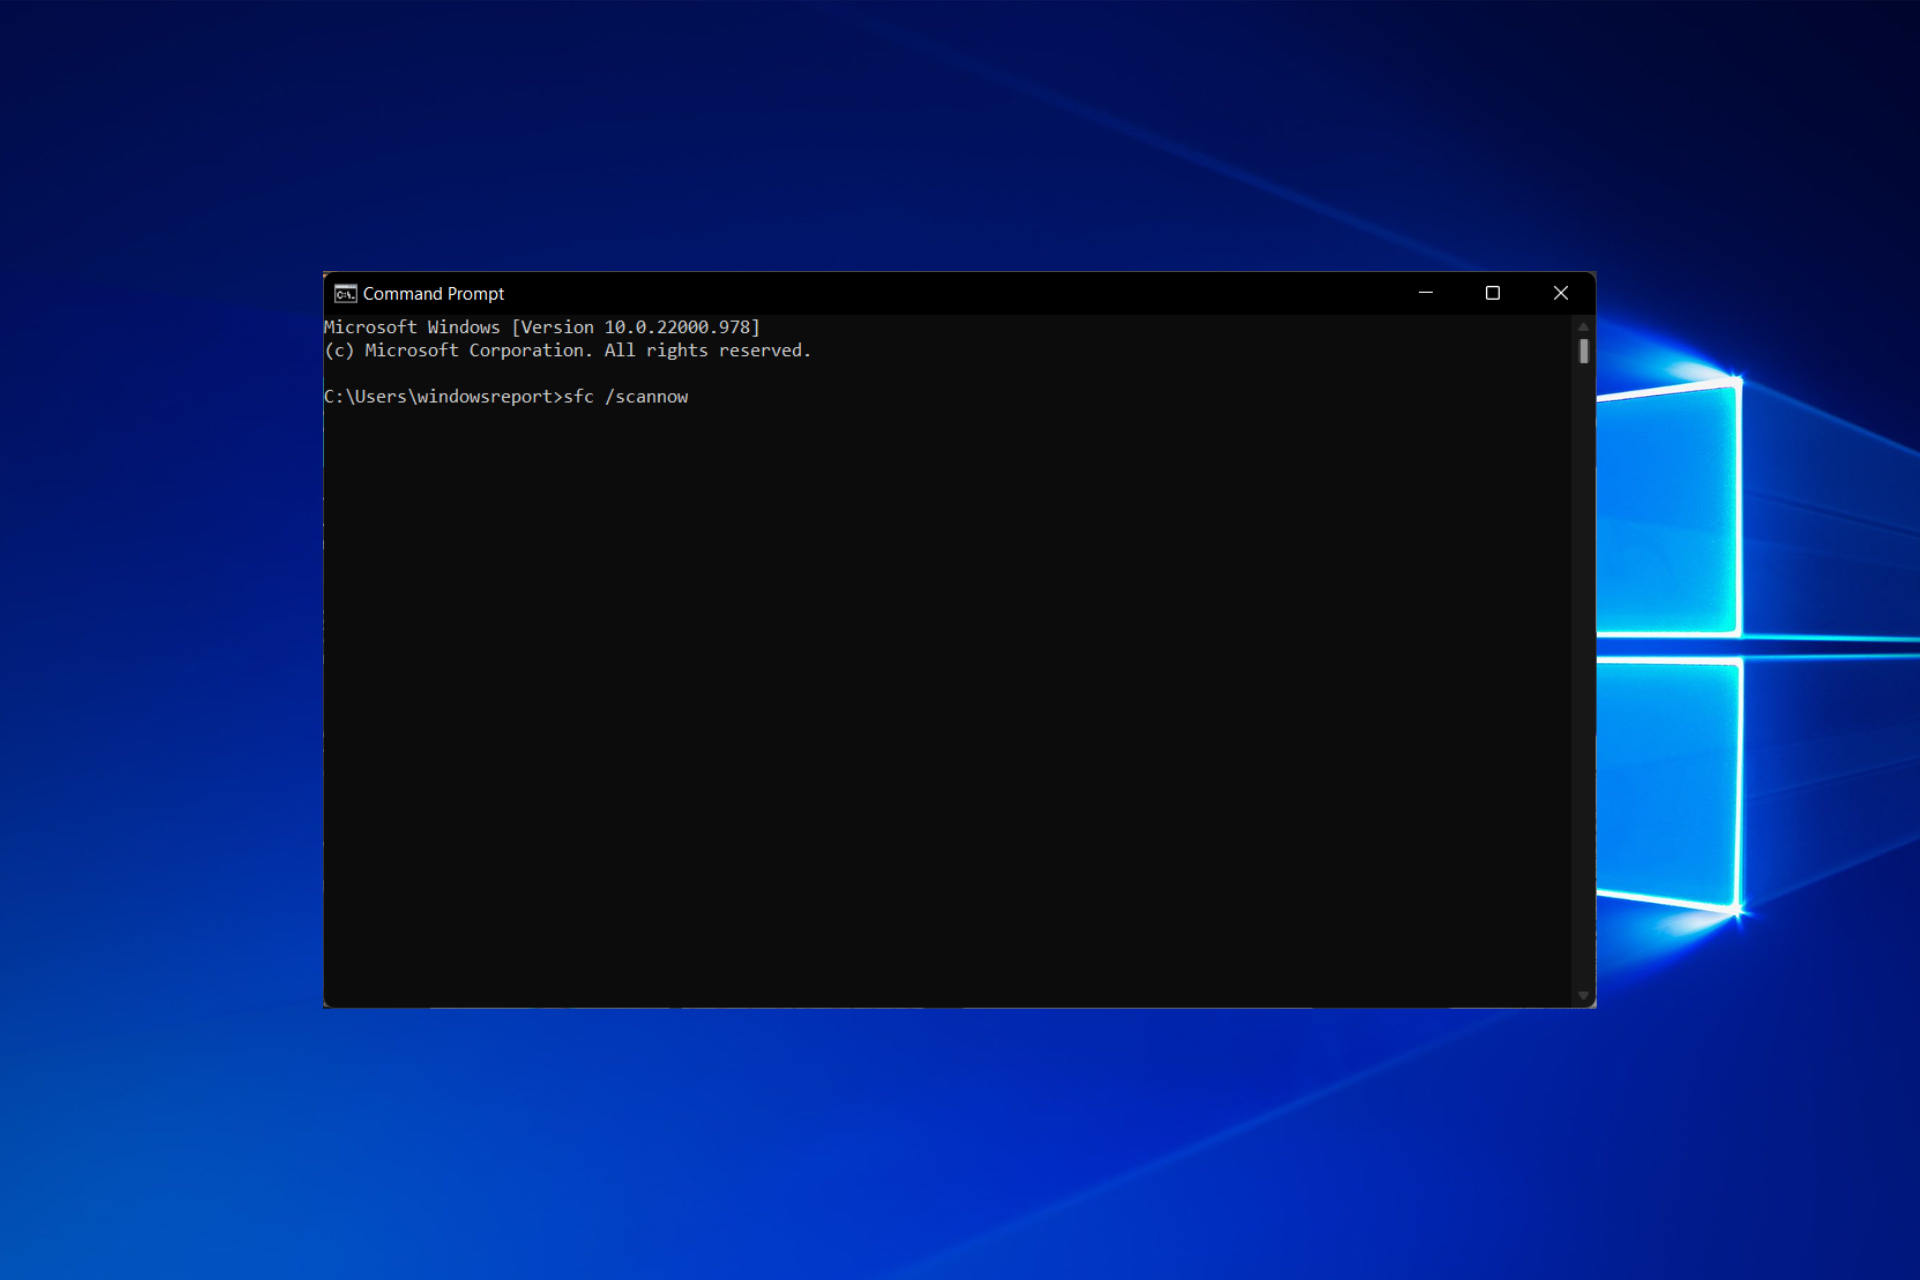
1. Press Win + X to bring up Power User menu and select Command Prompt.
2. Type: sfc /scannow and hit Enter.
According to the Microsoft Windows Support, SFC, also called System File Checker, is a utility in Windows that allows users to scan for corruptions in Windows system files and restore corrupted files.
However, sometimes, Windows users may not be able to run the sfc / scannow command line to repair the corrupted files on their Windows 10/8/7 PCs due to some reasons. So how to quickly restore corrupted system files and make SFC work again? Just follow the below parts and resolve this issue on your own now:
Part 1. Check and View ‘SFC Won’t Run’ Error Details
Before starting fixing the SFC not working error on your PC, we highly recommend that you follow the below tips to check and view the details of this issue:
1. Press Win + X to bring up Power User menu and select Command Prompt.
2. Type: sfc /scannow and hit Enter.
3. Wait for the process to complete and if you get the below messages, take different actions according to the related problems:
- Windows Resource Protection did not find any integrity violations: This means not system files are missing or corrupted. You don’t need to take any methods.
- Windows Resource Protection could not perform the requested operation: This means that a problem exists while running the scan and offline scan command. You can apply an SFC alternative tool for help.
- Windows Resource Protection found corrupted files and successfully repaired them. Details are included in …: This means the SFC command lines work just fine. No actions need to be taken.
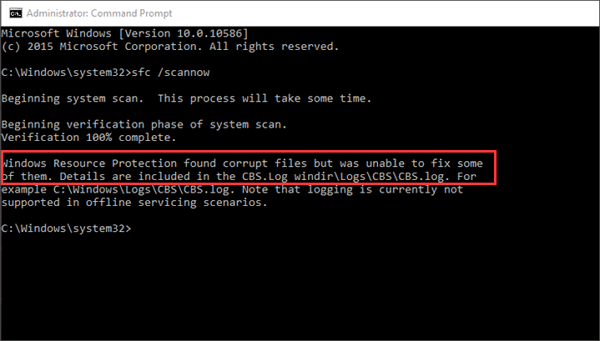
- Windows Resource Protection found corrupted files but was unable to fix some of them: This means sfc / scannow finds corrupted files but unable to fix.
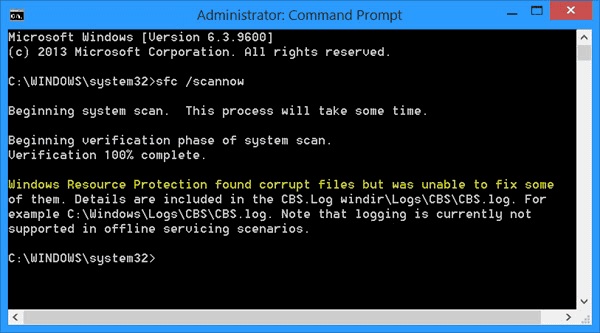
And therefore, you need to find an alternative tool or method to fix the corrupted files on Windows PC. The method in Part 2 can help.
Part 2. Repair Corrupted Files with SFC Alternative Tool on Windows PC
When the SFC fails to work, the first move that you should take is to find an SFC alternative tool or program that can help you find and repair the corrupted files on Windows PC.
Here we’d like to recommend you try EaseUS Partition Master which will thoroughly scan, find and repair corrupted system files on Windows 10/8/7 in just three simple steps:
After this, you shall be able to use saved data on the hard drive partition and even save new data on the drive by then.
Part 3. Fix SFC (System File Checking) Is Not Working Error on Windows 10/8/7
So how to make the SFC work again on your Windows 10/8/7 computers? Here in the below, you will find a few recommended methods which will help you manually repair and fix not working System File Checker on Windows 10:
Method 1. Run DISM command to resolve sfc /scannow won’t run issue
1. Press Win + R to bring up Run dialog and type: cmd to open Command Prompt.
2. Sign in with your administrator account and password if the system asks.
3. Type: Dism /Online /Cleanup-Image /RestoreHealth and hit Enter.
4. Reboot your PC to keep all changes to repair the SFC to work again.
Method 2. Manually repair corrupted system file and make SFC work again
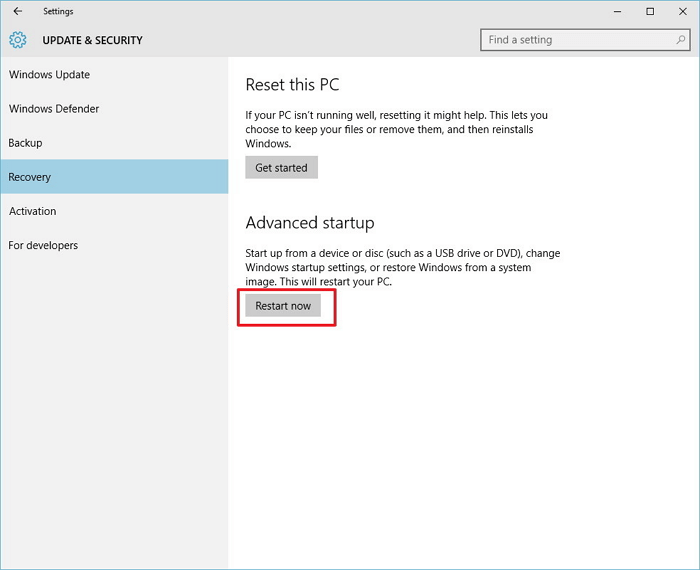
1. Press Win + I to bring up Settings window and click Update & security.
2. Click Recovery, select Restart now under Advanced startup.
And therefore, you need to find an alternative tool or method to fix the corrupted files on Windows PC. The method in Part 2 can help.
Part 2. Repair Corrupted Files with SFC Alternative Tool on Windows PC
When the SFC fails to work, the first move that you should take is to find an SFC alternative tool or program that can help you find and repair the corrupted files on Windows PC.
Here we’d like to recommend you try EaseUS Partition Master which will thoroughly scan, find and repair corrupted system files on Windows 10/8/7 in just three simple steps:
After this, you shall be able to use saved data on the hard drive partition and even save new data on the drive by then.
Part 3. Fix SFC (System File Checking) Is Not Working Error on Windows 10/8/7
So how to make the SFC work again on your Windows 10/8/7 computers? Here in the below, you will find a few recommended methods which will help you manually repair and fix not working System File Checker on Windows 10:
Method 1. Run DISM command to resolve sfc /scannow won’t run issue
1. Press Win + R to bring up Run dialog and type: cmd to open Command Prompt.
2. Sign in with your administrator account and password if the system asks.
3. Type: Dism /Online /Cleanup-Image /RestoreHealth and hit Enter.
4. Reboot your PC to keep all changes to repair the SFC to work again.
Method 2. Manually repair corrupted system file and make SFC work again
1. Press Win + I to bring up Settings window and click Update & security.
2. Click Recovery, select Restart now under Advanced startup.
3. Click Troubleshoot > Advanced Options and then select Command Prompt.
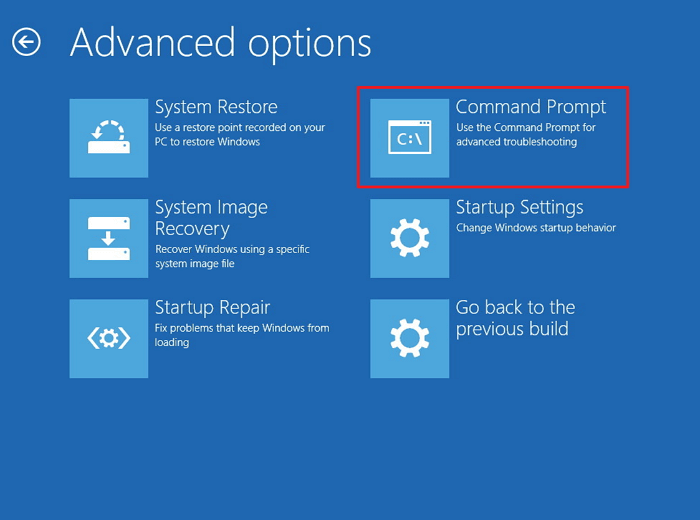
4. Enter your Administrator account and password on the reboot and then type: wmic logicaldisk get deviceid, volumename, description and hit Enter.
5. Type: sfc /scannow /offbootdir=C: /offwindir=D:Windows and hit Enter to continue.
4. Enter your Administrator account and password on the reboot and then type: wmic logicaldisk get deviceid, volumename, description and hit Enter.
5. Type: sfc /scannow /offbootdir=C: /offwindir=D:Windows and hit Enter to continue.
By doing so, Windows will repair the corrupted system files offline on your PC.
6. Then close Command Prompt when the scan and repair process complete.
7. Click Continue to exit and go back to your Windows 10.
After this, you should be able to use the SFC to check and repair corrupted files on your computers again.
- Notice:
- Those methods can also be applied to fix SFC issue on Windows 8/7 computers. Please Google to find the right guide to adjust or change some steps if you are a Windows 8/8.1 or Windows 7 user.
Running the SFC scan in Safe Mode is a quick workaround
by Milan Stanojevic
Milan has been enthusiastic about technology ever since his childhood days, and this led him to take interest in all PC-related technologies. He’s a PC enthusiast and he… read more
Updated on November 25, 2022
Reviewed by
Vlad Turiceanu

Passionate about technology, Windows, and everything that has a power button, he spent most of his time developing new skills and learning more about the tech world. Coming… read more
- Sfc /scannow is an instruction that runs in Command Prompt as an administrator. It is a handy and viral scan because it can be used to solve a large spectrum of problems.
- Make sure you run cmd as administrator, disable Turbo Memory or try using the DISM scan when the command freezes.
XINSTALL BY CLICKING THE DOWNLOAD FILE
This software will repair common computer errors, protect you from file loss, malware damage, hardware failure and optimize your PC for maximum performance. Fix PC issues and remove virus damage now in 3 easy steps:
- Download and Install Fortect on your PC
- Launch the tool and Start scanning to find broken files that are causing the problems
- Right-click on Start Repair to fix issues affecting your computer’s security and performance
- Fortect has been downloaded by 0 readers this month.
Sfc /scannow is a Command Prompt command that allows you to scan your Windows system for errors and repair them. This is a valuable feature, but several users reported that sfc /scannow is not working anymore.
This can be a big problem, but there are several solutions that you can try. Follow along!
How long should SFC Scannow take?
The sfc /scannow process should take a couple of minutes up to one hour. If the process takes longer than one hour, it might get stuck.
Follow along as we have prepared a list of solutions for you to try to fix any sfc /scannow, not working issues.
Why is SFC Scannow stuck?
This is because your computer contains specific corrupt system files, which prohibit it from carrying out tasks associated with the sfc /scannow command.
If the scan falls, you have to fix corrupted system files in Windows using different methods. Usually, the best alternative is the DISM scan.
Sometimes you might get an error message like the SFC /scannow Windows resource protection could not perform.
If you’re unlucky and DISM scan will fail as well, then you might have to reconsider reinstalling your operating system.
Here are some of the most common issues the users reported, which we will cover today:
- Sfc /scannow stuck at verification, at beginning system scan – You might be able to fix the problem simply by replacing the corrupted files.
- Sfc /scannow frozen in Windows 10 – To fix this issue, it’s advised to restore your PC using System Restore and check if that solves the problem.
- Windows resource protection sfc /scannow not working – Running the CHKDSK tool will work in this instance. Follow the second solution below to find out how to.
- Sfc scannow nothing happens – When this is the case, you need to use the DISM scan instead and check if that solves the issue.
- Sfc scannow stops scanning – This is a strange issue, and it might be caused by Turbo Memory feature. Simply disable this feature and check if that solves the issue.
- Administrator sfc /scannow not working – You should change to another admin account and see if this solved the error.
- Sfc /scannow fails Windows 10, 8.1, 7 – This problem can appear on almost any version of Windows, and Windows 8.1 and 7 aren’t exceptions. However, you should be able to fix this issue by using one of our solutions.
- Sfc /scannow stops you must be an administrator – SFC scan requires administrative privileges in order to run, and if you’re having any issues with SFC, be sure that you’re using Command Prompt as an administrator.
- System repair pending sfc /scannow not working – Uninstall or disable the Turbo Memory feature in order to make sfc /scannow work again.
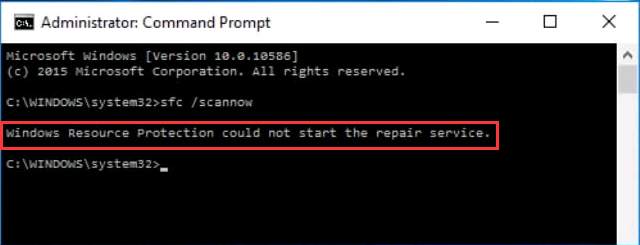
- Windows Resource Protection could not start the repair service – Resetting your PC should do the trick in this scenario.
- Sfc /scannow not showing progress – After entering Safe Mode as we have shown below, you will be able to successfully run the scan.
- Sfc /scannow /offbootdir not working – If the offline version of the scan is unsuccessful in running, you may connect to a network and use the online version.
How do I fix the SFC scannow if it’s not working?
- Why is SFC Scannow stuck?
- How do I fix the SFC scannow if it’s not working?
- 1. Run the DISM scan
- 2. Run the CHKDSK scan
- 3. Try to run the SFC scan from Safe Mode
- 4. Perform a System Restore
- 5. Reset your PC
- 6. Take control of the system32 directory
- How to stop sfc /scannow in Windows 10?
Before attempting any of the troubleshooting methods below, make sure to check the following:
- Check your hardware, especially the RAM, since it can cause such issues.
- It is advised to disable or uninstall the Turbo Memory altogether.
1. Run the DISM scan
- Press Windows, then enter cmd and select the Run as administrator option on the right.

- When Command Prompt opens, enter the following command and note that it can take a while:
DISM /Online /Cleanup-image /Restorehealth
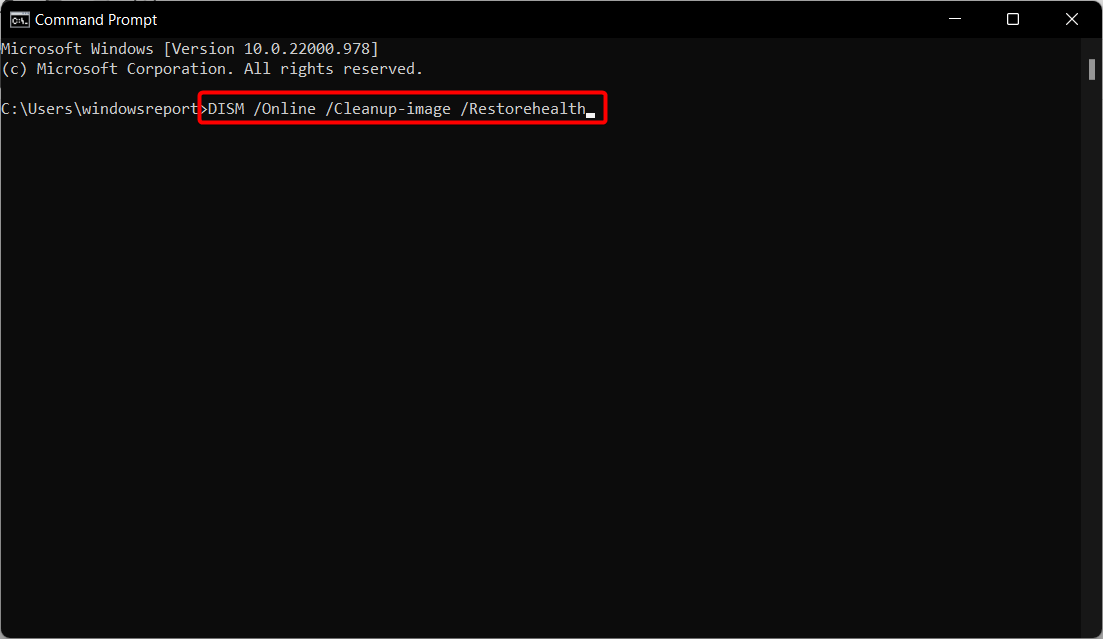
The DISM scan allows you to repair your system, and if sfc /scannow is not working or if it can’t fix the problem, you can use DISM to fix it.
2. Run the CHKDSK scan
- Tap Windows, then type cmd into the search bar and select Run as administrator.
- When Command Prompt starts, enter the following command and press Enter. You’ll be asked to schedule a scan and restart your PC. Enter Y and then press Enter:
chkdsk /f C:
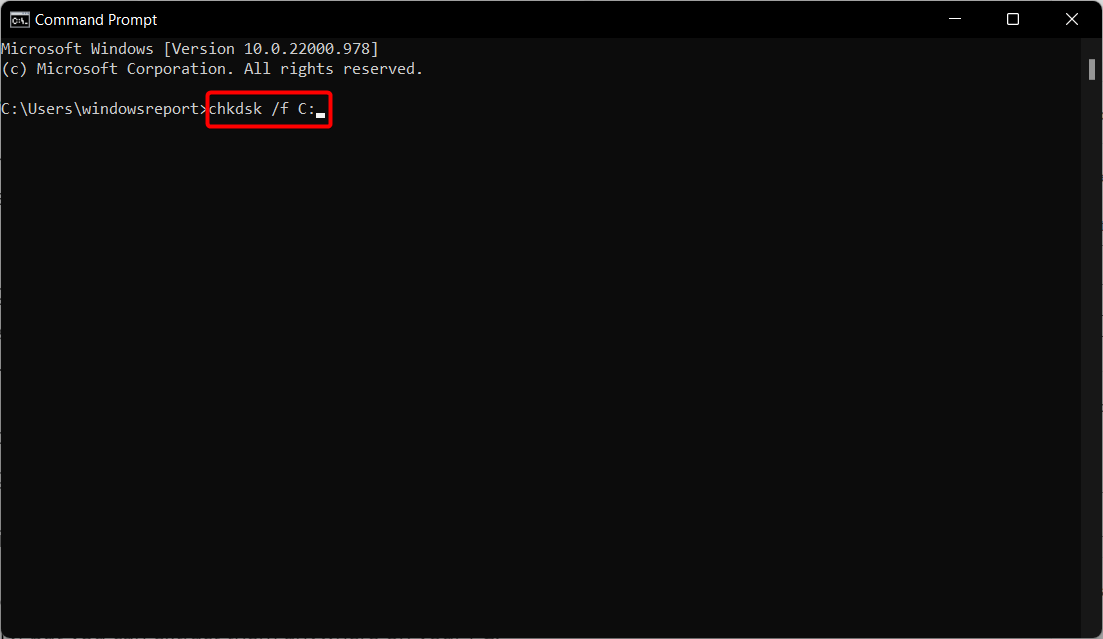
Sometimes the data on your hard drive can get corrupted, causing the SFC scan to get stuck. However, you might be able to fix the problem by running a CHKDSK scan.
3. Try to run the SFC scan from Safe Mode
If you’re not familiar, Safe Mode is a particular segment of Windows that runs with default applications and settings, making it perfect for troubleshooting. You can try to run this process from Safe Mode.
Some PC issues are hard to tackle, especially when it comes to missing or corrupted system files and repositories of your Windows.
Be sure to use a dedicated tool, such as Fortect, which will scan and replace your broken files with their fresh versions from its repository.
1. Reboot your computer and start into Safe Mode.
2. Once your PC restarts, you’ll be presented with options. Select the desired version of Safe Mode by pressing the corresponding key.
3. Afterward, open Command Prompt as an administrator by pressing Windows, typing cmd, and clicking Run as administrator.
4. Type the following command and press Enter to see whether it works now:sfc /scannow

Several users reported that they were able to run the SFC scan from Safe Mode, so be sure to try that.
4. Perform a System Restore
- Please restart your computer and start into Safe Mode as we have shown in our dedicated guide.

- After your PC starts up, press Windows + R, then input rstrui and press Enter.

- The System Restore window will open. Click Next to proceed.

- Select the Restore point you wish to return to and click Next.
- Follow the on-screen instructions to complete the process.
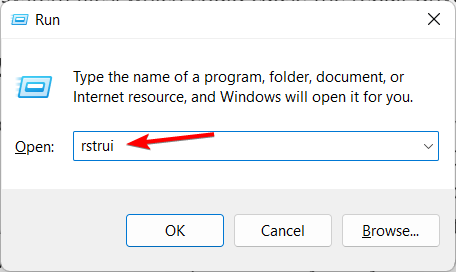
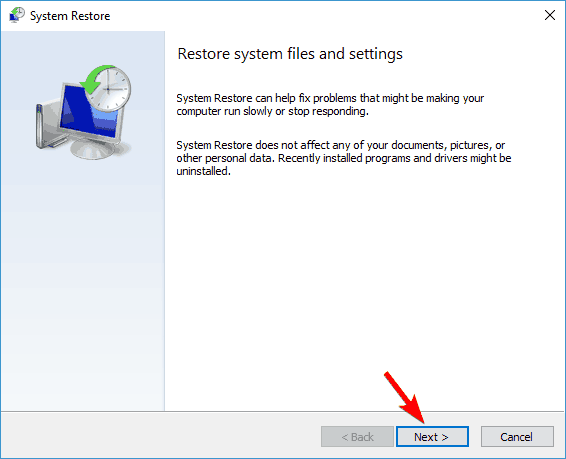
System Restore is a valuable feature that allows you to fix various problems. Many users reported that this issue was resolved after restoring their PC with the System Restore tool.
If you’re interested in more info on how to create a restore point and how that would help you, look at our dedicated article to find out everything you need to know.
- How to perform a Windows 10 repair upgrade
- How to fix DLL files missing from your Windows 10/11 PC
- Fix: Settings and Updates not opening in Windows 10/11
5. Reset your PC
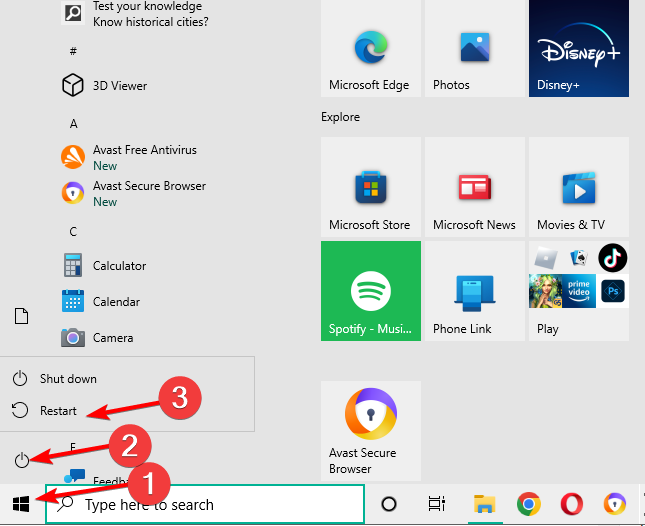
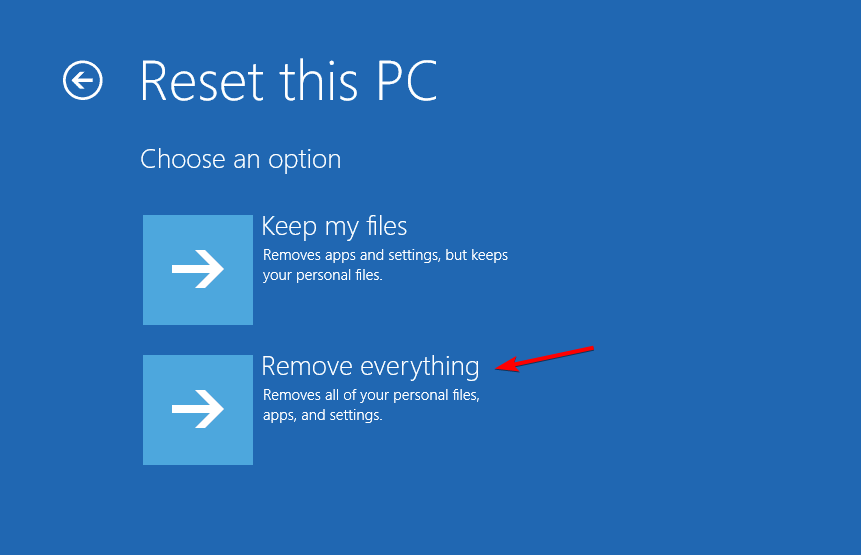
You might have to reset your PC if other solutions don’t work. This procedure will delete all files from your C partition, so be sure to create a backup. For example, to reset Windows, do the following:
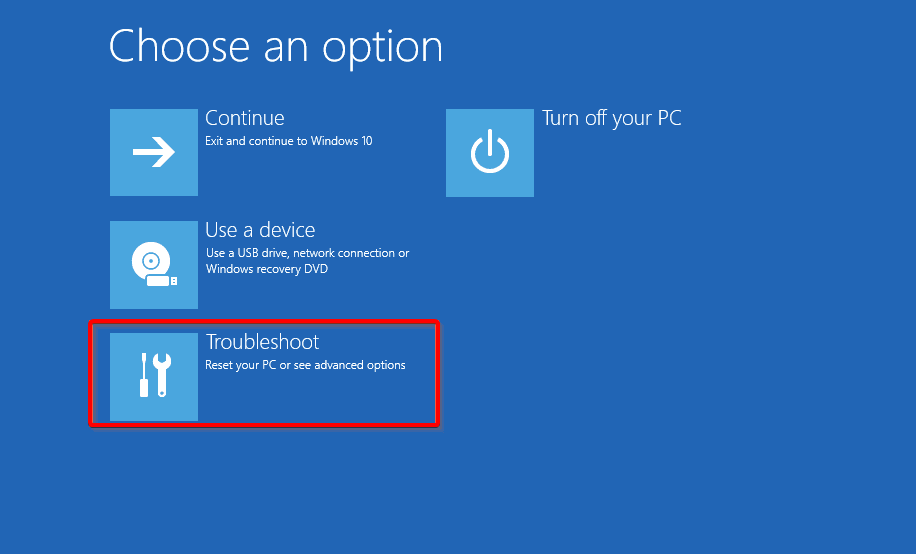
- Click the Start icon, click the Power button, press and hold the Shift key, and select Restart from the menu.

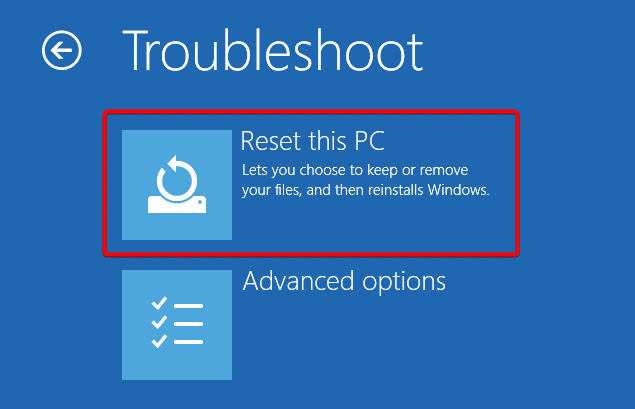
- A list of options will appear. Select Troubleshoot.

- Click Reset this PC.

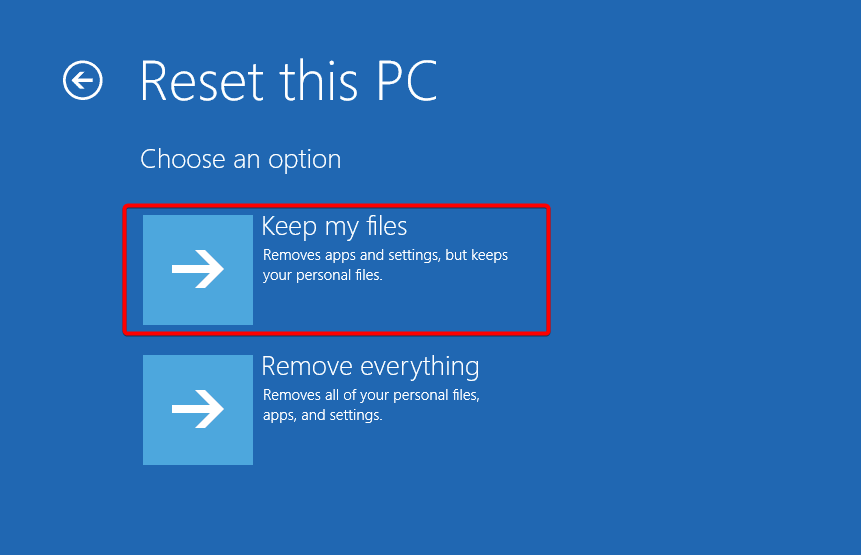
- Select the Keep my files option.

- Select your account and enter your password if prompted. If asked to insert the installation media, be sure to do so. If you don’t have it, follow our dedicated guide to create one. Then select the Reset button and proceed with the on-screen steps.
- If this method doesn’t work, you should repeat the reset process and choose to Remove everything followed by Only the drive where Windows is installed.
6. Take control of the system32 directory
Before we start, we have to mention that this is an advanced solution, and if you don’t perform it correctly, you can cause issues with your system.
In addition, the system32 directory is closely related to your system, so that any changes can affect your Windows installation. In the worst-case scenario, your Windows might not be able to boot, so keep in mind that you’re using this solution at your own risk.
Several users reported that they solved this issue simply by taking control of a system32 directory. There are many ways to do that; the best might be to use a third-party application.
We explained in detail how to take ownership over a directory in one of our previous articles, so be sure to check it out for more information.
How to stop sfc /scannow in Windows 10?
- Press Windows + R to open the Run utility, then type sfc/revert and click OK.
- Restart your computer afterward.
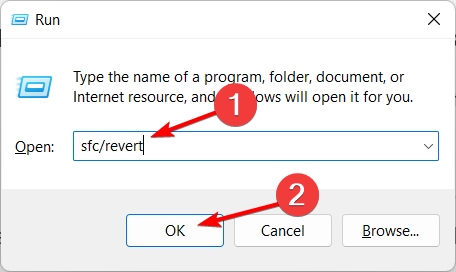
If sfc /scannow stops, it’s usually due to corrupted files, and you can fix this problem by following the above methods. However, there are other ways to fix corrupted files; we recommend you check that out.
If you have any more suggestions or questions, don’t hesitate to leave them in the comments section below, and we’ll be sure to take a look.
Still experiencing issues?
SPONSORED
If the above suggestions have not solved your problem, your computer may experience more severe Windows troubles. We suggest choosing an all-in-one solution like Fortect to fix problems efficiently. After installation, just click the View&Fix button and then press Start Repair.
![]()
The System File Checker is a user-friendly tool to check whether there is a corruption for system files. However, if it is not working, you may receive an error message Windows resource protection could not perform the requested operation. But this post will show how to solve the problem SFC scannow not working issue.
The Issue SFC Scannow Not Working
SFC is a very useful tool to check whether there is a corruption for system files. However, some uses complain that sometimes the System File Checker may fail to work. And they usually receive the following two error messages when SFC Scannow is not working.
- Windows resource protection could not perform the requested operation.
- Windows resource protection could not start the repair service.
Thus, do you know how to solve the issue SFC scannow? Just go on your reading, this post will show you how to solve the SFC error respectively.
Windows Resource Protection Could Not Perform the Requested Operation
One of the SFC error is the Windows resource protection could not perform the requested operation. You can see the error message in the following picture.

Thus, how can you solve the issue Windows resource protection could not perform the requested operations? You can read the following four methods.
Quick Video Guide:
Solution 1. Run SFC Scannow Command in Safe Mode
If you have encountered the issue Windows resource protection could not perform the requested operation, you can try to run SFC scannow command in safe mode to solve the problem. Here, we will show you how to solve the problem step by step.
Step 1: Press Windows key and R key together to launch Run box.
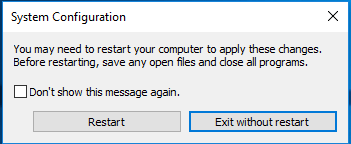
Step 2: Type msconfig in the box and hit Enter to continue.
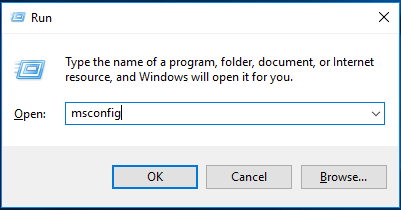
Step 3: Then go to Boot tab, tick on Safe boot and click OK to continue.
Step 4: Then restart your computer to apply this change. Click Restart to continue.
Then your computer will boot in safe mode and you can input SFC scannow command again to check whether the issue Windows resource protection could not perform the requested operation is solved.
Solution 2. Run Check Disk
If there are some errors on your hard disk, the SFC scannow not working issue can also occur. So in this situation, you can try to check the disk and try to solve the problem Windows resource protection could not perform the requested operation. And we will introduce how to check disk step by step.
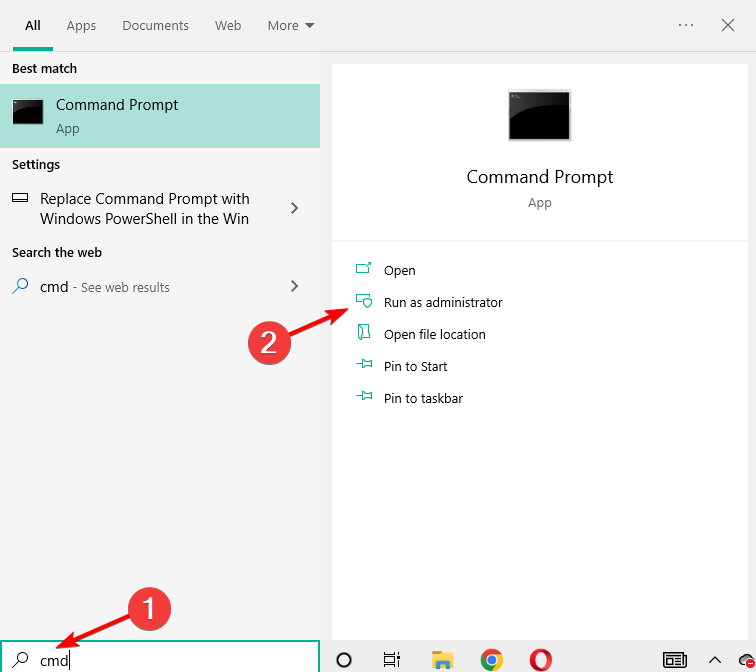
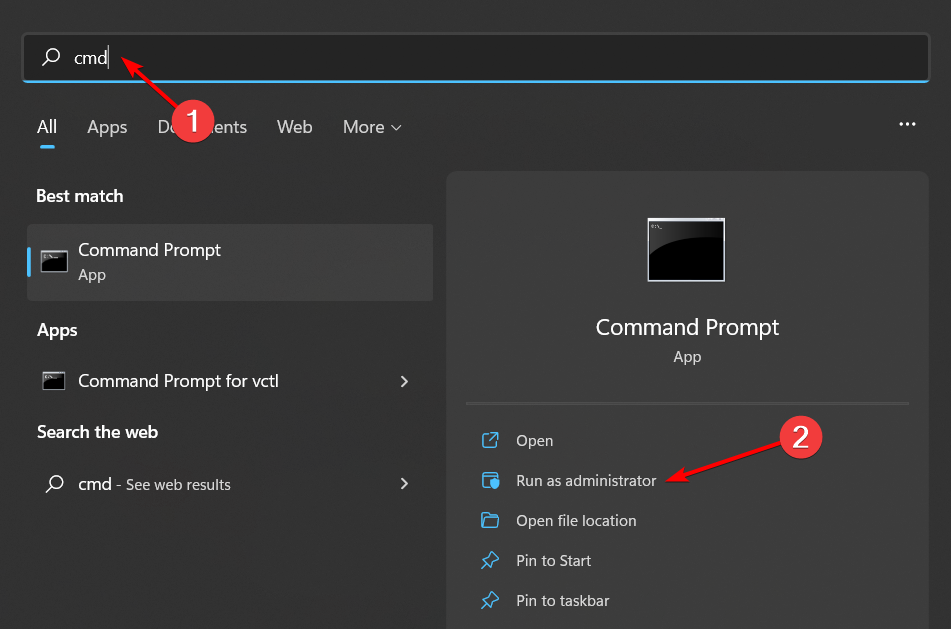
Step 1: Type cmd in the search box of Windows 10 and right-click the Command Prompt to choose Run as administrator.
Step 2: Type chkdsk /r command in the popup command window and hit Enter to continue.
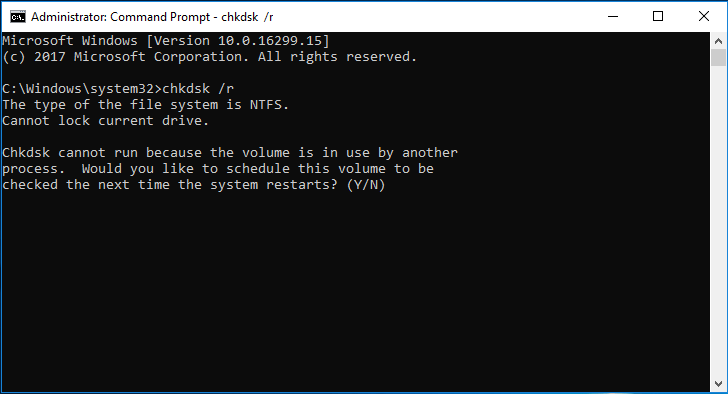
Step 3: Then you will receive a message that shows ‘Chkdsk cannot run because the volume is in use by another process. Would you like to schedule this volume to be checked the next time the system restarts?’. Thus, you need to type Y to continue.
Step 4: After that, close the command window and restart your computer. Then it will start to check the disk and fix the detected error automatically.
When the process of checking disk is finished, you can run SFC scannow again to check whether the issue Windows resource protection could not perform the requested operation is solved.
Solution3. Change Security Descriptors
A security descriptor contains the security information associated with a securable object. If SFC scan fails to access winsxs folder, the issue SFC scannow not working issue may also occur.
So in order to solve the issue SFC Windows resource protection could not perform the requested operation, you can try to change the security descriptors to solve SFC error. Here, we will show how to change security descriptors in detail.
Step 1: Type cmd in the search box of Windows 10 and right-click Command Prompt to choose Run as administrator.
Step 2: In the command window, type the ICACLS C:Windowswinsxs command and hit Enter to continue.
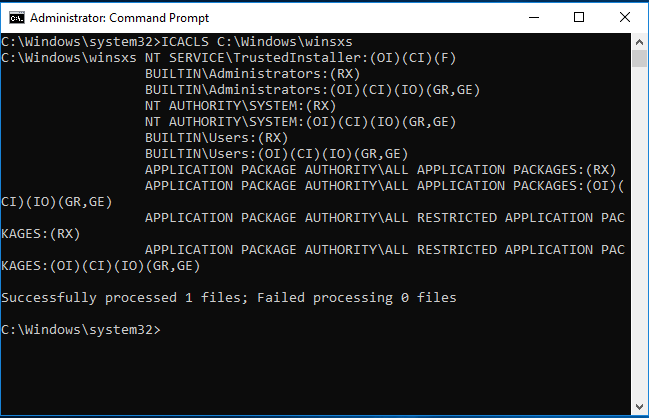
After that, you need to close the command window and restart your computer to check whether the issue SFC Windows resource protection could not perform the requested operations is solved.
Solution 4. Run Automatic Repair
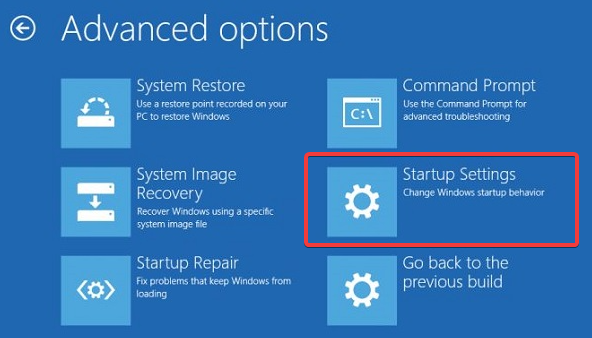
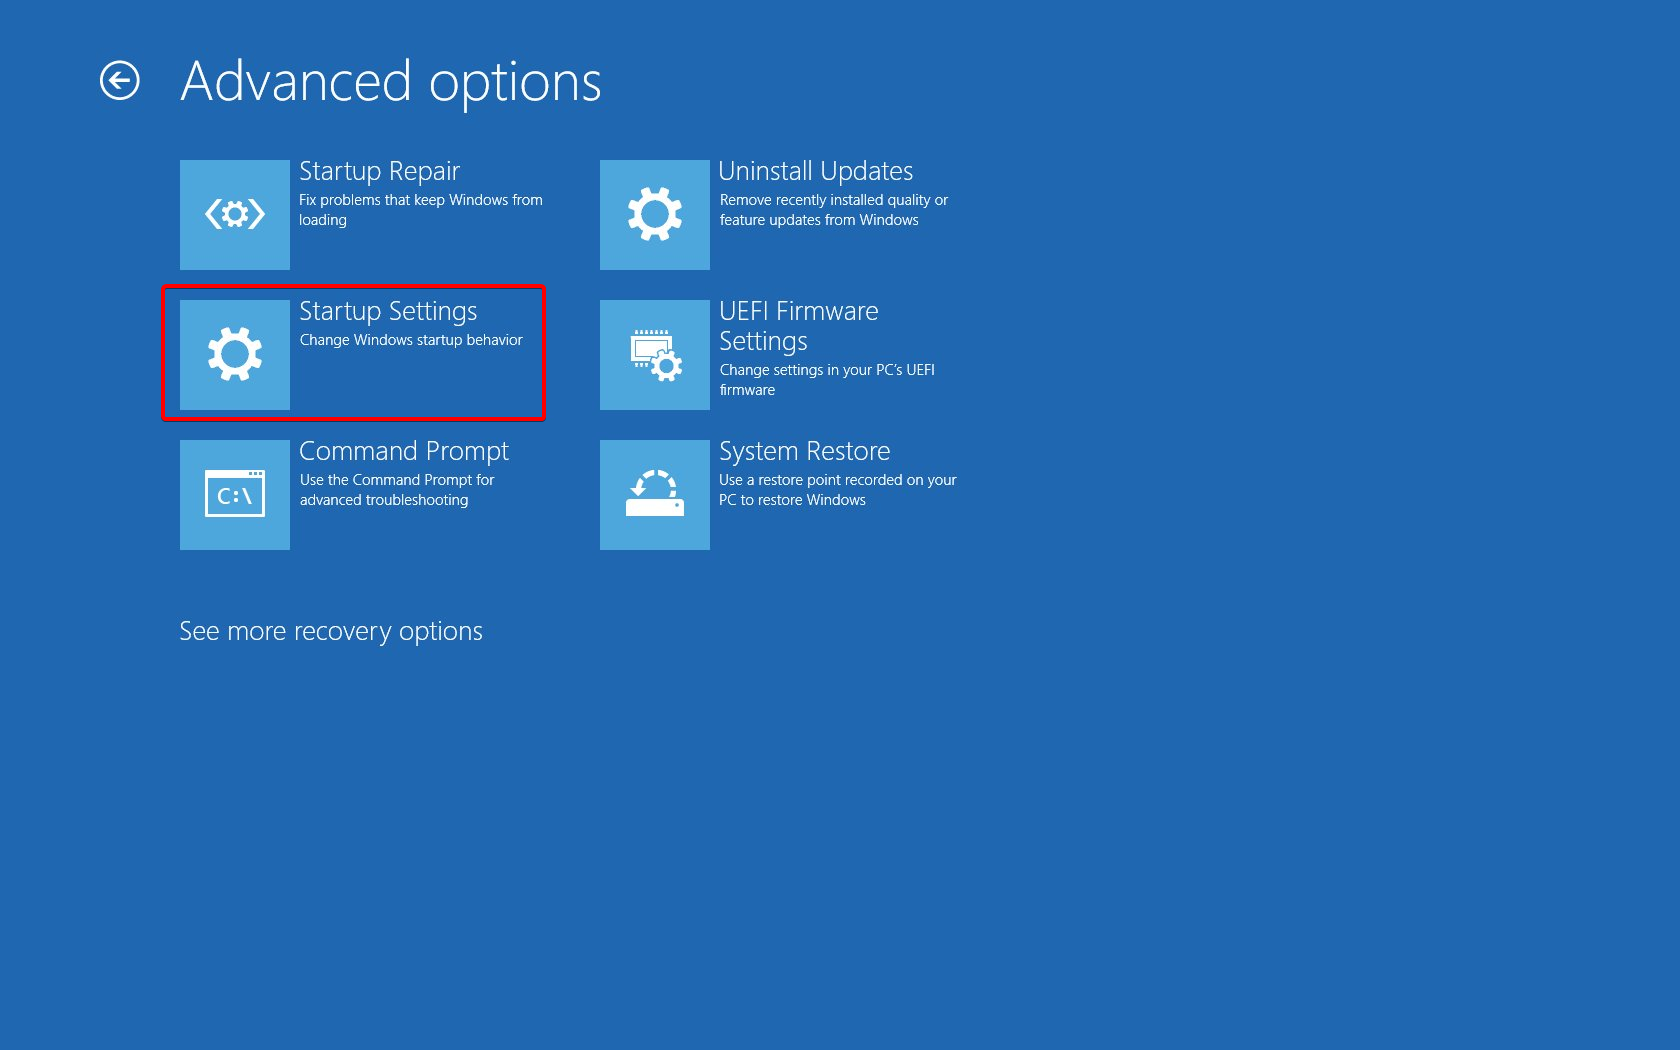
If the above solutions are not working, you can try to go on this method to solve the issue Windows resource protection could not perform the requested operation. You can run Automatic Repair to solve SFC scannow not working problem. And we will show you how to run Automatic Repair step by step.
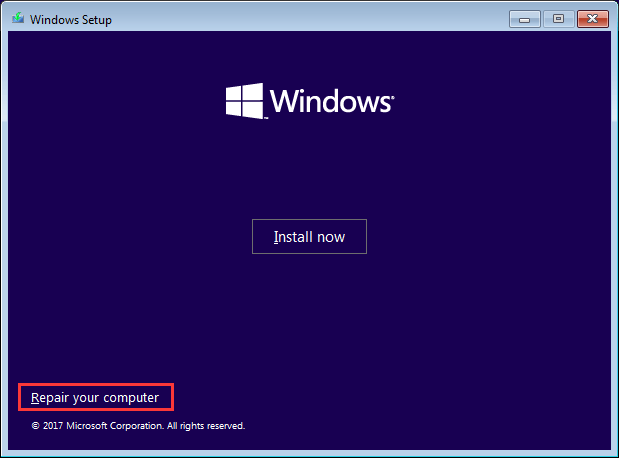
Step 1: Insert the Windows 10 bootable installation to your computer and boot your computer from it. If you don’t have the Windows 10 installation disc, you can click here to download the Microsoft Media Creation Tool and launch it to create an installation disc.
Step 2: Then you will enter the welcome interface and click Next to continue.
Step 3: Then click Repair your computer in the bottom-left corner to continue.
Step 3: You need to choose Troubleshoot in the popup window to continue.
Step 4: Click Advanced options to go to the next page.
Step 5: Choose the Startup Repair in the Advanced options screen and wait for the process to be completed.
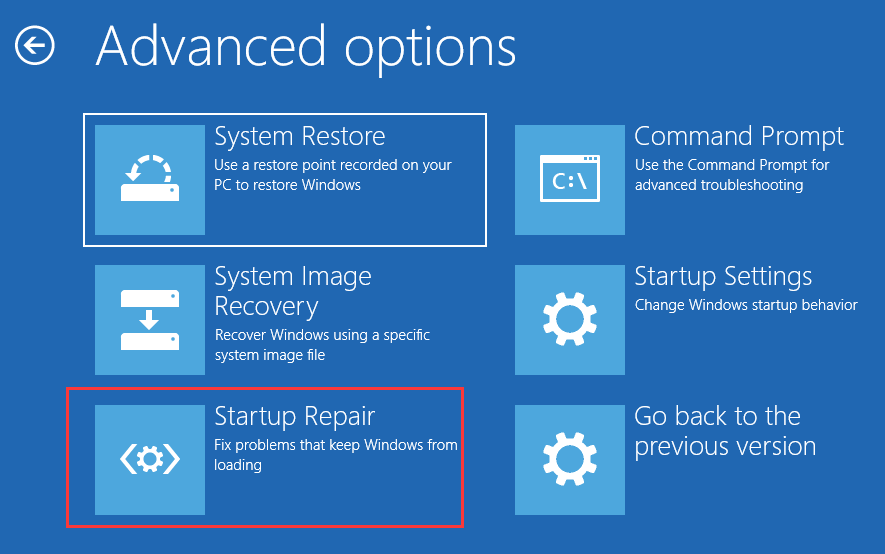
Now, when the process is finished, you can restart your computer to check whether the Windows resource protection could not perform the requested operation is solved.
I have successfully solved the issue Windows resource protection could not perform the requested operation. Have a try now!Click to Tweet
Windows Resource Protection Could Not Start the Repair Service
As we have mentioned in the above part, this post focuses on two cases of SFC scannow not working issue. And the issue Windows resource protection could not perform the requested operation has been talked in the above paragraphs.
Now, we will talk about another issue Windows Resource Protection could not start the repair service.
When you are running SFC scannow command, you may receive the following error message which shows that Windows resource protection could not start the repair service.
This SFC error may occur when Windows Modules Installer services are disabled. Windows Modules Installer services have full access to Windows Resource Protection files and registry keys. If you want to use SFC scannow command to restore missing or corrupted WRP resources, Windows Modules Installer services need to be running.
Thus, if you receive the SFC error message Windows resource protection could not start the service, we can enable Windows Modules Installer to fix the problem. Now, we will show how to enable Windows Modules Installer step by step.
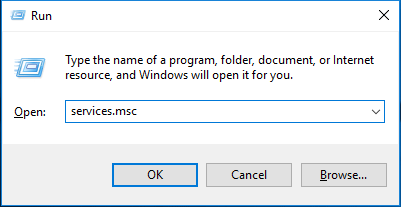
Step 1: Press Windows and R keys together to launch Run dialog, and input services.msc in the box, then click OK to continue.
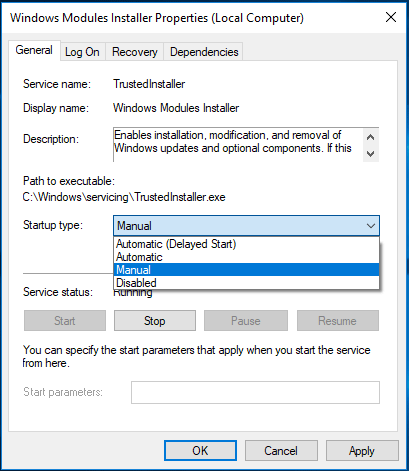
Step 2: In the popup window, select the Windows Modules Installer and double-click it.
Step 3: You will see Windows Modules Installer Properties window, set Startup type as Manual, then click Apply and OK to confirm this change.
Step 4: Close the services window. Then type cmd in the search box of Windows 10 and right-click Command Prompt to choose Run as administrator.
Step 5: Type the following commands in the command window and hit Enter to continue after each command.
sc config trustedinstaller start= demand
net start trustedinstaller
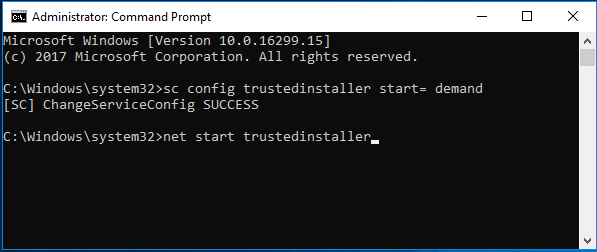
When you have finished the above process, you can restart your computer and input the SFC scannow command to check whether the issue Windows resource protection could not start the repair services is solved.
Top Recommendation
Although SFC scannow command can scan for corruptions in Windows system files and restore corrupted files, things will become worse when SFC scannow is not working, in particular when the computer is corrupted and SFC scannow not working.
Therefore, we strongly suggest that you create a Windows image when your computer can work normally since not only you can use the backup image to perform some recovery actions especially when some accidents occur, but also can protect your data.
For instance, when your Windows 10 is corrupted or you don’t like the current Windows version, you can use the backup image to restore to an earlier date.
Thus, to create a backup image, many computer users choose the professional Window 10 backup software – MiniTool ShadowMaker. This free software can handle lots of backup matters with its various powerful features, such as system backup, files and folders backup, disk backup and so on.
The automatic backup software – MiniTool ShadowMaker can protect your computer well and can provide disaster recovery solutions when some accidents happen.
Therefore, in order to create a system image, you can get the MiniTool ShadowMaker from the following button which can be freely used within 30 days.
Free Download
After installing the free backup software, we will show you how to create a system image step by step with pictures.
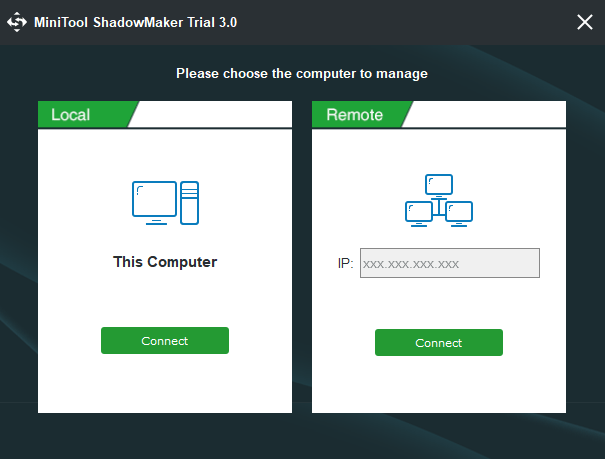
Step 1: Launch the software and click Keep Trial to continue. Then click Connect in This Computer to enter its main interface.
Step 2: Then, MiniTool ShadowMaker will remind you to back up if you haven’t performed any backup action with this backup tool. You just need to click SET UP BACKUP to continue. MiniTool ShadowMaker is set to back up the operating system by default.
Of course, you can also go to the Backup tab to select the Source tab and Destination tab to choose what you want to back up and where you want to save the backup image. In addition, it is recommended to choose an external hard drive as the destination path.
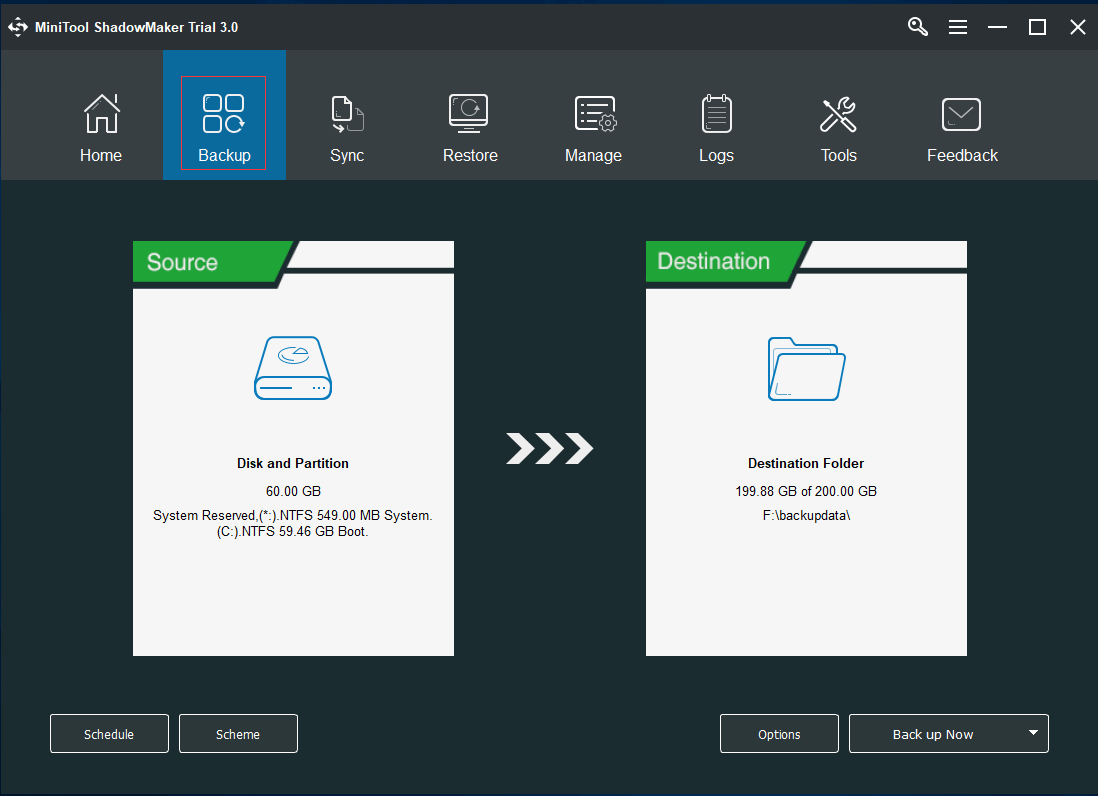
Step 3: Now, you can click Back up Now to perform backup action immediately. Of course, you can also click Back up Later to delay the backup process.
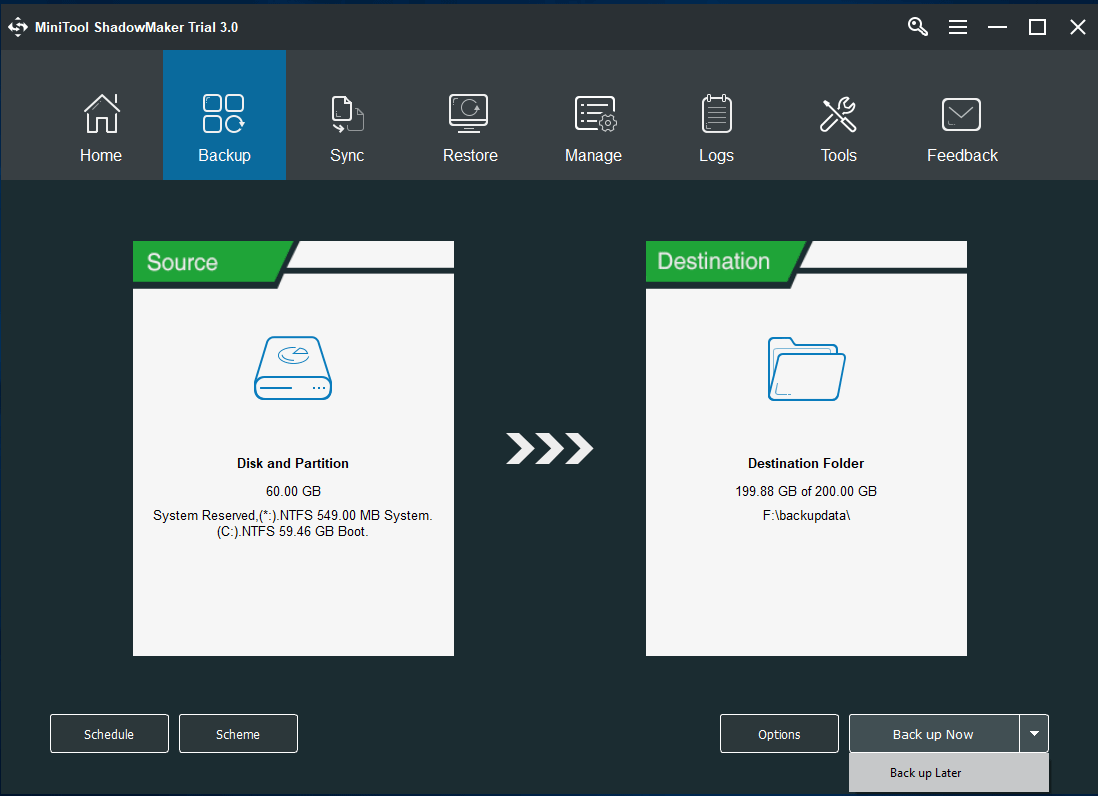
Note: In the bottom, you can see three options. The Schedule Setting helps you to set the backup matters on a regular basis such as daily/weekly/monthly so as to protect your PC and data well. Scheme which includes Full Scheme, Incremental Scheme, and Differential Scheme can help you to delete former backup versions so as to manage disk space. The Options can assist you in setting some advanced backup parameters.
Step 4: After successfully creating the backup image, you had better go to the Tools tab to create a bootable media which can be used to help you to restore to an earlier date or do some other recovery actions with the backup image at any time you want.
MiniTool ShadowMaker is a fantastic tool that can easily create a backup image within a few steps. With this backup software, you can protect your PC and important data and files well.Click to Tweet
Bottom Line
In conclusion, this article focuses on two cases of SFC scannow not working issue, which respectively are Windows resource protection could not perform the requested operation and Windows resource protection could not start the repair service.
Aiming at those two different situations, we also list different solutions to solve the SFC error. Now, it is your turn to have a try.
In addition, if you have any better solution to the SFC scannow not working issue, you can share it on the comment zone. Or if you have any problem with MiniTool ShadowMaker, you can feel free to contact us via the email [email protected].
Windows Resource Protection Could Not Perform the Requested Operation FAQ
How do I fix Windows Resource Protection could not perform the requested operation?
- Run SFC Scannow command in Safe Mode.
- Run check disk command.
- Change security descriptor.
- Run automatic repair.
How do I fix SFC Scannow?
- Scan the hard drive for errors.
- Enable the hidden Administrator Account.
- Set the computer to reboot in safe mode.
- Login as the Administrator User.
- Open an Administrative Command Prompt.
- Ensure that PendingDeletes and PendingRenames Folders exist.
- Run the SFC Scannow command in safe mode.
How do I start Windows Resource Protection?
- Open Command Prompt as administrator.
- Type the command sfc /scannow and hit Enter to continue.
- Then wait for the process to be finished.
How do I repair a file?
- Check hard drive.
- Run chkdsk command.
- Run sfc /scannow command.
- Change the file format.
- Use file repair software.