
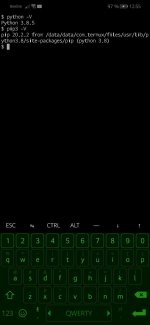
I am installing python on termux but I am getting this error:
$ pkg install python
Checking availability of current mirror: ok
Reading package lists... Done
Building dependency tree... Done
E: Unable to locate package python
![]()
Gino Mempin
24.7k28 gold badges92 silver badges128 bronze badges
asked Dec 9, 2020 at 4:30
![]()
0
I think you haven’t update repo, look like you have just install termux. Anyway, execute
apt update
and then install any package.
![]()
wjandrea
27.2k9 gold badges59 silver badges80 bronze badges
answered Dec 11, 2020 at 11:04
![]()
1
The following combination of answers from this post worked for me:
termux-setup-storagetermux-change-repo(I selected Albatros)pkg updateandpkg upgradeexitand then restart termuxpkg install python -y
![]()
answered Feb 13, 2022 at 2:32
![]()
termux has haulted all update through google playstore download it from f-droid
then change mirror it works (sometime)
termux-change-repo
or change it manually by editing
sources.list
file in directory
$PREFIX/etc/apt
check out my blog post for more link
answered Jun 24, 2021 at 4:39
![]()
0
Make sure you have an internet connection, then allow access to your storage;
Run termux-setup-storage, this should ask you for permission to allow termux use your device storage.
Then to confirm storage is accessible, run ls ~/storage/shared to list directories contained in shared storage.
If this doesn’t work, try switching repos as some other answers suggest, as the node you’re on may be down.
answered Jul 9, 2021 at 19:37
![]()
ruzorruzor
313 bronze badges
2
Try to upgrade your Termux via pkg upgrade then it finds the packages on pkg
answered Oct 9, 2021 at 16:24
![]()
Only for mobile termux
termux-change-repo
There might be services for game and science need to select all the 3 options and select the A1batross’s options there by completes all the permission process steps
Once done with all this steps you can install and do operation as Linux terminal
Ps: update the apt would be better before any other steps
answered Jun 15, 2022 at 12:35
![]()
renish p.rrenish p.r
1051 silver badge5 bronze badges
I changed my termux repository to A1batross’s
answered Jul 15, 2021 at 16:21
![]()
Just give storage permission and restart the app, it worked fine for me.
answered Mar 9, 2021 at 18:08
![]()
Are you using termux app on your android?
If, yes, then i think you’re stuck with this error called “Unable To Locate Package” if you trouble with that then here I have a 99% working solution for you.
Yeah, if you’re using termux or if you’re thinking to install packages on your termux terminal or getting this error then definitely you should follow my steps to fix unable to locate package in termux easily with some simple commands.
So to fix this error we need to set up our storage first, and then we can fix this error, so let’s jump into our main topic and setup our termux storage location and fix the error.
How To Download Termux for Windows 10 – Mac OS?
Steps To Fix Unable To Locate Package in Termux App Android or Pc
First open your terminal and place thise codes:
apt updateNow you ned to do Upgrade your terminal after updating:
apt upgradeNow its time to place the command to setup your internal storage for package location:
termux-setup-storageNow you will get a popup message to “allow or deny” so just click on the “Allow” button to get access to your internal storage.
Now when you click on “Allow” then its time to check is it worked or not? so to check this just write another command called.
lsThen you need to place another command:
cd storageNow this is the last command to check all folders of your storage to final checking:
lsThat’s set, if you see your internal storage folders are over here then you’re completely set up your location to your internal storage, and now it’s time to install your package to see if the “unable to locate package” error has or not?
I’m dammed sure that, if you successfully follow all the commands then you will didn’t get any error on your terminal, and now you can install anything on your termux app.
Bottom Line
So, it’s time to leave, because i will complete practically showed you the exact way of how to fix unable to locate package error of termux app? and now it’s your turn to follow my all commands and fix your issue.
Also, in return, if you found anything helpful from this article then please do share on your social media or leave a good comment below to motivate me and that’s why I will create for you latest articles related to termux terminal.
The apt-get pip installation error “Unable to locate package python-pip” can occur if your apt repositories are out of date, or if your system uses python3-pip or python2-pip packages instead. You may already have it – check to see if the pip2 or pip3 commands are available.
The other day I was toying around with an older version of Ubuntu. Or, rather, I was stuck using an older version of Ubuntu for reasons I’d rather forget. When trying to install some Python package via pip install <whatever>, I got:
“Hmm, weird” I thought. I could have sworn it was already installed. But, I’ve been in this situation a million times before. I know exactly what to do!
Then I did the next logical thing, and tried running:
sudo apt-get install python-pip
But, unfortunately, that didn’t do what I thought it was going to do. Instead, I was greeted with the following error message:
Reading package lists... Done
Building dependency tree
Reading state information... Done
E: Unable to locate package python-pip
What. That always used to work!
Fortunately, I was able to figure it out. Let’s look at a few different ways you can install pip – one of these will work!
Fix 1: You might already have it!
If you’re not able to run the pip command, it’s possible your system already has it installed as pip2 or pip3 instead. Newer versions of Debian based systems like Ubuntu 20.04 will install Python 2 as “python2” and Python 3 as “python3”. I really look forward to the day when this isn’t the case. Literally nobody should be using Python 2 anymore. It’s been long enough.
Anyway, try the following if you must use Python 2 and need pip as well:
pip2 install <your package>
Or, if you’re really trying to get pip for Python 3, try this:
pip3 install <your package>
Still didn’t work? Alright, well, moving on then…
Fix 2: Try installing python2-pip or python3-pip instead
The next logical step, if pip2 or pip3 didn’t work, is to try installing those. You can short-circuit the guesswork if you can figure out if you have the python2 or python3 commands. Depending on which version of Python you actually want, that is.
If you have one of those, good news! One of the following commands should work.
If you want Python 2 pip, run this:
sudo apt-get install python2-pip
And if you want Python 3 pip, try this one:
sudo apt-get install python3-pip
Still nothing?? Well, don’t worry. I have a few more tricks up my sleeve.
Fix 3: Update your apt repositories
You might just need to update your apt repositories. Unlikely, yes, but still possible. python2-pip or python3-pip should have already been in your apt packages list on install. But, maybe you installed your OS without internet access, or maybe you just… did something weird. I don’t know.
It’s worth a try though, right?
Try the following:
sudo apt-get update && sudo apt-get install python-pip
If that didn’t work, try substituting “python-pip” with one of the specific variations, python2-pip or python3-pip. Yes, we’re grasping at straws here.
Fix 4: Add the “universe” repository
If you made it this far wit no luck, we might be in trouble. But, hang in there. We have a couple more things to try.
You might have some success by installing the “universe” repository. Beware though, these are packages from all over the place, not just the Debian or Ubuntu sanctioned ones. We don’t need their rules anyway, right? Please don’t sue me if you break something – you’ve been warned!
sudo apt-get install software-properties-common
sudo apt-add-repository universe
sudo apt-get update
sudo apt-get install python-pip
Again, if you don’t have success trying python-pip, try the python2-pip or python3-pip packages instead.
Fix 5: Use the ensurepip module
Python comes with a built-in way to make sure pip in installed. Though, it’s unlikely to work if you’re on Ubuntu or Debian, because they usually disable it. Or, at least, it’s always disabled when I try this. But it’s worth a shot. I’ve been saying that a lot lately… hopefully you haven’t had to read down this far.
python -m ensurepip --upgrade
You’re more than likely going to get the following error or some variation of it:
ensurepip is disabled in Debian/Ubuntu for the system python.
Python modules for the system python are usually handled by dpkg and apt-get.
    apt install python3-<module name>
Install the python3-pip package to use pip itself.  Using pip together
with the system python might have unexpected results for any system installed
module, so use it on your own risk, or make sure to only use it in virtual
environments.
Rats. Now we’re down to our nuclear option – use the get-pip script.
Fix 6: Use the get-pip.py script
Alright – this is guaranteed to work, but it’s definitely not the best option. Why? Because on Debian and Ubuntu, packages like pip are managed through apt. And if you step outside that package management system, you’re asking for trouble, because now apt doesn’t know what you have installed, and you can’t uninstall or manage dependencies for those packages with apt.
But, if this is an emergency, go ahead and give it a try:
curl https://bootstrap.pypa.io/get-pip.py | python
Or, if you don’t have curl installed and can’t or don’t want to install it, you can use wget instead with the following one-liner:
wget -qO - https://bootstrap.pypa.io/get-pip.py | python2
There you go. Now you should have pip.
You might get the following warning:
WARNING: The scripts pip, pip3 and pip3.9 are installed in '/home/user/.local/bin' which is not on PATH.
Consider adding this directory to PATH or, if you prefer to suppress this warning, use --no-warn-script-location.
If you do, that means you’ll have to add /home/<you>/.local/bin to your $PATH environment variable. You can do this (if you use bash) by adding the following to the bottom of your .bashrc file:
You’ll have to log out / log back in again for this to take effect. Or open a new terminal window if you’re logged into the desktop environment.
Conclusion
So there you go, one of those was guaranteed to work. Well, I can’t say “guaranteed”, because there’s always something, but I can say “probably”. Yeah, we’ll go with that. One of those probably worked. If you can think of any possible solutions I may have missed please let me know!
Hope this helped, and if it didn’t, good luck.
I have just installed the latest Termux on my Android device and Python 3.9 is the default Python installation. I need to run Python 3.8.x due to some package incompatibilities.
My searching tells me there is no way to downgrade Python within Termux — is this correct?
If I install a previous version of Termux, will this in turn install an earlier version of Python or will it just collect the same default version?
Is there another way for me to make this change?
asked Nov 16, 2020 at 6:50
![]()
1
I’ve encountered something similar over the past few days!
Here is a summary of the solution given by @kcubeterm on Reddit, who has very kindly provided a way to install python 3.8X on Termux.
- Remove python 3.9 if you have it installed:
pkg uninstall python
- Make a note of the architecture of your device’s CPU using this command:
uname -m
-
Go to https://github.com/Termux-pod/termux-pod and find the file corresponding to your device’s CPU. According to @kcubeterm, you should try python_3.8.6_.deb first and then the
staticversion if there is any error. -
Download the raw .deb file in termux using web-get.
make sure you add ?raw=true to the end of the url, or else you’ll end up downloading the html file!
wget https://github.com/Termux-pod/termux-pod/blob/main/arm/python/python_3.8.6_<CPU_ARCH.>.deb?raw=true
- Finally, execute the following command in termux:
dpkg -i ./python_3.8.6_<CPU_ARCH.>.deb
Once again, replacing <CPU_ARCH.> with your cpu’s architecture (for me it was arm).
Hope this answer helped you to install Python 3.8! I love termux but find it frustrating that they provide no way to install non-bleeding edge versions of packages!
Thanks again to @kcubeterm who provided this solution.
answered Nov 19, 2020 at 16:18
![]()
Joe BoyleJoe Boyle
1692 silver badges7 bronze badges
1
git clone the termux-packages repo
then cd to the packages/python folder
git log build.sh to find the commit with the version you want
checkout that commit (for the entire repo, to be sure)
then follow the standard instructions at
https://wiki.termux.com/wiki/Building_packages
Otherwise you don’t know what kind of binary you are installing. Build it yourself to be sure. I’d wanna be sure.
answered Jan 11, 2021 at 18:05
![]()
Mike AmyMike Amy
3513 silver badges4 bronze badges
It doesn’t depends upon the Version of termux. It depends upon the repository. And it always update it’s packages . So i think there is no way
answered Nov 16, 2020 at 7:04
![]()
install pypy3 using apt
# apt search python

.
.
.
pypy/stable 7.3.9-1 aarch64
  A fast, compliant alternative implementation of Python
.
.
.

# pypy3 --version
Python 3.8.13 (4b1398fe9d76ad762155d03684c2a153d230b2ef, Apr 25 2022, 09:26:53)
[PyPy 7.3.9 with GCC Clang 14.0.1]
answered Jun 23, 2022 at 10:49
![]()
M.DM.D
691 gold badge2 silver badges12 bronze badges

f22
Codeby Team
-
#2
Ignoring numpy: markers ‘python_version == «3.5»‘
don’t match your environment Ignoring numpy: markers ‘python_version == «3.6»‘
don’t match your environment Ignoring numpy: markers ‘python_version == «3.7»‘
don’t match your environment
А какая версия python и pip установлена?
python -V
pip3 -V
Возможно стоит запускать установку от конкретной версии.
-
#3
А какая версия python и pip установлена?
python -V
pip3 -VВозможно стоит запускать установку от конкретной версии.
-

Screenshot_20200822_125502_com.termux.jpg
66 КБ
· Просмотры: 383
billy_605
-
#4
Короче, выполняеш все эти команды, прям все команды даже первую(установку питона):
1. pkg install python python-dev # установка питона
2. pkg install libjpeg-turbo-dev libpng-dev cmake pkg-config # установка нужных компонентов
3. git clone [URL]https://github.com/opencv/opencv[/URL] && cd opencv # качаеш пакет opencv из гитхаба, после установки пакета, комманда *&& cd opencv* автоматом зайдет в папку папку opencv
4. mkdir build && cd build # создаеш папку и открываеш его(папку)
5. LDFLAGS=" -llog -lpython3" cmake -DCMAKE_BUILD_TYPE=RELEASE -DCMAKE_INSTALL_PREFIX=$PREFIX -DBUILD_opencv_python3=on -DBUILD_opencv_python2=off -DWITH_QT=OFF -DWITH_GTK=OFF .. # ставиш эту комманду
6. make # выполняеш
7. make install # устанавливаеш
-
#5
Короче, выполняеш все эти команды, прям все команды даже первую(установку питона):
1.
pkg install python python-dev# установка питона2.
pkg install libjpeg-turbo-dev libpng-dev cmake pkg-config# установка нужных компонентов3.
git clone [URL]https://github.com/opencv/opencv[/URL] && cd opencv# качаеш пакет opencv из гитхаба, после установки пакета, комманда *&& cd opencv* автоматом зайдет в папку папку opencv4.
mkdir build && cd build# создаеш папку и открываеш его(папку)5.
LDFLAGS=" -llog -lpython3" cmake -DCMAKE_BUILD_TYPE=RELEASE -DCMAKE_INSTALL_PREFIX=$PREFIX -DBUILD_opencv_python3=on -DBUILD_opencv_python2=off -DWITH_QT=OFF -DWITH_GTK=OFF ..# ставиш эту комманду6.
make# выполняеш7.
make install# устанавливаеш
$pkg install python python-dev
Checking availability of current mirror: ok
Reading package lists… Done
Building dependency tree
Reading state information… Done
Package python-dev is not available, but is referred to by another package.
This may mean that the package is missing, has been obsoleted, or
is only available from another source
However the following packages replace it:
python
E: Package ‘python-dev’ has no installation candidate
billy_605
-
#6
$pkg install python python-dev
Checking availability of current mirror: ok
Reading package lists… Done
Building dependency tree
Reading state information… Done
Package python-dev is not available, but is referred to by another package.
This may mean that the package is missing, has been obsoleted, or
is only available from another source
However the following packages replace it:
pythonE: Package ‘python-dev’ has no installation candidate
Попробуй отделнeю установку:
1. pkq install python-dev
Если не будет, работать попробуй выполнить осталние команды.
-
#7
Попробуй отделнeю установку:
1.pkq install python-devЕсли не будет работать попробуй выполнить осталние команды
Тоже самое
billy_605
-
#8
Осталные комманды попробуй выполнить
-
#9
Осталные комманды попробуй выполнить
$ LDFLAGS=» -llog -lpython3″ cmake -DCMAKE_BUILD_TYPE=RELEASE -DCMAKE_INSTALL_PREFIX=$PREFIX -DBUILD_opencv_python3=on -DBUILD_opencv_python2=off -DWITH_QT=OFF -DWITH_GTK=OFF ..
— The CXX compiler identification is Clang 10.0.1
— The C compiler identification is Clang 10.0.1
— Detecting CXX compiler ABI info
— Detecting CXX compiler ABI info — done
— Check for working CXX compiler: /data/data/com.termux/files/usr/bin/c++ — skipped
— Detecting CXX compile features
— Detecting CXX compile features — done
— Detecting C compiler ABI info
— Detecting C compiler ABI info — done
— Check for working C compiler: /data/data/com.termux/files/usr/bin/cc — skipped
— Detecting C compile features
— Detecting C compile features — done
— Detected processor: aarch64
— Found PythonInterp: /data/data/com.termux/files/usr/bin/python (found suitable version «3.8.5», minimum required is «2.7»)
CMake Warning at cmake/OpenCVDetectPython.cmake:81 (message):
CMake’s ‘find_host_package(PythonInterp 2.7)’ found wrong Python version:
PYTHON_EXECUTABLE=/data/data/com.termux/files/usr/bin/python
PYTHON_VERSION_STRING=3.8.5
Consider providing the ‘PYTHON2_EXECUTABLE’ variable via CMake command line
or environment variables
Call Stack (most recent call first):
cmake/OpenCVDetectPython.cmake:271 (find_python)
CMakeLists.txt:599 (include)
— Could NOT find Python2 (missing: Python2_EXECUTABLE Interpreter)
Reason given by package:
Interpreter: Wrong major version for the interpreter «/data/data/com.termux/files/usr/bin/python»
— Found PythonInterp: /data/data/com.termux/files/usr/bin/python3 (found suitable version «3.8.5», minimum required is «3.2»)
— Looking for ccache — not found
— Performing Test HAVE_CXX_FSIGNED_CHAR
— Performing Test HAVE_CXX_FSIGNED_CHAR — Success
— Performing Test HAVE_C_FSIGNED_CHAR
— Performing Test HAVE_C_FSIGNED_CHAR — Success
— Performing Test HAVE_CXX_W
— Performing Test HAVE_CXX_W — Success
— Performing Test HAVE_C_W
— Performing Test HAVE_C_W — Success
— Performing Test HAVE_CXX_WALL
— Performing Test HAVE_CXX_WALL — Success
— Performing Test HAVE_C_WALL
— Performing Test HAVE_C_WALL — Success
— Performing Test HAVE_CXX_WERROR_RETURN_TYPE
— Performing Test HAVE_CXX_WERROR_RETURN_TYPE — Success
— Performing Test HAVE_C_WERROR_RETURN_TYPE
— Performing Test HAVE_C_WERROR_RETURN_TYPE — Success
— Performing Test HAVE_CXX_WERROR_NON_VIRTUAL_DTOR
— Performing Test HAVE_CXX_WERROR_NON_VIRTUAL_DTOR — Success
— Performing Test HAVE_C_WERROR_NON_VIRTUAL_DTOR
— Performing Test HAVE_C_WERROR_NON_VIRTUAL_DTOR — Success
— Performing Test HAVE_CXX_WERROR_ADDRESS
— Performing Test HAVE_CXX_WERROR_ADDRESS — Success
— Performing Test HAVE_C_WERROR_ADDRESS
— Performing Test HAVE_C_WERROR_ADDRESS — Success
— Performing Test HAVE_CXX_WERROR_SEQUENCE_POINT
— Performing Test HAVE_CXX_WERROR_SEQUENCE_POINT — Success
— Performing Test HAVE_C_WERROR_SEQUENCE_POINT
— Performing Test HAVE_C_WERROR_SEQUENCE_POINT — Success
— Performing Test HAVE_CXX_WFORMAT
— Performing Test HAVE_CXX_WFORMAT — Success
— Performing Test HAVE_C_WFORMAT
— Performing Test HAVE_C_WFORMAT — Success
— Performing Test HAVE_CXX_WERROR_FORMAT_SECURITY
— Performing Test HAVE_CXX_WERROR_FORMAT_SECURITY — Success
— Performing Test HAVE_C_WERROR_FORMAT_SECURITY
— Performing Test HAVE_C_WERROR_FORMAT_SECURITY — Success
— Performing Test HAVE_CXX_WMISSING_DECLARATIONS
— Performing Test HAVE_CXX_WMISSING_DECLARATIONS — Success
— Performing Test HAVE_C_WMISSING_DECLARATIONS
— Performing Test HAVE_C_WMISSING_DECLARATIONS — Success
— Performing Test HAVE_CXX_WMISSING_PROTOTYPES
— Performing Test HAVE_CXX_WMISSING_PROTOTYPES — Success
— Performing Test HAVE_C_WMISSING_PROTOTYPES
— Performing Test HAVE_C_WMISSING_PROTOTYPES — Success
— Performing Test HAVE_CXX_WSTRICT_PROTOTYPES
— Performing Test HAVE_CXX_WSTRICT_PROTOTYPES — Success
— Performing Test HAVE_C_WSTRICT_PROTOTYPES
— Performing Test HAVE_C_WSTRICT_PROTOTYPES — Success
— Performing Test HAVE_CXX_WUNDEF
— Performing Test HAVE_CXX_WUNDEF — Success
— Performing Test HAVE_C_WUNDEF
— Performing Test HAVE_C_WUNDEF — Success
— Performing Test HAVE_CXX_WINIT_SELF
— Performing Test HAVE_CXX_WINIT_SELF — Success
— Performing Test HAVE_C_WINIT_SELF
— Performing Test HAVE_C_WINIT_SELF — Success
— Performing Test HAVE_CXX_WPOINTER_ARITH
— Performing Test HAVE_CXX_WPOINTER_ARITH — Success
— Performing Test HAVE_C_WPOINTER_ARITH
— Performing Test HAVE_C_WPOINTER_ARITH — Success
— Performing Test HAVE_CXX_WSHADOW
— Performing Test HAVE_CXX_WSHADOW — Success
— Performing Test HAVE_C_WSHADOW
— Performing Test HAVE_C_WSHADOW — Success
— Performing Test HAVE_CXX_WSIGN_PROMO
— Performing Test HAVE_CXX_WSIGN_PROMO — Success
— Performing Test HAVE_C_WSIGN_PROMO
— Performing Test HAVE_C_WSIGN_PROMO — Success
— Performing Test HAVE_CXX_WUNINITIALIZED
— Performing Test HAVE_CXX_WUNINITIALIZED — Success
— Performing Test HAVE_C_WUNINITIALIZED
— Performing Test HAVE_C_WUNINITIALIZED — Success
— Performing Test HAVE_CXX_WINCONSISTENT_MISSING_OVERRIDE
— Performing Test HAVE_CXX_WINCONSISTENT_MISSING_OVERRIDE — Success
— Performing Test HAVE_C_WINCONSISTENT_MISSING_OVERRIDE
— Performing Test HAVE_C_WINCONSISTENT_MISSING_OVERRIDE — Success
— Performing Test HAVE_CXX_WNO_DELETE_NON_VIRTUAL_DTOR
— Performing Test HAVE_CXX_WNO_DELETE_NON_VIRTUAL_DTOR — Success
— Performing Test HAVE_C_WNO_DELETE_NON_VIRTUAL_DTOR
— Performing Test HAVE_C_WNO_DELETE_NON_VIRTUAL_DTOR — Success
— Performing Test HAVE_CXX_WNO_UNNAMED_TYPE_TEMPLATE_ARGS
— Performing Test HAVE_CXX_WNO_UNNAMED_TYPE_TEMPLATE_ARGS — Success
— Performing Test HAVE_C_WNO_UNNAMED_TYPE_TEMPLATE_ARGS
— Performing Test HAVE_C_WNO_UNNAMED_TYPE_TEMPLATE_ARGS — Success
— Performing Test HAVE_CXX_WNO_COMMENT
— Performing Test HAVE_CXX_WNO_COMMENT — Success
— Performing Test HAVE_C_WNO_COMMENT
— Performing Test HAVE_C_WNO_COMMENT — Success
— Performing Test HAVE_CXX_WNO_DEPRECATED_ENUM_ENUM_CONVERSION
— Performing Test HAVE_CXX_WNO_DEPRECATED_ENUM_ENUM_CONVERSION — Success
— Performing Test HAVE_C_WNO_DEPRECATED_ENUM_ENUM_CONVERSION
— Performing Test HAVE_C_WNO_DEPRECATED_ENUM_ENUM_CONVERSION — Success
— Performing Test HAVE_CXX_WNO_DEPRECATED_ANON_ENUM_ENUM_CONVERSION
— Performing Test HAVE_CXX_WNO_DEPRECATED_ANON_ENUM_ENUM_CONVERSION — Success
— Performing Test HAVE_C_WNO_DEPRECATED_ANON_ENUM_ENUM_CONVERSION
— Performing Test HAVE_C_WNO_DEPRECATED_ANON_ENUM_ENUM_CONVERSION — Success
— Performing Test HAVE_CXX_FDIAGNOSTICS_SHOW_OPTION
— Performing Test HAVE_CXX_FDIAGNOSTICS_SHOW_OPTION — Success
— Performing Test HAVE_C_FDIAGNOSTICS_SHOW_OPTION
— Performing Test HAVE_C_FDIAGNOSTICS_SHOW_OPTION — Success
— Performing Test HAVE_CXX_QUNUSED_ARGUMENTS
— Performing Test HAVE_CXX_QUNUSED_ARGUMENTS — Success
— Performing Test HAVE_C_QUNUSED_ARGUMENTS
— Performing Test HAVE_C_QUNUSED_ARGUMENTS — Success
— Performing Test HAVE_CPU_NEON_SUPPORT (check file: cmake/checks/cpu_neon.cpp)
— Performing Test HAVE_CPU_NEON_SUPPORT — Success
— Performing Test HAVE_CPU_FP16_SUPPORT (check file: cmake/checks/cpu_fp16.cpp)
— Performing Test HAVE_CPU_FP16_SUPPORT — Success
— Performing Test HAVE_CPU_BASELINE_FLAGS
— Performing Test HAVE_CPU_BASELINE_FLAGS — Success
— Performing Test HAVE_CXX_FVISIBILITY_HIDDEN
— Performing Test HAVE_CXX_FVISIBILITY_HIDDEN — Success
— Performing Test HAVE_C_FVISIBILITY_HIDDEN
— Performing Test HAVE_C_FVISIBILITY_HIDDEN — Success
— Performing Test HAVE_CXX_FVISIBILITY_INLINES_HIDDEN
— Performing Test HAVE_CXX_FVISIBILITY_INLINES_HIDDEN — Success
— Performing Test HAVE_C_FVISIBILITY_INLINES_HIDDEN
— Performing Test HAVE_C_FVISIBILITY_INLINES_HIDDEN — Success
— Performing Test HAVE_LINK_AS_NEEDED
— Performing Test HAVE_LINK_AS_NEEDED — Success
— Looking for pthread.h
— Looking for pthread.h — found
— Looking for posix_memalign
— Looking for posix_memalign — found
— Looking for malloc.h
— Looking for malloc.h — found
— Looking for memalign
— Looking for memalign — found
— Check if the system is big endian
— Searching 16 bit integer
— Looking for sys/types.h
— Looking for sys/types.h — found
— Looking for stdint.h
— Looking for stdint.h — found
— Looking for stddef.h
— Looking for stddef.h — found
— Check size of unsigned short
— Check size of unsigned short — done
— Searching 16 bit integer — Using unsigned short
— Check if the system is big endian — little endian
— Found ZLIB: /data/data/com.termux/files/usr/lib/libz.so (found suitable version «1.2.11», minimum required is «1.2.3»)
— Performing Test HAVE_C_WNO_UNUSED_PARAMETER
— Performing Test HAVE_C_WNO_UNUSED_PARAMETER — Success
— Performing Test HAVE_C_WNO_SIGN_COMPARE
— Performing Test HAVE_C_WNO_SIGN_COMPARE — Success
— Performing Test HAVE_C_WNO_SHORTEN_64_TO_32
— Performing Test HAVE_C_WNO_SHORTEN_64_TO_32 — Success
— Performing Test HAVE_C_WNO_IMPLICIT_FALLTHROUGH
— Performing Test HAVE_C_WNO_IMPLICIT_FALLTHROUGH — Success
— libjpeg-turbo: VERSION = 2.0.5, BUILD = opencv-4.4.0-dev-libjpeg-turbo
— Check size of size_t
— Check size of size_t — done
— Check size of unsigned long
— Check size of unsigned long — done
— Performing Test HAVE_BUILTIN_CTZL
— Performing Test HAVE_BUILTIN_CTZL — Success
— Looking for include file locale.h
— Looking for include file locale.h — found
— Looking for include file stdlib.h
— Looking for include file stdlib.h — found
— Looking for include file sys/types.h
— Looking for include file sys/types.h — found
— Looking for assert.h
— Looking for assert.h — found
— Looking for dlfcn.h
— Looking for dlfcn.h — found
— Looking for fcntl.h
— Looking for fcntl.h — found
— Looking for inttypes.h
— Looking for inttypes.h — found
— Looking for io.h
— Looking for io.h — not found
— Looking for limits.h
— Looking for limits.h — found
— Looking for memory.h
— Looking for memory.h — found
— Looking for search.h
— Looking for search.h — found
— Looking for string.h
— Looking for string.h — found
— Looking for strings.h
— Looking for strings.h — found
— Looking for sys/time.h
— Looking for sys/time.h — found
— Looking for unistd.h
— Looking for unistd.h — found
— Performing Test C_HAS_inline
— Performing Test C_HAS_inline — Success
— Check size of signed short
— Check size of signed short — done
— Check size of unsigned short
— Check size of unsigned short — done
— Check size of signed int
— Check size of signed int — done
— Check size of unsigned int
— Check size of unsigned int — done
— Check size of signed long
— Check size of signed long — done
— Check size of signed long long
— Check size of signed long long — done
— Check size of unsigned long long
— Check size of unsigned long long — done
— Check size of unsigned char *
— Check size of unsigned char * — done
— Check size of ptrdiff_t
— Check size of ptrdiff_t — done
— Check size of INT8
— Check size of INT8 — failed
— Check size of INT16
— Check size of INT16 — failed
— Check size of INT32
— Check size of INT32 — failed
— Looking for floor
— Looking for floor — not found
— Looking for pow
— Looking for pow — not found
— Looking for sqrt
— Looking for sqrt — not found
— Looking for isascii
— Looking for isascii — found
— Looking for memset
— Looking for memset — found
— Looking for mmap
— Looking for mmap — found
— Looking for getopt
— Looking for getopt — found
— Looking for memmove
— Looking for memmove — found
— Looking for setmode
— Looking for setmode — not found
— Looking for strcasecmp
— Looking for strcasecmp — found
— Looking for strchr
— Looking for strchr — found
— Looking for strrchr
— Looking for strrchr — found
— Looking for strstr
— Looking for strstr — found
— Looking for strtol
— Looking for strtol — found
— Looking for strtol
— Looking for strtol — found
— Looking for strtoull
— Looking for strtoull — found
— Looking for lfind
— Looking for lfind — found
— Performing Test HAVE_SNPRINTF
— Performing Test HAVE_SNPRINTF — Success
— Check if the system is big endian
— Searching 16 bit integer
— Searching 16 bit integer — Using unsigned short
— Check if the system is big endian — little endian
— Performing Test HAVE_C_WNO_UNUSED_BUT_SET_VARIABLE
— Performing Test HAVE_C_WNO_UNUSED_BUT_SET_VARIABLE — Failed
— Performing Test HAVE_C_WNO_MISSING_PROTOTYPES
— Performing Test HAVE_C_WNO_MISSING_PROTOTYPES — Success
— Performing Test HAVE_C_WNO_MISSING_DECLARATIONS
— Performing Test HAVE_C_WNO_MISSING_DECLARATIONS — Success
— Performing Test HAVE_C_WNO_UNDEF
— Performing Test HAVE_C_WNO_UNDEF — Success
— Performing Test HAVE_C_WNO_UNUSED
— Performing Test HAVE_C_WNO_UNUSED — Success
— Performing Test HAVE_C_WNO_CAST_ALIGN
— Performing Test HAVE_C_WNO_CAST_ALIGN — Success
— Performing Test HAVE_C_WNO_SHADOW
— Performing Test HAVE_C_WNO_SHADOW — Success
— Performing Test HAVE_C_WNO_MAYBE_UNINITIALIZED
— Performing Test HAVE_C_WNO_MAYBE_UNINITIALIZED — Failed
— Performing Test HAVE_C_WNO_POINTER_TO_INT_CAST
— Performing Test HAVE_C_WNO_POINTER_TO_INT_CAST — Success
— Performing Test HAVE_C_WNO_INT_TO_POINTER_CAST
— Performing Test HAVE_C_WNO_INT_TO_POINTER_CAST — Success
— Performing Test HAVE_C_WNO_MISLEADING_INDENTATION
— Performing Test HAVE_C_WNO_MISLEADING_INDENTATION — Success
— Performing Test HAVE_CXX_WNO_MISSING_DECLARATIONS
— Performing Test HAVE_CXX_WNO_MISSING_DECLARATIONS — Success
— Performing Test HAVE_CXX_WNO_UNUSED_PARAMETER
— Performing Test HAVE_CXX_WNO_UNUSED_PARAMETER — Success
— Performing Test HAVE_CXX_WNO_MISSING_PROTOTYPES
— Performing Test HAVE_CXX_WNO_MISSING_PROTOTYPES — Success
— Performing Test HAVE_CXX_WNO_UNDEF
— Performing Test HAVE_CXX_WNO_UNDEF — Success
— Performing Test HAVE_C_STD_C99
— Performing Test HAVE_C_STD_C99 — Success
— Performing Test HAVE_C_WNO_UNUSED_VARIABLE
— Performing Test HAVE_C_WNO_UNUSED_VARIABLE — Success
— Performing Test HAVE_C_WNO_UNUSED_FUNCTION
— Performing Test HAVE_C_WNO_UNUSED_FUNCTION — Success
— Could NOT find OpenJPEG (minimal suitable version: 2.0, recommended version >= 2.3.1)
— Performing Test HAVE_C_WNO_IMPLICIT_FUNCTION_DECLARATION
— Performing Test HAVE_C_WNO_IMPLICIT_FUNCTION_DECLARATION — Success
— Performing Test HAVE_C_WNO_UNINITIALIZED
— Performing Test HAVE_C_WNO_UNINITIALIZED — Success
— Performing Test HAVE_C_WNO_UNUSED_BUT_SET_PARAMETER
— Performing Test HAVE_C_WNO_UNUSED_BUT_SET_PARAMETER — Failed
— Performing Test HAVE_C_WNO_STRICT_OVERFLOW
— Performing Test HAVE_C_WNO_STRICT_OVERFLOW — Success
— Performing Test HAVE_C_WNO_POINTER_COMPARE
— Performing Test HAVE_C_WNO_POINTER_COMPARE — Success
— Performing Test HAVE_C_WNO_ABSOLUTE_VALUE
— Performing Test HAVE_C_WNO_ABSOLUTE_VALUE — Success
— Performing Test HAVE_C_WNO_STRICT_PROTOTYPES
— Performing Test HAVE_C_WNO_STRICT_PROTOTYPES — Success
— math lib ‘libm’ not found; floating point support disabled
— Looking for semaphore.h
— Looking for semaphore.h — found
— Performing Test HAVE_CXX_WNO_SHADOW
— Performing Test HAVE_CXX_WNO_SHADOW — Success
— Performing Test HAVE_CXX_WNO_UNUSED
— Performing Test HAVE_CXX_WNO_UNUSED — Success
— Performing Test HAVE_CXX_WNO_SIGN_COMPARE
— Performing Test HAVE_CXX_WNO_SIGN_COMPARE — Success
— Performing Test HAVE_CXX_WNO_UNINITIALIZED
— Performing Test HAVE_CXX_WNO_UNINITIALIZED — Success
— Performing Test HAVE_CXX_WNO_SWITCH
— Performing Test HAVE_CXX_WNO_SWITCH — Success
— Performing Test HAVE_CXX_WNO_PARENTHESES
— Performing Test HAVE_CXX_WNO_PARENTHESES — Success
— Performing Test HAVE_CXX_WNO_ARRAY_BOUNDS
— Performing Test HAVE_CXX_WNO_ARRAY_BOUNDS — Success
— Performing Test HAVE_CXX_WNO_EXTRA
— Performing Test HAVE_CXX_WNO_EXTRA — Success
— Performing Test HAVE_CXX_WNO_DEPRECATED_DECLARATIONS
— Performing Test HAVE_CXX_WNO_DEPRECATED_DECLARATIONS — Success
— Performing Test HAVE_CXX_WNO_MISLEADING_INDENTATION
— Performing Test HAVE_CXX_WNO_MISLEADING_INDENTATION — Success
— Performing Test HAVE_CXX_WNO_DEPRECATED
— Performing Test HAVE_CXX_WNO_DEPRECATED — Success
— Performing Test HAVE_CXX_WNO_SUGGEST_OVERRIDE
— Performing Test HAVE_CXX_WNO_SUGGEST_OVERRIDE — Failed
— Performing Test HAVE_CXX_WNO_INCONSISTENT_MISSING_OVERRIDE
— Performing Test HAVE_CXX_WNO_INCONSISTENT_MISSING_OVERRIDE — Success
— Performing Test HAVE_CXX_WNO_IMPLICIT_FALLTHROUGH
— Performing Test HAVE_CXX_WNO_IMPLICIT_FALLTHROUGH — Success
— Performing Test HAVE_CXX_WNO_TAUTOLOGICAL_COMPARE
— Performing Test HAVE_CXX_WNO_TAUTOLOGICAL_COMPARE — Success
— Performing Test HAVE_CXX_WNO_REORDER
— Performing Test HAVE_CXX_WNO_REORDER — Success
— Performing Test HAVE_CXX_WNO_UNUSED_RESULT
— Performing Test HAVE_CXX_WNO_UNUSED_RESULT — Success
— Performing Test HAVE_CXX_WNO_UNUSED_LOCAL_TYPEDEFS
— Performing Test HAVE_CXX_WNO_UNUSED_LOCAL_TYPEDEFS — Success
— Performing Test HAVE_CXX_WNO_SIGN_PROMO
— Performing Test HAVE_CXX_WNO_SIGN_PROMO — Success
— Performing Test HAVE_CXX_WNO_TAUTOLOGICAL_UNDEFINED_COMPARE
— Performing Test HAVE_CXX_WNO_TAUTOLOGICAL_UNDEFINED_COMPARE — Success
— Performing Test HAVE_CXX_WNO_IGNORED_QUALIFIERS
— Performing Test HAVE_CXX_WNO_IGNORED_QUALIFIERS — Success
— Performing Test HAVE_CXX_WNO_UNUSED_FUNCTION
— Performing Test HAVE_CXX_WNO_UNUSED_FUNCTION — Success
— Performing Test HAVE_CXX_WNO_UNUSED_CONST_VARIABLE
— Performing Test HAVE_CXX_WNO_UNUSED_CONST_VARIABLE — Success
— Performing Test HAVE_CXX_WNO_SHORTEN_64_TO_32
— Performing Test HAVE_CXX_WNO_SHORTEN_64_TO_32 — Success
— Performing Test HAVE_CXX_WNO_INVALID_OFFSETOF
— Performing Test HAVE_CXX_WNO_INVALID_OFFSETOF — Success
— Performing Test HAVE_CXX_WNO_ENUM_COMPARE_SWITCH
— Performing Test HAVE_CXX_WNO_ENUM_COMPARE_SWITCH — Success
CMake Error at cmake/android/OpenCVDetectAndroidSDK.cmake:49 (message):
Android SDK: specify path to Android SDK via ANDROID_SDK_ROOT /
ANDROID_HOME / ANDROID_SDK variables
Call Stack (most recent call first):
cmake/android/OpenCVDetectAndroidSDK.cmake:172 (ocv_detect_android_sdk)
CMakeLists.txt:702 (include)
— Configuring incomplete, errors occurred!
See also «/data/data/com.termux/files/home/opencv/build/CMakeFiles/CMakeOutput.log».
See also «/data/data/com.termux/files/home/opencv/build/CMakeFiles/CMakeError.log».
$ make
make: *** No targets specified and no makefile found. Stop.
Я устанавливаю python на termux, и эта ошибка показывает:
$ pkg install python
Checking availability of current mirror: ok
Reading package lists... Done
Building dependency tree... Done
E: Unable to locate package python
7 ответов
Я думаю, что вы не обновили репо, похоже, вы только что установили termux. В любом случае, выполнить
apt update
А затем установите любой пакет.
14
wjandrea
11 Дек 2020 в 22:46
Termux вытащил все обновления через google playstore, загрузил их с f-droid, затем поменял зеркало, все работает (иногда)
termux-change-repo
Или измените его вручную, отредактировав
sources.list
Файл в каталоге
$ПРЕФИКС/и т.д./подходящий
Прочтите мою запись в блоге, чтобы найти дополнительную ссылку
5
Th3cr00k3dm4n
24 Июн 2021 в 07:39
Убедитесь, что у вас есть подключение к Интернету, затем разрешите доступ к вашему хранилищу;
Запустите termux-setup-storage, это должно запросить у вас разрешение, чтобы разрешить termux использовать хранилище вашего устройства.
Затем, чтобы убедиться, что хранилище доступно, запустите ls ~/storage/shared, чтобы получить список каталогов, содержащихся в общем хранилище.
Если это не сработает, попробуйте переключить репозитории, как предлагают некоторые другие ответы, поскольку узел, на котором вы находитесь, может быть недоступен.
1
ruzor
11 Июл 2021 в 04:34
Попробуйте обновить Termux через pkg upgrade, тогда он найдет пакеты в pkg
1
Berke Şentürk
9 Окт 2021 в 19:24
Я изменил свой репозиторий termux на A1batross.
0
Silver
15 Июл 2021 в 19:21
Просто дайте разрешение на хранение и перезапустите приложение, у меня это сработало.
-1
Satwik
9 Мар 2021 в 21:08
В моем случае это произошло потому, что я оставил пробел после строки, например. pkg install python и пробел приведут к ошибке, поэтому не ставьте пробел.
-1
cigien
24 Дек 2021 в 20:10