
Кто не встречал ошибок в процессе обновления Ubuntu? Ошибки обновления в Ubuntu и иных дистрибутивах Linux встречаются часто и не вызывают удивления. В статье описан ряд часто встречающихся ошибок и способы их решения.
Данная статья является частью серии, посвященной новичкам в Ubuntu, и она призвана помочь лучше понять работу с дистрибутивом.
В данном туториале мы рассмотрим часто встречающиеся ошибки, которые можно встретить при обновлении Ubuntu. Они зачастую происходят тогда, когда пытаешься добавить софт или репозитории самостоятельно.
Если во время обновления системы появляются ошибки, паниковать не стоит. Ошибки случаются часто и решения есть. Вы научитесь как решить часто встречающиеся ошибки.
Ошибка 0: Failed to download repository information
Многие пользователи Ubuntu обновляют систему через графическую программное средство обновления. Вам приходит оповещения, что стали доступными обновления для вашей системы и теперь можно нажать на кнопку для начала скачивания и установки.
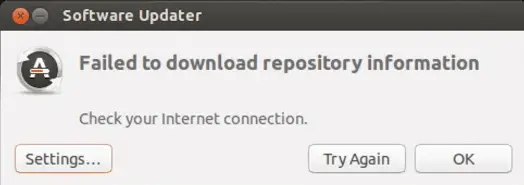
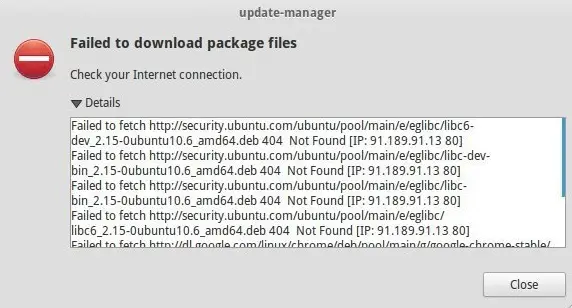
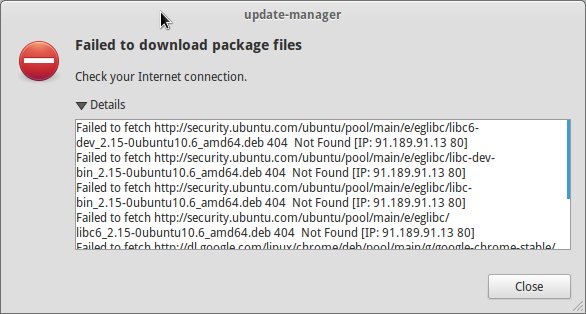
Обычно так и происходит, но иногда можно увидеть подобную ошибку:
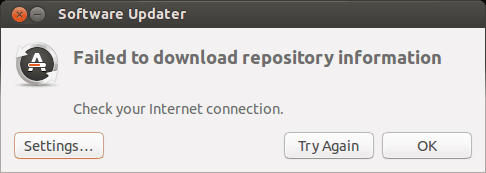
Скорее всего ошибка покажется странной, так как интернет работает, но вас все равно просят его проверить.
Заметили, что я назвал ее “Ошибка 0”? Это потому что это по сути не ошибка. То есть, скорее всего, она не связана с подключением к интернету. Тем не менее помимо этого путающего сообщения больше информации нет.
Если вы видите данное сообщение, а подключение к интернету в порядке, то значит пришло время надевать шляпу детектива и пошевелить мозгами.
Нам придется использовать командную строку. Для того чтобы ее быстро открыть можете воспользоваться сочетанием клавиш ctrl+alt+T. Исполните в ней данную команду:
sudo apt update
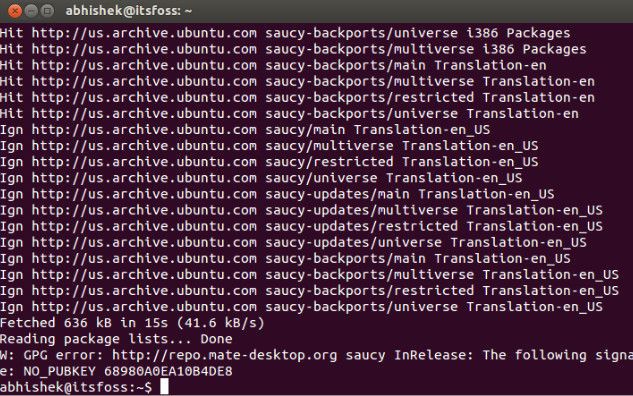
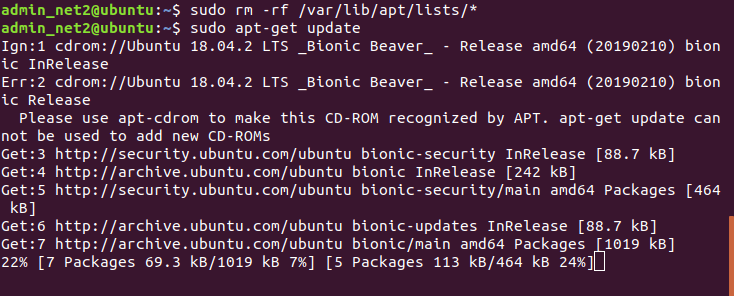
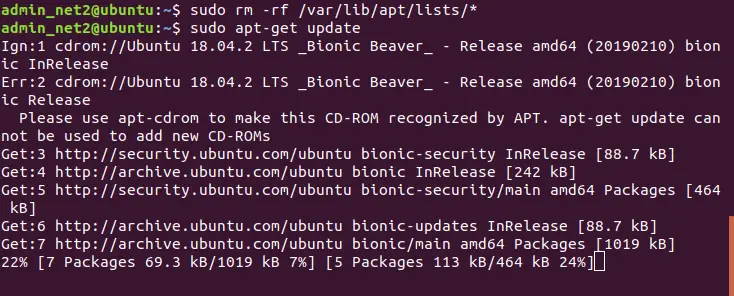
Дождитесь завершения процесса. Рассмотрите последние 3-4 строки вывода. Они покажут действительные причины ошибки sudo apt-get update. Вот пример:
Дальше туториал будет посвящен способам решения ошибок, указанных в нескольких последних строчках вывода командной строки.
Ошибка 1: Problem With MergeList
Когда вы запустите обновление в терминале, то можете увидеть ошибку “Problem With MergeList”:
E:Encountered a section with no Package: header,
E:Problem with MergeList /var/lib/apt/lists/archive.ubuntu.com_ubuntu_dists_precise_universe_binary-i386_Packages,
E:The package lists or status file could not be parsed or opened.’
По какой-то причине файл в директории /var/lib/apt/lists сломался. Вы можете удалить все файлы в указанной директории и запустить обновление снова. Исполните указанные команды одна за другое:
sudo rm -r /var/lib/apt/lists/*
sudo apt-get clean && sudo apt-get update
Проблемы должны исчезнуть
Ошибка 2: Hash Sum mismatch
Вы можете встретиться с ошибкой “Hash Sum mismatch”. Ее решение аналогично тому, что мы написали выше.
W:Failed to fetch bzip2:/var/lib/apt/lists/partial/in.archive.ubuntu.com_ubuntu_dists_oneiric_restricted_binary-i386_Packages Hash Sum mismatch,
W:Failed to fetch bzip2:/var/lib/apt/lists/partial/in.archive.ubuntu.com_ubuntu_dists_oneiric_multiverse_binary-i386_Packages Hash Sum mismatch,
E:Some index files failed to download. They have been ignored, or old ones used instead
Скорее всего ошибка происходит из-за несовпадения на серверах кэша метаданных. Для исправления ситуации используйте данные команды:
sudo rm -rf /var/lib/apt/lists/*
sudo apt update
Ошибка 3: Failed to fetch with error 404 not found
Если вы попытаетесь добавить репозиторий, который недоступен в вашей текущей версии Ubuntu, то увидите ошибку 404 not found:
W: Failed to fetch http://ppa.launchpad.net/venerix/pkg/ubuntu/dists/raring/main/binary-i386/Packages  404  Not Found
E: Some index files failed to download. They have been ignored, or old ones used instead.
Вы добавили PPA в надежде установить приложение, но оно недоступно для вашей версии Ubuntu, и появилась ошибка. Вот почему следует заранее проверять доступно ли PPA для вашей версии Ubuntu или нет. Как удостовериться, что для вашей версии есть PPA, можно посмотреть здесь.
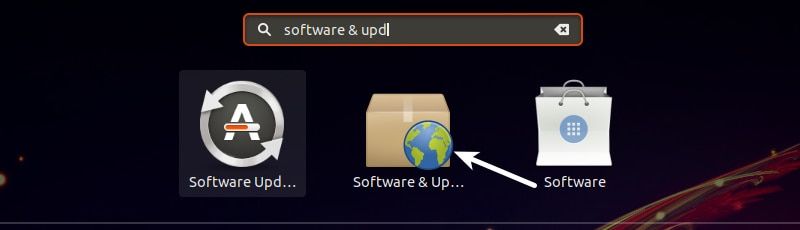
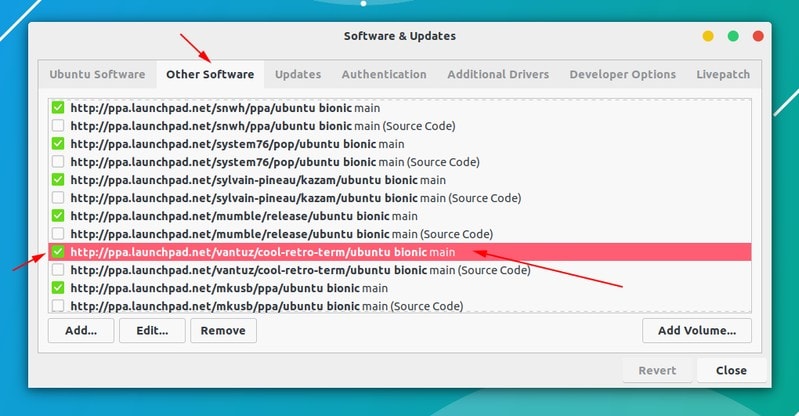
Так или иначе решением данной проблемы является удаление проблемной PPA из списка репозиториев. Название PPA вы найдете в сообщении об ошибке. Зайдите в средство Software & Updates:
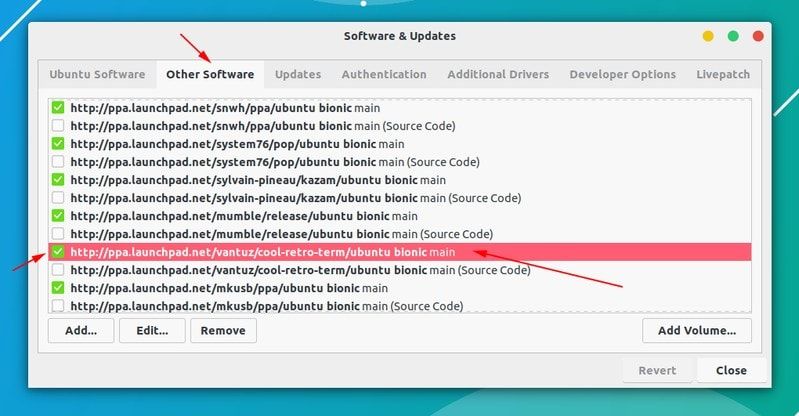
Здесь пройдите во вкладку Other Software и поищите PPA. Уберите галочку, чтобы PPA удалилась из системы.
Ваш список программ после этого обновится. Теперь, если вы снова запустите обновление, ошибка исчезнет.
Ошибка 4: Failed to download package files
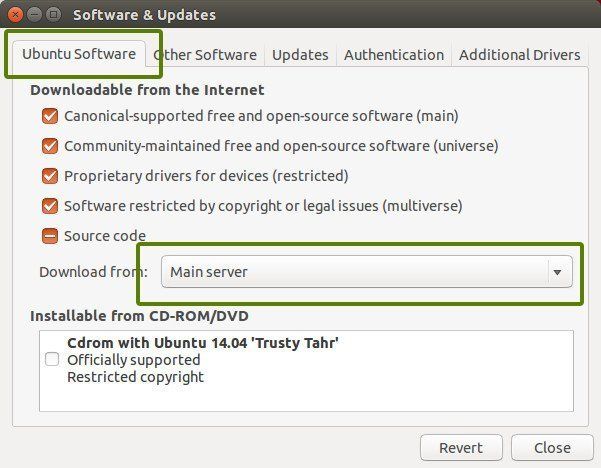
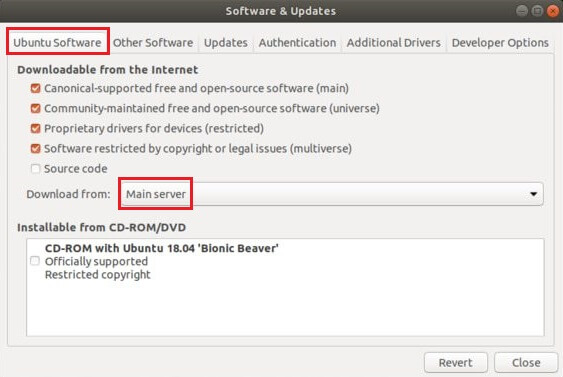
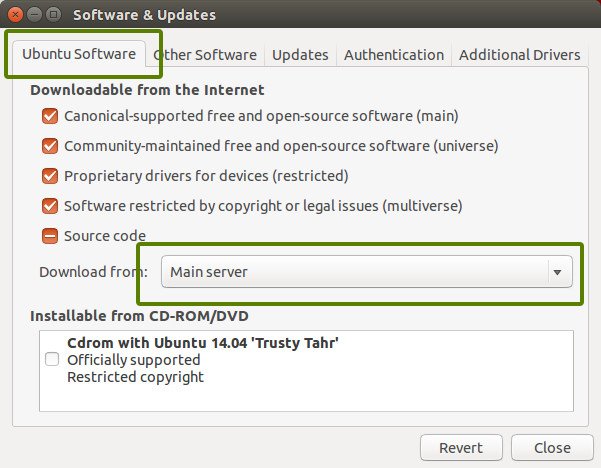
В данной ситуации доступна новая версия программы, но эта версия не распространена на все зеркала. Если вы не используете зеркало, то решить эту проблему просто — сделайте источником программы основной сервер. Пройдите в Software & Updates там измените сменить сервер с которого происходит скачивание на main (основной):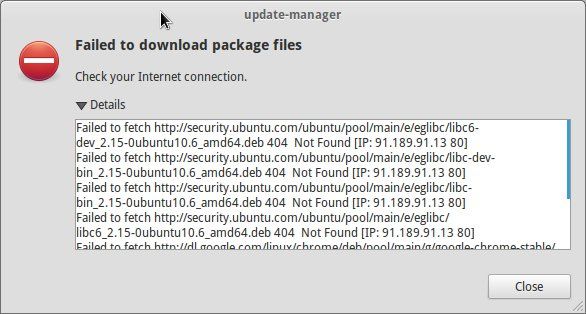
Ошибка 5: GPG error: The following signatures couldn’t be verified
Добавление PPA может также привести к оповещению “GPG error: The following signatures couldn’t be verified” во время обновления:
W: GPG error: http://repo.mate-desktop.org saucy InRelease: The following signatures couldn’t be verified because the public key is not available: NO_PUBKEY 68980A0EA10B4DE8
Все что надо в данном случае сделать, так это добавить публичный код в систему. Возьмите ключ из сообщения. В сообщении выше это 68980A0EA10B4DE8.
Данный ключ можно использовать так:
sudo apt-key adv --keyserver keyserver.ubuntu.com --recv-keys 68980A0EA10B4DE8
Как только ключ будет добавлен, запустите обновление и все должны быть в порядке.
Ошибка 6: BADSIG error
Еще одна знаковая ошибка при обновлении Ubuntu — это “BADSIG error”, которая выглядит примерно так:
W: A error occurred during the signature verification. The repository is not updated and the previous index files will be used. GPG error: http://extras.ubuntu.com precise Release: The following signatures were invalid: BADSIG 16126D3A3E5C1192 Ubuntu Extras Archive Automatic Signing Key
W: GPG error: http://ppa.launchpad.net precise Release:
The following signatures were invalid: BADSIG 4C1CBC1B69B0E2F4 Launchpad PPA for Jonathan French W: Failed to fetch http://extras.ubuntu.com/ubuntu/dists/precise/Release
Все репозитории подписаны GPG, и по какой-то причине система считает их неверными. Необходимо обновить ключи подписей. Проще всего это сделать путем повторной генерации списка apt get (с ключами подписей) и он должен иметь верный ключ.
Используйте следующие команды одну за другой:
cd /var/lib/apt
sudo mv lists oldlist
sudo mkdir -p lists/partial
sudo apt-get clean
sudo apt-get update
Ошибка 7: Partial upgrade error
Обновление через терминал может привести к такому:

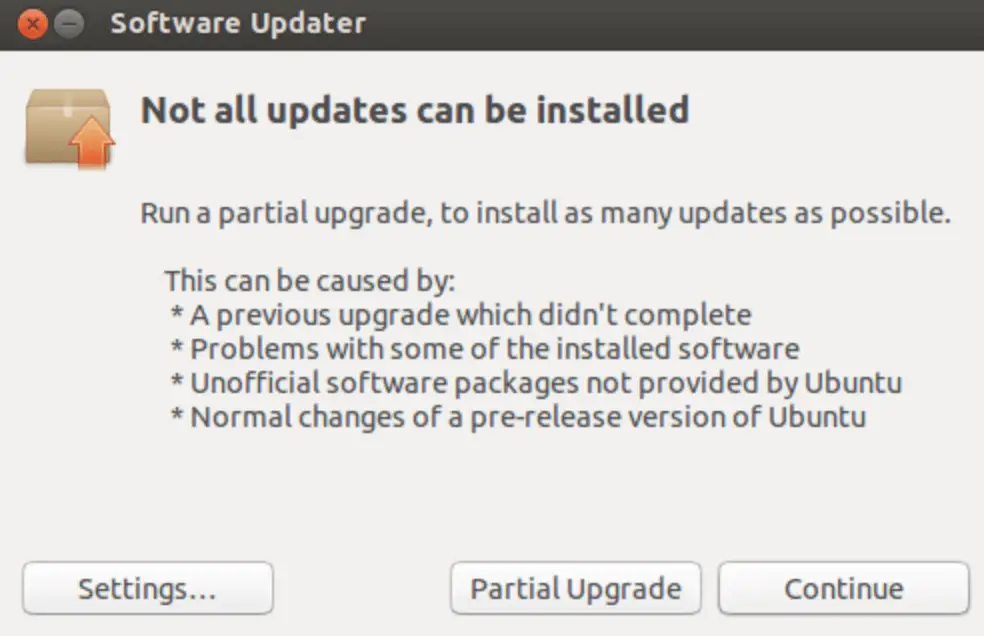
Not all updates can be installed
Run a partial upgrade, to install as many updates as possible
Для исправления ошибки исполните в терминале данную команду:
sudo apt-get install -f
Ошибка 8: Could not get lock /var/cache/apt/archives/lock
Данная ошибка происходит, когда еще одна программа использует APT. Допустим вы устанавливаете что-то через Ubuntu Software Center и в одновременно пытается запустить apt в терминале.
E: Could not get lock /var/cache/apt/archives/lock – open (11: Resource temporarily unavailable)
E: Unable to lock directory /var/cache/apt/archives/
Проверьте не использует ли apt другая программа. Это может быть команда в терминале, Software Center, Software Updater, Software & Updates или иной другой соф, который занимается установкой и удалением приложений.
Если можете такие программы закрыть, закрывайте. Если что-то в процессе, то дождитесь завершения.
Если ничего найти не можете, используйте данную команду для того, чтобы прекратить все подобные процессы:
sudo killall apt apt-get
Это хитрая проблема, так что придется попотеть. Если это не поможет, то рекомендуем эту статью.
Встречали ли вы другие ошибки при обновлении?
Так завершается обзор часто встречающихся ошибок при обновлении Ubuntu. Надеюсь данная статья поможет вам с ними справится.
Вы не встречали других ошибок при обновлении Ubuntu недавно, о которых здесь не говорится? Расскажите в комментариях.
In this article, you will learn how to fix some common update errors that occur frequently when you try to update your Ubuntu version.
Ubuntu is a popular and reliable operating system, but occasionally updates can fail or produce errors. These errors can range from minor issues that can be easily resolved, to more serious problems that may require more extensive troubleshooting. In this tutorial, we will discuss some common methods for fixing Ubuntu update errors, including an introduction to some of the tools and techniques that you can use to troubleshoot and resolve update issues.
Before diving into the specific steps for fixing update errors, it is important to understand a few key concepts and tools that will be useful in troubleshooting and resolving update issues on Ubuntu. These include:
The “apt” package manager: Ubuntu uses the “apt” package manager to install, update, and manage packages on the system. Apt is a powerful and flexible tool, but can also be a source of update errors if there are issues with the package repository or with the packages themselves.
The “apt-get” command: The “apt-get” command is a command-line tool for interacting with the apt package manager. You can use apt-get to install, update, and remove packages, as well as to troubleshoot and resolve update issues.
The “apt-cache” command: The “apt-cache” command is a command-line tool that allows you to view information about packages in the package repository, such as their dependencies, files, and descriptions. You can use apt-cache to investigate issues with specific packages and their dependencies.
The “apt-config” command: The “apt-config” command is a command-line tool that allows you to view and modify the configuration options for the apt package manager. You can use apt-config to investigate issues with the package repository or with the configuration of apt itself.
With these concepts and tools in mind, we can now move on to discussing some common methods for fixing update errors on Ubuntu.
Error with “Hash sum Mismatch” :
When checking for updates, you might end up getting a “Failed To Download Repository Information” error.

This problem affects particularly rapidly changing repositories, such as the development release.
In order to fix this issue, you would just need to remove all the content of the directory /var/lib/apt/lists. Run the following command in the terminal :
sudo rm -rf /var/lib/apt/lists/*
then run:
sudo apt-get update
Read: What you need to do to secure Ubuntu
Problem with MergeList error :
It is one of the most frequently occurring errors during an Ubuntu update (sudo apt-get update not working|sudo apt update not working for instance ). It can happen when using both the sudo apt-get update in terminal and Ubuntu Update Manager. The error text might look similar to the following:
E:Encountered a section with no Package: header,
E:Problem with MergeList /var/lib/apt/lists/archive.ubuntu.com_ubuntu_dists_precise_universe_binary-i386_Packages,
E:The package lists or status file could not be parsed or opened.
Issue the following commands to fix the problem:
sudo rm -r /var/lib/apt/lists/*

sudo apt-get clean && sudo apt-get update

“Failed to Download Repository Information” Error :
This is a rather generic error that can pop up for any kind of error during an Ubuntu update. You might have added a PPA which is not responding or is no longer available. It might look like the following :
E:Unable to parse package file /var/lib/apt/lists/partial/archive.ubuntu.com_ubuntu_dists_precise_multiverse_i18n_Index (1)
If this a PPA problem, you would just need to identify the PPA that is failing and remove it from sources file.
Read: How to speed up Linux
To fix this, just issue the commands below like you did above:
sudo rm -rf /var/lib/apt/lists/*
then run:
sudo apt-get update
Error “Failed to download package files error”
This can be solved easily by modifying the software sources to Main server.
Read: How to install and uninstall applications in Ubuntu ? A Beginner’s guide
It’s simple: just open : Software & Updates, go to download from and change download server to main server .
This change will make future downloads slightly slower, due to the fact the main server is busier than a local server. This should provide more stability and a longer up-time.
Could not get lock /var/cache/apt/archives/lock
This error occurs when APT is being used by another program. In case an installation from Ubuntu Software Center is ongoing and at the same time you are running apt in the terminal, this error can pop up and might look similar to the output below:
E: Could not get lock /var/cache/apt/archives/lock – open (11: Resource temporarily unavailable)
E: Unable to lock directory /var/cache/apt/archives/
Since you can close the software update once it completed so that the lock gets released. If the problem persists however, issue the following commands:
sudo rm /var/lib/apt/lists/lock

Read: How to fix ‘E: Could not get lock /var/lib/dpkg/lock’ Error in Ubuntu
If the command above did not solve this problem, try the command:
sudo killall apt-get

Partial upgrade error
When installing updates in the terminal, you might encounter this upgrade error :
You may want to execute the command below to try to fix this error:
sudo apt-get install -f
Error while loading shared libraries
This is rather an installation error and not an update error. In case you are trying to install a program directly from the source code, this error might pop up:
Read: How to fix high memory usage in Linux
error while loading shared libraries:
cannot open shared object file: No such file or directory
To fix this issue, try to issue the following command:
sudo /sbin/ldconfig -v

GPG error: The following signatures couldn’t be verified
This isn’t much of an error but rather a small configuration issue. It used to occur quite frequently with IGD( Intel Graphics Drivers ) when trying to add the PPA. The error might look similar to the output below :
W: GPG error: http://repo.mate-desktop.org saucy InRelease: The following signatures couldn’t be verified because the public key is not available: NO_PUBKEY 68980A0EA10B4DE8
The solution would be is to look up the public key that was not available from the remote server. Copy the key from the message and run the following command:
sudo apt-key adv –keyserver keyserver.ubuntu.com –recv-keys 68980A0EA10B4DE8
Once the key has been retrieved and added, issue an update again and you should be good to go.
Read: How to use the APT command on Ubuntu/Debian Linux systems
BADSIG error
The BADSIG error might resemble the output below :
W: GPG error: http://download.virtualbox.org lucid Release: The following signatures were invalid: BADSIG 54422A4B98AB5139 Oracle Corporation (VirtualBox archive signing key)
To fix this error, run the following commands in the terminal:
sudo apt-get clean
cd /var/lib/apt
sudo mv lists oldlist
sudo mkdir -p lists/partial
sudo apt-get clean
sudo apt-get update
If the issue occurs again however, open Nautilus as root and navigate to var/lib/apt then delete the “lists.old” directory. Afterwards, open the “lists” folder and remove the “partial” directory. Finally, run the above commands again.
If this does not work, copy the character shown in bold in the error message above and then issue the command below like you did in the previous section :
sudo apt-key adv –recv-keys –keyserver keyserver.ubuntu.com 54422A4B98AB5139
Another simpler way to fix the BADSIG GPG errors is via Y PPA manager.
First you would need to install it via the following commands :
sudo add-apt-repository ppa:webupd8team/y-ppa-manager
sudo apt-get update
sudo apt-get install y-ppa-manager
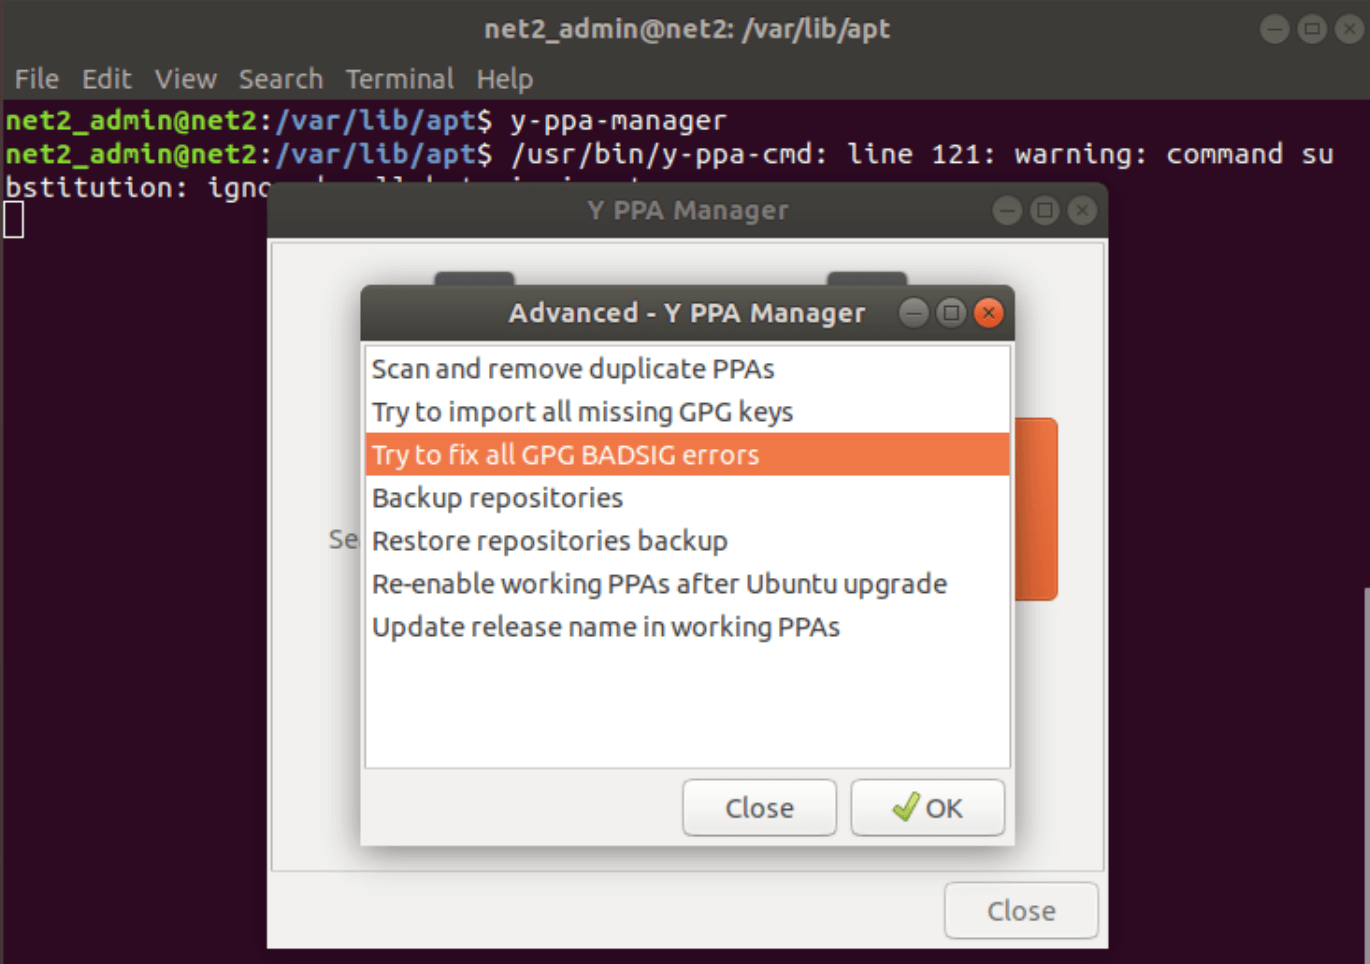
Then open it up by invoking :
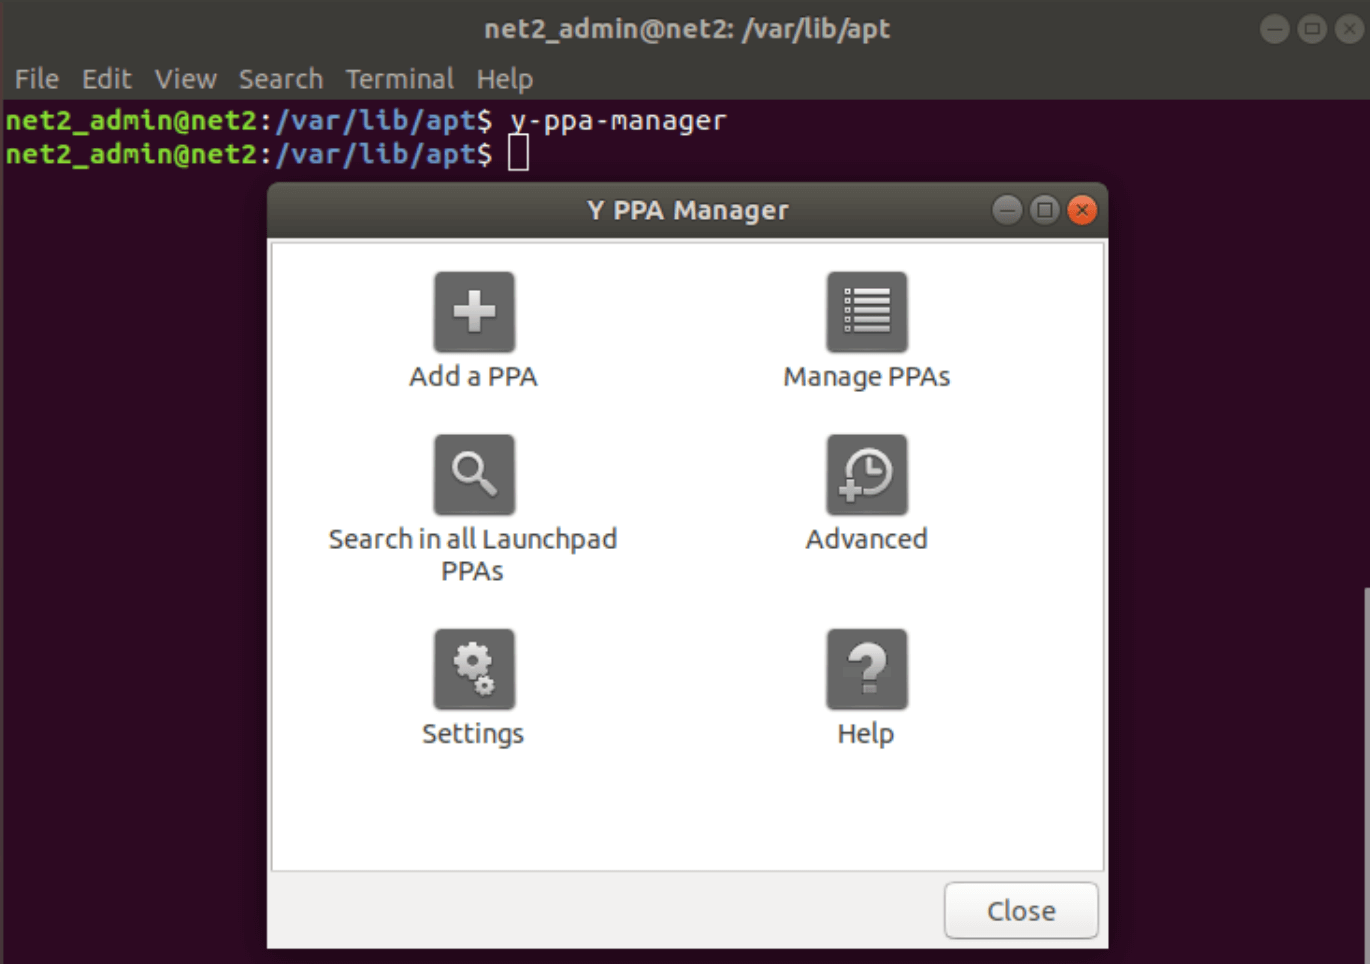
And click on Advanced and then select Fix all GPG Badsig errors:
If you like the content, we would appreciate your support by buying us a coffee. Thank you so much for your visit and support.
I am experiencing the following error when running apt update which is causing me to be unable to update the Ubuntu server.
~$ sudo apt update
Ign:1 http://security.ubuntu.com/ubuntu impish-security InRelease
Err:2 http://security.ubuntu.com/ubuntu impish-security Release
  404  Not Found [IP: 91.189.91.39 80]
Hit:3 http://ppa.launchpad.net/oibaf/graphics-drivers/ubuntu impish InRelease
Ign:4 http://nova.clouds.archive.ubuntu.com/ubuntu impish InRelease
Ign:5 http://nova.clouds.archive.ubuntu.com/ubuntu impish-updates InRelease
Ign:6 http://nova.clouds.archive.ubuntu.com/ubuntu impish-backports InRelease
Err:7 http://nova.clouds.archive.ubuntu.com/ubuntu impish Release
  404  Not Found [IP: 185.125.190.41 80]
Err:8 http://nova.clouds.archive.ubuntu.com/ubuntu impish-updates Release
  404  Not Found [IP: 185.125.190.41 80]
Err:9 http://nova.clouds.archive.ubuntu.com/ubuntu impish-backports Release
  404  Not Found [IP: 185.125.190.41 80]
Get:12 https://download.docker.com/linux/ubuntu impish InRelease [48.9 kB]
Get:10 https://packagecloud.io/netdata/netdata-edge/ubuntu impish InRelease [24.8 kB]
Hit:11 https://packagecloud.io/netdata/netdata-repoconfig/ubuntu impish InRelease
Get:13 https://packagecloud.io/netdata/netdata-edge/ubuntu impish/main amd64 Packages [13.3 kB]
Reading package lists... Done
E: The repository 'http://security.ubuntu.com/ubuntu impish-security Release' no longer has a Release file.
N: Updating from such a repository can't be done securely, and is therefore disabled by default.
N: See apt-secure(8) manpage for repository creation and user configuration details.
E: The repository 'http://nova.clouds.archive.ubuntu.com/ubuntu impish Release' no longer has a Release file.
N: Updating from such a repository can't be done securely, and is therefore disabled by default.
N: See apt-secure(8) manpage for repository creation and user configuration details.
E: The repository 'http://nova.clouds.archive.ubuntu.com/ubuntu impish-updates Release' no longer has a Release file.
N: Updating from such a repository can't be done securely, and is therefore disabled by default.
N: See apt-secure(8) manpage for repository creation and user configuration details.
E: The repository 'http://nova.clouds.archive.ubuntu.com/ubuntu impish-backports Release' no longer has a Release file.
N: Updating from such a repository can't be done securely, and is therefore disabled by default.
N: See apt-secure(8) manpage for repository creation and user configuration details.
As you can see ping resolves for the hostname:
~$ ping security.ubuntu.com
PING security.ubuntu.com (185.125.190.39) 56(84) bytes of data.
64 bytes from aerodent.canonical.com (185.125.190.39): icmp_seq=1 ttl=51 time=75.4 ms
64 bytes from aerodent.canonical.com (185.125.190.39): icmp_seq=2 ttl=51 time=73.9 ms
64 bytes from aerodent.canonical.com (185.125.190.39): icmp_seq=3 ttl=51 time=73.9 ms
64 bytes from aerodent.canonical.com (185.125.190.39): icmp_seq=4 ttl=51 time=74.5 ms
64 bytes from aerodent.canonical.com (185.125.190.39): icmp_seq=5 ttl=51 time=74.4 ms
To be clear, I have auto-update turned on on the Ubuntu server and this happened recently (past week or 2). Please help!
asked Jul 27, 2022 at 4:26
![]()
Blake DrummBlake Drumm
1571 gold badge1 silver badge8 bronze badges
0
Impish went EoL on the 14th of July. As such, its repositories can no longer be found on the mirrors, so if you want to continue using this version, you need to use old-releases.ubuntu.com as your mirror.
Be aware however, that there will be no more upgrades for Impish, so you might want to switch to a supported version. The easiest way to upgrade is to run this command: do-release-upgrade
![]()
Blake Drumm
1571 gold badge1 silver badge8 bronze badges
answered Jul 27, 2022 at 6:49
![]()
LacekLacek
7,17323 silver badges28 bronze badges
4
I tried this (on a RPI3, Ubuntu 21.10), modify /etc/apt/sources.list
deb http://ports.ubuntu.com/ubuntu-ports impish main restricted
to
deb http://old-releases.ubuntu.com/ubuntu impish-security main restricted
Do the same with all entries (make a copy first)
Then
sudo apt update
sudo apt upgrade
In my case the upgrade was successful.
I then tried
sudo do-release-upgrade
and this failed:
Checking for a new Ubuntu release
Your Ubuntu release is not supported anymore.
For upgrade information, please visit:
http://www.ubuntu.com/releaseendoflife

You have not rebooted after updating a package which requires a reboot. Please reboot before upgrading.
So one reboot later
sudo do-release-upgrade
= Welcome to Ubuntu 22.04 ‘Jammy Jellyfish’ =
The Ubuntu team is proud to announce Ubuntu 22.04 ‘Jammy Jellyfish’.
To see what’s new in this release, visit:
https://wiki.ubuntu.com/JammyJellyfish/ReleaseNotes
And I continued with the dist upgrade

Hope this helps

Andrew
answered Aug 1, 2022 at 12:16
![]()
I want to clear what Andrew Holt wrote —
ubuntu 21 (called impish) got to its end of life, thus its repositories are down.
you can use the archive repositories by replacing all
ports.ubuntu.com/ubuntu-ports
with
old-releases.ubuntu.com/ubuntu
at the file
/etc/apt/sources.list
then, without reboot or something, just run
sudo apt update
sudo apt upgrade
note that those steps will not upgrade the release…
answered Aug 1, 2022 at 18:55
![]()
1
The above worked for me, with the following modification.
In /etc/apt/sources.list I changed
deb http://ports.ubuntu.com/ubuntu-ports/ impish main restricted
to
deb http://old-releases.ubuntu.com/ubuntu/ impish main restricted
i.e. ubuntu-ports is changed to ubuntu for all entries.
Only after getting this right was I able to do sudo apt update, sudo apt upgrade and finally an upgrade to the latest release.
answered Aug 28, 2022 at 18:00
![]()
DonnaDonna
1211 bronze badge
1
Running the following command allowed me to upgrade the Ubuntu release to the updated and supported version:
do-release-upgrade
The apt update command is now working as expected!
answered Jul 27, 2022 at 15:26
![]()
Blake DrummBlake Drumm
1571 gold badge1 silver badge8 bronze badges
I got the same error on Ubuntu 22.04
febrin@febrin:~$ lsb_release -a
No LSB modules are available.
Distributor ID: Ubuntu
Description:    Ubuntu 22.04.1 LTS
Release:    22.04
Codename:   jammy
Err:7 http://old.releases.ubuntu.com/ubuntu impish-security Release
  404  Not Found [IP: 185.125.190.37 80]
Reading package lists... Done
E: The repository 'http://security.ubuntu.com/ubuntu impish-security Release' does not have a Release file.
But the file I had to change was slightly different
febrin@febrin:/etc/apt$ ag "impish-security"
sources.list.d/impish-security.list
1:deb http://security.ubuntu.com/ubuntu impish-security main
The fix was changing that line in /etc/apt/sources.list.d/impish-security.list file
deb http://security.ubuntu.com/ubuntu impish-security main
to
deb http://old-releases.ubuntu.com/ubuntu impish-security main
answered Sep 16, 2022 at 8:50
![]()
2
The repos for your OS version have removed from most mirrors (because the OS version has reached end of life). Since OS updates are hosted by goodwill of mirrors they try to keep only newer versions hosted.
Below commands will edit your now out of date repo urls to the old-releases mirror — this worked from Impish -> Jammy and potentially for future versions as well. [Credit]
sudo sed -i -r 's/([a-z]{2}.)?archive.ubuntu.com/old-releases.ubuntu.com/g' /etc/apt/sources.list
sudo sed -i -r 's/security.ubuntu.com/old-releases.ubuntu.com/g' /etc/apt/sources.list
After that you can run update, upgrade, and then do strongly consider release upgrade:
sudo apt update
sudo apt upgrade

sudo do-release-upgrade
While understandable repos won’t be hosted super long, it would be very helpful if this migration could be recognized by the apt tool and the fix automatically suggested/applied. It seems a bit much to step away for 6 months from an absolutely minimal Ubuntu install and come back to a OS that can’t update without modifying apt repo paths.
answered Apr 23 at 9:58
![]()
2
Who hasn’t come across an error while doing an update in Ubuntu? Update errors are common and plenty in Ubuntu and other Linux distributions based on Ubuntu. Here are some common Ubuntu update errors and their fixes.
This article is part of Ubuntu beginner series that explains the know-how of Ubuntu so that a new user could understand the things better.
In an earlier article, I discussed how to update Ubuntu. In this tutorial, I’ll discuss some common errors you may encounter while updating Ubuntu. It usually happens because you tried to add software or repositories on your own and that probably caused an issue.
There is no need to panic if you see the errors while updating your system.The errors are common and the fix is easy. You’ll learn how to fix those common update errors.
Before you begin, I highly advise reading these two articles to have a better understanding of the repository concept in Ubuntu.

Understand Ubuntu repositories
Learn what are various repositories in Ubuntu and how they enable you to install software in your system.

Understanding PPA in Ubuntu
Further improve your concept of repositories and package handling in Ubuntu with this detailed guide on PPA.
Error 0: Failed to download repository information
Many Ubuntu desktop users update their system through the graphical software updater tool. You are notified that updates are available for your system and you can click one button to start downloading and installing the updates.
Well, that’s what usually happens. But sometimes you’ll see an error like this:

Failed to download repository information. Check your internet connection.
That’s a weird error because your internet connection is most likely working just fine and it still says to check the internet connection.
Did you note that I called it ‘error 0’? It’s because it’s not an error in itself. I mean, most probably, it has nothing to do with the internet connection. But there is no useful information other than this misleading error message.
If you see this error message and your internet connection is working fine, it’s time to put on your detective hat and use your grey cells (as Hercule Poirot would say).
You’ll have to use the command line here. You can use Ctrl+Alt+T keyboard shortcut to open the terminal in Ubuntu. In the terminal, use this command:
sudo apt updateLet the command finish. Observe the last three-four lines of its output. That will give you the real reason why sudo apt-get update fails. Here’s an example:
Rest of the tutorial here shows how to handle the errors that you just saw in the last few lines of the update command output.
Error 1: Problem With MergeList
When you run update in terminal, you may see an error “problem with MergeList” like below:
E:Encountered a section with no Package: header,
E:Problem with MergeList /var/lib/apt/lists/archive.ubuntu.com_ubuntu_dists_precise_universe_binary-i386_Packages,
E:The package lists or status file could not be parsed or opened.’
For some reasons, the file in /var/lib/apt/lists directory got corrupted. You can delete all the files in this directory and run the update again to regenerate everything afresh. Use the following commands one by one:
sudo rm -r /var/lib/apt/lists/*
sudo apt-get clean && sudo apt-get update
Your problem should be fixed.
Error 2: Hash Sum mismatch
If you find an error that talks about Hash Sum mismatch, the fix is the same as the one in the previous error.
W:Failed to fetch bzip2:/var/lib/apt/lists/partial/in.archive.ubuntu.com_ubuntu_dists_oneiric_restricted_binary-i386_Packages Hash Sum mismatch,
W:Failed to fetch bzip2:/var/lib/apt/lists/partial/in.archive.ubuntu.com_ubuntu_dists_oneiric_multiverse_binary-i386_Packages Hash Sum mismatch,
E:Some index files failed to download. They have been ignored, or old ones used instead
The error occurs possibly because of a mismatched metadata cache between the server and your system. You can use the following commands to fix it:
sudo rm -rf /var/lib/apt/lists/*
sudo apt update
Error 3: Failed to fetch with error 404 not found
If you try adding a PPA repository that is not available for your current Ubuntu version, you’ll see that it throws a 404 not found error.
W: Failed to fetch http://ppa.launchpad.net/venerix/pkg/ubuntu/dists/raring/main/binary-i386/Packages  404  Not Found
E: Some index files failed to download. They have been ignored, or old ones used instead.
You added a PPA hoping to install an application but it is not available for your Ubuntu version and you are now stuck with the update error. This is why you should check beforehand if a PPA is available for your Ubuntu version or not. I have discussed how to check the PPA availability in the detailed PPA guide.
Anyway, the fix here is that you remove the troublesome PPA from your list of repositories. Note the PPA name from the error message. Go to Software & Updates tool:

In here, move to Other Software tab and look for that PPA. Uncheck the box to remove the PPA from your system.
Your software list will be updated when you do that. Now if you run the update again, you shouldn’t see the error.
Error 4: Failed to download package files error
A similar error is failed to download package files error like this:
In this case, a newer version of the software is available but it’s not propagated to all the mirrors. If you are not using a mirror, easily fixed by changing the software sources to Main server. Please read this article for more details on failed to download package error.
Go to Software & Updates and in there changed the download server to Main server:
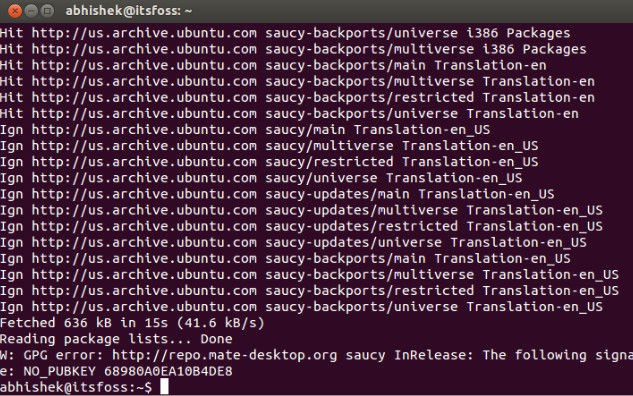
Error 5: GPG error: The following signatures couldn’t be verified
Adding a PPA may also result in the following GPG error: The following signatures couldn’t be verified when you try to run an update in terminal:
W: GPG error: http://repo.mate-desktop.org saucy InRelease: The following signatures couldn’t be verified because the public key is not available: NO_PUBKEY 68980A0EA10B4DE8
All you need to do is to fetch this public key in the system. Get the key number from the message. In the above message, the key is 68980A0EA10B4DE8.
This key can be used in the following manner:
sudo apt-key adv --keyserver keyserver.ubuntu.com --recv-keys 68980A0EA10B4DE8
Once the key has been added, run the update again and it should be fine.
Error 6: BADSIG error
Another signature related Ubuntu update error is BADSIG error which looks something like this:
W: A error occurred during the signature verification. The repository is not updated and the previous index files will be used. GPG error: http://extras.ubuntu.com precise Release: The following signatures were invalid: BADSIG 16126D3A3E5C1192 Ubuntu Extras Archive Automatic Signing Key
W: GPG error: http://ppa.launchpad.net precise Release:
The following signatures were invalid: BADSIG 4C1CBC1B69B0E2F4 Launchpad PPA for Jonathan French W: Failed to fetch http://extras.ubuntu.com/ubuntu/dists/precise/Release
All the repositories are signed with the GPG and for some reason, your system finds them invalid. You’ll need to update the signature keys. The easiest way to do that is by regenerating the apt packages list (with their signature keys) and it should have the correct key.
Use the following commands one by one in the terminal:
cd /var/lib/apt
sudo mv lists oldlist
sudo mkdir -p lists/partial
sudo apt-get clean
sudo apt-get update
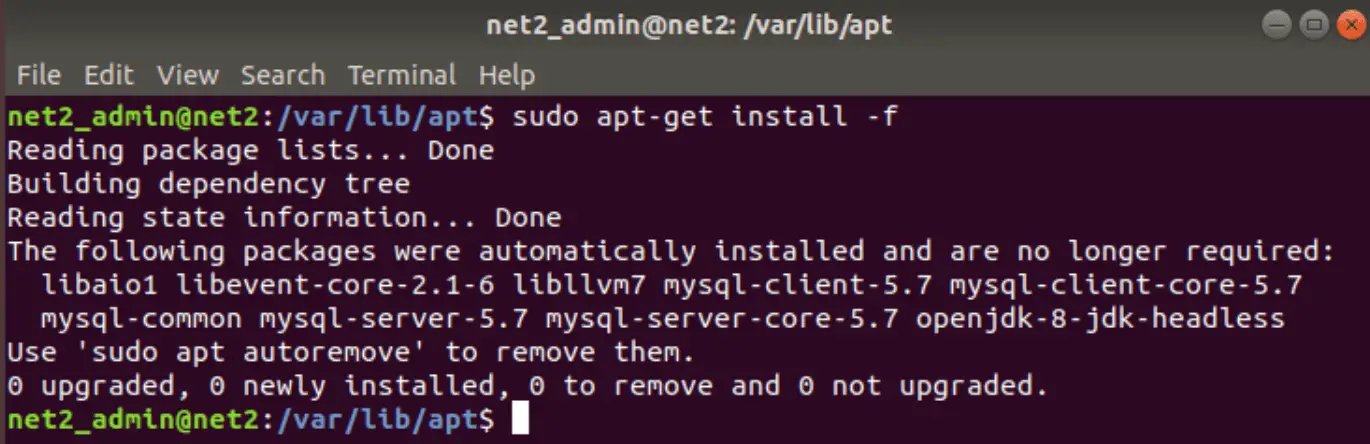
Error 7: Partial upgrade error
Running updates in terminal may throw this partial upgrade error:

Not all updates can be installed
Run a partial upgrade, to install as many updates as possible
Run the following command in terminal to fix this error:
sudo apt-get install -f
Error 8: Could not get lock /var/cache/apt/archives/lock
This error happens when another program is using APT. Suppose you are installing some thing in Ubuntu Software Center and at the same time, trying to run apt in terminal.
E: Could not get lock /var/cache/apt/archives/lock – open (11: Resource temporarily unavailable)
E: Unable to lock directory /var/cache/apt/archives/
Check if some other program might be using apt. It could be a command running terminal, Software Center, Software Updater, Software & Updates or any other software that deals with installing and removing applications.
If you can close other such programs, close them. If there is a process in progress, wait for it to finish.
If you cannot find any such programs, use the following command to kill all such running processes:
sudo killall apt apt-get
This is a tricky problem and if the problem still persists, please read this detailed tutorial on fixing the unable to lock the administration directory error in Ubuntu.
Any other update error you encountered?
That compiles the list of frequent Ubuntu update errors you may encounter. I hope this helps you to get rid of these errors.
Have you encountered any other update error in Ubuntu recently that hasn’t been covered here? Do mention it in comments and I’ll try to do a quick tutorial on it.
- Печать
Страницы: [1] 2 Все Вниз

Тема: Ошибка при обновлении (сервер) (Прочитано 3835 раз)
0 Пользователей и 1 Гость просматривают эту тему.

tarya

Добрый день.
На днях я решил обновить систему и увидел что она не может этого сделать, и просит запустить «apt-get -f install» что я и сделал. При работе этой команды появляются ошибки.
Reading package lists... Done
Building dependency tree
Reading state information... Done
Correcting dependencies... Done
The following packages were automatically installed and are no longer required:
  linux-headers-3.2.0-44-generic linux-headers-3.2.0-40 linux-headers-3.2.0-35 linux-headers-3.2.0-41 linux-headers-3.2.0-36 linux-headers-3.2.0-37 linux-headers-3.2.0-43 linux-headers-3.2.0-38 linux-headers-3.2.0-44 linux-headers-3.2.0-45 linux-headers-3.2.0-51
  linux-headers-3.2.0-48 linux-image-3.2.0-45-generic linux-headers-3.2.0-37-generic linux-image-3.2.0-48-generic linux-image-3.2.0-40-generic linux-headers-3.2.0-45-generic linux-image-3.2.0-43-generic linux-headers-3.2.0-48-generic linux-headers-3.2.0-40-generic
  linux-headers-3.2.0-35-generic linux-image-3.2.0-51-generic linux-headers-3.2.0-43-generic linux-headers-3.2.0-38-generic linux-image-3.2.0-41-generic linux-headers-3.2.0-51-generic linux-image-3.2.0-44-generic linux-headers-3.2.0-41-generic linux-headers-3.2.0-36-generic
Use 'apt-get autoremove' to remove them.
The following extra packages will be installed:
  linux-image-server linux-server
The following packages will be upgraded:
  linux-image-server linux-server
2 upgraded, 0 newly installed, 0 to remove and 32 not upgraded.
5 not fully installed or removed.
Need to get 0 B/4,012 B of archives.
After this operation, 0 B of additional disk space will be used.
Do you want to continue [Y/n]? y
Setting up initramfs-tools (0.99ubuntu13.2) ...
update-initramfs: deferring update (trigger activated)
Setting up linux-image-3.2.0-53-generic (3.2.0-53.81) ...
Running depmod.
update-initramfs: deferring update (hook will be called later)
The link /initrd.img is a dangling linkto /boot/initrd.img-3.2.0-54-generic
Examining /etc/kernel/postinst.d.
run-parts: executing /etc/kernel/postinst.d/apt-auto-removal 3.2.0-53-generic /boot/vmlinuz-3.2.0-53-generic
run-parts: executing /etc/kernel/postinst.d/initramfs-tools 3.2.0-53-generic /boot/vmlinuz-3.2.0-53-generic
update-initramfs: Generating /boot/initrd.img-3.2.0-53-generic
gzip: stdout: No space left on device
E: mkinitramfs failure cpio 141 gzip 1
update-initramfs: failed for /boot/initrd.img-3.2.0-53-generic with 1.
run-parts: /etc/kernel/postinst.d/initramfs-tools exited with return code 1
Failed to process /etc/kernel/postinst.d at /var/lib/dpkg/info/linux-image-3.2.0-53-generic.postinst line 1010.
dpkg: error processing linux-image-3.2.0-53-generic (--configure):
subprocess installed post-installation script returned error exit status 2
Setting up linux-image-3.2.0-54-generic (3.2.0-54.82) ...
Running depmod.
update-initramfs: deferring update (hook will be called later)
The link /initrd.img is a dangling linkto /boot/initrd.img-3.2.0-53-generic
Examining /etc/kernel/postinst.d.
run-parts: executing /etc/kernel/postinst.d/apt-auto-removal 3.2.0-54-generic /boot/vmlinuz-3.2.0-54-generic
run-parts: executing /etc/kernel/postinst.d/initramfs-tools 3.2.0-54-generic /boot/vmlinuz-3.2.0-54-generic
update-initramfs: Generating /boot/initrd.img-3.2.0-54-generic
gzip: stdout: No space left on device
E: mkinitramfs failure cpio 141 gzip 1
update-initramfs: failed for /boot/initrd.img-3.2.0-54-generic with 1.
run-parts: /etc/kernel/postinst.d/initramfs-tools exited with return code 1
Failed to process /etc/kernel/postinst.d at /var/lib/dpkg/info/linux-image-3.2.0-54-generic.postinst line 1010.
dpkg: error processing linux-image-3.2.0-54-generic (--configure):
subprocess installed post-installation script returned error exit status 2
dpkg: dependency problems prevent configuration of linux-image-server:
linux-image-server depends on linux-image-3.2.0-53-generic; however:
Package linux-image-3.2.0-53-generic is not configured yet.
dpkg: error processing linux-image-server (--configure):
dependency problems - leaving unconfigured
dpkg: dependency problems prevent configuration of linux-server:
linux-server depends on linux-image-server (= 3.2.0.53.63); however:
Package linux-image-server is not configured yet.
linux-server depends on linux-headers-server (= 3.2.0.53.63); however:
Version of linux-headers-server on system is 3.2.0.54.64.
dpkg: error processing linux-server (--configure):
dependency problems - leaving unconfigured
Processing triggers for initramfs-tools ...
No apport report written because the error message indicates its a followup error from a previous failure.
No apport report written because MaxReports is reached already
update-initramfs: Generating /boot/initrd.img-3.2.0-52-generic
gzip: stdout: No space left on device
E: mkinitramfs failure cpio 141 gzip 1
update-initramfs: failed for /boot/initrd.img-3.2.0-52-generic with 1.
dpkg: error processing initramfs-tools (--configure):
subprocess installed post-installation script returned error exit status 1
No apport report written because MaxReports is reached already
Errors were encountered while processing:
linux-image-3.2.0-53-generic
linux-image-3.2.0-54-generic
linux-image-server
linux-server
initramfs-tools
E: Sub-process /usr/bin/dpkg returned an error code (1)
Друзья подскажите что делать.
Спасибо.
« Последнее редактирование: 12 Октября 2013, 02:34:59 от tarya »
vasilisc
нет места (No space left on device)
думаю в /boot
рекомендую аккуратно удалить лишние ядра и начать обновление снова
вы переходите с релиза на релиз или штатное обновление?
tarya
Не успел про нестачу места написать. Да я тоже первое что увидел это именно «gzip: stdout: No space left on device».
Я полез df -l
Filesystem 1K-blocks Used Available Use% Mounted onДа, на бут имеено 100% но я не могу удалить ядра, их не мало, так как там какие то зависимости.
/dev/mapper/Homeless-root 238181000 69132540 156949492 31% /
udev 951924 4 951920 1% /dev
tmpfs 384404 432 383972 1% /run
none 5120 0 5120 0% /run/lock
none 961004 0 961004 0% /run/shm
/dev/sda1 233191 230005 0 100% /boot
/dev/sdb1 480720552 446674316 9626964 98% /media/backup
root@Homeless:/home/tarya# dpkg --get-selections | grep linux-image
linux-image-3.2.0-39-generic			install
linux-image-3.2.0-40-generic			install
linux-image-3.2.0-41-generic			install
linux-image-3.2.0-43-generic			install
linux-image-3.2.0-44-generic			install
linux-image-3.2.0-45-generic			install
linux-image-3.2.0-48-generic			install
linux-image-3.2.0-51-generic			install
linux-image-3.2.0-52-generic			install
linux-image-3.2.0-53-generic			install
linux-image-3.2.0-54-generic			install
linux-image-server				install
root@Homeless:/home/tarya# sudo apt-get purge linux-image-3.2.0-39-generic
Reading package lists... Done
Building dependency tree
Reading state information... Done
You might want to run 'apt-get -f install' to correct these:
The following packages have unmet dependencies:
 linux-server : Depends: linux-headers-server (= 3.2.0.53.63) but 3.2.0.54.64 is to be installed
E: Unmet dependencies. Try 'apt-get -f install' with no packages (or specify a solution).
Обновление стандартное, хотел настроить автоматическую синхронизацию времени — гляжу ничего не обновляется.
Версия 12.04.3
Сперанский
Удаление старых ядер (по моему оставляет два- текущее и предыдущее)
sudo apt-get purge $(dpkg -l 'linux-*' | sed '/^ii/!d;/'"$(uname -r | sed "s/(.*)-([^0-9]+)/1/")"'/d;s/^[^ ]* [^ ]* ([^ ]*).*/1/;/[0-9]/!d' | head -n -1) --assume-yes
tarya
К сожалению чтото тут не то.
root@Homeless:/home/tarya# sudo apt-get purge $(dpkg -l 'linux-*' | sed '/^ii/!d;/'"$(uname -r | sed "s/(.*)-([^0-9]+)/1/")"'/d;s/^[^ ]* [^ ]* ([^ ]*).*/1/;/[0-9]/!d' | head -n -1) --assume-yes
Reading package lists... Done
Building dependency tree
Reading state information... Done
You might want to run 'apt-get -f install' to correct these:
The following packages have unmet dependencies:
 linux-headers-server : Depends: linux-headers-3.2.0-54-generic but it is not going to be installed
 linux-server : Depends: linux-headers-server (= 3.2.0.53.63) but 3.2.0.54.64 is to be installed
E: Unmet dependencies. Try 'apt-get -f install' with no packages (or specify a solution).
Сперанский
Это что то лишнее, удалите и даст спокойно почистить ядра
sudo apt-get purge linux-headers-server linux-server
tarya
Все тоже
gzip: stdout: No space left on device
E: mkinitramfs failure cpio 141 gzip 1
update-initramfs: failed for /boot/initrd.img-3.2.0-52-generic with 1.
dpkg: error processing initramfs-tools (--configure):
 subprocess installed post-installation script returned error exit status 1
No apport report written because MaxReports is reached already
                                                              Errors were encountered while processing:
 linux-image-3.2.0-53-generic
 linux-image-3.2.0-54-generic
 linux-image-server
 initramfs-tools
E: Sub-process /usr/bin/dpkg returned an error code (1)
You have new mail in /var/mail/root
ArcFi
Короче, руками переносите часть файлов и чините пакетный менеджер:
sudo dpkg —configure -a
sudo apt-get -f install
Потом удаляете старые ядра и возвращаете файлы на место.
tarya
Ситуация такая что все замыкается что нет свободного места. Сейчас попросил сервер перезагрузиться, после показал что 98% занято, было все 100%. Но я не знаю что от куда удалить или перенести, что это за раздел BOOT.
Сперанский
Можно ж ещё примонтировать boot к другому разделу, перенеся сначала все файлы?
tarya
Якось то зрушилося! То есть что-то да получилось! Получилось таки одно удалить ядро и далее как то пошло.
Но как сделать чтоб больше так не было? Чтоб не переполнялось.
JmAbuDabi
Увеличить еще на 300МБ /boot раздел
Не хранить лишних ядер, чистить логи, если они не нужны и захламляют Всё вокруг. Логи к /boot никак не относятся.
Покой – это не место, где тихо и мирно, где нет шума и беспокойства.
Покой – это когда при всем этом, вы сохраняете мир и спокойствие в своем сердце.
tarya
Я не профи, нужно почитать как это все сделать. И желательно чтоб обновлялось все автоматически.
Помню как когда то я работал в одной компании и там на редхете стоял сквид в котором был лог файл, и если тот файл заполнялся на 2 гб кажется — вся система повисала. Ох я над ним и дрожал. 
Хотелось бы все автоматизировать чтоб не повторялось.
a1e10
Bleachbit-простой способ избавления от мусора
Действие — это продолжение мысли, а не наоборот.
Spect
Bleachbit- мало чем поможет в данном случае — там /boot забивается.
Ну, можно в шедулер забить команду Сперанского, в которой «удаление всех ядер кроме двух последних».. Или просто периодически раз в неделю запускать 
Как увеличить размер /boot — это просто, но потребует изменения границ разделов. Читайте, масса там про это. А так ли нужен «вынесенный» /boot ? Может, проще вернуть его «на родину» (в раздел рута) и забить. Или там рейд.
Ubuntu 16.04 LTS [x86-64]/i3-2100T/2*4G/1T HDD/Intel HD 2000
Hatsan Escort Aimguard Combo 12/76, 7+1
- Печать
Страницы: [1] 2 Все Вверх