
Иногда случаются проблемы с VPN подключением или VPN не работает. На данной странице вы можете найти описание возникающей ошибки впн и самостоятельно исправить ее.
Вы везунчик!
Поздравляем! Вы нашли скрытый промо-код со скидкой 75% на покупку анонимного VPN без логов.
Промо-код действует только 1 час.
Купить VPN
Ошибки OpenVPN
Если вы не знаете как узнать ошибку, возникшую в ходе подключения, нажмите на следующую ссылку:
- Как узнать какая OpenVPN ошибка возникла?
Ниже представлен список возможных ошибок и методы их устранения. Нажмите на ошибку, чтобы узнать как ее устранить. Названия ошибок соответствуют записям в окне лога.
- Не могу выбрать «Connect» при нажатии на иконку в системном трее?
- Connect to IP:Port failed, will try again in 5 seconds; No Route to Host
- Cannot load certificate file client.crt
- All TAP-Win32 adapters on this system are currently in use
- ERROR: Windows route add command failed: returned error code 1?
- Initialization Sequence Completed With Errors
Как узнать какая OpenVPN ошибка возникла?
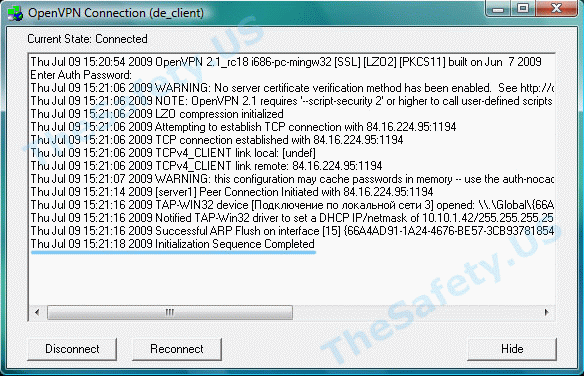
Программа OpenVPN имеет лог подключения. При подключении к OpenVPN серверу программа записывает данные подключения. Эта информация никуда не передается и остается на вашем компьютере, чтобы вы могли понять из-за чего возникла ошибка впн. Чтобы вызвать окно лога, нажмите дважды левой кнопкой мыши на иконку OpenVPN в системном трее.

Когда соединение прошло успешно, и вы подключены к VPN серверу, то окно лога должно выглядеть так:
наверх
Не могу выбрать «Connect» при нажатии на иконку в системном трее
В списке есть только «Proxy Settings», «About» и «Exit», но нет пункта «Connect».

Это означает, что вы не скачали и/или не скопировали конфигурационный файл «client.ovpn» в «C:/Program Files/OpenVPN/config». Откройте еще раз Инструкцию по настройке OpenVPN соединения для вашей ОС и проверьте все шаги установки и настройки.
наверх
Connect to IP:Port failed, will try again in 5 seconds; No Route to Host
Данная ошибка означает, что у вас нет подключения к Интернету, либо его блокирует ваш Firewall или Антивирус.
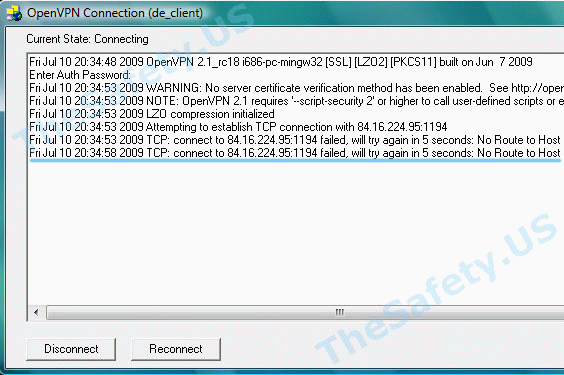
Проверьте активно ли ваше Интернет подключение, отключите Firewall, Антивирус и подключитесь еще раз.
наверх
Cannot load certificate file client.crt
Данная ошибка связана с отсутствием сертификационных файлов в папке «C:Program FilesOpenVPNconfig».
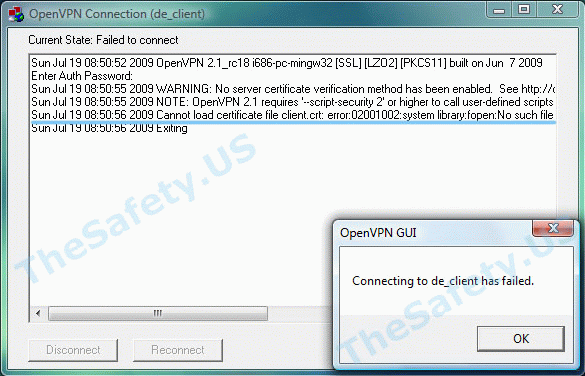
В процессе установки было необходимо скачать архив с сертификатами и распаковать его в папку с программой. Откройте еще раз Инструкцию по настройке OpenVPN соединения для вашей ОС и проверьте все шаги установки и настройки.
наверх
All TAP-Win32 adapters on this system are currently in use
Эта впн ошибка связана с некорректной работой Windows и программы OpenVPN. Также эта OpenVPN ошибка может возникнуть вследствие отключения Интернета без отключения сначала OpenVPN соединения. Всегда отключайте сначала OpenVPN соединение и только затем Интернет.
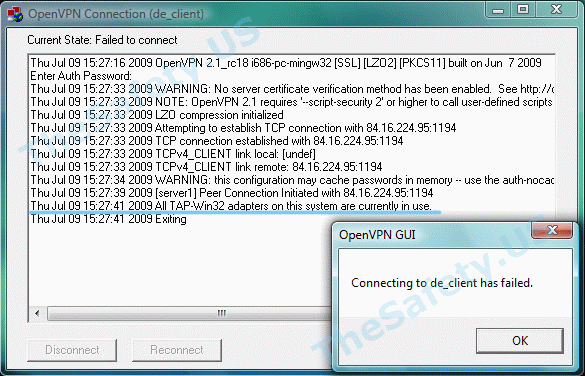
Для устранения ошибки, зайдите в «Пуск -> Сетевые подключения». Найдите «Подключение по локальной сети. TAP-Win32 Adapter» и правой кнопкой мышки щелкните на ярлыке. Выберите «Отключить».

Затем, таким же образом, «Включите» данное подключение. После выполнения данных действий проблемы с VPN подключением должны исчезнуть.

наверх
ERROR: Windows route add command failed: returned error code 1
Данная ошибка связана с ограничением прав в Windows Vista, Seven.
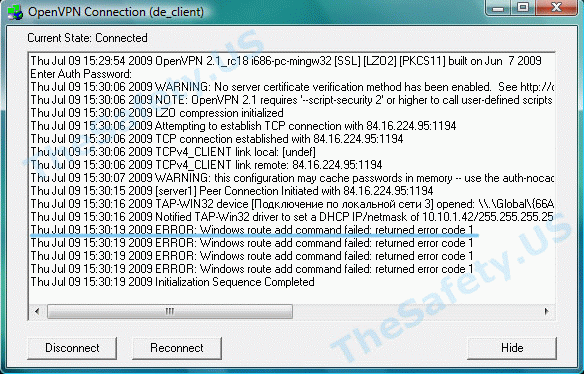
Для устранения ошибки, необходимо выйти из OpenVPN GUI. Правой кнопкой мышки нажать на иконку OpenVPN GUI на рабочем столе и выбрать пункт меню «Свойства»

На вкладке «Совместимость» поставьте галочку «Выполнять эту программу от имени администратора».
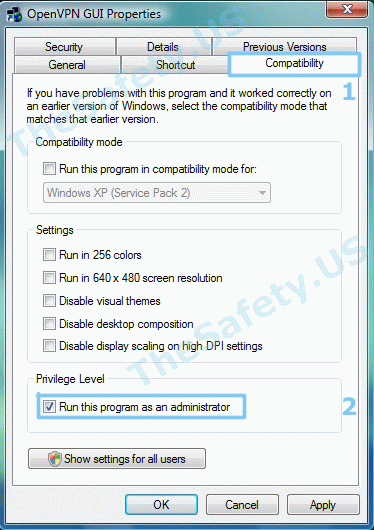
Теперь запустите OpenVPN GUI еще раз и подключитесь к VPN серверу.
наверх
Initialization Sequence Completed With Errors
Данная ошибка связана с неправильной работой службы DHCP из-за антивирусов или фаерволов.
Ошибка наблюдалась постоянно у фаервола Outpost Firewall версии 2009 и ранее, наблюдается также у антивируса Касперского. Ниже представлено решение для антивируса Касперского. Сам алгоритм ничем не отличается от решения проблемы для других антивирусов и фаерволов.
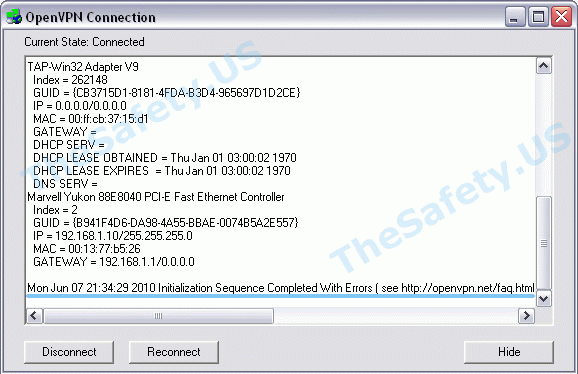
Для устранения ошибки, необходимо зайти в «Пуск -> Панель Управления -> Сетевые подключения» и зайти в «Свойства» виртуального адаптера «TAP-Win 32 Adapter». На вкладке «Общие» в списке отключить Kaspersky Anti-Virus NDIS Filter и затем нажать «ОК».
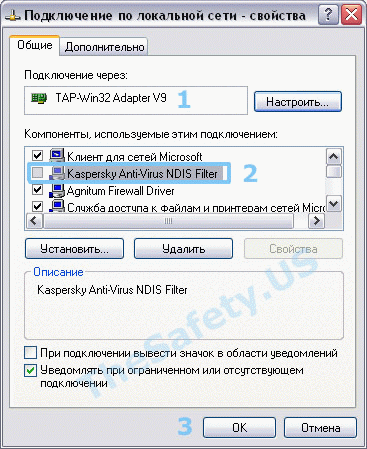
Теперь подключитесь к VPN и подключение должно пройти успешно.
наверх
Purpose of this troubleshooting page
This page is specifically about attempting to find and resolve problems with an OpenVPN client program failing to connect to an OpenVPN Access Server. It does not deal with problems in reaching a target system over the established VPN tunnel once the VPN tunnel is already working. That is handled in a separate page: troubleshooting reaching systems over the VPN tunnel.
So if for example you start the OpenVPN client connection and it issues an error and disconnects you, then the information here should help you in determining a possible cause and solution. If not, reach out to us on the support ticket system and provide as much detail as you can.
Locating the server log files
To diagnose problems with an OpenVPN server or client, it is helpful to look at the log files. The log files are located in specific areas on your computer systems, and the following is a general guide on how to find them and how to get the best information out of them. Log files are the place to check whenever you’re having any problems making a connection with an OpenVPN client program to the OpenVPN Access Server, they the information needed to ascertain what’s going wrong.
On the OpenVPN Access Server there is the server side log:
/var/log/openvpnas.log /var/log/openvpnas.node.log (in case of a failover setup)
In the event that you are having problems with starting the Access Server or certain portions of it, for example the web services, then it may be useful to stop the Access Server service, move the log file aside, then start the Access Server service, and stop it again immediately. This creates a new clean log file that contains the startup and shutdown sequence of the Access Server and no other extraneous information. This makes analysis of the log file much easier. To do so use these commands in order:
service openvpnas stop
mv /var/log/openvpnas.log /var/log/openvpnas.log.old
service openvpnas start
service openvpnas stop
You can then grab the /var/log/openvpnas.log file for analysis and start the Access Server again:
service openvpnas start
Locating the client log files
Log file location for the OpenVPN Connect Client for Windows:
C:Program Files (x86)OpenVPN TechnologiesOpenVPN Clientetclogopenvpn_(unique_name).log
The OpenVPN Connect Client for Mac:
/Library/Application Support/OpenVPN/log/openvpn_(unique_name).log
Macintosh may not show you this folder in finder as it only shows you certain things and hides others. So to get to the /Library folder, open Finder and in the menu at the top choose Go followed by Go to folder and then enter the path /Library to get into that directory. You can then go to the correct folder and look up the log file. Please also note that the OpenVPN Connect Client for Macintosh will have permissions set on the log file so that you cannot normally open it. To bypass this, right click the log file and choose the Get info option in the menu. Then at the bottom, under Sharing & Permissions, you will be able to use the yellow padlock icon to unlock the settings and to give everyone read access. Then you will be able to open the log file with a right click and selecting Open with and then choosing something like Text editor to view the contents of the log file.
Known error messages and possible solutions
TLS Error: TLS key negotiation failed to occur within 60 seconds (check your network connectivity)
This particular error can have multiple different causes as it is a fairly generic error message.
A possible explanation is that the client program is old and supports only TLS 1.0, but the server is expecting TLS level 1.1 or higher. To see if this is the case log on to the server and check the server side log file. The chances are high that your client program is an older version, like version 2.2 or older, and that it doesn’t know how to handle a modern TLS minimum level requirement, when you see messages that look like this on the server side:
OpenSSL: error:140760FC:SSL routines:SSL23_GET_CLIENT_HELLO:unknown protocol'
TLS_ERROR: BIO read tls_read_plaintext error'
TLS Error: TLS object -> incoming plaintext read error'
TLS Error: TLS handshake failed'
SIGUSR1[soft,tls-error] received, client-instance restarting'
The solution to this particular problem is to upgrade the client software to the latest version.
Another possible explanation is that the settings regarding TLS minimum requirement level have been altered but the OpenVPN client is using an older copy of the connection profile which has incorrect instructions. The settings on the client and the server must match for the connection to be successful. In this situation installing a new copy of the configuration profile will solve the issue. A complete uninstall, redownload, and reinstall of the OpenVPN Connect Client should take care of that for you.
And yet another possible explanation is that there is a blockade in place in a firewall or at the Internet service provider that is blocking or interfering with the TLS handshake in some way.
TLS Error: local/remote TLS keys are out of sync
For some reason the negotiated TLS key to be used on the client side for TLS encryption/decryption is different from the one used on the server side. That should never happen. When the client and server are talking to one another they agree upon a TLS key to be used for encrypting and decrypting traffic. By default in Access Server such a key is valid for 6 hours, and after those 6 hours, automatically the TLS refresh kicks in and they will agree upon a new key. There is a short overlap where both the old and new key are accepted, until the old key is expired and the new key must be used. If for some reason one side doesn’t do this, you see this error message.
A possible cause is a bug in the OpenVPN protocol with the version used in OpenVPN Connect Client which was resolved, where the automatic TLS key refresh would fail because the client and server couldn’t agree properly on the encryption cipher to use. So if you encounter this particular problem and you are using an OpenVPN3 based client like OpenVPN Connect Client 2.*, then consider updating to the latest version. You can do so for example per computer by downloading OpenVPN Connect Client for Windows or OpenVPN Connect Client for macOS from our website, and installing it. However a better solution would be to update your Access Server to the latest version so that you get the updated Connect Client embedded in there, and then downloading and installing the latest version of OpenVPN Connect Client from your Access Server. If you use other client software and it shows problems, try finding a newer version for it. Worst case scenario, you could also consider changing the TLS key refresh to something larger in the Advanced VPN page of the Admin UI, to avoid triggering the issue. This does of course lower security somewhat.
Server poll timeout
One of the very first steps that an OpenVPN client program will do when trying to connect to an OpenVPN Access Server is to simply send out a message requesting for a reply. So basically a «hello are you there?» message. The server is then supposed to respond and then a connection is started. However if you see a server poll timeout error message then the server could not be reached at the specified port. Why this is not possible is another question entirely, but the error message is very clear: there is simply no response at all on that address and port. So when you see this message it would be good to check if the port is actually open, if the port is correct, if the address you’re trying to reach can actually be reached from the Internet, and isn’t a private IP address only, and other such checks to confirm basic connectivity to the server. At this point you’re not even looking at a problem that has anything to do with the OpenVPN protocol itself. This is a most basic «this server cannot be reached» message.
A common mistake that is made is that people set up the Access Server on a private IP address but neglect to set up a proper FQDN DNS name for it, and configure that FQDN DNS name in the Admin UI under Server Network Settings in the Host name or IP address field. It is that field value that connection profiles generated and provisioned to the OpenVPN clients will be using to start a connection to. So if this is set to an internal private IP address that the Access Server was installed on, then the connection profiles will try to connect to that private IP address, which is unlikely to be reachable from anywhere else but the internal network that the Access Server itself is on. The solution is to set up a proper DNS name and configure that and save settings. Then uninstall, redownload, and reinstall the connection profile or OpenVPN Connect Client program and to try again.
Another common mistake is to forget to open the 3 ports required for OpenVPN Access Server to be reachable properly. By default these are TCP 443, TCP 943, and UDP 1194.
SESSION_ID only allowed to be used by client IP address that created it
OpenVPN Access Server uses a session-based-token system for server-locked and user-locked profiles. Auto-login type profiles don’t. What this means is that after a user authenticates successfully, they are given a session token to identify themselves with. Compare it to going to a party and you show up and pay your entry fees, and if you need to go out for a little bit, they give you a stamp on the back of your hand, or put a paper/plastic strip around your wrist, so that you can show up again later and be admitted access again. That’s a very simplified explanation. With a session token, each token is unique and uniquely identifies you. This avoids having to store your credentials in memory or bothering the user to reauthenticate when you temporarily lose contact with the server and reconnect again, so it’s safer and more convenient. The session token is locked to the IP address that the original authentication attempt was made from, this is a security feature. When you see this message it means the session token your client program offered to the server was generated originally from another IP address. This can happen for example if you switch Internet connection, like logging in at work, then moving your laptop home and it tries to reconnect automatically with the session token. This session token IP lock is a security feature that can be disabled to allow such automatic reconnects to occur without this error message.
Authentication Error: Session: your session has expired, please reauthenticate
The OpenVPN Access Server works with a session token based authentication system when you are using a server-locked or user-locked profile. When you authenticate successfully, you are given a session token instead. The session token identifies you now from that moment onward. By default the session token expires after 5 minutes of inactivity as in not being connected to the server, and it also expires after 24 hours by default. Furthermore, when the session token is generated on the server, it gets locked to the VPN client’s connecting IP address. This session IP lock can be disabled, and the timeout for session inactivity and the timeout for total session duration mentioned can also be adjusted. If for example you are on your phone and you are connected through WiFi, and you walk out of range of WiFi, and it switches to another Internet connection like 3G/4G or something, then your VPN client will disconnect but attempt to reconnect automatically. Your IP will now be different and as such the session token is not valid anymore. You will see an error like in the previous section in the server side log file (SESSION_ID only allowed to be used by client IP address that created it). And if your connection has lasted 24 hours in total, then it will also disconnect you if you’re on a session-based connection with server-locked or user-locked profile. The solution is to either use an auto-login type profile or to increase the session token duration.
unable to obtain session ID from vpn.yourserver.com, ports=443: (error description here)
This error message can be found in the capi.log file and also shown in the popup message in Windows or macOS when you use OpenVPN Connect Client for Windows or macOS. This error message indicates that a server-locked connection profile is being used, which is the default on OpenVPN Access Server when you download and install the OpenVPN Connect Client. A server-locked connection profile is designed to be user-agnostic, meaning it doesn’t carry any user-identifiable information in it, and is a sort of universal profile. This allows any valid user accounts to start a connection with this OpenVPN Connect Client. The credentials are passed over a secure HTTPS channel to the XML-RPC services of the Access Server for verification, and if approved, the client will receive a copy of the user-locked profile for this user, and a session token. Those will be used to start the OpenVPN tunnel. After the tunnel is disconnected, the user-locked profile and session token are deleted. But for this to work, there must be a working HTTPS connection to the web services of the Access Server.
unable to obtain session ID from vpn.yourserver.com, ports=443:
Other SSL errors:[(‘SSLroutines’,’SSL23_READ’,’ssl handshake failure’)]
This could indicate that the Connect Client was able to reach some service, but it does not appear to be the Access Server web services, or perhaps the traffic is mangled by some firewall or proxy solution. For example we have seen situations where OpenVPN Access Server was installed with default settings, and OpenVPN Connect Client was installed and working, and then the port was changed on the server side from TCP 443, to TCP 444 for example, and then a web server was setup on that same server system, with an HTTPS website running on it on port TCP 443. The OpenVPN Connect Client won’t have received an update to the new port setting for the Access Server web services, and so it tries to talk to the old port, where now a web server runs. This causes an unexpected problem that can result in this type of error. If you encounter this problem you should investigate if the port that the client is trying to reach is actually reachable by this client, and to try to determine if there really is an Access Server web service running there. If you changed the ports on the server you need to reinstall this client so it updates the settings.
unable to obtain session ID from vpn.yourserver.com, ports=443:
ConnectionRefusedError: 10061: No connection could be made because the target machine actively refused it
This is a very clear indication that the address and port that the OpenVPN Connect Client is trying to reach, does not have an Access Server web service running there. For example if you install OpenVPN Connect Client on a client computer, and then you go to the Access Server and change the ports that it listens to, then the client will still be trying to connect to the old ports that were originally configured. This can also sometimes occur if the address of your server is simply misconfigured. The solution is making sure that in the Admin UI in the Network Settings page you have set the address that your server can be reached at correctly (it is best to do a DNS name instead of an IP) and that the ports are how you want them, and then after that’s set up, to download and install the OpenVPN Connect Client on your client computers.
unable to obtain session ID from vpn.yourserver.com, ports=443:
XML-RPC: TimeoutError
This indicates that the Access Server web interface’s XML-RPC interface is unreachable. The OpenVPN Connect Client uses this interface to obtain the necessary certificates and configuration to start the OpenVPN connection when you are using a server-locked profile. You will not be needing the XML-RPC interface when you use user-locked and auto-login profiles. The advantage of server-locked profiles is that they are universal — any valid user at the Access Server can log in and connect. The timeout error just means the connection timed out, usually a firewall or such is blocking the connection. The solution is to ensure that the web interface is reachable from this OpenVPN client, or instead use a user-locked or auto-login type profile.
unable to obtain session ID from vpn.yourserver.com, ports=443:
XML-RPC function GetSession with 1 arguments may not be called at the configured relay level
The OpenVPN Connect Client program for Windows and macOS by default uses server-locked profiles. These contain only the information necessary to talk to the XML-RPC web interface of the Access Server for the purpose of authenticating a user and obtaining the required certificates and connection information to start the OpenVPN tunnel. This is done so this client is universal. It will work for all valid users on the server and isn’t locked to a specific user. This does require that the web interface is reachable and that under client settings in the Admin UI the XML-RPC function is set to at least limited functionality. Full functionality also works, but when you set this to disabled, then you will get this error. The solution is to either stop using server-locked profiles and switch to user-locked or auto-login profiles, or to enable at least limited functionality for XML-RPC calls. The default is limited functionality and that is sufficient for OpenVPN Connect Client and server-locked profiles.
See the logfile ‘C:Program Files (x86)OpenVPN TechnologiesOpenVPN Clientcoreovpntray.exe.log’ for details
If you see this error message while launching the OpenVPN Connect Client, and it fails to launch, you may be missing specific Microsoft Visual C++ Redistributable DLL library files. This issue was resolved in OpenVPN Connect Client for Windows version 2.5.0.136 by adding specific required library files into the OpenVPN Connect Client program directories. You should ensure you use up-to-date software to resolve this issue. You can upgrade your Access Server to the latest version so that it offers updated OpenVPN Connect Client software, or you can separately download the OpenVPN Connect Client for Windows from our website, to upgrade your existing Connect Client version.
Serial number not found in DB
OpenVPN Access Server by default comes with an internal PKI structure, which means a self-signed root certificate with unique certificates generated for each OpenVPN client for that server. These are all unique and tied together. This is part of the strength of OpenVPN, the identity of a VPN client and a VPN server are verified in both directions when a connection is made. The client verifies the server, and the server verifies the client. So for each user account you add to the Access Server, a unique certificate is generated. The certificate is bound to the user account name, so you can’t log in with the credentials for user bob with the certificates for user billy. Each certificate also has a serial number, a unique number identifying the certificate. If you see the error that the serial number is not found in the database, that means this certificate is not known to this server. Even if you revoke a certificate, it is still known to the server, and will not produce this particular error. So you may be using a certificate from a completely different Access Server by mistake, or maybe you started with a new setup of Access Server on your server and the certificates are wiped and new ones generated for the new setup, while you’re still using old certificates from the previous installation. To resolve this problem, make sure to delete the wrong connection profile from your client computer and obtain a new one from your current Access Server installation and use that to connect.
Open TAP device «» PATH=»» FAILED TUN Error: cannot acquire TAP handle EVENT: TUN_IFACE_CREATE cannot acquire TAP handle [FATAL-ERR] 2021 EVENT: DISCONNECTED Client exception in transport_recv: tun_exception: not connected
You may receive this error message when the OpenVPN Connect 3.x service stops or does not resume when you sign back into the computer. The issue is likely caused by an antivirus program. Specifically, we’ve seen this with ESET Antivirus. You can reconnect by restarting the service manually, but the automatic connection may still encounter the issue. To test, turn off ESET. If that resolves the issue, then you may want to open a support ticket with ESET.
See also the topic authentication problems for more possible error messages and solutions regarding authentication issues.
OpenVPN — очень популярная программа для организации виртуальных сетей и VPN-серверов. Это очень удобно, так как вы можете объединить несколько компьютеров, находящихся в разных концах мира в одну виртуальную локальную сеть и для операционной системы всё будет выглядеть так, как будто эти компьютеры действительно находятся в одной локальной сети.
Но иногда сеть перестает работать или не получается её настроить. В этой статье мы разберём несколько причин, почему не подключается OpenVPN, с которыми лично сталкивался я и которые мне приходилось исправлять. Возможно, одна из них и привела к вашей поломке.
1. Сервис запущен?
Если вы только что установили и настроили OpenVPN, убедитесь, что его сервис запущен и работает. Если сервер не запущен, то, как правило, при попытке подключения вы будете получать ошибку «Connection refused». Для проверки выполните:
sudo systemctl status openvpn
В некоторых случаях сервис запускается с определённым конфигом. Тогда для проверки нужно указать этот конфигурационный файл:
sudo systemctl status openvpn@имя_конфига

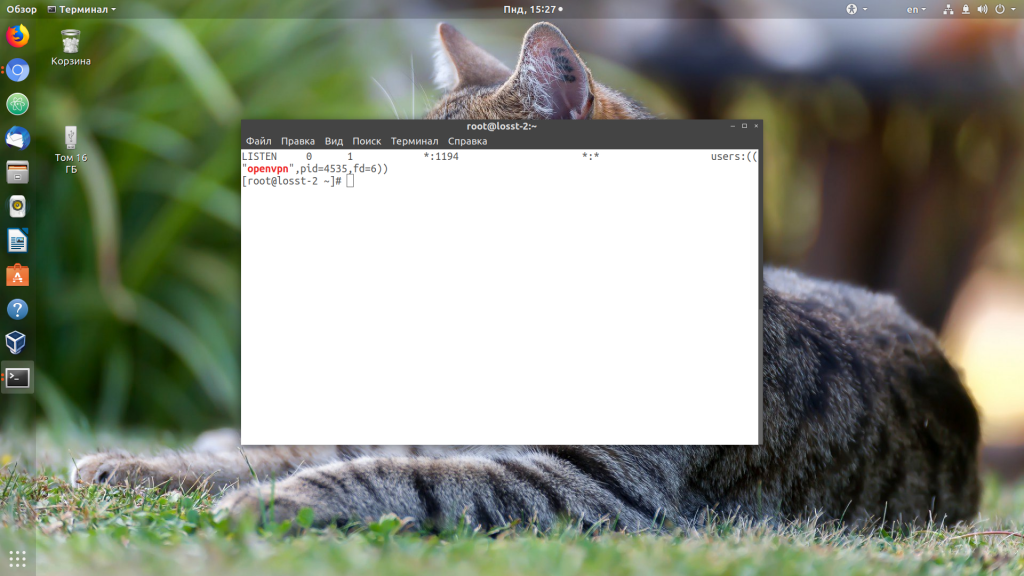
Также вы можете посмотреть, слушает ли сервис подключения на порту OpenVPN:
ss -tlpn | grep openvpn
2. Открыт порт?
Если сервис запущен и слушает подключения на 1194 порту, а вы всё ещё не можете подключится, убедитесь, что этот порт не защищён брандмауэром на сервере. Для этого просто пробуем подключится к нему с помощью telnet:
telnet ip_сервера 1194
Когда всё хорошо, утилита сообщит об успешном подключении:
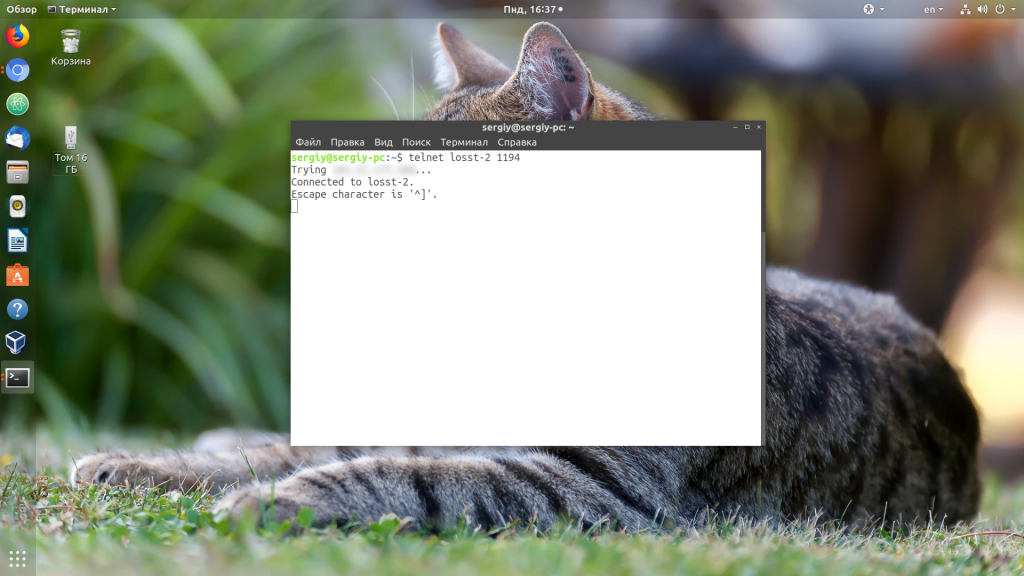
Если вы получаете такую же ошибку — «Connection refused» — или просто долго идёт подключение, но сервис запущен, значит порт закрыт. Открыть порт в Ubuntu можно с помощью команды:
sudo ufw allow 1194
А в CentOS:
sudo firewall-cmd --zone=trusted --add-service openvpn
sudo firewall-cmd --zone=trusted --add-service openvpn --permanent
Теперь можете снова попробовать подключаться к вашему OpenVPN-серверу и теперь всё должно заработать.
3. Соответствуют ли настройки?
Если сервер запущен и доступен извне, но вы всё ещё не можете подключится, то проверьте, соответствуют ли клиентская сторона настройкам сервера. Обратите внимание на тип подключения — tcp это или udp? Также обратите внимание на настройки шифрования и сжатия, особенно tls и comp-lzo. Все настройки, касающиеся подключения, должны быть одинаковыми как в конфигурационном файле клиента, так и сервера.
4. Используете ли правильные ключи?
Если вы подписывали ключи вручную, без использования какого-либо автоматического скрипта настройки OpenVPN, и поэтому они находятся в отдельных файлах от клиентского конфигурационного файла, тогда проверьте, используете ли вы правильные ключи и правильно ли они подписаны. Обычно при проблемах с ключами всё это очень хорошо видно в лог-файле OpenVPN. Но об этом позже. Попробуйте подписать ключи ещё раз.
5. Стабильная сеть?
Если OpenVPN подключается, но подключение постоянно разрывается, причиной этому может стать нестабильная сеть. Если вы знаете, что сеть у вас не очень стабильная или сильно загружена, уберите эти опции из конфигурационного файла клиента:
sudo vi /etc/openvpn/server.conf
#ping 5

#ping-restart 10
Как правило, это решает проблему с сетью и программа может нормально работать даже в сети, которая постоянно разрывается. Также можно не удалять эти строки полностью, а просто увеличить их значения.
6. Проанализируйте лог файл
Если вам всё ещё не удалось выяснить, почему не работает подключение, значит это что-то более серьёзное и без анализа лог-файла вам не обойтись. При подключении в терминале клиента вы обычно будете получать примерно одну и ту же ошибку:
SIGUSR1[soft,connection-reset] received, process restarting
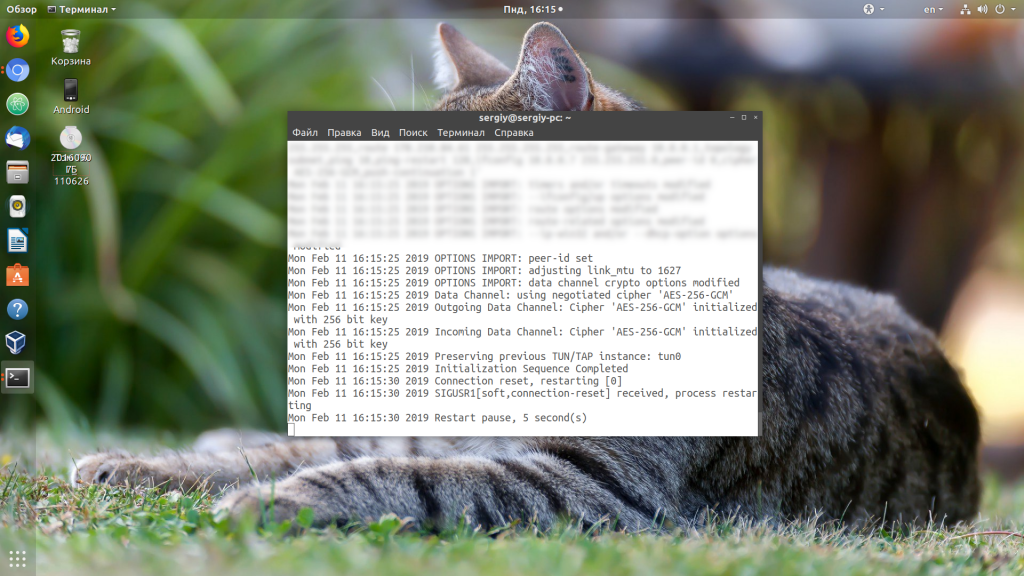
Более подробную информацию можно взять из лог-файла сервера. Лог-файл настраивается директивой log-append в конфигурационном файле сервера, обычно это /var/log/openvpn.log.
По умолчанию уровень логирования равен трём. На этом уровне вы мало что сможете понять. Вам нужен уровень 9, максимальный. Поэтому откройте конфигурационный файл и приведите настройки логирования к такому виду:
log-append /var/log/openvpn.log

verb 9
Теперь перезапустите OpenVPN:
sudo systemctl restart openvpn@имя_конфига
Откройте лог-файл и попробуйте снова подключится:
tail -f /var/log/openvpn.log
Здесь вы увидите очень много информации, просмотрите её внимательно и найдите, где именно находится проблема. Обычно программа сама говорит где проблема и как её решить. Главное, потом не забудьте вернуть значение параметра verb по умолчанию (3) иначе лог-файл очень быстро займёт всё свободное место на жёстком диске.
7. Два пользователя одновременно
Если по одному и тому же конфигурационному файлу пытаются подключится два или больше пользователей одновременно, то OpenVPN примет только одно подключение, а все остальные будет сбрасывать. Это поведение можно изменить, добавив к конфигурации сервера строчку:
duplicate-cn
Но лучше так не делать и создавать для каждого пользователя или устройства отдельный конфигурационный файл, тогда можно будет просто отследить, кто и когда подключался.
8. Истек срок действия crl
CRL — это список отозванных сертификатов. Этот файл имеет свой срок действия, и он может истекать. Если это произойдёт, то в логе вы найдёте ошибку «CRL has expired». Для быстрого её решения можно просто закомментировать строчку:
crl-verify crl.pem
Но тогда отозванные сертификаты перестанут быть отозванными. Другой вариант — это создать этот файл заново. Если у вас установлен пакет скриптов EasyRSA, который, обычно, автоматически устанавливается вместе с OpenVPN, то сделать это очень просто. Перейдите в папку со скриптами:
cd /etc/openvpn/easyrsa/
И выполните:
./easyrsa gen-crl
Затем скопируйте полученный файл в папку с файлами OpenVPN:
cp /etc/openvpn/easy-rsa/pki/crl.pem /etc/openvpn/crl.pem
Готово, теперь у вас всё будет работать.
9. Сервер перегружен
Если вы не можете подключится или подключение разрывается, причиной этому может стать недостаточное количество ресурсов на сервере. Убедитесь, что сервер ничем не перегружен, а на жёстком диске есть свободное место.
Выводы
Сегодня мы разобрали несколько причин, почему может возникнуть ошибка «не удалось подключиться к OpenVPN». Конечно, это только самые простые проблемы, и при более серьёзном использовании программы можно столкнутся с более крупными проблемами. Какие казусы с подключением к OpenVPN вам приходилось решать? Напишите свои варианты решений в комментариях!
Обнаружили ошибку в тексте? Сообщите мне об этом. Выделите текст с ошибкой и нажмите Ctrl+Enter.

Статья распространяется под лицензией Creative Commons ShareAlike 4.0 при копировании материала ссылка на источник обязательна .
Есть сервер OpenVPN который функционирует, работает на Linux. И клиент Windows на котором установлен OpenVPN.
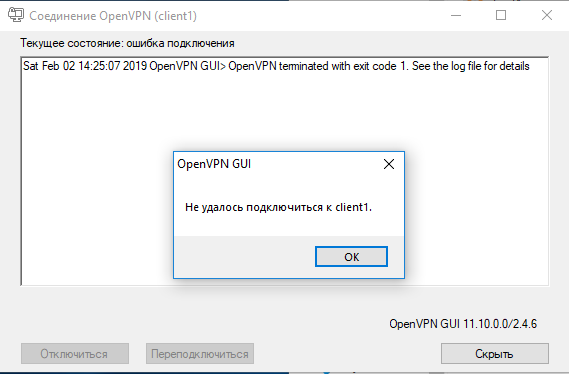
Клиент выдаёт ошибку:
ошибка клиента
log клиента

Строка с ошибкой на которую указал лог:
файл на которую указал лог
Как-то давно была похожая ошибка, помогло переустановить OpenVPN server и CA server, но сейчас я в непонятках, как и почему, прошу руку помощи.
Конфиг OpenVPN servera
# Which local IP address should OpenVPN
# listen on? (optional)
;local a.b.c.d
port 1194
# TCP or UDP server?
proto tcp
explicit-exit-notify 0 # Для протокола tcp
;proto udp
;dev tap
dev tun
ca ca.crt
cert ServerITDO.crt
key ServerITDO.key  # This file should be kept secret
dh dh.pem
;topology subnet
server 10.8.0.0 255.255.255.0
ifconfig-pool-persist ipp.txt
;server-bridge 10.8.0.4 255.255.255.0 10.8.0.50 10.8.0.100
;server-bridge
;push "route 192.168.10.0 255.255.255.0"
;push "route 192.168.20.0 255.255.255.0"
;client-config-dir ccd
;route 192.168.40.128 255.255.255.248
;client-config-dir ccd
;route 10.9.0.0 255.255.255.252
;learn-address ./script
push "redirect-gateway def1 bypass-dhcp"
push "dhcp-option DNS 208.67.222.222"
push "dhcp-option DNS 208.67.220.220"
;client-to-client
;duplicate-cn
keepalive 10 120
tls-auth ta.key 0 # This file is secret
key-direction 0
cipher AES-256-CBC
auth SHA256
;compress lz4-v2
;push "compress lz4-v2"
;comp-lzo
;max-clients 100
user nobody
group nogroup
persist-key
persist-tun
status openvpn-status.log
log         openvpn.log
log-append  openvpn.log
verb 5
;mute 20
;crl-verify crl.pem
Конфиг OpenVPN client
client
;dev tap
dev tun
;dev-node MyTap
proto tcp
;proto udp
remote 192.168.1.90 1194
;remote-random
resolv-retry infinite
nobind
;user nobody
;group nogroup
persist-key
persist-tun
;http-proxy-retry # retry on connection failures
;http-proxy [proxy server] [proxy port #]
;mute-replay-warnings
;ca ca.crt
;cert client.crt
;key client.key
remote-cert-tls server
tls-auth ta.key 1
cipher AES-256-CBC
auth SHA256
key-direction 1
#comp-lzo
verb 5
;mute 20
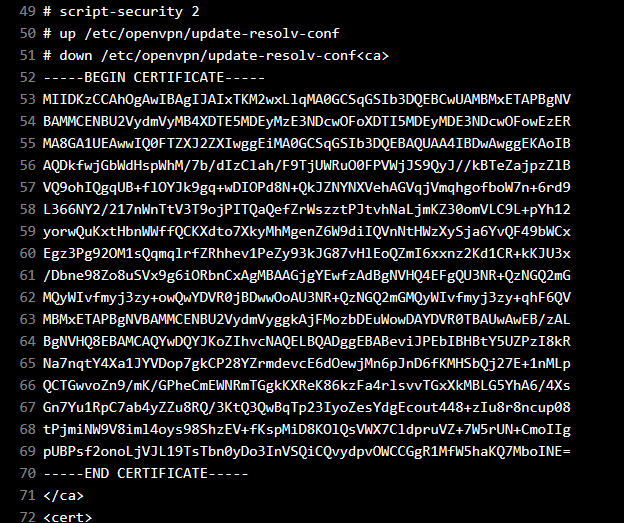
# script-security 2
# up /etc/openvpn/update-resolv-conf
# down /etc/openvpn/update-resolv-confТестирую локально.
Жалуется на ключ ca ca.crt, но что его не устраивает я хз
-
Вопрос заданболее трёх лет назад
-
4561 просмотр
Я так понял у вас клиент на андроиде?
Сертификаты нужно указывать так:
<ca>
# script-security 2
# up /etc/openvpn/update-resolv-conf
# down /etc/openvpn/update-resolv-conf
-------BEGIN CERTIFICATE-----
....
-------END CERTIFICATE-----
</ca>
Аналогично и для других опций, содержащих ссылки на файлы ключей (ca, cert, key).
На сколько вижу у вас не хватает открывающего тега — . Это типичные xml теги — должен быть начальный тег и конечный.
Пригласить эксперта
-
Показать ещё
Загружается…
14 июн. 2023, в 03:49
3000 руб./за проект
14 июн. 2023, в 03:45
4000 руб./за проект
14 июн. 2023, в 01:02
5000 руб./за проект
Минуточку внимания
Tweak your settings to secure an unbreakable VPN connection
by Elena Constantinescu
Elena started writing professionally in 2010 and hasn’t stopped exploring the tech world since. With a firm grasp of software reviewing and content editing, she is always trying… read more
Updated on January 18, 2023
Reviewed by
Edgar Nicov

Since the dial-up Internet era, Edgar was interested in online resources. From forums to e-commerce websites, he started digging into how those resources could generate revenue. Today he… read more
- OpenVPN is one of the most popular VPN protocols, thanks to its superior security and connection speed.
- You can also use an official OpenVPN client for free.
- Many users report that OpenVPN is not working on their Windows 10 PCs.
- If you’re one of them, discover our easy workarounds, like adding an exception to the system firewall.
OpenVPN is an open-source VPN client and VPN protocol with immense popularity, thanks to high security and excellent connection speed.
You can separately download and install the OpenVPN client on all popular devices for free if you want to create a secure tunnel to the web.
Or, you can turn to a commercial VPN provider that adopts OpenVPN.
However, OpenVPN may stop working on Windows 10 computers, due to various issues. If you’re encountering this scenario, here’s what you need to do.
Speaking of scenarios, there are several errors that may appear when you have problems with OpenVPN, many users report issues when attempting to start up the app:
- OpenVPN GUI not opening
- Openvpnagent request error in Windows 7, Windows 10 or Windows 11
- Connecting to the Management interface failed in OpenVPN
Meanwhile, others manage to launch it only to encounter severe disruptions afterward:
- OpenVPNcrashing in Windows 10 or OpenVPN stopped working all of a sudden
- OpenVPN connected but not working windows 10
- DNS not working in Windows 10 with OpenVPN
- TAP mode is not supported in OpenVPN
- OpenVPN service is not available
- Error attempting to connect to the selected server in OpenVPN
- OpenVPN socket protect error
- OpenVPN Windows Firewall not working
Below you will find easy-to-follow instructions that should help fix any of the above-mentioned errors and be able to browse the web through a secure OpenVPN tunnel.
How do I enable OpenVPN in Firewall on Windows 10?
In case you have OpenVPN connected but not working in Windows 10, you can enable it by changing a few settings in your firewall security.
Hence, these are the short steps on how to enable OpenVPN in your Firewall:
- In the Start Menu, access Firewall settings.

- Click on the Advanced Settings.

- In the next windows, go to Inbound Rules.
- Click on the New rule button.

- Select the Program option and Next.

- Go to Program’s path and choose OpenVPN.

- On the Action window, select Allow the connection.
- Let all the three options checked and click Next.
- Set the name and description, and then click Finish.
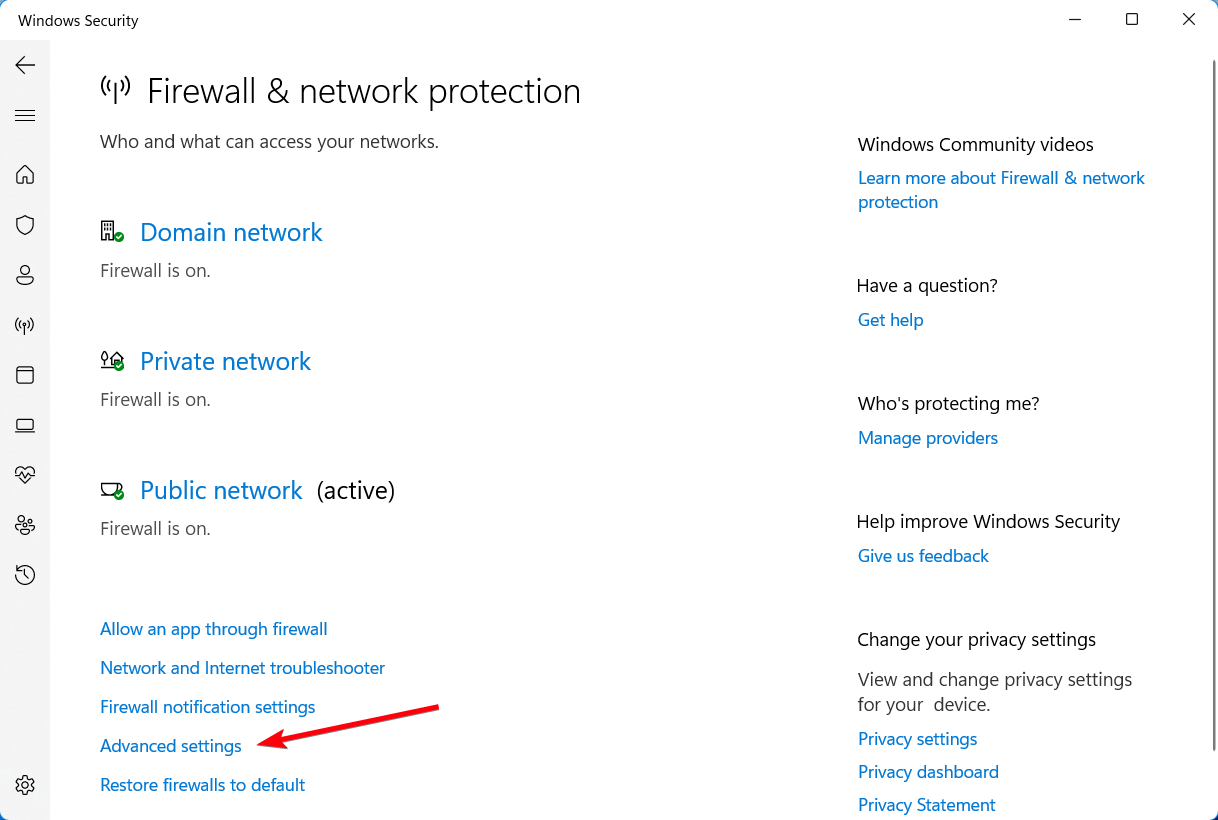
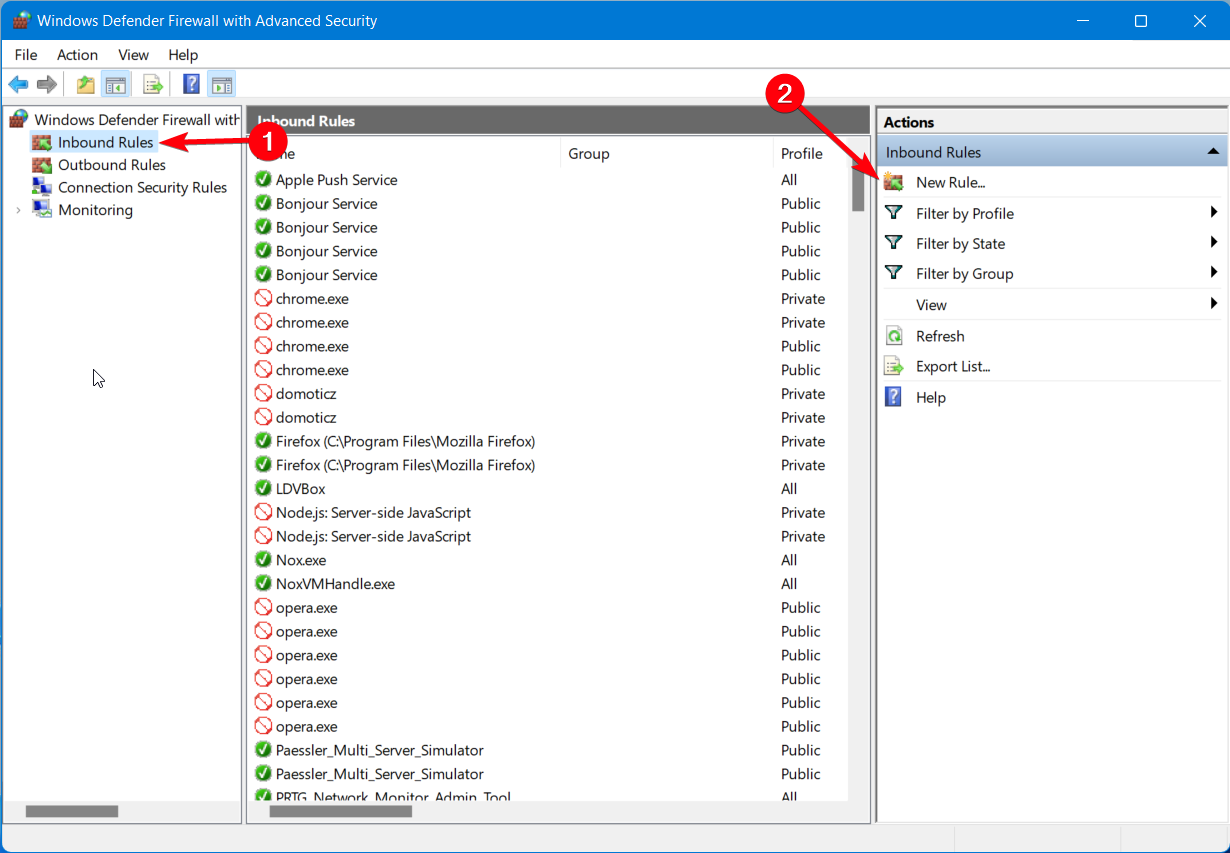
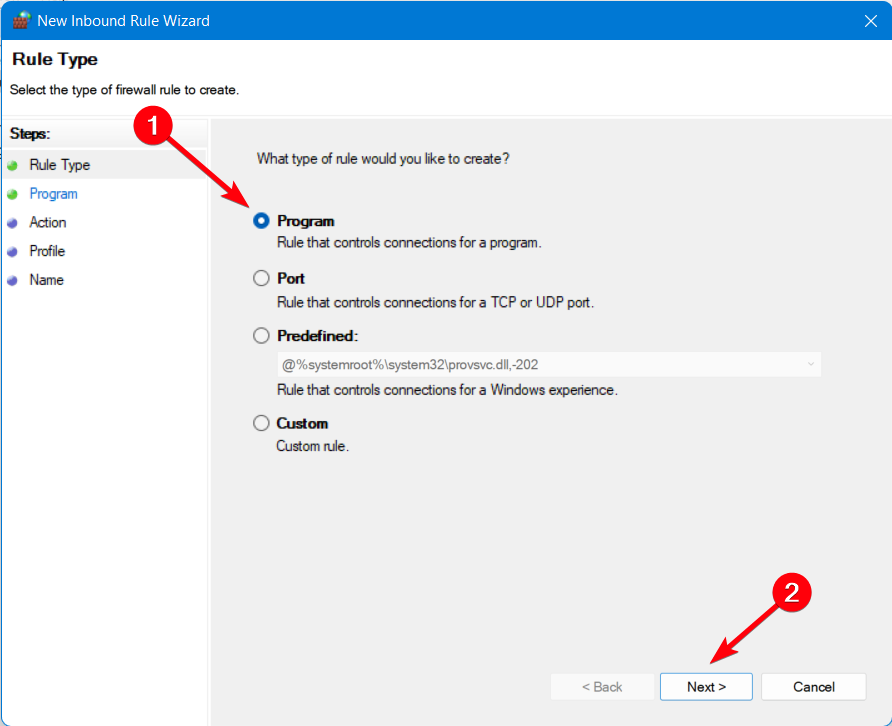

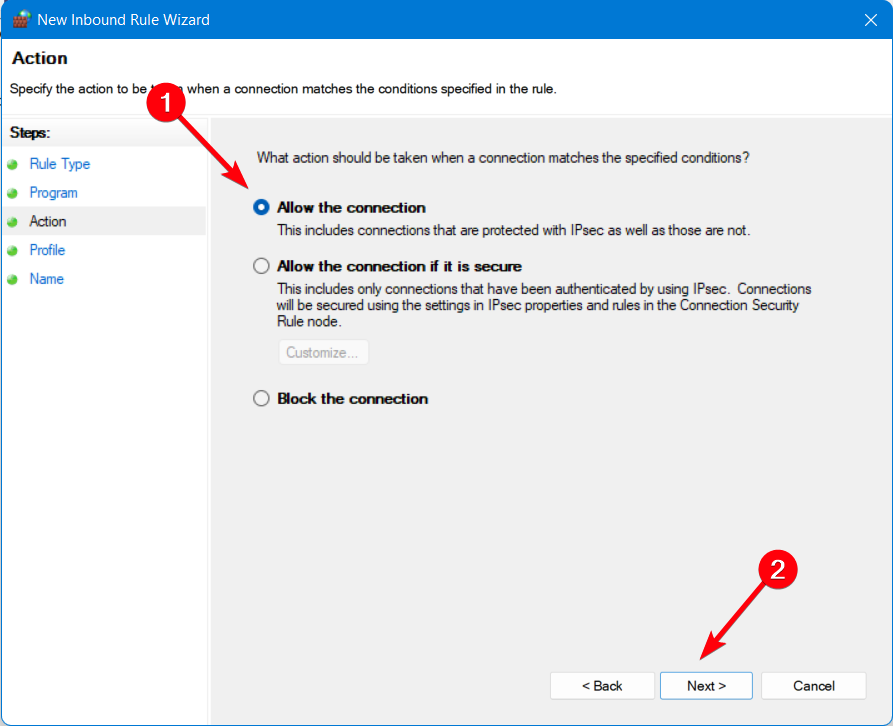
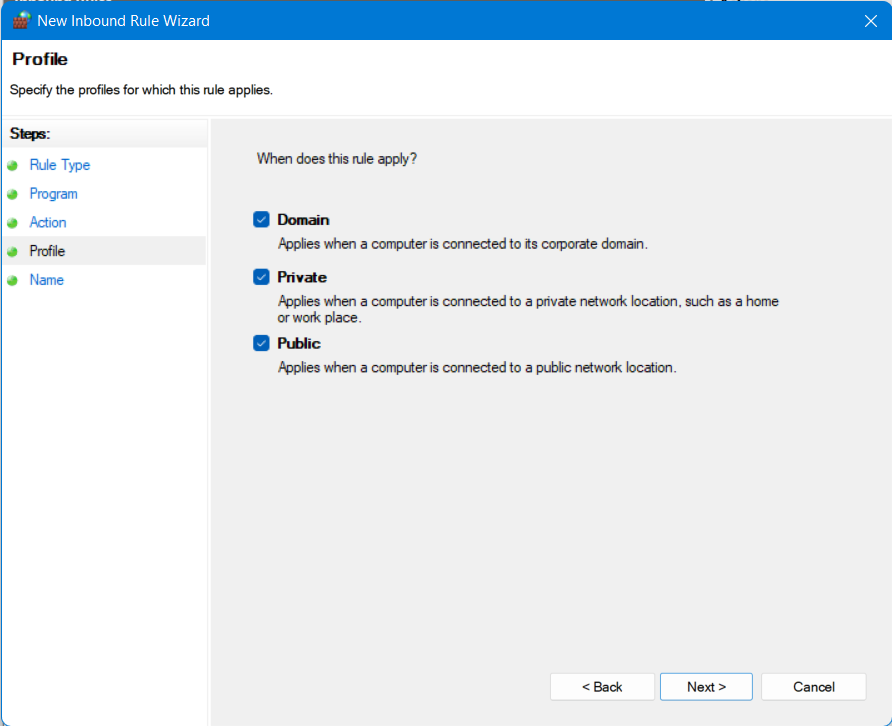
At the same time, this step-by-step guide should resolve OpenVPN not working on Windows 11, so you can use the method on the newest OS version without problems.
How can I fix OpenVPN not working on Windows 10?
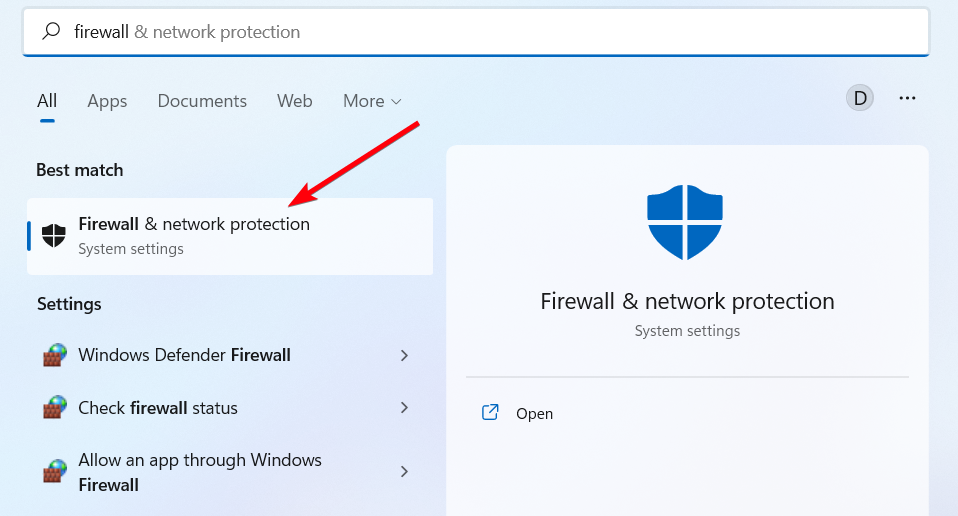
1. Add an exception to the firewall
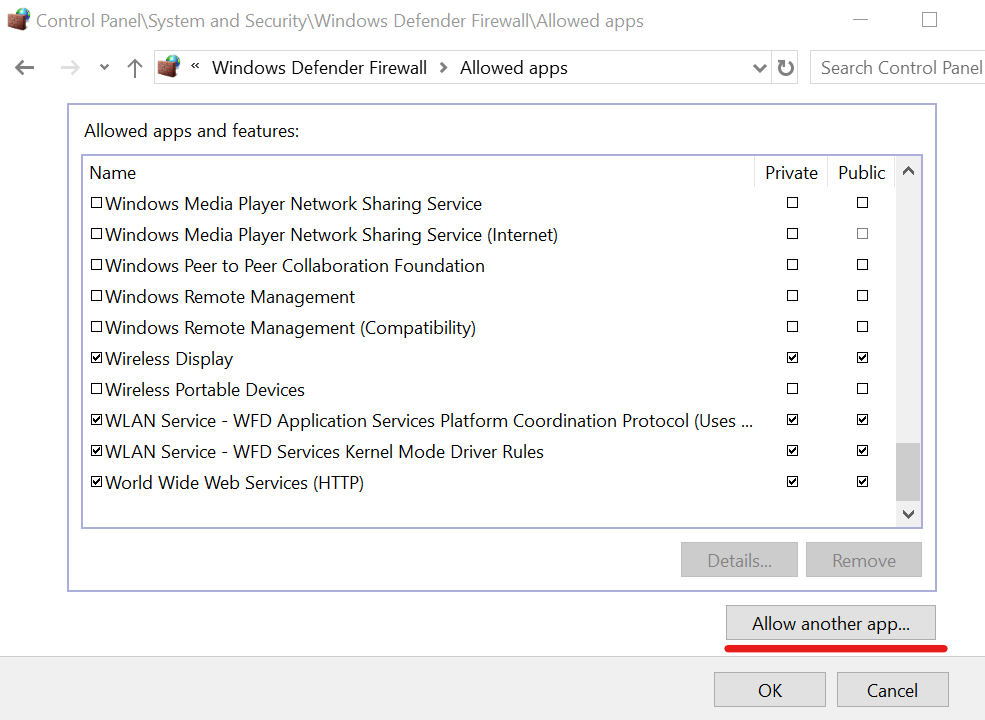
- Press the Win key, type firewall, and open Firewall & network protection
- Click Allow an app through the firewall
- Click Change settings (you need admin rights)
- Search for OpenVPN in this list and check its boxes for Private and Public
- If it’s not in this list, click Allow another app to browse and select it
It’s possible that your firewall didn’t whitelist OpenVPN when you installed the client. In that case, you have to manually add an exception for it in the system firewall.
If another application is responsible for your computer’s firewall, make sure to adjust the above settings accordingly.
To quickly test this theory, you can temporarily disable the firewall and check if OpenVPN works properly on Windows 10 now.
But don’t forget to turn it back on since you risk exposing your home network to vulnerabilities.
2. Use a reliable VPN client with OpenVPN support
If you’re trying and failing to get the OpenVPN to work on Windows 10, consider getting a commercial VPN app that supports the OpenVPN protocol.
And we can’t think of a better option than Private Internet Access. This software supports multiple protocols, including OpenVPN.
Some PC issues are hard to tackle, especially when it comes to corrupted repositories or missing Windows files. If you are having troubles fixing an error, your system may be partially broken.
We recommend installing Restoro, a tool that will scan your machine and identify what the fault is.
Click here to download and start repairing.
This VPN is compatible with all major operating systems and also has a manual configuration option for OpenVPN for those of you who want to add it directly to a supported router.
More about Private Internet Access
- 35 000+ servers in 80+ countries
- Split tunneling functionality
- Private DNS address on each server
- Zero-logs policy
- Bypass geo-blocking restrictions from other regions
- Compatibility with any devices like Windows, macOS, Android, or iOS
Private Internet Access
Utilize this leading VPN software to set up OpenVPN on your Windows device for complete privacy.
3. Whitelist OpenVPN in your antivirus
If your anti-malware application throws errors when you try to use OpenVPN on Windows 10, it could mean that it’s blocking the client or protocol.
However, it’s a false positive. In that case, make sure to add OpenVPN to the whitelist to prevent your antivirus from blocking your VPN.
As in the previous solution, you can quickly test it by temporarily deactivating the real-time detection engine of your anti-malware tool.
But we suggest turning it back on as soon as you finish the test and not leave your computer exposed to malware attacks.
If you’re interested in an anti-malware tool with built-in VPN functionality, check out our best picks.
4. Reset the TAP adapter
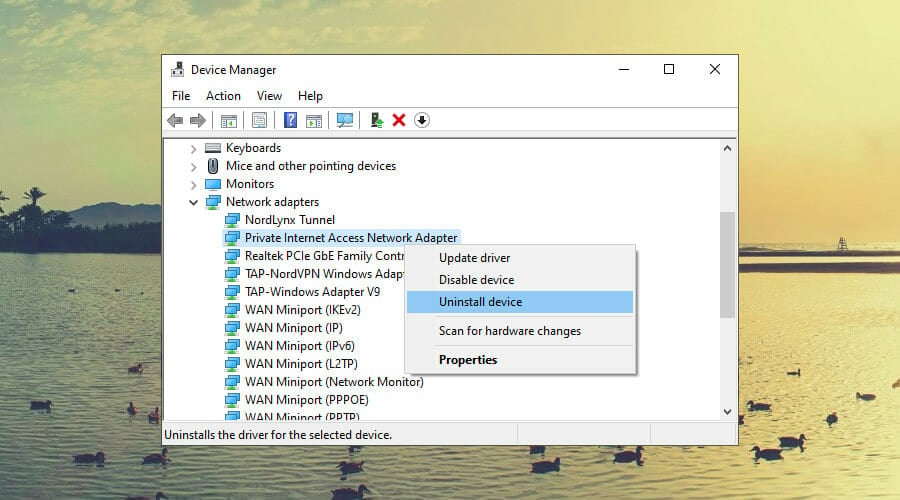
- Right-click the Start button and select Device Manager
- Expand the Network adapters menu
- Look for any TAP drivers, right-click and select Uninstall device
- Open the Action menu and select Scan for hardware changes
The OpenVPN client requires a TAP driver to work properly. If its functionality is broken, it could be the reason why OpenVPN is not working on your Windows 10 PC.
However, you can easily fix this by uninstalling the TAP driver from Device Manager – it should get automatically reinstalled.
As a general rule, it’s essential to keep Windows drivers updated to the latest version.
- Runtime Error 3706: Provider Cannot be Found [Fix]
- How to download & play Mirror’s Edge on Windows 11
- Microsoft roadmap: What’s next for the Halo franchise?
- What can you do with Bing’s new visual input feature?
5. Check if the DHCP service is running
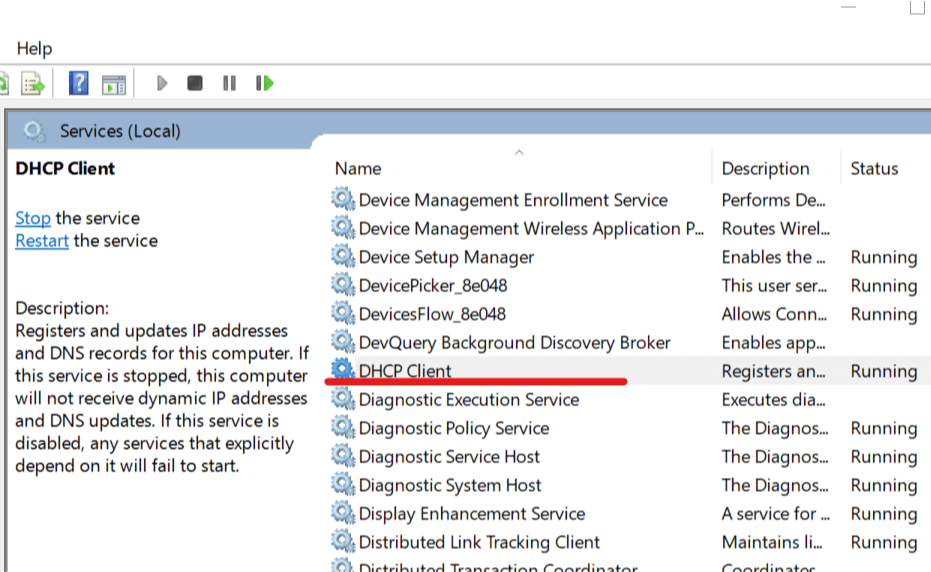
- Press the Win key, type services, and open Services
- Right-click DHCP Client and select Properties
- Set Startup type to Automatic
- Click OK
Many OpenVPN users report seeing the Initialization Sequence Completed with errors message on Windows 10.
It signals a problem with the DHCP client, which you can restart using the instructions above.
6. Flush DNS and reset Winsock
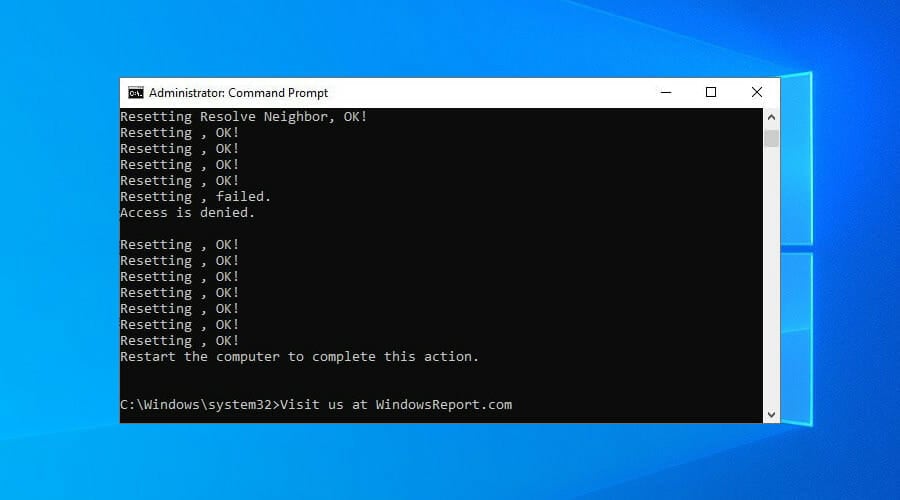
- Run Command Prompt as admin: press Ctrl + R, type cmd, hold Ctrl + Shift, and press Enter
- Copy and paste the next lines (press Enter between each line)
ipconfig /flushdns

ipconfig /registerdns

ipconfig /release

ipconfig /renew

NETSH winsock reset catalog

NETSH int ipv4 reset reset.log

NETSH int ipv6 reset reset.log

exit
Restart your PC to apply the new changes.
The DNS cache and Winsock configuration are responsible for your computer connectivity.
If they’re not initialized properly, it could be the reason why OpenVPN isn’t working on Windows 10.
To recap, if your OpenVPN configuration fails to work on Windows 10, you can fix this issue by adding an exception to the firewall and whitelisting OpenVPN in your antivirus.
You can also reset the TAP adapter, check if the DHCP service is running, as well as flush your DNS and reset Winsock.
But we suggest opting for a trustworthy VPN like Private Internet Access It has built-in support for the OpenVPN protocol, which means that you shouldn’t see any errors anymore.
Learn everything about OpenVPN to master this VPN protocol and client. Also, visit our VPN Troubleshooting Hub whenever you need a VPN quick fix.
Still having issues? Fix them with this tool:
SPONSORED
If the advices above haven’t solved your issue, your PC may experience deeper Windows problems. We recommend downloading this PC Repair tool (rated Great on TrustPilot.com) to easily address them. After installation, simply click the Start Scan button and then press on Repair All.
![]()