«Не удалось загрузить плагин» в браузере: причины возникновения и варианты устранения ошибки
Интернет – это мировой, масштабный пользовательский портал, в котором каждый человек может найти интересующую информацию. Через компьютеры и разнообразные гаджеты люди пользуются информативными данными разных сайтов, слушают музыку, просматривают видео, читают новости, общаются, играют. Какое же разочарование постигает пользователя, когда в какой-то момент его интернет-возможности ограничиваются надписью на экране, которая показывает невозможность загрузки интересующего плагина. Рассмотрим в этой статье причины возникновения проблемы подобного вида, а также распространённые и результативные варианты их устранения.
Исправление ошибки загрузки плагина в браузере.
Что означает «Не удалось загрузить плагин»
Современные устройства позволяют пользователям беспрепятственно странствовать по интернету при наличии соединения. Загрузка интересующих приложений, программ и контента происходит через браузер, причём выбор последнего делает исключительно пользователь. Иногда случаются нештатные ситуации, когда при входе даже на часто посещаемый сайт не даёт загрузить нужный контент.
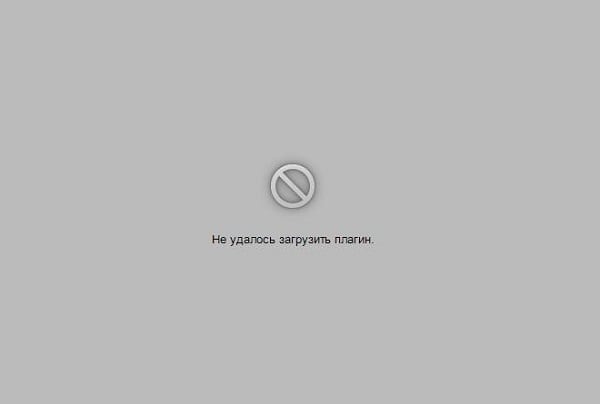
Прежде чем перейти к причинам невозможности свободной эксплуатации пользовательских интернет-ресурсов, важно понять, когда проблема связана с функциональными возможностями плагина и что это значит. Зачастую пользователям приходится сталкиваться с этой проблемой при посещении сайтов, которые дают возможность просмотра или скачивания видео, игровых приложений или музыкальных файлов, чаще всего при использовании в качестве браузеров Google Chrome, Opera и Yandex. Проблема проявляется следующим образом: на экране, вместо ожидаемой информации, появляется фраза «Couldn’t load plug-in», что значит, в переводе «Не удалось загрузить плагин».
Такая фраза на экране устройства ограничивает возможности, делает невозможной загрузку этого контента. Работоспособность браузера обеспечивается комплексом функций, которые невидимы человеку. Разбираться в нюансах и тонкостях работы обычному пользователю приходится только в тех ситуациях, когда не удалось получить интересующий контент, при возникновении неполадок с воспроизведением команды.
Причины появления уведомления об ошибке
Как показывает практика, причин, почему не загружается определённая информация на компьютерном устройстве, может быть несколько. Для начала стоит проверить наличие соединения с интернетом. Если это исключено, тогда возможно плагин не удаётся загрузить по причине устаревания браузера, с потребностью его обновления до последней версии, его переполнения сторонней информацией, или же неисправность заключается в некорректности работы Adobe Flash Player. По умолчанию, работа этого плеера незаметна пользователю, но даже незначительные сбои в его функционировании ограничат просмотр, загрузку и скачивание определённых данных. Рассмотрим подробно, как справится с подобной проблемой, с чего начинать исправление ошибок, как вернуть функциональность браузера и доступ ко всем данным интернета.
Метод устранения проблемы загрузки плагина
Разберёмся поочерёдно, что делать, если не удалось загрузить плагина, ориентируясь на практическую сторону решения вопроса.
Обновление Adobe Flash Player
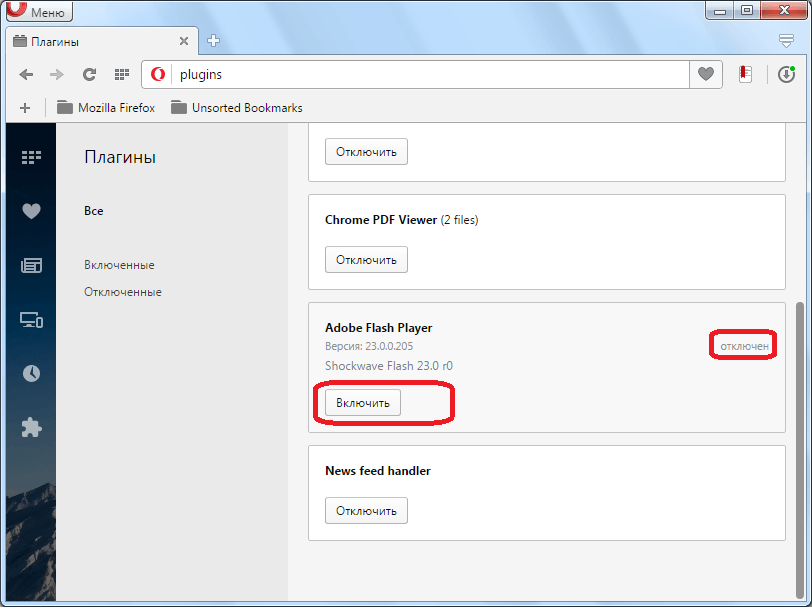
Сообщение Couldn’t load plug-in на экране любого устройства, выбивает человека из обычного режима работы, ограничивая его возможности. Начинать решение стоит с обновления Adobe Flash Player, устаревание или сбой функционирования которого является самым частым фактором, провоцирующим невозможность работы с некоторыми сайтами. Поэтому исправить неполадки в работе плеера можно несколькими вариантами решения проблемы. Для начала необходимо удостовериться, что в системе включен плагин. Для этого в браузере в адресной строчке ввести команду: название браузера двоеточие двойной слеш plugins. К примеру, для Оперы процедура будет выглядеть так: opera://plugins, в открывшемся окне найти инструмент Adobe Flash Player и проверить его статус. Если инструмент отключён, активировать его работу.
Можно также обновить его до последней версии. Для этого нужно удалить плагин , скачать новый и установить его. Можно также разрешить автоматическое обновление программы. Если с первым вариантом всё ясно, то для установки автоматических обновлений нужно: войти в панель управления браузером, зайти в раздел «Все элементы управления». Тут найти Adobe Flash Player, выбрать пункт «Изменить настройки обновления»и разрешить автоматизированное обновление. После перезагрузки компьютера изменения должны вступить в силу, если причины была в устаревшем ПО, плагины будут загружаться в стандартном режиме.
Чистка Cache и Cookies
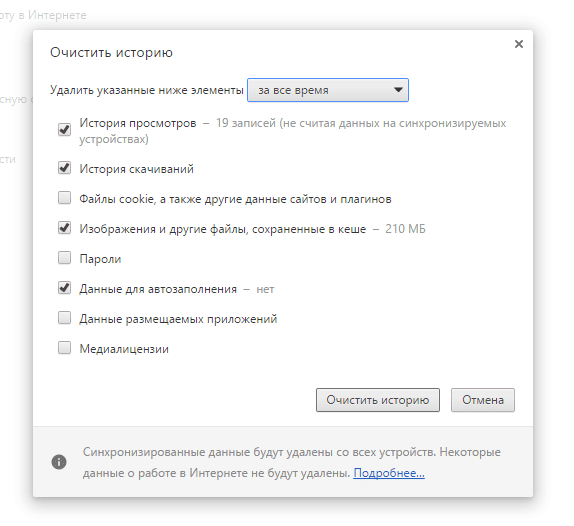
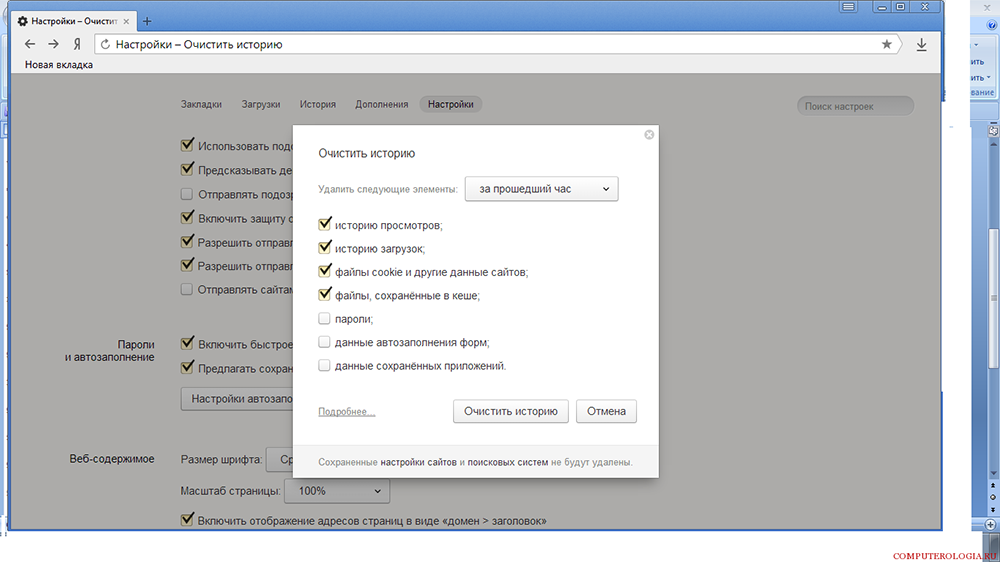
Нередкой причиной возникновения проблемы с плагинами является засорённость браузера, которая объясняется наличием большого количества информационных файлов и большая история посещения веб-страниц потребителем. Такая информация является своеобразным «программным» мусором, который влияет на работоспособность браузера, поэтому нужно периодически чистить Cookies и Cache. Процесс устранение проблемы «Не удалось загрузить плагин» посредством чистки истории является аналогичным для всех браузеров похож по функциональности, но имеет некоторые отличия, в зависимости от типа программы. Если в качестве браузера эксплуатируется Google Chrome, при этом программа выдала информацию о невозможности загрузить плагин, чистка Кеша и Куки осуществляется так:
- Открыть меню вкладок Гугл Хром, значок которого находиться в верхнем, правом углу страницы.
- Зайти в реестр «Дополнительные инструменты».
- Поставить галочки напротив лишней информации.
- Выбрать характеристику «За всё время».
- Подтвердить кнопкой «Очистить историю».
В Internet Explorer потребуется через меню, как в Хроме зайти в строку «Безопасность», с переходом в реестр «Удалить журнал браузера». После проставления галочек, напротив «лишней» информации, подтвердить действие кнопкой «Удалить». В «Опере» значок меню находится в левом верхнем углу браузера. Если не удалось загрузить плагин в Opera, для решения проблематики засорённости потребуется открыть браузер, в меню найти пункт «Настройки», перейти в «Безопасность», где откроется возможность выбрать и удалить Cookies, кэшированные файлы, историю загрузок и посещений за весь период эксплуатации утилиты.
Когда не загружаются плагины в Яндекс браузере, его очистку от мусора, в виде кэшированных агентов и серверных фрагментарных данных, производят через меню, где, внизу страницы, имеется пункт «Показать дополнительные настройки». В развернувшемся окне, в рубрике «Личные данные» зайти в пункт «Очистить историю загрузки», где выбрать Cache и Cookies, после чего подтвердить их удаление. После выполненных процедур и перезагрузки браузера проблема, в ограничении возможности скачивать определённый контент должна решиться.
Апгрейд браузера
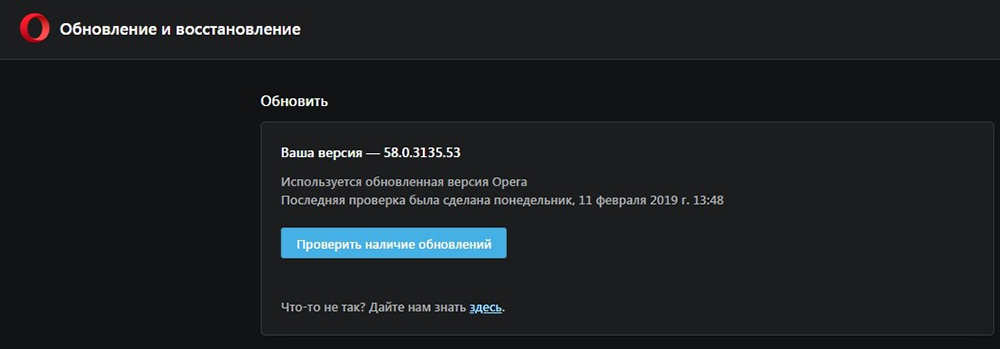
Окно с ошибкой «Не удалось загрузить плагин» в Яндекс Браузере, Google Chrome, Opera или других интернет-обозревателях может также проявляться по причине устаревания самого браузера. В таком случае устранить неисправность можно обновлением обозревателя. Для обновления браузера, независимо от его названия, потребуется зайти в настройки приложения, через меню, где найти пункт «О программе» и кликнуть по нему правой клавишей мышки. В появившемся окне надо нажать на «Обновить» и дождаться завершения обновления. Об этом будет свидетельствовать соответствующая надпись на экране.
Удаление вирусов
Очень редкими, но имеющими место являются случаи, когда функциональность браузера ограничивается вирусами, попавшими на ПК в процессе «странствования» по сайтам. Для исключения вирусного заражения компьютера потребуется запустить антивирусную программу, принудительно сканируя ОС на присутствие вирусов, если она имеется на ПК, или же загрузить и установить лицензионную версию одной из них.
Восстановление функциональности системы
Проблема загрузки плагинов может объясняться и конфликтом утилит, установленных на ПК. Если пользователь установил недавно какое-либо приложение, конфликтующее с Flash Player браузера, тогда потребуется произвести восстановление работоспособности программного обеспечения. Процедура заключается в пошаговом следовании инструкции:
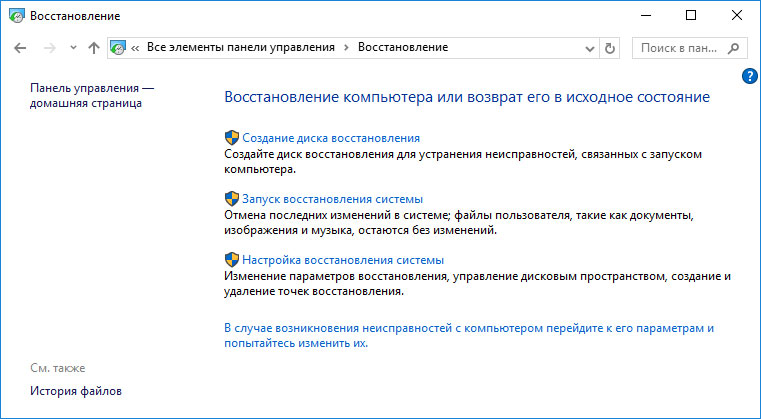
- Открыть через меню «Панель управления» ПК, с последующим переходом в категорию «Все элементы управления». Для этого в строке «Просмотр» надо выбрать пункт «Мелкие значки», где отыскать в списке строку «Восстановление».
- В появившемся окне выбрать строчку «Запуск восстановления системы», следовать командам, появляющимся на экране, осуществлять переход до контрольной позиции клавишей «Далее».
- Восстановительная процедура займёт некоторое время, по завершении процесса все системные настройки, необходимые для корректного функционирования ОС, будут восстановлены.
Подведение итогов
Ошибка, заключающаяся в невозможности работы с плагинами, является одной из наиболее распространённых, но несложно устраняющихся на компьютерных устройствах. Устранение ошибки не предусматривает сложных системных манипуляций, в основном результат достигается после обновления Adobe Flash Player, иногда может потребоваться очистка браузера, его апдейт или переустановка. Следуя инструкциям, прописанным в статье, каждый человек сможет самостоятельно, без помощи специалистов, вернуть работоспособность браузера, исправив ошибку системы.
If you came here and nothing worked, don’t worry, it’s not your fault.
You probably have executed these two commands to install the plugin as per the official documentation:
$ ionic cordova plugin add <your plugin>
$ npm install --save @ionic-native/<your plugin>
You have also added the plugin in the app-module.ts file:
@NgModule({
    ...

    providers: [
        ...
        Your plugin
        ...
    ]
...
})
You are already making calls to your plugin which has been correctly imported and injected into your calling class’s constructor.
You are even waiting for the deviceReady event to start using your plugin:
this.platform.ready().then(() => {
    //Use plugin now
});
And then you are still getting the plugin_not_installed error. One thing that could be happening is that, despite this multi-MB clusterfuck of node and configuration files, the plugin was added recently while the project was created some time ago. When you added the plugin it has downloaded the most recent version available in the repository (!!!) and for some of the platforms installed in your project (android or ios) this plugin needs a Cordova version greater than the one you have now. Type again the first command:
$ ionic cordova plugin add <your plugin>
And look carefully at the output. It looks like it went OK but if you scroll up you might find an error saying that this plugin you have downloaded requires Cordova android (or ios) version X and you have Cordova android (or ios) version Y with Y < X. Example:
Fetching plugin "phonegap-plugin-push@~2.1.0" via npm
Installing "phonegap-plugin-push" at "2.1.0" for android
Plugin doesn't support this project's cordova version. cordova: 7.0.2, failed version requirement: >=7.1.0
Skipping 'phonegap-plugin-push' for android
What is worse, the plugin has been partially added and it might be present in the root plugin folder and the config.xml, and is listed in the cordova plugin list command output, but it is not present in the platform_wwwplugins folder.
If this is the case you need to update the offending platform. And cordova platform update has been deprecated, so you now need to do this:
ionic cordova platform remove android
ionic cordova platform add android@X
Where X is the version the plugin needs or greater, for instance «7.1.0».
Now you need to properly install the plugin again:
$ ionic cordova plugin add <your plugin>
$ npm install --save @ionic-native/<your plugin>
We are not done yet. In Android you might now get this error when running on device:
FAILURE: Build failed with an exception.

* What went wrong:
Execution failed for task ':app:processDebugManifest'.
> Manifest merger failed : uses-sdk:minSdkVersion 16 cannot be smaller than version 19 declared in library [:CordovaLib]
After updating the platform, some of the new code requires a higher new minSDK. For ionic, you need to change this in the config.xml:
<preference name="android-minSdkVersion" value="19" />
And hopefully you will be OK now. Cordova really sucks in dependency management. Also the documentation is written as if everybody had the latest everything.
So I am able to generate tokens and retrieve them, after the app is running. For example, on the loading screen, it asks the user for permission, and you hit allow the app proceeds as normal. But in the database, it isn’t getting to the code that actually saves the info.
But I put a button on a hidden page that runs the same exact code and if i click it, the token gets saved with the userID.
import { HttpClient } from '@angular/common/http';
import * as firebase from 'firebase/app';

import { Injectable } from '@angular/core';
import { Firebase } from '@ionic-native/firebase';
import { Platform } from 'ionic-angular';
import { AngularFirestore } from 'angularfire2/firestore';

@Injectable()
export class FcmProvider {

  userID: string;

  constructor(public http: HttpClient,
    public firebaseNative: Firebase,
    public afs: AngularFirestore,
    private platform: Platform
  ) {
    console.log('Hello FcmProvider Provider');
    this.userID = firebase.auth().currentUser.uid;
    console.log('UserID - ', this.userID)
  }

// Get permission from the user
async getToken() {

  let token;

  if (this.platform.is('android')) {
    token = await this.firebaseNative.getToken()
  }

  if (this.platform.is('ios')) {
    //await this.firebaseNative.grantPermission();
    token = await this.firebaseNative.getToken();
    console.log('ios token', token)
    await this.firebaseNative.grantPermission();
  }

  if (this.platform.is('browser')) {
    token = await this.firebaseNative.getToken()

  }

  //console.log('token is -- ', token)
  return this.saveTokenToFirestore(token)
}

// Save the token to firestore
private saveTokenToFirestore(token) {
  if (!token) return;

  const devicesRef = this.afs.collection('devices')

  const docData = {
    token,
    userId: this.userID,
  }

  return devicesRef.doc(token).set(docData)
}

// Listen to incoming FCM messages
listenToNotifications() {
  return this.firebaseNative.onNotificationOpen()
}

}
Having trouble while installing Creative Cloud app extensions or plugins? Quickly find solutions to some common errors that you might encounter during installation.
Marketplace tab doesn’t show in Creative Cloud desktop app
If you don’t see the Stock & Marketplace tab in the Creative Cloud desktop app, it’s likely that you are using Windows on ARM. We are working to ensure plug-in support for Windows computers that use ARM processors. In the meantime, we recommend that you install and run your plug-ins on Windows computers that use Intel processors.
Cannot install Adobe XD plugins from Marketplace
Your Adobe XD plugins can only be installed from the Stock & Marketplace tab in the Creative Cloud desktop app. If you don’t have the latest version of Adobe XD and try to install an XD plugin, you get the following error message:
Fix error «Something went wrong. You might not see all of your plugins.»
It might happen that the Adobe Exchange website shows your acquired plugins, but they don’t show in the Creative Cloud desktop app. In this case, you get the following error message: «Something went wrong. You might not see all of your plugins.»
You can fix this issue with the following steps:
Once the Creative Cloud desktop app finishes loading, your acquired plugins or extensions show up in the Stock & Marketplace tab.
Prompted to open app in Intel emulation mode after installing plugin
When you install a plugin or extension on Mac computers with Apple Silicon, you are prompted to open the app in Intel emulation mode.
To open the app in Intel emulation mode, do the following:
Not seeing your plugins when signing in from your Business ID?
Sometimes, plugins aren’t migrated after your business account is upgraded.
Sign in to the Creative Cloud desktop app with the appropriate Profile and re-install the plugins. If you require a plug-in for multiple profiles, repeat the process for each profile.
Find solution for your error code
Find your error code in the following table and follow the given solutions.
How to fix errors when installing plugins from the Creative Cloud desktop app
| Error code | Error message or description | How to fix the error |
|
-1 |
Unknown Error |
Quit the Creative Cloud desktop app and the installed app. Then, relaunch the Creative Cloud desktop app and try installing the extension or plugin again. |
| -2 | File System Error |
The file system errors are usually permission errors or are related to disk space. Free some space on the disk. Then, relaunch the Creative Cloud desktop app and try installing the extension or plugin again. If this doesn’t work, quit the Creative Cloud desktop app and the installed app. Then try installing the extension or plugin again. |
|
-3 |
Extraction failure |
Error -3 indicates that the compressed plugin file is corrupt, is missing one of the plugin files, or has run out of disk space. Free some space on the disk. Quit the Creative Cloud desktop app and the installed app. Relaunch the Creative Cloud desktop app and try installing the extension or plugin again. |
|
-4 |
Manifest Parse failure |
Quit the Creative Cloud desktop app and the installed app. Then, relaunch the Creative Cloud desktop app and try installing the extension or plugin again. |
|
-5 |
Internal parsing failure |
Quit the Creative Cloud desktop app and the installed app. Then, relaunch the Creative Cloud desktop app and try installing the extension or plugin again. |
|
-6 |
Plugin not compatible |
Error code -6 indicates that the downloaded plugin is not compatible with any of the installed apps. An extension or plugin installed on Adobe Exchange does not get added to your Creative Cloud app if the app version is not compatible with the extension. Similarly, if you update your app and it is no longer compatible with the extension or plugin, it won’t appear in the app. Install a compatible app, and quit the Creative Cloud desktop app and the installed app. Then, relaunch the Creative Cloud desktop app and try installing the extension or plugin again. If the above solution doesn’t work, try the solutions on this page in the given order. |
|
-7 |
Download failure |
First, make sure that you are connected to the Internet. Then, check to see that you are signed in to the Adobe Exchange website and the Creative Cloud desktop app with the same account. |
|
-8 |
No Internet connection |
Check the Internet connection, and quit the Creative Cloud desktop app and the installed app. Then, relaunch the Creative Cloud desktop app and try installing the extension or plugin again. |
| -9 | Connection timeout | Check the Internet connection, and quit the Creative Cloud desktop app and the installed app. Then, relaunch the Creative Cloud desktop app and try installing the extension or plugin again. |
|
-10 |
Invalid extension |
Quit the Creative Cloud desktop app and the installed app. Then, relaunch the Creative Cloud desktop app and try installing the extension or plugin again. |
|
-11 |
Database update failure |
Quit the Creative Cloud desktop app and the installed app. Then, relaunch the Creative Cloud desktop app and try installing the extension or plugin again. |
| -12 |
Task canceled |
Quit the Creative Cloud desktop app and the installed app. Then, relaunch the Creative Cloud desktop app and try installing the extension or plugin again. |
| -13 | User canceled the operation | Quit the Creative Cloud desktop app and the installed app. Then, relaunch the Creative Cloud desktop app and try installing the extension or plugin again. |
| -14 |
The application is running but not responsive |
Quit the Creative Cloud desktop app and the installed app. Then, relaunch the Creative Cloud desktop app and try installing the extension or plugin again. |
| -15 | Application not reachable | Quit the Creative Cloud desktop app and the installed app. Then, relaunch the Creative Cloud desktop app and try installing the extension or plugin again. |
| -16 | Incorrect package returned | Quit the Creative Cloud desktop app and the installed app. Then, relaunch the Creative Cloud desktop app and try installing the extension or plugin again. |
| -17 | Timeout Error | This error occurs when you haven’t entered your account credentials on being prompted, leading to a timeout. To fix this issue, retry the operation and enter the credentials when prompted. |
| -18 | User is not signed in | This error occurs when you aren’t signed in. To fix this issue, ensure that you are signed in to the Creative Cloud desktop app. |
| -19 | Operation failed | Quit the Creative Cloud desktop app. Then, relaunch the Creative Cloud desktop app and try the operation again. If the issue still occurs, reinstall the Creative Cloud desktop app. |
| -20 | Operation failed | Quit the Creative Cloud desktop app. Then, relaunch the Creative Cloud desktop app and try the operation again. If the issue still occurs, reinstall the Creative Cloud desktop app. |
| -21 | Adobe application compatible with the extension is currently running. Please quit the application and retry. | Quit the app compatible with the plugin and then try to install the extension or plugin again. |
| -22 |
Plugin installer is not ready |
Quit the Creative Cloud desktop app. Then, relaunch the Creative Cloud desktop app and try installing the extension or plugin again. |
| -23 | Unable to verify developer certificate |
This error occurs for UXP hybrid plugins which require a portion of the plugin’s code to be signed with a valid developer certificate. Request the developer to update the plugin as per the packaging guidelines and try installing the plugin again once the updates are available. |
| -24 | Extension is not entitled |
Acquire the entitlement for the plugin and try installing the plugin again. |
| -152 | Couldn’t install plugin | This error only occurs on macOS Catalina and later versions. To fix this error, go to System Settings > Privacy & Security > Full Disk Access. Select Add an application and then add the Creative Cloud desktop app, if not already present. Turn on the settings for the Creative Cloud desktop app. Then, relaunch the Creative Cloud desktop app and try installing the extension or plugin again. |
| 1001 | Entitlement not found |
|
| 1002 | Permission issue |
This error occurs when you haven’t entered your account credentials on being prompted. Try to install the plugin or extension again and enter your credentials when prompted. |
| 1003 | Plugin operation timeout | Check the Internet connection, and quit the Creative Cloud desktop app and the installed app. Then, relaunch the Creative Cloud desktop app and try installing the extension or plugin again. |
How to fix errors when installing plugins from ExManCmd tool or Unified Plugin Installer Agent (UPIA)
| Error code | Error message or description | How to fix the error |
| -175 | Installation failed due to a lack of administrator access |
This error occurs if you do not have administrator access to install applications on your computer, or if you select No or Cancel when prompted to enter an administrator password. To fix this error, you need to enter the administrator password if it is requested during installation. Try to install the extension or plugin again. Go to Stock & Marketplace in the Creative Cloud desktop app. Find the extension, and if it is installed, select Uninstall. Wait for two minutes for the removal to complete, then select Install. Select the notification message when it appears. Enter your administrator password if prompted, and select Yes in the notification dialog. (Windows only) If the issue persists, open the Task Manager and go to the Details tab. Select the process AdobeExtensionsService.exe, and then select End task. Once the background process closes, try to install the plugin again. |
| -192 | Extension Manager init failed, status = -192!
Your version of the Creative Cloud desktop app is incompatible with the ExMan Command Tool. Please update your Creative Cloud app and try again.
|
Update to the latest version of the Creative Cloud desktop app and then try to install your extension or plugin. |
| -201, 204 | Couldn’t install plugin | This error only occurs on macOS Catalina and later versions. To fix this error, go to System Settings > Privacy & Security > Full Disk Access. Select Add an application and then add the Creative Cloud desktop app, if not already present. Turn on the settings for the Creative Cloud desktop app. Then, relaunch the Creative Cloud desktop app and try installing the extension or plugin again. |
| -402 | Failed signature verification | This error occurs when the plugin is not signed. Request the developer to sign the plugin. |
| -403, -411 | Compatible Creative Cloud app not found. | Install a compatible version of the Creative Cloud application before installing the extension. Once the application is installed, try installing the extension again |
| -407, -408 | Another Add-on required by this one is not installed or enabled. | Check which extensions or plugins must be installed first by reading the description of the extension or plugin you are trying to install. Install the required extension or plugin first, and then reinstall the one you were trying to install. |
| -412 | An Add-on with the same name is already installed. | Check that the extension or plugin you have already installed is the one you want. If it is a different product with the same name and you want the one available through Creative Cloud Marketplace, you must uninstall the one that is currently installed. Then reinstall the extension or plugin through Creative Cloud Marketplace. |
| -418 | A newer version of this Add-on is already installed. | If you want the specific version being offered through Creative Cloud Marketplace, you must remove the newer version that you have previously installed. Then reinstall the older version through Creative Cloud Marketplace. Go to Plugins in Creative Cloud Marketplace, find the extension or plugin, and if it is already installed, select Uninstall. Wait two minutes for the removal to complete, then select Install. |
| -433 | Plugin not supported |
The UXP Hybrid plugin you are trying to install is not supported by the installed Creative Cloud application. Install the compatible version, and quit the Creative Cloud desktop app and the installed apps. Then, relaunch the Creative Cloud desktop app and try installing the extension or plugin again. |
| -456 |
Case 1: The Add-on requires the relevant Creative Cloud apps to be closed to complete the installation/update. Case 2: The Add-on requires its compatible Adobe application to be closed to complete the installation/update. |
Quit the compatible Creative Cloud applications that are running. Then, try installing/updating the extension or plugin again. |
| -458 | None of the required Adobe applications have been installed. |
An extension or plugin installed on Adobe Exchange does not get added to your Creative Cloud app if the app version is not compatible with the extension or plugin. Similarly, if you update your app and it is no longer compatible with the extension or plugin, they won’t appear in the app. Install at least one compatible Creative Cloud application that supports this extension (plugin or add-on), and then try installing the extension or plugin again. |
| -459 | Installation failed because it is incompatible with installed Adobe applications. |
An extension or plugin installed on Adobe Exchange does not get added to your Creative Cloud app if the app version is not compatible with the extension or plugin. Similarly, if you update your app and it is no longer compatible with the extension or plugin, they won’t appear in the app. Install at least one compatible Creative Cloud application that supports this extension (plugin or add-on), and then try installing the extension or plugin again. |
| -1xx (-151 to -191) | There was a file operation error when installing this Add-on. | The extension or plugin is corrupted. Try installing it again. |
| -2xx (-251 to -278) | There was a file operation error when installing this Add-on. | The extension or plugin is corrupted. Try installing it again. |
| -5xx (-500 to -513) | Failed to update the database | The extension or plugin is corrupted. Try installing it again. |
| -506 | You are trying to install a plugin using the UPIA tool when it is already installed through the Creative Cloud desktop app. | Uninstall your plugin or extension from the Creative Cloud desktop app and then install it using the UPIA tool. |
| -602 | License check failed, or you are using an encrypted plugin without signing into the Creative Cloud desktop app. |
This error may occur when either the plugin installation is tied with administrator privileges, or when you are signed out of the Creative Cloud desktop app. To fix this error:
|
| -6xx (-601, -602, -603, -604, -651, -652, -653) | Your license failed to validate, or you are using an encrypted plugin when the Creative Cloud desktop app is not installed. |
This error may occur when either the plugin is corrupted, or when you don’t have the Creative Cloud desktop app installed on your device. To fix this error:
|
| -629 | Admin privileges not provided | This error occurs when you deny the admin credentials when prompted. To fix this issue, retry the operation and provide the admin credentials when prompted. |
| -630 | Timeout Error |
This error occurs when you haven’t entered your account credentials upon being prompted, leading to a timeout. To fix this issue, retry the operation and enter the credentials when prompted. |
| -631 | Request failed | This issue occurs when you are trying to install extensions or plugins using the Universal Plugin Installer Agent (UPIA) while being signed out of the Creative Cloud desktop app. To fix this issue, sign in to the Creative Cloud desktop app. Then try installing your extension or plugin. |
| -641, -642 | Couldn’t install plugins | This error occurs when you are trying to install extensions or plugins using commands with sudo on the Universal Plugin Installer Agent (UPIA) command-line tool. To fix this issue, open the Creative Cloud desktop app. Then try installing your extension or plugin. |
| -643, -644 | Internal communication failure | Relaunch the Creative Cloud desktop app and try performing the plugin operation again. |
| -645 |
Failed to launch CCD | Relaunch the Creative Cloud desktop app and try performing the plugin operation again |
| -646 |
Plugin Installer init failed | Reinstall the Creative Cloud desktop app and retry the plugin operation. |
Share log files of the installation with Adobe Customer Care so we can help diagnose the issue.
A few days back I was facing a strange issue i.e Plugin Not Installed! in of my Ionic 3 Application. The weird thing about this issue was, the application was working fine in development APK and even after creating productions release of APK it was working fine, the issue used to happen when I installed the application from Playstore after release.
In method catch section I was luckily having an alert which shown me this error “plugin_not_installed”. I was using Ionic’s App Version and Ionic’s Admob Free plugin and I was facing the issue in both these plugins methods.
After some research, I found a list of various forums people facing with similar issues, but they were having some plugin related issues which were resolved for them later. In my case, as this was in two plugins, so something else seemed to be wrong.
How I resolved plugin_not_found issue?
yes! after Installing and uninstalling plugins and creating release versions again and again then uploading on play store, then banging my head for a whole day I finally found a solution!
I pointed out that I was calling App version and AdMob free method in my constructor ( which I also tried to load in ionViewDidLoad, didn’t worked ). Then I tried to call my method in platform ready method as follows:
Not Working Code
// THIS IS NOT WORKING :(
....
....
constructor(
    public navCtrl: NavController,
    public admob: AdMobFree,
    private appVersion: AppVersion
  ) {
      this.appVersion.getVersionNumber().then(value => {
        this.appVersionText = value;
      }).catch(err => {
        alert("1-> "+JSON.stringify(err));
      });
      this.showBanner();
    });
  }
....
....
Working Code 😀
//THIS WORKS FINE :)
....
....
constructor(
    platform: Platform,
    public navCtrl: NavController,
    public admob: AdMobFree,
    private appVersion: AppVersion
  ) {

    platform.ready().then(() => {
      this.appVersion.getVersionNumber().then(value => {
        this.appVersionText = value;
      }).catch(err => {
        alert("1-> "+JSON.stringify(err));
      });
      this.showBanner();
    });
  }
....
....
After wrapping, methods in platform ready everything got back to normal 🙂
What may have caused the issue?
I think this is something related to placement of cordova.js file which is added in head section while other js files are added in body section so, due to which only I think maybe the reason of this issue. As the issue is resolved by placing the code in platform ready so it may be related to the platform on which we are loading the application.
I shared this hack which worked for me to help if it can save someones precious time 🙂

