
«Ошибка сервера: отказ в доступе к ретрансляции 554 5.7.1» в Outlook возникает по двум основным причинам. Первая причина в том, что ваш сервер исходящей почты (SMTP) не позволяет отправлять электронные письма без аутентификации пользователя, а другая причина в том, что ваш адрес электронной почты помечен в списках спама как источник спама.

Это руководство содержит инструкции по устранению следующей ошибки после отправки электронного письма: «Ваше сообщение не достигло некоторых или всех предполагаемых получателей. Следующие получатели не могут быть достигнуты. Ошибка сервера: 554 5.7.1 Relay Access Denied»
Как исправить ошибку Relay Access Denied в почте.
Чтобы точно определить причину ошибки Relay Access Denied 554 5.7.1 и устранить проблему, выполните указанные ниже действия.
Шаг 1. Проверьте настройки почтового сервера и учетные данные.
Прежде всего, убедитесь, что вы правильно ввели имя сервера исходящей электронной почты (SMTP), имя пользователя и пароль в приложении электронной почты (Outlook, Thunderbird и т. Д.). *
* Примечание. Если ошибка «Relay Access Denied» возникла без причины (например, если вы работали без проблем до вчерашнего дня), продолжите работу и включите «SMTP-аутентификацию» (шаг 2).
(Настройки учетной записи электронной почты Outlook)

Шаг 2. Включите аутентификацию пользователя SMTP Безопасное соединение.
Чтобы избежать спамеров, многие почтовые серверы запрещают ретранслировать электронные письма без предварительной аутентификации пользователя. Итак, продолжите и включите аутентификацию SMTP и безопасное соединение в настройках сервера исходящей почты.
1. От файл меню, выберите Настройки аккаунта *
* В Outlook 2007, 2003, перейдите на инструменты > учетные записи.
2. Дважды щелкните по своей учетной записи электронной почты, где вы столкнулись с ошибкой «Relay Access Denied», чтобы запустить его свойства.
")
3. щелчок Больше настроек.

4. Выберите Исходящий сервер вкладка и проверьтеМой исходящий сервер (SMTP) требует аутентификациивариант.

5. Затем выберите продвинутый и укажите следующие параметры для сервера исходящей почты.
-
- Порт исходящего сервера (SMPT): 465
- Тип шифрования: SSL

6. щелчок хорошо а потом Тестовые настройки аккаунта.

7. Если тест пройден успешно, нажмите следующий и закройте настройки учетной записи электронной почты. Наконец, попробуйте отправить электронное письмо, чтобы узнать, устранена ли ошибка «Relay Access Denied». *
* Примечание. Если тест не пройден или вы продолжаете получать сообщение об ошибке «Relay Access Denied 554 5.7.1», снова откройте дополнительные настройки, но на этот раз укажите следующие параметры. **
-
- Порт исходящего сервера (SMPT): 587
- Тип шифрования: TLS или STARTTLS

Шаг 3. Проверьте настройки электронной почты у своего провайдера электронной почты Сканирование на вирусы.
Если вы по-прежнему получаете сообщение об ошибке «Отказано в доступе к ретрансляции», после применения вышеуказанных шагов и настроек обратитесь к своему поставщику электронной почты, чтобы проверить, что информация об учетной записи ( Пароль) и настройки для зашифрованного соединения SMTP (Порт Тип шифрования) правильный.
Кроме того — но очень важно — проверьте ваш компьютер и все остальные компьютеры в сети на наличие возможных вредоносных программ. Для выполнения этой задачи выполните все шаги из этого Руководства по быстрому сканированию и удалению вредоносных программ для ПК.
Шаг 4. Проверьте, включен ли ваш почтовый сервер или домен в списки СПАМ (БЛОК). *
* Примечание: последний шаг по устранению ошибки «Relay Access Denied» в основном касается доменов компании. Владельцы почтового сервера.
A. Если у вас есть адрес электронной почты, который является частью домена компании (например, user@company.com), и вы получаете сообщение об ошибке «Relay Access Denied»:
1. Перейдите к следующему адресу электронной почты, проверяющему сайты:
-
-
- www.mxtoolbox.com/blacklists.aspx
- multi.valli.org/lookup
-
2. Введите доменное имя компании (например, «company.com») или свой полный адрес электронной почты (например, user@company.com) в поле поиска и нажмите Проверка черного списка.

B. Если вы являетесь владельцем сервера исходящей почты и ваши конечные пользователи получают ошибку «Relay Access Denied», убедитесь, что ваш почтовый сервер не занесен в черный список. Для этого:
1. Перейдите к следующему адресу электронной почты, проверяющему сайты:
-
-
- www.mxtoolbox.com/blacklists.aspx
- multi.valli.org/lookup
-
2. В поле поиска введите имя сервера исходящей почты (например, «mail.example.com») и нажмите Проверка черного списка.

Это оно! Дайте мне знать, если это руководство помогло вам, оставив свой комментарий о вашем опыте. Пожалуйста, любите и делитесь этим руководством, чтобы помочь другим.
В почтовом отбойнике фигурирует ошибка «Access relay denied (Relay access denied)».
Причины ошибки и методы её устранения:
Нарушена маршрутизация почты
Если вы пользуетесь сторонним сервисом почты (Yandex, Google Apps, Mail.ru), отключите локальную отправку почты в панели управления:
Перейдите в раздел Почта и выберите Почтовые домены:
Кликните по почтовому домену и нажмите Удалить:
Обратите внимание: если вид вашей панели управления отличается от представленного в статье, в разделе «Основная информация» переключите тему с paper_lantern на jupiter.
В разделе Электронная почта выберите Маршрутизация почты:
В выпадающем списке выберите необходимый домен и в блоке Настроить маршрутизацию почты отметьте пункт Удаленный почтовый обменник:
Нажмите Изменить.
На вкладке «Почта» перейдите в раздел Настройки почты и кликните по имени необходимого домена:
В открывшемся окне снимите галочку с «Активировать почтовую службу на этом домене» и нажмите Применить:
Готово! Вы наладили маршрутизацию почты.
Большое количество одновременных IMAP-соединений
Проблема наблюдается при отправки с почтовых клиентов, настроенных на отправку почты по протоколу IMAP. Особенно актуальной становится, если подключение происходит с нескольких клиентов одновременно. Рекомендации по устранению проблемы описаны в статье Ограничение IMAP-соединений.
IP сервера попал в спам-лист
В этом случае в отбойнике содержится информация о том, каким именно листом был заблокирован IP-адрес сервера.
Возможны два варианта:
- У вас заказана услуга виртуального хостинга сайтов. В этом случае вам необходимо сообщить о проблеме технической поддержке хостинга;
- У вас заказан VPS-сервер — вероятнее всего, с вашего сервера производится рассылка спама. В этом случае рекомендуем проверить сервер на вирусы, определить скрипты, рассылающие спам.
Вы также можете самостоятельно направить уведомление об исключении IP-адреса из спам-базы, пройдя по ссылке указанной в отбойнике.
The «Server Error: Relay Access Denied 554 5.7.1» in Outlook occurs for two main reasons. The first reason is that your outgoing mail server (SMTP) doesn’t allow to send emails without user authentication and the other reason is that your email address is marked at spam lists as a source of spam.

This tutorial contains instructions to solve the following error, after sending an email: «Your message did not reach some or all of the intended recipients. The following recipient(s) cannot be reached. Server error: 554 5.7.1 Relay Access Denied»
How to fix Relay Access Denied Error in Mail.
To determine the exactly reason of the Relay Access Denied 554 5.7.1 error and to resolve the problem follow the steps mentioned below.
Step 1. Verify Mail Server Settings and Account Credentials.
First of all, make sure that you have typed correctly the name of the Outgoing email server (SMTP), the User Name and your Password at your email application (Outlook, Thunderbird, etc.). *
* Note: If the «Relay Access Denied» error has appeared without a reason (e.g. if you worked without problems until yesterday), then proceed and enable the «SMTP Authentication» (Step-2).
(Outlook Email Account Settings)

Step 2. Enable SMTP User Authentication & Secure Connection.
To avoid spammers, many mail servers deny the emails to be relayed without first authenticating the user. So, proceed and enable the SMTP authentication and the secure connection at the Outgoing Mail Server settings.
1. From the File menu, choose Account Settings *
* In Outlook 2007, 2003, go to Tools > Accounts.
2. Double click at your email account where you experienced the «Relay Access Denied» error to launch its properties.
")
3. Click More Settings.

4. Select the Outgoing Server tab and check the «My outgoing server (SMTP) requires authentication» option.

5. Then select the Advanced tab and specify the following settings for the Outgoing Mail Server.
-
- Outgoing server (SMPT) Port: 465
- Encryption type: SSL

6. Click OK and then Test Account Settings.

7. If the test is successful, click Next and close the Email Account Settings. Finally, try to send an email to see if the «Relay Access Denied» error is resolved. *
* Note: If the Test fails, or you continue receiving the «Relay Access Denied 554 5.7.1» error, then open the Advanced settings again, but this time specify the following settings. **
-
- Outgoing server (SMPT) Port: 587
- Encryption type: TLS or STARTTLS

Step 3. Verify Email Settings with your Email Provider & Scan for Viruses.
If you still receive the «Relay Access Denied» error, after applying the above steps and settings, then speak with your email provider to verify that the account information (Username & Password) and the settings for the SMTP encrypted connection (Port & Encryption type) are correct.
Additionally –but very important – check your computer and all other computers on your network for possible malware infections. To accomplish this task follow all the steps from this Quick Malware Scan and Removal Guide for PC’s.
Step 4. Check if your Mail Server or your Domain is Listed at SPAM (BLOCK) lists. *
* Notice: The final step to resolve the «Relay Access Denied» error mostly concerns company domains & Mail Server owners.
A. If you own an email address, which is part of a company domain (e.g. user@company.com) and you receive the «Relay Access Denied» error:
1. Navigate to the following email blacklist checking sites:
- www.mxtoolbox.com/blacklists.aspx
- multi.valli.org/lookup
2. Type the company domain name (e.g. «company.com») or your full email address (e.g. user@company.com) at the search box and click Blacklist Check.

B. If you ‘re the owner of the Outgoing mail server and your end users receive the «Relay Access Denied» error, check that your mail server is not Blacklisted. To do that:
1. Navigate to the following email blacklist checking sites:
-
-
- www.mxtoolbox.com/blacklists.aspx
- multi.valli.org/lookup
-
2. At the search box, type the name of the Outgoing Mail Server (e.g. «mail.example.com») and click Blacklist Check.

That’s it! Let me know if this guide has helped you by leaving your comment about your experience. Please like and share this guide to help others.
If this article was useful for you, please consider supporting us by making a donation. Even $1 can a make a huge difference for us in our effort to continue to help others while keeping this site free:

If you want to stay constantly protected from malware threats, existing and future ones, we recommend that you install Malwarebytes Anti-Malware PRO by clicking below (we
do earn a commision from sales generated from this link, but at no additional cost to you. We have experience with this software and we recommend it because it is helpful and useful):
Full household PC Protection — Protect up to 3 PCs with NEW Malwarebytes Anti-Malware Premium!
Sending mail results in error «Relay access denied».
It throws «Relay access denied», whenever I tried to send mail to «other_domain» from «outside_network».
It works just fine for «myown_domain» from «outside/inside_network» and to «other_domain» from «inside_network».
Here is the list of telnet commands.
mail from:myself@mydomain.com
- 250 2.1.0 Ok
rcpt to:yourself@mydomain.com
- 250 2.1.5 Ok
rcpt to:yourself@yourdomain.com
- 554 5.7.1 <yourself@yourdomain.com>: Relay access denied.
rcpt to:yourself@gmail.com
- 554 5.7.1 <yourself@gmail.com>: Relay access denied.
rcpt to:yourself@yahoo.com
- 554 5.7.1 <yourself@yahoo.com>: Relay access denied.
I followed all the steps described in «Microsoft Support» and make sure that server configured in correct way and it do not reject any mail. I also tried to trace through using couple of blogs like this one.
While using MxToolbox also got the same result «Relay access denied».
As «Relay access denied» is very common issue.. there are lot of blogs/documentation are there.. I tried to read all, but I think I am looking in wrong place.
Does anybody have any suggestion?
«Ошибка сервера: отказ в доступе к ретрансляции 554 5.7.1» в Outlook возникает по двум основным причинам. Первая причина в том, что ваш сервер исходящей почты (SMTP) не позволяет отправлять электронные письма без аутентификации пользователя, а другая причина в том, что ваш адрес электронной почты помечен в списках спама как источник спама.
Это руководство содержит инструкции по устранению следующей ошибки после отправки электронного письма: «Ваше сообщение не достигло некоторых или всех предполагаемых получателей. Следующие получатели не могут быть достигнуты. Ошибка сервера: 554 5.7.1 Relay Access Denied»
Чтобы точно определить причину ошибки Relay Access Denied 554 5.7.1 и устранить проблему, выполните указанные ниже действия.
Шаг 1. Проверьте настройки почтового сервера и учетные данные.
Прежде всего, убедитесь, что вы правильно ввели имя сервера исходящей электронной почты (SMTP), имя пользователя и пароль в приложении электронной почты (Outlook, Thunderbird и т. Д.). *
* Примечание. Если ошибка «Relay Access Denied» возникла без причины (например, если вы работали без проблем до вчерашнего дня), продолжите работу и включите «SMTP-аутентификацию» (шаг 2).
(Настройки учетной записи электронной почты Outlook)
Шаг 2. Включите аутентификацию пользователя SMTP Безопасное соединение.
Чтобы избежать спамеров, многие почтовые серверы запрещают ретранслировать электронные письма без предварительной аутентификации пользователя. Итак, продолжите и включите аутентификацию SMTP и безопасное соединение в настройках сервера исходящей почты.
1. От файл меню, выберите Настройки аккаунта *
* В Outlook 2007, 2003, перейдите на инструменты > учетные записи.
2. Дважды щелкните по своей учетной записи электронной почты, где вы столкнулись с ошибкой «Relay Access Denied», чтобы запустить его свойства.
3. щелчок Больше настроек.
4. Выберите Исходящий сервер вкладка и проверьтеМой исходящий сервер (SMTP) требует аутентификациивариант.
5. Затем выберите продвинутый и укажите следующие параметры для сервера исходящей почты.
-
- Порт исходящего сервера (SMPT): 465
- Тип шифрования: SSL
6. щелчок хорошо а потом Тестовые настройки аккаунта.
7. Если тест пройден успешно, нажмите следующий и закройте настройки учетной записи электронной почты. Наконец, попробуйте отправить электронное письмо, чтобы узнать, устранена ли ошибка «Relay Access Denied». *
* Примечание. Если тест не пройден или вы продолжаете получать сообщение об ошибке «Relay Access Denied 554 5.7.1», снова откройте дополнительные настройки, но на этот раз укажите следующие параметры. **
-
- Порт исходящего сервера (SMPT): 587
- Тип шифрования: TLS или STARTTLS
Шаг 3. Проверьте настройки электронной почты у своего провайдера электронной почты Сканирование на вирусы.
Если вы по-прежнему получаете сообщение об ошибке «Отказано в доступе к ретрансляции», после применения вышеуказанных шагов и настроек обратитесь к своему поставщику электронной почты, чтобы проверить, что информация об учетной записи ( Пароль) и настройки для зашифрованного соединения SMTP (Порт Тип шифрования) правильный.
Кроме того — но очень важно — проверьте ваш компьютер и все остальные компьютеры в сети на наличие возможных вредоносных программ. Для выполнения этой задачи выполните все шаги из этого Руководства по быстрому сканированию и удалению вредоносных программ для ПК.
Шаг 4. Проверьте, включен ли ваш почтовый сервер или домен в списки СПАМ (БЛОК). *
* Примечание: последний шаг по устранению ошибки «Relay Access Denied» в основном касается доменов компании. Владельцы почтового сервера.
A. Если у вас есть адрес электронной почты, который является частью домена компании (например, user@company.com), и вы получаете сообщение об ошибке «Relay Access Denied»:
1. Перейдите к следующему адресу электронной почты, проверяющему сайты:
-
-
- www.mxtoolbox.com/blacklists.aspx
- multi.valli.org/lookup
-
2. Введите доменное имя компании (например, «company.com») или свой полный адрес электронной почты (например, user@company.com) в поле поиска и нажмите Проверка черного списка.
B. Если вы являетесь владельцем сервера исходящей почты и ваши конечные пользователи получают ошибку «Relay Access Denied», убедитесь, что ваш почтовый сервер не занесен в черный список. Для этого:
1. Перейдите к следующему адресу электронной почты, проверяющему сайты:
-
-
- www.mxtoolbox.com/blacklists.aspx
- multi.valli.org/lookup
-
2. В поле поиска введите имя сервера исходящей почты (например, «mail.example.com») и нажмите Проверка черного списка.
Это оно! Дайте мне знать, если это руководство помогло вам, оставив свой комментарий о вашем опыте. Пожалуйста, любите и делитесь этим руководством, чтобы помочь другим.
This morning, in order to correct a problem with a name mismatch in the security certificate, I followed the recommended steps from How to fix mail server SSL?, but now, when attempting to send an email from a client (in this case the client is Windows Mail), I receive the following error.
The rejected e-mail address was
’email@gmail.com’. Subject ‘This is a
test. ‘, Account: ‘mail.domain.com’,
Server: ‘mail.domain.com’, Protocol:
SMTP, Server Response: ‘554 5.7.1
: Relay access
denied’, Port: 25, Secure(SSL): No,
Server Error: 554, Error Number:
0x800CCC79
Edit: I can still retrieve emails from this account, and I send emails to other accounts at the same domain. I just can’t send emails to recipients outside of our domain.
I tried disabling TLS altogether but no dice, I still get the same error.
When I check file mail.log, I see the following.
Jul 18 08:24:41 company imapd: LOGIN, user=user_name@domain.com, ip=[::ffff:111.111.11.11], protocol=IMAP
Jul 18 08:24:42 company imapd: DISCONNECTED, user=user_name@domain.com, ip=[::ffff:111.111.11.11], headers=0, body=0, rcvd=83, sent=409, time=1
Jul 18 08:25:19 company postfix/smtpd[29282]: connect from company.university.edu[111.111.11.11]
Jul 18 08:25:19 company postfix/smtpd[29282]: NOQUEUE: reject: RCPT from company.university.edu[111.111.11.11]: 554 5.7.1 <email@gmail.com>: Relay access denied; from=<user_name@domain.com> to=<email@gmail.com> proto=ESMTP helo=<UserPC>
Jul 18 08:25:19 company postfix/smtpd[29282]: disconnect from company.university.edu[111.111.11.11]
Jul 18 08:25:22 company imapd: DISCONNECTED, user=user_name@domain.com, ip=[::ffff:111.111.11.11], headers=13, body=142579, rcvd=3289, sent=215892, time=79
File main.cf looks like this:
#
# Postfix MTA Manager Main Configuration File;
#
# Please do NOT edit this file manually;
#

#
# Postfix directory settings; These are critical for normal Postfix MTA functionallity;
#

command_directory = /usr/sbin
daemon_directory = /usr/lib/postfix
program_directory = /usr/lib/postfix

#
# Some common configuration parameters;
#

inet_interfaces = all
mynetworks = 127.0.0.0/8
mynetworks_style = host

myhostname = mail.domain.com
mydomain = domain.com
myorigin = $mydomain

smtpd_banner = $myhostname ESMTP 2.4.7.1 (Debian/GNU)
setgid_group = postdrop

#
# Receiving messages parameters;
#

mydestination = localhost, company
append_dot_mydomain = no
append_at_myorigin = yes
transport_maps = mysql:/etc/postfix/transport.cf

#
# Delivering local messages parameters;
#

mail_spool_directory = /var/spool/mail
mailbox_size_limit = 0
mailbox_command = procmail -a "$EXTENSION"

biff = no

alias_database = hash:/etc/aliases

local_recipient_maps =

#
# Delivering virtual messages parameters;
#
virtual_mailbox_maps=mysql:/etc/postfix/mysql_virt.cf
virtual_uid_maps=mysql:/etc/postfix/uids.cf
virtual_gid_maps=mysql:/etc/postfix/gids.cf
virtual_mailbox_base=/usr/local/virtual
virtual_maps=mysql:/etc/postfix/virtual.cf
virtual_mailbox_domains=mysql:/etc/postfix/virtual_domains.cf


#
# SASL paramters;
#
smtp_use_tls = yes
smtpd_use_tls = yes
smtpd_tls_auth_only = yes
smtpd_tls_loglevel = 1
smtpd_tls_received_header = yes
smtpd_tls_session_cache_timeout = 3600s

smtp_tls_CAfile = /etc/postfix/ssl/smptd.pem
smtp_tls_cert_file = /etc/postfix/ssl/smptd.crt
smtp_tls_key_file = /etc/postfix/ssl/smptd.key

smtpd_tls_CAfile = /etc/postfix/ssl/smptd.pem
smtpd_tls_cert_file = /etc/postfix/ssl/smptd.crt
smtpd_tls_key_file = /etc/postfix/ssl/smptd.key

smtpd_sasl_auth_enable = yes

smtpd_sasl_security_options = noanonymous

smtpd_sasl_local_domain =

broken_sasl_auth_clients = yes

smtpd_sender_restrictions =
        permit_sasl_authenticated
        permit_mynetworks

smtpd_recipient_restrictions =
        permit_sasl_authenticated
        check_recipient_access hash:/etc/postfix/filtered_domains
        permit_mynetworks
        reject_unauth_destination
As a side note, my employer wants to be able to send emails from clients (Thunderbird and Outlook) both from within our local network and outside it.
«Ошибка сервера: отказано в ретрансляционном доступе 554 5.7.1» в Outlook возникает по двум основным причинам. Первая причина заключается в том, что ваш сервер исходящей почты (SMTP) не позволяет отправлять электронные письма без пользователя. аутентификации, а другая причина заключается в том, что ваш адрес электронной почты отмечен в списках спама как источник спам.

В этом руководстве содержатся инструкции по устранению следующей ошибки после отправки электронного письма: «Ваше сообщение не дошло до некоторых или всех предполагаемых получателей. Следующие получатели недоступны. Ошибка сервера: 554 5.7.1 Отказано в доступе к ретранслятору »
Как исправить ошибку отказа в ретрансляционном доступе в почте.
Чтобы точно определить причину ошибки Relay Access Denied 554 5.7.1 и решить проблему, выполните действия, указанные ниже.
Шаг 1. Проверьте настройки почтового сервера и учетные данные.
Прежде всего, убедитесь, что вы правильно ввели имя сервера исходящей электронной почты (SMTP), имя пользователя и пароль в своем почтовом приложении (Outlook, Thunderbird и т. Д.). *
* Примечание: Если ошибка «Ретрансляционный доступ запрещен» возникла без причины (например, если вы работали без проблем до вчерашнего дня), продолжите и включите «Аутентификацию SMTP» (Шаг 2).
(Настройки учетной записи электронной почты Outlook)

Шаг 2. Включите аутентификацию пользователя SMTP и безопасное соединение.
Чтобы избежать спамеров, многие почтовые серверы запрещают ретрансляцию электронных писем без предварительной аутентификации пользователя. Итак, продолжайте и включите аутентификацию SMTP и безопасное соединение в настройках сервера исходящей почты.
1. От Файл меню, выберите Настройки аккаунта *
* В Outlook 2007, 2003 перейдите в Инструменты > Счета.
2. Дважды щелкните свою учетную запись электронной почты, в которой возникла ошибка «Relay Access Denied», чтобы открыть ее свойства.
")
3. Нажмите Больше настроек.

4. Выберите Исходящий сервер вкладка и отметьте «Мой исходящий сервер (SMTP) требует аутентификации» вариант.

5. Затем выберите Передовой и укажите следующие настройки для Сервера исходящей почты.
-
- Порт исходящего сервера (SMPT): 465
- Тип шифрования: SSL

6. Нажмите В ПОРЯДКЕ а потом Настройки тестовой учетной записи.

7. Если проверка прошла успешно, нажмите Следующий и закройте настройки учетной записи электронной почты. Наконец, попробуйте отправить электронное письмо, чтобы узнать, устранена ли ошибка «Relay Access Denied». *
* Примечание: Если тест завершился неудачно или вы продолжаете получать ошибку «Relay Access Denied 554 5.7.1», то снова откройте дополнительные настройки, но на этот раз укажите следующие настройки. **
-
- Порт исходящего сервера (SMPT): 587
- Тип шифрования: TLS или STARTTLS

Шаг 3. Проверьте настройки электронной почты у своего поставщика услуг электронной почты и выполните поиск вирусов.
Если вы по-прежнему получаете сообщение об ошибке «Relay Access Denied» после выполнения описанных выше действий и настроек, обратитесь к своему поставщику услуг электронной почты, чтобы убедитесь, что информация об учетной записи (имя пользователя и пароль) и настройки для зашифрованного соединения SMTP (порт и тип шифрования) соответствуют правильный.
Дополнительно — но очень важно — проверьте свой компьютер и все остальные компьютеры в сети на предмет возможных заражений вредоносными программами. Для выполнения этой задачи выполните все шаги из этого Краткое руководство по сканированию и удалению вредоносных программ для ПК.
Шаг 4. Проверьте, внесен ли ваш почтовый сервер или ваш домен в списки СПАМА (БЛОК). *
* Уведомление: Последний шаг по устранению ошибки «Relay Access Denied» в основном касается доменов компании и владельцев почтовых серверов.
А. Если у вас есть адрес электронной почты, который является частью домена компании (например, [email protected]), и вы получаете сообщение об ошибке «Relay Access Denied»:
1. Перейдите на следующие сайты проверки черного списка электронной почты:
- www.mxtoolbox.com/blacklists.aspx
- multi.valli.org/lookup
2. Введите доменное имя компании (например, «company.com») или свой полный адрес электронной почты (например, [email protected]) в поле поиска и нажмите Проверка черного списка.

Б. Если вы являетесь владельцем сервера исходящей почты и ваши конечные пользователи получают сообщение об ошибке «Relay Access Denied», убедитесь, что ваш почтовый сервер не занесен в черный список. Для этого:
1. Перейдите на следующие сайты проверки черного списка электронной почты:
-
-
- www.mxtoolbox.com/blacklists.aspx
- multi.valli.org/lookup
-
2. В поле поиска введите имя сервера исходящей почты (например, mail.example.com) и нажмите Проверка черного списка.

Вот и все! Сообщите мне, помогло ли вам это руководство, оставив свой комментарий о своем опыте. Пожалуйста, поставьте лайк и поделитесь этим руководством, чтобы помочь другим.
Большое спасибо за публикацию, это было для меня спасением, когда мой Outlook завершил процесс отправки.
The «Server Error: Relay Access Denied 554 5.7.1» in Outlook occurs for two main reasons. The first reason is that your outgoing mail server (SMTP) doesn’t allow to send emails without user authentication and the other reason is that your email address is marked at spam lists as a source of spam.
This tutorial contains instructions to solve the following error, after sending an email: «Your message did not reach some or all of the intended recipients. The following recipient(s) cannot be reached. Server error: 554 5.7.1 Relay Access Denied»
How to fix Relay Access Denied Error in Mail.
To determine the exactly reason of the Relay Access Denied 554 5.7.1 error and to resolve the problem follow the steps mentioned below.
Step 1. Verify Mail Server Settings and Account Credentials.
First of all, make sure that you have typed correctly the name of the Outgoing email server (SMTP), the User Name and your Password at your email application (Outlook, Thunderbird, etc.). *
* Note: If the «Relay Access Denied» error has appeared without a reason (e.g. if you worked without problems until yesterday), then proceed and enable the «SMTP Authentication» (Step-2).
(Outlook Email Account Settings)
Step 2. Enable SMTP User Authentication & Secure Connection.
To avoid spammers, many mail servers deny the emails to be relayed without first authenticating the user. So, proceed and enable the SMTP authentication and the secure connection at the Outgoing Mail Server settings.
1. From the File menu, choose Account Settings *
* In Outlook 2007, 2003, go to Tools > Accounts.
2. Double click at your email account where you experienced the «Relay Access Denied» error to launch its properties.
3. Click More Settings.
4. Select the Outgoing Server tab and check the «My outgoing server (SMTP) requires authentication» option.
5. Then select the Advanced tab and specify the following settings for the Outgoing Mail Server.
-
- Outgoing server (SMPT) Port: 465
- Encryption type: SSL
6. Click OK and then Test Account Settings.
7. If the test is successful, click Next and close the Email Account Settings. Finally, try to send an email to see if the «Relay Access Denied» error is resolved. *
* Note: If the Test fails, or you continue receiving the «Relay Access Denied 554 5.7.1» error, then open the Advanced settings again, but this time specify the following settings. **
-
- Outgoing server (SMPT) Port: 587
- Encryption type: TLS or STARTTLS
Step 3. Verify Email Settings with your Email Provider & Scan for Viruses.
If you still receive the «Relay Access Denied» error, after applying the above steps and settings, then speak with your email provider to verify that the account information (Username & Password) and the settings for the SMTP encrypted connection (Port & Encryption type) are correct.
Additionally –but very important – check your computer and all other computers on your network for possible malware infections. To accomplish this task follow all the steps from this Quick Malware Scan and Removal Guide for PC’s.
Step 4. Check if your Mail Server or your Domain is Listed at SPAM (BLOCK) lists. *
* Notice: The final step to resolve the «Relay Access Denied» error mostly concerns company domains & Mail Server owners.
A. If you own an email address, which is part of a company domain (e.g. user@company.com) and you receive the «Relay Access Denied» error:
1. Navigate to the following email blacklist checking sites:
- www.mxtoolbox.com/blacklists.aspx
- multi.valli.org/lookup
2. Type the company domain name (e.g. «company.com») or your full email address (e.g. user@company.com) at the search box and click Blacklist Check.
B. If you ‘re the owner of the Outgoing mail server and your end users receive the «Relay Access Denied» error, check that your mail server is not Blacklisted. To do that:
1. Navigate to the following email blacklist checking sites:
-
-
- www.mxtoolbox.com/blacklists.aspx
- multi.valli.org/lookup
-
2. At the search box, type the name of the Outgoing Mail Server (e.g. «mail.example.com») and click Blacklist Check.
That’s it! Let me know if this guide has helped you by leaving your comment about your experience. Please like and share this guide to help others.
If this article was useful for you, please consider supporting us by making a donation. Even $1 can a make a huge difference for us in our effort to continue to help others while keeping this site free:
If you want to stay constantly protected from malware threats, existing and future ones, we recommend that you install Malwarebytes Anti-Malware PRO by clicking below (we
do earn a commision from sales generated from this link, but at no additional cost to you. We have experience with this software and we recommend it because it is helpful and useful):
Full household PC Protection — Protect up to 3 PCs with NEW Malwarebytes Anti-Malware Premium!
Emails are one of the most widely used ways of communication nowadays. Especially in the IT industry where everything: starting from meeting schedules and ending with contracts concludes, is done mostly via email. Relay Access Denied is a rather common error. It indicates that the server is not letting an email to be sent to another mail server. The most common reasons for this error are:
The sender did not authenticate to the outgoing mail server due to some misconfigurations
The recipient’s server has determined the sender’s server to be a source of spam, or that it had failed security checks
Reasons for getting a relay access denied error
Firstly, let’s take a look at the whole entire process of sending an email. When you send an email, your email client forwards the email to your own mail server. Then your mail server transmits it on Relays to the recipient’s email server. After that, their email server delivers the email to the recipient.
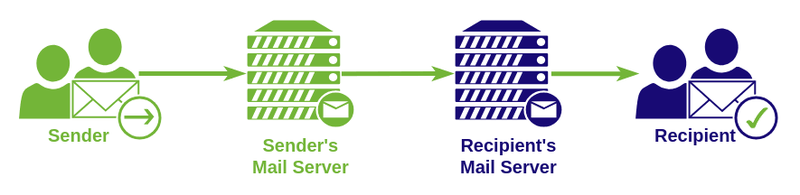
So there are 2 servers (aka MX) that are involved – Sender’s MX and Recipient’s MX. If one of these servers rejects the mail, then the sender will see the Relay Access Denied error.
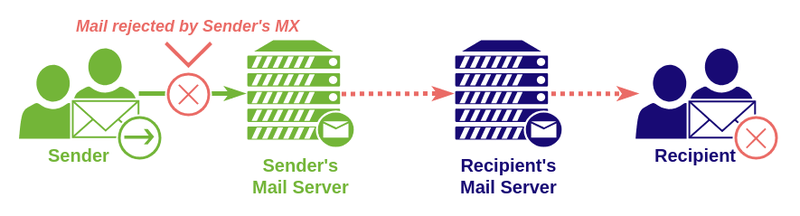
Case 1 — Sender’s MX rejects the email
Before the actual sending of the email, MX of the sender asks to provide a username and password to send emails. If your MX won’t be able to successfully authenticate you before sending the email, then it will deny the email from being relayed to the recipient’s MX.
Why does it happen? Such precaution is done to keep the spammers out, so they aren’t able to send mail using your server without proper credentials. Sometimes it happens even with trustworthy email users if they forget to turn on auth in their mail clients.
So there are 2 servers (aka MX) that are involved – Sender’s MX and Recipient’s MX. If one of these servers rejects the mail, then the sender will see the Relay Access Denied error.
Case 1 — Sender’s MX rejects the email
Before the actual sending of the email, MX of the sender asks to provide a username and password to send emails. If your MX won’t be able to successfully authenticate you before sending the email, then it will deny the email from being relayed to the recipient’s MX.
Why does it happen? Such precaution is done to keep the spammers out, so they aren’t able to send mail using your server without proper credentials. Sometimes it happens even with trustworthy email users if they forget to turn on auth in their mail clients.
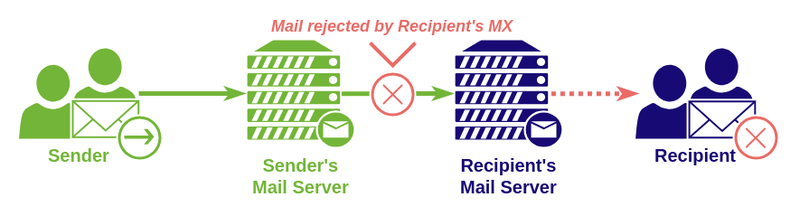
Case 2 — Recipient’s MX rejects the mail
If the email was successfully sent from Sender’s MX, then the issue might appear with the recipient’s MX. It will accept mail only if:
— The Sender’s MX passed all security checks/spam filters
— The recipient’s MX doesn’t have any misconfigurations
The most common misconfigurations on the recipient’s MX are:
— SMTP authentication settings are disabled
— The recipient’s email is invalid/inactive/canceled
— DNS MX records are pointing to the wrong server
— MX has some database errors
Solution for Relay Access Denied error on the user side.
First of all, you should ask your email service provider for assistance and verify your email settings with them. You will need to check that you have proper credentials, such as Mail server, Username, and Password. Further, verify whether or not you should use SMTP Authentication, moreover it might be that you need to use POP before SMTP you should also consider this point by verifying settings with your email provider.
So, if it turns out that you are using POP before SMTP then you can run into occasional problems with mobile devices. This is caused by your data network changing due to reduced coverage, either if you’re switching different WiFi hotspots. In such case, your IP address may be changing, as a result, you will send an email from a new IP address instead of the IP address you first authenticated with. To counter this issue, try and switch to SMTP Authentication thus you will be able to test if your email provider has enabled this feature as well. If it fails, then you should reach your email provider and request them to enable SMTP Authentication on the mail server.
And lastly, there is always a possibility of spam filters coming into action on the recipient’s server. If so, then you should ask your email provider to look through the mail server’s log files and acquire more information from them regarding how to stop this issue.
Solution for Relay Access Denied error on the mail server side
There are two most common situations why a server owner may face such or similar errors.
— The first one, when end users attempted to send an email, they may receive and send this error in a bounce back
— The second one, a person trying to send an email to a user on your server receives an error and they report it to you
You should find something close to this message in your log files.
2018-10-30 15:22:23 1brcGf-0006ac-Mf ** [email protected]
R=dkim_lookuphost T=dkim_remote_smtp H=exampleserver.com [192.168.0.1]
X=TLSv1.2:ECDHE-RSA-AES256-GCM-SHA384:256
CV=yes: SMTP error from remote mail server after RCPT
TO:<[email protected]>: 554 5.7.1
<e[email protected]>: Recipient address rejected: Access denied
Moreover, pay attention to the error code. We have noticed a couple of versions for that error:
— 554 5.7.1 Relay Access Denied – You can see this error code in the recipient’s mail server logs when an email is rejected.
— 454 4.7.1 Relay Access Denied – This error code is observed inside server logs when the recipient server is temporarily incapable to receive emails. In such a case, another attempt to send mail will take place later.
Case 1 — User authentication fail
If all your end users began to receive such an error, then it’s most likely this case. You should review the server authentication configurations. For example, if you are using a Postfix server, you must ensure that SMTP authentication is enabled. To do this, check the configuration file and make sure that the “smtpd_recipient_restrictions” is configured as follows:
smtpd_recipient_restrictions = permit_sasl_authenticated
From time to time when it comes to updating server software, there is a possibility that it can change configurations. Therefore, if your mail server was running smoothly all the time, and then it suddenly stops, most likely the reason is the latest software update. For example, cPanel control panel automatically checks for updates during nighttime. Sometimes new and fresh updates that have been just rolled out may break all things. In such a situation, you can either wait for a new update, or you’ll have to manually change some settings.
If you have used to update your server manually, you should consider having a test server setup similar to your live server. Utilization of such a test server for checking updates on it first — is a good practice. Next, if everything works fine on your test environment, you can proceed and roll it out to your live environment.
Case 2 — Authentication database is corrupted
On servers similar to Plesk usernames, passwords, and authenticated IP addresses are stored in the database. Like any other database, this can become corrupted for numerous reasons. But you can always rely on a simple command line to restore a table.mysqlcheck -r psa smtp_poplocks -uadmin -p
This command will perform the check of the table called «smtp_poplocks» and fix it if it turns out that it’s broken.
Case 3 — External mail server failed anti-spam check on your server
Such a situation may occur when someone is sending an email to your end users and the sender’s emails may be rejected by spam filters configured on your mail server. In this case, you’ll probably find such entries in your mail logs:
2022-09-09 14:05:23 H=(myserver.com) [xx.xx.xx.xx] sender verify fail for <[email protected]>:
response to "RCPT TO: <[email protected]>"
from senderserver.com [yy.yy.yy.yy] was: 554
<[email protected]>: Relay access denied
2016-10-10 14:05:23 H=(myserver.com) [xx.xx.xx.xx] F=<[email protected]> rejected RCPT
<[email protected]>: Sender verify failed
This happens due to Sender Verification Callout or simply Sender Verify spam rule. And it indicates that examplesrv.com rejected an email from sendersrv.com based on this rule.
There are three possible ways to resolve such an issue:
— You should investigate mail logs. If this happens with trustworthy mailbox and emails from this address are blocked due to anti-spam check too often. Then it’s better to consider updating and disabling that anti-spam rule.
— If you are sure that the server which is sending the email is totally trustworthy, you can simply whitelist this server. But use this with caution, because this will allow all emails from that server to pass through without any anti-spam checks. So, if by any chance the whitelisted server will be hacked and used to send spam, then all that spam will pass through your server.
— Reach the owner of the sending email server, and request him to re-configure his server in such a way as to be compliant to your anti-spam rules and checks.
Every mail server should have anti-spam checks enabled. But, you should also consider that if you’ll be too offensive with those checks. Then some of your customers may lose important emails. So, we suggest sticking to the IETF | RFC’s compliant spam checks, which are a reference for most server owners and users.
Case 4 — Anti-spam rules on the recipient server are bouncing back your user’s emails
If it happens that your end users are sending emails and in response, they are receiving them back with such an error code:
— 454 4.7.1 : Relay access denied
Most likely that your server is not passing the recipient’s server anti-spam rules and checks. As well as it may get on the firewall blacklist on the recipient’s side.
In such a situation you should firstly review the headers of the bounced emails. It should bring you more details and info on why the email was rejected. Usually, it’s provoked when your server gets on RBL’s (Real-time Blackhole List). Such sites as MxToolbox and MultiRBL will help you to figure this out and check if your server is located in blacklists. Info that you will get from those sites will tell you about any blacklists that you may be on and usually refer to these RBL’s, so you can request them to delist you from those RBL’s. However, before asking to delist your server you should make sure and resolve the origin of getting blacklisted. For example, if a spammer was detected on your server then you have to remove him before asking to remove your server from the blacklist.