
Sometimes when you unmount a filesystem or drive, the system shows «unmount target is busy» message. Unless you release the busy system, you won’t be able to unmount.
In this guide, we learn how to fix umount target is busy in Linux.
What is unmount target busy
A mounted filesystem can be accessed by any process running on the Linux operating system. When such a filesystem or a directory which is being accessed by some process is unmounted, the system may issue the target as busy (“device is busy”). One of the reasons the system doesn’t allow unmount is to prevent data loss.
This problem generally occurs in the following scenarios:
- The current working directory accessed by the terminal is on the path of the mount point
- A process is accessing the files on the filesystem hierarchy being unmounted
- A process is accessing a file which relies (reads/writes) on the file inside the filesystem which is being unmounted.
- Remote mount point unreachable

Force unmount
Force unmount is one solution to detach the busy device.
Usually, you see a busy device message when you try to unmount an NFS filesystem. This happens often when the NFS server has some issues (mainly unreachable) and you have a soft NFS mount.
Force unmount will detach the server mount point by disrupting some running processes.
CAUTION: This may cause data loss or corrupt files or programs accessing file throw errors.
unmount -f /path/to/busy-nfs-mount
You can verify if it is successfully unmounted using the df command.
Using lsof — Find and Kill the processes using the file
The lsof (list open files) command displays a list of all open files and the processes associated with them on a specific file system, directory, or device. By default, it lists all files, shared libraries, and directories that are currently open and provides as much information as possible about each of them.
We can use lsof command to find PID (process id) corresponding to our mount point and then kill that process.
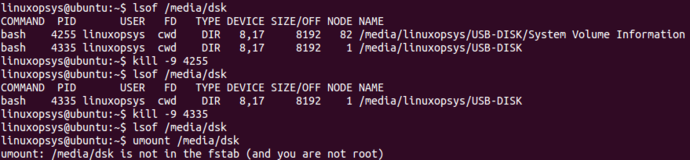
Use the following lsof command to list processes using the mount point.
lsof /media/dskorlsof | grep '/media/dsk'

The output shows that the user linuxopsys has two bash processes with PIDs 4255 and 4335 using /media/dsk.
Once these two programs are stopped the device is no longer busy.
Once you make sure its safe to kill the process, run the following kill command:
kill -9 4255
kill -9 4335
If no more processes tide to the mount point, you initiate umount command.
Using fuser — Kill processes accessing the file
fuser command in Linux helps to identify the processes which are accessing sockets or files on filesystems.
Use fuser command with -m option which lists all the processes accessing the files or mount point on the file system. You can add -v option for verbose.
The following example displays all the processes accessing the file system /media/dsk along with their process ids arranged in a tabular format.
fuser -mv /media/dsk
Now you found the processes which are using the file on the mounted filesystem. You can use kill command to terminate those processes.
You can add -k option to kill processes in a single command, so you can avoid one step.
fuser -kmv /media/dsk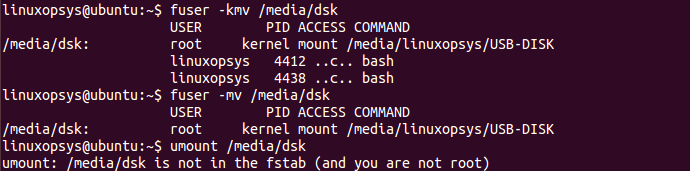
Lazy unmount
Lazy unmounting is used to unmount the mount point from the Linux filesystem hierarchy. The command removes all references to the detached file system as soon as it is no longer busy. Once no processes are accessing the unmounted file system, the umount command executes and actually detaches the file system.
Lazy unmounting a mount point is beneficial when we don’t want to unexpectedly kill the process which are accessing the file systems as this may lead to loss of data or may corrupt the file systems.
For example, when you are copying a file from the mounted flash drive to linux machine and need to unmount the mounted device at the same time so that you don’t need to actively check the status of the file transfer, you can execute a lazy unmount on the flash drive so that once the operation to copy the file is complete, the system automatically detaches the mount point of the flash drive.
To lazy unmount use -l option followed by the mount path:
umount -l <path_to_mount_point>

Conclusion
In this guide, we learned how to fix when you encounter umount target is busy in Linux. We have explained solutions using force unmount, detaching busy device by finding and kill the processes, and finally lazy mount.
Thanks for reading, please leave your feedback and suggestions in the comment section.
Unmounting disks in the Linux command line is not complicated. All you have to do is to use the umount command:
umount targetBut once in a while, you’ll come across an error that says ‘umount: target is busy’:

So how are you supposed to solve this issue?
Well, before solving this issue, let me share the reason behind this problem first.
The reason behind Umount target is busy
The reason is quite simple! The target device is still in use.
With enough permissions, any process might be utilizing that drive that you want to unmount, and to prevent data loss, the kernel won’t allow you to unmount.
How to solve Umount target is busy in Linux
⚠️
If an ongoing data transfer occurs in the background, you may lose your data by forcefully unmounting your drive.
There are times when you want to unmount the drive at any cost. Perhaps the drive isn’t responding for some reason and you want to unmount it.
In this tutorial, I will share three ways to unmount the target:
- By killing the process itself
- Using force unmount
- Using the lazy unmount
Let’s start with the first method.
Method 1: Unmout target by killing the process itself (recommended)
This is the best way of unmounting the target in my opinion as you are eventually killing the process itself.
The first step is to find the PID of the process that causes the problems.
To do so, I will be using the lsof command in the following manner:
sudo lsof /Path/to/target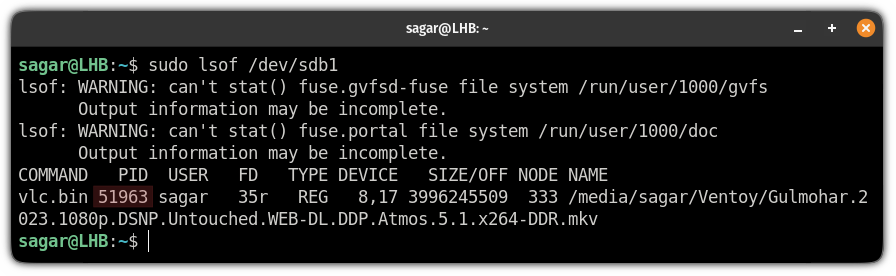
Once you get the PID, it’s quite simple to force kill the process:
sudo kill -9 [PID]And now, you should be able to unmount the drive easily:

Pretty neat way. Isn’t it?
Method 2: Using force unmount (for Network File Systems)
The force unmount option is mainly preferred by those who are dealing with network file systems.
So it may NOT give you the expected results with your local file system.
To use the force unmount, you will have to use the same old umount command but with the -f flag:
sudo umount -f /Path/to/target
Method 3: Using the lazy unmount (Schrödinger’s unmount)
📄
This option does not actually unmount your target but just removes the target from the namespace. And will unmount the target when the drive is not being utilized anymore!
It is more of a Schrödinger’s mount when you can never be sure of whether the filesystem is unmounted or not!
So why am I even adding this to the solution’s list? Well, this is the least harmful way of unmounting your stubborn drive.
To use the lazy unmount, you will have to use the -l flag with the umount command as shown:
sudo umount -l /Path/to/target
And here you have it!
Which one should you choose?
In times like you have to have your drive unmounted, I would prefer going with the 1st method which involves killing the process itself.
And there is a strong reason why. It gets my job done without any hiccups.
Sure, you may want to go with either of the last two options based on your use case.
It is not difficult to fix umount target is busy error. But what it means? While transferring data in any computer, if you unmount a USB flash driver/Data storage from your system while it is still busy on it, you face the error ”device is currently in use” and asks you to close programs first. While unmounting a device/portion on Linux, the same error occurs after running the umount command. Fix umount target is busy error in Linux is what you will learn in this article. It is not a complicated error and even helps to not lose your data but unless you solve it you cannot unmount your device.
After buying Linux VPS, you can access all the mounted filesystems. But if the accessed filesystems would not unmount, the ‘’device is busy’’ error does not let you continue. You are highly recommended to not unmount your device forcefully since it endangers your data or disrupts some running processes. So, join us with this guide to review all four methods you can use to pass this issue.
What is the ”Umount Target is Busy” error and why occur?
This error is simply saying that your device is still in use. In other words, a user or a process has an open file on that file system. Any process with sufficient permissions can access a device’s filesystem after you mount it in your system. An active process is actively accessing a file or directory on the device when the error “target is busy” appears. The Linux kernel will therefore prevent you from unmounting the device while it is being accessed in order to prevent data loss.
However, if you still need to unmount the target device, let’s learn how to fix umount target is busy error. Stay with us to review different methods to troubleshoot this error and in the end, you can decide which one is easier for you to use.
Tutorial Fix ”Umount Target is Busy” Error
Generally, the cause of umount target is busy error is an active process in your Linux system. When you have to unmount your drive, you need to find a solution to do this without data loss. According to different situations, one of the following methods would be helpful. In this part, you will learn all the best solutions to fix umount target is busy error.
Technique 1. Find and Kill Active Processes
Since the reason behind the ”umount target is busy” error is an active process, you must find and kill it. The lsof command views a list of open files to let you know what processes are associated with them. run the following command to find the process id (PID) first and then kill it.
sudo lsof /Path/to/targetThe above command lists all the processes using the mount point and does fix umount target is busy error. When the PID is displayed, it is time to terminate all running processes.
sudo kill -9 [PID]For example, if the output is saying that a process with PID 4255 is using the device, you need to run the command below to kill that process.
kill -9 4255You might find more than one process accessing a file, make sure that you have terminated all of them. In this way, all the processes that are attached to the device would be stopped, and you will be able to unmount the device.
Technique 2. Unmount Forcefully
While unmounting an NFS (Network File System), you might face the discussed error in this article. In this way, you can use the force unmount as a solution to detach your busy device. Since this method causes data loss, choose it when you have no valuable and sensitive data.
Run the command below to fix umount target is busy error and unmount the device forcefully:
sudo umount -f /Path/to/targetTechnique 3. Find and Kill Processes Accessing the File
The lsof command displays all open files on the mount point but the fuser command shows all the processes accessing the mount point. Since the Open (possibly deleted) socket is one of the reasons for the ”target is busy” error, the fuser command enables you to find the processes that are accessing sockets or files on filesystems. The -m option lists all the processes accessing the files. Also, you can add -v option for verbose. Run the command below to use this method and fix umount target is busy error.
fuser -mv /Path/to/targetOnce the processes which are using the file on the mounted filesystem are displayed, use the kill command to stop them all.
If you add -k option, processes will be killed at once. To achieve this, run:
fuser -kmv /Path/to/targetTechnique 4. Lazy Unmount
To fix umount target is busy error, a methodical way is the Lazy unmount. It unmounts the mount point from the Linux filesystem. To remove all the processes attached to the device (that are not in use) slowly, you can use this solution. Since the Lazy unmount removes all references to the detached file system, it will detach the file system when there is no more process accessing the unmounted file system. So, if the last suggested method is your choice, type:
sudo umount -l /Path/to/targetIn this way, all ideal processes will be automatically removed and the device will be unmounted. According to your used case, all the recent solutions can be chosen to fix umount target is busy error.
What if none of the methods works?
I guess you are using ClearCase. If yes, you are recommended to check /Vobs/Myvob since it might be the current working directory on a client host when unmounting. If the current directory sends target busy error, you can make sure that it is the current directory.
To solve this failure, you must turn ClearCase off since when unmounting, it should not be the working directory on a host client.
The first-mentioned solution, »using lsof command to find and kill active processes» , is recommended as the best way to unmount the target.
Users who are working with Network File Systems usually prefer to use this method. So, it will not give ideal results on local file systems. Also, it is helpful when the error is caused by an unreachable resource such as a network resource.
The Lazy unmount is less harmful since it does not kill the process unexpectedly.
Conclusion
In this article, you learned how to Fix Umount Target is Busy Error in Linux. Now, you know the reason of occurring this error. Four different techniques such as detaching busy device by finding and killing the processes (lsof command), force unmount, using fuser command, and finally, lazy mount were explained. Keep in mind to run both lsof and fuser commands as root to have unlimited outputs. Using any of these methods helps you to troubleshoot this error. Based on your system and situation choose the best way to fix umount target is busy error.
Please do not hesitate to contact us if you encounter any problems. Our technical support team will try their best to solve your problems.
[sudo] пароль для valet:
root@pc-78:~# fdisk -l
Диск /dev/loop0: 55,3 MiB, 58007552 байт, 113296 секторов
Единицы: секторов по 1 * 512 = 512 байт
Размер сектора (логический/физический): 512 байт / 512 байт
Размер I/O (минимальный/оптимальный): 512 байт / 512 байт


Диск /dev/loop1: 290,4 MiB, 304545792 байт, 594816 секторов
Единицы: секторов по 1 * 512 = 512 байт
Размер сектора (логический/физический): 512 байт / 512 байт
Размер I/O (минимальный/оптимальный): 512 байт / 512 байт


Диск /dev/loop2: 30,3 MiB, 31735808 байт, 61984 секторов
Единицы: секторов по 1 * 512 = 512 байт
Размер сектора (логический/физический): 512 байт / 512 байт
Размер I/O (минимальный/оптимальный): 512 байт / 512 байт


Диск /dev/loop3: 31 MiB, 32432128 байт, 63344 секторов
Единицы: секторов по 1 * 512 = 512 байт
Размер сектора (логический/физический): 512 байт / 512 байт
Размер I/O (минимальный/оптимальный): 512 байт / 512 байт


Диск /dev/sda: 465,8 GiB, 500107862016 байт, 976773168 секторов
Единицы: секторов по 1 * 512 = 512 байт
Размер сектора (логический/физический): 512 байт / 4096 байт
Размер I/O (минимальный/оптимальный): 4096 байт / 4096 байт
Тип метки диска: dos
Идентификатор диска: 0xb389be3d

Устр-во    Загрузочный    начало     Конец   Секторы Размер Идентификатор Тип
/dev/sda2  *             1050624   2101247   1050624   513M             b W95 FA
/dev/sda3                2103294 975722495 973619202 464,3G             5 Расшир
/dev/sda4              975722496 976771071   1048576   512M             b W95 FA
/dev/sda5                2103296 975722495 973619200 464,3G            83 Linux

Раздел 3 начинается не на границе физического сектора.
Элементы таблицы разделов упорядочены не так, как на диске.
root@pc-78:~# lsblk
NAME   MAJ:MIN RM   SIZE RO TYPE MOUNTPOINT
loop0    7:0    0  55,3M  1 loop /snap/core18/1885
loop1    7:1    0 290,4M  1 loop /snap/vlc/1700
loop2    7:2    0  30,3M  1 loop /snap/snapd/9279
loop3    7:3    0    31M  1 loop /snap/snapd/9607
sda      8:0    0 465,8G  0 disk
├─sda2   8:2    0   513M  0 part
├─sda3   8:3    0     1K  0 part
├─sda4   8:4    0   512M  0 part
└─sda5   8:5    0 464,3G  0 part /
root@pc-78:~# cat /etc/fstab
# /etc/fstab: static file system information.
#
# Use 'blkid' to print the universally unique identifier for a
# device; this may be used with UUID= as a more robust way to name devices
# that works even if disks are added and removed. See fstab(5).
#
# <file system> <mount point>   <type>  <options>       <dump>  <pass>
# / was on /dev/sda6 during installation
UUID=ab2fdc9d-920b-424c-a2c5-75ca5a85de92 /               ext4    errors=remount-ro 0       1
/swapfile                                 none            swap    sw              0       0
root@pc-78:~# df -hT
Файл.система   Тип      Размер Использовано  Дост Использовано% Cмонтировано в
udev           devtmpfs   2,9G            0  2,9G            0% /dev
tmpfs          tmpfs      582M         1,4M  581M            1% /run
/dev/sda5      ext4       456G          68G  368G           16% /
tmpfs          tmpfs      2,9G          41M  2,9G            2% /dev/shm
tmpfs          tmpfs      5,0M         4,0K  5,0M            1% /run/lock
tmpfs          tmpfs      2,9G            0  2,9G            0% /sys/fs/cgroup
/dev/loop0     squashfs    56M          56M     0          100% /snap/core18/1885
/dev/loop1     squashfs   291M         291M     0          100% /snap/vlc/1700
/dev/loop2     squashfs    31M          31M     0          100% /snap/snapd/9279
tmpfs          tmpfs      582M          40K  582M            1% /run/user/1000
/dev/loop3     squashfs    31M          31M     0          100% /snap/snapd/9607
root@pc-78:~# cat /proc/mounts
sysfs /sys sysfs rw,nosuid,nodev,noexec,relatime 0 0
proc /proc proc rw,nosuid,nodev,noexec,relatime 0 0
udev /dev devtmpfs rw,nosuid,relatime,size=2940960k,nr_inodes=735240,mode=755 0 0
devpts /dev/pts devpts rw,nosuid,noexec,relatime,gid=5,mode=620,ptmxmode=000 0 0
tmpfs /run tmpfs rw,nosuid,noexec,relatime,size=595712k,mode=755 0 0
/dev/sda5 / ext4 rw,relatime,errors=remount-ro 0 0
securityfs /sys/kernel/security securityfs rw,nosuid,nodev,noexec,relatime 0 0
tmpfs /dev/shm tmpfs rw,nosuid,nodev 0 0
tmpfs /run/lock tmpfs rw,nosuid,nodev,noexec,relatime,size=5120k 0 0
tmpfs /sys/fs/cgroup tmpfs ro,nosuid,nodev,noexec,mode=755 0 0
cgroup /sys/fs/cgroup/unified cgroup2 rw,nosuid,nodev,noexec,relatime,nsdelegate 0 0
cgroup /sys/fs/cgroup/systemd cgroup rw,nosuid,nodev,noexec,relatime,xattr,name=systemd 0 0
pstore /sys/fs/pstore pstore rw,nosuid,nodev,noexec,relatime 0 0
cgroup /sys/fs/cgroup/cpu,cpuacct cgroup rw,nosuid,nodev,noexec,relatime,cpu,cpuacct 0 0
cgroup /sys/fs/cgroup/devices cgroup rw,nosuid,nodev,noexec,relatime,devices 0 0
cgroup /sys/fs/cgroup/freezer cgroup rw,nosuid,nodev,noexec,relatime,freezer 0 0
cgroup /sys/fs/cgroup/hugetlb cgroup rw,nosuid,nodev,noexec,relatime,hugetlb 0 0
cgroup /sys/fs/cgroup/rdma cgroup rw,nosuid,nodev,noexec,relatime,rdma 0 0
cgroup /sys/fs/cgroup/net_cls,net_prio cgroup rw,nosuid,nodev,noexec,relatime,net_cls,net_prio 0 0
cgroup /sys/fs/cgroup/memory cgroup rw,nosuid,nodev,noexec,relatime,memory 0 0
cgroup /sys/fs/cgroup/pids cgroup rw,nosuid,nodev,noexec,relatime,pids 0 0
cgroup /sys/fs/cgroup/blkio cgroup rw,nosuid,nodev,noexec,relatime,blkio 0 0
cgroup /sys/fs/cgroup/cpuset cgroup rw,nosuid,nodev,noexec,relatime,cpuset 0 0
cgroup /sys/fs/cgroup/perf_event cgroup rw,nosuid,nodev,noexec,relatime,perf_event 0 0
mqueue /dev/mqueue mqueue rw,relatime 0 0
systemd-1 /proc/sys/fs/binfmt_misc autofs rw,relatime,fd=42,pgrp=1,timeout=0,minproto=5,maxproto=5,direct,pipe_ino=12214 0 0
debugfs /sys/kernel/debug debugfs rw,relatime 0 0
hugetlbfs /dev/hugepages hugetlbfs rw,relatime,pagesize=2M 0 0
fusectl /sys/fs/fuse/connections fusectl rw,relatime 0 0
configfs /sys/kernel/config configfs rw,relatime 0 0
/dev/loop0 /snap/core18/1885 squashfs ro,nodev,relatime 0 0
/dev/loop1 /snap/vlc/1700 squashfs ro,nodev,relatime 0 0
/dev/loop2 /snap/snapd/9279 squashfs ro,nodev,relatime 0 0
tmpfs /run/user/1000 tmpfs rw,nosuid,nodev,relatime,size=595708k,mode=700,uid=1000,gid=1000 0 0
gvfsd-fuse /run/user/1000/gvfs fuse.gvfsd-fuse rw,nosuid,nodev,relatime,user_id=1000,group_id=1000 0 0
/dev/loop3 /snap/snapd/9607 squashfs ro,nodev,relatime 0 0
root@pc-78:~# ```
Attaching and removing storage devices from your system is a crucial part of data transfer in any computer. In Linux, the mount and unmount keywords are provided, which will add or remove certain storage components or even file systems. These commands can help to switch between various storage devices. For example, you can unmount a certain storage device and mount another one to use it. Oftentimes, while attempting to unmount a device, the “umount target is busy” problem can be invoked.
This article will guide you on why this problem arises and how it can be dealt with easily.
How to Resolve the “umount target is busy” Issue?
The reasons behind this problem can relate to the working of this command. This section will not only elaborate on why this error occurs but will also help you resolve it.
Reason: The Device is in Use
There are many different processes that have enough permissions to be able to access any storage device at any time. Due to this, the device is accessed the majority of the time. If a device is being accessed and the user tries to unmount the device, it will prompt the error mentioned above. This happens because if the device is unmounted during its use, there is a chance of some data being lost. To prevent that from happening, the error will be invoked, and the device will not be unmounted.
Let’s have a look at how this issue can be fixed.
Solution 1: Unmount Forcefully
The first solution is to try to unmount the device forcefully. It needs to be noted that this method should only be applied when there is no sensitive data on the device because this process has a chance of causing data loss. To unmount the device forcefully, run the following command:
$ umount -f /device-pathWhere “-f” is used to force the unmount, and the “device-path” is the directory path of the device.
Solution 2: Stop the Active Process
As discussed above, an active process may be causing the error “unmount target is busy”. We simply need to stop the active process occupying the device to fix it. Use the command below to access the process list of the device:
$ sudo lsof /device-pathRunning this command will return all the processes surrounding that device.
The next step is to note down their process ID. The snippet below shows sample PIDs:
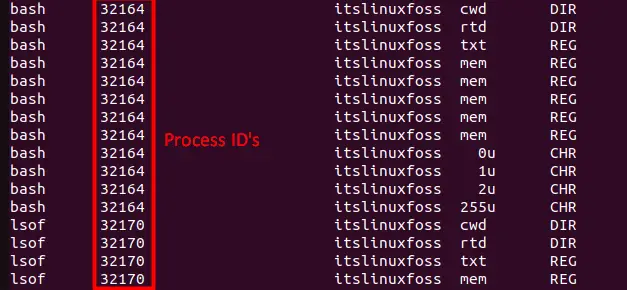
Note down the process-id and terminate the process using the command shown below:
$ sudo kill -9 [PID]Using this command, you can terminate all the processes that are attached to the device. After this, the error will not occur, and you can successfully unmount the device.
Solution 3: Lazy Unmount
It is a combination of both the methods mentioned above and is effective among all. In lazy unmount, the system will forcefully unmount the device but in a methodical way. Using this way, the system will slowly remove all the processes attached to the device that is not in use. To achieve this, use the following command:
$ umount -l /device-pathThe “l” represents the lazy unmount in the device.
Using any of these methods, the problem “umount target is busy” can be fixed easily.
Conclusion
The “umount target is busy” issue occurs due to the device being in use by various processes at the time of unmounting. The problem can be resolved in 3 ways. The first is to forcefully unmount the device, which risks the loss of data. The second way is to find and eliminate each process individually. The third way is to do a lazy unmount, which will automatically remove all ideal processes and then unmount the device. This article has provided a detailed guide on the reasons behind this error and has proposed a list of solutions as well.