
Have you tried to delete the Your_Solution_FileName.suo file?
The .suo file should be in the same folder as your .sln file, or in the .vs folder for newer versions of Visual Studio. The .vs folder might be hidden.
Update for Visual Studio 2017
In VS 2017 the .suo files are located in a different folder: you can find the .suo file in YourSolutionFolder.vsYourSolutionNamev15.suo
The .vs folder is hidden, and the .suo files is a file without name, with just the .suo extension.
Explanation
The .suo file contain various information like the opened files list, and some preferences that are not saved in the solution file (like the starting project) and other things.
Normally you can delete the .suo file without problems. You might have to set the StartUp Project for your solution afterwards.
Just to stay on the safe way, you can rename the .suo file, and then retry to start the solution, to see if this help.
In my experience sometime VS crash on start because there is an error in some source code, and due to that error VS can’t compile the code, and then crash because without compiled code it’s unable to show form in design mode.
In this case, deleting the .suo file will solve the situation because it reset the open files list, so the solution can start up without opening/showing any files.
When deleting the .suo file doesn’t works
Here’s a list of other things you can try when deleting the .suo file doesn’t resolve the issue:
- Restart the computer
- Clean Windows temp folder
- Clean the solution from the IDE (MenuBuildClean Solution)
- Clean the solution manually (delete the compiled DLL/EXE in the
/bin/folder and empty the temporary files that VS create during the build process in the/obj/folder (each project that compose the solution has these folders, so clean them all)) - Try to open each single project that compose the solution 1-by-1 and build it, to understand which is the specific project that generate the issue
- Understand what is the change/edit/modification that triggered the error, and undo it (source control tool can help…)
- If you have custom controls: check the code in the constructor. The VS IDE will call the constructor of your custom controls even at design time, and weird things can happen (at design time some properties dont works, your connection string probably isn’t populated…)
As a last resort…
- Try to install any VS update
- Try to disable VS extensions (if you installed any…)
- Try to update any external DLL/Control referenced in your solution
- Try to update Windows
Windows, Windows 10, Windows 7, Windows 8, Windows Server, Windows Vista, Windows XP
- 02.08.2020
- 18 637
- 1
- 20
- 18
- 2
- Содержание статьи
- Описание
- Причина 1: Отключенная служба «Брандмауэр Windows»
- Причина 2: Отключен общий доступ для текущего сетевого профиля
- Комментарии к статье ( 1 шт )
- Добавить комментарий
Описание
Ошибка с кодом 0x000006d9 появляется в операционной системе Windows, когда вы пытаетесь разрешить общий доступ к принтеру. В данной статье мы рассмотрим несколько основных причин, которые приводят к данной ошибке. Выглядит данная ошибка вот таким вот образом (при открытии окна «Свойства принтера»):

Не удалось сохранить параметры принтера. Не удалось завершить операцию (ошибка 0x000006D9)
В английской версии:
Printer Settings could not be saved. Operation could not be completed (Error 0x000006D9)
Либо вот так (при использовании мастера установки принтеров):
Windows не может открыть общий доступ к принтеру. Не удалось завершить операцию (ошибка 0x000006D9)
В английской версии:
Windows could not share your printer. Operation could not be completed (Error 0x000006D9)
Причина 1: Отключенная служба «Брандмауэр Windows»
Очень часто пользователи отключают службу брандмауэра Windows после установки ОС, т.к. периодически от нее больше проблем, чем пользы. Но к сожалению при попытке открыть общий доступ к принтерам, при сохранении настроек идет проверка на предмет того, что служба брандмауэра Windows запущена и работает. Поэтому, чтобы обойти ошибку 0x000006D9 нам необходимо запустить эту службу и применить настройки. Сделать это можно следующим образом:
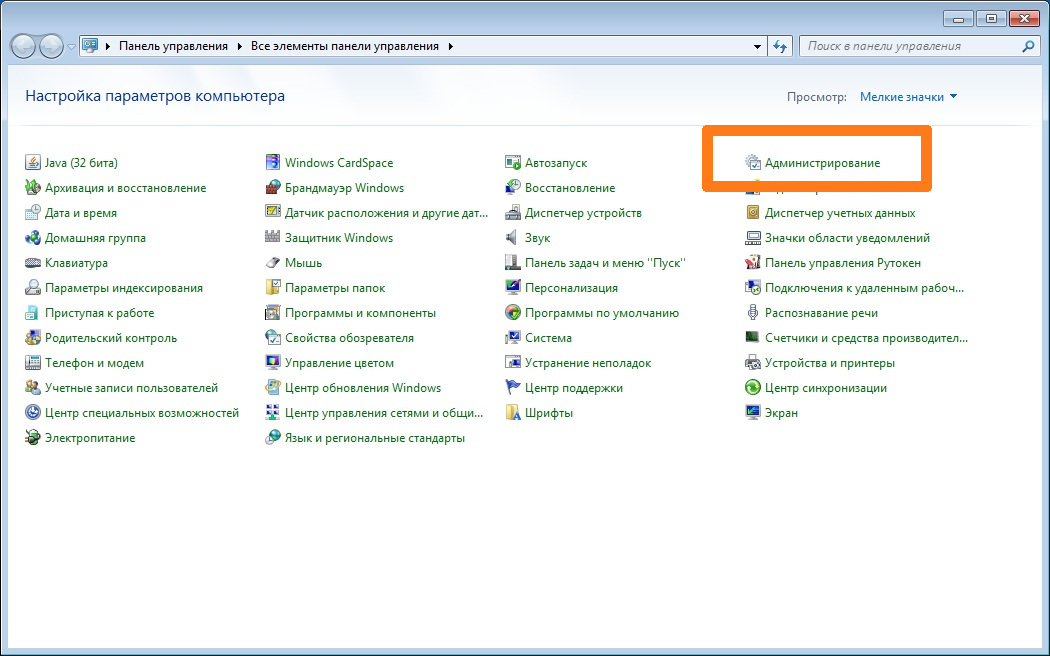
Открываем панель управления и выбираем там пункт «Администрирование«
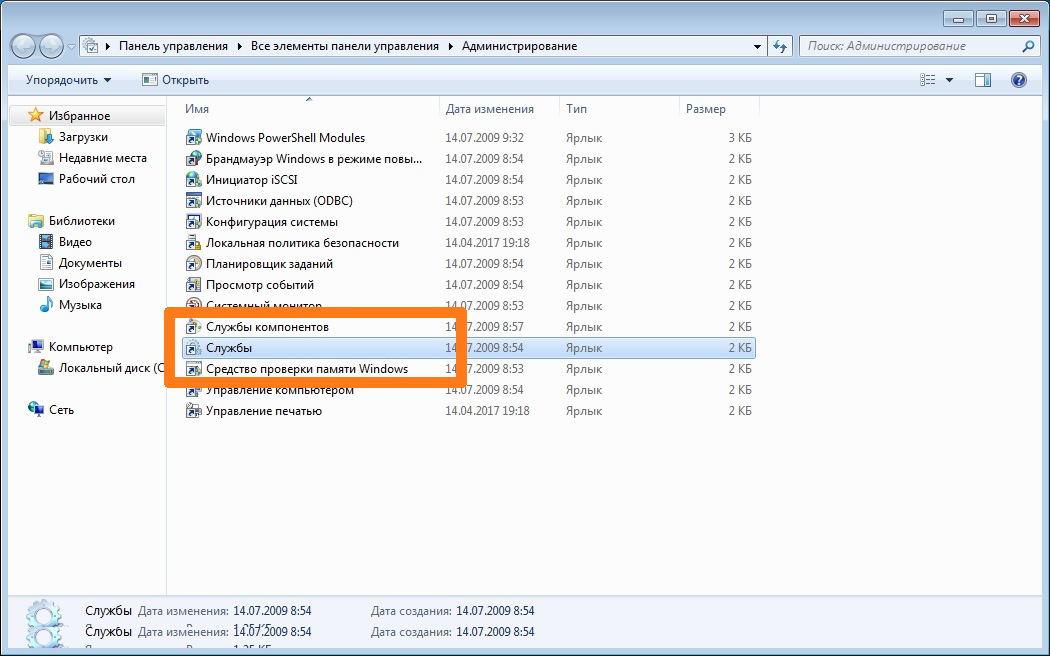
В открывшихся настройках выбираем пункт «Службы«
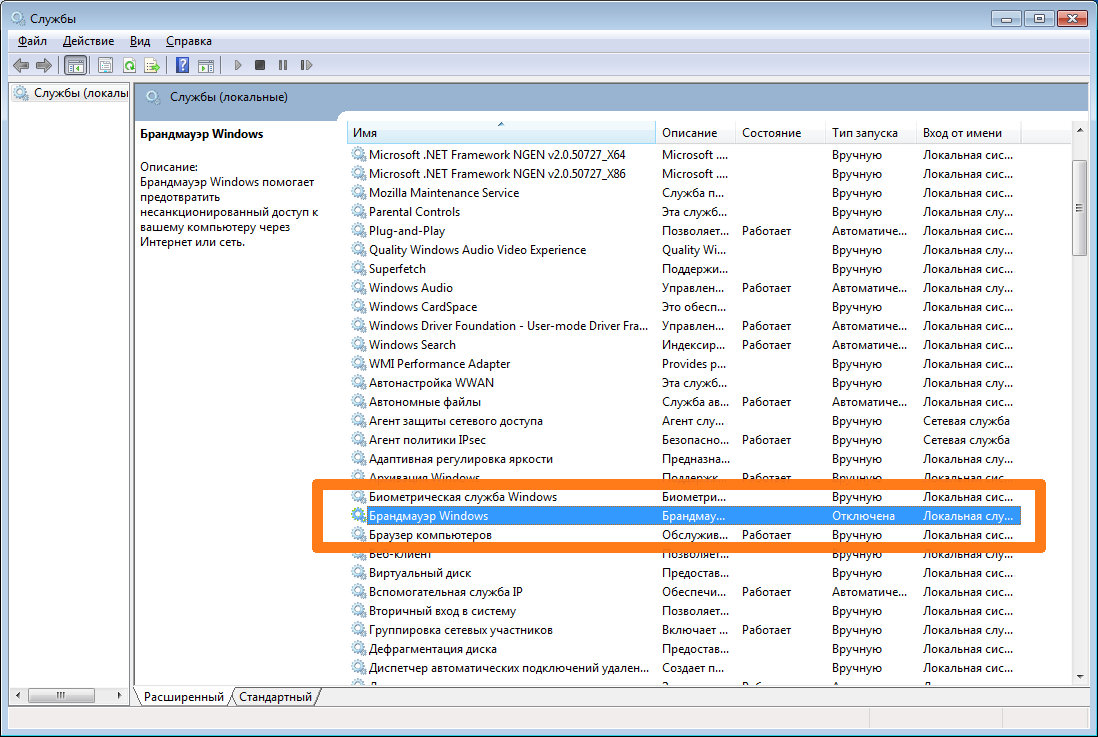
После этого откроется список служб Windows, где нам надо найти службу «Брандмауэр Windows» и открыть ее настройки (дважды кликнуть левой кнопкой мыши на нужной службе):
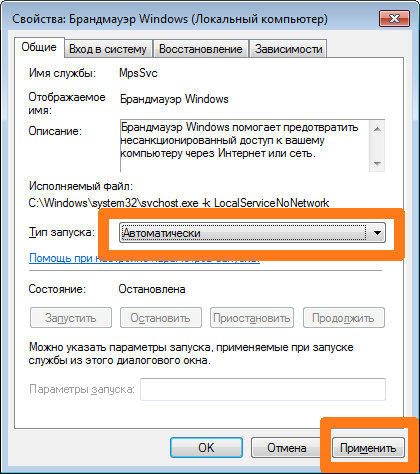
В открывшемся окне настроек запуска службы Брандмауэр Windows необходимо выбрать тип запуска — «Автоматически» и нажать кнопку «Применить«:
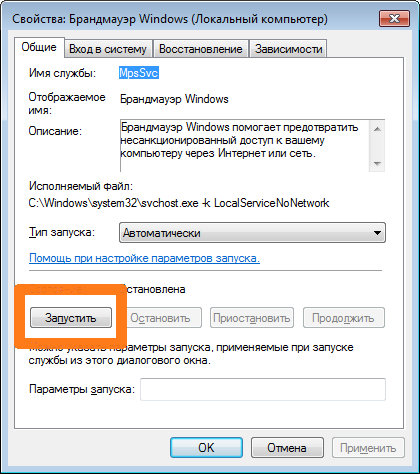
После этого станет доступна кнопка «Запустить«, которую нам необходимо будет нажать, чтобы служба запустилась:
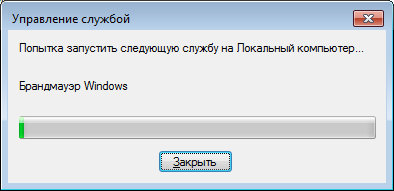
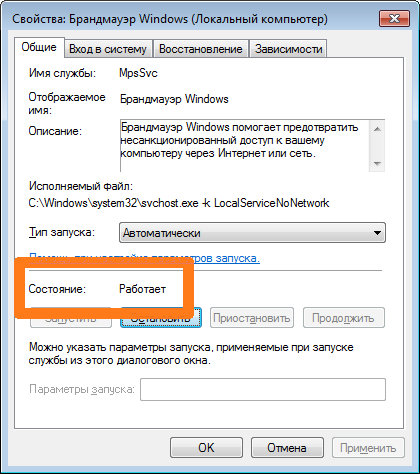
После чего будет запущена служба Брандмауэр Windows и если все нормально, то ее состояние должно измениться на «Работает«:
После этого необходимо попытаться еще раз открыть общий доступ к нужному принтеру.
Если все прошло гладко и общий доступ к принтеру заработал нормально, то можно опять отключить службу брандмауэра Windows, т.к. она не требуется для работы шаринга принтера.
Если же ошибка так и не ушла, то переходим к следующему пункту статьи.
Причина 2: Отключен общий доступ для текущего сетевого профиля
В Windows есть настройки для различных сетевых профилей, в которых как раз есть пункт про общий доступ к принтерам. Чтобы открыть эти настройки, необходимо проделать следующее:
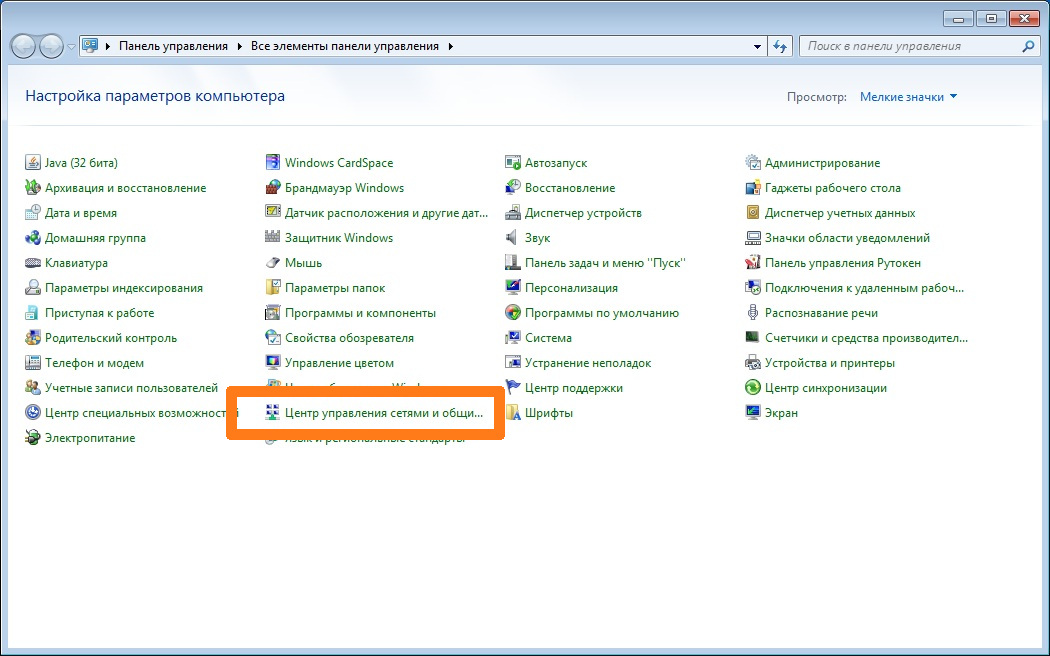
Открываем панель управления и выбираем там пункт «Центр управления сетями и общим доступом«
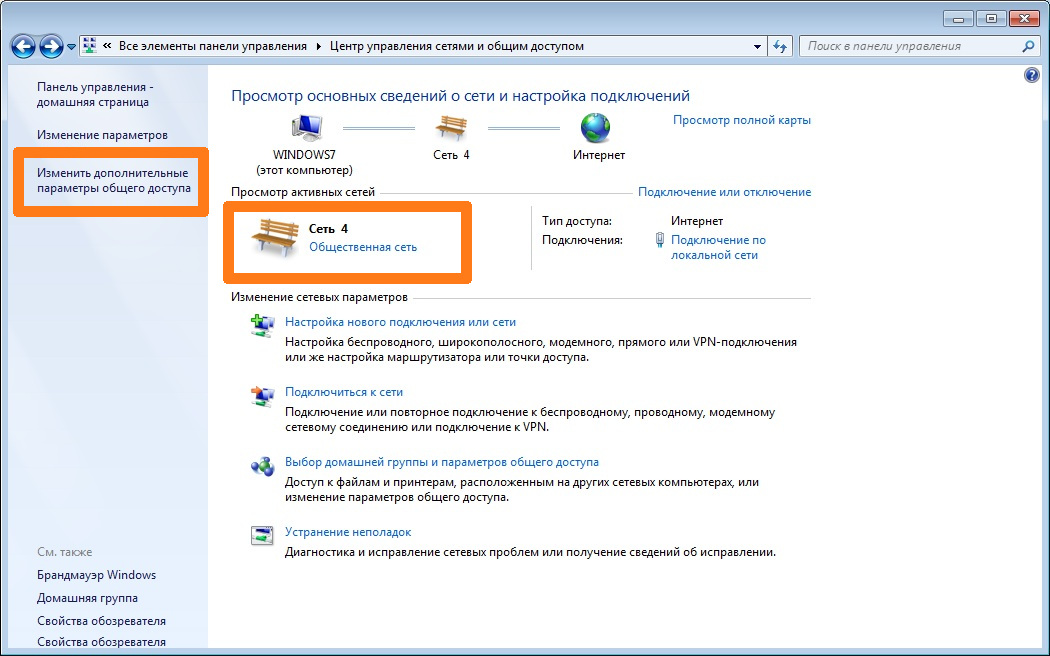
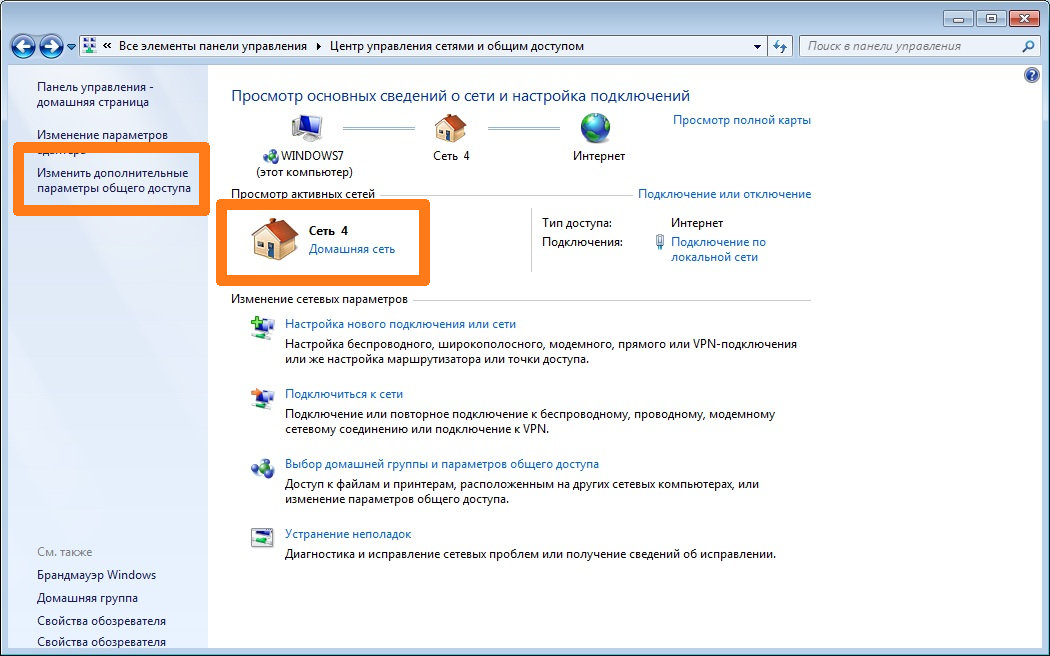
В открывшемся окошке настроек, смотрим на текущий активный сетевой профиль (Общественная сеть или Домашняя сеть) и выбираем пункт «Изменить дополнительные параметры общего доступа«:
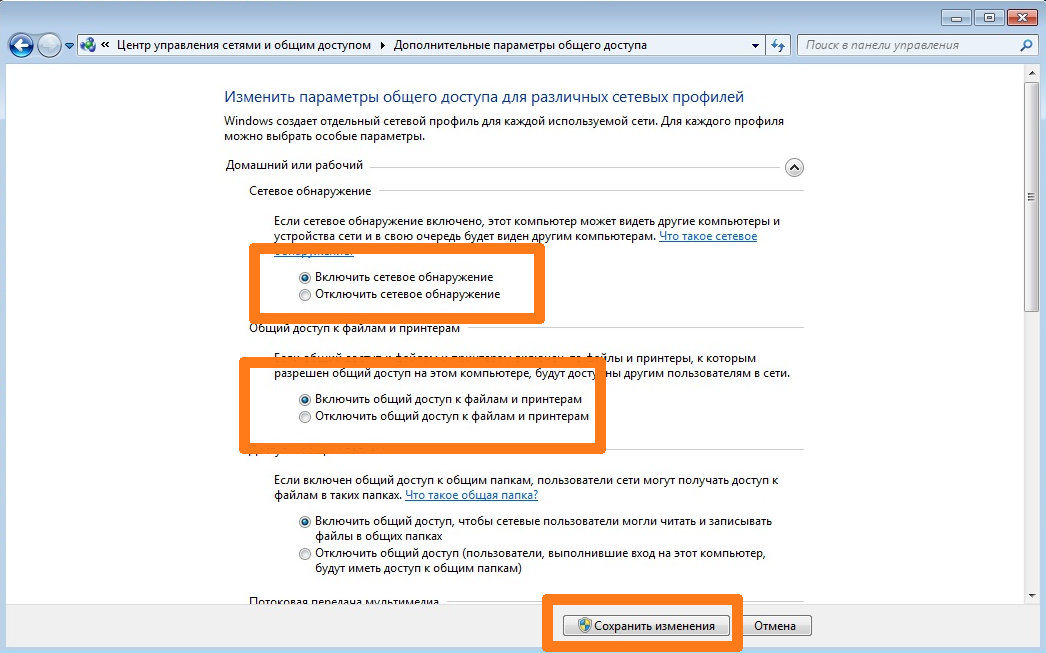
Далее, в открывшемся окне настроек для активного профиля (Общественная сеть или Домашняя сеть) необходимо включить 2 настройки: «Включить сетевое обнаружение» и «Включить общий доступ к файлам и принтерам» и нажать кнопку «Сохранить изменения«.
Если сомневаетесь, то включите данные настройки для обоих профилей «Домашний или рабочий» и «Общий» и нажмите кнопку «Сохранить изменения«
После этого необходимо попытаться еще раз открыть общий доступ к принтеру и ошибка должна исчезнуть.
How to Fix Error 0x00000709 When Selecting Default Printer
If you can’t set your default printer and get an “Operation could not be completed (error 0x00000709)” message, follow the instructions provided in this article to fix the problem.
When you set a default printer, all print jobs are automatically sent to the selected printer, and you don’t have to select a printer each time you want to print. However, Windows may fail to change the default printer and throw the 0x00000709 error in some cases.
The full error message reads as follows:
Operation could not be completed (error 0x00000709). Double check the printer name and make sure that the printer is connected to the network.
This error mainly occurs when more than one printer is connected to a computer. It may also occur when a printer is shared over a network.
What Causes Error 0x00000709
- Incorrect Windows Registry settings.
- Allowing Windows to manage the default printer automatically.
- The cumulative update KB5006670 for Windows 10. Uninstalling this update should solve the problem.
Video on How to Fix “Operation could not be completed (error 0x00000709)”
Table of Contents:
- Introduction
- Method 1. Run the Printer Troubleshooter
- Method 2. Disable Windows Automatic Printer Management
- Method 3. Set Default Printer via Windows Registry Editor
- Video on How to Fix “Operation could not be completed (error 0x00000709)”
Method 1. Run the Printer Troubleshooter
1. Hold down Windows+R keys to open Run.
When you set a default printer, all print jobs are automatically sent to the selected printer, and you don’t have to select a printer each time you want to print. However, Windows may fail to change the default printer and throw the 0x00000709 error in some cases.
The full error message reads as follows:
Operation could not be completed (error 0x00000709). Double check the printer name and make sure that the printer is connected to the network.
This error mainly occurs when more than one printer is connected to a computer. It may also occur when a printer is shared over a network.
What Causes Error 0x00000709
- Incorrect Windows Registry settings.
- Allowing Windows to manage the default printer automatically.
- The cumulative update KB5006670 for Windows 10. Uninstalling this update should solve the problem.
Video on How to Fix “Operation could not be completed (error 0x00000709)”
Table of Contents:
- Introduction
- Method 1. Run the Printer Troubleshooter
- Method 2. Disable Windows Automatic Printer Management
- Method 3. Set Default Printer via Windows Registry Editor
- Video on How to Fix “Operation could not be completed (error 0x00000709)”
Method 1. Run the Printer Troubleshooter
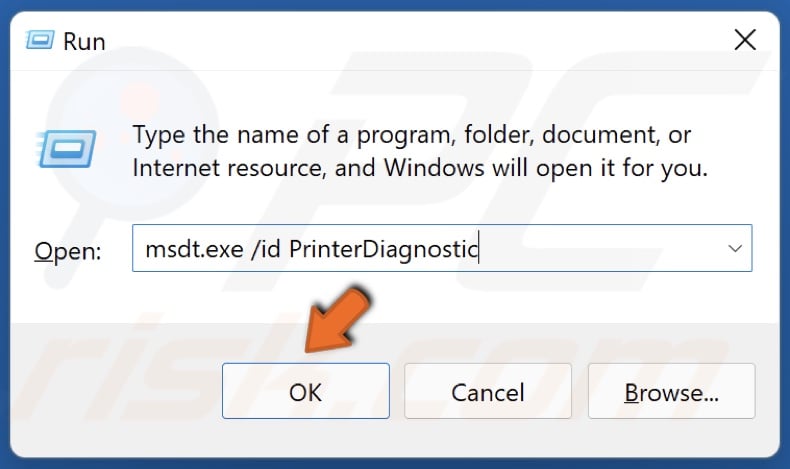
1. Hold down Windows+R keys to open Run.
2. In the Run dialog box, type in msdt.exe /id PrinterDiagnostic and click OK.
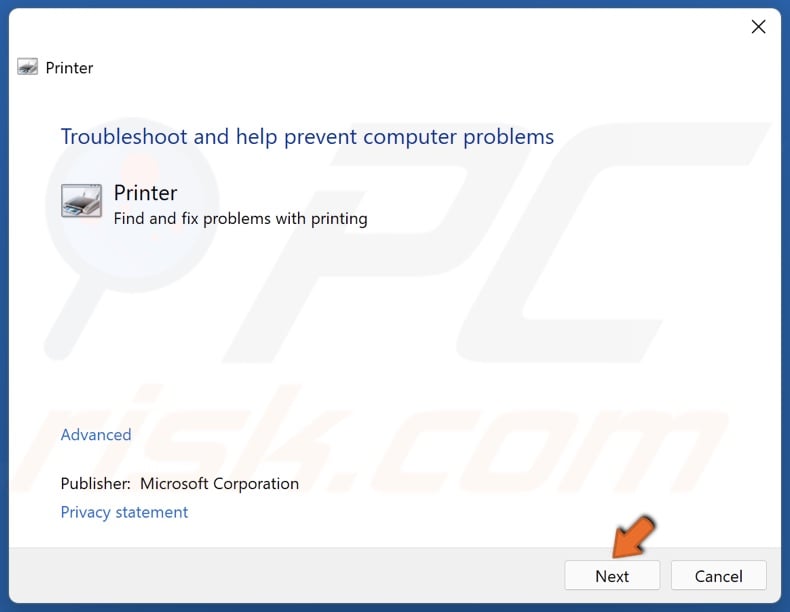
3. In the Printer Troubleshooter window, click Next.
3. In the Printer Troubleshooter window, click Next.
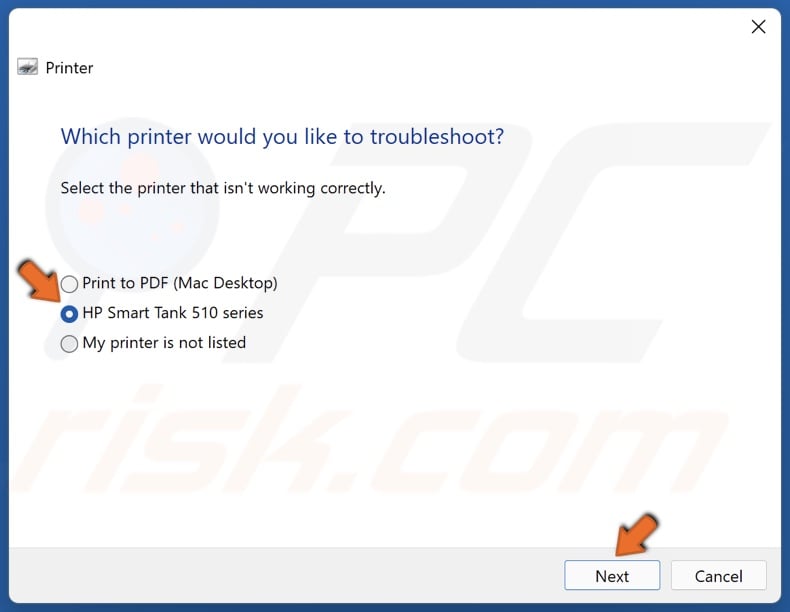
4. Select the printer and click Next.
5. The troubleshooter will identify the problem and provide a fix.
[Back to Table of Contents]
Method 2. Disable Windows Automatic Printer Management
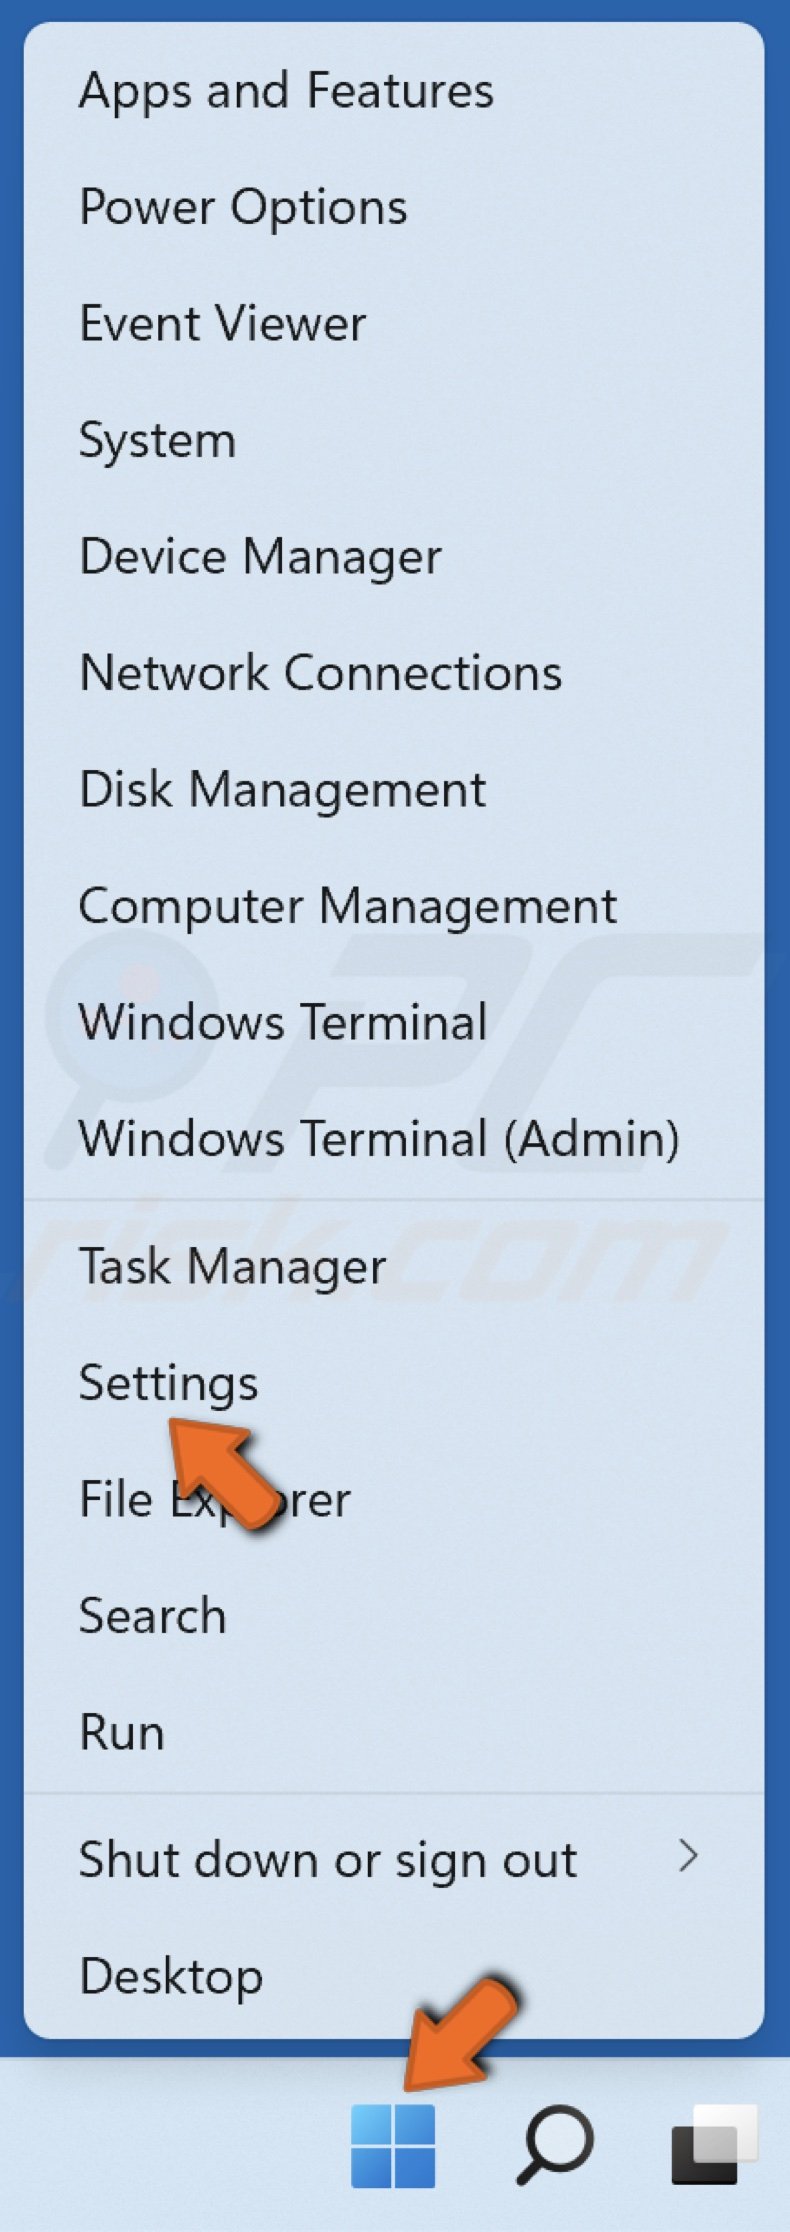
1. Right-click Start and click Settings.
1. Right-click Start and click Settings.
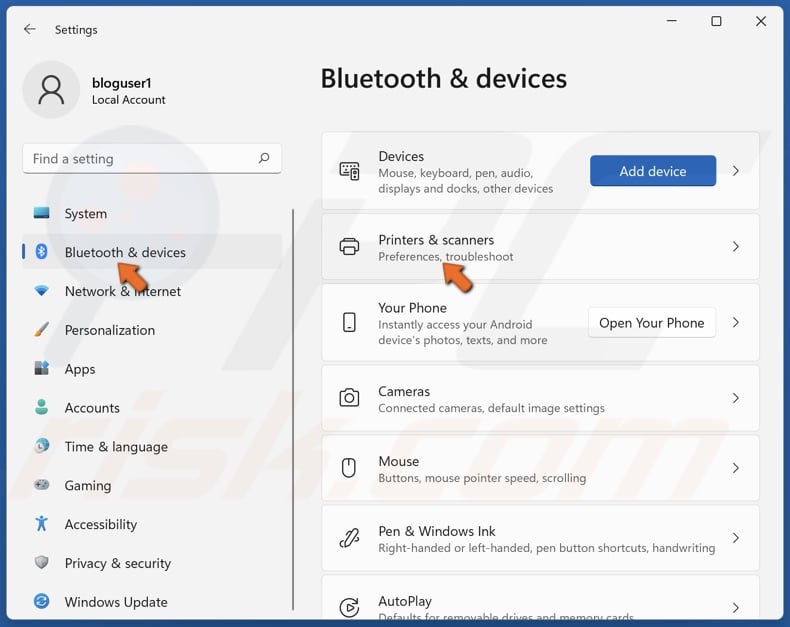
2. In the left pane, select Bluetooth and devices.
3. Select Printers & scanners.
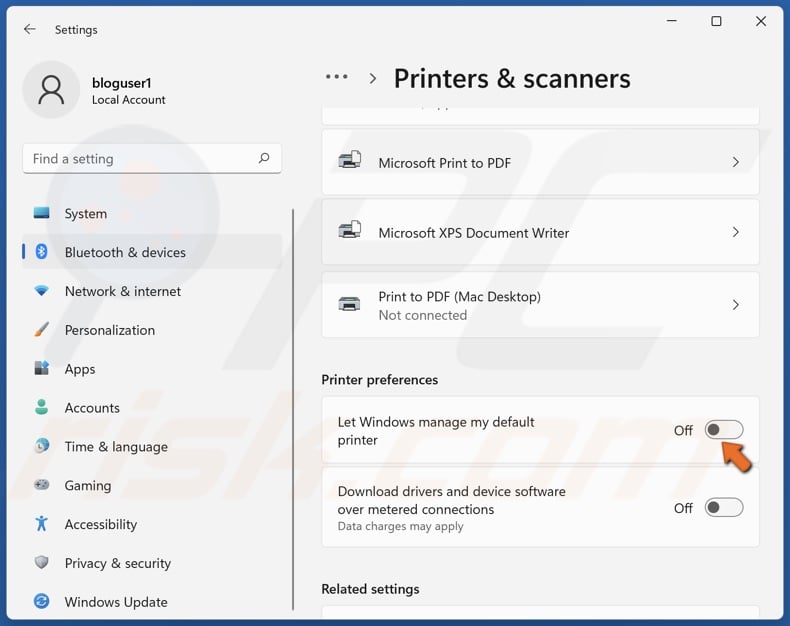
4. In the Printer preferences section, toggle off the, Let Windows manage my default printer, option.
4. In the Printer preferences section, toggle off the, Let Windows manage my default printer, option.
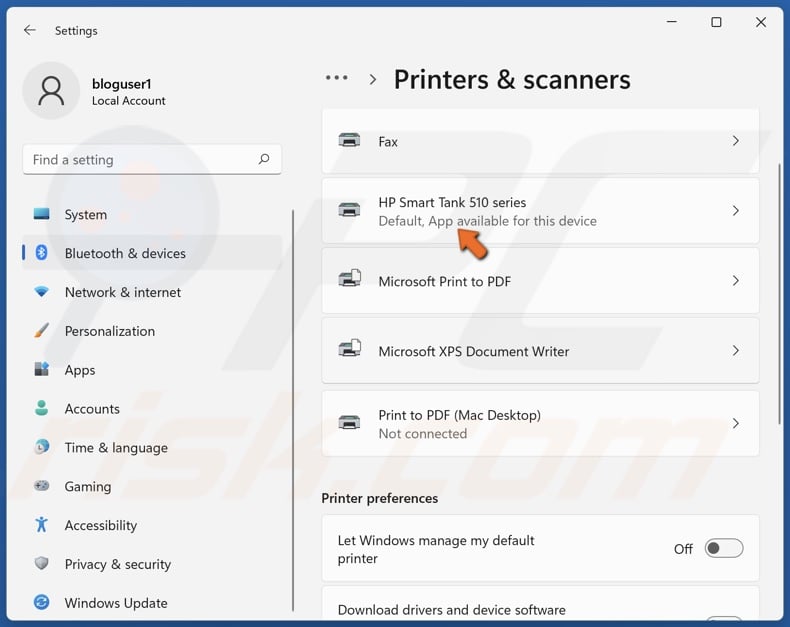
5. Then, select the printer.
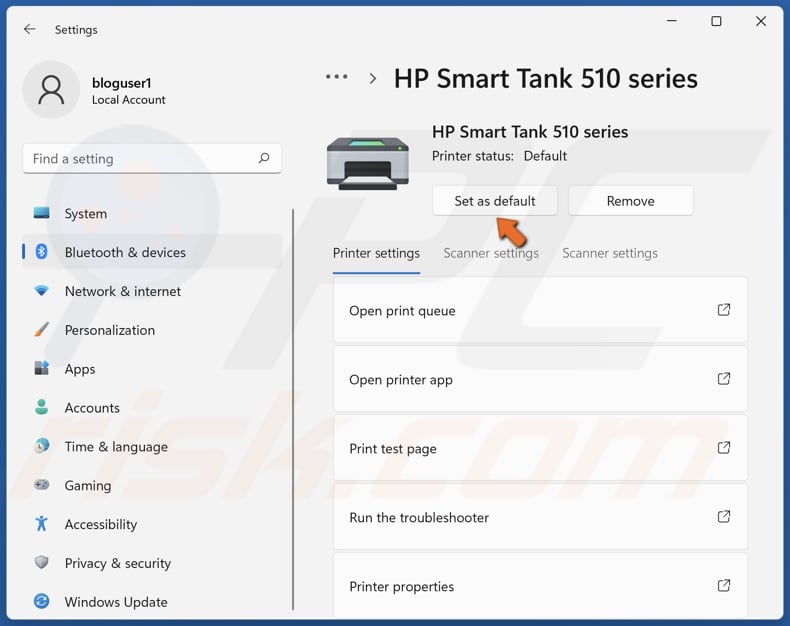
6. Click Set as default.
[Back to Table of Contents]
Method 3. Set Default Printer via Windows Registry Editor
Before going through the steps, you need to know the exact name of your printer.
6. Click Set as default.
[Back to Table of Contents]
Method 3. Set Default Printer via Windows Registry Editor
Before going through the steps, you need to know the exact name of your printer.
1. Right-click Start and click Settings.
2. In the left pane, select Bluetooth and devices.
3. Select Printers & scanners.
2. In the left pane, select Bluetooth and devices.
3. Select Printers & scanners.
4. Check the name of your printer.
5. Hold down Windows+R keys to open Run.
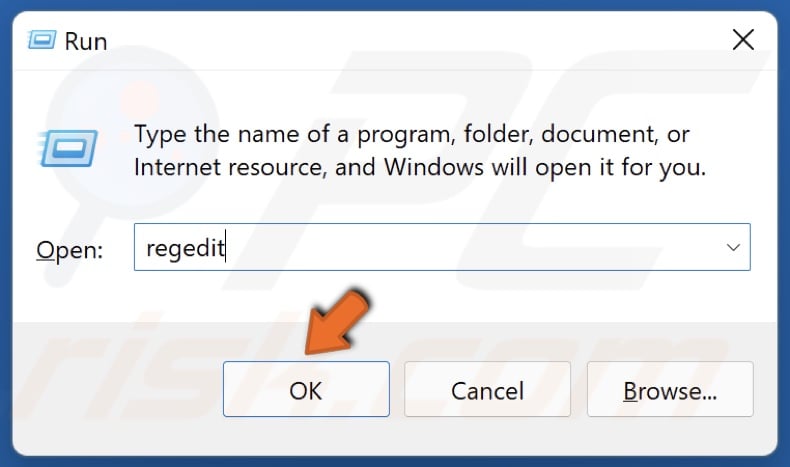
6. In the Run dialog box, type in regedit and click OK.
6. In the Run dialog box, type in regedit and click OK.
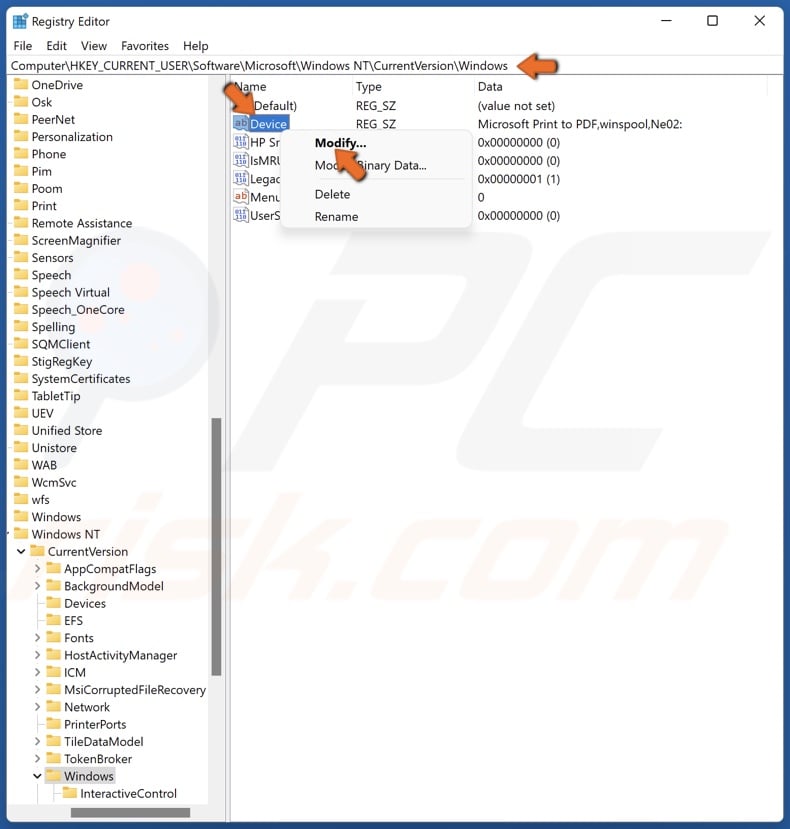
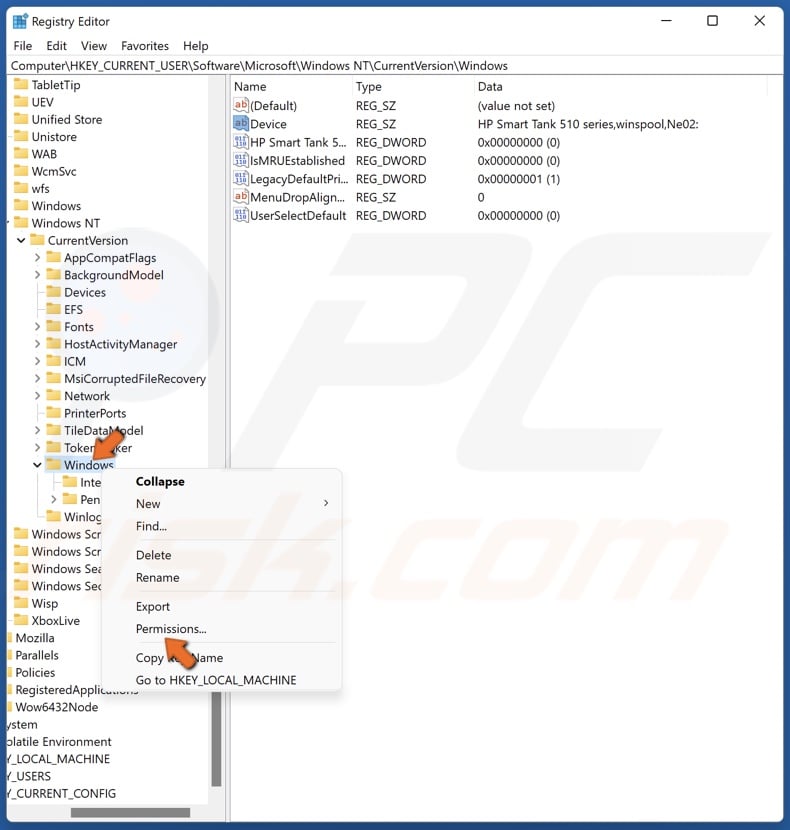
7. In the Windows Registry Editor, navigate to HKEY_CURRENT_USERSoftwareMicrosoftWindowsNTCurrentVersionWindows
8. Right-click Device and click Modify.
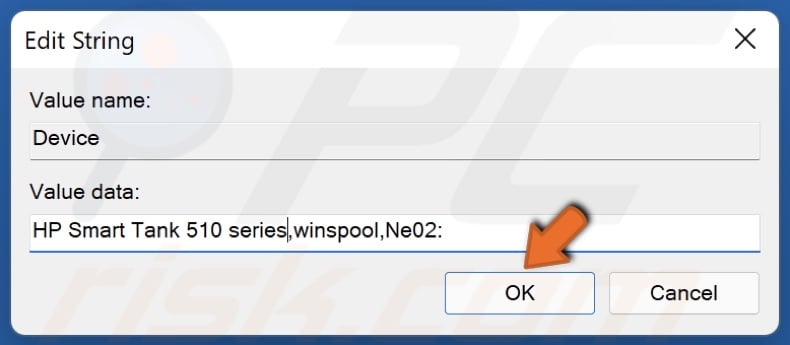
9. In the Value data section, type in your printer name and click OK. The value data is separated by a comma into three parts. You only need to change the part at the front, which is the printer name.
10. If you get a Cannot edit Device: Error writing the value’s new contents error, perform the following steps.
11. Right-click the Windows key in the left pane and click Permissions.
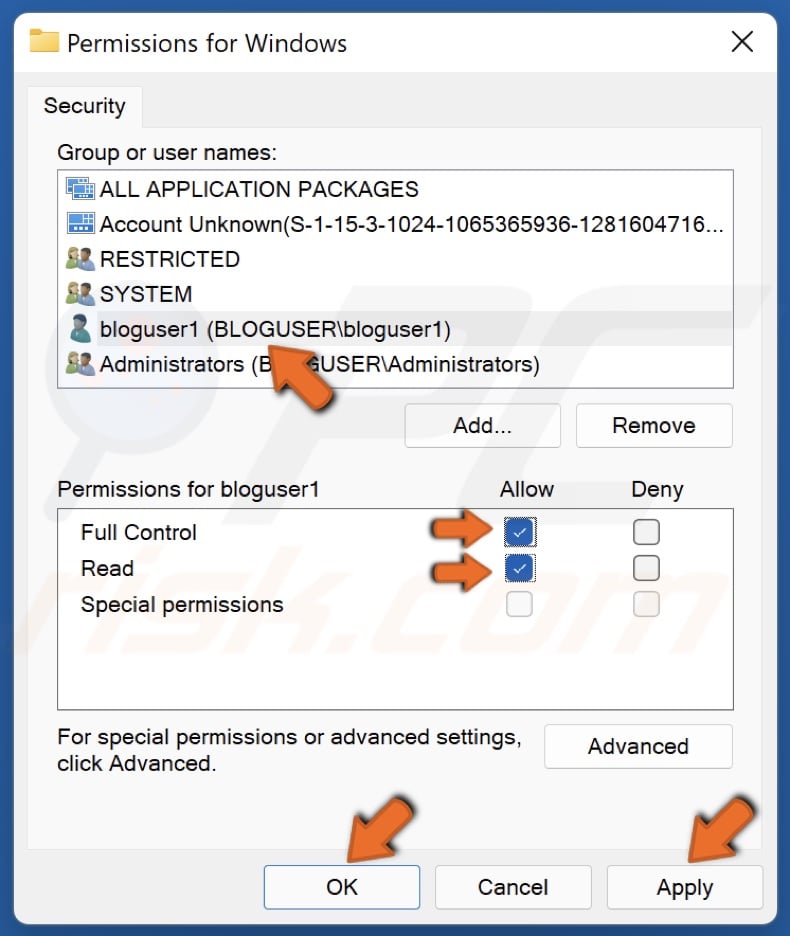
12. Select your administrator account, and tick Allow for Full Control and Read.
13. Click Apply and click OK to save the changes.
12. Select your administrator account, and tick Allow for Full Control and Read.
13. Click Apply and click OK to save the changes.
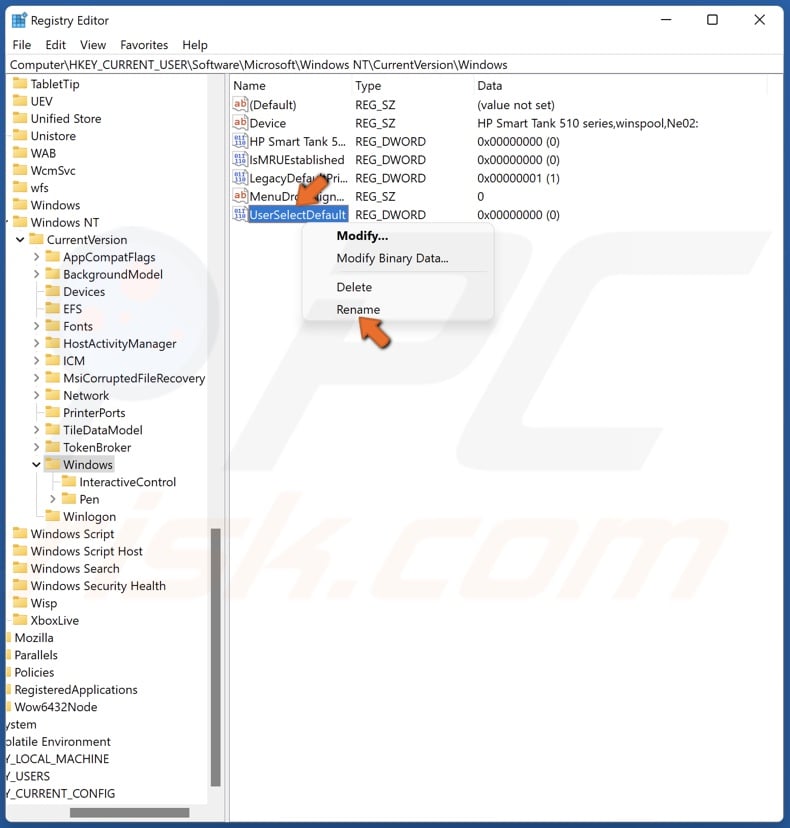
14. Right-click UserSelectDefault and click Rename.
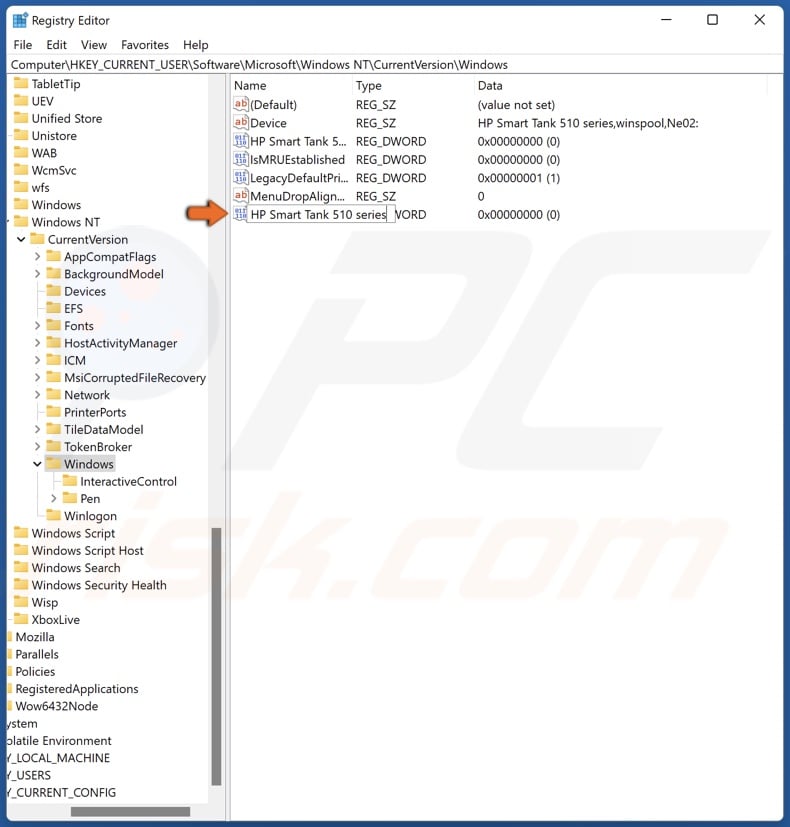
15. Rename it to the name of your printer.
[Back to Top]

2 Correct answers

![]()
Adobe Employee
,
Nov 12, 2019
Nov 12, 2019
nikunj.m
•
Adobe Employee
,
Nov 12, 2019
Nov 12, 2019
Hi there,
We are sorry about the issue you are facing with Photoshop 2020 while trying to Save for Web.
Would you mind going to the System Preferences for Mac then navigate to Security and Privacy > select the Privacy Tab > Select Accessibility from the list on the left and add Photoshop to the list. Also, grant Photoshop permissions to the Files and Folders then restart the computer to check if that helps.
You can also try to reset the preferences of Photoshop to check if that helps. You
…

![]()
Community Expert
,
May 19, 2020
May 19, 2020

23
Replies
23
![]()
Hey JJMack, to answer your question I just updated Photoshop and CC to the latest version yesterday and the animation does play and loop for me in CC 2018 there’s also nothing is wrong with my library I just don’t sign in to CC whenever I use Photoshop thus resulting in that error.
Anywho I just uploaded the PSD folder to my Google Drive, here’s the link: https://drive.google.com/open?id=19eH6s9CYXbZeqXb5Bz_Ae26LWQJwN4VW
Hopefully you’d be able to help me troubleshoot the problem