while run time am getting the following errors… I clean my project then after that too am getting the same error
[2011-04-10 05:33:31 - PersonalTask] ------------------------------
[2011-04-10 05:33:31 - PersonalTask] Android Launch!
[2011-04-10 05:33:31 - PersonalTask] adb is running normally.
[2011-04-10 05:33:31 - PersonalTask] Performing com.acarin.project.personal.task.LoginPage activity launch
[2011-04-10 05:33:31 - PersonalTask] Automatic Target Mode: launching new emulator with compatible AVD 'MA_AVD_2.3.1'
[2011-04-10 05:33:31 - PersonalTask] Launching a new emulator with Virtual Device 'MA_AVD_2.3.1'
[2011-04-10 05:33:34 - Emulator] NAND: could not write file D:Bama_BackUpandrandroid-sdk-windows/platformsandroid-9images/system.img, No space left on device
Any one can help me pls thank you fri
asked Apr 9, 2011 at 12:12
![]()
2
The system NAND flash for the emulator has run out of space. Your host system D: is not the issue, but for some reason the system.img file that represents a NAND flash for the emulator is full. You can try creating a new emulator, or doing a factory default reset in the emulator to clean it up. To do this, either issue a Factory Data Reset inside Android under Settings -> Privacy, or start the emulator from the command-line:
android list avd
emulator -avd My_Avd_Name -wipe-data
The first command list all Android Virtual Devices. You need the name for the second command. The emulator should not already be running. A third option would be to delete the disk images located under your Windows profile. Under your profiles, it’s .android/avd/My_Avd_Name.avd You should only need to delete userdata-qemu.img and maybe cache.img. You can try deleting other image files if necessarily, but note, sdcard.img won’t be re-created automatically. You need to run mksdcard from the command-line.
answered Apr 9, 2011 at 12:28
![]()
penguin359penguin359
1,27913 silver badges26 bronze badges
5
This may also happen because, you dont have free space in the drive where you are creating your Emulator, try deleting few items of that drive and it would get launched, make sure you have 1 gb (for precautions) data free in the drive. It worked for me
answered Jul 14, 2013 at 16:48
![]()
Ali AshrafAli Ashraf
1,8412 gold badges24 silver badges27 bronze badges
1 — Eclipse IDE : you can set :
run -> run configurations -> choose your run config -> Target ->Additional Emulator Command Line Options : -partition-size 512
2 — Console :
android-sdk-home/tools> android list avd
emulator.exe -avd -partition-size 512 -no-snapshot-load
3 — You can also create new avd with enough space, since android apps install first in the phone partition (you can move it later to sdcard), you have to check in your phone
Settings -> Sd cards & phone storage -> Internal Phone storage -> available space
answered Sep 7, 2011 at 14:39
![]()
amineamine
3203 silver badges7 bronze badges
I have solved this. If you have a MAC OS X. You might want to disable RamFS you created.
either:
sudo rm -rf /System/Library/StartupItems/RamFS
or:
sudo chmod -R 000 /System/Library/StartupItems/RamFS
The latter to disable it.
Don’t forget to restart your MAC after completing one of the above steps.
Aparantly the SDK is giving misleading information on which mount the space is not enough…
You could also increase the size of the RamFS but how much RAM do you have?
I hope this helps.
answered Mar 5, 2014 at 6:43
![]()
SashoSasho
3,4621 gold badge31 silver badges30 bronze badges
I my case it was not the problem with device and
‘sudo rm -rf /tmp/*’
solved my problem
answered May 18, 2017 at 3:06
![]()
ADV config now moved to Android Studio already.
1. Open Device Manager from Android Studio

2. Select device you want to change Disk Space.
- Click icon Pen at Actions column.
- Click Show Advance Setting
- Input Internal Storage
- Click Finish

answered Apr 18 at 13:00
![]()
Binh HoBinh Ho
3,4231 gold badge29 silver badges31 bronze badges
09 May 2018
 Кто из вас не сталкивался с этим сообщением при обновлении студии под linux? Пожалуй каждый, кому доводилось с ней работать эту ошибку уже видел хотя бы раз и спешно шел в гугель для поиска ответа на вопрос что же ей не нравится и как это фиксить.
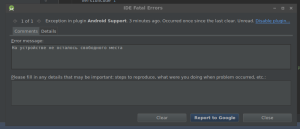
java.io.IOException: На устройстве не осталось свободного места
java.io.IOException: No space left on device
И так каждый раз. А вся проблема в том, что студия использует /tmp для распаковки установочных архивов перед копированием.
И чаще всего места там катастрофически недостает.
$ df -h |grep /tmp
tmpfs 3,9G 455M 3,4G 12% /tmp
Во многих дистрибутивах размер раздела выставляется равным половине объема озу. Решений несколько и каждый применяет то, которое ему нравится больше.
Временное увеличение размера /tmp
$ sudo mount -o remount,size=8G,noatime /tmp
Чем плохо: система активно начнем использовать подкачку и ей может просто не хватить суммарного объема свопа и ram.
Переназначение временной директории для студии
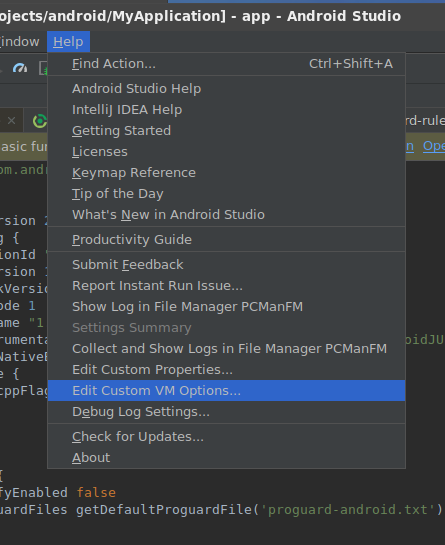
В открывшийся файл дописываем указание временной директории для виртуальной машины.
-Djava.io.tmpdir=/path-to-tmp-dir
Минус подхода: вся инфраструктура будет использовать эту временную директорию (компиляция, запуск и прочее), что приведет к замедлению работы если директория находится на диске (и неважно ssd это или hdd).
А еще все настройки будут теряться при обновлении студии (они хранятся в каталоге с настройками студии.
Есть другой вариант, позволяющий вынести настройки в глобальную область.
echo "-Djava.io.tmpdir=/tmp-dir-path" > ~/android-studio-tmp.fix
STUDIO_VM_OPTIONS=~/android-studio.fix android-studio
Указать временную директорию для всех приложений java
Прописать в .bashrc
export _JAVA_OPTIONS=-Djava.io.tmpdir=/path-to-tmp-dir
Это наименее разумный способ — он заставит абсолютно все java-приложения использовать указанную директорию.
Указать отдельное размещение для распаковки временных файлов в момент установки
$ cd ~
$ mkdir -p tmp/PackageOperation04
$ cd /tmp
$ ln -s $HOME/tmp/PackageOperation04
Самый разумный способ, имхо. Делать это нужно непосредственно перед тем, как вы нажмете кнопку “обновить”.
Литература
- Configure Android Studio
- SO: /tmp directory in Linux Android SDK
- Android Studio – No space left on device
- Android Studio – No space left on device
Теги:
android
java
linux
Категории:
Разработка
HowTo
Have you ever encountered an “insufficient storage available” error on your Android phone? Storage full message appears when your phone has reached the limit of its capacity to store data. Despite the message, the space may not be full, or there may be a way to increase the storage capacity of your device.
In this post, we will show you five ways to free up space on Android and fix insufficient storage errors.
Why Does It Show Insufficient Storage While My Phone Still Has Space?
Your phone actually has two different types of storage: your internal storage, which is the space data is stored on your current device, and the external storage or micro SD card in your device. When you see an “insufficient storage available” notification pop up, it’s because that’s referring to your internal storage.
There are many reasons why your Android phone may be suffering from storage space issues.
- First, you may not have much free space left to begin with.
- Another common problem is that you have too many apps installed.
- You may also have a lot of media files or other large files taking up space.
- Or you may have an app that’s misbehaving.
This is a common problem with Android smartphones, especially as you load them up with apps, photos, and videos, but you can fix it.

Image source: Unsplash (free image)
Thankfully, it is not always necessary to delete old data to make room for new data. There are several ways that might help you clear up some extra storage on your phone. We’ll show you how below.
#1. Check Your Storage and Clear Cache
The first step is to check how much storage space is actually available on your device. You can do this by going to Settings > Storage. To free up some space, you can clear the app cache on your Android device. This step will remove temporary files and free up space without deleting any important data or apps.
To clear your app cache:
- Step 1: Go to Settings and tap Apps or Application Manager (depending on which version of Android OS you are running).
- Step 2: Scroll through the list of apps and select the app for which you want to clear the cache.
- Step 3: Tap Storage > Clear Cache.
Though clearing cached data is usually safe and won’t cause any loss of personal data, we recommend making a backup of anything significant before doing so.
#2. Move Apps and Files to Removable SD Card
Android apps can be installed either on the device’s internal storage or the external (removable) SD card. If you receive the error message “insufficient storage available”, this means that your phone has run out of memory in which to store new data.
Move Apps to SD Card (if Available)
If your Android phone supports an SD card, you can try moving the apps that allow this to free up some space. However, keep in mind that some apps do not allow this and will not work correctly if they are moved.
To move an app to the SD card:
- Step 1: Go to Settings > Applications
- Step 2: Select Manage Applications and find the app you want to move and select it.
- Step 3: Then choose Move to SD Card (if available).

Image source: Unsplash (free image)
Move music and movies to your SD Card.
If you store lots of music or video on your device and don’t use streaming services like Spotify or Netflix, you may be able to free up a lot of space by moving those files to an SD card instead.
This may be easiest if you plug your device into a computer — if so, browse the files using Windows Explorer or Finder (on Macs), copy them to the card in the appropriate folder (for example, Music), then eject the card and reinsert it to your phone.
#3. Uninstall Unnecessary Apps And Games
Uninstalling unused apps and games is the best way to free up space on your device. Every app you install takes up a certain amount of space. If one app is using more than its fair share, it might be time to uninstall it.
To uninstall an app, long press its icon from the home screen or from within the app tray, then drag it upwards onto the Uninstall option in the top right corner. Alternatively, you can uninstall apps by:
- Tapping Apps & notifications and then
- Choosing the app that you want to uninstall from the list of currently installed apps.
- After that, Tap Uninstall and confirm on the popup.
These steps will also help speed up slow phones, as a lack of storage often causes phone slowdown.
#4. Use an Android Cleaner App
Another way to free up space on Android is by using an Android cleaner app. There are many such apps available in Google Play Store that you can use, but one of the best ones is CCleaner. It offers a lot of tools like junk cleaners and uninstallers that you can use to free up some space on your device.
The app also includes other features like a Task Killer and RAM Booster that will help improve the performance of your smartphone or tablet as well.
#5. Use a Cloud Service
The most elegant solution for freeing up space on your device is to use a cloud service like Google Photos, Dropbox, or OneDrive. These services will keep all of your photos and videos backed up to the cloud, and you can delete them from your phone knowing that they’re safe in case you ever want them again.
If you don’t want to pay for additional storage on Google Photos, it’s recommended that you set it up so that only “high quality” images are saved to the service. This will save you space on your phone without costing you any additional money.
Conclusion
There are a lot of different ways to free up space on an Android device. You can delete apps you don’t want, clear the cache and data for apps, or even move entire apps to the SD card. With a few hints and tricks above, you might be able to free up some space in a jiffy.
We hope that the information above is useful and helped you successfully freed up some space on your Android device. If you have any questions, then please feel free to ask in the comments below.
In this guide, we will show you a couple of methods to fix the Remote Write Failed: No space left on device error when using ADB Push. There exist quite a few methods of transferring files from your PC to your Android device. These include the likes of MTP [USB], OTG, ADB Sideload, and ADB Push. With that said, I have come across a few instances wherein ADB Push was the only option that I could opt for.
For example, once when I was booted to TWRP and the storage was encrypted, the device’s internal storage wasn’t visible on the PC’s File Explorer. On the other hand, I didn’t have an OTG device and cannot use ADB Sideload because it will end up flashing the file [which is not recommended if you are using TWRP, rather go for its Install option].

Image source: Unsplash (free image)
Thankfully, it is not always necessary to delete old data to make room for new data. There are several ways that might help you clear up some extra storage on your phone. We’ll show you how below.
#1. Check Your Storage and Clear Cache
The first step is to check how much storage space is actually available on your device. You can do this by going to Settings > Storage. To free up some space, you can clear the app cache on your Android device. This step will remove temporary files and free up space without deleting any important data or apps.
To clear your app cache:
- Step 1: Go to Settings and tap Apps or Application Manager (depending on which version of Android OS you are running).
- Step 2: Scroll through the list of apps and select the app for which you want to clear the cache.
- Step 3: Tap Storage > Clear Cache.
Though clearing cached data is usually safe and won’t cause any loss of personal data, we recommend making a backup of anything significant before doing so.
#2. Move Apps and Files to Removable SD Card
Android apps can be installed either on the device’s internal storage or the external (removable) SD card. If you receive the error message “insufficient storage available”, this means that your phone has run out of memory in which to store new data.
Move Apps to SD Card (if Available)
If your Android phone supports an SD card, you can try moving the apps that allow this to free up some space. However, keep in mind that some apps do not allow this and will not work correctly if they are moved.
To move an app to the SD card:
- Step 1: Go to Settings > Applications
- Step 2: Select Manage Applications and find the app you want to move and select it.
- Step 3: Then choose Move to SD Card (if available).
Image source: Unsplash (free image)
Move music and movies to your SD Card.
If you store lots of music or video on your device and don’t use streaming services like Spotify or Netflix, you may be able to free up a lot of space by moving those files to an SD card instead.
This may be easiest if you plug your device into a computer — if so, browse the files using Windows Explorer or Finder (on Macs), copy them to the card in the appropriate folder (for example, Music), then eject the card and reinsert it to your phone.
#3. Uninstall Unnecessary Apps And Games
Uninstalling unused apps and games is the best way to free up space on your device. Every app you install takes up a certain amount of space. If one app is using more than its fair share, it might be time to uninstall it.
To uninstall an app, long press its icon from the home screen or from within the app tray, then drag it upwards onto the Uninstall option in the top right corner. Alternatively, you can uninstall apps by:
- Tapping Apps & notifications and then
- Choosing the app that you want to uninstall from the list of currently installed apps.
- After that, Tap Uninstall and confirm on the popup.
These steps will also help speed up slow phones, as a lack of storage often causes phone slowdown.
#4. Use an Android Cleaner App
Another way to free up space on Android is by using an Android cleaner app. There are many such apps available in Google Play Store that you can use, but one of the best ones is CCleaner. It offers a lot of tools like junk cleaners and uninstallers that you can use to free up some space on your device.
The app also includes other features like a Task Killer and RAM Booster that will help improve the performance of your smartphone or tablet as well.
#5. Use a Cloud Service
The most elegant solution for freeing up space on your device is to use a cloud service like Google Photos, Dropbox, or OneDrive. These services will keep all of your photos and videos backed up to the cloud, and you can delete them from your phone knowing that they’re safe in case you ever want them again.
If you don’t want to pay for additional storage on Google Photos, it’s recommended that you set it up so that only “high quality” images are saved to the service. This will save you space on your phone without costing you any additional money.
Conclusion
There are a lot of different ways to free up space on an Android device. You can delete apps you don’t want, clear the cache and data for apps, or even move entire apps to the SD card. With a few hints and tricks above, you might be able to free up some space in a jiffy.
We hope that the information above is useful and helped you successfully freed up some space on your Android device. If you have any questions, then please feel free to ask in the comments below.
In this guide, we will show you a couple of methods to fix the Remote Write Failed: No space left on device error when using ADB Push. There exist quite a few methods of transferring files from your PC to your Android device. These include the likes of MTP [USB], OTG, ADB Sideload, and ADB Push. With that said, I have come across a few instances wherein ADB Push was the only option that I could opt for.
For example, once when I was booted to TWRP and the storage was encrypted, the device’s internal storage wasn’t visible on the PC’s File Explorer. On the other hand, I didn’t have an OTG device and cannot use ADB Sideload because it will end up flashing the file [which is not recommended if you are using TWRP, rather go for its Install option].
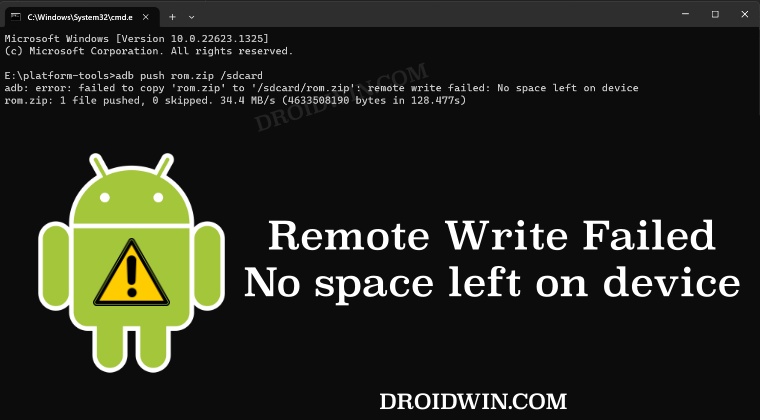
But as fate would have it, even the ADB Push wasn’t working along the expected lines as it gave out the Remote Write Failed: No space left on device error. What is surprising to note here is the fact that my device already had over 100GB of storage space, hence this error didn’t made much sense. So I did further research on this issue and managed to find out a couple of methods that should help you rectify this bug. So without further ado, let’s check them out.
It is recommended that you try out each of the below-mentioned workarounds and then see which one spells out success. So with that in mind, let’s get started. Droidwin and its members wouldn’t be held responsible in case of a thermonuclear war, your alarm doesn’t wake you up, or if anything happens to your device and data by performing the below steps.
FIX 1: Transfer to Data Partition
Instead of transferring to sdcard [root directory of internal storage], you should transfer it to the data partition. So for example, if you want to transfer the rom.zip file, then the command for transferring it to the data partition will be:
adb push rom.zip /data

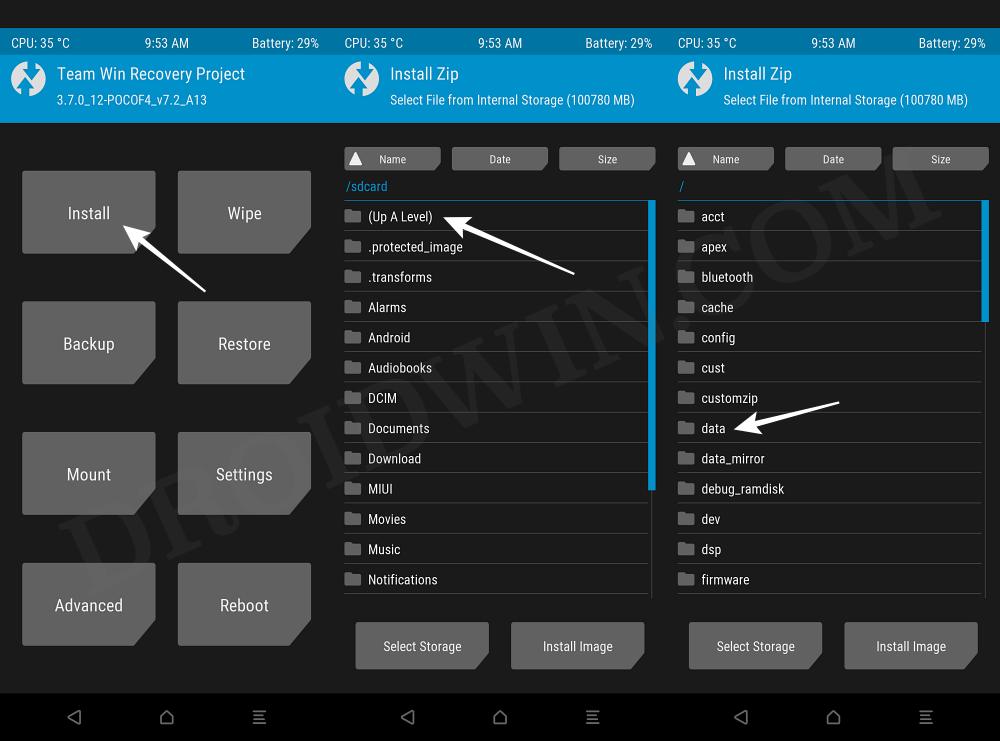
Just make sure that the rom.zip is placed inside the platform-tools folder and then use the above command. And if you want to flash the file via TWRP, then go to Install > Up a Level > Data > select the file from there > flash it.
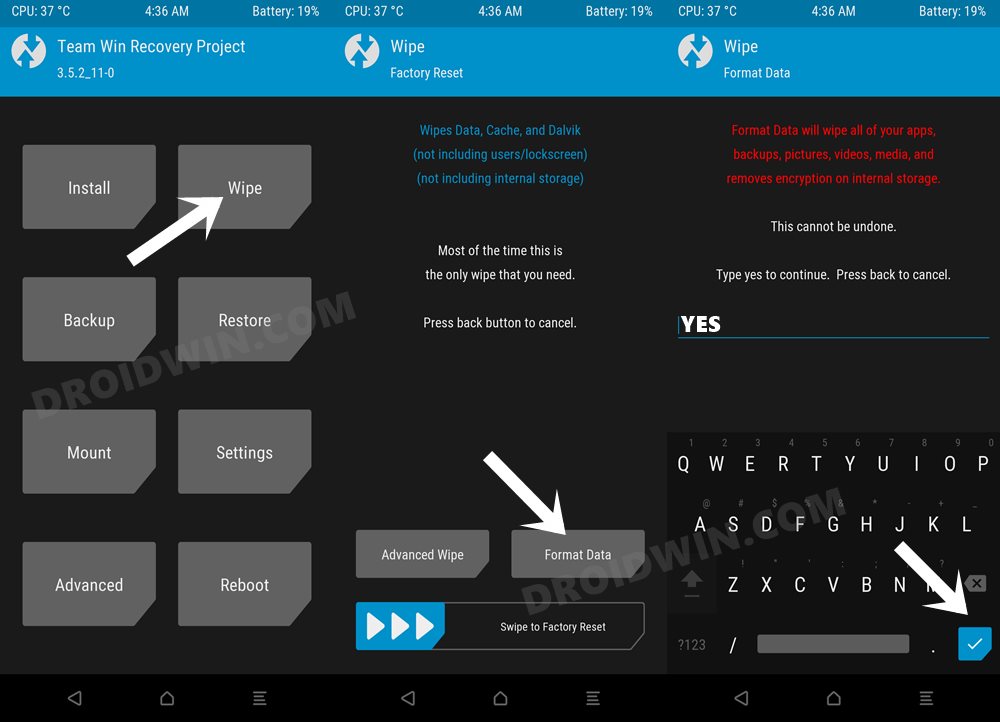
FIX 2: Format Data After Flashing
In some cases, this issue might also occur if you have performed a factory reset via TWRP and then are trying to perform ADB Push. So in such cases, you should first transfer the file via the ADB Push command [adb push rom.zip /sdcard], then flash that file, and finally do a Format Data at the end. However, this fix is only applicable to those ROMs that don’t ask for format data before flashing.
That’s it. These were the two methods that should help you fix the Remote Write Failed: No space left on device error when using ADB Push. If you have any queries concerning the aforementioned steps, do let us know in the comments. We will get back to you with a solution at the earliest.
- ADB VENDOR KEYS Not Set: How to Fix
- How to Install Custom ROM on Android via ADB Sideload
- Enable and Use ADB Commands in OnePlus Stock Recovery
- Remove/Uninstall Bloatware Apps from Android via ADB
About Chief Editor

Sadique Hassan
administrator
A technical geek by birth, he always has a keen interest in the Android platform right since the birth of the HTC Dream. The open-source environment always seems to intrigue him with the plethora of options available at his fingertips. “MBA by profession, blogger by choice!”
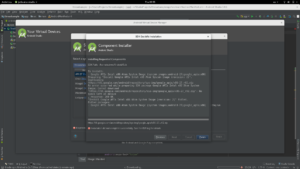
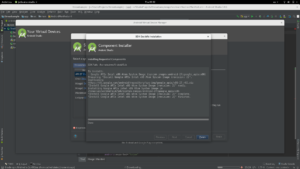
Recently we tried to install some packages from the Android SDK through Android Studio 3.0.1 and we got the error that the PC ran out of space while downloading the necessary packages and could not perform the operation.
Sadique Hassan
administrator
A technical geek by birth, he always has a keen interest in the Android platform right since the birth of the HTC Dream. The open-source environment always seems to intrigue him with the plethora of options available at his fingertips. “MBA by profession, blogger by choice!”