
У меня есть localhost который я запустил при помощи сервер-сокета в java я протестил, в telnet всё великолепно работает и при использовании наименования localhost, и когда использую 127.0.0.1 (мой порт: 8000), однако как только я захожу в любой браузер не работает ничего из всех вышеперечисленных вариантов:
Не удается получить доступ к сайту
Веб-страница по адресу 127.0.0.1:8000, возможно, временно недоступна или постоянно перемещена по новому адресу.
ERR_CONNECTION_ABORTED
Я проверил, программа была запущенна и работала корректно, проблема появлялась только в браузере.
Когда я вывожу счётчик в консоль, то при обновлении страницы счётчик отлично работает а ошибка никуда не пропадает, соответственно я ничего не могу вывести в браузер.
Download PC Repair Tool to quickly find & fix Windows errors automatically
If you encounter the Localhost refused to connect error message when running any web server on your local Windows 11/10 computer, then this post is intended to help website owners and administrators fix the issue with the most adequate solutions.

What does it mean when localhost refused to connect?
If you have encountered the localhost refused to connect error message, it simply means you’re unable to access the webserver via localhost. There’s a chance that your firewall may be blocking the connection. You can often resolve this problem by modifying your firewall settings to allow incoming connections for the port that MAMP is trying to access.
The most likely culprits to this error include;
- Localhost isn’t corresponding to 127.0.0.1.
- Using WSL on Windows to run a web server.
- Port 80 is used by another application on your computer.
- Accessing your web server from a wrong port.
- Insufficient Permissions.
If the Localhost refused to connect error message appears on your Chrome browser in Windows 11/10 computer, you can try our recommended solutions below in no particular order and see if that helps to resolve the issue.
- Access Localhost via 127.0.0.1
- Access Localhost via Port Number
- Change Apache port in XAMPP
- Change Apache port in WAMP
- Delete application.config File (if applicable)
- Restart LxssManager Service (applies to Web Servers running on WSL)
Let’s take a look at the description of the process involved concerning each of the listed solutions.
1] Access Localhost via 127.0.0.1
This solution requires you to start the web server by launching XAMPP or WAMP and then go to your browser and type 127.0.0.1 and hit Enter on your keyboard. If this workaround solves the Localhost refused to connect error message, then it means the localhost isn’t pointing to this IP – so, to access any projects/files on your web server, you’ll need to type in 127.0.0.1/filename instead of localhost/filename.
2] Access Localhost via Port Number
If your web server isn’t running on the default port 80, you will encounter this error. In this case, to resolve the issue, you can access the local web server by specifying the port number – to do that, you have to type localhost:8080 in your browser.
3] Change Apache port in XAMPP
To change the Apache running port in XAMPP, do the following:
- Start XAMPP from the Start Menu.
- Double-click the XAMPP icon in the system tray on the taskbar to launch the XAMPP Control Panel.
- In the XAMPP Control Panel Window, you would see a list of services that are currently running i.e Apache, MySQL etc.
- Next to the service name, there would be a Stop button.
- Click on Stop in front of the apache service.
- Next, press Windows key + E to open File Explorer.
- Now, navigate to the directory below:
C:xamppapacheconf
- At the location, look for a file named httpd.conf.
- Next, open the file with a Text Editor.
- Inside the file, search for the following two lines:
Listen 80
ServerName localhost:80
Replace them with the following:
Listen 8080
ServerName localhost:8080
- Save the file by pressing CTRL + S.
- Now open the XAMPP Control Panel again, and start the Apache webserver.
The error should be fixed now if the issue was caused by a conflicting port number. Otherwise, try the next solution.
4] Change Apache’s port in WAMP
To change the Apache running port in WAMP, do the following:
- Kill all running instances of WAMP in Task Manager.
- Next, open File Explorer.
- Now, navigate to the directory below:
C:wampapache2conf
- At the location, look for a file named httpd.conf.
- Next, open the file with a Text Editor.
- Inside the file, search for the following two lines:
Listen 80
ServerName localhost:80
Replace them with the following:
Listen 8080
ServerName localhost:8080
- Save the file.
Now open WAMP and see if the issue is resolved or not. If the latter is the case, try the next solution.
5] Delete application.config File (if applicable)
To delete the application config file, do the following:
- Open your project folder in File Explorer.
- Next, open up the .vs folder. You may need to show hidden files/folders.
- Once inside the .vs folder, explore the config folder.
- Inside the config folder, delete the application.config file.
- Exit File Explorer.
If the issue is still unresolved, try the next solution.
6] Restart LxssManager Service (applies to Web Servers running on WSL)

Do the following:
- Press Windows key + R to invoke the Run dialog.
- In the Run dialog box, type services.msc and hit Enter to open Services.
- In the Services window, scroll and locate the LxssManager service.
- Right-click the service and select Restart or Start.
- Exit Services console.
Check your webserver now and the issue should be resolved.
Hope any of these solutions work for you!
Why is 127.0 0.1 refused to connect?
This exception message says you’re trying to connect to the same host (127.0. 0.1), while you’re stating that your server is running on a different host. This 127.0. 0.1 represents a ‘loopback’. To resolve the 127.0 0.1 refused to connect, try adding port to the address; example http://127.0.0.1:8080 (Default for JIRA).
Related post: The proxy server is refusing connections error in Firefox or Chrome.
Obinna has completed B.Tech in Information & Communication Technology. He has worked as a System Support Engineer, primarily on User Endpoint Administration, as well as a Technical Analyst, primarily on Server/System Administration. He also has experience as a Network and Communications Officer. He has been a Windows Insider MVP (2020) and currently owns and runs a Computer Clinic.
Cправка — Google Chrome
Войти
Справка Google
- Справочный центр
- Сообщество
- Google Chrome
- Политика конфиденциальности
- Условия предоставления услуг
- Отправить отзыв
Тема отзыва
Информация в текущем разделе Справочного центра
Общие впечатления о Справочном центре Google
- Справочный центр
- Сообщество
Google Chrome
Introduction
Localhost refused to connect is a common error that may occur when working on a local machine. In this article, you will learn the most common causes of the localhost refused to connect error and how to resolve it.
Localhost is a loopback address used for testing and developing on a local machine. When a user pings localhost, the request remains on the local network and connects to the machine in use. If such a connection is not possible, the browser displays an error message:
localhost refused to connect.
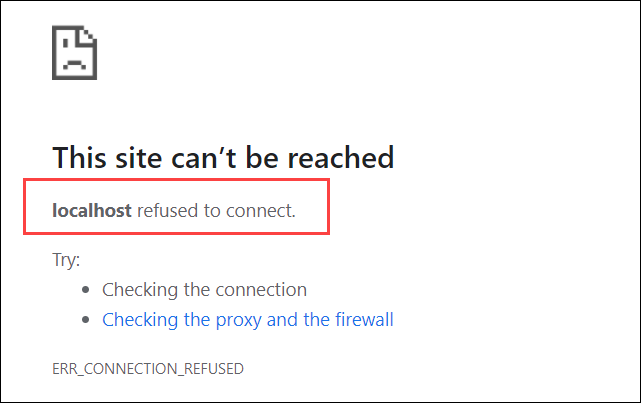
The localhost refused to connect message displays one of two possible errors:
- ERR_CONNECTION_REFUSED (the server rejected the request for connection)
- ERR_CONNECTION_TIMEOUT (the server has not responded to the request and the client is still waiting for a response)
What Causes the Localhost Refused to Connect Error
Common causes that result in localhost refusing to connect:
- The server being blocked by the firewall.
- Localhost doesn’t resolve to 127.0.0.1.
- Apache failing to run properly.
- DNS failing to function.
- The server being accessed from the wrong port.
- The browser settings blocking the connection.
To solve the issue, identify the source of the error. The best way to do so it to test out each probable cause, starting from the most frequent ones.
How to Solve the Localhost Refused to Connect Error?
The sections below provide methods to resolve the localhost refused to connect error.
Temporary Disable the Firewall
Check whether the firewall settings are blocking the localhost connection by disabling the firewall temporarily. (For OS-specific instructions, see sections below.)
Once you disable the firewall, navigate to localhost in a browser to check whether it connects. If localhost still refuses to connect, move on to other potential causes. Also, make sure to turn on the firewall once you have finished working with localhost.
Disable Firewall on Linux
The firewall configuration tool on Linux systems varies depending on the distro. While Ubuntu and Debian distributions utilize UFW, CentOS and RHEL systems use firewalld by default.
To disable the UFW firewall on Ubuntu/Debian, open the terminal window and run:
sudo ufw disableCheck the status by running:
sudo ufw status
To disable firewalld on CentOS/RHEL, use the command:
sudo systemctl stop firewalldVerify the status is inactive by running:
sudo systemctl status firewalld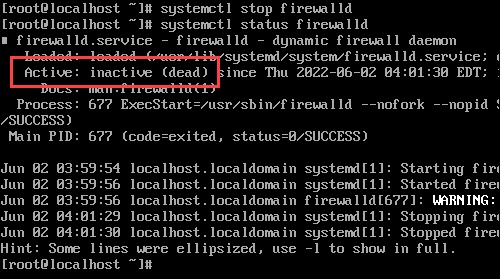
Disable the Firewall on Mac OS
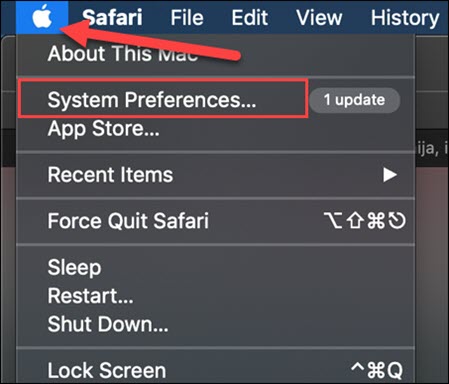
1. Click the Apple icon in the upper-left corner to open the menu and select System Preferences.
2. Navigate to Security and Privacy settings and move to the Firewall tab.
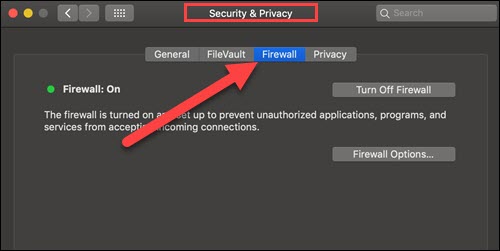
3. If the lock at the bottom left of the pane is locked, click the icon to unlock the preference pane. Type in your password to confirm.
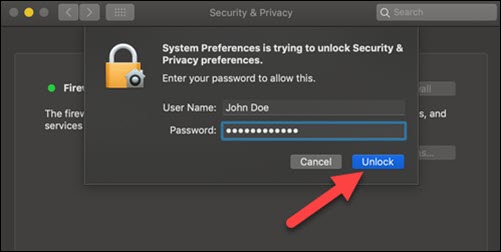
4. Click Turnoff Firewall to complete the process.
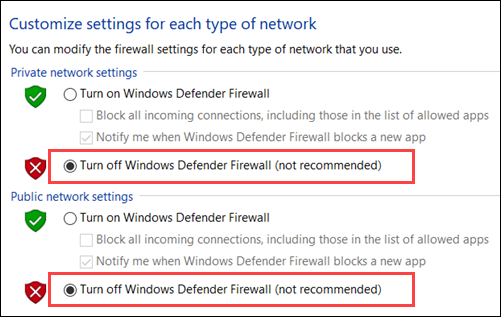
Disable the Firewall on Windows
1. Open the Windows Control Panel and click the Windows Defender Firewall icon.
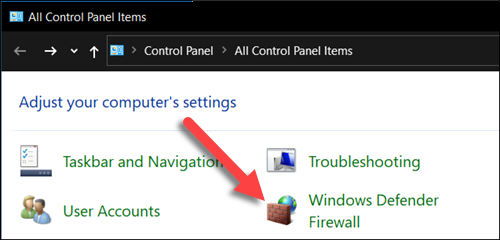
2. Select Turn Windows Defender Firewall on or off from the menu on the left side of the window.
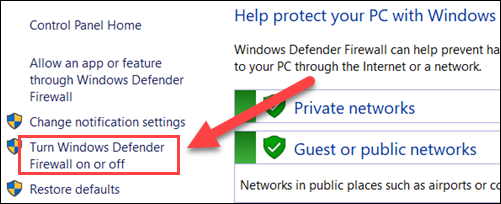
3. Finally, check the Turn off Windows Defender Firewall checkbox and click OK.
Check Localhost IP Address
Localhost and the IP address 127.0.0.1 are not completely synonymous. In most cases, 127.0.0.1 is used for loopback, however not exclusively. For instance, IPv6 systems link the localhost to the address : :1.
Additionally, if the host file has been modified, the localhost could link to a different IP address.
Try typing both localhost and 127.0.0.1 in the browser search bar, in case of a connection error.
Check Apache Server Status
Another important factor for accessing the localhost is that the Apache server is running properly. Therefore, if the system rejects the connection, it is necessary to check Apache’s status.
The command for verifying whether Apache is running on a Linux OS depends on the distribution in use. Follow the steps below and use the appropriate command.
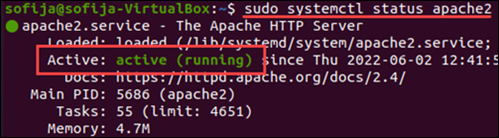
1. Verify Apache status with the command:
Ubuntu/Debian:
sudo systemctl status apache2CentOS/RHEL:
sudo systemctl status httpdThe output should display that Apache is active (running), as in the image below. If that is the case, the Apache server is working correctly and you can move to the next probably cause for error.
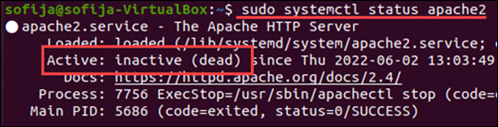
2. If Apache is not running properly, the output displays that its status is inactive (dead).
3. To fix the issue, try restarting the Apache service using:
Ubuntu/Debian:
sudo systemctl restart apache2CentOS/RHEL:
sudo systemctl restart httpd4. Check the Apache status again:
Ubuntu/Debian:
sudo systemctl status apache2CentOS/RHEL:
sudo systemctl status httpd5. If the status remains inactive, move on to deleting and reinstalling Apache on the system:
- Install Apache on Ubuntu
- Install Apache on CentOS
Flush the DNS
DNS cache is stored to speed up loading of previously visited websites. If DNS collects too many records or some of the records get corrupt, it may fail to function. Such an issue can result in localhost refusing to connect.
The best way to ensure DNS is not preventing the localhost connection is to clear the DNS cache and delete all saved DNS lookup information.
The steps for flushing the DNS vary depending on the OS in use. For detailed instructions, refer to How to Flush DNS Cache in macOS, Windows, & Linux.
Linux:
sudo /etc/init.d/nscd restartMacOS:
sudo killall -HUP mDNSResponderWindows:
ipconfig /flushdnsChange Port Settings
By default, localhost uses port number 80. If another application is using the same port, it can create a conflict resulting in localhost refusing to connect.
Change Port Number on XAMPP
If you are using the XAMPP stack, follow the steps below:
1. Open the XAMPP control panel and click on the Netstat button.

2. Netstat opens a list of all TCP listening sockets. If port 80 is already in use by another application, move on to choosing a free port for Apache.
3. Before proceeding to the next step, make sure to stop the Apache service.

4. Locate and open the httpd.conf file. The location of the file varies depending on the OS:
- Linux users will find it in bin/apache.
- Windows stores the file in C:xamppapacheconf.
- The path to the file on Mac OS is Applications/XAMPP/xamppfiles/etc/httpd.conf.
5. Find the following lines in the file:
Listen 80
ServerName localhost:80
6. Change the port number to any other free port. In this example, we change it to 8080.
Listen 8080
ServerName localhost:8080
7. Save and exit the file. Restart the Apache web server in the XAMPP control panel and try connecting to localhost again.
Change Port Number on WAMPP
If you are using the WAMP software stack and want to change the Apache port:
1. First, stop all instances running in WAMP with the End Task button.
2. Then, open the httpd.conf file located in C:wampapache2conf.
3. Locate the following lines in the file:
Listen 80
ServerName localhost:80
4. Change the port number to a free port (8080 for example).
Listen 8080
ServerName localhost:8080
5. Save the changes and exit the file.
Check Browser Settings
Make sure the browser is not responsible for causing the localhost error.
Start by navigating to localhost in a different browser. If the connection establishes, then the settings in the initial browser are the issue.
Often, browsers automatically redirect HTTP addresses to HTTPS causing the localhost refused to connect error.
Change DNS Settings in Chrome
1. To change the default setting on Chrome, paste the following URL in the address bar: chrome://net-internals/#hsts
2. Then, open the Domain Security Policy tab and scroll down to the Delete domain security policies section.
3. Add localhost as the domain name and click Delete.
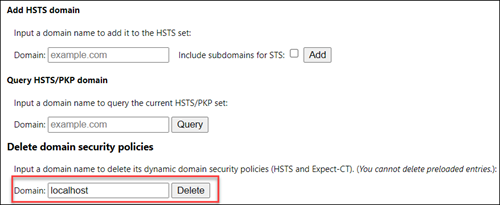
4. Restart the browser to apply the changes.
Change DNS Settings in Firefox
1. Open the Application Menu in the top right corner of the browser window and select Settings.
2. Navigate to Privacy & Security and scroll down to the HTTPS-Only Mode section.
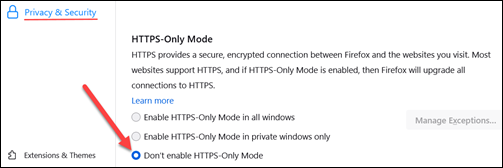
3. To apply the changes, reopen the browser.
Conclusion
After reading this article, you should know the steps to locate the cause and fix the localhost refused to connect error.
Another common issue that occurs when working locally on software stacks such as LAMP, WAMP, and others is the Access denied for user root@localhost error. Follow the link to troubleshoot Access denied for user root@localhost error in a few simple steps.
У меня есть большая проблема с открытием http: // localhost / в Windows 7 (бета). Я установил эту ОС, и все прошло отлично; когда я установил Wamp, я увидел, что localhost не работает вообще. Я просто вижу эту ошибку:
в Mozilla и Explorer.
Я удалил Wamp и через несколько недель (это означает две недели с сегодняшнего дня) я установил NetBeans в Windows 7. Я создал тестовый PHP-скрипт, и когда я его отлаживаю, я снова получаю ту же ошибку. Я пытался получить доступ к нему с помощью ip 127 …. но все тот же. В чем проблема?
Когда я установил NetBeans, я установил его в порт 8080.
Чтобы устранить проблему с портом 80, выполните следующие действия:
От cmd как администратор:
-
sc config http start= demand(вам нужно место после знака равенства, а не раньше) - перезагружать
- Запустите команду (
netsh http show servicestate) в качестве администратора, чтобы проверить, что порт 80 используется
После выполнения этой команды вы можете отключить http.sys следующим образом:
-
net stop http(остановить процесс) -
Sc config http start= disabled(если вы хотите отключить службу навсегда)
меня устраивает.
Если вы установили его на порт 8080, вам необходимо получить к нему доступ на порт 8080:
http: // localhost: 8080 или http://127.0.0.1:8080
Отредактируйте файл C:WindowsSystem32driversetchosts
Убедитесь, что есть запись, которая выглядит так:
127.0.0.1 localhost
Если есть запись типа
:: localhost
Прокомментируйте это, чтобы выглядеть так
#:: localhost
Это должно решить вашу проблему, у меня была эта проблема в прошлом.
Для меня это был скайп, вызывающий проблему. Как только я остановил скайп, все сработало. У меня есть 1.7.1 xampp (mysql и apache), работающий в Windows 7 x64.
Похоже, у вас нет ни одного веб-сервера, работающего где угодно.
Попробовали ли вы включить IIS и использовать его для отображения базового файла html?
Программы и функции -> Включение / выключение функций Windows -> Интернет-службы
Затем поместите свой html-файл в C: inetpub wwwroot index.html и перейдите к http: // localhost .
Как только это сработает, попробуйте заставить WAMP / php работать. Будьте осторожны с конфликтами портов.
Моя первоначальная мысль заключается в том, что вам не хватает записи в файле hosts. Что-то вроде «127.0.0.1 localhost», однако вы упоминаете, что получаете ошибку 404. Это означает, что веб-сервер подключается к вашему клиенту / браузеру и отвечает на запрос конкретной веб-страницы.
Я не достаточно хорошо знаком с Windows 7, однако, я уверен, что он не включает веб-сервер по умолчанию. Кроме того, если вы на самом деле не кодируете, не создаете и не запускаете приложение веб-сервера с помощью netbeans, вы не получите желаемого ответа.
Когда дело доходит до этого … ваша проблема будет одной из следующих:
1) вы обслуживаете статические документы, а веб-сервер не настроен на обслуживание файлов из любого надлежащего DOCROOT. Это включает папки PUBLIC в каталогах пользователя. (базовая установка Apache включает базовую домашнюю страницу)
2) у вас есть приложение динамического веб-сервера, в котором контроллер смотрит на путь приложения, чтобы решить, какую страницу отобразить или какую функцию выполнить. (см. MVC-Controller). В основном неполная реализация.
3) еще одна ошибка конфигурации: ваш сайт может фактически определить виртуальный домен. (что-то другое, чем localhost), поэтому, когда вы ищете локальный хост в URL-адресе, сервер не может быть настроен для предоставления страницы по умолчанию.
Разоружение следующей строки в файле хоста работало для меня,
#127.0.0.1 localhost
Ну, вы получаете 404, поэтому веб-сервер работает, он просто не может найти файл.
Проверьте файл http.conf. Если он указывает на правильный корневой каталог?
Если вы используете разные порты, проверьте http.conf, чтобы узнать, прослушивает ли Apache на нужном порту, или если apache перенаправляет трафик на порт в корневой каталог forther.
Может быть, может помочь опубликовать ваш файл http.conf?
Если у вас все еще есть эта проблема, попробуйте следующее:
- Отредактируйте файл хостов (с повышенными привилегиями)
- Раскомментируйте строку «# 127.0.0.1 localhost» (т.е. – удалите #)
- Сохраните файл как есть. хосты без расширения
В Win7 MS решила прокомментировать строку localhost с этим msg, который говорит, что он обрабатывается в dns. Я все еще не совсем понимаю, к чему они относятся, за исключением того, что они говорят людям использовать dns для разрешения localhost вместо файла hosts. Во всяком случае, это безопаснее.
Да, для меня это было больно.
Итак, что я сделал, это найти «Start Wampserver», просто нажмите кнопку «Пуск» и введите его.
Затем щелкните его правой кнопкой мыши и выберите свойства. Я установил его для запуска в пакете 3-го приложения XP на вкладке capatability. Я также проверил поле «Запустить эту программу как администратор».
Затем я щелкнул правой кнопкой мыши WAMPSERVER в системном лотке и перезапустил все службы. Это работало идеально для меня, надеюсь, это тоже поможет вам.
обкрадывать
Были ли запущены другие программы? msn ect …? некоторые привязаны к порту 8080, тогда ваш веб-сервер не запустится и вызовет 404, попробуйте привязать его к другому порту 80, который должен быть по умолчанию
У меня 404 не удалось подключить ошибку, тогда я установил wampmanager.exe для запуска как Xp Sp3 и, похоже, работает нормально, это можно сделать
- Щелкните правой кнопкой мыши на нем
- свойства
- щелкните вкладку с вкладкой «Совместимость»
- Tick Box просто undeder «Режим совместимости»
- Выберите Windows XP (Service Pack 3)
- Нажмите Применить, затем ОК.
Для меня тоже вмешался Skype. Я изменил настройки Skype (в Skype перейдите в «Инструменты»> «Параметры»> «Дополнительно»> «Соединение» и «UNCHECK» используйте порт 80 и 443 в качестве альтернативы входящим подключениям), затем закройте Skype. У меня есть Win 7 HomePremium 64 бит, я установил Xampp в отличном исполнении с MySQL, но неважно, сколько раз я запускал Apache (и консоль показывала «Apache запущена»), я все еще получил ошибку «firefox not not connection» браузера. После того, как изменения Skype были сохранены, Apache показал зеленый «Running», и все работающие теперь благодаря
Для меня это сделало трюк в порту 80 в конце:
-
Вы должны отключить службу http.sys вручную через реестр:
- Запуск RegEdit:
- Перейти к: HKEY_LOCAL_MACHINE SYSTEM CurrentControlSet Services HTTP
- Добавить новое значение DWORD (32-разрядное)
- Назовите его «NoRun», не включая цитаты
- Дважды щелкните новое свойство
- В поле «Значение» введите «1», не включая кавычки, и нажмите «ОК».
- Перезагрузите компьютер
Теперь вы должны найти, что Apache начнет работу на порту 80!
Вы попробовали iis? Перейдите в Панель управления-> Программы и компоненты-> Включите или выключите функции Windows (боковая панель). Попробуйте установить или переустановить Информационную службу Интернета. У меня есть windows 7 с iis, с .net и php, и он отлично работает …
вам необходимо установить службу, перейти в службу wamp-> Apache-> Service-> Install, затем появится окно командной строки, затем нажмите клавишу ввода и через несколько секунд перейдите на тот же маршрут Services-> и нажмите кнопку Start / Возобновить службу, и вы готовы
У меня была такая же проблема, и решение – это то, что кто-то уже сказал:
На панели задач щелкните значок WAMP.
Перейти к Apache -> Сервис -> Установить службу
Затем вернитесь, щелкнув и выбрав «Apache» -> «Сервис» -> «Начать / возобновить службу»
Это позволит работать с localhost (помните, что я уже изменил файл хоста, расположенный в каталоге c: windows system32 drivers etc, чтобы удалить # из строки 127.0.0.1)
Если вам нужно отредактировать этот файл, вам нужно щелкнуть его правой кнопкой мыши и выбрать «Свойства». Затем перейдите на вкладку «Безопасность» и нажмите кнопку «Дополнительно». Затем вам нужно выбрать «Пользователи», нажмите «Изменить» и выберите «Полный контроль». Это позволит вам отредактировать его.
При этом вам также необходимо установить службу MySQL в соответствии с той же процедурой.
MySQL -> Сервис -> Установить службу
Затем вернитесь, щелкнув правой кнопкой мыши еще раз и выбрав «MySQL» -> «Сервис» -> «Начать / возобновить службу».
И это должно исправить все это в Windows 7!
Перед установкой Wamp перейдите в controlpanel => Adminstrative tools => IIS Manager и выключите IIS-сервер. Установите wamp и все работает нормально. Когда IIS включен, он также использует порт 80. Вы можете пройти через много изменений портов и разрешений для wamp, но я нашел это самым быстрым и простым способом получения успеха для успешного запуска.
Попробуйте добавить следующие теги в файл wwwroot web.config. Эти теги должны быть добавлены как дочерние элементы тегов конфигурации, как показано ниже.
-configuration- --system.webServer-- ---validation validateIntegratedModeConfiguration="false" --- --/system.webServer-- -/configuration-
Возможно, Skype или другое приложение использует порт 80. Это вы можете проверить
Инструменты-> Настройки-> дополнительно-> Подключение
См. Вышеупомянутые решения очень хорошие. Но всякий раз, когда вы получаете это 404 eroor, сначала увидите это. Я уверен, что проблема будет решена …
Просто перейдите в файл httpd.conf, щелкнув значок сервера wamp в нижней правой панели задач – Apache->httpd.conf … или c:\wampt\bin\apache\apache2.2.1\conf\httpd.conf и приблизительный в строке № 46 вы найдете «Слушайте 80» … просто убедитесь, что написано «80» после прослушивания … если он не изменит его до 80 … И ваша проблема будет решена. ,
Предполагая, что нет проблем с поиском на localhost (до 127.0.0.1), вам необходимо убедиться, что ваш сервер прослушивает 127.0.0.1.
netstat работает в обоих окнах UNIX. Вероятно, вам нужно « netstat -a » для отображения слушателей.