

Устранение неисправностей
WorkCentre 5019/5021
Руководство пользователя
11-21
Коды ошибок
Если из-за ошибки некорректно завершается печать или возникает неисправность аппарата,
мигает код ошибки (X-X) или (XXX-XXX).
Примеры отображения кодов ошибки
В таблице ниже приведены коды ошибок и способы их устранения.
Примечания
•
Когда отображается код ошибки, могут быть утрачены данные печати в аппарате,
а также информация, хранящаяся в памяти аппарата.
•
Если отображается код ошибки, которого нет в таблице ниже, или ошибку не
удается устранить после выполнения приведенных в таблице указаний,
обращайтесь в центр технической поддержки Xerox. Номер контакта напечатан на
наклейке или карточке, прикрепленной к аппарату.
•
Когда отображает двухзначный код (X-X), можно проверить соответствующий
шестизначный код (XXX-XXX), нажав и удерживая кнопку
Копия удостоверения.
Содержание
- Xerox 5021 j5 error
- Xerox 5021 j5 error
- Xerox 5021 j5 error
- Xerox 5021 j5 error
- Устранение неисправностей на принтере Xerox WorkCentre 5021
- Неисправности аппарата
- Отпечатки светлые (блеклые, нечеткие)
- На копиях появляются черные пятна
- На отпечатках с равными интервалами появляется загрязнение
- На участках заполнения черным цветом появляются белые пятна
- На руках остаются следы от отпечатков
- Направление подачи бумаги
- Проблемы с копиями
- Печать не выполняется
- Проблемы с отпечатками
- Проблемы при сканировании
- Сканирование не выполняется
- Данные сканирования не загружаются на компьютер
- Проблемы с качеством изображения сканирования
- Коды ошибок
- Примеры отображения кодов ошибки
- Код ошибки (X-X)
- Застревание бумаги
- E-1. Застревание бумаги за левой крышкой A
- E-2: Застревание бумаги в однолотковом модуле B
- E-3. Застревание бумаги в лотке 1
- E-4. Застревание бумаги в лотке 2
- E-5. Застревание бумаги в обходном лотке
- Застревание оригиналов
Xerox 5021 j5 error
КОНФЕРЕНЦИЯ СТАРТКОПИ
Принтеры, копировальные аппараты, МФУ, факсы и другая офисная техника:
вопросы ремонта, обслуживания, заправки, выбора
0. mangutkin 10.06.15 14:28
Кто сталкивался с проблемой? принтер пишет ошибку J-5. Грешили на чип, но после замены с другим чипом ошибка осталась.
1. northpiter 10.06.15 14:47
3. mangutkin 11.06.15 08:32
ну это понятно. проблема в общем то решена с ошибкой. Её причиной был элементарно чип.
4. mangutkin 11.06.15 08:42
заказали чип оригинал, поставили и поняли что картриджи в общем не очень хорошо печатают, их было два старых. у обоих ушлепаные силеновые. да и дивилопер на подходе. было решено взять новые картриджи драм.,
но вот незадача новые картриджи пишут j-5.
ну ладно! меняем чип — ошибка пропала! ура.
но вот незадача! бумага не доходя до картриджа останавливается и пишет 061-321 (произошла ошибка выклоючить и включить аппарат) пробуем и ошибка та же!
меняю крышку драма от старого (под которой чип стоит) и — Ура. начал печатать!
но вот незадача ! лист совершенно белый!
пока что кроме матерных слов в голову ни чего не пришло)) мож кто чего посоветует?
заранее благодарен!
5. Портной Нёма 11.06.15 11:16
mangutkin (4): заказали чип оригинал, — уже смешно, учитывая то, что производитель отдельно чипами не торгует.
мож кто чего посоветует? Совет один — начать учить матчасть и разобраться с принципом работы аппарата в частности с системой работы CRUM.
Настораживает появление кода 061-321. Сбой лазера — не просто так.
6. komardin_dima 11.06.15 12:59
(4) Учите сначала мат часть а потом лезьте в аппарат. А лучше отдайте в офф сервисный центр
7. komardin_dima 11.06.15 13:02
(5) может у данного человека дядя на заводе ксерокса работает )))) у него(дяди) этих чипов просто завались )) вот и шлют кому не поподя ))))
8. mangutkin 21.06.15 13:57
Портной Нёма (5): mangutkin (4): заказали чип оригинал, — уже смешно, учитывая то, что производитель отдельно чипами не торгует.
Суровое начальство утверждает что чип оригинал. )))))
9. mangutkin 21.06.15 14:04
Да ладно с юмором все понятно. по поводу машины ни чего понятного нет! есть пять десять заводов выпускающих разные принтеры и комплектующие вроде бы как на одну и ту же модель, но в то же время ни чего ни к чему не подходит. если не по размерам то по схеме.
Решено было следующее выдрать комплектующие нового друма и воткнуть их в старый который как ни как худо но печатал.
машина работает, ошибок нет, клиент доволен!
10. mangutkin 21.06.15 14:05
Вопрос что такое мат часть? если кому не сложно объяснить. буду благодарен
Источник
Xerox 5021 j5 error
КОНФЕРЕНЦИЯ СТАРТКОПИ
Принтеры, копировальные аппараты, МФУ, факсы и другая офисная техника:
вопросы ремонта, обслуживания, заправки, выбора
Имеются 2 аппарата wc 5019 :
В 1ом аппарате качество печати плохое но работает. Требуется драм картридж поменять ( который идет с девелопером чипом и . )
2й аппарат пишет ошибку j5 и все на этом. сброс настроек делал 999 999 не помогло, менял чип в принт картридже (китайский брал в чипкарте) увы все равно пишет j5 .
1)Подскажите если я поставлю чип с 1го аппарата ( где стоит оригинальная расходка) во второй будет ли работать?
2)Если я поставлю блок с нерабочего на рабочий будет ли работать и не убьет ли это мать.
Вообще конечно буду эксперементировать, но хотелось бы помощи. Спасибо всем кто откликнулся и простите если что не так отписал.
Только что в нерабочем аппарате скинул ячейку 095 910 поствил 0 он пожужжал и выдал уже другую ошибка 093 956
Усовец (1): 093 956
093-956 Drum New CRU Installation Fail
During the developing powder installation mode after installing the Drum Cartridge, the ATC Measured Value is found to be abnormal. (Seal not removed)
1. Remove the developing powder seal from the Drum Cartridge.
2. If the problem persists after removing the seal, replace the Drum Cartridge.
(2) там девелопер в аппарате лежит горой + на самом барабане идет слой тонера щас перебираю блок отработку вычистил , чип похоже хоть китайскии но рабочий оказался. по результату отпишу блага времени много. А на счет уплотнение парашка как переводчик переводит я так понял это дозирующее лезвие?
Уважаемые инженеры получилось! и Так докладываю что делал
Первое действие открываем переднюю крышку. входим в сервисный там в ячейке памяти жмем 095 910 стаим 0 потом удерживая 0 зажимаем старт. Потом выкл вкл. должен выйти код 093 956
Достаем драм чистим отработку, в драм засыпаем с тубы парашка я на гла засыпал грам 100 далее включаем вставляем в аппарат он начнет мешать, в момент перемешивания открываем боковую крышку несколько раз я раз 15 открывал , чтобы инсталяция долго шла и счастье случилось. Пока тестирую все отлично качество лучше чем с завода.
Усовец (5): Первое действие открываем переднюю крышку. входим в сервисный там в ячейке памяти жмем 095 910 стаим 0 потом удерживая 0 зажимаем старт. Потом выкл вкл. должен выйти код 093 956
Достаем драм чистим отработку, в драм засыпаем с тубы парашка я на гла засыпал грам 100 далее включаем вставляем в аппарат он начнет мешать, в момент перемешивания открываем боковую крышку несколько раз я раз 15 открывал , чтобы инсталяция долго шла и счастье случилось. Пока тестирую все отлично качество лучше чем с завода.
Вы инженер? Или шаман?
С Xerox, так нельзя. Он отомстит.
С Xerox, так нельзя. Он отомстит. поддерживаю. И мстя его будет страшна
Пока тестирую все отлично качество лучше чем с завода перед смертью всегда становиться внезапно лучше
8. sahrikov1945 24.03.16 19:22
(5) а тот ли вы парашок засыпали, если печать лучше чем с завода )))
МСТЯ аппарата будет страшна )))
(8) Я правильно понимаю, что имелось в виду — пОрОшок?
Источник
Xerox 5021 j5 error
КОНФЕРЕНЦИЯ СТАРТКОПИ
Принтеры, копировальные аппараты, МФУ, факсы и другая офисная техника:
вопросы ремонта, обслуживания, заправки, выбора
0. gemeni85 02.04.13 17:47
Здравствуйте, клиент сказал вот такой код ошибки «J5». Если у кого есть сервиска скажите на что он ругается. Гуглил, не нашёл.
1. Mishel01 02.04.13 17:52
2. gemeni85 02.04.13 17:59
Там аппараты ВСЕ другие 5018, 4500 — это всё старые модели , а это новая, и для каждой модели ошибка J5 разная например в 4500 это «нет контакта с мотором оптики» , а в 5018 «заканчивается картридж». ТАК ЧТО НЕТ ЭТО ЧУТОК НЕ ТО
там наклейка должна быть на нем с кодами ошибок
4. Mishel01 02.04.13 18:03
gemeni85 (2): для каждой модели ошибка J5 разная
Уважаемый, приведите, пожалуйста, названия двух моделей цифровых копиров Херох, для которых один и тот же код ошибки имеет разные значения (. ). Если не сможете — придется извиниться за ложь.
(3) +1.
(0) а «клиент» ничего не путает по поводу ошибки?
6. Портной Нёма 02.04.13 18:22
Стандартный вариант: ремонт по телефону, деньги — по факсу.
(0) Пока сами не увидите ошибку, ничего не предпринимайте.. Наворочаете делов..
7. gemeni85 03.04.13 13:38
(4)Xerox 5328 J5, J6 ADF to machine communications problem,
Xerox 5400N
Error Code J5: Toner Low Troubleshooting Procedure. Да действительно лучше съездить. Ехать далеко в другой город.
8. gemeni85 03.04.13 13:39
5400N правда принтер.
9. Mishel01 03.04.13 15:23
(8) Вопрос был про цифровые копиры/МФУ, а не про все Херохи подряд, если помните.
Источник
Xerox 5021 j5 error
КОНФЕРЕНЦИЯ СТАРТКОПИ
Принтеры, копировальные аппараты, МФУ, факсы и другая офисная техника:
вопросы ремонта, обслуживания, заправки, выбора
пришел с ошибкой J6
последовательность действий
ставим новый оригинальный блок барабана — J5
ставим новый тонер
отрываем-закрываем крышку — мешает — J5
и так делаем три раза — J5
после третьего раза мешания — опять ошибка — J6
в каком направлении двигаться
на глаз мало смеси (тонер/девелопер) в блоке — мешалка не покрывается
блок чистили — все крутится
Двигаться в направлении поиска и вдумчивого чтения сначала Руководства пользователя, а потом — SM. Давно не тайна.
У этой модели нормальные коды отказов шестизначные (ххх-ххх).
Цитата из РП: «Когда отображает двухзначный код (X-X), можно проверить соответствующий шестизначный код (XXX-XXX), нажав и удерживая кнопку «Копия удостоверения«. (русский вариант, стр. 11-21)
Предположу код отказа 092-910
Pavels (0): отрываем-закрываем крышку — тогда уж зарывайте то что оторвали :))
дополнительный код 93959. В s.m. согласно гугл переводчику пишут:
Количество выполненных порошковых установок в режиме установки превысило верхний предел.
И добавляют:
Замените его подходящим барабанным картриджем.
(2)наверно всё-таки код 093-959. Drum New CRU Installation Fail Exceeds
Thresholding Times — это значит в процессе установки (когда аппарат мешает проявку и замеряет концентрацию) было слишком много попыток, после чего аппарат «сдаётся» и отображает ошибку.
The number of developing powder installation mode executions has exceeded the upper limit. — количество попыток замера концентрации превысило предельное значение.
Теперь понятно, что проблема с процессом инсталляции носителя. ИМХО, возможно значение с датчика «скачет» (но в пределах нормальных значений), поэтому аппарат считает, что смесь нужно размешать. После нескольких попыток «по мнению» аппарата значение датчика ATC должно быть постоянным, а оно продолжает меняться — вот и ошибка.
(3) Все так и было, но делать то что? Кормить новыми блоками — накладно, чипами -тоже как-то не то. Может есть сброс этой ошибки, а я не вижу?
(4)Какой «сброс ошибки»? У вас алгоритм инсталляции нарушен, из-за чего отсюда не видно. Может мешалки не крутятся, может проблемы в цепи датчика, может пробой вытягивает носитель. Если бы просто по счётчику закончился принт-картридж было бы J4, а J6 — это неисправность. Поставили заведомо исправный блок — получили J6? Ну так отстаньте от блока, займитесь машиной.
Источник
Устранение неисправностей на принтере Xerox WorkCentre 5021
Неисправности аппарата
При появлении признака неисправности проверьте состояние аппарата.
Аппарат не включается.
Вилка шнура питания вставлена не в розетку.
Выключите питание и проверьте надежность подключения шнура питания. Затем снова включите питание.
Шнур питания не подсоединен к аппарату
Розетка не обеспечивает надежную подачу электропитания.
Чтобы убедиться, что питание подается, подключите к розетке другое устройство.
Мигает индикатор ошибки.
Неисправность системы аппарата или установленных устройств.
Выключите и снова включите питание. Если после этого неисправность не устранится, обратитесь в центр технической поддержки.
Светится индикатор ошибки.
Застряла бумага или оригинал.
Извлеките застрявшую бумагу или оригинал.
Открыта передняя или другая крышка аппарата.
Выполните указания, отображаемые для данного кода ошибки.
Светится кнопка Энергосбережение.
Аппарат находится в режиме энергосбережения. Для выхода из режима энергосбережения нажмите кнопку Энергосбережение.
Не выполняется печать или копирование.
На дисплее панели управления отображается код ошибки.
Выполните указания, отображаемые для данного кода ошибки.
Шнур питания не подключен.
Выключите питание и проверьте надежность подключения шнура питания к розетке. Затем снова включите питание.
Индикатор передачи данных не светится даже при отправке работы на печать.
Интерфейсный кабель не подключен.
Проверьте подключение интерфейсного кабеля.
Рабочая среда компьютера настроена неправильно.
Проверьте рабочую среду компьютера, например настройки драйвера принтера.
Печать не выполняется, хотя для работы указан обходной лоток.
Бумага заданного размера не вложена в данный лоток.
Выполните указания, отображаемые для данного кода ошибки — загрузите бумагу заданного размера и попробуйте снова.
Низкое качество печати.
Проблема с качеством изображения.
Примите соответствующие меры по устранению, указанные в разделе Проблемы с качеством изображения.
Не вставляется или не снимается лоток.
Во время печати открывалась крышка или отключалось питание.
Не прилагайте к лотку чрезмерных усилий при установке или снятии. Выключите питание. Через несколько секунд снова включите питание. Когда аппарат будет готов к приему данных, вставьте или снимите лоток.
Не удается скопировать оригинал указанного размера.
Загрязнено стекло экспонирования или его крышка.
Очистите стекло экспонирования или его крышку.
Копируется пленка или прозрачный материал.
Копируйте со стекла экспонирования, накрыв оригинал листом белой бумаги.
Оригинал в неправильном положении.
Поместите оригинал правильно.
Оригинал вложен неправильно.
Направляющие оригиналов на податчике установлены неправильно.
Установите направляющие оригиналов правильно.
Оригинал со складками.
Распрямите оригинал и поместите его правильно.
Когда бумага вкладывается в обходной лоток и нажимается кнопка Старт, выдается код ошибки.
Проверьте положение направляющих бумаги в обходном лотке.
Установите направляющие бумаги в правильное положение.
Часто застревают оригиналы.
Оригиналы неподходящего типа.
Правильно вложите в податчик оригиналы подходящего типа.
Копируются оригиналы неправильной формы, визитки, пленки или тонкие документы.
На оригиналах имеются наклейки, зажимы или липкая лента.
Перед копированием удалите с оригиналов наклейки, зажимы или липкую ленту.
Направляющие оригиналов установлены неправильно.
Отрегулируйте положение направляющих оригиналов.
В податчике оригиналов остались обрывки бумаги.
Откройте крышку податчика оригиналов и проверьте наличие бумаги.
Сгибается кромка оригинала.
Распрямите оригинал и вложите его заново.
Вероятная причина Устранение
Сдвиг или перекос копий.
Оригинал размещается неправильно.
Поместите оригинал правильно.
Неправильно вложена бумага в лоток.
Вложите бумагу правильно.
Если бумага подается из выходного лотка, значит направляющие не касаются бумаги.
Вложите бумагу правильно.
Направляющие в податчике оригиналов установлены неправильно.
Правильно разместите оригинал и установите направляющие так, чтобы они касались оригинала.
Лоток вставлен не до конца.
Задвиньте лоток в аппарат до упора.
Пробелы на копиях.
На влажной бумаги могут получаться пропуски изображения или нечеткие копии. Вложите бумагу из неоткрытой пачки.
Бумага в лотке сгибается или мнется.
Уберите проблемные листы или вложите бумагу из неоткрытой пачки.
Копируется мятый оригинал или оригинал с наклеенными фрагментами.
Мятый оригинал или оригинал с наклеенными фрагментами может неплотно прилегать к стеклу экспонирования. Чтобы добиться правильного прилегания оригинала к стеклу экспонирования, прижмите его сверху стопкой белой бумаги.
Полосы на копиях.
Попытка чрезмерного увеличения копии оригинала.
При чрезмерном увеличении оригинала на копии могут появляться полосы. Уменьшите масштаб копий.
Отпечатки светлые (блеклые, нечеткие)

Принт- картр и дж выработал ресурс или поврежден.
Вложите новую бумагу.
Установите новый принт-картридж.
Установите новый тонер-картридж.
На копиях появляются черные пятна
Принт-картридж выработал ресурс или поврежден.
Установите новый принт-картридж.

На отпечатках появляются черные или цветные линии.
Принт-картридж выработал ресурс или поврежден.

Загрязнена узкая полоска стекла.
Очистите узкую полоску стекла.
На отпечатках с равными интервалами появляется загрязнение
Загрязнение тракта подачи бумаги.
Распечатайте несколько листов.

Принт- картр и дж выработал ресурс или поврежден (продать в Новосибирске, скупка новых для принтера, awella страница, url, скупка hp, epson, xerox, продать просроченные по рыночной цене, выкуп оригиналки, покупка просрочки).
На участках заполнения черным цветом появляются белые пятна
Вложите бумагу подходящего типа.
Принт- картридж выработал ресурс или поврежден.
На руках остаются следы от отпечатков
Тонер не закрепляется на бумаге.
Бумага загрязнена тонером.
Вложите новую бумагу.
Вложите бумагу подходящего типа.
Отпечаток полностью черный.

Принт- картр и дж выработал ресурс или поврежден.
Неисправность высоковольтного источника питания.
Обратитесь в центр технической поддержки.
Отпечаток получается пустым.
Подача сразу нескольких листов (двойная подача).
Перед вкладыванием пачки бумаги пролистайте листы.

Сбой питания или неисправность высоковольтного источника питания.
Обратитесь в центр технической поддержки.
На отпечатках белые участки л ибо белые или цветные полосы.
Вложите новую бумагу.
Вложите бумагу подходящего типа.
Весь отпечаток получается блеклым.

Если используется обходной лоток, значит указанный в драйвере принтера размер или тип бумаги не соответствует размеру или типу бумаги в лотке.
Вложите в обходной лоток бумагу соответствующего размера и типа.
Подача сразу нескольких листов.
Перед вкладыванием пачки бумаги пролистайте листы.

Вложите новую бумагу.
Добавление бумаги к уже вложенной в лоток.
Вложите новую бумагу.
Добавление бумаги к уже вложенной в лоток.
Белые или цветные вертикальные полосы.
Принт- картр и дж выработал ресурс или поврежден.

Направление подачи бумаги
Наклона изображения на отпечатке.
Неправильно установлены направляющие бумаги.
Установите правильно горизонтальную и вертикальную направляющие бумаги.
Проблемы с копиями
В таблице ниже приведены возможные причины проблем с копиями.
Вероятная причина Устранение
Загрязнение стекла экспонирования или его крышки.
Очистите стекло экспонирования или его крышку.
Копируется пленка или прозрачный материал.
Если загрязнена крышка стекла экспонирования, при копировании прозрачных оригиналов это отражается на копиях. Перед копированием накройте оригинал листом белой бумаги.
Копируется оригинал на цветной или грубой бумаге, либо светокопия.
Копируется фоновый цвет. Перед копированием настройте плотность копий, качество изображения или подавление фона.
Оригинал напечатан на глянцевой бумаге.
Глянцевая бумага легко прилипает к стеклу экспонирования, и на копиях могут воспроизводиться тени. Перед копированием подложите под оригинал прозрачный лист или пленку.
Копии слишком светлые или слишком темные.
Неправильно настроена плотность копий.
Настройте плотность копий.
Настройте плотность копий.
Неправильная настройка качества изображения.
Если копия с черным текстом получается слишком светлой, установите для параметра «Тип оригинала» настройку «Текст».
Небольшой сдвиг копий.
Неправильное вкладывание бумаги в лоток.
Выровняйте пачку бумаги и вложите ее так, чтобы передняя кромка совмещалась с углами лотка.
Вероятная причина Устранение
Пробелы на копиях.
На влажной бумаги могут получаться пропуски изображения или нечеткие копии. Вложите бумагу из неоткрытой пачки.
Бумага в лотке сгибается или мнется.
Уберите проблемные листы или вложите бумагу из неоткрытой пачки.
Мятый оригинал или оригинал с наклеенными фрагментами.
Мятый оригинал или оригинал с наклеенными фрагментами может неплотно прилегать к стеклу экспонирования. Чтобы добиться правильного прилегания оригинала к стеклу экспонирования, прижмите его сверху стопкой белой бумаги.
Неверный размер оригинала.
Проверьте правильность установки размера оригинала.
Неверный размер бумаги.
Проверьте правильность установки размера бумаги.
Полосы на копиях.
Слишком большое увеличение оригинала.
При чрезмерном увеличении оригинала на копии могут появляться полосы. Уменьшите масштаб копий.
Сдвиг или перекос копий.
Оригинал размещается неправильно.
Поместите оригинал правильно.
Направляющие в податчике оригиналов установлены неправильно.
Правильно разместите оригинал и установите направляющие так, чтобы они касались оригинала.
Лоток вставлен не до конца.
Задвиньте лоток в аппарат до упора.
Неправильно установлены направляющие бумаги в обходном лотке.
Правильно разместите оригинал и установите направляющие так, чтобы они касались оригинала.
Неверный размер оригинала.
Проверьте правильность установки размера оригинала.
Неверный размер бумаги.
Проверьте правильность установки размера бумаги.
Вероятная причина Устранение
Размер копий не соответствует ожидаемому размеру.
Загрязнение стекла экспонирования или его крышки.
Очистите стекло экспонирования или его крышку.
Копируется пленка или прозрачный материал.
Перед копированием накройте оригинал листом белой бумаги.
Поместите оригинал правильно.
Направляющие в податчике оригиналов установлены неправильно.
Правильно разместите оригинал и установите направляющие так, чтобы они касались оригинала.
Оригинал со складками.
Распрямите оригинал и поместите его правильно.
Неверная настройка размера оригинала.
Проверьте правильность установки размера оригинала.
Неверная настройка размера бумаги.
Проверьте правильность установки размера бумаги.
Обрезание копий по краям.
Размер оригинала больше области печати.
Немного уменьшите масштаб копий.
Неверный размер оригинала.
Проверьте правильность установки размера оригинала.
Неверный размер бумаги.
Проверьте правильность установки размера бумаги.
Печать не выполняется
В таблице ниже приведены возможные причины того, что не выполняется печать.
Данные не исчезают с пиктограммы принтера.
Питание аппарата не включено.
Включите питание аппарата.
Не подключен кабель компьютера.
Подключите кабель компьютера.
Не подключен кабель аппарата.
Подключите кабель аппарата.
Проверьте сведения об ошибке и примите соответствующие меры.
Данные отправлены на аппарат.
Не вложена бумага.
Отсутствует бумага указанного размера.
Вложите бумагу указанного размера.
Проверьте сведения об ошибке и примите соответствующие меры.
Отмените работу с экрана, если это требуется.
Проблемы с отпечатками
В таблице ниже приведены возможные причины проблем с отпечатками.
Отпечатки выполнены на бумаге неправильного размера.
В указанный лоток вложена бумага неправильного размера.
Вложите в лоток бумагу другого размера или измените параметры печати в соответствии с бумагой в лотке.
Обрезание изображения по краям.
Размер документа больше области печати аппарата.
Увеличьте область печати аппарата или уменьшите область печати документа.
Отключены настройки для параметров печати.
Используется драйвер принтера для другой модели аппарата.
Установите драйвер принтера для данного аппарата.
На аппарате не установлено соответствую щее устройство.
Проверьте установленные на аппарате устройства и выберите их в драйвере принтера, в группе «Элементы» раздела «Опции».
На компьютере не используется драйвер принтера, прилагаемый к аппарату (используется драйвер другого производителя).
Проверьте на компьютере, используется ли драйвер принтера, прилагаемый к аппарату.
Выберите на компьютере драйвер принтера, прилагаемый к аппарату. Если драйвер принтера отсутствует в списке для выбора, его следует установить, а затем выбрать. При использовании драйвера принтера другого производителя функционирование не гарантируется.
Проблемы при сканировании
В данном разделе приведены способы устранения неисправностей, которые могут возникать при сканировании.
Сканирование не выполняется
В таблице ниже приведены возможные причины того, что не выполняется сканирование.
Неправильная подача оригиналов податчиком.
Размер оригинала слишком мал.
Минимальный формат бумаги в податчике оригиналов: А5.
Данный тип оригиналов не поддерживается.
Податчик не подает оригиналы неправильной формы, визитки, пленки или тонкие документы, а также оригиналы с наклейками, зажимами и липкой лентой.
Неправильно установлены направляющие оригиналов.
Установите направляющие по размеру оригинала.
В податчике оригиналов застряли обрывки.
Откройте крышку податчика оригиналов и извлеките застрявшие обрывки.
Данные сканирования не загружаются на компьютер
В таблице ниже приведены возможные причины того, что данные сканирования не загружаются на компьютер.
Не удается найти сканер.
Питание аппарата не включено.
Включите питание аппарата.
Не подключен USB-кабель компьютера.
Подсоедините USB-кабель компьютера.
Не подключен USB-кабель аппарата.
Подсоедините USB-кабель аппарата.
Вероятная причина Устранение
Не удается загрузить данные со сканера из-за ошибки связи с драйвером TWAIN.
Драйвер сканера не установлен.
Установите драйвер сканера.
Остановлено выполнение операции при загрузке данных.
Слишком большой размер файла.
Уменьшите настройку разрешения и попробуйте снова загрузить данные.
Проблемы с качеством изображения сканирования
В таблице ниже приведены возможные причины проблем с качеством изображения сканирования.
Загрязнение изображения сканирования.
Загрязнение стекла экспонирования или его крышки.
Очистите стекло экспонирования или его крышку.
Копируется пленка или прозрачный материал.
Если загрязнена крышка стекла экспонирования, при сканировании прозрачных оригиналов это отражается на отпечатках. Перед сканированием накройте оригинал листом белой бумаги.
Копируется оригинал на цветной или грубой бумаге, либо светокопия.
Перед сканированием настройте плотность сканирования или качество изображения.
Сканируемый оригинал напечатан на глянцевой бумаге.
Глянцевая бумага легко прилипает к стеклу экспонирования, и на отпечатках могут воспроизводиться тени. Перед сканированием подложите под оригинал прозрачный лист или пленку.
Изображение слишком светлое или слишком темное.
Неправильно настроена плотность сканирования.
Настройте плотность сканирования.
Неподходящий тип оригинала.
Выберите подходящий тип оригинала.
Пробелы на изображении.
Мятый оригинал или оригинал с наклеенными фрагментами.
Мятый оригинал или оригинал с наклеенными фрагментами может неплотно прилегать к стеклу экспонирования. Чтобы добиться правильного прилегания оригинала к стеклу экспонирования, прижмите его сверху стопкой белой бумаги.
Вероятная причина Устранение
Размер изображения не соответствует ожидаемому размеру.
Загрязнение стекла экспонирования или его крышки.
Очистите стекло экспонирования или его крышку.
Копируется пленка или прозрачный материал.
Перед сканированием накройте оригинал листом белой бумаги.
Поместите оригинал правильно.
Направляющие в податчике оригиналов установлены неправильно.
Правильно разместите оригинал и установите направляющие так, чтобы они касались оригинала.
Оригинал со складками.
Распрямите оригинал и поместите его правильно.
Установлено низкое разрешение.
Установите более высокое разрешение.
Коды ошибок
Если из-за ошибки некорректно завершается печать или возникает неисправность аппарата, мигает код ошибки (X-X) или (XXX-XXX).
Примеры отображения кодов ошибки


В таблице ниже приведены коды ошибок и способы их устранения.
• Когда отображается код ошибки, могут быть утрачены данные печати в аппарате, а также информация, хранящаяся в памяти аппарата.
• Если отображается код ошибки, которого нет в таблице ниже, или ошибку не удается устранить после выполнения приведенных в таблице указаний, обращайтесь в центр технической поддержки Xerox. Номер контакта напечатан на наклейке или карточке, прикрепленной к аппарату.
• Когда отображает двухзначный код (X-X), можно проверить соответствующий шестизначный код (XXX-XXX), нажав и удерживая кнопку Копия удостоверения.
Код ошибки (X-X)
Код ошибки Причина
Застревание оригинала в податчике.
Извлеките застрявший оригинал.
Размер оригиналов в податчике не поддерживается.
Поместите данный оригинал на стекло экспонирования.
Не удается определить размер оригинала.
Проверьте следующее: — В податчике находятся только оригиналы. — Направляющие установлены по размеру оригинала. — Все оригиналы одинакового размера. Нельзя вкладывать одновременно оригиналы разного размера. Для работы с оригиналами разного размера пользуйтесь стеклом экспонирования.
Чтобы продолжить выполнение работы, заново вложите оригиналы, которые не были скопированы или отсканированы, и нажмите кнопку Старт.
Открыта крышка податчика оригиналов.
Отсутствует лоток для автовыбора или нет бумаги подходящего размера в выбранном лотке.
Сначала выберите лоток из тех, у которых светится индикатор, нажав кнопку Снабжение бумагой, и выдвиньте данный лоток. Затем вложите бумагу, размер и ориентация которой отображаются в области индикации на схеме состояния аппарата, и нажмите кнопку Старт.
Для отмены работы нажмите кнопку Стоп.
Нет бумаги в лотке 1.
Снова загрузите бумагу в лоток 1. Если лоток пуст, загрузите бумагу.
Код ошибки Причина
Нет бумаги в лотке 2.
Снова загрузите бумагу в лоток 2. Если лоток пуст, загрузите бумагу.
Нет бумаги в обходном лотке.
Заново вложите бумагу в обходной лоток. Если лоток пуст, загрузите бумагу.
Размер и ориентация бумаги в лотке 1 не соответствуют настройкам аппарата.
Убедитесь, что размер и ориентация бумаги в лотке 1 соответствуют настройкам, отображаемым в области индикации на схеме состояния аппарата, заново вложите бумагу и установите направляющие в правильное положение. Если настройка размера или ориентации бумаги изменились, сначала отмените работу кнопкой Стоп.
Размер и ориентация бумаги в лотке 2 не соответствуют настройкам аппарата.
Убедитесь, что размер и ориентация бумаги в лотке 2 соответствуют настройкам, отображаемым в области индикации на схеме состояния аппарата, заново вложите бумагу и установите направляющие в правильное положение. Если настройка размера или ориентации бумаги изменились, сначала отмените работу кнопкой Стоп.
Код ошибки Причина
Размер и ориентация бумаги в обходном лотке не соответствуют настройкам аппарата.
Убедитесь, что размер и ориентация бумаги в обходном лотке соответствуют настройкам, отображаемым в области индикации на схеме состояния аппарата, заново вложите бумагу и установите направляющие в правильное положение. Если настройка размера или ориентации бумаги изменились, сначала отмените работу кнопкой Стоп.
При копировании в режиме «Страниц на листе» значение масштаба, требуемое для размещения указанного числа страниц на листе, выходит за пределы диапазона 25 — 400 %.
Нажмите кнопку Стоп. Измените масштаб так, чтобы все страницы могли разместиться на листе, поместите все оригиналы и нажмите кнопку Старт.
Застревание бумаги за левой крышкой аппарата.
Откройте левую крышку аппарата и извлеките застрявшую бумагу.
Застревание бумаги за крышкой однолоткового модуля аппарата.
Откройте крышку однолоткового модуля аппарата и извлеките застрявшую бумагу.
Застревание бумаги в лотке 1.
Извлеките застрявшую бумагу.
Застревание бумаги в лотке 2.
Извлеките застрявшую бумагу.
Застревание бумаги в обходном лотке.
Извлеките застрявшую бумагу.
Открыта левая крышка аппарата.
Открыта передняя крышка аппарата.
Открыта крышка однолоткового модуля аппарата.
Код ошибки Причина
При текущей настройке изображение будет обрезаться.
Поместите оригинал в горизонтальной ориентации и нажмите кнопку Старт.
е. Если используется податчик оригиналов, заново вложите в него все оригиналы, не открывая крышку стекла экспонирования.
Идет охлаждение внутри аппарата.
Запускается автоматически. Не открывайте никакие крышки аппарата.
Выключите питание, подождите 10 секунд после того, как погаснет экран, затем снова включите питание. Если это изображение не снимается со схемы состояния аппарата, замените.
Истек гарантийный срок по качеству изображения.
Качество изображения может ухудшиться. Рекомендуется заменить.
Истек гарантийный срок функционирования.
Это может привести к повреждению аппарата. Замените.
Срочно замените. В противном случае возможно повреждение аппарата.
Исчерпан лимит копий, если он установлен. Кроме того, активен сеанс пользователя, исчерпавшего лимит копий.
Нажмите кнопку Стоп и обратитесь к системному администратору.
Работа отменена из-за нехватки памяти при чтении.
Изменив настройку, попробуйте снова.
Изменив настройку, попробуйте снова.
Выключите аппарат и снова включите его после того, как погаснет дисплей.
Выключите аппарат и снова включите его после того, как погаснет дисплей. Если снова появится данный код ошибки, обратитесь в центр технической поддержки.
Выключите аппарат и снова включите его после того, как погаснет дисплей.
Выключите аппарат и снова включите его после того, как погаснет дисплей. Если снова появится данный код ошибки, обратитесь в центр технической поддержки.
Выключите аппарат и снова включите его после того, как погаснет дисплей.
Ошибка податчика оригиналов.
После завершения копирования выполните следующие действия: нажмите любую кнопку на панели управления и выполните новую работу или дождитесь завершения тайм-аута для сброса ошибки.
010-311 010-312 010-320 010-327 010-392
Выключите аппарат и снова включите его после того, как погаснет дисплей. Если снова появится данный код ошибки, обратитесь в центр технической поддержки.
016-500 016-501 016-502 016-504 016-571 016-742 016-744
Выключите аппарат и снова включите его после того, как погаснет дисплей.
Изменив настройку, попробуйте снова.
Код ошибки Причина
Выключите аппарат и снова включите его после того, как погаснет дисплей. Если снова появится данный код ошибки, обратитесь в центр технической поддержки.
042-325 042-400 042-608 042-614
062-277 062-311 062-360 062-371 062-380 062-386 062-389 062-396
072-210 072-212 072-215
Заканчивается срок службы.
Приготовьте для замены.
Приготовьте для замены.
Принт-картридж вскоре потребуется заменить.
Приготовьте для замены.
Значение ATC SNR выходит за пределы установленного диапазона.
Выключите аппарат и снова включите его после того, как погаснет дисплей. Если снова появится данное сообщение, обратитесь в центр технической поддержки.
Значение температуры SNR выходит за пределы установленного диапазона.
Код ошибки Причина
116-321 116-323 116-334 116-377
Выключите аппарат и снова включите его после того, как погаснет дисплей. Если снова появится данное сообщение, обратитесь в центр технической поддержки.
Не удается выполнить сканирование, т. к. слишком мала область сканирования.
Уменьшите значение для стирания рамки или масштаб.
Выключите аппарат и снова включите его после того, как погаснет дисплей. Если снова появится данное сообщение, обратитесь в центр технической поддержки.
Застревание бумаги
В данном разделе приведены действия по извлечению застрявшей бумаги.
Когда в аппарате застревает бумага, он останавливается и на схеме состояния аппарата загорается индикатор лотка и пиктограмма застревания. Кроме того, на дисплее появляется код ошибки, указывающий, какие действия нужно выполнить, чтобы извлечь застрявшую бумагу.
Аккуратно извлеките застрявшую бумагу, чтобы не порвать ее. Не оставляйте в аппарате обрывки бумаги.
• Если после извлечения застрявшей бумаги на дисплее по-прежнему отображается код ошибки по застреванию, значит бумага застряла на другом участке аппарата или в нем остались обрывки бумаги. Проверьте это по схеме состояния аппарата и по коду ошибки и полностью извлеките застрявшую бумагу.
• После извлечения застрявшей бумаги работа копирования возобновляется автоматически.
• Работа печати возобновляется с той страницы, при печати которой произошло застревание.
• Если бумага застревает при выполнении работы копирования с помощью податчика оригиналов без подборки копий (когда оригиналы подаются и сканируются по одному листу), после извлечения застрявшей бумаги автоматически возобновляется копирование уже отсканированного оригинала. Одна для подачи и сканирования остальных вложенных оригиналов необходимо снова нажать кнопку Старт.
Если необходимо выдвинуть лоток для извлечения застрявшей бумаги, обратитесь в местное представительство Xerox. Во избежание ожогов не выдвигайте лоток.
Не пытайтесь извлечь бумагу, застрявшую глубоко внутри аппарата, например, намотанную на блок фьюзера или нагревательный вал. Это может привести к травмам или ожогам. Немедленно выключите аппарат и обратитесь в местное представительство.
• Если выдвинуть лоток после застревания бумаги, не определив участок застревания, бумага может порваться и в аппарате останутся обрывки. Во избежание повреждения аппарата определите место застревания бумаги, прежде чем приступать к ее извлечению.
• Если в аппарате останутся обрывки бумаги, указание застревания бумаги на схеме состояния не исчезнет.
• При извлечении застрявшей бумаги оставьте аппарат включенным. Отключение питания приведет к удалению информации, хранящейся в памяти аппарата.
• Не прикасайтесь к внутренним частям аппарата. Это может вызвать ошибки при печати.
E-1. Застревание бумаги за левой крышкой A
Для извлечения застрявшей бумаги из-за левой крышки аппарата выполните следующие действия.
При извлечении бумаги на ремне переноса (из черной пленки) за левой крышкой может содержаться изображение. Не прикасайтесь к ремню переноса. Это может привести к снижению качества изображения или повреждению ремня переноса, после которого потребуется замена ремня.
1. Откройте обходной лоток (1), осторожно откройте левую крышку (3), удерживая рычажок (2) в приподнятом состоянии.

Если бумага застряла на участке блока фьюзера
a. Опустите защелку.
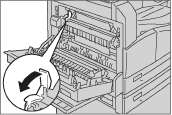
b. Извлеките застрявшую бумагу.

Не оставляйте в аппарате обрывков бумаги. c. Верните защелку в исходное положение.
Если бумага застряла за левой крышкой
a. Если бумага застряла в месте, указанном на данном рисунке, извлеките ее, потянув вверх.
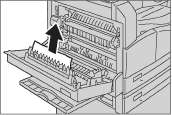
b. Если бумага застряла в месте, указанном на данном рисунке, извлеките ее, потянув вверх.

2. Нажав на центр левой крышки, медленно закройте ее и поднимите обходной лоток.
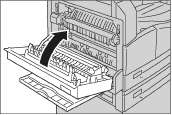
E-2: Застревание бумаги в однолотковом модуле B
Для извлечения застрявшей бумаги из-за крышки однолоткового аппарата выполните следующие действия.
1. Потяните за фиксирующий рычаг и осторожно откройте крышку однолоткового модуля.

2. Извлеките застрявшую бумагу.

• Бумага может застрять в верхней части, где ее трудно увидеть. Внимательно проверьте наличие застрявшей бумаги.
• Если бумага порвется, проверьте, чтобы внутри аппарата не осталось обрывков. 3. Осторожно закройте крышку однолоткового модуля.

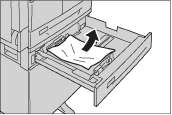
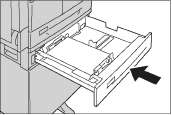
E-3. Застревание бумаги в лотке 1
Для извлечения застрявшей бумаги из лотка 1 выполните следующие действия.
1. Извлеките застрявшую бумагу.
2. Если застрявшая бумага не извлекается, выдвиньте лоток.

Если выдвинуть лоток после застревания бумаги, не определив участок застревания, бумага может порваться и в аппарате останутся обрывки. Во избежание повреждения аппарата определите место застревания бумаги на дисплее, прежде чем приступать к ее извлечению.
3. Извлеките застрявшую бумагу. Если лоток пуст, загрузите бумагу.

Если бумага порвется, проверьте, чтобы внутри аппарата не осталось обрывков.
4. Аккуратно задвиньте лоток до упора.

E-4. Застревание бумаги в лотке 2
Для извлечения застрявшей бумаги из лотка 2 выполните следующие действия.
1. Извлеките застрявшую бумагу.
2. Если застрявшая бумага не извлекается, выдвиньте лоток.

Если выдвинуть лоток после застревания бумаги, не определив участок застревания, бумага может порваться и в аппарате останутся обрывки. Во избежание повреждения аппарата определите место застревания бумаги на дисплее, прежде чем приступать к ее извлечению.
3. Извлеките застрявшую бумагу. Если лоток пуст, загрузите бумагу.
Если бумага порвется, проверьте, чтобы внутри аппарата не осталось обрывков.
4. Аккуратно задвиньте лоток до упора.
E-5. Застревание бумаги в обходном лотке
Для извлечения застрявшей бумаги из обходного лотка выполните следующие действия.
1. Извлеките застрявшую бумагу.
2. Осмотрите обходной лоток изнутри (около отверстия подачи бумаги) и извлеките застрявшую бумагу.

• Если вложено несколько листов бумаги, уберите их все на время извлечения застрявшей бумаги.
• Если бумага порвется, проверьте, чтобы внутри аппарата не осталось обрывков.
3. Если вложено несколько листов бумаги, извлеките их и выровняйте по углам.
4. Вложите бумагу стороной для печати вниз так, чтобы передняя кромка листов касалась входного отверстия лотка.

Застревание оригиналов
Если в податчике застревает оригинал, аппарат останавливается и на дисплее появляется код ошибки A-1, A-2, A-3. На схеме состояния аппарата загорается индикатор оригиналов и пиктограмма застревания.
Далее приведено описание извлечения застрявших оригиналов из податчика.
В конфигурации некоторых моделей податчик оригиналов в стандартную комплектацию не входит.
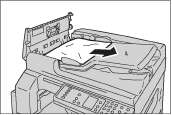
Для извлечения застрявшего оригинала выполните следующие действия.
1. Потяните переднюю рукоятку крышки податчика документов, затем полностью откройте крышку податчика документа.

В полностью открытом положении крышка фиксируется. Открывайте крышку осторожно.
2. Если оригинал еще не вошел в податчик, извлеките его.
3. Если оригинала не видно, поднимите ручку и откройте внутреннюю крышку.

4. Закройте внутреннюю крышку податчика оригиналов.
5. Закройте верхнюю крышку податчика оригиналов, чтобы она защелкнулась, и убедитесь, что крышка плотно прилегает к податчику с обеих сторон.
6. Если оригинала не видно, аккуратно поднимите податчик. Если оригинал виден, извлеките его и закройте податчик.
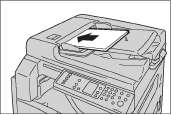
7. Если обнаружить оригинал согласно инструкциям в пункте 6 не удалось, поднимите лоток податчика и удалите документ.

8. Аккуратно верните лоток податчика оригиналов в исходное положение.
9. Следует убедиться, что оригинал не порван, не смят и не сложен, затем нужно снова загрузить оригиналы, которые еще не были скопированы или отсканированы.
Рваные и мятые страницы оригиналов или страницы со сгибами могут застревать и вызывать повреждение аппарата. Для копирования таких оригиналов используйте стекло экспонирования.
10. Чтобы начать копирование, нажмите кнопку Старт. Для сканирования запустите процесс с компьютера.
Источник
КОНФЕРЕНЦИЯ СТАРТКОПИ
Принтеры, копировальные аппараты, МФУ, факсы и другая офисная техника:
вопросы ремонта, обслуживания, заправки, выбора
Доброго времени суток!
имеем вот такую проблему,
возил с этой пролемой в сервис, починили, гдето после 100копий опять имеем данную ошибку, узел переноса поставили новый, не помогло, опять везти в сервис и ждать 40 дней клиента не устраивает, единственное,что удалось найти на просторах рунета, что это ошибка датчика автоматической концентрации тонера, как можно исправить ее самому? небольшой опыт ремонта принтеров имеется, помогите плиз!
Возможно, и удастся. Чем кормите пациента и какой у него пробег на сегодняшний день?
пациент съел стартовую тубу, вторую он съел гдето на половину, поэтому пробег копеечный, вторая туба тоже оригинал
The frequency at which the ATC Average Fail or the ATC Amplitude Fail has been occurring is
at the threshold value or higher.
NOTE: To clear this Fail, clear the value of NVM 752 (ATC Fail) or NVM 752 (ATC
Fail Continuous Count) to ‘0’. If the machine is not repaired back to normal status, this Fail will
occur again during the operation.
NOTE: Setting the NVM 752 (Dispense Mode) to ‘0’ (Timer Disp) or ‘2’ (ICDC Disp) will
prevent ATC related fail from occurring and enable you to use the M/C. However, this means
that the Toner density will not be controlled.
Cause/Action
1. Install a Toner Cartridge that contains Toner. Copy a Test Chart (499T 00247), etc. and
check whether the density has recovered.
2. Check the Toner Dispense Motor (Output Check 92) for operation failure. (PL 8.2)
3. Check the Toner transport path for Toner blockage.
4. Check the connection between the ATC Sensor (Drum Cartridge) P615 and the ESS/
MCU PWB J409 for open circuit, short circuit, and poor contact.
5. Check for toner blockage within the Developer Unit.
6. If no problem is found, replace the following parts in sequence:
Drum Cartridge
ESS/MCU PWB
Пробовали по инструкции сбрасывать?
В инструкции нет про эту ошибку ничего
драм и тонер я поменял, я так понимаю осталось сбросить саму ошибку, но как? датчик ATC это тот, который на драме установлен?
SergeyS (6): сбросить саму ошибку, но как?
Вам подробно расписано тремя постами выше.
единственное что смог сделать — войти в сервисное меню (нажатие 0 и старт), повилось на дисплее (— —)может подскажете какая последовательность дальше?
(8) Если непонятен второй абзац («To clear. «) в (3) — откройте СМ на любой (почти?) Воркцентр этой модельной линейки, там будет расписано.
для это:
1. включам принтер, зажимаем кнопку «0» держим не менее 4 сек, и не отпуская нажимаем «старт», потом вводим «6789», кнопка СТАРТ,
попадаем в сервисное меню
2. вводим 752, кнопка СТАРТ, 059 кнопка старт, походу когда ошибка взведена видим «1» нажимаем старт, вводим «000» нажимаем старт, получам «ок», зажимаем кнопку «0» держим не менее 4 сек, и не отпуская нажимаем «старт», чудо техники перезагрузится уже без ошибки,
СПАСИБО ВСЕМ,КТО ПОМОГ.
SergeyS (10): включам принтер, зажимаем кнопку «0» держим не менее 4 сек, и не отпуская нажимаем «старт»
потом вводим 6789 и только потом
SergeyS (10): попадаем в сервисное меню
по крайней мере так было у меня, когда я входил в сервис 5021.
проблема со старым драмом осталась, с новым все ок!
(13) Значит, переходите к пунктам 1. 6 из (3).
Источник
Ошибка 092-910 на принтерах Xerox WorkCentre 5024
Ошибка 092-910 у Xerox WorkCentre 5024 возникает по разным причинам:
- выход из строя датчика плотности тонера ATC;
- недостаток тонера в картридже;
- неполадки драм-юнита и прочее.
Если чистка датчика ATC, а также замена расходников не помогли решить проблему, тогда остановка печатного процесса может быть вызвана поломкой материнской платы или ее отдельных компонентов.
Как сбросить ошибку 092-910?
Простой замены изношенного блока фотобарабана или отработанного картриджа порой недостаточно, чтобы сбросить ошибку 092-910 .
Для завершения операции потребуется войти в сервисное меню принтера Xerox 5024 и произвести следующий алгоритм действий:

- включите аппарат;
- зажмите кнопку с цифрой «0» на 5 секунд, не отпуская ее нажмите еще кнопку «Старт»;
- введите набор цифр «6789» и снова нажмите «Старт»;
- после того, как откроется сервисное меню, наберите «752», завершив комбинацию кнопкой «Старт»;
- далее наберите «059» — «Старт»;
- на дисплее должна показаться цифра «1», нажмите «Старт» — «000» — «Старт»;
- когда появится подтверждение сброса ошибки «OK», зажмите цифру «0» на 5 секунд, не отпуская кнопку нажмите «Старт».
После перезагрузки аппарат должен запуститься без отображения ошибки 092-910 .
Источник
Устранение неисправностей WorkCentre.
WorkCentre 5019/5021
Руководство пользователя
Выключите аппарат и снова включите его
после того, как погаснет дисплей. Если снова
появится данный код ошибки, обратитесь
в центр технической поддержки Xerox.
Заканчивается срок службы принт-
картриджа.
Замените принт-картридж.
См. раздел
Приготовьте принт-картридж для
замены.
Приготовьте принт-картридж для замены.
Принт-картридж вскоре потребуется
заменить.
Приготовьте принт-картридж для замены.
Значение ATC SNR в принт-картридже
выходит за пределы установленного
диапазона.
Выключите аппарат и снова включите его
после того, как погаснет дисплей. Если снова
появится данное сообщение, обратитесь
в центр технической поддержки Xerox.
Значение температуры SNR в принт-
картридже выходит за пределы
установленного диапазона.

Устранение неисправностей WorkCentre.
Замените тонер-картридж.
См. раздел
Выключите аппарат и снова включите его
после того, как погаснет дисплей. Если снова
появится данное сообщение, обратитесь
в центр технической поддержки Xerox.
Не удается выполнить сканирование,
т. к. слишком мала область
сканирования.
Уменьшите значение для стирания рамки или
масштаб.
См. раздел
Выключите аппарат и снова включите его
после того, как погаснет дисплей. Если снова
появится данное сообщение, обратитесь
в центр технической поддержки Xerox.

Застревание бумаги, Застревание бумаги -29, Аппарата. см. раздел
WorkCentre 5019/5021
Руководство пользователя
В данном разделе приведены действия по извлечению застрявшей бумаги.
Когда в аппарате застревает бумага, он останавливается и на схеме состояния аппарата
загорается индикатор лотка и пиктограмма застревания. Кроме того, на дисплее появляется код
ошибки, указывающий, какие действия нужно выполнить, чтобы извлечь застрявшую бумагу.
Аккуратно извлеките застрявшую бумагу, чтобы не порвать ее. Не оставляйте в аппарате
обрывки бумаги.
Если после извлечения застрявшей бумаги на дисплее по-прежнему отображается
код ошибки по застреванию, значит бумага застряла на другом участке аппарата
или в нем остались обрывки бумаги. Проверьте это по схеме состояния аппарата
и по коду ошибки и полностью извлеките застрявшую бумагу.
После извлечения застрявшей бумаги работа копирования возобновляется
автоматически.
Работа печати возобновляется с той страницы, при печати которой произошло
застревание.
Если бумага застревает при выполнении работы копирования с помощью
податчика оригиналов без подборки копий (когда оригиналы подаются
и сканируются по одному листу), после извлечения застрявшей бумаги
автоматически возобновляется копирование уже отсканированного оригинала.
Одна для подачи и сканирования остальных вложенных оригиналов необходимо
снова нажать кнопку
Если необходимо выдвинуть лоток для извлечения застрявшей бумаги,
обратитесь в местное представительство Xerox. Во избежание ожогов не выдвигайте лоток.
Не пытайтесь извлечь бумагу, застрявшую глубоко внутри аппарата,
например, намотанную на блок фьюзера или нагревательный вал. Это может привести
к травмам или ожогам. Немедленно выключите аппарат и обратитесь в местное
представительство Xerox.
Если выдвинуть лоток после застревания бумаги, не определив участок
застревания, бумага может порваться и в аппарате останутся обрывки. Во
избежание повреждения аппарата определите место застревания бумаги, прежде
чем приступать к ее извлечению.
Если в аппарате останутся обрывки бумаги, указание застревания бумаги на схеме
состояния не исчезнет.
При извлечении застрявшей бумаги оставьте аппарат включенным. Отключение
питания приведет к удалению информации, хранящейся в памяти аппарата.
Не прикасайтесь к внутренним частям аппарата. Это может вызвать ошибки при
печати.
Источник
Xerox 5021 ошибка j4 сброс
Если Ваш копировальный аппарат («ксерокс»), принтер или МФУ Xerox выдали на индикации некий код, то узнать причину возникновения ошибки Вы можете в разделе «Коды».
О том, как устранить причину ошибки, есть много материалов в разделах «Ремонт», «Ликбез», «FAQ»; так же Вы можете воспользоваться поиском или указателем материалов сайта.
А в данном разделе представлена информация о методике сброса тех или иных ошибок.
Для большинства моделей этой фирмы (по крайней мере тех, что не являются аналогами Sharp’ов) вход в сервисный режим – удерживая [ 0 ], включить аппарат.
Иные способы входа в сервисный режим:
| Xerox 5845, 5855 | Либо включить аппарат с одновременно нажатыми кнопками [Прерывание] и [2] либо на включенном аппарате нажать и удерживать эти кнопки более 2 сек. Если аппарат неисправен – вход осуществляется кнопками [Прерывание] и [5], с ограничением функций (последовательно появляющиеся сообщения о неисправностях сбрасываются двойным нажатием клавиши [Стоп]). Далее аппарат запрашивает четырёхзначный код доступа: это либо 8765 (по умолчанию), либо последние четыре цифры счётчика копий в обратном порядке (если счётчик копий показывает 01234567 – код входа 7654). |
| Xerox N17 24/32/40 3225/4025 |
Есть 3 диагностических режима: 1 – проверяются выключатели, датчики и выводятся параметры фьюзера; вход: (2+6), после «IOT?» нажать «7»; 2 – печатается тест-лист «сетка» в симплексе или дуплексе; вход: (2+6), после «IOT?» нажать «4»; 3 – меняются параметры и настройки принтера (NVRAM); вход: (2+6), после «IOT?» нажать (4+7), «7» сразу же отпустить; «4» держать до появления «3» на дисплее, затем отпустить. |
| XD102. 155 XE60. 84 XC800. 1255 |
stop – auto – stop – auto иногда записывают как C – Density select – C – Density select (что то же самое) |
| WC PE 16(e) | набираем на клавиатуре [menu] – [#] – [1934] – [menu]; после входа в сервисное меню появится надпись «TECH» |
Для выхода из сервисного режима можно дважды нажать кнопку [Сброс] или просто выключить и включить аппарат.
| Xerox 5201/5203/5305/5306 XC351/355/356 | Обнуление счетчика фоторецептора. Признак – моргают все лампы, в готовность не выходит.
|
| Xerox ХC520/540/560/580 | Сброс ошибки Н3/Н4.
|
| Xerox N17, N2125 24/32/40 3225/4025 N2025/2825 Phaser 5400 |
Эти модели имеют счетчик фьюзера. По его окончании аппарат просит заменить набор регламентных работ или «Maintenance Kit». Этот счетчик тоже можно сбросить, если печка в порядке: (2+6), вкл. питание, дождаться «IOT?», не позднее 5 сек. после появления «IOT?» нажать (0+5) и держать до появления сообщения о сбросе «Reset Complete. Please Reboot». Выключите и включите принтер. Рекомендация: все же лучше не просто сбрасывать счетчик, а устанавливать набор, в который входят фьюзер в сборе, ролик переноса, ролики подачи (6 или 15), протирочная салфетка |
| WC РE16(e) |
Samsung SCX 4016/4116/4216(F)
4321/4521(F)
Сброс сообщения «Нет тонера» после заправки – есть два варианта:
1. Поставить в паз на передней части картриджа предохранитель на 1/16А (0.0625А), при первом же включении аппарат пережгёт предохранитель и сообщение сбросится. Известны случаи, что работало и с предохранителем до 0.5А; но если МФУ предохранитель не сможет сжечь, будет ошибка CRU FUSE ERROR, которая уходит после установки более слабого предохранителя.
2. Через сервисное меню:
для входа в сервисное меню 4216/PE16 набираем на клавиатуре : [menu] – [#] – 1934 – [menu], (для 4016/4116 – [menu] – [upper level] – [Стрелка влево] – [Стрелка вправо] – [upper level] – [enter]). После входа в сервисное меню появится надпись TECH; с помощью клавиш [Стрелка влево] – [Стрелка вправо] находим запись «New cartridge», выбираем «Yes».
Для выхода из сервисного меню просто выключаем и включаем МФУ (или для 4216/PE16 набираем на клавиатуре [menu] – [#] – 1934). Xerox 4030 Процедура одинакова для обоих картриджей: удерживая кнопку сброса, находящуюся рядом со шнуром питания; включите принтер. Xerox 5017/5316/5317 Сброс барабана (ошибка J7):
на платке с EPROM запаиваем F2, а вместо F1 включаем тестер в режиме измерения тока на пределе 3 mA с защитой. Делаем 101 копию, и – привет!
Другие способы приведены в разделах «Заметки – Xerox» и «F.A.Q.» DC 212/214 Сброс ошибки U4.
Войдите в диагностический режим и подождите 30 сек, пока аппарат завершит инициализацию. Введите диагностический код [401] и нажмите кнопку «Старт». Выйдите из диагностики, выключите аппарат. Подождите 10 сек, включите аппарат. Подождите 30 сек.
Если код U4 появился снова, повторите процедуру сброса. Если после 3-х процедур код появляется вновь, но Вы уверены в работоспособности фьюзера – замените главную плату. WC Pro 320 Сброс кода U4 (печная ошибка) – код 10-1, введите 0 и нажмите кнопку [Старт] WC Pro 610 Тонер: включите аппарат, откройте крышку; нажмите [MENU], [6], [3], [CLEAR], [ENTER]
Барабан: включите аппарат, откройте крышку; нажмите [MENU], [6], [4], [CLEAR], [ENTER] XD155df после сброса счётчика 24-7 в 26-38 пропиши 1 – больше считать не будет. XE 60/80 Сброс OPC Cartridge: при включенном питании откройте переднюю крышку; удерживая кнопку [Copy Contrast], закройте крышку и продолжайте держать кнопку 3 секунды. Xerox 5845 При включении требует ввести пользовательский код или кликнуть администратора.
Надо войти в «АДМИНИСТРАТОР» (код 11111), затем ввести новый счет; или заблокировать аудитрон. Xerox WC 5020 DN Распечатка листа конфигурации: нажать и удерживать кнопку «2» четыре секунды; не отпуская, нажать АС. На экране появится 1. Отпустить обе кнопки и нажать «Стоп», на экране «run». Аппарат печатает лист конфигурации.
Повторяем для неискушенных пользователей: НИКОГДА не используйте никаких других диагностических кодов и процедур, потому что это может привести к непредсказуемым последствиям.
В данной таблице предоставлены коды сброса ошибок популярных моделей аппаратов разных производителей. В левой колонке указана модель аппарата, в правой – метод сброса. Для большинства моделей данной фирмы вход в сервисный режим одинаков – удерживая «0» включить агрегат.
Другие способы входа в сервисный режим

WorkCentre 5019/5021
Руководство пользователя
При текущей настройке
изображение будет обрезаться.
Поместите оригинал в горизонтальной
ориентации и нажмите кнопку
Если используется податчик
оригиналов, заново вложите в него все
оригиналы, не открывая крышку стекла
экспонирования.
Идет охлаждение внутри аппарата.
Запускается автоматически. Не открывайте
никакие крышки аппарата.
Замените тонер-картридж.
См. раздел
Необходимо заменить принт-
картридж.
Выключите питание, подождите 10 секунд
после того, как погаснет экран, затем снова
включите питание.
Если это изображение не снимается со схемы
состояния аппарата, замените принт-
картридж.
См. раздел
Истек гарантийный срок принт-
картриджа по качеству
изображения.
Качество изображения может ухудшиться.
Рекомендуется заменить принт-картридж.
См. раздел
Истек гарантийный срок
функционирования принт-
картриджа.
Это может привести к повреждению
аппарата. Замените принт-картридж.
См. раздел
Срочно замените принт-картридж.
В противном случае возможно повреждение
аппарата.
См. раздел
Исчерпан лимит копий, если он
установлен. Кроме того, активен
сеанс пользователя, исчерпавшего
лимит копий.
к системному администратору.
Работа отменена из-за нехватки
памяти при чтении.
Источник
➤Adblock
detector
An error code (X-X) or (XXX-XXX) blinks if printing terminated abnormally because of an error, or a malfunction occurred in the machine.
CAUTION: If an error code is displayed, any print data remaining in the machine and information stored in the machine’s memory is not secured.
If an error code is displayed that is not listed in the following table, or if you cannot resolve an error despite following the instructions described in the table, contact the Customer Support Center. The contact number is printed on the label or card attached to the machine.
A Codes
| Fault Code | Description |
|---|---|
| A-1 | The original is jammed in the Document Feeder. |
| A-2 | The size of the originals loaded in the Document Feeder are not supported, and has resulted in a document jam. |
| A-3 | The original size cannot be detected. |
| A-5 | The Document Feeder Cover is open or the Document Cover is open. |
C Codes
| Fault Code | Description |
|---|---|
| C-0 | Either there is no tray to auto-select or no appropriate size of paper loaded in the selected tray. |
| C-1 | Out of paper in Tray 1. |
| C-2 | Out of paper in Tray 2. |
| C-3 | Out of paper in the Bypass Tray. |
| C-5 | The size and orientation of paper loaded in Tray 1 do not match the setting of the machine. |
| C-6 | The size and orientation of paper loaded in Tray 2 do not match the setting of the machine. |
| C-7 | The size and orientation of paper loaded in the Bypass Tray do not match the setting of the machine. |
| C-9 | When copying using the «Pages per Size» feature, the zoom ratio required to fit the specified number of pages on a sheet is beyond the range of 25 — 400%. |
E Codes
| Error Code | Description |
|---|---|
| E-1 | Paper is jammed in the machine’s Left Cover. |
| E-2 | Paper is jammed in the machine’s One Tray Module cover. |
| E-3 | Paper is jammed in Tray 1. |
| E-4 | Paper is jammed in Tray 2. |
| E-5 | Paper is jammed in the Bypass Tray. |
| E-6 | Machine’s Left Cover is Open. |
| E-7 | Machine’s Front Cover is Open. |
| E-8 | Machine’s One Tray Module Cover is Open. |
| E-9 | The image will be cut off with the current setting. |
J Codes
| Error Code | Description |
|---|---|
| J-1 | Out of Toner (Dry Ink). |
| J-4 | The Drum Cartridge needs to be replaced. |
| J-6 | The Drum Cartridge is defective. |
| J-7 | The warranty period of the image quality on the Drum Cartridge is expired. |
| J-8 | The warranty period of performance on the Drum Cartridge is expired. |
| J-9 | The Drum Cartridge is defective. |
H and L Codes
| Error Code | Description |
|---|---|
| H-0 | Cooling inside the machine. Please wait. |
| L-1 | Reached the maximum copy limit when the limit is set. Also, the user who reached the copy job limit has logged in. |
n Codes
| Error Code | Description |
|---|---|
| n-1 | A job is canceled due to out of memory in reading. |
| n-2 | A job is canceled. |
Устранение неисправностей
WorkCentre 5019/5021
Руководство пользователя
11-21
Коды ошибок
Если из-за ошибки некорректно завершается печать или возникает неисправность аппарата,
мигает код ошибки (X-X) или (XXX-XXX).
Примеры отображения кодов ошибки
В таблице ниже приведены коды ошибок и способы их устранения.
Примечания
•
Когда отображается код ошибки, могут быть утрачены данные печати в аппарате,
а также информация, хранящаяся в памяти аппарата.
•
Если отображается код ошибки, которого нет в таблице ниже, или ошибку не
удается устранить после выполнения приведенных в таблице указаний,
обращайтесь в центр технической поддержки Xerox. Номер контакта напечатан на
наклейке или карточке, прикрепленной к аппарату.
•
Когда отображает двухзначный код (X-X), можно проверить соответствующий
шестизначный код (XXX-XXX), нажав и удерживая кнопку
Копия удостоверения.
-
Page 1: User Guide
September 2012 702P00733 WorkCentre 5019/5021 User Guide…
- Page 2
©2012 Xerox Corporation. All rights reserved. XEROX , and XEROX and Design , are trademarks of Xerox Corporation in the United States and/or other countries. Microsoft, Windows, Windows Server, Windows XP, Windows Vista, and Windows 7 are trademarks or registered trademarks of Microsoft Corporation. -
Page 3: Table Of Contents
Duplex automatic document feeder (optional) ……..3-5 WorkCentre 5019/5021…
- Page 4
Stopping a copy job …………..5-8 WorkCentre 5019/5021… - Page 5
Checking the total number of impressions copied ……… 9-4 WorkCentre 5019/5021… - Page 6
Notes and restrictions on the use of the Scan feature ……. . .12-9 WorkCentre 5019/5021… -
Page 7: Before Using The Machine
Preface Thank you for selecting the WorkCentre 5019/5021 (hereafter referred to as «the machine»). This guide describes how to operate the machine and the precautions you should follow during operation. To get the most out of the machine and to use it effectively, be sure to read this guide before use.
-
Page 8: Available Manuals
The help describes print features and operations. Guides for optional components Optional components are available for this product. Optional components come with an installation procedure guide that provides information on how to set up the product and other details. WorkCentre 5019/5021 User Guide…
-
Page 9: Using This Guide
The procedures in this guide may vary depending on the driver and utility software versions used. • In this document, «Computer» refers to a personal computer or workstation. • This guide uses Notes to call attention to important information and additional information on operations or features. WorkCentre 5019/5021 User Guide…
- Page 10
Long Edge Feed (LEF) the machine. feed direction SEF orientation Loading the document or paper in landscape orientation when viewed from Short Edge Feed (SEF): the front of the machine. feed direction WorkCentre 5019/5021 User Guide… -
Page 11: Safety Notes
Note Any unauthorized alteration including an addition of new functions or connection to external devices may not be covered by the product warranty. Contact your local Xerox representative for more information. Follow all warning instructions marked on this product. The following symbols are used to indicate…
-
Page 12: Machine Installation
If the power cord is damaged or insulated wires are exposed, contact your local Xerox representative for a replacement. Do not use a damaged or uninsulated cord to avoid the risk of electric shock and fire.
- Page 13
Locate this product in a well-ventilated area. Do not obstruct the ventilation openings of the product. Keep the minimum clearance indicated below for ventilation and access to the power plug. Unplug the product if an abnormal condition is noted. With Duplex Automatic Document Feeder 1100.9 325.9 (Unit: mm) WARNINGS: WorkCentre 5019/5021 User Guide… -
Page 14: Operational Safety
This product is equipped with a safety feature that prohibits access to hazardous areas. The areas are isolated by covers or protectors that require a tool to remove. To prevent electric shock and injury, never remove these covers and protectors. WorkCentre 5019/5021 User Guide…
-
Page 15: Consumables
Never throw a toner cartridge into an open flame. Remaining toner in the cartridge may catch fire and cause burn injury or explosion. If you have a used toner cartridge no longer needed, contact your local Xerox representative for its disposal.
-
Page 16: Location Of Warning And Caution Labels
Always follow all warning instructions marked on or supplied with this product. WARNING: To avoid the risk of burn injury and electric shock, never touch the area with the «High Temperature» or «High Voltage» indicators. Caution label Warning label 1-10 WorkCentre 5019/5021 User Guide…
-
Page 17: Regulations
Operation of this product in a residential area is likely to cause harmful interference in which case the user is required to correct the interference at their own expense. Changes and modifications to this product not specifically approved by Xerox may void the user’s authority to operate this equipment.
-
Page 18: Environment
Before using the machine Environment For environmental protection and efficient use of resources, Xerox recycles returned toner cartridges to manufacture parts and materials, or for energy recovery. Proper disposal is required for used toner cartridges and drum cartridges. Do not open toner cartridge containers.
-
Page 19: Freebsd
Copyright (C) 1991-2, RSA Data Security, Inc. Created 1991. All rights reserved. License to copy and use this software is granted provided that it is identified as the «RSA Data Security, Inc. MD5 Message-Digest Algorithm» in all material mentioning or referencing this software or this function. WorkCentre 5019/5021 1-13 User Guide…
- Page 20
It is provided «as is» without express or implied warranty of any kind. These notices must be retained in any copies of any part of this documentation and/or software. 1-14 WorkCentre 5019/5021 User Guide… -
Page 21: Legal Notice
Copyright material or trademarks without the consent of the owner • Postage stamps and other negotiable instruments This list is not inclusive and no liability is assumed for either its completeness or accuracy. In case of doubt, contact your legal counsel. WorkCentre 5019/5021 1-15 User Guide…
- Page 22
Before using the machine 1-16 WorkCentre 5019/5021 User Guide… -
Page 23: Environment Settings
After specifying scanning conditions on your computer display, you can scan documents while checking the scan results on the preview screen. For more information, refer to Loading scan data using a PC-based application on page 6-6. WorkCentre 5019/5021 User Guide…
-
Page 24: Usb Interface
Check that the machine status diagram display is off. Connect a USB cable to the USB 1.1/2.0 interface connector. Connect the other end of the USB cable to the computer. Press the power switch to the On position to turn the power on. WorkCentre 5019/5021 User Guide…
-
Page 25: Installing The Print Driver/Scan Driver
The CD-ROM contains the following print driver. Print Driver Name Description Xerox WorkCentre XXXXX Click Print Driver in the Main menu of the Driver CD Kit to start the installation. The standard print driver. Converts the data created by the application software to images before sending them to the printer.
-
Page 26: Uninstalling
CD-ROM Documentation (HTML) included on the CD-ROM. Uninstalling other software To uninstall other software installed from the Driver CD Kit CD-ROM, see the application’s Readme file. Readme files can be displayed from the Product Information (HTML) on the CD-ROM. WorkCentre 5019/5021 User Guide…
-
Page 27: Product Overview
This chapter lists the name of each machine component, and describes basic operations such as how to turn the power on/off and use the control panel. Machine components This section describes the machine components and their features. WorkCentre 5019/5021 User Guide…
-
Page 28: Front, Left Side
This stand is available when the One Tray Module is installed. Locking casters Locks the wheels of the machine. Lock these casters after moving the machine to its installation site. One tray module cover B Open this cover to remove any jammed paper from Tray 2. WorkCentre 5019/5021 User Guide…
-
Page 29: Right Side, Rear
Prevents the machine from toppling over. Move the machine to its installation site and then rotate this adjuster in clockwise direction until it touches a floor. USB 1.1/2.0 interface Connect a USB 1.1/2.0 cable. connector (Type B) WorkCentre 5019/5021 User Guide…
-
Page 30: Inside
Product overview Inside Component Description Toner cartridge Contains toner (the powder used to form the image). Drum cartridge Contains photoconductors. Fusing unit Fuses toner on paper. Do not touch this unit as it is extremely hot. WorkCentre 5019/5021 User Guide…
-
Page 31: Duplex Automatic Document Feeder (Optional)
Document stopper Prevents outputs from falling off. Document output tray Outputs are delivered here. Narrow glass strip Scans the loaded documents. Note In this guide, the duplex automatic document feeder is referred to as the «document feeder.» WorkCentre 5019/5021 User Guide…
-
Page 32: Power Source
While the machine is warming up, the machine status diagram displays as shown in the right image. The machine is not accessible while it’s warming up • Make sure that the power cable is connected to the machine and the wall outlet properly.. WorkCentre 5019/5021 User Guide…
-
Page 33: Switching The Power Off
Before switching the power off, make sure that the machine has completed all copy or print jobs. Then, make sure that the Data indicator does not light up. Press the power switch to the Off position to switch the power off. WorkCentre 5019/5021 User Guide…
-
Page 34: Energy Saver Modes
Low Power mode is set to 1 min. and Sleep mode to 1 min. at the time of factory shipment. If the machine is left idle for 1 minute, it switches to Low Power mode and then to Sleep mode if left idle for another minute after that. WorkCentre 5019/5021 User Guide…
-
Page 35: Exiting Energy Saver Modes
Entering System Administration mode from a computer • Pressing any button on the control panel • Taking out or putting in a tray • Opening or closing the document cover • Opening or closing any cover of the machine WorkCentre 5019/5021 User Guide…
-
Page 36: Control Panel
Log In / Out button Press this button to enter or exit System Administration mode. The Log In/Out button is lit in System Administration mode. For more information, refer to Entering System Administration mode page 8-2. 3-10 WorkCentre 5019/5021 User Guide…
- Page 37
The zoom ratio increases every time the button is pressed. For more information, refer to Reduce/enlarge on page 5-12. Toner Saver icon The indicator of the Toner Saver icon is lit in toner saver mode. For more information, refer to Lighten/Darken on page 5-15. WorkCentre 5019/5021 3-11 User Guide… - Page 38
Pages per side on page 5-19. Note Some buttons are not available on some models. If you add certain options, you will be able to use them. For more information, contact our Customer Support Center. 3-12 WorkCentre 5019/5021 User Guide… -
Page 39: Machine Status
Displays the scanning size and orientation that are specified with the Original Size button when the document glass is used. When the document is placed in the document feeder, automatic detection is automatically set and “Aut” is displayed. WorkCentre 5019/5021 3-13 User Guide…
-
Page 40: Icons
36, and follow the appropriate procedure to remove the jammed paper or document. Error This icon lights when an error occurs such as a tray problem, the toner cartridge runs out of ink, and the drum cartridge expires. 3-14 WorkCentre 5019/5021 User Guide…
- Page 41
When a paper/document jam occurs or any cover is open, the notification area blinks as shown below. Front cover Left cover A One tray module Tray 1 cover B Tray 2 Bypass tray Document feeder When any paper or document jam occurs, will also appear. WorkCentre 5019/5021 3-15 User Guide… -
Page 42: Account Modes
Password entry is not required for print jobs or scan jobs. Logging in to the machine in Single Account mode When the machine is in Single Account mode, “_ _ _ _ _ _” appears in the machine status diagram. 3-16 WorkCentre 5019/5021 User Guide…
- Page 43
For security reasons, as you enter each digit of the password, a hyphen appears in the display instead of the actual number you entered. Press the Start button to confirm the entered password. Start button WorkCentre 5019/5021 3-17 User Guide… -
Page 44: Logging In To The Machine In Multiple Account Mode
To log out, press the Log In/Out button again. Logging in to the machine in Multiple Account mode When the machine is in Multiple Account mode, “Id _ _ ” appears blinking in the machine status diagram. 3-18 WorkCentre 5019/5021 User Guide…
- Page 45
Account mode settings on page 8-8. Enter an account number using the numeric keypad. Numeric keypad The account number you entered appears in the display. Press the Start button to confirm the number. Start button WorkCentre 5019/5021 3-19 User Guide… - Page 46
Enter the password that corresponds to the account number that you just entered using the numeric keypad. Numeric keypad For security reasons, as you enter each digit of the password, a hyphen appears in the display instead of the actual number that you entered. 3-20 WorkCentre 5019/5021 User Guide… - Page 47
The Log In/Out button remains lit while you are logged in to the machine. Log In/Out button Notes • You do not need to log in to the machine for a scan job or print job. • To log out, press the Log In/Out button again. WorkCentre 5019/5021 3-21 User Guide… - Page 48
Product overview 3-22 WorkCentre 5019/5021 User Guide… -
Page 49: Loading Paper
To achieve optimum machine performance, use only paper types recommended by Xerox. Use of non- recommended paper types may result in paper jams, lower print quality, malfunctions, or damage to the machine. If you wish to use paper other than the paper recommended by Xerox, contact our Customer Support Center. Notes •…
-
Page 50: Supported Paper Weights And Sheet Counts
Ream weight: 51.6 — 94.6 kg (Up to 10 mm) When using 80 gsm paper When using Xerox standard paper Notes • Paper jams may result if you attempt to print on a different paper type or size than the type or size selected in the print driver, or from a tray that does not support the loaded paper.
- Page 51
Xcite Plain Before copying or printing, fan the paper well and reload it in the tray. Xceed Plain — Plain — ASTRO EXTRA Plain — Plain — Xpress Plain — Xtra Plain — Plain — WorkCentre 5019/5021 User Guide… -
Page 52: Usable Paper
Blue) Usable paper In addition to the standard/semi-standard paper, the following paper also can be used. Basis weight Paper Paper name Notes/countermeasure (gsm) type DocuPaper Black Plain — Laserprint Plain — Green Wrap (Recycle) Plain — WorkCentre 5019/5021 User Guide…
- Page 53
— WARRIOR Plain — Performer Plain Before copying or printing, fan the paper well and reload it in the tray. Professional Plain — Xerox Undertones — Plain — Several Colours Recycled Pure (Recycle) Plain — Colotech+ Plain — Heavy- —… -
Page 54: Unusable Paper
— Star Plain — Unusable paper Using paper not recommended by Xerox may cause a paper jam or machine malfunction. Use paper recommended by Xerox. Storing and handling paper Please keep the following points in mind when storing paper •…
-
Page 55: Loading Paper
For information on how to change the paper size and orientation in a tray, refer to Changing the paper size for Trays 1 and 2 on page 4-11. Pull out the tray until it stops. WorkCentre 5019/5021 User Guide…
- Page 56
Do not load paper above the maximum fill line. Doing so could cause paper jams or machine malfunctions. • Do not place any paper or objects in the empty space on the right side of Tray 1 or 2. Doing so could cause paper jams or machine malfunctions. WorkCentre 5019/5021 User Guide… -
Page 57: Loading Paper In The Bypass Tray
Fan the paper well before loading it in a tray. This prevents the pages from sticking to each other and reduces paper jams. Open the Bypass tray. Note If necessary, pull out the extension tray. Pull out the extension tray gently. WorkCentre 5019/5021 User Guide…
- Page 58
The machine may not be able to feed or create the desired print quality for some types of heavyweight paper. Gently align the paper guides to the loaded paper. Execute the copy or print operation. 4-10 WorkCentre 5019/5021 User Guide… -
Page 59: Changing Paper Size
To prevent paper jams or loading errors, do not load different sizes or types of paper on top of any remaining paper in a tray. Remove any paper loaded in the tray. For Tray 1, push down the metal plate to the bottom of the tray. WorkCentre 5019/5021 4-11 User Guide…
- Page 60
When pushing the tray in, do it slowly. Pushing the tray with too much force could cause machine malfunctions. • Affix the paper size label to the front of the tray. Set the paper size setting. Refer to Setting the paper size on page 4-13. 4-12 WorkCentre 5019/5021 User Guide… -
Page 61: Setting The Paper Size
Press and hold the Size (Press 2sec) button for more than 2 seconds until the paper size in the paper size display area starts blinking. Size (Press 2sec) button WorkCentre 5019/5021 4-13 User Guide…
- Page 62
To exit paper size setting mode without saving the settings, press the Clear All button or the Stop button. Note Be sure to press the Start button. Otherwise the settings of paper size and orientation are canceled and remain the previous settings. 4-14 WorkCentre 5019/5021 User Guide… -
Page 63: Setting The Paper Type
Press the Size (Press 2sec) button to start changing the setting. Enter the program number of the paper type that you want to set, and press the Start button. Program number Item Normal Heavyweight Lightweight WorkCentre 5019/5021 4-15 User Guide…
- Page 64
After the entered program number blinks twice, the new setting is confirmed. After you confirm the setting, press the Log In/Out button and exit System Administration mode. Note When you exit System Administration mode, the Log In/Out button light goes off. 4-16 WorkCentre 5019/5021 User Guide… -
Page 65: Copy
Bound documents, such as book Note The document feeder is not available for some models. An optional component is required. Contact your local Xerox representative. Document feeder Supported document sizes You can place documents of the standard sizes in the document feeder.
- Page 66
Place the document in the center of the document feeder, with the side to copy (or the front surface of a 2 Sided document) facing up. Note The document indicator lights up when a document is placed in the document feeder. If the indicator is not lit, place the document again. Lights up WorkCentre 5019/5021 User Guide… -
Page 67: Document Glass
CAUTION: Do not apply excessive force to hold a thick document on the document glass. Doing so may break the glass and cause injuries. Follow the steps below to place a document on the document glass. WorkCentre 5019/5021 User Guide…
- Page 68
Place the document face down and align it against the top left corner of the document glass. Close the document cover. Note Make sure to set the size and orientation of document when using the document glass. Refer to Original size on page 5-13. WorkCentre 5019/5021 User Guide… -
Page 69: Setting Advanced Settings
You can enter a value between 1 and 999 for the number of copies. Use the numeric keypad to enter the desired number of copies. Numeric keypad The entered value appears in the machine status diagram. WorkCentre 5019/5021 User Guide…
-
Page 70: Starting The Copy Job
If any of the following features are set, a copy job may not be started after loading a document due to the blinking Last Original button. • Collate: On 2 Sided: 1 → 2 Sided, 2 → 2 Sided • • Pages per Side: 2 Pages or 4 Pages • ID Card Copy: On WorkCentre 5019/5021 User Guide…
- Page 71
Copy After all the documents have been scanned, press the Last Original button to start copying. Last Original button WorkCentre 5019/5021 User Guide… -
Page 72: Stopping A Copy Job
Copy Stopping a copy job To cancel the currently copying job press the Stop button. Stop button WorkCentre 5019/5021 User Guide…
-
Page 73: Advanced Copy Settings
* You can change the settings for features marked with «*» in System Administration mode. Note You can change the default value of some features. For more information on changing these settings, refer to Feature settings on page 8-11. WorkCentre 5019/5021 User Guide…
-
Page 74: Paper Supply
Tray 1, Tray 2, and Bypass tray Select one of the selectable trays. The indicator moves to the selected tray every time the Paper Supply button is pressed. Note Tray 2 is an optional component. 5-10 WorkCentre 5019/5021 User Guide…
-
Page 75: Collate
When a document is placed in the document feeder, it automatically turns on. You can also change the setting to off. When all documents are scanned, press the Last Original button. Last Original button WorkCentre 5019/5021 5-11 User Guide…
-
Page 76: Reduce/Enlarge
Variable zoom ratio Set the desired zoom ratio by selecting a value from 25 to 400 (1% increments). Variable Zoom Ratio button Note When using the automatic zoom ratio, you cannot select the automatic paper selection. 5-12 WorkCentre 5019/5021 User Guide…
-
Page 77: Original Size
Fixed document size (preset) You can set the document size of the placed document by selecting from the preset document sizes. The document size and orientation change everytime the Original Size button is pressed. WorkCentre 5019/5021 5-13 User Guide…
-
Page 78: Original Type
Select this option when the document contains sharp black and white objects such as text. Photo & Text Select this option when the document contains both text and photos. Photo Select this option when the document contains only photos. 5-14 WorkCentre 5019/5021 User Guide…
-
Page 79: Lighten/Darken
Lighten/Darken: Light +2 • Sharpness: Sharp +2 • Original type: Photo&Text (Should not be changed) ID card copy You can copy both sides of an ID card (name card, employee card, etc.) on one side of paper. WorkCentre 5019/5021 5-15 User Guide…
- Page 80
Place an ID card face down slightly away from the top left corner of the document glass, and then close the document cover. Placing the ID card too close to the corner of the document glass may not copy the edge of the ID card properly. 5-16 WorkCentre 5019/5021 User Guide… - Page 81
In the machine status diagram, the tray indicator lights up on the selected tray, and its paper size and orientation are displayed on the paper size display. Paper Supply button Press the Start button. When one-side is finished scanning, the Start button blinks. Start button WorkCentre 5019/5021 5-17 User Guide… -
Page 82: 2-Sided
To copy 1 → 2 Sided or 2 → 1 Sided for short edge binding, change the binding edge setting and place the document in landscape orientation. It is not copied properly for short edge binding when either the document or the paper is set for portrait orientation or is using the «Pages per Side» feature. 5-18 WorkCentre 5019/5021 User Guide…
-
Page 83: Pages Per Side
Setting Pages per Side automatically sets the Reduce/Enlarge setting to automatic. • The zoom ratio is adjusted automatically within the range of 25% to 400%. Press the Pages per Side button to select the desired copy method. Pages per Side button WorkCentre 5019/5021 5-19 User Guide…
-
Page 84: Sharpness
When this feature is enabled, the document’s background noise is removed during copying. When this feature is disabled, the document’s background noise is not removed. You can set the background suppression in System Administration mode. For more information, refer Feature settings on page 8-11. 5-20 WorkCentre 5019/5021 User Guide…
-
Page 85: Erase Frame
The zoom ratio is set to automatic. • The zoom ratio is set to 100% and both document and paper are the same size. Make sure to set the size and orientation of the document when using the document glass. WorkCentre 5019/5021 5-21 User Guide…
-
Page 86: Managing The Copy Paper With Accounting
For information on accounting modes, refer to Account mode settings on page 8-8. Operations when using the copy feature The operation procedure differs depending on the account mode you are using. For more information, refer to Account modes on page 3-16. 5-22 WorkCentre 5019/5021 User Guide…
-
Page 87: Scan
Bound documents, such as books Note The document feeder is not available for some models. An optional component is required. Contact your local Xerox representative. Document feeder Supported document sizes You can place documents of the standard sizes in the document feeder.
- Page 88
Follow the steps below to place the document on the document feeder. You can place single or multiple sheet documents. Remove any paper clips or staples from the document before placing it in the document feeder. WorkCentre 5019/5021 User Guide… - Page 89
The document indicator lights up when a document is placed in the document feeder. If the indicator is not lit, place the document again. Lights up Align the document guides to each side of the document. Open the document stopper. WorkCentre 5019/5021 User Guide… - Page 90
Open the document cover. Note When using the document glass, make sure to close the document cover after finishing your scan job. Place the document face down, and align it against the top left corner of the document glass. WorkCentre 5019/5021 User Guide… -
Page 91: Using The Scan Feature
Day (2 digits), HH = Hour (2 digits), MM = Minutes (2 digits), and SS = Seconds (2 digits). • The size of the scanned image may be slightly larger than the document size in some cases. This is due to the margin of error introduced with processing. WorkCentre 5019/5021 User Guide…
-
Page 92: Loading Scan Data Using A Pc-Based Application
6-1. Start an application to load the scanned data. From the File menu, select the item for the scanner (source). Select Xerox WorkCentre 5019/5021. Change other options if needed. Note For information on the scan functions, click Help in the screen to display the help information.
-
Page 93: Stopping The Scan Job
Scan Stopping the scan job To cancel the current scanning job: On the machine Press the Stop button. Stop button On the computer Press Cancel on the screen displayed while scanning. WorkCentre 5019/5021 User Guide…
- Page 94
Scan WorkCentre 5019/5021 User Guide… -
Page 95: Print
Watermarks Prints ‘Confidential’ or another preset character string on top of print data. Mixed Document Prints documents containing both vertical and horizontal pages, or pages of different sizes. WorkCentre 5019/5021 User Guide…
-
Page 96: Printing
The procedure used to print varies according to the application you are using. See your application’s manual for the specific procedure. The steps below are used in the Xerox WorkCentre 5019/5021 print driver screen. Select Print from the application’s File menu.
-
Page 97: Stopping The Print Job
Select the document name that you desired to cancel, and then press the Delete key. If there is no document within the window, cancel it manually on the machine. WorkCentre 5019/5021 User Guide…
- Page 98
Print WorkCentre 5019/5021 User Guide… -
Page 99: Tools
Notes • If there are any current or pending jobs you cannot enter System Administration mode. • While in System Administration mode you cannot receive a print job or start a print or scan job. WorkCentre 5019/5021 User Guide…
-
Page 100: Entering System Administration Mode
The password can be changed. For more information, refer to System settings on page 8-5. • The Log In/Out button lights up when the machine enters System Administration mode. The program number input screen appears, and shows the letter P. WorkCentre 5019/5021 User Guide…
-
Page 101: Changing The Settings
Press the Start button to confirm the entered value. Exiting System Administration mode Press the Log In/Out button. Note The Log In/Out button light goes off when the machine exits System Administration mode. Log In/Out button WorkCentre 5019/5021 User Guide…
-
Page 102: System Administrator Program List
Minute Set the minute for the machine’s system clock. 0* — 59 Date Format Set the date display format. 0: YYMMDD* 1: MMDDYY 2: DDMMYY Time Format Set the time display format. 0: 12h 1: 24h* WorkCentre 5019/5021 User Guide…
-
Page 103: System Settings
Set the amount of time the machine waits 1: 20 seconds Complete Timer before automatically processing the next job 2: 30 seconds* when there are no additional documents to 3: 60 seconds be loaded when using the document glass. 4: 90 seconds WorkCentre 5019/5021 User Guide…
- Page 104
206 is set to 4 or 5. 0: 8.5 × 13″ 1: 8.5 × 13″ 2: 8.5 × 13.4″ When 5 is set: 0: 8.5 × 14″ 1: 8.5 × 13″ 2: 8.5 × 14″ WorkCentre 5019/5021 User Guide… - Page 105
Set the paper type in Bypass Tray. 0: Normal* Bypass Tray 2: Heavyweight 5: Lightweight Firmware Displays the firmware version of the Version of controller. Controller Firmware Displays the firmware version of the UI Version of UI panel. panel WorkCentre 5019/5021 User Guide… -
Page 106: Account Mode Settings
Specify account number 7’s password using 4 — 6 digit numbers Number 7 three digits. (Default: 0007) Password Account Specify account number 8’s password using 4 — 6 digit numbers Number 8 three digits. (Default: 0008) Password WorkCentre 5019/5021 User Guide…
- Page 107
Specify the maximum number of copy pages 0 (No Limit)* — 255 Number 10 allowed for account number 10. (1 = 1,000) Copy Job Limit 7002 Account Shows the total number of copies made Number 1 under account number 1. Copy Count WorkCentre 5019/5021 User Guide… - Page 108
Copy Count 7010 Account Shows the total number of copies made Number 9 under account number 9. Copy Count 7011 Account Shows the total number of copies made Number 10 under account number 10. Copy Count 8-10 WorkCentre 5019/5021 User Guide… -
Page 109: Feature Settings
Set the value for the sharpness. 0: Soft +2 (Copying) 1: Soft +1 2: Normal* 3: Sharp +1 4: Sharp +2 3007 Background Set whether to suppress the document’s 0: Off Suppression background color. 1: On* (Copying) WorkCentre 5019/5021 8-11 User Guide…
- Page 110
5: B4 6: 8.5 × 14″ 7: 8.5 × 13″ 9: A4 10: 8.5 × 11″ 14: B5 16: 8.5 × 11″ 18: A4 19: A5 23: B5 56: 8.5 × 13.4″ 134: Expected document size 8-12 WorkCentre 5019/5021 User Guide… - Page 111
2: 2 → 1 3: 2 → 2 3010 Preset Zoom Set the preset zoom ratio. 25 — 400% Ratio (Copying) You can set a value between 25 and 400% (Default: 81%) (in 1 minute increments). WorkCentre 5019/5021 8-13 User Guide… - Page 112
2: Normal* 3: Sharp +1 4: Sharp +2 4002 Background Set the suppression level. This feature is 0: Level1 Suppression available when scanning a monochrome 1: Level2* Level (Copying) document. 2: Level3 3: Level4 4: Level5 8-14 WorkCentre 5019/5021 User Guide… -
Page 113: Machine Status
The items printed will vary according to the machine’s settings. Follow the steps below to print a report. Enter System Administration mode. Refer to Entering System Administration mode on page 8-2. Enter the program number «202», and press the Start button. WorkCentre 5019/5021 User Guide…
-
Page 114: Checking The Job Counter
Checking the job counter You can check the number of pages printed by the machine under the «Counter» on the System Settings Report output. Total Impressions The total number of pages printed or copied is displayed. WorkCentre 5019/5021 User Guide…
-
Page 115: Checking Consumables
Replacement is not currently needed. • Replace Soon Replacement is needed soon. Drum Status Shows the drum cartridge status. • Replacement is not currently needed. • Replace Soon Replacement is needed soon. • Replace Now Replacement is needed now. WorkCentre 5019/5021 User Guide…
-
Page 116: Checking The Total Number Of Impressions Copied
Copied impressions by User 10 Copy limit Program number Description Copy limit for User 1 Copy limit for User 2 Copy limit for User 3 Copy limit for User 4 Copy limit for User 5 Copy limit for User 6 WorkCentre 5019/5021 User Guide…
- Page 117
To return to the program number input screen, press the Stop button. When you finish checking, press the Log In/Out button, and exit System Administration mode. Note When you exit System Administration mode, the Log In / Out button light goes off. WorkCentre 5019/5021 User Guide… - Page 118
Machine status WorkCentre 5019/5021 User Guide… -
Page 119: Maintenance
1 unit/box Drum Cartridge 013R00670 1 unit/box Notes • Our service representatives will replace the drum cartridge. Contact your local Xerox representative or sales representative. • We recommend that you always keep spare consumables/periodic replacement parts available. CAUTION: Use a broom or a wet cloth to wipe off spilled toner. Never use a vacuum cleaner for the spills.
- Page 120
When calling our Customer Support Center to order consumables/periodical replacement parts, have the product codes ready. • The use of consumables/periodic replacement parts not recommended by Xerox could impair machine quality and performance. Use only consumables/periodic replacement parts recommended by Xerox. -
Page 121: Replacing The Toner Cartridge
When you replace a toner cartridge, toner may spill and soil the floor. We recommend laying paper on the floor beforehand. • The use of toner cartridges not recommended by Xerox may degrade image quality and performance. Use only toner cartridges recommended by Xerox. •…
- Page 122
Never throw a toner cartridge into an open flame. Remaining toner in the cartridge may catch fire and cause burn injuries or explosion. If you have a used toner cartridge no longer needed, contact your local Xerox representative for its disposal. - Page 123
Maintenance Unpack a new toner cartridge, and shake it lightly up/down, and left/right 10 times. Note Do not touch the shutter. WorkCentre 5019/5021 10-5 User Guide… - Page 124
Orient the toner cartridge with the arrow () facing up, and insert it as far as it will go. Close the front cover. Note If the front cover is not completely closed, an error code will appear and the machine will remain paused. 10-6 WorkCentre 5019/5021 User Guide… -
Page 125: Replacing The Drum Cartridge
The following error codes and icons display in the machine status diagram when the drum cartridge is near the end of its service life. Contact your local Xerox representative or sales representative to have your drum cartridge replaced. Error code…
- Page 126
Notes • The use of drum cartridges not recommended by Xerox may degrade image quality and performance. Use only drum cartridges recommended by Xerox. • Do not expose drum cartridges to direct sunlight or strong light from indoor fluorescent lighting. -
Page 127: Cleaning The Machine
Wipe off any excess water with a soft cloth. Cleaning the document cover and document glass If the document cover and document glass become soiled, smudges may appear on copies, or scanned documents and the machine may not properly detect document sizes. WorkCentre 5019/5021 10-9 User Guide…
-
Page 128: Cleaning The Document Presser And Narrow Glass Strip
Cleaning the document presser and narrow glass strip If the document presser or narrow glass strip becomes soiled, smudges may appear on copies, or scanned documents and the machine may not properly detect document sizes. 10-10 WorkCentre 5019/5021 User Guide…
- Page 129
Do not use cleaning agents other than water or neutral detergent. • If you cannot remove dirt easily, gently wipe the narrow glass strip with a soft cloth moistened with a small amount of neutral detergent. WorkCentre 5019/5021 10-11 User Guide… -
Page 130: Cleaning The Document Feeder Rollers
If you cannot remove dirt easily, gently wipe the rollers with a soft cloth moistened with a small amount of neutral detergent. Close the document feeder top cover until it clicks into place, and confirm that there is no space between either side of the cover and the document feeder. 10-12 WorkCentre 5019/5021 User Guide…
-
Page 131: Problem Solving
Trouble during printing Refer to Printer problems on page 11-16. Trouble during scanning Refer to Scan problems on page 11-18. If the error is not resolved even after following the above procedure, contact our Customer Support Center. WorkCentre 5019/5021 11-1 User Guide…
-
Page 132: Machine Problems
Refer to USB interface on page 2-2. not light even Is the computer’s Check the computer’s environment, such as though you environment correctly set? print driver settings. instructed the machine to print. 11-2 WorkCentre 5019/5021 User Guide…
- Page 133
Refer to Placing the document on page 5-1. the correct positions? Is the document folded? Smooth out the document and place it again correctly. Refer to Placing the document on page 5-1. WorkCentre 5019/5021 11-3 User Guide… - Page 134
Some paper types may not be cut out finely. Load the paper after fanning it well. A document is Is the document small? The minimum size of document that can be not fed onto loaded into the document feeder is A5 document feeder. 11-4 WorkCentre 5019/5021 User Guide… - Page 135
Open the document feeder cover and check remaining in the document inside. feeder? Refer to Document jams on page 11-36. An edge of the Is the document curled? Flatten the curl and load the document document is again. folded. WorkCentre 5019/5021 11-5 User Guide… -
Page 136: Image Quality Problems
Refer to Loading paper in Trays 1 and 2 drifted away from the (optional) on page 4-7. corners of the tray? Refer to Loading paper in the Bypass tray page 4-9. 11-6 WorkCentre 5019/5021 User Guide…
- Page 137
When making enlarged copies, some appear in copies. make an enlarged copy enlargement factors can create striped patterns. of the document with too Adjust the copy enlargement factor. large an enlargement Refer to Reduce/enlarge on page 5-12. factor? WorkCentre 5019/5021 11-7 User Guide… - Page 138
Refer to Replacing the drum cartridge printouts. damaged. page 10-7. The narrow glass strip is Clean the narrow glass strip. dirty. Refer to Cleaning the document presser and narrow glass strip on page 10-10. 11-8 WorkCentre 5019/5021 User Guide… - Page 139
Replace the paper with new paper. comes off on the The paper is unsuitable. Load the correct type of paper. fingers. The toner is not fused to the paper. The paper is contaminated with toner. WorkCentre 5019/5021 11-9 User Guide… - Page 140
Loading paper in the Bypass tray does not match the type and page 4-9. size of the paper actually loaded. Multiple pages were fed Riffle through the stack of paper thoroughly through the machine at before loading it. once. 11-10 WorkCentre 5019/5021 User Guide… - Page 141
Align the horizontal and vertical paper slanted. guides are not aligned to the guides properly. correct position. Refer to Loading paper in Trays 1 and 2 (optional) on page 4-7. Refer to Loading paper in the Bypass tray page 4-9. WorkCentre 5019/5021 11-11 User Guide… -
Page 142: Copying Problems
Open the document feeder cover, and stuck in the document remove the document shreds. feeder. Refer to Document jams on page 11-36. You have placed a document You cannot place documents with different containing pages of different size pages. sizes. 11-12 WorkCentre 5019/5021 User Guide…
-
Page 143: Copy Output Problems
The paper loaded in the tray Align the paper stack, and load it so that the slightly out of is misaligned. leading edge of the paper is aligned with the position. front corners of the tray. WorkCentre 5019/5021 11-13 User Guide…
- Page 144
Check the document size set correctly. correct. Refer to Original size on page 5-13. The paper size is not correct. Check the paper size set correctly. Refer to Setting the paper size on page 4-13. 11-14 WorkCentre 5019/5021 User Guide… - Page 145
Check the document size set correctly. correct. Refer to Original size on page 5-13. The paper size is not correct. Check the paper size set correctly. Refer to Setting the paper size on page 4-13. WorkCentre 5019/5021 11-15 User Guide… -
Page 146: Printer Problems
The image at the The document exceeds the Enlarge the machine’s print area, or reduce edges of the machine’s printable area. the document’s print area. paper is missing. 11-16 WorkCentre 5019/5021 User Guide…
- Page 147
Operation is not machine (is using guaranteed if another company’s print another driver is used. company’s print driver). WorkCentre 5019/5021 11-17 User Guide… -
Page 148: Scan Problems
The PC’s USB cable is Reconnect the computer’s disconnected USB disconnected. cable. Refer to USB interface on page 2-2. The machine’s USB cable is Reconnect the machine’s disconnected USB disconnected. cable. Refer to USB interface on page 2-2. 11-18 WorkCentre 5019/5021 User Guide…
-
Page 149: Scan Image Quality Problems
Place a stack of white paper on top of the document to bring it into proper contact with the document glass. WorkCentre 5019/5021 11-19 User Guide…
- Page 150
6-1. The document is creased. Smooth out the document and place it again correctly. The image is A low resolution is set. Set a higher resolution. grainy. Refer to Placing the document on page 6-1. 11-20 WorkCentre 5019/5021 User Guide… -
Page 151: Error Codes
Customer Support Center. The contact number is printed on the label or card attached to the machine. • If a two-digit error code (X-X) appears, you can view the grouped six-digit error code (XXX-XXX) while holding down the ID Card Copy button. WorkCentre 5019/5021 11-21 User Guide…
- Page 152
Start button. To cancel a job, press the Stop button. Refer to Loading paper on page 4-7. 11-22 WorkCentre 5019/5021 User Guide… - Page 153
4-7. When changing the setting of paper size and orientation, cancel the job first by pressing the Stop button. Refer to Changing the paper size for Trays 1 and 2 on page 4-11. WorkCentre 5019/5021 11-23 User Guide… - Page 154
E-5: Paper jams in the Bypass Tray on page 11-34. Machine’s left cover is open. Close the cover. Refer to Machine components page 3-1. Machine’s front cover is open. Close the cover. Refer to Machine components page 3-1. 11-24 WorkCentre 5019/5021 User Guide… - Page 155
Replacing the drum cartridge on page 10-7. Reached the maximum copy limit Press the Stop button, and contact while the limit is set. Also, the user your system administrator. who reached the copy job limit has logged in. WorkCentre 5019/5021 11-25 User Guide… - Page 156
Switch off the machine power, make sure that the display is blank, and 010-312 then switch on the machine power. If 010-320 the same error code is displayed 010-327 again, contact our Customer Support 010-392 Center. 11-26 WorkCentre 5019/5021 User Guide… - Page 157
Replace the drum cartridge. Refer to Replacing the drum cartridge on page 10-7. 091-440 Prepare for the drum cartridge Have a replacement drum cartridge replacement. ready. 091-441 Replace the drum cartridge soon. Have a replacement drum cartridge ready. WorkCentre 5019/5021 11-27 User Guide… - Page 158
Switch off the machine power, make sure that the display is blank, and 117-327 then switch on the machine power. If 123-314 An error occurred. the same message is displayed again, contact our Customer Support Center. 11-28 WorkCentre 5019/5021 User Guide… -
Page 159: Paper Jams
WARNING: If you need to pull out a tray to remove paper jam, contact your local Xerox representative. Do not pull out a tray, otherwise it may cause injuries.
-
Page 160: E-1: Paper Jam In Left Cover A
If the paper is jammed around the fusing unit Pull down the latch. Remove the jammed paper. Note Do not leave any torn pieces of paper inside the machine. Return the latch back to its position. 11-30 WorkCentre 5019/5021 User Guide…
- Page 161
If the paper is jammed in the location shown in the diagram, remove the jammed paper pulling upwards. Push on the center of the left cover, close it slowly, and raise the Bypass tray. WorkCentre 5019/5021 11-31 User Guide… -
Page 162: E-2: Paper Jam In One Tray Module Cover B
Close the one tray module cover gently. E-3: Paper jams in Tray 1 Follow the steps below to clear paper jams in Tray 1. Remove the jammed paper by referring to E-1: Paper jam in left cover A on page 11-30. 11-32 WorkCentre 5019/5021 User Guide…
-
Page 163: E-4: Paper Jams In Tray 2
E-4: Paper jams in Tray 2 Follow the steps below to clear paper jams in Tray 2. Remove the jammed paper by referring to E-2: Paper jam in one tray module cover B on page 11- WorkCentre 5019/5021 11-33 User Guide…
-
Page 164: E-5: Paper Jams In The Bypass Tray
E-5: Paper jams in the Bypass Tray Follow the steps below to clear a paper jam in the Bypass tray. Remove the jammed paper by referring to E-1: Paper jam in left cover A on page 11-30. 11-34 WorkCentre 5019/5021 User Guide…
- Page 165
If multiple sheets of paper were loaded, align the corners of the removed paper. Insert the paper with the side to print on facing down, aligning it so that its leading edge lightly contacts the paper feed entrance. WorkCentre 5019/5021 11-35 User Guide… -
Page 166: Document Jams
The cover will remain fixed in position when fully opened. Open the cover slowly. If the document has not yet been fed into the feeder, remove it. If you cannot find the document, lift up the handle to open the inner cover. Handle 11-36 WorkCentre 5019/5021 User Guide…
- Page 167
Torn, wrinkled or folded document pages can cause document jams or damage. Always copy torn, wrinkled or folded documents by placing them directly on the document glass. 10. For copying, press the Start button. For scanning, operate your computer to restart scanning. WorkCentre 5019/5021 11-37 User Guide… - Page 168
Problem solving 11-38 WorkCentre 5019/5021 User Guide… -
Page 169: Appendix
Tray 1 (standard) and 2 (optional): 60 — 90 gsm Bypass tray: 60 — 110 gsm Note: Use paper recommended by Xerox. Copying may not be performed correctly depending on the conditions. First Copy Output Time Document glass: 7.5 sec. or less (A4 Document feeder: 14 sec.
- Page 170
) + Bypass tray (100 sheets * Optional: 500 sheets * (One Tray Module) Maximum: 850 sheets (Standard + Optional) : When using 80 gsm paper : When using Xerox standard paper Continuous Copy 999 sheets Note: The machine may pause temporarily to perform image stabilization. - Page 171
Monochrome: 600 × 600 dpi, 400 × 400 dpi, 300 × 300 dpi, 200 × 200 dpi Scanning Halftone Monochrome 8-bit input/output Scanning Speed Monochrome: 18 sheets/minute With a standard Xerox document (A4 ), at 200 dpi, using TWAIN driver (USB) Note: The scanning speed varies depending on documents. WorkCentre 5019/5021 12-3… - Page 172
Width 540 × Depth 492 × Height 95 mm, 6.3 kg Duplex output unit (optional) Paper Size Same as the basic functions/copy functions Paper Weight 60 — 110 gsm Note: Use the Bypass tray when using 91 — 110 gsm paper. 12-4 WorkCentre 5019/5021 User Guide… -
Page 173: Printable Area
The standard printable area is the area of the page within 4.0 mm from the top, bottom, left and right edges of the paper. The actual printable area may vary depending on the printer (plotter) and control language. Unprintable area Printable area/ Guaranteed print area Paper feed direction WorkCentre 5019/5021 12-5 User Guide…
-
Page 174: Optional Components
This stand is available when the One Tray Module is installed. Notes • The optional components are subject to change without notice. • For the latest information, contact our Customer Support Center. 12-6 WorkCentre 5019/5021 User Guide…
-
Page 175: Notes And Restrictions
Colors may appear muted on the underside of high-density images in printing in low-temperature, low-humidity environments. • Small white spots may appear within images on the back side of the paper in printing in low- humidity environments. WorkCentre 5019/5021 12-7 User Guide…
-
Page 176: Notes And Restrictions On The Use Of The Copy Feature
When printing a 2 Sided print job, depending on the application being used, blank sheets can be inserted automatically to adjust pages. These blank sheets inserted by the application also are counted by the job counter. 12-8 WorkCentre 5019/5021 User Guide…
-
Page 177: Notes And Restrictions On The Use Of The Scan Feature
For the notes and restrictions on the scan driver, see the «Readme» information on the CD-ROM for the Driver CD Kit that came with the machine. Restriction on scanning capacity The maximum scanning capacity for one page is 297 × 432 mm. For standard sizes, A3 or 11 × 17 inches. WorkCentre 5019/5021 12-9 User Guide…
- Page 178
Appendix 12-10 WorkCentre 5019/5021 User Guide… - Page 179
Document cover, 3-2 Document feeder, 5-1, 6-1 Document feeder cover, 3-5 Document feeder tray, 3-5 Last Original button, 3-11 Document glass, 3-2, 5-3, 6-4 Left cover, 3-3 Document guides, 3-5, 5-3, 6-3 Lighten/Darken, 5-15 Document indicator, 3-13, 6-3 WorkCentre 5019/5021 User Guide… - Page 180
Drum cartridge icon, 3-14 Paper tray empty icon, 3-14 Error icon, 3-14 Paper types, 4-1 Original Size display area, 3-13 PDL, 12-3 Paper Size display area, 3-14 Power Consumption, 12-3 Paper tray empty icon, 3-14 Power cord connector, 3-3 WorkCentre 5019/5021 User Guide… - Page 181
Toner Saver icon, 3-11 Toner status, 9-3 Total Copy display area, 3-13 Tray 1, 3-2 Tray 2, 3-2 Tray indicators, 3-14 Troubleshooting, 11-1 TWAIN Driver, 12-4 USB interface, 2-2, 3-3 Variable Zoom Ratio button, 3-11 Warm-up Time, 12-1 WorkCentre 5019/5021 User Guide… -
Page 182: Iv Workcentre
Index WorkCentre 5019/5021 User Guide…
An error code (X-X) or (XXX-XXX) blinks if printing terminated abnormally because of an error, or a
malfunction occurred in the machine.
Display example of an error code
Refer to the error codes in the following table to resolve problems.
Notes
•
If an error code is displayed, any print data remaining in the machine and information
stored in the machine’s memory is not secured.
•
If an error code is displayed that is not listed in the following table, or if you cannot
resolve an error despite following the instructions described in the table, contact our
Customer Support Center. The contact number is printed on the label or card attached to
the machine.
•
If a two-digit error code (X-X) appears, you can view the grouped six-digit error code
(XXX-XXX) while holding down the ID Card Copy button.
WorkCentre 5019/5021
User Guide
Problem solving
11-21
You are here: Home / error code / Xerox WorkCentre 5019 error and solving error codes
– Compatible Printer model: Xerox WorkCentre 5019
– Xerox WorkCentre 5019 Error Codes with quick guides:
- Code: 003-500, 003-795
- Description: N-Up NG Out Of Range/ AMS NG Out Of Range [N-Up NG Out Of Range] During 2-Up or 4-Up, the reduce/enlarge ration was not within the range of 25 to 400%. [AMS NG Out Of Range] During AMS (Auto Magnification Selection), the reduce/enlarge ration was not within the range of 25 to 400%
- Troubleshooting Guides: Press [Stop] on the UI Panel and change the settings.
- Code: 003-754
- Description: IPS Overrun The IPS processing has overtook the Scan processing
- Troubleshooting Guides: This might be avoided by setting the R/E ratio to 99% or 101%. If this occurs frequently, obtain the document from the User and contact the Support Department for assistance.
- Code: 003-942
- Description: Not-Supported Doc Size During DADF Scan of a Copy Job, an unsupported document size was detected.
- Troubleshooting Guides: 1. Press [Stop] on the UI Panel. 2. Check the setting of the document size group. 3. Check whether the document size is a supported size. 4. If the document size is a supported size, the DADF might have malfunctioned. Refer to following FIP to check the DADF. • 005-196 (Size Mismatch Jam on No Mix-size) • 005-948 (SS-Size Mismatch Jam on No Mix-size)
- Code: 003-951
- Description: 1Job Max Page Over During Copy Job, the number of pages that can be scanned has been exceeded.
- Troubleshooting Guides: Press [Stop] on the UI Panel and reduce the number of document pages.
- Code: 003-963
- Description: APS NG Out Of Range During Copy Job, when APS is selected, the image size obtained from document size x reduce/enlarge ratio was detected to be larger than the largest Standard Paper Size.
- Troubleshooting Guides: Press [Stop] on the UI Panel and change the settings.
- Code: 003-972
- Description: During Copy Job, the EPC memory is filled up.
- Troubleshooting Guides: Print out all the images that had been successfully scanned by the DADF so far and then perform the copy again for the documents (images) that were unable to be scanned.
- Code: 003-973
- Description: Auto Rotation NG Out Of Range During Copy Job, the following conditions were met. • Rotation is required. • The length of the image obtained by document x reduce/enlarge ratio is longer than 297 mm.
- Troubleshooting Guides: Press [Stop] on the UI Panel and change the reduce/enlarge ratio.
- Code: 004-345
- Description: HVPS Communication Error Communication failure between the ESS/MCU PWB and the HVPS was detected.
- Troubleshooting Guides: 1. Turn the power OFF and ON. 2. Turn OFF the power and check the connection between the HVPS J500 and the ESS/ MCU PWB J402 for open circuit, short circuit, and poor contact. 3. If no problem is found, replace the following parts in sequence: • HVPS (PL 18.1) • ESS/MCU PWB (PL 18.1)
- Code: 005-122
- Description: DADF Simplex/Side 1 Pre Regi Sensor On Jam • After Pre-Feed started for the first sheet (DADF Feed Motor On (CW)) in Simplex and Duplex, the DADF Pre Regi Sensor did not turn ON within the specified time. • After Pre-Feed started for the second sheet onwards (DADF Feed Motor On (CW)) in Duplex, the DADF Pre Regi Sensor did not turn ON within the specified time.
- Troubleshooting Guides: Check the following: • Transportation failure due to foreign substance on the document path. • The surface of the Feed Roll and Nudger Roll for foreign substances. • The surface of the Feed Roll and Nudger Roll for wear. • The DADF Pre Regi Sensor (Input Check [005-206]) for operation failure. (PL 56.14) • The DADF Feed Clutch (Output Check [005-062]) for operation failure. (PL 56.7) • The DADF Feed Motor (Output Check [005-008]) for operation failure. (PL 56.6) • The Drive Gear for wear and damage. If no problem is found, replace the DADF PWB. (PL 56.2)
- Code: 005-123
- Description: DADF Simplex/Side 1 Regi Sensor On Jam CH5.4 The DADF Regi Sensor does not turn ON within the specified time after the DADF Pre Regi Sensor On.
- Troubleshooting Guides: Check the following: • Transportation failure due to foreign substance on the document path. • The surface of the Takeaway Roll and Regi Roll for foreign substances. • The surface of the Takeaway Roll and Regi Roll for wear. • The DADF Regi Sensor (Input Check [005-110]) for operation failure. (PL 56.14) • The DADF Pre Regi Sensor (Input Check [005-206]) for operation failure. (PL 56.14) • The DADF T/A Clutch (Output Check [005-098]) for operation failure. (PL 56.7) • The DADF Feed Motor (Output Check [005-008]) for operation failure. (PL 56.6) • The Drive Gear for wear and damage. If no problem is found, replace the DADF PWB. (PL 56.2)
- Code: 005-125, 005-145
- Description: DADF Regi Sensor Off Jam/ DADF Regi Sensor Off Jam on Inverting CH5.4 [DADF Regi Sensor Off Jam] After the DADF Pre Regi Sensor turned OFF at Scan operation, the DADF Regi Sensor did not turn OFF within the specified time. [DADF Regi Sensor Off Jam on Inverting] After the DADF Pre Regi Sensor turned OFF at Invert operation, the DADF Regi Sensor did not turn OFF within the specified time.
- Troubleshooting Guides: Check the following: • Transportation failure due to foreign substance on the document path. • The surface of the Regi Roll, Out Roll, and Exit Roll for foreign substances. • The surface of the Regi Roll, Out Roll, and Exit Roll for wear. • The DADF Regi Sensor (Input Check [005-110]) for operation failure. (PL 56.14) • The DADF Pre Regi Sensor (Input Check [005-206]) for operation failure. (PL 56.14) • The DADF Feed Motor (Output Check [005-008]) for operation failure. (PL 56.6) • The Drive Gear for wear and damage. If no problem is found, replace the DADF PWB. (PL 56.2)
- Code: 005-131, 005-132
- Description: DADF Invert Sensor On Jam on Inverting/ DADF Invert Sensor On Jam [DADF Invert Sensor On Jam on Inverting] After the DADF Regi Sensor turned ON at Invert operation, the DADF Invert Sensor did not turn ON within the specified time. [DADF Invert Sensor On Jam] After the DADF Regi Sensor turned ON in the Scan operation, the DADF Invert Sensor did not turn ON within the specified time.
- Troubleshooting Guides: Check the following: • Transportation failure due to foreign substance on the document path. • The surface of the Out Roll for foreign substances. • The surface of the Out Roll for wear. • The DADF Invert Sensor (Input Check [005-211]) for operation failure. (PL 56.10) • The DADF Regi Sensor (Input Check [005-110]) for operation failure. (PL 56.14) • The DADF Feed Motor (Output Check [005-008]) for operation failure. (PL 56.6) • The Drive Gear for wear and damage. If no problem is found, replace the DADF PWB. (PL 56.2)

Solve Xerox WorkCentre 5019 Error codes
- Code: 005-134, 005-139
- Description: DADF Invert Sensor Off Jam on Inverting/ DADF Invert Sensor Off Jam [DADF Invert Sensor Off Jam on Inverting] During the Invert operation where there is a next document, after the DADF Regi Sensor turned OFF, the DADF Invert Sensor did not turn OFF within the specified time. [DADF Invert Sensor Off Jam] During the Simplex and Duplex Scan operation, after the DADF Regi Sensor turned OFF, the DADF Invert Sensor did not turn OFF within the specified time.
- Troubleshooting Guides: Check the following: • Transportation failure due to foreign substance on the document path. • The surface of the Out Roll and Exit Roll for foreign substances. • The surface of the Out Roll and Exit Roll for wear. • The DADF Invert Sensor (Input Check [005-211]) for operation failure. (PL 56.10) • The DADF Regi Sensor (Input Check [005-110]) for operation failure. (PL 56.14) • The DADF Feed Motor (Output Check [005-008]) for operation failure. (PL 56.6) • The Exit Pinch Roll for operation failure (including for the operation failure of the Exit Nip Release Solenoid (Output Check [005-072])). (PL 56.7) • The Drive Gear for wear and damage. If no problem is found, replace the DADF PWB. (PL 56.2)
- Code: 005-135
- Description: DADF Side 2 Pre Regi Sensor On Jam After the DADF Feed Motor started the reverse rotation at Invert operation, the DADF Pre Regi Sensor did not turn ON within the specified time.
- Troubleshooting Guides: Check the following: • Transportation failure due to foreign substance on the document path. • The surface of the Exit Roll for foreign substances. • The surface of the Exit Roll for wear • The DADF Pre Regi Sensor (Input Check [005-206]) for operation failure. (PL 56.14) • The DADF Feed Motor (Output Check [005-048]) for operation failure. (PL 56.6) • The Exit Pinch Roll for operation failure (including for the operation failure of the Exit Nip Release Solenoid (Output Check [005-072])). (PL 56.7) • The Drive Gear for wear and damage. If no problem is found, replace the DADF PWB. (PL 56.2)
- Code: 005-136
- Description: DADF Side 2 Regi Sensor On Jam After the DADF Pre Regi Sensor turned ON at Invert operation, the DADF Regi Sensor did not turn ON within the specified time.
- Troubleshooting Guides: Check the following: • Transportation failure due to foreign substance on the document path. • The surface of the Exit Roll, Takeaway Roll, and Regi Roll for foreign substances. • The surface of the Exit Roll, Takeaway Roll, and Regi Roll for wear. • The DADF Regi Sensor (Input Check [005-110]) for operation failure. (PL 56.14) • The DADF Pre Regi Sensor (Input Check [005-206]) for operation failure. (PL 56.14) • The DADF Feed Motor (Output Check [005-008]) for operation failure. (PL 56.6) • The DADF T/A Clutch (Output Check [005-098]) for operation failure. (PL 56.7) • The Exit Pinch Roll for operation failure (including for the operation failure of the Exit Nip Release Solenoid (Output Check [005-072])). (PL 56.7) • The Drive Gear for wear and damage. If no problem is found, replace the DADF PWB. (PL 56.2)
- Code: 005-147
- Description: DADF Pre Regi Sensor Off Jam on Inverting After the DADF Feed Motor started the reverse rotation at Invert operation, the DADF Pre Regi Sensor did not turn OFF within the specified time.
- Troubleshooting Guides: Check the following: • Transportation failure due to foreign substance on the document path. • The surface of the Exit Roll, Takeaway Roll, Regi Roll, and Out Roll for foreign substances. • The surface of the Exit Roll, Takeaway Roll, Regi Roll, and Out Roll for wear. • The DADF Pre Regi Sensor (Input Check [005-206]) for operation failure. (PL 56.14) • The DADF Feed Motor (Output Check [005-048/008] (CCW/CW)) for operation failure. (PL 56.6) • The Exit Pinch Roll for operation failure (including for the operation failure of the Exit Nip Release Solenoid (Output Check [005-072])). (PL 56.7) • The Drive Gear for wear and damage. If no problem is found, replace the DADF PWB. (PL 56.2)
- Code: 005-196
- Description: Size Mismatch Jam on No Mix-Size The 2nd sheet or later of the document was detected to be of a different size conpared to the 1st sheet (the length of the document’s 2nd sheet or later in SS direction is longer).
- Troubleshooting Guides: 1. Check the size of the document that was fed by the User. 2. If the error is not cleared, check the following: • The DADF Pre Regi Sensor (Input Check [005-206]) for operation failure. (PL 56.14) • The Document Tray Size Sensor 1/2 (Input Check [005-221/222]) for operation failure. (PL 56.11) 3. If no problem is found, replace the DADF PWB. (PL 56.2)
- Code: 005-197
- Description: Prohibit Combine Size Jam A Mixed Size document was detected.
- Troubleshooting Guides: Explain to the User that Mixed Size is not supported.
- Code: 005-198, 005-199
- Description: Too Short Size Jam/ Too Long Size Jam [Too Short Size Jam] It was detected that the document length in Slow Scan direction is shorter than the specifications (Simpex: 85 mm, Duplex: 110 mm). [Too Long Size Jam] It was detected that the document length in Slow Scan direction is at the specifications (Simpex: 1275 mm, Duplex: 480.1 mm) or longer.
- Troubleshooting Guides: Check the size of the document that was fed by the user. If it is within the permitted length for DADF transport, check the following: • The DADF Pre Regi Sensor (Input Check [005-206]) for operation failure. (PL 56.14) • The Document Tray Size Sensor 1/2 (Input Check [005-221/222]) for operation failure. (PL 56.11) If no problem is found, replace the DADF PWB. (PL 56.2)
- Code: 005-210
- Description: DADF Download Fail When the IISS starts up (including at Power ON/Sleep recovery), it was detected that the DADF is in Download Mode.
- Troubleshooting Guides: Perform the DADF software download.
- Code: 005-275, 005-280
- Description: DADF RAM Fail/ DADF EEPROM Fail [DADF RAM Fail] The DADF PWB RAM failed during the Read/Write operation. (At Power ON) [DADF EEPROM Fail] Write failure to DADF EEPROM or communication failure with EEPROM was detected.
- Troubleshooting Guides: 1. Turn the power OFF and ON. 2. If the problem persists, replace the DADF PWB. (PL 56.2)
- Code: 005-305
- Description: DADF Feeder Cover Interlock Open The DADF Feeder Cover Interlock Switch was opened during DADF operation.
- Troubleshooting Guides: 1. Check the DADF Feeder Cover for mismatch. 2. Check the DADF Feeder Cover Interlock Switch (Input Check [005-212]) for operation failure. (PL 56.6) 3. If no problem is found, replace the DADF PWB. (PL 56.2)
- Code: 005-500
- Description: DADF Download Flash Write Error Failed to write into the Flash ROM during DAFD Download.
- Troubleshooting Guides: 1. Turn the power OFF and ON. 2. If the problem persists, replace the following parts in sequence: • DADF PWB (PL 56.2) • ESS/MCU PWB (PL 18.1)
- Code: 005-907, 005-908, 005-913
- Description: DADF Pre Regi Sensor/DADF Regi Sensor/DADF Invert Sensor Static Jam Paper was detected by the applicable sensor at Power ON, Feeder Cover Interlock Close, or DADF Open Sensor Close.
- Troubleshooting Guides: 1. Check the applicable sensor for remaining paper, the Actuator for return failure, contamination on sensor, and etc. 2. Check the applicable sensor for operation failure. • DADF Pre Regi Sensor (Input Check[005-206]) (PL 56.14) • DADF Regi Sensor (Input Check[005-110]) (PL 56.14) • DADF Invert Sensor (Input Check[005-211]) (PL 56.10) 3. If no problem is found, replace the DADF PWB. (PL 56.2)
- Code: 005-940
- Description: DADF No Original Fail It was detected that the document was pulled out during document feed.
- Troubleshooting Guides: Reload the document.
- Code: 005-948
- Description: SS-Size Mismatch Jam on No Mix-size In No Mix mode, it was detected that a document with a shorter size in Slow Scan (SS) direction was transported from the DADF.
- Troubleshooting Guides: 1. Check the size of the document that was fed by the User. 2. If the error is not cleared, check the following: • The DADF Pre Regi Sensor (Input Check [005-206]) for operation failure. (PL 56.14) • The Document Tray Size Sensor 1/2 (Input Check [005-221/222]) for operation failure. (PL 56.11) 3. If no problem is found, replace the DADF PWB. (PL 56.2)
- Code: 010-311
- Description: Fusing Unit Center Thermistor Defect An open circuit abnormality (the AD value of the STS is equivalent to the open circuit value) of the Heat Roll Center Thermistor was detected.
- Troubleshooting Guides: Turn OFF the power and disconnect the Heat Roll Center Thermistor connector P/J600. Measure the resistance between the Heat Roll Center Thermistor J600 pin-1 and J600 pin-2. Is the resistance infinite? Y↓N→Reconnect the connector P/J600 and measure the resistance between the ESS/MCU PWB J403 pin-1 and J403 pin-2. Is the resistance infinite? Y↓N→Replace the ESS/MCU PWB. (PL 18.1) Check the following connections for open circuits and poor contacts. • Between ESS/MCU PWB J403-1 and Heat Roll Center Thermistor P600-4 • Between ESS/MCU PWB J403-2 and Heat Roll Center Thermistor P600-3 Replace the Fusing Unit. (PL 7.1)
- Code: 010-312
- Description: Fusing Unit Rear Thermistor Defect An open circuit abnormality (the AD value of the STS is equivalent to the open circuit value) of the Heat Roll Rear Thermistor was detected.
- Troubleshooting Guides: Turn OFF the power and disconnect the Heat Roll Rear Thermistor connector P/J600. Measure the resistance between the Heat Roll Rear Thermistor J600 pin-3 and J600 pin-4. Is the resistance infinite? Y↓N→Reconnect the connector P/J600 and measure the resistance between the ESS/MCU PWB J403 pin-3 and J403 pin-4. Is the resistance infinite? Y↓N→Replace the ESS/MCU PWB. (PL 18.1) Check the following connections for open circuits and poor contacts. • Between ESS/MCU PWB J403-3 and Heat Roll Rear Thermistor P600-2 • Between ESS/MCU PWB J403-4 and Heat Roll Rear Thermistor P600-1 Replace the Fusing Unit. (PL 7.1)
- Code: 010-320
- Description: Over Heat Temperature Fail A high temperature error was detected at the Center Thermistor (245 degrees C or higher) or the Rear Thermistor (270 degrees C or higher). NOTE: To clear this Fail, first remove the cause, next clear the value of NVM [744-040] (Over Heat Temp Fail) to ‘0’, and then turn the power OFF then ON. The relationship between the displayed value and the Thermistor that detected the high temperature error is as follows: • 0: Normal • 1: High Temperature Error of Heat Roll Center Thermistor • 2: High Temperature Error of Heat Roll Rear Thermistor
- Troubleshooting Guides: Check the following: • The Center Thermistor or the Rear Thermistor for dropped parts, sensor contamination, and foreign substances blocking the sensor. • The Heat Roll for wound up, stuck paper. • The Heat Roll Center Thermistor (Analog Monitor [010-050]) for operation failure. • The Heat Roll Rear Thermistor (Analog Monitor [010-051]) for operation failure. • The Heater Rod for operation failure. If no problem is found, replace the following parts in sequence: • Fusing Unit (PL 7.1) • LVPS (PL 18.1) • ESS/MCU PWB (PL 18.1)
- Code: 010-327
- Description: Fusing Unit On Time Fail Any of the following was detected: • The Heater Rod did not turn OFF within the specified time after the Heater Rod On. • After power ON, the temperature of the Fusing Unit does not reach the specified value within the specified time.
- Troubleshooting Guides: Check the following: • The Heater Rod for operation failure. • The connection between the LVPS J511 and the Fusing Unit P10 for open circuit and poor contact • The Center Thermistor for dropped parts, sensor contamination, and foreign substances blocking the sensor. • The Heat Roll for wound up, stuck paper. If no problem is found, replace the following parts in sequence: • Fusing Unit (PL 7.1) • LVPS (PL 18.1) • ESS/MCU PWB (PL 18.1)
- Code: 010-379
- Description: Fusing Unit Hot Not Ready Return Time Fail The time taken to recover from High Temperature Not Ready state has exceeded the specified time.
- Troubleshooting Guides: 1. Turn the power OFF and ON. 2. Turn OFF the power and check the following: • The Fusing Unit for improper installation. • The connection between the Fusing Unit P10 and the LVPS J511 for open circuit, short circuit, and poor contact. • The connection between the Fusing Unit P600 and the ESS/MCU PWB J403 for open circuit, short circuit, and poor contact. • The connection between the ESS/MCU PWB J401 and the LVPS J513 for open circuit, short circuit, and poor contact. • The Heat Roll for wound up, stuck paper. 3. If the problem persists, replace the following parts in sequence: • Fusing Unit (PL 7.1) • LVPS (PL 18.1) • ESS/MCU PWB (PL 18.1)
- Code: 010-392
- Description: NOHAD Fan Defect NOHAD Fan failure was detected. When the NOHAD Fan Fail signal indicating an abnormality of the Fan was monitored at the specified time interval, it was found to have failed the specified number of times or higher in a row.
- Troubleshooting Guides: 1. Check the NOHAD Fan (Output Check [042-002]) for operation failure. (PL 4.1) 2. Check the NOHAD Fan for foreign substances. 3. If no problem is found, replace the ESS/MCU PWB. (PL 18.1)
- Code: 010-602
- Description: Over Temp Cooling Mode Unable to print because the temperature in the machine has risen above the specification value.
- Troubleshooting Guides: Wait until the temperature in the machine has dropped.
- Code: 016-500
- Description: Controller Download Flash Write Error Unable to write the Download File of Controller Main into the Flash ROM.
- Troubleshooting Guides: 1. Turn the power OFF and ON. (If the contents of the Flash ROM is corrupted, the machine will boot up in Emergency Boot Download mode after Power ON.) 2. If the problem persists, replace the ESS/MCU PWB. (PL 18.1)
- Code: 016-501
- Description: Controller Boot Flash Write Error Unable to write the Download File of Controller Boot into the Flash ROM.
- Troubleshooting Guides: 1. Turn the power OFF and ON. 2. If the problem persists, replace the ESS/MCU PWB. (PL 18.1)
- Code: 016-502
- Description: UI Panel Download Flash Write Error Unable to write the Download File of UI Panel into the Flash ROM.
- Troubleshooting Guides: 1. Turn the power OFF and ON. 2. If the problem persists, replace the following parts in sequence: • ESS/MCU PWB (PL 18.1) • UI PWB (PL 1.6)
- Code: 016-570
- Description: No Response from USB-Host for Scan Job When any of the following has occurred as Scan to PC (USB) is in progress. • The command from the PC was disrupted for 5 seconds. • The machine has detected a communication error with the USB Device. • The sending of commands to the PC remained unsuccessful even when 500 ms has passed. (The timeout time is the time calculated from the size of the data being sent only when sending image data.)
- Troubleshooting Guides: 1. Press [Stop] on the UI Panel. 2. Check the connection of the USB Cable between this machine and the PC. 3. Check the status (is it powered OFF, frozen, etc.) of the PC.
- Code: 016-571
- Description: No Response from USB-Host for Print Job When any of the following has occurred as USB Print or Download data interpretation is in progress. • The command from the PC was disrupted for 2 minutes. • The machine has detected a communication error with the USB Device. • The sending of commands to the PC remained unsuccessful even when 500 ms has passed. NOTE: This Fault will clear automatically. (It will not be displayed on the UI Panel)
- Troubleshooting Guides: 1. Check the connection of the USB Cable between this machine and the PC. 2. Check the status (is it powered OFF, frozen, etc.) of the PC.
- Code: 016-742, 016-744
- Description: Download File Error/ Download File Check Sum Error [Download File Error] It was detected that there is an error with either the file format of the Download File, the Device Identifier, the Device Serial Number, or the Target Device Character String. [Download File Check Sum Error] The Download File checksum error was detected.
- Troubleshooting Guides: 1. Turn the power OFF and ON. 2. Install a firmware with the correct version.
- Code: 016-749, 016-799
- Description: HBPL or XPJL Syntax Error/ Print Instruction Fail [HBPL or XPJL Syntax Error] When the Print Job data interpretation is in progress, an illegal command that cannot be ignored was received from the Client driver. [Print Instruction Fail] During the Print Job, the Job cannot be executed with the specified combination of print parameters (Stored File Size, Paper Size, Paper Tray, Duplex Settings, Output Tray, and etc.). NOTE: During Continuous Print, this error will not occur until the paper that immediately precedes the paper where the applicable image is supposed to be printed on has been output successfully.
- Troubleshooting Guides: 1. Press [Stop] on the UI Panel. 2. Check whether the Printer Driver that is being used is the correct one. 3. Check whether the specified print parameters are correct.
- Code: 016-759
- Description: Copy Counter Full During Multi Account Mode, any of the following has occurred: • The general user that is logged in has reached the alotted maximum print count. • A general user that has reached the alotted maximum print count has logged in.
- Troubleshooting Guides: 1. Press [Stop] on the UI Panel. 2. Clear the count for the user.
- Code: 016-776
- Description: Marker Code Detection Fail During Copy Job or Print Job, when expanding only up to the size that was specified at the expansion, the End Code cannot be found in the compressed data. NOTE: Before the occurrence of this fail, there are cases where [045-310 Image Ready Error] would occur first. NOTE: During Continuous Print, this error will not occur until the paper that immediately precedes the paper where the applicable image is supposed to be printed on has been output successfully.
- Troubleshooting Guides: 1. Turn the power OFF and ON. 2. If the problem reoccurs, determine whether it is caused by the Copy document or the Print data and contact the Support Department for assistance.
- Code: 023-600
- Description: Held Down key Error (UI Panel) Any key on the UI Panel has been pressed and held down for 1 minute or longer.
- Troubleshooting Guides: Check whether any key on the UI Panel is pressed and held down.
- Code: 024-910, 024-911, 024-915
- Description: Tray 1/Tray 2/MSI Paper Length Mismatch The Paper Size for the applicable Tray is longer by 10.1 mm or more, or shorter by 13.1 mm or more than the setting.
- Troubleshooting Guides: Check the following: • Transportation failure due to foreign substance on the document path. • The surface of the Feed Roll, T/A Roll 2 (Tray 2), Regi. Roll, and Idler Roll of the applicable Tray for foreign substances. • The surface of the Feed Roll, T/A Roll 2 (Tray 2), Regi. Roll, and Idler Roll of the applicable Tray for wear. • The Regi Sensor (Input Check [071-105]) for operation failure. (PL 15.1) • The Regi Clutch (Output Check [071-001]) for operation failure. (PL 15.1) • The MSI Feed Clutch (Output Check [072-006]) for operation failure. (MSI) (PL 13.3) • The BTR for contamination, wear, and transportation failure due to deterioration. • The Drive Gear for wear and damage. • Usage of out of spec paper. If no problems are found, replace the ESS/MCU PWB. (PL 18.1)
- Code: 024-950, 024-951, 024-954
- Description: Tray 1/Tray 2/MSI No Paper Any of the following was detected: • The paper in the applicable Tray has ran out. (When the APS function of Tray 1 and Tray 2 is disabled) • Although the paper in the applicable Tray was detected to have ran out, paper is not supplied from another Tray. (When the APS function of Tray 1 and Tray 2 is enabled)
- Troubleshooting Guides: 1. Load paper into the applicable Tray. (If this had occurred during APS of Tray 1 or Tray 2, load paper with the same settings as for the aplicable Tray into other than MSI.) 2. If the problem persists, check the following: • The paper supply mechanism of the applicable Tray for damage and foreign substances. • The No Paper Sensor of the applicable Tray (Input Check [072-100/101/102]) for operation failure. (PL 9.1, PL 10.3, PL 13.3) • The No Paper Sensor of the applicable Tray for contamination, improper installation, and Actuator operation failure. 3. If no problem is found, replace the following parts: • ESS/MCU PWB (Tray 1/MSI) (PL 18.1) • STM PWB (Tray 2) (PL 10.6)
- Code: 024-958, 024-959, 024-960
- Description: MSI/Tray 1/Tray 2 Paper Size Mismatch During Print Job, the paper size settings of the selected Tray is different from the paper size specified for the Job.
- Troubleshooting Guides: Change the paper settings of the selected Tray to the appropriate one.
- Code: 024-965
- Description: APS NG Unselected During Copy Job, Print Job, and Report Job with APS settings, the Paper Size and paper orientation (SEF/LEF) settings specified by the Job are different from the settings at Tray 1 and Tray 2.
- Troubleshooting Guides: Change the paper settings of the Tray to the appropriate one.
- Code: 041-210, 041-211
- Description: STM NVM Out-Of-Order/ STM NVM R/W Error [STM NVM Out-Of-Order] The NVM of the STM is malfunctioning. [STM NVM R/W Error] Unable to perform NVM Read / Write for the STM.
- Troubleshooting Guides: 1. Turn the power OFF and ON. 2. If the problem persists, replace the STM PWB. (PL 10.6)
- Code: 042-325, 042-614
- Description: Main Motor Rotation Error/ Main Motor Rotation Warning [Main Motor Rotation Error] The Main Drive Motor revolution failure was detected. When the Lock Up (Main Drive Motor Fail) signal of the Motor Drive output was monitored at the specified time interval after a certain time has passed since the Main Drive Motor operation had started, it was found to have failed 5 times in a row. [Main Motor Rotation Warning] The Main Drive Motor revolution failure was detected. When the Lock Up (Main Drive Motor Fail) signal of the Motor Drive output was monitored at the specified time interval after a certain time has passed since the Main Drive Motor operation had started, it was found to have failed 2 times in a row.
- Troubleshooting Guides: Enter the CE Mode and turn ON the Output Check [042-001] (Main Drive Motor). Does the Main Drive Motor rotate? Y↓N→Check the power supply line (+24VDC, +5VDC) of the Main Drive Motor. Is the power supply of the Main Drive Motor normal? Y↓N→Check the power supply circuit to the Main Drive Motor. Turn OFF the power and check the following: • The connection between the Main Drive Motor J202 and the ESS/MCU PWB J403 for open circuit, short circuit, and poor contact. • The Drive Gear for wear, damage, and bearing blockage. • The Main Drive Motor for loading. If no problem is found, replace the following parts in sequence: • Main Drive Motor (PL 3.1) • ESS/MCU PWB (PL 18.1) Press [Stop] and turn OFF the power. Check the connection between the Main Drive Motor J202-8 and the ESS/MCU PWB J403-5 for open circuit, short circuit, and poor contact. If no problem is found, replace the following parts in sequence: • ESS/MCU PWB (PL 18.1) • Main Drive Motor (PL 3.1)
- Code: 045-310
- Description: Image Ready Error Unable to send the Image-valid signal cannot within the specified time. NOTE: When the attempt to expand the image has failed, [016-776 Marker Code Detection Fail] occurs after the recover operation.
- Troubleshooting Guides: 1. Check the USB Cable (Local) for poor connection. 2. If no problem is found, replace the ESS/MCU PWB. (PL 18.1)
- Code: 045-313
- Description: IOT Logic Fail The IOT Software error was detected.
- Troubleshooting Guides: 1. Turn the power OFF and ON. 2. Install the correct version of the IOT firmware. 3. If the problem persists, replace the ESS/MCU PWB. (PL 18.1)
- Code: 061-321
- Description: ROS Motor Fail The number of rotation of the ROS Motor did not come within the standard range within the specified time (5 s) after the ROS Motor On.
- Troubleshooting Guides: 1. Turn the power OFF and ON. 2. Check whether the Drum Cartridge is installed. 3. Check the ROS Motor (Output Check [061-001]) for operation failure. 4. Check the LD +5VDC power supply of the LD PWB J140 pin-8. 5. If no problem is found, replace the following parts in sequence: • ROS Assembly (PL 2.1) • ESS/MCU PWB (PL 18.1)
- Code: 061-325
- Description: No SOS Fail. After the detection of ROS Motor Ready (steady rotation), the SOS interval was detected to be longer than the reference value 5 times in a row.
- Troubleshooting Guides: 1. Turn the power OFF and ON. 2. Check whether the Drum Cartridge is installed. 3. Turn OFF the power and check the connections between the ESS/MCU PWB J410, J411 and the LD PWB J140, J160 for open circuits, short circuits, and poor contacts. 4. If no problem is found, replace the following parts in sequence: • ROS Assembly (PL 2.1) • ESS/MCU PWB (PL 18.1)
- Code: 062-277
- Description: DADF Communication Fail Transmission cannot be established between the ESS/MCU PWB and the DADF PWB.
- Troubleshooting Guides: 1. Turn the power OFF and ON. 2. Turn OFF the power and check the connections between the ESS/MCU PWB J421 and the DADF PWB J751, J752 for open circuits, short circuits, and poor contacts. 3. If no problem is found, replace the following parts in sequence: • DADF PWB (PL 56.2) • ESS/MCU PWB (PL 18.1)
- Code: 062-311
- Description: IIT Software Logic Fail A software error was detected at the ESS/MCU PWB.
- Troubleshooting Guides: 1. Turn the power OFF and ON. 2. Update the software version to the latest one. 3. If no problem is found, replace the ESS/MCU PWB. (PL 18.1)
- Code: 062-360
- Description: Carriage Position Fail Any of the following was detected: • An error with the count value of the Carriage Position Control. • There is no Regi Sensor input during Carriage initialization. • An error with the Regi Sensor detection position.
- Troubleshooting Guides: Check the following: • The Pre Regi Sensor (Input Check [062-212]) for operation failure. (PL 1.3) • The Carriage Motor (Output Check [062-005/006] (Scan/Return)) for operation failure. (PL 1.4) • The Drive Belt and Drive Wire for slack and wear. • The Carriage operation for mechanical loading. If no problems are found, replace the ESS/MCU PWB. (PL 18.1)
- Code: 062-371, 062-380
- Description: Lamp Illumination Fail/ AGC Fail [Lamp Illumination Fail] Insufficient light from Lamp detected in CCD. (During white gradation correction/AGC before Scan starts) [AGC Fail] Insufficient lamp brightness was detected when performing AGC.
- Troubleshooting Guides: Check whether there is something blocking the light and check the Lamp, Lens, Mirror, and White Color Correction Plate for deterioration or contamination.
1. Turn ON the power and enter the Diag mode. Change the value for NVM [715-030] to ‘1’ and then perform [NVM Write]. 2. A 3 or 4-digit number is displayed in the current value column. 3. Check the upper 1 or 2 digits, or the lower 2 digits using the following table and replace the appropriate parts. Sample Display • 110 (3-digit display): LED Lamp failure and LED Lamp Flexible Flat Cable is damaged or has poor contact. (The first digit ‘1’ in ‘110’ is the upper digit, which indicates the LED Lamp (‘0′ in ’01’ is not displayed). The lower 2 digits ’10’ indicates the LED Lamp Flexible Flat Cable.) • 1000 (4-digit display): The LED Lamp Flexible Flat Cable is damaged or has poor contact. (The first 2 digits ’10’ in ‘1000’ are the upper digits, which indicates the LED Lamp Flexible Flat Cable. The lower 2 digits ’00’ indicates that nothing is applicable (no failures).) NOTE: Perform IIT diagnostic and then call NVM [715-030] again (press the Change Settings button) to check the value (diagnostic result). 4. After replacing the appropriate parts, again change the value for NVM [715-030] to ‘1’ and then perform ‘NVM Write’. 5. Check that the current value column becomes ‘0’. 6. If the problem persists after performing the above procedure, check the following: • Check for burnt out LED Lamp (DC330 [062-002]). (PL 1.5) • Check the Flat Cable between the LED Lamp PWB J7002 and the IIT Carriage J7001 for open circuits, short circuits, and poor contacts (especially, check whether the Flat Cable was inserted in a skewed manner). • Check the Flat Cable between the IIT Carriage J700 and the ESS/MCU PWB J420 for open circuits, short circuits, and poor contacts (especially, check whether the Flat Cable was inserted in a skewed manner). 7. If no problem is found, replace the ESS/MCU PWB. (PL 18.1)
- Code: 062-386
- Description: AOC Fail A CCD output error was detected when performing AOC.
- Troubleshooting Guides: 1. Turn ON the power and enter the Diag mode. Change the value for NVM [715-030] to ‘1’ and then perform [NVM Write]. 2. A 3 or 4-digit number is displayed in the current value column. 3. Check the upper 1 or 2 digits, or the lower 2 digits and replace the appropriate parts. (For more information on display example and part selection, refer to Procedure 3 in 062- 371 FIP.) NOTE: Perform IIT diagnostic and then call NVM [715-030] again (press the Change Settings button) to check the value (diagnostic result). 4. After replacing the appropriate parts, again change the value for NVM [715-030] to ‘1’ and then perform ‘NVM Write’. 5. Check that the current value column becomes ‘0’. 6. If the problem persists after performing the above procedure, check the Flat Cable between the IIT Carriage J700 and the ESS/MCU PWB J420 for open circuits, short circuits, and poor contacts (especially, check whether the Flat Cable was inserted in a skewed manner). 7. If no problem is found, replace the ESS/MCU PWB. (PL 18.1)
- Code: 062-389
- Description: Carriage Over Run Fail (Scan End Side) The Carriage has overrun at the Scan End.
- Troubleshooting Guides: Check the following: • The Drive Belt and Drive Wire for slack and wear. • The Carriage operation for mechanical loading. • The Carriage Motor (Output Check [062-005/006] (Scan/Return)) for operation failure. (PL 1.4) • The IIT Regi. Sensor (Input Check [062-212]) for operation failure. (PL 1.3) If no problems are found, replace the ESS/MCU PWB. (PL 18.1)
- Code: 062-396
- Description: CCD Cable Connection Fail A CCD Flat Cable connection error was detected.
- Troubleshooting Guides: 1. Turn the power OFF and ON. 2. Turn OFF the power and check the Flat Cable between the IIT Carriage J700 and the ESS/MCU PWB J420 for open circuits, short circuits, and poor contacts (especially, check whether the Flat Cable was inserted in a skewed manner). 3. If no problem is found, replace the following parts in sequence: • CCD Flexible Flat Cable (PL 1.3) • ESS/MCU PWB (PL 18.1)
- Code: 071-105
- Description: Regi Sensor On Jam (Tray 1) During paper feed from Tray 1, the Regi Sensor did not turn ON within the specified time after the Tray 1 Feed Clutch On.
- Troubleshooting Guides: Check the following: • The Regi Sensor (Input Check [071-105]) for operation failure. (PL 15.1) • The Main Drive Motor (Output Check [042-001]) for operation failure. (PL 3.1) • The Tray 1 Feed Clutch (Output Check [072-001]) for operation failure. (PL 9.1) • The Feed Roll for contamination, wear, and transportation failure due to deterioration. • The Drive Gear for wear and damage. • A paper transportation failure due to foreign substances on the paper path. • Usage of out of spec paper. If no problems are found, replace the ESS/MCU PWB. (PL 18.1)
- Code: 072-102
- Description: Feed Out Sensor 2 On Jam During paper feed from Tray 2, the Feed Out Sensor 2 did not turn ON within the specified time after the Tray 2 Feed Motor On.
- Troubleshooting Guides: Check the following: • The Feed Out Sensor 2 (Input Check [072-104]) for operation failure. (PL 10.5) • The STM Take Away Motor (Output Check [072-004]) for operation failure. (PL 10.6) • The STM Take Away Roll Clutch (Output Check [072-003]) for operation failure. (PL 10.6) • The Tray 2 Feed/Lift Up Motor (Output Check [072-002] (Feed)) for operation failure. (PL 10.3) • The T/A Roll 2, Feed Roll, Nudger Roll, and Pinch Roll for transportation failure due to contamination, wear, and deterioration. • The LH Cover for improper latching. • The Drive Gear for wear and damage. • A paper transportation failure due to foreign substances on the paper path. • Usage of out of spec paper. If no problem is found, replace the STM PWB. (PL 10.6)
- Code: 072-105
- Description: Regi Sensor On Jam (Tray 2) During paper feed from Tray 2, the Regi Sensor did not turn ON within the specified time after the Feed Out Sensor 2 On.
- Troubleshooting Guides: Check the following: • The Regi Sensor (Input Check [071-105]) for operation failure. (PL 15.1) • The STM Take Away Motor (Output Check [072-004]) for operation failure. (PL 10.6) • The STM Take Away Roll Clutch (Output Check [072-003]) for operation failure. (PL 10.6) • The T/A Roll 2, Feed Roll, and Pinch Roll for transportation failure due to contamination, wear, and deterioration. • The Drive Gear for wear and damage. • A paper transportation failure due to foreign substances on the paper path. • Usage of out of spec paper. If no problem is found, replace the following parts in sequence: • ESS/MCU PWB (PL 18.1) • STM PWB (PL 10.6)
- Code: 072-210
- Description: Tray 2 Lift Up Fail Any of the following was detected: • A Tray 2 Lifter error. • A Tray 2 Paper Size detector component malfunction.
- Troubleshooting Guides: Check the following: • The Tray 2 Nudger Level Sensor (Input Check [072-103]) for operation failure. (PL 10.3) • The Tray 2 Feed/Lift Motor (Output Check [072-005] (Lift Up)) for operation failure. (PL 10.3) • The drive system between the Bottom Plate and the Tray 2 Feed/Lift Motor for operation failure. • The Tray for Paper misload • The Tray for existence of objects other than Paper. If no problem is found, replace the STM PWB. (PL 10.6)
- Code: 072-212
- Description: Tray 2 Size Sensor Broken Abnormal output AD value from Tray 2 Paper Size Switch was detected.
- Troubleshooting Guides: Check the following: • Broken link and damage at the bottom of the Tray • The Actuator at the rear of the Tray for operation failure • The Tray 2 Paper Size Switch (Analog Monitor [072-050], Output Check [072-105]) for operation failure. (PL 10.1) • The Tray for Paper misload • The Tray for existence of objects other than Paper. If no problem is found, replace the STM PWB. (PL 10.6)
- Code: 072-215
- Description: MCU-STM Communication Fail. Communication failure between the ESS/MCU PWB and the STM PWB was detected.
- Troubleshooting Guides: 1. Turn the power OFF and ON. 2. Turn OFF the power and check the connection between the ESS/MCU PWB J413 and the STM PWB J541C for open circuit, short circuit, and poor contact. 3. If no problem is found, replace the following parts in sequence: • STM PWB (PL 10.6) • ESS/MCU PWB (PL 18.1)
- Code: 075-135
- Description: Regi Sensor On Jam (MSI) During paper feed from the MSI, the Regi Sensor did not turn ON within the specified time after the MSI Feed Clutch On.
- Troubleshooting Guides: Check the following: • The Regi Sensor (Input Check [071-105]) for operation failure. (PL 15.1) • The Main Drive Motor (Output Check [042-001]) for operation failure. (PL 3.1) • The MSI Feed Clutch (Output Check [072-006]) for operation failure. (PL 13.3) • The MSI Feed Roll and the MSI Nudger Roll for contamination, wear, and transportation failure due to deterioration. • The Drive Gear for wear and damage. • A paper transportation failure due to foreign substances on the paper path. • Usage of out of spec paper. If no problems are found, replace the ESS/MCU PWB. (PL 18.1)
- Code: 077-101
- Description: Regi Sensor Off Jam The Regi Sensor did not turn OFF within the specified time after the Regi Clutch On.
- Troubleshooting Guides: Check the following: • The Regi Sensor (Input Check [071-105]) for operation failure. (PL 15.1) • The Main Drive Motor (Output Check [042-001]) for operation failure. (PL 3.1) • The Regi Clutch (Output Check [071-001]) for operation failure. (PL 15.1) • The Regi Roll and Pinch Roll for transportation failure due to contamination, wear, and deterioration. • The Transfer Unit for a decrease in the transportation force. • The Drive Gear for wear and damage. • A paper transportation failure due to foreign substances on the paper path. • Usage of out of spec paper. If no problems are found, replace the ESS/MCU PWB. (PL 18.1)
- Code: 077-103
- Description: Fusing Unit Exit Sensor Off Jam (Long) After the Regi Sensor Off, the Fusing Unit Exit Sensor did not turn OFF within the specified time.
- Troubleshooting Guides: Check the following: • The Fusing Unit Exit Sensor (Input Check [071-106]) for operation failure. (PL 7.1) • The Main Drive Motor (Output Check [042-001]) for operation failure. (PL 3.1) • The Invert Motor (Output Check [071-003] (Exit)) for operation failure. (When Duplex is installed) (PL 17.1) • The Exit Roll and Pinch Roll for transportation failure due to contamination, wear, and deterioration. • The Transfer Unit for a decrease in the transportation force. • The Heat Roll for wound up, stuck paper. • The Drive Gear for wear and damage. • Usage of out of spec paper. If no problems are found, replace the ESS/MCU PWB. (PL 18.1)
- Code: 077-104
- Description: Fusing Unit Exit Sensor Off Jam (Short) The time taken for the Fusing Unit Exit Sensor to turn from ON to OFF is shorter than the specified time.
- Troubleshooting Guides: Check the following: • The Fusing Unit Exit Sensor (Input Check [071-106]) for operation failure. (PL 7.1) • The Regi Sensor (Input Check [071-105]) for operation failure. (PL 15.1) • The Main Drive Motor (Output Check [042-001]) for operation failure. (PL 3.1) • The Invert Motor (Output Check [071-003] (Exit)) for operation failure. (When Duplex is installed) (PL 17.1) • The Heat Roll for wound up, stuck paper. • Usage of out of spec paper. If no problems are found, replace the ESS/MCU PWB. (PL 18.1)
- Code: 077-106
- Description: Fusing Unit Exit Sensor On Jam The Fusing Unit Exit Sensor did not turn ON within the specified time after the Regi Clutch On.
- Troubleshooting Guides: Check the following: • The Fusing Unit Exit Sensor (Input Check [071-106]) for operation failure. (PL 7.1) • The Main Drive Motor (Output Check [042-001]) for operation failure. (PL 3.1) • The Regi Clutch (Output Check [071-001]) for operation failure. (PL 15.1) • The Fusing Unit Exit Chute for improper installation and deformation. • The Transfer Unit for a decrease in the transportation force. • The Drive Gear for wear and damage. • The Heat Roll for wound up, stuck paper. • A paper transportation failure due to foreign substances on the paper path. • Usage of out of spec paper. If no problems are found, replace the ESS/MCU PWB. (PL 18.1)
- Code: 077-129
- Description: Regi Sensor On Jam (Duplex Wait) During the paper stop at the invert wait position at Duplex print, the Regi Sensor did not turn ON within the specified time after the Duplex Clutch On.
- Troubleshooting Guides: Check the following: • The Regi Sensor (Input Check [071-105]) for operation failure. (PL 15.1) • The Main Drive Motor (Output Check [042-001]) for operation failure. (PL 3.1) • The Invert Motor (Output Check [071-005] (Dup)) for operation failure. (PL 17.1) • The Dupex Clutch (Output Check [071-002]) for operation failure. (PL 14.4) • The Exit Roll, Duplex Roll 1, 2, and Pinch Roll for transportation failure due to contamination, wear, and deterioration. • The Drive Gear and Belt for wear and damage. • A paper transportation failure due to foreign substances on the paper path. • Usage of out of spec paper. If no problems are found, replace the ESS/MCU PWB. (PL 18.1)
- Code: 077-212
- Description: Tray Module Reset Fail The Tray Module was detected to be reset.
- Troubleshooting Guides: 1. Turn the power OFF and ON. 2. Check voltages of the following pins: • STM PWB J541C-5 (+5VDC) • STM PWB J541C-8 (+24VDC) 3. Turn OFF the power and check the connection between the ESS/MCU PWB J413 and the STM PWB J541C for open circuit, short circuit, and poor contact. 4. If no problem is found, replace the following parts in sequence: • STM PWB (PL 10.6) • ESS/MCU PWB (PL 18.1)
- Code: 077-300, 077-301, 077-305
- Description: Front Cover/Left Hand Cover/STM Cover Open The applicable Cover Switch was detected to be open.
- Troubleshooting Guides: 1. Check the applicable Cover Switch for operation failure. • Front Cover Switch (Input Check[071-301]) (PL 19.1) • Front Cover Interlock Switch and L/H Cover Interlock Switch (Input Check[071-300]) (PL 19.1, PL 14.1) • STM Left Cover Switch (Input Check[072-300]) (PL 10.4) 2. Check the applicable Cover Switch for damage and mismatch. 3. If no problem is found, replace the following parts: • ESS/MCU PWB (Front Cover Open, L/H Cover Open) (PL 18.1) • STM PWB (STM Left Cover Open) (PL 10.6)
- Code: 077-900, 077-901, 077-904
- Description: Regi Sensor/Fusing Unit Exit Sensor/ Feed Out Sensor 2 Static Jam Paper was detected by the applicable sensor at Power ON, M/C Stop, or Interlock Close.
- Troubleshooting Guides: 1. Check the applicable sensor for remaining paper, the Actuator for return failure, contamination on sensor, and etc. 2. Check the applicable sensor for operation failure. • Regi Sensor (Input Check[071-105]) (PL 15.1) • Fusing Unit Exit Sensor (Input Check[071-106]) (PL 7.1) • Feed Out Sensor 2 (Input Check[072-104]) (PL 10.5) 3. If no problem is found, replace the following parts: • ESS/MCU PWB (Regi Sensor, Fusing Unit Exit Sensor) (PL 18.1) • STM PWB (Feed Out Sensor 2) (PL 10.6)
- Code: 091-313
- Description: CRUM ASIC Communication Fail Communication failure between the CRUM ASIC and the CPU was detected. The CRUM ASIC has malfunctioned.
- Troubleshooting Guides: 1. Turn the power OFF and ON. NOTE: If this resolves the problem, it is highly probable that the ESS/MCU PWB had misdetected due to external noise abnormal or noise caused by electrical discharge in the machine. Check for any noise source around the machine and check for any abnormal electrical discharge, etc. 2. Turn OFF the power and check the following: • The Drum CRUM PWB and Drum Cartridge CRUM connection terminals in the Drum Cartridge for poor contact. • The connection between the Drum Cartridge J615 and the Drum CRUM PWB JA for open circuit, short circuit, and poor contact. • The connection between the ESS/MCU PWB J426 and the Drum Cartridge P615 for open circuit, short circuit, and poor contact. 3. If no problem is found, replace the following parts in sequence: • Drum Cartridge (PL 8.1) • ESS/MCU PWB (PL 18.1)
- Code: 091-401, 091-402
- Description: Drum Cartridge Quality Life Over/ Drum Cartridge Life Over [Drum Cartridge Quality Life Over] The image quality guarantee period for the Drum Cartridge has ended. (When Drum Hard Stop-less is enabled) [Drum Cartridge Life Over] When in Life Extension Mode, the Drum Cartridge was detected to be near the end of its lifespan.
- Troubleshooting Guides: Replace the Drum Cartridge. (PL 8.1)
- Code: 091-406, 091-424
- Description: Drum Cartridge Normal Life Over/ Drum Cartridge Abnormal Life Over [Drum Cartridge Normal Life Over] The operation guarantee period for the Drum Cartridge has ended. (When Drum Hard Stop-less is enabled) [Drum Cartridge Abnormal Life Over] The Drum Cartridge is out of warranty and this could result in a malfunction of the machine. (When Drum Hard Stop-less is enabled)
- Troubleshooting Guides: Replace the Drum Cartridge. (PL 8.1)
- Code: 091-430
- Description: Drum Cartridge Life End The Drum Cartridge must be replaced.
- Troubleshooting Guides: Replace the Drum Cartridge. (PL 8.1)
- Code: 091-440
- Description: Drum Cartridge Pre Near End Preparation for replacing the Drum Cartridge is required.
- Troubleshooting Guides: The Drum Cartridge needs to be replaced soon. Prepare a new Drum Cartridge. Replace the Drum Cartridge as required. (PL 8.1)
- Code: 091-441
- Description: Drum Cartridge Near End The Drum Cartridge needs to be replaced soon.
- Troubleshooting Guides: The Drum Cartridge needs to be replaced soon. Replace the Drum Cartridge as required. (PL 8.1)
- Code: 091-914
- Description: Drum CRUM Communication Fail Communication failure with Drum CRUM was detected. The CRUM ASIC has malfunctioned.
- Troubleshooting Guides: 1. Turn the power OFF and ON. 2. Turn OFF the power. Disconnect and reconnect the Drum Cartridge. NOTE: If turning the power OFF and ON or removing and reinstalling the Drum Cartridge resolves the problem, it is highly probable that the ESS/MCU PWB had misdetected due to external noise abnormal or noise caused by electrical discharge in the machine. Check for any noise source around the machine and check for any abnormal electrical discharge, etc. 3. Turn OFF the power and check the following: • The Drum CRUM PWB and Drum Cartridge CRUM connection terminals in the Drum Cartridge for poor contact. • The connection between the Drum Cartridge J615 and the Drum CRUM PWB JA for open circuit, short circuit, and poor contact. • The connection between the ESS/MCU PWB J426 and the Drum Cartridge P615 for open circuit, short circuit, and poor contact. 4. If no problem is found, replace the following parts in sequence: • Drum Cartridge (PL 8.1) • ESS/MCU PWB (PL 18.1)
- Code: 091-915, 091-916
- Description: Drum CRUM ID Error/ Drum CRUM Market Identity Mismatch [Drum CRUM ID Error] The Drum CRUM ID error was detected. [Drum CRUM Market Identity Mismatch] The Drum CRUM region mismatch was detected.
- Troubleshooting Guides: Replace it with the correct Drum Cartridge. (PL 8.1)
- Code: 092-660, 092-668
- Description: ATC Amplitude Fail/ ATC Average Fail [ATC Amplitude Fail] The output amplitude of the ATC Sensor in the ATC (Automatic Toner Control) measurement is small. [ATC Average Fail] The average output value is not within the specified range in the ATC (Automatic Toner Control) measurement.
- Troubleshooting Guides: 1. Install a Toner Cartridge that contains Toner. Copy a Test Chart (499T 00247), etc. and check whether the density has recovered. 2. Check the Toner Dispense Motor (Output Check [092-001]) for operation failure. (PL 8.2) 3. Check the Toner transport path for Toner blockage. 4. Check the connection between the ATC Sensor (Drum Cartridge) P615 and the ESS/ MCU PWB J409 for open circuit, short circuit, and poor contact. 5. If no problem is found, replace the following parts in sequence: • Drum Cartridge (PL 8.1) • ESS/MCU PWB (PL 18.1)
- Code: 092-661
- Description: Temperature Sensor Fail The output value of the Temperature Sensor is not within the specification range.
- Troubleshooting Guides: 1. Turn the power OFF and ON. 2. Check the connection between the HVPS J500-1 and the ESS/MCU PWB J402-14 for open circuit, short circuit, and poor contact. 3. If no problem is found, replace the following parts in sequence: • HVPS (PL 18.1) • ESS/MCU PWB (PL 18.1)
- Code: 092-910
- Description: ATC Sensor Fail The frequency at which the ATC Average Fail or the ATC Amplitude Fail has been occurring is at the threshold value or higher. NOTE: To clear this Fail, clear the value of NVM [752-059] (ATC Fail) or NVM [752-060] (ATC Fail Continuous Count) to ‘0’. If the machine is not repaired back to normal status, this Fail will occur again during the operation. NOTE: Setting the NVM [752-005] (Dispense Mode) to ‘0’ (Timer Disp) or ‘2’ (ICDC Disp) will prevent ATC related fail from occurring and enable you to use the M/C. However, this means that the Toner density will not be controlled.
- Troubleshooting Guides: 1. Install a Toner Cartridge that contains Toner. Copy a Test Chart (499T 00247), etc. and check whether the density has recovered. 2. Check the Toner Dispense Motor (Output Check [092-001]) for operation failure. (PL 8.2) 3. Check the Toner transport path for Toner blockage. 4. Check the connection between the ATC Sensor (Drum Cartridge) P615 and the ESS/ MCU PWB J409 for open circuit, short circuit, and poor contact. 5. Check for toner blockage within the Developer Unit. 6. If no problem is found, replace the following parts in sequence: • Drum Cartridge (PL 8.1) • ESS/MCU PWB (PL 18.1)
- Code: 093-312
- Description: Toner Dispense Motor Rotation Fail Regardless of low usage of toner from Toner Cartridge, it was detected to be empty.
- Troubleshooting Guides: Check the following: • The Toner Cartridge for improper installation • The Toner Dispense Motor (Output Check [092-001]) for operation failure. (PL 8.2) • The Toner transport path for Toner blockage. • The Drive Gear for wear and damage. If no problem is found, replace the following parts in sequence: • Toner Cartridge (PL 8.1) • ESS/MCU PWB (PL 18.1)
- Code: 093-400
- Description: Toner Near Empty The Toner Cartridge needs to be replaced soon.
- Troubleshooting Guides: The Toner Cartridge needs to be replaced soon. Replace the Toner Cartridge as required. (PL 8.1)
- Code: 093-406
- Description: Toner Pre Near Empty Preparation for replacing the Toner Cartridge is required.
- Troubleshooting Guides: The Toner Cartridge needs to be replaced soon. Prepare a new Toner Cartridge. Replace the Toner Cartridge as required. (PL 8.1)
- Code: 093-912
- Description: Toner Empty The toner must to be replaced as it has ran out.
- Troubleshooting Guides: Replace the Toner Cartridge. (PL 8.1)
- Code: 093-956
- Description: Drum New CRU Installation Fail During the developing powder installation mode after installing the Drum Cartridge, the ATC Measured Value is found to be abnormal. (Seal not removed)
- Troubleshooting Guides: 1. Remove the developing powder seal from the Drum Cartridge. 2. If the problem persists after removing the seal, replace the Drum Cartridge. (PL 8.1)
- Code: 093-959
- Description: Drum New CRU Installation Fail Exceeds Thresholding Times The number of developing powder installation mode executions has exceeded the upper limit.
- Troubleshooting Guides: Replace it with the correct Drum Cartridge. (PL 8.1)
- Code: 095-910
- Description: No Drum Cartridge The Drum Cartridge cannot be detected.
- Troubleshooting Guides: 1. Turn the power OFF and ON. 2. Turn OFF the power and check the following: • The Drum CRUM PWB and Drum Cartridge CRUM connection terminals in the Drum Cartridge for poor contact. • The connection between the Drum Cartridge J615 and the Drum CRUM PWB JA for open circuit, short circuit, and poor contact. • The connection between the ESS/MCU PWB J426 and the Drum Cartridge P615 for open circuit, short circuit, and poor contact. 3. If no problem is found, replace the following parts in sequence: • Drum Cartridge (PL 8.1) • ESS/MCU PWB (PL 18.1)
- Code: 116-321
- Description: Controller Logic Fail • A software defect that cannot be ignored was found in the Controller software. • The CPU has rebooted due to the occurrence of an exception.
- Troubleshooting Guides: 1. Turn the power OFF and ON. 2. Install a Controller Firmware with the correct version.
- Code: 116-323
- Description: Controller NVM Data Defect Any of the following was detected: • The On Board NVM data of the Controller is corrupted. • The On Board NVM of the Controller is not installed. • Any one of the Print Counter has reached its maximum value. • The number of times the NVM can be changed has reached its limit. NOTE: If this Fault reoccurrs after performing Data Backup/Restore, perform Data Restore again. (Perform NVM Matching (NVM[621-400]) in the CE Mode.)
- Troubleshooting Guides: 1. Turn the power OFF and ON. 2. Perform NVM Initialize in the CE Mode. (Refer to [6.4.2.5 NVM Initialize].)
- Code: 116-334
- Description: NVM Data Mismatch The verification result between the On Board NVM and the Backup NVM of the Controller is mismatched. (This includes cases where one of the NVM is Blank)
- Troubleshooting Guides: 1. Turn the power OFF and ON. 2. Perform NVM Matching (NVM[621-400]) in the CE Mode.
- Code: 116-377
- Description: IIT Interrupt Time out The DMA start trigger when scanning documents cannot be detected for a specified time.
- Troubleshooting Guides: 1. Turn the power OFF and ON. 2. Turn OFF the power and check the Flat Cable between the IIT Carriage J700 and the ESS/MCU PWB J420 for open circuits, short circuits, and poor contacts (especially, check whether the Flat Cable was inserted in a skewed manner). 3. Check the ESS/MCU PWB for improper installation (loose screw). 4. If no problem is found, replace the ESS/MCU PWB. (PL 18.1)
- Code: 116-747
- Description: Invalid Page Margin During Copy Job, subtracting the amount of edge erase from the section that should have been scanned resulted in a negative value.
- Troubleshooting Guides: Change the value for NVM [790-301] (Document Edge Erase Amount) or NVM [790-302] (Document Edge Erase Amount (for ID Card Copy)).
- Code: 117-326
- Description: Controller Backup NVM Data Defect Any of the following was detected: • The Backup NVM data of the Controller is corrupted. • The Backup NVM of the Controller is not installed. • Any one of the Print Counter has reached its maximum value. • The number of times the NVM can be changed has reached its limit.
- Troubleshooting Guides: 1. Turn the power OFF and ON. 2. Check the EEPROM (Master) on the ESS/MCU PWB for poor contact with the socket. 3. Perform NVM Initialize in the CE Mode. (Refer to [6.4.2.5 NVM Initialize].) 4. If the problem persists, replace the ESS/MCU PWB. (PL 18.1)
- Code: 123-314
- Description: UI Panel Communication Fail Communication failure between the ESS/MCU PWB and the UI Panel was detected.
- Troubleshooting Guides: 1. Turn the power OFF and ON. 2. Turn OFF the power and check the Flat Cable between the UI PWB J740 and the ESS/ MCU PWB J422 for open circuits, short circuits, and poor contacts. 3. If no problem is found, replace the following parts in sequence: • UI PWB (PL 1.6) • ESS/MCU PWB (PL 18.1)
– Get more error code list with quick guide to fix printer product, click here
– About get help with reseting Epson inkpad or others, click here
– Get more information about Epson XP 15000 troubleshooting, click here
Xerox printer reset software introduction:
Notes before resetting Xerox printer:
– Identify accurate version, serial and crum of Xerox printer.
– How to get Xerox printer model info: Click Here
– Before you continue with the reprogramming of the firmware, please make sure that the device is installed on your computer.
– It is very important that under no circumstances should you remove the chip from the cartridge while reprogramming the firmware. After you have succesfully reprogrammed the printer, remove the chip from the cartridge and store it somewhere safely (the chip – a key). In all cartridges which you are going to use in the printer, the chip has to be either removed or sealed. If you have accidently inserted a new cartridge without removing the chip, the device will be blocked. In order to unblock it, you can use the stored chip as a key which help you to unblock the printer.
– And make sure that any other devices (except mouse and keyboard), which are connected to your computer via USB or LPT ports are disconnected. It’s preferable that the computer is connected to the “UPS” (uninterruptible power source) device, because if during the reprogramming process the electricity source has any interruptions, then the reprogramming will be carried out with an error, which makes the device unable to work.
– This firmware will be installed directly to your printer. Before opening firmare link make sure that printer is turned on and connected to your computer and printer drivers are installed correctly.
Be aware that with the reprogramming of the firmware the manufacturer’s warranty goes lost!!
How To Run Firmware Fix Xerox printer
1. Connect the printer to the computer and turn it on.
2. Wait until the printer is ready for work.
3. Drag and drop *.hd to usbprns2.exe file.

4. The reprogramming process starts automatically.
5. Wait until the printer reprograms (10-20 minute) and restarts.
6. After that the reprogramming process is finished, restart the printer.
– Fix Xerox B205 Toner Empty Error, click here
Contact us to get support with Xerox WorkCentre 5019 Error case
Telegram: https://t.me/hyperaktiv
Facebook: https://www.facebook.com/dngnm/
Or click here to get more ways.